- Care and maintenance of the instrument
- Unit installation technology
- Installing a street trap
- Installing the grease trap indoors
- Operational properties of separators
- Cleaning the grease trap
- Equipment installation technology
- Installation of a street grease trap
- Installing the grease trap indoors
- Main manufacturers
- How does it work?
- What are they made of?
- Types
- Performance
- Installation
- Where to install
- How to install
- The device and principle of operation of the grease trap
- Types of grease traps for sewerage for a restaurant
- How to make a grease trap under the sink with your own hands?
- Selection criteria and main manufacturers
- Preparing to make a fixture
- Grease trap drawing
- Required Tools
- Proper cleaning of the grease trap: instructions, how often should you do it?
- Mounting
- Grease trap installation step by step guide
Care and maintenance of the instrument
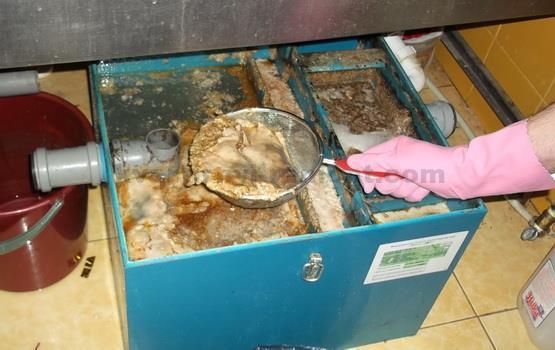
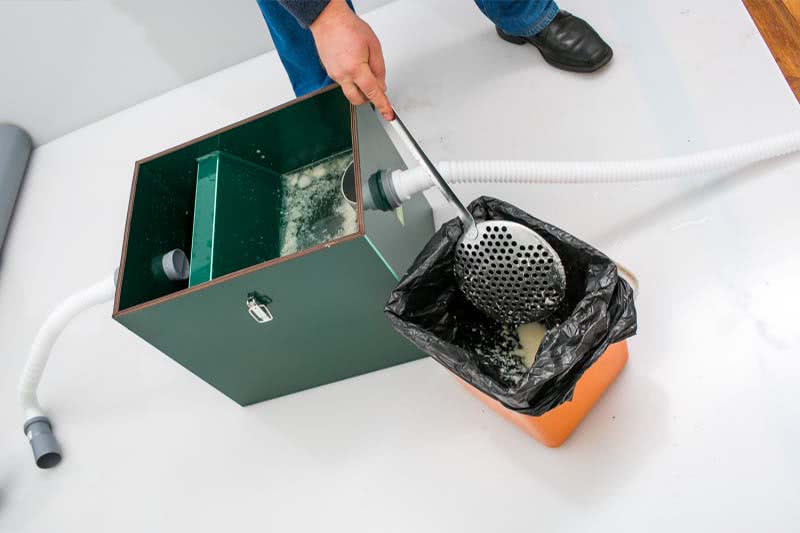
With intensive use of the grease trap, it may be necessary to perform operations to remove grease from the cleaning plant every couple of weeks. The accumulation of contaminants is controlled by opening the top cover of the container. The fat clot accumulated in the upper part of the container must be removed. For this, a special cage is suitable, which is included in the factory equipment of some devices.You can also use a suitable size ladle or an ordinary mug. Dietary fat mixed with dirt, which formed a clot, is dense enough, so it easily collects, like foam from the surface of a liquid, and is thrown into the trash.
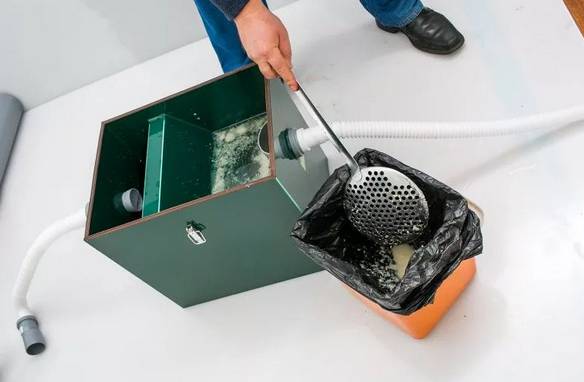
In order for the grease trap unit installed under the sink not to create emergency problems, and also to effectively work for at least the period declared by the manufacturer, it needs a simple annual preventive maintenance. To do this, it is disconnected from the siphon supply and sewer communications and washed thoroughly to get rid of heavy bottom sediments.
Unit installation technology
The installation procedure can be carried out in different ways. It depends on the type of device. Let's look at the two most common options.
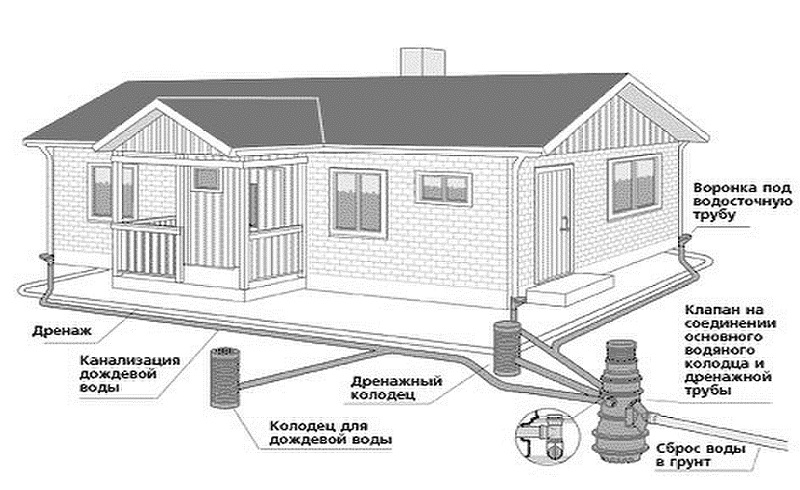
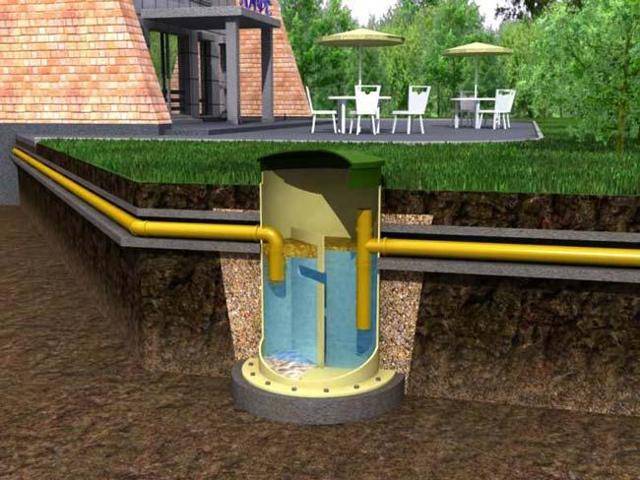
Installing a street trap
The event is quite complex. Many prefer to entrust it to specialists. If you want to do everything yourself, you need to do the following work:
- Choose a place to mount the filter. When choosing, the layout of the infield and the possibility of carrying out any landscape work in the future are necessarily taken into account.
- We determine the dimensions of the pit, which is necessary for the installation of equipment. Its depth should be such that the cover of the grease trap protrudes 3-4 cm above the ground, and there is solid backfill at the bottom of the pit.
- We dig a hole. At the bottom of a mixture of cement and sand, we equip a solid formwork. The amount of cement in the solution is determined by the type of soil. For loams and sandy soils, a mixture diluted at the rate of 1:5 will suffice. For more unstable soils, the amount of cement is increased.
- We are waiting for the filled base to dry completely.We put the body of the fat trap in place and fix it to a solid base using anchor bolts.
- We install plywood formwork around the device. This is necessary to prevent shedding of the soil. If the equipment will be operated in a cold climate, it is covered with thermal insulation material. Styrofoam or mineral wool is quite suitable.
- The outlet pipe of the device is connected to the drainage system. All joints are carefully treated with sealant.
- The inlet pipe of the device is connected to the sewer pipe. The joint is coated with sealant.
- We fill up the free space between the hull and the ground. Most often, the so-called backfill is used, that is, the soil previously selected from this place when digging a hole is poured into the opening.
Do not forget about the fan riser. It is necessary to remove excess gases from the sewer system. If it is assumed that the load on the wastewater disposal system will be large, it is best to install not one riser, but two.
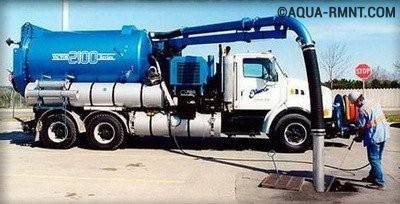
Street grease traps are most often cleaned using pumps or special equipment. The fat accumulation sensor installed inside the device will warn of the need for a procedure
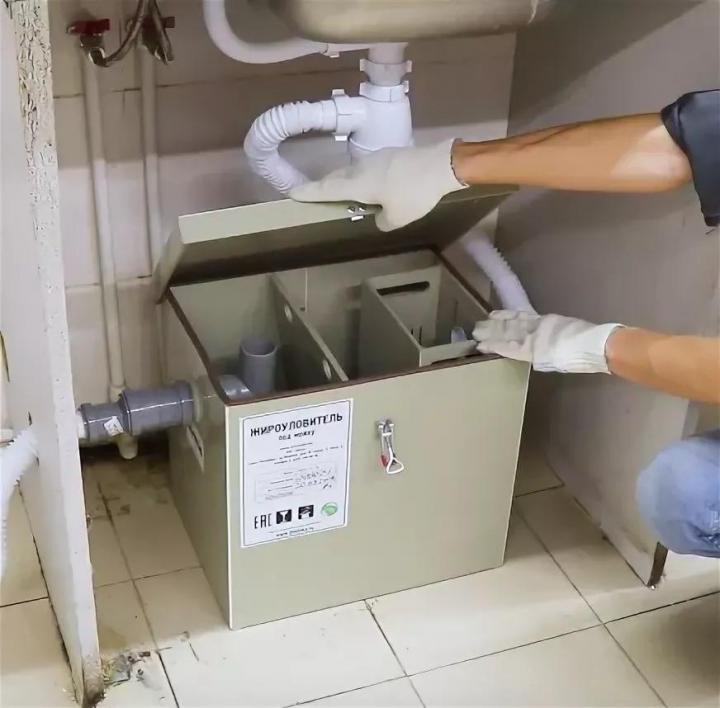
Installing the grease trap indoors
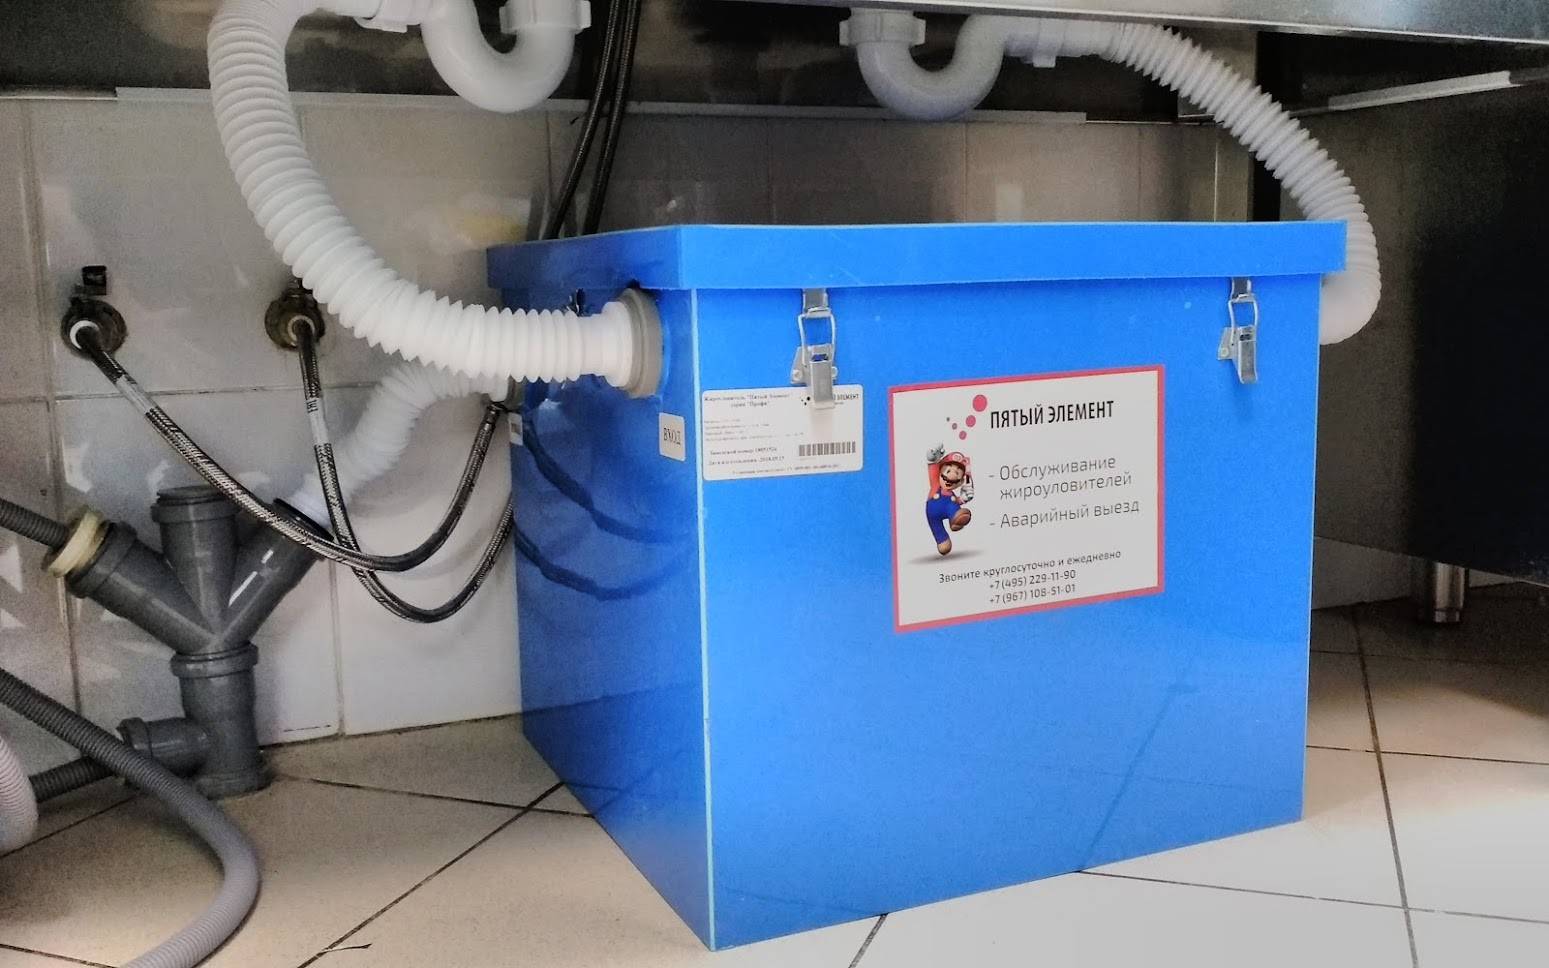
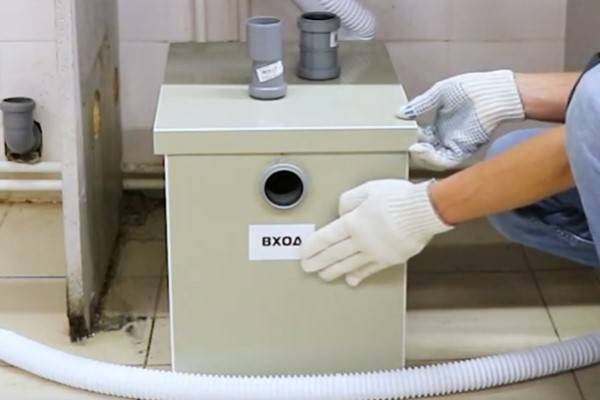
It is much easier to install a grease trap under the sink than on the street. To do this, you will need to perform the following steps:
- We determine the place for mounting the device. It should be an easily accessible hard and level surface, if possible in close proximity to the sink or dishwasher.
- Set up a fat trap.
- We bring the outlet into the sewer system.At the connection site, be sure to install the rubber gasket that comes with the device.
- We connect the inlet pipe of the device to the outlet pipe of the sink or to the section of the pipeline where the washing equipment and the sink are connected. Do not forget about the special gasket.
- We collect water in the grease trap and check its tightness. If everything is in order, replace the cover of the device.
Indoors, the equipment is most often mounted under the sink or in the immediate vicinity of the junction of the washing equipment and the sink.
Operational properties of separators
Grease traps vary greatly in power and performance. Devices with a capacity of 0.1 to 2 l / s are considered household equipment.
All devices with a capacity of more than 2 l / s belong to industrial devices. Fat separators provide effective wastewater treatment from fats up to 20 mg/l.
 Full operation of the fat separator is possible if the performance of the device corresponds to the amount of waste coming from the sewerage system
The performance of the equipment must correspond to the amount of sewage entering the device or be higher than this value.
Grease traps also differ in the way they are cleaned. There is equipment:
- manual cleaning;
- mechanized cleaning.
In most cases, manual grease separators with low throughput, designed by the manufacturer for indoor installation.
They are under constant control, the filters are cleaned manually using improvised means.
Grease traps of mechanized cleaning are, most often, industrial grease separators, which are characterized by high productivity. Typically, devices are equipped with sensors that signal the need for cleaning.
The cleaning procedure is carried out using pumps or specialized vehicles.
Cleaning the grease trap
The following classification is based on how the equipment is cleaned. According to these parameters, it is customary to distinguish 2 varieties:
- with manual cleaning (the person responsible for the operation of the installation independently monitors the level of accumulation of fat waste, cleans the device with improvised means);
- with mechanized cleaning (cleaning is carried out by a pump or special devices; such installations automatically signal the accumulation of fats to a critical level).
Installations with manual cleaning do not have a lot of power. They are mainly installed indoors. Devices with mechanized cleaning are installed on the street and on waste systems of industrial enterprises.


 In the photo - Installation with manual cleaning.
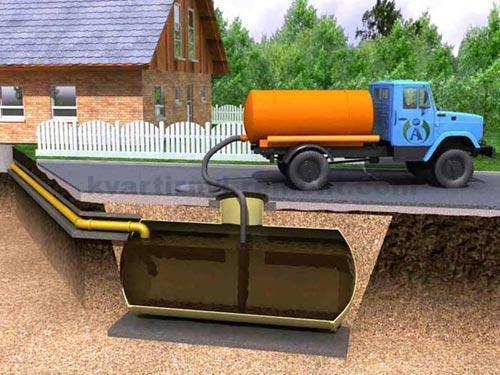 In the photo - Mechanized cleaning
Equipment installation technology
The installation process of the fat separator can be carried out in various ways. It is necessary to choose the optimal type of installation depending on the type and characteristics of the fat trap. Consider several options for mounting separators.
Installation of a street grease trap
The procedure for mounting an industrial fat trap is complex and time-consuming. Therefore, most trap buyers prefer to entrust the installation of equipment to specialists.
In order to perform the installation yourself, you need to carry out a number of preparatory work:
- We select a place for installation.When choosing, one should take into account the features of the layout of the site, as well as the possibility of performing landscape work in the future.
- We determine the size of the pit for mounting the device - its depth should be such that the fat trap cover is about 4 cm higher than the ground surface.
- We dig a hole. At the very bottom, we equip a solid formwork into which we pour a mixture of sand and cement. For sandy soils and loams, a solution prepared in a ratio of 1: 5 is optimal.
- We wait until the solution hardens, at a minimum it is 14 days.
When the preparation of the base for installation is completed, you can proceed directly to the installation of equipment. To do this, we install the body of the fat trap on a concrete base and securely fasten the device to the loops embedded in a home-made concrete slab during the pouring period. If you forgot to put the hinges, then they can be fixed with anchor bolts.
Now we are building peculiar plywood walls around the equipment installed in the pit. This process is necessary to prevent soil shedding. If it is planned to operate the separator in a cold climate, then it must be covered with thermal insulation material. For this, mineral wool or polystyrene is suitable.
It remains to connect the fat trap to the communication networks. To do this, the outlet pipe of the equipment must be connected to the drainage system. Joints must be treated with sealant. And we connect the inlet pipe of the device to the sewer pipe. We coat the place of joining of the elements with sealant.
All free space formed between around the body of the grease trap is covered with soil.Backfilling is usually used, during which it is necessary to fill the opening with soil excavated from this place at the stage of digging a hole.
We must not forget about the need to install a fan riser. It is required to remove excess gases accumulated in the sewer system. If there is a heavy load on the wastewater disposal system, it is better to install several risers at once. The fat accumulation sensor, which is installed inside the equipment, will warn you about the need for a cleaning procedure.
Street grease traps are more often cleaned by specialists of specialized companies using pumps or special equipment
Installation and installation of industrial fat traps is recommended to be carried out with the involvement of professional installers. They must also have permits to carry out the entire range of work.
Also, professional specialists have the necessary construction equipment for installation, so they can perform the necessary procedures for stable and long-term operation of the equipment.
Installing the grease trap indoors
Installing a domestic separator under the sink is an easier process than installing equipment outside. To do this, you first have to choose the optimal place for mounting the equipment.
It should be located on an easily accessible, hard and as level surface as possible, close to plumbing fixtures.
It remains to perform a series of sequential actions:
- We bring the outlet pipe of the equipment into the sewerage system. At the connection point, you need to install a rubber gasket that comes with the device.
- We connect the inlet pipe of the trap to the outlet pipe of the plumbing equipment or to the pipeline (at the junction of the sink and washing equipment), not forgetting to put a special gasket.
- We collect the required amount of water in the grease trap to check the device for leaks.
If the test was successful, you can install a cover on the fat trap. With the installation of the cover, the installation of the equipment can be considered complete.
For more information on how to choose and install a grease trap under the sink, read this material.
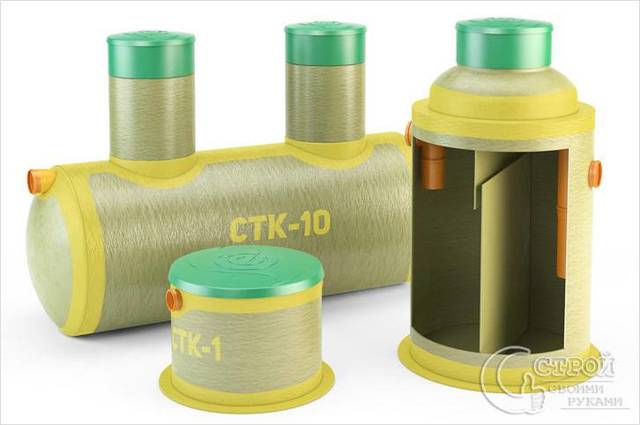
Main manufacturers
Grease traps are produced by both Western companies and domestic ones. There is no fundamental difference in the quality of the equipment. Any installations will correspond to each other in terms of basic parameters, the principle of operation is similar for them. It matters only the type of grease trap for those parameters. Which are listed above.
There are several companies whose products are in demand due to their reliability and high quality.
- The EuroREK brand from the Wavin Labko concern, which operates in 28 countries, is in great demand.
- Flotenk produces a wide range of fiberglass devices.
- Helix focuses its production on the needs of manufacturing and catering enterprises.
- EvoStok - manufacturers from Russia, they manufacture grease traps from plastic (polypropylene, reinforced plastic), the company's product range is very wide, they produce separators for household and industry).
- Fifth Element. The company is actively engaged in the production of grease traps, improving their functionality, developing new models.Their products include equipment for industrial purposes and for domestic purposes. Products are certified, have good quality at a reasonable price. The warranty period for grease traps from the company The Fifth Element compares favorably with that offered by competitors.
Every company has its pros and cons. Grease traps from the above manufacturers cost almost the same. The quality of imported and domestic products differs slightly.
In order not to make a mistake with the choice of a grease trap, you must carefully weigh all your needs and available offers. By comparing them, everyone will be able to choose a device that will satisfy existing needs and work properly for many years.


Share
tweet
Pin it
Like
Class
whatsapp
Viber
Telegram
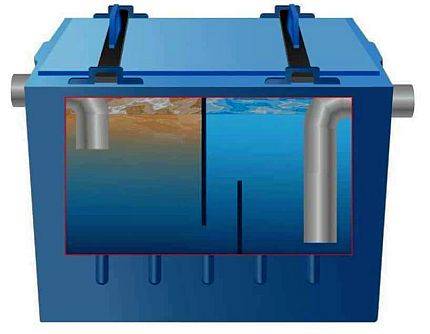
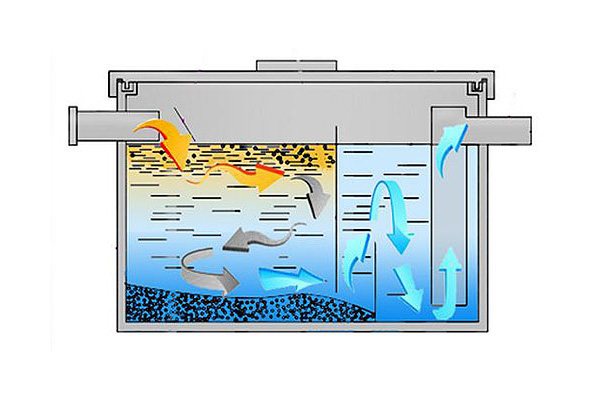
How does it work?
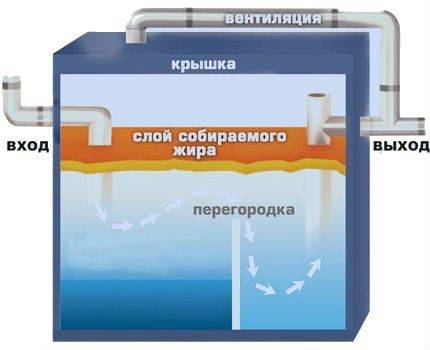
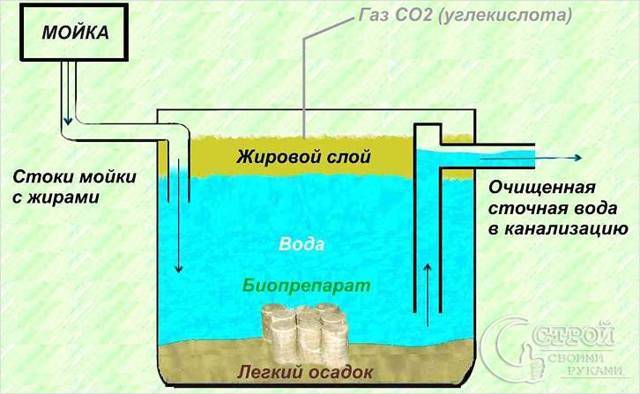
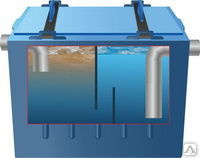
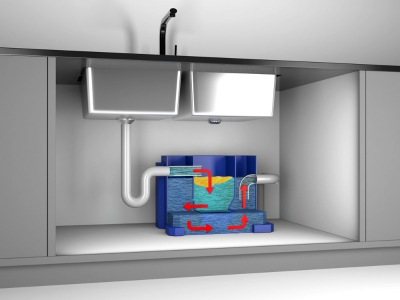
Grease traps work on the principle of gravitational settling. A household grease separator is a plastic container divided inside by partitions into chambers. In the first and last compartment there are branch pipes for connecting pipes.
The design has a removable cover. The principle of separation is based on the fact that during settling, the liquid is divided into layers depending on the density. The process goes like this:
- the polluted liquid entering the sink drain enters the first chamber of the grease trap through the inlet pipe;
- separators installed in the transverse direction separate part of the fatty impurities rising up;
- the water flow moves to the next compartment, where fat removal continues;
- the collected fat is moved to the drive;
- from time to time the storage chamber must be freed from fat.
What are they made of?
Grease traps can be made from different materials:
- stainless steel;
- plastic;
- fiberglass.
Household models are made mainly from polymeric materials (polypropylene), since this material is the cheapest and most practical. Industrial grease traps can also be made of steel.
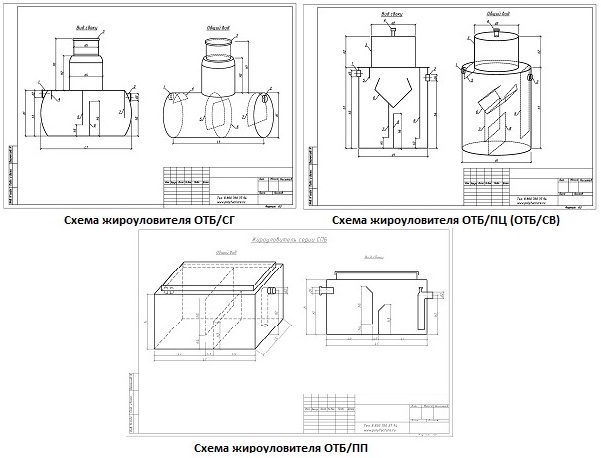
Types
According to the place of installation, the following options are distinguished:
- models for installation under the sink;
- grease traps for installation in the next room;
- option for installation at the outlet of the sewer from the house;
- outdoor devices.
Performance
An important criterion for choosing a grease trap is the performance of the model. The greater the water flow, the greater the throughput of the grease trap should be. In domestic conditions, installations with a capacity of 0.1-2 liters per second are used. Models of higher productivity are classified as industrial.
Installation
Installing a grease trap is a simple process, especially if you think through everything in advance and create the conditions necessary for the operation of the device.
Where to install
Household grease separation devices can be installed in a building or on the street (in a country house - in front of an external sewage septic tank. In a cafe, restaurant or canteen, separators can be installed in a separate room, in a dishwasher, in a basement or on a street. Industrial - in workshops and on OS.
For outdoor installation of the separator, it is required to equip the place - dig a recess, level and concrete the area for the grease separator. This device requires careful preparation. For the installation of a street separator, they usually turn to specialists.
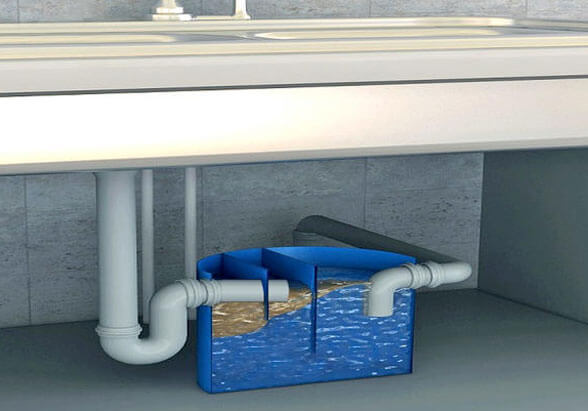
To install a grease separator under the sink, you must first accurately measure the location of furniture, sewerage units in order for the device to fit optimally. It is necessary to provide a gap between the separator and the furniture walls of at least 3-4 cm, and also provide for free access to the grease separator for its maintenance.
How to install
To install a grease trap you need to choose and prepare the right place. The place for installation should be as flat as possible. It must be remembered that the device is filled with water during operation, therefore, instead of a light PVC housing, you need to rely on a heavy unit weighing at least 40 kg. This is only a static load. It is necessary to add a dynamic load to it, because the water entering the separator body in batches invariably generates vibrations. A light shelf or a shelf on weak fastenings will not withstand this shaking monster.
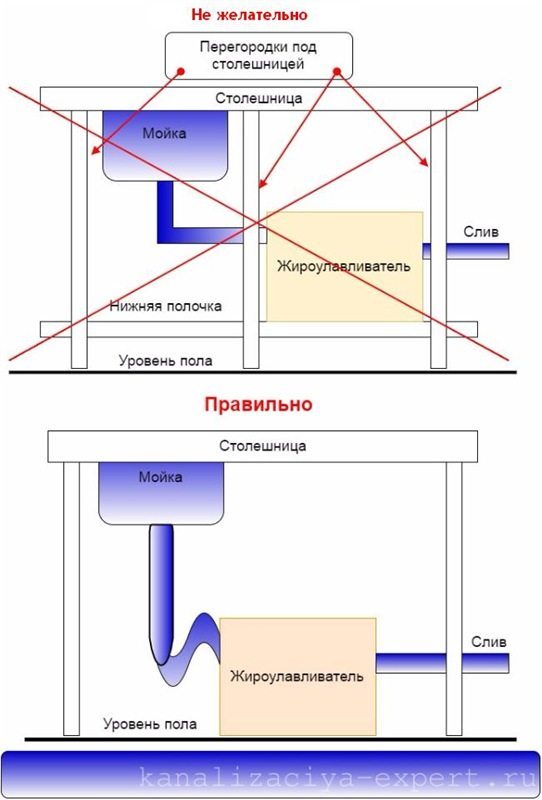
Enough space must be provided so that the separator and its pipes fit in one compartment (cupboard) and not connected to each other through the walls of the furniture. After all, the displacement of a heavy separator (for one reason or another) will cause a breakdown of pipes, the freedom of which is limited by a hole in the walls of the furniture. Therefore, the correct installation option with a lack of space under the sink, see the picture.
The assembly process is written in the instructions. Installation of the grease trap is not difficult. The main thing is to make sure that everything is in order inside the device (you can make sure even when buying). Further required:
- Install the body in the chosen place,
- connect it to the sink drain using a corrugated pipe,
- connect the outlet of the housing to the sewerage system.
The main thing is to make sure that all rubber gaskets are installed during installation, and not to confuse where the grease trap has an inlet and an outlet. It is possible to lubricate the gaskets with silicone before installation, and after installation, coat the joints with silicone or other sealant from the outside.
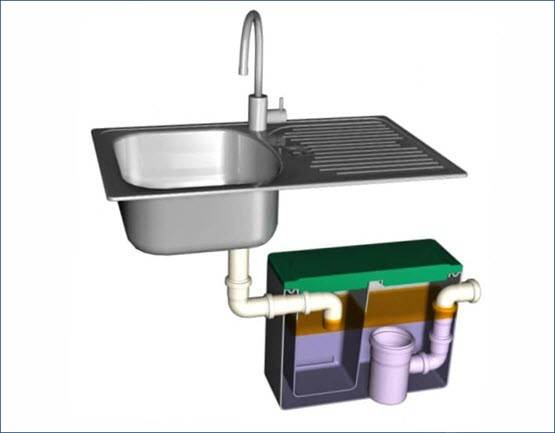
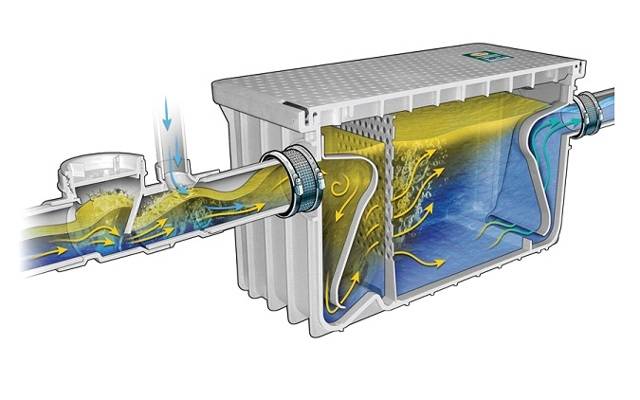
The device and principle of operation of the grease trap
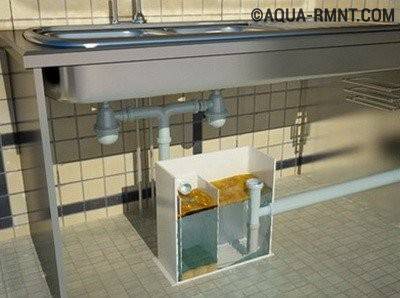
The grease trap performs the function of cleaning wastewater from fats and solid waste, catching them and collecting them in a special tank. It is compact and fits easily under the sink. The body of household models is made of polypropylene or stainless steel.
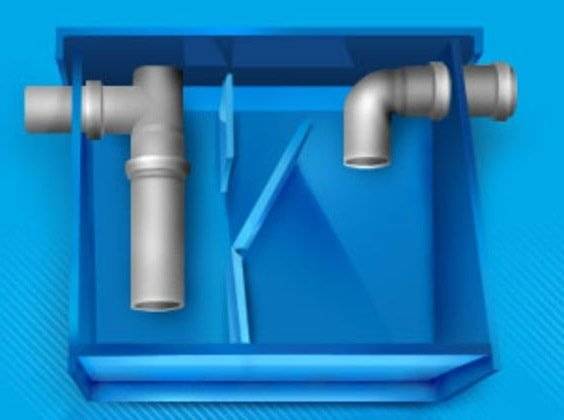
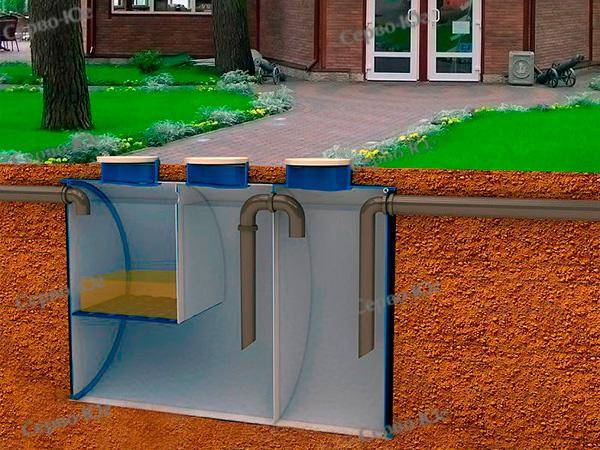
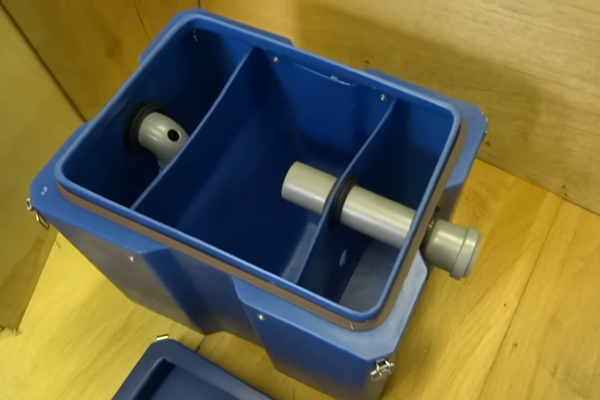
The separator device is simple, consists of the following elements:
• a rectangular body with 2-3 holes (2 holes for the inlet and outlet of drains, one more is not available in all models for ventilation);
• internal partitions acting as traps;
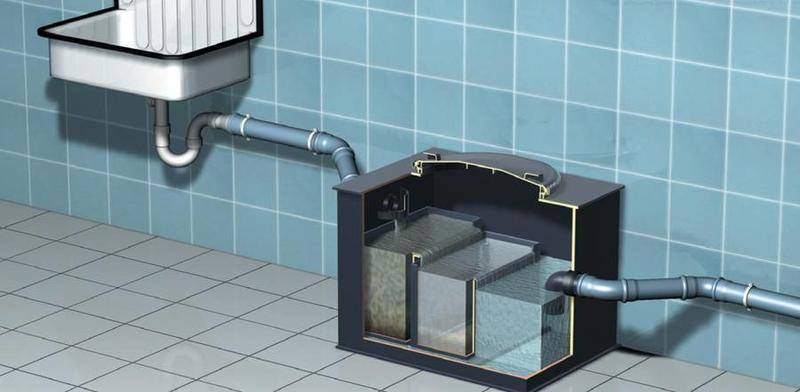
• cover with a rubber seal to prevent the penetration of odors into the room;
• inlet pipe (short in the form of a knee);
• exhaust pipe (in the form of a tee).
The principle of operation of the device consists in the ingress of effluents into the receiving zone of the separator and their passage through partitions, where solid particles and fats are cut off from the liquid. The difference in the density of fats and water raises the former to the top, where they accumulate. Behind all the partitions there is a second chamber, where the treated drains go, getting into the sewer system. As the fat builds up in the upper part of the tank, the mass is excavated with subsequent disposal.


Types of grease traps for sewerage for a restaurant
Grease separators for cafes and restaurants have differences in dimensions and installation locations, i.e., they can be either an integral element of a cleaning complex or a self-sufficient separate cleaning device, for example:
A grease trap for a cafe under a sink is a compact design made of HDPE, for example, which fits freely directly under the bowl counter or next to it, and therefore is used in cafes and bars with small amounts of work.
The principle of operation here is as follows: a stream of water saturated with fats enters the first or central chamber of the separator, depending on the model, where, according to the law of gravity, heavy dirt particles settle and fat floats to the surface. Drains pass further through several partitions and get already cleaned into the central sewerage pipeline.
A striking example of such a product is the Termit grease trap.
Industrial grease traps for restaurants have a device identical to household appliances, namely, a sealed plastic tank with partitions, as well as inlet and outlet pipes, a lid and additional fasteners.
These are more productive units capable of processing large volumes of wastewater. The dimensions of this device are quite weighty, and therefore they are installed in separate rooms or basement areas. In addition, there are grease traps for underground cafes.
Separation also occurs in a similar way, i.e., drains flow through the inlet by gravity and, separated from fats and dirt impurities, flow through the outlet into the sewer system. The fat components settle, at the same time, in the sump chamber.
Recently, there have also appeared grease traps for a restaurant with aeration, where air, flowing through bubblers (special pipes), causes fats and suspended dirt elements to turn into foam and rise to the surface of the drains.Then the foamy mass flows into the soothing compartments, which are settling tanks. And the final point is a prefabricated well, where fat accumulations come from the sump and are removed manually.
This design significantly minimizes the formation of putrefactive processes inside the fat mass.
How to make a grease trap under the sink with your own hands?
With a little time and patience, it’s easy to make a homemade simple separator for washing in the kitchen from improvised materials. In this case, you can do without drawings. For manufacturing we need:
- a plastic box with a lid, with a volume of about 40 liters;
- tee and elbow PET Ø 50 mm;
- pipe Ø 100 mm (its length should be approximately 2/3 of the height of the body);
- branch pipe Ø 50 mm (same length) it must have a mounting extension and a rubber cuff.
From tools and consumables should be prepared:
- jigsaw (preferably electric);
- sealant;
- sandpaper;
- adhesive rubber sealing tape.
When everything is ready, we proceed to the manufacturing process, we act according to the following algorithm:
- At the opposite ends of the box we make holes Ø50 mm. From the top edge of the box to the holes should be approximately 50 mm. Don't forget to clean the edges with sandpaper.
- We install a pipe Ø 100 mm under one of the holes and glue it in such a way that its lower edge does not reach the bottom of the box by about 30-40 mm.
- As soon as the glue dries, we install a pipe Ø 50 mm inside the previously glued pipe. In this case, the lower edge of the branch pipe should be approximately 50 mm higher than the lower edge of the pipe.
- We connect a tee to the upper end of the pipe, we put one of its free ends into the hole, the second will be directed upwards, and play the role of ventilation.
- We make installation of an introductory elbow.
- We cover all cracks and joints with silicone sealant.
- At the junction of the cover and the box, glue the sealing tape.
- We close the lid, wait until the silicone sealant hardens, after that we can connect the grease trap.
Not many people know why a grease trap is needed for sewerage from the dining room. In conditions where a large number of kitchen appliances are used, sewerage is contaminated with fatty waste. Such equipment includes deep fryers, grills, dishwashing equipment. With the help of a grease trap, it is possible to avoid pollution of the sewer.
Canteen sewer grease trap
Selection criteria and main manufacturers
To select the necessary device, first of all, it is necessary to proceed from its purpose. The operating parameters of the separators depend on this. For example, for domestic purposes, performance will be sufficient in the range of 0.1-2 liters per second. But these characteristics are completely unsuitable for cleaning wastewater entering the sewer from a canteen, cafe or restaurant; industrial models with the appropriate technical characteristics will be required for this task.
It is worth noting that many industrial models (for example, for workshops where the production of dairy products is established) are equipped with additional equipment that increases service efficiency.These can be automatic pumps for pumping wastewater, fill sensors, etc.
An important factor is the material from which the tank body is made, it can be plastic, fiberglass or stainless steel. In industrial devices, the well is often made of concrete.
Household cleaners are usually made of plastic, which is explained by the low cost of the material, as well as its following useful properties:
- light weight, which greatly simplifies installation and maintenance;
- long service life (at least 30 years);
- harmlessness to humans.
Such devices are designed for domestic use or installation in small catering establishments.
Fiberglass separators. A distinctive feature of such cases is high mechanical strength and resistance to aggressive chemicals.
Such characteristics are excellent for industrial models, especially taking into account the fact that outdoor installation is allowed.
Fiberglass hulls are weather resistant, lightweight and easy to clean.
Stainless steel housings are typically used for industrial separators. Characteristics:
- long service life;
- high hygienic properties;
- presentable appearance.
These characteristics, as well as possible, meet the requirements of public catering establishments.
The only drawback that limits the use of such a case is the high price.
When choosing a manufacturer, we recommend giving preference to well-known brands, such as Ecoline, Alta, The Fifth Element, Thermite, etc.We also note that domestic products are not inferior in quality to foreign ones, but are significantly cheaper. As for unknown manufacturers from the Middle Kingdom, here, as always, the quality must be checked on the spot.


When choosing a separator model, it is necessary to take into account the place of its installation. There are models designed for installation indoors and/or outdoors.
There are three home installation options:
- under the sink or sink;
- in the basement;
- in the space provided for this purpose.
In everyday life, as a rule, use the first option. Briefly describe the sequence of actions when installing a household separator:
- Choose where the device will be located. For this, any surface with a smooth and hard coating is suitable. Since the grease trap requires regular cleaning during operation, it is necessary to provide free access to it. The best option is a place under the sink or next to it.
- We install the separator in the selected place.
- We connect the sink drain hose to the inlet pipe. To ensure the sealing of the joint, we use rubber gaskets (usually supplied with the device), as an additional security measure, you can use silicone sealant.
- We connect the drain pipe to the sewer (it is best to use a corrugated hose of the appropriate diameter for this purpose), without forgetting about rubber seals.
- We fill the structure with water in order to check the tightness. If a leak is found, fix it.
- Close the top cover, after which the device is ready for use.
An outdoor vertical or conventional grease trap is mounted in the ground according to the same principle as a septic tank, a description of this process can be found on our website.
Preparing to make a fixture
Having learned what the dimensions of the grease trap body should be, it is necessary to draw up a drawing and find all the necessary tools for assembling the product.
Grease trap drawing
At the stage of drawing up the drawing, it is required to indicate the location of the inlet and outlet.
The lower edge of the branch pipe for redirecting water from the grease trap to the sewer pipe should be located 3–5 cm below the middle of the inlet. The slot where the water supply pipe will be installed should be located next to the housing cover.
The grease trap can be made up of 6 elements including a vent
Required Tools
The manufacture of a grease trap is carried out using tools such as:
- electric jigsaw or saw;
- sanitary hermetic agent;
- a piece of sandpaper;
- rubber sealing tape treated with glue.
Proper cleaning of the grease trap: instructions, how often should you do it?
Household devices are cleaned about once a week, while industrial devices are cleaned every six months. To determine the need for cleaning, it is enough to inspect the container during the first month after installation.
The frequency of cleaning directly depends on the frequency of use of the sink, as well as on the drains drained.
For cleaning, products are used that completely remove grease from the surface. To increase the period between cleanings, you can use special biological products.
Mounting
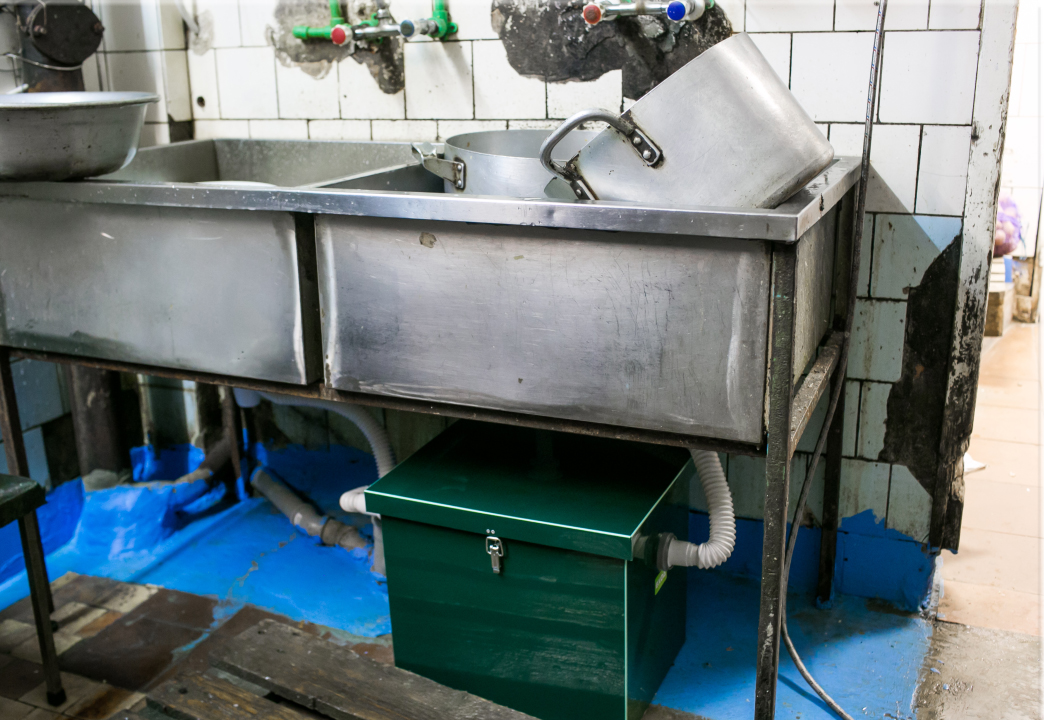
In fact, installing a grease trap is a simple process. You can do without calling the wizard, really cope with its installation yourself.The best place for installation is under the sink or next to it. Often sewer separators are built into kitchen sinks. To carry out the installation of a grease trap under the sink, the device is connected to the sewer. The kit contains everything you need for this purpose.
The device must be placed on a solid and level surface during installation. The main requirement for the separator is that the container must be accessible for regular cleaning.
Work sequence:
- the sink drain hose is connected to the inlet pipe, rubber gaskets are lubricated with silicone sealant;
- the drain pipe, using a corrugated hose with the same diameter, is connected to the sewer using rubber seals;
- the container is filled with water to check how tight the structure is (if there is even the slightest leak, it is eliminated);
- after closing the top cover, the device will be ready to receive drains;
- it remains to install the outer part of the household grease trap, connecting it to the sewer.
Professional installation of the grease trap at an industrial enterprise is carried out by specialists who are obliged to instruct the process personnel in detail regarding the correct operation and cleaning of the grease trap.
Grease trap installation step by step guide
- Preparing the necessary space.
- If the parts are supplied separately, the installation of the outlet and inlet pipes (preliminary lubrication with silicone is necessary).
- Screwing the necessary adapters.
- The introduction of the body of the device in the allotted place.
- Processing with a sealing compound of all junctions with a siphon and sewage connected to the device.
- Connecting all pipes and curing the sealant.
- Connecting the duct to the sewer riser, if any.
- Checking the tightness of the grease trap body and tube connections using open water.
- The absence of leaks indicates the readiness of the device for operation.