- If there is no welding machine
- Do-it-yourself bailer for cleaning a well: instructions and drawings
- Weighting
- How to quickly make a bailer for a well from an ordinary pipe
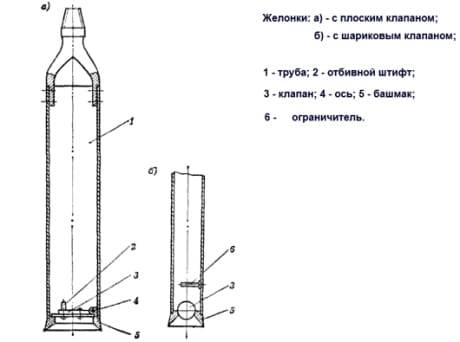
- Types and their device
- First compressor cleaning immediately after drilling
- Features of the use of bailers when drilling
- How to make a well with your own hands (video)
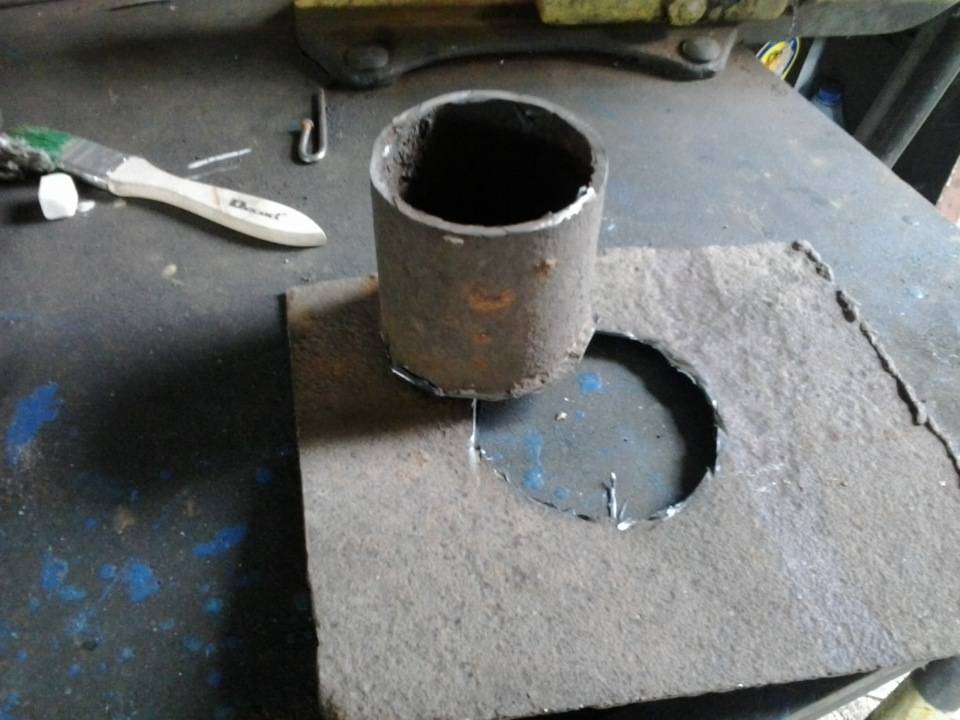
- Pipe for the manufacture of the body
- Case manufacturing
- Assembly steps with ball valve
- Assembly steps with reed valve
- Useful recommendations from experts
- Cleaning a well with a homemade bailer
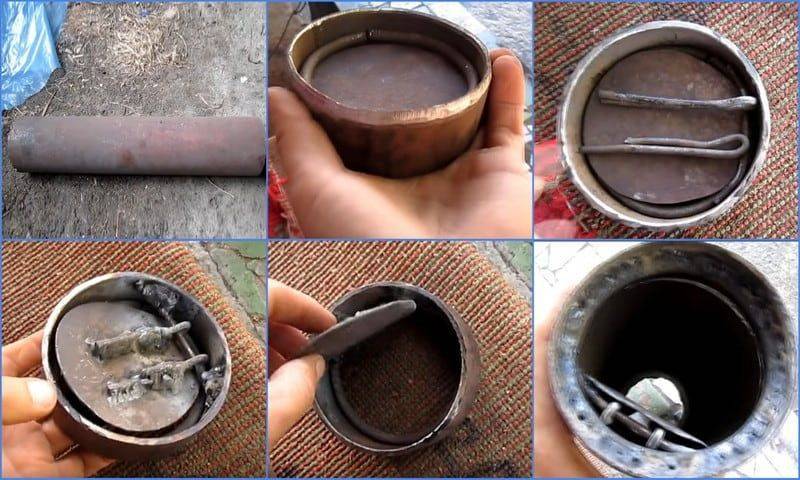
If there is no welding machine
To make a solid and durable bailer, you need to connect several metal parts by welding. If this is not possible, the simplest, but quite efficient bailer can be made without it.
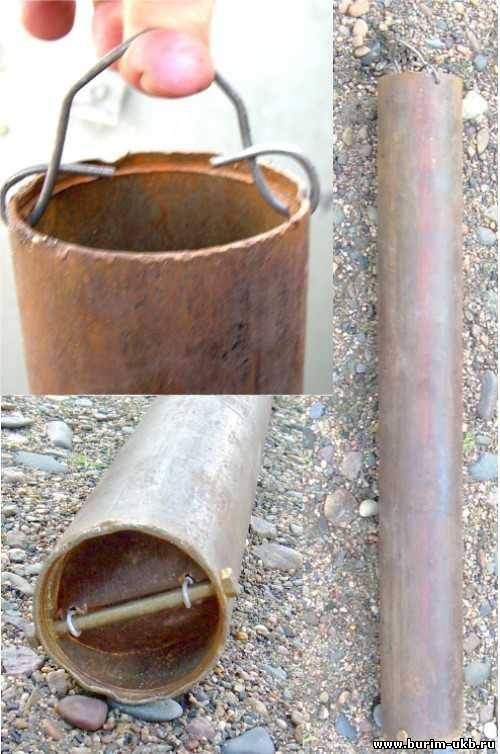
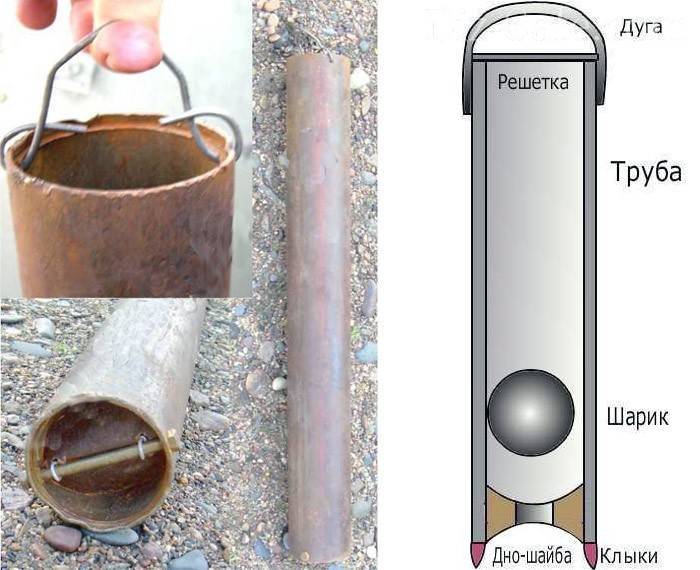
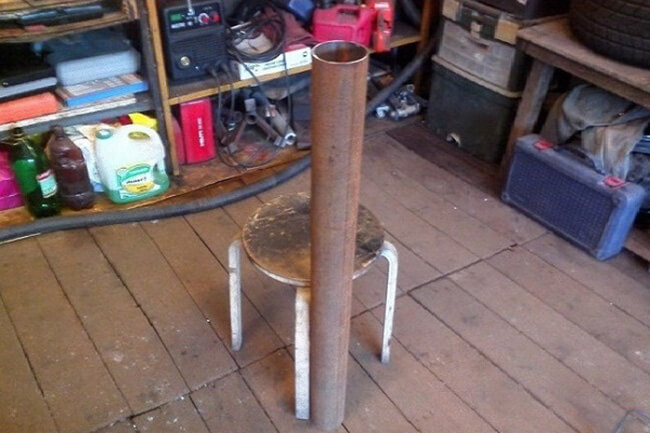
To do this, you can take an ordinary pipe, about 0.6 m long and about 70 mm in diameter. Of course, it must be heavy enough. From above it is necessary to attach a handle made of thick wire.
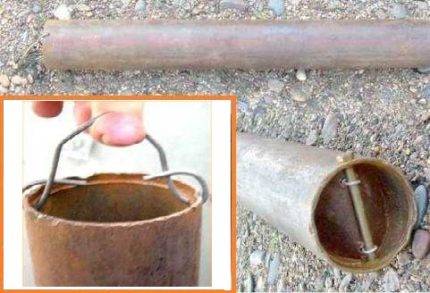
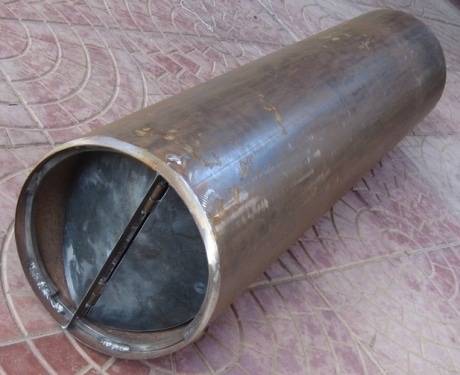
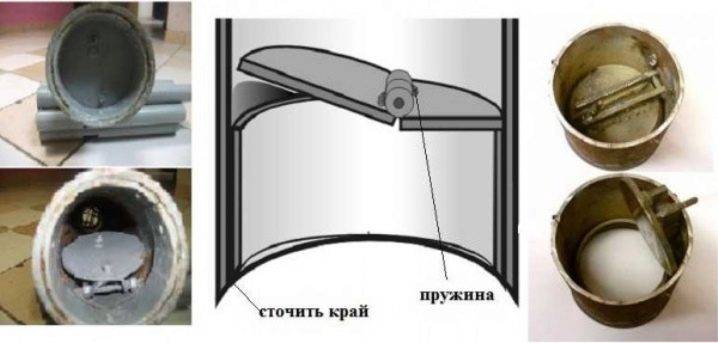
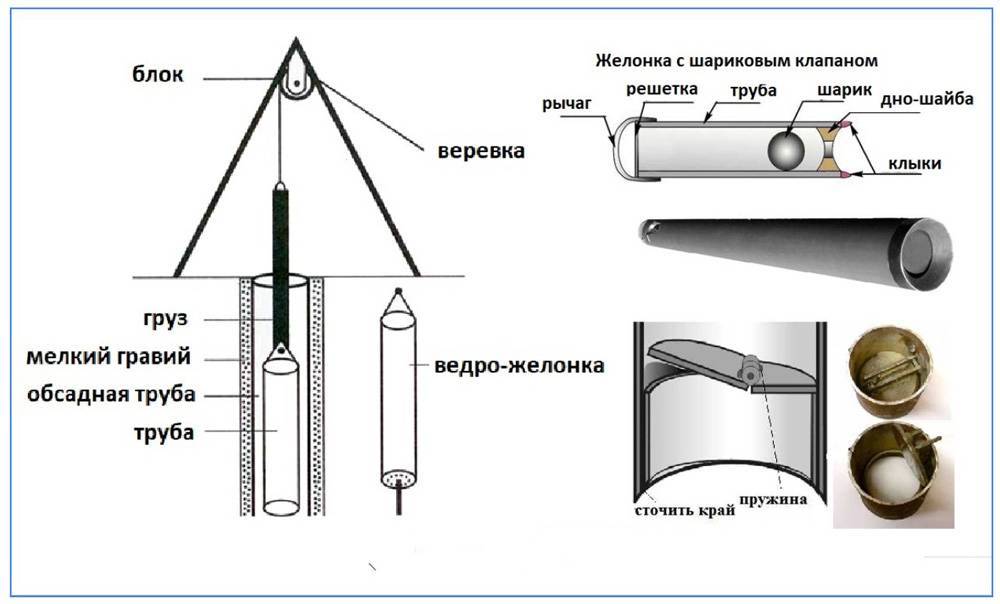
In the manufacture of a bailer with a petal valve, from improvised means for hanging the device, a handle is made of thick wire, which is threaded into the holes in the upper part of the pipe
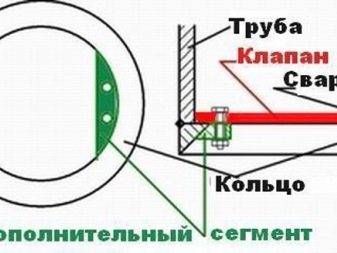
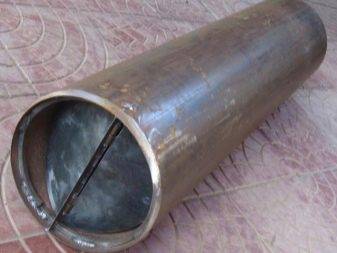
To do this, two holes are drilled in the walls of the pipe, the wire is threaded through them and fixed.A petal valve is installed at the bottom, which can be made from an ordinary plastic bottle. A two liter container will do.
A valve of suitable size in the shape of an ellipse is cut out of its wall.
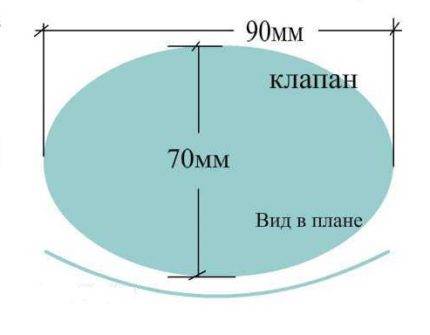
This diagram clearly shows the manufacture of a reed valve for a pipe with an internal diameter of 70 mm
The smaller diameter of the valve must be equal to the internal diameter of the bailer, and to determine the larger diameter of the ellipse, another 20 mm is added to the diameter of the pipe.
The valve is fixed with a bolt 6-8 mm thick. The length of the bolt must exceed the outside diameter of the pipe so that it can be inserted across the pipe and secured.

The petal valve is fixed approximately 10 cm from the lower edge of the bailer. To do this, drill two holes into which fasteners are inserted.
Those. The length of the bolt is the sum of the outside diameter of the bailer and the thickness of the nut. But the bolt should not be too long so that it does not touch the walls of the casing.
Under the bolt in the walls of the bailer, two holes are drilled approximately 10 mm from the bottom end of the bailer. To connect the valve to the bolt, use a wire 2-4 mm thick.
Two wire rings are made from it in the middle of the valve. The bolt must fit freely into these rings.
To assemble such a homemade bailer, you need to bend and push the valve inside the bailer. The bolt is then threaded through the hole in the pipe wall, then through the valve wire rings, and again through the pipe wall. Fix the bolt with a nut.
The bolt must move freely in and out of the valve rings so that the bailer can be easily cleaned during operation.
Do-it-yourself bailer for cleaning a well: instructions and drawings
Prepare for work:
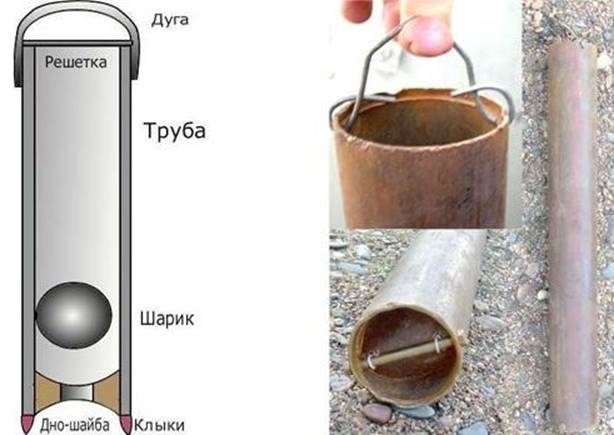
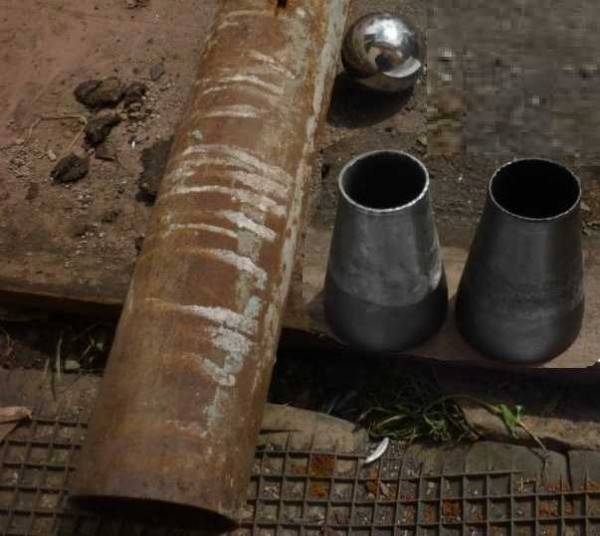
- Pipe section.
- Metal ball (diameter = 2/3 of the pipe diameter).
- Washer (an inner hole of such a size that the ball does not pass through).
- Wire or rod for the limiter.
- Welding and electrodes.
- Bulgarian.
- Rope.
- Rope loop.
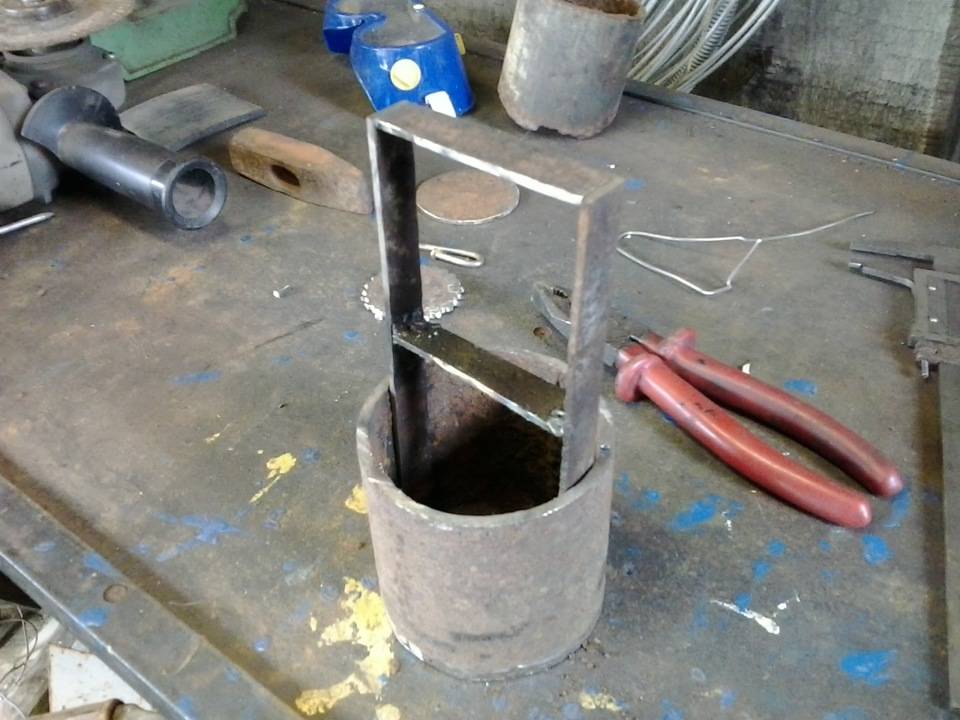
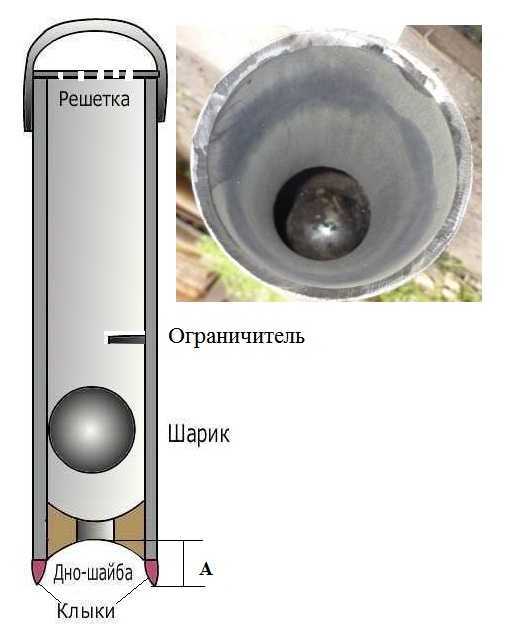
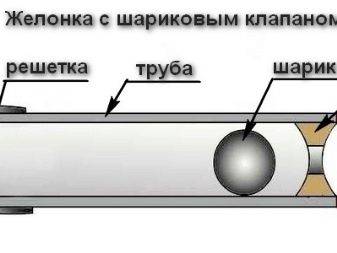
Drawing of a bailer with a ball valve
Progress:
- Slots are made in the upper part for draining.
- The washer is inserted into the bottom and welded in a circle.
- A ball is dropped through the top hole.
- At a height of 3-4 ball radii, a limiter is installed. To do this, holes are drilled, a pin is threaded through, and the ends are welded or riveted.
- For better penetration into the soil, the lower edge of the workpiece can be sharpened or fangs can be made on it. The height of the “fangs” should not be too small so that the ball does not protrude, but not too large, otherwise little soil will get inside at a time.
- A loop is made in the upper part for attaching the cable.
It is better to use a steel cable, not a rope. She can fray and get the tool there will be little chance. This means that you will have to drill in a new place!
Weighting
- Fix a load on the bailer, for example, a piece of a similar pipe.
- At the top of the tool, pour a concrete "cork".
And it’s better to immediately use metal with a thickness of 1 cm, then no weighting is needed.
How to quickly make a bailer for a well from an ordinary pipe
The bailer for the well is assembled by hand from simple materials:
- Steel or cast iron pipe with a wall thickness of 2 mm. The best option is from 2 to 4 mm. The length of the pipe can be up to 3 m.
- A steel sphere or metal plates that form a check valve.
- Connecting slider for reed valve, rubber sealing strip, stopper (metal pin, bolt) if ball is used.
- Grid material at the top (steel wire, flat plates), strong rope to lift the unit.
There are 2 main types of construction with different valve systems:
- with ball system.
- With lamellar (petal) locking mechanism.
The ball design is more durable. Such a mechanism is not subject to breakage and wear.


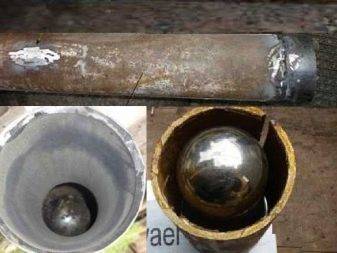
A drawing of a do-it-yourself well bailer using a metal sphere and a movable plate is shown below.
The body length is calculated based on the purpose of the device. In drilling, a thick-walled pipe with a length of 2.5 m or more is used. In the process of cleaning, a body measuring 70–90 cm is sufficient. The total weight of the structure directly depends on the specified parameter. Too heavy will make it difficult to lift a filled bailer, and the light weight of the pipe is not enough to create a powerful water hammer.
The sphere diameter for the valve is from 50% to 75% of the internal diameter of the pipe, the base is made in the form of a cone. A bailer for a well with a flap or plate valve is equipped with a movable lock made of polymer or metal, the diameter of which is 2–3 mm less than the inner diameter of the pipe.
Let us consider in detail how to make a bailer for drilling a well and modernize it after punching for cleaning:
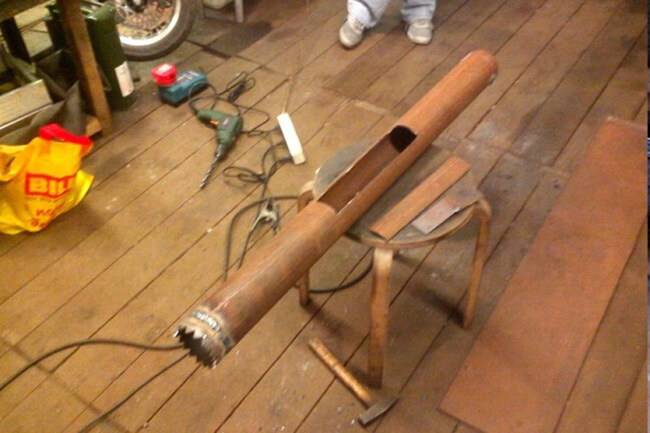
At the initial stage, it is necessary to cut the pipe on both sides.

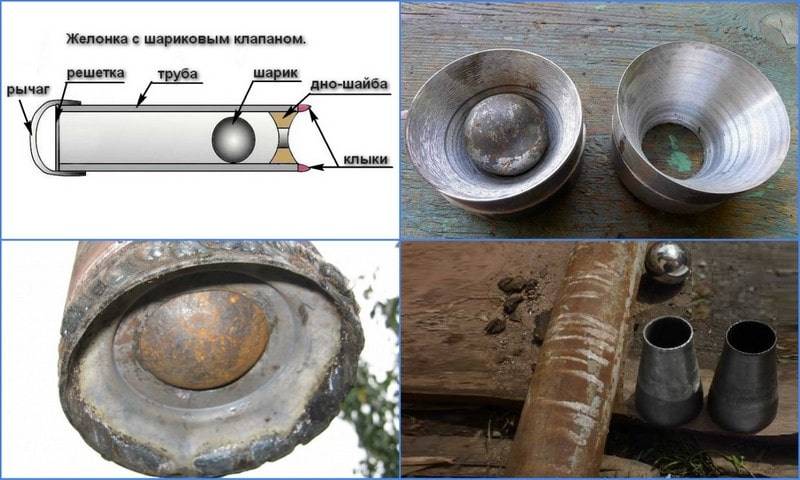
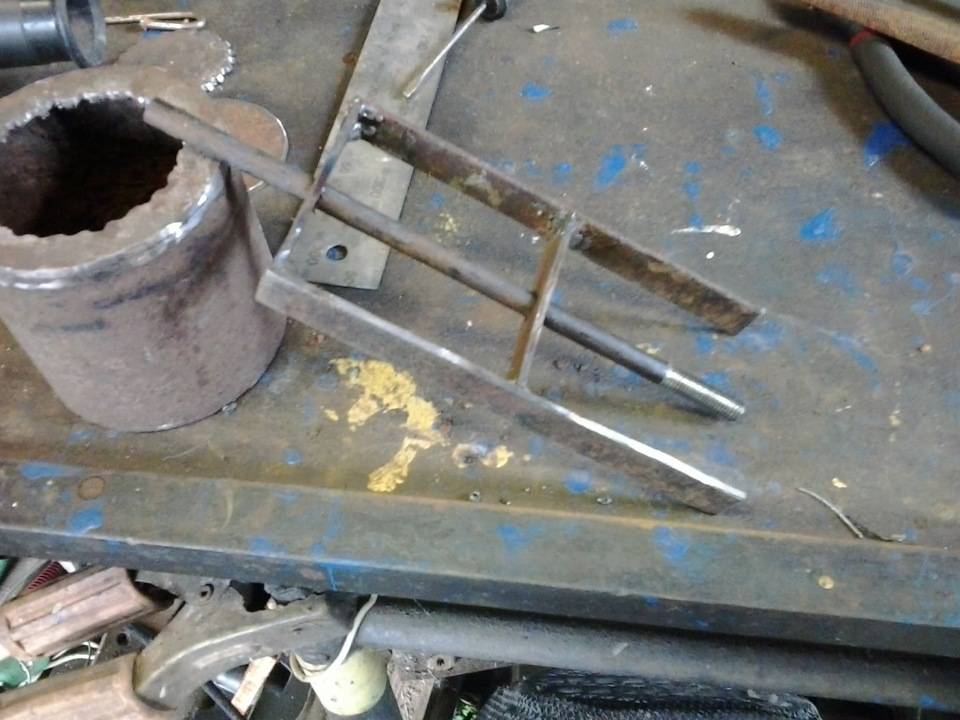
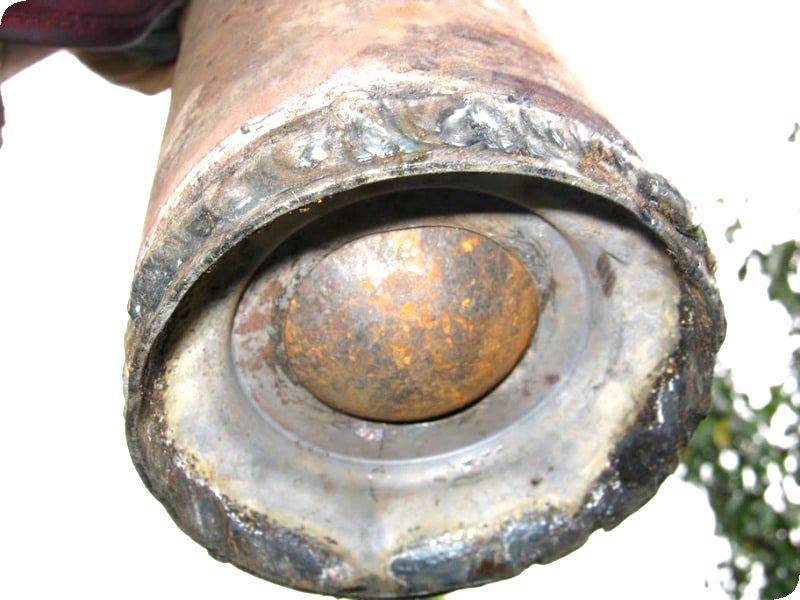
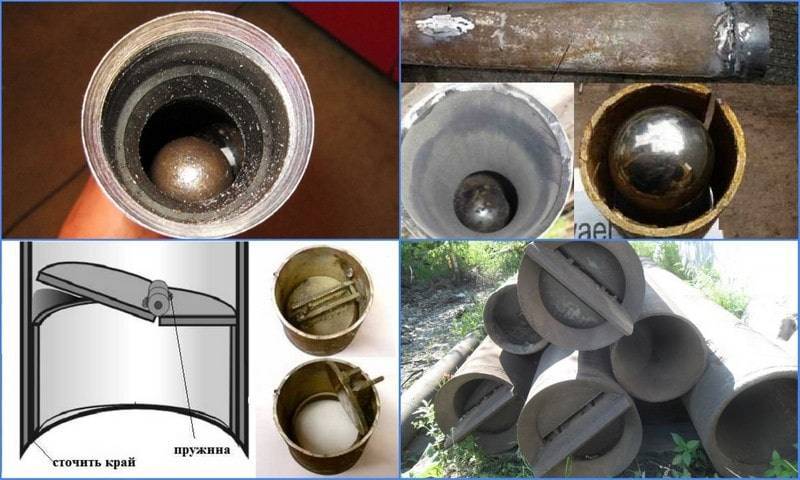
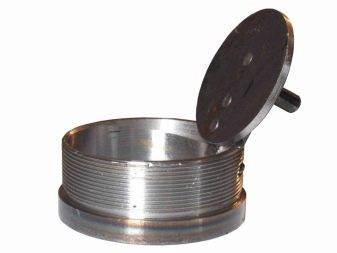
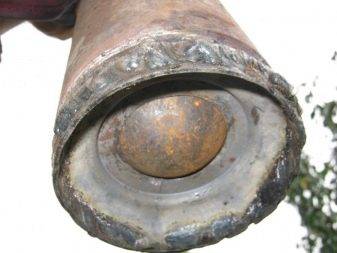
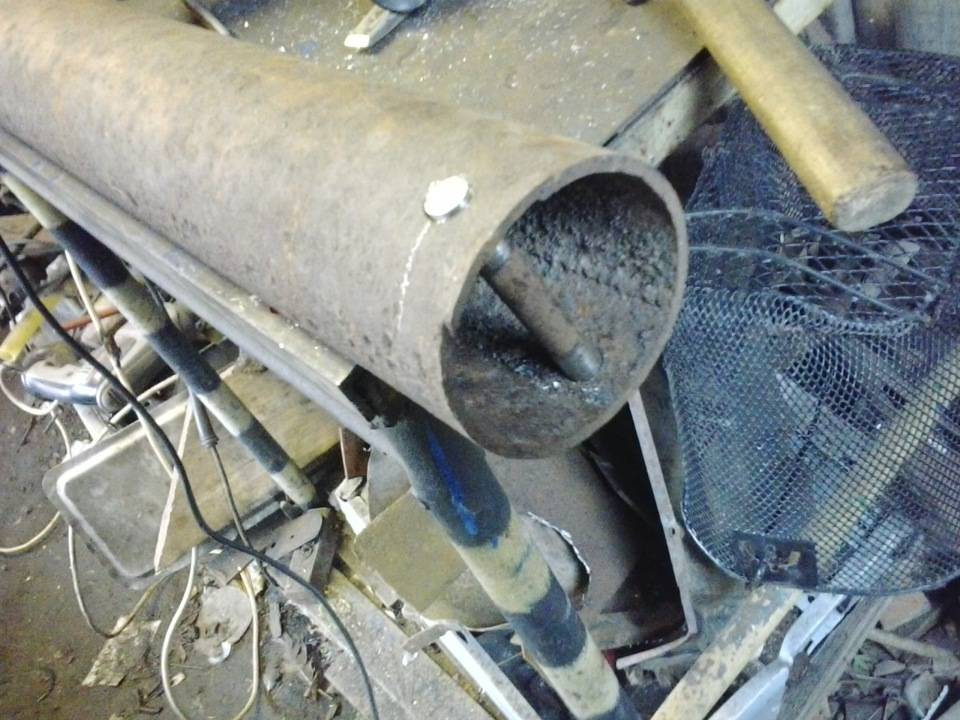
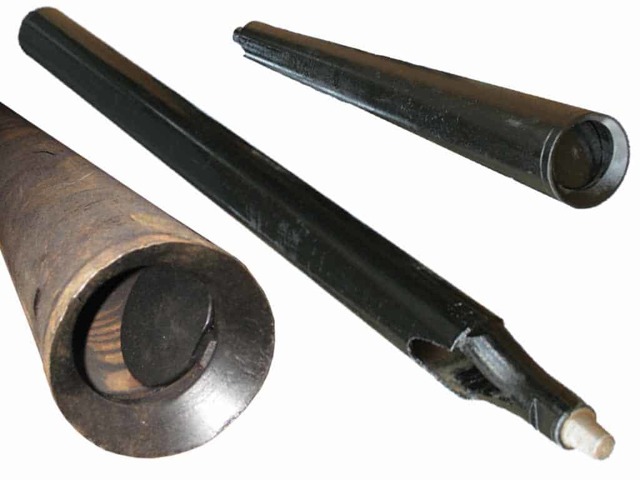
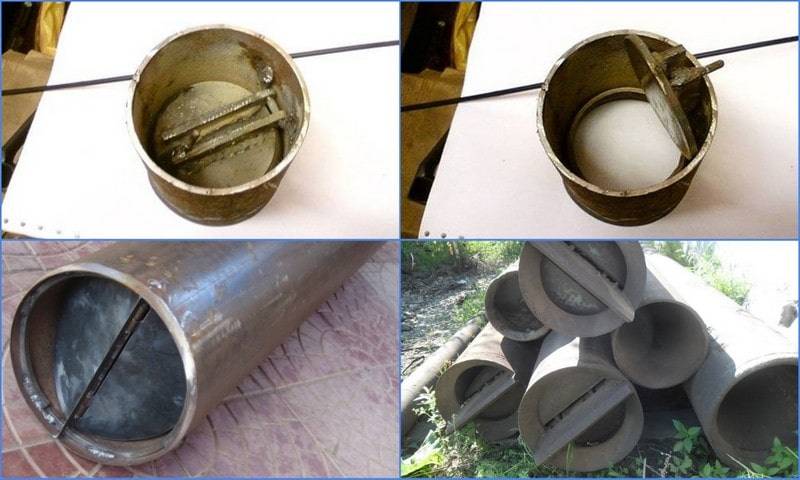
For the manufacture of a spherical valve, you need to pick up a massive metal ball from bearings, if possible, order it from a turner. A washer or cone-like platform is attached to the lower end of the pipe.The seat is welded to the base.

A glass with a flat (lamellar) valve is attached to the base using a threaded connection or welding. It is possible to make a locking plate from any steel, the remainder of a muffled pipe. The edges of the plate are processed to smoothness. Additionally, you can seal the structure with rubber gaskets. The valve may consist of two petals.

- In a device with a ball locking mechanism, a limiting stop must be made that will not allow the sphere to fly out over the top of the filled bailer. If the design is intended for cleaning a well, it is enough to weld a grate at the upper end.
- A transverse stop along the diameter is welded on top to fix the hook. You can also use a powerful wire as a handle, for fixing which you will have to drill two holes.
A simple solution for quick manufacturing of reed valve.
The main assistant in speeding up and facilitating the punching process is a sharp edge. It is advisable to sharpen the inner surface, an additional method is also used: sharp fangs are welded to the base, thanks to which the bailer sinks deeper into the ground.


A hose connected to the pump can be hermetically attached to the upper edge. In this case, you do not have to completely remove the device each time to free it from clay, sand, silt.
Particular attention should be paid to the size and density of the bailer entry into the well. A short pipe will hit the walls, and the sinking speed and impact force will decrease. Too large bailer diameter will cause the device to jam inside the well
Too large bailer diameter will cause the device to jam inside the well.
Types and their device
The device has a different configuration, based on which the product can be classified. Products presented on the modern market have a different valve system, which differ in the principle of operation and device. Such specifics of the bailer should be taken into account when making the fixture with your own hands.


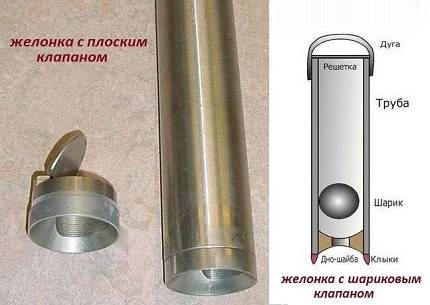
Based on the type of valve, the following bailers for wells can be distinguished:
- products with petal valves;
- products that are equipped with ball valves.
However, a bailer with valves of this type is characterized by a high level of efficiency during operation. In appearance, such a valve is an elliptical plate, which is fixed in the center of the pipe. In some models, a seal is attached to the walls of the valve, which increases the tightness of the part. It is usually made from rubber or leather.
Most often, these valves are made from polymer raw materials or from thin springs made of steel. According to the scheme of work, they act as an analogue of the "curtains" in the bailer - that is, pollution penetrates inside only in one direction. Under the pressure of water, the edges of the plate open, due to which the soil and other contaminants get inside. What is reflected in the productivity and speed of cleaning wells.
A subspecies of petal valves for a bailer can include a valve on a spring, which is responsible for closing the element. This type of valve is widely used both for cleansing springs and for drilling wells.
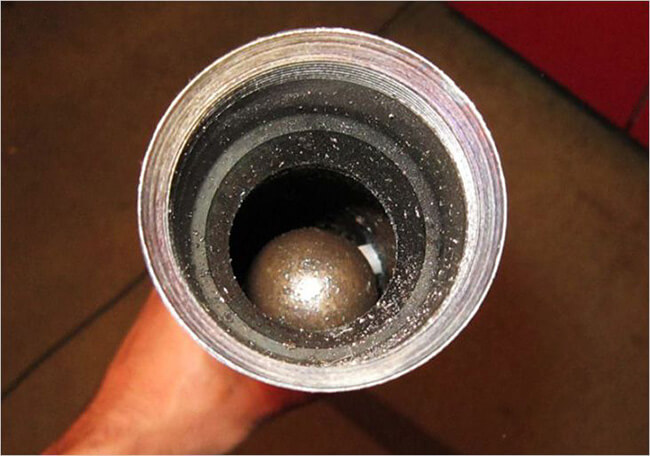
Devices with a spherical valve, according to experts, are considered the most reliable for working with wells.
By its configuration, the ball valve is a funnel in which the mouth is closed with a ball, the selection of which is based on the size of the hole. Such products are made on lathes or purchased in stores. The ball must have an impressive weight, and also effectively close a funnel that is large in diameter. Some craftsmen make a hand-type ball using various improvised means for this, including metal waste.
First compressor cleaning immediately after drilling
As soon as the well is drilled, it must immediately be cleaned, because not only water will flow into the pipes from the aquifer, but also all the debris that is in it. Installed filters cannot trap the smallest particles, from which the water becomes cloudy and unsuitable for drinking. Depending on the depth of the well, the flushing process after drilling can take from 10 hours to several weeks.
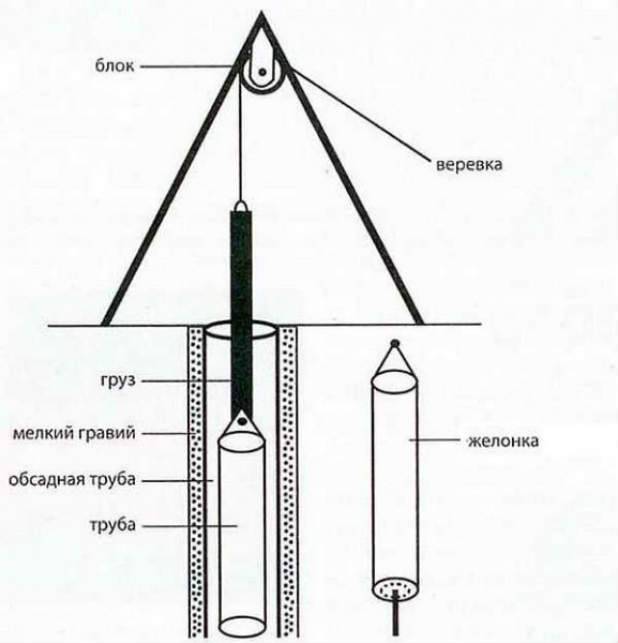
If drilling was carried out by specialists, then they flush the system using a flushing unit. If you drilled the well yourself, you will also have to clean it of dirt yourself. To do this, you will need a compressor with a capacity of at least 12 atm and several pipes that must be connected to each other and inserted into the well so that they reach the bottom. In this case, the diameter of the pipes must be smaller than the diameter of the well so that there is an empty space between them.
The compressor forces air into the well at high pressure, so dirty water can fly out at high speed and splatter everything around
Let's consider step by step how to clean the well yourself using a compressor:
- We insert pipes into the well.It is desirable to strengthen the top with a rope, because under high water pressure the structure can bulge upward.
- We put a vacuum adapter on the pipe, fixing it with self-tapping screws.
- Pump up the compressor to maximum pressure.
- We put the compressor hose on the adapter.
- We turn on the unit and release all the air into the well.
- We repeat the pumping several times.
Air under pressure will push dirty water through the annulus. Therefore, do not be surprised if everything around is filled with mud.
If air does not achieve clean water, repeat the procedure, replacing the air purge with a water purge, using the same piping system with an adapter. To do this, find some large barrel, put it next to the compressor and fill it with water.
Using a water compressor, drive this water at maximum pressure into the well. But be careful, because heaps of dirt pushed out by this water will fly at you. Clean the well until the tank is dry. Then, flushing should be repeated until dirt is no longer ejected from the annulus.
With the help of blowing and flushing, the well is cleaned of silt or sand. But salt deposits on the filter cannot be knocked out in this way.
Features of the use of bailers when drilling
As already noted, the use of a bailer as a drilling tool is unpopular due to the laboriousness and duration of the process. At the same time, a home-made bailer is thrown into the well with acceleration so that the caked sediment or rock can loosen and get inside without problems.
- In this way, which is called shock, you can go through a maximum of 10 meters of the pit, while when using a drill rotating in moist soil, you can reach a depth of 20 meters in the same time. But there are situations when one cannot do without a bailer when constructing a well.
- For manual drilling, factories also produce them. Factory bailers are not so different in design - the only way to drop the raised soil may be different.
- A set of pipes for building up the rod is attached to them, by means of which the bailer is rotated and deepened into the soil. To free the cavity, the valve part (shoe) is unscrewed and the contents are poured out without the need to turn the instrument over.
- The bailer can be most useful in the process of drilling when passing a quicksand. This is a viscous mass of loose sand and clay particles drifting in the ground, which can deliver many unpleasant minutes to private diggers.
- The quicksand must be passed, because although it is oversaturated with water, it does not give it away - and besides, it is too dirty. And here the bailer is simply an indispensable tool.
Here's what the process of passing the quicksand looks like:
| Photo, steps | Comment |
|---|---|
| Step 1 - initial drilling | First, the penetration begins with a conventional drill with wide blades. |
| Step 2 - extension of the rod | As it deepens, the bar grows. |
| Step 3 - Rotate the drill | You can rotate the drill with one special tool, or together, by means of a lever threaded through the through holes. |
| Step 4 - excavation | The soil taken out by the blades is taken aside and put on a stretcher or other container. |
| Step 5 - Installing the pipe casing | After going deep into a couple of meters, you can begin to install the casing. |
| Step 6 - Using the Quicksand Drifter | If you have a quicksand, you will have to use a special drill with small turns to pass it. |
| Step 7 - upsetting the pipe | It is inserted into the pipe and screwed into the thickness of the quicksand. In parallel, the pipe is deposited in such a simple way. |
| Step 8 - Tool Change | Now a bailer is required, which is put on the bar instead of the drill. |
| Step 9 - excavation of the mud mass of quicksand | With the help of a bailer, they scoop out the dirty slurry that has fallen into the casing pipe - and do this until clean water remains there. |
And in our high-tech age, there is the use of such a simple device as a bailer, which is especially useful when meeting with a quicksand during drilling - or for a banal cleaning of a well. Just remember that the pipe that is used to make this kind of tool should be a couple of centimeters smaller in diameter than the barrel circumference.


How to make a well with your own hands (video)
Drilling in viscous soils such as clay or loam requires a narrower but longer “window” that makes it much easier to extract the contents. Casing pipes in this case become optional. When passing quicksands, it is necessary to create weighting that will prevent equipment from getting stuck in the ground.
It might be useful to read:
- Insulation for baths and steam rooms, which insulation is better? ;
- Do-it-yourself barn from a profile pipe;
- Projects of baths 6x6 with a toilet and a kitchen;
- How to process a wooden house from the outside How to process a log house;
- Combined projects of houses;
- The best protection of wood from moisture and rotting. Treatment of a wooden house after construction;
- Building Instructions ;
- How to make a garden path out of plastic covers? ;
Pipe for the manufacture of the body
So, to make a bailer you will need:
- Pipe of suitable diameter.
- Valve.
- Welding machine.
- Metal cable.
- Thick wire.
- Pieces of metal, etc.
To make a bailer yourself, first you need to choose a pipe of a suitable diameter. In this case, you need to focus on the internal dimensions of the casing pipe.
The distance between the outer wall of the bailer and the walls of the shaft should be two centimeters. So, you need to subtract 40 mm from the inner diameter of the casing. This will be the value of the outer diameter of the pipe from which the bailer will be made.
The bailer tube should be long and thick enough to effectively loosen and pick up dirt and soil, but light enough to be quickly removed for cleaning.
The size of the gap between the bailer and the well can vary, but only up to certain limits.
Too much clearance will reduce work efficiency. But if the gap is too narrow, the bailer can scratch or damage the barrel walls.
It is even worse if, due to the large diameter of the pipe, the bailer gets stuck in the well, especially if the casing pipe is slightly skewed. It will not be easy to take it out, you can completely ruin the well and lose it.
The length of the pipe should also not be too short or too long. A short device will more often touch the walls when moving up and down.And an element that is too long can be too heavy and difficult to reach, especially when the bailer is filled with heavy moldboard.
The length of the bailer pipe is usually about 80 cm, but can vary between 60-150 cm. Longer and heavier devices are used for drilling.
The wall thickness of the pipe is also important, since the total weight of the product largely depends on it. The thicker, the more the pipe weighs, and the more efficient the bailer will operate.
But if the drilling tool is too heavy, it will be difficult to work with it for the reasons already stated. A pipe thickness of 2-4 mm is considered sufficient, but it can reach 10 mm.
Thus, when choosing a pipe for a bailer, a certain balance must be observed. The weight of the device and its dimensions must satisfy two conditions.
First, it is necessary to provide a sufficiently high penetrating inertia so that contaminants are removed from the well quickly and efficiently. Secondly, the weight of the product with loading must be such that the bailer can be pulled out by hand or with a winch.
Case manufacturing
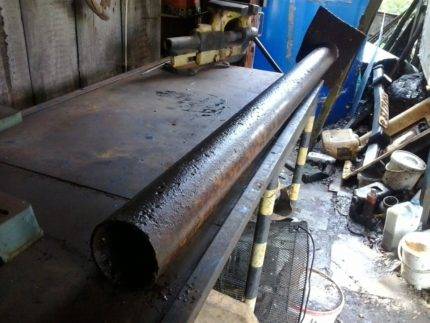
Use steel or cast iron (requires special welding technologies) pipe. Its segment should not have bends along the length. The edges are aligned and the internal thread is cut from below, if such a connection is provided. At the top of the case, a window is cut out (drilled and knocked out with a chisel) to be able to clean the cavity from dirt.
When selecting a pipe, it is important to balance the weight and length of the workpiece. After all, the finished tool must have sufficient impact inertia and the ability to be removed manually or by a winch when the cavity is completely filled with soil.
Useful information. The weight of the device is important when drilling a new source. Therefore, for efficient operation, a pipe 2–4 m long is used. In the manufacture of a bailer for cleaning a well, from 0.7 to 1.2 m is sufficient.


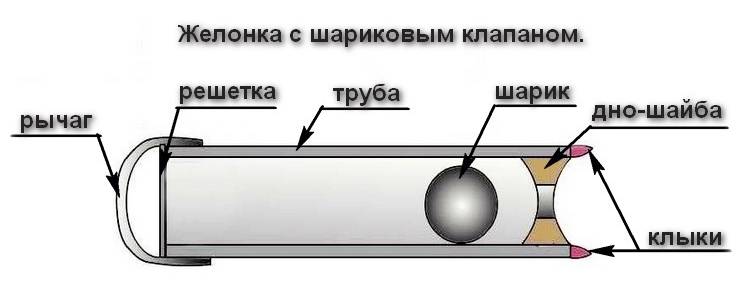
Assembly steps with ball valve
Follow this order:
- A seat for a metal ball is screwed or welded to the lower edge of the pipe. This can be a conical funnel turned by a turner or a washer with an internal hole corresponding to the ball. Suitable for the seat and a concentric purchased adapter used to connect pipes of various diameters. This part is inserted into the product with a side with a smaller diameter and scalded.
- A metal ball is inserted through the top.
- Then a ball lifting limiter is made in the device body. It is fixed above the saddle at a distance of 3–4 sphere diameters. As a limiter, it is better to use a screwed bolt.
- At the top of the body, a restrictive grid is welded (for large fractions of the soil) and a loop for connecting to the cable.
- The provided pointed teeth are welded to the finished bailer. You can also do this at the stage of assembling a glass with a valve seat.
Assembly steps with reed valve

The assembly order is the same, except for the following points:
- A petal valve already assembled in a special metal cup is attached to the lower edge of the body.
- It is not necessary to make a limiter inside the pipe, since the ball is not used in this design.
Useful recommendations from experts
If the depth of the water exceeds the length of the drill, then it can be extended by joining another pipe on top.They can be joined with a threaded coupling or a welding joint. When using pipes of small diameter, it is allowed to use bolts or cotter pins. However, such a connection is not very reliable, and with a large rotational force, the bolt can be sheared and the rods will disengage. Getting the drill left in the well can be very problematic.
Before embarking on the design of the device, it is recommended to draw up a drawing of a drill for a well. This will make it possible to have in front of you a clear sample of what should come out in the end. Attempts to create a drilling mechanism using the “scientific poke” method are more exciting for some home craftsmen, but take too much time and effort.
A lighter manual version of the well device is with the help of a bailer bit. Lifting and dropping a percussion tool requires less force than the rotation of a buried drill. In addition, the percussion method can be used to drill even one person. True, this method is very long, and the work can drag on for several days.
If the auger drill cannot be lifted out of the well on its own, you can make the task easier by building a device for the lever. For example, by placing a barrel next to it, and throwing a bar over it. Tie one edge of the bar to the drill, and apply physical force to the other edge.
Helpful2Useless
Cleaning a well with a homemade bailer
In order to always have clean and usable water in the well, it is necessary to carry out work on its purification. Some owners of summer cottages of private houses do not always maintain the well in working condition and decide on its cleaning in its rather neglected state.You should always remember the main rule when operating wells: the less they use it, the faster it silts up. Modern methods of cleaning wells with the help of special vehicles, pumps and injection guns are quite expensive. In this regard, many owners perform well cleaning on their own. One way to do it yourself is to clean with a bailer.
For a more detailed view, click on the picture.
This method is very reliable, but quite laborious. It allows you to clean the well, which has not worked for a long time. Having taken out coarse sand, silt, small stones, it is possible to bring it to its original state. The bailer can be made independently and in sizes in accordance with the diameter of your well. The main rule is that the outer diameter of the bailer should be 2 cm less than the inner dimensions of the narrowest part of the well. For the manufacture of a bailer of standard sizes, it is necessary to have a pipe with dimensions of 50 mm. 60 cm, a metal ball with a diameter of 40 mm and a thick washer. The upper plane of the washer is made funnel-shaped, and the hole is the size of the ball. The bottom of the washer is either flat or in the form of a reverse funnel. The washer is welded to the bottom of the pipe, and a thick wire grate is attached to the top so that the ball cannot fly out of it. Next, a handle is arranged to which a thin metal cable or nylon cord will be attached. For the most efficient work
bailers from below, a bottom with 2-4 metal strong fangs is inserted into the pipe for loosening sand and silt. To clean the well, the bailer on a nylon cord or metal cable is lowered to the bottom of the well, then raised by 30-50 cm and sharply lowered to the bottom.With this lowering, the ball remains in place, and its lower hole opens. It receives water with silt and sand.
Approximately half of the bailer is filled after 3-4 movements. Then, smoothly, without sudden movements, the bailer is raised to the surface, and water with sand and silt pours out of it. In one lift, she can lift about 250-500 grams. sand and silt, not taking into account the volume of water. This is about 3 cm of the silty layer of the well with a pipe diameter of 108 mm. In order to facilitate the process of lifting the bailer, a tripod winch is sometimes used.
To fully clean the well in the future, a layer of silt is determined and the necessary cleaning frequency is calculated to keep the well in working condition.
Dear readers, comment on the article, ask questions, subscribe to new publications - we are interested in your opinion :)
Cleaning and repairing wells is an important issue for homeowners. Before starting the operation, it is necessary to determine and eliminate the causes of contamination and then choose the best cleaning option. To do this, you should familiarize yourself with its design, calculate what the cost of cleaning the wells will be, the timing of the work
To do this, you should familiarize yourself with its design, calculate what the cost of cleaning the wells will be, the timing of the work.


