- Blockage Prevention
- Valve systems for bailers
- Option number 1 - the design of the petal valve
- Option number 2 - manufacturing a ball valve
- How to drill an artesian well
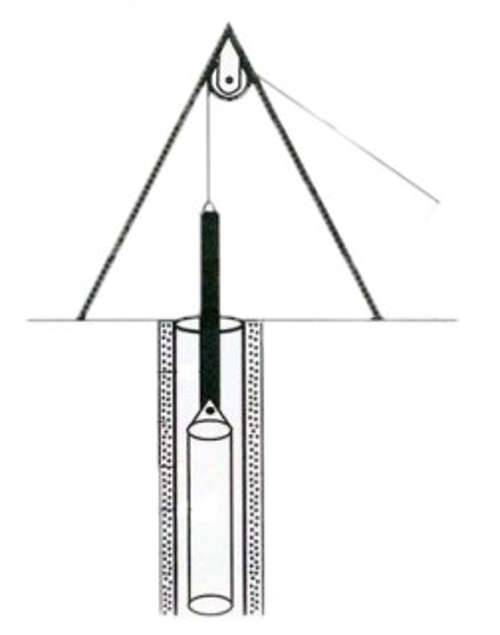
- Operating principle
- Features of drilling with a bailer
- Manufacturing technology
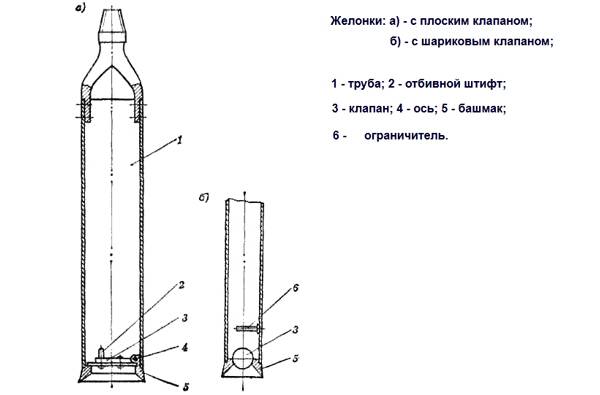
- Making a bailer with a ball valve
- Making a bailer with a flat valve
- How to do?
- Features of the use of bailers when drilling
- How to make an Abyssinian well
- Hydro drilling rig
- Do-it-yourself needle well without equipment
- Abyssinian well made of polypropylene pipes
- Pumping after drilling
- How to make a bailer for a well
- Determining the size of the bailer
- Instructions for making a bailer
- How to prevent clogging of the well?
- Why flush a well after drilling?
Blockage Prevention
To prevent the well from silting up, the following rules for operating the well source should be followed:
- The used electric pump and water consumption must correspond to the flow rate of the well, with significantly higher rates of the latter, the likelihood of stagnation in the source and, accordingly, siltation increases.
- The immersion height of the electric pump from the bottom level must match the recommendations given in the instructions.
- In no case should submersible vibration pumps be used for water intake - in addition to low productivity, they create vibrations that contribute to the compaction of sandy-silt deposits in the bottom area.
- Interruption of source operation for more than two months should be avoided. If possible, pump out at least 100 liters of water during this period.
- In order to avoid the penetration of surface and ground waters, dirt into the well channel, it is necessary to use a cap or a cover that covers the end of the upper casing pipe.

Rice. 15 Cleaning work
When solving the problem of how to clean a well with their own hands, they use various methods using electric pumps, compressors, mechanical devices in the form of bailers or heavy blanks. When carrying out work on your own, it is better to start with the simplest operations - the source is cleaned by pumping with a vibration pump or a compressor, if the result is negative, you can switch to the technology of lifting the soil with a bailer or hydraulic shocks. If these operations have not brought results, you can always use the help of specialized drilling companies that are highly likely to cope with the task in a short time.
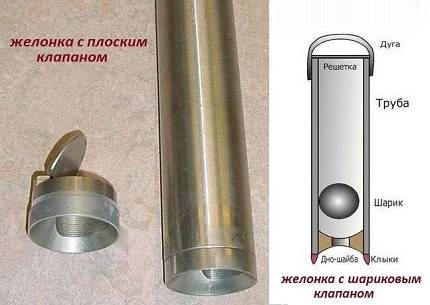
Valve systems for bailers
The most complex element of the bailer is the valve. There are two main options here: reed valve and ball valve. The task of this element is one: to let dirt or soil into the pipe and not allow it to spill out.
If the valve fits snugly, then the bailer will effectively capture not only dense contaminants, but also water, which will increase the cleaning efficiency. But on some light soils, drilling can be performed without a valve at all.
Option number 1 - the design of the petal valve
The reed valve is easy to make, but not very durable. It is an oval (ellipsoidal) plate of springy material: metal or polymer.
The valve is fixed in the center of the pipe. Under the influence of the flow of water, the edges of the ellipse open, passing soil or silt into the bailer. For a more effective fit of the valve to the walls of the bailer, a rubber or leather seal is used.
 The principle of operation of the flap valve is similar to the operation of the door. When the bailer hits the ground, it presses on the door, opening it. And when we raise the bailer for the next blow, the door-valve closes under the action of the mass of soil
When lifting the bailer with the petal valve, its “petals” are closed. But constant movements wear out the valve rather quickly, it simply fails.
Another version of the petal valve is a valve on a spring, and closes with a fairly powerful spring.
The design is not complicated, it can be used both when cleaning a well and when drilling with a bailer. Craftsmen also come up with their own, quite effective versions of valves for the bailer.
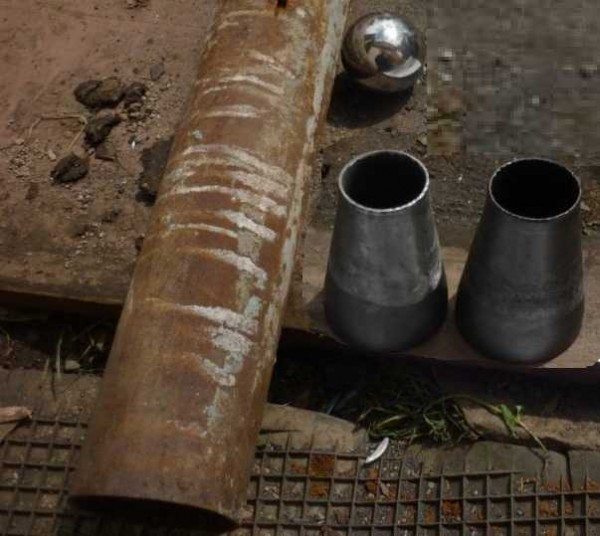
Option number 2 - manufacturing a ball valve
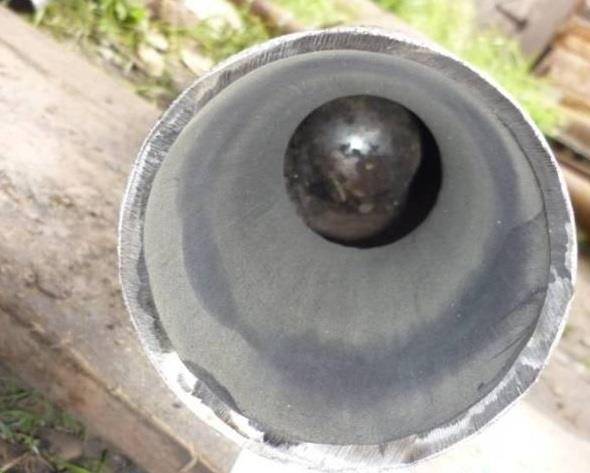
A ball valve is a funnel, the mouth of which is tightly closed with a ball of the appropriate size.
The biggest challenge in making this valve is getting the right ball. It must cover a fairly large hole into which contaminated water will enter and be heavy enough to lower and close the valve reliably and quickly.
There are three options to get such a ball:
- just find it among the old scrap metal, for example, remove it from a large bearing;
- order the manufacture of the desired part from the turner, who will turn the ball on the machine;
- make a ball yourself using improvised means.
To make a ball yourself, you need to find a hollow plastic or rubber ball, these are sold in toy stores. In the shop for hunters, you should buy a sufficient amount of lead shot. In addition, you will need epoxy or any other waterproof adhesive.
The toy ball is cut in half. Each half is filled with a mixture of shot and glue. After drying, the halves need to be glued and sanded, the ball is ready.
Instead of lead shot, any heavy metal balls, for example, taken out of old bearings, will do. It is also possible to cast a ball from molten lead, but this process is a bit more complicated.
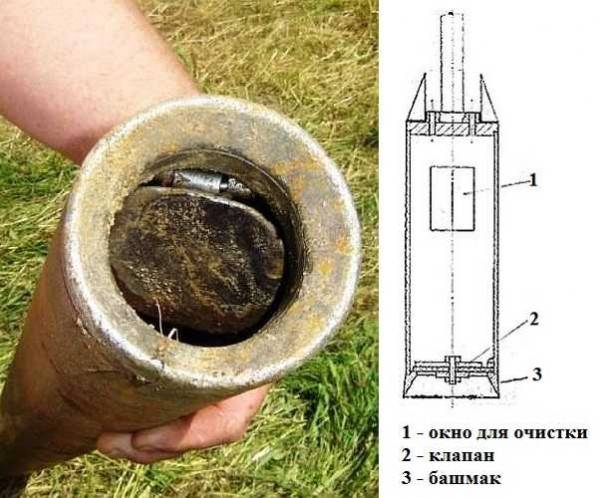
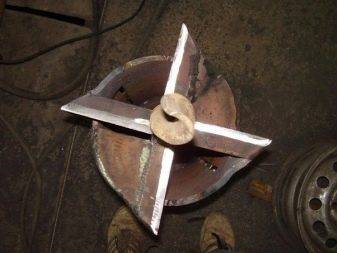
 This diagram clearly describes the manufacture of a bailer with a ball valve. The ball rests against a special washer at the bottom, a protective grill should be installed on top
The ball size should be approximately 60-75% of the diameter of the well casing. The second part of the ball valve is a thick metal washer, in which a funnel-shaped seat for the ball is cut out. Usually, a ball is found or made first, and then a puck of a suitable configuration is made.
For the ball, a special “saddle” is machined with a hole that this ball closes. The valve opening must be large enough to allow a lot of soil to enter.
If this does not happen, the hole is bored as far as the diameter of the ball allows. If a decision is made to entrust the manufacture of a ball to a turner, then it makes sense to immediately order a saddle for it, i.e. the entire valve.


How to drill an artesian well
- a drill, the components of which are a core barrel, a drill rod, a core for drilling, an active part;
- metal screw;
- tripod;
- winch;
- several pipes with different diameters;
- valve;
- caisson;
- filters;
- pump.
It is not necessary to buy all these tools, because they can cost a fortune. It is advisable to rent them. The work proceeds according to the following algorithm:
- Dig a 1.5 m x 1.5 m hole. Line it with plywood and boards so that it does not crumble.
- Install a sturdy derrick, preferably made of metal or wood, directly over the recess. Then fix the winch at the junction of the supports. This device is used for lifting and lowering equipment.
- Choose the right pump that will fit easily into the pipe.
- Lower the filter column, which consists of a pipe, a sump and a filter. But it is worth doing this when the required depth has already been reached. In order to strengthen the pipe, the space near it is covered with sand. In parallel with this, pump water into the pipe, the upper end of which is airtight.
Next, simply lower the pump, and then a hose or water pipe is needed to bring water out of the depths. Connect them too. To do this, remove the pipe and weld it to the head of the caisson. Next, install a valve that will regulate the level of water inflow - and your well is ready.
Operating principle
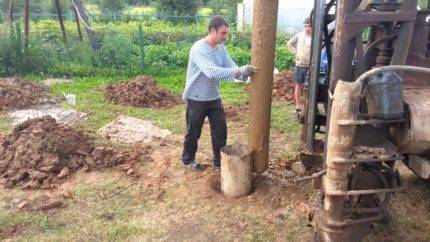
It should be noted that bailer drilling is used on sandy, clay and gravel soils. It is necessary to make a tripod in such a way that the projectile rises as high as possible.
The essence of this mechanism is as follows:
- with the help of a strong cable, the heavy bailer rises to the maximum height;
- the cable is released, and under its weight it hits the ground, as a result of which the soil breaks and enters the chute through the opened valve;
- then the projectile rises, under the pressure of the clogged soil, the valve closes and holds it inside;
- he again rushes sharply against the ground, this is repeated several times until the pipe is completely clogged;
- after that, the pipe rises to the surface, and the soil is shaken out over the upper edge;
- then everything happens according to the knurled pattern.
Thus, with each impact, the structure sinks more and more into the ground. This work continues until the desired water layer is reached. As a result, a new shaft is drilled or a finished well is cleaned from clogging with a bailer. This method requires considerable physical effort, but it is considered effective and does not require financial investments.
Features of drilling with a bailer
Bailer drilling is a popular, albeit rather time-consuming, way to create a well. Not every device of this type, suitable for cleaning a well, will cope with the excavation of a large amount of dense soil. For drilling, a sufficiently long bailer should be used - about four meters.
For drilling a well with a bailer, rather large devices are used, up to four meters long. The use of such heavy devices requires special lifting equipment.
Here, a kind of petal valve is more appropriate, which is a plate that is fixed with a special spring. With its help, a gap is created in the body, the area of which is almost equal to the area of the bailer cut.This allows you to pass the maximum amount of soil into the body of the bailer for each dive.
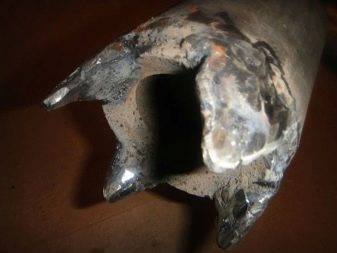
Removing dense soil from a long and narrow bailer is not always easy. To simplify this task, a special window is made in the upper part of the pipe, designed for more efficient and faster cleaning of the device. If sandy rocks are to be drilled, it will be easier to free the bailer.

To drill a well with a bailer, you need a device with a large clearance at the bottom and a body long enough to take out a lot of soil in one go
When drilling with a bailer, different types of rocks have their own characteristics. Here are some helpful tips:
- On sandy soils, the bailer should not be sunk more than 10 cm without casing. In general, the casing is supposed to be 10 cm ahead of the bailer.
- When drilling sandy soil, water is supplied to the borehole to further strengthen the walls.
- If wet sand is over-compacted during the work and does not fall into the bailer, a special chisel is used.
- The immersion of the casing pipe during drilling is performed constantly.
- For quicksand, a bailer two meters or more long with a reliable flat valve and a leather seal is used.
- Raising the bailer on a quicksand, you need to not only lower the casing, but also turn it, it is more convenient to do this work with two or three people.
- If the casing does not enter the shaft, it is lowered under pressure, for which a platform is placed on top, on which the load is placed.
- When drilling layers of gravel and pebbles, sometimes the use of a chisel, which breaks large inclusions, and a bailer to excavate broken soil are alternated.
- On dense deposits, the bailer is raised by only 10-15 centimeters, and movements are made often.
- When drilling tight formations, the casing is deepened by hydraulics or someone periodically stands on the platform installed on the casing pipe.
- Dry layers are softened by supplying water to the mine.
- On very soft plastic soils, the valve is not always needed, the rock remains in the bailer without it.
- The bailer must be raised after driving every 0.5 - 0.7 m, so as not to tear when lifting the body filled to the limit.
As with other drilling methods, using a bailer, one should take into account the individual characteristics of the soil on which the work is performed.
The right strategy and timely casing of the wellbore usually allows you to create a working well quite successfully.
You may also be interested in information on how to flush a well after drilling.
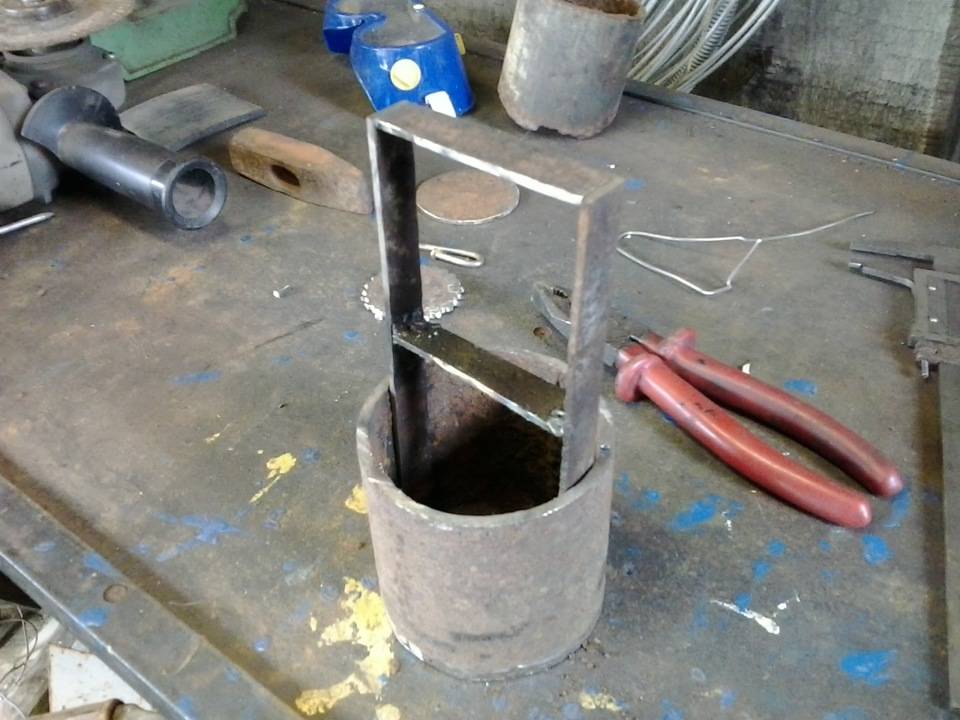
Manufacturing technology
The manufacturing scheme depends on the type of equipment.
Making a bailer with a ball valve
Drilling a well with a bailer with a ball valve is simpler and more convenient. For the manufacture of such equipment you will need:
steel pipe;
Diameter pipes for the manufacture of the body of the bailer should be 2 - 3 cm less than the diameter of the well casing. The optimal pipe length is 80 - 100 cm.
- funnel;
- sheet metal;
- steel ball, suitable in diameter;
- metal cable or strong rope for lifting equipment.
From the tools you will need:
- Bulgarian;
- drilling machine (it is possible to use a drill);
- welding machine with a set of electrodes.
The manufacturing process of the equipment is as follows:
- at the first stage, a design drawing is developed, which makes it possible to avoid a large number of errors in further manufacturing;
- a seat for the ball is constructed from sheet metal, which is also an adapter for the pipe. For this:
- a hole is made in the center of the sheet, slightly larger than the diameter of the ball;
- a funnel is made from the sheet, the wide part of which is equal to the diameter of the pipe intended for the manufacture of the body of the bailer;
- the docking seam is boiled;
- the body of the product is cleaned of burrs and welding residues;
Ball seat
- notches are made at the base of the pipe intended for the body of the bailer;
It is enough to make teeth 3-4 cm high.
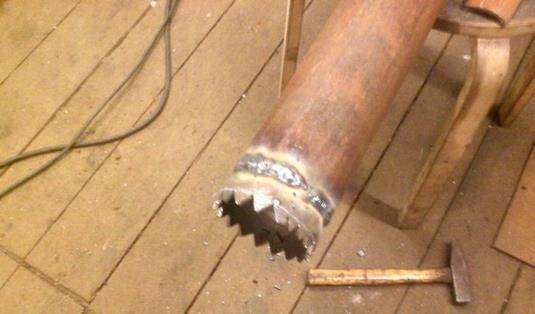
Making teeth for drilling
- at a height of 3 - 4 ball diameters, a stroke limiter is installed. The easiest and fastest way to make a limiter is to drill a hole on the pipe and install an ordinary bolt;
- the funnel is joined to the pipe by welding;
- a hole is made in the side of the body, designed to facilitate the excavation of soil (silt);
- cable mount is made. There are two mounting options:
- eye welding;
- drilling holes;
Manufacture of fasteners for the cable
- several hooks are welded on the sides, which will be required to remove the equipment from the casing in the event of a cable break.
In more detail, the process of manufacturing a bailer with a ball valve is presented in the video.


Making a bailer with a flat valve
The manufacturing process of the bailer with a flat valve differs only in the production technology of the locking element. The valve can be made:
- from sheet iron;
- from plastic;
Valve types
A plastic valve is less strong and durable and cannot be used when drilling / deepening a well.The device is only permitted for cleaning work.
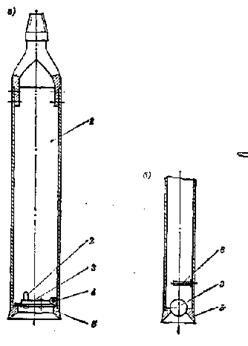
The manufacture of a metal valve in the form of a separate insert is carried out according to the following scheme:
- a sheet of metal cut to the appropriate dimensions is inserted into a piece of pipe 10–15 cm high and with a diameter corresponding to the diameter of the pipe intended for the body of the bailer;
- the metal is fixed with spring loops by welding.
Scheme of manufacturing a bailer with a flat metal valve
The plastic valve is made in the following sequence:
- a through hole is drilled in the lower part of the pipe, into which a bolt is inserted;
- an oval is cut out of plastic, the smaller side of which is equal to the diameter of the bailer pipe, and the larger side is 2 cm larger than the pipe diameter;
- the plastic plate is fixed to the bolt, for example, using a strong wire.
Independent production of the bailer allows not only to make a durable tool, but also significantly reduce cash costs. The average cost of components for equipment varies between 1,000 - 3,000 rubles, and the cost of a finished tool starts from 18,000 rubles.
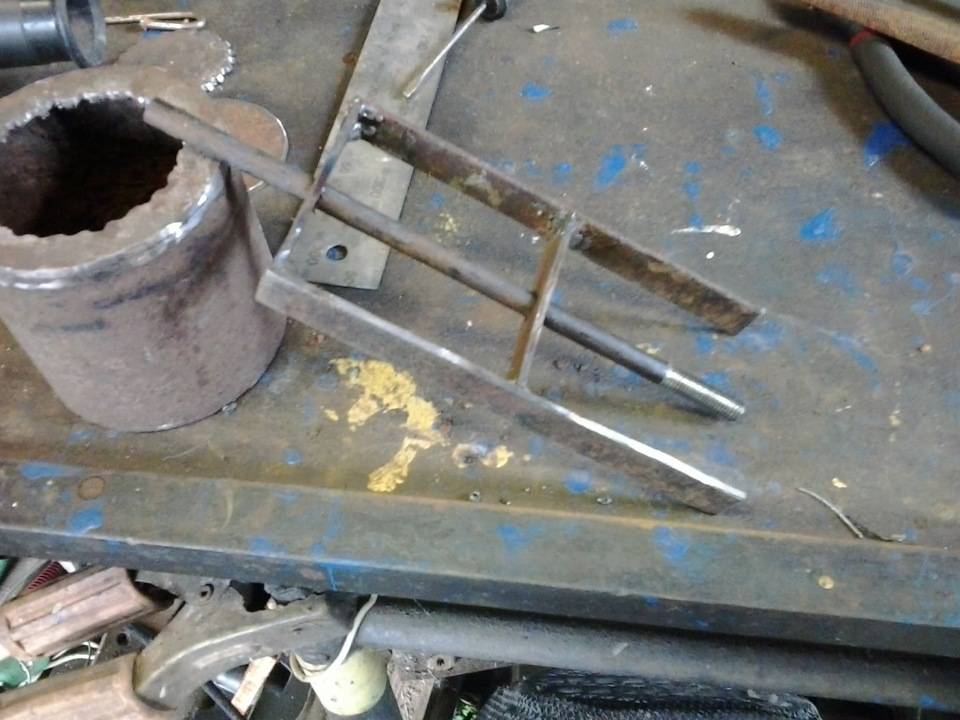
How to do?
You can make a bailer for pumping wells yourself. To perform such work, you should familiarize yourself with the drawings of the product. To make a bailer, you will need the following materials:
- a metal pipe that will act as a body;
- valve;
- apparatus for welding;
- metal cable and strong wire.
When choosing a pipe, one should proceed from its diameter, the size of the well casing will serve as a guideline.For the efficient functioning of the bailer, the distance between the walls of the source and the base of the cleaning device should be about 2-3 centimeters. That is, this value must be subtracted from the internal diameter of the pipe in order to obtain the required pipe diameter for the manufacture of the element.
The distance between the wall of the shaft and the cleaning device can be different, but the efficiency of the bailer directly depends on its size. Too much clearance will adversely affect the cleanout process. And a small distance, in turn, can lead to damage to the walls of the well when the bailer sinks or exits the source wellbore. In some cases, the pipe can jam at all, it will be very difficult to remove it. Since there is a risk of damaging both the product itself and the wellbore.
The most acceptable pipe length is considered to be 80 centimeters, but this value can vary between 60-150 centimeters. The optimal size of the bailer should be selected based on the size of the well, since a device that is too short will touch the walls during operation, and a long element can be very heavy. Such a product will be difficult to immerse, and in particular, to lift when the bailer is filled with silt or other dump. Long products will be more efficient when drilling.
The combination of the above parameters will directly affect the course of cleaning activities. Therefore, the weight and size of products must meet the following requirements for bailers:
- provide explosive penetrating inertia, which allows you to quickly remove contaminants from the well;
- the mass of the element itself, together with the formations collected from the bottom, should allow the bailer to be removed from the source independently or when using a winch.
In order to make a durable and functional bailer, you will need to connect several more components of the product to the pipe. In the absence of a welding machine, the bailer can be made from a pipe 0.6 m long, with a diameter of 70 mm. Attach a wire handle to the top.
For fastening, holes are made at the base of the pipe, and a wire is threaded through them. A valve is located at the bottom. The petal element can be made from a plastic bottle; for this, an ellipse of the required size is cut out of the container wall.
The valve is fixed with a 6 mm bolt, however, it should be noted that its length should not be more than the outer diameter of the pipe. Under the bolt, two holes are drilled in the pipe. The valve with the bolt is fixed with a wire, its thickness should be about 3 mm. It forms two rings. The valve is bent and pushed into the bailer. Then a bolt is threaded, as well as wire rings. The bolt is screwed on with a nut.
At the final stage of manufacturing the element, it is necessary to sharpen the lower edge. It is better that the hydro-vacuum bailer be sharpened unilaterally from the inside. So that the edge is not erased, it is better to heat-harden it.


The fastener for the metal cable to the top of the pipe must also be welded. The vertical position of the loop will allow you to keep the bailer in the same position. The absence of distortions in the design will exclude jamming of the installation and the possibility of damage to the walls of the well shaft.
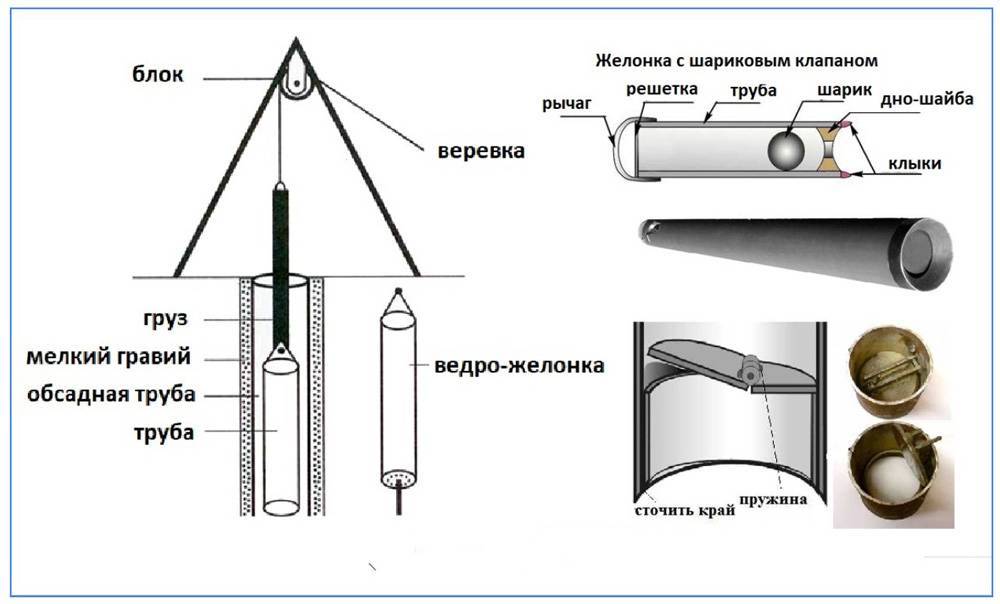
When using a ball valve, a mesh is welded at the top of the pipe, which will protect against accidental flying out of the ball when the element is immersed in the source. After attaching the cable to the pipe, you can start work.
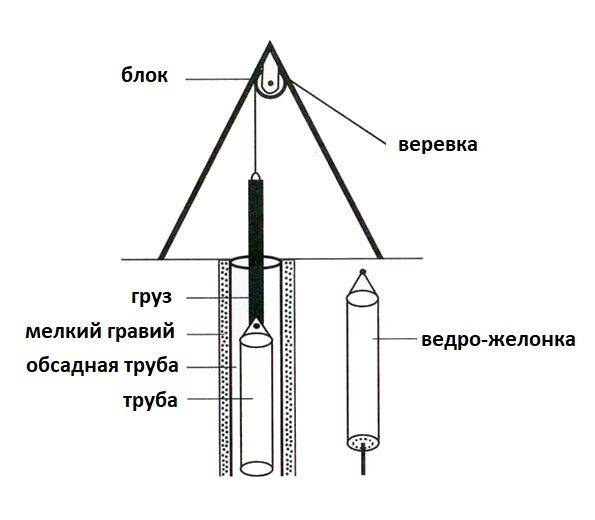
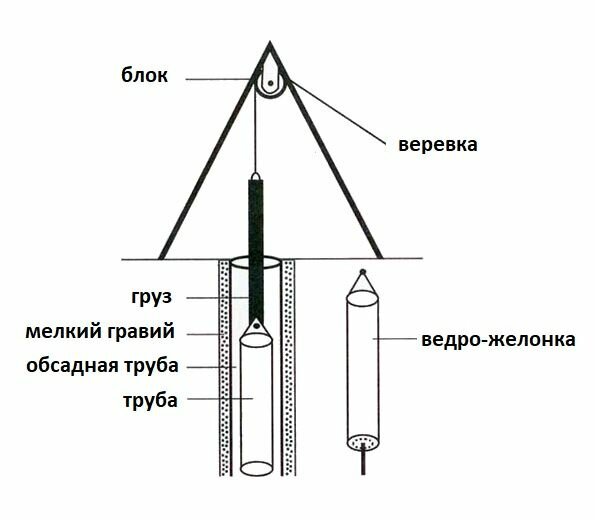
To facilitate the descent and raising of the bailer above the well, it is better to install a frame with a block. The cable is led behind the block and the device is manipulated. This greatly facilitates cleaning and work with the bailer in the absence of an automatic device control system.
Features of the use of bailers when drilling
As already noted, the use of a bailer as a drilling tool is unpopular due to the laboriousness and duration of the process. At the same time, a home-made bailer is thrown into the well with acceleration so that the caked sediment or rock can loosen and get inside without problems.
- In this way, which is called shock, you can go through a maximum of 10 meters of the pit, while when using a drill rotating in moist soil, you can reach a depth of 20 meters in the same time. But there are situations when one cannot do without a bailer when constructing a well.
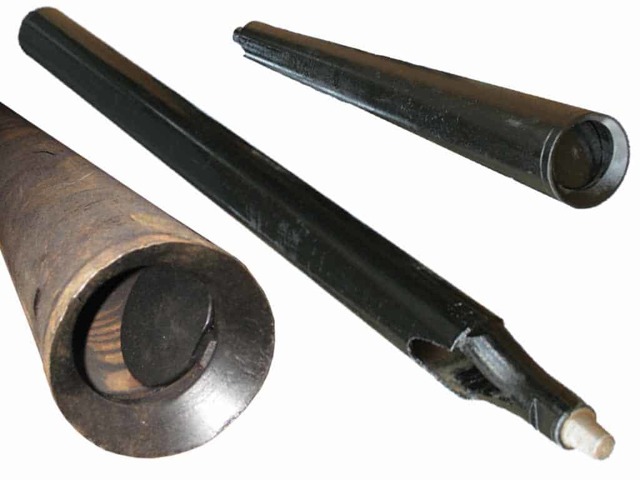
- For manual drilling, factories also produce them. Factory bailers are not so different in design - the only way to drop the raised soil may be different.
- A set of pipes for building up the rod is attached to them, by means of which the bailer is rotated and deepened into the soil. To free the cavity, the valve part (shoe) is unscrewed and the contents are poured out without the need to turn the instrument over.
- The bailer can be most useful in the process of drilling when passing a quicksand.This is a viscous mass of loose sand and clay particles drifting in the ground, which can deliver many unpleasant minutes to private diggers.
- The quicksand must be passed, because although it is oversaturated with water, it does not give it away - and besides, it is too dirty. And here the bailer is simply an indispensable tool.
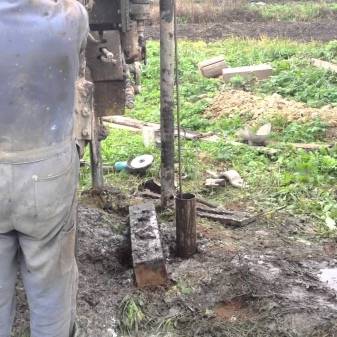
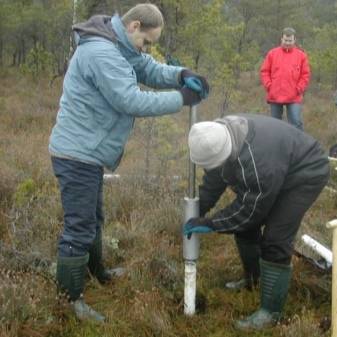
Here's what the process of passing the quicksand looks like:
| Photo, steps | Comment |
|---|---|
| Step 1 - initial drilling | First, the penetration begins with a conventional drill with wide blades. |
| Step 2 - extension of the rod | As it deepens, the bar grows. |
| Step 3 - Rotate the drill | You can rotate the drill with one special tool, or together, by means of a lever threaded through the through holes. |
| Step 4 - excavation | The soil taken out by the blades is taken aside and put on a stretcher or other container. |
| Step 5 - Installing the pipe casing | After going deep into a couple of meters, you can begin to install the casing. |
| Step 6 - Using the Quicksand Drifter | If you have a quicksand, you will have to use a special drill with small turns to pass it. |
| Step 7 - upsetting the pipe | It is inserted into the pipe and screwed into the thickness of the quicksand. In parallel, the pipe is deposited in such a simple way. |
| Step 8 - Tool Change | Now a bailer is required, which they put on on a bar instead of a drill. |
| Step 9 - excavation of the mud mass of quicksand | With the help of a bailer, they scoop out the dirty slurry that has fallen into the casing pipe - and do this until clean water remains there. |
And in our high-tech age, there is the use of such a simple device as a bailer, which is especially useful when meeting with a quicksand during drilling - or for a banal cleaning of a well.Just remember that the pipe that is used to make this kind of tool should be a couple of centimeters smaller in diameter than the barrel circumference.
How to make an Abyssinian well
Abyssinian wells can be drilled only in late spring or summer. In autumn and winter, such work is not carried out. Since precipitation falls during this period, which can soften and moisten the soil. There is a high possibility of contamination, which will degrade the quality of the water.
Abyssinian well drilling do in depth:
- 5-7 m for domestic needs.
- 8-10 m for household purposes, including watering the garden.
Hydro drilling rig
Use the diesel rig to drill the Abyssinian well through clay and rock formations. These drilling rigs are made with a drive for control and pressure on the drill bit.
A powerful pump is used to pump the drilling fluid into the hole to speed up drilling.
Since mini drilling rigs cost more than 150,000 rubles, you can rent them from ads on Avito.
Or do it yourself. How to make a drilling rig according to the drawings, we wrote in the article.


After drilling, you can offset the costs by renting a machine to your neighbors. Or start an Abyssinian well drilling business.
Do-it-yourself needle well without equipment
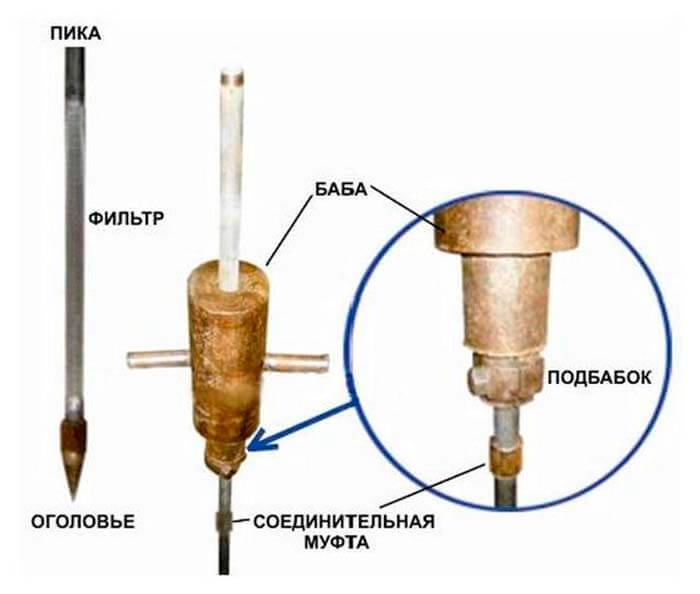
Abyssinian well is driven into the ground. The tip is a pipe with a perforation in the lower part with a pointed tip. This structure is clogged until reaching the aquifer. A hand pump is connected to raise the liquid.
Of course, such a structure is not difficult to make, but the service life of the system is not long, as it quickly becomes clogged with fine sand, which is in the produced water.For filtering, the pipe is wrapped with a fine mesh or wire. It protects from sand.
The device is clogged with a sledgehammer, which is why it is called a driven well. More often used "grandmother". According to the principle of operation, this is the same sledgehammer, but it has a guide, with a stable application of impact force.
The driving method is simple and allows you to quickly make a source. However, by applying impact force, there is a possibility of damage to the threaded connections and damage to the filter. And this is the reason for water pollution and a decrease in the life of the Abyssinian well.

Abyssinian well drilling equipment:
- Threaded pipes with a diameter of 1 - 2. We recommend buying stainless steel or galvanized. Buy at the rate of no more than 8 meters, including the filter.
- Spear-shaped filter - tip.
- Couplings.
For water intake you will need:
- Zaburnik (manual drill). A garden hand drill with an extension cord is suitable. If the purchase is not planned and there is no possibility to rent it, then make the chimney from reinforcing steel.
- The headstock is replaced by a sledgehammer.
- Hand pump with check valve.
Technology how to drill an Abyssinian well with your own hands:
- A hole is made with a chisel to the first water carrier. Wet sand should appear in the raised soil.
- Upon detection of a water carrier, we assemble the column, tightly screwing it through the couplings to the first link with a spear-shaped filter - a pipe tip to the desired length. We seal the joints with linen tow.
- Carefully, avoiding distortions, we hammer the finished column with a headstock or a sledgehammer into the hole prepared by the burner.
- When the column rises to the desired depth, we fasten a hand pump to the upper outlet.
- Pour water into the barrel and pump.The liquid should flow freely, the hand pump should work easily - a sure sign that the Abyssinian well is clogged to the desired depth.
Abyssinian well made of polypropylene pipes
When plugging a pipe, it is difficult to determine the first aquifer. Therefore, augers are used for the Abyssinian well.
- We drill a hole of a larger diameter so as not to clog, but it is easy to install a polypropylene pipe without damage.
- We fill the bottom of the well with crushed stone, which creates an additional natural filter, improving water quality and increasing the service life.
The procedure for the manufacture of hydraulic structures from polypropylene pipes is similar to method No. 1. Large labor costs will be manual drilling with an auger of a hole of large diameter.
Pumping after drilling
After completion of work, pumping of the Abyssinian well after drilling is required.
During clogging of pipes, dirt collects in the filter and barrel. The task of pumping is to clear the structure of sand.
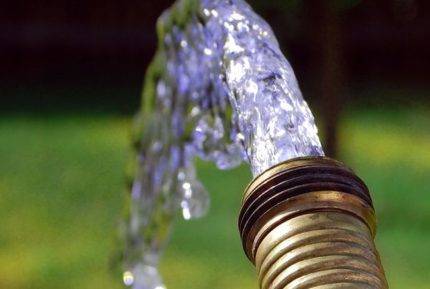
Pumping is done until clean water comes out.
We recommend pumping a new Abyssinian with a hand pump.

It is not necessary to use a Baby pump or other electrical appliance. Water with impurities will damage the equipment, and the pump will become unusable.
In addition, at the beginning of work, the source has low water yield. With a hand pump, you can adjust the application of force, and increase to the working volume.
How to make a bailer for a well
Determining the size of the bailer
When determining the dimensions, consider the following points:
- The dimensions of the projectile must correspond to the depth and diameter of the well. The length of the bailer is in the range of 0.8-3 m.
- For drilling, a larger and therefore heavier tool is used, however, a large product makes the structure heavier, which can cause it to jam.
- Too short can warp and, when moved, will touch the walls.
- Use small bailers to clean the well.
- To determine the diameter of the projectile, measure the diameter of the hole and reduce it by 40 mm (it should enter the pipe with a gap of 2 cm per side).
- The size of the gap can be changed, but only slightly. Too much clearance reduces the efficiency of excavation, while too little clearance can damage the walls of the shaft or jam the tool. Removing a stuck cylinder is not easy.
- The recommended wall thickness of the product is 2-4 mm, but pipes with walls of 10 mm can be selected if it is necessary to increase its weight.
Instructions for making a bailer
Perform the following operations:
- Cut off a piece of pipe of the required length from the workpiece. Sharpen the lower part of the cylinder from the inside so that the tool enters the ground well. Harden the pointed area to harden it.
- Before you make a bailer for the well, find a metal ball with a diameter of 40 mm (its dimensions should cover 65-75 percent of the internal diameter of the fixture). This valve element can be machined, cast from lead, or removed from an old bearing. It is easy to make it yourself from a rubber or plastic ball. To do this, cut the ball in half and fill the halves with shot mixed with any waterproof glue. After drying, glue both parts and sand the joints.
- Make a plug with a diameter of 40 mm from a thick sheet of metal.Make a funnel-shaped hole in it with an outer diameter of 40 mm and an inner diameter of 30 mm. The dimensions of the inner hole can be increased if the projectile is poorly filled.
- Check the fit of the ball to the seat. The better both surfaces are, the less soil will be lost when the bailer is raised.
- Leave the other side of the washer flat, but often it is also made funnel-shaped with a slight slope into the cylinder.
- Weld the washer to the bottom of the pipe, pushing it inward by 10-20 mm. Insert the ball into the cavity. To prevent it from rising too high, make a limiter inside the cylinder, for example, drill a hole in the wall, install a bolt in it, and grab the head by welding. Otherwise, dirt will fall out before the valve closes.
- Attach several rows of wire or a fine mesh to the top of the projectile.
- To improve the loosening of sand and soil, weld three fangs protruding a few centimeters down to the skirt of the bailer.
- Weld a thick rod to the top of the tool, to which tie a strong cord or fasten a thin cable to lift it. Lift the product by the cord and make sure it hangs vertically. Bailer distortions are not allowed.
- In the upper part of the cylinder, cut special windows that will help shake the soil out of it.
A bailer with a flap valve is made as follows:
- Cut a piece of pipe 800 mm long from a workpiece with a diameter of 70 mm. On one side, at a distance of 10 mm from the end, drill a through hole with a diameter of 6-8 mm through the cylinder.
- Select a bolt that is long enough to fit through the holes and fit the nut. It should not touch the borehole wall.
- Cut out an oval-shaped valve from a regular two-liter bottle. The smaller diameter of the element should be equal to 70 mm, the larger one - 20 mm more.
- Insert a bolt into the holes of the cylinder and screw the valve to it in two places with a wire with a diameter of 2-3 mm in four places. Loops can be made in advance and install a bolt in them when assembling the structure.
- Bend the plate slightly and install it into the pipe.
How to prevent clogging of the well?
There are no "eternal" wells for water supply. Unfortunately, sooner or later, the owner of an individual water source will run into problems. It’s bad if the aquifer has dried up, you have to drill again or deepen the existing development. This is difficult and very costly.


It is another matter if a clogging of the well has happened - it is easier and cheaper to prevent than to “treat”.
Extending the service life of the source contributes to the observance of several rules of operation:
- Strictly adhere to the chosen drilling technology. Carefully monitor the tightness of the casing and the integrity of the filter.
- Immediately after completion of drilling operations, flush the source until clean water appears.
- Protect the well from the penetration of surface water and pollution by installing a caisson, head. As a temporary solution, simply seal the top of the casing.
- Prior to the start of operation, it is correct to select and install a submersible pump at the required height, always taking into account the flow rate of the well.
- It is advisable not to use a vibration pump to supply water. Vibrating in the casing, it, depending on the type of soil, to a greater or lesser extent provokes the penetration of sand into the well or contributes to siltation of the adjacent soil.A cheap and simple vibrator can be used for a short time; a centrifugal pump is needed for permanent operation.
- The well should not stand idle without parsing water. The ideal mode of operation is the daily pumping of several tens or hundreds of liters of water. It is provided if people permanently live in the house. If this is not possible, you should regularly, at least once every 2 months, pump out at least 100 liters of water from the well.
The implementation of these recommendations, of course, will not allow to avoid clogging of the well in the future. However, it will delay this trouble by providing the maximum possible resource for effective operation for this source.
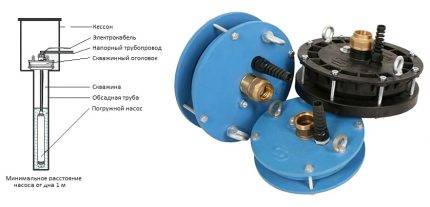 The correct arrangement of the well is the key to its longevity. It is necessary to install a special head on the casing pipe, which seals it and serves for reliable installation of equipment
Why flush a well after drilling?
After the drilling process is completed, the well needs to be flushed to ensure that the extracted water meets sanitary and hygienic requirements.
The fact is that the contaminants that make the water unusable enter the mouth in large quantities during development. Also, debris, small insects, and so on can get in from above during drilling.
If you neglect washing and immediately install filters, they will quickly become clogged and become unusable, and a silt layer will form at the bottom, which will become a source of unpleasant taste and smell.
In addition, pathogenic microorganisms multiply very well in the mud layer, which means that drinking water from such a well will be dangerous to health.
The silty layer will increase over time and completely block access to the aquifer.The operation of the well will become impossible. These problems can be easily avoided and extend the life of your source if you flush it immediately after drilling.
Flushing the well after drilling will extend the life of filters, pumping equipment and the well itself by several times
Reasons for flushing a well:
- improving the quality of produced water;
- extending the service life of pumping equipment, filters;
- increase in well productivity;
- increase in service life, open access to the aquifer.
Well flushing before commissioning can be done by hand, without the involvement of specialists.
This is not a very complicated process if you know the technology and the features of its implementation.


