- Common mistakes when performing installation work
- Common mistakes when performing installation work
- Room for the installation of a gas boiler
- boiler room requirements
- Requirements for the room for the installation of a turbocharged unit
- Installation: recommendations and diagrams, the main stages of the installation of the chimney
- General requirements
- Installation steps
- Video description
- Connecting a ceramic chimney
- Video description
- Methods for grounding boilers
- Grounding a gas boiler in a private house
- How to choose the right grounding conductor?
- Requirements for the quality of grounding
- Ground loop resistance
- Installation work
- Grounding instruction
Common mistakes when performing installation work
There are a number of characteristic shortcomings to which people who are not specialists are subject. If you know them, you can avoid possible mistakes. The list includes:
- Treatment of electrodes with moisture protection. Some simply paint them, not realizing that the paint layer excludes conductivity. The return of electricity does not occur, the system does not perform its intended function.
- Refusal to weld. The welding machine is expensive, you don’t want to pay rent, and there is an erroneous opinion that the pins with the connection can be bolted together. Such fasteners maintain electrical conductivity for no more than one to two weeks.Corrosion will cause failure.
- Attempts to “move out” the outer contour as far as possible from the residential building. As a result, the throughput decreases as the total resistance of the system increases. This happens because the input is too large and becomes an obstacle to the movement of electrons.
- Savings on profile and wires. Insufficient section will work until the first case. Then the wires or other elements simply burn out, and it’s good if the ground does the job up to this point. The next time, the detrimental consequences of a short circuit are inevitable.
- Applications of copper and aluminum. Again, such a solution is resorted to in the name of economy. Often there are veins in the garage, workshop, pantry. But when connecting such conductors, welding is impossible, which means that corrosion will eventually disable the circuit.
As soon as you think there is a problem and the ground is not working, find out what the problem is. Eliminate it immediately. Only in this case it is possible to guarantee the safety of property and the health of family members. The hope that the threat will not arise is perhaps the biggest mistake. That is why fires happen in private houses, people suffer, household appliances break down.
Common mistakes when performing installation work
Experts note that during self-assembly, the following mistakes are most often made:
- An attempt to protect the electrodes from corrosion by painting. This method is unacceptable, because. prevents flow to the ground.
- Connection of a steel metal connection with pins with bolts. Corrosion quickly breaks the contact between the elements.
- Excessive removal of the circuit from the house, which significantly increases the resistance of the system.
- Application of too thin profile for electrodes.After a short period of time, corrosion causes a sharp increase in the resistance of the metal.
- Contact of copper and aluminum conductors. In this case, the connection deteriorates due to contact corrosion.
If deficiencies are found in the design, they should be eliminated immediately. An excessive increase in electrical resistance or a violation of the continuity of the circuit disrupts the operation of the ground. The circuit will not be able to guarantee safety.
Circuit grounding is necessary for a private house. This design will ensure the electrical safety of residents and eliminate tragic accidents. However, it should be remembered that the effectiveness of grounding depends on the correct calculations, the choice of circuit and the installation. If there is doubt in one's own abilities, then it is better to use a ready-made kit.
Read more:
What types of grounding systems exist and what is protective grounding?
Determining the cross-sectional area of a conductor by its diameter
SPD - what is it, description and connection diagrams in a private house
How to connect an outlet with grounding?
What is a short circuit in a simple way?
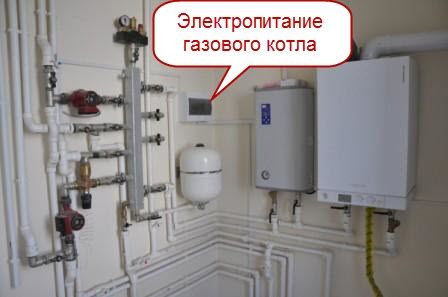
Room for the installation of a gas boiler
The volume of the room for a gas boiler depends on the type of unit and its power. All requirements for the boiler room or other place where the device is located are prescribed in SNiP 31-02-2001, DBN V.2.5-20-2001, SNiP II-35-76, SNiP 42-01-2002 and SP 41-104-2000 .
Gas boilers differ in the type of combustion chamber:
…
- units with an open combustion chamber (atmospheric);
- devices with a closed firebox (turbocharged).
To remove combustion products from atmospheric gas boilers, you will need to install a full-fledged chimney. Such models take air for the combustion process from the room in which they are located.Therefore, these features require a device for a gas boiler in a separate room - a boiler room.
Units equipped with a closed firebox can be placed not only in a private house, but also in an apartment in a multi-storey building. The removal of smoke and the influx of air masses is carried out by a coaxial pipe that exits through the wall. Turbocharged devices do not require a separate boiler room. They are usually installed in the kitchen, bathroom or hallway.


boiler room requirements
The minimum volume of the room for installing a gas boiler depends on its power.
| Gas boiler power, kW | Minimum volume of the boiler room, m³ |
| less than 30 | 7,5 |
| 30-60 | 13,5 |
| 60-200 | 15 |
Also, a boiler room for placing an atmospheric gas boiler must meet the following requirements:
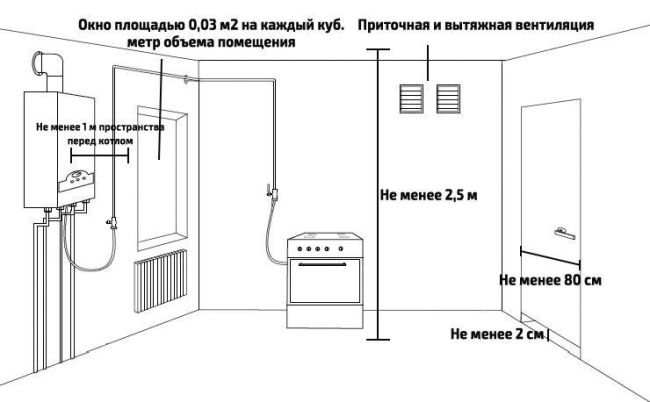
- Ceiling height - 2-2.5 m.
- The width of the doors is not less than 0.8 m. They must open towards the street.
- The door to the boiler room must not be hermetically sealed. It is required to leave a gap between it and the floor 2.5 cm wide or make holes in the canvas.
- The room is provided with an opening window with an area of at least 0.3 × 0.3 m², equipped with a window. To ensure high-quality lighting, for every 1 m³ of the volume of the furnace, 0.03 m2 of the area of the window opening should be added.
- The presence of supply and exhaust ventilation.
- Finishing from non-combustible materials: plaster, brick, tile.
- Electric light switches installed outside the boiler room.
Note! Installing a fire alarm in the boiler room is not a mandatory, but recommended condition. It is strictly forbidden to store flammable liquids and objects in the boiler room. The boiler must be freely accessible from the front panel and from the side walls.
The boiler must be freely accessible from the front panel and from the side walls.
It is strictly forbidden to store flammable liquids and objects in the boiler room. The boiler must be freely accessible from the front panel and from the side walls.
…
Requirements for the room for the installation of a turbocharged unit
Gas boilers with a closed combustion chamber with a power of up to 60 kW do not require a separate furnace. It is enough that the room in which the turbocharged unit is installed meets the following requirements:
- Ceiling height over 2m.
- Volume - not less than 7.5 m³.
- Has natural ventilation.
- Closer than 30 cm next to the boiler there should not be other appliances and easily combustible elements: wooden furniture, curtains, etc.
- The walls are made of fire-resistant materials (brick, slabs).
Compact hinged gas boilers are even placed between cabinets in the kitchen, built into niches. It is more convenient to install double-circuit units near the water intake point so that the water does not have time to cool before it reaches the consumer.
In addition to generally accepted standards, each region also has its own requirements for a room for installing a gas unit
Therefore, it is important to find out not only how much space is needed to install a gas boiler, but also all the nuances of placement operating in a given city.
Installation: recommendations and diagrams, the main stages of the installation of the chimney
The installation of the chimney is divided into several stages - this is the preparatory work, the installation itself, then the connection, start-up and, if necessary, debugging of the entire system.
General requirements
When combining several heat generating installations, a separate chimney is created for each of them. In exceptional cases, a tie-in to a common chimney is allowed, but at the same time, a difference in height of at least one meter must be observed.


First, the parameters of the chimney are designed and calculated, which are based on the recommendations of the manufacturers of gas boilers.
When summarizing the calculated result, the inner section of the pipe cannot be less than the diameter of the boiler outlet pipe. And according to the check according to NPB-98 (fire safety standards), the initial speed of the natural gas flow should be 6-10 m / s. And besides, the cross section of such a channel must correspond to the overall performance of the unit (8 cm2 per 1 kW of power).
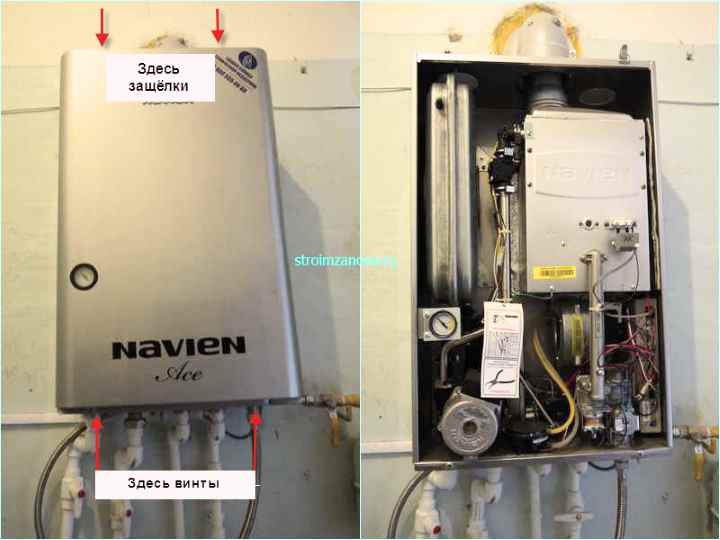
Installation steps
Chimneys for gas boilers are mounted outside (add-on system) and inside the building. The simplest is the installation of the outer pipe.
Installation of an external chimney
Installing a chimney at a wall-mounted boiler is done as follows:
- A hole is cut in the wall. Then a piece of pipe is inserted into it.
- A vertical riser is assembled.
- The joints are sealed with a refractory mixture.
- Fixed with wall brackets.
- An umbrella is attached to the top to protect it from rain.
- An anti-corrosion coating is applied if the pipe is made of metal.
Proper installation of the chimney guarantees its impermeability, good draft, and prevents soot from accumulating. Installation performed by specialists will significantly reduce the cost of maintaining this system.
In the case of arranging an opening for a pipe in the roof of a house, special boxes with aprons are used. In this case, the design as a whole is influenced by such factors as:
- The material from which the pipe is made.
- Exterior design of the chimney.
- Type of roofing.
The main factor influencing the choice of design is the temperature of the gas that passes through the pipe. At the same time, according to the standards, the distance between the chimney pipe and combustible materials must be at least 150 mm. The most advanced is the assembly system by segments, where all elements are assembled by cold forming.
Video description
How the chimney pipe is installed, see the following video:
Connecting a ceramic chimney
Ceramic chimneys themselves are almost eternal, but since this is a rather fragile material, you need to clearly imagine how the connection (docking) of the metal part of the chimney and the ceramic one is correctly performed.
Docking can only be done in two ways:
By smoke - a metal pipe is inserted into a ceramic
It is important to remember here that the outer diameter of the metal pipe should be smaller than that of the ceramic one. Since the thermal expansion of the metal is much greater than that of ceramics, otherwise the steel pipe, when heated, will simply break the ceramic one.
For condensate - a metal pipe is put on a ceramic one.
For both methods, specialists use special adapters, which, on the one hand, are equipped with a gasket for contact with a metal pipe, and on the other, which contacts directly with the chimney, are wrapped with a ceramic cord.
Docking should be carried out through a single-wall pipe - it has a higher heat transfer coefficient. This means that the smoke will have time to cool down a little before it reaches the adapter, which ultimately extends the life of all materials.
Video description
Read more about connecting to a ceramic chimney in the following video:


VDPO shows great requirements for chimneys for gas boilers, because of this, it must be installed by specialized teams. Since competent installation guarantees not only long-term operation of the device, but also makes living conditions in a private house safe.
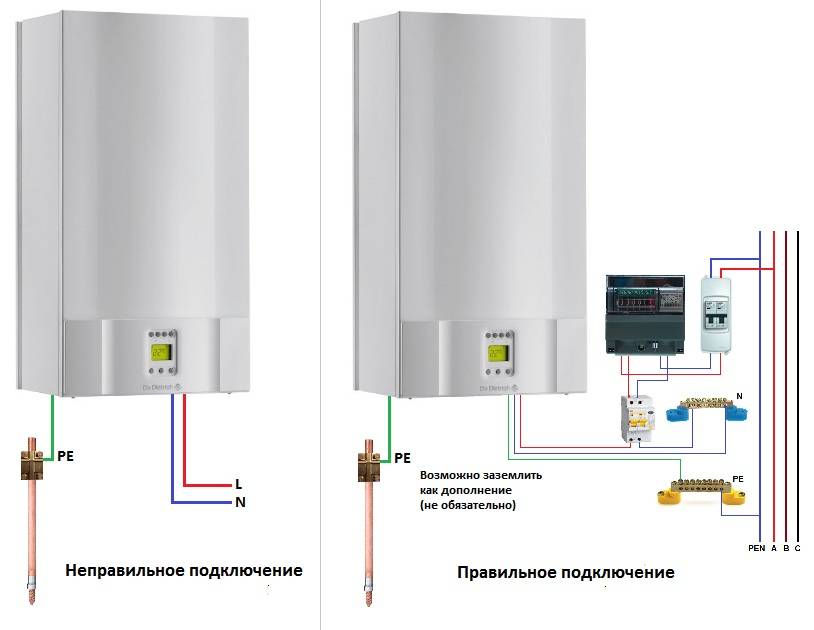
Methods for grounding boilers
There are several ways to install a ground loop:
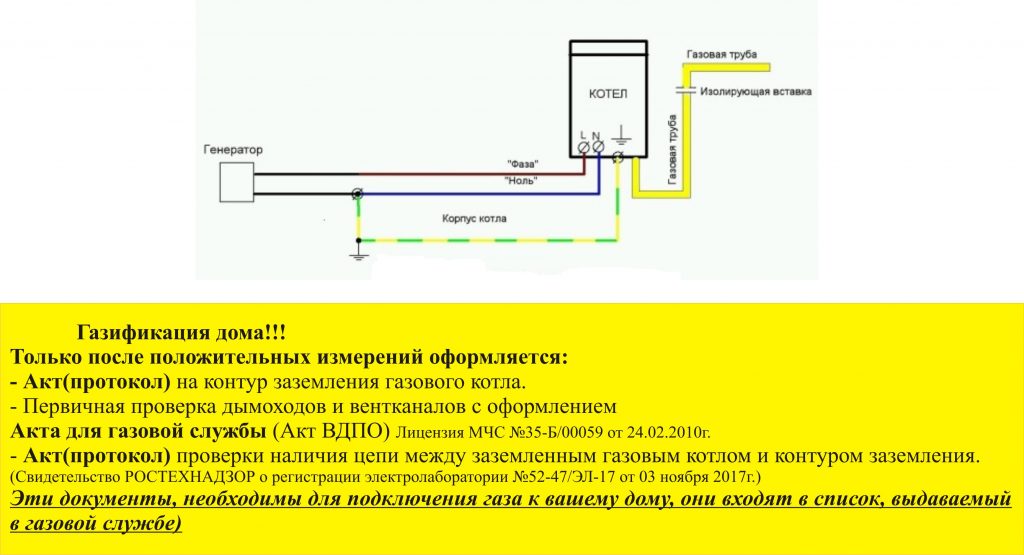
- By type of device - there is a need for a separate grounding of the gas boiler. Household appliances: washing machines, refrigerators, kettles, etc., have differences in parameters and technical characteristics from heating equipment.
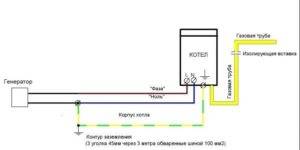
PUE impose higher requirements for connecting a gas boiler. Therefore, if it is planned to install grounding through a socket, it must be connected not to the switchboard, but directly to the circuit. - According to the manufacturing features - the connection is made with a ready-made kit, specially made for connecting to a gas boiler, or with the help of improvised materials.
The PUE relating to grounding describes the rules prohibiting the use of a water, sewer or gas pipe as grounding when connecting the boiler.
Grounding a gas boiler in a private house
The boiler needs mandatory grounding due to the fact that static voltage constantly accumulates on its body. First of all, it is fraught with fire. In fact, this reason is the main argument in favor of the need to ground the boiler. Secondly, static voltage may well provoke a failure in the operation of automation, or even disable it altogether.Electronics are very sensitive to power surges, and replacing a burned-out board will cost you a pretty penny.
It should be noted that more stringent requirements are imposed on a gas boiler than on conventional household appliances. Therefore, if you decide to do it yourself, do not forget that everything must comply with current regulations. The best option is to buy a ready-made kit and install it yourself. There is nothing particularly complicated here. In particular, for installation, you will need a small area measuring about 50 by 50 centimeters, for example, in the area adjacent to the house, or in the basement. However, having the skills to work with a welding machine and tools for cutting metal, you can make a grounding device yourself. To do this, we need a steel corner and a strip, from which it will be necessary to make a certain structure.
First, we should decide on a ground electrode - an electrode that is in direct contact with the ground. They are of 2 types:
- natural;
- artificial.
Natural grounding conductors are metal structures that are immersed in the ground. At the same time, according to the current rules, they must have at least 2 contacts with boiler equipment and conductors. In addition, it should be borne in mind that pipelines containing a flammable or explosive liquid cannot be used as natural grounding conductors. These are not all restrictions. It is also forbidden to use heating and sewer pipes, or metal coated with a protective anti-corrosion substance.Artificial - these are ground electrodes that were specially made for this - metal pipes, corners or strips. In order to protect against corrosion, it is recommended to use galvanized electrodes. However, according to a number of experts, the most optimal coating here is copper.
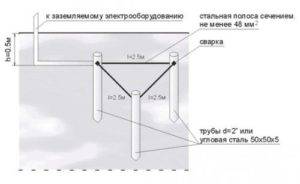
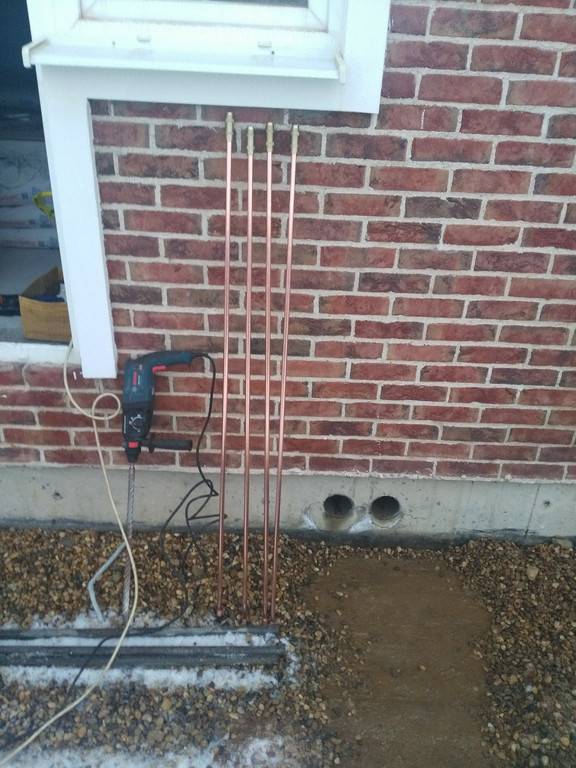
Next, we need a motor drill. With its help, deep pits are made in the upper part of the trench. Then, ground electrodes should be inserted into these holes. Here, for example, a 3-meter steel corner 60 by 70 millimeters is suitable
When installing them, one important rule must be observed. In particular, they should protrude above the bottom of the trench by about 15 centimeters. Naturally, small deviations in one direction or another are quite acceptable.
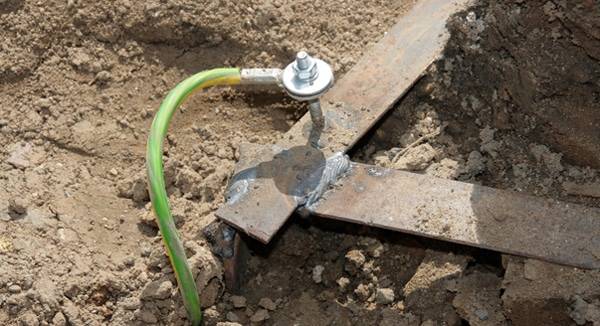
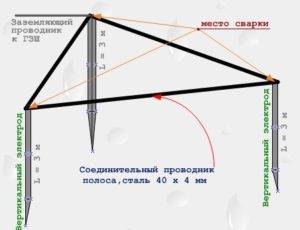
Next, we connect the corners with a metal strip 40 by 4 millimeters. For this we need a welding machine. In addition, the same strip must be laid along the previously dug trench to the building, and raised above the level of the blind area by about half a meter
Naturally, small deviations in one direction or another are quite acceptable. Next, we connect the corners with a metal strip 40 by 4 millimeters. For this we need a welding machine. In addition, the same strip must be laid along the previously dug trench to the building, and raised above the level of the blind area by about half a meter.
Now there are only two steps left to take. At the penultimate stage, it will be necessary to attach the strip to the basement of the building using welding and a metal rod. Remember that according to the PUE, the resistance of the grounding system should be no more than 4 ohms. After an independent circuit has been created, it remains only to correctly connect it to the power shield.This is best done with a copper conductor. It is bolted to the basement of the building. On the shield, we connect the conductor to the protective zero.


How to choose the right grounding conductor?
As an artificial ground electrode, steel pipes, corners, strips are chosen, which are driven into the ground. The following requirements are imposed on the grounding conductor, the circuit element:
- carrying out special anti-corrosion treatment (copper plating or galvanizing);
- the presence of at least two contacts with separate parts of the boiler surface when using natural grounding.
Depending on the resistance level of the circuit (optimally 30 ohms for a voltage of 220/380 volts), the circuit materials, tires, and the number of electrodes are selected. Loop electrodes are made from 2" tubing or angle steel material up to 50 square millimeters in cross section and two meters in length. The tire is knocked out in the form of a steel or copper strip.
Requirements for the quality of grounding
When carrying out the installation of grounding, it is necessary to pay attention to the type of material and the cross-sectional area of \u200b\u200bthe wires that connect the circuit to the zero phase of the switchboard. When using copper wire, the recommended cross section is more than 10, aluminum - at least 16, steel - more than 75 millimeters square. Steel pipes and angles (electrodes) are connected to the bus using spot welding
Steel pipes and angles (electrodes) are connected to the bus using spot welding.
Ground loop resistance
The type of soil also matters. A circuit can be installed in muddy soil if its resistance does not exceed 10 ohms (at a standard voltage of 220 volts or a three-phase value of 380 volts).It is possible to mount a ground loop in sandy soil with a resistance value of up to 50 ohms (for devices operating from 220 or 380 volts). If such requirements are met, there will be no claims from the gas service.
Installation work
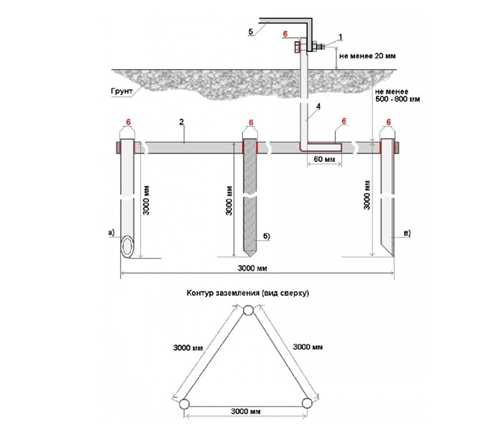
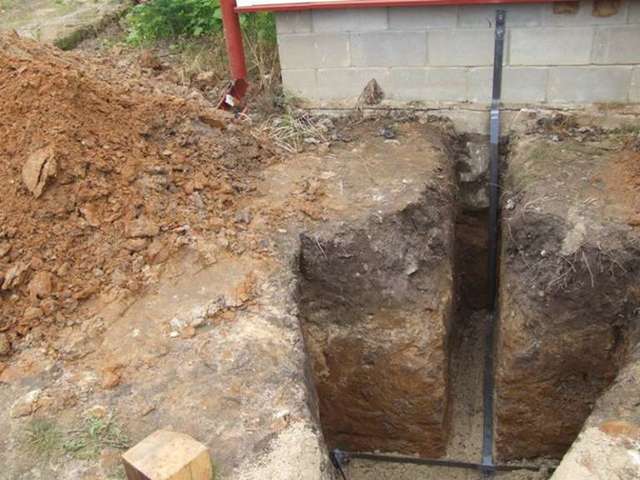
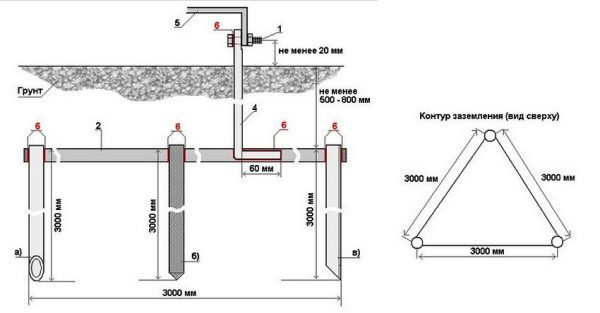
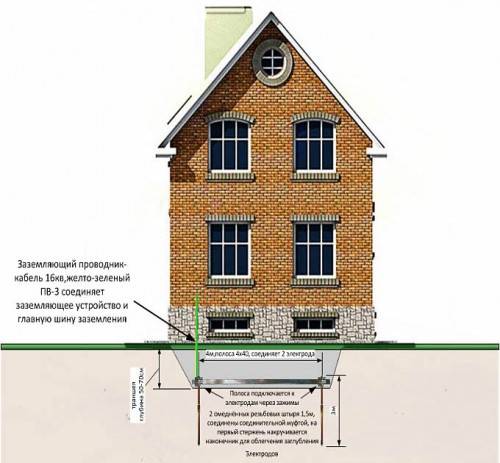
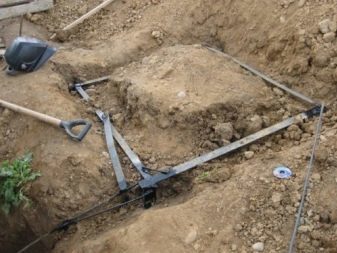
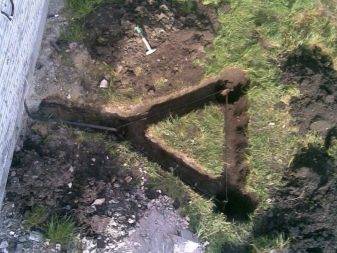
The implementation of procedures for arranging grounding begins with the preparation of the territory. She proposes to allocate a site free from outbuildings, and then build a triangular, square or polygonal layout. The excavation of a trench is carried out according to a previously drawn up project. Rods are hammered in the corners of the recess. The distance from its bottom to the upper section of the electrodes should be in the range from 150 to 200 mm. From the corner as close as possible to the building, a small ditch is created, which necessarily reaches the foundation.
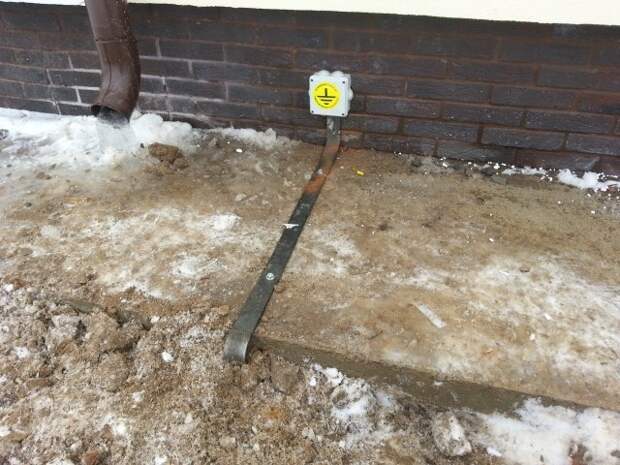
A steel wire with a cross section of 48 square millimeters is laid along the bottom of the formed channel, with which the conductors are connected to each other. The master is also allowed to install a strip with a width of 40 mm and a thickness of 4 mm. The joints are connected using a welding machine or bolts. When grounding is entered into the dwelling, a metal strip is welded to the cable. It is located on the site so as to rise above the blind area by 500 mm. A hole for copper wire is drilled in the wall of the room where there is a gas boiler.
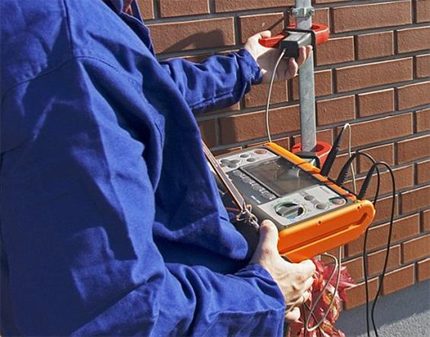
Its first end is fixed on the grounding bus terminal, and the second - on the metal base plate. Then the heating unit is connected to the panel using automated protective devices and a voltage stabilizer.Before starting to dig in the excavation, it is recommended for the master to check the resistance to the propagation of current through the circuit structure. A similar operation is carried out by means of a light bulb with a carrying, which should be connected to the phase and circuit.
If the resistance indicators are lowered, you will have to put additional electrodes. The error-free installation work and the level of safety of the self-made grounding of the gas boiler is checked by specialists. If the check for compliance with the standards for the operation of electrical installations gave a positive result, the owner receives an act allowing the use of the boiler.
Grounding instruction
Grounding a gas boiler in a private house is carried out according to certain instructions. It all starts with the fact that a contour layout is dug out on the ground. The chosen place should be at a certain distance from the foundation of the house: not less than 1 meter, but not more than 5 meters. On this site, after grounding, it will not be possible to erect any buildings, plant flowers and plants, and in general it is categorically not desirable for a person to be there. It is best to enclose everything with some kind of fence (including the bus leading to the house) and decorate the place with some kind of static object that does not require special attention.
Usually the contour looks like an equilateral triangle, the sides of which are approximately 2.5 meters. The depth of the groove should be 50 centimeters, and the width should vary from 35 to 40 centimeters. Then recesses are formed in the corners, into which steel corners or pipes are driven to a depth of 2-3 meters. The parameters of the grounding conductors are as follows: the length is approximately 3 meters, and the surface area is 60 by 70 millimeters.They need to be hammered in in such a way that about 15 centimeters protrude above the bottom of the groove. At the next stage, these corners are connected to the tire, that is, to the steel strip. Its dimensions are 40 by 4 millimeters. This strip will become a horizontal ground electrode.
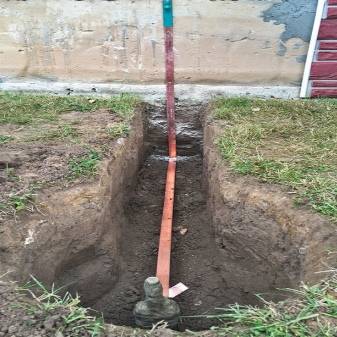
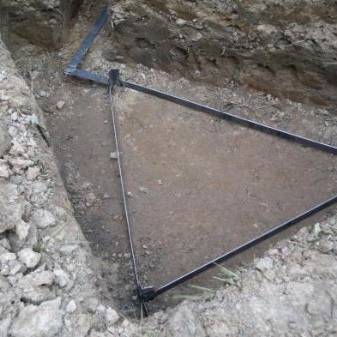
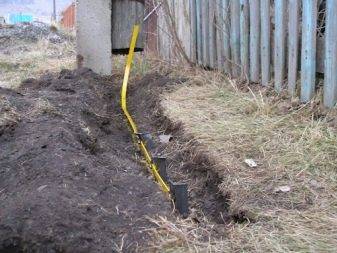
This usually happens by welding. A trench breaks out, which goes to the basement of the house where the boiler is located. Along it goes the same horizontal strip, which will "rise" above the ground by about half a meter in the place where it approaches the house. On the side where the building is located, you will need to attach a hairpin and cover it with a protective box, preferably PVC.
Finally, both the trench and the groove are well camouflaged with earth - almost no element should remain on the surface, only a piece of steel strip with a stud. This area can even be fenced off somehow. The stud is firmly connected to the wires coming from the shield, and the steel strip is ideally welded to the basement fragment of the house. The resistance value of a standard gas boiler grounding system does not go beyond 4 ohms, which fully meets the official requirements.
To correctly connect the created circuit to the power shield, you can use a grounding conductor. On the one hand, it is fixed at the basement level of the building, and on the other hand, it is attached to the protective zero of the shield.


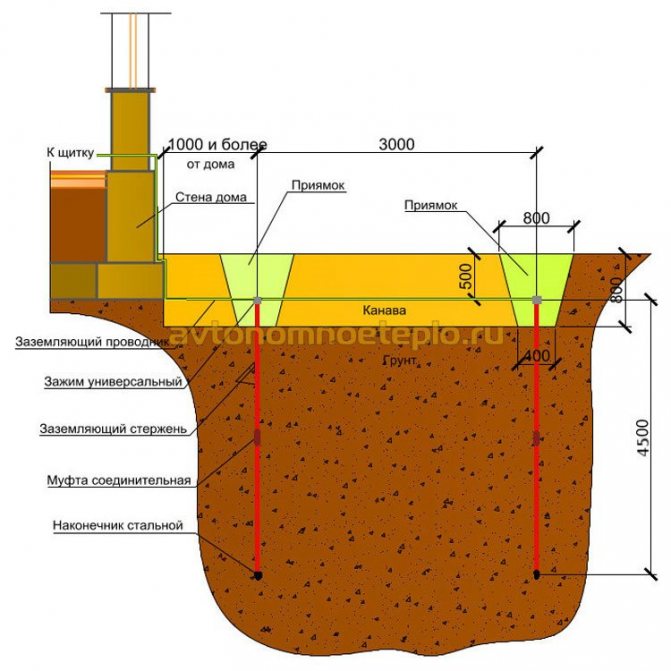

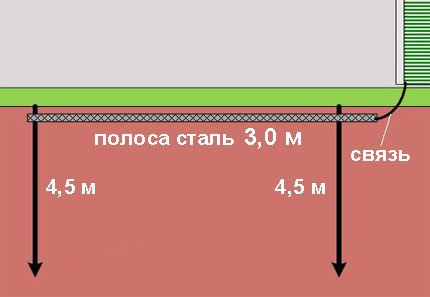
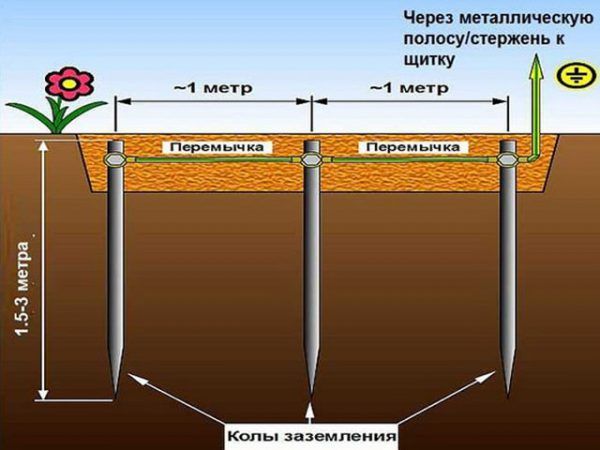
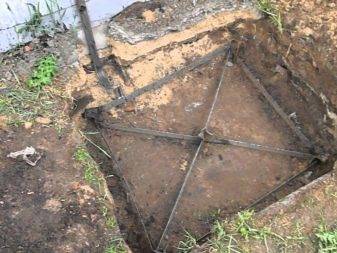
In the case when there is not enough space on the territory to form a triangular contour, one can limit oneself to a linear design. For her, a four-meter trench will have to be dug and filled with three electrodes, which will be located at a depth of 1.5 to 2.5 meters. Between them, the distance will be about 2 meters.In theory, the contour can be made in the form of a square, and a trapezoid, and a polygon, the main thing is to keep the general connection scheme.

It is worth knowing that a ready-made kit for making a ground loop is commercially available. It consists of copper-treated steel rods, one end of which is sharpened so that it can easily enter the ground. The kit also includes a tool that will process the elements in order to protect it from corrosion. Finally, there are also connecting elements made of brass.
However, if you have free time, certain skills and knowledge, this system can be organized with your own hands. Of course, it will take more time, but if you do all the details yourself, you can save a lot. In any case, the result is important - the check of the circuit by the gas service should pass without any complaints. During this procedure, both the soil resistance coefficient and its conductivity will be examined. Specific requirements will depend on the PUE, according to which the verification is carried out.
After the visit of specialists, a package of documents will be issued, including, among other things, a technical report on the testing, several protocols, a list of documentation and other important data. With this act, you can already apply for connecting the house to the main gas pipeline. The total cost of this procedure will depend on the type of earth, on the materials from which the electrodes are made, on the material of the wires and their thickness, and, finally, on the type of grounding: natural or artificial.
Installation of grounding for a gas boiler, see the following video.