- Overview of materials
- Drywall
- Plastic panels
- Blinds
- Homemade or ready-made box
- Choosing a piping system and replacing the line
- Algorithm for replacing pipe-rolling materials with a collector wiring diagram
- Repair of cast-iron sewer elements
- Pros and cons of combined and separate bathrooms
- Tools and materials necessary for work
- Which material to choose?
- Mounting methods
- Do-it-yourself plumbing in a private house
- What is the order in which toilet work is carried out?
- Errors when replacing the pipeline
Overview of materials
Many materials can be used to hide sewer pipes or water mains. For example, blinds that cover a niche in the wall. Plastic panels or drywall can be used to sew up a box in which engineering communications will pass. On the network you can find photos of various options for using these materials.
Drywall
The most commonly used method is sewing pipes into a drywall box. Detailed video installation instructions for the box can be found at the end of the article. This material has many advantages:
- If necessary, the structure can be dismantled.
- It is quite easy to carry out installation work. First you need to build a frame of timber or profiles. Then sheathe everything with drywall.
- It is an environmentally friendly material that is harmless to humans and animals. It does not emit harmful substances even when heated.
- With the help of drywall, you can get a flat and smooth surface, which is suitable not only for laying ceramic tiles, but also for wallpapering, as well as painting.
The only downside to using drywall is that if the pipes are replaced or repaired, you will have to completely dismantle it and then rebuild it.
Plastic panels
Sheathing the same box as under drywall can be done with plastic panels. This material has its advantages:
Methods for hiding pipes in the bathroom
- These products are very easily and quickly mounted on a frame made of timber or guide profiles.
- The material is safe for humans.
- If the box is sealed with plastic panels, then they are much easier and faster to dismantle in the event of an accident than drywall. In this case, after the repair work, the product can be installed in the old place.
- Impressive service life with preservation of original appearance.
- Such material is not afraid of moisture. It is easy to clean and is resistant to mold and insect damage.
- On sale there are many options for colors and textures of this material, so you can easily choose a product that matches the style and color of your interior. There are also covers with photo printing and various geometric prints.
- After you sheathe the box with plastic panels, you do not need to do any finishing, because the panels have a decorative coating.
The only drawback is that this material may not harmonize well with tiled wall cladding.
Blinds
The easiest and most affordable option for hiding pipes in a toilet is to use blinds.It is suitable for bathrooms of small dimensions, in which all pipes are on the same wall or in a separate niche. Blinds provide the following benefits:
- They do not require difficult installation - no need to make a box or frame, just fix the fasteners on the ceiling. Thus, you can quickly and easily close the wall where sewer pipes and water communications pass.
- This product allows you to save free space in the room.
- Depending on the size of the blinds, you can close the wall partially or completely.
- To gain access to pipes or water meters, you just need to lift the blinds.
- A wide range of colors and textures, as well as blinds with photo printing will make it easier to choose the right product for the color and style of the interior.
- Due to the fact that an impressive section of the wall will be closed, shelves for storing household chemicals and various household equipment can be installed behind the blinds.
There are almost no drawbacks to blinds, it is important to choose products from high-quality material that will not change its color during operation. It is also important to consider that the product should be easy to wash and not absorb odors.
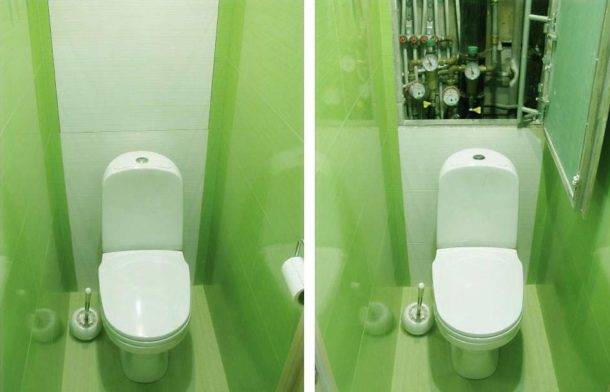
Homemade or ready-made box
To close the pipes in the toilet, you can use a ready-made or home-made removable box. This option also has its advantages:
- The finished product remains only to be installed (see photo below).
- If the finished design is not suitable due to the characteristics of the room, then you can make such a box yourself. Its manufacture and installation will also not cause problems.
- Due to the fact that the design is removable, at any time there is access to engineering networks.
The main disadvantage is that this is a rather large product, which may not be suitable for your small space. Also, the price of the structure will be slightly more than the manufacture of a non-removable drywall box in the manner described above. There may also be problems with connecting the toilet if using a ready-made box. Types of sewer pipes for internal use


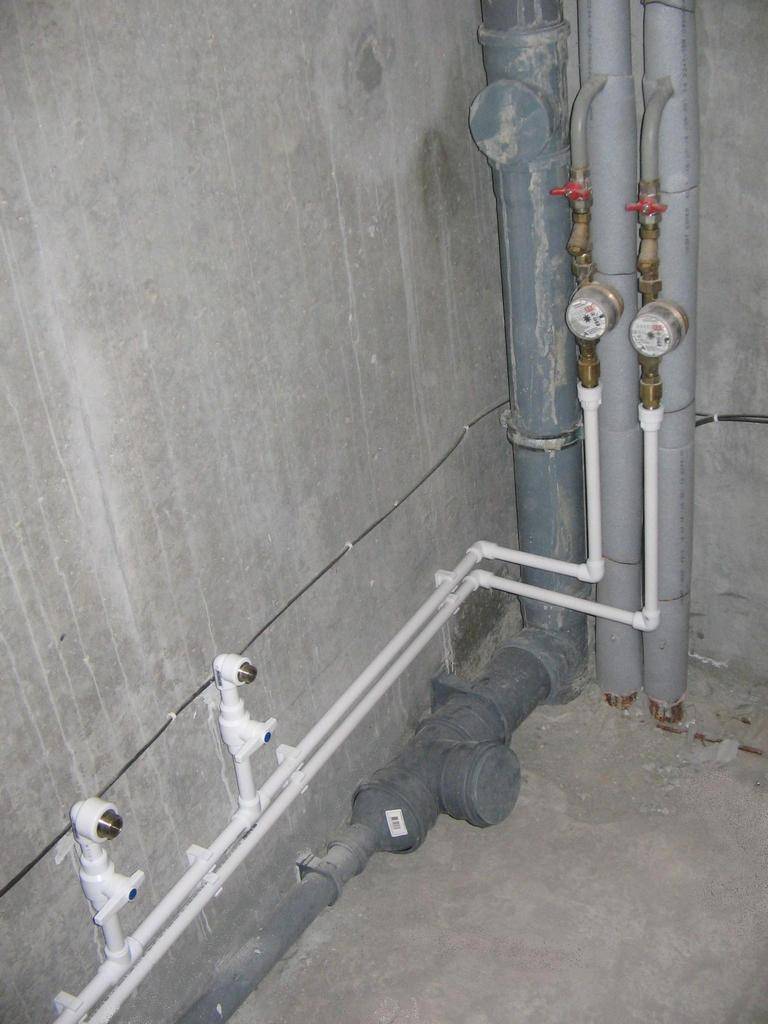


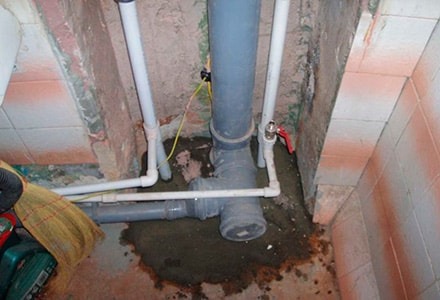
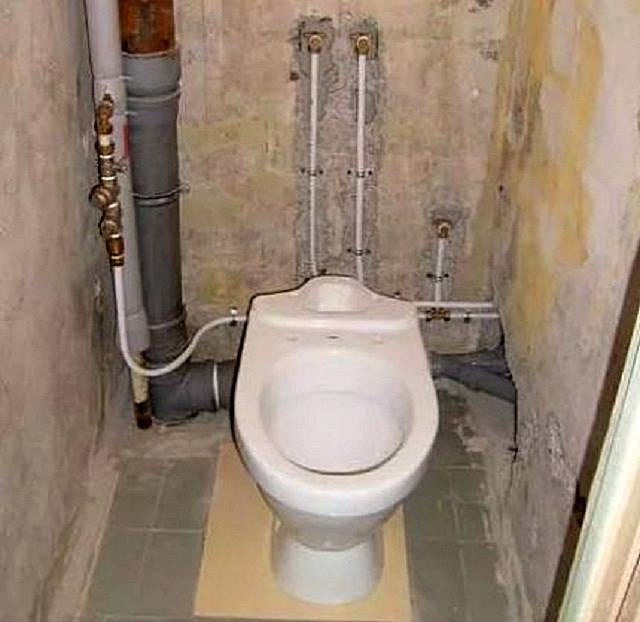
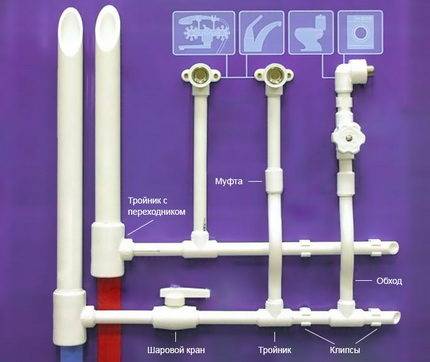
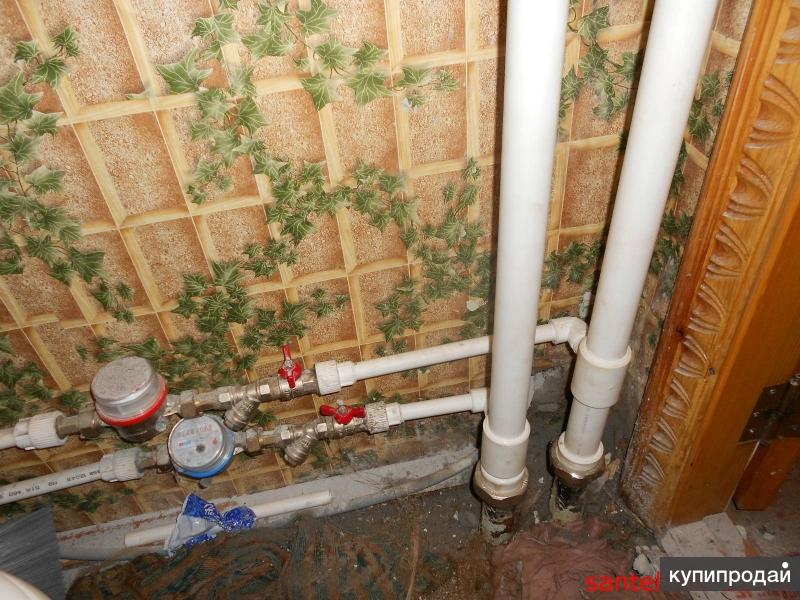
Choosing a piping system and replacing the line
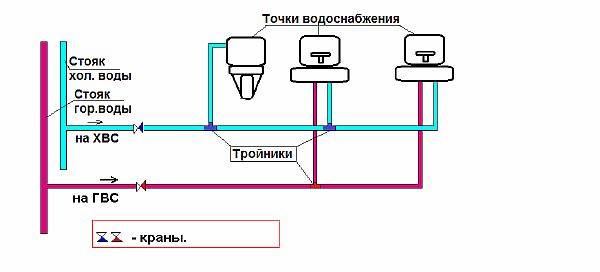
The traditional method of laying the network in the bathroom is the tee method. Implementing it, they lay the main pipe from the riser to the end point of consumption. It is laid along the wall and attached to it with brackets.
Watch the video
As the next water intake point is reached, a tee is installed on it, from which a flexible hose is connected to a tap or mixer. In parallel, a second tube is drawn - hot water supply and in the same way the connection to the corresponding tap is made.
It should be noted that the replacement of old pipes in the bathroom is not carried out separately. It is performed simultaneously for the entire water supply system.
The sequence of individual connections in the bathroom from the beginning of the system to the end may look like this:
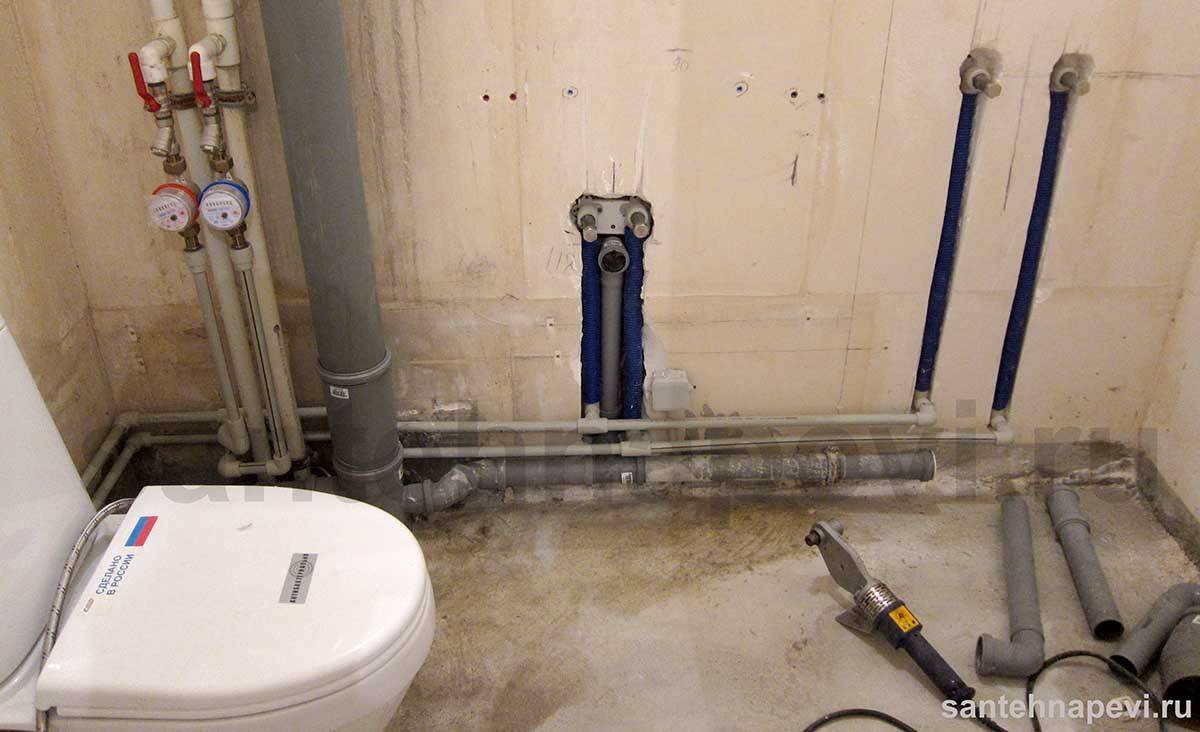
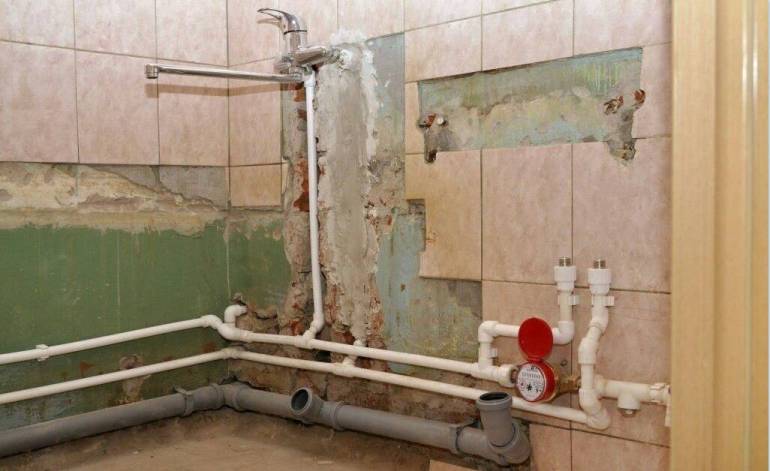
- Install coarse and fine water filters after the valve on the riser. Hot and cold water meters are also connected at this location.
- Extend a branch from the riser to the first point of water intake. To connect it, you may need a metal-plastic adapter, this is a standard product. The main pipe can be used in size 20 or 25 millimeters
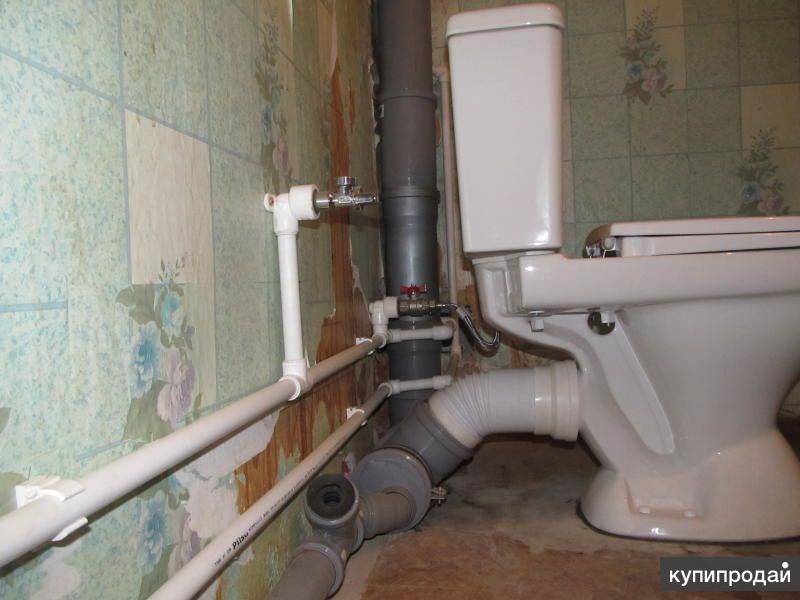
- Install a tee to drain to the first point of consumption, usually a toilet or bidet, since the riser is traditionally located in the toilet. Then the second point will also be here to connect the toilet. Only cold water is connected to it.
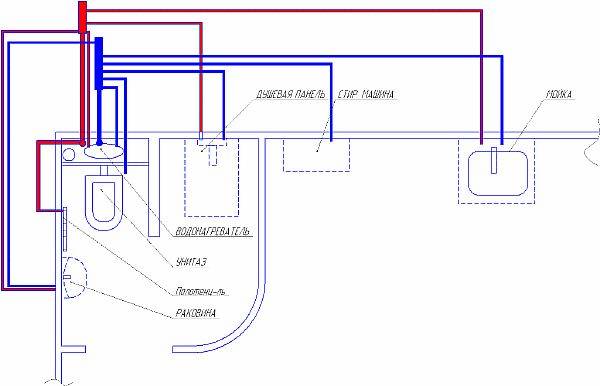
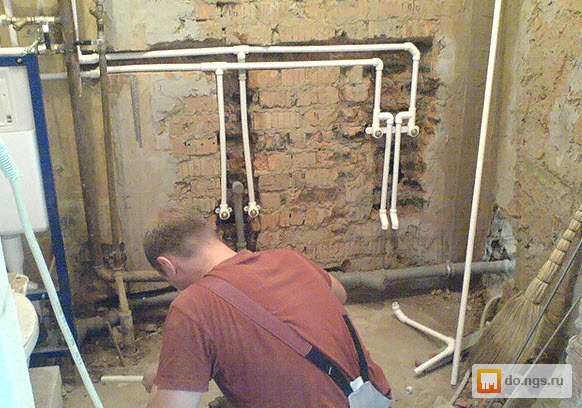
- Further, the system is led through the wall to the bathroom, where it is necessary to install tees for the bathtub, washing machine and washbasin in series.
- From the bathroom, wiring is carried out to the kitchen, where the water intake points are outlets for the sink, kitchen machine and other equipment that consumes water.
- At the last section of the water intake, a square or a plug is installed in a tee.
In this way, new communications are laid for cold and hot water when replacing old ones. The number of fittings required, including flexible bends with a diameter of 16 millimeters, is determined by the number of water intake points. An exception is made for the toilet, to which hot water is not supplied.
Watch the video
The disadvantages are the following:
- The need to turn off all wiring during repairs or maintenance.
- The drop in water pressure in the system when several points of water intake are turned on at the same time.
Watch the video
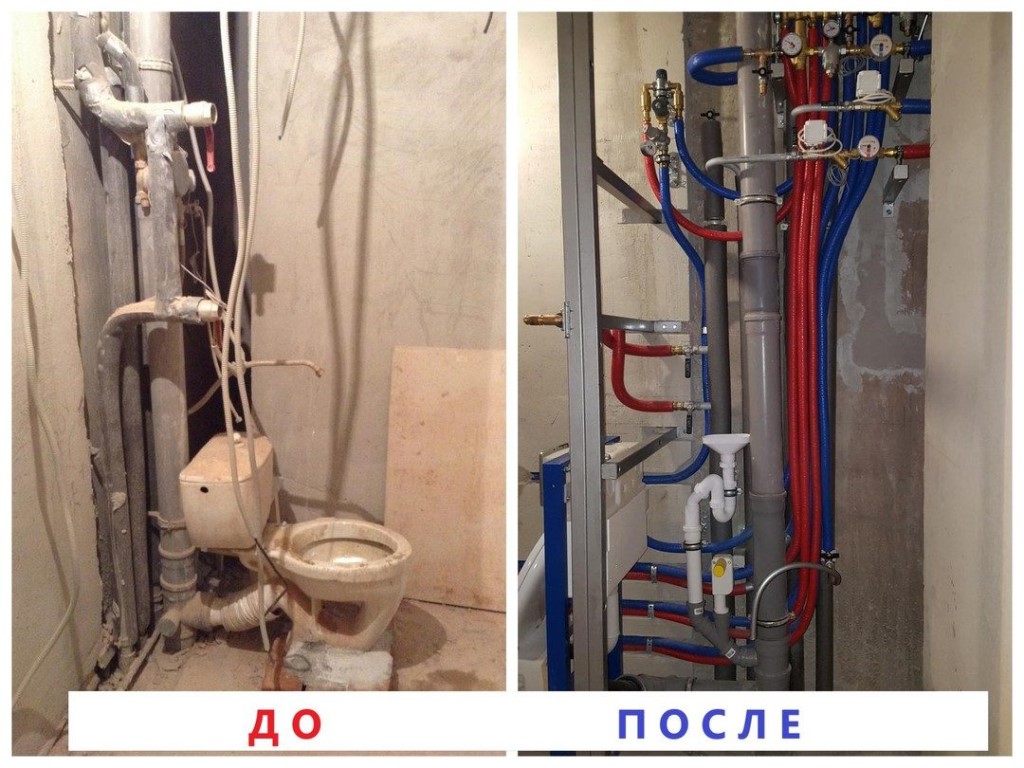
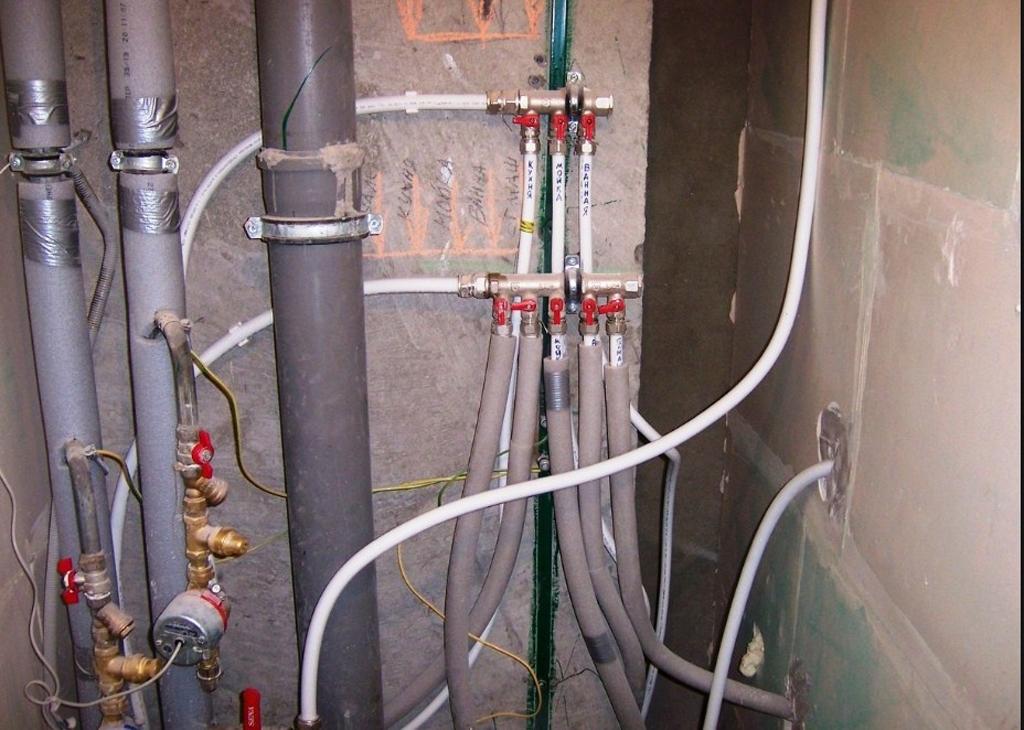
Algorithm for replacing pipe-rolling materials with a collector wiring diagram
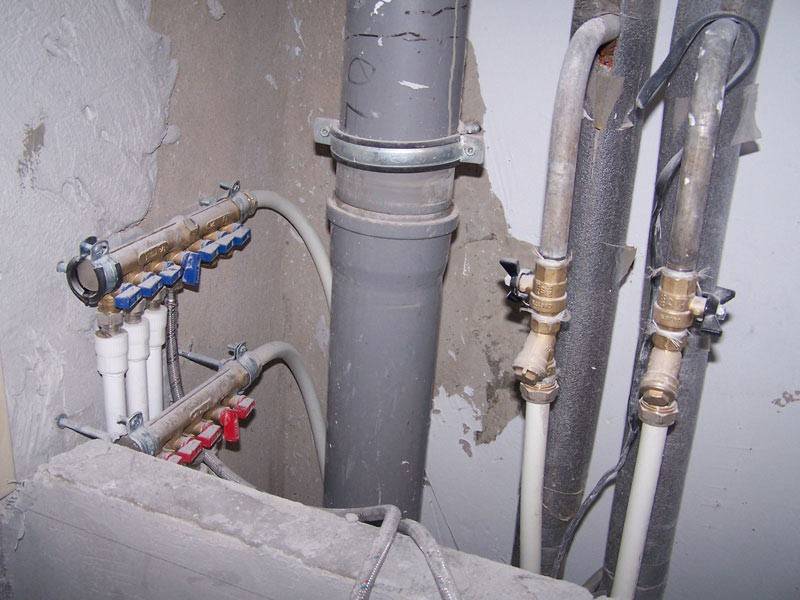
The essence of this method is to install a dispensing station - a collector, from which the distribution is made to the points of water consumption. For supply to the collector during the replacement process, a pipe of 20 or 25 millimeters is used, for individual branches - 16 - 20.
The device itself is a metal or plastic case, from which branches equipped with ball valves depart. Naturally, separate collectors are installed for the cold and hot water network. Each branch, when replaced, is connected to the corresponding tap or mixer.
This method of distributing water throughout the system allows, if necessary, to turn off the corresponding branch on the collector and carry out repair work.
Watch the video
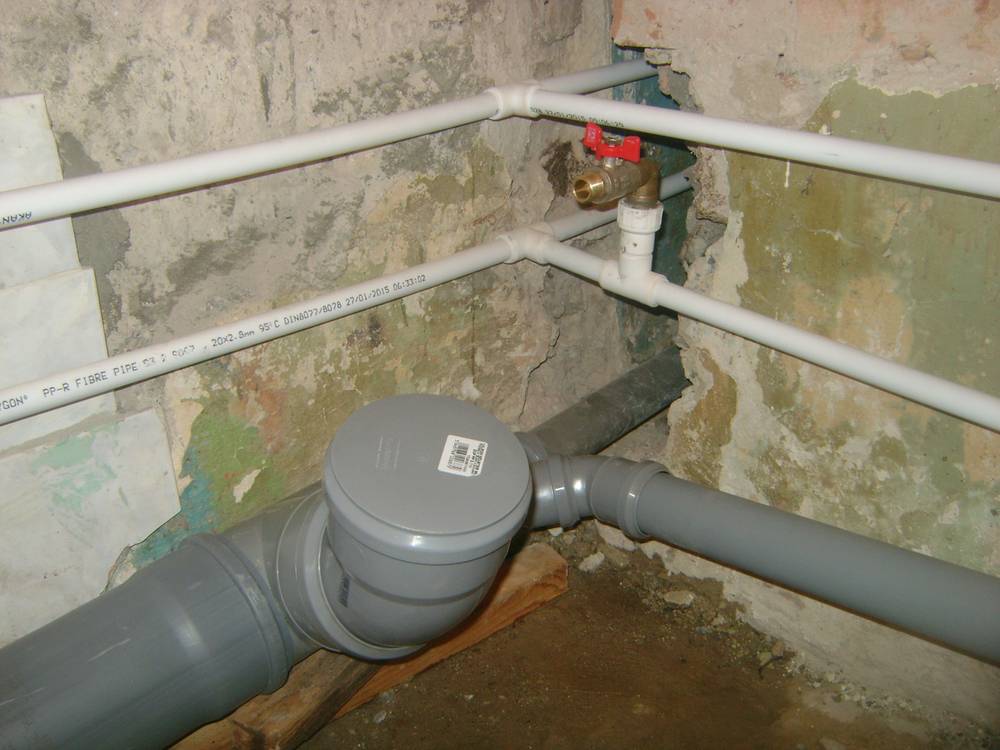
If flexible polyethylene or polypropylene pipes are used for wiring during replacement, pieces of the desired size are measured and cut from the coil according to the actual size. To do this, a ruler is applied on the outer surface, which allows you to determine the length without unnecessary measurements, even in cramped conditions.
When used to replace PVC pipes, assembly is carried out in sections, on a workbench. Working with a soldering iron on weight is very inconvenient. After welding of a section of several parts, it is finally installed on weight, using the help of a partner.
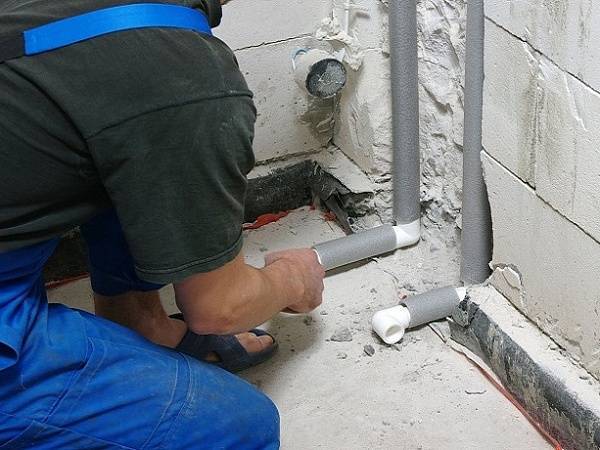

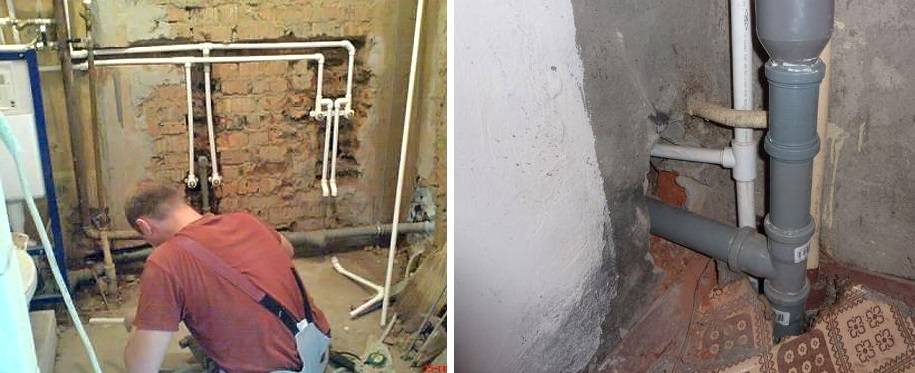

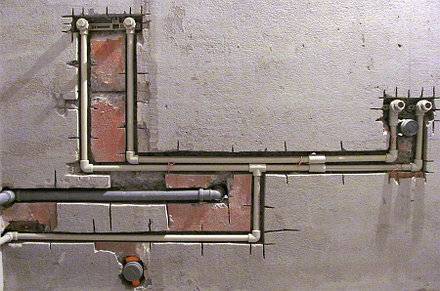


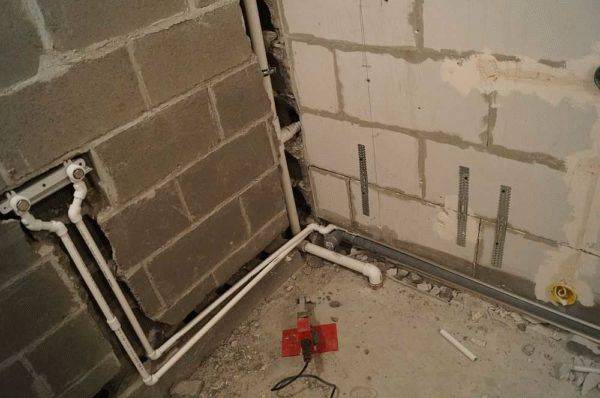
Pipes are fastened to the walls using a plastic bracket. It is fixed with a self-tapping screw into a hole with a dowel, the pipe is inserted into the grooves on the bracket. Subsequently, all pipes can be closed with a box mounted on the wall.
When using jointless branches, they can be hidden in the wall, but the amount of gating is very significant.
Brackets are installed on the wall at a distance of no more than a meter from each other, as well as at the entry and exit points of the turn. At the end of the installation, when replacing, it is necessary to pressure test the new water supply.
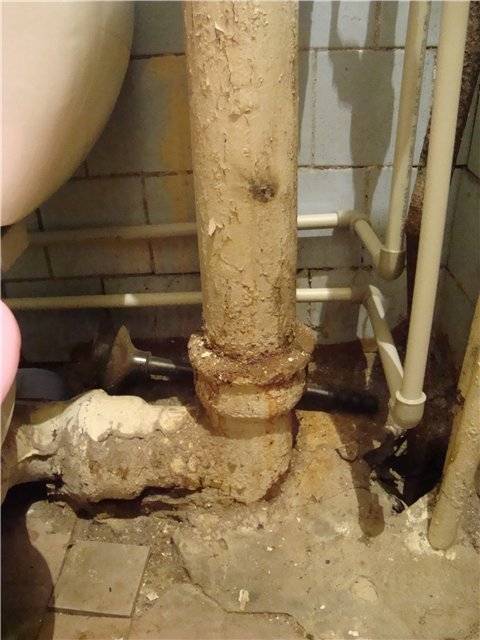
Repair of cast-iron sewer elements
The most common malfunction of cast iron pipes is the appearance of leaks or fistulas.
In order to avoid a breakthrough, it is necessary to carry out regular inspection of the system, even in hard-to-reach places.
If a leak is fixed, then you can stop the damaged area, for this:
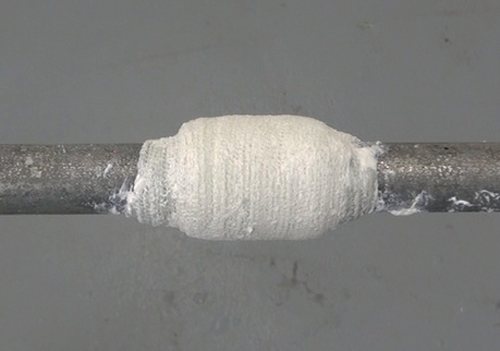
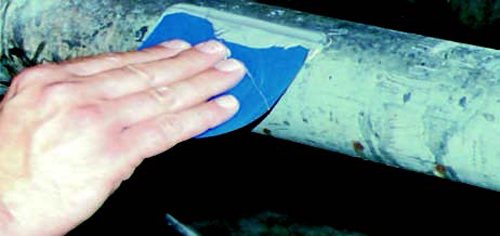
Fixing a leak with a bandage
- preparation of appropriate tools and materials;
- a rubber patch is applied to the crack, which is fastened with clamps. A small fistula can be struck with a chisel or a gag made of lead;
- if the pipe cannot be dehydrated, then you can try to apply a bandage soaked in a cement mortar with liquid glass to the damaged area. It is necessary to apply layers until a cocoon is formed, which at the end must also be impregnated with silicate glue;
- under the condition of serious violations of the integrity of the pipe, it makes sense to use a more radical method. To do this, you process the damaged area with a steel brush, thereby removing layers of paint and metal. Then the surface is degreased with gasoline or acetone, and a mixture of phosphoric acid and copper oxide is applied to it with a spatula. All this freezes very quickly.
Elimination of leaks with a special putty
If all the measures taken did not give a positive result, then there is only one way out - a complete replacement of the cast-iron pipes in the apartment with plastic ones.
Pros and cons of combined and separate bathrooms
To organize the normal use of the toilet and bathroom, it is necessary to create a competent drainage system. If you decide to do the connection and wiring yourself, you need to understand not only the principle of operation, but also what configurations of bathrooms exist.
 Fig 8. Separate and combined bathrooms
Considering the arrangement of apartments and residential facilities, there are often two types of bathrooms: separate and combined. In the second case, this is a whole space without partitions. In the first case, the toilet and bathroom have separate entrances to the space. The choice is subjective. However, from a sanitary point of view, it is worth noting that a combined bathroom is not the best solution. The use of a combined bathroom is relevant in the following situations:
- If the separate spaces of the toilet and bathroom are too cramped and allow you to fit basic hygiene items. When combined in a combined bathroom, a large share of the space is sometimes freed up, allowing, for example, to move a washing machine or mount a bidet.
- If initially the area of \u200b\u200bthe room is large (from 10 sq. M).
- The use of the bathroom is limited to a limited number of people.
By choosing the right wiring method, you can achieve the best result yourself and create an uninterrupted system for supplying cold or hot water.
Tools and materials necessary for work
The most commonly used materials for sewerage are polypropylene and polyvinyl chloride (PVC). Installation of cast-iron sewer pipes in a private house (dacha) or apartment is quite rare. There are special adapters for connecting different materials. The advantages of plastic pipes are a very smooth inner surface, corrosion resistance, long service life.


The most important feature for installing sewers in an apartment with your own hands is their low weight. Among the shortcomings can be noted poor sound insulation
Pipes are required in two diameters: 5-7 cm and 10-15 cm.They are connected by means of fittings with sealing rubber bands that have different configurations - elbows, tees, branches, etc. An inspection hatch must be provided on the riser. When installing sewer pipes with your own hands, you will need the following tools:
- chisel and hammers;
- roulette and level;
- grinder and saw;
- pencil (marker).
All necessary connections are adjusted and checked before the pipes are assembled. The sewer system can leak if the edges are not properly processed. The pipe of the required size is cut strictly at a right angle, without distortions.
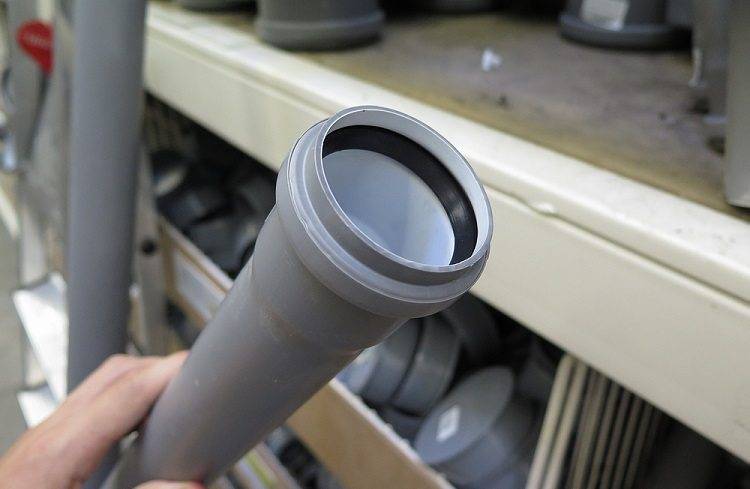
Sewer pipes must be equipped with rubber seals.
Burrs are removed with sandpaper or a file, which will prevent blockages. The sealing gum must also be cleaned of dirt and dust.
Which material to choose?
You can choose different pipes for laying water pipes, but experts most often recommend practical modern solutions:
- Polypropylene. Such parts cope with pressure up to 25 atmospheres, are durable and do not corrode. Polypropylene pipes are suitable for both cold and hot water. Diffusion welding is used to connect the elements, resulting in reliable one-piece joints.
- Metal-plastic. Each part is a two-layer structure, inside of which there is plastic, and outside - metal. Products can be used for cold and hot water supply. Pipes bend well, which reduces the number of joints. For the arrangement of joints, compression or clamping fittings are used.
 For laying a water pipe, you will need pipes complete with adapters, tees, corners, couplings and valves
The sewer line is most often made of PVC pipes. Polyvinyl chloride is characterized by sufficient rigidity, which makes it possible to use it when installing risers. To connect the elements, a bell-shaped design with a seal is used.
The light weight of PVC pipes greatly facilitates their installation. For laying sewers, elements of two main sizes are used: with a diameter of 50 and 110 mm.
Mounting methods
What materials can be used, we figured out. It remains to understand how to close the pipes in the toilet using these materials. First, let's look at how to make a frame for plasterboard or plastic panels. We carry out work in several stages (see video at the end of the article):
- First you need to mark the future frame on the walls of the room.
- After that, according to the marking, longitudinal guides are attached from a bar with a section of 20x30 mm or a special profile for drywall. We fix the guides to the wall with dowels and self-tapping screws.
- After that, we install transverse bars or profiles. Fasten with screws to the already installed guides. The pitch of the transverse elements is usually 30-50 cm. At the same time, do not forget that we will need to install inspection hatches. Usually they are mounted in the place where meters, valves are installed, or where there is an inspection hole for cleaning the sewer. The place for the future hatch must be further strengthened with bars or profiles (at the same time, it is worth adhering to the dimensions of the hatch).
- At this stage, you can start sewing the box with drywall sheets or plastic panels.We fix drywall with self-tapping screws to the box, and for fixing plastic panels we use special plastic guides and corner elements. Leave a hole for the hatch.
- If panels were used, now you can install an inspection hatch.
- If the installation of the box was carried out using drywall, then we carry out its finishing with ceramic tiles, wallpaper or painting. And only after that we mount the hatch.
There are several options for the box device:
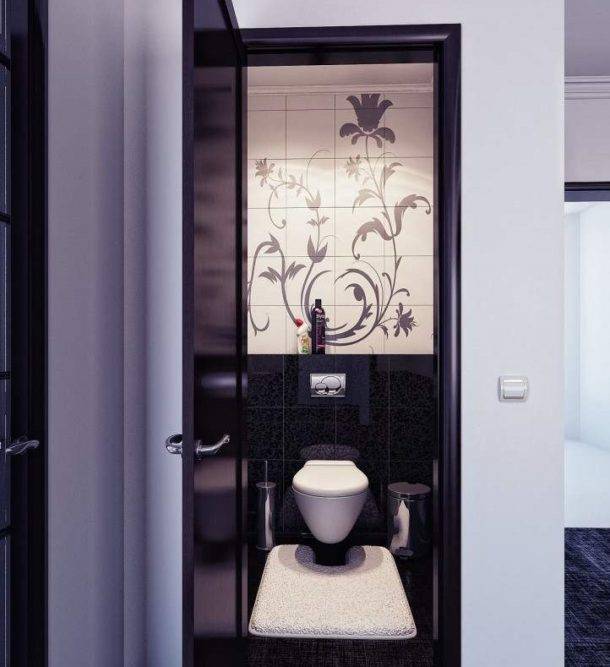
- In the form of a solid false wall. This option is suitable for small toilets where the pipes are concentrated on one wall behind the toilet. Also, this method is applicable when installing a hanging toilet bowl, since it is possible to hide the supporting frame of a sanitary appliance behind it. The only drawback of a false wall is that in this case access to the pipes is limited and in the event of an accident, the entire wall will have to be dismantled.
- If all pipes and risers are collected in one corner of the room, then it is better to make a square box, behind which all communications will be hidden. Do not forget to make a hatch at the installation site of meters and valves.
- An oblique false wall is made if thinner pipes extend from a group of risers, which must also be hidden. In this case, it is not advisable to make a flat false wall, since it will take up a lot of usable area of the room. In this case, a slightly beveled structure is performed along the wall along which the pipes from the risers pass.
- If you don’t know how to hide the pipes in the toilet, where communications pass in such a way that in order to hide them, you have to fence off almost half of the room, then you can use a multi-level box.In this case, the pipes are closed with a box only up to a certain height, and not for the entire room.
If you plan to use blinds, then the fasteners for them are mounted on the ceiling. At the same time, the blinds themselves can cover the wall completely (from wall to wall) or partially. The second option is used when the pipes are in a niche located on the back wall. The height of the blinds may also differ depending on the features of the laying of communications. So, the louvered structure can be the entire height of the room or only as long as the pipes are laid.
Video instructions for installing a drywall box in the toilet:
Do-it-yourself plumbing in a private house
Start with plumbing since the presence of water is necessary already at the stage of building a private house. In this case, you need to think first of all about ensuring the supply of cold water. You can also install a heating boiler, the installation of which is a simple procedure.
To equip the water supply of a private house, plumbing, materials and tools are needed:
-
shut-off plumbing;
-
PVC pipes;
-
pump equipment;
-
a set of keys;
-
pliers;
-
shovel;
-
Bulgarian.
Before you make plumbing in a private house, you need to determine what types of plumbing equipment will be installed. Consider the general rules and sequence of installation.


As mentioned above, at the initial stage, a plan should be developed for the placement of plumbing and plumbing elements. The scheme should include information about all the nodes of the external and internal wiring of the water supply system of a private house. Based on the parameters of the water supply, you need to select the optimal equipment for arranging a pumping station.Manufacturers of such equipment attach a wiring diagram to it, indicating the main features of connecting a private house to the water supply system. It is necessary to place the pump plumbing unit in such a way as to minimize the noise from its operation. To do this, select the most convenient place in the house (in the basement or basement). In the documentation for the pumping station, you can find information about the noise level that is created during its operation.
After the location of the pumping equipment has been chosen, it is possible to start arranging trenches for laying external pipes through which water from the source will be supplied to the house. Their depth should exceed the level of soil freezing. If there is no technical possibility of laying a pipeline at such a distance, it is necessary to insulate the line using special fiberglass materials.
After arranging the outer part of the water supply of a private house and installing pump plumbing, the installation of internal pipes is carried out. This is a very important stage that must be carried out with strict adherence to the technology of work. When the distribution of water pipes is completed, the specialists proceed to the installation of plumbing and installation of the sewer system.
Let's consider installation of the sewerage for the private house. Here, even before the installation work, an engineering diagram of the system is drawn up, indicating the points of placement of plumbing. A professionally drawn up sewerage plan will eliminate the difficulties during installation and problems during operation.
Sewerage of a private house includes external and internal systems.The elements of outdoor installation include sewer pipes and cleaning systems. The internal part also consists of piping and plumbing of a private house.
Rules for installing sewerage in a private house:
-
when choosing the location of the cesspool, it is necessary to provide for the possibility of unhindered access to it by sewage vehicles;
-
the lowest line of the cesspool is placed one meter deeper than the freezing level of the soil. The sewage collector is equipped with a slope and must have a depth of more than 70 cm.
In situations where it is not possible to lay sewer pipes below the freezing level, the collector is insulated.
For the installation of the sewer system of a private house, plastic pipes are currently used. Unlike metal products, such a pipe will not experience corrosion problems. The installation of these elements of a private house is carried out by inserting one pipe into another, followed by sealing the seams. Laying of sewer pipes is carried out in strict accordance with the preliminary calculations of the depth. This will allow the line to be laid on undisturbed solid ground, which will prevent the elements from bending. Pipes for risers and collectors must be of a larger diameter than sewer pipes coming from private home plumbing.
To carry out work on the arrangement of sewage systems in a private house, experienced and highly qualified specialists should be involved. The works on the installation and connection of plumbing are carried out in strict accordance with the requirements of building codes according to the drawn up scheme. Only experienced specialists who perform work under engineering supervision can satisfy such parameters.
Read the material on the topic: How to choose accessories for pipes
What is the order in which toilet work is carried out?
Even a small repair of a toilet in a panel house will require a large number of different tasks. In this small room there are many different communications: pipeline, sewerage, heating, lighting. Often the toilet itself needs to be replaced. In some cases it may be necessary defective act overhaul.
First you need to decide on the sequence of repairs in the toilet. Repair begins in an old house or in a new building with the development of design and calculation of the necessary materials. It is advisable to perform further repair steps in the following order:
- removal of old coatings from the ceiling and walls;
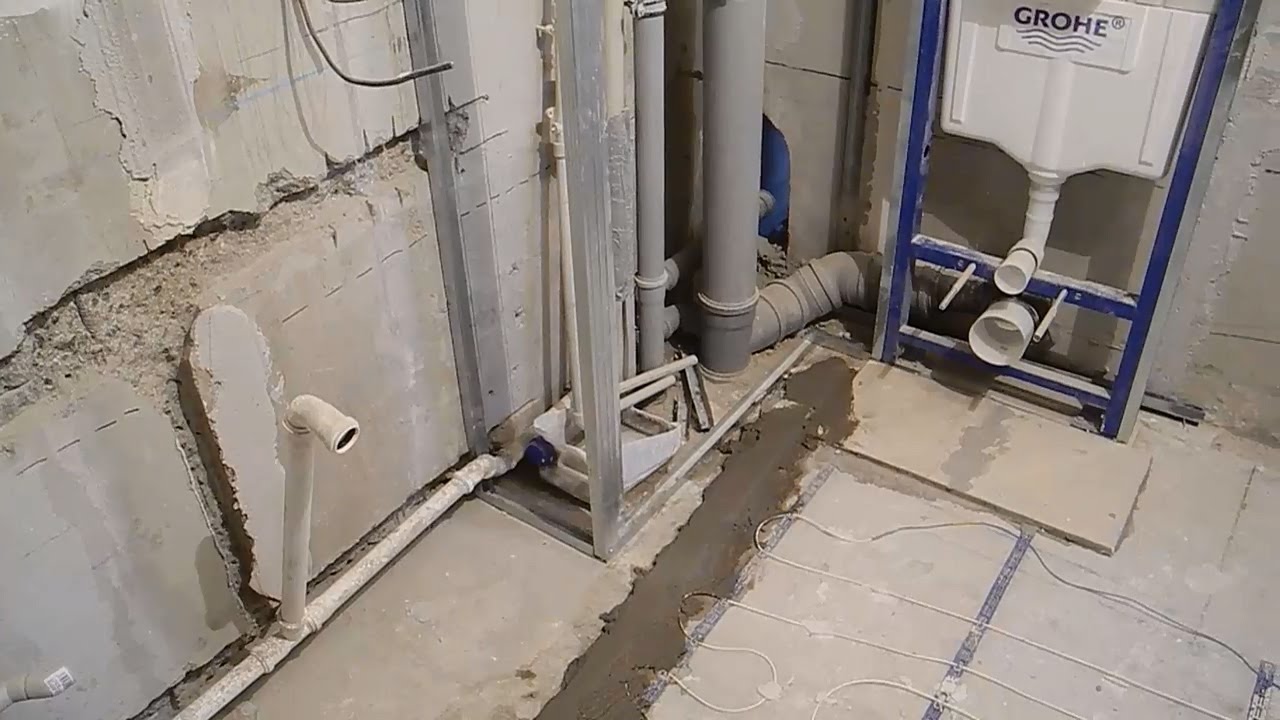
- replacement of heating risers and sewerage pipes, installation of a toilet installation;
- replacement of wiring (if necessary);
- cleaning of the premises;
- preparation of the floor, pouring the screed, laying the floor covering;
- installation of wall coverings (wallpaper, tiles, panels);
- if necessary - assembly of a sanitary cabinet;
- toilet installation;
- installing a new door.
Even the most modest repair in the toilet takes a lot of time and requires a significant investment, since plumbing is expensive. The most inexpensive repair option in the toilet is a simple cosmetic one, when the drain or wiring is not changed, but only the ceiling and walls are refreshed.


Errors when replacing the pipeline
During the repair process, errors in the installation of water pipes often occur. Especially when a person is doing the job for the first time.
The most common mistakes:
The choice of material. No need to save. Poor quality material not up to standard. Even if the system does not leak, its service life will decrease.
Lack of access to pipes.Closed wiring is beautiful and elegant. But few people plan to have access to pipes before problems arise.
It does not matter what the pipes are hidden under - drywall or cement, you will either have to dismantle the sheets or break the brick wall. It is better to close the pipes, but leave as much access to them as possible, especially to the joints, the meter and the inlet valve
You can even leave the hole open, but block it with a decorative cabinet, water tank, washing machine, etc.
The stand has not been replaced. The sewer or plumbing accessory is made of steel. It is located inside the wall and is constantly in contact with water. Often this leads to his breakthrough. Therefore, the old pipe can be replaced with a plastic one in your apartment without touching the riser of your neighbors.
The choice of low-quality materials is a common mistake when replacing a pipeline.
The tightness of the system should be carefully checked, since pipes can leak even at night. And this will lead to flooding of neighbors, who will then demand compensation for repairs after the flood. Checking is the most important moment when replacing a pipeline. Therefore, it is necessary to be guided by reliable sources of information and not install sewers, learning from mistakes. It is better to spend time and prepare in advance. This will save you from mistakes.


