- Who should do the work
- Dismantling of the old sewer
- Replacing a horizontal sunbed
- The choice of material when replacing sewer pipes
- Dismantling of old used pipes
- Dismantling of the old sewerage system
- Dismantling steps
- Disassembly of cast iron pipes
- Pipe Condition Assessment
- Material selection
- Calculation of the sewer pipeline
- The choice of material for sewer pipes
- Choosing the diameter of the sewer pipe
- Calculation of the number of system elements
- Where to begin?
- Preparing for the replacement process
- Removing the cast iron pipe
- Dismantling the tee
- Who should carry out the replacement?
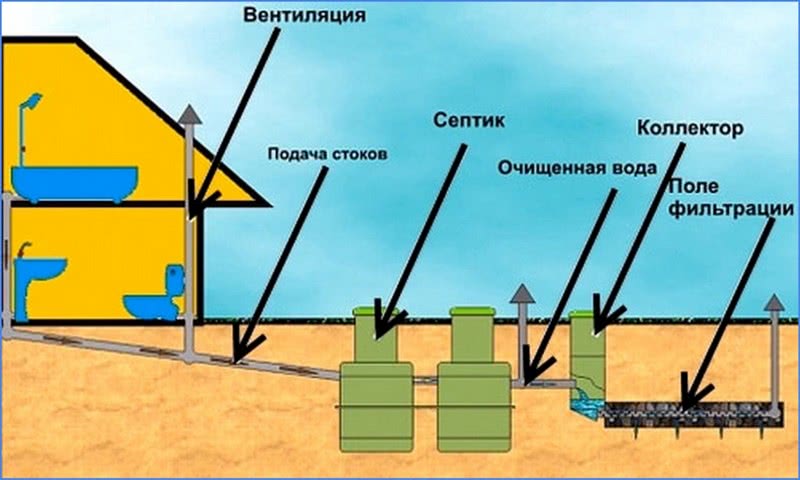
- Pipe laying systems
- The main mistakes in the repair of the sewer system
- Preparing to replace the sewer system
- Demolition of the old sewerage system
- Installation of sewerage of their plastic pipes
- Checking pipe joints
- Preparatory work
- Dismantling of the old cast iron sewer system
- Material selection
- About neighbors
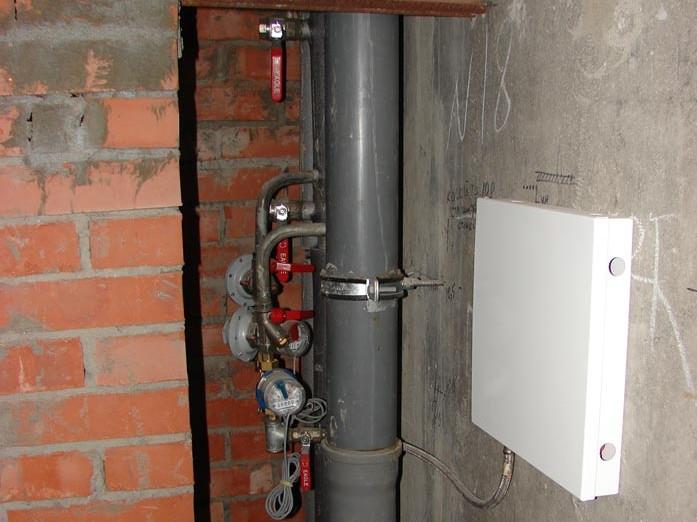
- Water heated floor
- Pipe replacement
Who should do the work
The sewer riser and the outlet to the first joint are the common property of an apartment building, and the rules for maintaining property in this case are regulated by the state.
The following are used as normative documents:
- Government Decree on the maintenance of common property (No. 491 of 08.08.2006).
- Guidelines for the repair and maintenance of common property dated 02.04.2004.
- Decree of the State Construction Committee on the norms of the technical operation of the housing stock.
The next step will be to agree on the time of work, when the homeowner is obliged to provide free access to the specialists of the management company.
Dismantling of the old sewer
Before replacing the sewer pipe in the apartment, it is necessary to dismantle the old equipment. It is possible to disassemble the old sewer system only after the necessary materials and tools have been prepared, the places for the installation of plumbing equipment and household appliances have been determined.
Work is carried out according to the following scheme:
Turn off hot and cold water supply.
Allow to drain the remnants of water from all sources.
Turn off all equipment and disassemble the system.
To get to the old cast iron pipes, it is necessary to break the cement screed. You may need a hammer and chisel for this.
With the help of a grinder cut off the freed pipe
In this case, it is important to retreat from the place of wiring on the riser about 5 cm.
After disconnecting the system from the riser, vibrations will no longer be transmitted to it. Therefore, dismantling can be carried out with stronger tools, for example, using a grinder and scrap.
The potholes and irregularities formed on the floor are poured with cement mortar and wait for complete drying.
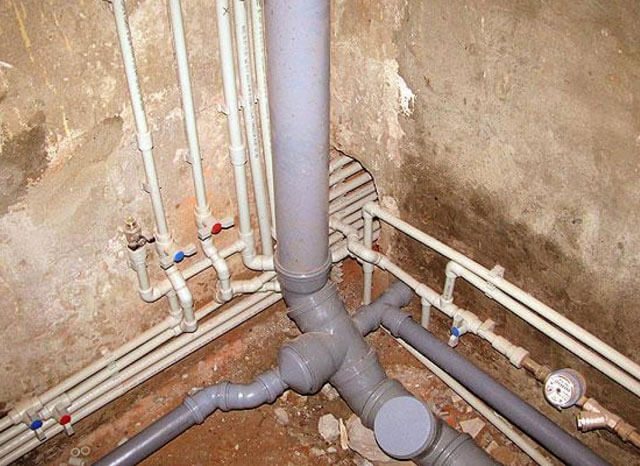
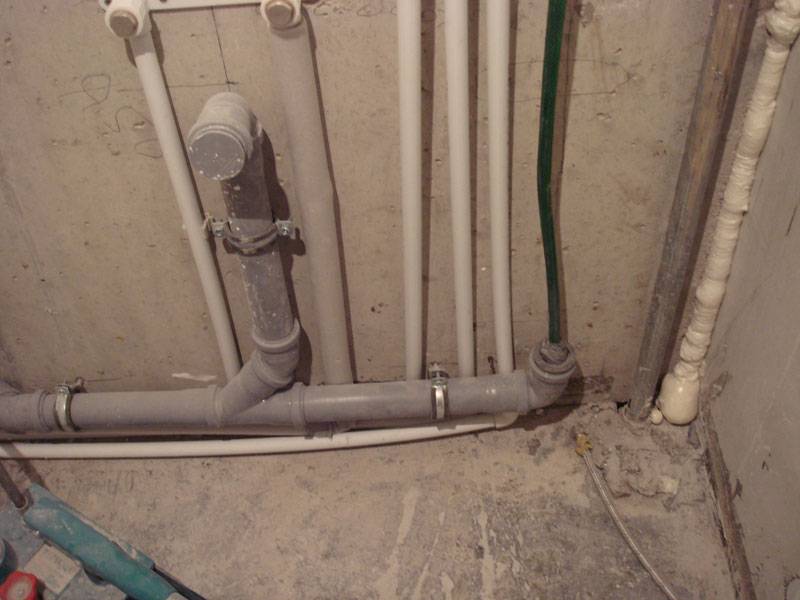
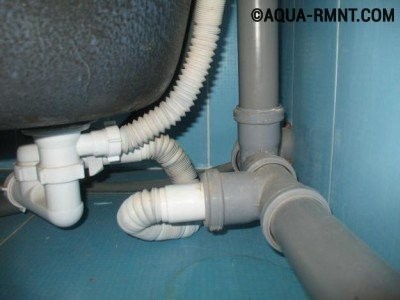
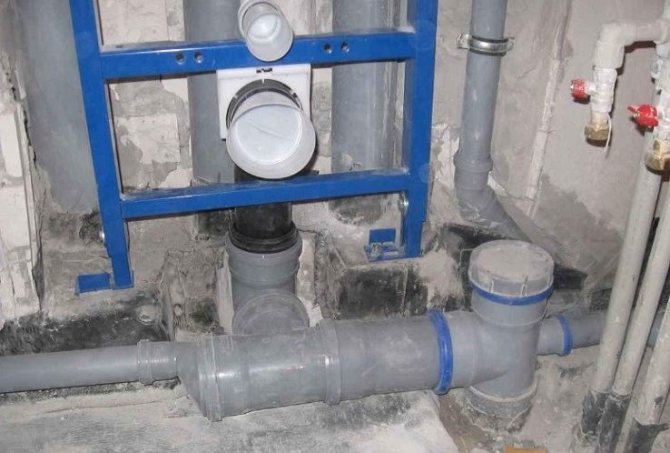
Replacing a horizontal sunbed
Replacing sewer pipes in an apartment with your own hands, limited only to a horizontal section, is the simplest event.
As a rule, you need connect a branch to a cast iron tee from pipes with a diameter of 50 mm.To do this, a 75/50 rubber coupling-adapter is inserted into the tee, into which a plastic pipeline is inserted and then the system is assembled based on the location of plumbing fixtures.
Usually, from the tee, the pipeline passes to the bathtub and is led to the kitchen, ending with a vertical outlet for washing. Replacing new plastic pipes is easy, they are simply inserted into the sockets. The work resembles a children's designer, you just need to cut the pipes along the length so that the bends are at the level of the devices
It is important to provide a technological slope, which for 50 mm pipes is 3 cm per 1 m of length. This will avoid blockages and the appearance of a bad smell in the apartment.
The choice of material when replacing sewer pipes
Sewerage in old houses was usually mounted on heavy cast-iron or steel pipes. Cast iron during operation is exposed to the destructive action of water and air, so it is recommended to change it to other materials:
- ceramics;
- polymers;
- stainless steel.
Each of them has its pros and cons. Ceramic pipeline in an apartment or house is a rather rare occurrence. Ceramics makes shaped products heavy in weight, which complicates their delivery and installation work.
High cost is another argument against ceramic pipes. The only advantage of this material is its resistance to aggressive components in tap water, as well as the smoothness of the inner surface, due to which plaque does not form inside.
Steel pipes are also subject to corrosion and are quite demanding on operating conditions. Too low temperatures affect them badly, leading to breaks and cracks.
The metal is also notable for its considerable weight, especially when it comes to a thick 110 mm sewer pipe. Although in some houses and apartments the owners still install metal pipes, there are many requirements for their operation.
Polymer pipes are one of the most preferred options. Plastic pipes that can be seen in modern apartments, offices, hospitals, schools are actually polypropylene (PP) or polyvinyl chloride (PVC) pipes.
Polypropylene is considered the most optimal way to replace old sewer pipes in an apartment. Experienced plumbers give several arguments in their favor:
- light weight for easy transportation and installation;
- resistance to temperature loads;
- resistance to internal pressure;
- strength;
- durability.
The service life of PP pipes is 30-50 years, which allows them to compete with metal and ceramic counterparts.
Dismantling of old used pipes
Before
how to do
sewerage in the apartment, it is necessary to dismantle the old system. it
have to do so
how old pipes have poor-quality and leaking connections, connecting new
pipelines or plumbing fixtures to them is difficult or not at all
impossible. In addition, sometimes you have to completely redo the wiring, since the location of the old pipes is not
satisfies the owner. Often it is required to lay a hidden system located in another place or on another
level.
Dismantling
old pipes - a difficult and time-consuming task
Reworking the system should not affect others
communications or finished interior elements, so you have to work very
carefully and carefully. Open part of pipelines
usually does not create problems, it is more difficult to remove hidden pipes mounted in
walls or floor
Horizontal wiring
completely cut off together with fasteners. Vertical riser
must first be securely fastened at the top with a clamp. Then gently
a piece of pipe is cut out, with the help of a chisel and a hammer they are cleaned of cement
connections, and the riser is disassembled into parts. If there is no experience of such work,
it is better to invite a qualified specialist, otherwise you can cause a collapse
the entire vertical pipe string. It is especially dangerous to carry out such work in
apartments located on the lower floors of an apartment building with cast iron
risers.
If a
some parts of the old system are in good condition, they can be mothballed and continued
operation. It is only necessary to install adapters on modern plastic
pipes that are commercially available for all types and diameters of cast iron
pipelines.


Dismantling of the old sewerage system
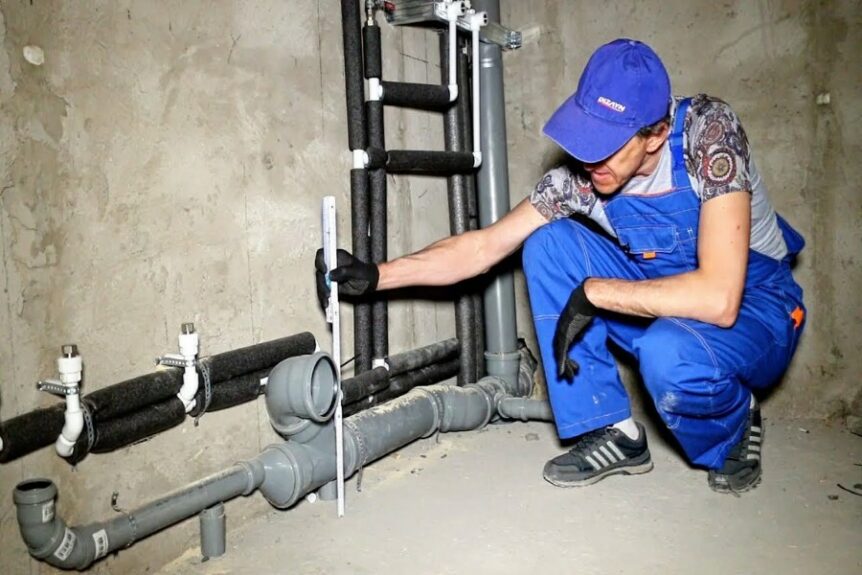
The dismantling of sewer pipes begins with the preparation of the premises. It is necessary to free the workplace from all unnecessary things in order to gain full access to the riser and sewer pipes. You also need to prepare a tool for work: a hacksaw for metal, a grinder, a set of screwdrivers, a hammer, a puncher, a chisel, a needle file.
Dismantling steps
- If you are making repairs in a multi-storey building, then you need to agree with your neighbors in the sewer riser that at such and such a time they will not use the sewer. Otherwise, all the drains will be in your workplace.
- Turn off the water.
- Disconnect the water supply hose to the drain tank.
- Remove the toilet by first unscrewing the bolts securing it to the floor.
- Disassemble and dismantle old pipes.
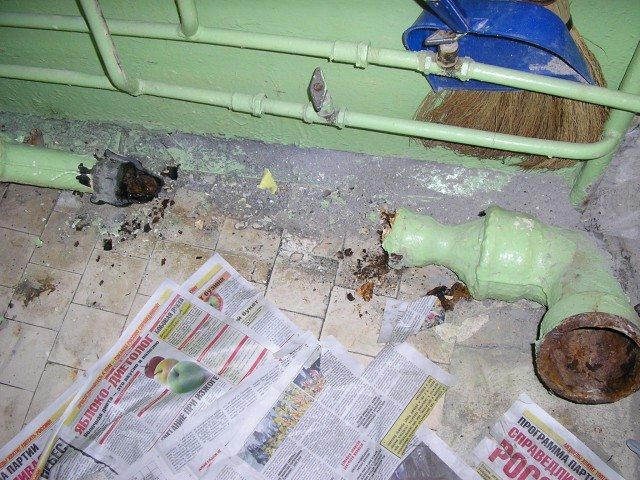
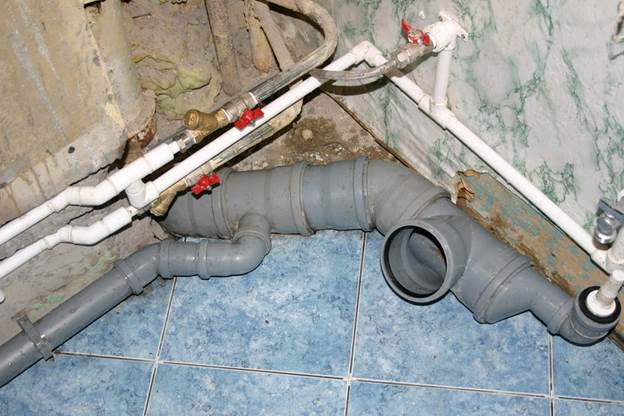
Disassembly of cast iron pipes
Since the old sewer system is made of cast iron pipes and socket fittings, dismantling is not difficult. The pipes must be pulled out of the sockets using auxiliary tools - a chisel and a screwdriver. If the junction cannot be disassembled, then it is worth using a grinder or a hacksaw
By making cuts in the necessary places and gently hitting with a hammer, you can remove part of the system
Particular attention should be paid to work at the junction with the main riser. You can’t use a hammer here, as you can violate the integrity of the entire house sewer system. The tee connected to the riser is carefully cleaned of the remnants of the old seal
If, during disassembly, it was not possible to pull the pipe completely out of the joint with the riser, then using a grinder with a small circle (the diameter of the cutting circle should allow you to enter inside the tee), cut the rest of the pipe into pieces and pull them out with a chisel. If necessary, you can use a puncher with a drill for metal
The tee connected to the riser is carefully cleaned of the remnants of the old seal. If, during disassembly, it was not possible to pull the pipe completely out of the joint with the riser, then using a grinder with a small circle (the diameter of the cutting circle should allow you to enter inside the tee), cut the rest of the pipe into pieces and pull them out with a chisel. If necessary, you can use a puncher with a drill for metal.
Pipe Condition Assessment
An assessment of the current state of the pipes will have to be carried out in any case, even if they are completely replaced.If you have an accurate idea of \u200b\u200bthem, you will be able to choose the most optimal dismantling option. For example, sometimes it is quite simple to deal with old connections - it is enough, shaking the pipes at the joints, just to disconnect them. If it was not possible to just pull out the pipes, then a chisel will come to the rescue, with which the joints are processed - the seal is removed from them. If the case is very difficult, then you will have to use a sledgehammer and a grinder to completely disassemble the entire system. It is also worth purchasing a gas burner for dismantling work - some elements will have to be thoroughly heated to separate.
Old cast iron sewer pipe
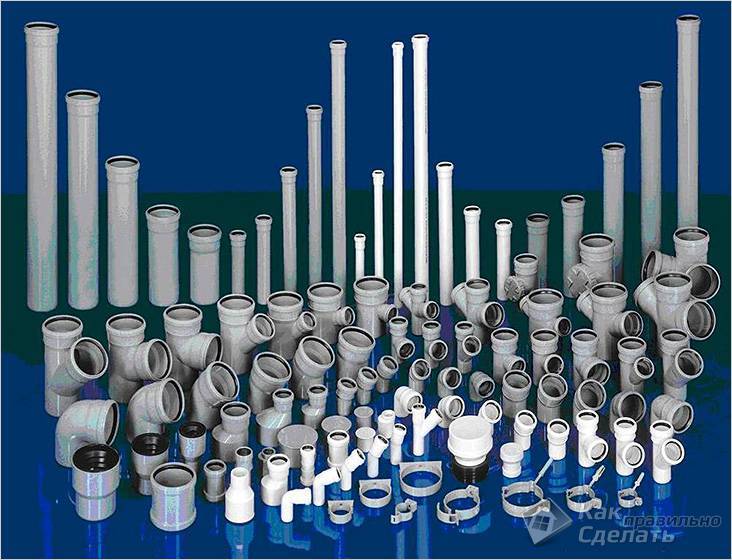
Material selection
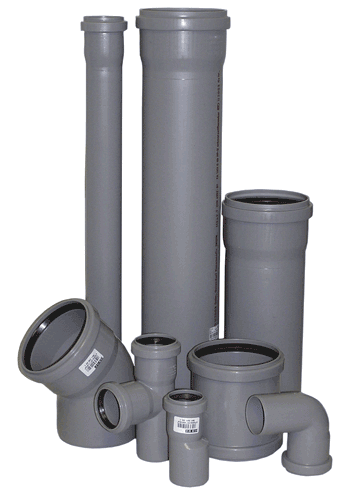
 Plastic sewer pipes
The sewerage in the apartment is mounted from plastic, it is more difficult to work with cast-iron pipes. Three types of polymer pipes are used: PVC, propylene and polyethylene. These products are similar in appearance and properties:
- smooth surface on which deposits do not accumulate;
- strength, resistance to corrosion;
- a light weight;
- durability;
- installation does not require welding.
 Adapters for sewer pipes
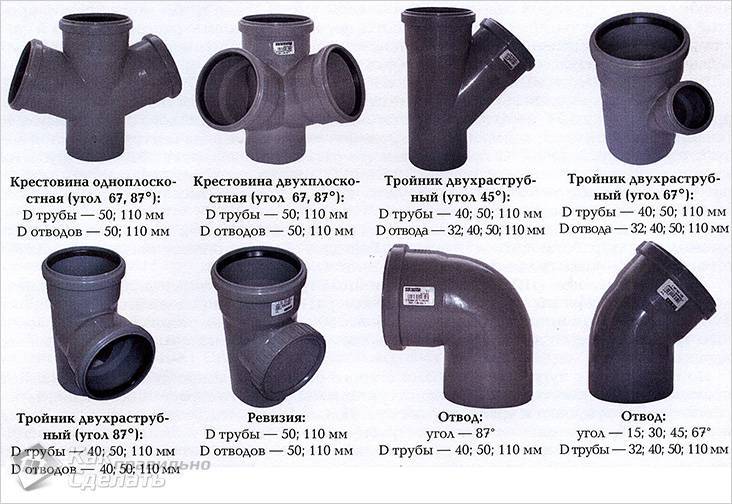
To connect pipes, special elements are needed: bends, tees, transitions from metal, cuffs. It is better to purchase all the necessary material from one manufacturer, this guarantees the accuracy of matching all diameters. Sealing joints will require silicone grease, it is also bought in advance. So, for work we will need:
- plastic pipes with a diameter of 50 and 110 mm;
- fitting;
- sealing cuffs;
- plastic clamps, selected according to the pipe section;
- inspection hatch, which is installed on a common riser;
- silicone sealant.
Tools:
- perforator;
- Bulgarian;
- a hammer;
- hacksaw;
- chisel;
- wrenches of various sizes.
Calculation of the sewer pipeline
The choice of material for sewer pipes
Of all the possible types of sewer pipes for do-it-yourself repairs, pipes made of polymers are chosen.
Advantages of plastic pipes:
- Corrosion resistance.
- Chemical resistance.
- Easy assembly.
- Light weight.
- Smooth wall surface (internal).
- Resistance to low and high temperatures.
- Ease of repair.
- Durability.
Compared to metal pipes, plastic products are more fragile, so care must be taken when handling and storing. This disadvantage is compensated by light weight and ease of installation.
Choosing the diameter of the sewer pipe
Minimum allowable diameters:
- Bidet, washbasin, sink - 40 mm.
- Shower cubicle, bathtub - 50 mm.
- In the case of including several plumbing fixtures in one pipe - 85 mm.
- Riser (main) of a house or apartment - 100 mm.
The versatility of the system can be achieved by using a 50 mm diameter pipe to connect all plumbing fixtures, except for the toilet bowl, and make the main riser from a 110 mm diameter pipe, connect the toilet bowl to the same 110 mm sewer pipe.
Calculation of the number of system elements
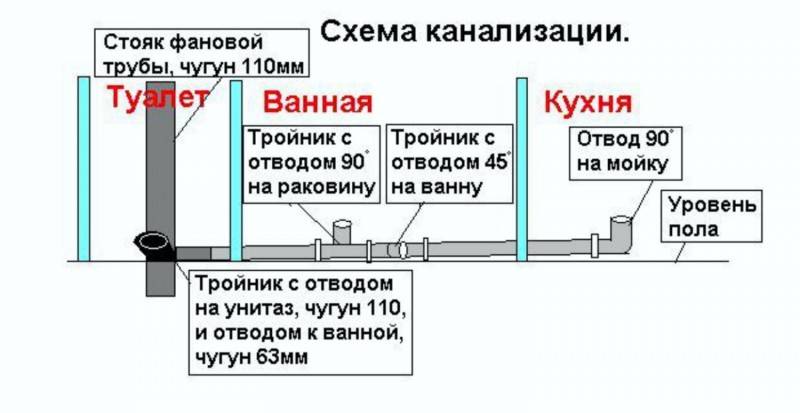
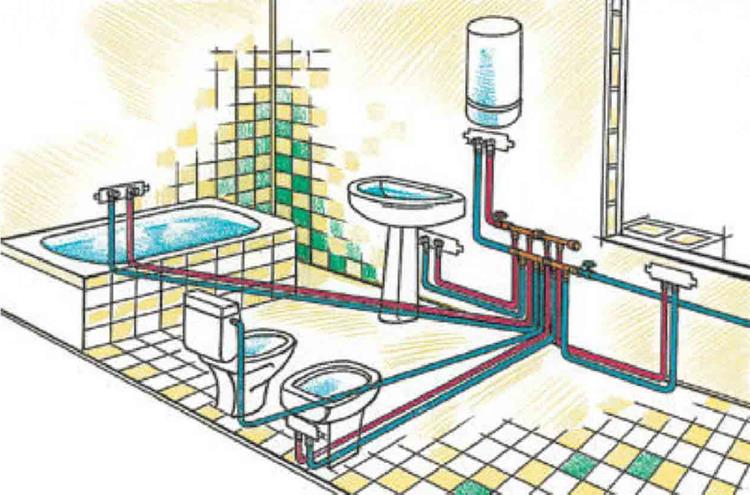
To calculate the pipeline and carry out the installation of sewer pipes, it is necessary to draw up a diagram of the future system. It is enough just to take a sheet of paper and place on it all the plumbing fixtures that need to be connected.
Approximate scheme of the intra-house pipeline
It should be noted that it is not recommended to use bends with an angle of 90o. In this case, it is better to use two 45° bends, which significantly reduces the likelihood of blockage in the pipe.


A wide range of fittings - angles, crosses, tees, couplings - will allow you to choose the necessary element of the desired configuration and the required diameter. If you plan to install another plumbing fixture in the future, then determine the installation location and add it to the diagram. During installation of the system, this outlet will be closed with a plug until it is needed.
Having selected all the necessary pipes and fittings according to the scheme of the future pipeline, you can proceed to the next stage of the repair.
Where to begin?
The first thing you should do on the way to a new indoor sewer system is to draw a future network.
This is important to do even if you plan to replace pipes and some plumbing equipment, and not redo the sewer scheme by changing the positions of sanitary fixtures and pipe passages
It is not necessary to draw up a drawing, as is done in design organizations, but the diagram should be as detailed as possible.
The plan should show:
- lengths of all pipes to scale;
- be sure to indicate the diameters of pipelines, their number, as well as the number and location of all connecting elements and hydraulic seals;
- sketch the sanitary facilities and their location;
- the location of the riser;
- the number of pipes and the distance from them to the walls;
- location of inspection hatches;
- pipeline slope.
In order to correctly draw up a plan for arranging the drainage system, as well as to implement it, it is necessary to take into account the nuances of installing an internal sewer network.
Preparing for the replacement process
Before starting all work, a sewerage scheme in the apartment should be drawn up, which will help determine the number of pipes and additional elements.When compiling it, all plumbing fixtures, places and methods of connecting them to the sewer pipe are taken into account.
To avoid clogging, it is not recommended to make a 90° turn in the sewer line. This rule is not followed here.
Accordingly, the schemes determine what materials will be needed to carry out the work. In addition to pipes with a socket, you may need: an adapter between plastic and cast iron, an expansion pipe, a revision, a cross, a coupling, a branch, a tee.
Removing the cast iron pipe
The dismantling of the riser begins with the removal, located between the tee and the ceiling. First, an annular gap is made on top of the section. To do this, at a distance of 12-16 cm from the ceiling, using a grinder, a cut is made in the pipe with the rest of the wall of about 3-5 cm.
An incomplete cut is needed to prevent jamming of the tool with a possible vertical movement of the column. Then, stepping back 9-13 cm down, a similar cut is made, parallel to the first. The ring between the cuts is carefully knocked out with a hammer or wedges.
The next step is sawing the cast iron section from the bottom. For its implementation, an incomplete cut by a grinder is made at a height of 50-70 cm from the upper socket of the tee. The clamps securing the section to the wall are removed (their you can just cut Bulgarian). The pipe is broken by swinging or hitting with a hammer at the place of incomplete cut and removed from the column.
Dismantling the tee
The most important operation of the entire dismantling of the old sewage system is the removal of the tee from the socket of the lower section of the riser
As noted, there is an important condition: this bell must not be damaged. The simplest dismantling options are used when filling the joint with cement mortar.First, an attempt is made to separate by loosening
First, an attempt is made to separate by loosening.
A crowbar is placed in the hole of the rest of the pipe, with its help bending forces are created in different directions. Most often, such loosening destroys the cement bond, and the tee can be removed from the lower socket. When the joint is destroyed, the ingress of large cement pieces into the pipe should be eliminated, that is, the cement is removed from the socket with a screwdriver or chisel.
If loosening did not lead to a positive result, then a more time-consuming method will have to be applied: the cement mass is destroyed with a chisel and a hammer
Given the brittleness of cast iron, this procedure should be carried out very carefully, and the impact force should be applied away from the walls of the socket. The goal is to provide a gap between the tee pipe and the socket walls. As cement pieces break off, they are immediately removed from the joint area
As the cement pieces break off, they are immediately removed from the joint area.
The most difficult method of dismantling has to be used when filling the joint with sulfur. Such a composition is very durable and does not lend itself to the destruction methods described above. In this case, heating of the joint area is most often used with a gas burner or a blowtorch. The work is carried out by two people. One worker warms up the joint, and the other loosens the tee.


When the mass is melted, the tee is easily removed from the socket
Such work takes place when very harmful gases are released, which means that precautions must be taken (respirator and goggles)
Finally, extreme circumstances may arise when it is not possible to remove the tee from the lower section in any way (it is impossible to use heating, especially strong pouring and other non-standard situations). In this case, the most undesirable option is used - the tee is cut off at a height of about 5-6 cm from the socket. The end of the rest of the pipe is carefully aligned, and subsequently, when installing plastic pipes, you will have to use a coupling.
If the installation of new plastic sewer pipes is planned, then it is impossible to do without the rather laborious dismantling of the old cast-iron sewer. This process can cause a number of difficulties, so you should prepare in advance to solve problems that arise.
When replacing a worn-out pipeline, the most difficult task is to dismantle the cast-iron pipe. The material with which the pipes were connected adds to the complexity of the work. Previously, cement mortar, sulfur or aluminum were taken for reliable pipe joining (see. Thus, the whole structure became almost monolithic. It is quite easy to remove the cement composition, but sulfur and aluminum are forced to make maximum efforts (see).
Who should carry out the replacement?
It is the responsibility of homeowners to monitor the proper condition of all pipes located in their apartment and timely payment of utility bills. The owner can install communication nodes inside his own home from the materials that he considers necessary. But if the question arises about (the most important for most apartment residents), who should change the sewer riser in the apartment, the answer is unequivocal - housing and communal services.The riser is public property, and its independent replacement can be qualified as a violation of the law. Therefore, if there are leaks, cracks or other problems with the riser, immediately contact the appropriate organizations - they are obliged to help you. You still pay monthly for it. In the event of a refusal or demand for material resources, insist that everything should be done for you free of charge.
Pipe laying systems
There are several ways to organize a pipeline:
- Centralized system. Connection is made directly to the highway. The tie-in requires an application to the local water authority and a work permit.
- decentralized system. The tie-in is carried out in an autonomous source of water resources. They can be a well, a well, a reservoir, a container with imported liquid.
For the organization of the pipeline, a centralized water supply system is used.
The internal water supply system is divided into 2 types:
- Gravity. Water is supplied to a tank installed on top of the building. Further, according to the laws of physics, the liquid flows into the water supply system.
- Water pressure. The internal network is filled by means of a pump.
Indoor plumbing schemes:
- Sequential. A pipe goes from the riser, then branches are separated into different rooms and devices. Advantages - low cost due to the small amount of consumable material.
- Parallel. Provides separate branches for each device - toilet, sink, washing machine, sink, etc. Each is equipped with a shut-off valve. The advantage is that you can block 1 branch during repairs, and the rest will function.The disadvantage is the high cost due to the large amount of material used.
According to the laying methods it happens:
- Open gasket. Pipes are installed outside the wall. The method makes it easy to maintain the system. However, the elegance of the bathroom is lost.
- Closed gasket. It is supposed to be installed inside the wall, and the handles of cranes and valves are brought out. The advantage is the placement of all pipes in the wall, which makes the bathroom more beautiful. The disadvantage is the difficulty in maintenance due to poor access to the pipeline.
The main mistakes in the repair of the sewer system
It is possible to identify the cause of a sewage malfunction and repair it only with an understanding of how the system works. It is impossible to start repairs without determining the material from which the pipeline is made. Otherwise, there is a risk of flooding the neighbors and creating an emergency that will affect the entire house. Work should be carried out in strict accordance with the technological process, observing the sequence of actions.
When choosing a material for a new sewer, many try to save money, while the service life depends on it. You need to buy all the components for repair in trusted stores. Quality certificates must be provided for products.
Preparing to replace the sewer system
Today, 90% of the sewer elements on the sanitary ware market are easily connected hermetic products made of PVC.
The service life of such systems is 50 years, which is quite enough for the vast majority of apartments in high-rise buildings.
To replace an old sewer with a modern one, you will need:
- PVC pipes with a diameter of 50-70 mm and 100-150 mm;
- bends, tees, sealing rubber cuffs for the tightness of connections;
- corrugated hose with a sealing cuff for connecting the toilet;
- metal mounting clamps for fastening pipes and a sewer riser to the wall;
- silicone sealant and tow (if you have to connect to an old cast-iron tee).
PVC sewer pipes
Demolition of the old sewerage system
If new sewer materials have been purchased, tools for work have been prepared, plumbing installation sites have been designated directly on site, then it's time to start large-scale alterations.
Replacing sewer pipes begins with turning off the supply of hot and cold water.
After the remaining water drains from all plumbing fixtures, you can proceed to dismantle.
- We turn off the plumbing and dismantle it;
- We release access to old cast-iron pipes, for which we break the cement screed with a hammer and chisel;
- We cut off the pipe with a grinder, stepping back from the tee of the sewer riser 3-4 cm;
- After the system is disconnected, and the vibrations are not transmitted to the riser, feel free to use force to dismantle the old sewage system (we use a hammer, chisel, grinder, crowbar, etc.).
Use of force during dismantling
- We close up all the irregularities in the floor and on the walls with cement mortar and wait for complete drying.
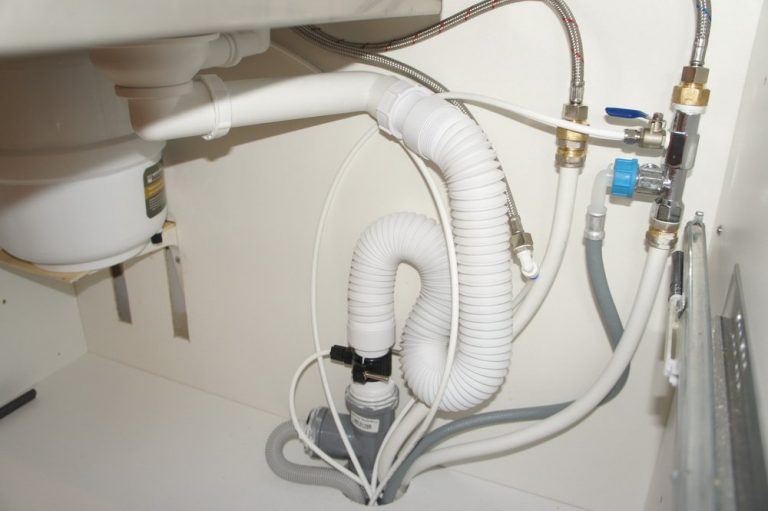
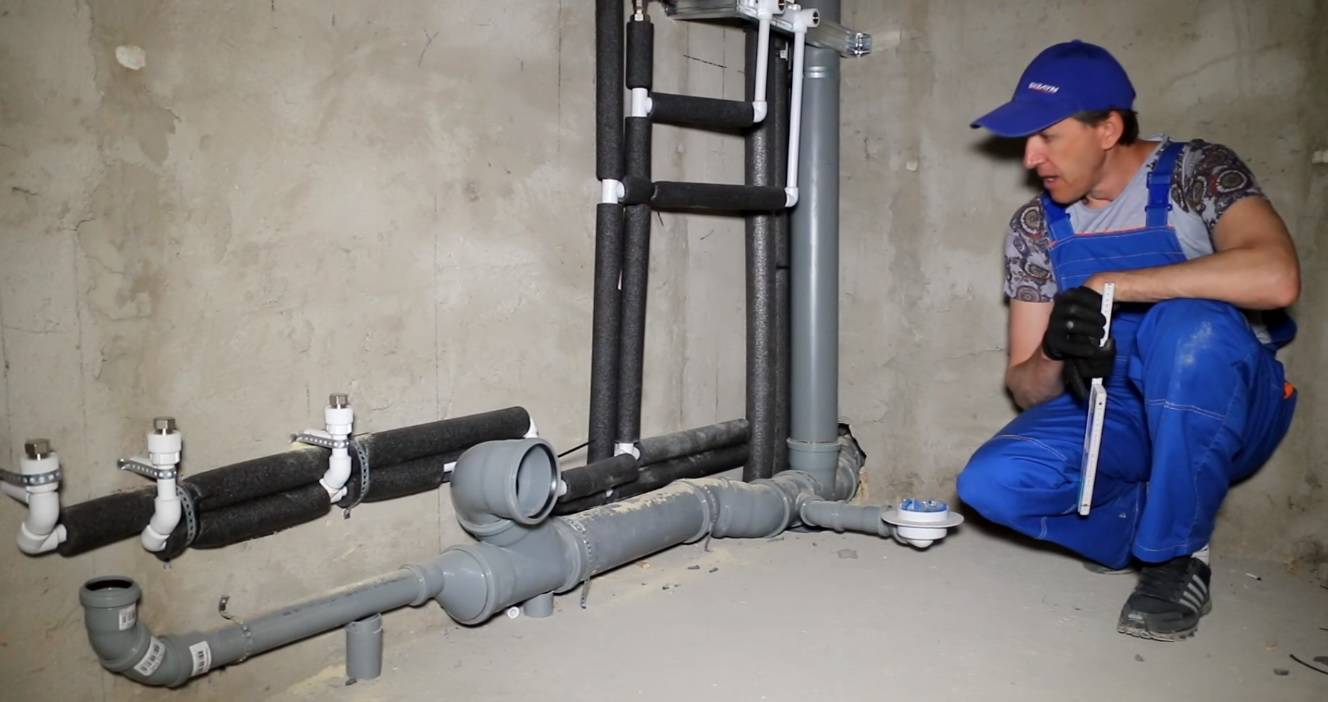
Installation of sewerage of their plastic pipes
After dismantling the old system and preparatory work, it's time to start installing a new sewer.


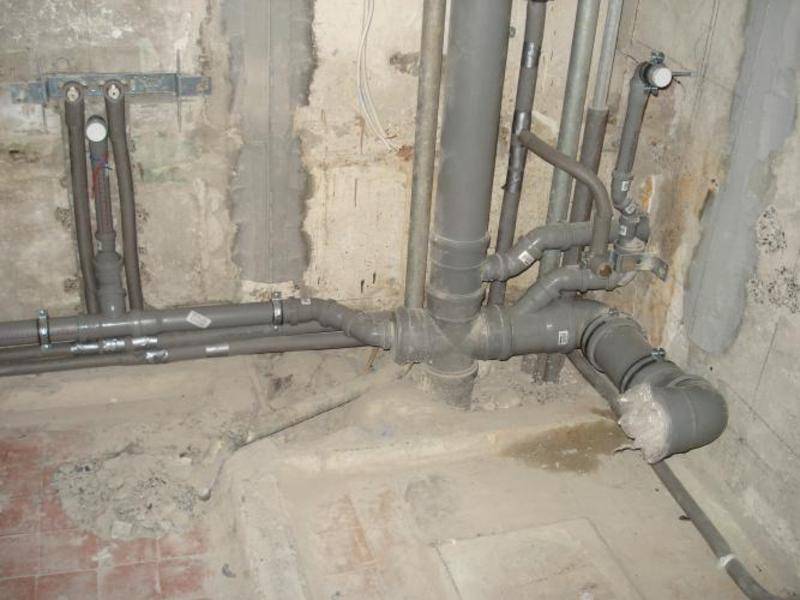


For this:
- using a square and a ruler, we mark on the wall the line for fixing the sewer pipe, observing a slope of 5 degrees from the extreme point of the drain to the sewer riser;
- we assemble a system of pipes of the required length and tees for connecting plumbing;
- we put the attachment points of the clamps on the wall;
- drill holes for them;
- install and fix on the wall;
- we attach the PVC pipe to the sewer riser;

The first stage is the connection of a plastic pipe to the riser
we build it up with pipes of the required length to the next catchment point, fixing the entire structure on the wall using mounting clamps;

Installation of sewerage against the wall using fasteners (clamps)
-
all connections are carried out using sealing rubber cuffs;
- check the tightness of the resulting system.
- connect plumbing to the sewer system;
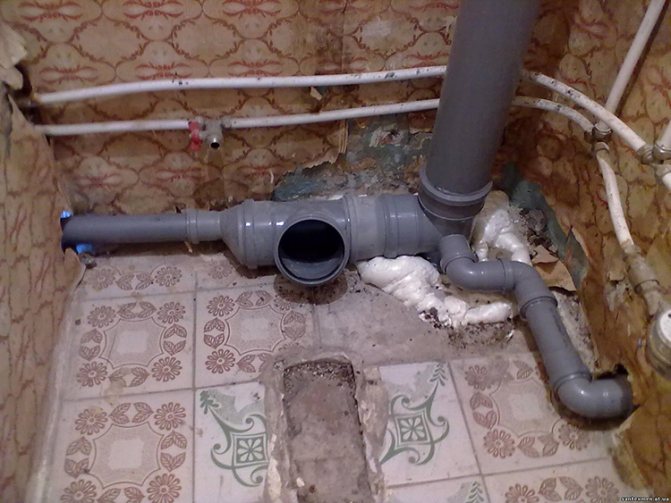
Not all owners are satisfied with the open way to install sewers, and they prefer to make it hidden.
There are only 2 options for closing sewer pipes:
- Hide them in the floor or wall, for which you need:
-
- drill holes of the required depth, sufficient to fit the pipes entirely;
- build a podium
- Hide after installation, for which:
build a decorative drywall box for bathroom and toilet pipes, which can later be tiled.
An option for installing an open-type sewerage system with the subsequent construction of a decorative box
Conclusions: if the sewer pipes in the apartment are to be replaced, a video on the step-by-step technical operations will be a good help for the implementation of this work and on the question of how to hide the pipes in the toilet and bathroom. The main rule is to do everything conscientiously, since sewage is what you need first of all.
Checking pipe joints
To make sure that the pipes are hermetically connected to each other in a divorce and a riser, you must proceed as follows.
- Dial the bathroom by closing the overflow hole.
- Release the drains and at the same time open the hot and cold water valves to full capacity.
- Plug the drain hole on the toilet. It is convenient to use a plunger for this.
- Fill the toilet with a bucket of water to the brim and open the drain.
- Ask the neighbors from above to drain the water to check the tightness of the riser.
If the work is done qualitatively, then there should be no water at all at the joints.
Such difficult work remains to be done to replace the sewer network inside the apartment. If you doubt that you can do it efficiently and in a short time, then contact the specialists. After all, neighbors also do not come to wait while you are on the spot to deal with the nuances of dismantling the old and installing a new network.
Preparatory work
 Project
Creation
sewerage in the apartment
with your own hands must be preceded by a certain preparation. It consists
in planning, creating a project for the future system.
You need to make a diagram
which will display the composition, configuration, parameters and dimensions of all
elements. Scheme
sewerage in the apartment will allow you to calculate the number of pipes,
connecting elements, ensure the prescribed slope of the horizontal wiring.
The slope of the pipelines is necessary to avoid stagnant drains leading to
congestion formation. The value of the minimum slope depends on the diameter of the pipes:
- for pipes 50 mm - 30 mm / m length;
- 110 mm - 20 mm / m;
- 160 mm - 8 mm;
- 200 mm - 7 mm.
At the same time, there is a limitation on the maximum slope, which should not exceed 150 mm / m.
Before starting the installation of the system, it is necessary
notify your neighbors upstairs about your intentions. In addition, you must contact
management company and resolve the issue of temporary shutdown of water supply, since neighbors can simply forget about repair
work and start using the water supply as usual, which will lead to
apartment flooding. It is necessary to prepare all the necessary tools, materials,
fasteners, so as not to delay the process and complete the installation as soon as possible
term
It is important to remember that all the time while sewerage is being laid in the apartment, neighbors
will remain without water, so we must try to minimize the problem for them and reduce the lead time
works
Dismantling of the old cast iron sewer system
Residents of the upper floors can immediately start dismantling. But those who have neighbors from above need to warn them about the planned work so that they do not use the sewer for some time. It will be much better if the main riser is replaced in all apartments at the same time. If no one else agrees to change the pipe, you will have to cut out only your part of the riser.
This is done very carefully so as not to damage the pipes going to the neighbors. There is no need to save old rusty pipes, so they can be cut in a convenient place. Before doing this, you need to disconnect all plumbing fixtures so as not to destroy them. Then short sections are disassembled, after which they proceed to the most difficult process - the dismantling of the riser.
To do this, in the middle of the riser, using a pipe cutter or grinder, make two cuts at a distance of 15 cm and at a slight angle to each other.
It is necessary to make incisions at a slight angle, so that later you can cut a section of the pipe
Then you need to very carefully, so that nothing falls into the sewer, remove the cut piece from the pipe. Now there are two pieces of riser left: one hanging from the ceiling and the other sticking out of the bottom tee. First, the upper piece is cut off, but taking into account the height of the shaped part, which you will then put on the remainder of the riser sticking out of the ceiling.


Then remove the lower piece of the riser. If it can be swung, then you need to gently swing it and pull it up until the pipe comes out of the tee. If the pipe "sits" firmly, you first need to clear the seam between the riser and the tee. And then again try to swing. If these actions do not lead to what you want, you will have to saw off the tee, stepping back a couple of centimeters from the socket. And then, using a special wedge, remove the rest of the tee piece by piece.
Material selection
 Plastic sewer pipes
The sewerage in the apartment is mounted from plastic, it is more difficult to work with cast-iron pipes. Three types of polymer pipes are used: PVC, propylene and polyethylene. These products are similar in appearance and properties:
- smooth surface on which deposits do not accumulate;
- strength, resistance to corrosion;
- a light weight;
- durability;
- installation does not require welding.
 Adapters for sewer pipes
To connect pipes, special elements are needed: bends, tees, transitions from metal, cuffs. It is better to purchase all the necessary material from one manufacturer, this guarantees the accuracy of matching all diameters. Sealing joints will require silicone grease, it is also bought in advance. So, for work we will need:
- plastic pipes with a diameter of 50 and 110 mm;
- fitting;
- sealing cuffs;
- plastic clamps, selected according to the pipe section;
- inspection hatch, which is installed on a common riser;
- silicone sealant.
Tools:
- perforator;
- Bulgarian;
- a hammer;
- hacksaw;
- chisel;
- wrenches of various sizes.
About neighbors
Self-replacement of sewers in an apartment building is impossible without good neighborly relations: after all, for the duration of your work, the neighbors “on the risers” (top and bottom) will have to sit without water and endure or go to the bucket instead of the toilet. And any secret ill-wisher, having opened the taps of the cold and hot water risers in the basement, will give them a sign that the work is supposedly over. They will begin to use "from the heart", and everything from above will go to you. There are non-trivial options here. The author of these lines knows a case when a vicious and irresponsible alcoholic was successfully neutralized for the duration of work, having drunk to death.
Water heated floor
It is possible to connect the circuits to the central heating line only in one case - if the apartment has only one riser for this, from which the supply and return to all registers in the premises are extended. In other options for a warm water floor, either a separate boiler is installed, or a heat exchanger is used that heats the water due to the thermal energy of the central heating system.
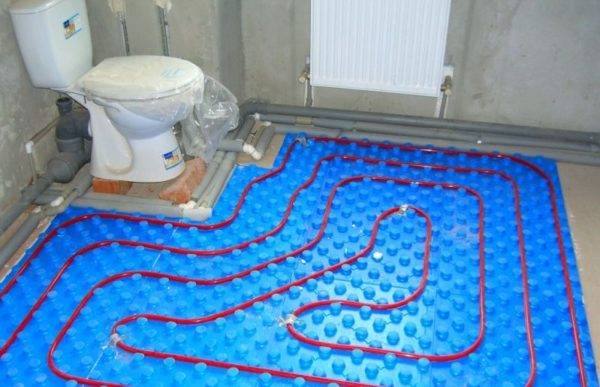
For TP circuits, a collector wiring diagram is always used. Pipes are mounted before pouring the screed, only in the passage areas of the bathroom. Under the bathtub, cabinets, shower cubicle, washing machine, they have no effect.
Due to the bulkiness of the collector units with heat exchangers, most users use electric type warm floors (IR, heating cable, cassette modifications).
Pipe replacement
It begins with changing the siphons located under the sinks, after which you can determine the amount of slope. Installation of pipes is carried out from the riser, the diameter of the pipes decreases with distance from it, which is associated with a change in the number of drains and the load on the system. The exception is the pipe leading to the toilet, regardless of how far it is from the riser, for this role a product with a diameter of at least 100 mm is selected.
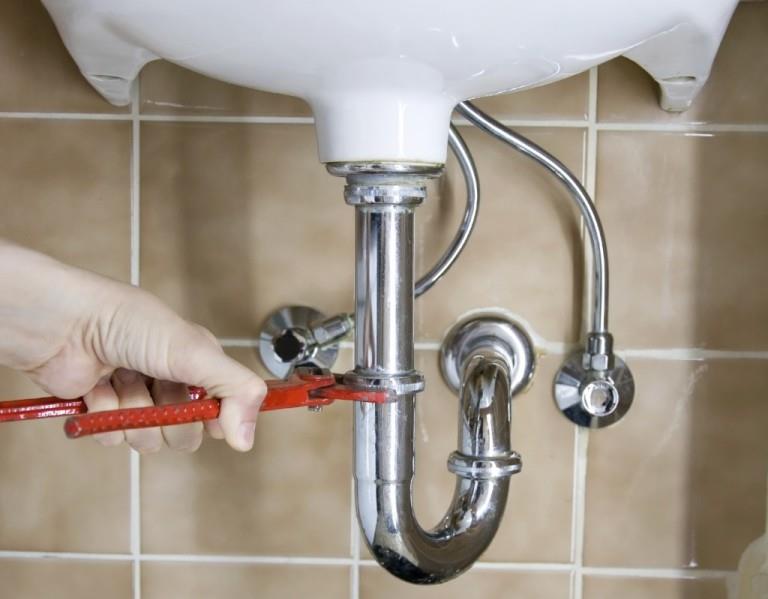
Siphon replacement
If the movement of drains is carried out under the influence of gravity, it is necessary to observe the slope. Otherwise, there will be frequent blockages in the sewer.
It happens that the natural movement of wastewater is impossible, then a fecal pump is included in the system, which is required to pump out waste, and in such a situation a slope is not necessary.
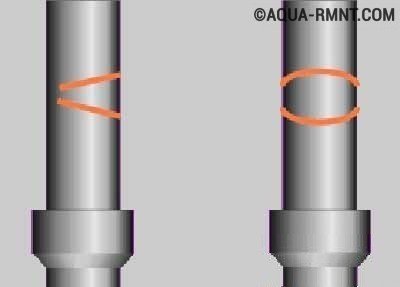
The connection of pipes is carried out by inserting the end of one pipe into the socket of the other. This type of connection is quite simple. To guarantee the tightness of the connection, a special gasket is inserted into the socket, which ensures a snug fit, and insurance in the form of the use of silicone sealant will not interfere in this matter, it is recommended to use it in any type of joints
When installing pipes, special attention should be paid to the quality of the connections, including in those places where the pipe diameter changes.
The work in the area of the plastic sewer riser also deserves special attention: before changing the sewer pipe that fits it, it should be fixed so that the dismantling work does not damage its integrity.If this procedure is neglected, the riser may loosen and burst from an increased level of vibration.
Fixing the riser
Replacing sewer pipes is not an easy and responsible process, but if appropriate preparation is carried out, and replacement actions are carried out exactly according to the instructions, the result will be simply excellent.