- Tools and equipment
- Step-by-step instructions for replacing electrical wiring
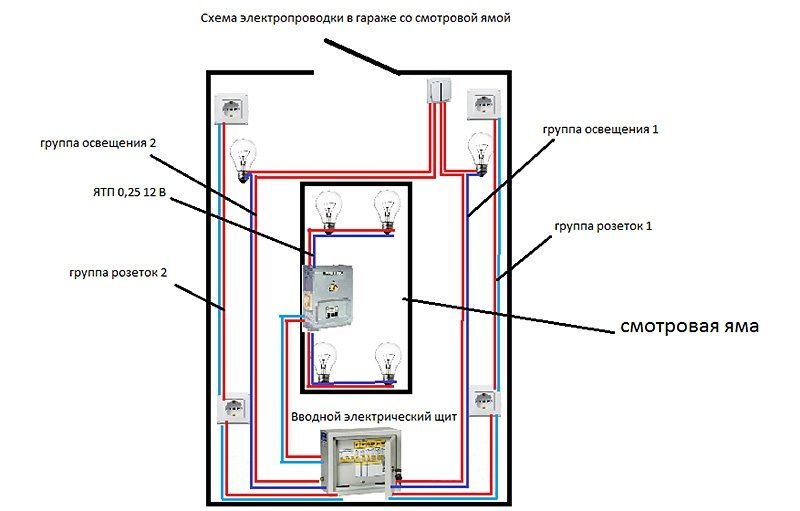
- Possible wiring methods
- Calculation of wiring parameters
- Calculation of the length and cross section of the cable (lighting, sockets for electrical appliances)
- Choice of protection devices (machines, RCDs)
- Let's start replacing
- Repair temporary hut
- Shtroblenie and socket boxes
- Wiring
- About wire colors
- Why define a cross section?
- Methods for laying wiring in an apartment
- The nuances of making strobes
- How to change the wiring in the apartment without the help of an electrician?
- Step 1: De-energize
- Step 2: Dismantling
- Step 3: Making a plan
- Step 4: Surface preparation
- Step 5: Direct installation
- Step 6: Checking and Plastering
- Stages of work
- Temporary device
- Dismantling old wiring
- wall chasing
- Wiring
- Final stage
Tools and equipment
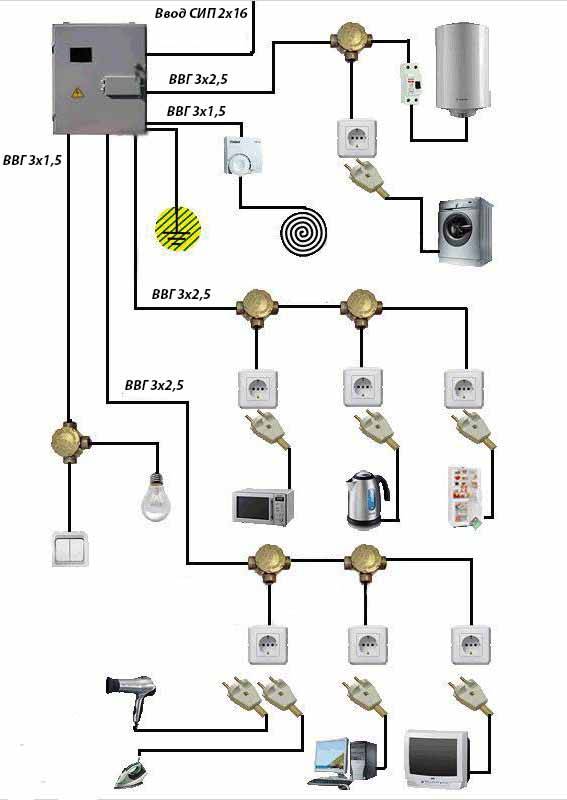
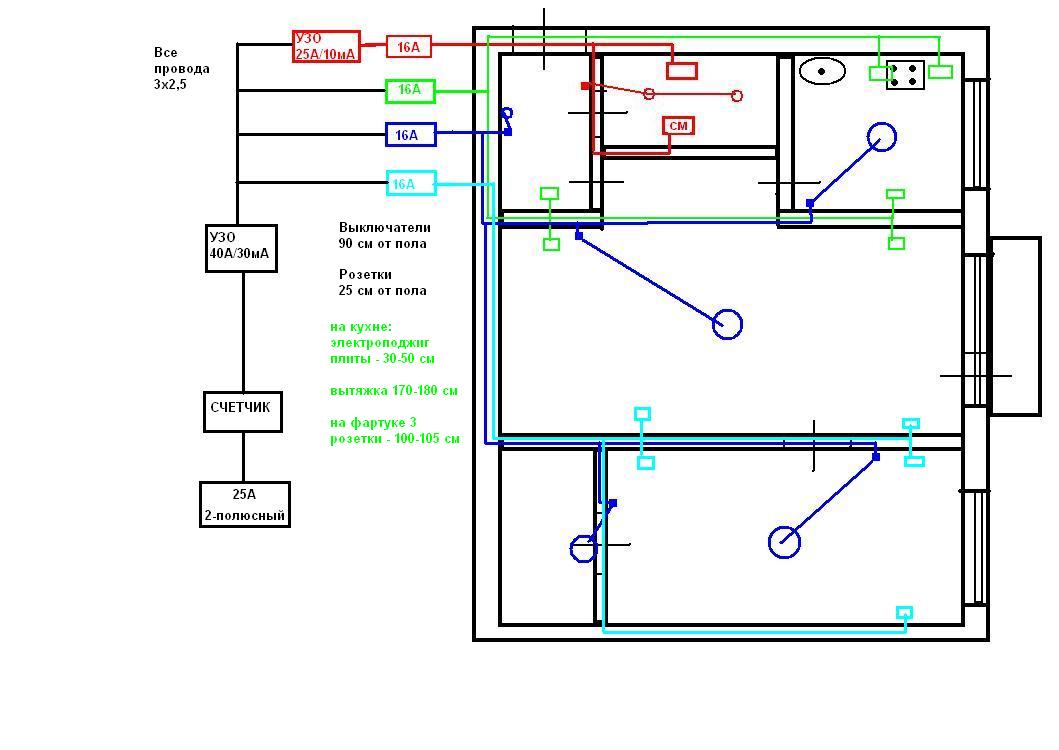
In addition to wires and cables, you will have to purchase protective automation for electrical wiring - residual current devices and circuit breakers. These devices are selected for each group of wires separately.
A sixteen-amp machine is connected to lighting, a 25-amp machine to sockets, and a 32-amp machine to high-power household appliances. A separate residual current device (with a current of 63 amperes) should also be installed on the input.

The procedure for replacing electrical wiring in a private house can be started only when all sockets, machines and lighting fixtures are purchased.
When buying them, you should be wary of marriages and fakes. It will not be superfluous to require a quality certificate for goods.
It is also worth making sure that all the necessary tools are at hand. For example, to replace electrical wiring in a private house, you may need:
- bit;
- puncher and several concrete drills to it;
- soldering iron;
- phase indicator;
- grinder on stone surfaces;
- pliers.
Here you need to add a set of screwdrivers, which any owner probably has, a level, a pencil. Other tools may be required.
Step-by-step instructions for replacing electrical wiring
We examined the main methods of wiring in a panel house apartment. Now let's talk directly about the rules for replacing the old electrical wiring. For ease of perception of the material, we will provide all stages of work in the form of step-by-step instructions. So, it is necessary to change the electrical wiring in the following sequence:
- Power outage in the apartment. First of all, you need to completely de-energize the line and make sure that there is no voltage. The only thing you may need is one temporary outlet for connecting a hammer drill, grinder or drill, without which it will be impossible to replace the wiring. A temporary socket is connected in the shield immediately after the electricity meter, it can be additionally protected by an automatic device that will work in case of a short circuit and overload. All other lines, except for a temporary outlet, must be turned off.You can make sure that there is no voltage using a multimeter, which must also be prepared.
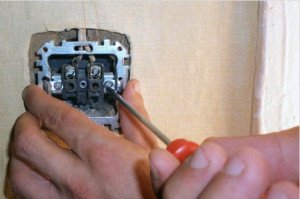
- Dismantling of old fittings. At this stage, you should move all furniture and appliances away from the walls, gain access to all junction boxes, sockets and switches. First, dismantle the sockets and switches so that only the wires in the wall remain. After that, you will need to find junction boxes and disconnect all wire connections from them.
- The next thing to do is to dismantle the old wiring from the walls. If dismantling is very difficult or impossible without damaging the walls themselves, you can simply leave the old wires in the wall, first disconnecting them from the shield, cutting them to the maximum possible length and insulating the ends with electrical tape. If possible, it is better to completely dismantle the wiring, leaving it in the panels should be in the most extreme cases.
- The choice of a new method of laying electrical wiring (we wrote about this above). If a decision is made to lay the cable in new strobes, you must first draw up a wiring diagram and, on its basis, make new strobes. If you simply decide to replace the wiring in a panel house without changing the circuit, it is enough to lay the cable in the old channels, having previously prepared them. You can also make open wiring in baseboards, but this is not the most suitable and rational option.
- Installation of new wiring - installation of junction boxes, laying individual lines to powerful consumers, installation of sockets and switches, assembly of the shield. We talked about all this in detail when we described the technology for installing electrical wiring in an apartment. We will not repeat ourselves, just study the following material:.
- Checking the installed electrical wiring. Using special devices (megaohmmeter and multimeter), you need to check the new wiring for a short circuit, as well as measure the cable insulation resistance. If everything is in order, you can proceed to sealing the strobe and finishing work. For verification work, it is better to call a specialist, pay a small amount, but be sure that the electrical installation is safe.
That's the whole technology by which the replacement of electrical wiring in a panel house is carried out. Finally, we recommend watching useful videos on the topic:
It will be useful to read:
- How to make an estimate for electrical work
- How to make grounding in an apartment
- How to save money on wiring replacement
- How to use a multimeter
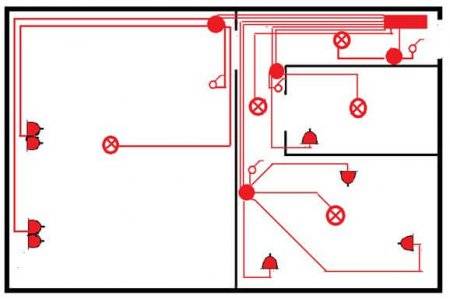
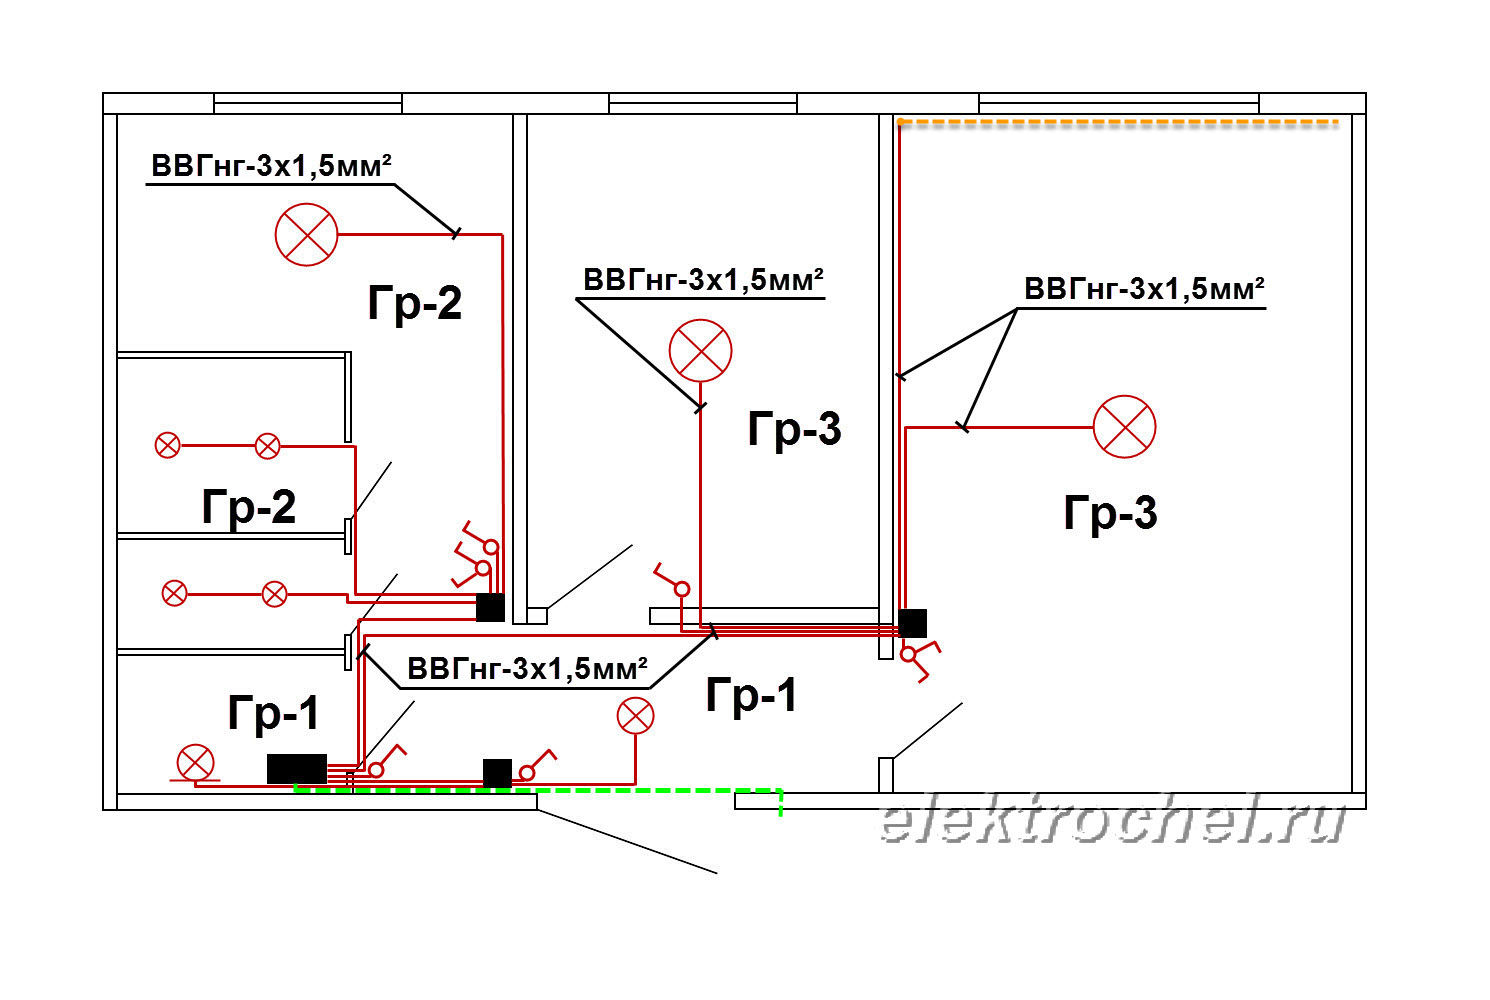
Possible wiring methods
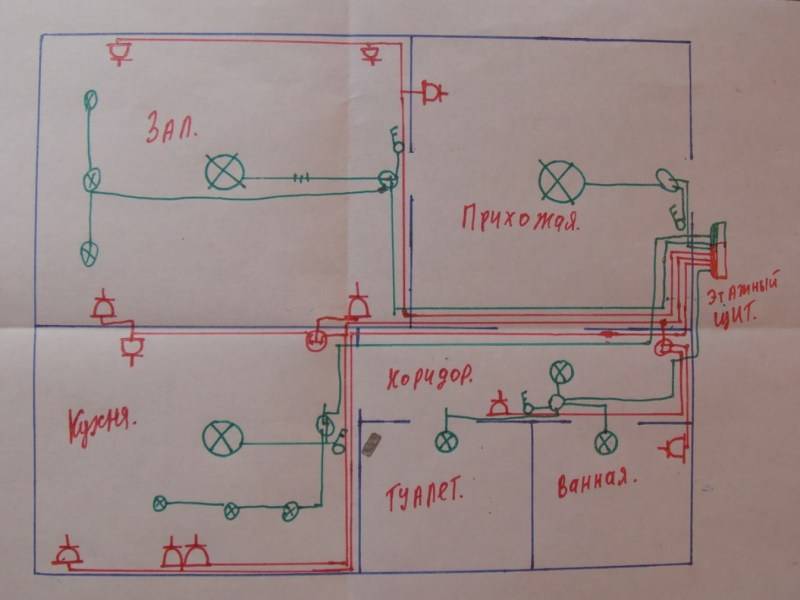
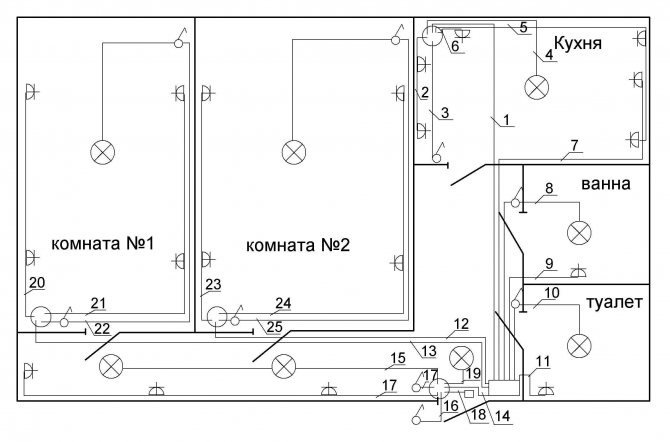
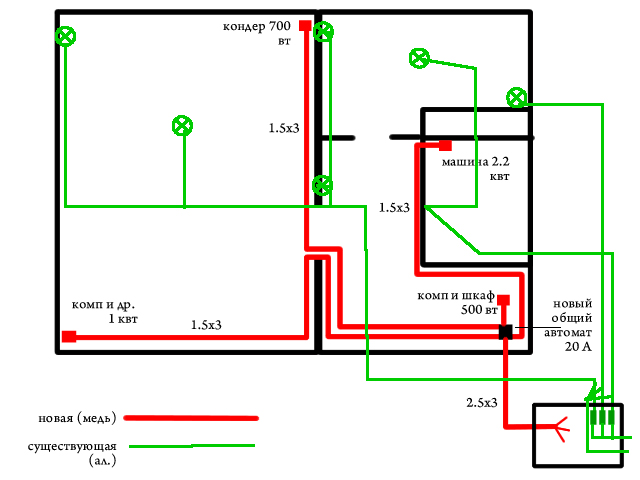
Replacing old wiring in a panel house begins with drawing up a new scheme. Also, the replacement of electrical wiring is divided into two options: partial or complete.
If it is necessary to completely replace all cables in a panel house, then a new circuit should be made. To do everything right, a specialist will need an old scheme. The new scheme will serve as step-by-step instructions for performing electrical work.
First you need to determine where what will be the load. For example, the kitchen usually consumes the most electricity. If we talk about an ordinary room, then one or two sockets per 5 square meters are enough. Given the needs of the kitchen, four sockets will be needed for the same room. Also, do not forget that for devices with high power consumption, it is necessary to pull separate lines from the shield.For some household appliances, you need to lay a copper cable with a cross section of up to 4-6 squares
Another room that requires special attention is the bathroom, because it is characterized by high humidity. Therefore, sockets must be connected via a differential automatic or RCD
Also, an RCD must be installed to protect individual electrical appliances, the most dangerous in terms of electric shock - a washing machine, a water heater, a hydromassage box, a hydromassage bath. The kitchen has a dishwasher and an electric oven.


When replacing electrical wiring in a panel house, several methods of laying a new cable are used:
- in ceiling slabs;
- under the ceiling;
- on the walls - under plaster, under drywall;
- on the floor in a screed.
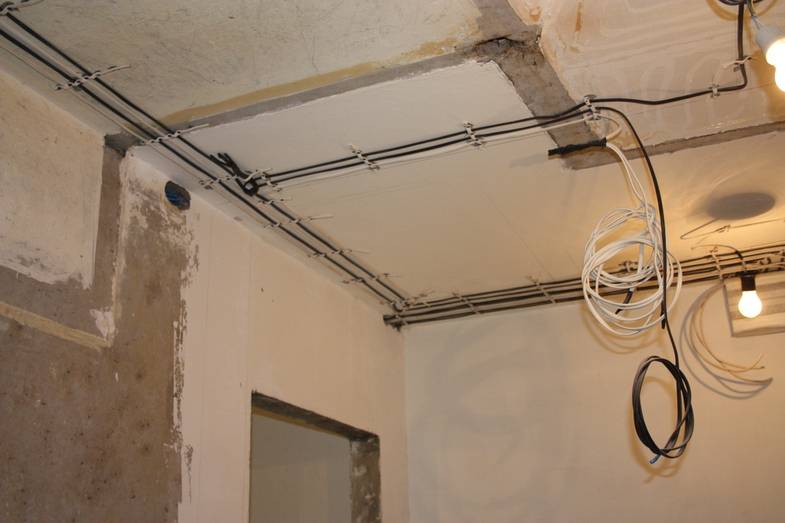
The most common way to lay the cable is to lay the cable under the plaster. In order to carry out the installation, it is necessary to make holes in which the cable will be laid and fixed. After laying, a layer of plaster is applied over the cables. Using this method, you can draw several lines in one strobe. You can also separately lay cables for lighting, various appliances, air conditioners, and other heating devices.
It is ideal to lay cables along the old channels, because then you can lay the wires without gating, and save time. Therefore, it is desirable to use the paths along which the old cables were laid. In general, you can use places where aluminum cables were simply plastered, for example, in the seams between the wall and the ceiling. Seams are places where it is easy to run new wiring.

When replacing old cables, it should be remembered that the channels in which they were located can be used to bring a new copper cable to a socket or switch. However, the channel can only be used if the fittings will stand in the original places and, if during dismantling it is possible to pull out the old cable.
In most cases, it is very difficult to find and use channels, so some experts recommend not to spend time for long searching and cleaning channels. Therefore, for horizontal installation in a panel house, it would be more expedient to stretch the cable along the upper joint between the wall and the ceiling. There is usually a gap in this place, which is either plastered or clogged with cotton.
An alternative option is to conduct electrical wiring along the ceiling and make strobes only in places of descent to sockets and switches. You can hide the cable attached from above by making a stretch or suspended ceiling.

When replacing electrical wiring in a panel house, it is first necessary to determine what the replacement will be: partial or complete. Also be sure to use the old channels. In order to carry out this work, you need to have a good tool. However, it is preferable that the replacement of electricians in a panel house is carried out by a specialist.
Calculation of wiring parameters
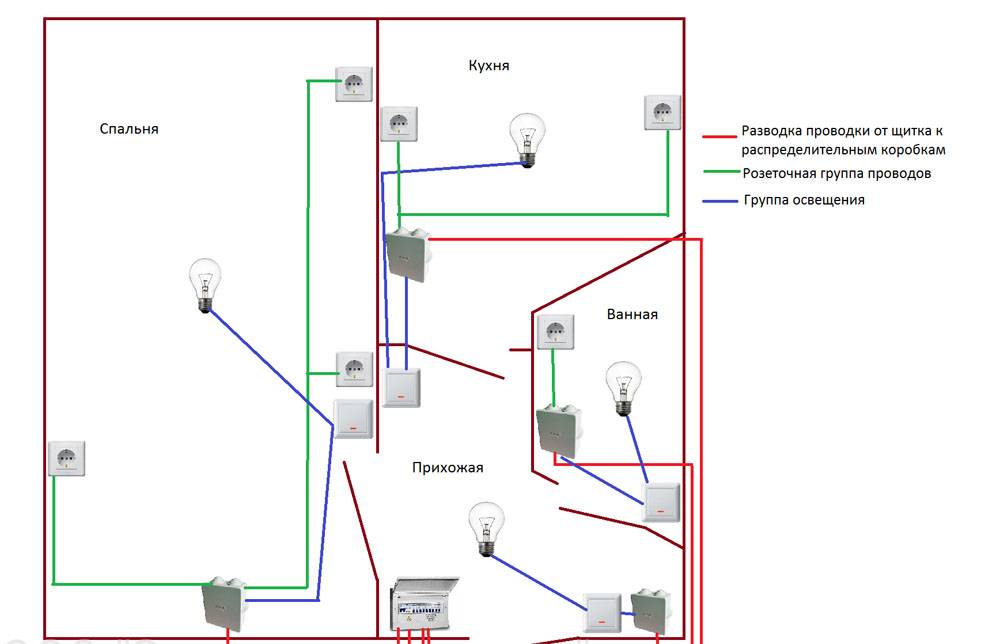
Repair of electrical wiring begins with the calculation of the parameters of the future home electrical network, which is equipped taking into account the construction project of your apartment. To do this, you first need to draw up its scheme, and then decide on the following initial data:
- The required footage of the cable, its type (number of cores) and the cross section of each of them.
- Brand and type of mounted protection devices (automatic devices and RCDs).
- Quantity and models of installation products (junction boxes, switches and sockets).
- The total power consumed from the home electrical network (including the connection of new equipment).
- Laying method (hidden or open wiring).
Sample diagram of a home electrical network
Based on these data, the owner of an apartment or house is able to independently calculate the necessary parameters.
Step-by-step instructions for drawing up a home electrical network diagram are on this page.
Calculation of the length and cross section of the cable (lighting, sockets for electrical appliances)
To determine the parameters of the wire, school knowledge of electrical engineering is quite enough. The entire calculation to be carried out boils down to the following steps:
- First, the total footage of the cable required for the apartment is determined.
- To do this, measure the length and width of each of the rooms.
- Then these values are multiplied, and the result is doubled.
- After summing these numbers, the desired value is obtained.
- Having found out the required cable length, proceed to determine its cross section.
- It is selected taking into account the requirements of the PUE, according to which it is enough for home wiring: for laying lighting lines - 1.5 mm2, and for ordinary sockets - 2.5 mm2.
- To connect powerful consumers to the power grid (electric stoves or washing machines, for example), a wire with a cross section of 6.0 mm2 is laid in the project.
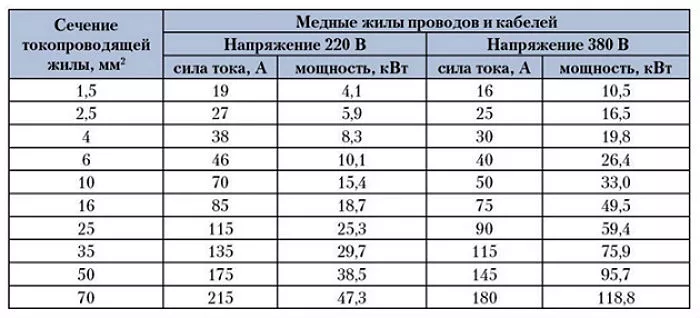
Cable section selection by power and current
To replace the wiring, it is best to use the VVG-ng cable. You can also use NYM or PVS, but the advantages of the VVG cable over others are obvious.
NYM cable
VVG cable
PVA cable
On this, the calculation of wiring in terms of cable selection can be considered complete.
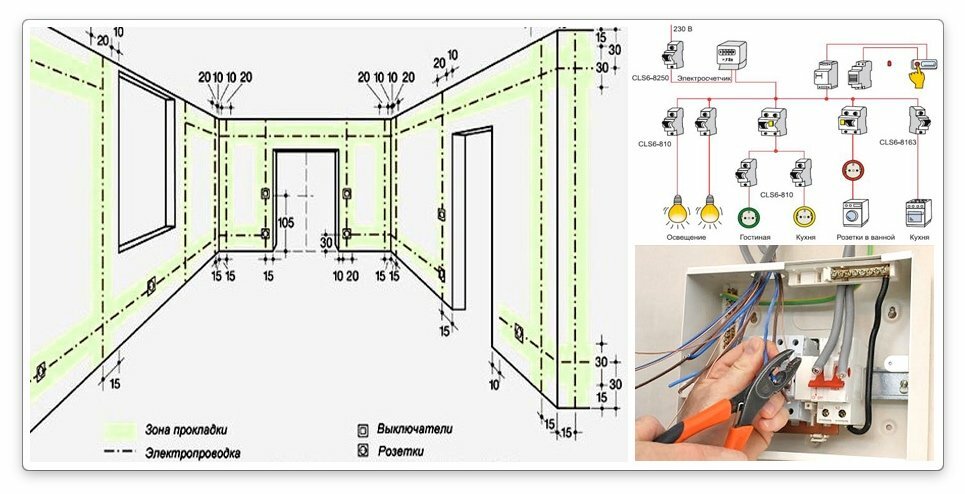
Choice of protection devices (machines, RCDs)
After calculating the parameters of the wires, you should select the type of introductory machine and other switching equipment, including the RCD, which is to be installed in the switch cabinet. In this case, the type of power supply that is supposed to be used in a private house is first determined (single-phase or 3-phase).
Typical parameters of protective devices for the apartment shield
If a three-phase connection is expected in a private house, you will have to take care of the following requirements:
- The introductory machine and the electric meter should also be replaced with three-phase counterparts.
- The same applies to linear automata and RCDs, selected according to the leakage current in each of the phase lines.
- The distribution cabinet will also have to be replaced, as the amount of equipment placed in it is almost tripled.
- When buying installation products, you will need to take into account special power sockets with four powerful terminals (one of them is grounding).
Three-pin power single-phase socket and plug
Four pin three phase power socket and plug
Five-pin three-phase socket with plug
Unlike apartment buildings, where three-phase power is almost impossible, close attention is paid to this issue in country mansions. This is due to the fact that in capital private buildings there are necessarily working workshops with power equipment such as a milling machine installed in them.
It will also be required if there are heating boilers of a certain design and powerful pumps with three-phase asynchronous motors.
Let's start replacing
Repair temporary hut
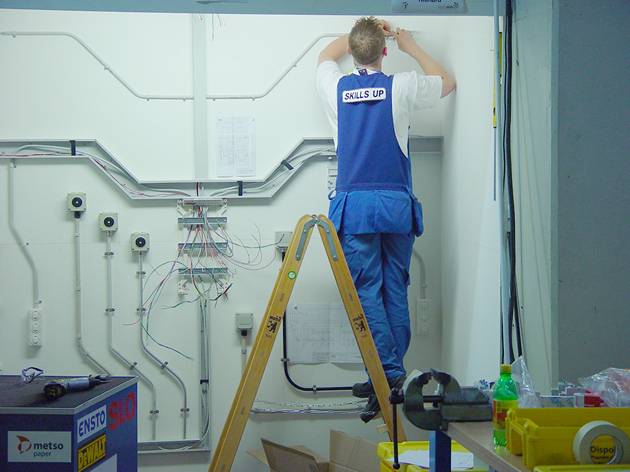
First of all, you need to provide power to the tool for the duration of the repair.To do this, we attach a double or triple socket and a 16 A machine with a piece of cable 4 sq. Mm in advance on a plank or piece of durable plastic. We also stock up on a long one, so that it is enough for all rooms, an extension cord.


Then we de-energize the apartment by unscrewing the plugs or turning off the apartment machine, we manually grind the dose near the meter, remove it and bring the wires from the meter out. We connect a temporary hut to them on a tight twist (twisting for the time of repair is permissible), carefully isolate the joints, and attach the temporary hut to the wall. We supply the apartment and get to work.
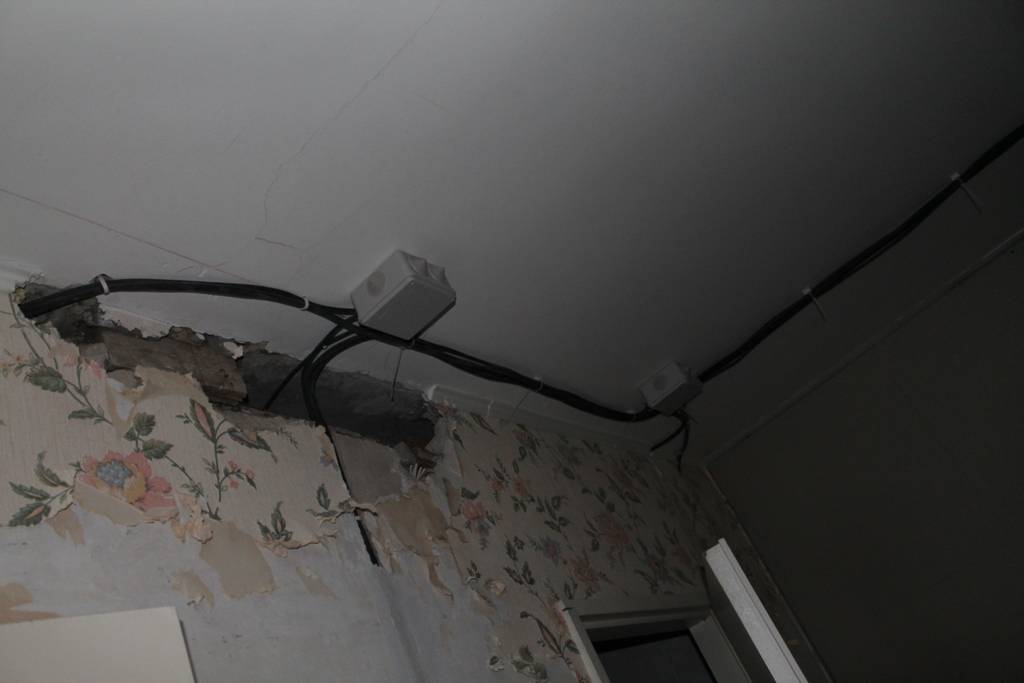
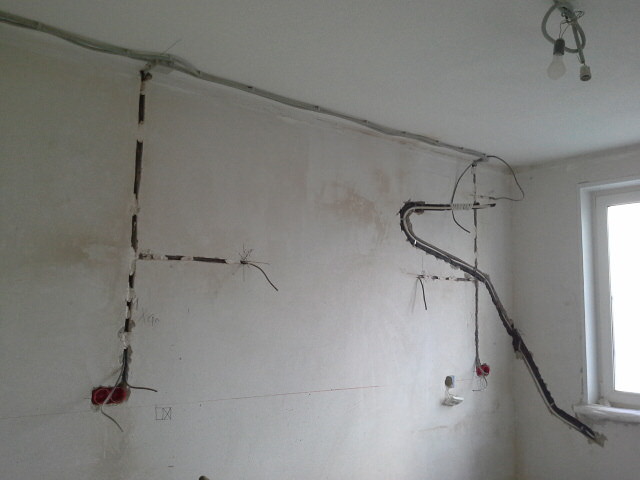
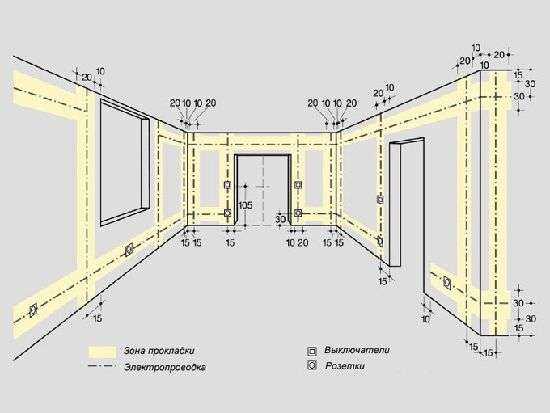
Shtroblenie and socket boxes
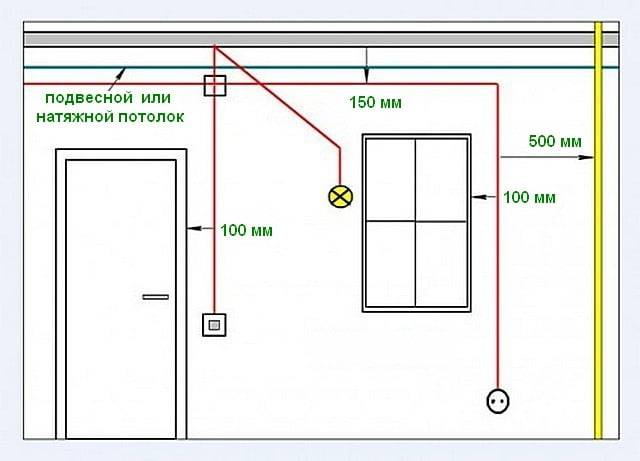
Strobes must be straight, horizontal or vertical. Inclined and crooked strobes lead to accidents and injuries. Horizontal strobes lead half a meter under the ceiling.
You need to ditch and drill the walls from a goat or from a stepladder with side stops, which outdoor advertisers use. An ordinary ladder from the side force can tip over, and you will crash down with a heavy, rapidly rotating tool in your hands.
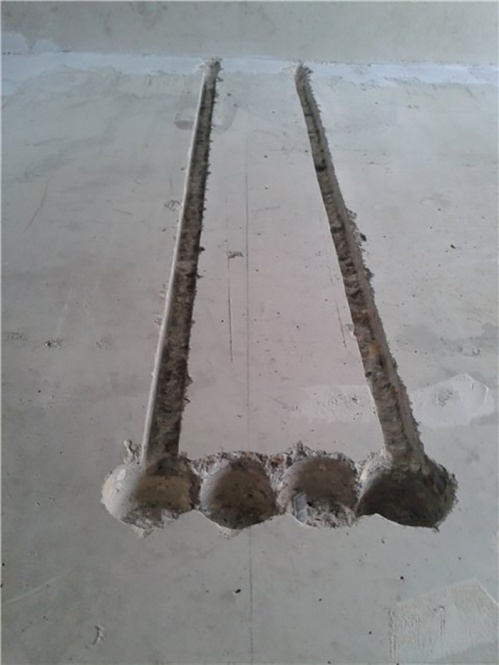
The boundaries of the strobe are first carried out with a grinder to a depth in the diameter of the corrugation and to the width of the perforator bit, then a groove is knocked out with a chisel. Inside the corners, a grinder makes an oblique cut, and a hole is knocked out with a chisel so that the corrugation bend is smooth.
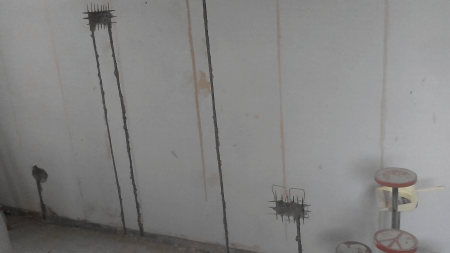
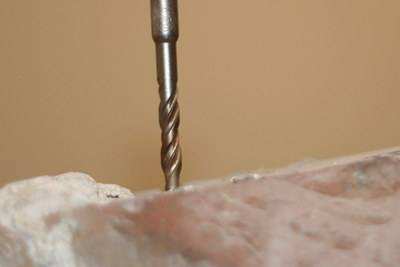
Holes for socket boxes in brick walls are chosen with a crown; in concrete - with a chisel. The crown, hitting the armature, immediately crumbles all over, but is not cheap. The notch under the VSC at the counter is also knocked out with a chisel.
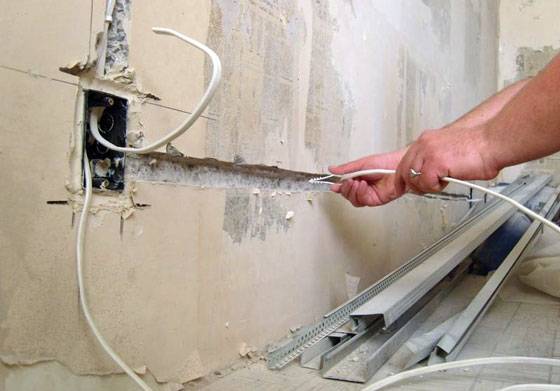
Gating is a very noisy, dusty and dirty job. Therefore, its time must be agreed with the neighbors. Best of all - in the first half of a weekday, when adults are at work, and mothers with small children are walking.
Read more about chasing the walls under electrical wiring and its equipment.
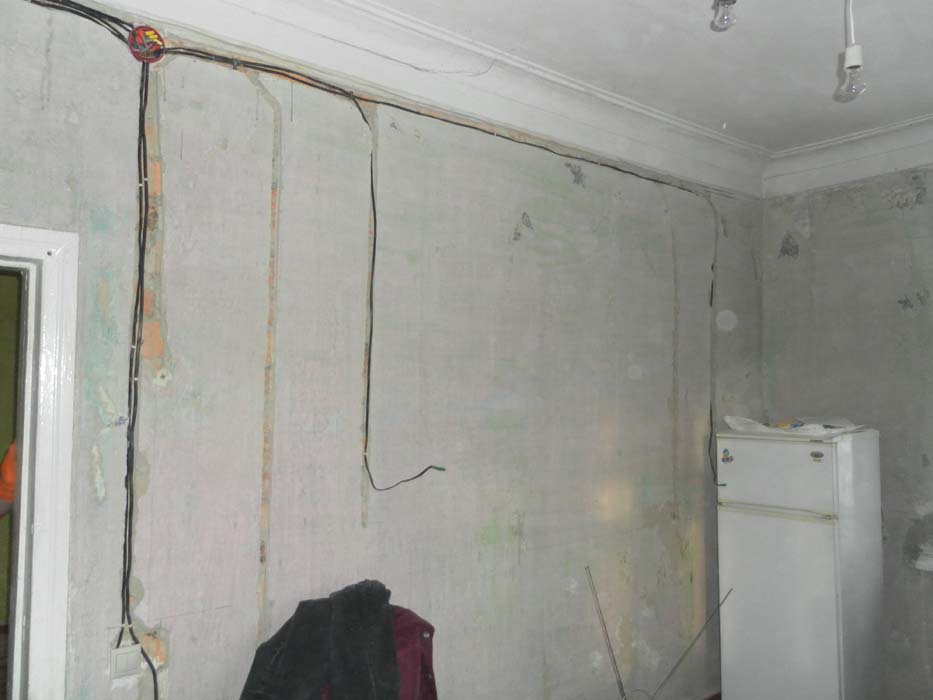
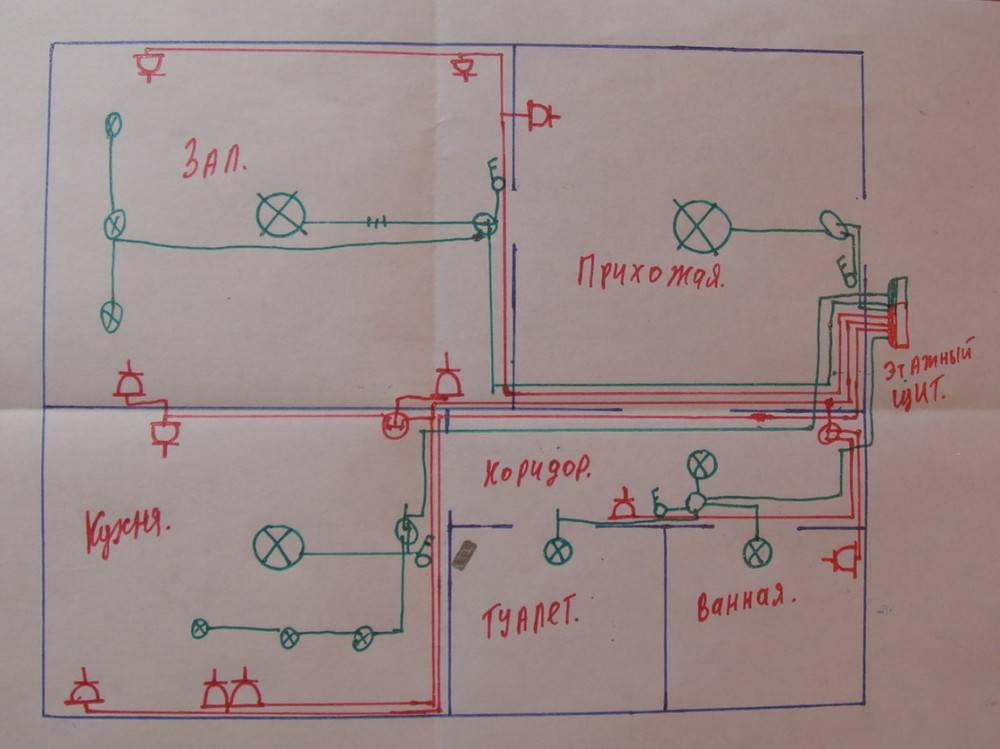
Wiring
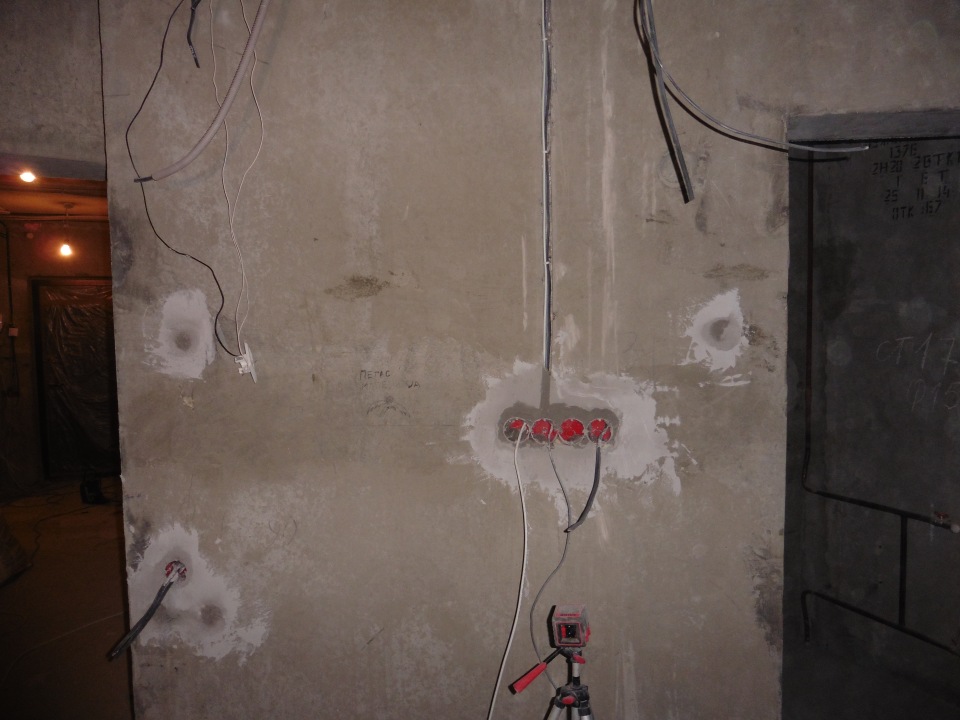
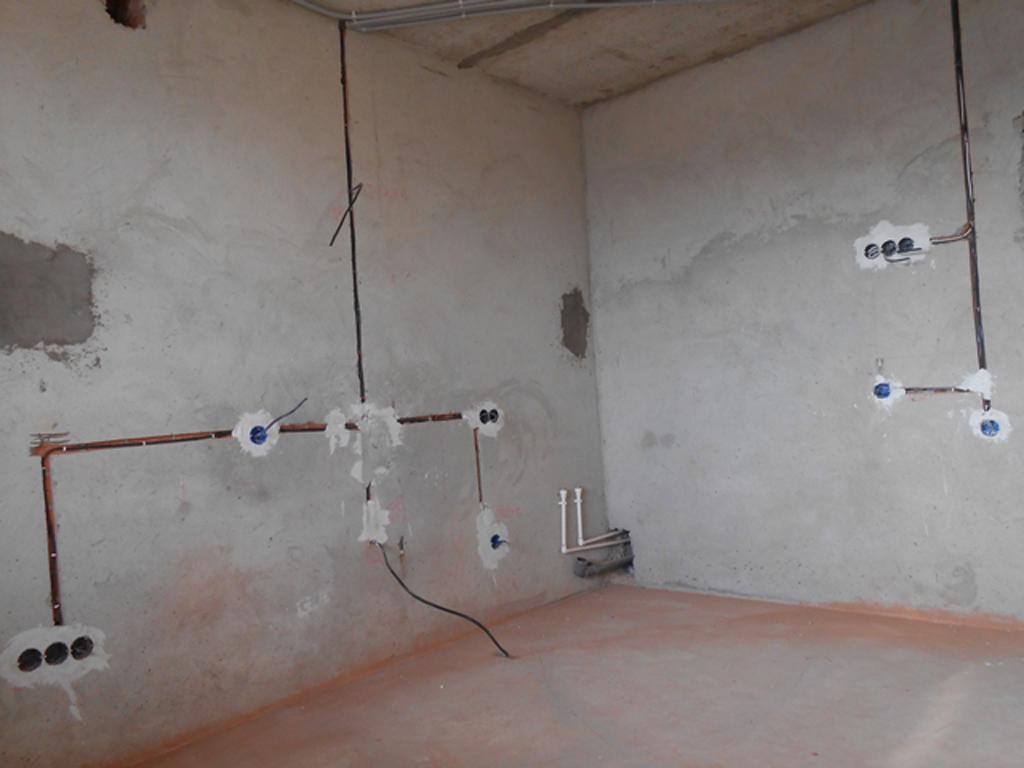
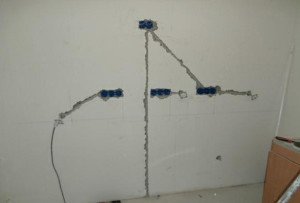
We measure the necessary pieces of cable and corrugation. We tighten the cable into the corrugation on the floor. Then we put socket boxes in the holes on the alabaster pillow. Then we lay the corrugation to the cable in the strobes; we put the ends of the wires into the sockets. Finally, we smear the socket boxes with alabaster to the level of the wall, and we smear the strobes with corrugated pieces in about half a meter.
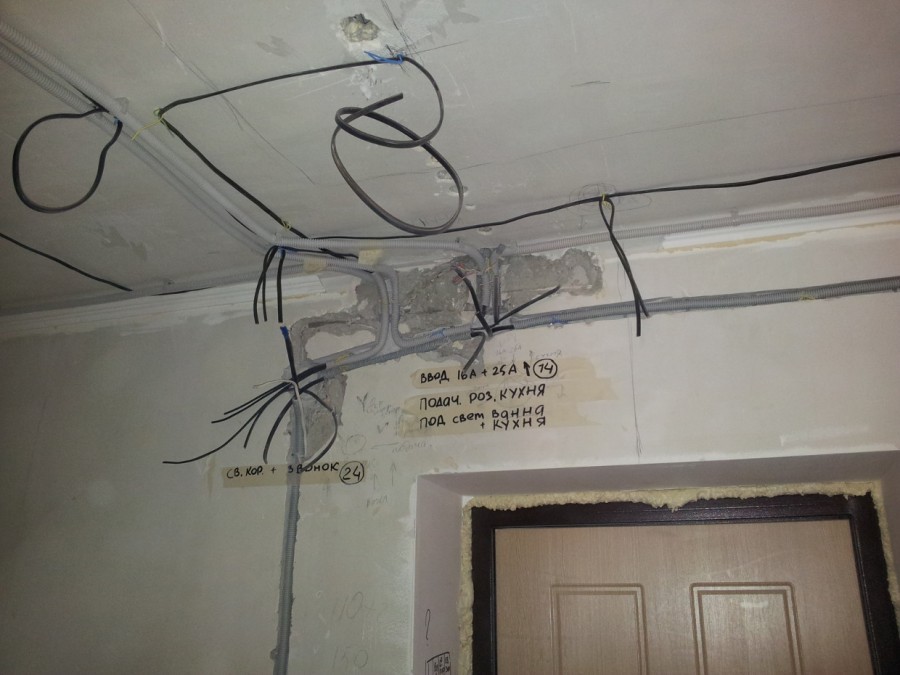
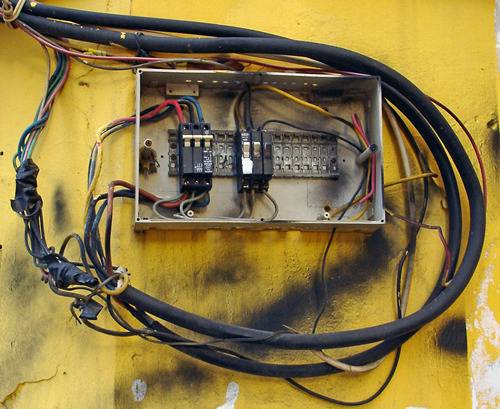
At the end of the laying of the wires, we start the lead-in ends of the corrugations in the VSC, lubricate it with conductive paste, grab it with a tin clamp on the screw, and connect the screw with a cut of the PE wire to the ground terminal of the VSC. We put the VSC in place, mark the mounting holes, drill them, drive in the dowels.
We de-energize the apartment, turn off the temporary hut. On weight, we introduce wires from the meter and apartment PE into the VSC; we attach PE to the VSC body. We put the VSC in place, fasten it. We carefully isolate the wires from the meter, put them in the VSC housing. It's time to plaster; the apartment is empty.
About wire colors
Zero (neutral, N) is always marked blue or light blue, protective conductor PE – yellow with a longitudinal green stripe. Phase wires can be white, red, black, brown. Only single-color wires can be connected to each other. The transition of phase to zero, phase to phase and the inclusion of a switch in a zero break are not allowed.
Why define a cross section?
First of all, if the wire is too small, it will not be able to withstand a large load of consumption.
It will heat up frequently, resulting in:
- Deterioration of insulation.
- Damage to the contacts on the terminals.
This increases the risk of a short circuit at times.
Also, not many people know that wires that differ in their cross section also differ in prices. Therefore, the calculation should be done in order not to overpay for material with excessive parameters.
It is important not to forget that the wires also differ in purpose, but this is easy to figure out if you know the correct color layout. It is shown in the table below.
It is provided in the table below.
| Wire color | Purpose |
| Striped, yellow-green | Zero protective conductor (grounding) |
| Blue | Zero working conductor |
| Black, red, brown, and all other colors different from the previous ones. | Phase conductors |
Methods for laying wiring in an apartment
It is important to immediately make a reservation that the following options will only be relevant for buildings with walls made of concrete or brick. They are not suitable for wooden houses, so the methods are not universal.
The first method will be relevant for those houses where there is not even a layer of plaster on the walls. Then the wiring can be placed directly on the surface of the walls. Here, too, there are two methods that have already been mentioned earlier:


- Place the cables in corrugated plastic pipes, if the thickness of the finish allows.
- Lay the cables simply open if they have double or triple insulation.
The second method is most often encountered, because it is suitable for such cases when:
- The plaster has already been applied.
- Its layer will not close the wires and you will have to make strobes right in the wall.
This is a more difficult and long path, but most often it turns out to be the only suitable one. In addition to the fact that strobes have to be done, the wires in them will also need to be carefully fixed - with plaster blotches or plastic staples.

*(Staples-dowels are especially successful for ceiling wiring)
In order to correctly make all the strobes, it is better to mark up according to the scheme right on the wall, then there will definitely not be any difficulties and there will be a chance to check everything again and correct something.
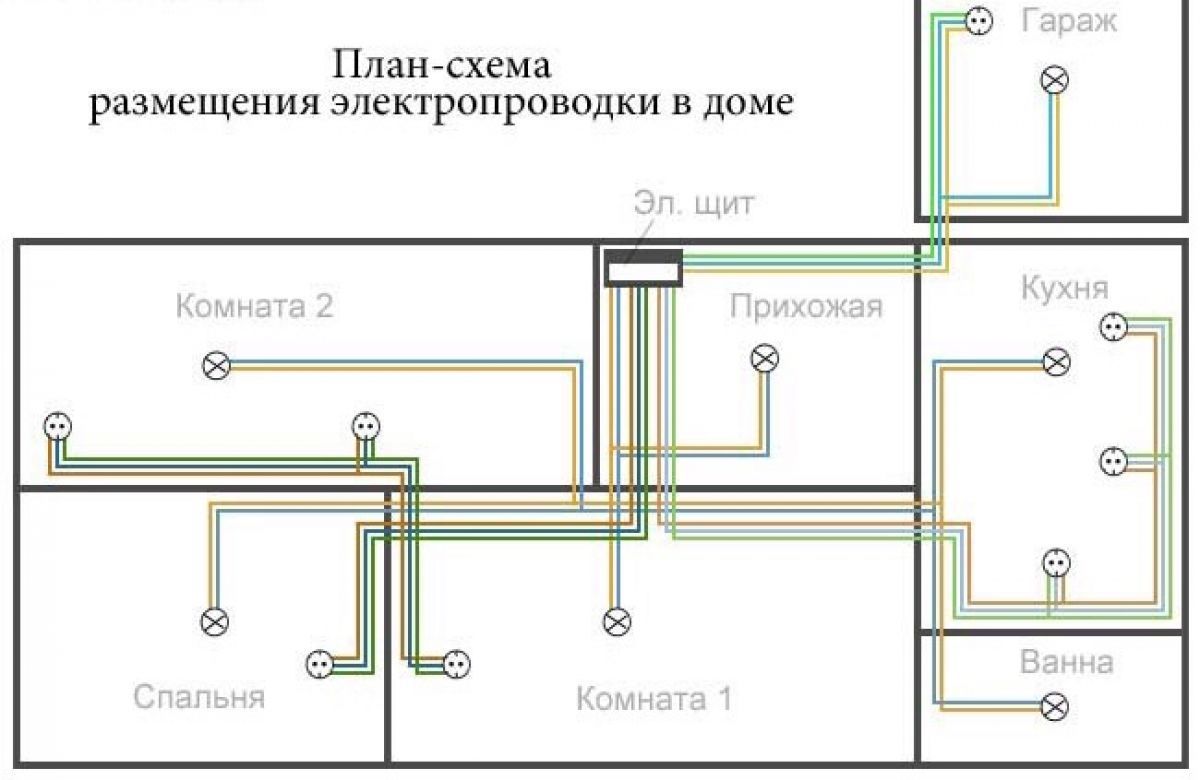
Now you need to determine how to lay the cables themselves. Lines from the switchboard to each junction box can be laid using the methods described in this table.
| Highway location | Peculiarities |
| Along the upper edge of the wall in a strobe or corrugated pipe | Used most often |
| On the floors, until the screeds on the floors are poured (in plastic pipes) | This is the shortest way. Here, by the way, strobes will not be useful, since when the floor is flooded, all the wires will be hidden. For such wiring, sockets mounted in baseboards are usually needed. By the way, now you can buy special kits - special plinth with cable channels, sockets, switches, junction boxes, etc. True, it is not suitable for any finish. |
| On the ceiling | Here, most likely, you will have to make strobes, however, the consumption of materials will also be economical. Junction boxes can also be placed on the ceiling, but this will hardly be convenient when repairs are needed. This method is relevant only when a stretch or false ceiling is supposed to hide the lines. |
With self-wiring, only the first option is suitable, and despite the great advantages of the other two, it is no worse than them. It will just take more time, but since the plan to lay the wiring with your own hands has reached the strobe stage, the most difficult thing is over.
* (strobes - this is the penultimate stage wiring paths)
The nuances of making strobes
It is worth noting that, in accordance with regulatory enactments, it is prohibited to ditch load-bearing walls and ceilings. But they noted that only horizontal strobes are not allowed to be laid. If the groove is vertical, then this is considered acceptable.
Naturally, one should not get too carried away here, because large vertical strobes can greatly weaken the structure. Trench should be to a depth not exceeding 10mm. The valve must not be dismantled.

It is possible to fix the wiring in the strobes with the support of dowels-clamps. In this case, it will be necessary to drill more small holes in order to install these dowels.
Recommendation: chasing is considered a difficult and noisy activity. For its implementation it is necessary to wear goggles protecting the eyes. In this case, the procedure will go much faster if you use a wall chaser, which is equipped with 2 laser discs and a dust extraction unit.
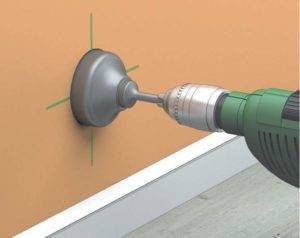 In addition to the strobe for electrical cables, it will be necessary to gouge holes for the sockets. The depth of the recesses for these purposes should not exceed 45mm. The diameter can be 80mm or more. It already completely depends on the dimensions of the socket itself.
If there is no desire to carry out a floor screed in a panel house, use plaster or mount a ceiling suspension system, then replacing the electrical wiring becomes much more complicated. As you know, it is best to hide the wiring in the wall.
In this case, the electrical cable must be horizontal. Of course, it is possible to hide electrical wiring in a strobe, but only vertically, since horizontal ones are prohibited. What to do with horizontal laying, because it is also necessary?
This is where the panel layout helps.You can use the gap that is formed in the place where the ceiling panels are joined to the wall. Quite often, this place is filled with plaster, cotton wool and even various rags. It is easy to release, clean and use for wiring.
It is also possible to try to apply the old "routes". If the old cable is simply plastered in them, then it will not be so difficult to get it out and clean the channel.
Problems will appear if this channel is filled with concrete. If none of the options can be applied, then to change the old electrical wiring it will be necessary to make an open type wiring.


How to change the wiring in the apartment without the help of an electrician?
It should be borne in mind that local replacement will not lead to anything good, but will only aggravate the situation. So get ready to carry out work in the whole house at once.
Step 1: De-energize
Despite the fact that this stage is one of the simplest, it can be considered the most important - after all, the slightest flaw and you can get an electric shock. So the main condition is a completely de-energized object - for this it is necessary to turn off all the machines in sequence. Just in case, check with a tester or test lamp if there is no voltage in the sockets.
Step 2: Dismantling
After checking, you can proceed directly to the dismantling of all wires and connection points. First, remove all sockets and their boxes, especially if the latter are made of plastic.In principle, if you are dealing with hidden wiring located in concrete walls, which is often typical for Khrushchev houses, then in this case there is no need to remove all the wires (of course, if you don’t want to put new ones into the old grooves), just bite them off and isolate the ends .
Step 3: Making a plan
Draw up a detailed plan for the location of the new network and enter all dimensions into it, for example, on which height from ceiling or the floor, walls and door openings will be wired. This will help you in the future, because everything is forgotten very quickly, and therefore sometimes even a simple nail driven into the wall will damage the cables immured in it, which will result not only in problems associated with replacing the damaged element, but can also be harmful to health. Of course, the layout plan can remain the same, but then check all the dimensions.
Step 4: Surface preparation
We clean the old furrows thoroughly from dirt and dust. If it is necessary to make new grooves, and this often happens, then we draw two parallel lines on the wall in the right place at a distance of 2 centimeters from each other, which will be their edges. Then we pass through them with a grinder (the depth of the cut is about 4 cm) and hollow out the middle with a hammer and chisel. Places for sockets, junction boxes and switches are cut out with a puncher with a special nozzle. If, when dismantling the old sockets and switches, you gouged the wall too much, then you need to plaster the extra space.
Step 5: Direct installation
First we install all the boxes, fixing them in the seats with a solution or with alabaster.Next, we separate the wires from the shield to the junction boxes, and then from the latter to each specific connection point. They fit into pre-prepared grooves and are attached there in a similar way. If the old wires from lighting fixtures can be easily pulled over, as described in the second step, then by attaching a new cable to one of their ends, it is quite possible to replace it without gating.
Step 6: Checking and Plastering
In principle, we have already figured out how to replace the electrical wiring in the apartment, only a little remains - strobe plaster. But first, you should test the resulting network. This is done quite easily - using an indicator screwdriver or a special tester. When you are convinced that your work is in good condition, wall it up in the walls, this is the end of the job.
Stages of work
Do-it-yourself wiring replacement needs to strictly follow the stages of work, as well as comply with all the recommendations of experienced electricians. Only in this case, it is possible not only to obtain a decent result of work, but also to carry out the wiring so that it does not cause a fire.
Temporary device
When replacing the old electrical wiring in the house, the electrician in the house must be turned off. But it is necessary for the operation of electrical appliances. In this case, a repair time should be made. It is a structure made of plastic or wooden beams, an extension cord and a socket. This design is connected to an external meter to completely de-energize an apartment or house.
Dismantling old wiring
Dismantling of electrical wiring is carried out only after the electricity in the apartment is completely turned off. It's best to use a multimeter to check.Dismantling starts from distribution boxes installed under the ceiling. It is necessary to open the box, find and remove the lead wire. If its removal is not possible, it is recommended to cut it as far as possible and isolate it. The rest of the wires are dismantled according to this principle.
wall chasing
It is possible to carry out wall chasing horizontally and vertically. If the work is carried out inaccurately, and the grooves turn out to be crooked, this can lead to future emergencies.
The boundaries of the grooves are best determined with a puncher, and then manually align them with a chisel. In those places where it is required to make an angle, it is necessary to make an oblique cut and knock out a hole. This is best done with a grinder. The absence of corners will allow the cable to lie flat, and avoid bends that lead to breakage and damage to the wire.
For creating holes in brick walls, into which the socket boxes will be inserted, you can use the crown put on the puncher. For concrete walls, such a tool will be ineffective, so it is best to use a chisel.
Holes for socket boxes must be made in those places where they will be convenient for use. Their places should be determined at the stage of drawing creation. Sockets for air conditioners, hoods and other stationary appliances should be placed as close as possible to the place where the appliance will be installed in order to hide the cord.
Wiring
Before laying the wires, it is necessary to prepare segments of the required size, as well as corrugations for them. After that, the wires should be tightened into the corrugations, and installed in pre-prepared strobes. The ends of the wires must be brought into the sockets.


After laying the wires, the socket boxes and strobes must be covered with a solution. Then lead the wire into the electrical panel and lubricate with thermally conductive paste. Connections must be strong and secure. The shield must be attached to the wall with dowels.

The temporary hut should be turned off, wires from the meter and ground should be put into the shield. After that, it is necessary to isolate the wire from the meter and put it in the electrical panel. The finished structure must be carefully fixed, after which it is possible to perform wall plastering and further decorative finishing.
Final stage
Replacing the old electrical wiring ends with the installation of sockets, sockets, switches and lighting fixtures.
An important step in replacing the wiring is to check each branch of the wires with a short circuit tester. To do this, turn on the electricity, then apply current and find using an indicator phase and zero. This will make it possible to lead the necessary wires to the appropriate terminals.
After inserting the wires into the desired terminals, it is recommended to check them again for a short circuit. If there are no problems, you can turn on the main machine and supply electricity to the house or apartment. It remains only to check the operation of all sockets, lamps and switches.
And only after that you can begin to carry out wall decoration and other repair work. Otherwise, it may be necessary to re-chase the walls in order to identify places of poor wire connection.