- How to replace a damaged gasket in a bathroom faucet
- Of the tools useful:
- Step-by-step description of the gasket replacement process
- How to replace the crane box?
- Two-valve faucet repair
- Repair of the "worm" crane box
- Repair of ceramic crane box
- Characteristic features of the main types of crane boxes
- How to unscrew the faucet nut if it is stuck
- Dissolving rust
- We heat the nut
- We destroy the nut
- How to replace the crane box with your own hands?
- 4 comments on Replacing the faucet box in a two-valve mixer - step by step instructions
- Conclusion
How to replace a damaged gasket in a bathroom faucet
With a successful set of circumstances, all the work will take you no more than 20 minutes and you will never again wonder how to replace the gasket in the mixer. Do not be afraid, do everything with a firm hand - the result will not be long in coming!
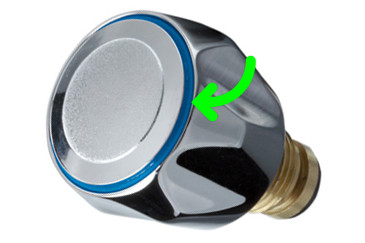
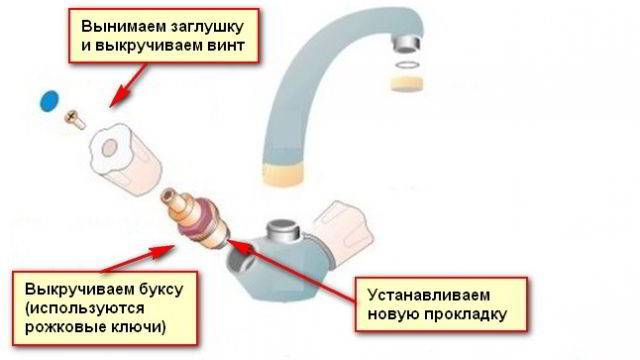
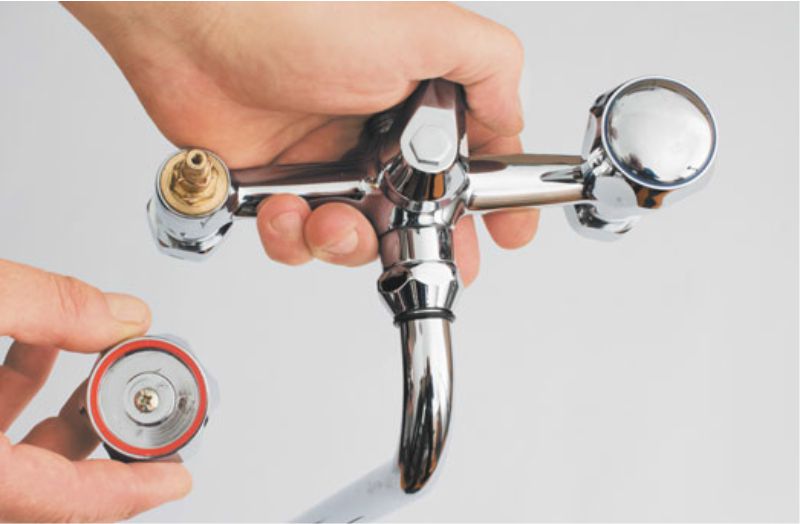
Using a screwdriver, a knife or your own fingers, remove the decorative cap from the faucet taps
Please note: you will need a screwdriver and a knife to pry it off and remove it, but you will have to use your fingers if the plug is threaded
If the decorative cap is stuck with lime, then you will have to carefully pick it with a knife or make an vinegar lotion for the night. In the latter case, the work time will increase, but there are more chances to maintain the integrity of the mixer.
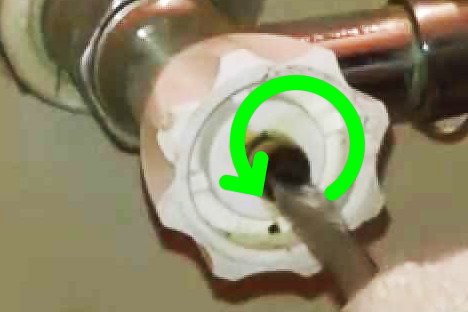
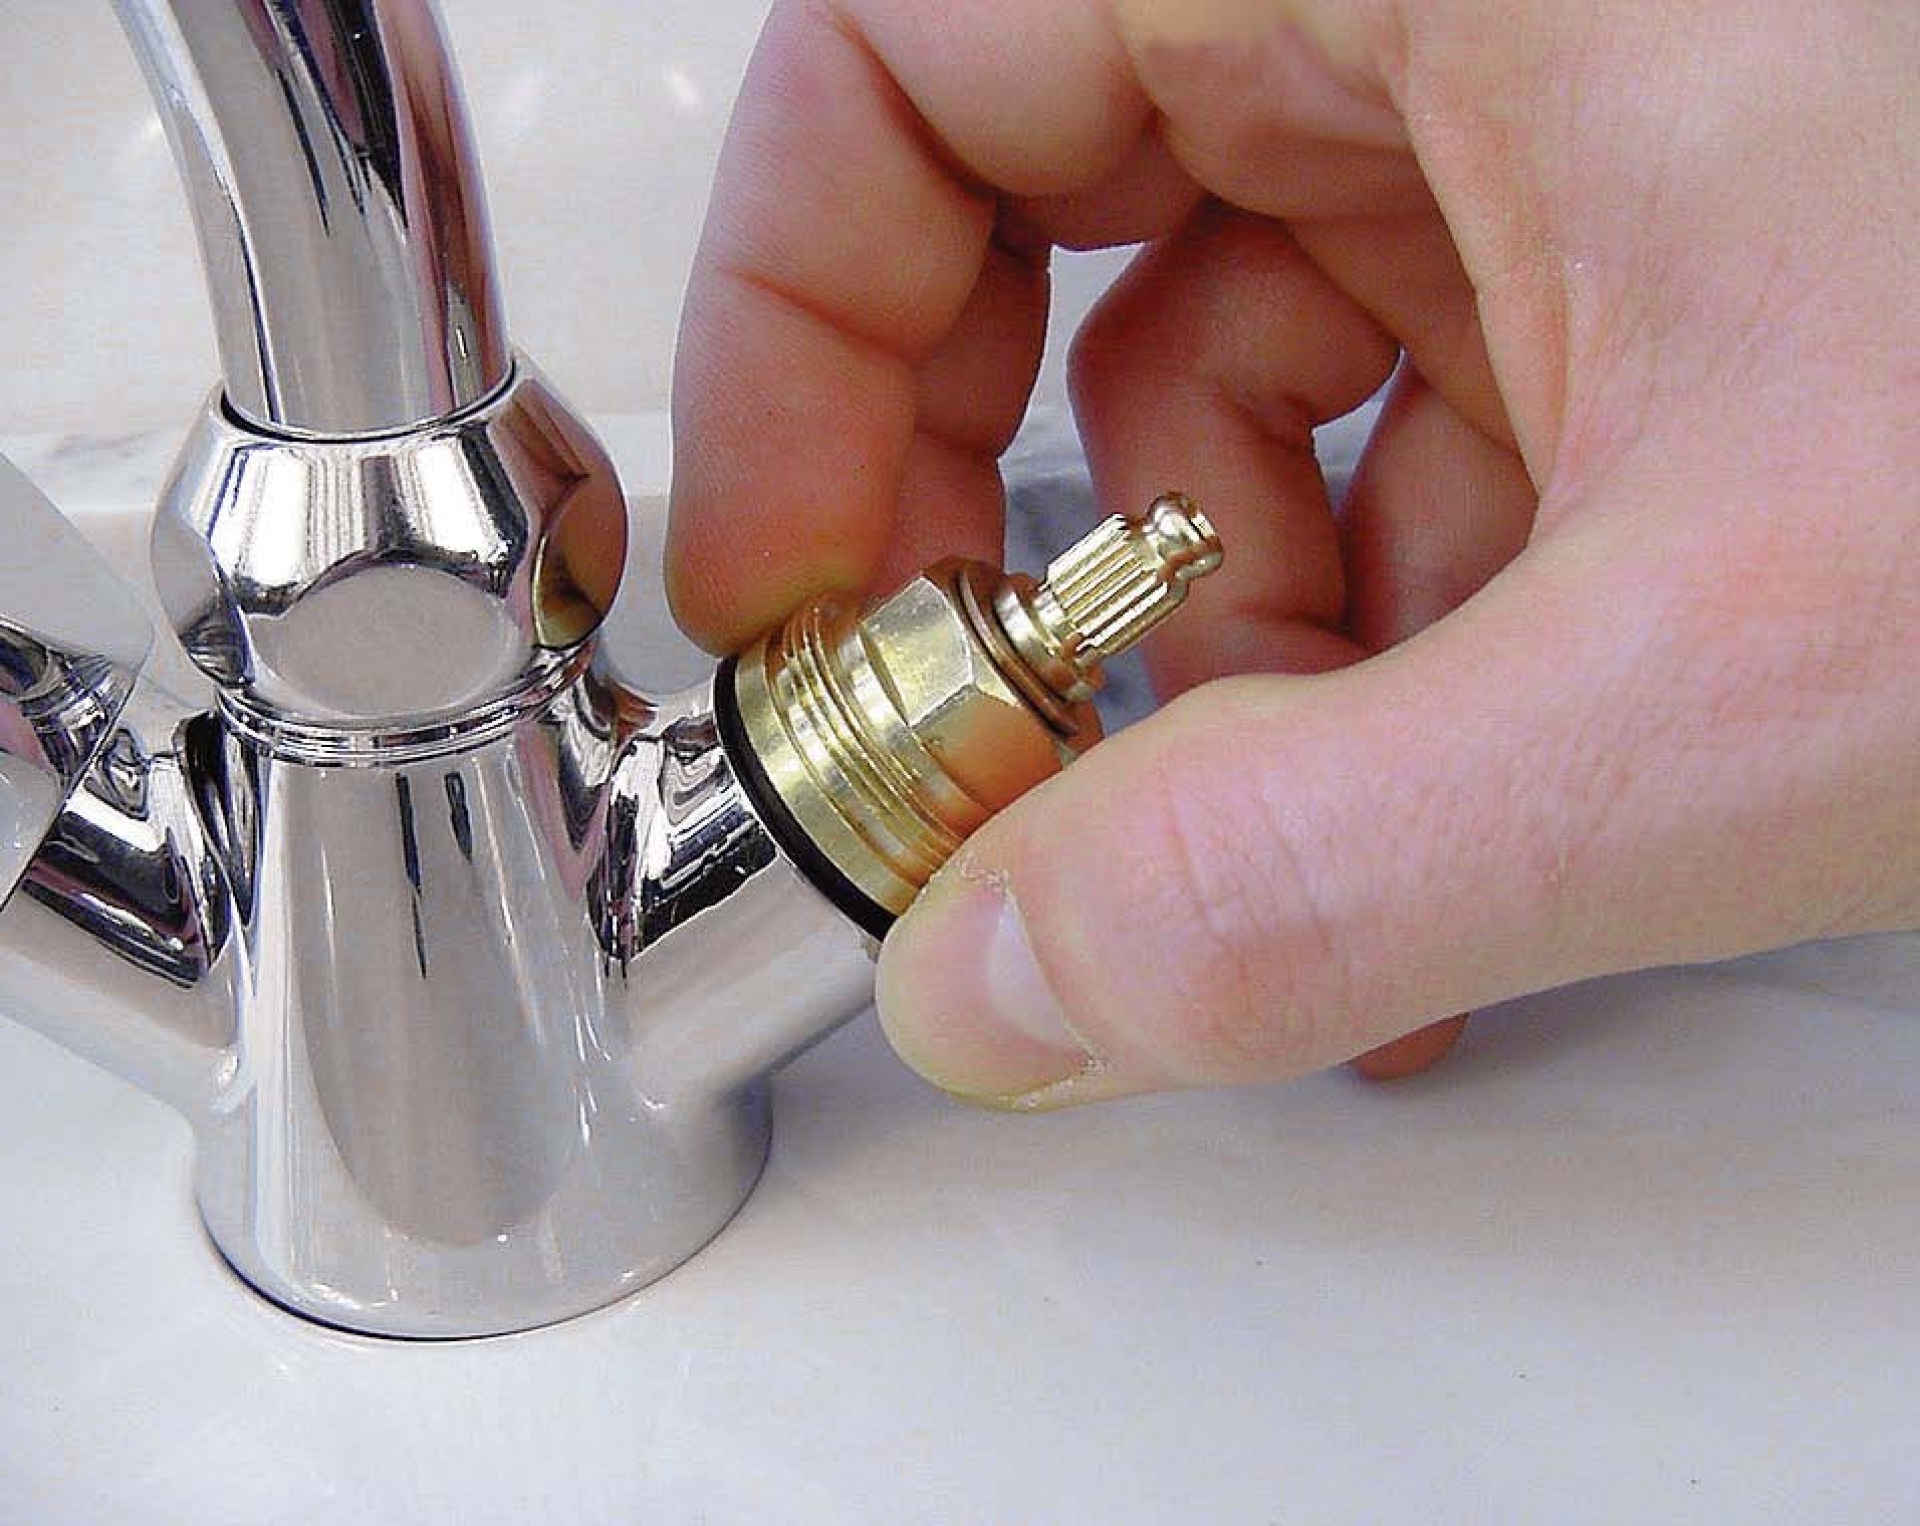
In the center of the valve you will see a bolt that must be unscrewed using a screwdriver of the right type and size. Thus, you will remove the valve and expose part of the crane box.
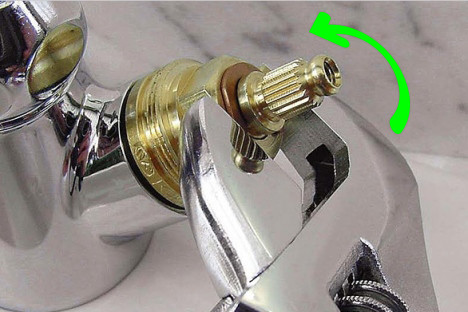
Now it's time to take on the adjustable wrench or wrench. With its help, the crane box is completely unscrewed
Please note: it may have a so-called lock nut. First you need to take it off.
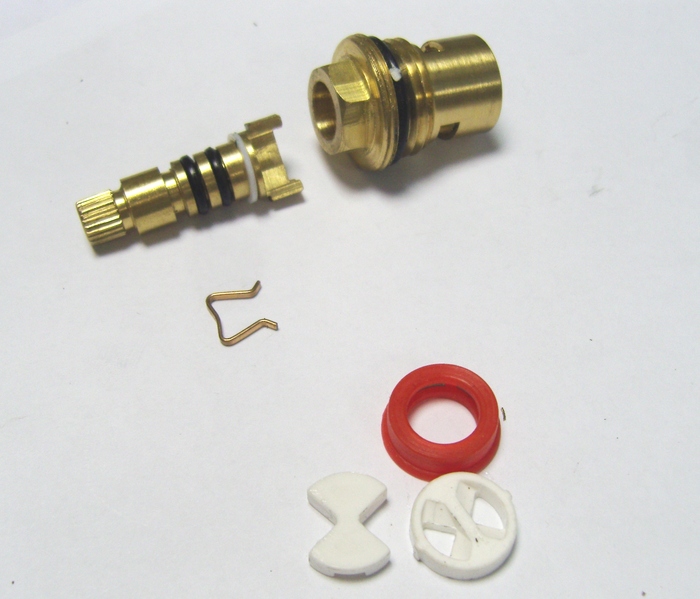
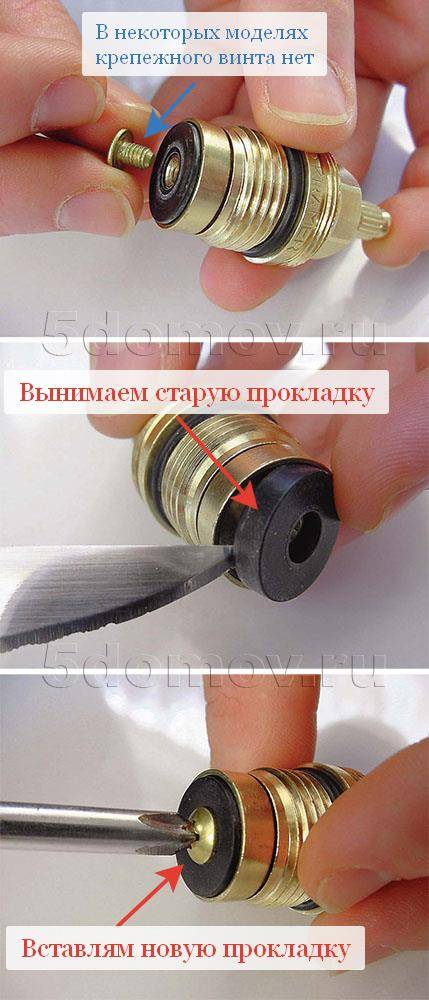
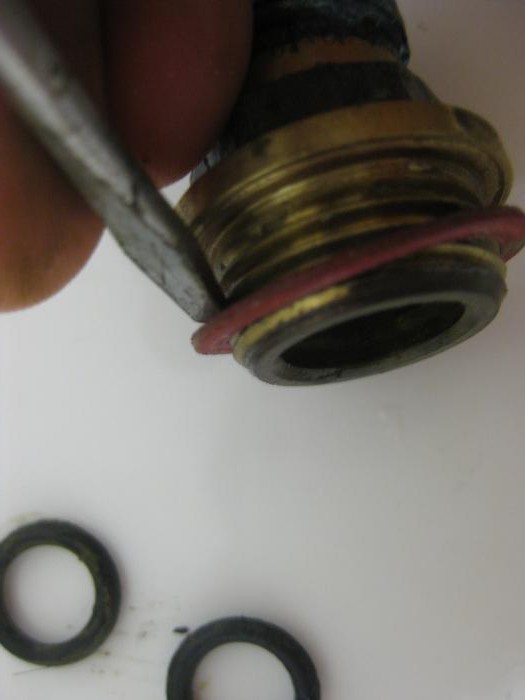
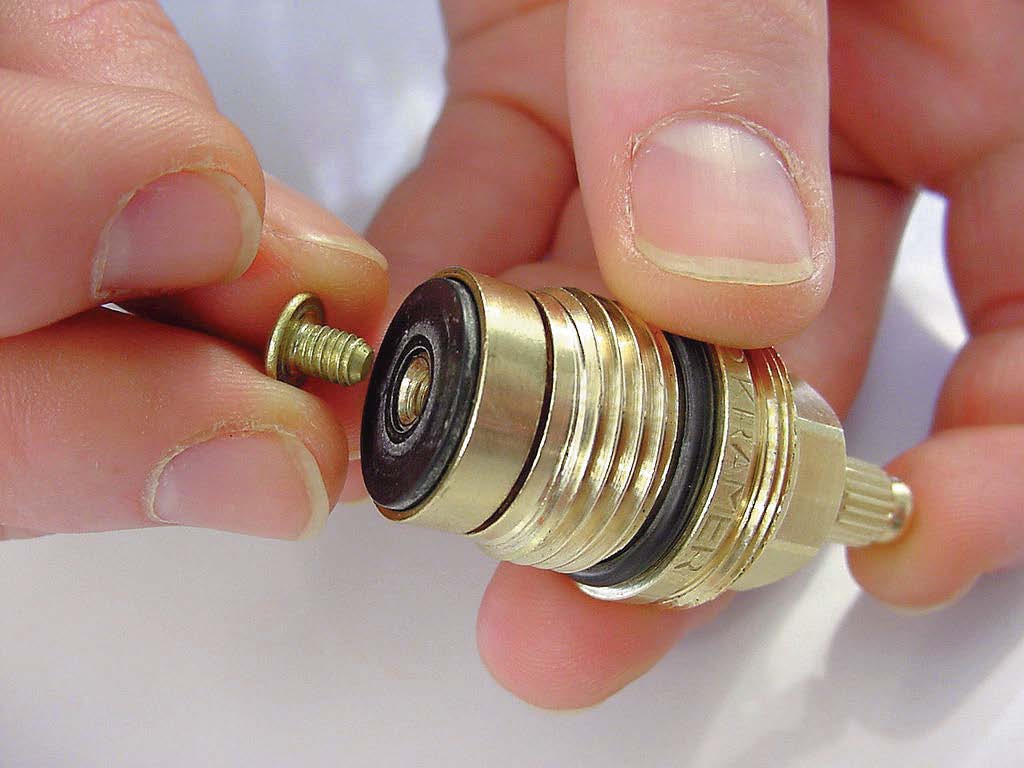
At the end of the crane box, you will see a gasket. It can be rubber or paronite. Take off the old one and put on the new one
Please note: if you have a worm-drive crane box, then a new gasket should be put on the stem with some effort, if it is ceramic, then it should exactly fit the diameter of the product
Replacing gaskets in a ceramic faucet mixer must be done with extreme caution! If ceramic elements are damaged or incorrectly installed in it, the faucet will not work properly.
The mixer is assembled in the reverse order: the crane box is screwed in, the lock nut is screwed on, the valve is put on and bolted. The final touch - a decorative cap is attached.


That's all! Turn on the water (start with low pressure, gradually adding) and check the quality of work. Open and close taps several times. If there are no unpleasant surprises, everything works fine, you can safely congratulate yourself!
Of the tools useful:
- Phillips and flat screwdriver
- scissors or thin knife
- Adjustable wrench.
Before starting work, you can immediately determine which of the gaskets has leaked: if water flows from under the tap itself, then the problem is in the tap gasket, but if water drips from the valve head, then it is necessary to remove the crane box.
Step-by-step description of the gasket replacement process
- After the valve is closed, drain the remaining water in the pipe by opening all the taps connected to this pipe.
- Place a bucket or other container under the faucet in case there is water left in it.
- Remove the faucet handle. To do this, first pry off the decorative plug with a knife, then unscrew the opened screw. Remove the released flywheel.
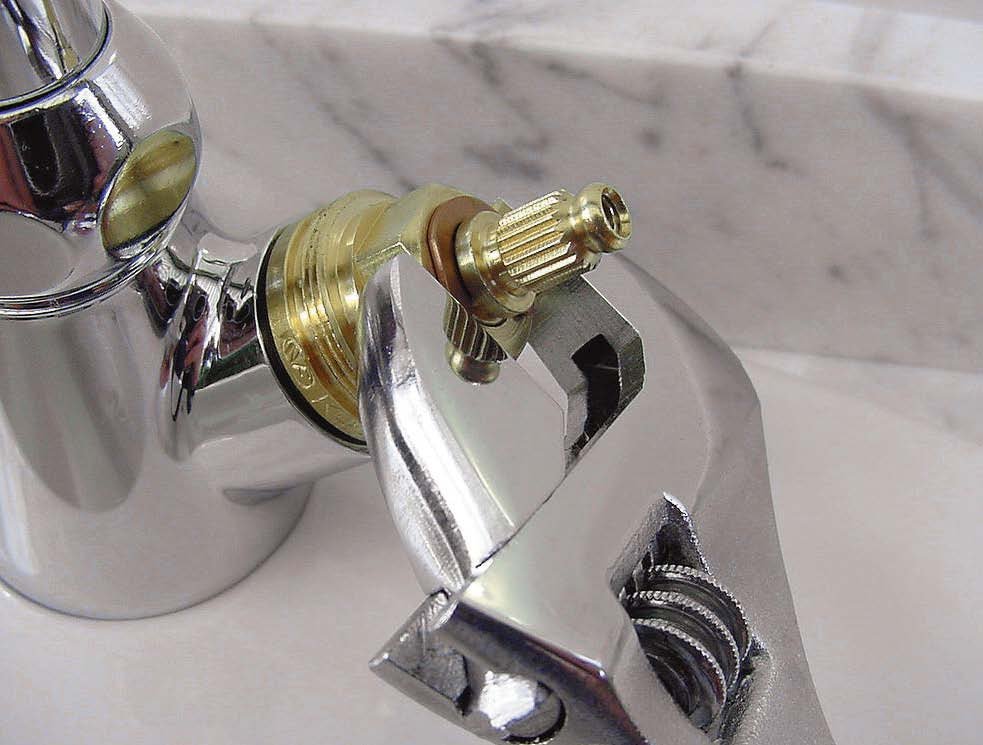
- Using an adjustable wrench, unscrew the faucet head.
After assembly, it is necessary to check the operation of the crane. To do this, the valve on the pipe must be slightly unscrewed, then open the tap and check for leaks. If the valve is adjusted smoothly, there are no leaks in the open form, then the valve is closed and checked in the closed state. If everything is in order here, then the valve on the pipe is fully opened.
Worn gaskets are the most common cause of leaky faucets. To reduce the likelihood of rapid wear and extend the life of your faucet, you can install a coarse water filter. It will prevent rust particles and various grains of sand from getting on the ceramic or rubber parts of the faucet. After all, it is during the vibration of small debris that the deformation of the sealing parts occurs. In addition, the replacement of pipes with new ones will have a positive effect. But even if a leak has already occurred, then, as we have seen, there is nothing difficult in replacing the gasket.
How to replace the crane box?
1. If you mustered up your courage and decided to replace the faucet box yourself, then the first thing you need to do is to turn off the supply of cold and hot water with shut-off valves at the inlet from the riser (water meters).

After you have shut off the water from the riser, you need to check whether the water is completely shut off. To do this, unscrew the cold and hot water taps on the mixer.If water does not start flowing from the mixer, then you have shut off the water well and you can start replacing it.
In the event that you plan to replace only one faucet box, you can only cut off the supply of the corresponding water. Just keep in mind that in this case you will not be able to open the second crane box. So, if you can shut off all the water, you better do it.
2. Remove the valve handle. To do this, remove the decorative valve cap. If it is screwed onto the body of the handle, then unscrew it counterclockwise with your hands, or carefully using pliers. If the plug is inserted into the handle body, carefully pry it out with a knife or flathead screwdriver and remove it from the valve.
 |  |
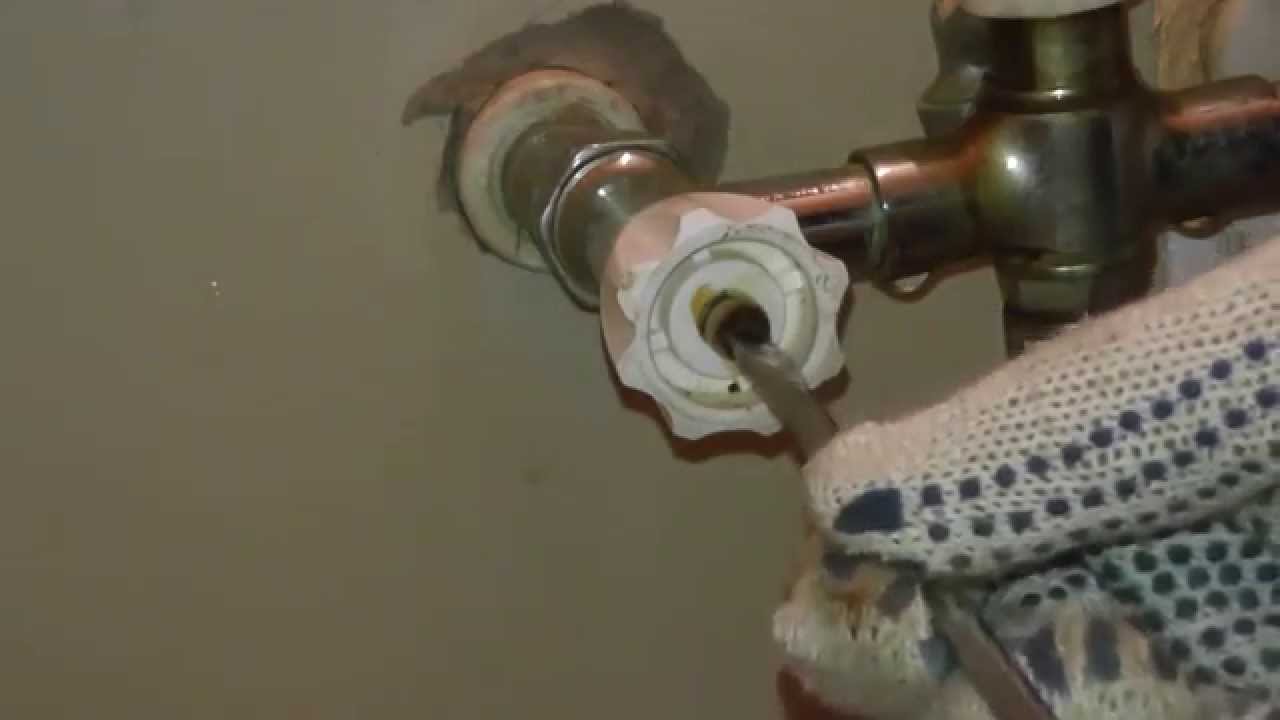
3. Unscrew the screw that has opened to your eyes with a suitable screwdriver and remove the valve.
It often happens that the valve handle is jammed on the splines of the valve stem and does not want to be removed. In this case, try to pull the handle off by loosening it in different directions, or gently tapping it from different sides. You can also try moistening the seat of the handle on the stem with kerosene or a penetrating lubricant.
Some faucets have an additional decorative slip skirt covering the top of the faucet box.
After removing the handle, unscrew the decorative skirt by hand, turning it counterclockwise. If it is not screwed on the thread, then simply pull it off the mixer body.
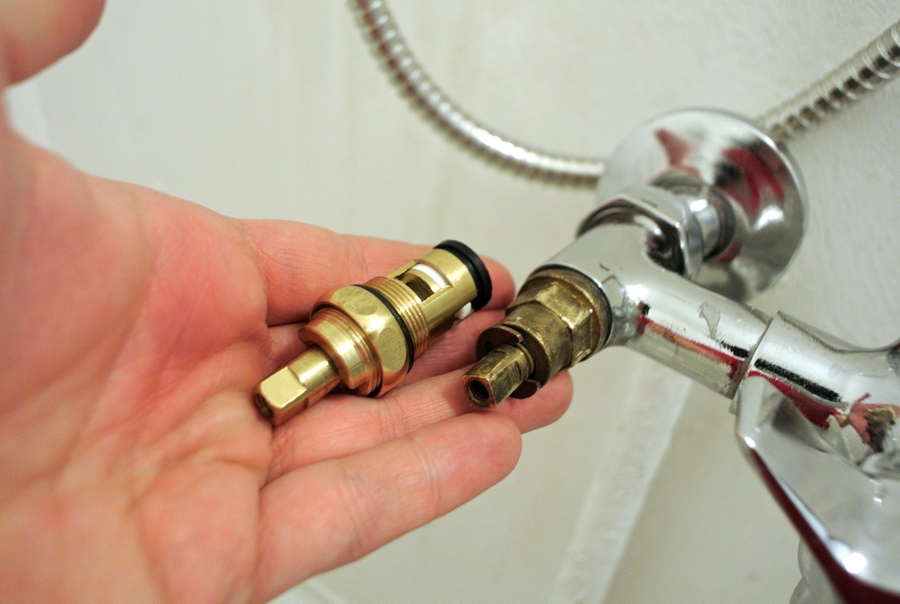
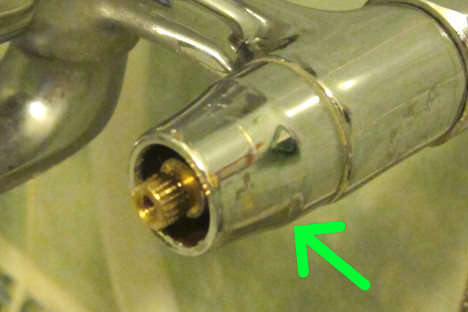
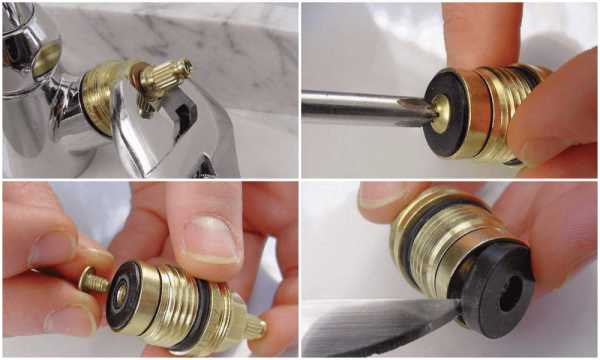
4. Using an adjustable wrench, open-end wrench or pliers, unscrew the faucet box by turning it counterclockwise and remove it from the mixer body.
5. Purchase a new crane box.To be completely sure that you will get the crane box that suits you, take the old crane box that you just removed with you to the store or to the market and show it to the seller. This way you will insure yourself against buying the wrong part.


At this stage, you will be able to upgrade your faucet. If your faucet was previously equipped with worm-type faucets, then instead of them you can purchase and install ceramic faucets of suitable size. In this way, you will increase the reliability of the mixer and significantly improve its user performance. In addition, ceramic bushings are installed in the same places where their old worm relatives previously stood, without the need for any alterations.
6. Install the new crane box in reverse order. Check for the presence of the necessary rubber seals in the design. Before installation, I recommend cleaning the thread for the tap-box in the mixer and the seat from possible dirt, scale, rust particles, etc.
Take care not to over-tighten the threaded connections during installation. Screw the faucet box into the mixer by hand until it stops. Then, without applying too much effort, so as not to strip the thread, tighten the axle box with a wrench or pliers.
7. Close the installed bushings, then open the shut-off valves to check the quality of the work done. If water drips somewhere after installation, tighten the appropriate connections with a wrench.
Replace the decorative skirt, valve, plug and you can use the updated mixer.
In the event that you decide to only replace the gasket on the worm-type bushing (note that the ceramic bushing changes completely), then you will still need to remove the bushing first, using the instructions you read earlier.
Two-valve faucet repair
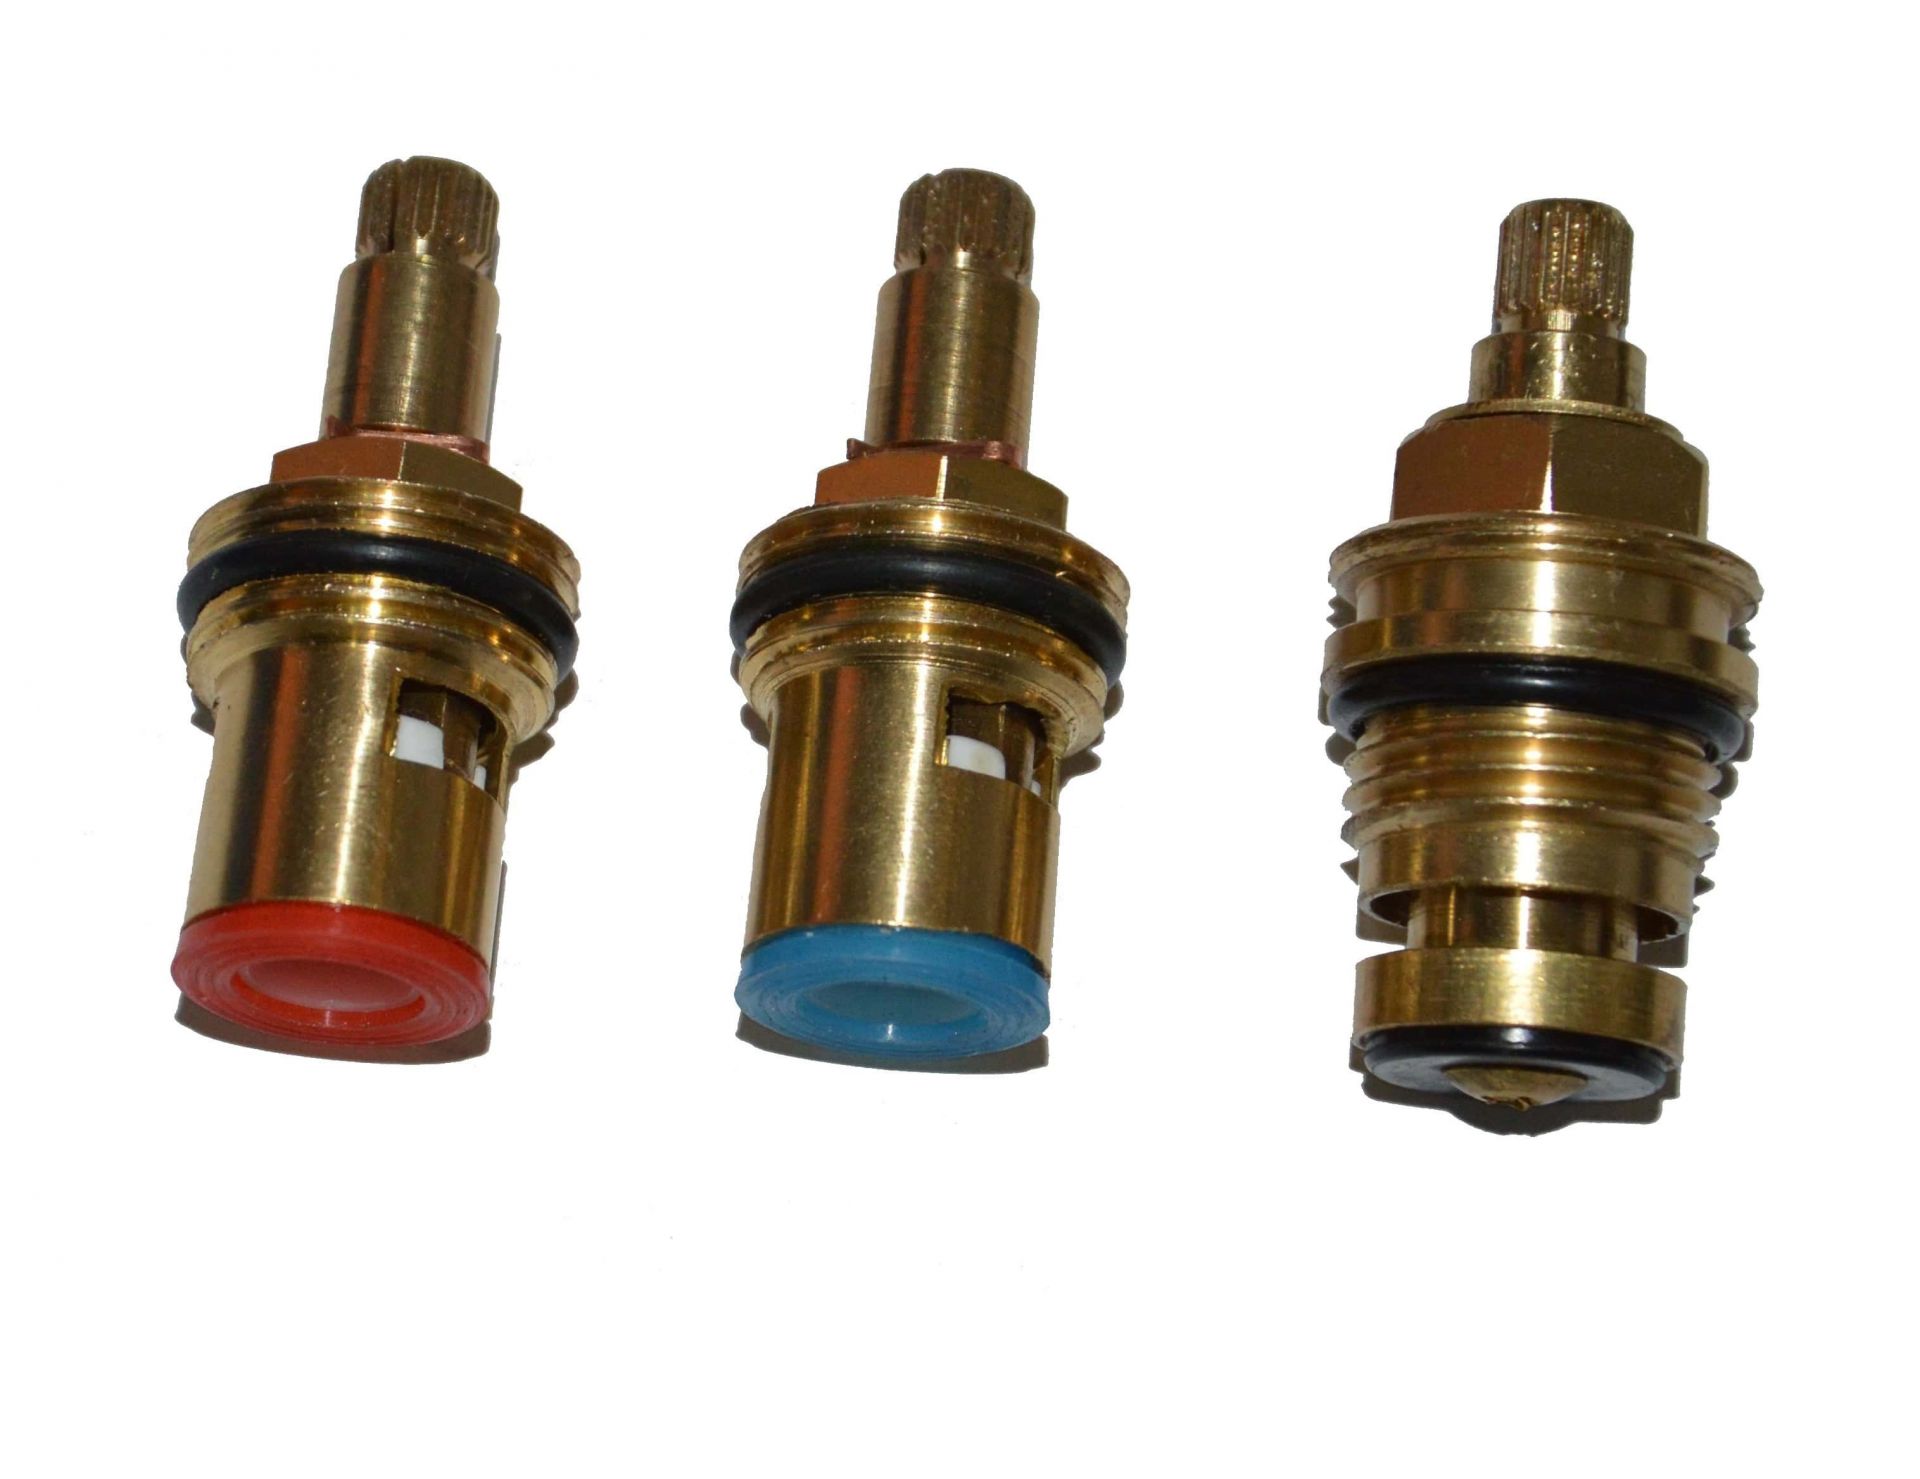
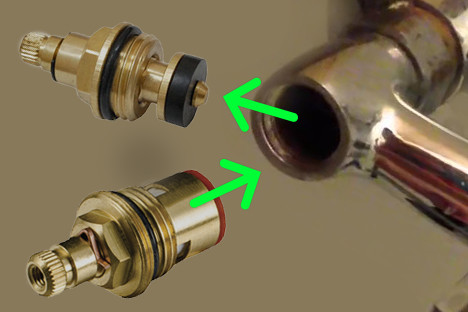
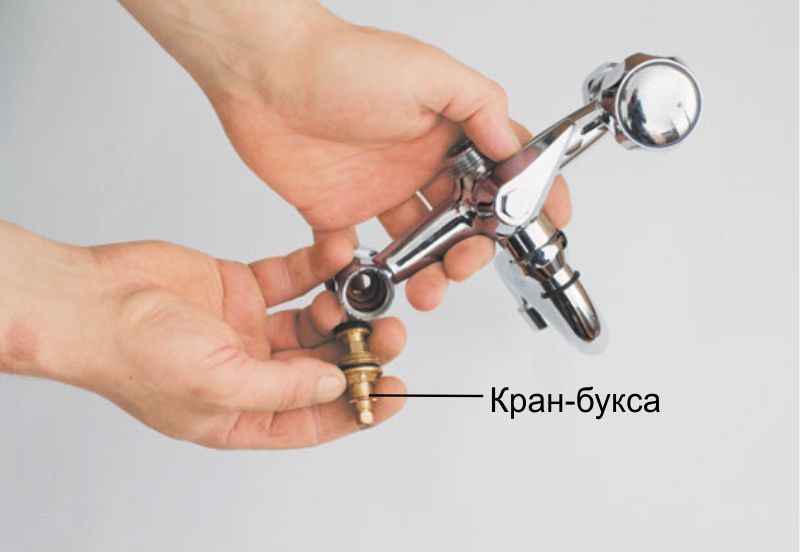
In two-valve models, mixing water to the desired temperature in the kitchen is carried out manually. The main node of such equipment is a crane - axle boxes. In modern mixers, two types of taps are used - axle boxes: "worm" (with a rubber gasket) and ceramic. Each of the equipment has its own advantages and disadvantages.
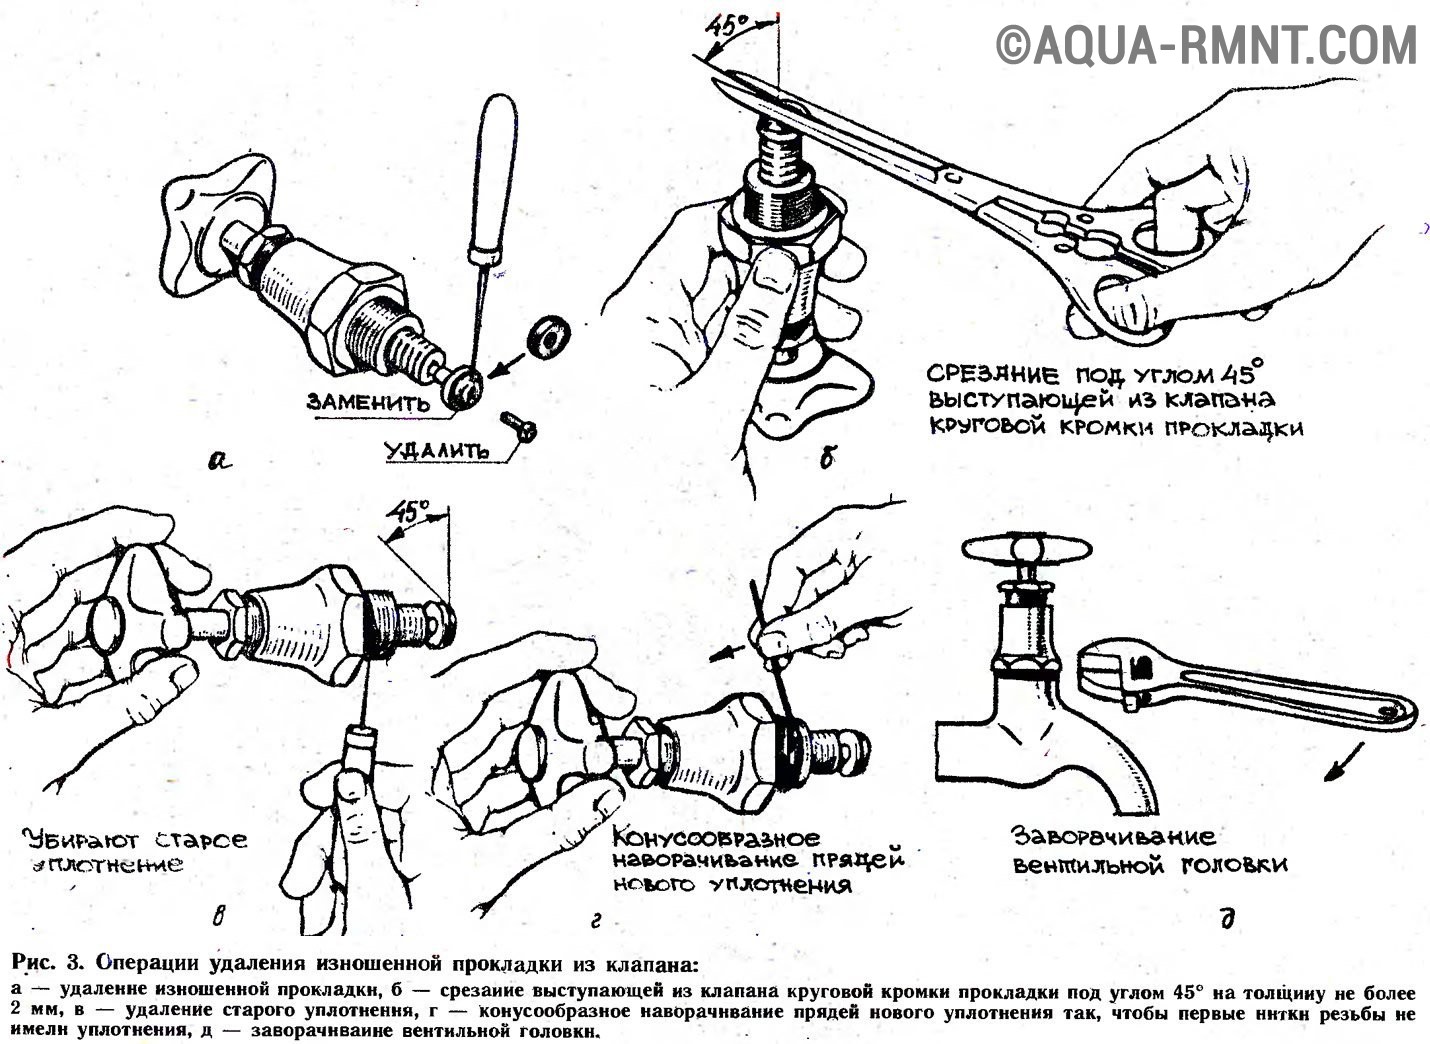
Repair of the "worm" crane box
The flow of water in the "worm" type device is held back by a rubber gasket. As the seal wears out, the seal between it and the mixer body is broken. To shut off the water supply, the valve has to be clamped harder each time. As a result, the gasket quickly "sits down", is damaged and ceases to cope with its task.
It is not difficult to make a seal on your own and install it on a mixer. Work algorithm Troubleshooting next:
- With a sharp object, a decorative valve cap is hooked and removed
- The screw located inside is unscrewed with a screwdriver
- The valve is removed, the axle box is removed (open-end wrenches are used)
- According to the model of the old gasket, thick leather or rubber is cut out and a new one is installed. Or use the factory gasket.
- Reassembly of removed elements
Another sign of rubber seal wear is a hum in the pipes at high pressure in the pipeline. Noises arise as a result of gasket resonation.
Attention! The consequence of constant clamping of the valves is the failure of the internal thread.In this case, you need a complete replacement of the node
Repair of ceramic crane box
The installation of such equipment in the kitchen is due to the convenience of its operation. Ceramic plates have a long service life. But on the other hand, they are very sensitive to water clogging. In the absence of pre-treatment of water, small particles penetrate into the mixer, which have an abrasive effect on ceramics. The sealing of the plates is broken and a leak forms between them.
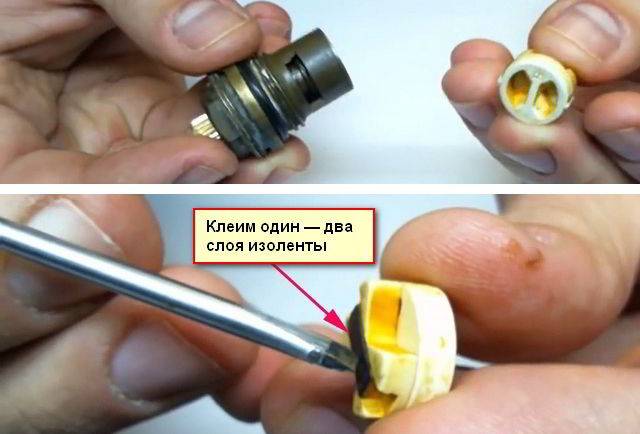
Sometimes the failure of the faucet-boxes is due to the wear of the gasket that presses the rotary ceramic pair. As a result of the weakening of the rigidity of the seal, the pressing force on the plates decreases. A blockage accumulates between them, which does not allow the plates to cling tightly. Water seeps through the cracks. The problem is solved by the method of "building". One or two layers of electrical tape are glued to the gasket
It is important not to forget to make holes for the movement of water.
In some cases, repair of the node is impossible or impractical. Eliminate the leak in the kitchen will allow the installation of a new axle box. The procedure for repair work with a ceramic mixer is similar to the algorithm for removing / installing "worm" devices.


When purchasing new spare parts for a crane, it is advisable to have old parts with you as a sample.
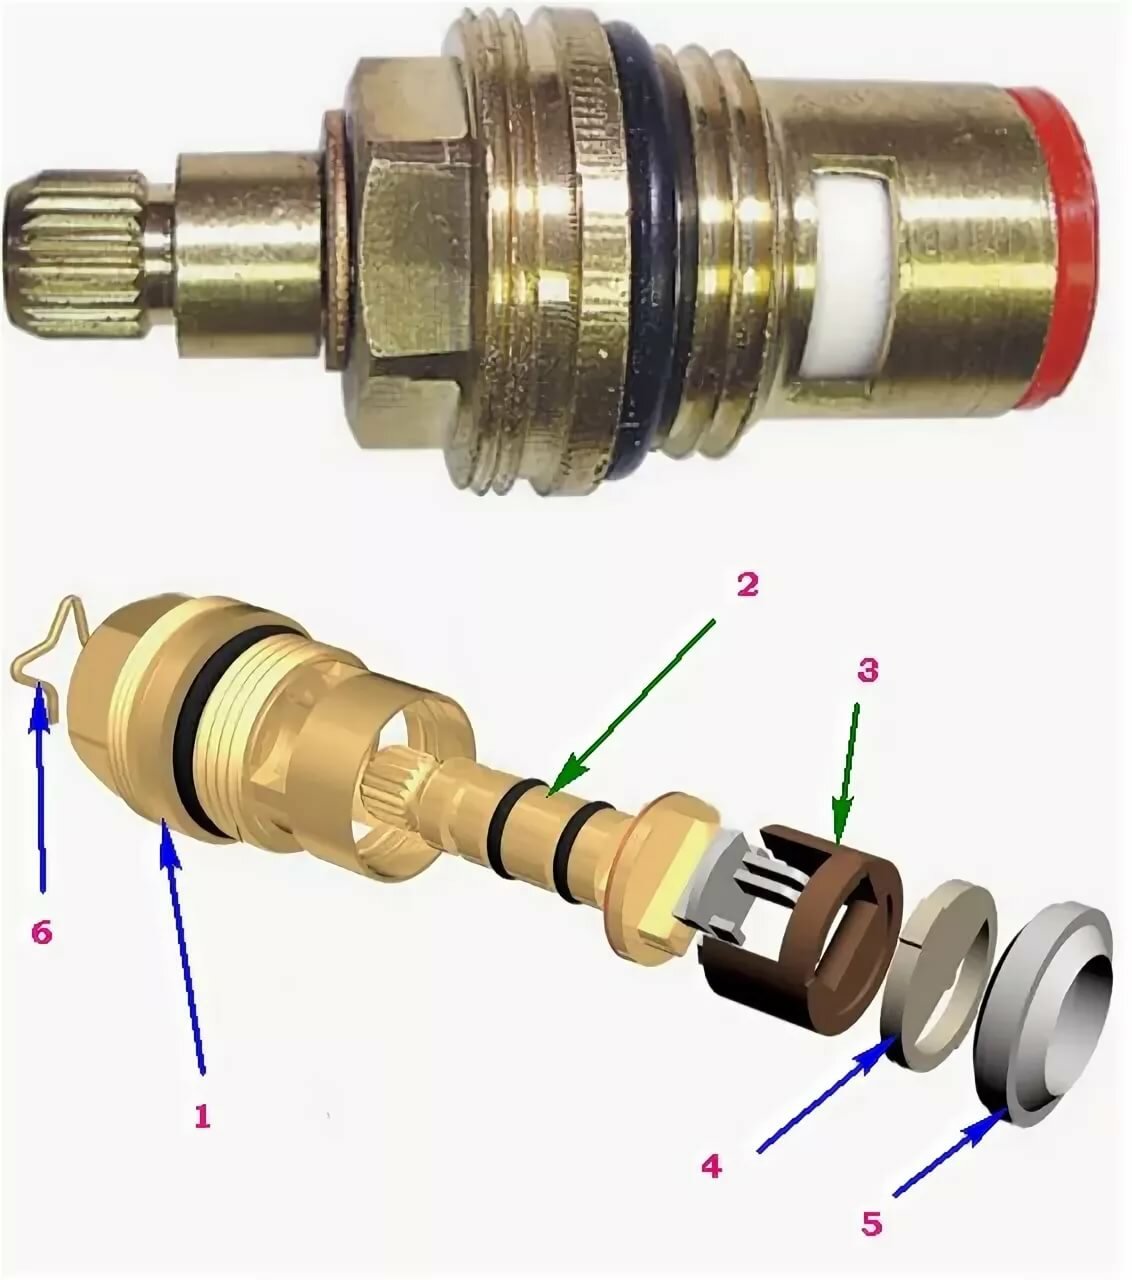
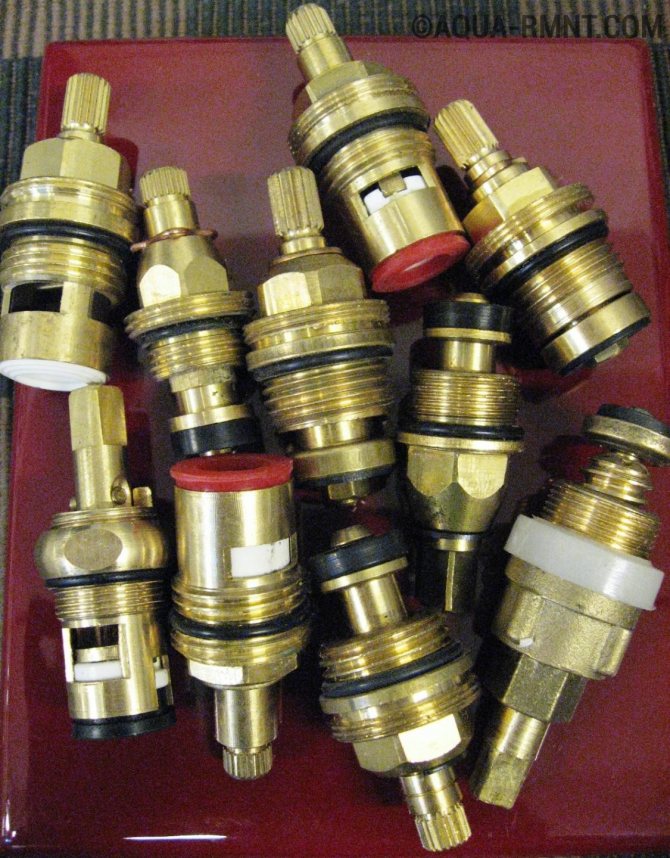
Characteristic features of the main types of crane boxes
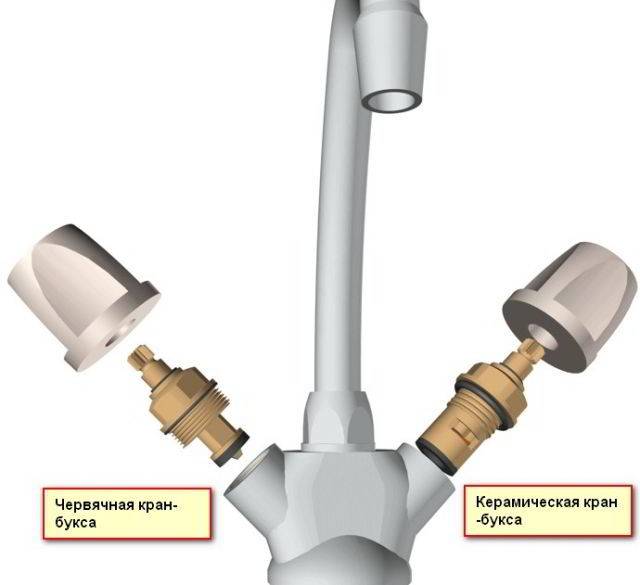
To understand how to change an old faucet box in a mixer, you need to know the types of faucet box for modern mixers. There are two types of these products:
- Ordinary worm with rubber cuffs.
- New generation with ceramic inserts.
Their difference is the length and number of slots. The imported product has 20 and 24 of them (under the handle).The domestic mixer has a square fixture for the handle, equipped with a special screw for fixing. They also differ in the diameter of the threaded part, the one that must be screwed into the faucet. The ½ inch diameter is more popular, the ¾ inch diameter is less common.
Let's take a closer look at the varieties of these products and their main differences.
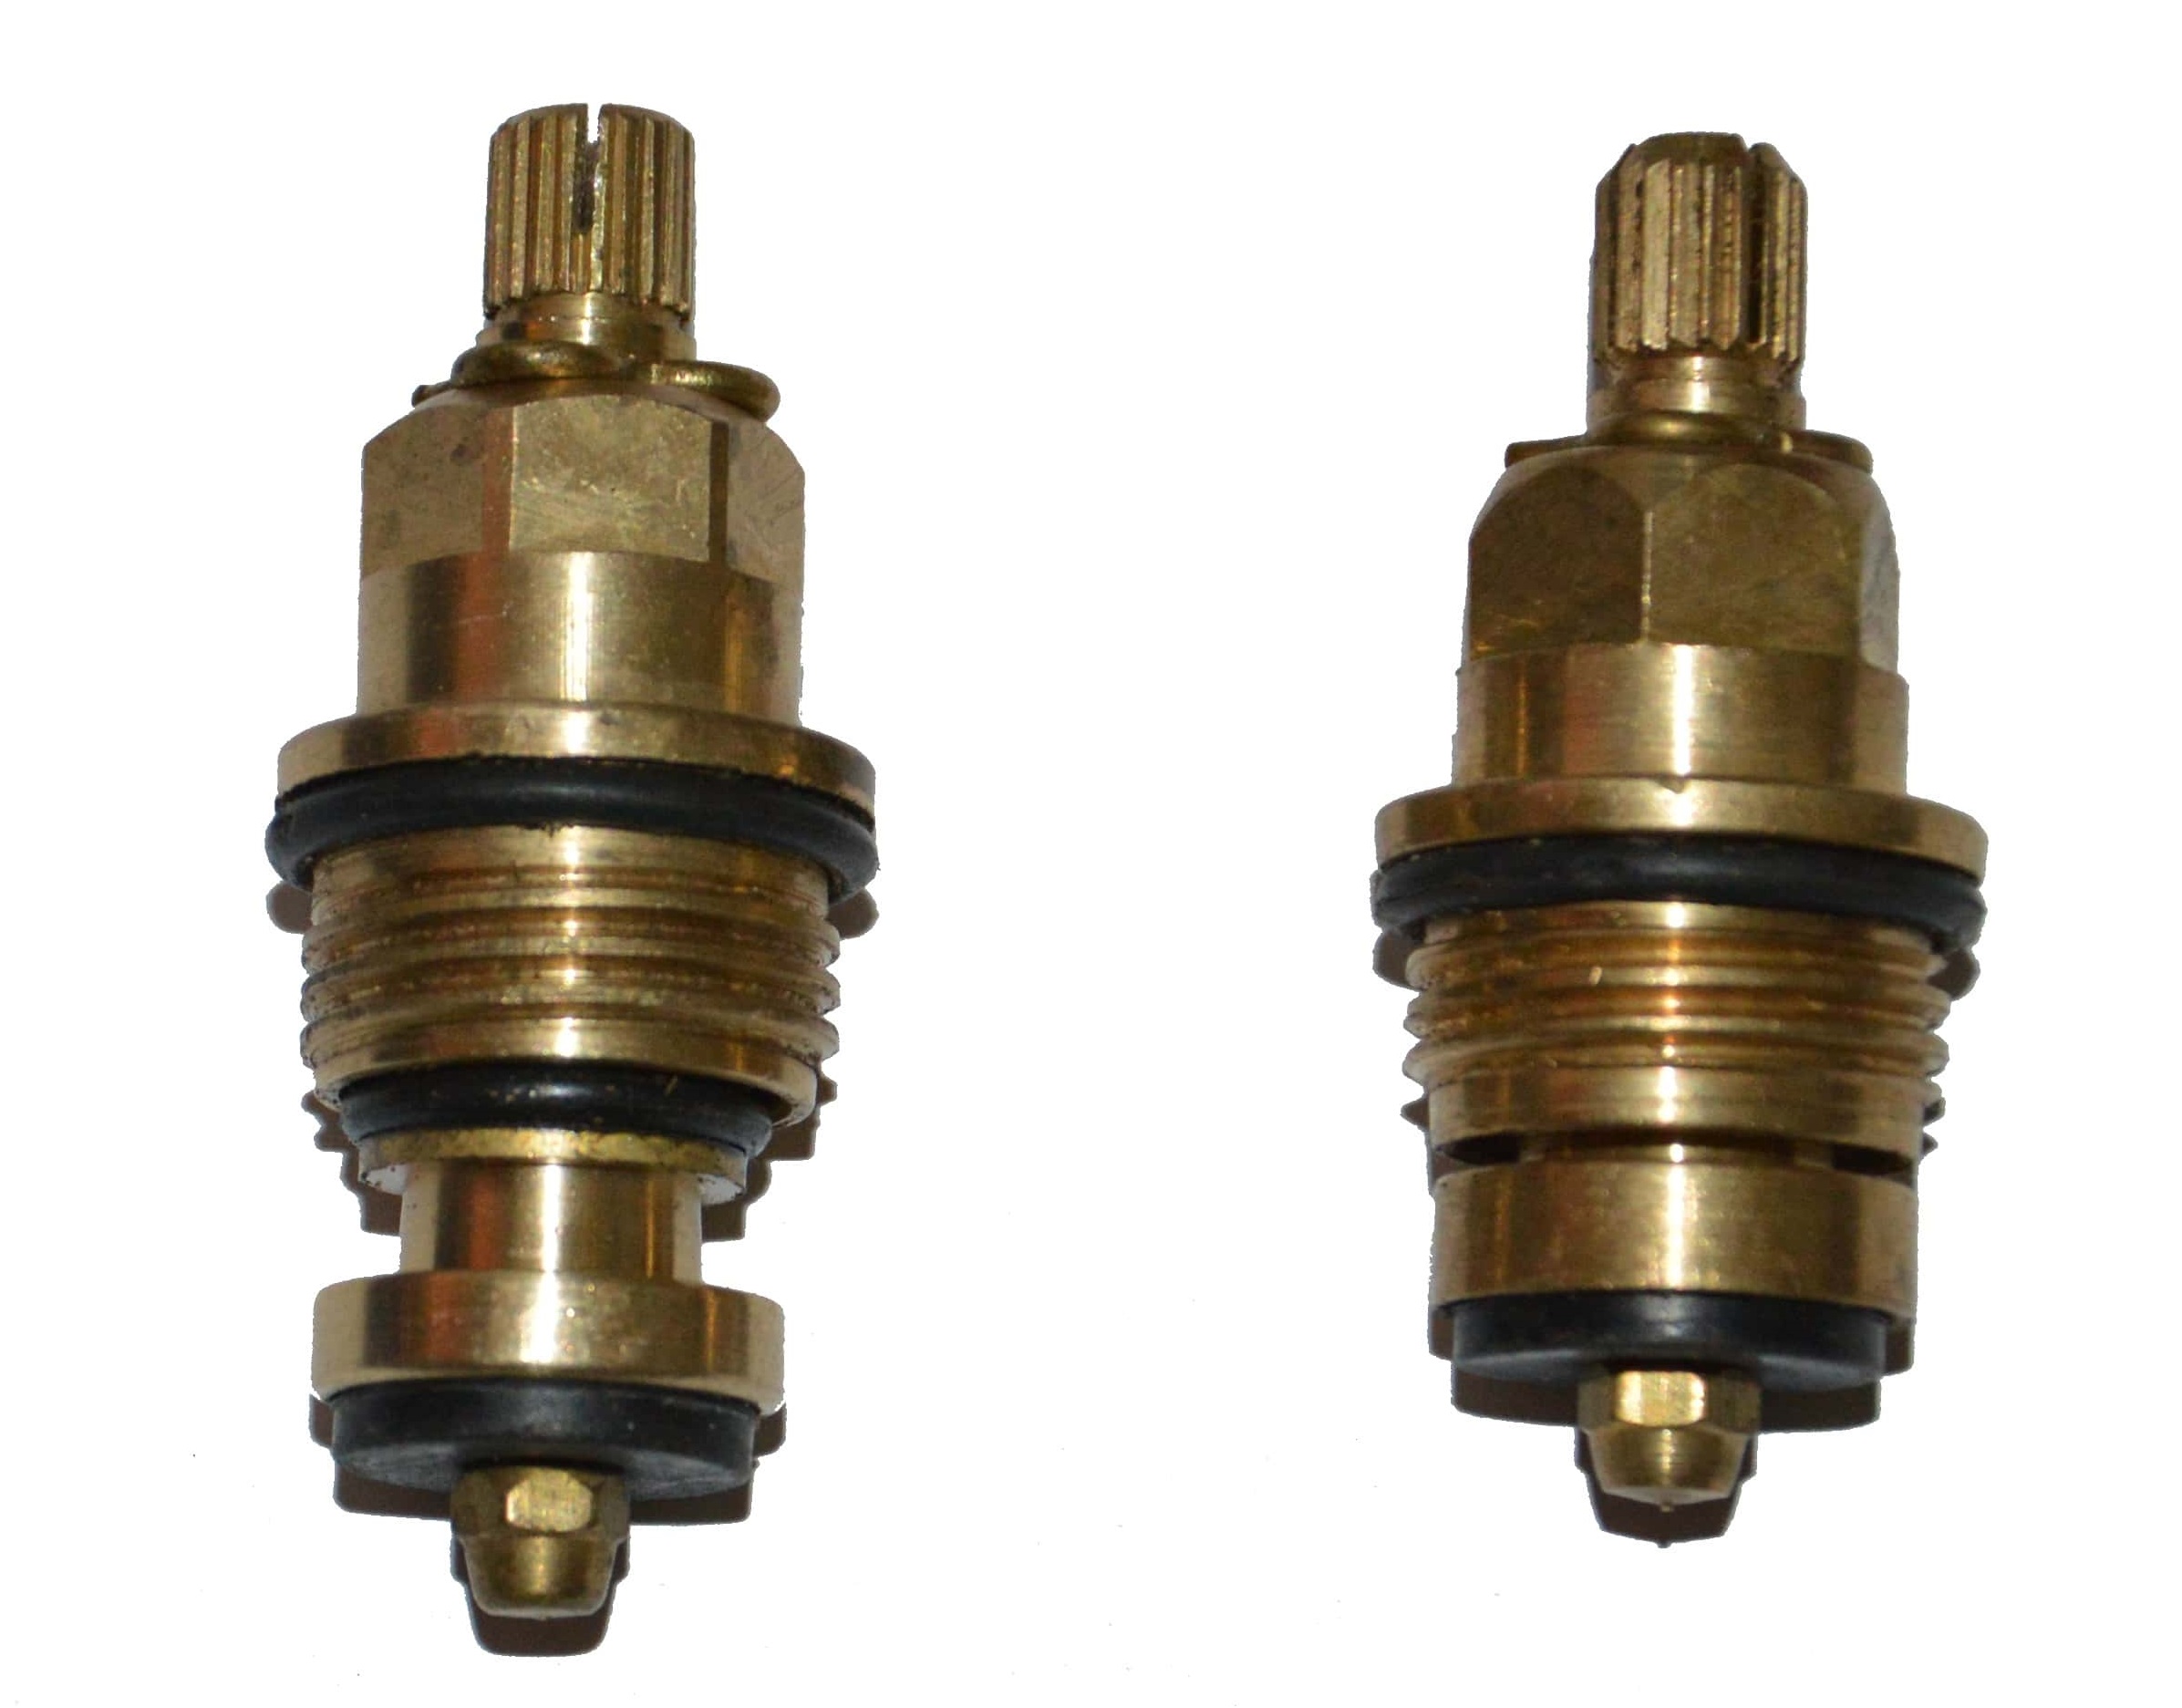
Bushing valve for mixer with rubber cuffs. The principle of operation of this type of axle box has a worm gear and a rubber gasket at the end of the retractable stem. In order to completely close it, it will take from two to four turns.
This box works as follows: the rubber gasket located in the inside of the valve is pressed against it, thereby blocking the water path. Such a gasket is subject to rapid wear, but it is easily replaced. The gasket can be made of different grades of rubber, on which its life depends.
Pros:
- There is no need to completely replace the crane box, you can simply change the gasket.
- Low cost pads.
- The ability to make rubber gaskets yourself.
Minuses:
- Short service life.
- In order to open or close, a large number of revolutions are required.
- Over time, smooth running is lost, which leads to the fact that the crane needs to be twisted harder.
- A particular unpleasant noise is caused by the resonating valve. This occurs when the gasket is worn out. This factor can adversely affect the operation of water communications.
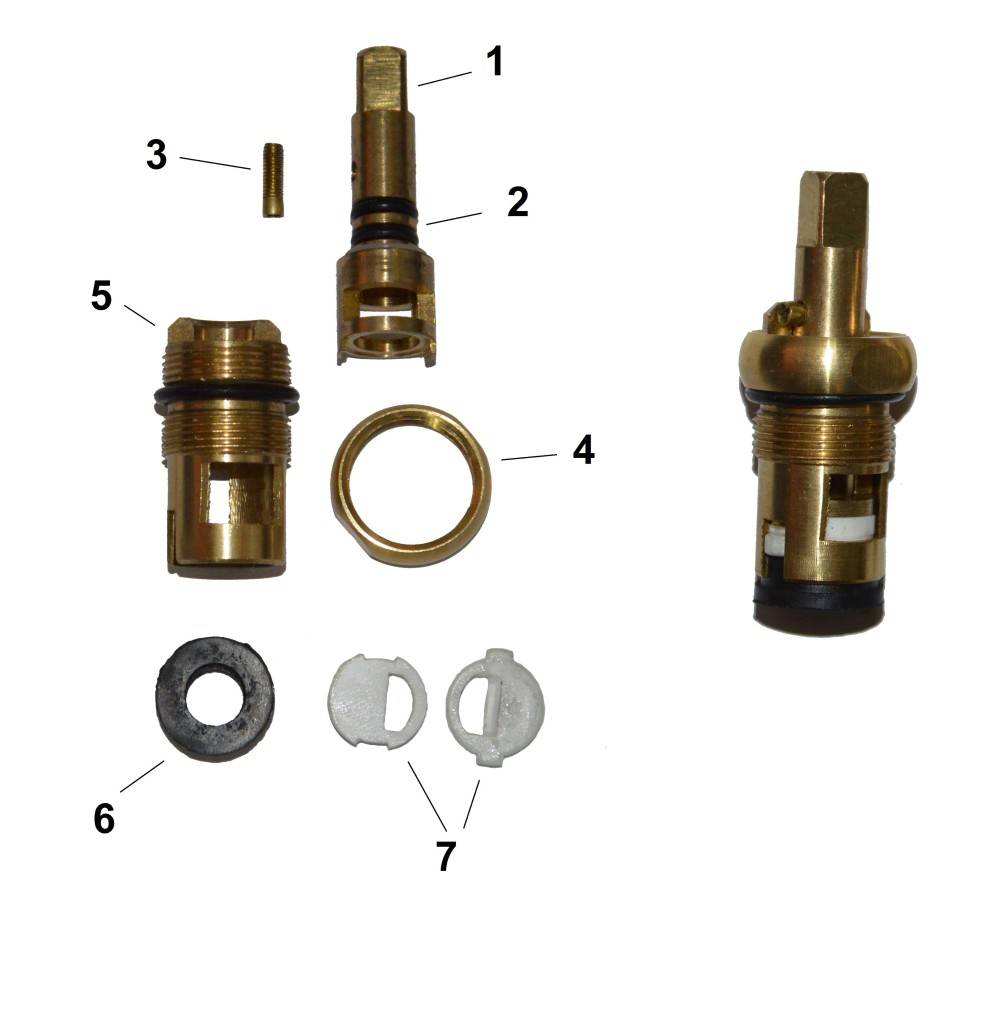
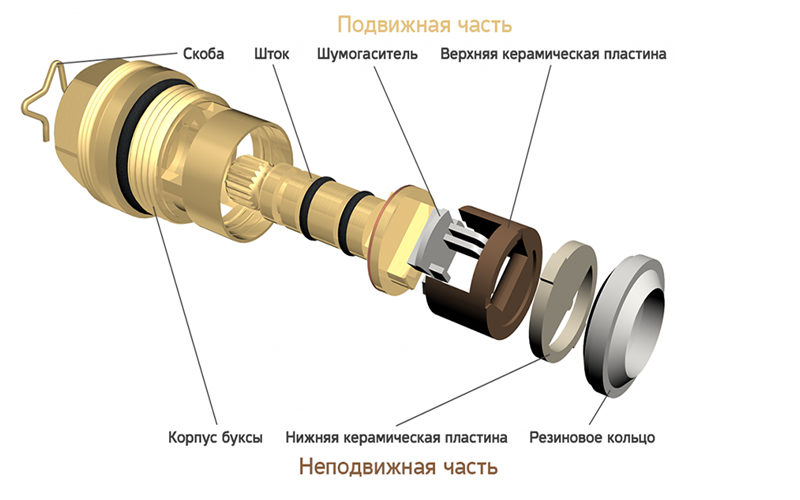
Crane box with ceramic inserts.The basis in such a crane box is made up of two ceramic inserts, which are made in the form of plates and equipped with identical holes. From the fully open to the maximum closed position, only half a turn of the handle is needed.
The box design is made in such a way that one of the plates inside its body is rigidly fixed. The second is on the stem, and is fixed with a flywheel. When the faucet handle is turned, the holes on the plates are aligned so that water flows through them into the mixer.
Ceramic inserts can be replaced, but removing and changing them is not as easy as in the case of rubber gaskets, because they need to be selected individually according to the size of the box. In this case, repairs are not needed, it will be easier to buy and install a new axle box.
Pros:
- Long service life of ceramics.
- Ease of use: it only takes half a turn to open the water.
- Low noise level during operation.
- Smooth turning handle.
Flaws:
- Prices are much higher than models with rubber gaskets.
- Buxe will be more difficult to work if there are various coarse impurities such as sand in the water, therefore, in order for the operation to be uninterrupted, it is recommended to install a filter for fine water purification.
How to unscrew the faucet nut if it is stuck
The easiest way to get a stuck nut to unscrew is to knock it down with a chisel or hammer. You can use the grinder. But in most cases, this option is not suitable. You just need to unscrew it so that later it can be screwed back. It would seem that the situation is hopeless, but this is somewhat untrue. There are several ways to help "re-stubborn" a rusted nut.
Dissolving rust
Many people know such a liquid as WD-40. In the common people it is called "Vedeshka". The essence of this tool is that it dissolves rusty deposits and, as a result, reduces friction. As a result, the mount gradually begins to give in.
If this tool was not at hand, then you can find a replacement for it. Kerosene, carburetor cleaner, gasoline, and brake fluid are good for this. In addition, vinegar, iodine or alcohol are suitable for the same purposes.
Guide to action:
- Thoroughly pour liquid over the nut and wait about thirty minutes. As soon as the time has passed, you can take the key and try to turn it off. If the mount does not give in or gives in, but is very tight, then the liquid has not soaked the rust enough. We moisten again, only this time a piece of rag, and wrap it around the nut. So the liquid will be more likely to corrode the rust.
- After such a lotion, the fastening element should begin to move. To make the movement easier, you can tap it a little with a hammer. And only then, with the help of a key, you can try to rip it off. To make the jerk stronger, you can lengthen the handle of the key. Any piece of pipe will do.
We heat the nut
Exposure to high temperatures leads to the expansion of metals, and, accordingly, the rust will collapse. After such an execution, any, even completely sour connection, will cease to be so strong. For heating, you can use any heat source. You can use a building hair dryer, a burner, a blowtorch or a regular lighter.
Guide to action:
Thoroughly warm up the nut and screw itself. After that, we try to turn it with a key. Sometimes the edges of the mount are damaged, which makes it impossible to use the key.In this case, we put on the socket head on the nut and warm it up with it. Then we unscrew the collar.


We destroy the nut
You can destroy the connection with an ordinary chisel, you can cut it with a hacksaw or a grinder, or you can use a drill.
Guide to action:
- By hitting the chisel with a hammer, we make grooves on the edges of the nut. The blows must be strong so that the chisel goes deep. This increases the inner diameter. Gradually we will destroy the fastening element. The same effect will be obtained if you drill holes on the edges with a drill. When the nut is destroyed, it can be easily removed.
- Things will move much faster if you cut off the nut with a hacksaw or an electric grinder. The main thing is to make a cut along the axis.
As you can see, even the most rusty nut can be unscrewed (if you really want to). However, it is much better not to bring the situation to such a result. It is better to initially use a mount that is not subject to corrosion. Then you certainly won’t have to puzzle over how to unscrew the “stubborn” and at the same time not break it.
How to replace the crane box with your own hands?
1. Remove the top cap from the flywheel. It may not be easy to do this during a long operation, so pliers will help in this case. Under the cap inside the flywheel is a bolt that must be unscrewed to remove the faucet valve.
2. Often, to unscrew the valve, it takes a lot of effort, because the metal, under the constant influence of water, forms an oxide, which, sometimes, tightly fastens the parts of the mixer to each other. After the valve is removed, it is necessary to clean the thread to which the bolt was attached - during the period of operation, debris could probably accumulate there.The flywheel itself must also be cleaned from the inside.
3. Next, you should start unscrewing the fittings of the crane, which may also not succumb the first time. For convenience, you need to take sliding pliers, and in order not to scratch the glossy surface with them, you can put a piece of dense matter under them.
4. After removing the fittings, you can see the axle box screwed into the mixer. Before you unscrew it, be sure to check whether the supply of hot or cold water is shut off (depending on which water was regulated by the failed faucet box).
If the water is not shut off, then it will gush immediately after removing the axle box from the mixer.
5. When the axle box is unscrewed, it is necessary to carefully clean the thread of the mixer. This is necessary so that the new axle box fits tightly along the thread, otherwise, if debris remains there, water will leak not only from the gander nose, but also at the base of the flywheel. For stripping, a card brush is suitable.
6. For each mixer, a certain type of crane box is suitable. It is necessary to select this part in such a way that it matches in thread, size and material (ceramic or rubber). For convenience, a box that is out of order can simply be taken with you to the store.
7. We screw the new bushing into the place where its predecessor stood. If the thread of the mixer is cleaned normally, then there should be no problems with the further assembly of the flywheel.
Since the faucet is often used in the bathroom and in the kitchen, it will be useful to have the skills to replace the faucet box, because most often it is she who is the cause of water leakage. Ah, thanks step by step instructions with photo, not only a man can cope with this, but also a housewife who does not have the opportunity to turn to a plumber.
I also suggest watching a video on replacing the crane box DIY mixer.
4 comments on Replacing the faucet box in a two-valve mixer - step by step instructions
Hello! Thank you for the step-by-step showing of the replacement of the bushing crane. And thanks for the VIDEO. There were two questions left: when the plumbers were replacing, for some reason they looked at the square windows of the bushing faucet, and the brand new bushing faucet was rejected. Why did they do it? And the second "gander" in the kitchen - rotates along with the mixer body: it simply "grown" to the mixer. What can be done? The mixer is good, and the stock of faucet boxes for it is decent. Calling plumbers is very expensive, and ... honestly, more often they cause some kind of damage, not fixes. Yours sincerely, Galina
And yesterday I had to go to the plumbing store twice, because at first I was too lazy to take the unscrewed handle with me. It turned out that there are different numbers of splines on the same-looking crane boxes. They gave me two samples and then had to trudge a second time to return the extra 🙂


Some say that crane boxes with a rubber gasket are much easier to maintain (repair) - I changed the rubber band, and that's it. Others say that ceramic bushings are more durable. What is the best option for a crane box in your opinion?
Ceramic faucet boxes begin to leak water over time, the faucet begins to drip, sometimes after a few months of use. It is necessary, for example, not to fully tighten the valve in order to stop the flow. It's about durability. For whom it is easier to throw it away and buy a new one - the best option.You can repair ceramic faucets with your own hands, but this is no longer as easy as in the case of simple rubber gaskets.
Conclusion
The reason for the tight turn of the faucet handle can be bad water, mechanical stress or the influence of time. All three options are solvable, any problem can be fixed. So that the faucet does not bother you for as long as possible, purchase plumbing only in reliable stores. If the mixer is no longer subject to repair, then you can choose a new one on the website of the 5-inch company. There you can also find everything you need for the repair and maintenance of plumbing, because our comfort depends on the quality of its work, which in turn affects our mood. When all the small details of our lives are working properly, there is time and energy to do something great, so take care of your comfort.
Grohe's one-handed faucet in the bathroom began to work slowly. It is written on the Internet that in most cases the problem is a small amount of lubricant in the ceramic cartridge (or lack of it at all). The problem is solved by removing the ceramic cartridge and, logically, applying lubricant to the discs inside. There was no lubrication, therefore, after disassembling the cartridge, I collected the pieces that were there with a clerical knife and evenly applied them to the discs. The problem has been fixed, but probably not for long. In addition, the kitchen also has a faucet with ceramic discs.
I decided to look for a suitable lubricant in advance. Here is the original from Grohe (aka Syntheso LM 220):
At the moment it costs 1190 rubles for 29 grams. Despite the presence of a nearby pickup point, my feelings are well described by the following picture:
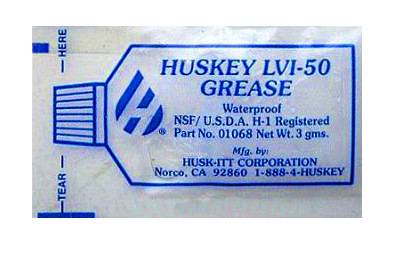
An analogue is any other silicone grease with food tolerance and a large temperature range. For example, Huskey LVI-50. In the package with new mixers is placed in bags of 3 grams. An excellent option for 1 time, but did not find it on sale.
1410 rubles, but, as I understand it, you need a pistol to use it. The price per gram is an order of magnitude less, but for household needs such a volume is redundant.
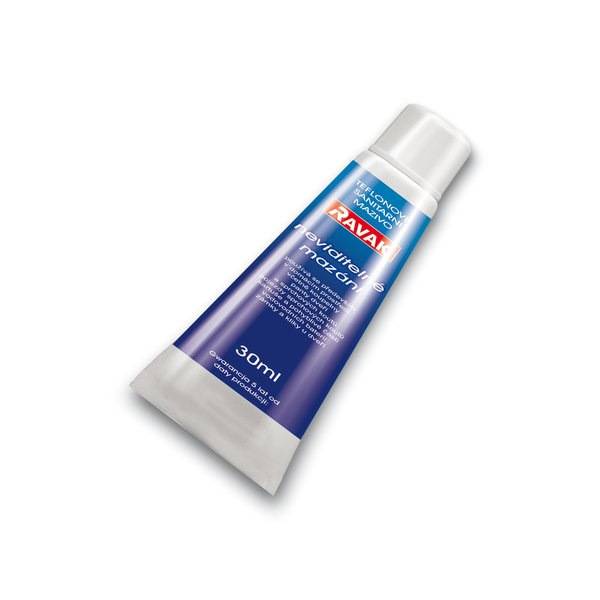
There is an article that describes various types of lubricants for mixers, among which Teflon lubricants are mentioned. For these purposes, it offers Ravak Teflon grease. Description on the manufacturer's website:“…Also suitable for cartridges and faucet moving parts”.Nothing is written about food tolerance, but the epithet “sanitary” adds optimism.
On the Huskey forum, someone Konstantine writes that he lubricates the mixer with Slipkote 220-R DBC grease:

By the way, Slipkote 230 is also suitable for these purposes. The specification has a food tolerance and a recommendation for use in water taps.
I decided to see what is in the existential - there was no slipcoat there (by the way, this is a trademark of the same Husky). Limon4e on the drive has already written about the problems of buying Slipkote for brake prevention (). But there is Husky 3 grams each, although the name is different: HVS-100.


