- Self-installation steps
- Troubleshooting Methods
- Checking the electric motor and disassembling the unit
- Technical properties of borehole pumps
- What to do if the pump is stuck?
- Causes of water pump failure
- Possible troubles and methods for their elimination
- Pump jammed by electric cable
- Casing pipe buckled
- The pump is silted up
- Frequent malfunctions of the drain system
- Symptoms
- If the pump is stuck due to a foreign object
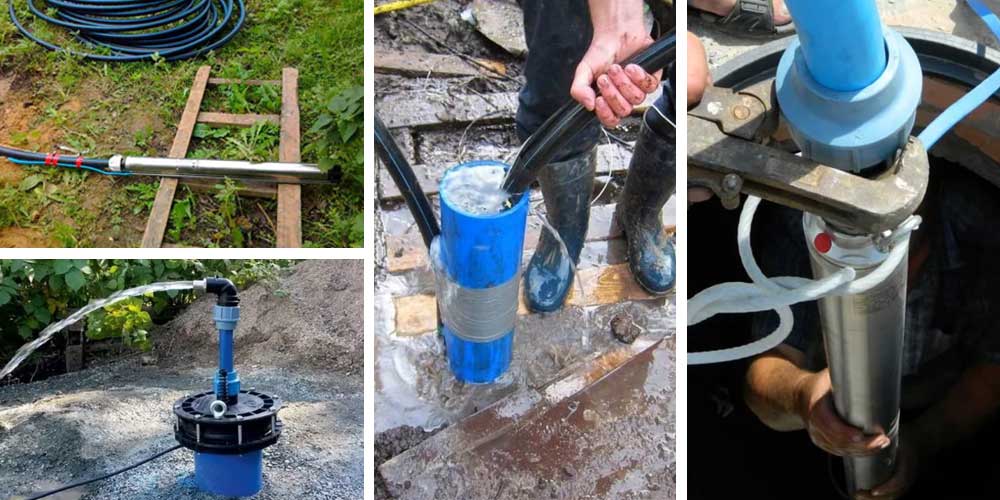
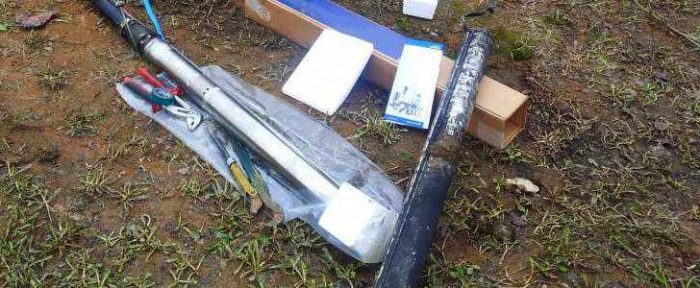
- How to independently lower the pump into the well: the order of work
- Preparatory work
- Lowering equipment
- Trial run
- Replacing the pump in the water intake
- Reasons for replacing a well pump
- Checking the power line
- Features of operation of a submersible pump in a well
- Prevention of possible problems
- Preliminary installation work
- Do I need to change the coolant when replacing the pump
Self-installation steps
For self-installation of pumping equipment, you must first familiarize yourself with the safety precautions. During work, use special work gloves that protect your hands from possible damage. If the pump is mounted with a pipe, welding gloves must be used.
Before installing a borehole pump, you should read the advice of professionals
When working on connections, it is important to ensure that they are airtight. Installation of the pump involves the installation of a transition fitting and a fitting
They contribute to the tight connection of the HDPE pipes and the pump.
Stages of work:
- The pump is attached to a safety cable. Its diameter is selected depending on the depth of the well or well. Mounting is possible due to the fact that the device is equipped with two "ears" located symmetrically.
- The end of the cable is fixed with special clamps that prevent detachment.
- The HDPE pipe is equipped with a sleeve, after which the fitting is assembled. It includes nuts, a ferrule, a clamping ring and a sealing rubber ring. The pipe is mounted in the pump.
- The cable is connected to the pump cable. After that, the safety rope and extension cable are attached to the pipe.
Installation of a downhole adapter involves the installation of a HDPE fitting. The end of the cable must be fixed to a strong and immovable object of large size. Before starting to lower the elements, you need to check the well or well.
Troubleshooting Methods
As in any electrical installation, the definition of a defect is carried out from simple to complex. In this case, this path starts from the power supply point and sequentially - to the electric motor of the unit. If the pump is powered from a separate machine, then the presence of voltage at the input terminals of the switch is checked, and then the test is carried out in the on position at the output terminals.
If there is no power after the machine, then the cause of the malfunction is in it, if available, the search continues from the starting protection equipment.Before starting work, it is necessary to turn off the electricity and post a warning sign so that power is not supplied by unauthorized persons.
The next step is to disconnect the ends of the motor power supply from the starting equipment. After performing this operation, voltage is applied to it and the tester checks its presence at the input and output of the starter. These actions confirm the integrity of the line from the circuit breaker to the starting equipment and its operability. If there is a signal at the output, it means that the chain under test is fully operational, which means that the pump will be removed from the well and replaced.
These works are laborious, so it will be difficult to manage without the help of family members. To lift the submersible pump, follow the steps as for installation, only in reverse order. Having disconnected the pipe from the head of the well to the pumping station and unscrewing the plug, they begin to lift the pump. Actions are performed smoothly, without jerks and excessive efforts.
All suspension elements of the unit are taken at the same time. The pump should rise smoothly, without sticking in the wellbore casing. The pump raised to the surface is placed on a pre-prepared site, after which it is visually inspected. If there are no visible damages on the pump housing and the electric motor, then proceed to the next step of troubleshooting.
Checking the electric motor and disassembling the unit
To control the performance of the engine, it is necessary to sequentially carry out a series of measurements. First of all, the integrity of the stator winding is determined. To do this, the tester measures the electrical resistance, which should approximately be equal to the value indicated in the passport.
If the device showed "zero" on all scales or does not respond to the action at all, then this indicates damage to the motor stator winding. Then you just need to replace the pump in the well. Further actions to restore the operability of the unit are terminated.
With normal readings of the device and the permissible resistance of the insulation of the winding relative to the case (more than 0.025 MΩ), the unit is disassembled. To do this, the protective mesh installed on the suction cavity of the pump is removed, and the unit is dismembered. The connection of the shafts of its parts is usually made with a key or spline fastening.
After disassembly is completed, the motor shaft and the pump itself are checked for ease of rotation. As a rule, the hydraulic part jams more often. This error can be corrected as follows:
Carefully secure the pump housing in a vertical position with the shaft facing upwards.
Using a gas wrench, try to turn the shaft in one direction and the other, while simultaneously pouring water on the inside of the housing through the suction cavity.
Carry out actions until clean water flows from the pressure pipe, and the shaft begins to rotate freely.
Next, the assembly of the unit is carried out and its operation is checked. To do this, the pump is placed in a container with clean water and briefly turned on.


The situation looks more complicated when the engine jams. As a rule, this means bearing failure. If they are made in the form of graphite segments, then such a unit is considered non-repairable, so you have to go to the store for a new pump. If rolling bearings are used, the motor can be restored by contacting a specialized workshop. Do not do this work on your own.At this step, troubleshooting on your own ends.
Technical properties of borehole pumps
The main characteristic properties of submersible pumping equipment are as follows:
- the possibility of creating a water pressure at the level at which its optimal extraction from the well and supply to the water supply system is ensured;
- high duration of uninterrupted operation;
- the cylindrical shape of the body, which provides a certain convenience during the installation process;
- some models are able to pump out from a well that has impurities in the form of sand and clay; such devices are made from materials that have high wear resistance.
Types of pumps for wells.
Deep pumping equipment is distinguished by good workmanship and a high degree of reliability. These qualities have allowed these devices to gain high popularity and become in demand among the owners of country houses and summer cottages.
The use of these pumping systems has become a popular way to organize autonomous water supply for country cottages and private houses.
The main advantages of submersible pumps:
- large depth of water intake;
- low technical complexity of the installation;
- lack of rubbing elements, which increases the overall service life and increases wear resistance;
- low noise level;
- long service life.
Due to the reliability of this equipment, maintenance and replacement of a submersible pump in the well are very rare.
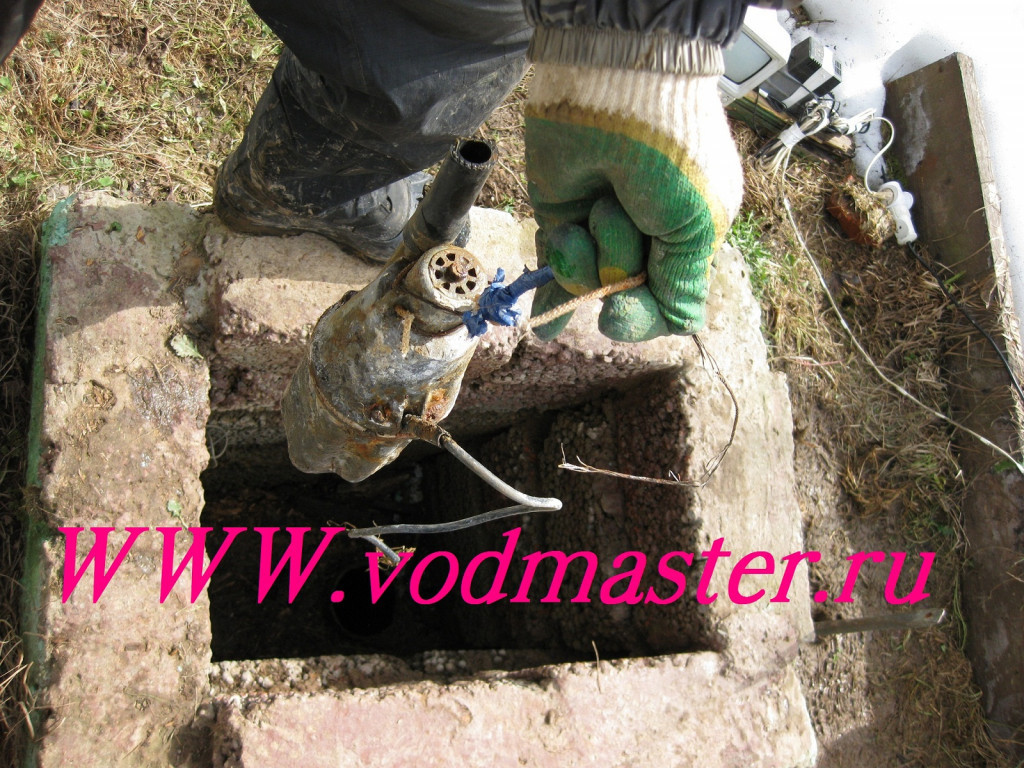
What to do if the pump is stuck?
The biggest trouble that can happen when lifting a pump is that it gets stuck or falls into the well.In especially severe cases, this may result in the need to drill a new well, since it will be impossible to use the old one due to a pump stuck in it.
However, you should always try to remove the pump. Let's talk about how to do it right.
Often when the pump is lifted, slack in the cable will form, forming a loop. It can overlap around the tool and wedged between it and the well wall. In this case, it's unlikely to help. The situation can only be prevented.
To do this, we carefully monitor the rising structure and do not allow the appearance of slack in the cable. In addition, it must be fastened to the pipe.
A slack in the electrical cable can cause the pump to get stuck in the well
The situation is easier to prevent than to correct, so it is important to prevent its occurrence. It is important that both the cable, and the pipe, and the cable come to the surface at the same time, without noticeable slack.
If it nevertheless appeared and the pump stuck a little, we take the pipe and slightly push the equipment down. Then we choose the slack and slowly continue to rise. If the pump no longer goes down, you should leave it in the position in which it is stuck and call specialists
It is important that both the cable, and the pipe, and the cable come to the surface at the same time, without noticeable slack. If it nevertheless appeared and the pump got stuck a little, we take the pipe and slightly push the equipment down
Then we choose the slack and slowly continue to rise. If the pump no longer goes down, you should leave it in the position in which it is stuck and call specialists.
It may turn out like this: the pump came out easily and without problems. Suddenly, he stopped moving upward, as if hitting an obstacle. Most likely, the equipment came across a ledge inside the casing. It can be welding residues or a parted joint.
In this case, the impact on the edge of the protrusion will be clearly felt, the pump will go down easily. There may also be a dent in the wall. Here the impact will not be felt, and the device will fall down with difficulty.
To remove the pump, you can advise this method. Gently rotating the device by the hose around its axis, slowly pull it up. If you're lucky, the device will slide around the obstacle, go around it and pass the problem area.
An object, such as a screwdriver or a key, may accidentally fall into the well. The gap between the pump and the well wall is so small that a foreign body that gets into it will immediately jam the equipment.


It is very difficult to get a pump silted up in a well
It is necessary to carefully swing the device so that the water that gets under it gradually erodes the plug of silt. In this case, the pump will easily go down, but will not be able to move up.
You should choose the slack in the cable, tighten it a little and securely fix the stuck pump
In this case, the pump will easily go down, but will not be able to move up. You should choose the slack in the cable, tighten it a little and securely fix the stuck pump.
Further work must only be carried out using special equipment. In an infrequently used sand well, silting of the pipe above the pump may occur. To extract it yourself, you should use the buildup method.
To do this, we evenly weaken, and then pull the cable on which the device is fixed. It is necessary to tear the pump at least a little from the bottom, in this case water will get into the resulting gap. It will liquefy the sludge when lowering / raising the equipment and it will most likely be able to be taken to the surface
It is very important to do everything carefully, without unnecessary efforts that can break the cable.
If all else fails and the pump remains in the well, you need to call specialists. They should have video diagnostic devices to help determine the cause of jamming, and special tools.
The same should be done when the pump falls into the well. It can only be removed with the help of special equipment. In the most hopeless case, you can try to destroy the stuck device with a drilling machine. True, this is an expensive and rather risky operation.
Verified practical ways extracting the pump from the well in case of jamming it in the wellbore are given in the following article, which we recommend reading.
Causes of water pump failure
The pump in the car can fail for various reasons. We list the most common:
- low quality coolant. Approximately 90% of water pumps in passenger cars break down precisely because of poor antifreeze. Poor quality coolant leads to the formation of resinous deposits that impede the rotation of the impeller. It can also cause corrosion of the internal parts of the pump. And also low-quality antifreeze can cause an increased level of cavitation, when the vacuum bubbles formed during the rotation of the impeller collapse and literally pull out steel particles from the inner surface of the pump, which leads to the rapid destruction of the device;
The inside of the water pump is destroyed due to cavitation
- natural wear. Any device can simply work out its resource. And the water pump is no exception. The average service life of a water pump is 200 thousand kilometers. After that, it should be checked without fail and, in case of severe wear, replaced;
- fastener problems. The bolts that secure the pump to the engine housing weaken over time. Since the pulleys are constantly rotating, when the fixing bolts are loosened on the pump shaft, play inevitably occurs, which increases as the run progresses. In the end, this will either damage the pump shaft or destroy the center bearing.
The shaft of the central pulley of the pump, worn out due to constant play
Possible troubles and methods for their elimination
It is far from always possible to replace the pump as described above, due to the fact that it is stuck in the well. Then we will consider under what circumstances such a nuisance may appear and how to eliminate it.
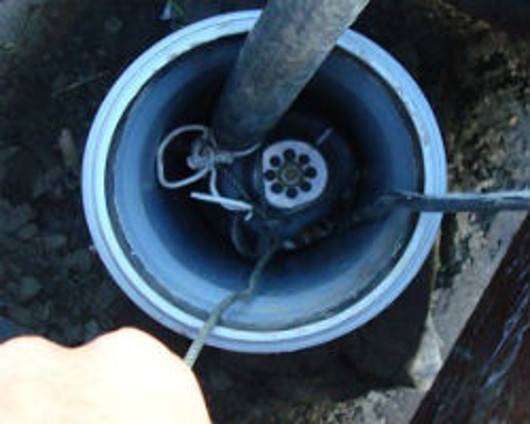
Pump jammed by electric cable
The most common problem when lifting the device is jamming due to the electrical cable, which forms a loop and gets caught between the wall of the well and the device.
To solve this trouble, push the device down a little. In some cases down the hose is sufficient. If the pump is not stuck too deep, then it can be pushed through with any material at hand - a pipe or fittings.
Casing pipe buckled
From time to time, the device jams due to the deformation of the casing pipe as a result of ground movements or the influx of slag from welding.In this case, it is possible to try to lift the pump by rotating it around its axis. If the device does not have a perfectly symmetrical shape, then it may be possible to fully pull it out.
The pump is silted up
This trouble may appear if the well has not been used for a long time. The level of sludge can also exceed the pump by a meter or two. In this case, go to mine the device in buildup - slowly pulling it and loosening it.


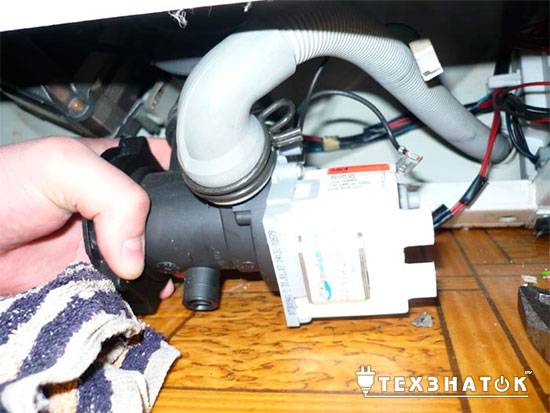
Frequent malfunctions of the drain system
If after washing the water does not drain, but the characteristic noise of a running pump is heard, perhaps everything is not so bad. It is likely that the pump is working, it works, but cannot pump out water. The main reason for this phenomenon is blockage.. To correct the situation, it is necessary to completely check the drain system. You should start with the filter, then see if threads are wound around the impeller, preventing its normal rotation. You will also have to check the drain hose and make sure that the sewer pipes are in good condition.
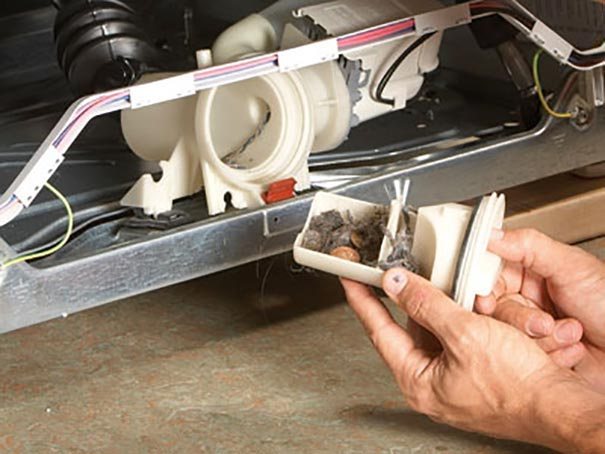
If it's not a blockage, the cause should be sought in the pump itself. One of the possible malfunctions is the lack of power. This version is easy to check. It is enough to inspect the wires going to the pump and make sure there is a circuit with a tester.
In most models, the pump is located at the bottom, under the drum, to access it, just remove the back or bottom cover.
Symptoms
There are four signs by which you can understand that the water pump in the VAZ 2114 car is out of order:
- The coolant drains quickly. This symptom indicates that the pump is damaged.Also, the leak may be elsewhere, for example, in the pipes or in the radiator itself. Check the entire cooling system for leaks.
- Rotor damage. To check this part, it is necessary to inspect the back of the water pump. If the rotor blades are partially or completely destroyed, the performance of the entire assembly deteriorates.
- Fluid at the vent hole. If antifreeze oozes out of this compartment, then the pump seal has worn out. If a dark deposit is found around the gland, it must be replaced.
- Howling noise during the operation of the VAZ 2114 engine. Such a defect most often appears when the pump shaft bearings are worn.
If the pump is stuck due to a foreign object
It also happens that a foreign object (stick, branch, pencil, stone, etc.) enters the well shaft and the pump encounters an obstacle when lifting. This problem is especially relevant for wells with a small diameter.
You can try lowering the pump to a shallow depth and gently raising it again. That is, to make a kind of soft jerks. There is a chance that an object that has fallen into the well will settle at a different angle and miss the pump, or with the streams of moving water it will rise along with the pump. This is the best deal for the situation.
If the pump does not go, then professionals recommend raising the pump to the maximum allowable height and fixing it. Thus, specialists will cope with the task faster and they will take less money for the work.
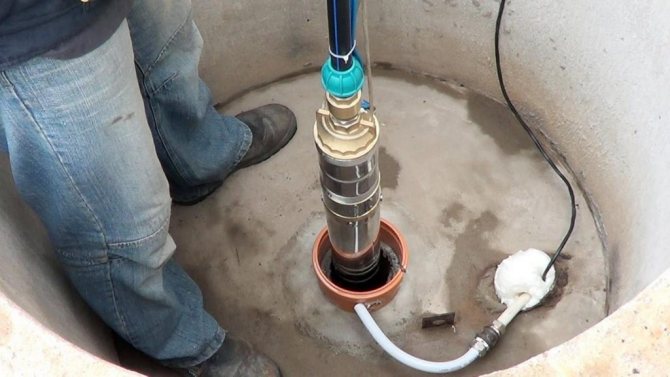
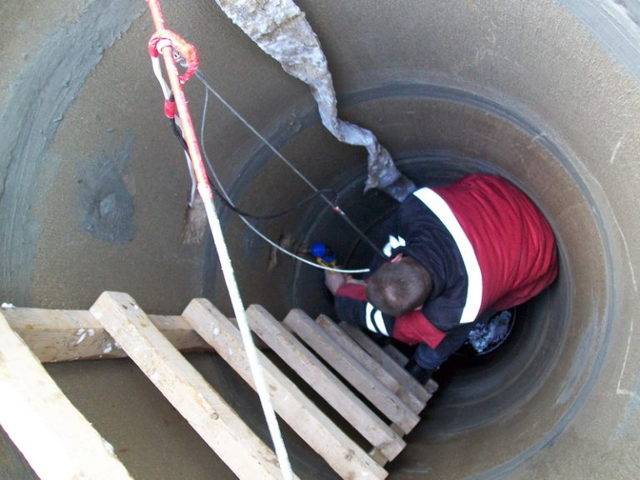
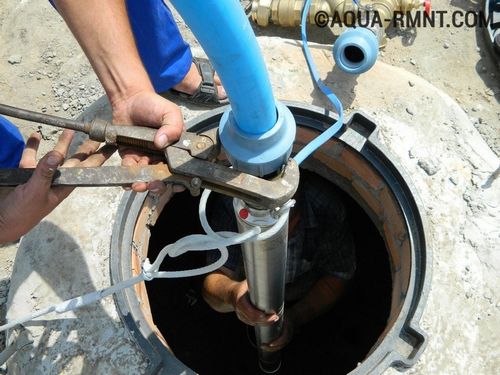
How to independently lower the pump into the well: the order of work
To properly lower the device into the well, you must perform the following operations.
Preparatory work
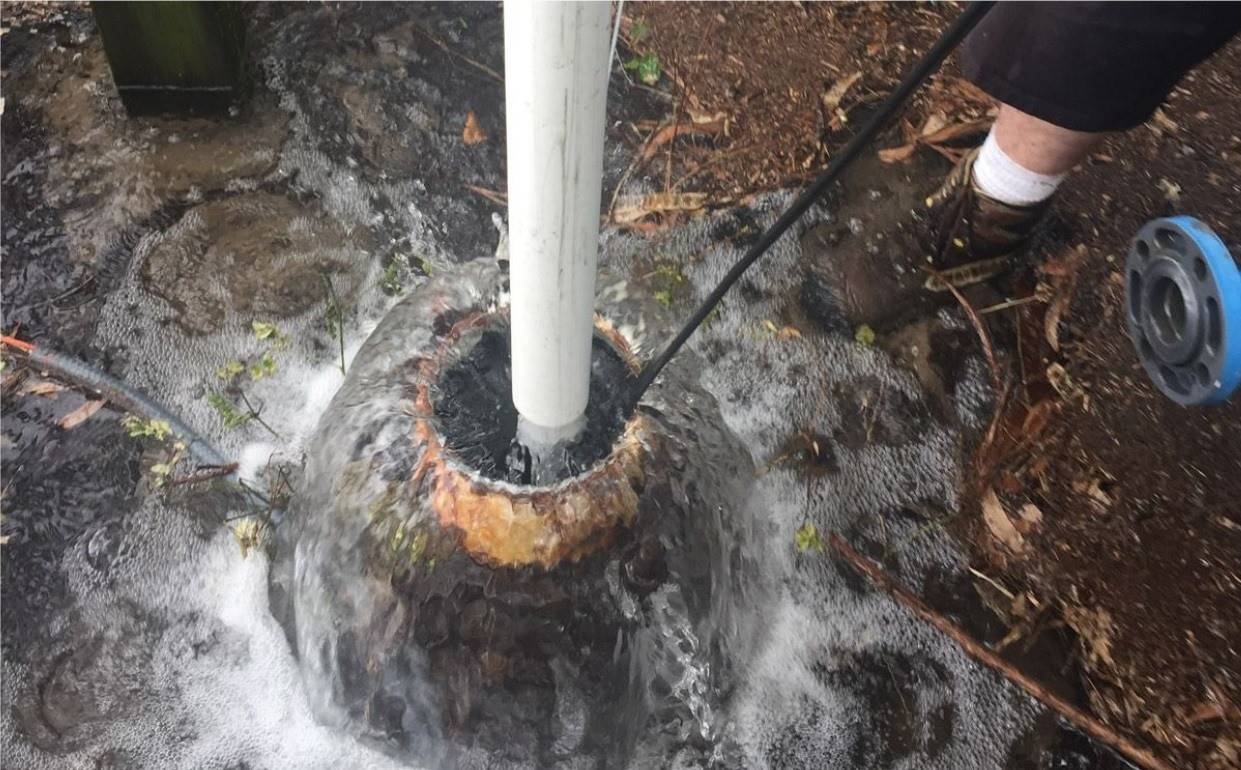
We clean the well from small particles of dirt and sand, pump it.We carefully examine the pump. We need to make sure that the valve works smoothly, the shaft rotates efficiently and all fasteners are secure. Be sure to check the integrity of the cable and electrical wiring. We specify the size of the gap between the casing pipe and the working part of the pump. If it is less than 5 mm, the device cannot be installed.
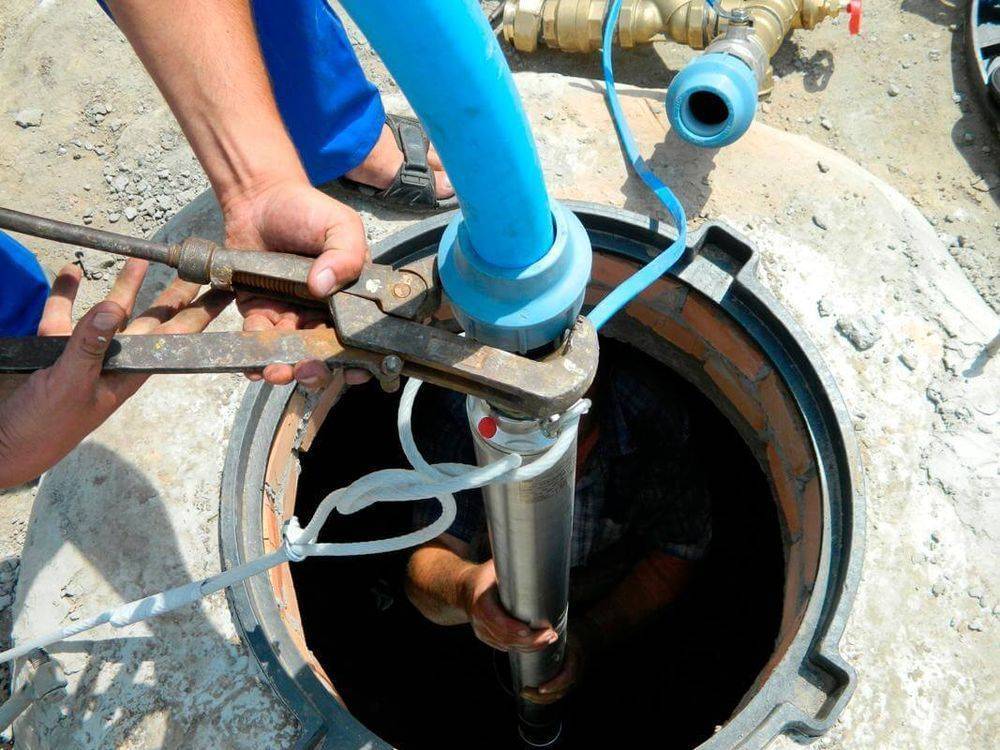
We install a tripod or a truck crane, which are usually used when lowering the pump into the well. Before lowering the device, you need to prepare it. Preparation consists in fixing the cable, electric cable and water pipe connected to the pump into a single sleeve. This will prevent jamming of the equipment inside the well. The elements are fastened with plastic clamps in increments of 75-130 cm.
We make the first fastening 20-30 cm from the pump nozzle. It is best to wrap the cable sections that come into contact with the clamp with sheet rubber. In this case, make sure that the clamp securely fixes the rubber, but is not overtightened, otherwise it may damage the insulation.
It is most convenient to lower the pump with a truck crane or a tripod.
Lowering equipment
The procedure is carried out very smoothly and carefully, without sudden movements. We try not to hit the equipment against the walls of the casing
If this is not possible, then it will be necessary to additionally protect its body even before the start of the descent of the device. In the process of lowering the device, it may hit an obstacle and stop. In this case, we raise the pump a little, and then we continue to lower it, slightly turning it in the casing pipe clockwise.
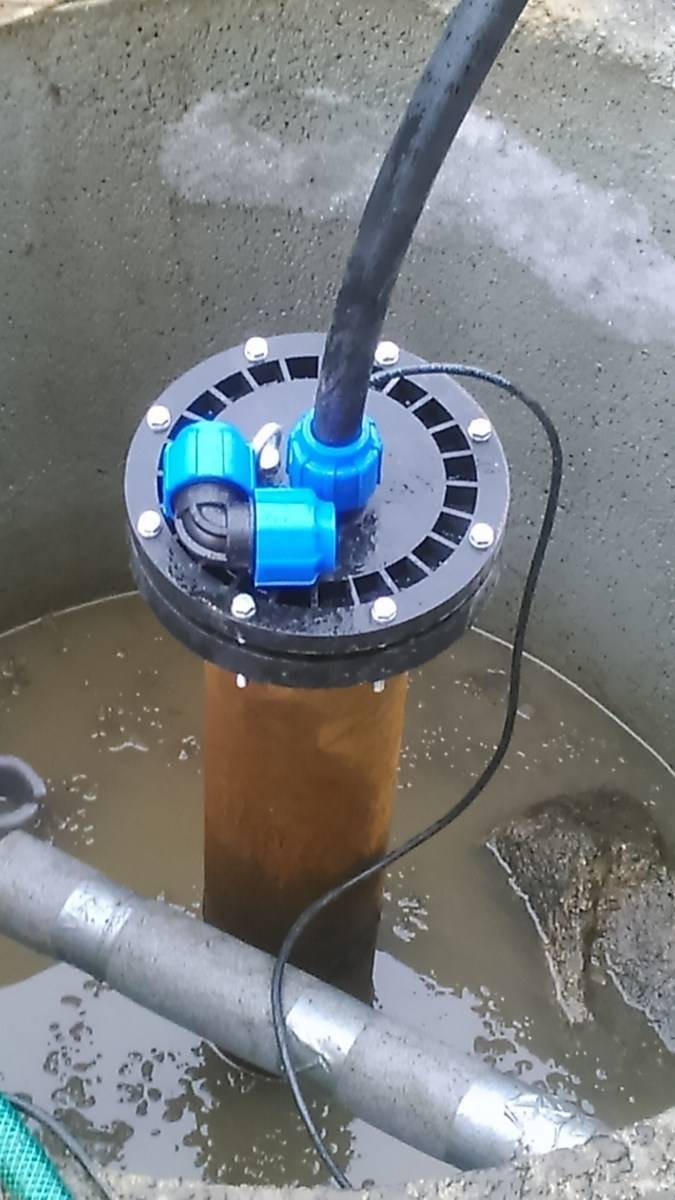
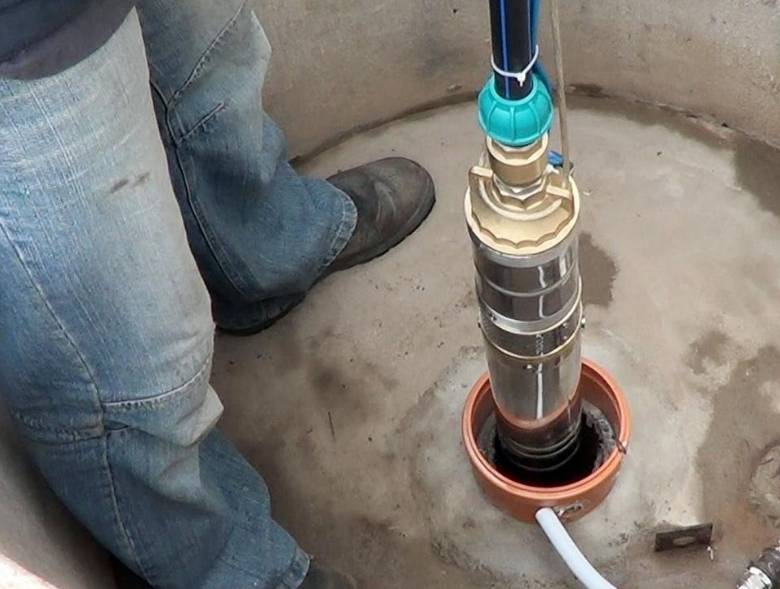
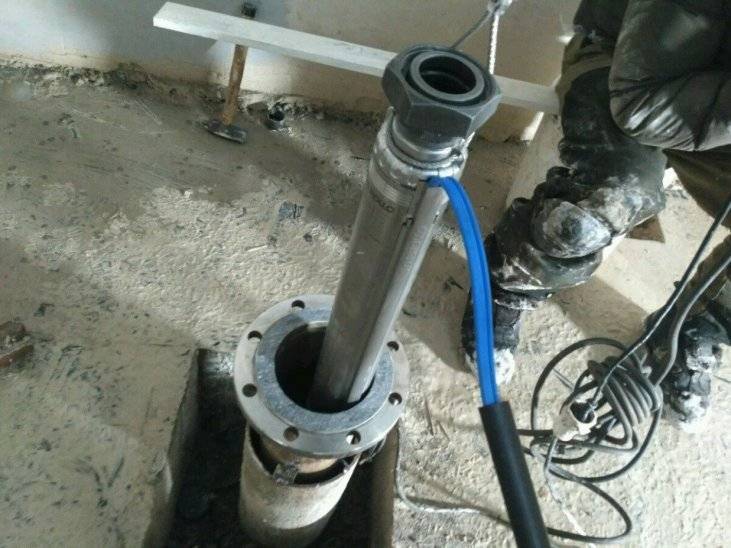
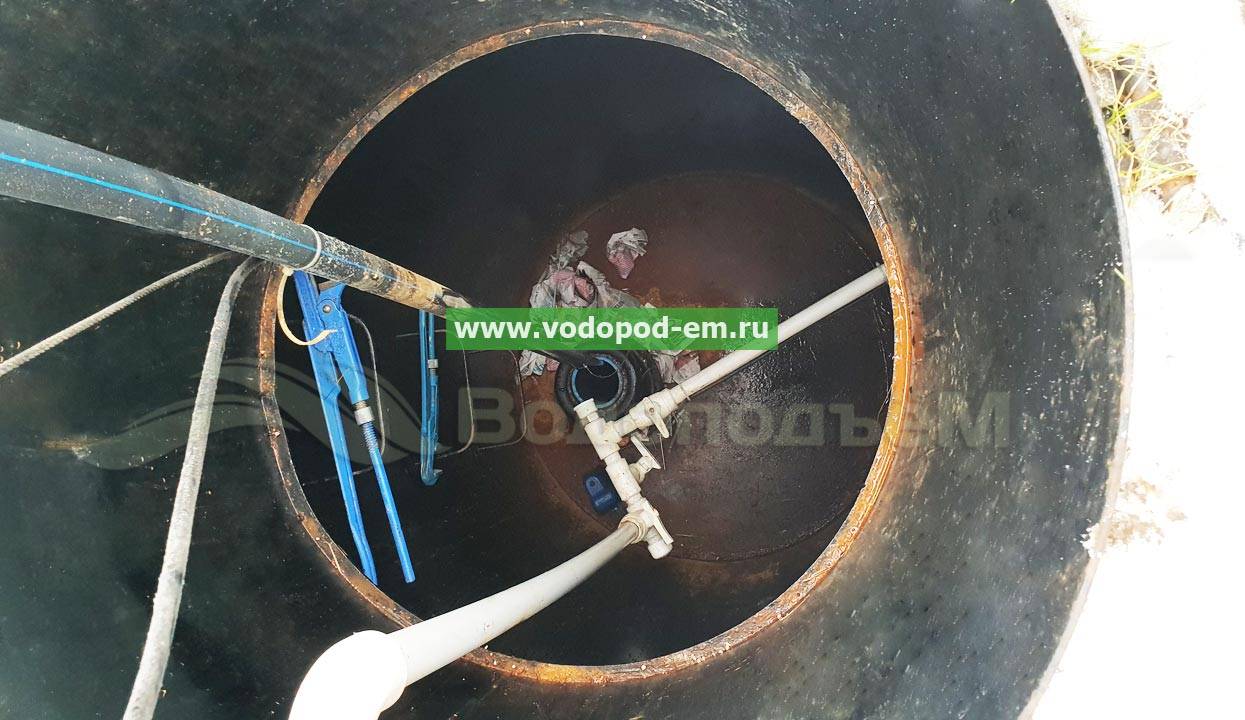
Having reached the desired depth, we fix the water pipe on the adapter. We solder the end of the steel cable with a thermal coupling so that it does not fluff.One and a half hours after the equipment is lowered into the water, we carry out a control measurement of the resistance of the pump motor winding and cable insulation. If the installation is carried out correctly, the indicators will correspond to the normative ones.
Trial run
We are doing a test run. We use a special automatic station for this, which eliminates the negative impact on the motor winding of possible overloads or short circuits. After starting, we measure the applied load, which must correspond to the parameters specified in the technical documentation for the device. If the indicators are higher than the normative ones, we close the valve at the well outlet and perform an additional push back, thereby bringing the indicators to optimal values.
If the pump has run into an obstacle, it must be lifted up a little, then continue the descent by rotating the equipment clockwise
Lowering the pump into the well is a complex and responsible undertaking. It requires great precision, accuracy and skill. You can, of course, carefully read the instructions and try to do everything yourself, but the risk of running into problems is very high. If the pump get stuck in the casing, and this happens quite often, it will be extremely difficult to extract it, which will entail additional costs and loss of time. Therefore, for those who do not have experience in carrying out such work, it is better to turn to professionals who will quickly and efficiently perform all the necessary manipulations.


The question, it turns out, is relevant: attempts to install the pump as close as possible to the bottom of the well are made in cases where, after pumping out a certain volume of water, the height of the water column becomes insufficient so that the idle valve does not work.According to the recommendations of pumping equipment manufacturers for, the minimum distance from the bottom of the pump to the bottom of the casing pipe cannot be less than 80 cm. But with a small well flow rate, the water level in it can drop critically, and it becomes clear the desire to lower the pump lower.
Replacing the pump in the water intake

If you have a problem with a deep pump or it is completely out of order, then you need to urgently get it, replace it, and then lower it back. And all these actions are not as simple as it might seem - they require skills and dexterity. We do the replacement of the ETsV pump and the replacement of other types of downhole equipment.
When installing, stainless steel cables must be used. And if you use a regular cable, then within a few years, it will rust, and your pump will break into the well. After a break, the pump is often damaged, and it is expensive to repair it. So when replacing equipment, especially the ECV type, everything must be taken into account to the smallest detail.
The life of a well for water and its condition depends on many factors:
- The depth of the well itself.
- Casing pipe diameter.
- Soil type and terrain.
- Water filter status.
- The amount of water consumed.
- The type of pump used, the quality of its installation and dismantling.
- The total life of the well pump.
In general, all these indicators just build the overall normal long-term operation of the well for many years.
Reasons for replacing a well pump
If it was necessary to replace the deep device, then it is worth remembering that such a procedure is quite complicated and time-consuming. In this case, it is best to invite specialists who have all the required equipment to extract the structure.
It is better to involve several people to replace the pump.
The most common situations requiring device replacement are:
- Breakdown of the electric motor;
- Cable breakage or burning;
- equipment jamming;
- Connecting pipe damaged.
When removing downhole equipment for the purpose of replacement, various problems can arise. Some of them are quite possible to solve on their own, if the depth is not too great. If you need to replace ECV pumps or vibration-type devices that are heavy, help may be required.
As a result, a loop is formed that interferes with the passage of the device. This is mainly due to improper installation, when the cable and cable are interconnected along the entire length. To solve the problem, you can try to push the device down a little.
You need to act very carefully so as not to damage the body of the device and the cable, since if the fasteners are damaged, the pump will simply come off and fall. If the cause of the breakdown was the wear of parts that arose during long-term operation, then the unit must be replaced very urgently. When it burns, you must first find out the cause, since the new device will break in the same way
When it burns, you must first find out the cause, since the new device will break in the same way.
There are several reasons for the breakdown, among which experts distinguish:
- Mounting errors;
- Wrong choice of design;
- Lack of dry air sensor;
- Incorrect automatic adjustment;
- Not good enough pressure.
In the event of absolutely any problems associated with pumping equipment, it is necessary not only to find the malfunction that has arisen, but also to comprehensively eliminate the main cause of the breakdown in order to prevent the parts from failing again.
Checking the power line
Preliminary diagnostics involves the removal of the device from the well, short-term work "dry" and monitoring the rotation of the shaft. The nature of the sound of the engine also needs to be determined. The motor must not be subjected to any additional load. Uneven sound, various crackling or rustling is strictly prohibited.
The pump test must be carried out without reconnecting to the mains. The size and cross-section of the wire must correspond to the characteristics of the element used in daily work. This is due to the fact that the decrease in voltage indicators on the line more than 30-50 meters can be significant. Also, one should not exclude the possibility of a fracture of the cores, damage to the insulating layer, defects in the protective trigger mechanism.
First you need to remove some core from the cable from the terminal block of the device and measure the power, the indicator of which should not be lower than the values \u200b\u200bspecified in the documents for the pump. In the case when the voltage is significantly reduced, it is better to install a better wire. It is necessary to additionally determine the resistance index between the cores, as well as in each of them separately. If everything is in order, the meter will not respond, if any readings are given in the same range, then there is a breakdown in the circuit. Insulation damage often occurs in PVC plastic wires.The resistance index of the most current-carrying cores will help to clarify the problem in more detail, to exclude the effect of transient resistances on the installed terminal clamps. It will be useful to determine the health of the circuit breaker.

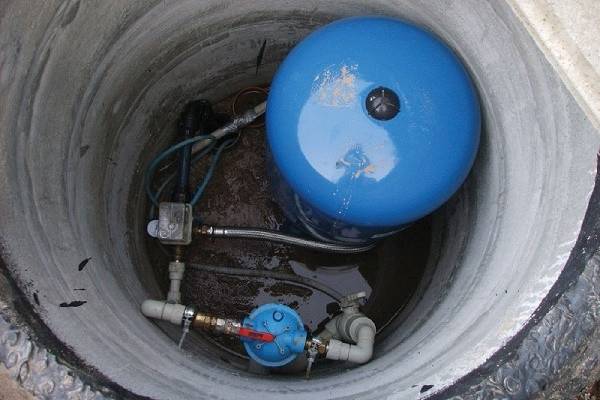


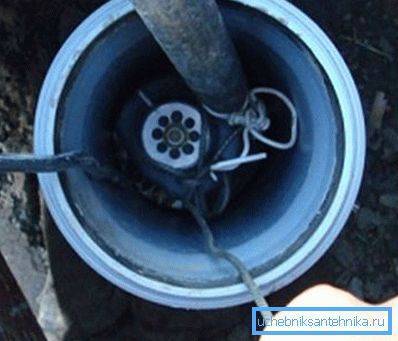
Features of operation of a submersible pump in a well
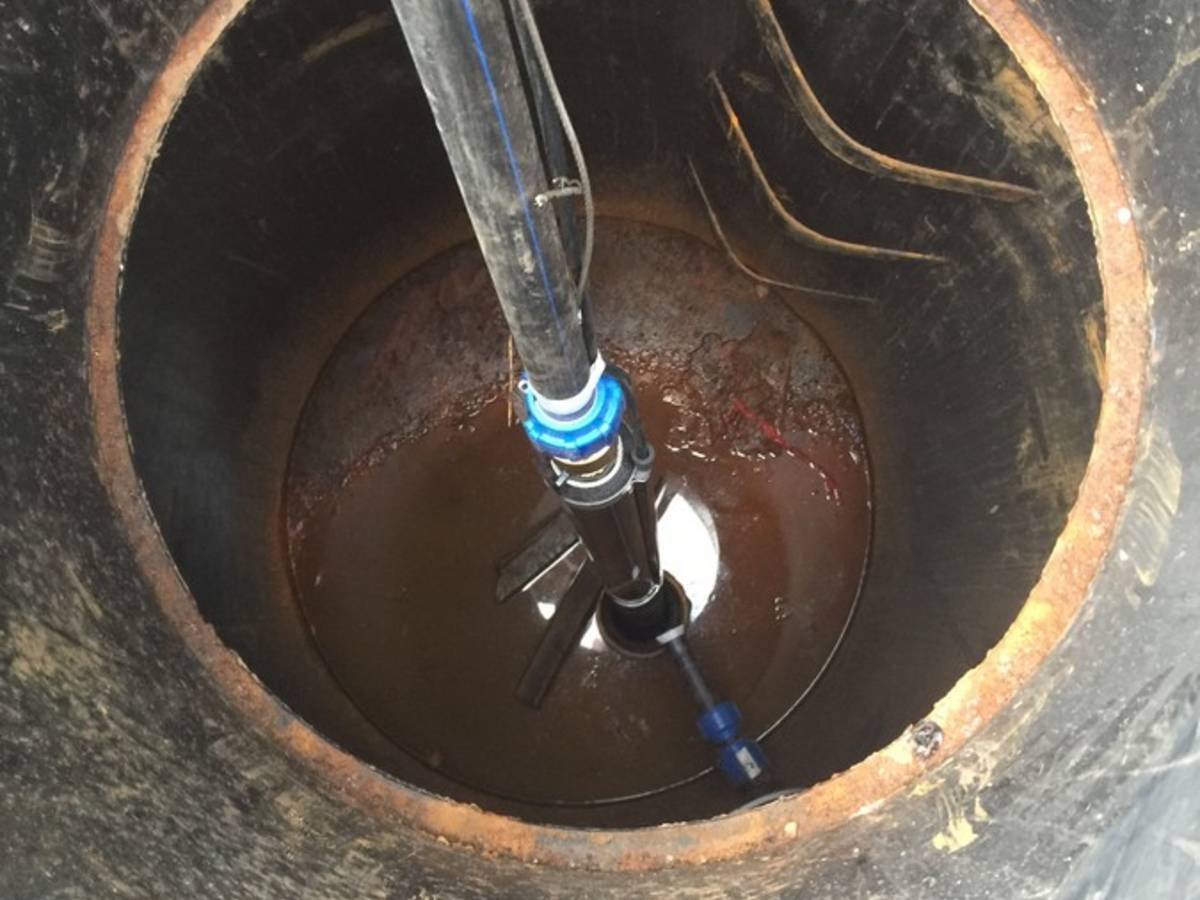
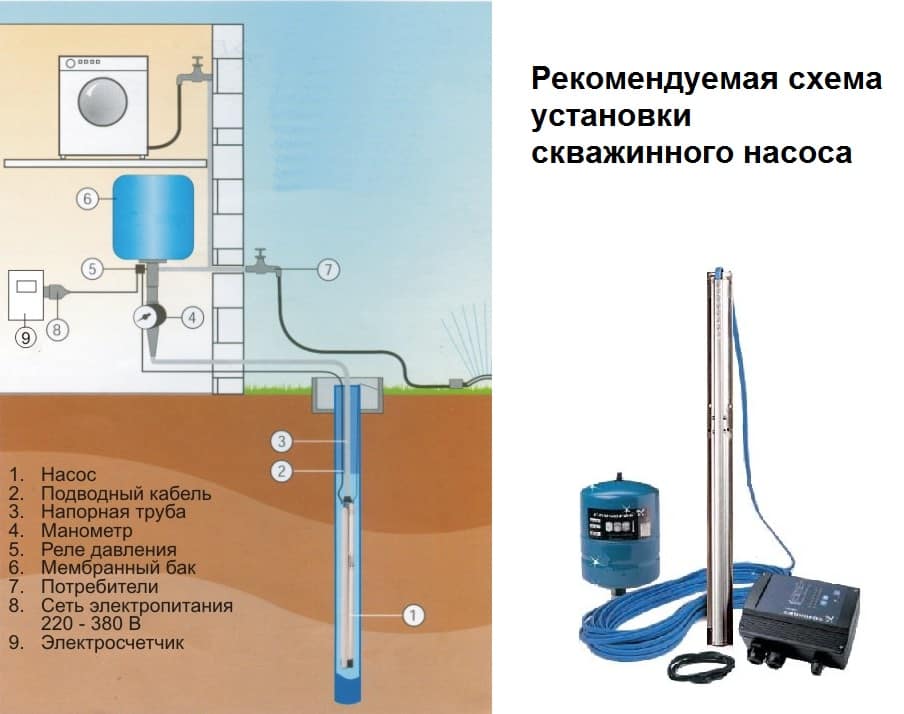
Downhole devices for pumping water are lowered into the casing and fixed in place with a steel cable in a polymer sheath or a nylon cord. The rise of water to the surface is carried out through a rigid pipe or a soft hose, which are connected to the outlet pressure pipe through threaded couplings. When organizing a full-fledged water supply for a residential building, a check valve is installed in the system (sometimes it is built right into the pump), which prevents water from leaving the well when the equipment is in standby mode.
The pumping equipment, along with the pipe, will have to be periodically removed from the well and reinstalled in order to monitor the condition of the safety cables (especially the clamps, which can be quickly damaged by corrosion), as well as to service the pump, valve, or the well itself. Experts recommend once a year to conduct a scheduled inspection of the "farm" in the water.
At depth, the importance of high-quality connections increases many times
Prevention of possible problems
It is not difficult to dismantle the downhole injection device if the source is shallow, and the pressure pipe is soft and the water is not backed by a check valve. But when a well is over 30 meters deep, rigid pipes are used (and this column is filled with water), the task becomes much more complicated.To prevent the pump from getting stuck in the casing, you should use the recommendations of experienced users and installation specialists:
- To raise and lower the equipment, it is desirable to use a gate (as on wells) or a winch. Control the smoothness of movement, at the slightest stop / hook, back off a little, and continue lifting.
- Engage two, and preferably three people.
- The pressure pipe supplied in coils must be kept stretched out for natural straightening before immersion.
- Do not use a vertical section of pressure pipe assembled from several pieces. Refuse to splice ropes and cables.
- Choose the diameter of the cable for the submersible pump depending on the mass of the injection device, use only high-quality products, including auxiliary elements, for example, clamps for making loops, which must be made of stainless steel.
- Fasten the pipe, cable and power cable together correctly (the latter is attached to the pipe, not to the cable) so that after installation there are no sags and loops that could get into the gap between the pump and the casing pipe. Everything must come to the surface at the same time.
- The cable and cable on the surface must be very securely fastened.
- Protect the head of the well from foreign objects falling inside that can wedge the elements of the system.
- Do not allow the equipment to be idle for a long time, so that the pump does not end up in a layer of silt and does not get stuck. There is also the problem of "silting back" in a heavily exploited source, where sediment builds up on the casing walls, preventing pump passage. In this case, it is worth flushing the well every two or three seasons.
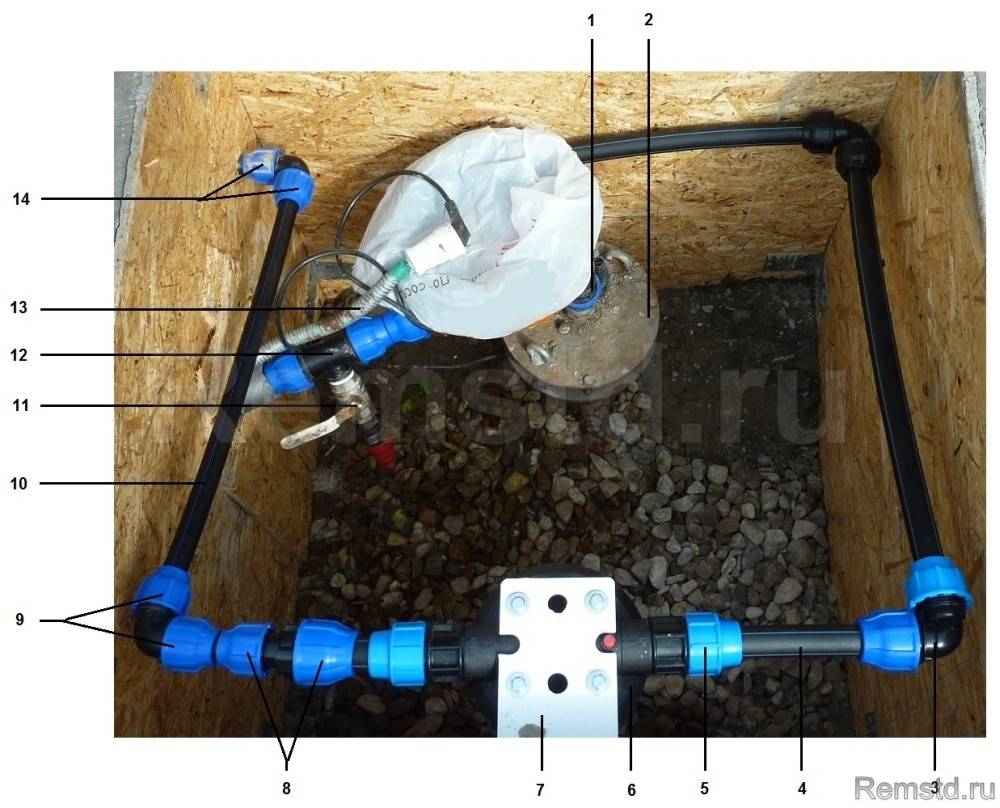
System with casing pipes of different diameters
Preliminary installation work
Submersible Pump Characteristics
Before lowering the pump into the well, all its parameters should be measured. The main technical parameters are:
- depth;
- static and dynamic water level.
If everything is immediately clear with depth and width, then not everyone knows what the statistical and dynamic water levels are. These terms are most often known only to professionals.
The dynamic potential affects the power of the device used and determines how much water the well is capable of delivering per unit of time.
The statistic indicates to what minimum height the pumping unit is capable of lifting water. It indicates the distance from the surface of the earth to the water level.
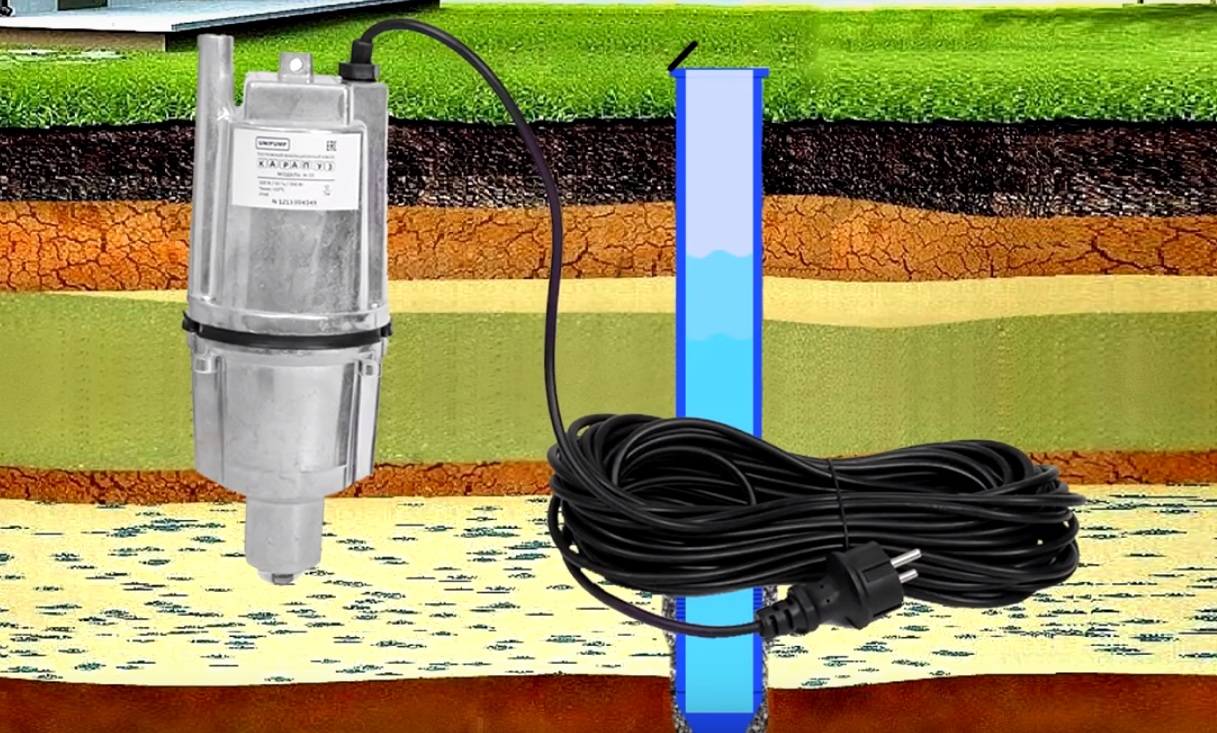
Before installing the pump in the well, you should decide how often the pump will be used. If frequent use is expected, then it makes sense to bring a stationary power supply line for pumping equipment. In case of occasional use, it will be enough to use an extension cord with a socket to power the equipment.
When connecting an extension cord, it should be taken into account that the power consumption of the device is quite high, so the extension cord must have a suitable cross section in order to prevent overheating and, as a result, a short circuit and a fire.
Do I need to change the coolant when replacing the pump
In short - yes, changing the pump, it is necessary to change the coolant. There are two reasons why this should be done:
- first of all, on the vast majority of cars, changing the pump is simply impossible without completely draining the antifreeze;
- the water pump is very demanding on the purity of the antifreeze.It is for this reason that it is categorically not recommended to refill the previously drained coolant. Even if the container into which the antifreeze was poured seems clean.
When replacing the pump, it is also necessary to replace the antifreeze in the cooling system, and the antifreeze must be of high quality
It should also be noted here that it is necessary to fill in the car not only with new, but also with the highest quality coolant. After all, as mentioned above, the vast majority of all problems with pumps are from bad antifreeze. It is for this reason that saving on antifreeze is categorically unacceptable, because it may one day cause an overhaul of the entire engine.


