- Problems detecting refilled ink tanks in Canon printers and MFPs
- Disabling ink level monitoring in Canon Pixma printers and Canon MP MFPs
- Resetting the ink counter using IPTool and MPTool
- It all depends on the mixer.
- Where to buy and how much?
- How to choose a faucet cartridge
- A bit of history
- Faucet cartridge replacement procedure
- Varieties of cartridges
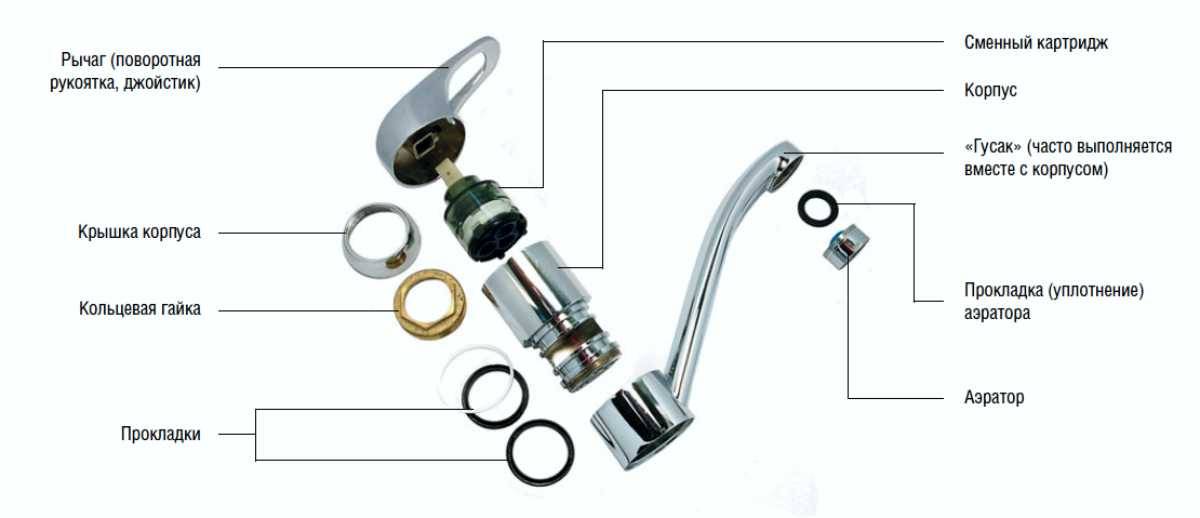
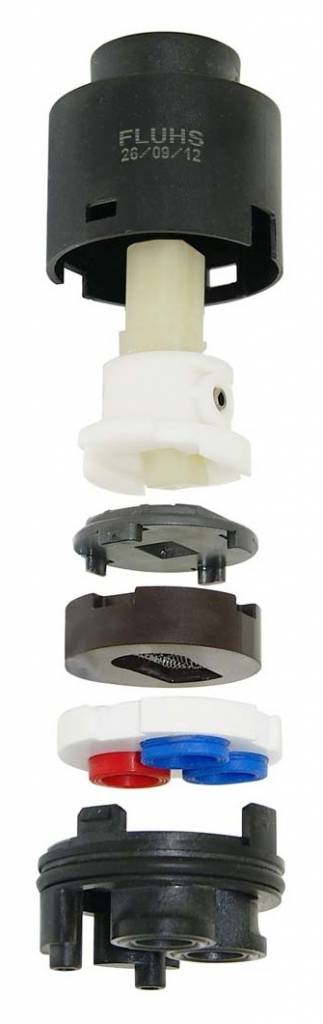
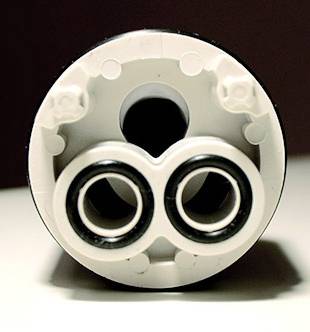
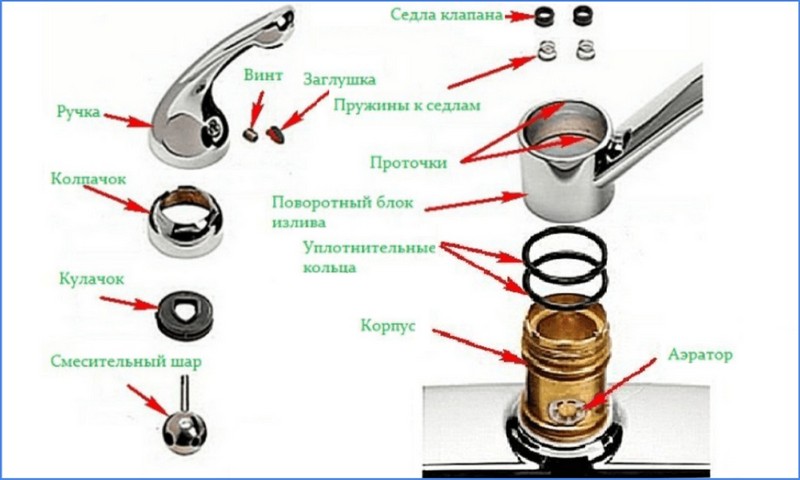
- Cartridge - what is it, where is it
- On a note
- Bonus
- We remove the bottom
- Diameters
- Through hole in plate
- Ledge "Dovetail"
- Ball cartridges
- Types of faucet cartridges
- Steel ball devices
- Disc "cores" made of ceramic plates
- Replacing the cartridge in the mixer: do-it-yourself step by step
- Kinds
- How to replace the cartridge in the faucet?
- Cartridge replacement
Problems detecting refilled ink tanks in Canon printers and MFPs
Depending on the model of the device, cartridge chips (and “diapers” of devices) can be: reset, reset using the programmer, or disable tracking of the counter in the device menu or device driver settings. In this article, we will tell you how to deal with chips on Canon cartridges.
Do not confuse the ink counter in the cartridge and the waste ink counter - the so-called diaper counter. They are dropped differently.
Resetting the cartridge chip PGI-5Bk, CLI-8, PGI-520Bk, CLI-521 using the programmer
Disabling ink level monitoring in Canon Pixma printers and Canon MP MFPs
The ink level information of chips installed in Canon Pixma printer cartridges that use separate ink tanks, such as iP4200, iP5200, etc., cannot be reset or reset.
In order not to block the operation of the printer when the ink level in the cartridges reaches zero values according to the chip data, it is necessary to disable the printer's control system for the level of ink in the cartridges. To do this, after the printer displays a message stating that some cartridge has run out of ink, you must press the paper feed button (the middle button with a triangle and a blinking indicator) and keep it pressed for 10 seconds.
This will disable the printer's ink level monitoring system for that ink tank. Now the printer will not block work.
If there are occasional messages that the cartridges are low on ink, just ignore them.
Resetting the ink counter using IPTool and MPTool
IPTool 1.1.5 — resetting ink counters in Canon iPxxx printers The program is designed for service work with Canon iP-series printers in Normal mode.
- Extended information about the printer, ink levels in cartridges and waste ink containers.
- Printing test samples for checking SG nozzles.
- Cleaning and deep cleaning of the PG printer, cleaning of the tray and cleaning of the rollers.
- Change the drying delay value.
- Change printer model.
- Read and reset printer EEPROM.
After turning on the printer and installing the “syringe cartridges”, select the required brand CHANGE Model, alternately press RESET Black (black ink reset), RESET Color (color ink reset), the remaining ink level Ink Level as a percentage will change its value to 100. Among other things in the future, the problem of overflowing the “sump” or exceeding the level of waste ink will come up. means of the specified program, a similar problem is solved according to a similar scenario. Optionally, you can use the service functions to clean the "head".
MPTool 0.9.6 The program is designed for service work with Canon MP-series printers in Factory mode.
- Extended information about the level of ink in the cartridges (the readings are correct for the 40th series of cartridges, for the 30th and 50th series they will be respectively overestimated and underestimated) and waste ink containers.
- Read, write and reset the EEPROM of the printer.
- Resetting the black and color ink level counters.
- Resets the "main" and "secondary" waste ink box full counters.
Refueling problems Canon Pixma 3600, 4600, MFP MP540, MP630
Recently, all mid-range and high-end Canon inkjet printers and MFPs use separate ink tanks, each of which contains ink of only one color, and a single print head is mounted on a carriage.
This technology is more economical - it allows you to manage each color separately, regardless of their number, the amount of remaining ink in each of the ink tanks and replace any of them separately.In addition, the new single print head allows you to control the size of the drop applied to the paper - from 2 to 1 pl! It also has a positive effect on print quality and color mixing. However, each ink tank has a chip used as a page counter. Due to the fact that the ink tanks are chipped, after the end of the ink, the machine stops and does not allow printing further until the ink tank is replaced. Such ink tanks are marked PGI-520Bk, CLI-521. They replaced the PGI-5Bk and CLI-8. The PGI-5Bk and CLI-8 ink tanks were successfully refilled, and the ink counter in the ink tanks was turned off by the user so that the device would not give an ink replacement error.
Canon Pixma iP4600 printer with new cartridges
Do not confuse the ink counter in the cartridge and the waste ink counter - the so-called diaper counter. They are dropped differently.
Such ink tanks are marked PGI-5Bk, CLI-8, PGI-520Bk, CLI-521.
How to replace a cartridge in an MFP (printer) Canon MF4410, MF4430, MF4450, MF4550d, MF4570dn, MF4580dnReplacing a cartridge in a Canon printer
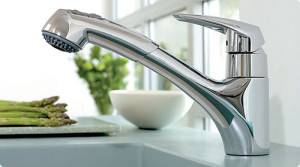
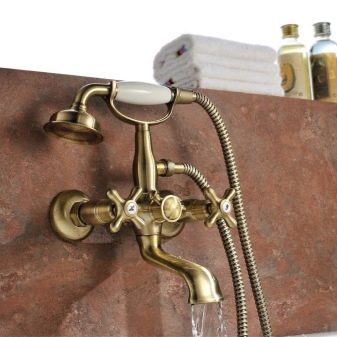
It all depends on the mixer.
There is a wide variety of different taps, each manufacturer has its own subtleties and nuances in creating plumbing. But it is the cartridges that differ little in their internal structure, their quality and service life are affected by the material from which they are made.
For the disc type, it is important that the strength of the discs be at a high level, which is why many well-known brands are trying to improve their quality through carbon crystal sputtering. It allows you to improve the performance of the cartridge, its discs have higher strength and a specific, smooth surface.
When choosing a mixer, special attention must be paid to its device. An important role is played by the methods of installation and fastening of the lever and handle.
When purchasing a branded mixer, you should ask in advance where and how you can order parts for replacements if needed and whether parts from other companies can be suitable for repairing a crane. Of course, it is better to purchase a mixer of a well-known brand or trademark, as these manufacturers have proven themselves in the world market and have a high reputation.
Of course, the cost of such a product is quite high, but it should be understood that high-quality and solid plumbing can last for quite a long time without replacing parts and repairs, while economy-class faucets require, if not complete, then partial replacement almost every year or two.
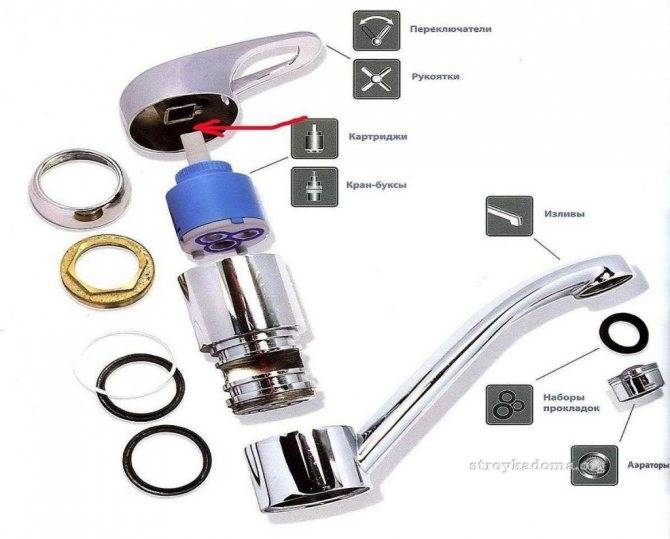
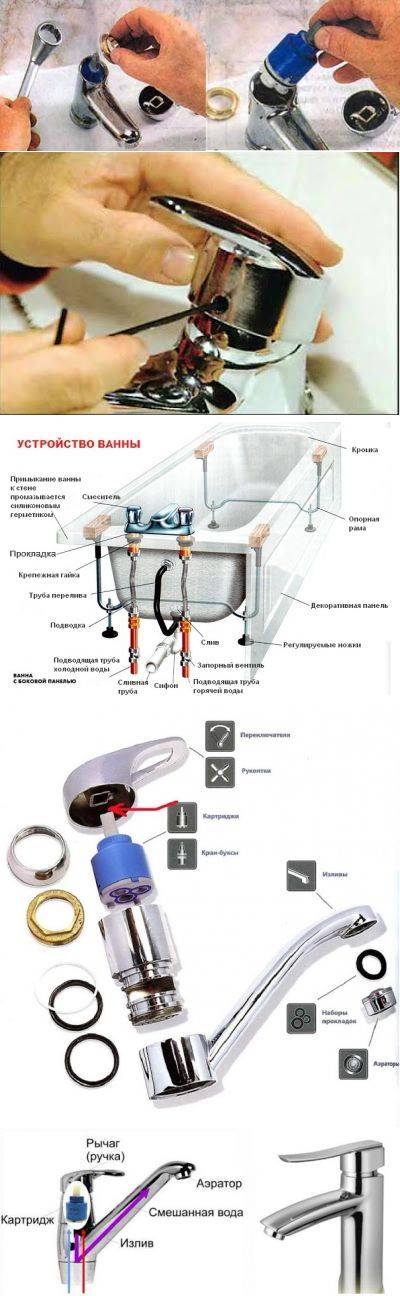
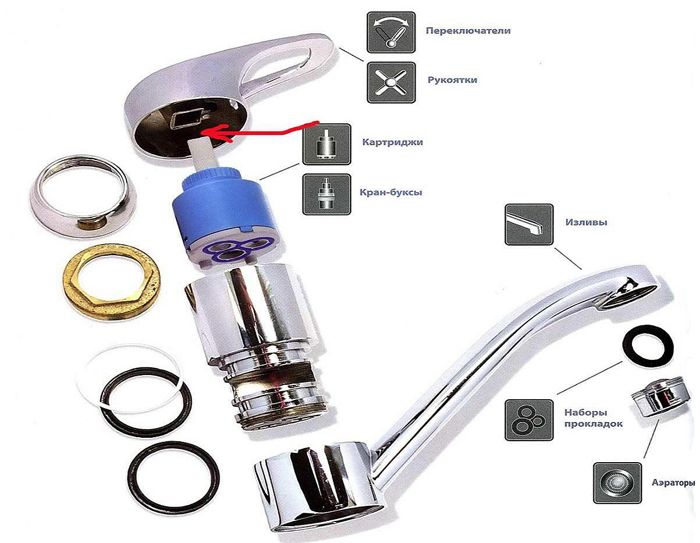
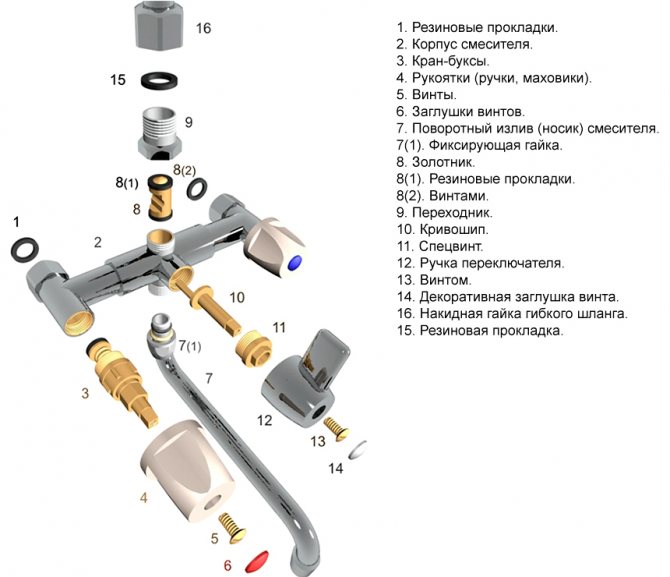
Mixer components
Often, manufacturers of sanitary ware of well-known brands produce different series of products, there are luxury goods, and there are also budget options. The main thing is that the manufacturer, in either case, uses high-quality material and modern technology for the production of his goods.


The following world brands are highly appreciated and deserved high rating:
- Grohe.
- Hansgrohe.
- Axor.
- Roca.
- Iddis.
- Gustavsberg.
Expensive products are usually equipped with a high level of protective water filters and are made of high quality material. So if you have to make repairs, then in the most extreme and rare cases.
Where to buy and how much?
If your "one-handed" has become faulty, it is not advisable to repair the mixer cartridge, since it is difficult to find individual parts for it.
It is better to buy a new part, because its cost is low.
Therefore, it is better to buy such products of well-known brands, choosing from the middle price category if you have a limited budget.
If the wallet allows, it is better to buy water filters at the same time, then it will work flawlessly for a long time.
Untreated water spoils the faucet, and therefore, without filters, you will soon have to buy a faucet cartridge and replace it.
It should be borne in mind that each company installs its own cartridges, and therefore, if you have one mixer, you will have to buy the same company.
Some large manufacturers produce these parts in several sizes, although they work the same way, they just control water of different volumes, so the price of a faucet cartridge can vary greatly.
Sometimes on sale you can find low-quality Chinese fakes, their price is low, but the quality is incomparably worse than that of well-known brands.
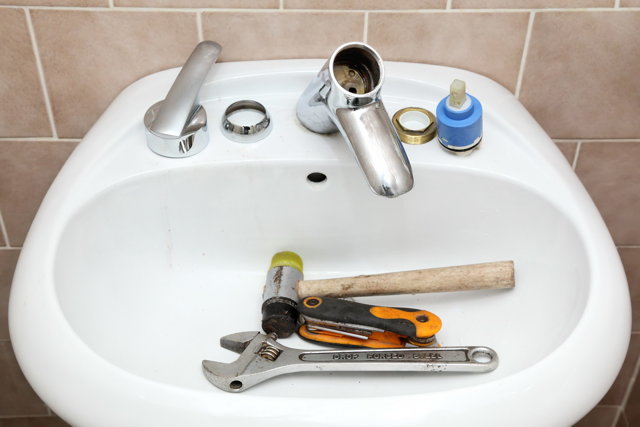
The most common cause of faucet failure in plumbing is a broken cartridge. You need to know how to change the cartridge in the bathroom faucet yourself and what types of this part exist. Of course, the easiest way is to call a specialist to perform this work, but there are also cases when this is impossible or difficult.
The cartridge is the main part in the mixer, but at the same time it is also its weakest point. The faucet stops working, starts to leak or makes noise - all these are signs that it is necessary to replace the main part. In fact, replacing a cartridge in a tap is not so difficult, you need to know its structure and have all the necessary tools for work with you.
But first you need to figure out what type of cartridge you should purchase, because even if you call a plumber to replace it, you often need to purchase parts yourself. Therefore, you need to know the characteristics of the old cartridge, and even better - remove it and take it with you to the store as an example. This will definitely save you from possible mistakes and difficulties in choosing.
How to choose a faucet cartridge
To choose the right cartridge for the mixer, you need to pay attention to the main characteristics of the device. It:

Naturally, it is better to buy high-quality models from European manufacturers. Good reviews about Grohe, Kaiser and Blanco. But, if necessary, you can pick up good Chinese options. These are Potato, Frap and others.
Mixers are of the following varieties:
Double valve
It does not yield its position even to new, more advanced mixers, since it is already considered a classic, which is very convenient to use and repair.
This device is, thanks to which the flow of hot and cold water is adjusted. It is this main part that will usually cause their breakdowns, due to which water leakage may occur. Nevertheless, it is two-valve faucets that are most convenient for installing them in the bathroom.
Lever
It appeared on the plumbing market not so long ago, but in this short time it managed to gain immense popularity and demand.
This mixer has only one lever, with which they can adjust the total pressure of the water flow and its temperature. To do this, simply lift the lever up and turn it to one side.Inside their structure, single-lever mixers have special cartridges and locking mechanisms.
Ball Valves
As well as lever not very long ago in the plumbing market. They replaced the old stuffing box valves, which often had problems with rubber gaskets. In these taps, there is one handle for regulating the water, which is attached under the trim with a small screw. They have a simple, very precise design, which is easy to repair in case of breakage.


A bit of history
The ancient Greek mathematician and mechanic Heron invented a mixer, which outwardly is completely different from modern taps, but differs little from them in terms of functional actions. The ancient Roman story about mixer taps says that the taps of Roman inventors repeated the principles of Heron in action, but were more comfortable. In the Middle Ages, taps were out of the question, personal hygiene was at a low level, which is why the spread of epidemics led to millions of victims in Europe. Then I had to think about sanitation, water and, of course, taps.


Since taps for supplying water for personal needs were available only to wealthy people, the main attention in the manufacture was paid to their appearance. At the end of the 18th century, the Englishman Joseph Brahm created a new faucet of 3 taps: the first supplied hot water, the second - cold, the third - mixed
Such faucets lasted until the beginning of the 20th century, when William Thomson improved Brahm's ideas to a two-valve faucet.

In the recent past, most mixers were controlled by crane boxes.Although they have not disappeared, and are often revived in a luxurious retro style, lever mixers, which are easy to operate and quickly change the flow modes and water temperature, have firmly taken their positions in mass consumption. The main element that carries the main functional load is the cartridge that mixes and supplies water. It is controlled by light movements of the lever, which ensures the desired temperature and water supply.

This is interesting: Rossinka faucets - features and benefits
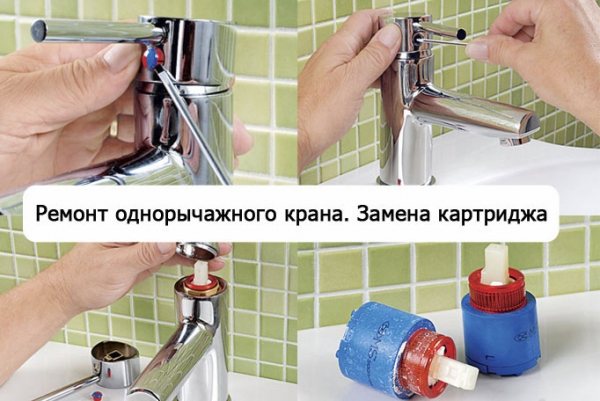
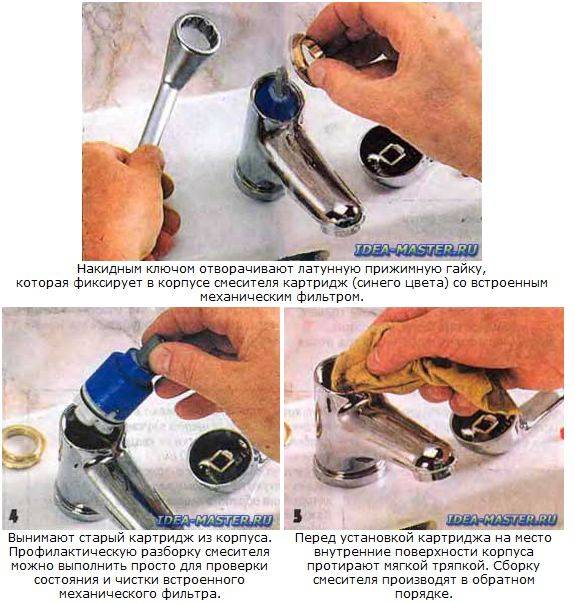
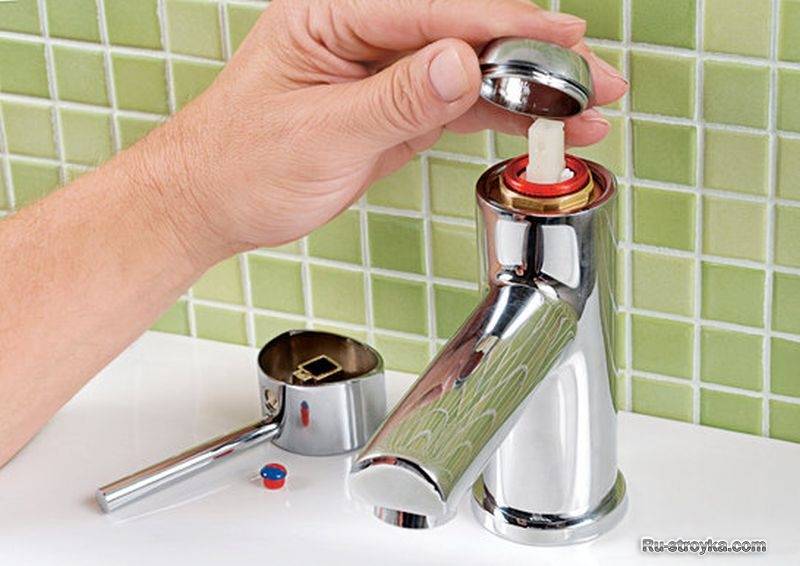
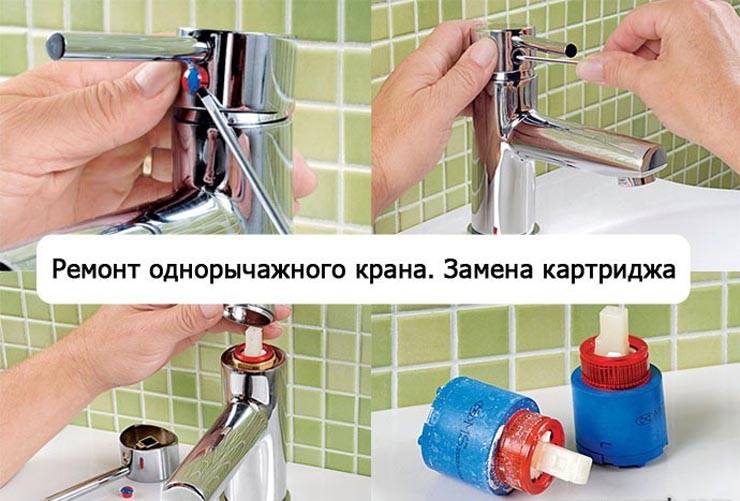
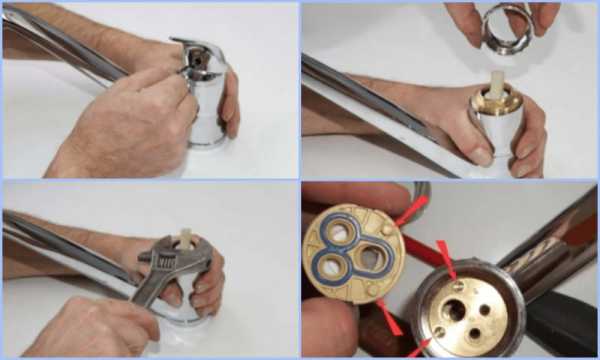
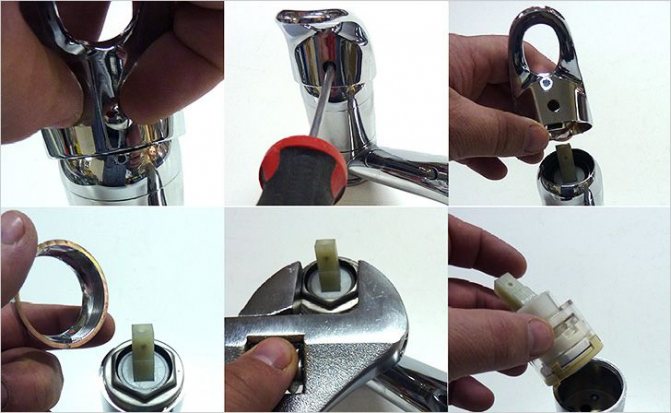
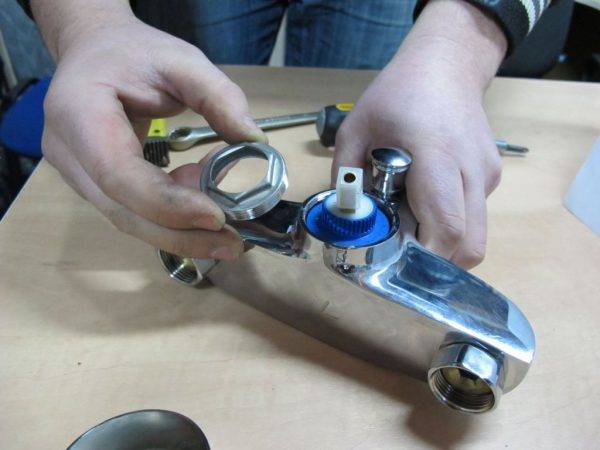
Faucet cartridge replacement procedure
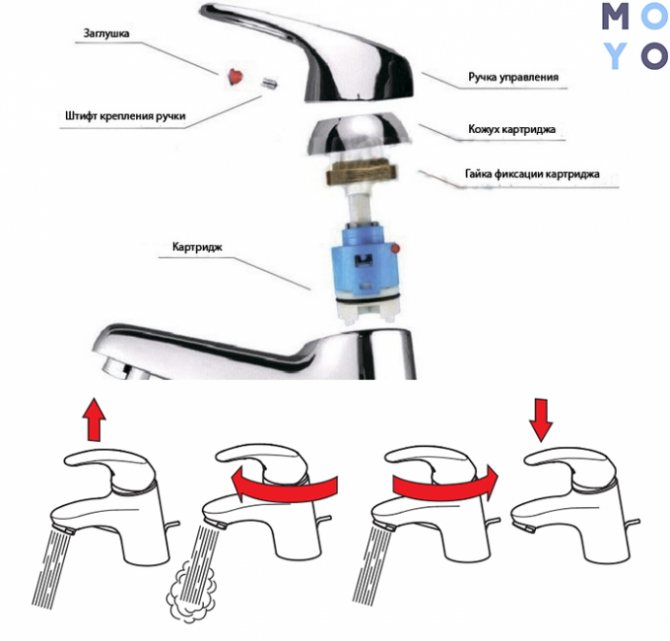
How to change the cartridge in the mixer yourself, what tools and consumables are needed for this? Modern single-lever faucets use two types of ceramic cartridges, which visually differ in size (diameter). If you are not sure which consumable you need, first you need to remove the cartridge from the mixer and go with it to the nearest plumbing store or market to buy the same new one.

How to remove the cartridge from the faucet, because the faucet design seems to be solid? Everything is very simple if you know the design of a single-lever mixer and arm yourself with the right tools. To replace the cartridge in a kitchen or bathroom faucet, we need the following tools:
- Slotted screwdriver with a small sting.
- Plumbing wrench with a diameter of up to 40 mm.
- A set of small hex keys.
Changing a cartridge in a faucet takes about 10 minutes if you have everything you need at hand, including a new consumable. The process itself goes like this:
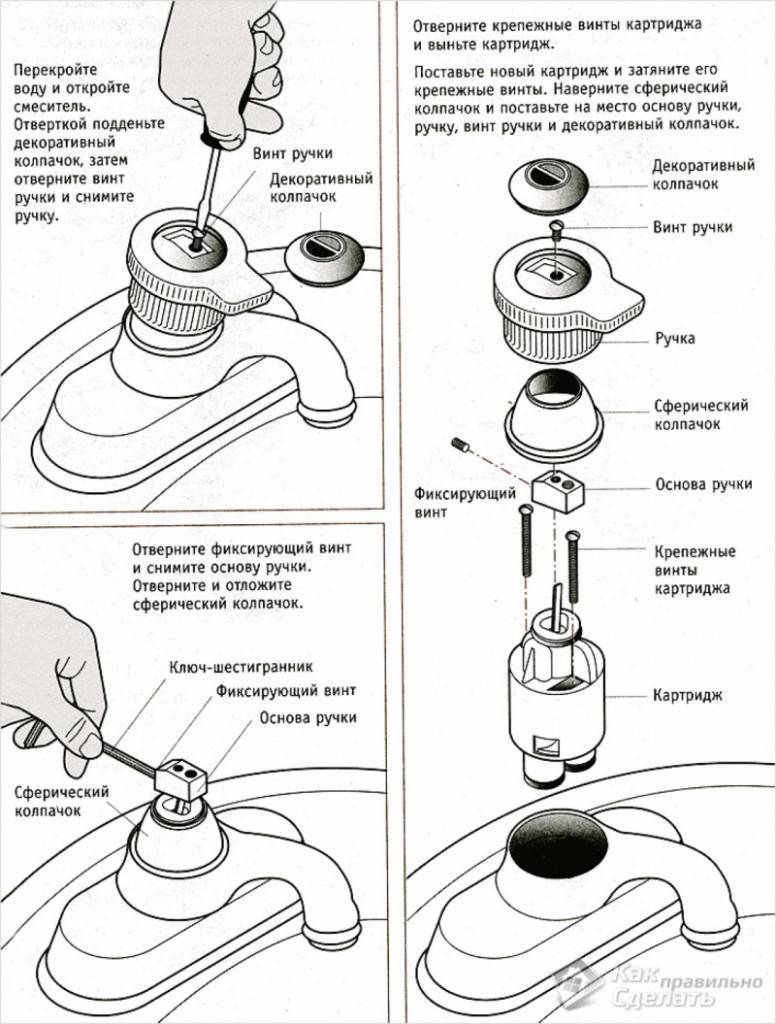
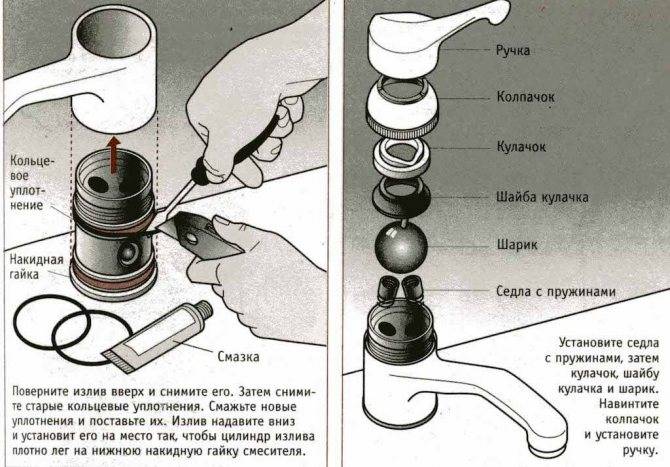
- Shut off the water supply (hot and cold).
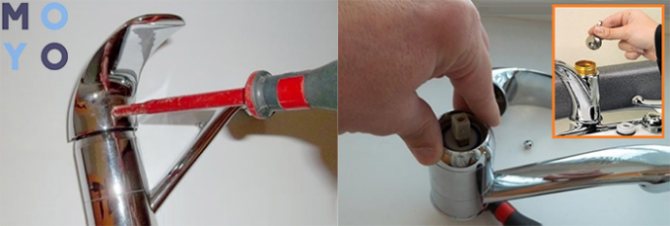
- Using a screwdriver with a thin sting, carefully pry off the plastic decorative plug on the front side of the lever (it is blue-red).
- After removing the plug, using a small hex wrench, loosen the screw that holds the mixer lever.
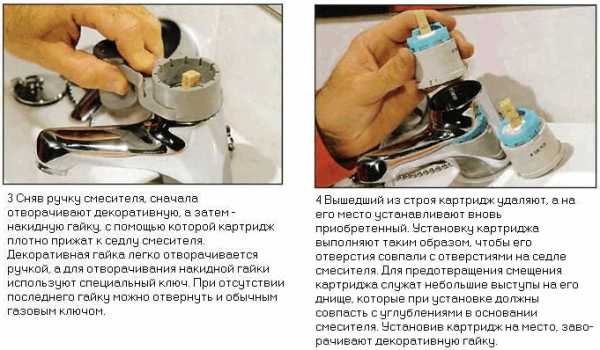
- The lever is removed, and we get access to the cartridge, which is clamped with a nut.
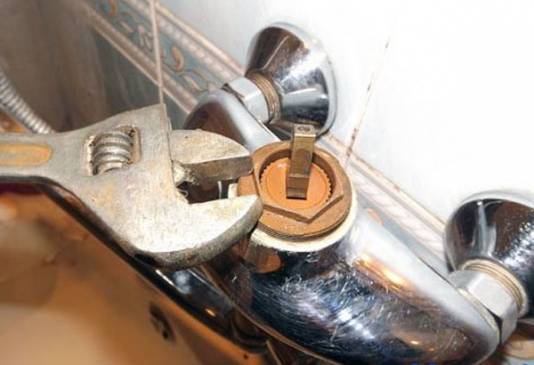
- Unscrew the nut with an adjustable wrench and take out the cartridge.
- We put a new cartridge and assemble the mixer in the reverse order.
Quite often, in cheap models of Chinese mixers, the nut is made not of steel, but of silumin and coated with chrome. This part is short-lived and often breaks when unscrewing with force. Buying a new nut is not a problem - it is sold in almost any plumbing store.
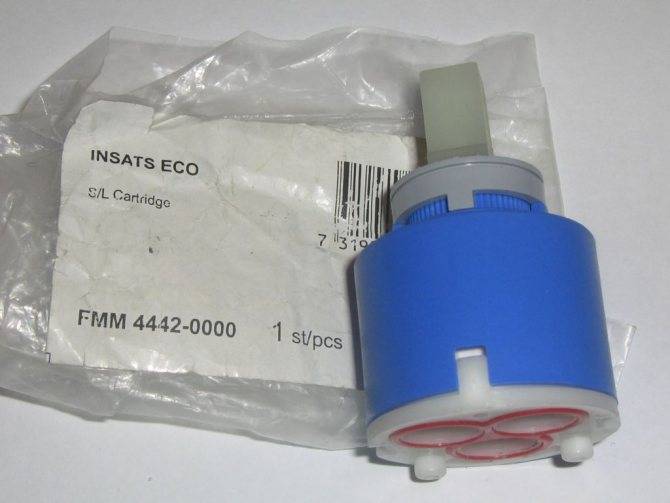
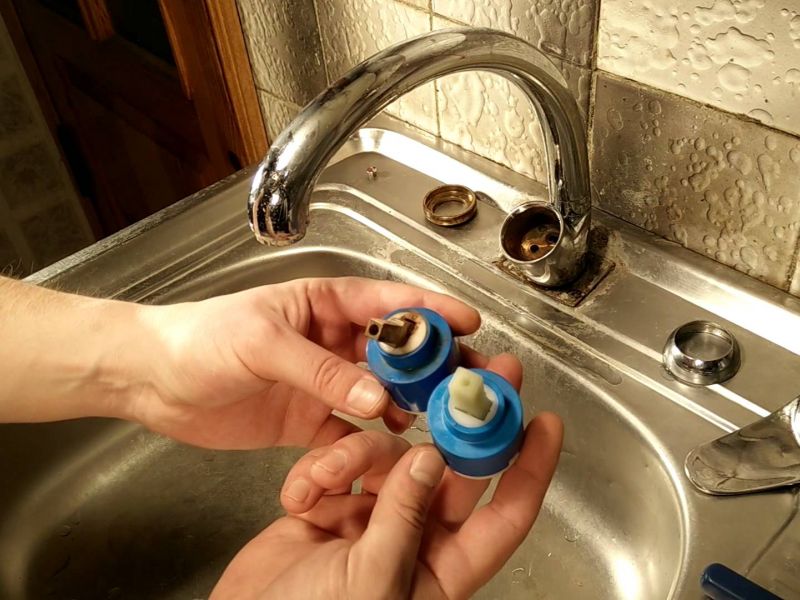
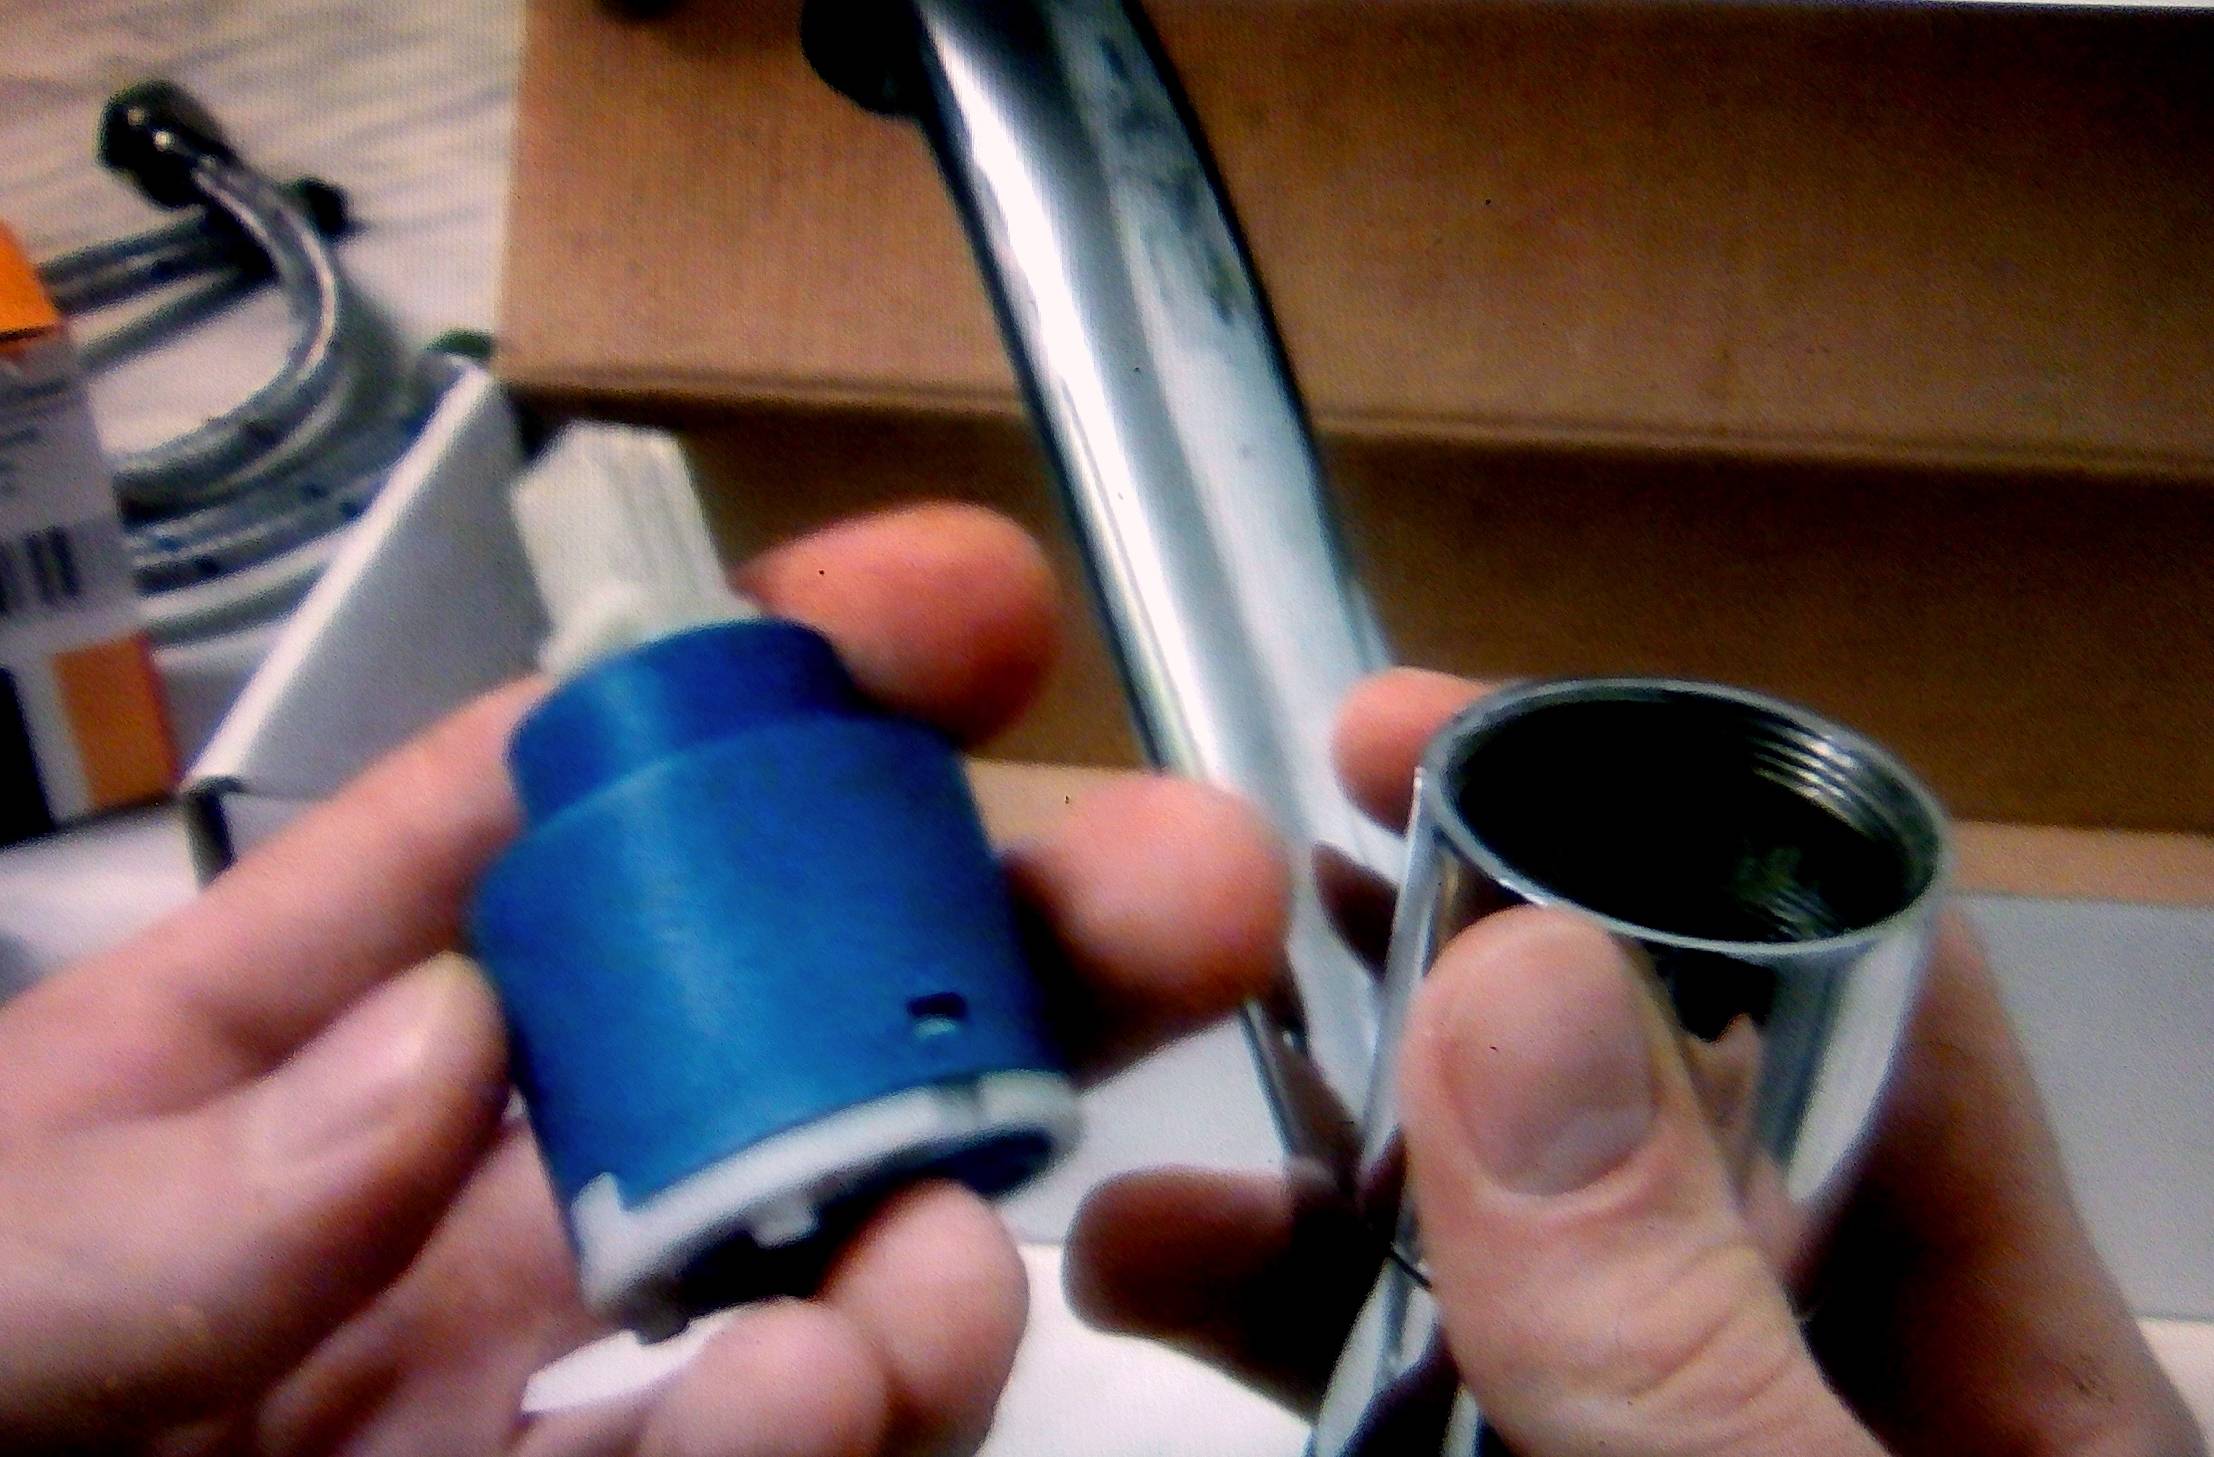
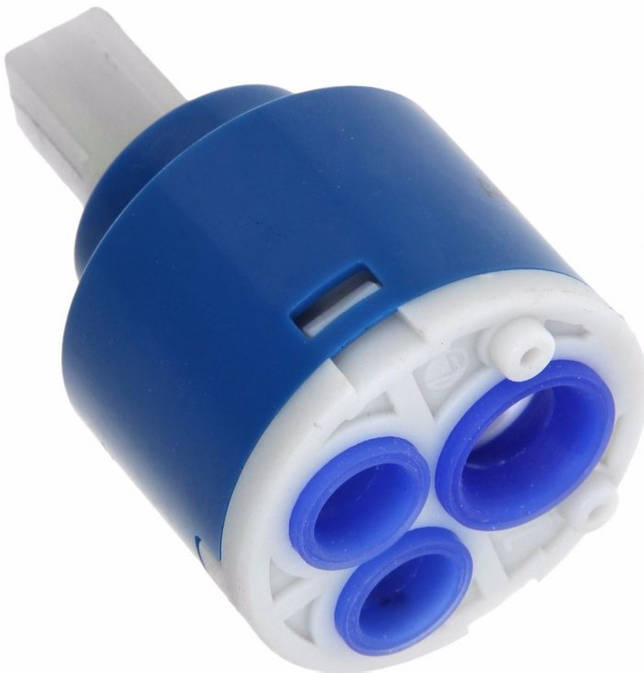
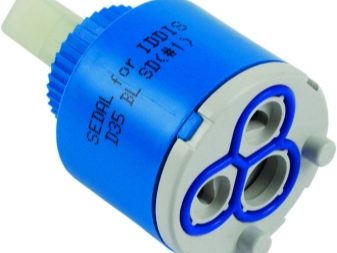
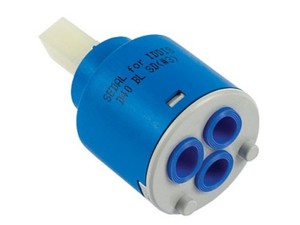
Varieties of cartridges
There are 2 main types of this part:
- Disk with cermet elements.
- Ball.
Both are used for the internal mechanism of a single lever faucet.
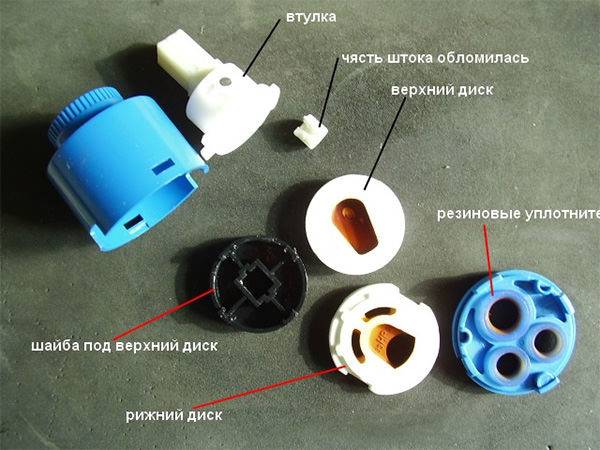
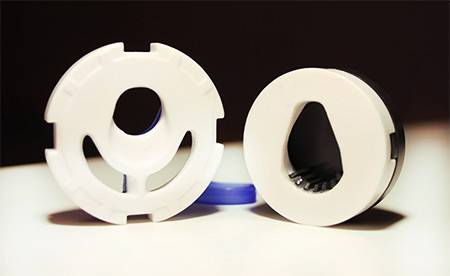
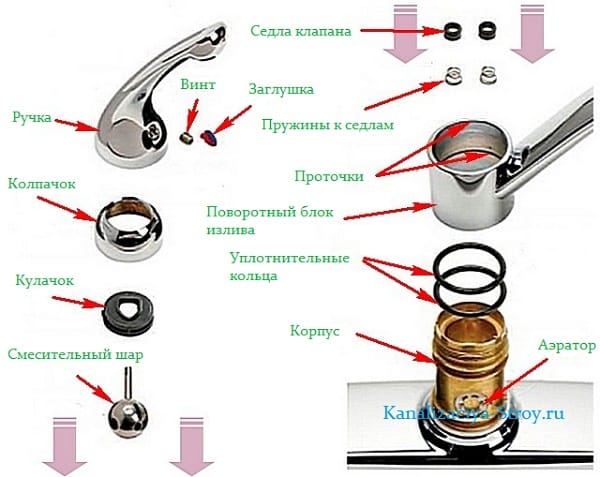
The disk cartridge has a fairly simple device, it is equipped with 2 ceramic-metal plates, which are placed parallel to each other in a horizontal plane. Water, getting inside the tank, mixes and flows out into the spout. The temperature of the water and its pressure are regulated by the position of the lever on the mixer, it is he who brings the upper disk to a certain position.
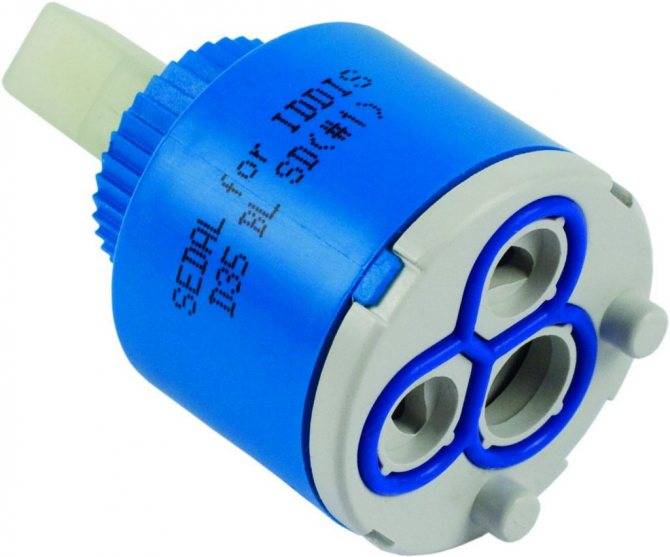
Disc cartridge
The ball cartridge also has a simple device. The main detail in it is a ball with internal voids. It has 2 holes, which are located on the top and bottom. Water enters directly into the ball, where it mixes. The ball itself is mounted on 2 rubber elements, the so-called “saddles”, each of them has its own holes for the passage of water.
The ball, under the influence of water pressure, fits snugly against the rubber elements, and water is supplied. The ball is actuated by the lever, depending on the change of its position, the cartridge begins to rotate and align with the holes in the “saddle”. With a complete coincidence, the water flow is strong, with a smaller combination, the water pressure is weak.
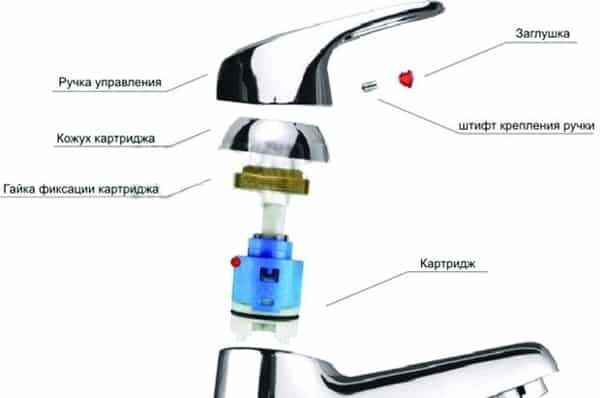
Cartridge - what is it, where is it
Swivel lever faucets are steadily conquering the market, displacing sanitary ware with two traditional valves from bathrooms, kitchens. Their key advantages are ease of use, practicality.
The cartridge is located in the core of the mixer
It doesn’t matter if you use a single-lever faucet for the bathroom or in the kitchen, its design is practically the same. The cartridge is responsible for mixing hot, cold water in the selected proportion, its supply to the spout under pressure
The working elements of the device are protected by a plastic case. In its upper part there is a rod responsible for connecting the mixer lever to the upper ceramic disc. This disk is moved by the movement of the mixer handle. The second disc is tightly attached to the first, always remains motionless. Both parts are equipped with holes through which water flows.
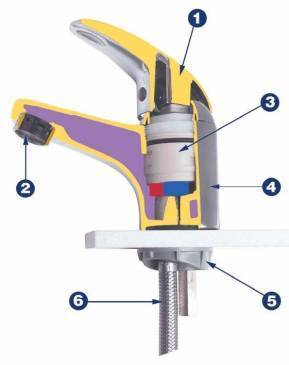

When the user lifts or turns the lever, the stem displaces and rotates the first disk. Thanks to this, hot, cold water is mixed in the right ratio, the pressure of its supply is regulated.
This is interesting: Floor standing toilets with a cistern: features and popular models
On a note
Devices that automatically regulate the temperature are very popular, but you should be careful when purchasing such models. Such cartridges are sensitive to the level of pressure, the quality of the water supplied, and the frequency of use. They react especially negatively to calcium.
This element is present in the composition of water in almost all regions of our country. An autonomous water purification system will not help to correct the situation. It is effective only with a small flow of water volumes, and also has a high cost. The price of such a system may be higher than the entire shower. Models that respond to water pressure in the pipeline are not suitable for everyone. If the pressure is small, the cassette may simply not work. In addition, it is unstable to water hammer - load drops.
They react especially negatively to calcium. This element is present in the composition of water in almost all regions of our country. An autonomous water purification system will not help to correct the situation. It is effective only with a small flow of water volumes, and also has a high cost. The price of such a system may be higher than the entire shower. Models that respond to water pressure in the pipeline are not suitable for everyone. If the pressure is small, the cassette may simply not work. In addition, it is unstable to water hammer - load drops.
Bonus
Well, now you know more than a good half of plumbers about the device of cartridges. But there are a couple of nuances.
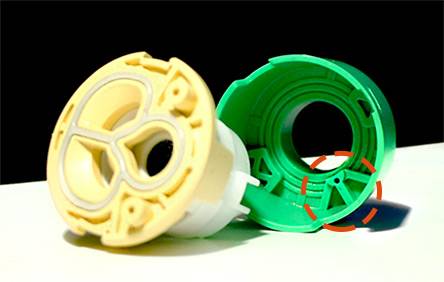
There is another type of cartridge - the so-called. "with legs".
We remove the bottom
The device is the same as the usual one, only the plastic bottom differs: water comes out of it not just into the hole from below, but into a large chamber:
This design is slightly larger in size, but allows you to choose a place for the exit of water along the entire bottom or in the lower part of the wall surrounding the cartridge. Compare faucet bodies for regular cartridge (left) and bipedal (right):

Diameters
Cartridges come in different diameters, in Russia the most common are 35 and 40 mm. Theoretically, the larger the diameter, the greater the throughput, and hence the flow rate (although the difference of 5 mm, after all, is not so significant).
Through hole in plate
It happens that the hole in the ceramic plate is not deaf, but through and is muffled from above with a plastic plate with an elastic band. This bipedal cartridge has just such a case.
Yes, pay attention to the plastic pins, they act as a noise suppressor
Ledge "Dovetail"
Some cartridges have a dovetail lug inside the case that fits into a notch on the leash (on the KCG).
The leash is located above the outlet. Due to such an additional limiter, when changing the "hot/cold water" ratio, the leash does not rotate around the axis of the cartridge, but around the axis of the outlet. It turns out that the plates move like the wipers of a car.
Ball cartridges
At one time, some manufacturers tried to make true ball cartridges with a stainless steel ball as the main assembly, but now they have mostly switched to cartridges with ceramic plates, which work on approximately the same principle.
Types of faucet cartridges
The main purpose of the cartridge is to mix hot and cold water flows, as well as to regulate the intensity of their supply, ensuring the smooth operation of plumbing equipment.
When equipping single-lever mixers, two types of devices are used: ball and disk. In terms of service life, they are approximately equal. But still, the bulk of mixers for domestic use are equipped with disc-type mechanisms.


In the event of a breakdown of the main functional mechanism of the plumbing fixture, the cartridge should be replaced in the mixer as soon as possible
This is due to the fact that in the legal plane with the production of ceramic disc mechanisms, the situation is much simpler. Not all manufacturers have a license for the manufacture of ball types of devices. In order not to pay for the right to release, it is easier for companies to stamp disk devices that are in demand on the market.
Steel ball devices
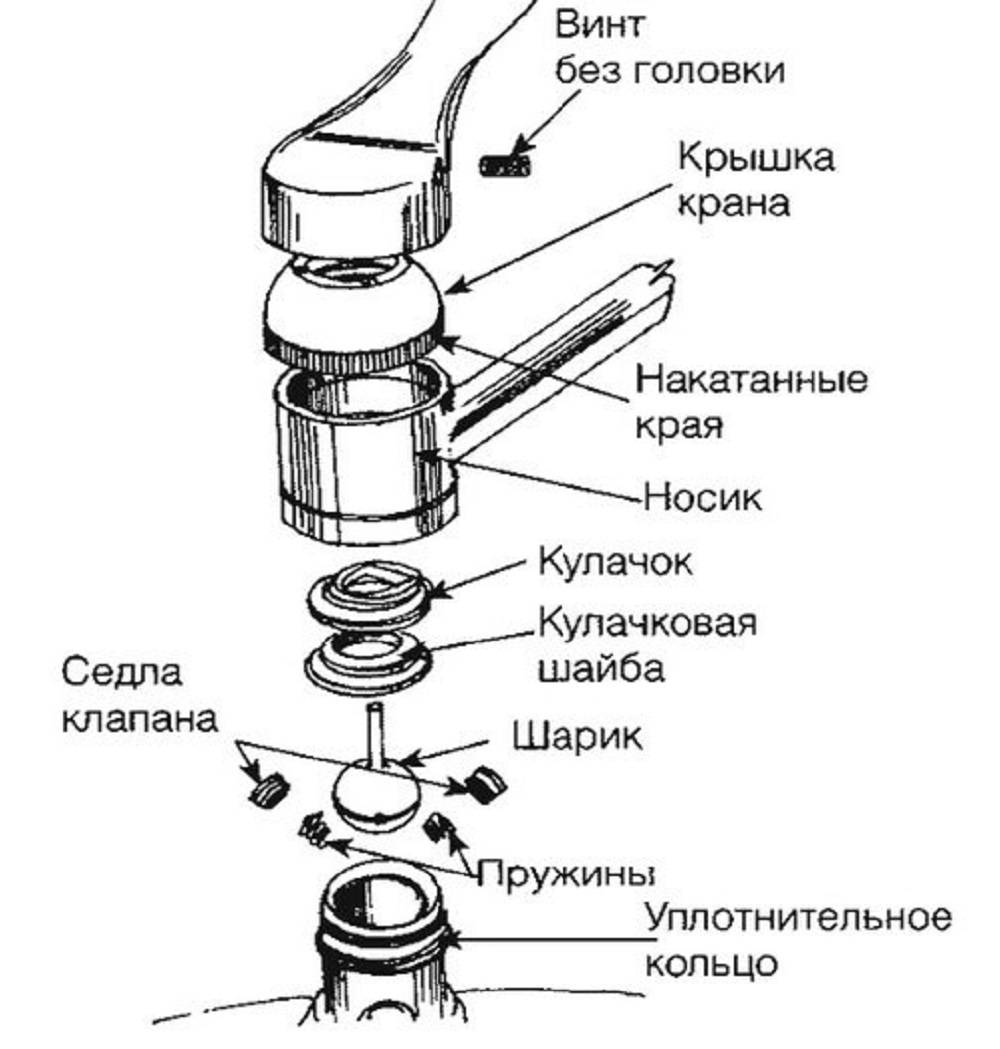
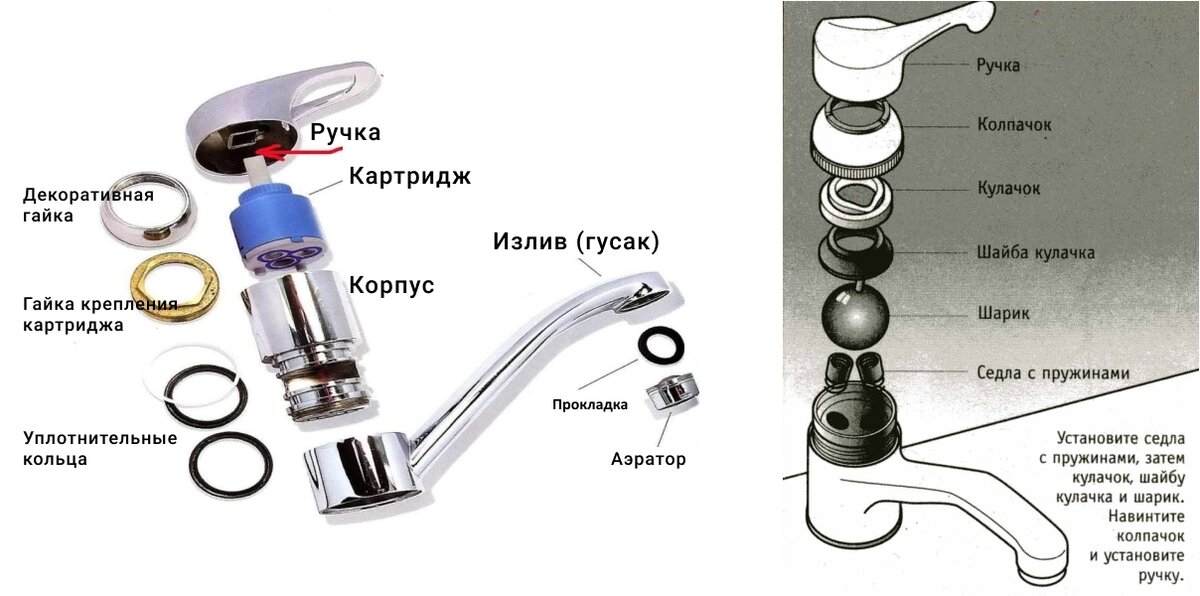
The design of the ball joystick is a locking element in the form of a hollow steel ball, equipped with three openings that communicate with each other: two inlets and one outlet.
The hollow element, seated in a cartridge sleeve made of high-strength rubber, is connected to the transmission mechanism using a lever
The temperature and pressure of the flow are set depending on the position of the openings of the inlet nozzles and the cavities of the ball. The larger the overlap area, the stronger the flow.
When the lever is turned or tilted, the walls of the ball block one or both holes, allowing flows from pipes with hot or cold water to enter and mix inside the cavities of the locking element.
The main disadvantage of ball devices is the vulnerability to deposits that form and accumulate inside them during operation. They worsen the smoothness of pressing the mechanism, causing the joystick to fail.
In the design of most models, the ball and seat are placed in a single cartridge body, but there are also options where the base is attached directly to the inner walls of the valve
Based on the diameter, height and seat, these types of devices on the market are presented in a large assortment.
Therefore, when changing the cartridge on the mixer, it is important to select and install a completely identical spare part.
In order to protect yourself from mistakes when choosing, leading to unplanned waste, buying a new “core”, it is advisable to take a used old one with you for a sample.
Disc "cores" made of ceramic plates
Disc cartridges are equipped with two smooth and tightly adjacent plates made of cermet. The lower plate is securely fixed in the “core”, and the movable upper plate is connected to the control rod, due to which it freely rotates around its axis.
In cylindrical devices, water flows are mixed due to the displacement of the disks relative to each other, as a result of which the holes completely or partially overlap
In the mixing cavity is a metal mesh, the main purpose of which is to suppress noise. In some models, the role of a noise suppressor is performed by curly protrusions.
The stem acts as the basis for fixing the handle of the single-lever device itself. It is attached to the upper ceramic disc and can be removed if necessary.
Adjustment of the water pressure in the cylindrical "cores" is carried out by moving the top plate. It is equipped with protrusions and depressions that cover the holes of the lower disc. The more the holes are closed, the weaker the pressure.
At a given position of the lever, the hollows and protrusions of the "core" are tightly combined, as a result of which the water supply from the tap is completely blocked.
To increase the tightness of the structure, most models have rubber gaskets at the bottom of the mechanism. To extend the "life" of ceramic elements, a metal mesh is provided. It acts as a coarse filter.
A similar device for cartridges for showers. We recommend that you familiarize yourself with the design and features of their repair.
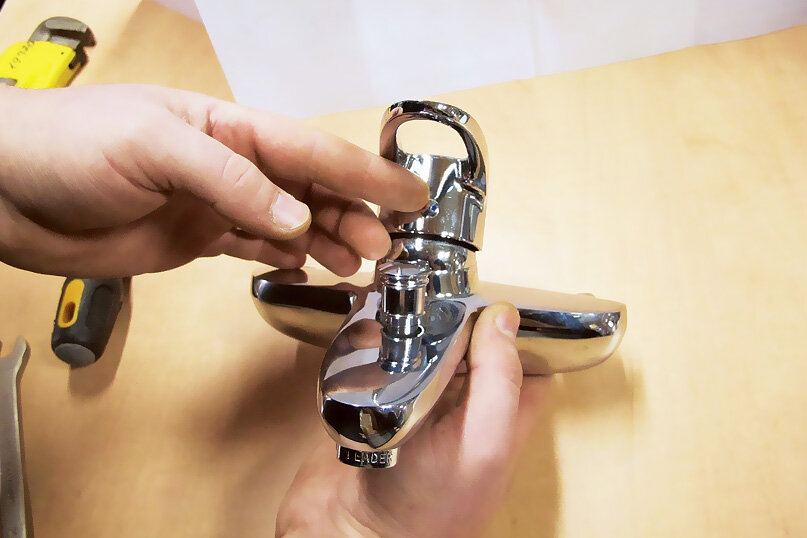
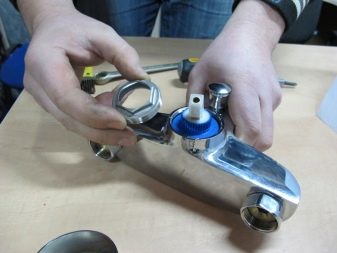
Replacing the cartridge in the mixer: do-it-yourself step by step
Having decided to do without plumbing in the event of a breakdown, you do not risk anything, since dismantling and installation are extremely simple, and it is difficult to make a mistake here. The most crucial moment will be the choice of a suitable part, since it will be impossible to replace the cartridge in a faucet in the kitchen, in the shower or in the bathroom if it is not identical.
Dismantling the mixer and dismantling the cartridge
First, remove the broken part from the mixer body, proceeding as follows:
Shut off the water supply at the outlet from the riser. Open the faucet to drain any remaining water from the pipes.
If the faucet is jammed, open any other on the same line or flush the toilet to relieve pressure in the system
When the single faucet on the riser is stuck, work carefully, as there will be a small fountain when the cartridge is removed.
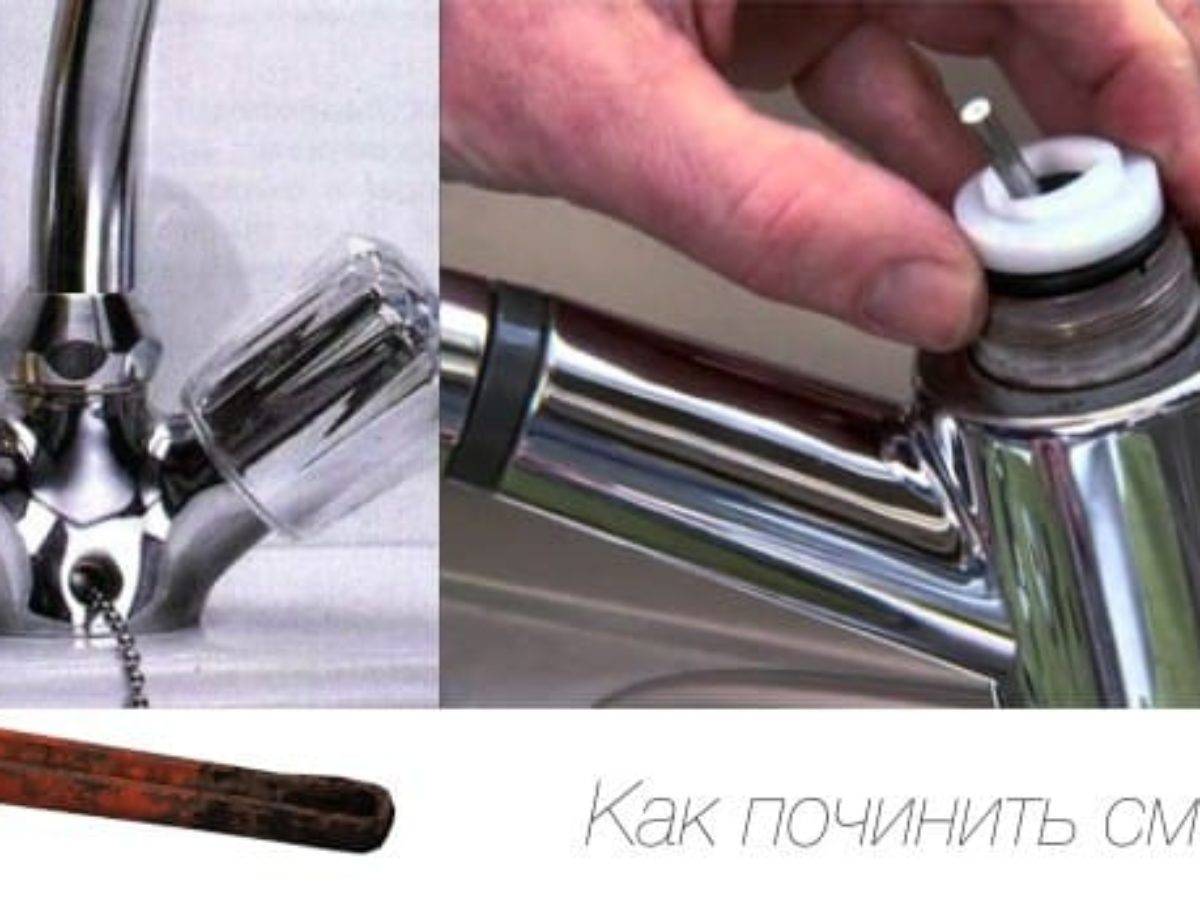
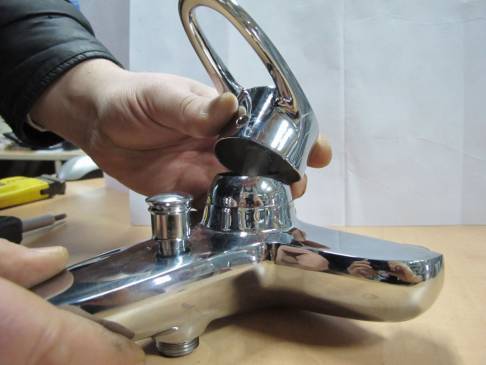
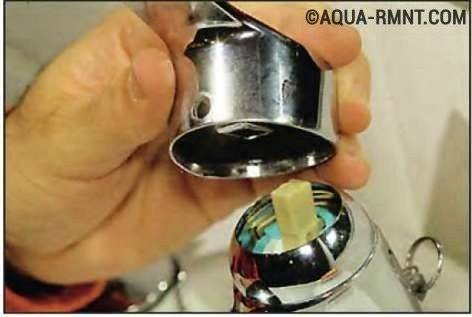
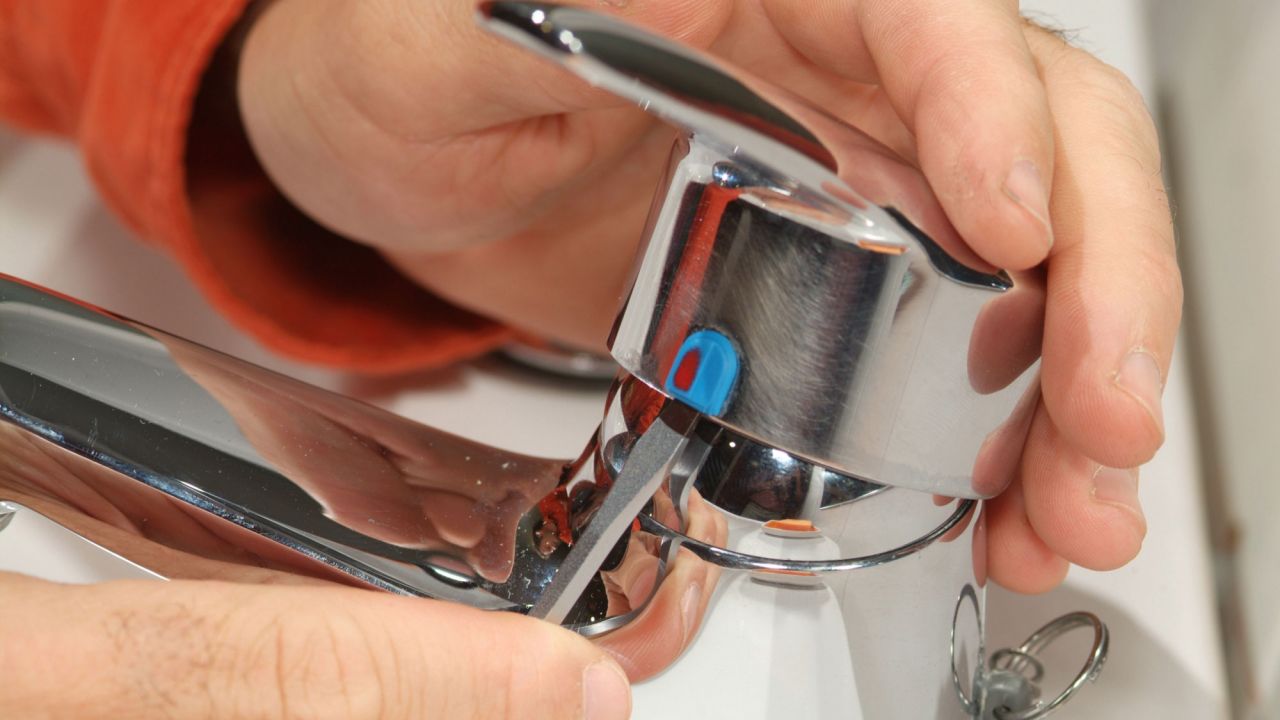
There is a blue-red plug on the lever, indicating the directions of the lever for obtaining cold and hot water. Pry it off with a knife or other handy object (even the tip of a fingernail will do).
Unscrew the screw located under the plug. Depending on the manufacturer, a hex, straight or Phillips screwdriver will come in handy.
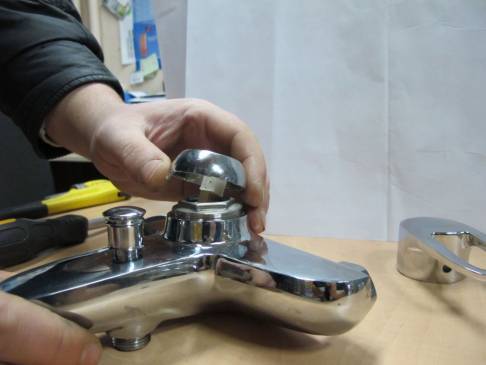
Now there is nothing holding the adjustment lever, so remove it with an upward movement.
If you feel resistance while doing this, spray it with WD40 universal grease or pour boiling water over it to heat the metal.
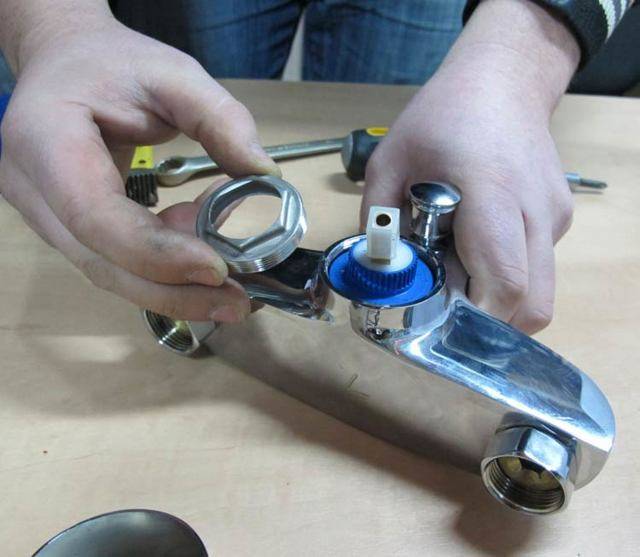
Under the lever there is a decorative union nut, which is easily twisted by hand. An adjustable wrench can damage the nut, as its walls are very thin.
Under the decorative one there is a clamping nut - cut and quite strong. It must be twisted with an adjustable wrench or wrench of a suitable size.
Before you will be the actual cartridge, which remains only to be removed by moving up.
Depending on the manufacturer, a hex, straight or Phillips screwdriver will come in handy.
There is nothing holding the adjustment lever now, so remove it in an upward motion. If you feel resistance while doing this, spray it with WD40 universal grease or pour boiling water over it to heat the metal.
Under the lever there is a decorative union nut, which is easily twisted by hand. An adjustable wrench can damage the nut, as its walls are very thin.
Under the decorative one there is a clamping nut - cut and quite strong. It must be twisted with an adjustable wrench or wrench of a suitable size.
Before you will be the actual cartridge, which remains only to be removed by moving up.
Take care of prevention
Since the part is sensitive to water quality, if you buy a single-lever faucet, install a filter at the entrance to the house. Expensive brands of plumbing remove the warranty if the water has not been treated.
Now go to the store, taking the defective part with you
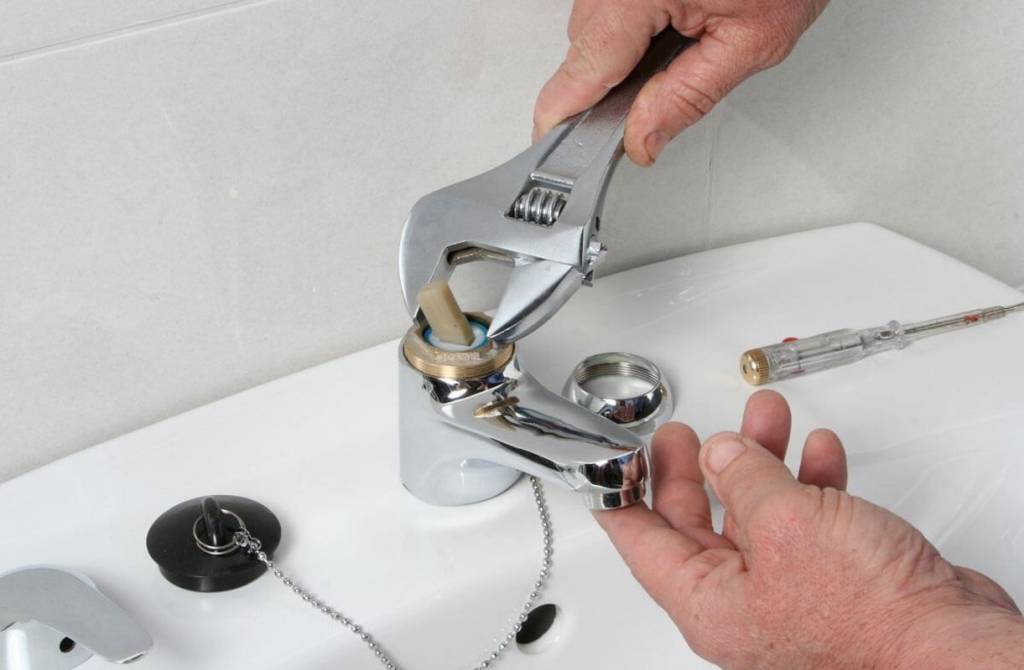
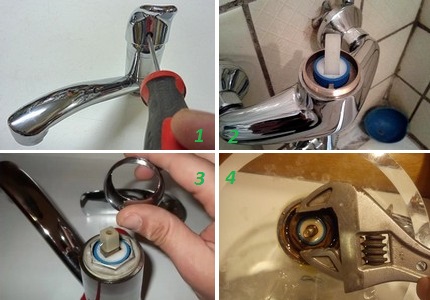
When buying, pay attention to the full compliance with the size and shape of the landing surface. Ideally, purchase a cartridge from an authorized dealer of the brand whose mixer you have installed. How to replace the cartridge in the faucet
How to replace the cartridge in the faucet
Having bought the necessary spare part, do not rush to install it, before that one more question remains to be solved:
- Clean the mixer body from the inside. Use a weak acid solution to remove limescale, and to wash out sand and dirt, twist the aerator and flush the faucet with plenty of water from the kettle.
- On the landing surface of the faucet and cartridge, find the marks for correct installation. As a rule, they are represented by bulges on the cartridge, and depressions on the mixer. Install the new part clearly into place.
- Assemble the faucet in the reverse order: screw on the clamping nut and slightly tighten it with a wrench, screw on the decorative nut and reinstall the adjusting lever.
- Use a screwdriver or a hexagon to tighten the screw and put the red-blue plug in place, remembering to position it correctly in relation to hot and cold water.
Open the water on the riser and check if the assembled mechanism is leaking. If everything is in order, you can congratulate yourself, you managed to replace the cartridge in the mixer yourself no worse than any plumber.
Kinds
In addition to the single-lever cartridge, no other types have yet been created for modern mixers. The cartridge system can be spherical, lamellar, with ceramic or plastic elements. In a single-lever mixer, the elements may be similar, but differ in the size of the seats. Mixers can also differ depending on the place of use.If for a simple mixer tap the length and shape of the lever does not matter, then when installing a lever shower mixer, these data can affect the comfort. This is especially true for the size of the shower cabin of the budget option.
How to replace the cartridge in the faucet?
 Before purchasing a new product, you need to find out its characteristics: stem length, seat and diameter. It is best to remove the old part and take it to the store with you.
Tools and materials that will be needed to repair the device:
- hex wrench or flathead screwdriver;
- pliers;
- adjustable open-end or wrench;
- liquid WD-40;
- paper towels or a clean rag.
The work of replacing the cartridge in the mixer can be handled even without special knowledge and skills. First of all, it is necessary to turn off the supply of hot and cold water. If the valves are faulty, then you will have to contact a plumber for help. When they work in uninterrupted mode, the repair will not cause any special difficulties.
The sequence of actions for replacing the cartridge in the mixer.
- The mixer lever rises to the highest position.
- On the front, at the bottom of the device, there is a cap with a blue and red mark, which should be removed with a screwdriver or a knife.
- Under the cap is a small screw that will need to be unscrewed to remove the lever. It is not necessary to unscrew the screw completely, just loosen it.
- After removing the lever from the structure, you can see a chrome-plated decorative cap, which should be easily unscrewed by hand. With a sufficiently long use of the mixer, this may not be possible, so you will need to use the number one adjustable wrench.It should be adjusted so that it does not break the cap.
- After the decorative cap is unscrewed, access to the nut holding the cartridge will open. It is unscrewed with the same key and the cartridge is taken out.
- Before installing a new device, you must clean the seat for it. Over the years, dirt accumulates in the mixer, which will prevent the hermetic installation of the cartridge. Hard particles of ceramics, which were formed as a result of the destruction of ceramic discs, can also interfere with this.
- When installing a new device, it is necessary to ensure that the protrusions on it coincide with the holes in the seat of the structure.
- After that, the nut is tightened, a decorative cap, a joystick and a plug are installed.
This completes the mixer cartridge repair. Now you should check the design for leaks and performance. This opens the water supply. If the replacement of the cartridge in the mixer has been performed correctly, the device will work without any problems. All repairs must be carried out carefully so as not to damage the decorative coating.
Cartridge replacement
Before replacing the cartridge yourself, you need to make sure that the water supply, both hot and cold, is turned off. Any remaining water that may be in the pipes should also be drained.
 Removing the cartridge
To work, you will need the following tools:
- screwdriver;
- hexagon;
- pliers;
- oil.
So, the next step is to do the following:
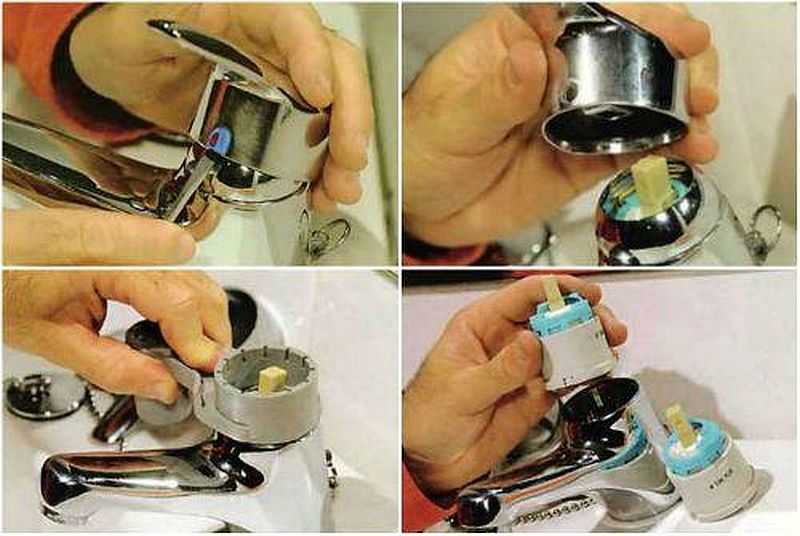
- The faucet has a special plug in front, it must be removed with a screwdriver, carefully prying along the edges, trying not to damage its integrity.
- Using a hexagon, unscrew the screw, which is located at the base of the handle. After removing it, you can proceed to the analysis of the mixer.
- The cartridge itself is located directly below the lever, so the control mechanism must be removed from the mixer. Quite often there are problems with removing the lever, as it can boil or be tightly compressed with limescale. In order to remove it, you can use boiling water, pour it on the parts, and while the metal is in a state of heating, they try to remove it.
- The cartridge is tightly held by a special nut, which is located on top of it. It is she who presses him tightly to the body and does not give the opportunity to balance. You can remove it with pliers.
- Next, you need to remove the old, faulty part and replace it with a new one. The main thing is that all the grooves match and the new cartridge sits correctly. It is necessary to carefully check whether all the details of the mixer and the cartridge matched, and only then proceed to attach it.
- After planting a new part, attach it with a nut and tighten it tightly.
- The faucet handle is installed in its original place, and the locking screw is carefully tightened. After that, a cap is put on.
In general, changing the cartridge is not so difficult, the main thing is to know how the faucet itself works and have the necessary parts and tools at hand.


