- Step-by-step instructions for replacing a valve
- Hoses for gas stoves
- gas stove repair prices
- Where to look for a gasman
- Safety rules during work
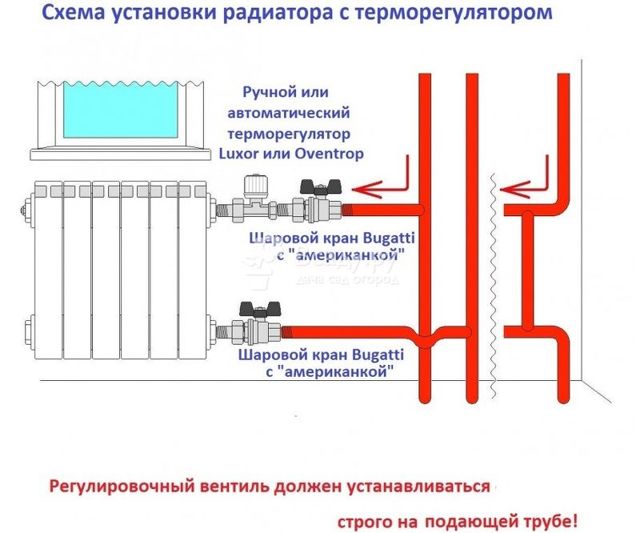
- Installation and replacement instructions
- Need to know: valuable tips
- Reliable signs of a fake
- How to choose the right flexible gas tube?
- Installation
- How to choose the right flexible gas tube?
- Installation
- Helpful Tips
- The procedure for processing documents
Step-by-step instructions for replacing a valve
The procedure for replacing the valve for supplying gas to the device is quite simple, but extremely responsible, since natural fuel is combustible, and in combination with air and an explosive substance. Therefore, we strongly recommend that you resort to the help of specialists who have been trained and received permission to carry out such work.
Having skills installation and following the rules safety, the installation of the crane can be done independently in just 15-20 minutes - but only in case of urgent need. In the future, the result should be controlled by a representative of Gorgaz
To replace a tap on a pipe, you will need tools and materials:
- new locking mechanism suitable for the pipe;
- two gas wrenches No. 1 or No. 2, one of which will be required to unscrew the threads, the second in order to keep the lower pipe stationary (this will avoid damage to the pipeline leading to the gas stove);
- a tool designed to seal the attachment point of a faucet with a pipe (for this purpose, you can use ordinary linen thread, FUM tape, Tangit Unilok thread);
- flat screwdriver;
- graphite grease, grease or other lubricants;
- a plug for a 0.5-inch pipe with an internal thread (when working together, you can do without this element).
If the threads or diameters of the pipes and the tap do not match, you may also need extension cords, fittings, adapters.
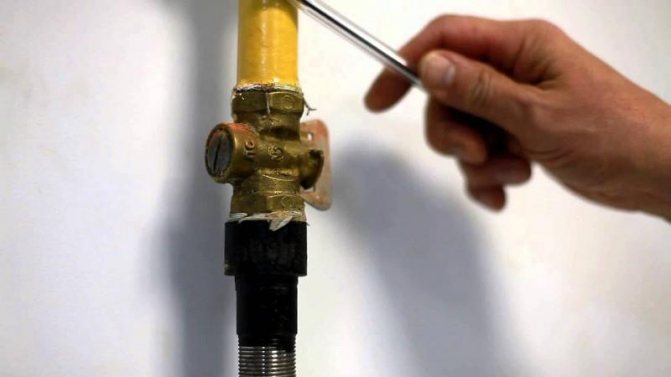
The replacement process consists of a series of simple operations that must be completed as quickly as possible to minimize gas leakage from the system. First of all, you should shut off the supply of natural fuel to the apartment by setting the valve handle in a position perpendicular to the pipe.
At replacing the gas shut-off valve is twisted by hand, only the last turns are made with a wrench
After that, you can proceed to dismantle the old crane, which is unscrewed from the pipeline. If the process is difficult, you can try to treat the threaded connection with WD-40, which increases smoothness.
If a welded valve was previously installed in the room, it will have to be cut off with a grinder, after which the pipes should be additionally threaded. A temporary plug is placed in place of the removed valve.
Before processing the connection of the valve with the pipe with a sealant or FUM tape, this place should be thoroughly cleaned of dirt and corrosion
A thread is wound onto the thread for sealing. To do this, unscrew about 7 cm of the thread, and put it in the extreme recess of the thread, then wind the thread clockwise into each hollow.
Having covered the thread with one layer of thread, you should continue winding in the opposite direction. After that, the laid insulation is coated with a layer of graphite grease or other suitable compound.
If linen thread is used as a thread sealant, it should be treated with oil paint. When using the thread Tangit Unilok, such an operation is not required.
The plug is removed and a new tap is quickly strung on this place (it is important to make sure that its handle is in the “closed” position). The element is screwed by hand, the last turns are performed with a wrench
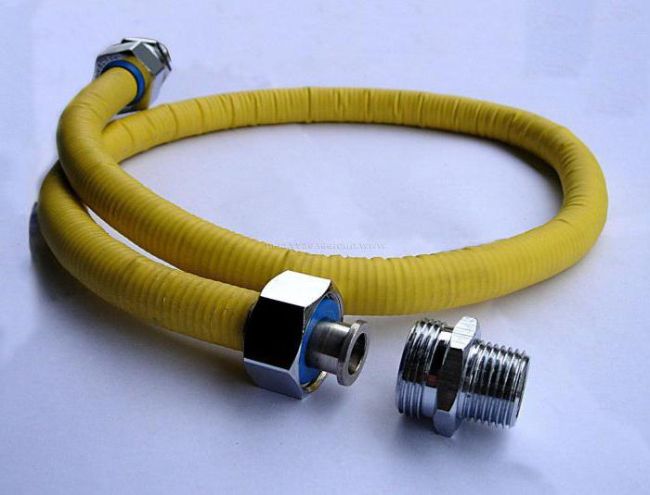
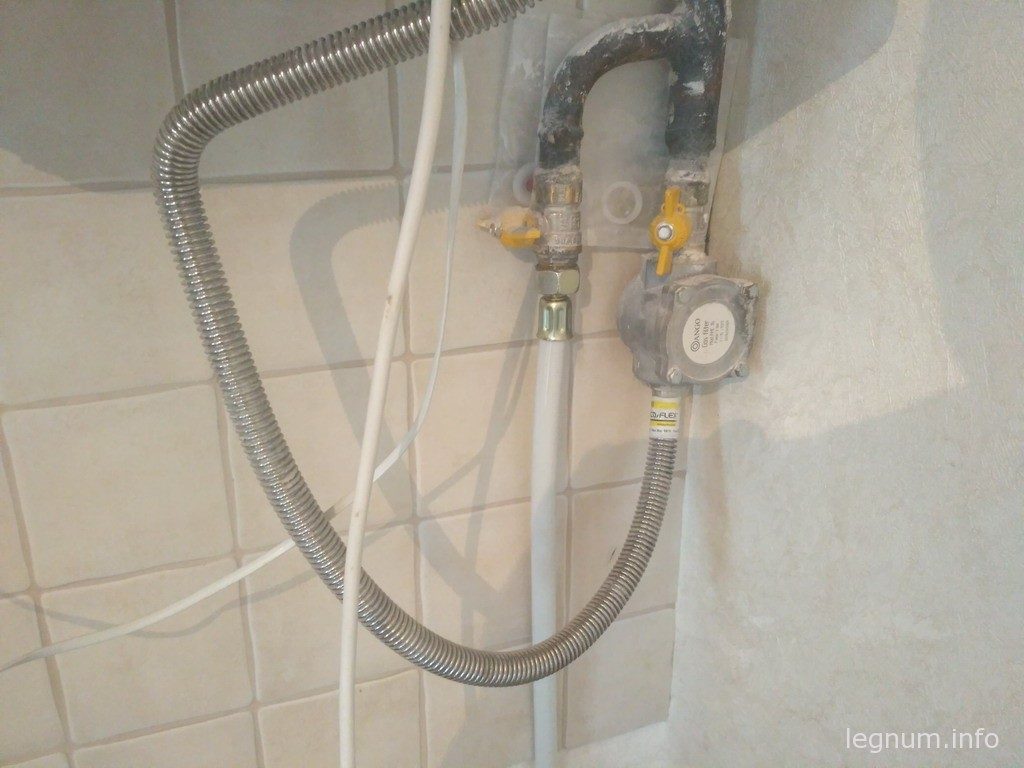
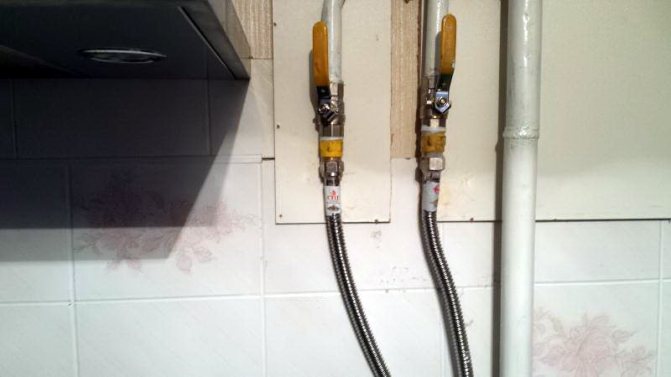
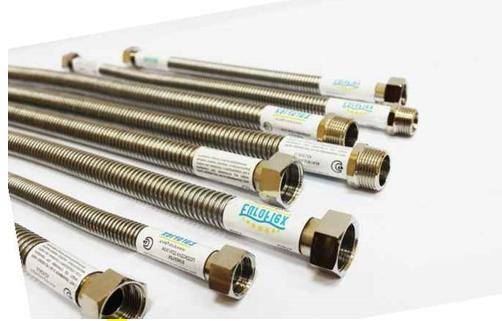
Hoses for gas stoves
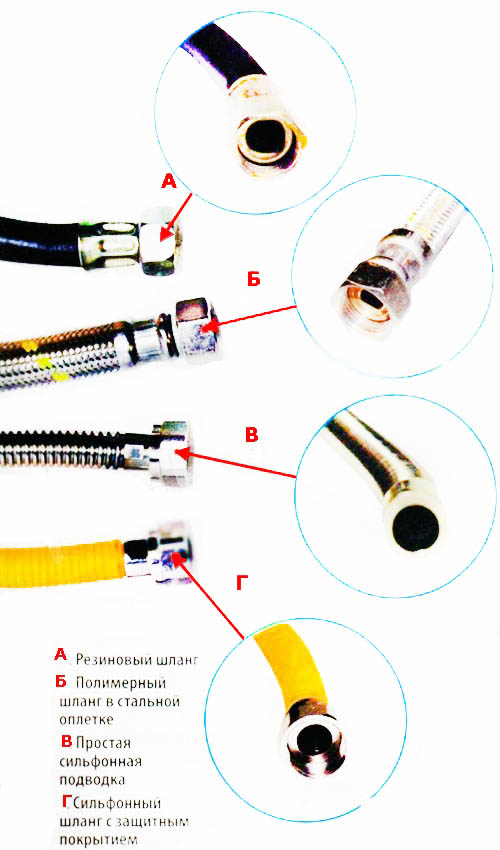
Special attention is paid to the choice of hose. There are 3 types of products on the market, among which the owner or master selects the most suitable
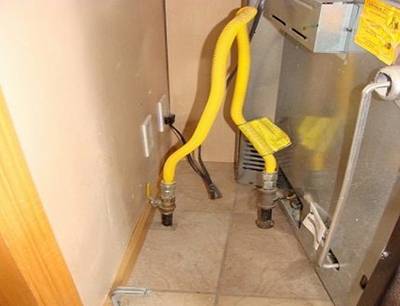
According to the regulations, the length of the flexible tube should not exceed 4 meters. Fitting diameters are standard ½″ and ¼″, or the less common ⅜″. The connection of the latter occurs through the conductor. Both ends of the hose are supplied with union nuts. Less often - a nut on one side and a thread on the other.
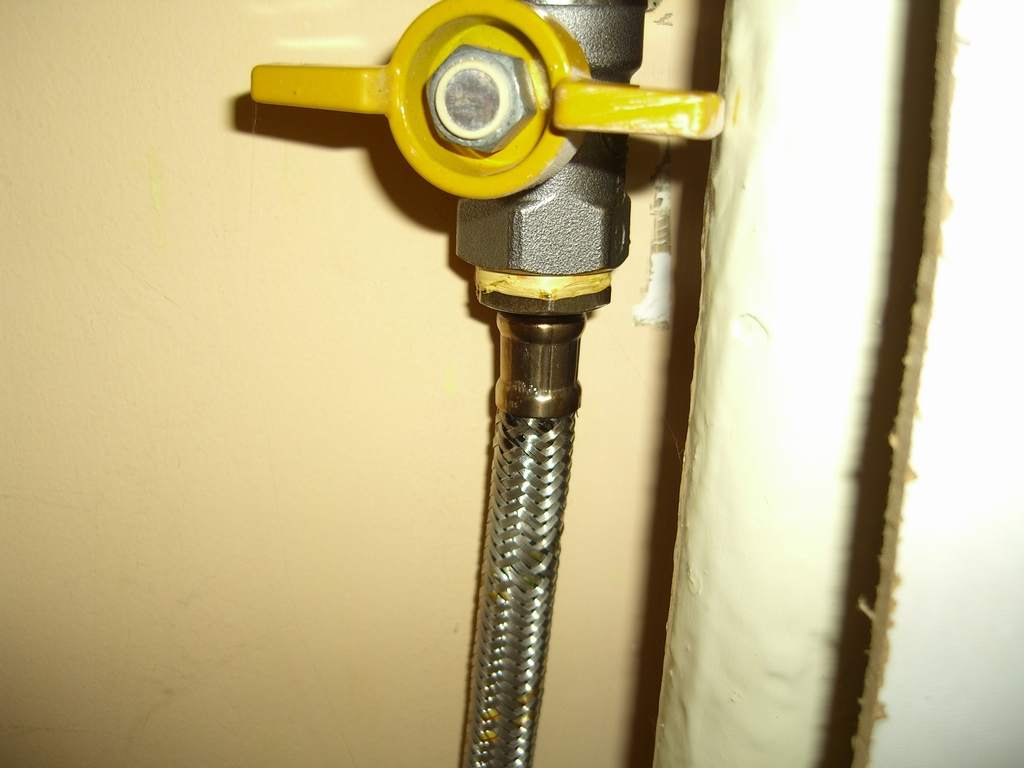

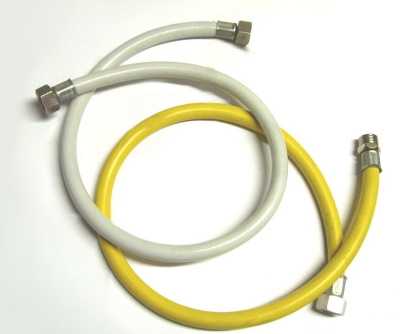

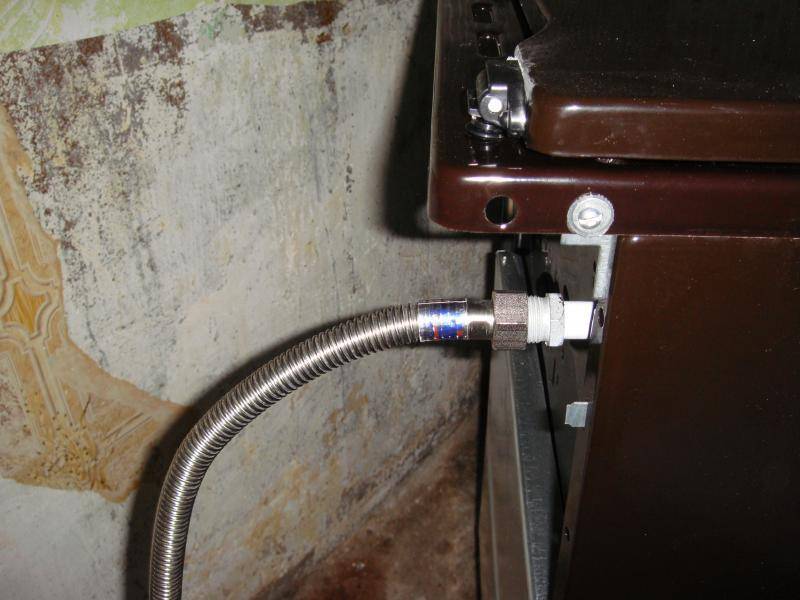


Table 1. Types of hoses for gas stoves and their properties.
| Hose type | Material | Dielectric Properties | Life time | Advantages | Flaws |
|---|---|---|---|---|---|
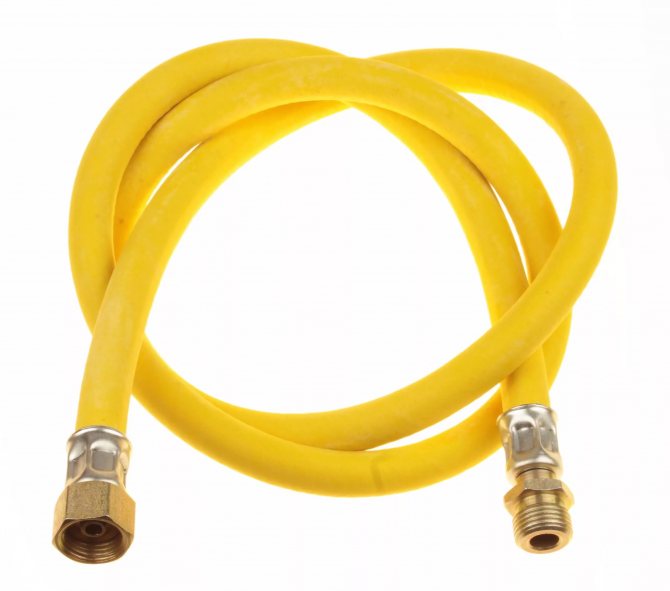
| Rubber | Rubber, fabric seal for increased strength | Rubber is a dielectric, no stray current gasket required | Up to 10 years | Low cost, due to which they are common in domestic use | Vulnerable to sudden temperature changes. Crack over time.Easily damaged by sharp objects |
| Rubber with metal braid | Vulcanized rubber or polymers, metal braid | Requires gasket to eliminate stray current | Up to 10 years | More durable than rubber hoses, protected from mechanical stress | It is impossible to control the tightness of the rubber tube |
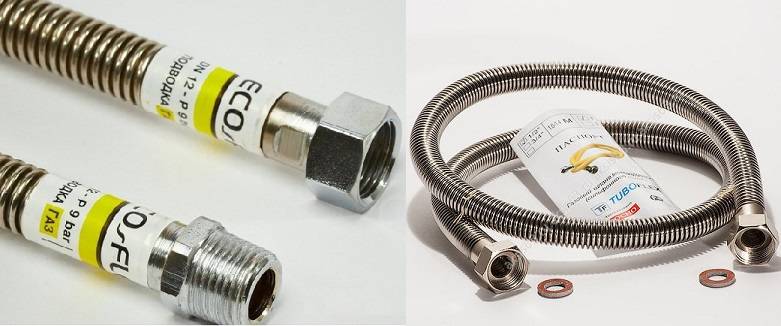
| Bellows | Stainless steel. Sometimes supplemented with a PVC polymer sheath. The product is in the form of a corrugated hose | It is obligatory to install a gasket to avoid stray currents | 25 years and over | The highest resistance to mechanical stress. Resistant to pressure drops | High price compared to other positions |
Bellows hose
gas stove repair prices
| 1 | Dismantling the gas stove with the installation of a plug | plug | 540 |
| 2 | Connecting a gas stove with removing the plug | plate | 1180 |
| 3 | Replacing the upper stove burner | burner | 110 |
| 4 | Replacing the oven burner | burner | 280 |
| 5 | Burner nozzle replacement | nozzle | 110 |
| 6 | Replacing the gas supply pipe of the upper burner | a tube | 200 |
| 7 | Replacing gas line gaskets | pad | 200 |
| 8 | Replacing (or repairing) the oven door | door | 1010 |
| 9 | Replacing the oven door handle | a pen | 100 |
| 10 | Replacing the oven spit drive | drive unit | 480 |
| 11 | Replacing the thermostat (temperature indicator, thermocouple) of the oven | thermostat / temperature gauge / thermocouple | 740 |
| 12 | Gas combustion control | plate | 200 |
| 13 | Adjusting the burning of the stove burners | oven | 410 |
| 14 | Replacement (or repair) of the solenoid valve (EMC) of the plate | EMC | 540 |
| 15 | Nozzle cleaning/nozzle replacement | nozzle | 140 |
| 16 | Cleaning the oven burner | burner | 540 |
| 17 | Replacing the oven door glass | glass | 580 |
| 18 | Repair/replacement of plate valve (rod, spring) | tap | 380 |
| 19 | Plate table replacement | table | 250 |
| 20 | Replacing (or repairing) stove handles | plate handle | 100 |
| 21 | Plate tap lubrication | tap | 380 |
| 22 | Replacing the spark plug | candle | 540 |
Where to look for a gasman
When selling gas kitchen equipment, many stores offer an additional professional connection of the stove to the gas supply. This option is used by many buyers. Otherwise, you can turn to other specialists.
- Find out who is involved in the maintenance of gas appliances, if we are talking about an apartment building, and order work from specialists from the relevant company.
- Contact a specialized organization that has a permit to work with gas. Employees of such companies are required to provide documents on work. The latter usually confirm that all actions with gas equipment have been carried out in accordance with state standards and regulations.
It is better to use the first option. In any case, an employee of the service company must check the correct connection of the stove in your apartment. Additionally, he will make marks in the registration certificate.
Installing and checking a gas stove by a gas service employee
Safety rules during work
All manipulations with gas equipment are classified as work with an increased level of danger. When working on a gas pipeline, a pipe is opened, which causes a gas leak.
This can lead to two serious dangers:
- Natural fuel is mixed with air, resulting in an explosive mixture. Any spark that can occur when an electrical appliance (such as a switch) is turned on can cause an explosion.
- At a higher concentration of gas, the air becomes unbreathable. Inhalation of a propane-butane mixture causes poisoning of the body, which can even lead to death.
To avoid emergencies, it is necessary to strictly observe the precautionary measures. When repairing equipment, in particular, replacing a valve, employees of the city gas service must necessarily comply with the "Rules for technical operation and labor safety requirements in the gas industry of the Russian Federation" (PB 12-368-00 Resolution of the Gosgortekhnadzor of Russia dated 18.07.00 No. 41, SNiP 2.04.08-87)
When repairing equipment, in particular, replacing a valve, employees of the city gas service must necessarily comply with the "Rules for technical operation and labor safety requirements in the gas industry of the Russian Federation" (PB 12-368-00 Resolution of the Gosgortekhnadzor of Russia dated 18.07.00 No. 41, SNiP 2.04.08-87).
When carrying out repairs, it is strictly forbidden to manipulate gas equipment located outside the apartment - on the street or in the entrance
When carrying out independent work, you must adhere to the following provisions:
All work must be carried out with the windows wide open.
The apartment must be completely de-energized, so for repairs it is important to have access to the shield and machines.
During manipulations to replace the gas valve in the room, it is forbidden to smoke, light matches.
All work must be carried out exclusively during the daytime.
The door to the kitchen where work is being carried out must be tightly closed. It is also advisable to plug all the cracks to prevent gas from entering other rooms.
It is forbidden to close the valve on the common gas riser, as in this case the gas leakage may increase many times, which will increase the risk of explosion.
It is advisable to carry out all work together: this will speed up the process and avoid complications.
You should not replace the faucet yourself if there are signs of corrosion or other damage on the gas pipe, in this case it is preferable to call specialists.
When carrying out work, it is desirable to have a fire-fighting device (fire extinguisher) in the immediate vicinity.
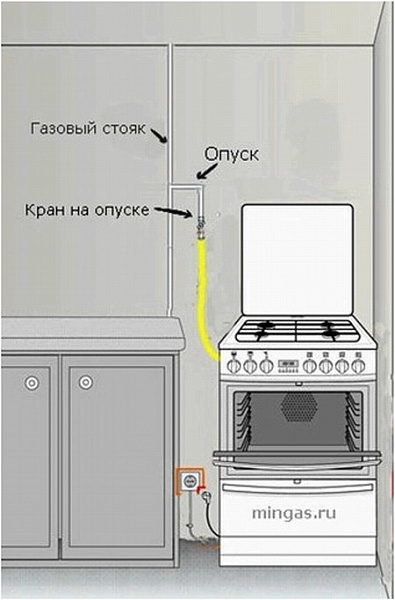
Note that a valve to shut off the gas supply can only be installed on a rigid section of the pipe. If the metal branch next to the device is damaged, it is transferred. In this case, a gas hose is included in the line, which is considered a temporary solution to the problem.


Installation and replacement instructions
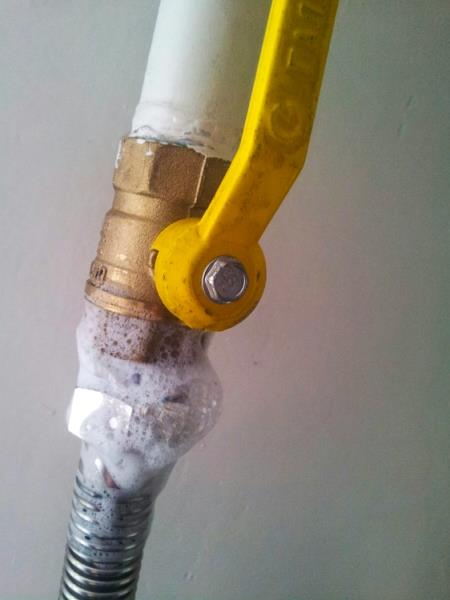
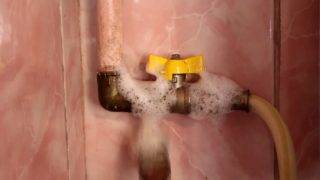 After installing a new faucet, it is checked for leakage using a soapy solution.
The simplest solution is to write and submit an application to the gas office.
After receiving a positive response and setting a repair time, you need to do the following:
- Buy a gas valve that matches the parameters of the system.
- Prepare an agreement with the management company, a passport and specifications.
- Burn off the gas in the pipe and stove. To do this, the valve is closed and all burners are set on fire.
- Ensure good ventilation in the kitchen. Close ventilation grilles.
- Check the correctness of the work of the master.
- Check the tightness of the connections and the operability of the system.
- Make sure that the appropriate mark is made in the documentation, certified by signature and seal.
- After complete ventilation of the room, open the ventilation openings.
If the repair is carried out independently, you need to prepare for it.
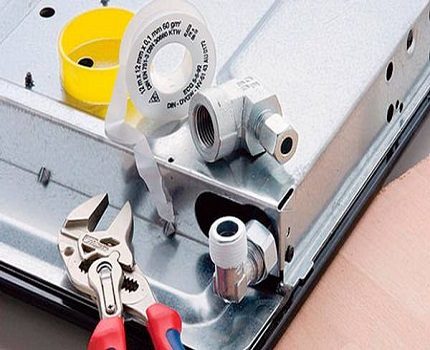
 Tools for replacing the gas valve yourself
For work you will need:
- 2 gas keys or plumbing pliers;
- FUM tape or tow with paint;
- a plug, if it is planned to restore an existing valve;
- materials for closing ventilation openings;
- graphite lubricant;
- rags;
- mounting gloves;
- gauze bandage;
- protective glasses.
After that, the following actions are performed:
- The apartment is de-energized in the shield located at the entrance. A warning sign is posted or a post is posted.
- Windows open, kitchen doors close. The cracks are closed with wet rags.
- The valve moves to the closed position. The gas is burned in the pipe and stove. Then the flexible hose is disconnected.
- A new product is being prepared for installation. Graphite grease is applied to its threads. The FUM tape is taken out of the package, a strip 3-4 cm long is released.
- Unscrew the old valve. This is done with two keys. One holds the pipe, and the other removes the part.
- The pipe is closed with a finger, the thread is cleaned with a rag from dirt and dust. Then FUM tape is wound on it.
- If maintenance of an existing faucet is scheduled, a plug is screwed onto the pipe. After that, you can slowly service the product.
- Put the valve in the closed position and screw it to the pipe. It should not be tightened too much, as this creates the possibility of stripping the thread, and this is fraught with great complications.
Finally, the tightness of the connection is checked.This is done in a time-tested way - with a soapy solution. If bubbles appear, the process is repeated until the desired result is achieved.
Need to know: valuable tips
Before purchasing a flexible hose, it is necessary to check the size of the thread at the outlet of the plate, its classification and whether it belongs to a straight or angled type. If the outlet is of a direct type (directed towards the wall), it is necessary to purchase a sleeve with a square at the end.
The gas hose must not be painted - this will accelerate its cracking. A more attractive look can be created by pasting with special paper or oilcloth.
And it is also strictly forbidden to tightly sew up gas communications with false plasterboard panels and other structures - this will make it difficult to carry out service work with individual elements.
For camouflage of the gas supply system, a collapsible box is used, which, if necessary, is easily dismantled. In this case, all structural elements of the gas system will have constant access.
If a master was called to connect the gas stove, it is necessary to check the correctness of the work: the extra drive from the faucet on the descent must be unscrewed, the flexible hose is directly connected exclusively to the faucet located on the branch pipe, and its other end - only with the gas stove outlet.
You can also use an adapter. Any additional settings are prohibited.


Reliable signs of a fake
Regardless of the type of flexible gas hose, you should verify the authenticity of the product before buying.The fact is that recently there have been more cases of marriage and fakes launched for sale by Chinese manufacturers.
The objects of falsification are usually well-known European brands. The difference between the quality of the original and the fake is enormous.
It is possible to play it safe and distinguish a quality product from a fake.
For this you need:
- take time for a thorough visual inspection;
- check whether the technical characteristics correspond to those indicated in the product passport;
- require the seller to present quality certificates confirming the safety of a device designed to work with an explosive substance;
- do not buy goods at a suspiciously low price, uncharacteristic of products in this category.
The structure of a counterfeit product may contain hazardous chemical or radioactive impurities. Defective hoses are short-lived and often cause explosions.
How to choose the right flexible gas tube?
It is safest to purchase a gas hose from a specialized store that has a state-issued certificate of conformity. It is best to opt for a bellows style hose.
Important! Beware of poor quality fakes. There is a high probability of buying counterfeit goods on the market. This threatens that the sleeve will be made of thin cheap rubber, which will quickly fail.
Most fakes can only be distinguished from the original by a professional
This threatens that the sleeve will be made of thin cheap rubber, which will quickly fail. Most fakes can only be distinguished from the original by a professional.
To identify a fake, you need to carefully study the technical characteristics of the product, the passport and the certificate of conformity. You should not buy goods at a suspiciously low price.
Before buying, you must measure, then add 20% to the length. You should not purchase a gas hose with a margin. Standard sizes are 1–2 m. In everyday life, 1/2 or 3/4 inch diameters are usually used.
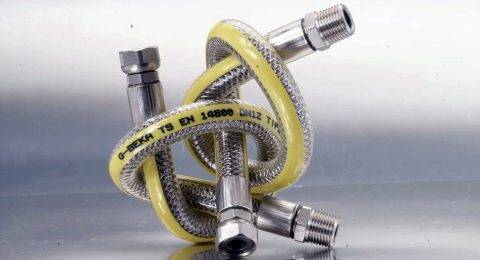
The sleeve comes with two types of fasteners: with two union nuts with internal thread (female-female) or with a nut at one end and a fitting at the other (female-male). The thread is selected depending on the output on the device. It is preferable to stop the choice on welded structures, and not on those where the fitting is connected to the corrugation with glue.
Installation
It is most reliable to contact a professional who will ensure the correct connection and provide a guarantee. After all, everyone knows from childhood that it is dangerous to joke with gas.
An unqualified connection to the gas pipeline can lead to an accident, the consequences of a domestic gas leak have all been seen in the news.
Nevertheless, a modern gas hose allows you to independently connect the boiler to the mains. Any adult can carry out the installation in compliance with safety regulations.


In work, you must adhere to the following rules:
- The length of the eyeliner is selected taking into account the distance over which the equipment is likely to move.
- The system is located in a place accessible for revision.
- There must be no other connections on the device.
- The product must not be painted to avoid cracking of the material.
- The dimensions of the gas hoses must comply with GOST standards.
- Do not twist, bend or stretch the sleeve.
- Do not solder or weld the joint.
- Replace the hose with a new one in accordance with the manufacturer's recommendations.
How to choose the right flexible gas tube?
It is safest to purchase a gas hose from a specialized store that has a state-issued certificate of conformity. It is best to opt for a bellows style hose.
Important! Beware of poor quality fakes. There is a high probability of buying counterfeit goods on the market
This threatens that the sleeve will be made of thin cheap rubber, which will quickly fail. Most fakes can only be distinguished from the original by a professional.
To identify a fake, you need to carefully study the technical characteristics of the product, the passport and the certificate of conformity. You should not buy goods at a suspiciously low price.
Before buying, you must measure, then add 20% to the length. You should not purchase a gas hose with a margin. Standard sizes are 1–2 m. In everyday life, 1/2 or 3/4 inch diameters are usually used.
The sleeve comes with two types of fasteners: with two union nuts with internal thread (female-female) or with a nut at one end and a fitting at the other (female-male). The thread is selected depending on the output on the device. It is preferable to stop the choice on welded structures, and not on those where the fitting is connected to the corrugation with glue.
Installation

It is most reliable to contact a professional who will ensure the correct connection and provide a guarantee. After all, everyone knows from childhood that it is dangerous to joke with gas.
An unqualified connection to the gas pipeline can lead to an accident, the consequences of a domestic gas leak have all been seen in the news.
Nevertheless, a modern gas hose allows you to independently connect the boiler to the mains. Any adult can carry out the installation in compliance with safety regulations.
In work, you must adhere to the following rules:
- The length of the eyeliner is selected taking into account the distance over which the equipment is likely to move.
- The system is located in a place accessible for revision.
- There must be no other connections on the device.
- The product must not be painted to avoid cracking of the material.
- The dimensions of the gas hoses must comply with GOST standards.
- Do not twist, bend or stretch the sleeve.
- Do not solder or weld the joint.
- Replace the hose with a new one in accordance with the manufacturer's recommendations.
Helpful Tips
Before purchasing a flexible hose, you need to look at the outlet of the gas stove (thread dimension, male or female, straight or angled). Thread can be 1/2? or 3/8?. In the latter case, as mentioned earlier, you need an adapter, which is most often supplied with a gas stove. The outlet can be angled (curved down) or straight (facing the wall). If the outlet is straight, you will need a hose with a square at the end.
It is strongly not recommended to buy homemade hoses or in random places
Hoses should be purchased only in stores.
The length of the flexible hose can be up to 5 meters.
It is not recommended to paint the hose, as it will crack over time.
A more aesthetic appearance of the hose, if desired, can be given with oilcloth or adhesive paper.
When connecting the stove, it is important to comply with the requirements for the cubic capacity of the room. This requirement is provided for by building codes, so, most likely, you should not worry here. However, if there is a gas boiler, then the compliance of the cubic capacity of the room with the technical requirements must be clarified additionally.
All gas communications (hose, drop, riser) must be in the free access zone
You can not hide the hose behind drywall sheets, non-removable false panels and other similar interior details. To hide communications, you can use a special collapsible box. It is easy to open if necessary.
Extra connections should be avoided. For such complications of the design, sanctions may follow - up to turning off the gas stove (since this is a violation of the technical regulations).
Sometimes it happens that an employee who is negligent in his duties leaves an extra drive from the faucet on the descent or puts the hose on the descent. It is forbidden to do this. The hose must be connected to the faucet and the gas stove. The maximum that can be allowed is an adapter. Any additional pipes are excluded.


However, if there is a gas boiler, then the compliance of the cubic capacity of the room with the technical requirements must be clarified additionally.
All gas communications (hose, drop, riser) must be in the free access zone. You can not hide the hose behind drywall sheets, non-removable false panels and other similar interior details. To hide communications, you can use a special collapsible box. It is easy to open if necessary.
Extra connections should be avoided.For such complications of the design, sanctions may follow - up to turning off the gas stove (since this is a violation of the technical regulations).
Sometimes it happens that an employee who is negligent in his duties leaves an extra drive from the faucet on the descent or puts the hose on the descent. It is forbidden to do this. The hose must be connected to the faucet and the gas stove. The maximum that can be allowed is an adapter. Any additional pipes are excluded.
If the stove is connected correctly - in accordance with the instructions, and no gas leaks were detected during the test, the system will function reliably for many years. We remind you once again: you should not take on work with gas equipment if you do not have the appropriate permit or at least confidence in your skills. It is best to seek help from specialists.
The procedure for processing documents
If the installation of a new geyser is planned in the same place and it does not exceed the old one in terms of power, then such a replacement is carried out according to the sketch, within the framework of the existing project.
This will require the following list of documents and their copies:
- Gas supply project.
- Certificate confirming the ownership of the apartment or house. For the private sector - an act on the right to use a land plot.
- Registration certificate of an apartment or house.
- The act of checking the condition of smoke and ventilation ducts. To obtain it, an application is first submitted to the service authorized in your region (housing and communal services, the Ministry of Emergency Situations, firefighters).
- Technical passport of the new water heater.
- Application for the replacement of a geyser without changing its location and capacity.
Requirements may vary by region.
An example of an application form provided to the gas service to replace the column. In some regions, additional requirements may be put forward for the installation of a gas alarm, the prohibition of turbocharged ventilation systems and others.
In all other cases, for example, when you need to move the column to another location or install a more powerful water heater, a new project is required.
The required documents are collected in the following order:
- Obtaining a chimney inspection certificate.
- Submission of an application to the Gorgaz (or other specialized organization with which an agreement has been concluded) for obtaining technical conditions for the replacement of a gas water heater.
- After their manufacture, it is necessary to find a design organization to create a project.
- Then the received documentation is coordinated in the metrological and technical department of the gas economy.
- 5 days before the start of work on replacing the column, it is necessary to submit an application for technical supervision. At this stage, you will need to present an act on the condition of the chimney.
- Installation work to replace the water heater is carried out by a licensed organization.
- Connection to the gas system and commissioning of a new column is carried out by a Gorgas representative.
At the final stage, the following list of documents will be on hand: a project, an act of acceptance into operation of a gas appliance, an act of checking the chimney.
Violating the registration procedure, ignoring it, or trying to somehow get around it is a bad idea. As soon as illegal replacement / installation of equipment is revealed, the violator will be fined
Going through the paperwork can seem like a rather lengthy and costly procedure.But the competition that has appeared in recent years in the market for the provision of maintenance services for VDGO and VKGO contributes to its acceleration and simplification. In addition, all attempts to circumvent it, in most cases, are even more expensive.