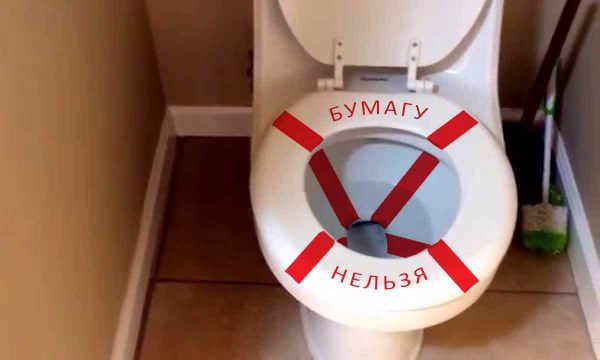
- Toilet cistern installation
- Wall mounting
- Installation of an autonomous tank
- Installing the tank on a compact bowl shelf
- Self-replacement of the drain device
- Easy replacement of the drain mechanism
- Complete replacement of components
- With bottom water supply
- Step-by-step instructions for replacing the flush mechanism in the toilet
- Important nuances when replacing the flush tank yourself
- Preparation process
- How to replace the toilet bowl yourself
- Removing the cover with two buttons
- General arrangement of tanks
- How to remove the tank completely if repair is impossible?
- Damage not related to rebar
- Preventive measures
- Briefly about the main
- Tank installation and cold water connection
- Device and principle of operation
- Adjustment of individual elements
- Replacement and fastening of parts
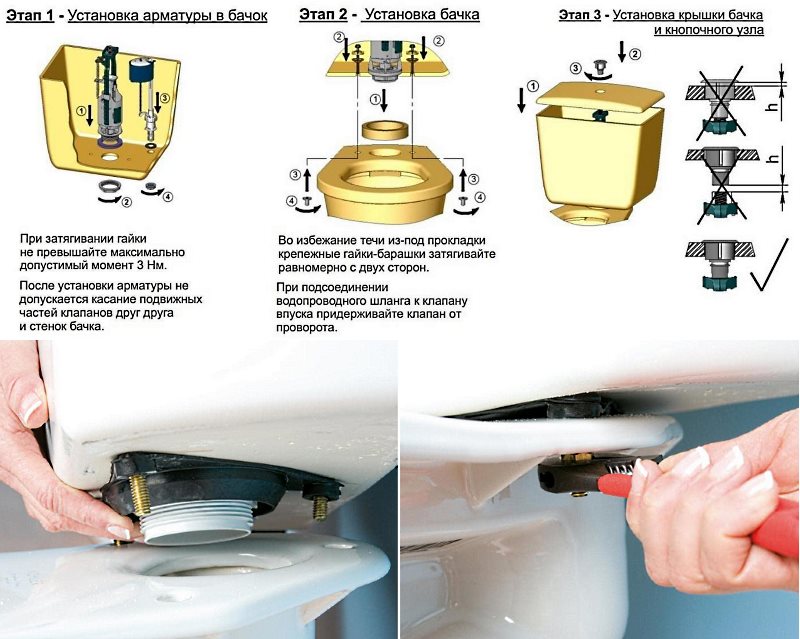
Toilet cistern installation
The preparatory work has been done, the internal parts are prepared for installation, the next step will be the installation of the tank. The installation method is pre-selected, since each type of tank is mounted according to its own scheme.
Wall mounting
For the installation of a hanging toilet bowl and a built-in cistern, a frame-frame is used - installation. Before sewing up the tank and the frame with a decorative screen, you need to check not only the correct installation of the tank, but also the integrity of the frame itself.
Algorithm for installing the installation and drain tank:
- Taking into account the wishes of the location of the tank in height, a convenient place is chosen for the frame in relation to the wall, to the floor and sewer pipes.
- When the dimensions of the frame are finally selected, the places of its fastening are marked on the wall and on the floor.
- Anchor bolts fix the position of the installation.
- A cistern and a sewer siphon are installed on the installation frame.
- The drain tank is connected to the water supply.
- A decorative screen is installed.
- A window is cut out under the drain button in a false wall with its subsequent installation.
This general diagram is for a preliminary acquaintance with the principle of mounting a built-in tank. The exact step-by-step work plan is described in the instructions for each system.
Installation of an autonomous tank

With this design, water is drained with pressure, which allows you to wash off dirt with less water consumption.

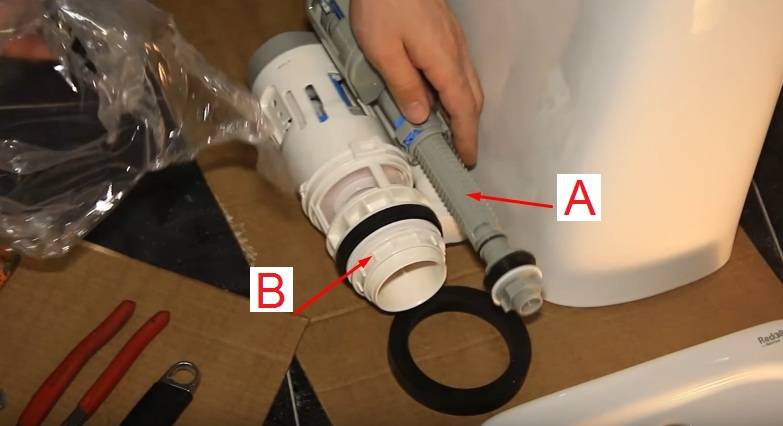
1 - container body;
2 - upper part - cover;
3 - for lowering the liquid - a lever;
4 - a pipe that enhances the flush pressure - a drain pipe;
5 - for fixing the pipe at the tank - coupling;
6 - for connecting to the toilet - an adapter.
Installation algorithm for autonomous plumbing:
- A bypass pipe is connected to the bowl structure. According to the level of its upper end, the installation location of the tank is marked on the wall. After the pipe is removed until the work with the drain is carried out.
- Points for fasteners are measured along the width of the tank.
- A tank is assembled: fittings are placed inside the drain tank, a bypass pipe is connected.
- The tank is fixed on the wall.
- The bypass pipe is connected to the bowl.
- Water pipes lead to the tank.
- A verification test is being carried out.
Installing the tank on a compact bowl shelf
The simplest scheme for mounting a drain tank is to attach it to the toilet shelf of the compact model. In this case, a professional tool is not required and all the work can be done independently.
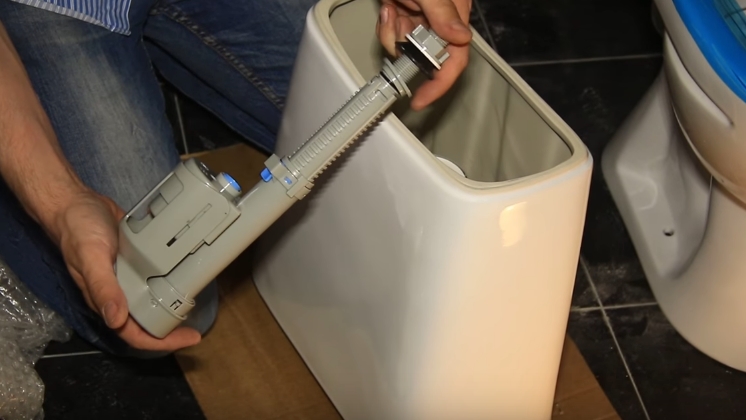
- Assemble the inside of the container.
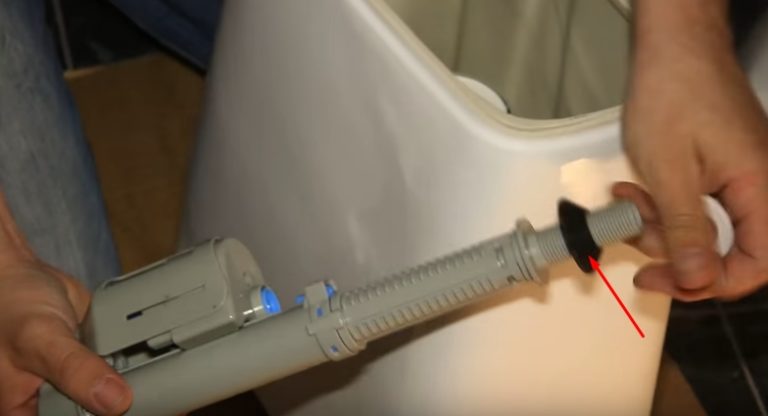
- An O-ring is installed on the protruding part of the toilet bowl (shelf). A tank is mounted on it so that it covers the connection hole through which the liquid is drained from the tank. The tightness of the connection is enhanced by tightening the bolts. The sealant is recommended to be placed on the sealant. In this case, the holes for the bolts connecting the drain structure and the bowl must match.
- First, plastic washers and cone-shaped rubber gaskets (cone down) are strung on the bolts, they are placed in the holes for the connecting bolts, after which flat gaskets and plastic washers are put on the pin of the bolts. The nuts are tightened with a wrench.
Strong tightening of the seal will lead to its rapid wear.
This work is not finished. You need to set the tank so that it is level. Armature is set up. The top of the container is placed in place - the lid. The button is mounted in place.
A connection to the water supply and testing work for the tightness of all connections, for the correct operation of the release mechanism are being carried out. To do this, the container is filled with water. If these tests passed without problems, then the operation is checked for the absence of leakage after the liquid is lowered into the bowl. If these tests were also successful, then the compact toilet can be used.
Self-replacement of the drain device
To replace the flush assembly in the tank, you must prepare:
- pliers;
- wrench or wrench;
- spare parts or a completely new mechanism.
All work is carried out as carefully as possible, since individual parts are very fragile. If excessive force is applied, the kit may be damaged.
Easy replacement of the drain mechanism
As a rule, the mechanism for the toilet bowl, which is responsible for flushing, can be easily adjusted or repaired, since this is a really simple and understandable design, as can be seen in the diagram. However, it also happens that the mechanism breaks down completely, then you can’t do without its complete replacement, for which you first need to deal with the dismantling of the old mechanism.


Remember
All work on replacing, adjusting or repairing the drain mechanism should only be started when you have completely cut off the water supply to it. The easiest way to do this is to turn off the common taps in the house or apartment. If these were not found, then you will have to contact the housing office with a request to close the riser for a certain time, which must be met.
Complete replacement of components
Competent and experienced consultants work in modern plumbing stores, who can simply describe the drain mechanism you need for an old-style toilet bowl, with a button or two buttons, so that they understand and advise exactly what you need.
- Turn off the water and press the tank drain button to release the remaining liquid from the system, which, during disassembly, may leak onto the floor, which is completely unacceptable.
- After unscrewing the drain button, remove the toilet lid. How exactly this can be done with different button options, there is already an article on our website, you should read it in more detail.
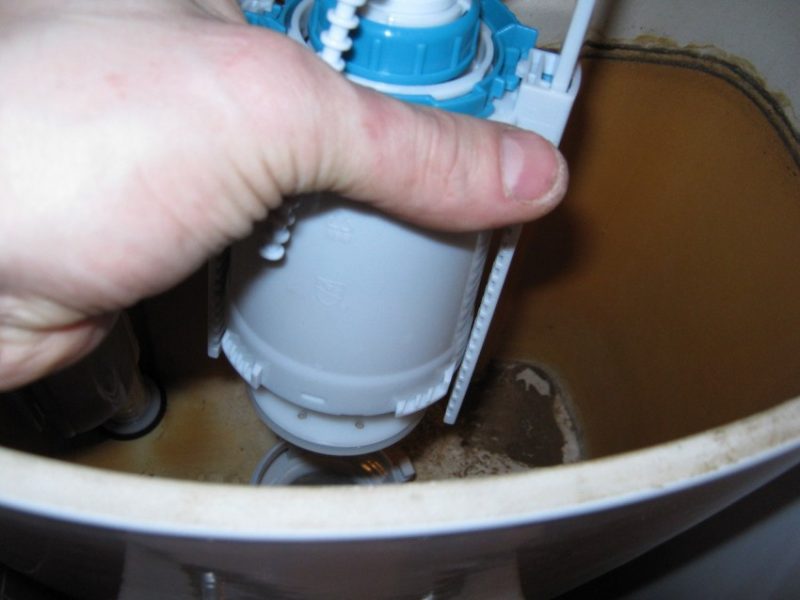
- Carefully disconnect all visible hoses and dismantle the inside of the drain mechanism with overflow and float.
- From the bottom of the toilet, unscrew the screws that securely fasten it to the cistern.
- After removing the tank from the mount, we dismantle the lower part of the drain mechanism with the large main gasket on it.
- In the opening of the tank thus freed, we begin to gradually and methodically insert the necessary parts in turn, repeating all the steps in reverse order.
If the fixing screws of the tank have succumbed to corrosion, then they need to be replaced, even if they are not in the repair kit. Then you will have to purchase these items additionally, good thing, their cost is affordable for everyone. Next, it remains to complete the assembly, but not completely, since the first draining of water must be done immediately, while you have not yet screwed the tank lid into its place. The flush mechanism of the toilet bowl with a double button is replaced in the same way as with one. The main thing is to get the right set of spare parts, so as not to miscalculate.
With bottom water supply
When the inlet valve for entering water into the tank is not located on the side, as in most cases, but from below, then it will take a little longer to tinker. The thing is that there will definitely be not just a valve, but a special membrane, which will be quite difficult to “get close” and unwind, due to the lack of free space. The tank is most often located close to the wall, so it will be really difficult to turn around.
Experts recommend either using special socket heads, which are not available on the farm of every home craftsman, or cutting off part of an ordinary wrench with a grinder, or trying to do something like this.All other actions, except for unscrewing the intake fittings, must be repeated according to the proposed plan, and new parts should be installed in place of the old parts. Remember, such actions will have to be repeated every 5-7 years, if during this time repairs in the bathroom and a complete replacement of the tank are not implied. So be prepared for such ups and downs, and experience usually comes with age.
Step-by-step instructions for replacing the flush mechanism in the toilet
The flush mechanism is installed as follows:
- Close the valve through which water enters the tank, drain the remaining contents of the tank.
- If the toilet is with a button, dismantle this element.
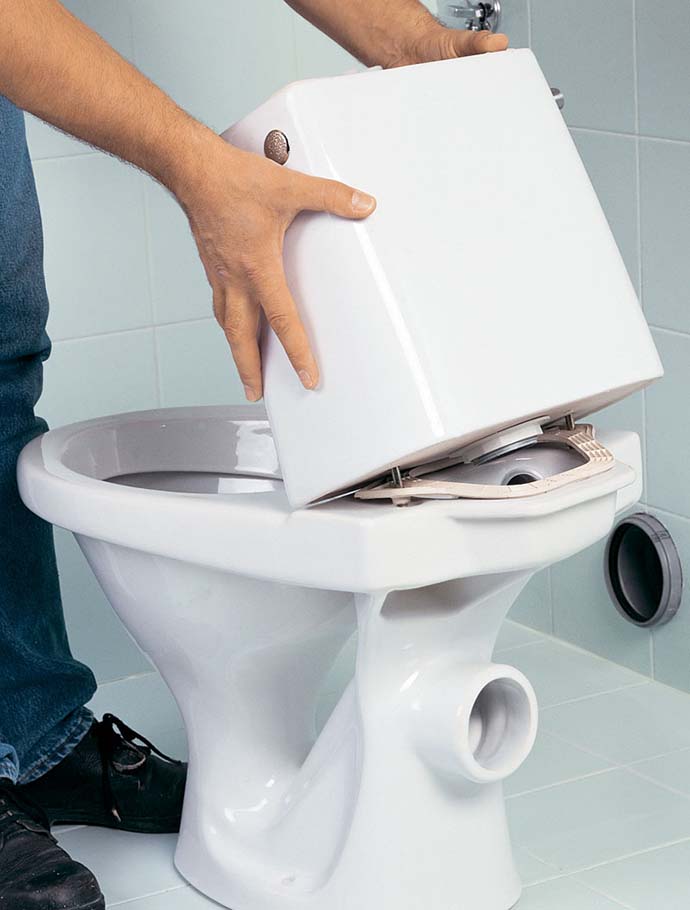
- Take off the tank lid.
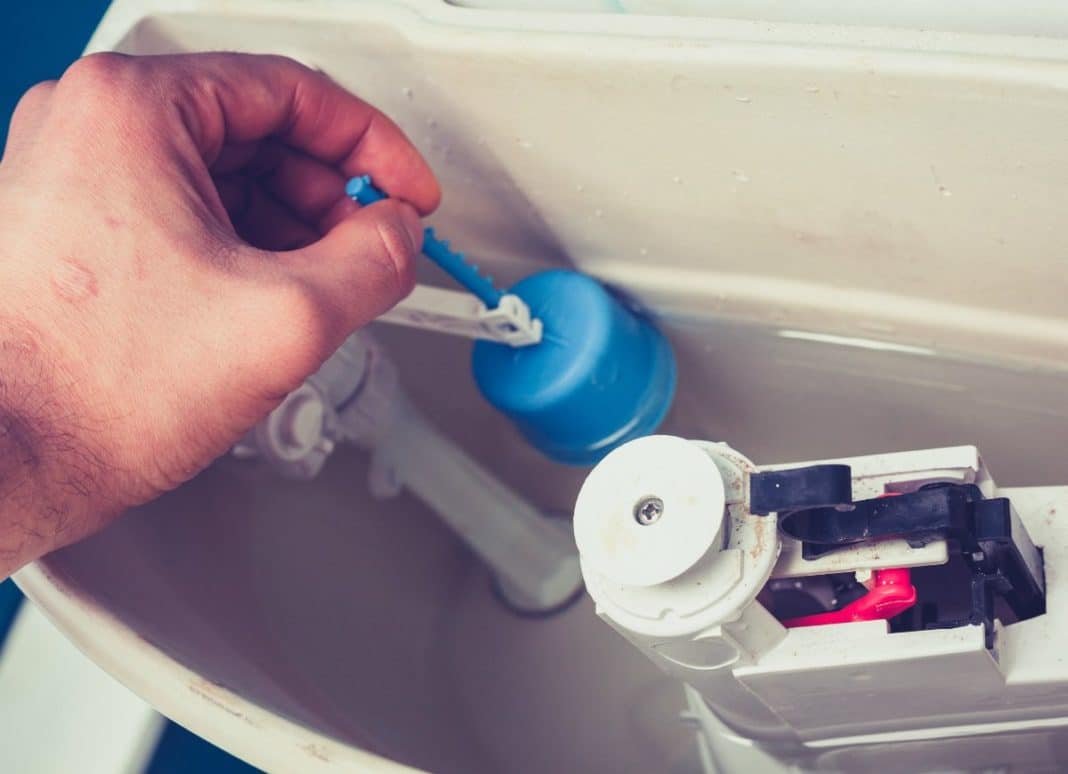
- Remove the release lever.
- Unscrew the bleed valve with seat.
- Disconnect the tank by unscrewing the fasteners that connect it to the toilet.
- Pull out the plastic nut that held the mechanism.
- Remove the gasket located under the reservoir, wash or replace it.
- The gasket is returned to its place.
- Install the mechanism in the drain tank, screw a new nut from below.
- Fix the tank.
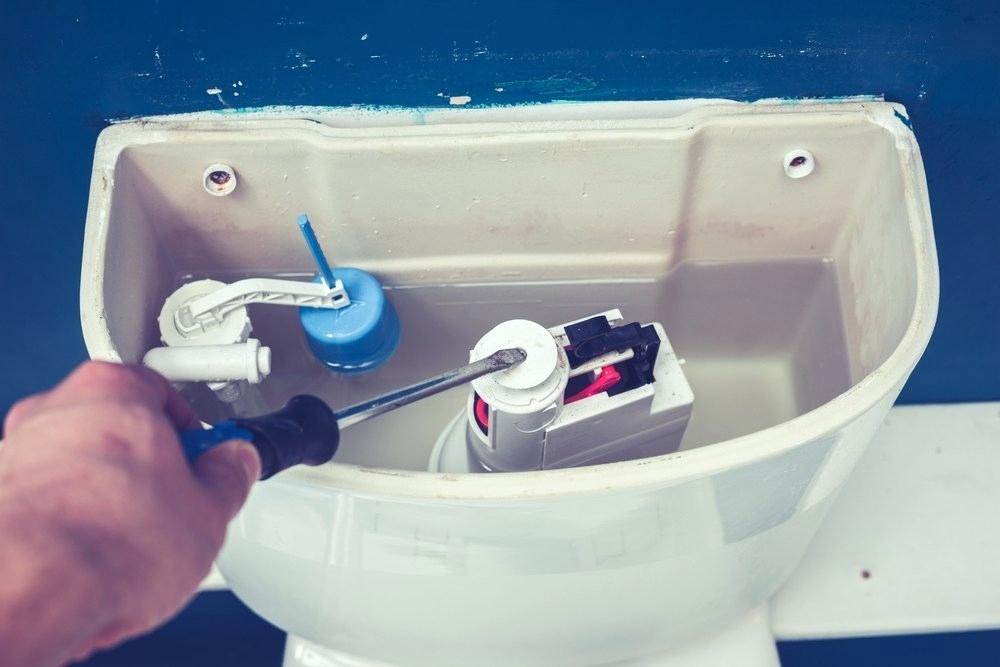
- Adjust the location of the drain lever according to the height of the container.
- Turn on the water and fill the tank.
- Adjust the settings of the drain mechanism.
- Install the cover in place.
- Screw the button.
Important nuances when replacing the flush tank yourself

The step-by-step instructions for replacing the toilet cistern at home are quite simple, but in order for everything to go smoothly, we advise you to follow certain recommendations:
Before buying a cistern, find out the brand of the toilet or measure it. Otherwise, the new item may not fit into your toilet.
It is better to contact trusted stores where experienced consultants work.
They will select the optimal tank model and recommend the necessary components.
All mounting bolts should be included in the kit - pay attention to this. Otherwise, immediately buy them separately.
If water is supplied to the tank through a pipe, it is better to replace it with a flexible hose
It is more convenient and reliable.
At the ends of the flexible connection, the nuts have an internal thread, and if a water outlet also comes out of the wall with an internal thread, you will have to use an adapter.
When buying a tank, evaluate the material of the reinforcement. If the parts are made of cheap and brittle plastic, they will quickly wear out and become unusable.
Now you know how to install a toilet flush tank at home and what you need for this. Our guide will allow you to save on the services of professional plumbers.
If you do not want to spend your free time on a tedious process, you can always order a toilet cistern replacement in our company. Plumbers with many years of experience work in Sanremo - they will arrive on time and carry out the work neatly, competently and inexpensively.
Preparation process
Types of pipe supply from the tank to plumbing
When choosing a toilet bowl, it is important to consider the type of tank connection to the plumbing system. Distinguish between side and bottom supply. With the side type of supply, the tank is connected from the side, this option is more popular
With the side type of supply, the tank is connected from the side, this option is more popular.
In the lower type of supply, the tank is connected from below, this option is considered quiet, it allows you to remove the pipes from sight. Little by little it is replacing the side type from the markets.
It is necessary to purchase a suitable type of supply for the existing sewer structure, if there are no plans for a major replacement of water pipes.
Tools you will need during the replacement of the toilet structure
To change a broken toilet, you will need standard tools. The composition of the set varies from the features of the plumbing that has gone out of work, the type of toilet bowl, the condition and location of the pipes.


You will need a puncher, a screwdriver and an adjustable wrench, a chisel with a hammer, a hacksaw, a rubber spatula, a measuring level, safety glasses and work gloves.
An adjustable wrench is used when connecting the water supply. A puncher makes holes in a concrete wall or floor for attaching a tank or bowl. Screwdrivers are needed to tighten the screws. Silicone sealant is used to process joints.
What items to prepare in advance
In order to quickly dismantle and install new plumbing, you need to buy the necessary items in advance, namely the toilet bowl - a compact. The composition includes rubber sealing rings, fasteners, a tank drain device. If a cast-iron riser is installed under the toilet, you will need a chisel with a hammer. When setting the bowl for accuracy, use a measuring level.
Consumables that will be needed during the replacement of plumbing
If there is a shortage of bolts, screws, washers, dowels in the mounting kit, you can buy the missing ones yourself.
The process of dismantling the old toilet
Dismantling modern equipment will not cause many difficulties. The process of dismantling outdated plumbing has its own nuances if the sewer consists of a cast-iron pipe.
If the toilet is attached to a wooden stand, then removing it is easy enough. The stand itself is removed and the floor hole is filled with a special screed.
A step-by-step description of the dismantling of modern toilets
First of all, we restrict access to water, then we drain the water from the tank.We remove the remaining water with a bucket and a rag. At the bottom of the tank, unscrew the bolts and remove it, pull out a corrugated pipe or a plastic eccentric connecting the sewer and the bowl. It is necessary to wipe the bowl dry with a cloth or sponge. We unscrew the fasteners under the bowl with a wrench, and it can be freely removed from the floor.
Dismantling a toilet installed with cement mortar
In Soviet times, the installation of plumbing was done in good faith, the toilet was mounted using cement mortar. The dismantling of plumbing will be similar, as for modern toilets until the bowl is removed. Using a chisel, beat the base of the toilet in a circle and split the cement, and then rock the toilet, use a chisel to gently split the outlet and remove the bowl. Then remove the remnants of plumbing and cement mortar from the pipe.
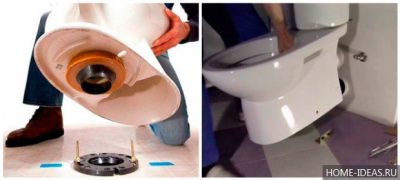
How to replace the toilet bowl yourself
When changing the toilet bowl of a new or old model at home, you need to install the new element without haste and very carefully
It is important to make sure that the hole in the bottom of the bowl lines up with the hole in the bed on the back of the bowl. First you need to put plastic washers with rubber gaskets on the mounting bolts, after which a rubber gasket is also put on the drain and a tank is placed on top
For reliability, you can coat all the rubber bands with silicone sealant. Make sure that all the holes match perfectly, after which you can insert the mounting bolts and start tightening the nuts - you need to do this gradually: first left, then right. This will avoid distortion. The main thing is not to overdo it so that the bottom of the tank does not burst.
If you are buying a new cistern, the fittings in it should be installed from the factory, so you do not have to install it, which will simplify your task. You will have to connect the flexible inlet hose to the side or bottom, but do not forget to use a gasket. Then open the faucet to fill the tank. Do not rush to drain the water, but first make sure that there are no leaks - water should not ooze or drip anywhere.
If everything is in order, you will have to cover the tank with a lid and tighten the drain button, and then check how the drain works.
Removing the cover with two buttons
The arsenal of devices for the bathroom has recently been replenished with two push-button samples. The principle of the device and the operation of the latest modification is not much different from the one-button counterpart and is available for do-it-yourself replacement. The only difference is that the algorithm of actions is repeated twice. To remove the drain tank:
- Press one of the buttons. At the same time, we remove the second button from the slot inside the second half.
- In the opened hole we find and unscrew the slotted screw.
- Lifting, turn the lid of the drain tank 90 degrees.
- Remove the clip that holds the button.
- Remove the cover and set aside.
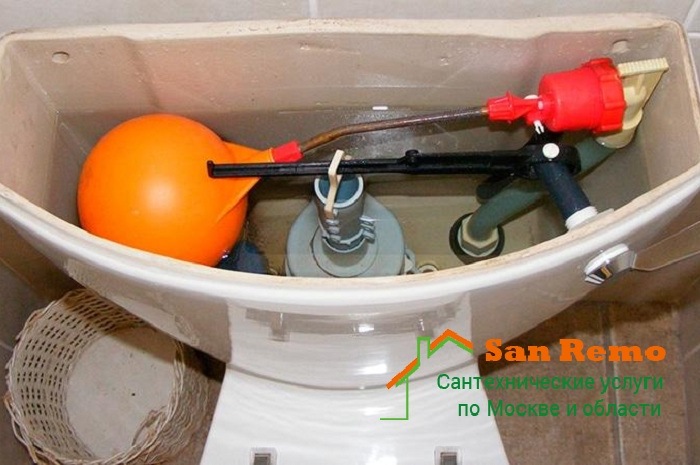
General arrangement of tanks
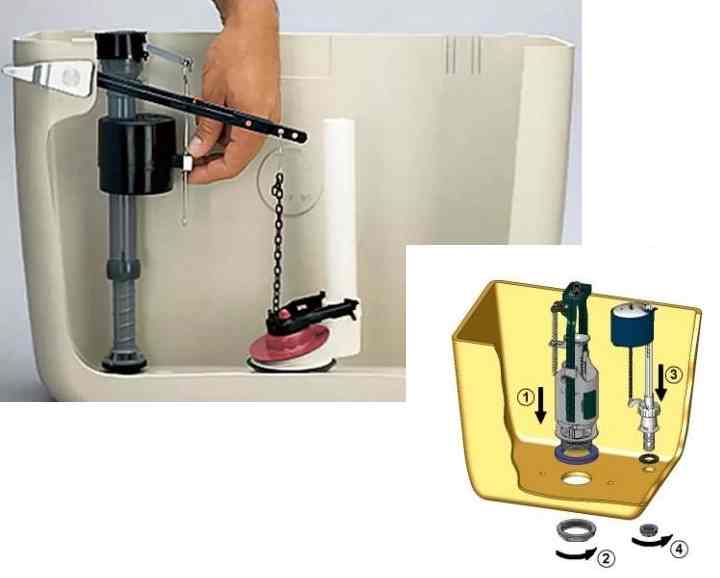
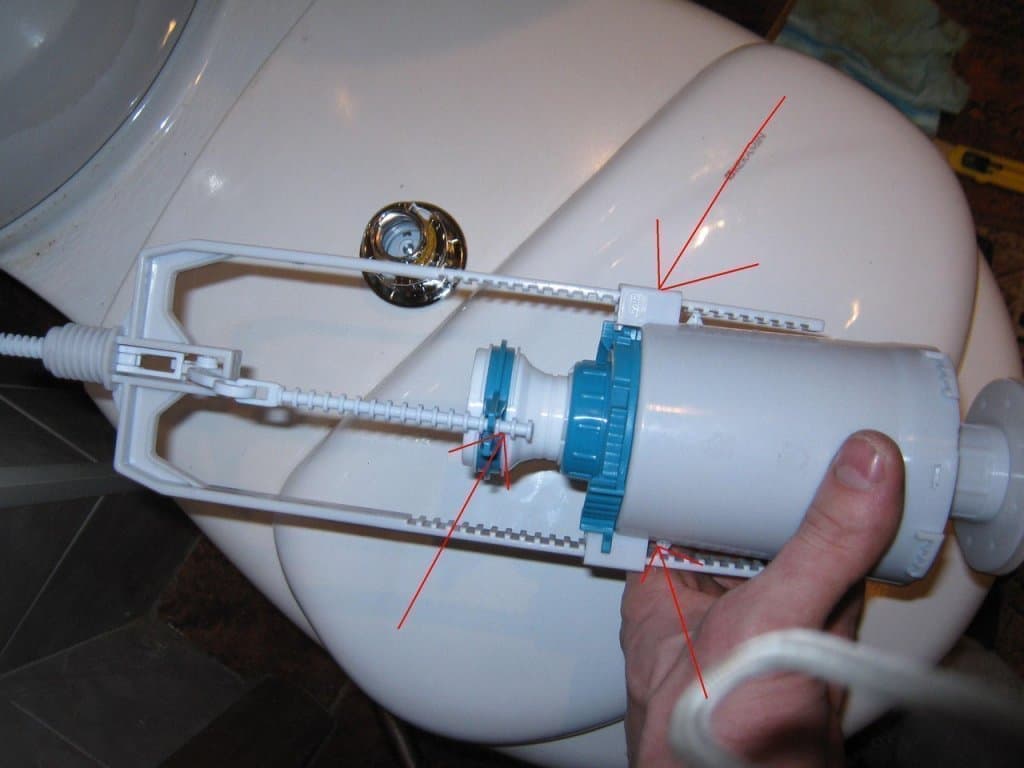
The composition of the toilet flush tank includes the following main elements:
- tank body;
- Complex of internal fittings;
- Sealing and fastening accessories.
The body of the toilet bowl is made of ceramics, has various shapes, volumes and designs. Occasionally there are plastic products. Water supply is carried out in two ways - from the side and from below, it can be done on the left and right.

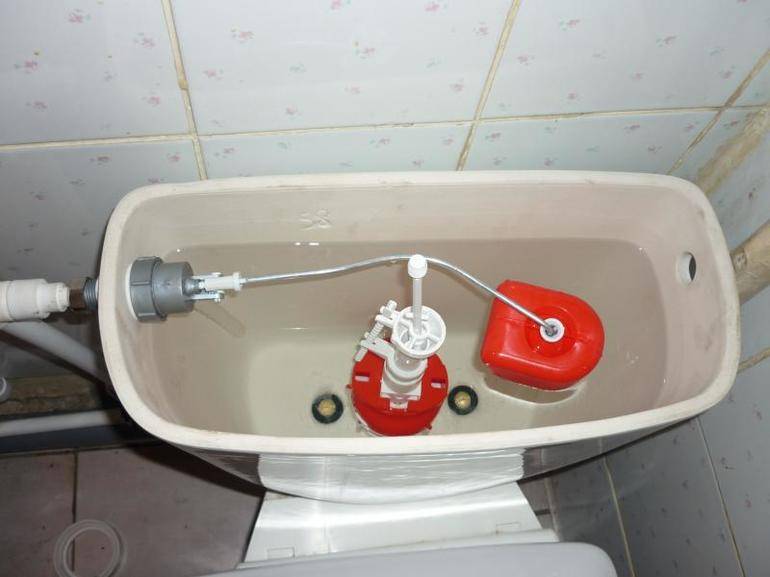


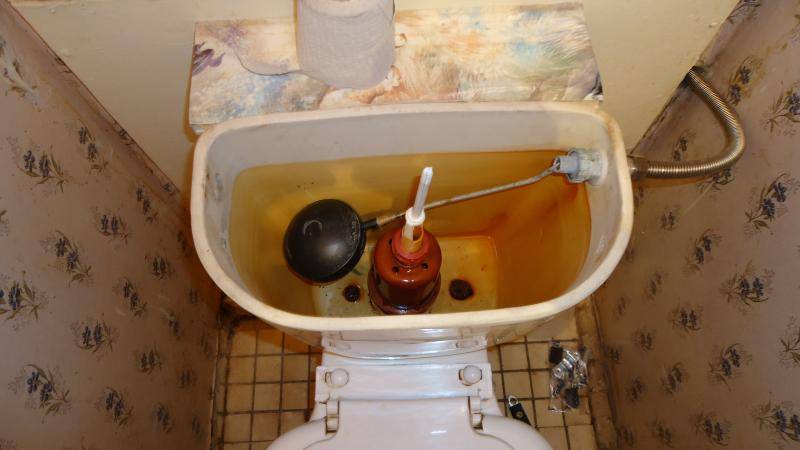


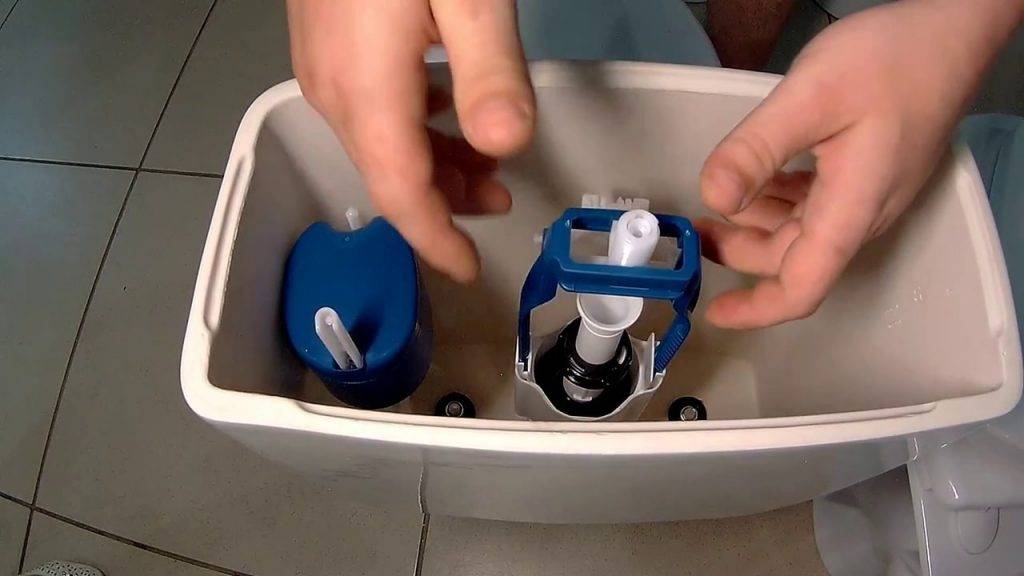
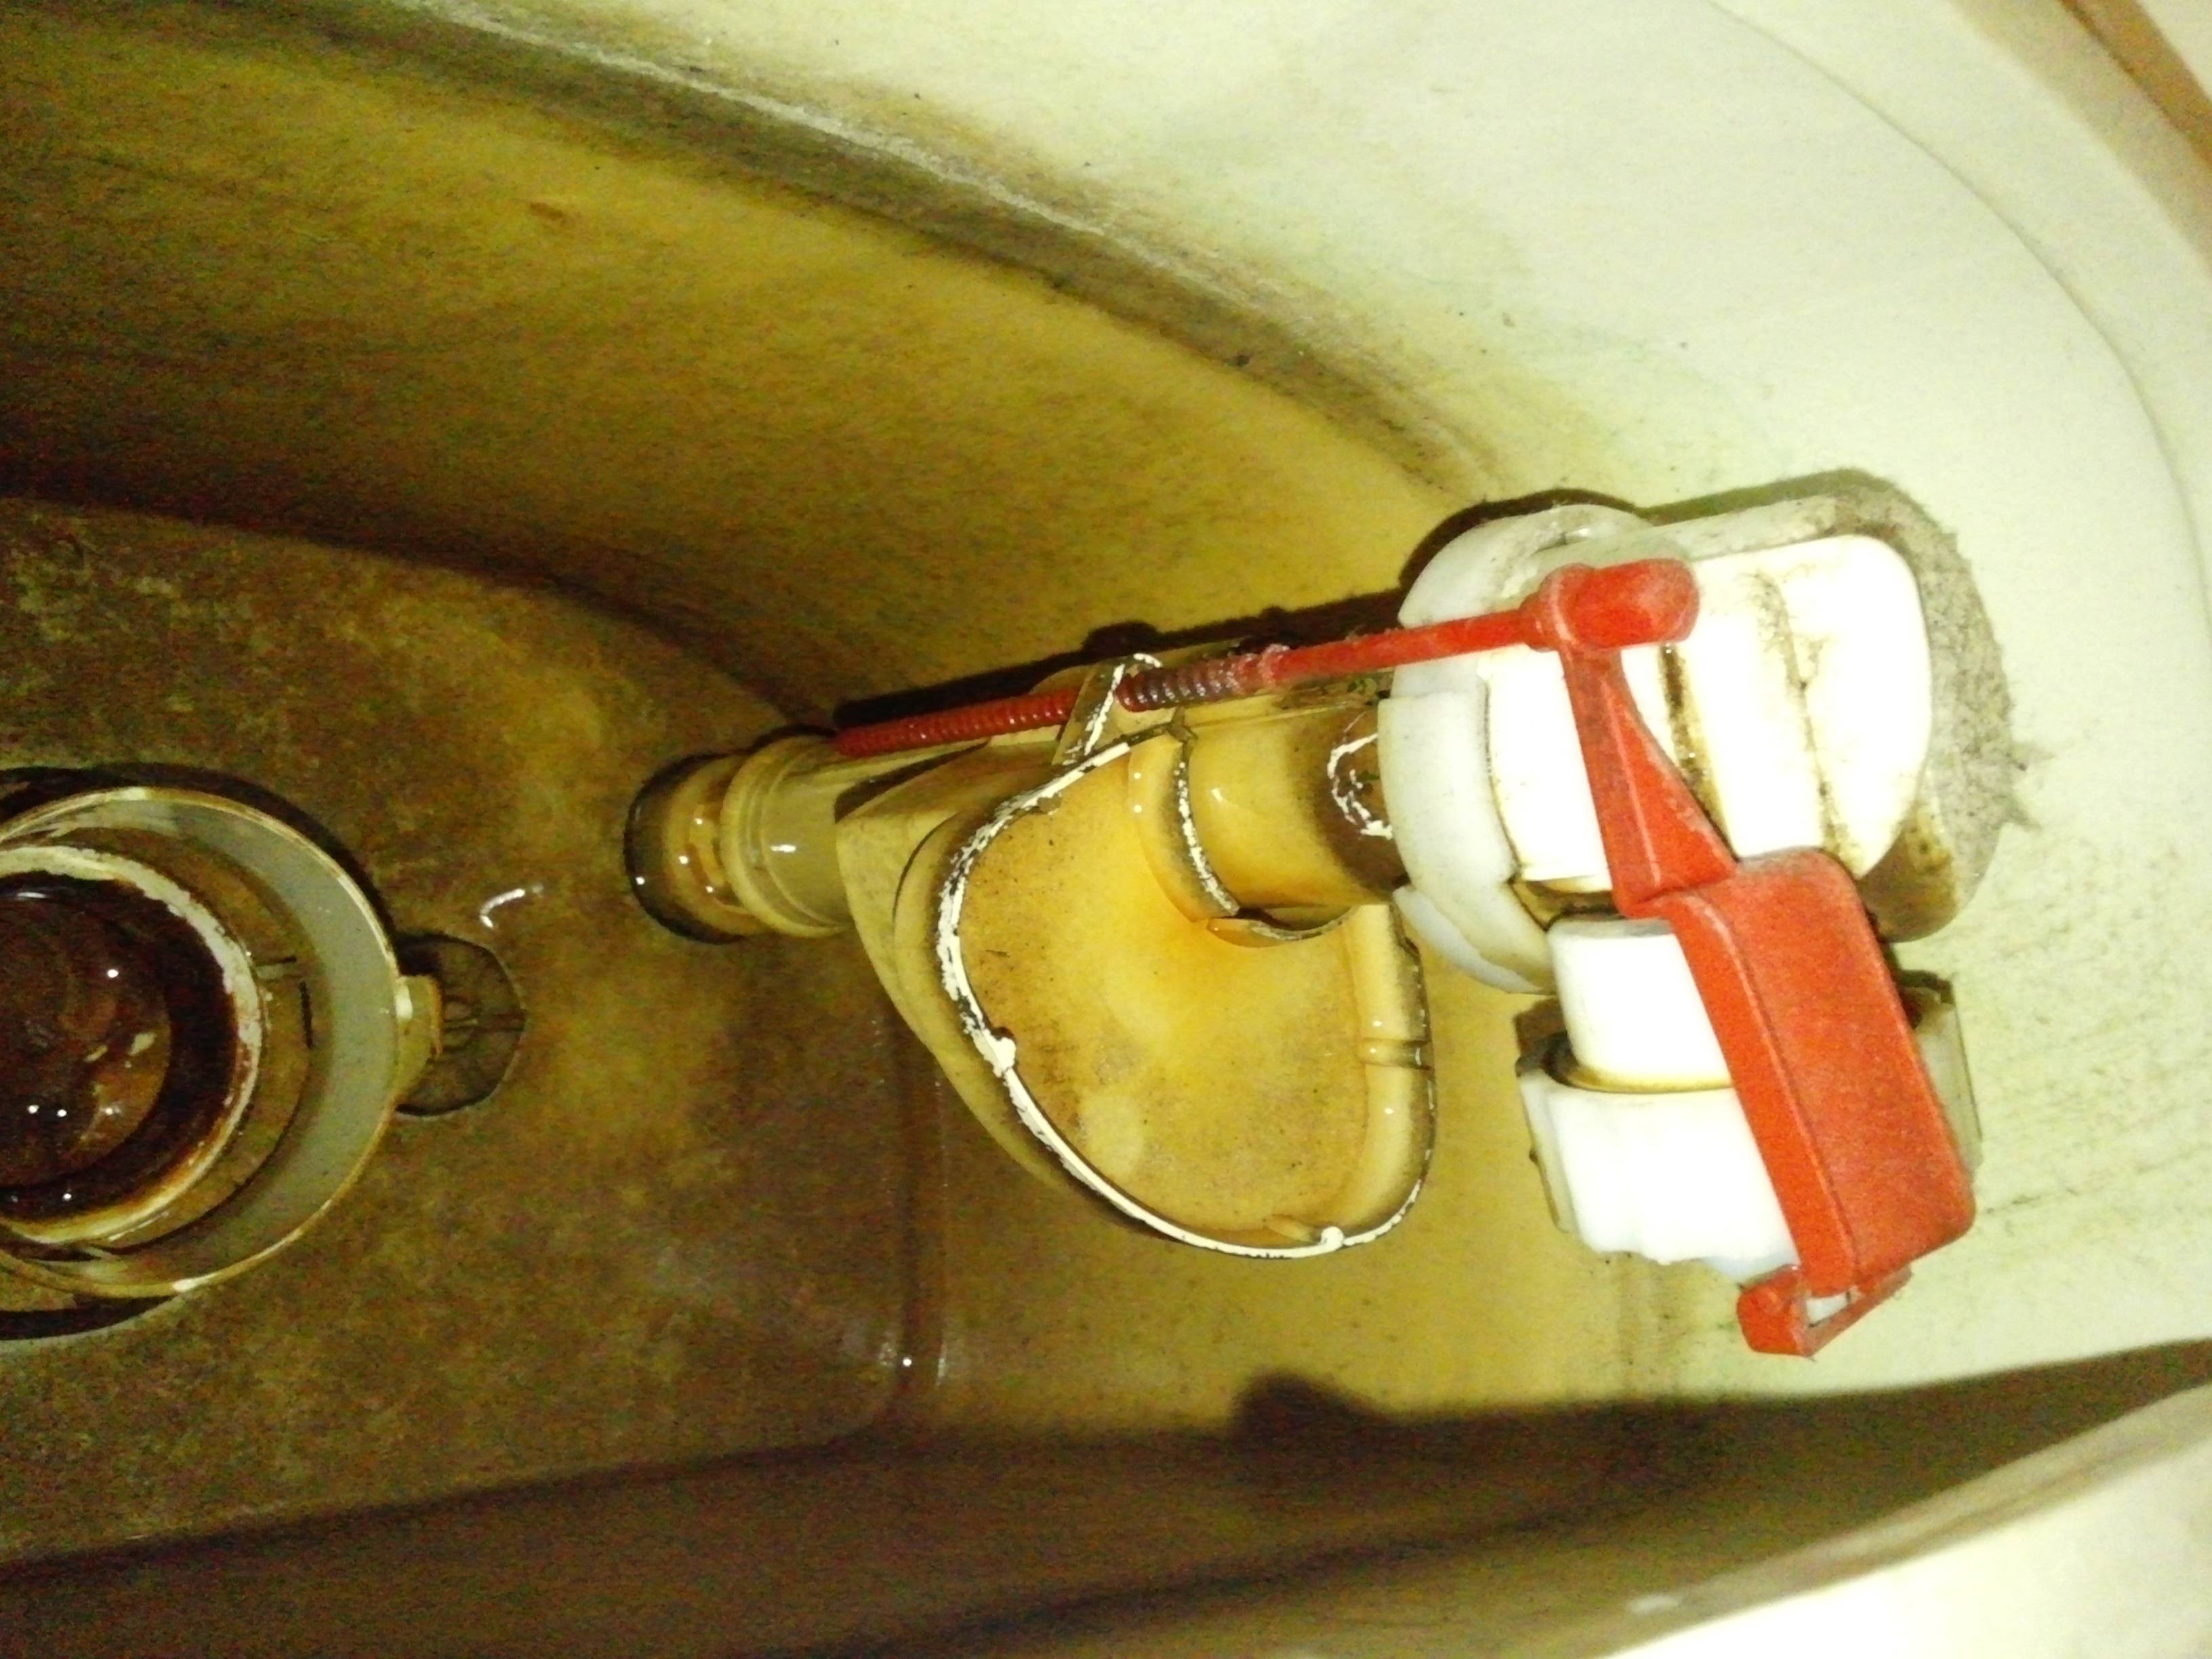
The complex of internal fittings consists of the following elements:
- Filling shut-off valve;
- Drain valve;
- float mechanism.
The tank is filled with water through the filling valve.
A flexible water supply is connected to the external thread, the inner part serves as a locking device and is controlled by a float mechanism. When the float is raised to its highest position, the valve closes; when lowered, it opens.
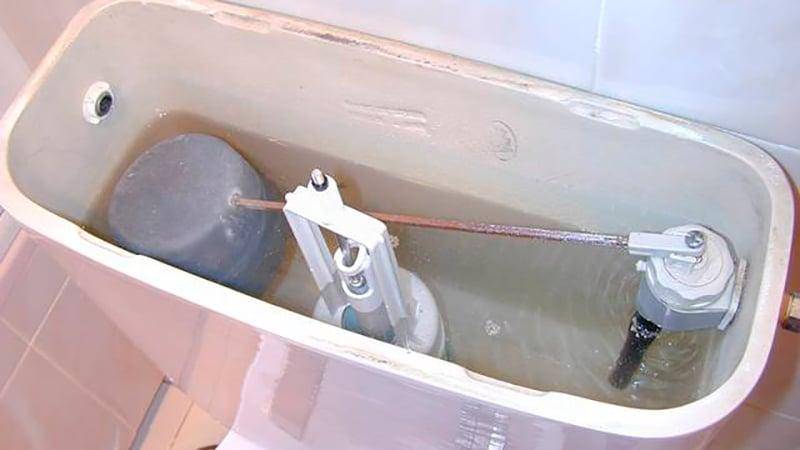
The float mechanism has two types of execution:
- Float on a metal spoke;
- Float on the rod of the lever drive.
The float is made of plastic, less often - of metal (aluminum and so on).
The drain valve is equipped with a lower locking element (pear, slip) made of plastic rubber (rubber). There is an overflow hole in the center of the pear. A hollow overflow tube is attached to the pear and rises to the upper third of the tank. When filled to its upper level (that is, the filling valve is not completely closed), water overflows into the toilet bowl.
The drain valve closes the hole through which water is supplied to the toilet. The valve is opened in several ways:
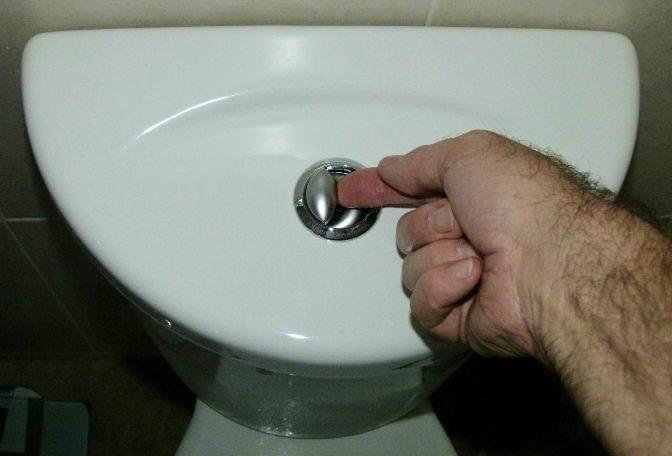
- Button device - single or double;
- Exhaust drive with handle;
- Exhaust drive of a hinged tank with a chain, a cord;
- Push float.
The button device, when pressed, raises the pear of the drain device using levers. A one-button device drains the entire volume of water, a two-button device drains two parts of different volumes.
The pull rod is connected directly to the drain actuator and when pulled opens the drain opening.According to a similar principle, water is drained from a separate (wall-mounted) tank, the pear is raised by pulling a chain or cord connected through a transmission mechanism.
Some models of plastic tanks are equipped with a pressure float; when pressed, the float opens the drain through a system of levers; when filled with water, it closes the filling valve.
How to remove the tank completely if repair is impossible?
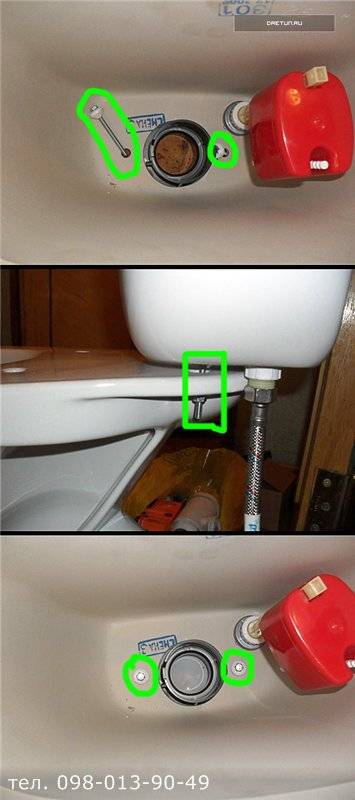
If the toilet cistern is beyond repair, it should be carefully replaced - but how to do it? You need to act in a certain sequence:
- Stop water supply. Disconnect the water supply using a Swedish adjustable wrench.
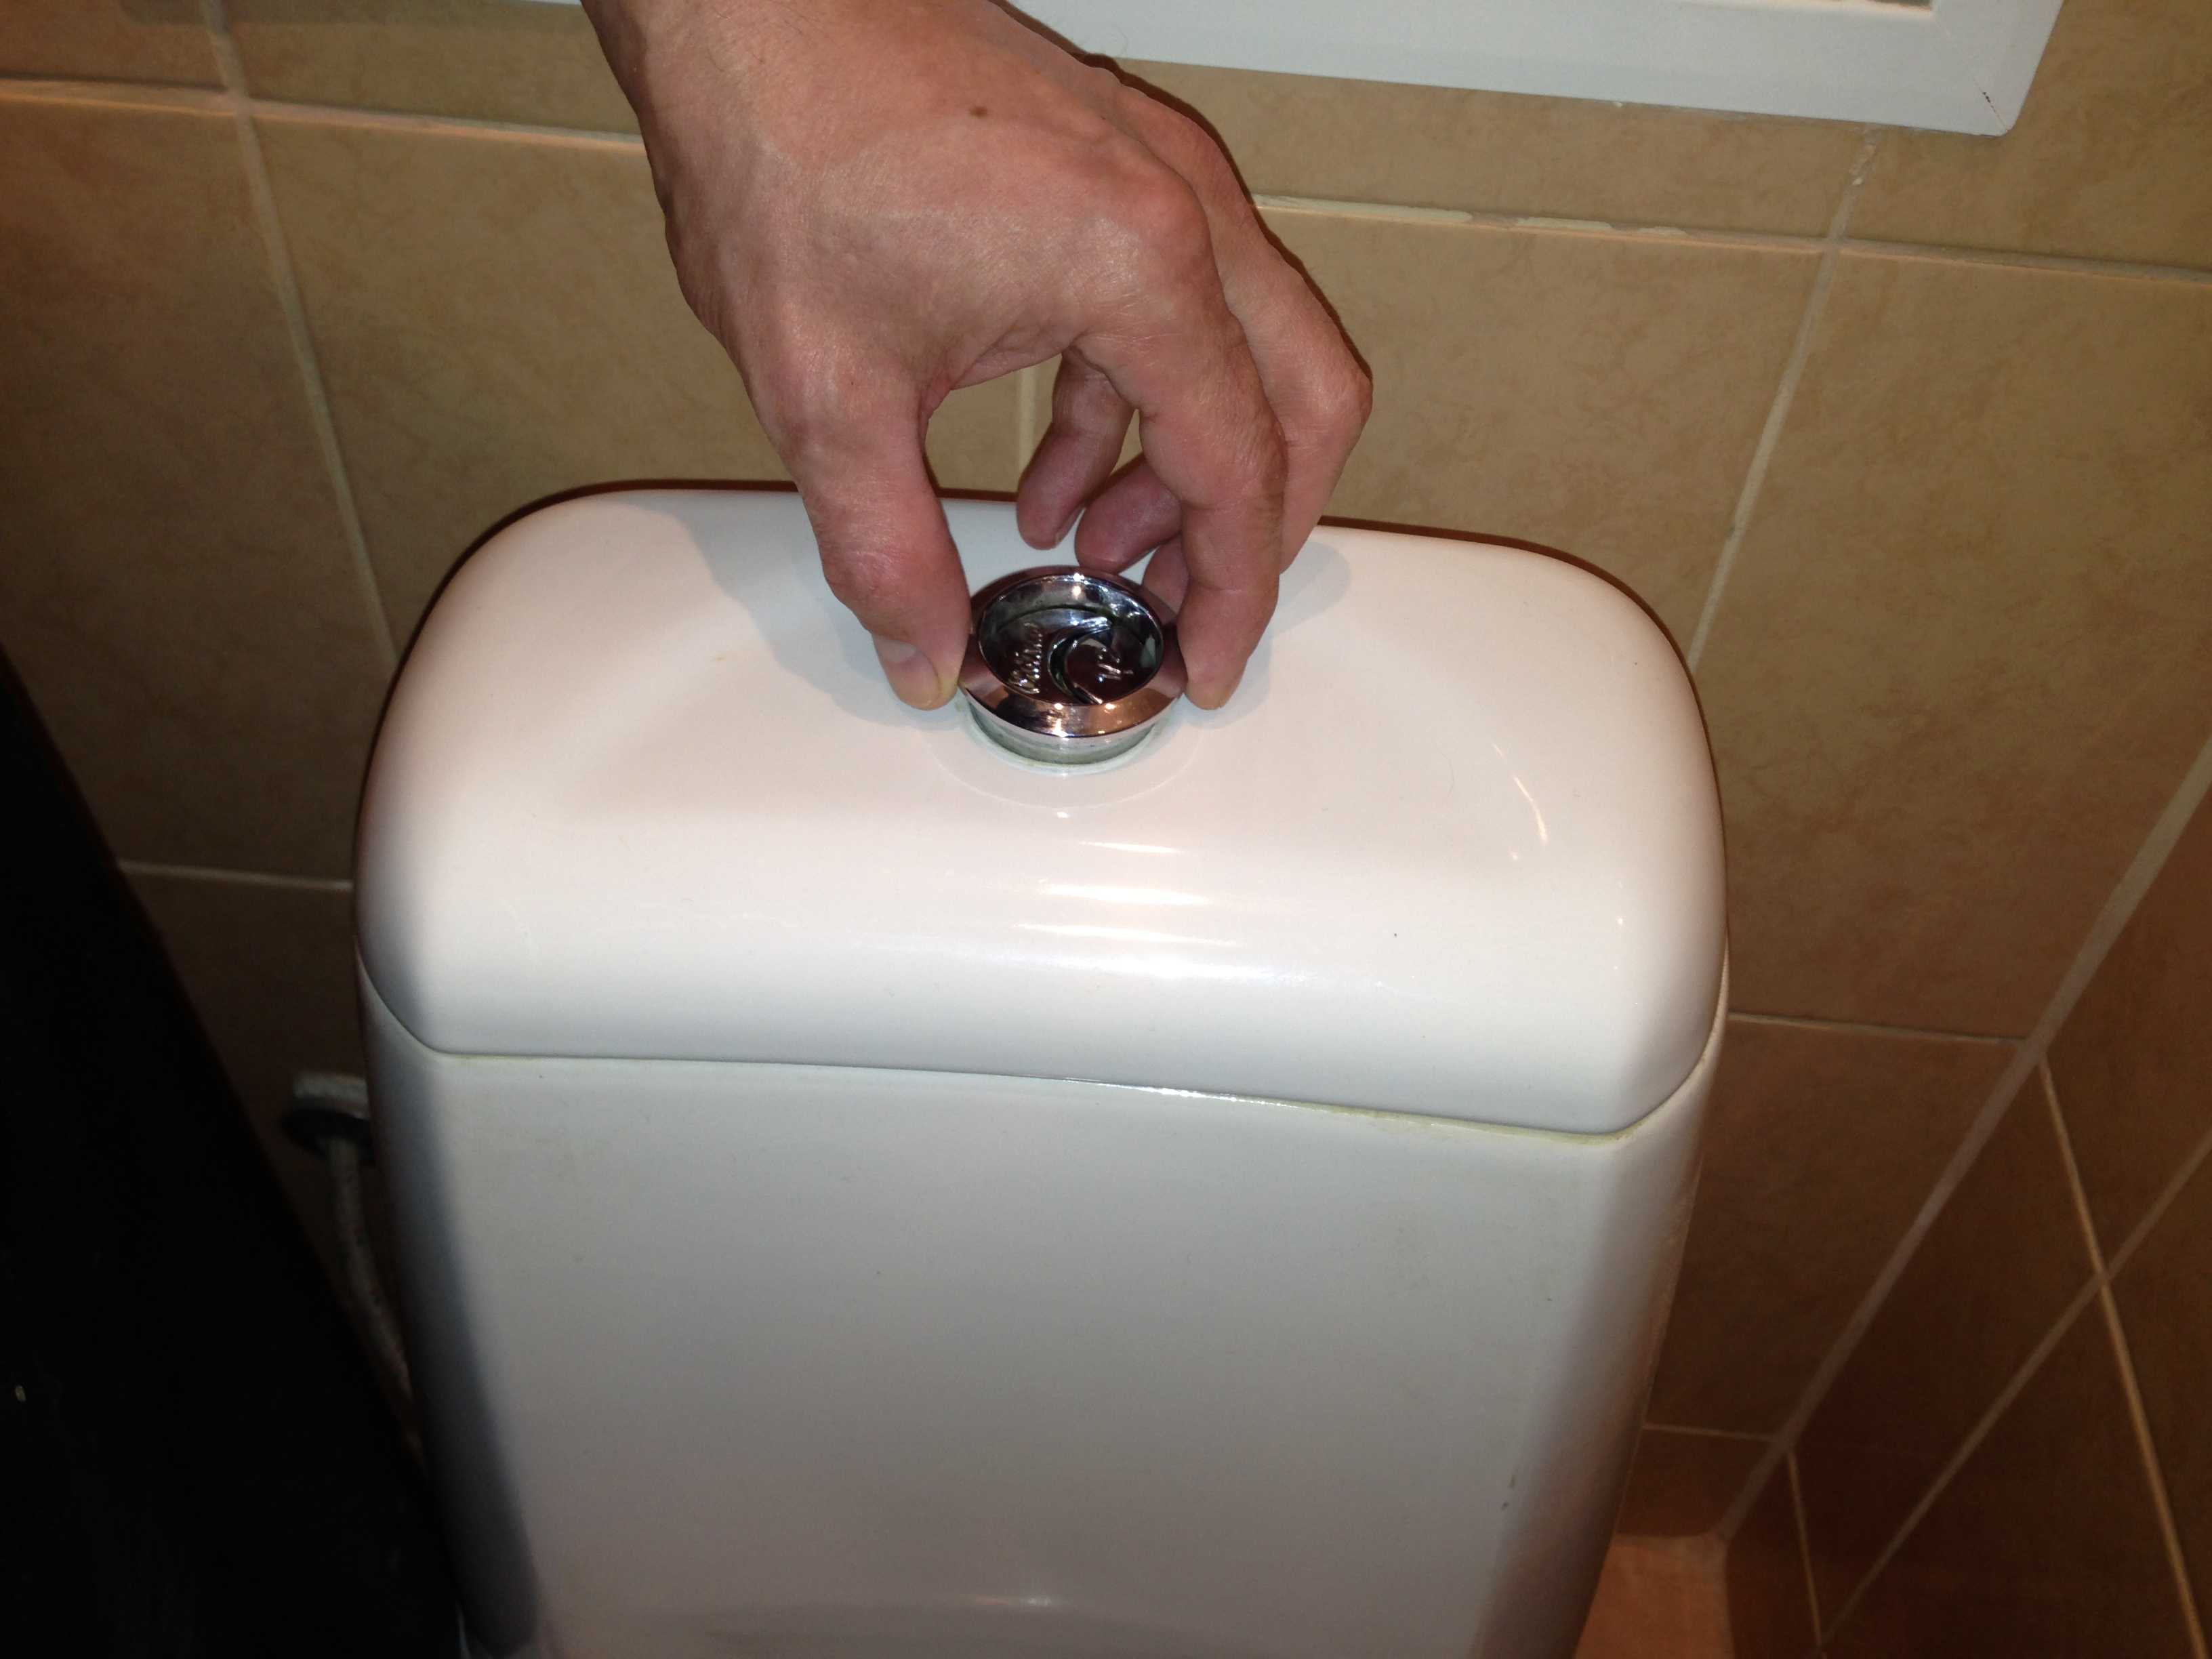
- Unscrew the drain button.
- Remove cover.
- Unscrew the two screws that attach the bowl to the toilet (they are located at the bottom of the tank).
- Replace the old gasket with a new one. This will help avoid possible leaks in the future.
- Attach a new tank to the toilet, strictly adhering to the reverse sequence of actions.
The tank must be installed evenly, otherwise it will either crack or leak. Bolts to the toilet are screwed gradually to avoid distortion.
If you have problems with the operation of the toilet, you do not need to panic and immediately contact the master. Having a few screwdrivers and pliers at home, as well as listening to the recommendations of experts, you can do all the work yourself, even if you are doing it for the first time.
Damage not related to rebar
It is important to know how to repair the cistern or the toilet itself if there are cracks in the body. Leaked water can cause a flood, so if you find a problem, you should act immediately.
Glue for ceramics will help to close the crack, but in the near future the plumbing will have to be replaced.
A leak can also occur if:
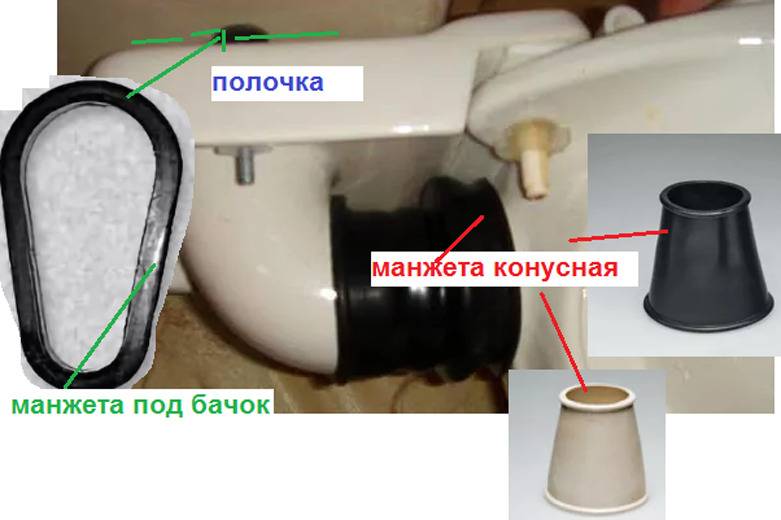
- The nuts on the bolts with which the tank is attached to the toilet pan have loosened. Fasteners must be carefully tightened with a wrench. If it is necessary to replace the seals, the tank will have to be dismantled and reinstalled.
- The connecting cuff between the tank and the toilet shelf is deformed or damaged. It must be replaced, but as a temporary measure, the resulting gaps can be sealed with silicone sealant.
How to quickly close a crack in the tank
Preventive measures
To avoid problems associated with leaks, with excessive consumption of water constantly flowing into the toilet bowl from the reservoir, it is important to know the design of the flush tank, to be able to adjust and repair the mechanisms. Recommended systematically:
Recommended systematically:
- check the condition of the flexible piping, connection node;
- inspect the fittings inside the tank, clean it from lime deposits and other contaminants;
- check the tightness of the connecting collar and bolt fasteners with a paper towel;
- inspect the tank and toilet for cracks.
Preventive measures allow you to extend the life of the mechanisms.
Briefly about the main
The cause of the breakage of the flush tank is usually worn or damaged fittings, improper adjustment, deformation and contamination of the seals or the drain valve. Knowing how to fix a drain tank, you can fix or adjust the water supply mechanism, return the functionality of the drain device, completely replace the fittings, or replace damaged elements, including seals.
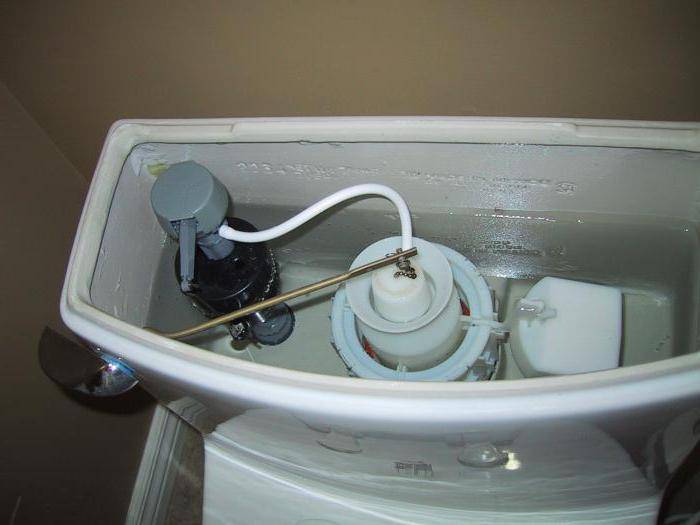


Tank installation and cold water connection
Shut off cold water. Using wrenches, adjustable wrenches, unscrew the bolts and remove the old tank. Then rinse and dry the shelf where he stood.
After dismantling, proceed to install a new one.
First, collect all the internal elements, install fittings to drain the water.
Remember, it should not affect the operation of the float.
Particular attention is paid to the tight connection of the tank with the toilet bowl. Coat the gasket on both sides with silicone sealant
Install the tank and secure the two bolts. Don't forget the pads
Tighten the bolts in turn, being careful, otherwise the earthenware may burst
Replacing the toilet barrel is almost complete. The cold water connection is the easiest to install. Connect the cold water hose to the valve on which the float is attached, adjust the float level and turn on the water. Observe the filling of the tank until the float rises to the maximum upper position.
As soon as the water reaches the set level, carefully check the tightness of the connection again. If necessary, readjust the float again. Drain the water during normal operation. If everything works well, then install the lid and fix the drain button.
- Do-it-yourself screed under a warm water floor - the subtleties of creating a high-quality screed
- Manual grain seeder - with your own hands you can do it in different ways
- We make a hay chopper with our own hands
Device and principle of operation
In the current level of competition, manufacturers are trying to offer the consumer the maximum choice. This also applies to tanks.The differences will be in the material used, the quality of implementation, the price. In order to understand how to adjust the toilet bowl or install a new one, you first need to understand its device.
The basis of work will be the same for everyone. The differences will be in the design of the tank. They may be as follows:
- One mode of operation - one button;
- Equipped with a dual-mode mechanism - two buttons.
A tank with one button means the release of the entire volume of water at once. The presence of two buttons and 2 modes of operation provides significant water savings. They allow you to drain only half the volume when draining. With this design, there are two buttons. A large one will drain all the water, and a small one - partially.

The process of water discharge can also be performed in different ways. Here, the methods of transferring force to the valve that closes the drain hole are distinguished.
The fluid flush scheme may be different.
- Direct flush. Water from the tank drains directly into the toilet. Doesn't change direction.
- Reverse flush. During flushing, the fluid changes direction. It is more efficient but noisier.
If you know the cistern device, then you can easily figure out how to fix the toilet cistern. Let's now look at the principle of operation and structural elements. There are two phases of work:
- The process of collecting the required amount of water;
- Flush directly.
The device of the drain tank will be similar to a conventional hydraulic seal. The main elements are the locking element, the float and the lever system. By pressing the button, we act on the levers. They lift the constipation that closes the drain hole. As a result, water is supplied to the toilet sink.
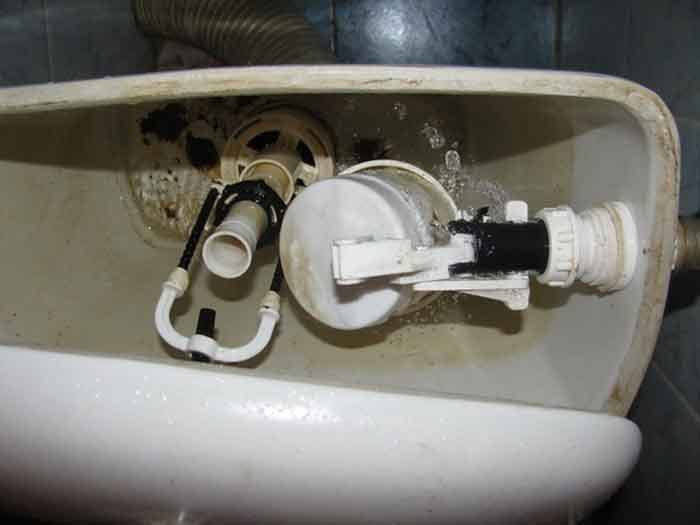
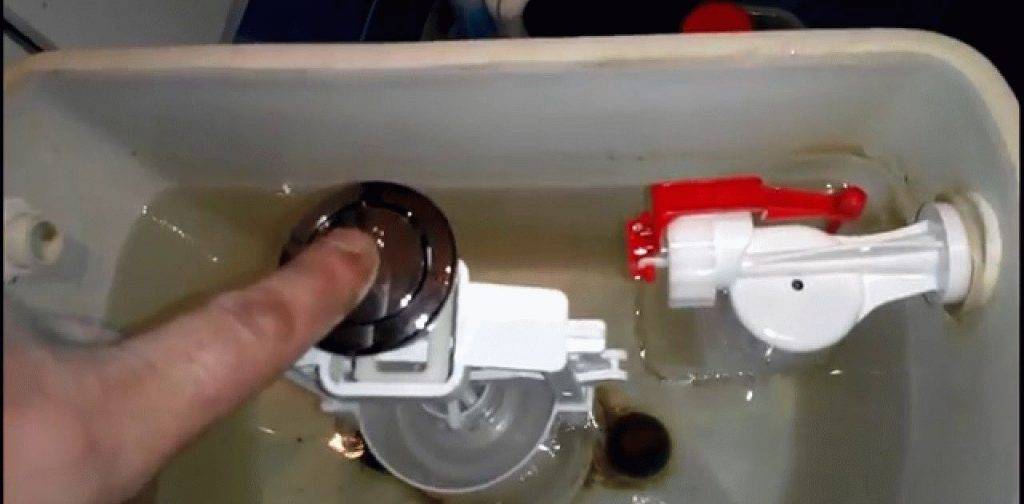
With an external design, everything is simple.It has only 3 elements - a tank, a lid, a drain button. It's harder on the inside. It includes the following:
- Float valve. Controls the presence and level of water. It includes a float, its lever. The faucet body has gaskets, a piston, a union nut for connecting a water supply hose.
- Pear. Rubber element covering the drain hole.
- Drain valve. Transfers force from the button to the pear.
In order to understand how to assemble a tank, you need to understand the principle of operation of the drain mechanism. He's next. When the button is pressed, the lever system transmits the movement to the rubber valve (pear). It rises, freeing the passage of water down. The water level is dropping. At the same time, the float lowers, opening the water supply valve. The container is filled to a certain level. The float is understood and closes the tap.
Related article: How to fix a toilet cistern
For smooth and smooth operation during installation, it is necessary to adjust and fix the float in a suitable position. Finding the right position is easy.


- Water is supplied more than required. Lower the float.
- The lack of water indicates the need to raise the float.
Adjustment of individual elements
To install a new system responsible for filling with water, you will need the following tools:
- plastic ruler or metal tape measure;
- wrench;
- spanners;
- newly purchased rebar components.
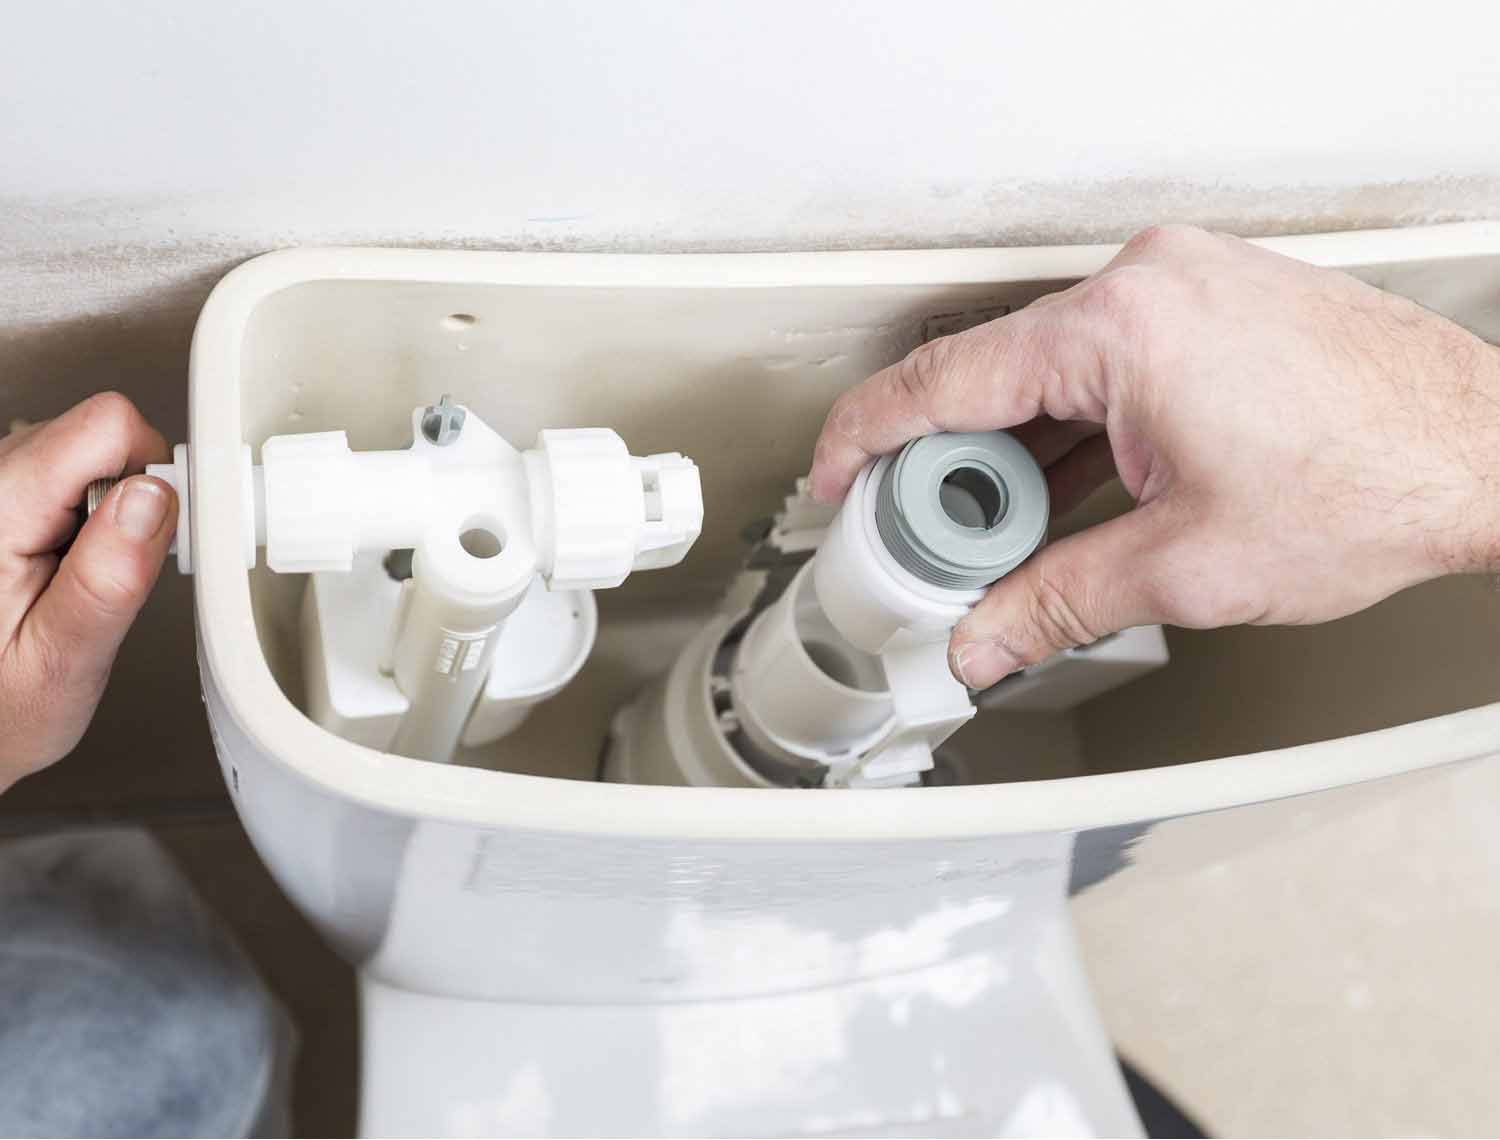
Water can enter the tank from below or from the side. If we are talking about lateral summing up, for repair you need to perform the following steps:
- Determine the diameter of the water intake pipe.
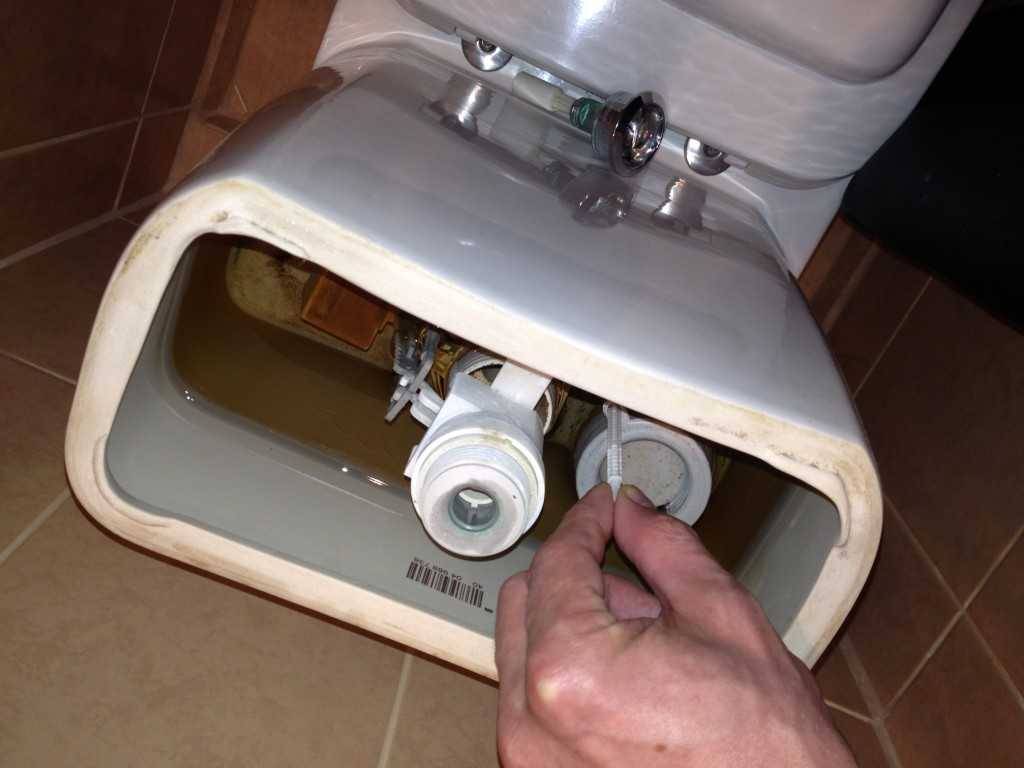
- Choose the system that is needed for your model.This is quite simple to do - you need to remove the lid from the tank and see what kind of fittings are in it. After that, buy the same one for sure.
- After the entire structure is purchased, you can install a new water intake valve.
- Shut off the water supply to the toilet.
- Open the lid and drain the water completely.
- Remove old fittings. This can be done after you unscrew the nut located on the flexible hose with a wrench. At the same time, be sure to keep the entire structure.
This event can be carried out by one person - the main thing is to work harmoniously with both hands.
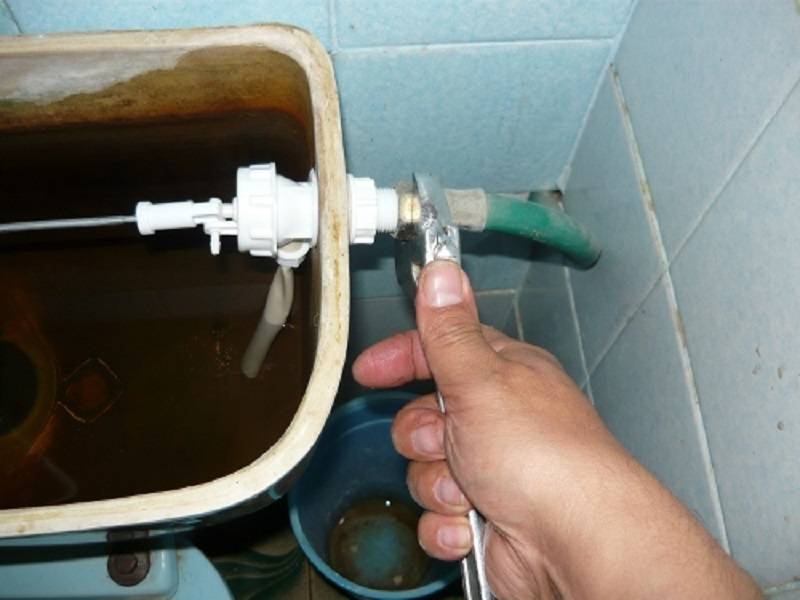
In the case when water comes from below, you will need to suffer pretty much to unscrew the nut. This can only be done with improvised materials or after shortening a standard wrench:
- Carefully inspect the already used gasket. If it does not have visible damage or violations, it is allowed to reuse it for a new installed structure.
- New fittings should stand so as not to interfere with the operation of the drain system, and also not to touch the walls of the tank itself.
- Connect water.
- Check the correctness of the work done.
Replacement and fastening of parts
After you open the lid, you will see several holes with a diameter of 1.5-2 cm for water supply (maybe only 1). In one of them, filling fittings with a membrane valve will be fixed.
The principle of its operation is simple: when the tank becomes empty, it starts the water supply, when it is full, it stops. A float is required to determine the water level. If you have little, or vice versa, a lot of water, you can adjust the desired level yourself. It is recommended to use a volume of 5-7 liters of water.
The membrane is very sensitive to water quality, so its life will depend on the water filters. If you don’t have filters at all, then it’s better to replace the mechanism with a domestic one with a stem valve.
Most often, you can solve the question of how to repair a toilet flush tank by completely replacing parts. For expensive toilets, you can find rem. set with sleeve and membrane. On cheap models, it will be more profitable to buy new fittings, they are not very expensive. The main thing when buying is to choose the desired pipe diameter, usually they are 10, 15 mm, as well as 1/3 and ½ inch.
Fitting kit for toilet repair
When replacing, you need to make a sealed joint, so put on a sealing gasket before fastening. The fittings are pulled together with a tank nut. Do not twist them too hard or cracks may appear.
Decorative plugs are inserted into the remaining free holes. If necessary, you can change the position of the water supply. If the plug is simply inserted into the hole until it clicks, and does not rest on the nut, then no seals are provided in it, so water will flow out in the event of a malfunction.
At the bottom of the tank are holes for attaching to the toilet. Fastening takes place on metal or plastic bolts. Bolts made of brass and stainless steel are best suited for fixing the toilet bowl. Ordinary metal fasteners will be stronger than plastic ones, but will quickly rust. Before fixing them, washers and rubber gaskets must be worn.
In the center is the largest hole for draining water. The shut-off valve for the drain tank is fastened with a cap washer through the gasket.