- Mounting the chandelier on the mounting platform
- Prices for LED chandeliers
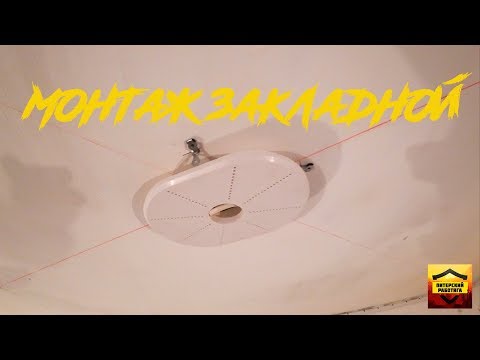
- Video - Installation of a chandelier on a stretch ceiling
- Preparing to install a mortgage
- Mounting the platform under the chandelier
- How to “drown” a chandelier in the ceiling?
- What should be done before installation?
- How to hang on a hook: step by step instructions
- Installing the mount, if not available
- Fixture installation
- Wiring and Grounding
- heavy structures
- Installation of mortgages under the eaves
- Mounting base
- Installation of mortgages
- For spotlights
- Under the chandelier
- For cornices
- Platforms for spotlights
- Features of installation in a stretch ceiling
- Installation of mortgages
- Mortgages under a stretch ceiling
- Mortgages for spotlights
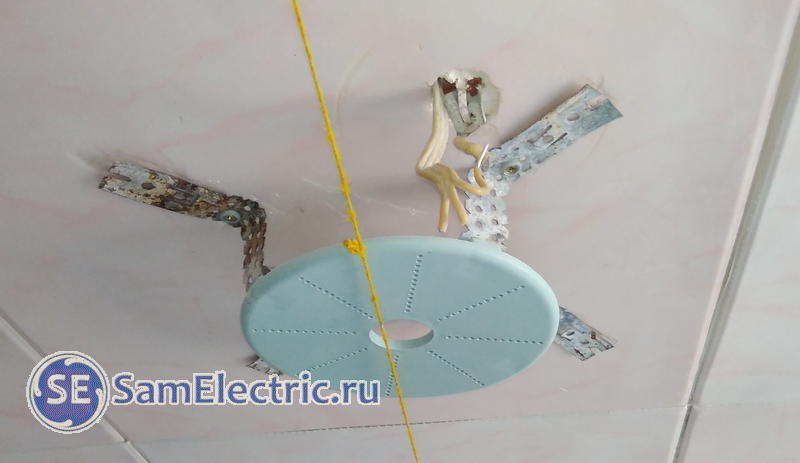
- Mortgage under the chandelier
- Where to hang small models
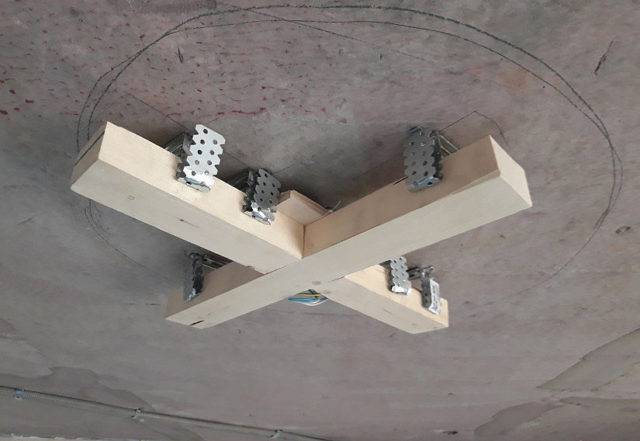
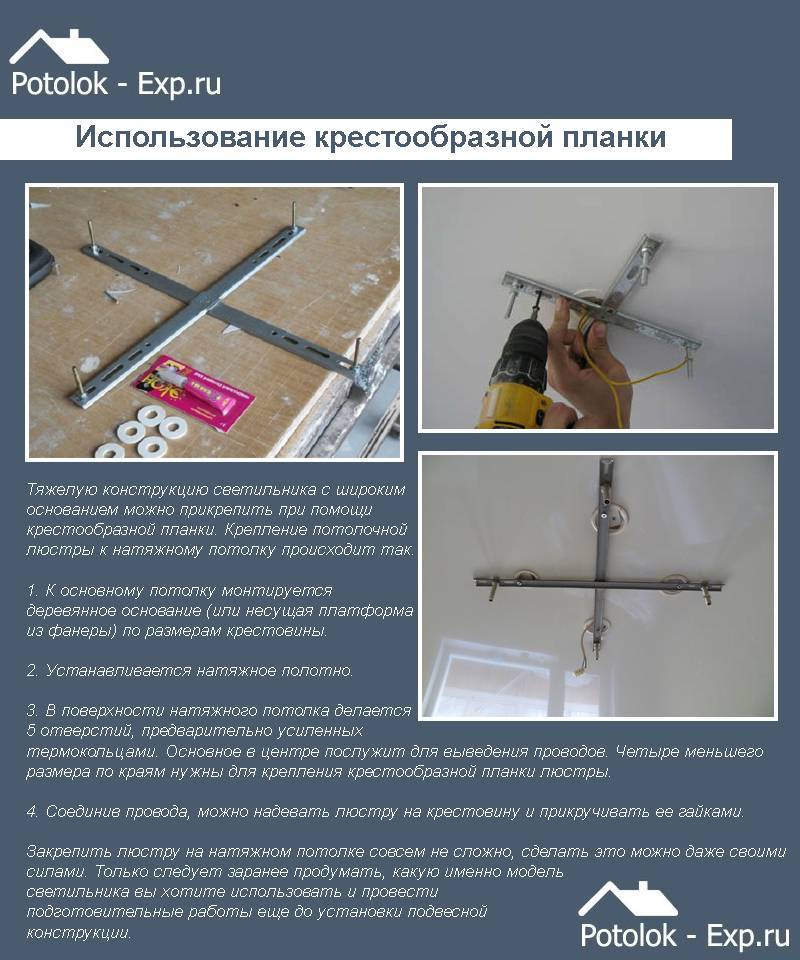
Mounting the chandelier on the mounting platform
This method is used when mounting on a longitudinal or cruciform mounting plate is provided. The size of the platform is determined based on the size of the bar, and its thickness depends on the weight of the lamp. Mount the bar when installing baguettes, keeping it flush with the guides.
The platform is made from a bar, board or piece of plywood. You will also need plastic mounting rings to mount the lamp.The diameter of the ring for the longitudinal bar should allow wires to be threaded inside it and the bar to be fixed on self-tapping screws. For a cruciform bar, five rings of different diameters are needed.
Prices for LED chandeliers
chandelier led

Mortgage foundation
mounting ring
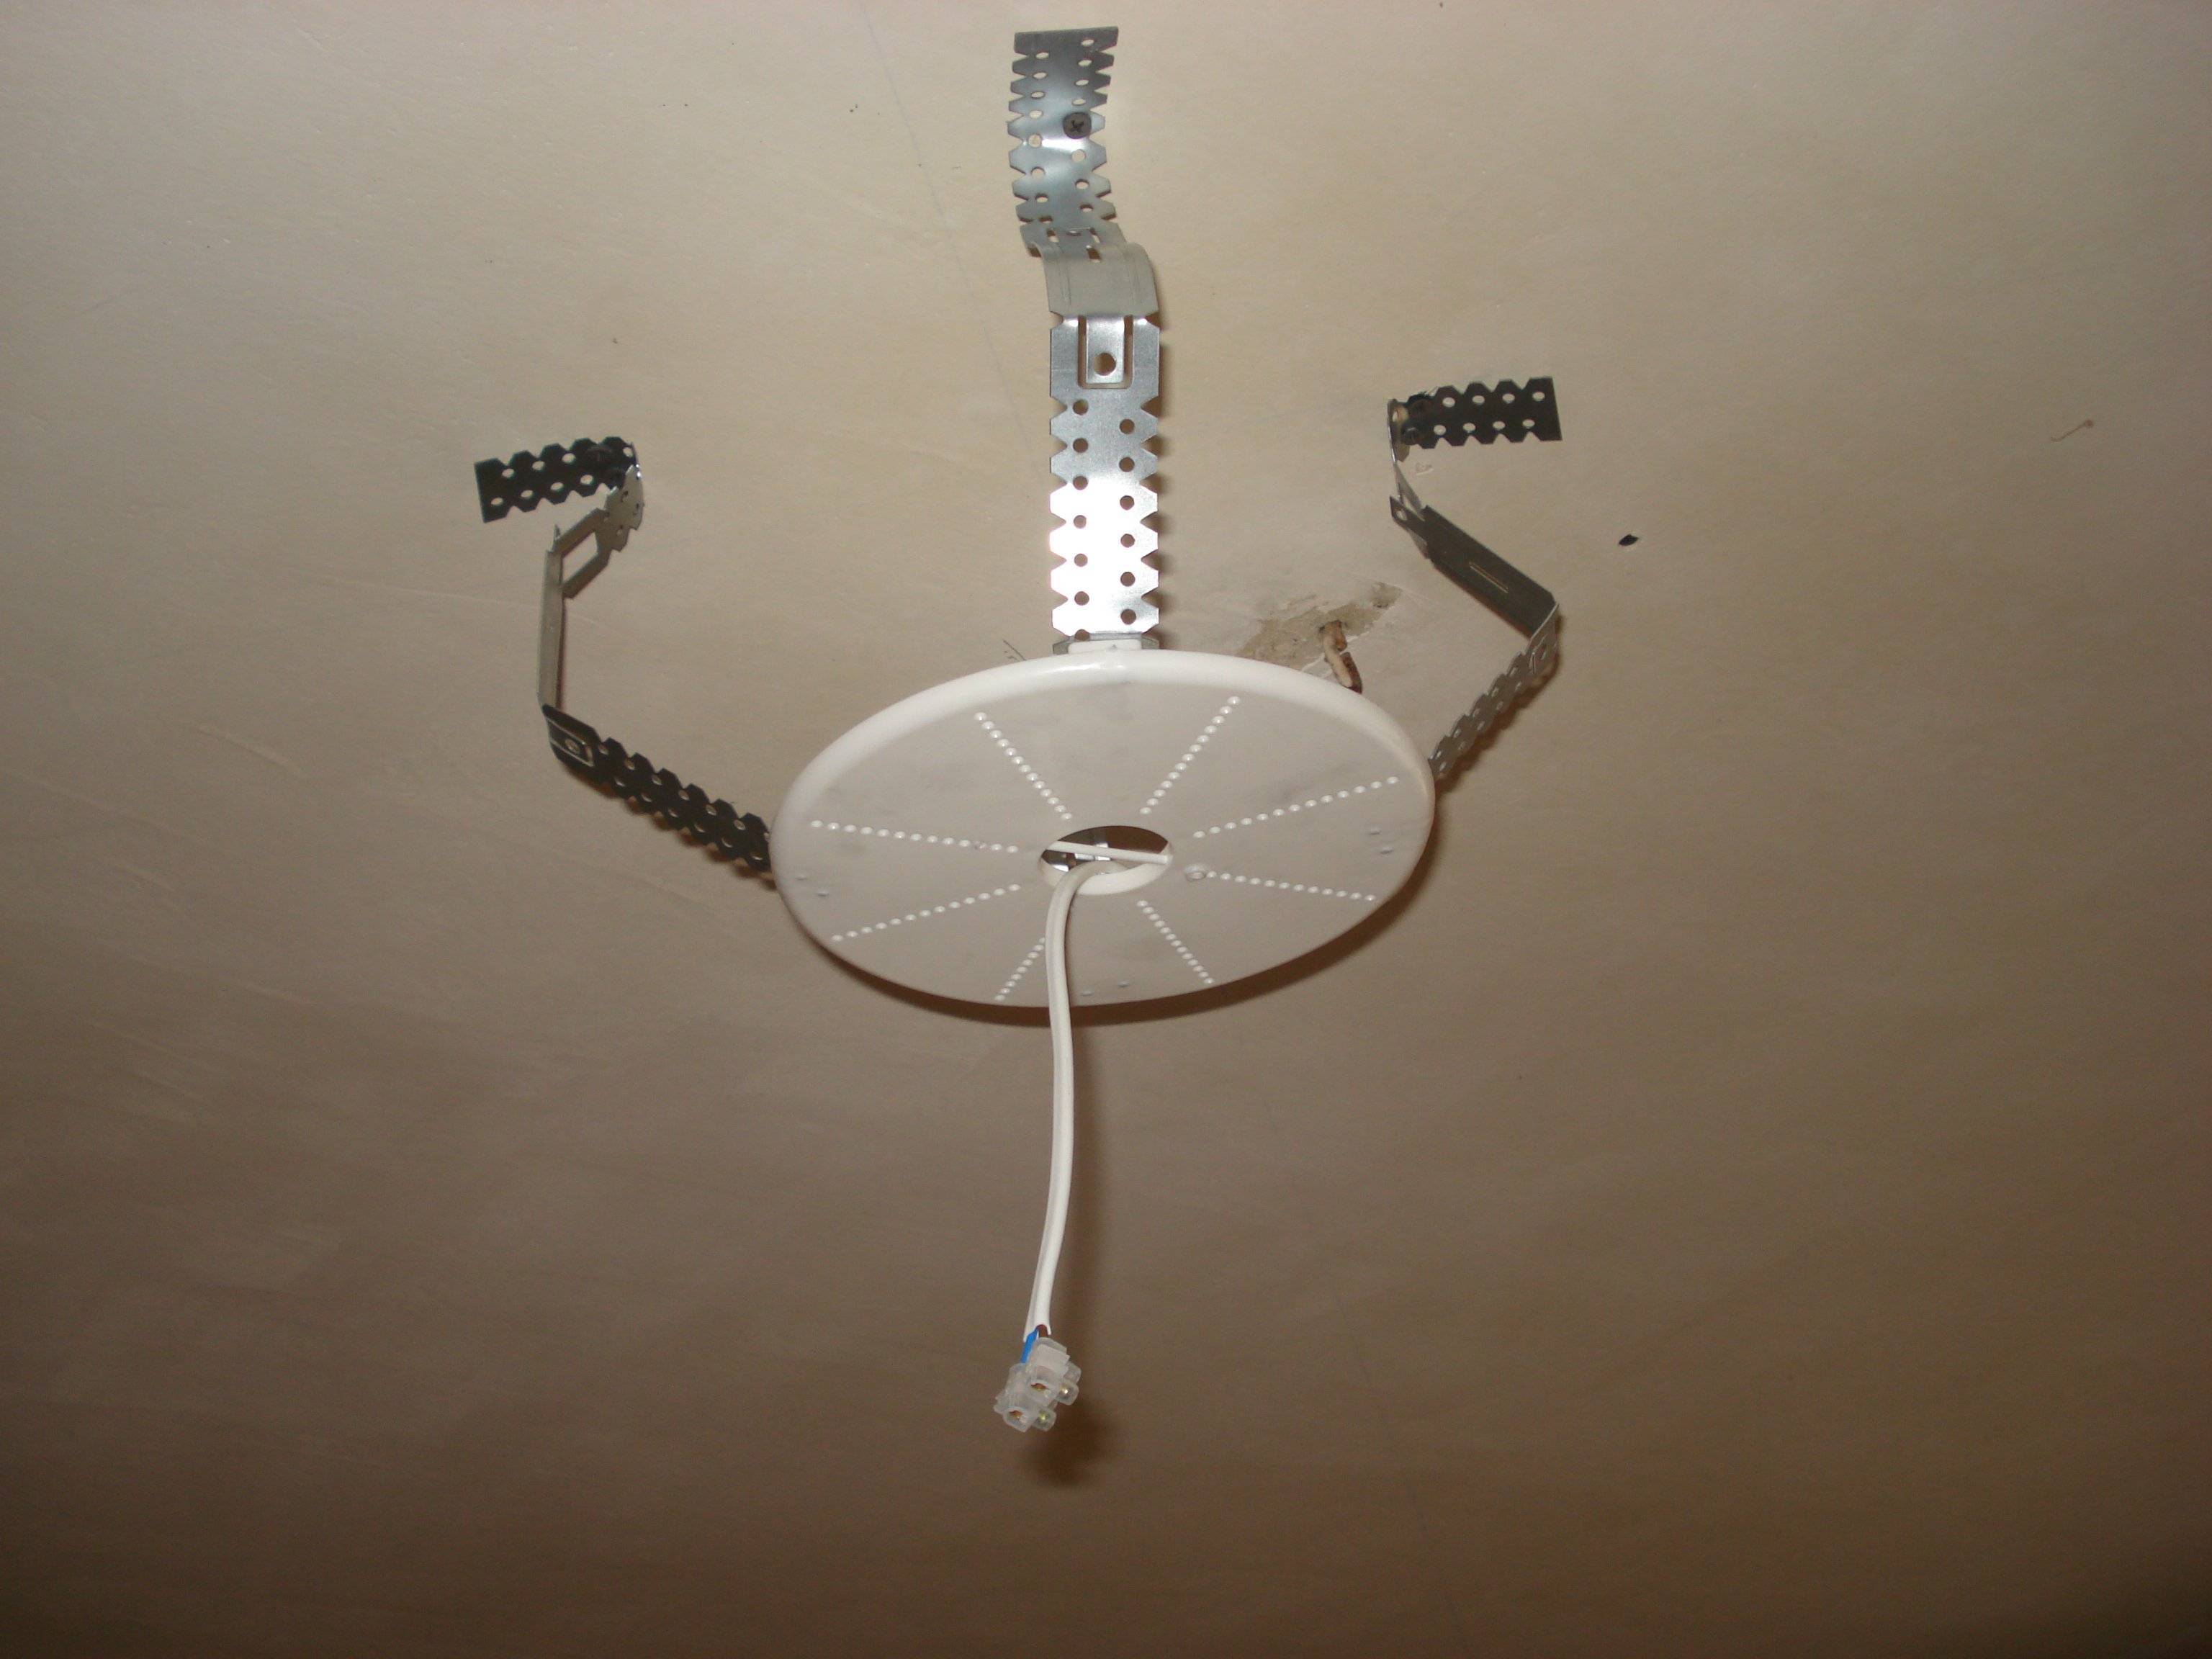
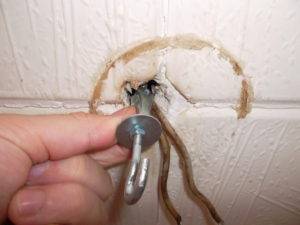
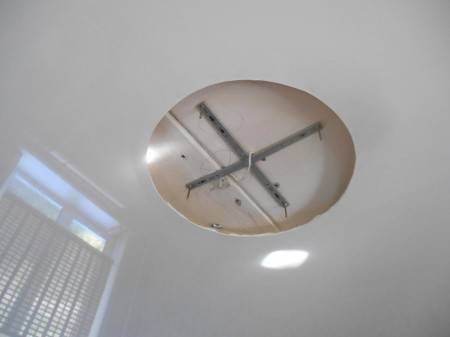
The place for installing the lamp on the mounting platform is determined by the design project. If the chandelier is hung in place of a standard hook, the latter is cut down or insulated inside the slab, and the hole is sealed with gypsum-based putty, after checking and stretching the wiring as much as possible.
Step 1. If the ceiling level drops slightly, to mount the luminaire on a small longitudinal bar, it is enough to fix a mortgage bar in the right place on the ceiling. They do it this way: drill two holes with a diameter of 2-3 mm in a bar. In order to lay the wires, a shallow groove is cut in the center of the bar. They mark the ceiling and drill holes with a puncher, after which they fix the bar and lay the wires in it.
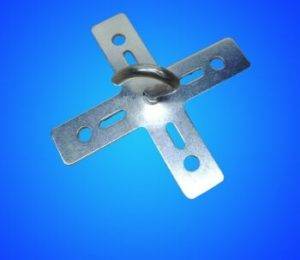
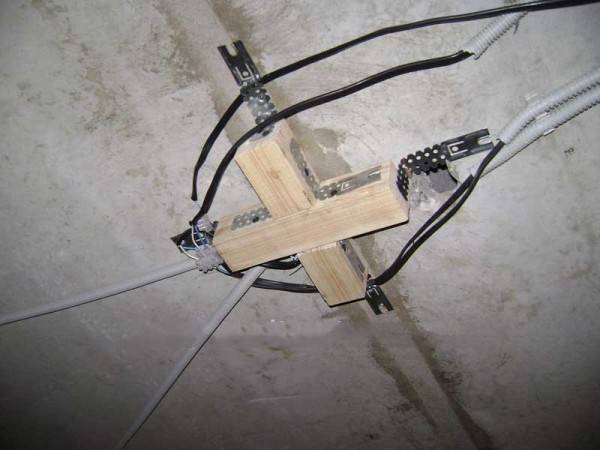
For a cruciform mounting plate, the platform is also made cruciform, fixing it with perforated brackets.
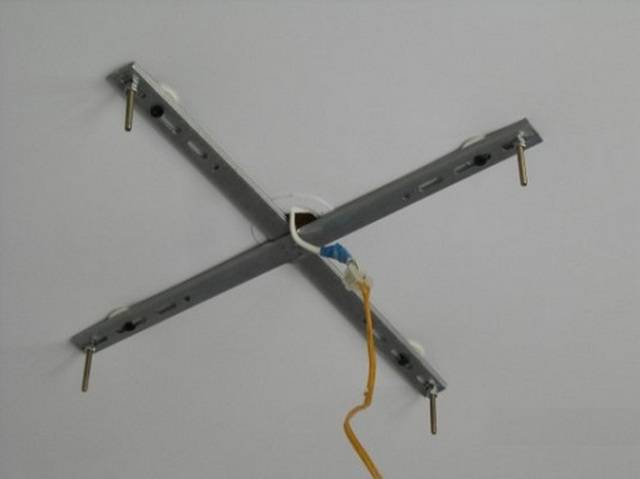
Cross mounting plate
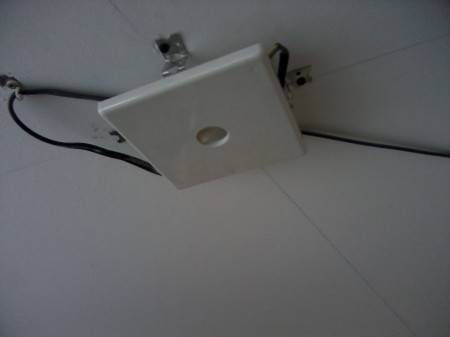
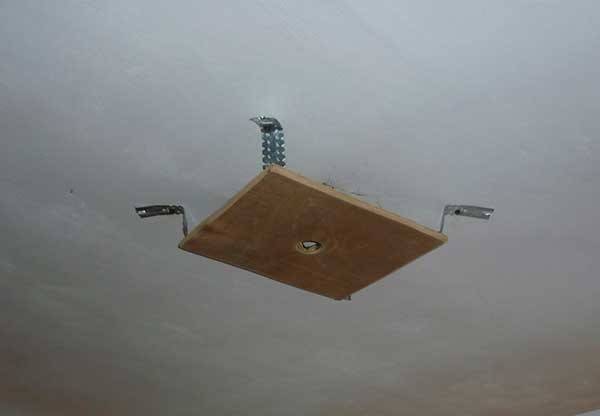
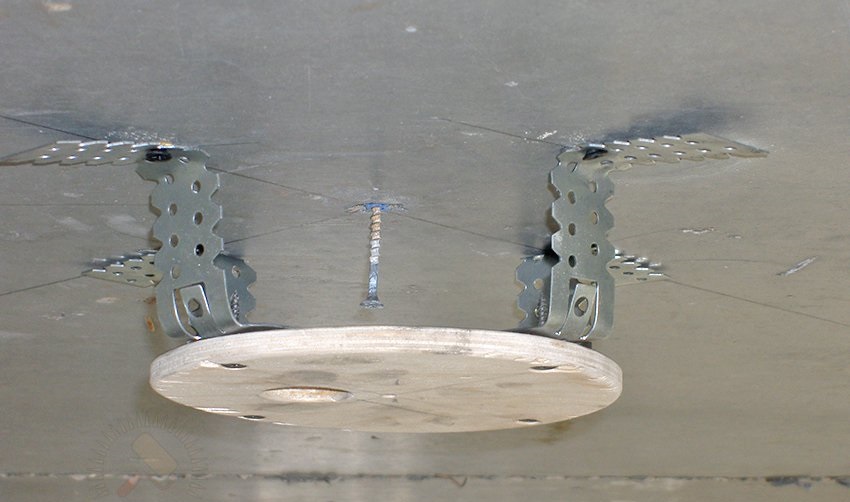
Step 2. With a significant change in the level of the ceiling, for example, when installing two-tier structures, use the prefabricated structure of the mounting platform. To make a platform from a piece of plywood 6-12 mm thick, cut out a rectangular platform of the required size. Its length should be several centimeters longer than the length of the luminaire strip, and its width should be slightly larger than the diameter of the mounting ring. For a cruciform plank, the platform is made square.
A hole for wires with a diameter of 10-15 mm is drilled in the center, after which the front side of the platform is carefully polished so as not to damage the ceiling canvas. At the corners of the platform, brackets are attached to wood screws.
Step 3. Apply the platform to the ceiling and check its level - it must match the calculated level of the finished ceiling. Adjust the height of the platform with the help of brackets, bending them. Fix the platform to the ceiling with self-tapping screws and dowels.
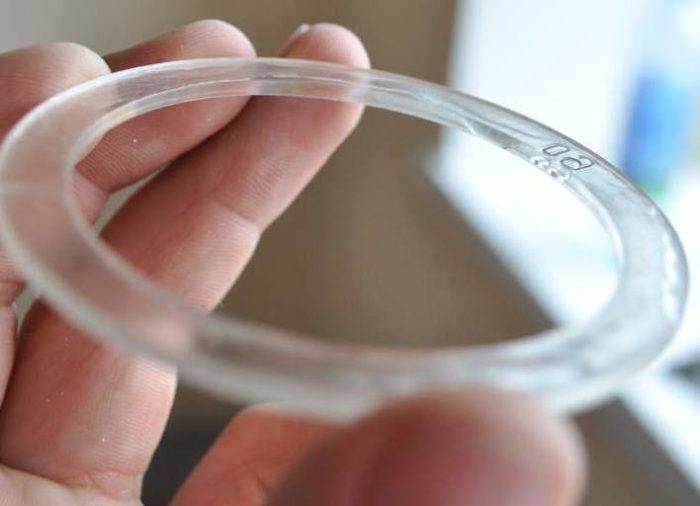
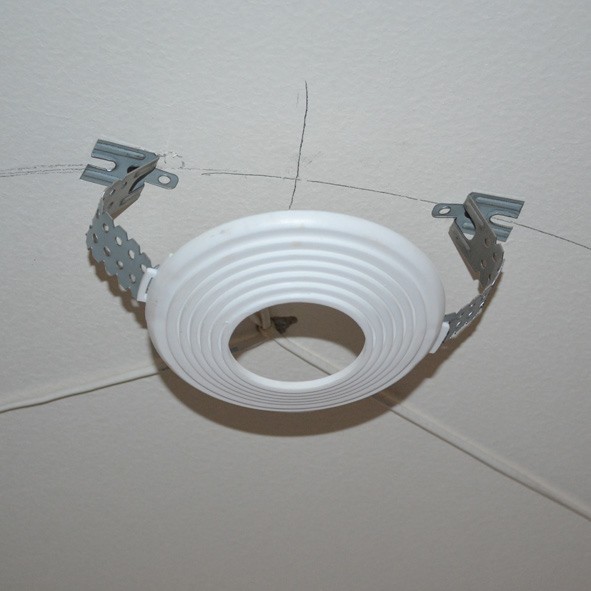
Step 4. Install guides around the perimeter of the room, checking that the levels of the mounting platform and baguettes match. Stretch the ceiling fabric according to the usual technology. After it cools down and acquires the necessary elasticity, proceed to the installation of the lamp. By touch, they determine the hole for the wires and fix the mounting ring around it with glue. Carefully cut out the canvas inside the ring and lead the wires through it.
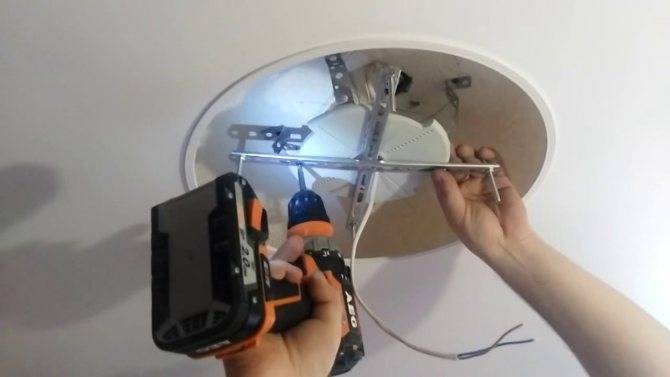
To attach the cruciform bar, it is necessary to fix five rings of different diameters on the canvas - one in the center for wires and four in the places where the bar is attached, their diameter can be small, the main thing is to pull the bar to the platform.
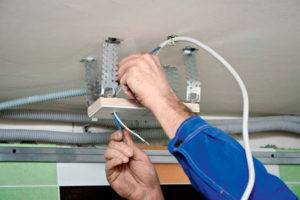
Step 5 Mounting studs are installed on the mounting plate and pulled onto the locknut. They need to be tightened well, otherwise it will be impossible to fix the lamp later. Fasten the bar with screws to the platform.
Mounting the chandelier on the mounting platform
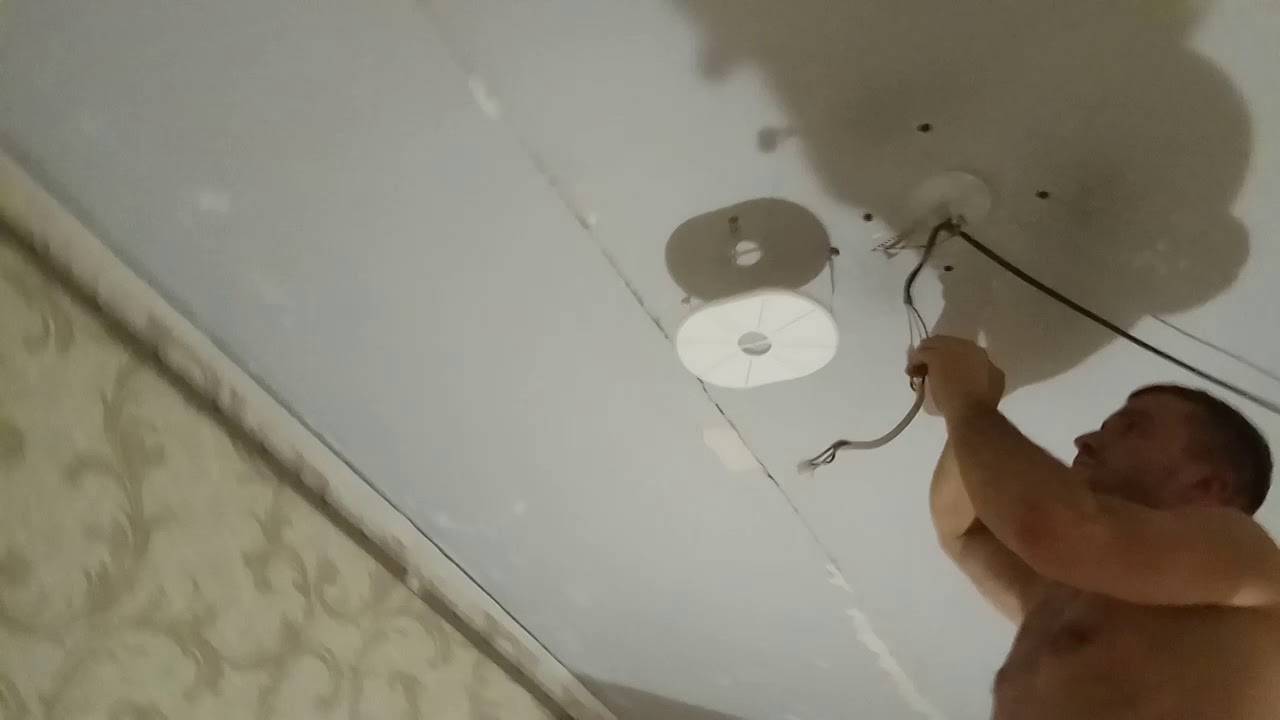
Step 6 Remove sharp parts, light bulbs from the lamp, prepare the terminal block for wiring. It is better to hang the chandelier together - one holds the lamp, and the second connects the wires and tightens the union decorative nuts on the lamp body.
Step 7They screw the lamps, install shades and decorative elements on the lamp, check the operation of the lamp, as well as heating, as described above.
To better understand the process of attaching a chandelier, you can watch a video.
Video - Installation of a chandelier on a stretch ceiling
Installation chandeliers on stretch the ceiling is not such a difficult matter if you follow all the steps of the instructions
It is important not to damage the canvas and securely fix the lamp, as well as connect it correctly. If you don't have the skills carrying out electrical work, the installation of the chandelier can be done independently, and it is better to entrust the connection to a professional - not only your safety, but also the durability of the ceiling depends on this
Preparing to install a mortgage
Before starting work, you should carefully inspect the ceiling for cracks, chips and other damage. The strength of the installed structure depends on this, especially if it is designed for heavy loads.
In order to mount the platform under the chandelier, you need to prepare the following tools:
- perforator with a set of carbide drills;
- material for marking drilling points;
- hand saw or electric jigsaw.
In addition, you will need a set of plugs or dowels, tape hangers and metal shears. When installing plastic embedded elements, you can limit yourself to a screwdriver, scissors or a sharp knife.
At the stage of platform installation, electrical wiring is also laid and connected, which must be done before stretching the web.
It is advisable to pre-clean the ceiling from cracked plaster and cover it with a special primer, which will protect the surface from the formation of mold or fungus.
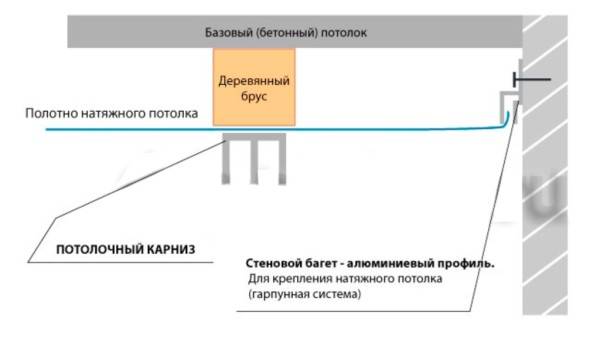
For the correct installation of parts, it is necessary to determine the height of the stretch ceiling, since the bottom of the embedded structure must be at the level of the stretch fabric. First, a baguette is mounted, and only after that mortgages are installed. The smallest distance from the ceiling to the stretch cover when installing the chandelier must be at least 5 cm.


If the canvas is located closer to the base ceiling than the established distances, then it will no longer be possible to properly mount the chandelier. In order to hide communications and the filling of electrical appliances, 5-6 cm in height is enough.
Mounting the platform under the chandelier
Before starting the installation, it is necessary to determine the place of attachment of the lighting device, and then mark the ceiling surface. Next, flexible steel suspensions are screwed to the platform, while small self-tapping screws are used as fasteners.
Now it is necessary to drill holes in the ceiling, hammer in plastic dowels and attach the platform with long self-tapping screws. The site should be flush with the stretch ceiling frame - this can be checked using a regular thread connecting metal baguettes on opposite walls.
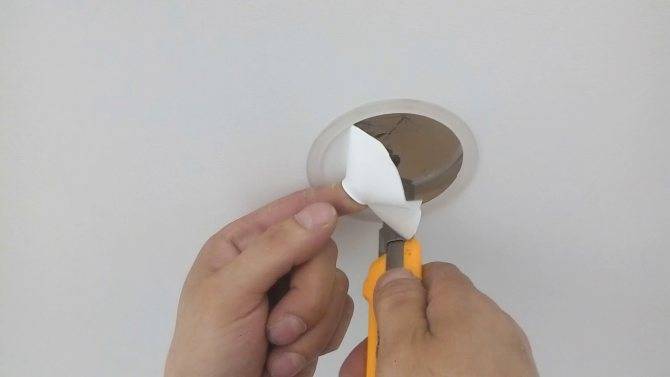
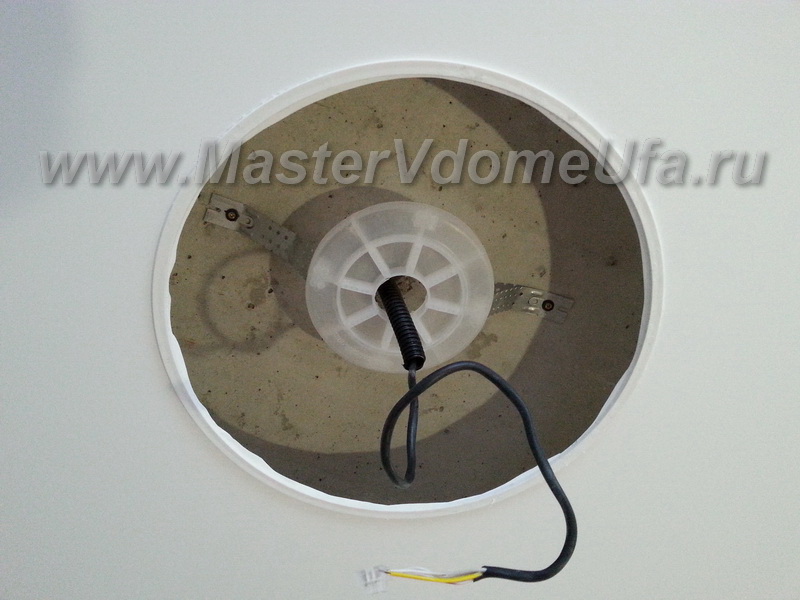
It is recommended to immediately insert the ends of the electrical cable into the terminal block and fix it in such a way that they do not interfere with further work. Immediately after stretching the canvas, it is necessary to find the location of the mortgage, stick the sealing ring in the center and cut out the inner film.
To prevent the film from dispersing, in the area of \u200b\u200battaching the chandelier to the mortgage, the material should be reinforced with reinforced tape or small tread rings
Next, a bar is screwed to the platform, after which the lighting device is connected to the wiring
In this case, it is important that the chandelier is held by a second person.
If there is no help, then it is better to hang the device on a rope. At the final stage, it is necessary to attach the chandelier to the metal bar and install all the shades.
How to “drown” a chandelier in the ceiling?
Luminaires with a base diameter of more than 40 cm have a high side that hides the transformer. Such a chandelier will look more aesthetically pleasing if you “drown” it a little into the ceiling.
To do this, you will need to prepare a large tread ring that matches the size of the base of the chandelier. Since thermal rings of such dimensions are simply not sold, you will have to build the part yourself.
It is necessary to purchase a regular PVC sheet, from which you will need to cut a ring with a diameter slightly larger than the base of the lamp. Next, the chandelier is applied to the ceiling and circled around with a special marker. It is to this contour that a homemade tread ring must be glued.
The embedded platform is installed immediately after stretching the film, while the platform should be placed above the ceiling level so that the side of the lamp is completely hidden behind the stretch fabric
After securely fixing the ring, it is necessary to cut out its film inside. However, this should not be done flush with the tread, but with an allowance of about 2 cm.
The inner edge of the film is cut, folded and glued to the ring. After that, you will need to fasten the bar to the mortgage and attach the chandelier to it. So, the effect of immersing the chandelier into the ceiling space is created.
What should be done before installation?
There are two main ways to install ceiling lights:
- hook fastening,
- Installation on a mounting plate.
Note!
The mounting plate is a mortgage included with the chandelier. For its installation, it is necessary to properly prepare the base.
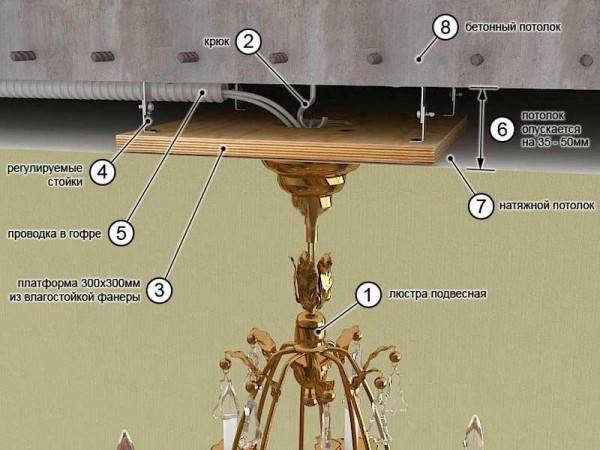
When using this method of fixing the ceiling lamp, a mortgage is used. It is located slightly above the level of the ceiling surface, but can also be located on the same level with it. It can be represented by a bar installed on a concrete base.
It is important to check it in height and align exactly. But you can use moisture resistant plywood as a mortgage. If the chandelier is equipped with several fasteners, you need to prepare two bars
Installation bars are installed at the level of the future stretch ceiling, if its space allows you to hide communications. This can be done using special racks.
If the chandelier is equipped with several fasteners, you need to prepare two bars. Installation bars are installed at the level of the future stretch ceiling, if its space allows you to hide communications. This can be done using special racks.
Note!
Fastening to a concrete base is allowed if even a small bar does not fit in the interceiling space. But usually it is made in such a way that all the necessary communications can be hidden.
It is better if the work on the installation of the mortgage and stretch ceilings will be carried out by specialists. Otherwise, you may expect errors that will lead to the need to redo the work. If workers refuse to carry out fixtures for a ceiling lamp, it is better to refuse their services.


A special plastic ring is installed in the place of fixing in the canvas and a hole of a suitable diameter is cut out. In this case, the diameter of the base of the chandelier should be slightly larger than the hole in the canvas. Then a chandelier is attached to the mortgage.
Thus, when using a mortgage, you can install any ceiling lights, no matter how complex they are. They will be perfectly combined with a canvas made of PVC film or fabric. The main thing is to do all the work correctly, without neglecting the planning and the correct arrangement of a suitable mortgage.
533
800
admin
Mortgage under a chandelier in a stretch ceiling
Pasting the ceiling with wallpaper with your own hands What can be the height of the ceilings in panel ...
How to hang on a hook: step by step instructions
Consider how to hang a chandelier with a hook on a concrete ceiling, following the sequence of installation steps - choosing and installing a hook in accordance with the type of ceiling surface, installing the luminaire itself and connecting the wiring.
Installing the mount, if not available
Some apartments do not have a ceiling hook, and this is not a particular problem - you can buy it at a hardware store. At the same time, the choice of the buyer is offered several options:
- Threaded hook (under the dowel).
- Anchor hook (anchor bolt).
- Hook with expansion elements (for mounting on a suspended ceiling).
Installing any hook option is not difficult, but technically responsible. First you need to drill a hole of the appropriate diameter. Further, if you intend to install a chandelier weighing up to 5 kg, you can drive in a dowel and screw a threaded hook into it. If the lamp is heavier, it is better to use an anchor mechanism.Its installation is also not very difficult. It is necessary to insert the anchor into the hole to its full length and start scrolling until the expansion elements are fully tightened.
Fixture installation
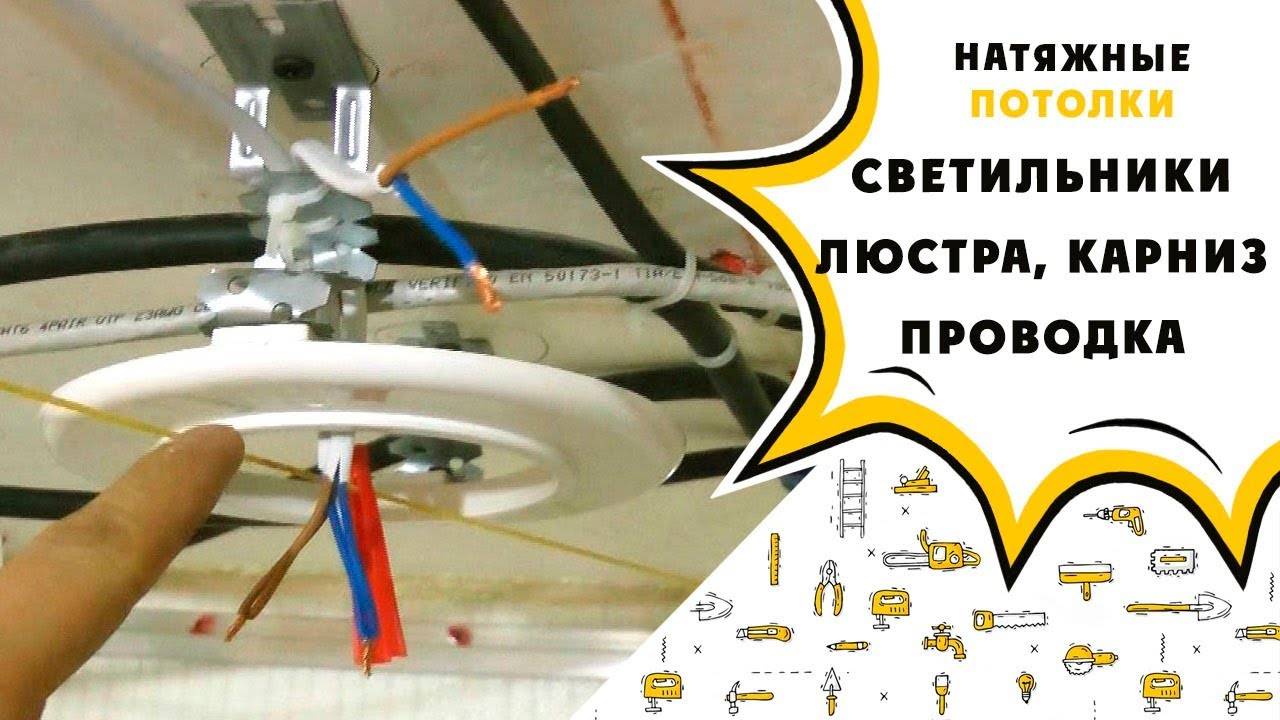
When the hook is installed and checked for reliability, the installation of the lamp begins. To do this, the chandelier must be completely assembled. However, whenever possible, all lamps, glass and other fragile elements are disconnected. Next, the chandelier is hung on a hook and the wires are connected. If the ground conductors are not used, they are isolated and carefully laid under the decorative panel.
Then the decorative bowl itself is fastened with screws or gaskets, so that the gap to the ceiling remains as small as possible. After installation, all the missing elements are hung on the lamp and the bulbs are screwed into the cartridges. Upon completion, the operation of the chandelier is checked using the switch.
Wiring and Grounding
 In order to correctly connect the wires of the chandelier and the mains, it is necessary to establish exactly where the phase, zero and earth fit. As a rule, in the instructions attached to the lamp, there is information and appropriate markings for distinguishing wiring. If the wiring in the house was mounted without a host, but standard color coding was used, then you can find the right wire by color:
- The phase is transmitted over the white, black, red, green and gray wires.
- Zero is traditionally a blue conductor.
- The earth is yellow-green.
Three wires, that is, including the ground conductor, are usually found in metal fixtures. Each wire must be connected according to the scheme and markings offered by the instructions for a particular lamp.All connected wires are subsequently covered with a decorative chandelier panel.
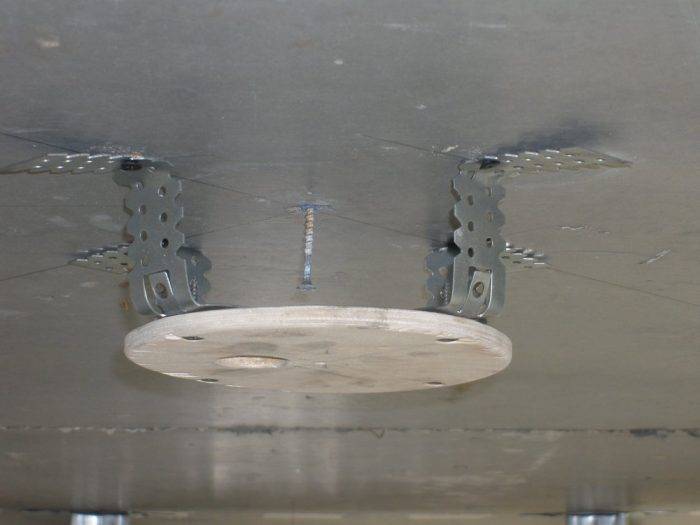
heavy structures
If the design provides for the installation of a heavy lighting fixture, then this process will take more time to complete. In addition, a frame device may be required, which is done before installing a film or fabric ceiling. A photo of a similar design is shown in the image below. The installation process resembles the fastening of a mortgage, but there are also characteristic differences.
The difference lies in how the foundation is built. It will be as strong as possible if the frame is fixed on the floor slab at several points. The plate itself, to which the weighty lamp is attached, must be durable. Therefore, it is recommended to use a metal profile
When assembling the structure, it is important to fit the lower plane of the frame to the stretch ceiling canvas. The same rule is observed when installing other embedded structures. Advice
The bottom of the base should be 1 to 2 mm away from the film or fabric of the ceiling system. For these purposes, it is recommended to use a laser level.
Advice. The bottom of the base should be 1 to 2 mm away from the film or fabric of the ceiling system. For these purposes, it is recommended to use a laser level.
Keep in mind that the installation of embedded structures is a mandatory moment when installing lighting fixtures for stretch ceilings. Such details will allow you to maintain a neat appearance of the canvas and ensure the convenience of connecting a light source. In order to see how a mortgage is installed under a lamp or a chandelier, we recommend watching the video.
Installation of mortgages under the eaves
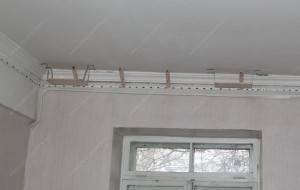
Mounted elements for eaves
In order to successfully install a cornice on a stretch ceiling, you must first install a rigid support for it, which, subsequently, like the other embedded elements described above, will remain invisible. The most reliable mortgage option is to install a longitudinal piece of thick plywood along the entire length of the eaves. Then you will definitely not be mistaken with the place of fixation, and in this regard it will be possible to feel more free.
Advice. Alternatively, you can attach to the ceiling not one, but several short fragments of plywood, only they should be set strictly in one horizontal plane.
Violation of the conditional straight line of the location of all fragments will later either lead to the bulging of the canvas due to the pressure of the plywood or, conversely, to its deflection, which will spoil all the charm of the ideal ceiling shape. When attaching plywood to the surface, all the same suspensions are used, and a chamfer is removed along all its edges.


The installation of linings for lighting fixtures and cornices is not only desirable, but a very necessary condition that provides convenience and preserves the entire aesthetics of the stretch coating. Mortgages can be purchased at points of sale or made independently, adhering to the basic recommendations. Untimely installation of products can sometimes lead to significant losses, as there are stretch ceiling mounting schemes that do not provide for their dismantling without damage after a complete initial installation.
Mounting base
Fixing the mounting hook, in principle, is simple.It is enough to make a hole of the required diameter in the main ceiling with a puncher, and then screw the mounting hook into it.
A taut line will allow you to correctly select the length of the hook that should protrude. The hook should not reach the fishing line by about 1-2 cm.
Mounting the base of a wooden beam is done in a slightly different way. First you need to decide on the length of the beam itself - it should be the same length or slightly longer than the mounting metal bar that comes with the chandelier.
To fix the beam to the ceiling, a metal construction profile is used.
First, the height at which the beam will be located is measured, the pieces of the profile required along the length are cut off. There must be at least 4 of them for fastening the beam.
A stretched fishing line will help determine the level of the film. The lower edge of the beam should not reach the fishing line by 0.5-1.0 cm.
If necessary, the profile can be used as a suspension - this is if the distance from the main ceiling to the level of the film is significant.
With the help of dowels, the sections of the profile are attached to the main ceiling, and a beam is already attached to them with self-tapping screws.
Before fixing the timber in the center, it is necessary to make a hole in it for the wiring output.
After all installation work, you need to stretch the wiring through the hole and fix its ends so that they do not interfere with further work.
If the fastening is using a cruciform mounting plate, plywood 10-12 mm thick will be required.
From it you need to cut a square, identical in size to a cruciform plank.
In the center of this square, you need to make a hole for the wiring output.
The installation of a plywood square is similar to the installation of a wooden beam.
First, the position of the square is replaced, all measurements are made, and with the help of pieces of a metal profile, the plywood is fixed to the main ceiling.

On this, all the preparatory work is completed, all subsequent ones will be done after stretching the film.
After the film is stretched, you can proceed to the next stage of work - installing the chandelier.
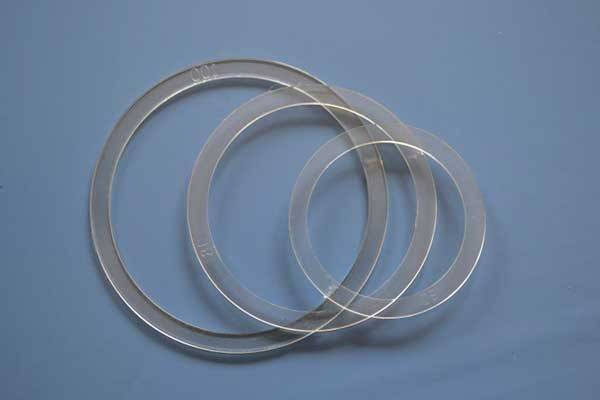
To do this, you need the presence of special heat-resistant rings.
Superglue, construction knife, wiring connectors, self-tapping screws, screwdriver or screwdriver.
Next, we describe how the installation is carried out, depending on the method of its fastening.
Installation of mortgages
The installation of load-bearing blocks begins with the preparation of the layout of the lighting fixtures. After that, a decision is made on the type of fastening, material and design of the mortgage.
By this time, all engineering communications should also be laid and load-bearing baguettes installed. The method of fixing depends on the base material. Concrete and wood surfaces will require the use of self-tapping dowels or anchors.
When working with drywall, the use of self-tapping screws is only advisable if they are fixed in a supporting metal profile located directly behind the plasterboard.
For spotlights
Mortgages under a stretch ceiling for spotlights are plastic rings. In this case, the diameter of the ring must correspond to the mounting value of the circumference of the point device.


Most often, you can see white models on sale, but if you wish, you can pick up components of a wide variety of shades. Fastening to the surface of the plate is made by a metal suspension.
This will ensure not only reliable fixation, but also durability.
If necessary, the suspension can be adjusted or “pulled”. After all the manipulations, a point device is installed in the structure. This is followed by connection and performance check.
Under the chandelier
 For massive lighting fixtures, it is necessary to prepare a solid mortgage design. Fixing a pendant lamp on the ceiling can be done by:
- ceiling hook;
- planks;
- crosses;
- I-beam.
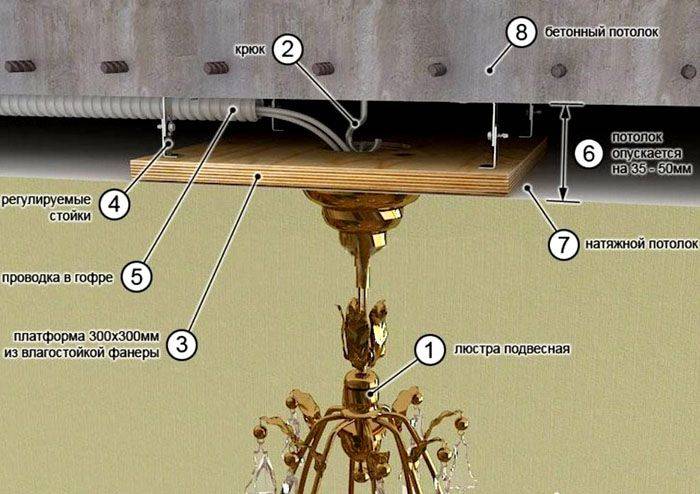
Most often, luminaires with a large weight and dimensions are mounted on a cross bar. Ingoda construction requires the construction of a special platform. In this case, a load-bearing element is mounted between the canvas and the concrete base. A mortgage for a stretch ceiling for a chandelier can be presented in the form of a wooden beam or a platform made of waterproof plywood. In the center of it, it is necessary to drill a technological hole for the output of wires. The plywood itself can be mounted directly to the ceiling or mounted on adjustable hangers.
In addition to the platform, it is often made in the form of a cross from a thick wooden beam.
After stretching the canvas at the place of future installation of the lamp, it is necessary to make a hole. To do this, first a special thermal ring is glued, after which the middle is cut out inside it. The use of a thermal ring prevents any mechanical damage to which PVC ceilings are very susceptible. Only after that the wires are brought out into the holes.
The last stage of work is the connection of the lighting device and checking its operation.
For cornices
When operating a stretch ceiling, at the request of the owners, the cornices can be hidden behind the canvas.
Most often, this design is a single longitudinal segment made of plywood. It runs along the wall, above the window and matches the width of the curtain. Less often, instead of one, there are several short segments giving in total at intervals the entire length of the curtain. The main thing is to arrange them exactly in one line and strictly horizontally.
Platforms for spotlights
For the installation of recessed spotlights in a stretch ceiling, factory-made platforms are used. They are made of heat-resistant plastic, which additionally protects the PVC film from the high temperature emanating from the lamps. Platforms are mounted to the bearing floor slab using adjustable metal racks, flexible hangers or perforated tape. For fastening, two points of support are sufficient. On the inside of the part there are non-through holes for self-tapping screws.
For the installation of fixtures in a stretch ceiling, two types of embedded platforms are produced:
- Fixed. They are rings of a certain diameter: 55, 60, 70, 75, 80, 85, 90, 112 mm and are selected in accordance with the size of the lighting device.
- Universal. They are a set of connected rings or squares of different diameters with a step of 5 or 10 mm. During installation, excess parts are cut out with a construction knife in accordance with the size of the luminaire. Several standard sizes of universal platforms are produced, square: 50-90, 90-140, 150-200 mm; round: 50-100, 55-105, 60-110, 65-115, 125-155, 165-225, 235-305 mm.
Features of installation in a stretch ceiling
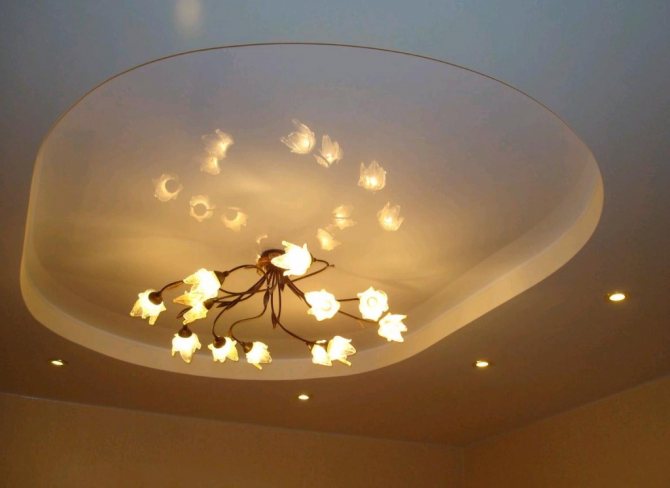
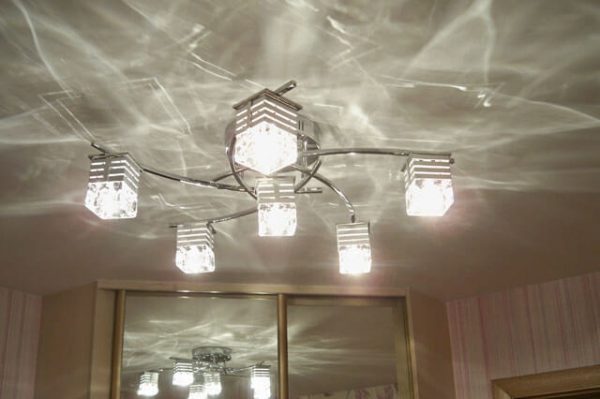
For stretch ceilings, spotlights are more often chosen. But they do not allow you to create beautiful visual effects and bring comfort.Therefore, for many, the installation of a chandelier becomes mandatory. The centralized source creates diffused soft light in the room. The rays reflected from the glossy surface of the film give the room a special charm.
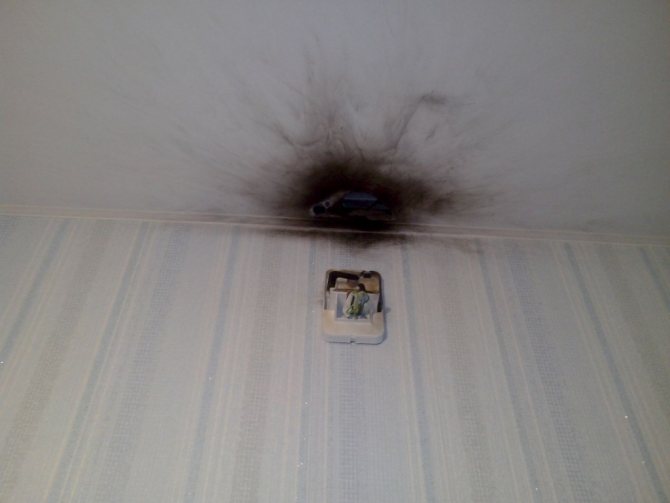
PVC is afraid of exposure to high temperatures. Already at +60 degrees Celsius, it begins to deform. And with more significant heating, a hole forms in it. Therefore, not all lighting devices are applicable for such structures. Fabric cloths withstand heating up to +80 degrees.
A chandelier for a stretch ceiling must meet the following requirements:
- The rays come from the lamps down or to the sides, but not up.
- Preference is given to models with a suspension and a base made of polymeric materials. The metal under the influence of electric current can heat up, which will lead to damage to the web.
- The cover completely covers the lamp. This will be an additional protection against overheating.
- The distance from the ceiling to the ceiling is at least 20 cm. It is it that is recognized as safe.
Among other things, the lamp should not look too bulky. The tension structure already reduces the height of the room. Massive appliances visually further reduce the room.
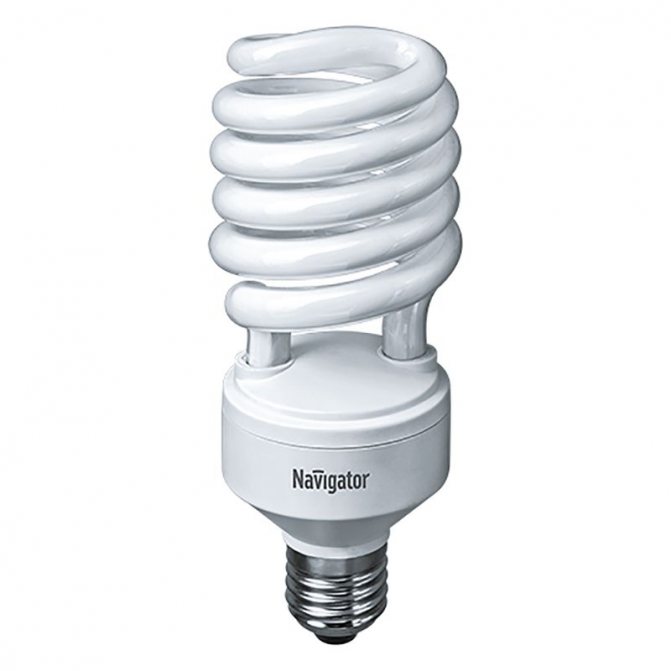
It is important not only the competent choice of the lamp, but also the lamps used in it. There are four popular types.
| Image | Name | Description |
|
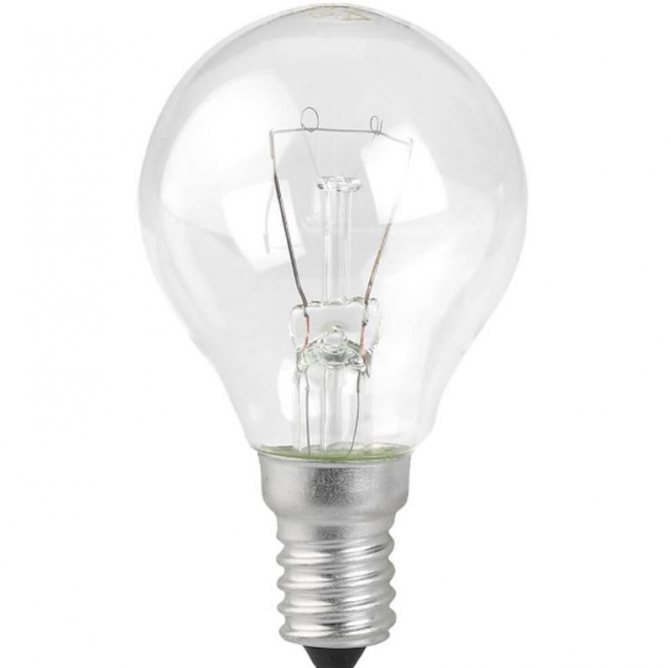
| Incandescent lamps | The oldest type of lamps. Differs in cheapness. But such lamps spend much more electricity compared to their counterparts, get very hot and do not last long. They are not suitable for film stretch ceilings. The minimum distance between the incandescent lamp and the fabric ceiling is 40 cm.And this is provided that the lamp power does not exceed 60 watts. |
|
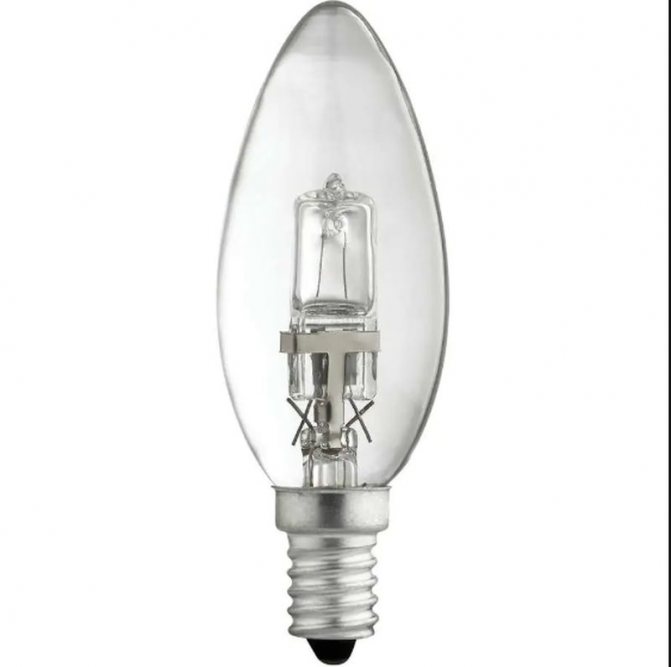
| Halogen | These lamps are more economical and have a long service life. They heat up slightly during operation, but when they are close to the web, this heat is sufficient to deform the film. Such models can only be used in lamps on suspensions with a length of at least 40 cm. |
|
| Fluorescent | They are called energy saving. They consume a minimum of electricity and have a long service life. The heating of such lamps is minimal, and therefore it is recommended to install them in fixtures for stretch ceilings. The power of such a lamp should not exceed 45 watts. |
|
| LED lamp | Considered the most preferred choice for film webs. LED lamps last a long time, do not overheat during operation and consume a minimum of electricity. |

There are no restrictions on the shape of the lamps or the weight of the chandelier. The remaining characteristics of the fixtures are selected based on the personal preferences of the owners.
Installation of mortgages
Before installing mortgages for a stretch ceiling, you need to think in advance and mark out the places for their installation. If we are talking about platforms for lighting fixtures, then electrical cables must be laid to this place.
It is also important to choose the appropriate method of fixing the product to the base in order to ensure the strength and reliability of the connection. For concrete and wooden surfaces, self-tapping screws and dowels, or anchors are suitable

If the base ceiling is hemmed with drywall, then it is useless to fasten self-tapping screws into loose gypsum. They will break out under the weight of a heavy product. In this case, fastening is carried out only in the place where the supporting metal profiles pass behind the gypsum plasterboard


It is important to screw the screws for fastening the part through the gypsum sheet directly into the profile
Mortgages under a stretch ceiling
In this case, we are talking about bars, ceiling rails and metal profiles, on which corner and connecting baguettes are attached, as well as ceiling cornices near windows.
The installation of these products is carried out before the installation of the tension coating in the following order:
- Marking is performed on the base ceiling surface. The auxiliary part is adjusted to the required size.
- Then, holes for fasteners are drilled in the prepared piece of metal profile or timber.
- The product is applied to the ceiling in order to transfer the hole markings to the base.
- Next, we drill holes in the ceiling with a puncher and install dowels in them.
- We attach the element to the base and fasten it with self-tapping screws.
If the tension fabric is installed at a considerable distance from the base surface, then it is better to mount the prepared part on a pre-built frame made of timber or a metal profile. Perforated suspensions are not suitable in this case, because they do not provide the necessary rigidity when attaching the cornice.
Mortgages for spotlights
Ready-made mortgages for spotlights made of heat-resistant plastic can be bought at the store. Moreover, there are universal products that fit devices of different diameters, and elements that are selected strictly according to the dimensions of the lamp.
To fix the product to the base, we use perforated hangers and self-tapping screws with dowels.
We work in the following order:
After marking the places for installing lighting fixtures, we attach perforated suspensions to the base ceiling surface.To do this, we drill holes in the ceiling, drive in dowels and fasten each suspension with two self-tapping screws.
Bend the perforated ears down.
Next, using the level, we find the installation mark of the stretch ceiling plane (it is important that the baguettes have already been installed). In this place, we attach plastic platforms to the suspension.
For fixing we use screws.
We check again how accurately the base coincided with the installation level of the stretch ceiling. If necessary, adjust its position.
After installing the fabric or film coating of the base, we probe and glue the thermal rings in this place.
The material inside the ring is cut through, the lighting device is installed and fastened to the platform.
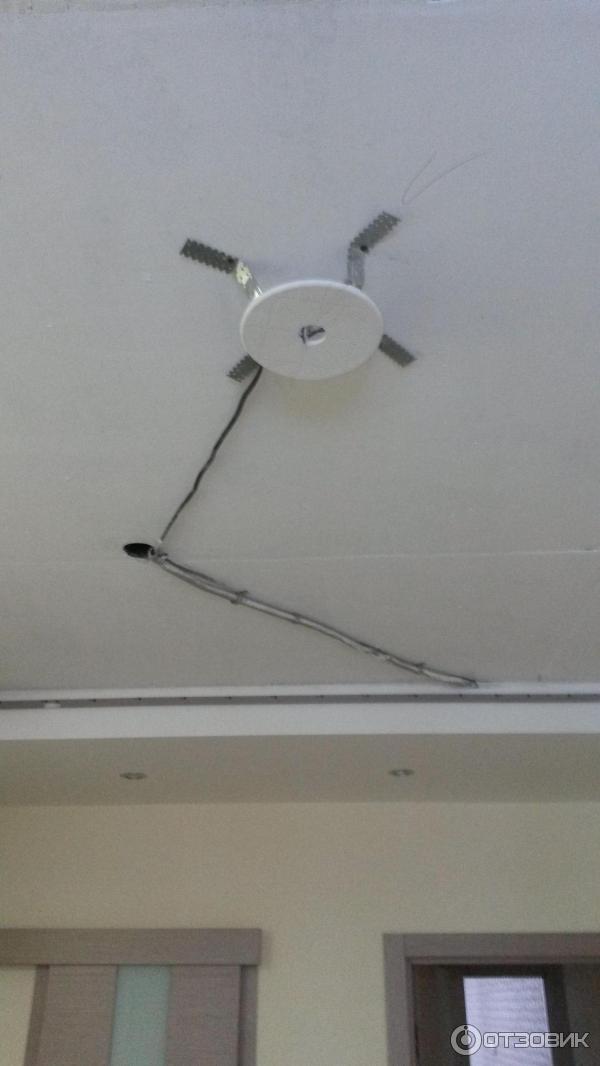
Mortgage under the chandelier
Installation of a mortgage under a stretch ceiling for a chandelier is carried out in different ways, depending on the part used.
More often used such options for fixing the chandelier to the base:
The lighting device is hung on hook fixed in the concrete floor. To do this, after stretching the film, a hole is cut in it, through which the hook is screwed into the base. The chandelier is hung on a hook
It is important that the diameter of the hole in the coating is smaller than this value on the decorative bowl of the light source.
If the distance between the base and the tension surface is small, then you can hang the chandelier on a pre-fixed beam. It can be a bar or a metal profile
After installing the coating, the beam is probed and a hole is made in the film in this place, through which the chandelier is fixed.
If the weight of the device is small, then a plywood or OSB base can be used as a platform, which is attached to the main ceiling on suspensions.In this case, the installation is carried out similarly to the installation of spotlights. It is worth making a hole in the base in advance, through which to release the wire to connect the lamp.
Also on sale are ready-made mortgages for chandeliers. These products can withstand 5-8 kg and have special holes for fasteners. For fixing to the base, dowels and suspensions are used.
Where to hang small models
When wondering how to fix a chandelier to a stretch ceiling if it is already stretched, it is important to understand that large appliances are not suitable for the task. The best choice is a small chandelier
This is chosen for halls and corridors.
It will not interfere with the opening of the doors. It minimizes the likelihood of people touching it when raising their hands, for example, in order to remove or put on a hat, as well as to close an umbrella.
Lightweight models are also good for bathrooms. The lighting device must be securely covered with a ceiling to prevent water from entering it.
If the ceiling height in the room is more than 3 meters, you can choose a chandelier, the shape of which you like more, and hang it where you want. In the kitchen, separate lighting above the dining table and separate lighting above the work area look good. Fabric-covered lamps hanging low above the table create a special cosiness.
Chandeliers of the classical type usually use a suspension in the form of a chain. To adjust the height, you need to remove or add chain links.


