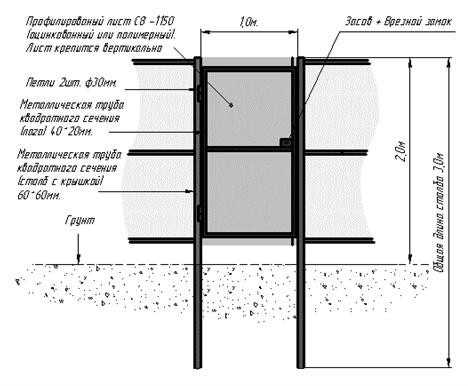
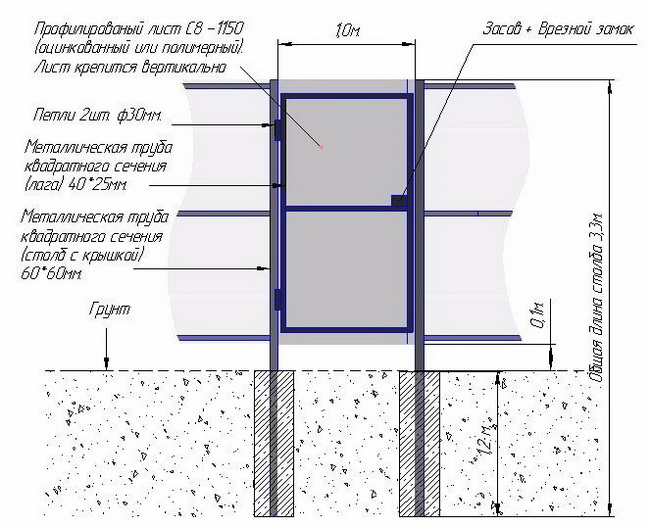
- Construction with metal poles
- The choice of profiled sheet for the construction of the fence
- Marking corrugated board for the fence
- Coating of profiled sheets
- Materials and tools
- Possible installation errors and their consequences
- Calculation of the necessary materials
- The stability of the supports - the durability of the fence
- Advantages of corrugated board
- Expert advice
- Do-it-yourself fence from corrugated board: photo report
- Metal preparation
- Pole installation
- Jumper setting
- Profiled sheet installation
- What else is needed?
- Material Selection Tips
- Profile sheet classification
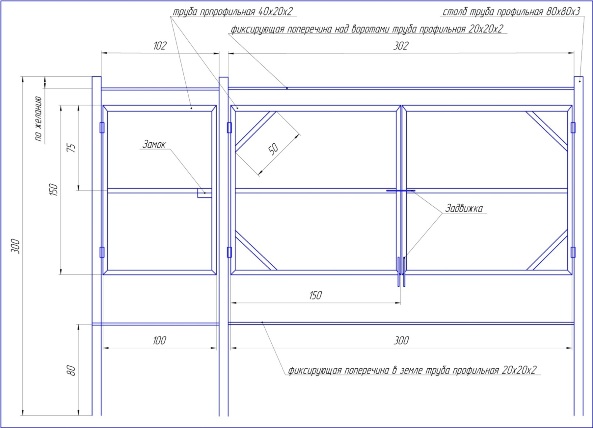
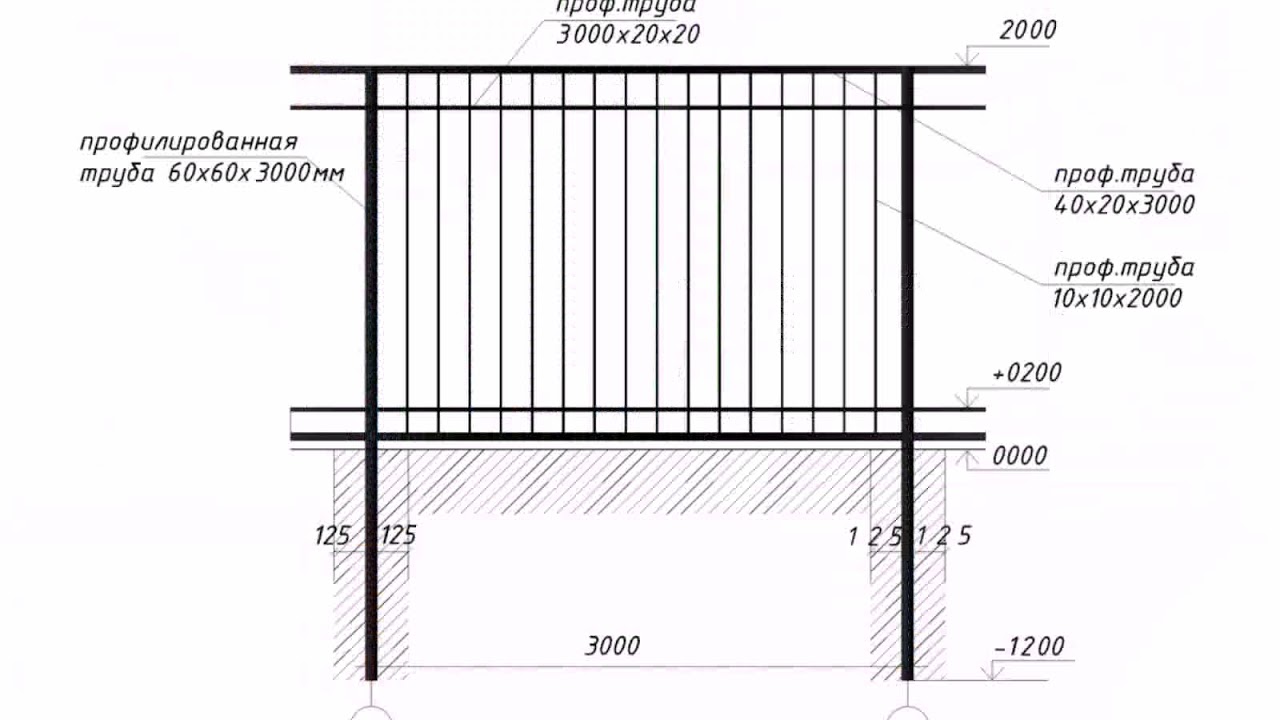
Construction with metal poles
The simplest production is a fence with metal poles dug into the ground. You can use round or square pipes, but it is more convenient to work with square - profiled ones.

The design of the fence made of corrugated board with posts
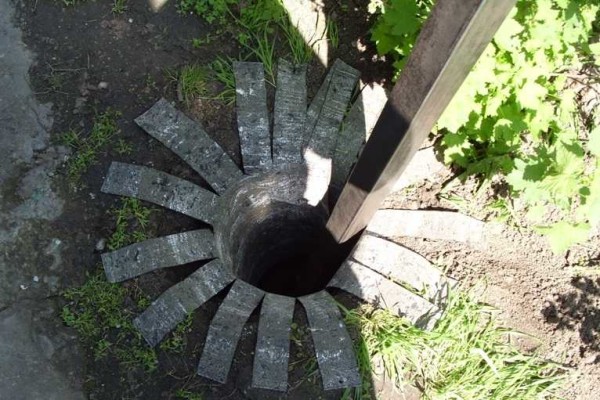
The length of the pillars is taken depending on the desired height of the fence, plus from 1 to 1.5 meters is added for penetration into the ground. It is necessary to dig into the ground below the freezing depth of the soil. For each region, the soil freezes to a different depth, but in Central Russia it is about 1.2 m. When determining the depth to which you bury pipes, it is better to play it safe and make the holes deeper.Otherwise, the forces of winter heaving of the rack will simply be pushed out, and your fence will fall down (see photo).
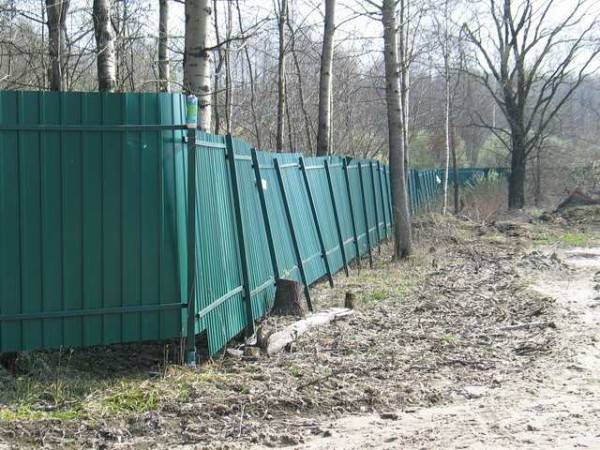
Insufficient penetration of the supporting pillars led to the fact that the fence slanted
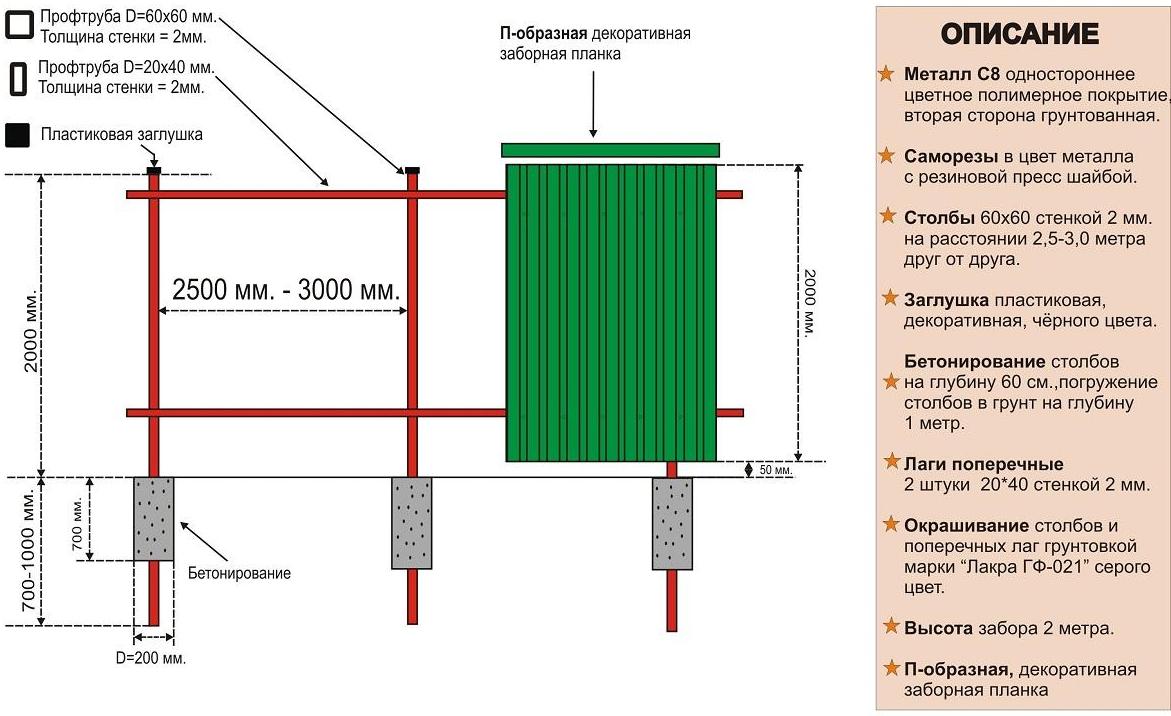
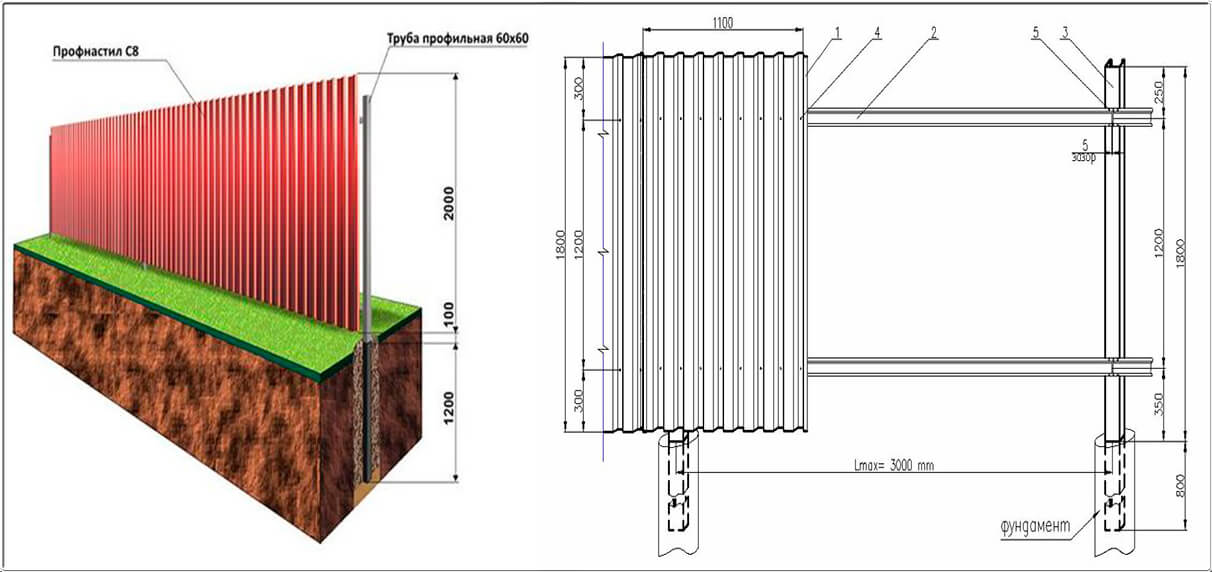
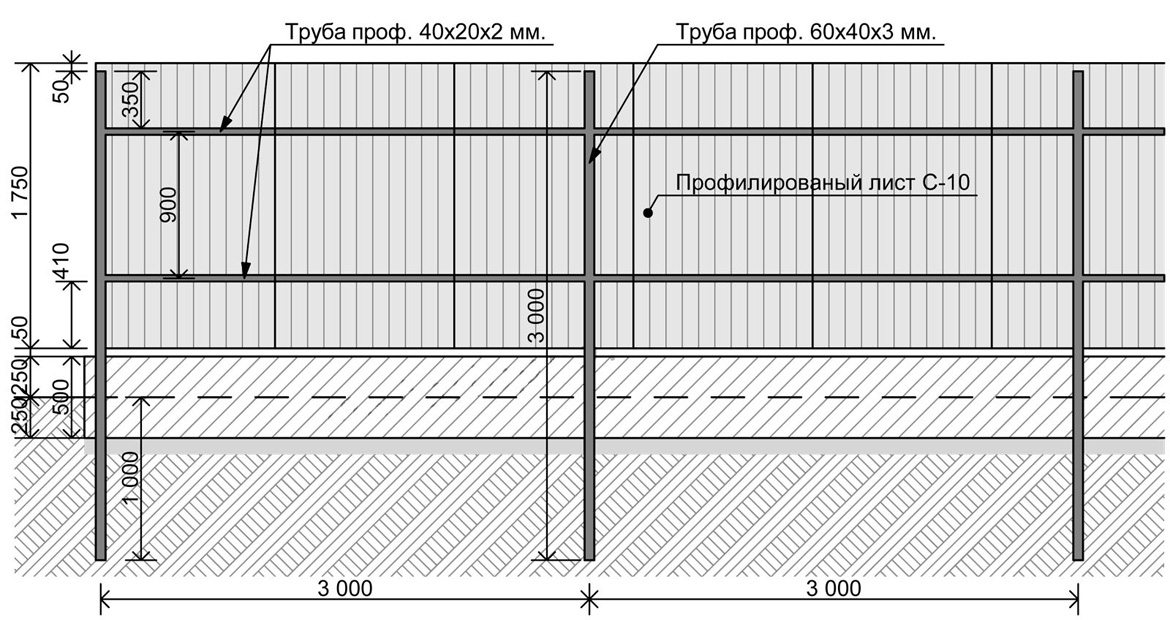
For pillars, they usually take a profiled pipe with a section of 60 * 60 mm with a wall thickness of 3 mm. The distance between the posts is from 2 to 3 meters. The greater the thickness of the profiled sheet, the less often you can put poles. If the soil is hard to dig, it makes sense to make the distances larger, otherwise you can save on the purchase of metal - the thinner, the cheaper and the price difference is significant.
Logs for a fence from a professional sheet are made from a profile pipe 40 * 20 or 30 * 20 mm. The second option is wooden bars 70 * 40 or so. When using wood, a significant amount is saved, but the tree disappears faster, and besides, it warps from moisture. Most likely in a few years you will have to change the lags, and they will already be metal. But as an economy option for several years will go.
Corrugated fence on wooden logs
When making a do-it-yourself corrugated fence with wooden logs, do not forget to carefully treat the wood with an antibacterial compound (for example, Senezh Ultra). It is better to do this in the bathroom - immerse the bars for 20 minutes in the solution completely. So they will last longer.
The number of lags depends on the height of the fence. Up to 2 meters - two are enough, from 2.2 to 3.0 meters you need 3 guides, even higher - 4.
The choice of profiled sheet for the construction of the fence
 Before you deal with the question of how to build a fence from a profiled sheet with your own hands, you need to familiarize yourself with the features and properties of the material used. The canvas is a steel sheet of a certain thickness, on which an anti-corrosion zinc coating is applied.Such sheets are rolled on special machines, as a result of which a conceived profile is formed. It is the thickness of the steel sheet and the shape of the profile that predetermine the purpose of the final material.
The increased resistance of the sheet to deformation is provided by a steel base and stiffeners. A special zinc and polymer coating reliably protects it from mechanical wear and rust.
Marking corrugated board for the fence
The main designations for marking corrugated board:
- The letter "H" indicates a material that is capable of performing the function of a building supporting structure. Such a sheet has a high profile, additionally equipped with longitudinal stiffeners. It is used in monolithic construction (fixed formwork), in the installation of roofing and load-bearing wall structures, in the production of containers. It is not used for the construction of a fence in a private courtyard due to its heavy weight and high cost.
- The letters "HC" denote an intermediate option between the carrier and wall material. The wave profile does not exceed 35-40 mm, and the thickness of the sheet is much less than that of the bearing one. Basically, this material is used for cladding the walls of buildings, but can also be used as a roofing for sheds. For the construction of fences, it is used at large construction sites, but the fencing of private areas becomes unreasonably expensive.
- Sheets with the letter "C" are intended for wall cladding. Profiled sheets of this series have a very affordable price, while sufficient strength and reliability for fencing private property. For such purposes, the profile height is selected up to 21 mm.
- Professional sheets of the MP series are universal.They are suitable for the construction of utility buildings, the creation of insulated panels, roofing. It is this type of corrugated board in all respects that is perfect for building a fence.
After the letter in the marking there are numbers that indicate the height of the stiffeners in millimeters. Often, the thickness of the steel sheet is also noted in the marking (indicated by a fractional number). For fencing a private area, a metal thickness of 0.45-0.6 mm is quite enough.
Coating of profiled sheets
There are few owners who wish to build a fence from a simple galvanized sheet. Sheets covered with a modern polymer coating look much more comfortable and beautiful. What they can be:
- In terms of price, corrugated board with a polyester coating is more affordable, which is practically not afraid of ultraviolet radiation and temperature changes. But the weak resistance to abrasive load (it is easily scratched to metal) is considered a very significant drawback, which is eliminated when applying matte polyester. The matte layer is thicker and more resistant to scratching, texture defects on it are less noticeable.
- Pural coating is able to provide a higher level of quality and durability of the material. Such a composite protective coating combines all the positive qualities of acrylic, polyurethane and polyamide. Profiled sheets with such a coating are more often used for roofing. Their use for fencing is limited due to their high cost.
- Plastisol coating has good characteristics, the main component of which is polyvinyl chloride.This type of spraying is applied in a thick layer (200 microns), which is a reliable protection of the sheet, even from abrasive loading. But this material also has disadvantages. It is not very resistant to elevated temperatures, so its use in hot regions is not recommended.
- And also manufacturers offer profiled sheets with PVDO coating. This is a composite material based on polyvinyl fluoride (80%) and acrylic (20%). Such corrugated board is suitable for regions with any climate. However, this material also has a high cost, which limits its use.


The most affordable for the average owner is a professional sheet with a polyester coating.
Materials and tools
It is important to prepare everything necessary before the start of construction so as not to be distracted during work and not delay the process. Materials for a fence from a professional flooring include several components. Materials for a corrugated fence include several components
Materials for a fence from a professional flooring include several components.
Decking
When choosing, it is important to pay attention to the thickness of the metal, wave height, texture, color of the coating, and the absence of a capillary groove. When planning the width of the sections, it is important to take into account that the corrugated board has a high level of windage.
Different manufacturers have different sizes of corrugated sheets, and the service life of a galvanized sheet can be up to 30, and for a material with a polymer coating - up to 50 years
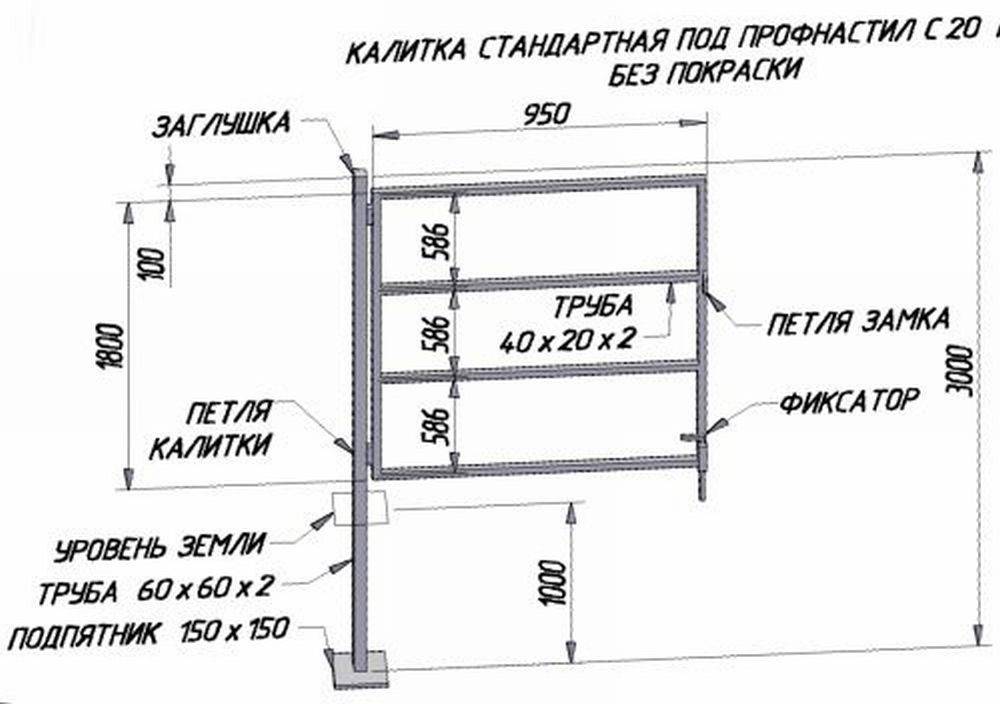
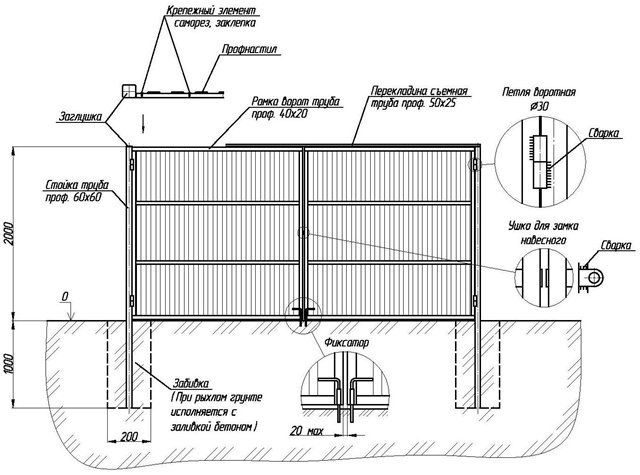
support poles
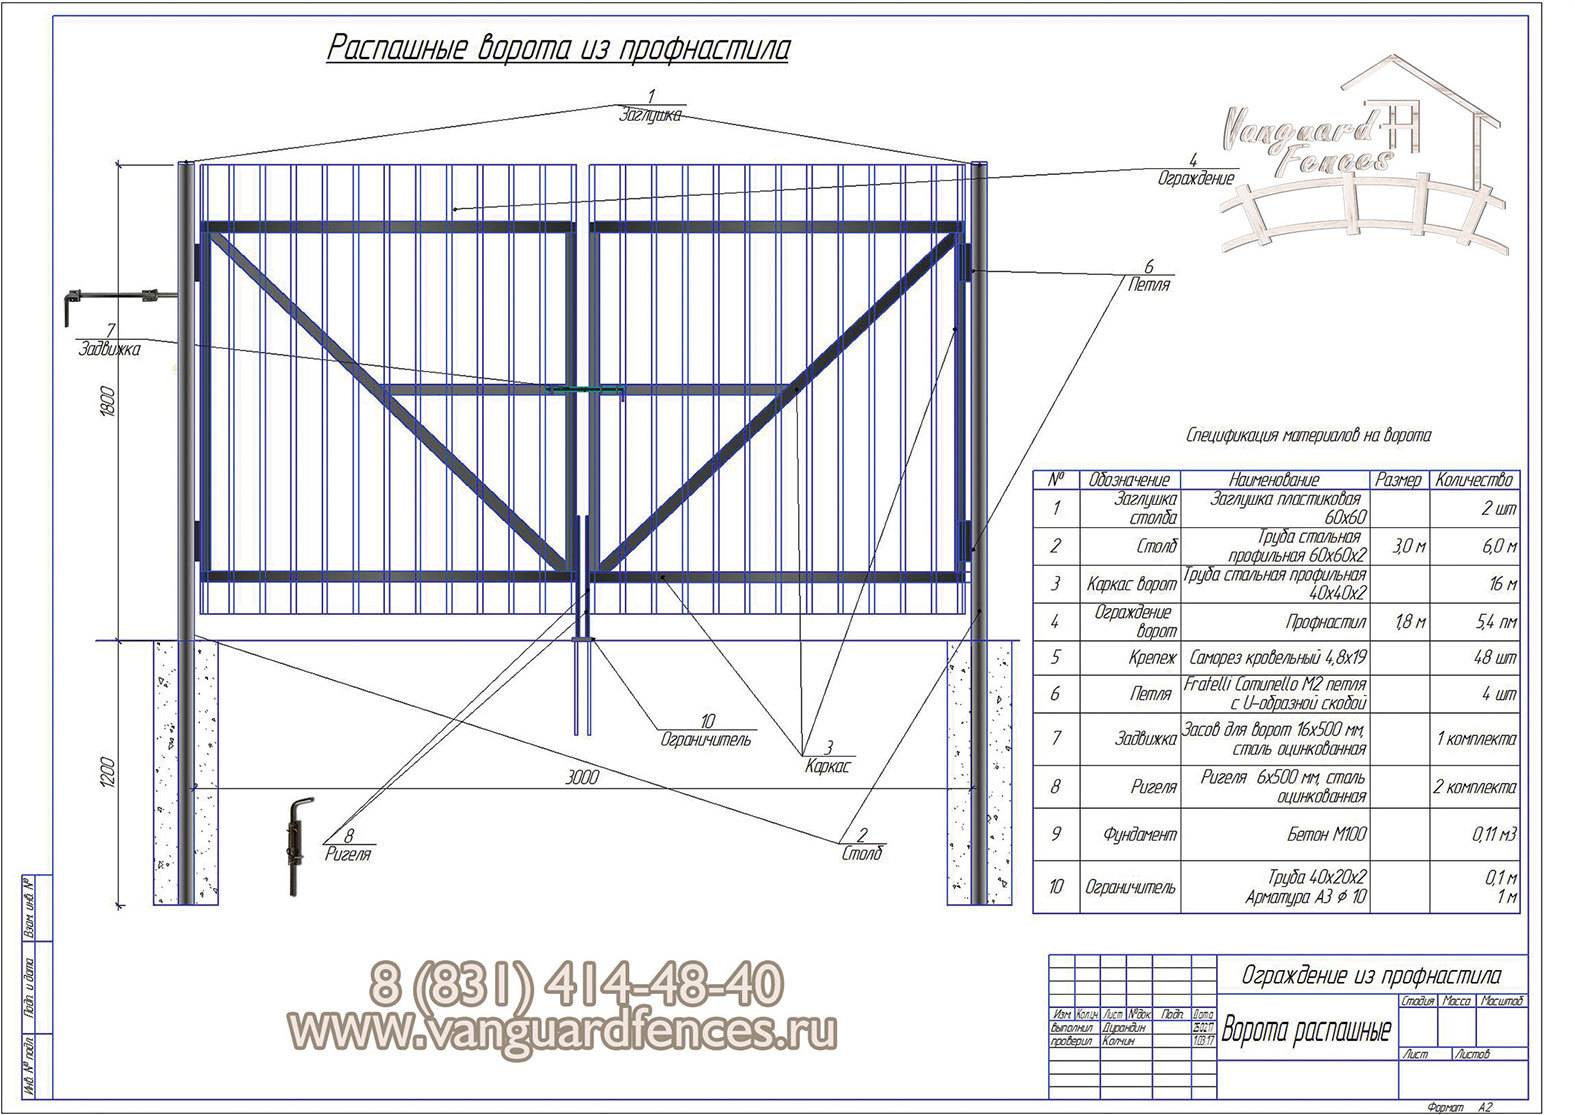
For posts, you can use any available material (metal, stone, brick or wood). The most affordable, durable and practical option is metal (pipes). The diameter of the pipes will depend on the possible load.Pipes are used rectangular (60x40x2 mm), square (40x40x2 mm) or round with a diameter of 60–100 mm. But piles and finished pipes for fences are also used. Ready-made supports for the fence are distinguished by the convenience of mounting the profiled sheet and durability.
- Cross bars. For logs, square pipes (40x40x2 or 20x20x2 mm) are used. Keep in mind that the width of the log should be equal to half the width of the rack. Bars made of wood as a log and racks should not be used, since the wood can rot at the attachment points. A metal corner for a log should also not be used. Due to its small thickness, it is not able to provide the necessary wind resistance. Self-tapping screws with a drill for corrugated board are designed for drilling material no thicker than 2.5 mm, therefore, a thick profile is not used as supports and a log when building a fence.
- Brackets and hardware. These fasteners are used to assemble the frame without welding. But you can also use bolts, screws or rivets. Self-tapping screws for corrugated board are equipped with a neoprene rubber gasket that tightly presses the corrugated sheet without damaging it. The visible part of the screw has a polymer coating in the color of the material, which protects it from corrosion. When using rivets, it is recommended to treat the edges of the holes in the corrugated board with a special paint.
- Paint for corrugated board. It may be needed to touch up mechanical damage to the material during installation, as well as for cut points. Paint consumption is small, for small needs one spray will be enough.
- Plugs for supports.If ready-made fence posts from corrugated board are not used, where this element is provided initially, special plastic plugs for pipes are used so that moisture does not get inside the support post. Instead of plugs, you can use cut plastic bottles.
- End plank. The U-shaped cover strip is installed on the top of the sections and protects the fence from moisture and corrosion, and also gives the fence an aesthetically complete look. When choosing this element, it is worth considering that its edges must be rolled, otherwise the bar will be impractical during operation and may scratch the metal during installation.
- Cement, gravel, sand. These materials are needed for the foundation or installation of supports.
- From the tool you will need a plumb line, a level, if the frame is attached without brackets, then a welding machine and electrodes.
- Mortar containers, construction mixer, shovel or drill, as well as formwork boards.
- Screwdriver, riveter (if necessary), gloves and goggles with grinder, rope.
- Primer, anti-corrosion solution for metal.
Possible installation errors and their consequences
As experience shows, the lack of professional knowledge and skills in working with the tool causes various errors, which further adversely affect the quality, reliability and durability of the fence. Consider the most common miscalculations, as well as their consequences.
- Error: Wrong season selection. The desire to complete construction work by the beginning of the summer season is quite understandable.However, the installation of a corrugated fence should begin no earlier than a positive temperature is established and the soil is completely thawed. This is due to the fact that due to the temperature difference, the soil becomes mobile. Consequences: warping of one or more pillars, "collapse" of the fence, partial destruction of the strip foundation.
- Error: Wrong choice of materials. Above, we have given recommendations for choosing corrugated board, profile pipes and consumables. If you plan to install a fence from a profiled sheet yourself, follow these tips. Remember that trying to save money when buying materials in the vast majority of cases results in additional costs. Consequences: rupture of the corrugated board due to high wind load, damage to the sheet at the point of attachment to the crossbar, distortion of the supporting pillars, rusting of self-tapping screws.
- Error: Incorrect installation of pillars. Any violation of the support installation technology, whether it is a deviation from the vertical, insufficient penetration into the ground, or the use of low-quality cement, leads to a decrease in performance and a deterioration in the appearance of the fence. Consequences: inclination of the pillars, rupture of the fence canvas due to a change in the geometry of the supports, skewed gates, inability to fully open the doors.
- Error: Wrong perimeter marking. The installation technology involves the following sequence of actions - first, pegs are installed at the corners of the future fence, then at the installation points of the gate posts, and only after that do the marking of the intermediate supports. Moreover, the distance between the latter should not exceed 2.5-3 meters. Any violation of the described procedure is unacceptable.Consequences: difficulties in the construction of the fence, inversion of supports due to excessive load, slope or fall of the fence.
- Error: Incorrect installation of cross members. The non-horizontal installation of the lag has the least consequences. It is much worse when mistakes are made when performing welding work or when using X-brackets. Consequences: difficulties in sheathing the fence with corrugated board, damage to the anti-corrosion coating of the support or log, rusting of profile pipes, separation of the cross member from the pole.
- Error: incorrect installation of corrugated board. This may include insufficient or excessive tightening of self-tapping screws, installation of sheets end-to-end, savings or excess fasteners, fastening at the top of the wave. Consequences: decrease in the strength characteristics of the material and the fence as a whole, rupture of the barrier web.
We bring to your attention a selection of photos in which you can see the consequences of unprofessional installation of fences from a profiled sheet.
Despite the fact that the fence from the profiled sheet outwardly seems to be an extremely simple design, its installation requires professional knowledge, as well as skills in handling the tool. As a rule, the first experience is not very successful, and after a year or two of operation, the barrier will need to be repaired. And these are additional costs. In addition, when doing work on your own, the installation time can stretch for several weeks and even months. That is why, without practical experience, it is better to entrust the installation to professionals.
Are you planning to build a fence on a site in Moscow or the Moscow region? offers the services of qualified installers. Our company has been operating in the market for the manufacture and installation of profiled sheet fences for more than ten years.Since then, we have formed teams of experienced specialists, purchased professional equipment and tools, and arranged direct purchases of materials from manufacturers. This allows us to guarantee not only high quality and speed of construction work, but also optimal prices.
Need an inexpensive, reliable and durable fence? We are ready to help!
Calculation of the necessary materials
In order to professionally put up a fence from corrugated board with your own hands, the following materials are needed:
- profiled sheets. It is necessary to immediately make a reservation that corrugated board is divided into two categories: roofing and fencing. Although both of them can be interchanged. So for fences, it is best to use material whose crest does not exceed 21 millimeters;
- racks. Here you can use various options. For example, brick or stone pillars, logs, pipes of various section shapes, metal profiles, and so on. Since we are talking about building a fence from corrugated board with your own hands, you will have to choose the simplest option. These are pipe poles. Their installation is simple, the price is low. It is best to choose round pipes with a diameter of 59 mm or square pipes with dimensions of 60x60 mm;
- transverse beams. Rectangular metal pipes with dimensions of 60x25 mm are also used here. Mandatory condition: the wall thickness of such a pipe should not exceed two millimeters;
- self-tapping screws for metal;
- paint for painting poles and lag is selected in the color of profiled sheets;
- cement and gravel.
Now everything needs to be accurately calculated. Let's start with corrugated board. To do this, you will have to decide how high your fence will be.


Ideally, this is 1.5 m, 2 m, 3 m, 4 m and so on.
For example, we choose a two-meter fence.Next, you will have to calculate the perimeter of the area that will be fenced. The width of the sheet is known, the height of the fence is also known, it remains to make a few mathematical calculations, and you will know exactly the required amount of corrugated board.
There is a small nuance. From the total number, you will have to subtract the dimensions of the gate and the gate, if it is located outside the gate.
Now we count the number of columns and their size. The height of the fence is 2 m, but this is only its outer part, and the installation of the pillars will have to be done in the ground. So the underground part of the pillars should be from the outer 30%. In our case, 70 cm. This means that the length of each metal rack is 2.7 m.
Now the number of columns. Here you need a diagram of the site and the value of its perimeter. The best option is when the posts for the fence from the profiled sheet will be located at a distance of 2-2.5 meters from each other.
The number of transverse lags is again determined on the basis of the site layout and its perimeter. There is one subtlety here. If the height of the fence exceeds 2 m, then the lag is installed in three rows, if less, then in two. The number of screws is determined simply.
The stability of the supports - the durability of the fence
Options for deepening posts for corrugated fencing
On the site intended for the construction of a corrugated fence, it is necessary to remove all vegetation and clear the ground of excess debris. By the way, the marking drawing also does not hurt, it is easy to determine the number of spans and supports from it.
If it is not planned to build a foundation for a corrugated fence, then it is still advisable to remove the top layer of soil and fill it with gravel or gravel. The backfill should be carefully compacted.This will protect the corrugated fence from moisture and vegetation.
In the corners of the future fence, you need to install pegs and pull the construction thread. This will help to set the posts at the same level. The pillars are installed at a distance of 2-3 m from each other, but you need to start installing them from the corners. To eliminate unnecessary costs, it is better to immediately determine the location of the gate and gate, then measure the distance from the corner to the gate mark, and divide the result by the working width of the profiled sheet. It will be easier to calculate everything if the gate with the gate is included in the drawing.
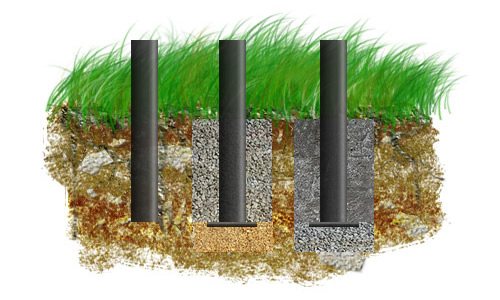
The supporting elements on corrugated fences are installed by several methods, the most optimal for non-problematic soil is driven, and on heaving soil it is better to build a strip-pillar foundation with reinforcement.
We will assume that you are lucky with the soil of the area around the house, so in the article we will describe the process of driving pillars. To do this, prepare the wells. They are dug or drilled to half the depth. Further, the post is installed in the hole, some material is applied on top of it to protect it from damage, for example, a bar, after which the support is clogged with a sledgehammer. The depth must be at least 80 cm.
After installing two corner fence posts from the corrugated board, a construction thread is pulled on top so that the remaining posts can be easily set at the same level. The rest of the supports are installed in the same way. When all the supporting elements are installed, you can proceed to the next stage of construction - fixing the lag.
Advantages of corrugated board
Profiled sheet as a material for fencing has many advantages:
- durability - with proper installation, a profiled sheet coated with a polymer coating will last more than 30 years. In European countries, there are fences whose service life has already reached 50 years;
- corrosion resistance - the combination of a galvanized layer and a polymer reliably protects the steel from air access and rusting
- strength. Despite the small thickness, due to the wave-like shape, the sheet acquires additional rigidity, withstands pressure well and does not bend under wind load;
- resistance to mold, fungi and pests;
- functionality: the fence is opaque, it is almost impossible to get over the fence made of profiled sheet - the upper sharp edge cuts hands;
- low cost;
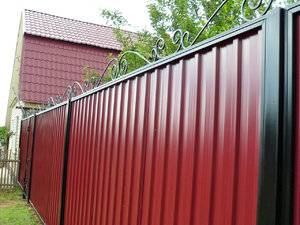
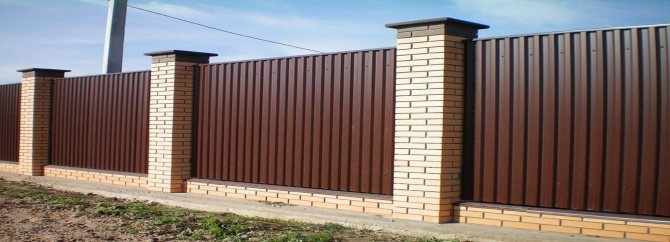
- aesthetics. The plastic coating has a very large range of colors and patterns, which allows you to choose a fence for any color of the house and estate buildings; fences with a pattern imitating stone and brick are very popular now, but there are more original patterns - flowers, greenery, landscapes, paintings, photos;
- simple installation - this work is easy to do with your own hands;
- light weight allows you to arrange a lighter columnar foundation, sheets are easier to transport, carry and mount.

Expert advice
When installing a fence on heaving soil, the fact of turning the base into plasticine is taken into account. The phenomenon is observed during the period of frost against the background of the manifestation of the effect of heaving, characteristic of the earth, which retains moisture. Installation tips:
- Removal of soil to the level of freezing. The soil is replaced with sand.
- Installation of the base below the freezing level. Such a moderate technique has a minus - the subsequent pressure of the soil on the walls of the foundation.
- If a light fence is installed, then the foundation is insulated.
- Drainage arrangement: digging a trench to the depth of the foundation arrangement. A perforated pipe is installed, previously wrapped in filter material. The construction of drainage is carried out at a distance of 50 cm from the foundation. The finished structure is covered with rubble.
If construction work is carried out on uneven ground, a sectional or combined fence is installed. The height and width of the spans are preliminarily calculated. To give the fence aesthetics, a stepped foundation is equipped. All work is carried out after measuring the slope. If the indicator does not exceed 35 degrees, then the minimum span width is 2.5 m.
When the slope fluctuates along the site, sections with different widths are formed. If the slope exceeds 35 degrees, the span spacing decreases. The configuration of the top edge should be stepped, reflecting the shape of the base, or linear (one line is formed).


Other advice from experts on installing a fence from corrugated board with their own hands on any soil:
- Closing the joints of the sheets with special strips. Their production is carried out using special bending equipment.
- Installation work is carried out in gloves.
- Metal shears are used to cut sheets. The edges of the cuts are tinted with paint. It is forbidden to use a grinder, as the protective layer is broken when cutting.
Fencing made of profiled anti-corrosion sheets requires minimal maintenance. If the site is located near the roadway, the fence is constantly exposed to mechanical damage with gravel. Such places are tinted with paint. When arranging a fence, you can mount long sheets horizontally, but the design is considered unsafe.
If installation work is carried out without welding, then special preparation of the poles is required. Perforation is performed in the places of fixation. The structure is not considered strong, as it loosens during operation under the influence of loads. It is more reliable to fix the frame pipes by welding. It is necessary to adhere to safety rules, using protective equipment (gloves, mask).
Subject to technical methods, a smooth and neat fence is equipped. Self-assembly, strength and resistance to aggressive environments, a high degree of reliability, long-term operation are the main advantages of a fence made of corrugated board. With its help, the summer cottage becomes attractive and concise. The professional flooring goes well with natural stone, brick, forging elements. The choice of scheme and appearance of the fence depends on the personal preferences of the homeowners.
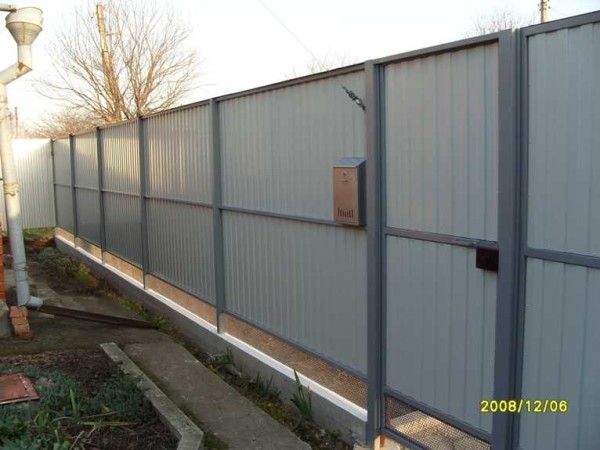
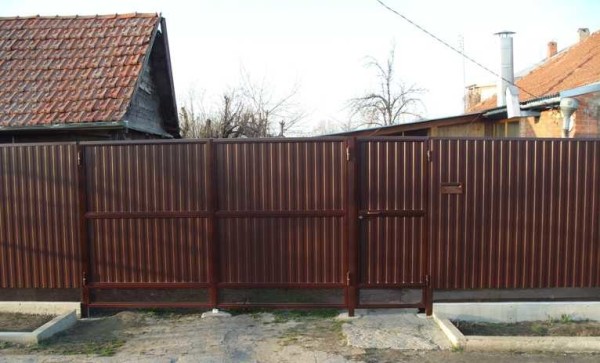
Do-it-yourself fence from corrugated board: photo report
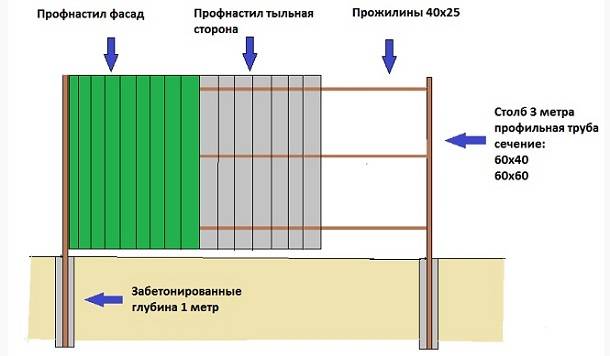
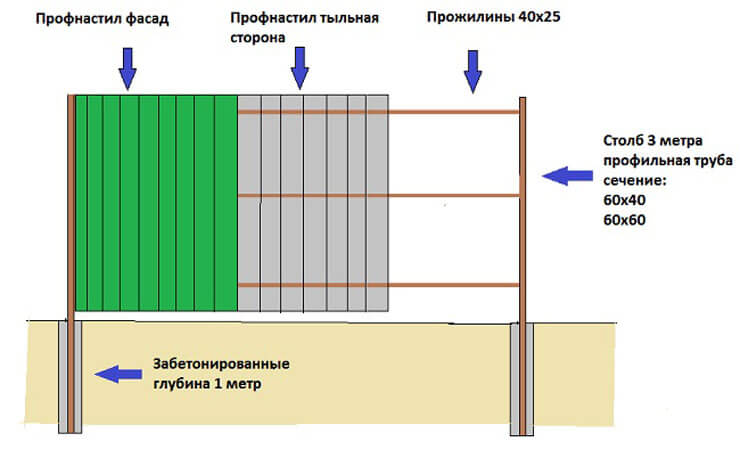
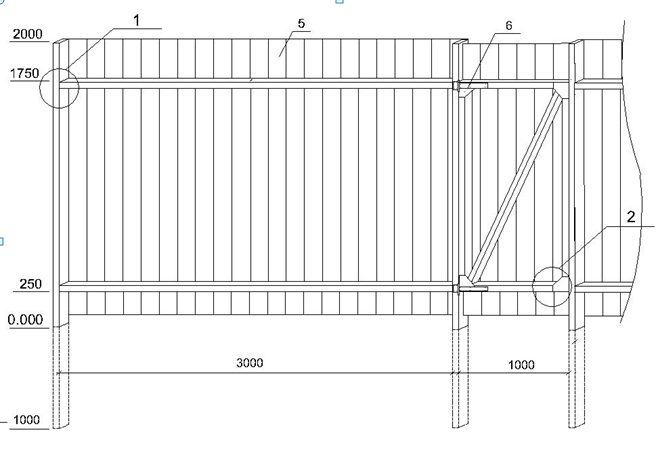
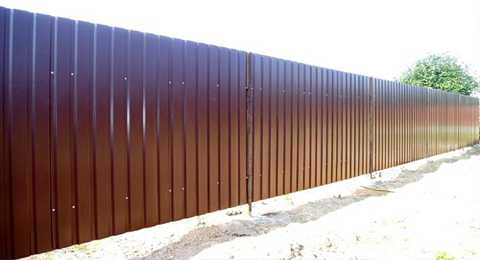
A fence was built from the neighbors and frontal. The total length is 50 meters, the height is 2.5 m. A brown profiled sheet is used on the front, and galvanized on the boundary, thickness 0.5 mm, grade C8.
In addition, the following materials went:
- profiled pipe 60 * 60 mm, wall thickness 2 mm, pipes 3 m long for poles;
- 80 * 80 mm with a wall of 3 mm were placed on the gate posts and gates;
- logs 30 * 30 mm;
- gate frame and gates 40*40 mm;
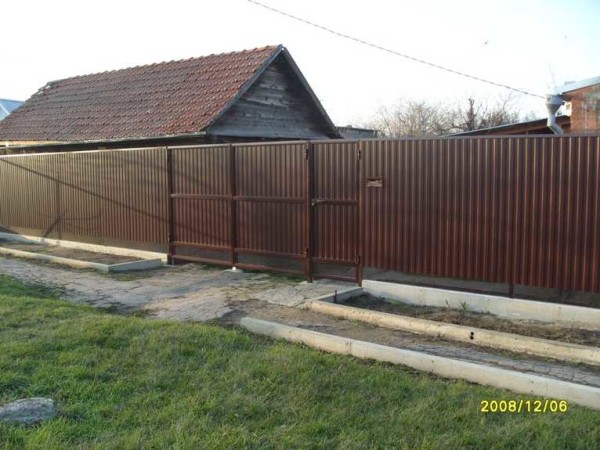
A ready-made fence from corrugated board was built by one person with his own hands
The fence is mounted on metal poles, between which the plinth is then poured. The owners need it, since it is planned to set up a flower garden in front of the fence (you can see the fence made under it). It is also needed so that water does not flood the yard during heavy rains. Metal sheets are not fastened immediately from the ground, but slightly retreated.This gap is closed with a die-cut - a tape that remains in some industries. This is done on purpose so as not to block the access of air, so that the earth dries out faster.
Inside view of the finished fence
Metal preparation
The first stage is the preparation of pipes. From the warehouse, the pipe comes rusty, so that it serves for a long time, you have to clean off the rust, then treat it with Antirust and then paint it. It is more convenient to first prepare all the pipes, prime and paint, then just start the installation. Rust was cleaned with a metal brush mounted on a grinder.

Pipes need to be cleaned of rust
The pipes in the warehouse were only 6 meters long. Since the height of the fence is 2.5 meters, you need to bury another 1.3 meters, the total length of the post should be 3.8 meters. To save money, they cut it in half into 3-meter pieces, and the missing pieces were added with various scrap metal available on the farm: trimming corners, fittings, pieces of various pipes. Then everything was cleaned, primed and painted.
Pole installation
The first two corner posts were placed. Pits were drilled with a drill bought in a store. The soil is normal, one hole 1.3 meters deep took about 20 minutes.
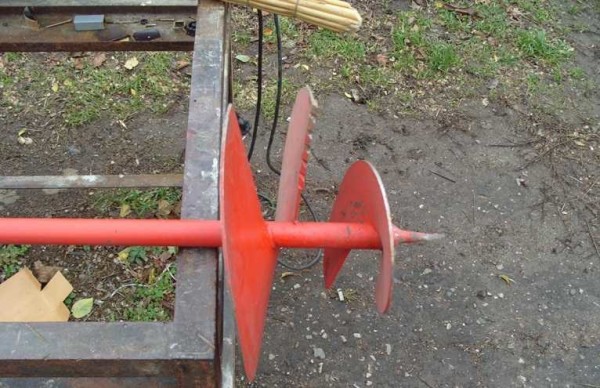
Hole drill for poles
The first pillar was set horizontally and so that it rose above the ground to a height of 2.5 meters. To set the second one, it was necessary to beat off the height. Used a water level. It must be filled in so that there are no bubbles - from a bucket, and not from the tap, otherwise it will lie.
They put up the second pillar at the beaten mark (applied to the bar, which was placed next to the hole) and concreted.When the cement had set, a twine was pulled between the posts, along which all the rest were aligned.


The filling technology was standard: a double-folded roofing felt was installed in the hole. A pipe was placed inside, poured with concrete (M250) and set up vertically. The level was controlled by a plumb line
It is very important to correctly set the poles, otherwise the entire fence will warp
In the process of work, it turned out several times that concrete was poured not inside the rolled roofing material, but between it and the walls of the pit. Raking it out of there is a small pleasure, because the protruding part was cut into petals, nailed to the ground with large nails. Problem solved.
So fixed the roofing material
After the concrete had set, they made a portable formwork from boards covered with a dense film. With their help, the basement was filled. To make it stronger, reinforcing bars are welded to the posts on both sides from the bottom. Formwork was placed around them.
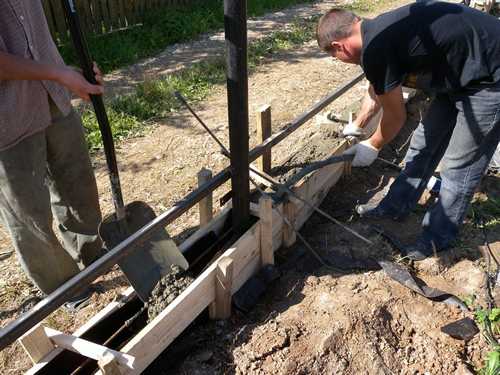
Plinth formwork
Jumper setting
Cleaned, primed and painted pipes for the crossbars were cut and welded. Cooked between the pillars. They are also tedious to put in a level to make it easier to mount.
We cook jumpers
After welding is completed, all welds are cleaned with a wire brush, treated with Antirust and then painted.
Profiled sheet installation
Since the top jumper runs along the very top of the fence, and it is welded exactly to the level, there were no problems with leveling and installing the sheets. Fastened first along the edges, then installed intermediate screws. To make it easier to put them evenly, a thread was pulled between the extreme ones.
Smoothly installed fasteners are also beautiful
After the gates were welded and attached.As a finishing touch, additional elements are installed on top - a U-shaped profile that covers the top of the fence and plugs for pipes.
The final view of the fence from the profiled sheet, made by yourself
As you can see, there is nothing particularly difficult.
It is important to set the posts evenly and weld the frame. This is the main task. A lot of time - about 60% is spent on pipe preparation - cleaning, priming, painting
A lot of time - about 60% is spent on preparing pipes - cleaning, priming, painting.
What else is needed?
In addition to corrugated board, you will need to choose accessories for fencing:
- pillars or support posts, can be wooden, brick, reinforced concrete or metal. The last option is the most common. It can be profile or round pipes of various diameters. You can purchase ready-made fence posts, which are sold with a top plug, a heel for installation and welded brackets;
- logs (cross connections), it is enough to take pipes 40x40x2 mm / 40x20x2 mm;
- brackets for mounting logs to poles for work without welding;
- fittings: M6 bolts or screws (20/30 mm), self-tapping screws or rivets.
Components and corrugated board should be selected taking into account the total weight of the fence. Heavier and more voluminous sheets require the installation of a frame made of shaped pipes of significant parameters.


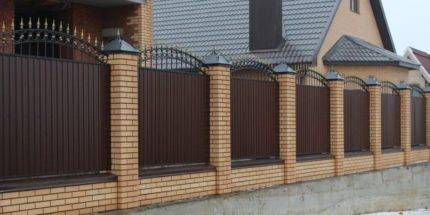 A sectional fence on the foundation decorates the site and is a capital structure. The construction of such a fence can be carried out according to individual requests, the profiled sheet fits perfectly into the most modern design projects.
Additionally, consumables can be purchased: paint, pipe caps and top fence strips.Accurate calculation of materials and components will allow you to quickly complete the construction and not spend extra money.
Material Selection Tips
Decking has several varieties, depending on the top protective coating. The following expert advice will help you understand and determine their quality:
- Galvanized surface. The coating is applied at high temperatures. A thin layer of zinc (up to 30 mm) is not enough for the entire service life, so the question arises of premature replacement of elements.
- The polymeric covering will add and increase quality indicators of a professional flooring. At the same time, the aesthetic beauty of the fence increases with the price.
- The polyvinylchloride surface guarantees increased protection against mechanical damage. It is not surprising, because the thickness of the layer ranges from 170-205 mm. Despite the durability and strength of such a corrugated board, it has one drawback: sensitivity to elevated temperatures (about 79 degrees C), so it is not recommended to use it in hot areas.
 Galvanized corrugated board
When buying building materials, ask about the quality certificate, compliance with GOSTs during production. A small difference in price can play on the strength and reliability of corrugated board. It is not advisable to choose a material with a corrugation height of more than 20 mm. Please also note that thin sheets of material (less than 0.45 mm) can be deformed by strong winds.
Profile sheet classification
- The letter "H" marks the material that can be used as a supporting structure. The product has a pronounced high profile, and can additionally be equipped with stiffeners, which are made in the form of longitudinal grooves.It is used for fixed formwork, in the production of containers, load-bearing wall structures. It is not advisable to use such a sheet profiled for a fence at extra costs.
- An intermediate option is a product marked "NS" the magnitude of the waves is significantly lower than in the previous version, does not exceed 35-40 mm. It is used most often when sheathing walls or as a roofing covering. It is also used as a fence for large construction projects, but is rarely used as a fence around a private house.
- The profiled sheet with the letter code "C" is used specifically for wall cladding. A distinctive feature is the height of the profile wave no more than 21 mm, while an undeniable advantage is also an affordable price.
- "MP" today this option can be called the most versatile in private construction. With its help, you can build buildings for household purposes, make fences from it and sheathe walls.
Such a variety allows you to choose the most suitable option for each specific case.
The length of the sheets is not regulated; it can be produced by anyone. Restrictions begin when you reach 12 meters, this is the most convenient and acceptable length. The manufacturer can make the most non-standard sizes, which is very convenient, there is no need to cut the sheets yourself and, in addition, minimize the amount of waste. The thickness of the sheet can also be different and depends on the purpose for which it is used. For fencing, you can choose sheets with a thickness of 0.45 to 0.6 mm.
So, for the construction of a fence, it is worth choosing sheets with a height waves from 18 to 21 mm.If the area is not exposed to strong winds, then you can choose a smaller wave size of 8-10 mm.


