- Reasonable choice of the appropriate option
- Ways to combine two types of ventilation
- The structure of the wall device
- The need to install a vent valve
- System construction process
- Circuit design or development
- Detailing and assembly of the system
- Design and principle of operation
- How to install a supply valve - instructions
- Advantages and disadvantages
- Supply valve installation
- Video description
- Video description
- Window inlet valve
- Video description
- Briefly about the main
- Conclusions and useful video on the topic
Reasonable choice of the appropriate option
Most often, exhaust valves for ventilation into the wall are made of metal or durable plastic. For conditions of high temperature and humidity, for example, for a bath, plastic products are not suitable, but they have proven themselves excellently in less difficult situations. When choosing a valve, its cross section should be taken into account: rectangular or round.
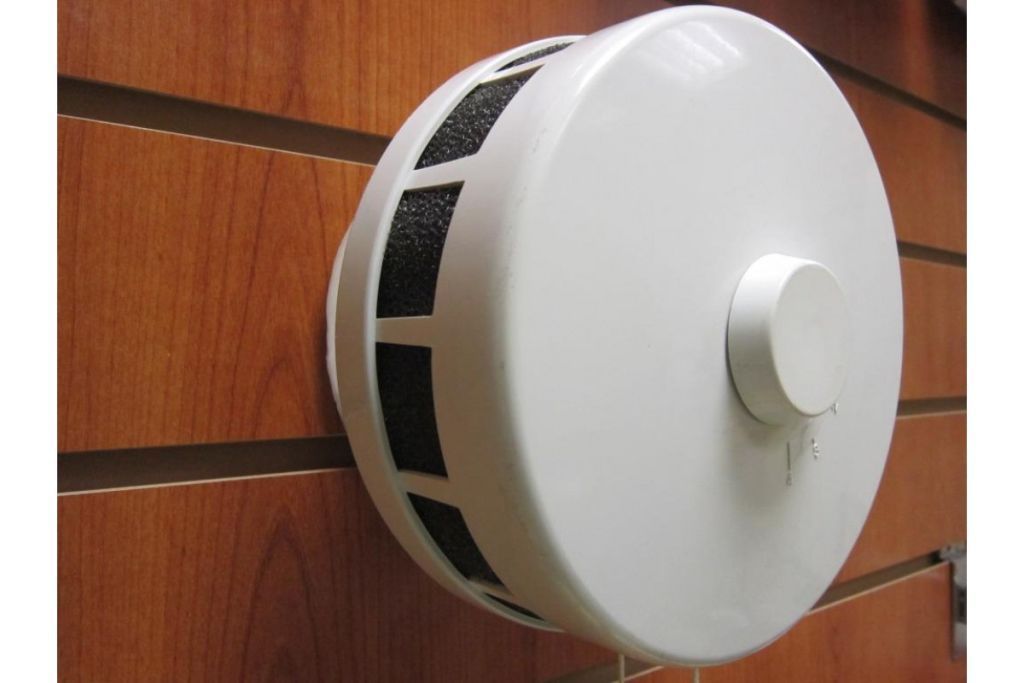
To organize forced exhaust ventilation in an apartment or house, you can use a design consisting of a fan and a check valve
The most important indicator is the airflow rate for which the device is designed. The most common are models designed for a flow of 4-6 m / s.
If the valve is selected for a natural ventilation system, it is very important that the damper blade elements react sensitively even to small air flows. But for systems with low draft, the presence of an exhaust fan is mandatory, so such sensitivity is not needed.
But here it is important to choose a fan that is suitable in terms of power depending on the volume of the room for which the device is selected. So, for the kitchen, the fan power is calculated using a multiplying factor of ten, and for the bathroom, this figure can be seven units.
In multi-storey buildings, the exhaust ventilation pipe must be led one meter above the roof so that unpleasant odors do not penetrate from the lower floors to the upper ones.
Ways to combine two types of ventilation
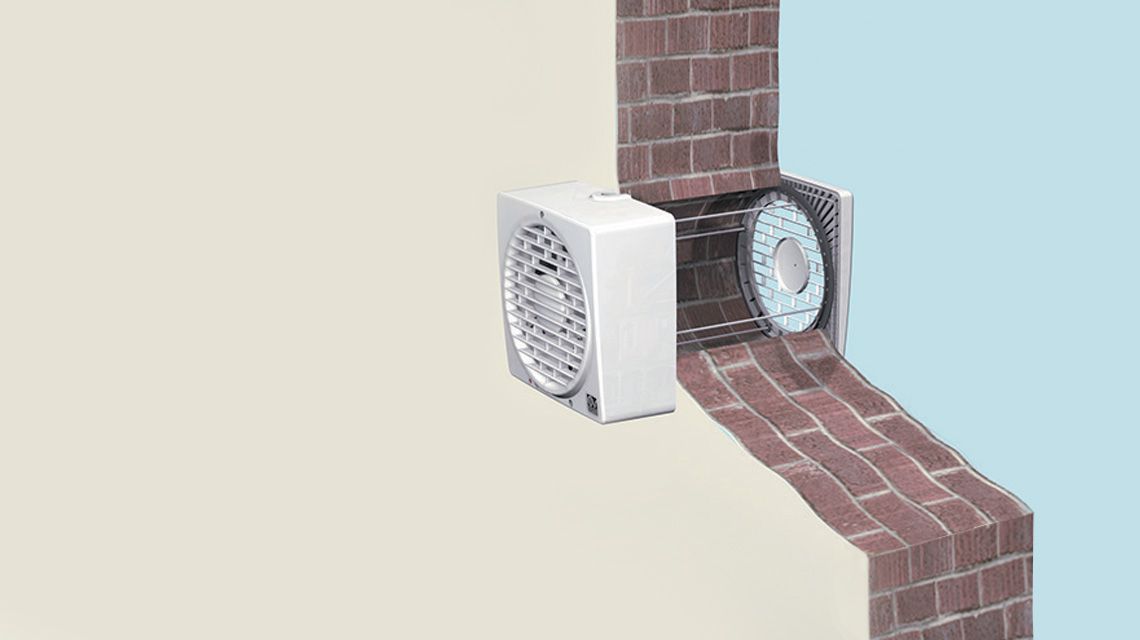
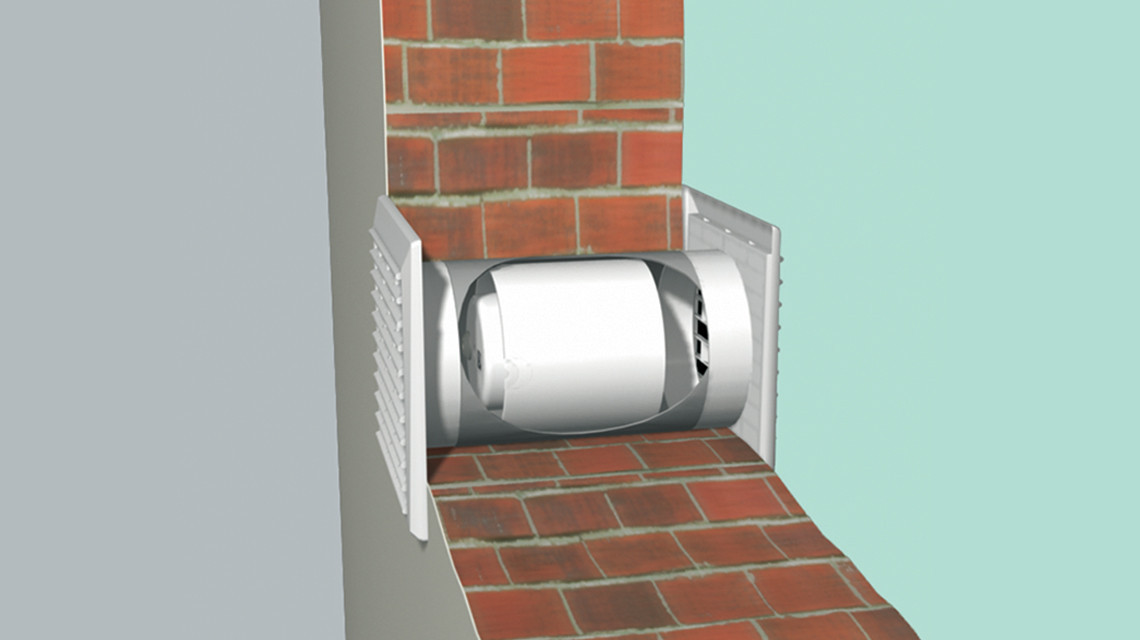
When the hood is turned on, the volume of incoming and outgoing air increases. During the shutdown of the device, the process of ventilation of the living room is practically absent. This happens due to the fact that the fan housing completely blocks the lumen of the ventilation window. The propeller blades interfere with the natural outflow of air from the bathroom. The problem is solved in two ways.
We insert a double grille into a large ventilation window-hole, in which there is a round window for the fan and several additional slotted curtains for natural air outflow.
There are fans on the market with different case diameters, so you can choose a device that is smaller than the vent. When the fan is off, the air will escape through a simple grate located under the appliance.
If the ventilation window is small, then to ensure a natural outflow of air, they put a fan on legs of 1.5-2 cm. The legs do not allow the appliance grille to fit snugly against the wall. Air is drawn into the resulting space under the action of the traction force generated in the shaft, and leaves through openings that are not closed by the round fan casing.
The legs are made by hand from ordinary foam. Self-tapping screws go well through this material. The foam legs also serve as a shock absorber, reducing the degree of vibration of the operating hood.
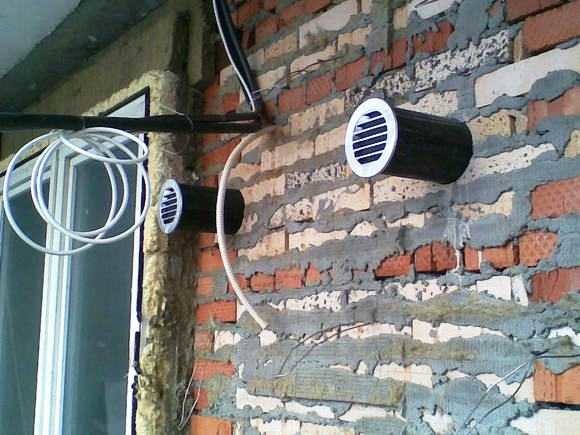
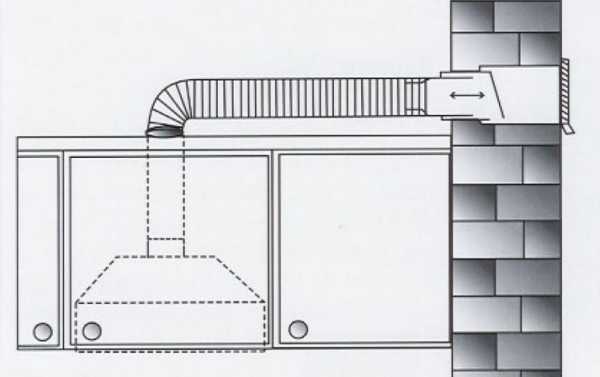
 An example of integrating two types of ventilation - forced and natural - in the bathroom of a private house
Having learned in detail about how to make a bathroom hood in a private house, you can decide for yourself whether this task is within your power or not. Perhaps the best solution would be to contact a company that provides services in your area for the installation of all known types of ventilation.


The structure of the wall device
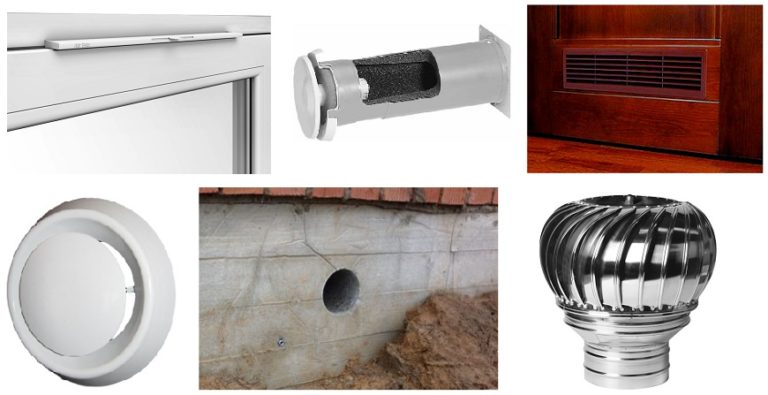
A typical exhaust valve consists of three main parts:
- flange;
- flaps;
- decorative lattice.
The round flange is a connecting element that allows you to connect the valve to the ventilation duct. The grate is a decorative element that simply masks a hole in the wall, and also prevents large debris from accidentally getting inside. The basis of the design is the damper.
This is a movable petal, round or square configuration, mounted on an axis. It can only open in one direction, ensuring the correct movement of the air flow. The design may also include a plumb bob that allows the valve to remain closed if the fan is turned off.
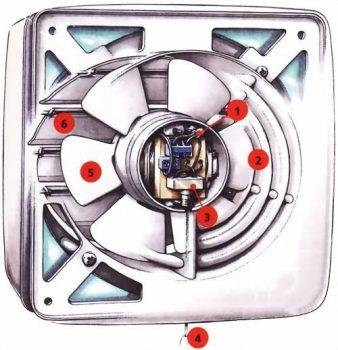
Axial exhaust fan consists of such elements as power cable (1), air intake grille (2), switch (3), switch cable (4), impeller (5), blinds (6)
For industrial applications, it is generally recommended to select a valve with good explosion-proof characteristics, but for residential applications, other features are important. For example, it would be useful to have a rubber gasket that allows you to reduce the amount of noise.
One of the common options for the exhaust valve is the "butterfly" design. It consists of two blades fixed on the central axis. Another popular design of such devices is called petal, it includes a number of parallel blades that move on the principle of blinds.
Installing an axial fan for exhaust type ventilation produced according to a single scheme for all systems:
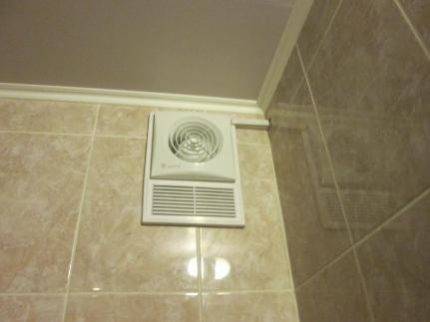
Such a fan is often mounted in bathrooms, bathrooms.
The need to install a vent valve
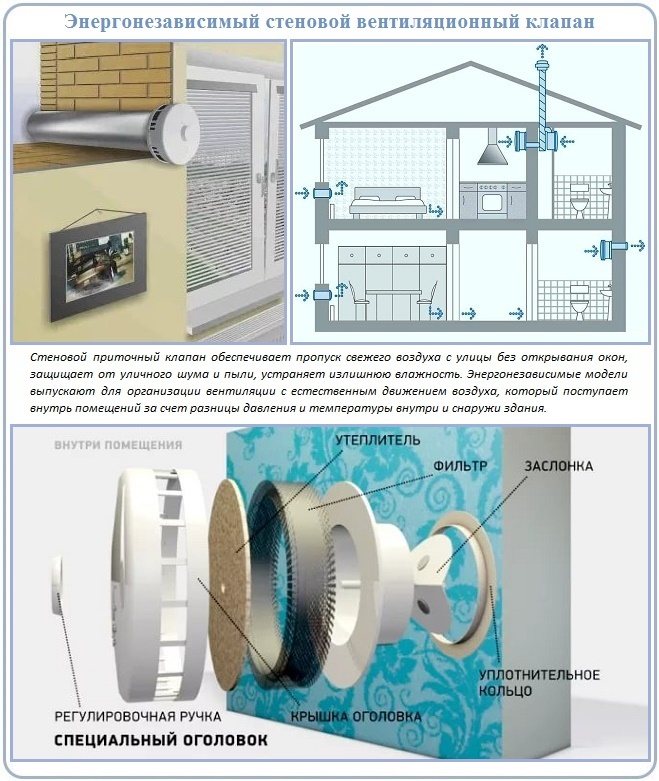
The main function of the supply ventilation valve is to ensure the supply of fresh air to an apartment or house.
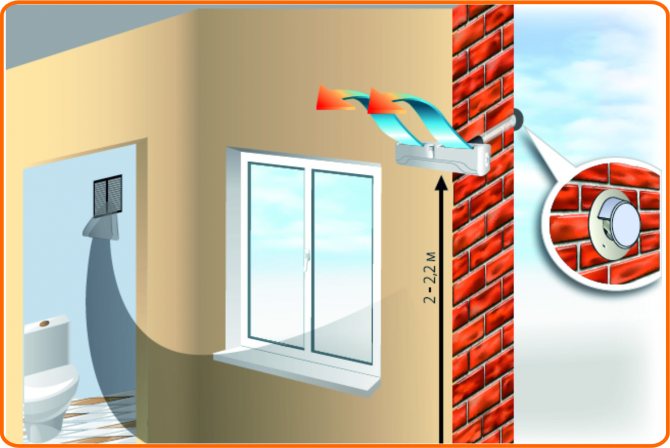
The wall ventilator normalizes the microclimate of the room when natural ventilation does not cope with its task.
With the massive replacement of wooden window blocks with PVC products, natural ventilation has lost its effectiveness - the inflow of air from the outside has significantly decreased due to the tightness of modern structures. The rate of circulation of air flows in a closed space tends to zero, which has an extremely negative effect on the quality of the microclimate.

The first sign of insufficient air intake is the appearance of condensation on the windows.High humidity promotes the development of microorganisms - mold and fungi
If you do not take measures to improve ventilation, then over time, minor troubles can cause more serious consequences:
- The concentration of carbon dioxide rises, which adversely affects the well-being of a person. Fatigue, drowsiness, headache, decreased performance are the result of a lack of oxygen.
- High humidity and lack of air circulation is an excellent environment for the development of pathogens. Mold spores can cause allergic reactions or trigger bronchial asthma. At risk are young children and people with reduced immunity.
- Exhaust ventilation works inefficiently with low air flow - unpleasant odors, pollution, harmful substances are not removed naturally.
- In conditions of constant high humidity, the structural elements of the building wear out faster.
The operation of the window in the ventilation mode can solve the above problems, but at the same time, the main advantages of "plastic" glazing are nullified: heat and noise insulation.
We also recommend reading the material about other ways of arranging supply ventilation.
Wall "supply" normalizes the movement of air masses in the room. Under normal conditions (pressure drop 10 Pa), most models pass about 25-30 cubic meters / hour, which meets the requirements of sanitary standards
System construction process
The exhaust ventilation device in the kitchen or in the bathroom begins with the layout of the entire system. After that, materials are selected and calculated. Never rush into calculations.Everything must be done in a measured and calm manner.


When designing, keep in mind that what matters in ventilation is its functionality, with the ability to make the most of all the conditions in each room. If you make a mistake, you will have to use mechanical air blowers, which will significantly increase the cost of the system.
For normal operation of the gravity type system, it is desirable that the ducts have as few turns as possible. It is recommended to install turbine deflectors on chimneys towering above the roof - they will increase the outflow
Installation steps:
- Ventilation design.
- Purchase of equipment: sewer pipes, installation products, fasteners, fittings, mounting metal tapes.
- Installation of brackets and clamps at the places of ventilation communications.
- A ventilation riser is assembled from large pipes.
- Assembly and installation of air ducts.
- Connecting all branches to each other.
- Sealing connections. There is no special need for this, but it does not hurt.
- Installation of fans and valves, if provided.
- Installation of ventilation dampers.
The finish of all types of installation work is testing the system for performance. All actions are to check the traction. To do this, attach a piece of paper or a napkin to the exhaust channels.
Circuit design or development
The creation of a ventilation project begins with elementary calculations and the collection of information, then:
- Calculate the rate of air exchange throughout the house. This indicator depends on the volume of all premises, their purpose and the number of residents. In living rooms, the air must be completely replaced 1 time per 1 hour, and in technical rooms (toilet / bath) - at least 3 times per 1 hour.Adding the resulting numbers, we get a performance indicator, taking into account which the diameter and height of the ventilation equipment will be selected.
- Draw a diagram of the movement of air currents. Immediately estimate the position of the intake and supply channels.
- Draw a duct diagram. For now, ignore the details, stick to the rules and try to fit the system without complicating the design. This is the most difficult stage of the work. Hiding ventilation from bulky plastic pipes is not so easy.
Sketches are ready. Take some time to think about what devices you will have embedded in the system and where they will be located.
Detailing and assembly of the system
Having solved all the questions on the scheme and giving it a final look, it's time to move on to detailing.
First, calculations are also carried out, the components of the system, equipment are selected and the budget is reduced, then:
- The cross section and area of air ducts are calculated. The maximum speed of quiet air movement is taken into account - otherwise there will be a rumble in the house.
- All dimensions are transferred to the diagram.
- Detailing. A list of all the necessary elements is compiled, indicating the sections.
- The total cost of the components of the ventilation system is calculated. Match your desires to your budget. At this stage, you will have to change the components several times, abandoning the desired in favor of the real.
- The final project is drawn. Do not forget about the nodes of the passage of ventilation channels through the roof, ceiling, walls, insulating and consumable materials, ventilation grilles, fasteners and all other little things that will eventually result in a decent amount.
It remains to find, buy and install. Not much has been written, but it will take a lot of nerves, time and effort to implement the plan.Having mounted the entire system, it is still impossible to say that everything is ready.
Air ducts from sewer pipes are assembled in accordance with the draft. PP pipes and fittings are connected by butt soldering, PVC by cold welding
The ventilation system made of plastic sewer pipes still needs to be tested and refined during operation. It is also not so easy to achieve coordinated work of each element of the system. If the natural ventilation option is not effective enough, it is worth upgrading by installing exhaust valves or their supply counterparts.
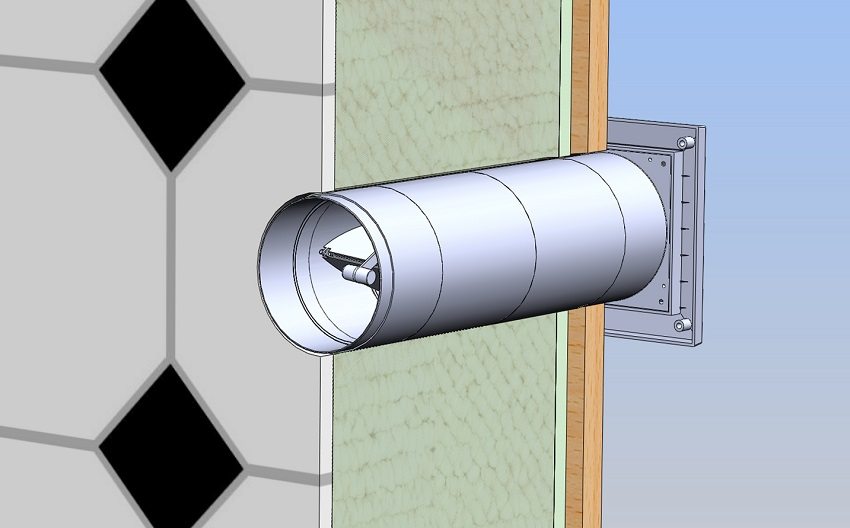
Design and principle of operation
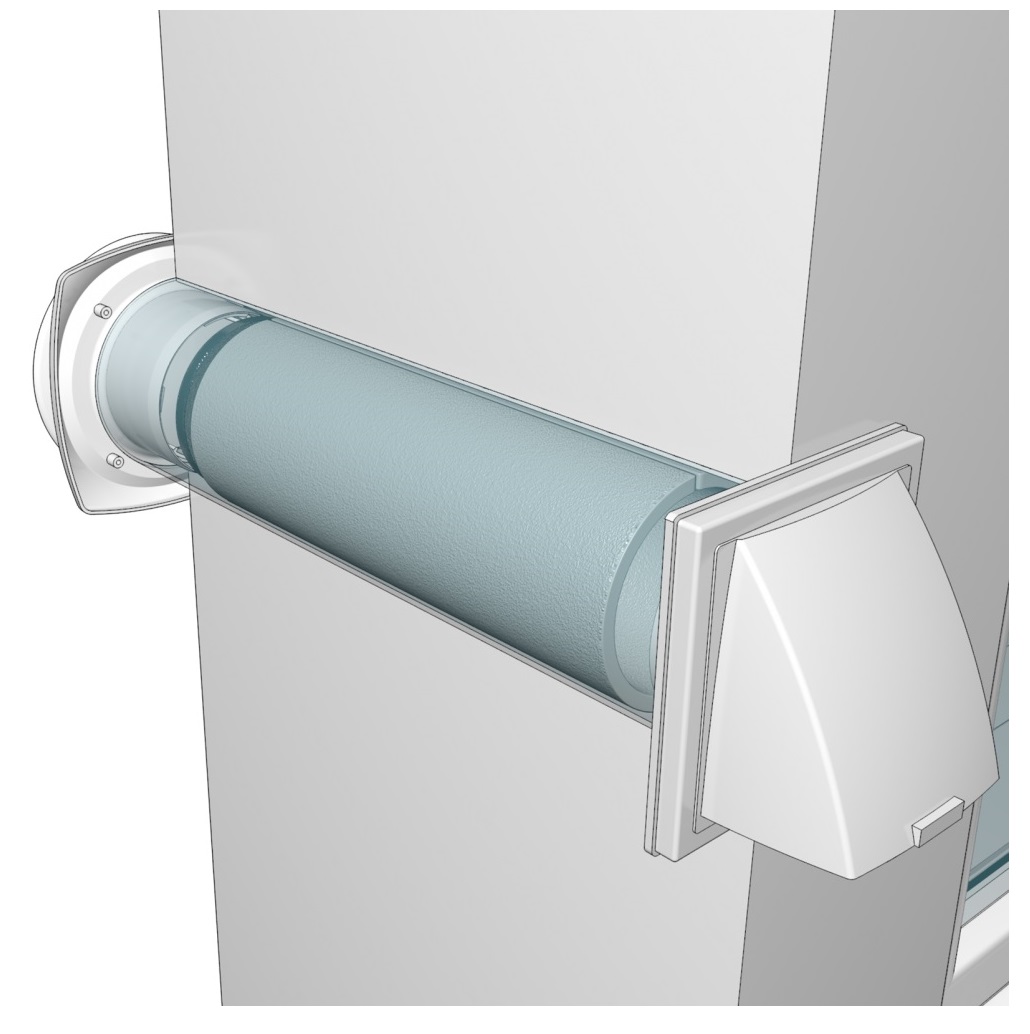
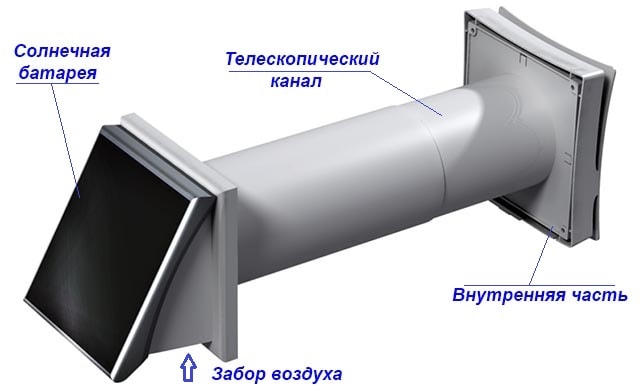
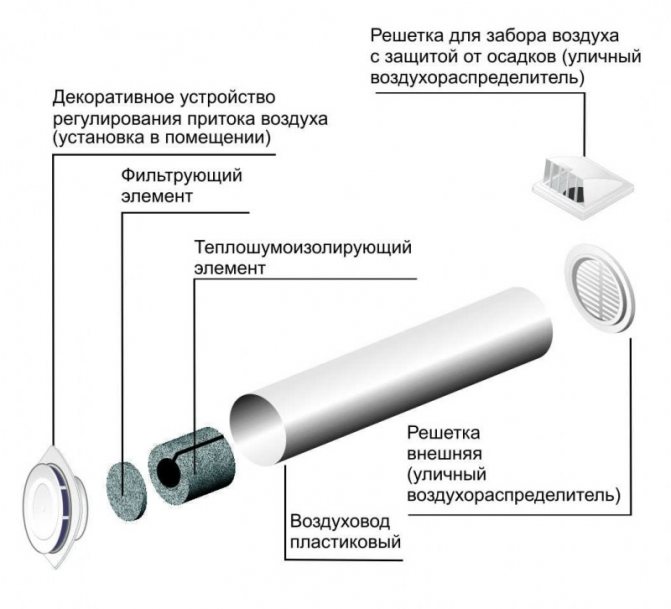
The design of the supply ventilation valve is rather primitive. The device consists of a cylindrical body with a diameter of 6-14 cm. Inside the valve there is heat and noise insulation, as well as a filter.
 Models from different manufacturers may look different on the outside. Some "supplies" are equipped with additional elements and functionality. For example: temperature sensor, humidity control, fan, remote control system
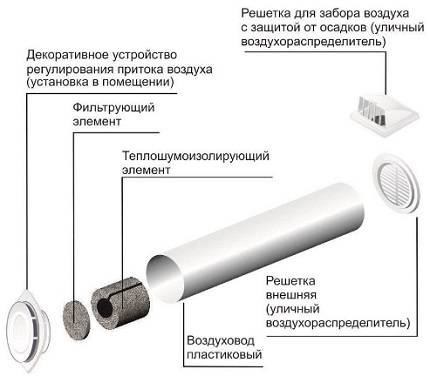
Individual elements of a typical valve design perform the following functions:
- Air duct. Air flows through the pipe from the outside into the room. The diameter of the air duct largely determines the performance of the supply valve. As a rule, this element is made of plastic.
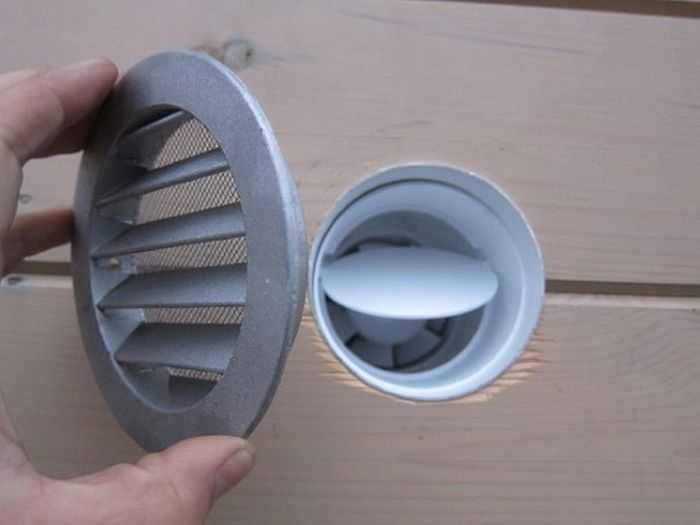
- Ventilation grill. It is placed on the outer side of the wall and is intended to protect the internal elements of the device from small animals, precipitation and debris. The optimal material for manufacturing is aluminum. In some models, an anti-mosquito insert made of polymer threads is provided.
- Heat and noise insulating insert.Passes through the entire duct and protects the wall from freezing, providing a reduction in street noise.
- filter element. Cleans the incoming air from dust.
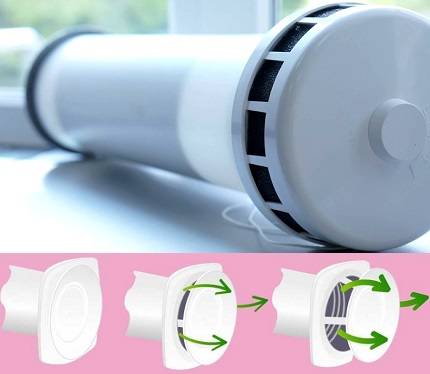
- Decorative cover. Installed on the inside of the wall. The plastic head is supplied with a handle for adjusting the airflow.
Many manufacturers equip the valve with a flapper o-ring. Both parts are placed on the inside of the wall and hold back gusts of wind.
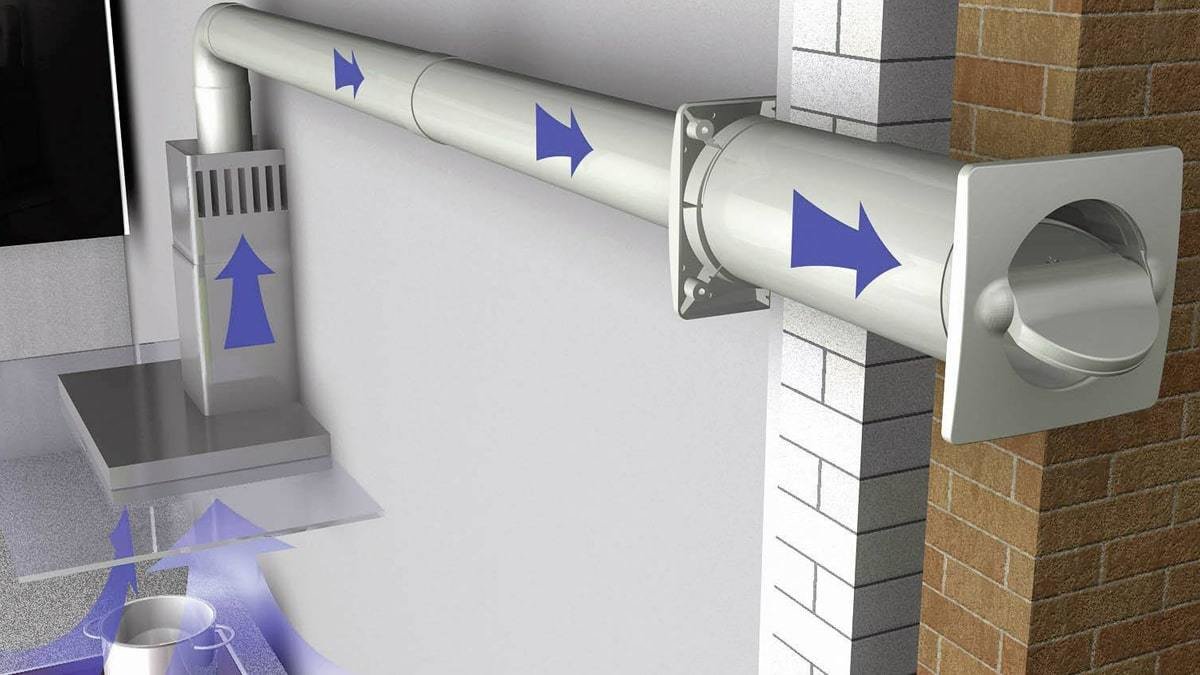
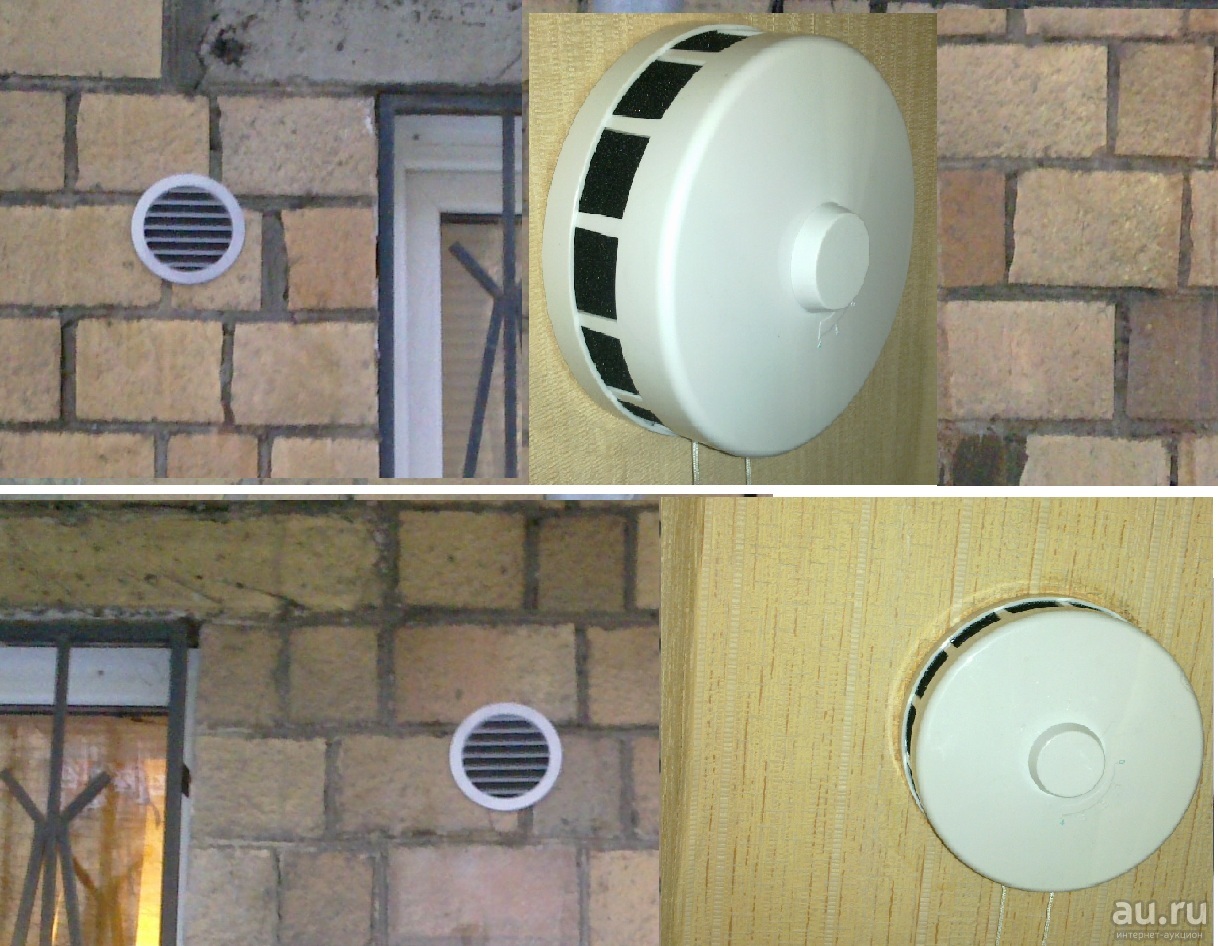
 With the help of the ventilator, you can control air exchange by forcibly pumping or suppressing the circulation of air masses. When the valve is correctly placed, drafts do not occur
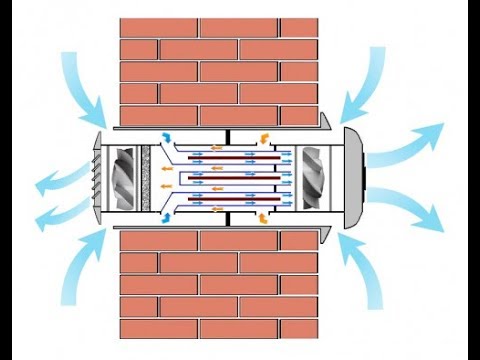
The system operates on a simple principle. The air, passing through the grill and the filter, is cleaned, moves through the heat and noise insulating channel and warms up a little. In the limited space of the pipe, the air flow speed decreases, it enters the adjustable damper, and then through the technological holes - into the room.


Ventilation can be carried out continuously with the windows closed. In this case, the room will not be cooled. If plastic windows are installed in the room, then it may be worth considering installing an inlet valve on the window.
However, for normal air circulation, the following conditions must be met:
- the presence of a working hood;
- the movement of air masses even with closed doors indoors - it is necessary to provide a gap between the floor and the door of 1.5 cm or equip ventilation grilles.
The operation of the hood can be tested experimentally. Open the window and bring thin paper to the grate.With good traction, the sheet will be attracted to the ventilation duct.
 If the sheet does not hold onto the grate, then the ventilation needs to be cleaned. In the warm season, the air is very “heavy” and it will not be possible to check the health of natural ventilation.
How to install a supply valve - instructions
Before installation, it is necessary to solve 2 questions: where to put the ventilation valve and how to drill a neat hole in the wall. We offer the following recommendations for placement:
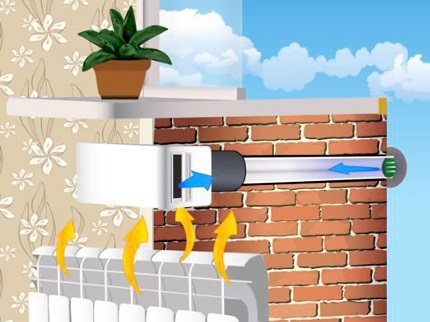
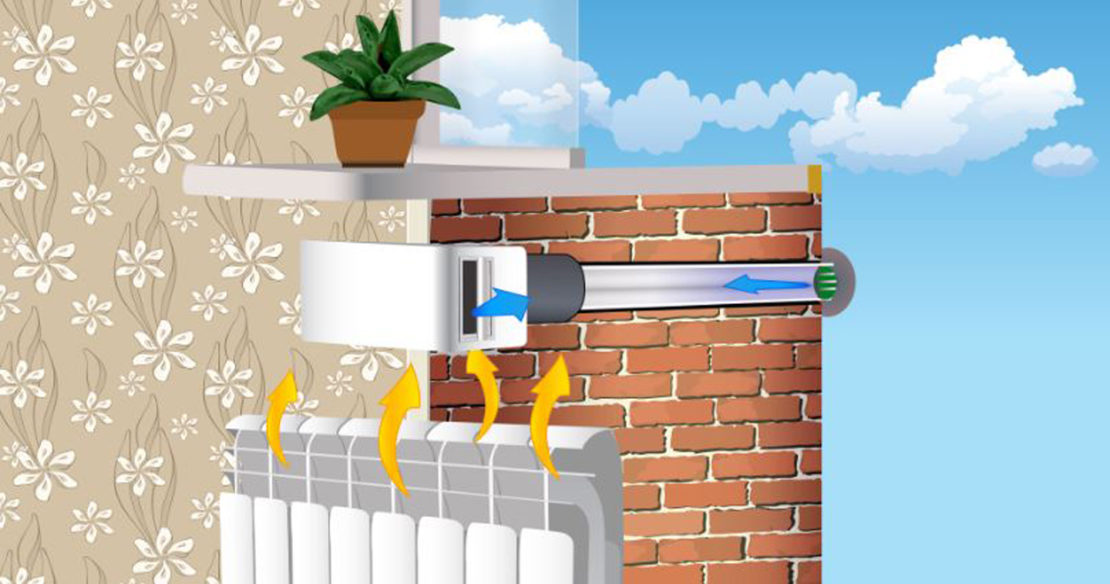
- Ventilators with a pipe diameter of 50–60 mm are best placed between a heating radiator and a window sill. Provided that there is enough clearance height. Then the cold street air will immediately mix with the upward convective flow from the battery.
- We put a device with an air duct more than Ø100 mm on the side of the window opening, make an indent of 30 cm (to prevent freezing). The second option is between the window and the ceiling, the minimum distance from the ceiling is 15 cm. In both cases, the ventilator is located in the zone of convection flow from the radiator.
- The height of the passive valve above the floor is 180…200 cm.
- When installing the recuperator valve, keep a distance of 0.5 m from all structures - the ceiling, the window, the nearest corner, as shown in the drawing.
- Place the transfer device in a convenient place without restrictions.
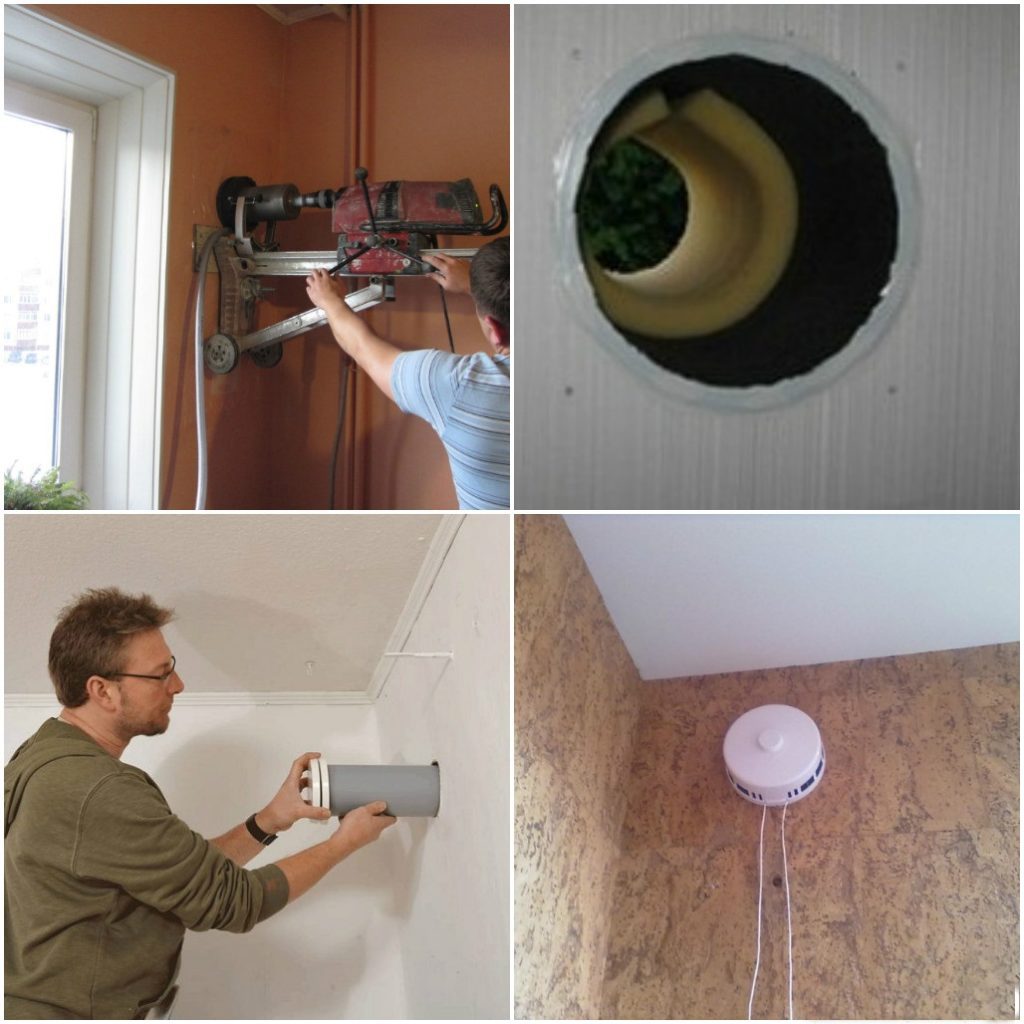
Drilling a reinforced concrete wall is best left to professionals armed with a machine tool with a diamond crown of the desired diameter. You can make a hole in the brick yourself, although you have to tinker. With a long thin drill, perform many drillings around the circumference, then carefully knock out the middle.
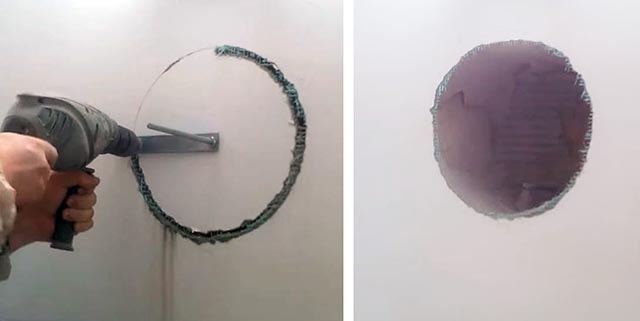
Two important points.Before starting work, make sure that there is no electrical wiring or heating pipes laid in a hidden way in the selected area of \u200b\u200bthe structure. Second: the hole is drilled with an inclination of 2–3° towards the street to allow condensate to escape.
How to properly install the inlet valve into the wall:
- We cut the air pipe flush with the structure or with a small outlet - as prescribed in the manufacturer's installation instructions. Telescopic air duct "Vents" is not cut.
- We insert the pipe into the hole, blow out the gaps with construction foam. Cement-sand mortar cannot be used.
- We fasten the grill with a mosquito net from the outside. We observe the correct position of the element - the visor is at the top, the blinds are directed downwards.
- We insert a heat-insulating element inside the duct, if necessary, cut it to length.
-
We disassemble the valve head, attach the body to the pipe and the inner surface of the wall with dowels. We put the filter, dampers and cover with the supply slots up.
Assembly diagram of the interior of the room ventilator
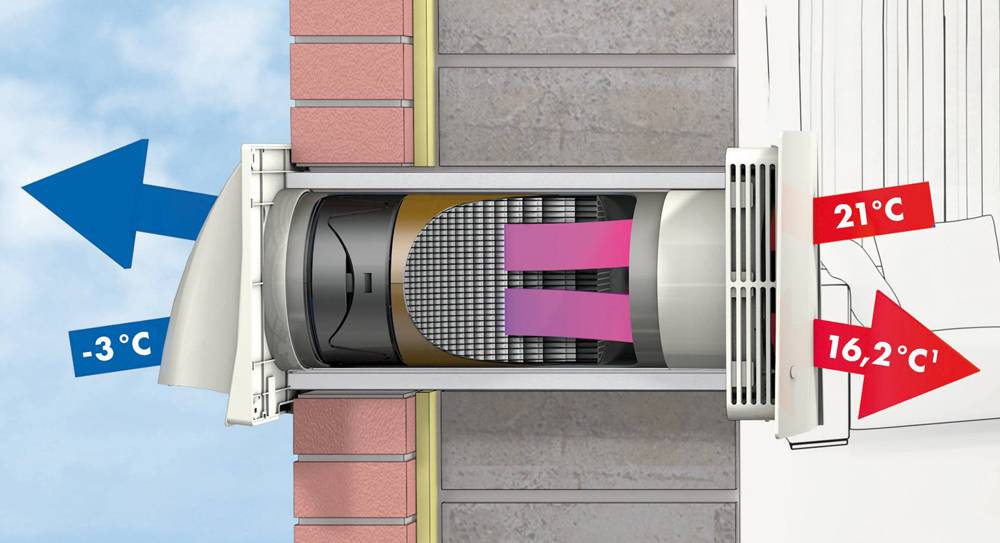
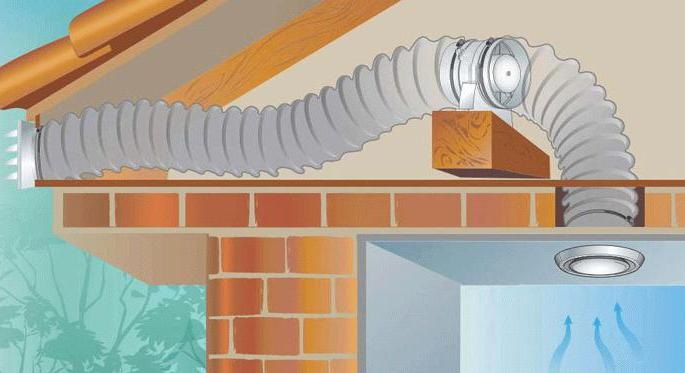
The installation technology of the recuperator valve is identical. First, an air duct is embedded in the wall, an external grille is attached, then the elements of the unit are placed from the inside - a ceramic heat exchanger, a fan and other elements. Differences: thermal insulation is mounted outside the pipe, a power cable is connected to the fan.
Advantages and disadvantages
The main advantage of the valve is that it can be used to easily increase the efficiency of the ventilation system. At the same time, minimal finances are invested. The device itself is inexpensive, and its installation is just drilling a hole in the wall where the device is installed.
And other benefits:
- If we compare the wall-mounted ventilation valve with window valves, then it is many times more efficient and powerful. Its productivity varies within 60-70 m³/h. This is a serious indicator.
- There is no need to open windows. That is, the service life of the fittings of the latter, and hence the window structures themselves, increases.
- The air from the street, passing through the filter, becomes cleaner. Dust will not pass through the valve, which means that the rooms will be much cleaner than if the rooms were ventilated through windows.
- It is always possible to regulate the incoming air flow. That is, you can adjust according to the size of the room and the whole house, as well as taking into account the season.
- Air exchange through the valve is not accompanied by heat losses in comparison with window ventilation.
- The device works offline. He doesn't need any energy.

The air flow is controlled by a damper
As for the shortcomings, they primarily relate to improper installation. And although manufacturers describe this process in detail in the instructions, home craftsmen manage to do something wrong. That's why:


- A hole in the wall reduces the strength of the supporting structure. The risk of loss of integrity is negligible.
- If the installation is not carried out correctly, then it is likely that the wall will freeze at the place where the valve is installed.
- In severe frosts, cold air can seep through the device.
- Installed inside the wall, the cylinder becomes clogged with dust over time. It will have to be removed periodically.
It is believed that the supply type valve is a source of cold air entering the rooms from the outside, which reduces the temperature inside the house. If it is installed in the wrong place, this can happen. Therefore, most often the device is mounted in the wall between the window sill and the heating radiator. That is, cold air entering the house is immediately heated by the heat of the radiator of the heating system. Of course, no one forbids installing the valve in some other place, but under the window is an ideal area.

Installation is best carried out above the radiator heating
Supply valve installation
Installing the device is a dusty and noisy process, because you have to check the wall. This will require a diamond crown. and a perforator. Masters use a special tool - a diamond drilling rig.
A hole drilled in the wall must be cleaned of dust, for which a vacuum cleaner is used. Then, a heat-insulating material is inserted into the hole. Usually for this today they use a shell made of mineral wool or polyurethane, which is sold in lengths of 1 m. It is simply cut to fit the width of the wall.
Next, the valve cylinder is inserted into the shell. From the outside, a decorative grille is attached to the wall with screws on plastic dowels. With inner cap with filter material.
Video description
The video shows how to properly install the ventilation inlet valve in the wall:
Since there are many varieties of valves on the market, the methods for installing them also vary, but the principle is the same. For example, there are devices in the cylinder of which a heat-insulating shell is installed. That is, they drill a wall along the diameter of a plastic pipe.The external decorative grille is not attached to the wall, but is inserted into the protruding end of the cylinder in the form of a cover. The same goes for the headline.
Video description
In the video, the specialist talks about the design of the flow valve, about the principle of its operation and installation method:
Window inlet valve
As promised above, we will give a little information about the ventilation valve for plastic windows. Let's start with the fact that the tightness of plastic windows has led to big problems. Many manufacturers immediately responded to the demands of consumers. So, various devices began to be inserted into the window frames, through which the air began to pass into the premises. For example:
- ventilated type profiles began to be used;
- limiters for opening frames and transoms were installed;
- seals were used with partial air permeability through them;
- glazing beads were mounted, in the design of which there was an opening valve.

Plastic window frame opening limiter
Window inlet valves have gained great popularity among consumers due to the high efficiency of air exchange. There are three types on the market:
- Folded. This device crashes into the window frame. That is, installation can be carried out on an existing window structure without changing other parts or elements. This variety has one drawback - low productivity up to 5 m³ / h. But these are the cheapest valves.
- Slotted. These models are installed in the gap between the frame and the sash. This is what complicates the installation process. Otherwise, the devices are better than folded ones due to more efficient air exchange - up to 20 m³ / h. The size of the inlets is limited only by the length of the gap.
- Overhead.These supply valves are installed on plastic windows during the installation of a double-glazed window. And this is a minus on the one hand. Another negative side is that the devices let a lot of noise through themselves, so they are not recommended to be installed in houses. But the devices have high performance - up to 100 m³ / h. They can be installed both in deaf and opening windows.
Video description
The video tells about the window supply, how the valve is installed in the window:
Briefly about the main
What is a supply air valve, the principle of its operation, for what purposes it is intended.
Advantages and disadvantages of the device, what you need to pay attention to when choosing it. Installation technology, nuances of the installation process
Installation technology, the nuances of the installation process.
Window supply: varieties, distinctive features, video - how to install the simplest valve on a plastic window.
Source
Conclusions and useful video on the topic
The video material tells about what happens when the owner of the premises violated the integrity of the ventilation duct design and this was revealed.


The legislation, public opinion and even common sense oppose the drilling of ventilation ducts. The reason is that this redevelopment will not give any cardinal advantage, but will reduce, and in some cases significantly, the comfort and safety of living. The microclimate parameters will also worsen, which often leads to various diseases, including asthma.
Have you encountered the issue of violation of the integrity of the ventilation duct and want to supplement the above material with useful information? Or do you have questions? You can express your opinion, share your experience, ask for advice from our experts and other users of the site in the block below this article.


