- Combined ventilation of the car box
- The structure of the mechanical ventilation system
- Ventilation above the paint area
- Garage ventilation schemes
- Selection of technological equipment, materials and components for garage ventilation
- Criteria for choosing a ventilation device for the garage and its basement
- Installation nuances
- Video description
- Conclusion
- Features of arranging ventilation in the garage
- Hood in the garage. Features of work and calculation.
- Mechanized type of ventilation
- Air exchange classes in the garage
- Do-it-yourself garage ventilation procedure
- How to make a hood in the garage
- Materials and equipment for ventilation in the garage
- What you need to know about ventilation
- How to make natural ventilation with your own hands
- The choice of ventilation scheme and calculation
- Tools and materials
- Installation and ventilation check
- Finally
- Summing up a little
Combined ventilation of the car box
The advantage of combining natural ventilation with a low power mechanical system is that the garage atmosphere is guaranteed to be renewed in any weather.
Neither calmness nor summer heat weaken the performance of such a supply and exhaust complex.
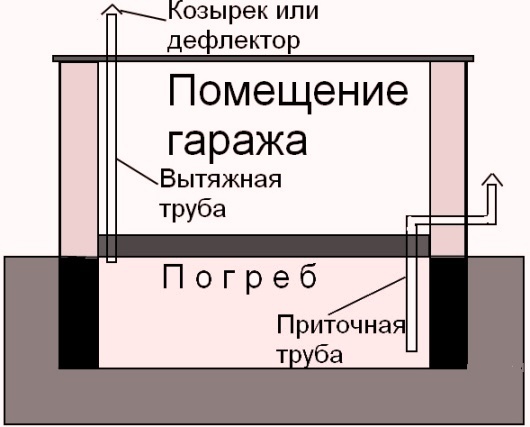
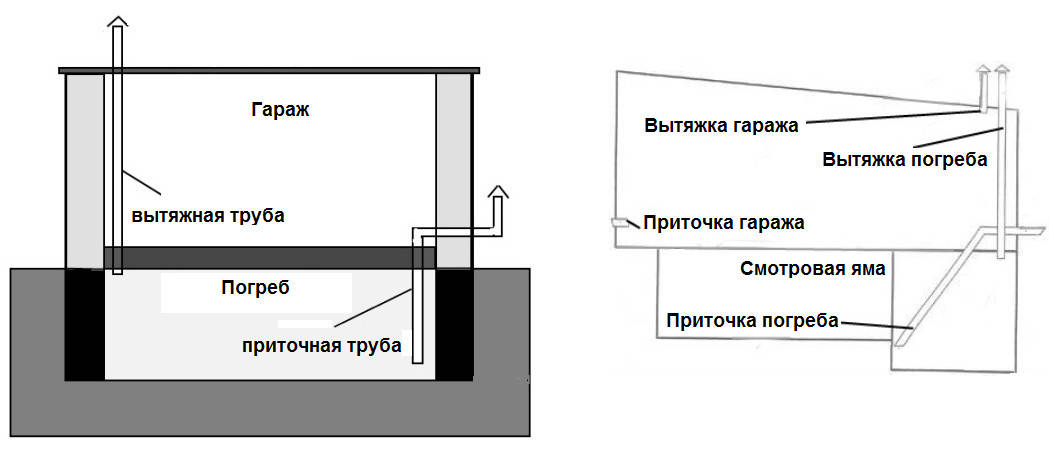
The scheme of combined ventilation is completely similar to the device of a natural air exchange system.The same location of the supply and exhaust air ducts, the same cross-section of the air pipes and the deflector at the upper end of the exhaust duct are used.
One difference is the installation of an axial or centrifugal fan into the cavity of the exhaust duct.
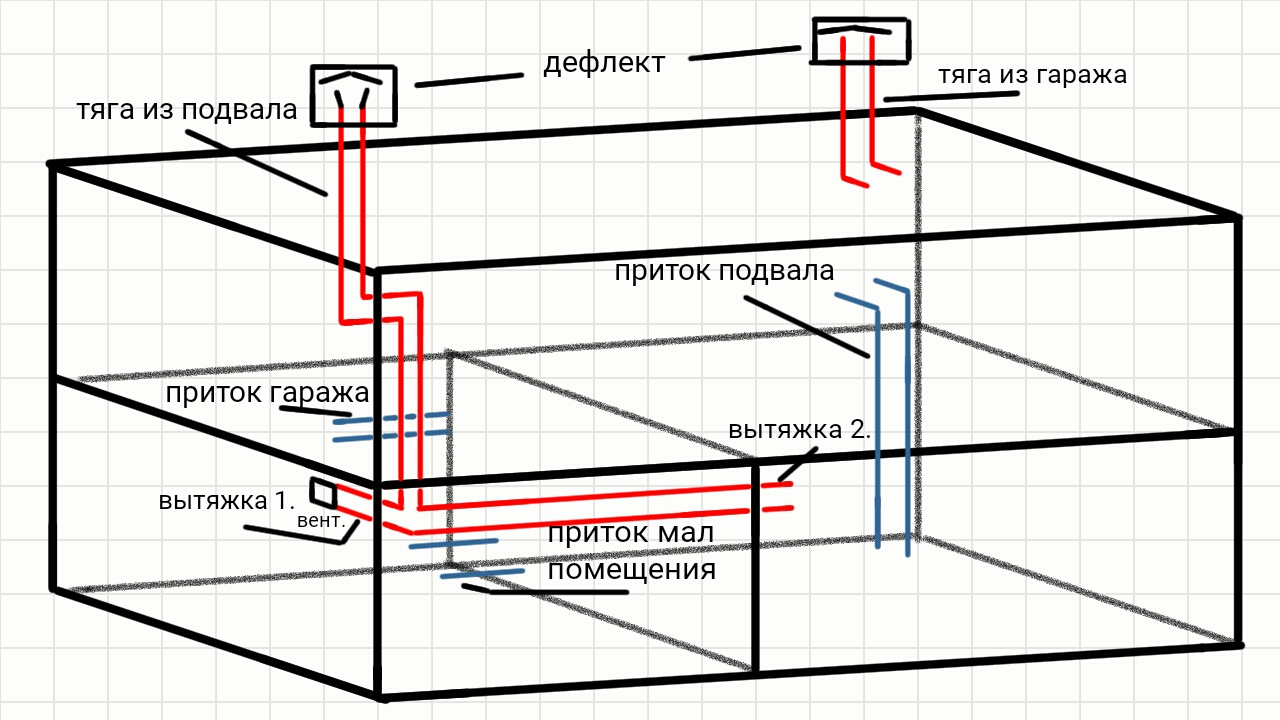
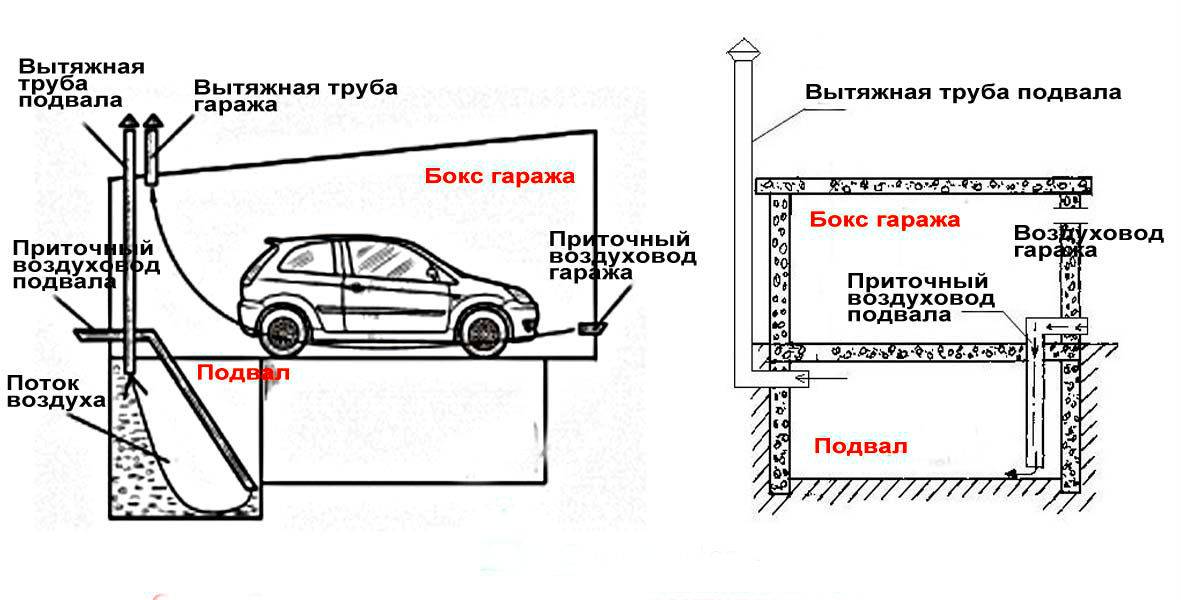
 The supply air will not get into the garage basement with a viewing hole from the general ventilation system - the level is too low. It is required to have a separate supply and exhaust in this room (+)
The power of the ventilation unit should not exceed 100 W, this is enough. The fan must be built into the insulated segment of the duct, otherwise condensate will enter it.
To control the operation of such a fan, an electronic timer is useful, built into the adapter between the electrical outlet and the power plug of the exhaust device.
Keeping the exhaust fan on for a long time is unprofitable because of its energy consumption, and there is no need for this. In addition, in winter, the combined ventilation of the garage will be too effective and will make the box very cold.
An adapter with a timer will allow you to set the frequency and duration of the fan for 24 hours and for several days in advance.
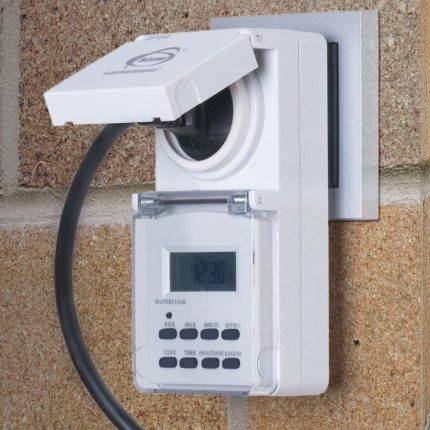 By placing electronic timer between socket and the power plug of the exhaust fan, you can control the on / off cycles of the electromechanical element of the exhaust system
Note that when choosing a sufficiently powerful centrifugal unit for ventilation, a larger section for the exhaust duct may be required. We remind you that the choice of the section of the air-conducting pipe depends on the speed of the air flow.
With an insufficient internal diameter, the hood will make a loud noise and draw air poorly.
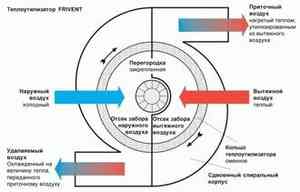
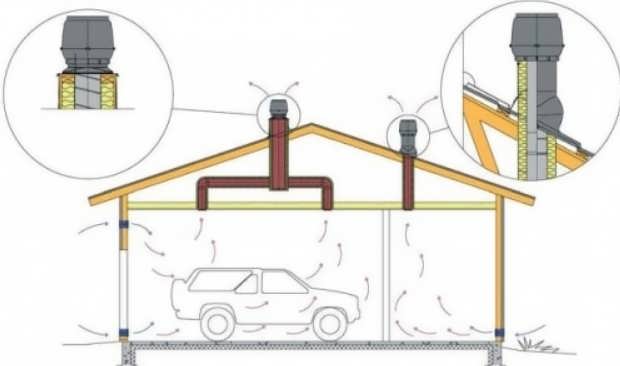
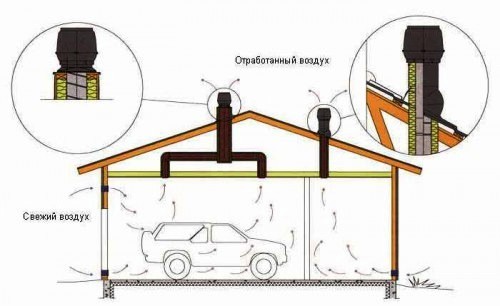
The structure of the mechanical ventilation system
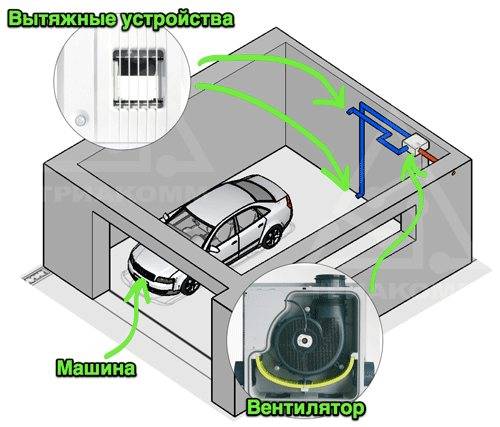
In the forced air ventilation system, there are no such disadvantages that are presented in the natural and combined scheme. Having equipped his garage with this ventilation, the garage owner can not worry about the condition of his car, as all temperature requirements will be met. Only forced ventilation can create good air circulation in the basement of the garage and hard-to-reach inspection pit. This type of ventilation system is the only one used in underground garages.
The main components of the mechanical circulation system are the air supply unit and the air exhaust equipment. The air supply unit consists of a filter, a fan and a heater, which is powered by electricity. The hood has one or more ventilation devices.
Fresh air, when it enters the ventilation supply pipe, is preliminarily cleaned and heated. Next, it moves towards the fans, which distribute clean and heated air throughout the garage. Waste and dirty air is pushed out with the help of a fan or special air equipment. This device will take up a large area under the roof of the garage and is more difficult to install, however, it will ensure high-quality and uniform air distribution.
A well-functioning mechanical ventilation system is sometimes constructed using a monobloc system. Two blocks perform all the main functions of the ventilation system - the supply and exhaust of air masses. The smallest amount of energy is used by monoblocks with plate heat regulators. The warmth that is released during operation it heats the airwhich constantly comes from outside.
Ventilation above the paint area
Car enthusiasts are often engaged in repairing and painting cars in the garage. Of course, during the staining process, a lot of toxic compounds are released that are potentially hazardous to health.
It is important to provide this area with an additional hood. At the same time, experts and more far-sighted garage workers note that the ventilation system above the painting area should also be equipped with filters.
Please note: the hood must be forced above the painting area. Natural ventilation in such a dangerous place will not be enough, since it has a rather low efficiency.
The air must be cleaned of harmful chemical compounds as quickly as possible.
The most successful solution is to install a forced ventilation system with two fans. One fan will increase the outflow of polluted air, and the other will provide active injection of clean air. It is better to install filters on both air ducts, for outflow and inflow.
It is also important to provide normal conditions for the work itself in the garage. For example, when the body is being painted, any tiny speck from the air instantly stands out on the fresh paint.
That is why the floor in the garage room must be moistened before work, and the air inlet must be reliably protected by a filter. Then particles of litter and dust will not penetrate into the room.


When the hood with filter is properly installed, it will not allow harmful toxic fumes to enter the atmosphere. Remember about the proper location of the air ducts. The exhaust duct is located at the bottom, but the opening for the influx of fresh air is mounted under the ceiling of the garage room.Then the harmful vapors will sink down and immediately quickly eliminated from the garage.
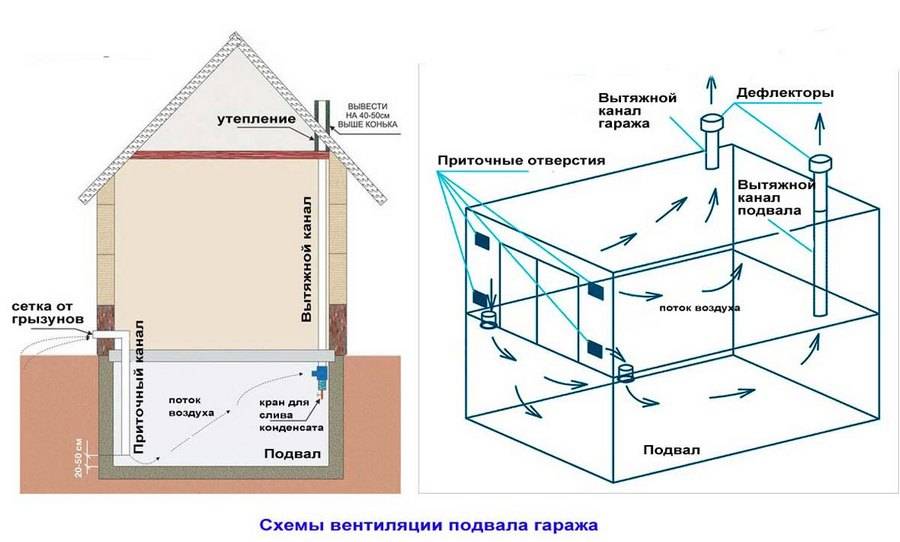
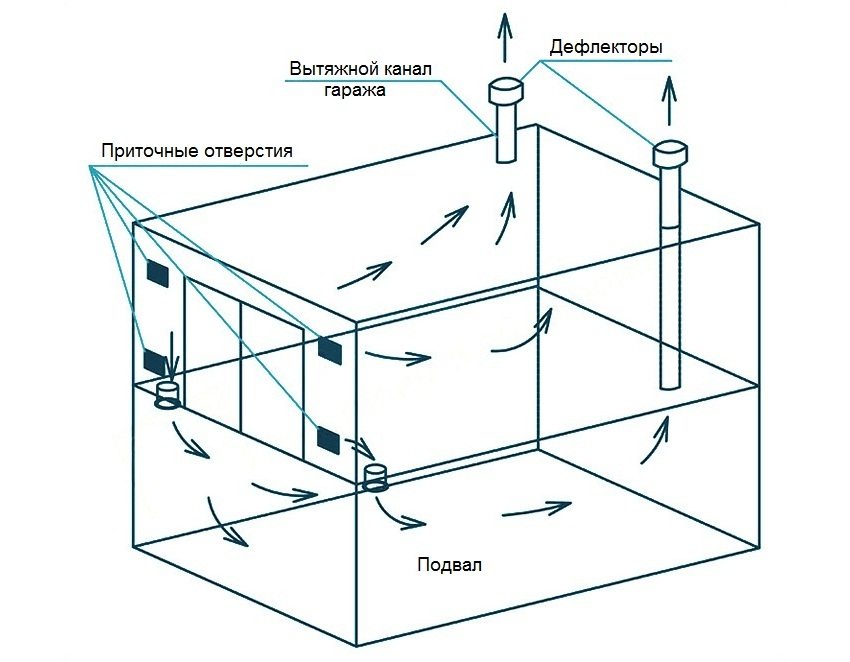
Garage ventilation schemes
In most cases, a private garage is a small room for one car. Plus, often part of the space in it is given over to a workbench with tools and a place for storing tires, canisters, etc.
It is easy to make ventilation in such a building yourself. It is not required to make complex calculations on air exchange here. It is enough to know a couple of formulas and norms.
There are two garage ventilation schemes:
- With natural air exchange.
- With forced air circulation between the street and the room.
The implementation of both options involves the installation of two ventilation vents with pipes - one for the exhaust, the second for the inflow. The forced ventilation circuit needs an electric fan. But for most garages, a conventional system with natural air draft will be more than enough. It is non-volatile, extremely easy to install and cheap.
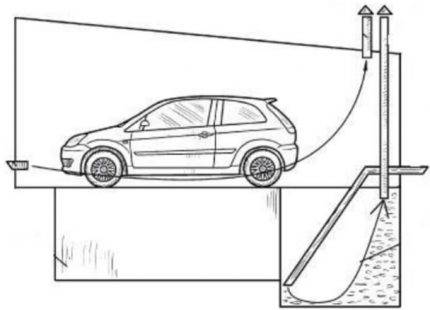
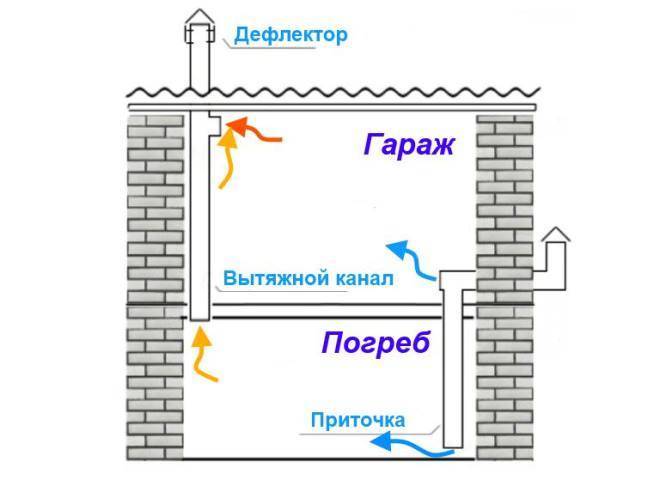
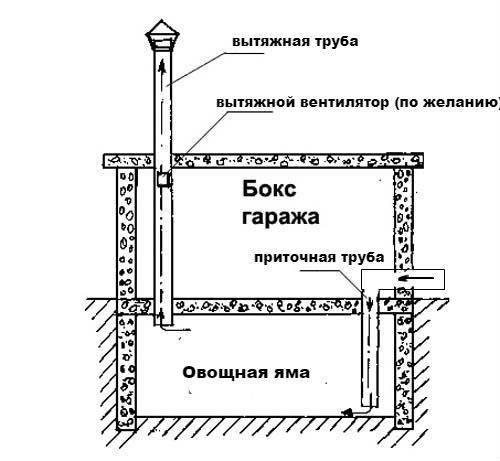
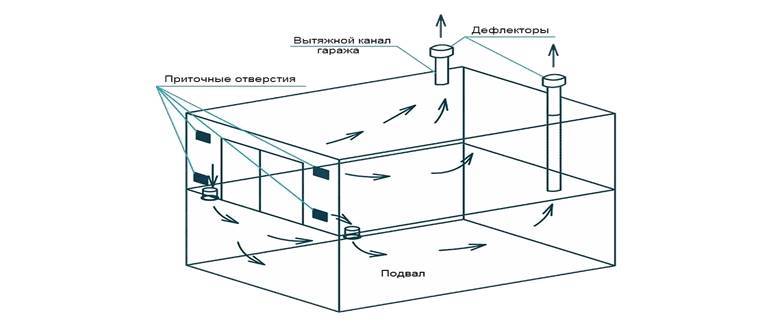
Air circulation in a garage with a pit with natural ventilation
Flow or exhaust ventilation that requires power supply in the garage should only be done if there is heating in it. In this case, it is best to leave your choice on one hood. With its help, you can organize a very effective air exchange. And it will cost not as expensive as combined supply and exhaust ventilation. The latter consists of a considerable amount of expensive equipment, which also requires additional expenses during operation.
When choosing a garage ventilation scheme, it is also necessary to take into account the design features of the garage box.If it is among the same type of structures, then there are restrictions on making ventilation holes in some of its walls. Ventilation pipes will not be able to be removed from all sides of the building. But to increase natural traction, they should be located in the garage just from its different ends.
In this case, it is recommended to opt for an exhaust, supply or combined option. These types of ventilation in the garage do not depend so much on the location and size of the ducts. The power of the fan will be more important here.
Air exchange with forced ventilation
Selection of technological equipment, materials and components for garage ventilation
To create this system, serial household appliances are suitable. When choosing, you should give preference to models adapted to high humidity.
Automating an exhaust fan in a garage can be done using special kits
To solve such problems, various power supply / power off devices are used according to the algorithm set by the user.

This technique is able to quickly clean a large garage from polluted air.
This centrifugal fan is suitable for outdoor use
If you use this solution, you can reduce the noise level in the room.
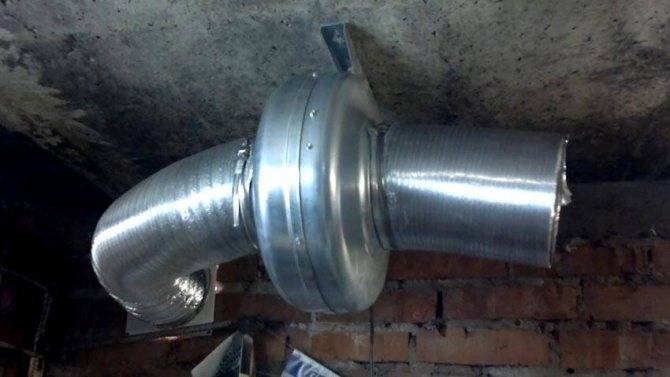
The garage exhaust fan can be installed in an optimal location as part of the channel design
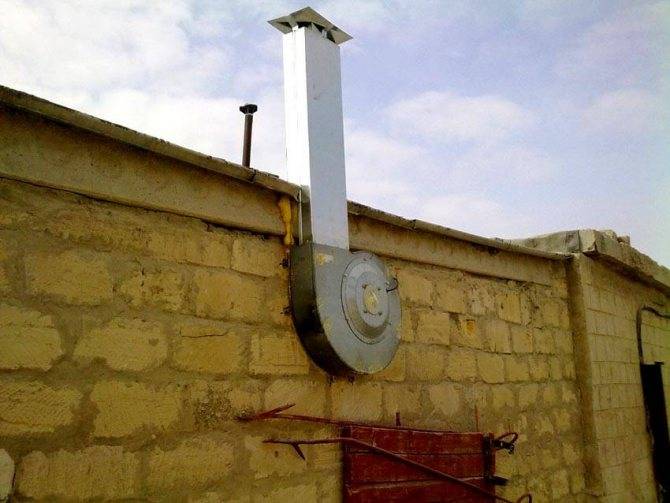
To create this design, the author used an individual order in a specialized workshop
Galvanized sheet is well protected from weather influences.It is suitable for the manufacture of products with unique sizes and shapes at no extra cost. Additional advantages are: light weight, easy installation, good appearance.

Connection of flexible pipes for ventilation in the garage with a durable intake device

Complex project
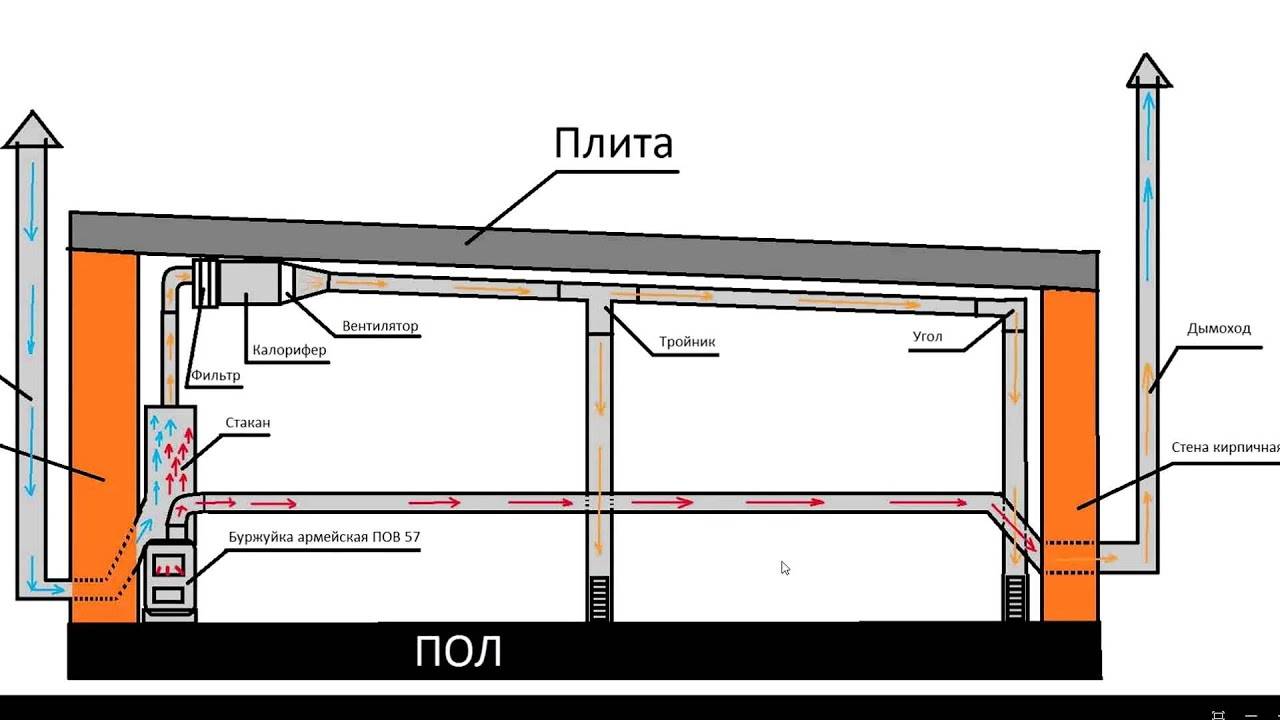
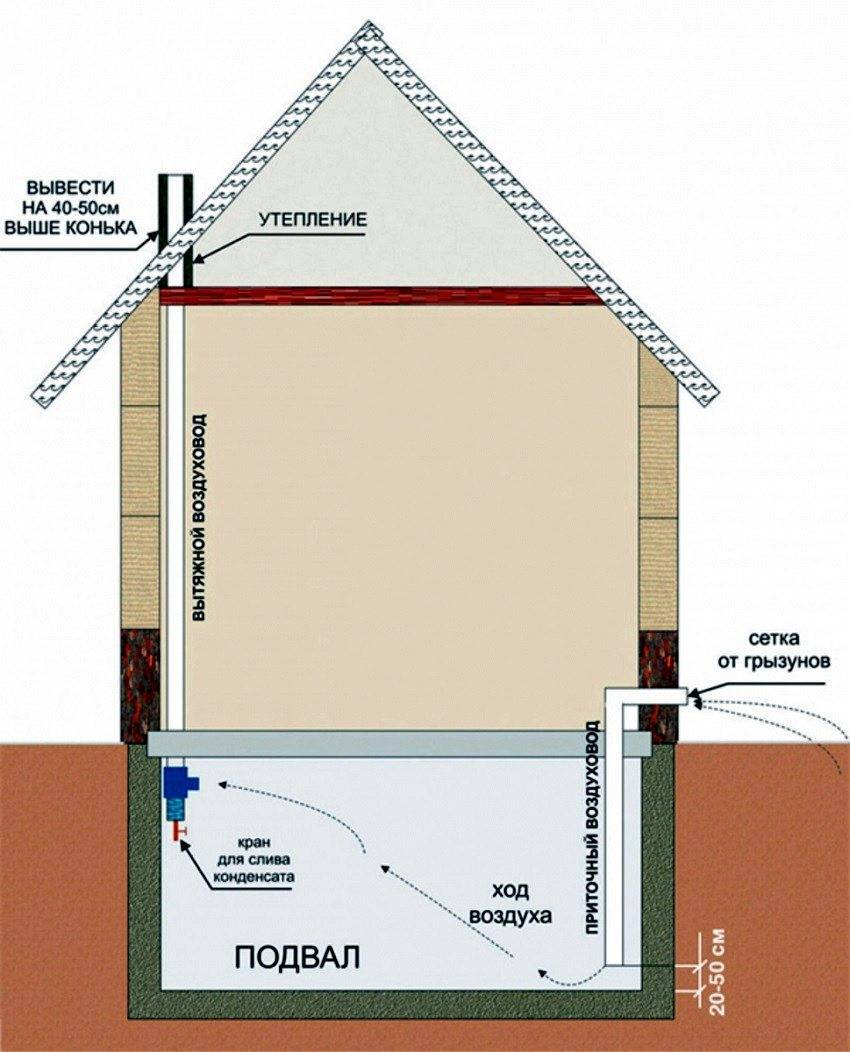
This list lists the components of a system that maintains comfortable temperature conditions during the cold season:
- ceiling (1) of reinforced concrete slab;
- brick walls (3, 5);
- input channel (2);
- solid fuel heating boiler (6) with chimney (4);
- glass (7) - here the air is preheated for the ventilation part of the system;
- filter (8);
- heater (9) with built-in electric heaters;
- fan (10) channel type;
- a tee (11), which supplies warm air to the center of a large room;
- square (12), which performs similar functions on the end part of the channel.
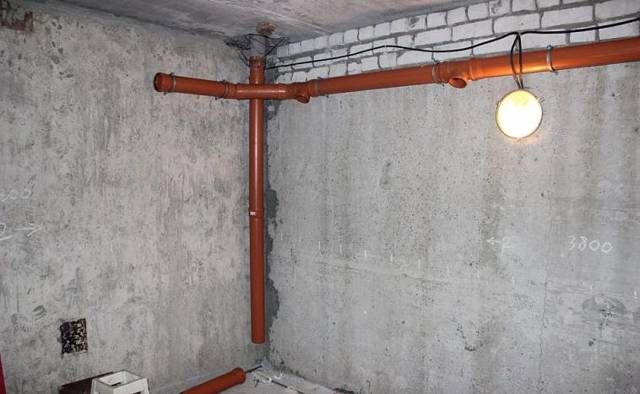
Note! When creating ventilation in a garage from sewer pipes, the following features must be taken into account. Specialized red PVC products are produced specifically for outdoor installation. They are somewhat more expensive than their gray counterparts, but they are distinguished by increased resistance to temperature and other influences.


Criteria for choosing a ventilation device for the garage and its basement
How to make a hood that is right for your garage? The answer lies in the area and volume of the room in which the installation is planned. For a garage that stores one car, natural ventilation is sufficient. But for high-quality work of the hood, regular inspection and cleaning of pipes is carried out. The average garage volume for which this type of hood is suitable is 20-40 cubic meters.
The supply and exhaust pipes, with their correct location, can easily cope with the replacement of air in such a room. If it is larger or the basement is located over the entire area of \u200b\u200bthe building, then forced methods are used. Installing fans will improve the efficiency of the ventilation system. Air will be replaced in greater volumes and, accordingly, food storage in the cellar will be less risky.
Sometimes the natural ventilation system does not cope with its work even for small areas of its application. This may be due to dirty pipes or insufficient draft due to certain weather conditions. For the first problem, the solution is simple. They are cleaning. And for the second - buy special devices. Such a supply and exhaust system can be easily supplemented with fans or other devices. Do-it-yourself installation will take no more than 30 minutes if you have all the necessary funds, and your hood will begin to live a new life.
Installation nuances
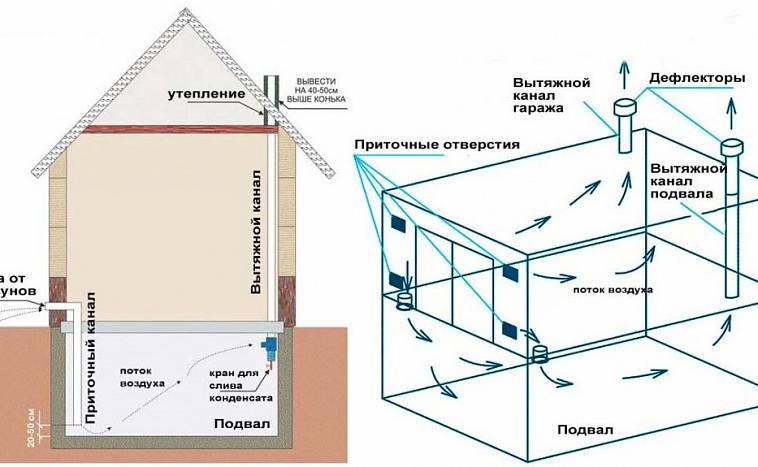
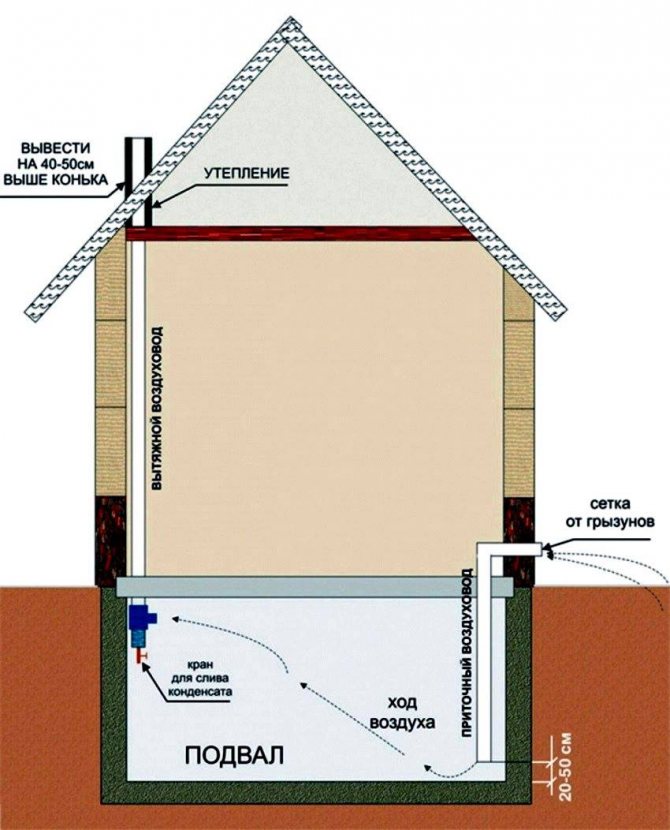
It is not always possible to provide air flow from the street, for example, in the box of a cooperative garage or built into the house. In such cases, the upper end of the supply pipe is led directly to the garage not far from the gate, and ventilation grilles are installed in them.
Scheme of natural ventilation without the outlet of the supply pipe to the street
Before making an vent in the cellar, it is necessary to determine the diameter of the pipes, which is especially important when arranging natural ventilation. The easiest way to calculate it is by the formula, according to which the cross-sectional area of \u200b\u200bthe pipe should be equal to 26 cm2 per square meter of the room .. For example, if the cellar area is 5 m2, then the cross section should be 130 cm2
Using the formula for the area of a circle, we find the diameter: 12 cm.If pipes of the required section are not found, products of a larger diameter are taken.
For example, if the cellar area is 5 m2, then the cross section should be 130 cm2. Using the formula for the area of a circle, we find the diameter: 12 cm. If the pipes of the desired section are not found, products of a larger diameter are taken.
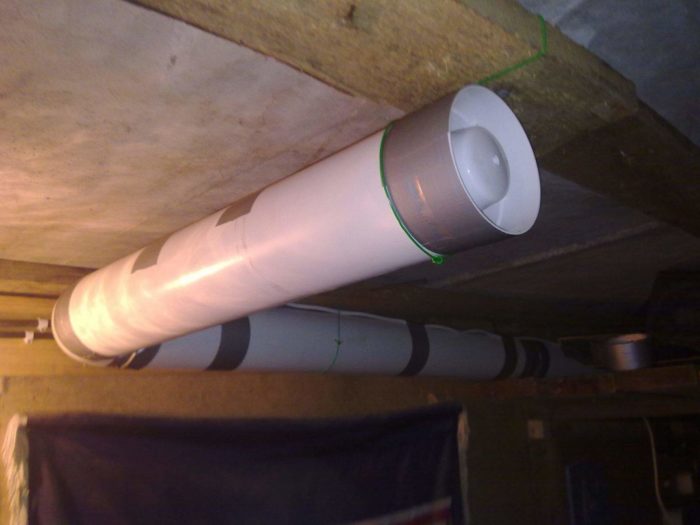
In such rooms that are not demanding on aesthetics, such as basements, cellars and garages, you can install any pipes - asbestos-cement, sewer, special ventilation ducts. The latter have an antistatic layer on the inner surface, which does not allow dust to settle on the walls and gradually narrow the working lumen of the channel. But they are not cheap either.
Plastic air ducts come in round and rectangular sections
Therefore, the most popular option is polypropylene sewer pipes, which are attractive for their low price and ease of installation when using couplings, angles and tees with sealing rubber rings that ensure the tightness of the joints. But they do not differ in a wide variety of diameters. And this is one of the reasons why a mixed type of ventilation is preferred. In this case, the diameter of the duct is not so important, because the flow of air passing through it is accelerated due to artificially created traction.
During installation, you need to remember the following rules:
- the fewer turns the air duct has, the better it provides fresh air;
- diameter throughout should not change;
- the places where pipes pass through walls and ceilings must be sealed with mounting foam or cement mortar.
Video description
The installation option for a ventilation system made of asbestos-cement pipes is described in the video:
Conclusion
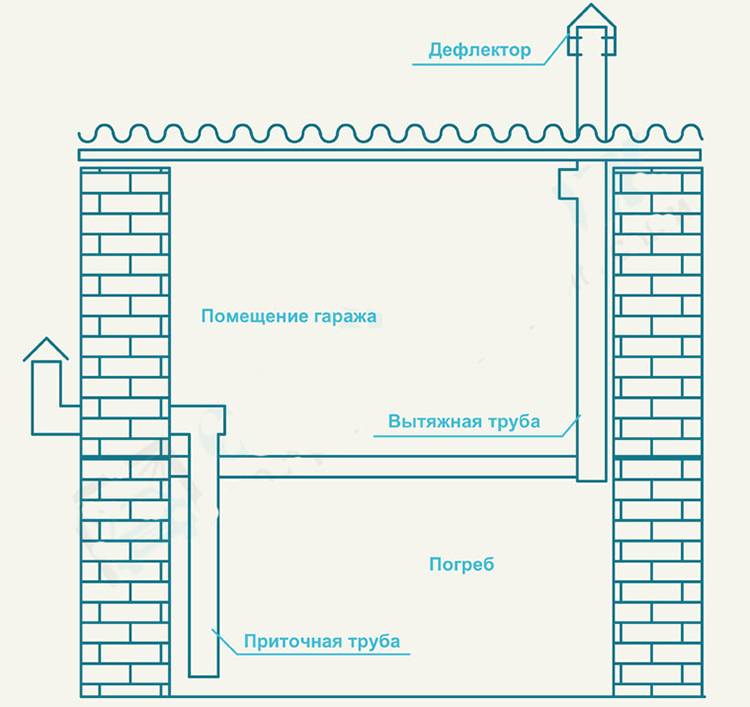
Knowing the physical principles of air movement, it is easy to understand how to make ventilation in the cellar of the garage. The circulation of air masses is provided by only two pipes installed at different levels. This is enough for small storages. By supplying the system with fans, it is possible to maintain a normal microclimate in large damp basements, thereby not only preserving the crop, but also not exposing the car to the risk of rusting ahead of time.
Features of arranging ventilation in the garage
The floor in the spray booth is also a necessary link in the ventilation unit.
You need to raise the floor 20 centimeters above ground level. This distance is enough for the hood, in order to build an exhaust fan into the floor.
A tubular electric heater (TEH) is a heating device in the form of a metal tube filled with heat-conducting insulators.
A nichrome filament is located in the middle of the tube, which forms the counteraction required to transfer the required power to the surface layer of the heater.
Types of heaters:
- double-ended;
- single-ended.
When installing ventilation in the chamber, the problem of drying the machines after painting should be solved. It is preferable to use infrared lamps, with their help the painted surface dries quickly, without air flow, so that the painting process becomes easier. And from drying cars with ordinary air, it is recommended to refuse.
If there are infrared lamps in the spray booth, but there is no hood, then this is wrong. The spray booth must have both an ultraviolet lamp and an extractor hood for painting. A well-designed ventilation system will be needed not only for drying the car, but also for the painting procedure itself.
It is worth thinking and analyzing for what purpose a spray booth is being created and whether it is possible to invest a tidy sum of money in this design. The advantage is that a professionally made painting booth will bring cash income, for the reason that you can paint cars yourself or profitably sell or rent the premises.


Hood in the garage. Features of work and calculation.
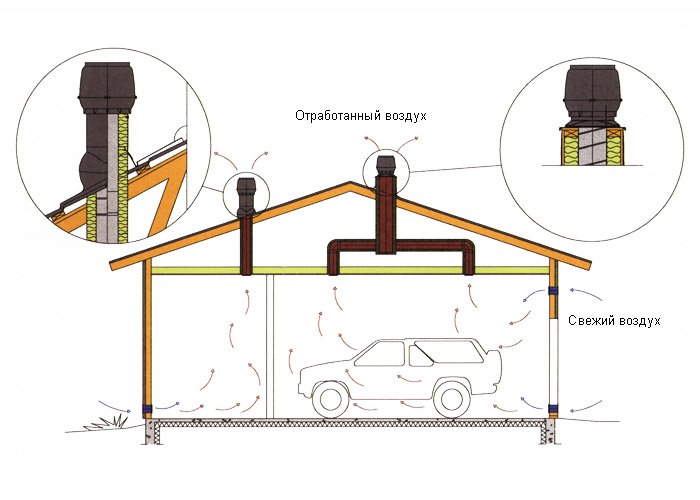
A garage room with a car permanently stored in it requires the organization of ventilation in it. Air circulation will prevent the occurrence of rust in the garage and protect the car owner from exhaust gases and other harmful fumes.
In the weather conditions of Russia, the arrangement of the ventilation system for a closed box must be organized very carefully.
For this, the following points must be taken into account:
- The temperature difference between the ambient air and the garage room. Due to the fact that the air inside the box is warmer and therefore lighter, it will rise up. At the same time, heavier air from the surrounding atmosphere will flow inside by gravity through the duct.
- There must be a difference of at least 3 meters in height between the inlet pipe and the outlet pipe. Due to this, a difference in pressure will be achieved.
- The air inlet pipe must be installed on the side of the garage from which the prevailing wind blows. And, accordingly, the branch pipe of the outlet from the opposite.
Compliance with the above rules is mandatory. Otherwise, the efficiency of the ventilation system will be minimal.
To increase the flow of air into the room, it is worth installing an air intake - a grill instead of a round duct. Moreover, its diameter should be 2-3 times the diameter of the main pipe. It must be mounted at a height of up to 50 cm. To reduce or increase the air flow, it must have a special damper.
Mechanized type of ventilation
The newest and most effective way to dry the cellar in the garage remains mechanized. In this case, the monoblock is fully responsible for air circulation, which provokes movement.
The software that is installed in it is controlled using a modular system. That is why this unit is called the most reliable at the moment.
The only drawback of the system is its high cost. Not every owner is ready to lay out several thousand to ensure normal air circulation in the utility room.
Air exchange classes in the garage
It should be noted that the ventilation of a garage box with and without a basement practically does not differ from each other.
Do-it-yourself ventilation in the garage can be made according to the following schemes:
- natural. Is the simplest of all. Air exchange in the room is carried out due to the difference in temperatures in the room and outside;
- mechanical (forced). The system is expensive, but the most effective. Air exchange occurs due to the equipment that produces the supply and removal of air;
- combined. It works similarly to natural, differing in the addition of a fan to the circuit to remove air from the room.
Do-it-yourself garage ventilation procedure
Before starting work, you need to prepare the following tools and materials:
- grinder (for cutting pipes);
- sealant;
- perforator (to create holes);
- plastic pipes;
- caps and protective grilles.
Then you can proceed with the installation, following the step-by-step guide:
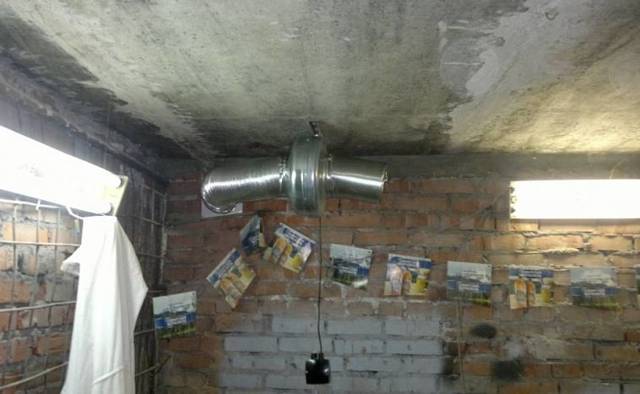
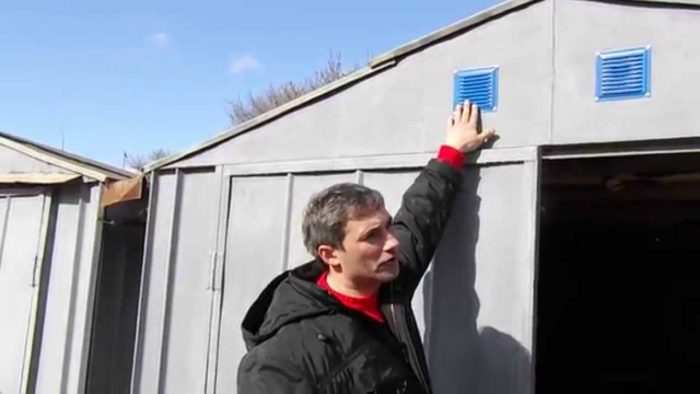
- First you need to make ventilation holes in the walls, calculating their diameter. If you follow the rules, for an average garage (6 by 3 meters), the diameter of the holes should be at least 27 cm. They are made with a puncher at a distance of 10-15 cm from the floor. Air ducts from pipes are mounted in the holes obtained.
- On the opposite wall (10 cm below the ceiling), holes are made for installing an outlet pipe that will extend beyond the roof of the garage. The higher it is, the more efficient the air exchange will be. The minimum height of the structure above the roof should be 50 cm.
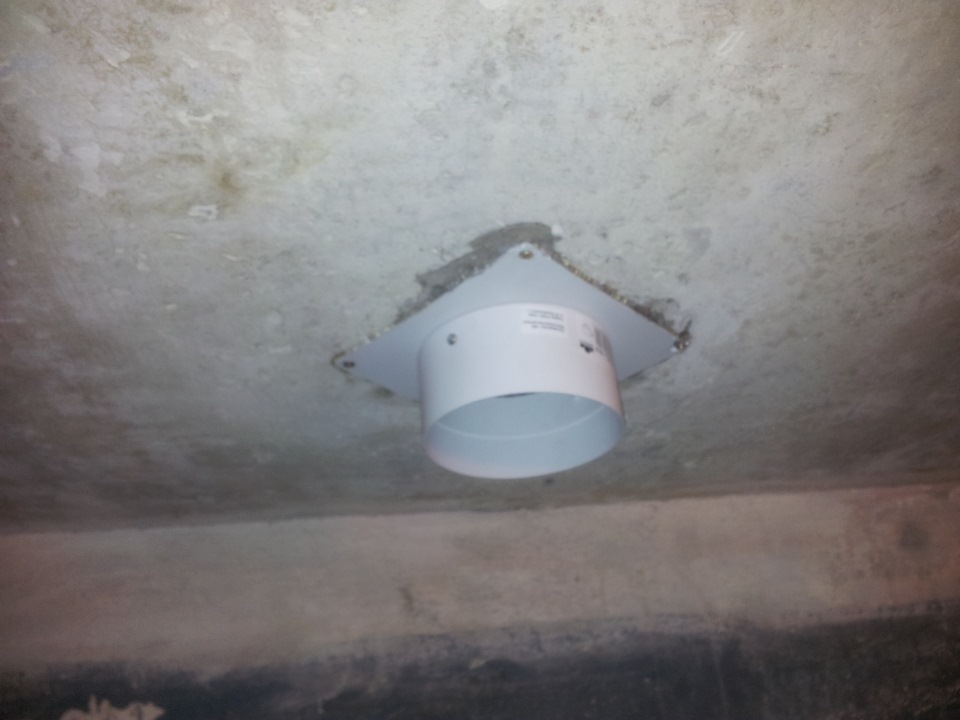
- After installing the pipes in the openings, it is necessary to seal the gaps between them and the wall with a sealant. The outlets of the pipes are closed with gratings that protect against the penetration of small rodents into the room. To prevent precipitation from entering the pipe, a protective cap is installed.
How to make a hood in the garage
To install the structure with your own hands, you need to perform the following steps:
- Step back from the floor 15-20 cm in height.
- Make a hole in the wall with a puncher to let in fresh air.
- Insert a piece of pipe, cover the area around it with plaster.
- Use a perforator to make a space in the ceiling, or step back from it 15-20 cm down the wall. It will release polluted air.
- Insert the pipe into the prepared place in the roof. The longer it is, the more efficient the air change will be. Close its outer end with a cone-shaped dome to protect it from precipitation.
The space in the wall, both upper and lower, must be covered with a protective grille. This will protect the room from debris, dirt, penetration of rodents. To prevent insects from flying inside, the hood should be equipped with a mosquito net.
In a metal garage, you can make the easiest and cheapest option: drill holes in the selected places with a drill like a grid, cover them with a grid.
Installation of a structure for extracting exhaust gases indoors is a mandatory requirement of SNiP 21-02-99. To choose the right type of it, you should understand the work of each of them.
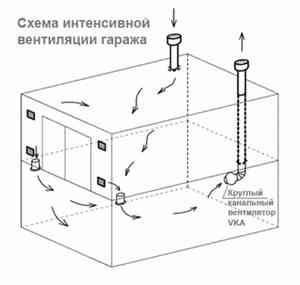
Garage ventilation system
Materials and equipment for ventilation in the garage
Of course, the most important parts of ventilation are the air ducts. And in order not to overpay extra money for their purchase, many install ventilation in garages from sewer pipes. At the same time, in addition to the cheapness of this material, it is also quite reliable, which means that its use is most optimal. And now we will try to compare the cost of not only air ducts made of various materials, but also fans, which can not only pump or extract air, but also warm it up
First, let's pay attention to the pipes for the ventilation of the garage
| Name | The size | Material | Cost, rub. |
| Pipe | 110x3000 | PVC | 400 |
| Pipe | 110x3000 | Brass | 1100 |
| air duct | 250x1000 | Aluminum | 340 |
| air duct | 204x60x1000 | Plastic | 160 |
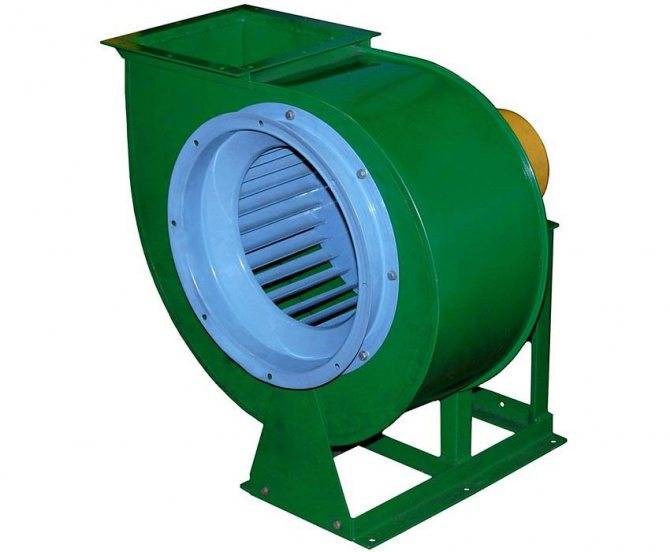
Now consider the different types of superchargers.
| Name | Model | Performance |
| Recuperator | Prana—250 | 650 m3/h |
| Recuperator "PRANA-250" | ||
| Forced ventilation | Selenga | 600 m3/h |
| Ventilation unit VentMachine Selenga |
Thus, the purchase of a heating installation becomes a rather costly undertaking.
It is for this reason that it is worth paying attention to the possibility of making it yourself. After all, a conventional exhaust fan in the garage will cost a much smaller amount.
Moreover, their range on Russian shelves is quite wide. The average price for which you can buy an exhaust fan for a garage ranges from 1500 to 4000 rubles.


Assortment of plastic pipes for ventilation
What you need to know about ventilation
Anyone who has at least once encountered the problem of indoor air exchange knows that there are natural, forced and combined ventilation systems. With the first option, everything is simple: it is based on the difference in air temperature inside and outside.
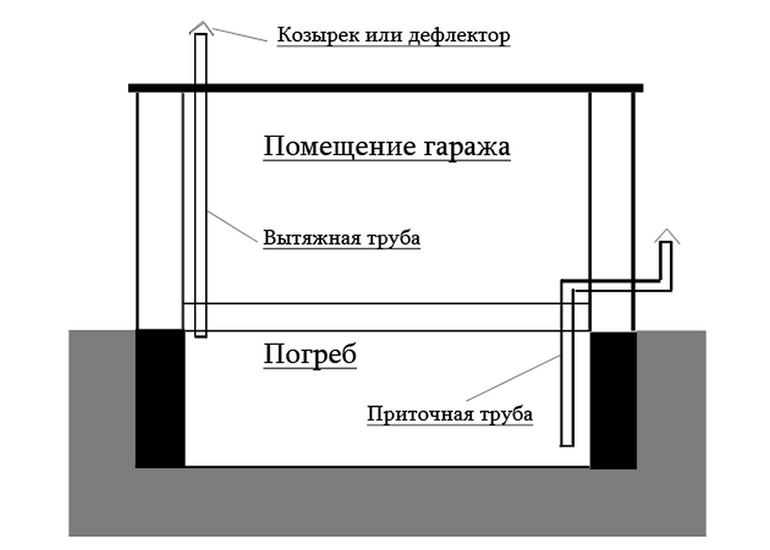
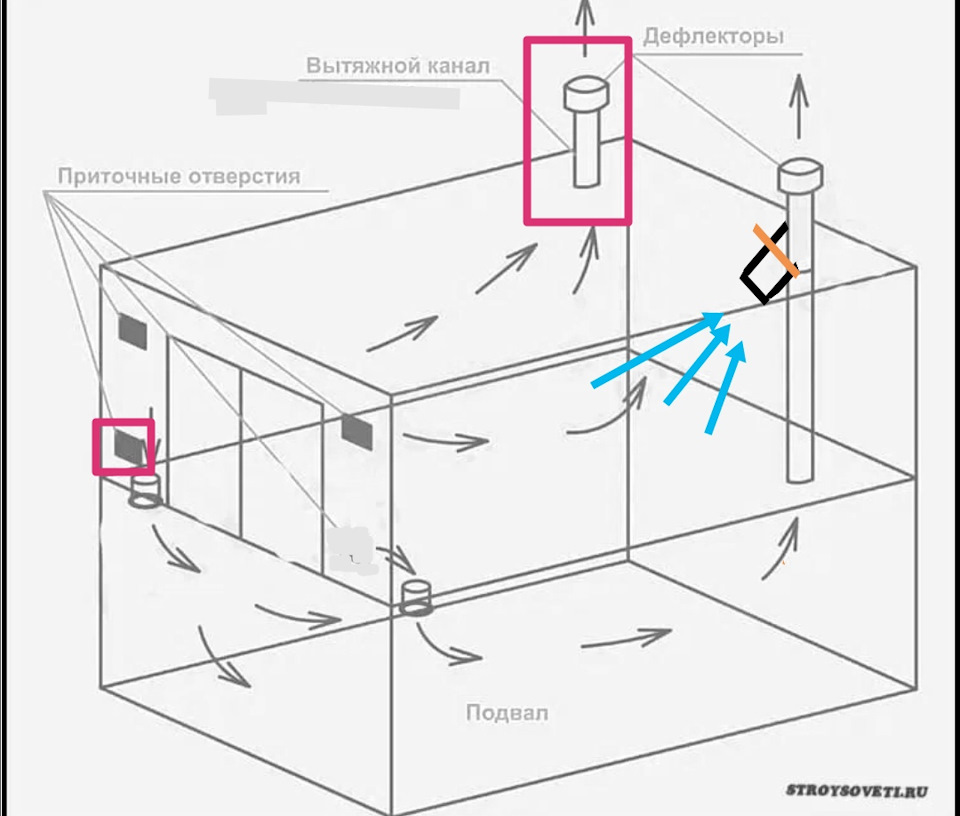
Organization of garage ventilation without a viewing hole: arrows "a" indicate the direction of air flow, the letter "b" indicates the location of the supply air vents, "c" - the ventilation duct
As you know, warm air rises and cold air sinks. The idea is that cool air masses enter the room from the street, rise up and naturally leave through the exhaust opening. At the same time, they must be replaced by new currents of fresh air that enters from outside.
In the garage, such ventilation is not difficult to organize. To do this, it is necessary to provide sufficiently wide openings for the inflow and exhaust of air, but the temperature difference between inside and outside the room will also be of great importance. In winter, there are no problems with this condition, but in summer, when the heat is almost the same everywhere, the efficiency of natural ventilation is sharply reduced.
To ensure the supply of fresh air to the garage, instead of a hole in the wall, you can put special supply grilles on the gate
An alternative option in such a situation is forced ventilation, i.e. using additional funds. Special fans are installed in the supply and exhaust openings, which, depending on the purpose, blow air into the room or remove it.
But installing two devices at the same time for one small garage is not always reasonable and justified from an economic point of view. It is more profitable to use a combined ventilation system, which requires only one device. For example, a supply fan is installed, it pumps fresh air, and the exhaust air masses are forced out through the exhaust opening.
In garages, an exhaust system is considered more acceptable. A fan is installed that effectively removes air saturated with harmful vapors and excess moisture. Fresh air masses will enter the room naturally through the supply part of the system.
How to make natural ventilation with your own hands
Consider how to make ventilation in the garage without the help of professionals. Before starting work, the building must be insulated to prevent condensation from accumulating inside the garage.
Networking rules:
- The air inlet is located at least 10 cm from the floor surface. To prevent debris from getting into it, the pipe is closed with a mesh.
- To protect against snow, make the outlet pipe of the inlet at a height of 30 cm relative to the ground.
- The hood is located in the upper part of the building opposite the inlet. It is better to space the dots diagonally and as far apart as possible. The hood should be placed at a distance of 10 cm from the roof. Output at least 50 cm above the roof horizon. To protect against precipitation, put on a fungus at the output end.
- It is permissible to organize the inflow with gratings embedded in the walls of the garage, gates. Efficient air exchange is maintained provided that the size of the gratings is 3 times larger than the cross section of the exhaust pipe.
The choice of ventilation scheme and calculation
Do-it-yourself ventilation scheme in the garage is selected for each individual room.
Terms:
- ease of implementation;
- availability of repairs;
- maximum air exchange;
- reduced heat loss;
- possibility of network reorganization.
The last item is required, since in the summer the owner may need to install a fan. In winter, most often it is necessary to block the intensive access of cold air.
The calculation of the diameter of the ventilation ducts is carried out in two ways:
- According to the formula, 15 mm of the pipe section is taken per 1 m2 of area. It turns out that for an area of 10 m2, a pipe with a diameter of 150 mm is chosen.
- According to the formula: the sum of the cross section of the holes \u003d 0.3% of the area of \u200b\u200bthe garage. This calculation is performed for a single-channel mechanical network.
Natural ventilation in the garage does not require special calculations, it is important to follow the rules:
- position the inlet on the windward side;
- equip the outlet of the inflow at a distance of 10 cm from the floor or 30 cm from the ground;
- protect the pipe from above with a grate;
- the hood is located diagonally as far as possible from the inlet;
- arrangement of the exhaust pipe not lower than 10 cm from the ceiling;
- outlet of the duct pipe at a distance of 50 cm above the roof horizon;
- protect the air duct with fungus and mesh.
Tools and materials
Structurally, the network consists of a number of elements that the master will need:
- inflow pipe with a diameter of up to 250 mm;
- exhaust pipe with a diameter of up to 250 mm;
- container for collecting condensate;
- nets and gratings for branch pipes;
- thermal insulation material;
- sealant;
- perforator;
- add-on elements.
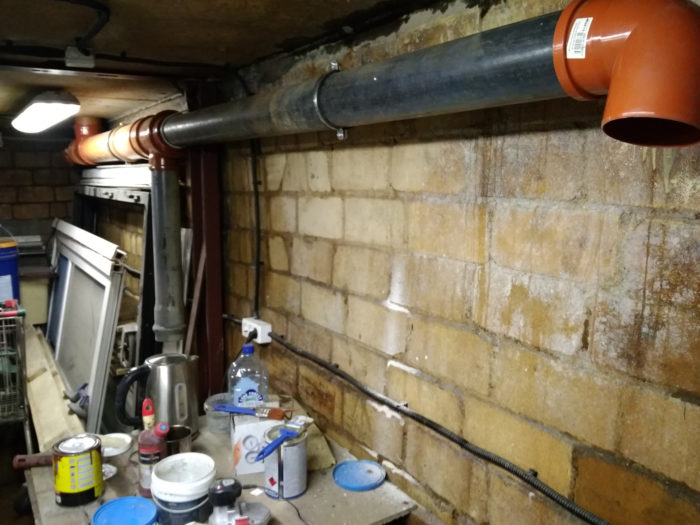
Pipes are selected according to the material depending on the purpose of the room. In household standard garages, PVC products with reinforcement are used. They have low linear expansion and are stronger than products without reinforcement. For buildings with elevated temperatures, it is more practical to take steel pipes, but only with galvanized or stainless steel. It is expensive, but the pipes will last longer than without a protective coating.
Installation and ventilation check
Installation of ventilation in the garage begins with the preparation of tools and cutting pipes. For cutting, a hacksaw for metal or plastic is useful.
How to equip the ventilation in the garage with your own hands in stages:
- Determine the areas for placement of exhaust and inflow pipelines. Drill holes.
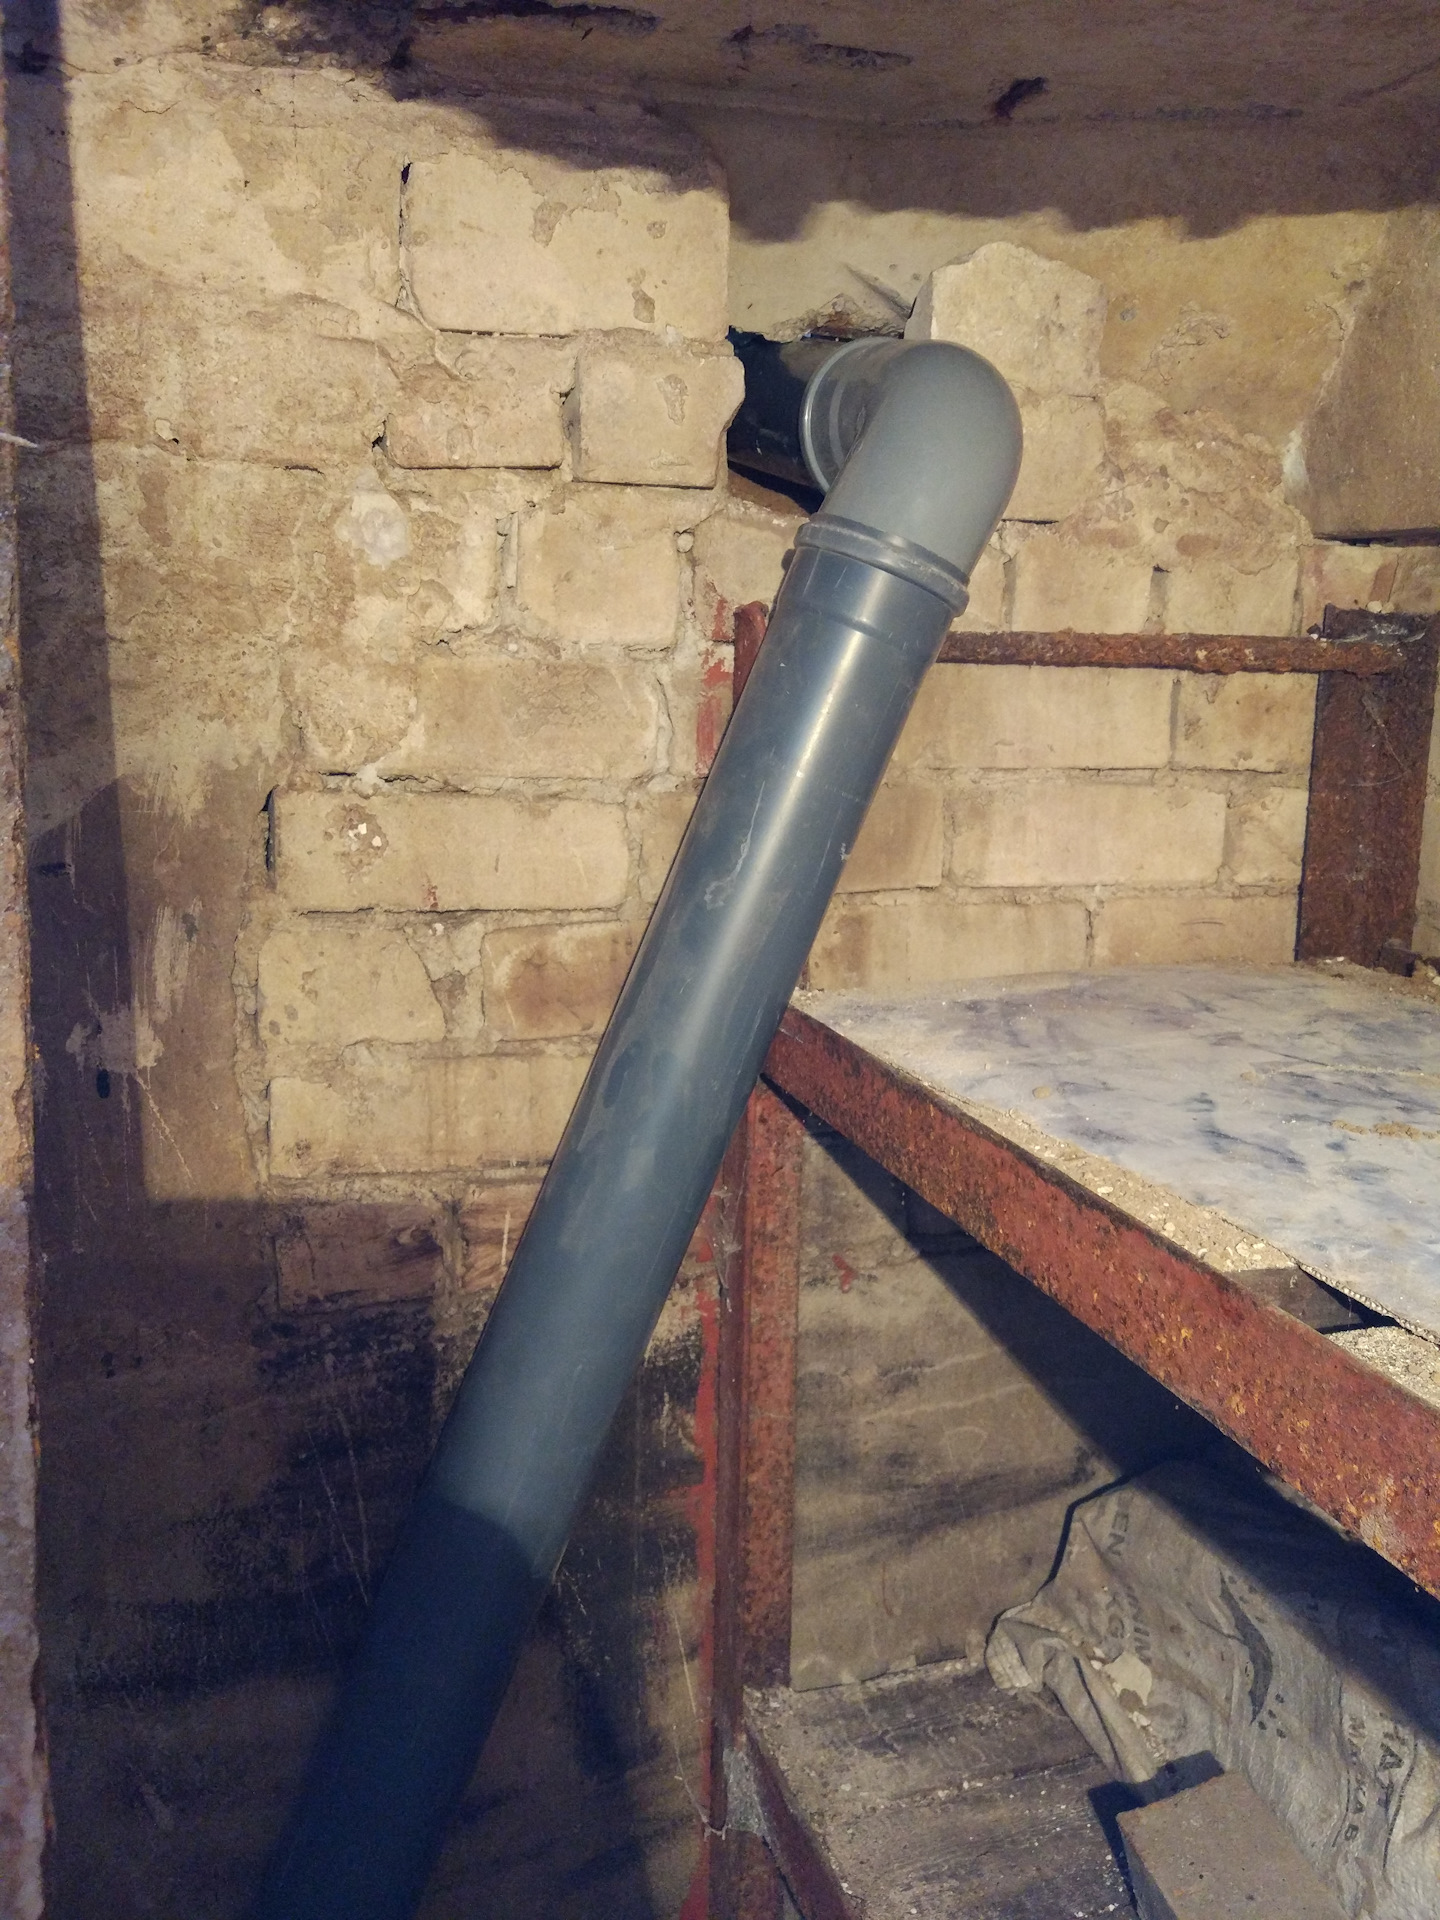
- Fix the exhaust duct. Place the lower end 1.5 m from the floor - it all depends on the height of the basement. The outer part of the pipeline is brought out 0.5-1.5 m above the roof point.
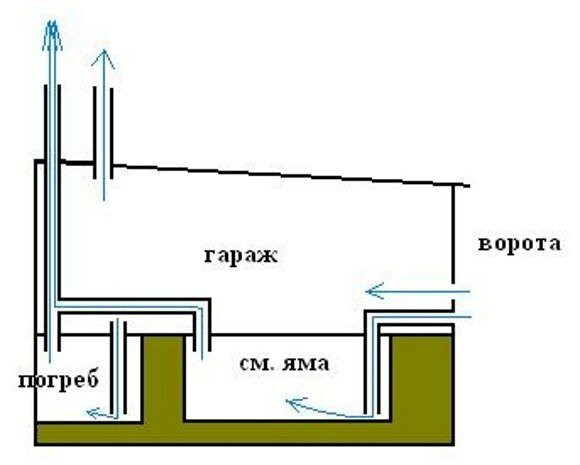
- Install exhaust pipe. You can do this through the garage floor and roof. Let's go through the wall. In this case, the ventilation device in the garage cellar is as follows - the lower part of the outlet pipeline is located horizontally. It goes through the side wall outside the building, rises next to the wall of the garage.
- Install the air duct.Here the lower part is inserted into a viewing hole or cellar. It is necessary to start so that the end is located in the opposite direction from the hood. The pipe is fixed at a distance of 0.5 m from the floor. Bring the other end outside the garage wall, placing it 30 cm from the ground level.
Now all the holes are closed with nets, the upper end on the roof is supplemented with a fungus. To collect condensate, a container is placed under the outlet pipe.


Any smoky device, for example, tow, will help to check the draft. Bring smoke to the exhaust pipe, track how the medium is drawn out through the pipeline. As a rule, there are no problems with the exhaust, and the supply is organized automatically after the removal of the spent medium. The supply air duct is checked with a burning candle - bring the flame to the outlet pipe, it should deviate towards the incoming stream.
Finally
Of course, ventilation in the garage, regardless of whether it has a cellar or basement, is quite important. And this applies not only to the safety of the car or stocks. The main ventilation of the garage protects the life and health of the motorist himself.
After all, the danger of carbon monoxide poisoning is quite high. That is why you should not save time and money on such work.
Mainly garage ventilation protects the life and health of the motorist. After all, the danger of carbon monoxide poisoning is quite high. That is why you should not save time and money on such work.
As for the safety of vegetables in the cellar, the work on the ventilation device is not too complicated here either. It is unlikely that the cost of the simplest ventilation will result in an amount exceeding the cost of purchasing the same amount of vegetables. And after all and the work during the summer it will be very a pity.That is why it is worth considering the scheme in detail and still mount ventilation in the garage. After all, this work will have to be done only once. But after, for many years, the excitement will disappear both for the safety of vegetables in winter and for your health, which can be greatly spoiled by exhaust gases from a running engine.
We hope that the information provided in the article was useful. If you have any questions, they will always help you in the discussion. Write, ask and share your advice.
Well, to consolidate the information, we suggest watching another short video:
Summing up a little
Summarizing all of the above, we will make a small conclusion. If the garage is used for its intended purpose - to store the vehicle, then the organization of the ventilation system is a mandatory measure.
Only with the help of this approach it is possible to ensure the timely removal of excess moisture from the room, which negatively affects the items stored inside the garage. Especially, this applies to the car itself, because with high humidity in the garage, the risk of corrosion on the metal surfaces of the vehicle is very high.
 Filters and ventilation for the garage.
Even with perfect waterproofing, the garage can be damp. And first of all, this happens when weather conditions change - when it rains, snows, etc. After all, driving into the garage in a wet car, moisture automatically spreads throughout the room, accumulating on its wall ceilings and ceiling.
A well-executed ventilation system will help to solve the problem with the removal of condensate and ventilate it in the garage: excess moisture, condensate will simply be vented out of the room under the influence of air mass circulation.
There are 3 options for ventilation in the garage:
- Natural
- the room is equipped with 2 ventilation ducts, where one serves to bring air into the room, and the other - to output it. The system works by pushing warm air out. - Mechanical.
It works on the same principle as the scheme with natural circulation of air masses. The only difference is the presence of special pumping equipment for the forced movement of air into and out of the room. As a rule, electric fans are used for such purposes. - Combined.
As the name implies, such a system is a hybrid of the previous two. In this case, fans or any other devices are placed at the outlet and instead of the removed air, a new one enters through the usual ventilation duct.
For the same reason, it becomes necessary to ventilate the inspection hole.


