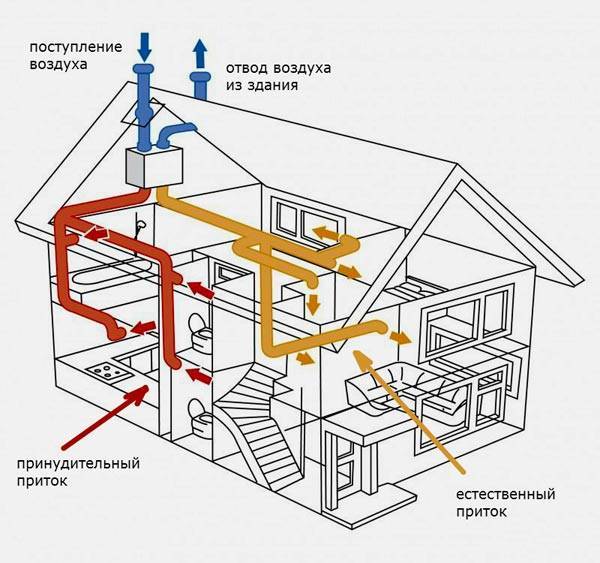
- Natural and forced ventilation
- Selection criteria for exhaust device
- Installation of ventilation equipment
- Supply
- Do-it-yourself hood
- Operation features
- Installing a hood in the kitchen
- Which ventilation scheme to choose?
- Classification
- Calculation of the ventilation system
- Classification and types of ventilation systems
- Natural or mechanical: which one to choose
- Recommendations for individual rooms
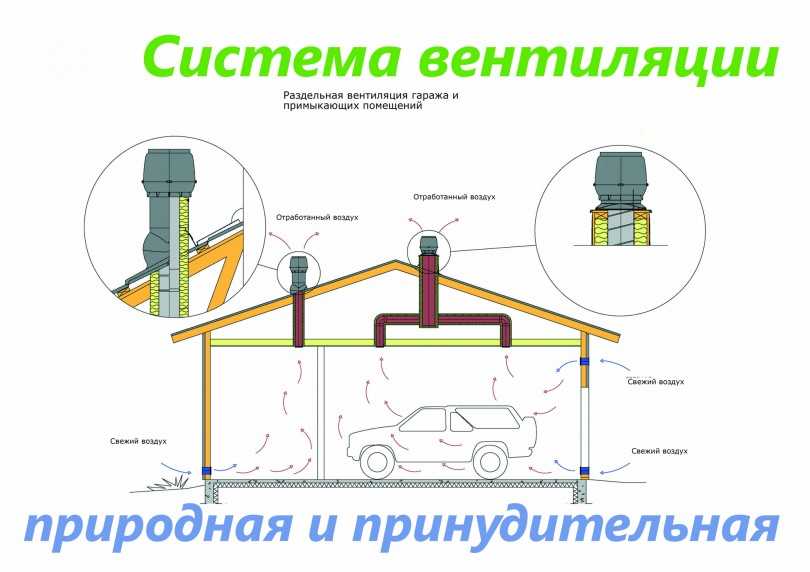
- Combined ventilation output to the attic
- Conclusions and useful video on the topic
Natural and forced ventilation
A ventilation duct and a chimney are not the same
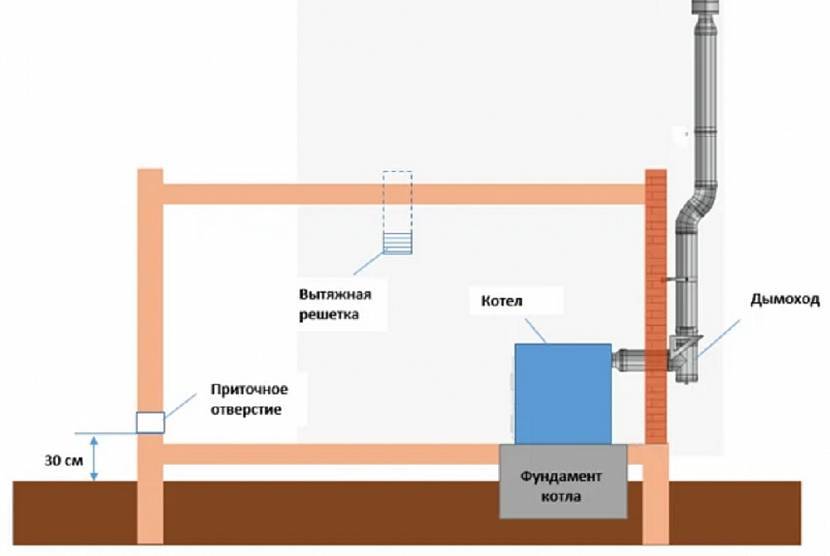
It is desirable that in a private house a special room be allocated for a gas boiler. This room is called the boiler room. In some houses, the boiler is mounted in the kitchen. In the first and in the second case, it is necessary to take care of ventilation. The circulation of air flows can be carried out in a natural and forced way.
Natural ventilation is allowed if the boiler output is 30 kW. The principle of operation is based on the difference in pressure inside and outside the house. Air can enter through vents or doors. Such ventilation is called unorganized. In the case of natural ventilation with organized stimulation, supply and exhaust ducts with adjustable dampers are mounted.For better traction, the ventilation system can be equipped with a deflector.
At natural ventilation in the boiler room it is necessary to take care of the installation of supply and exhaust ventilation ducts. To do this, a hole with a section diameter of 100, 150 mm is cut out in the wall, an air duct is inserted into it - part of a plastic pipe. All cracks are carefully filled with foam. The ventilation pipe is equipped with a mesh or grate that does not allow pests or dust to enter the house.
The check valve will help to secure the room from the return of air. The exhaust pipe is mounted above the boiler, as the combustion products tend to rise up. The supply ventilation duct for a gas boiler in a private house is mounted at the bottom of the boiler room so that the supply air enters directly into the combustion chamber.
Selection criteria for exhaust device
Scheme for calculating the required power of a kitchen hood
Hoods for the kitchen are selected according to the volume of the room and the power of the equipment. The air in the kitchen should be changed 10-12 times within an hour. Then odors, moisture, soot and grease will be completely removed from the kitchen.
Before you go for an air filter device, you need to determine the size of the kitchen. For this, the length, width and height of the room are measured with an ordinary tape measure.
The minimum extraction capacity is calculated by the formula:
(a × b × h) × 12 × 1.3
where: (a × b × h) - the volume of the kitchen;
12 - the number of complete air changes per hour;
1.3 is a correction factor that takes into account power losses during ventilation in the pipe and filters.
The resulting figure must be compared with the power indicated in the technical data sheet for the model you like.You need to choose a little more powerful, by 10 - 15%, so that the equipment does not work constantly with maximum load.
A weak hood will not provide complete air purification. Aromas and steam will accumulate in the kitchen and get into the rooms, soak into the walls and the surface of the furniture.
Devices that are too powerful are more expensive and consume more electricity even when operating in economy mode. On the other hand, in emergency cases, they are able to clear the kitchen from the smoke of food forgotten on the fire in a matter of minutes.
The design of the hood is selected based on the dimensions of the kitchen, the style of its design, the convenience of placing it above the stove and matching it in size. The lower, air intake part of the appliance must not be smaller than the hob.
Dome and fireplace models are suitable for rooms with high ceilings. If the height of the kitchen is small, it will be problematic to install an outlet channel.


The length of the exhaust pipe must be within 5 meters and have no more than 3 bends. If the stove is located far away, against the outer wall, it is worth considering the option of recirculating air purification.
In small kitchens, wall-mounted and retractable models will fit well. Dome and suspended hoods are appropriate in a large room with a high ceiling and in the kitchen-dining room.
When buying, you should ask the seller to turn on the hood and listen to how much it makes noise. Most low-end and mid-range equipment has fans that make a lot of noise during operation. Noise can reach 70 dB. A sound level of 40 dB is considered normal, with which you can stay in the kitchen for a long time. It is quieter than the calm conversation of people.
The control panel should be located on the front of the device so that it is easy to switch operating modes when cooking. The touchpad responds to touch, but is very sensitive to dirt. The push-button switching system requires little effort when pressed, stronger and more durable.
The backlight does not affect the operation of the hood, but it creates additional convenience for the hostess when cooking. In modern models, mainly halogen lamps and incandescent lamps are used. From above, they are closed with a transparent or frosted glass cover that protects them from moisture and hot air. In some expensive models, you can find diode and other types of lamps.
When buying equipment, you should pay attention to the type of lamp and its availability for replacement. The light should be directed downwards, not scattered in all directions and not blind to the eyes.
The hood can be additionally equipped with a timer that turns it off after a certain time. The air purity sensor determines the degree of pollution and automatically turns on the equipment.
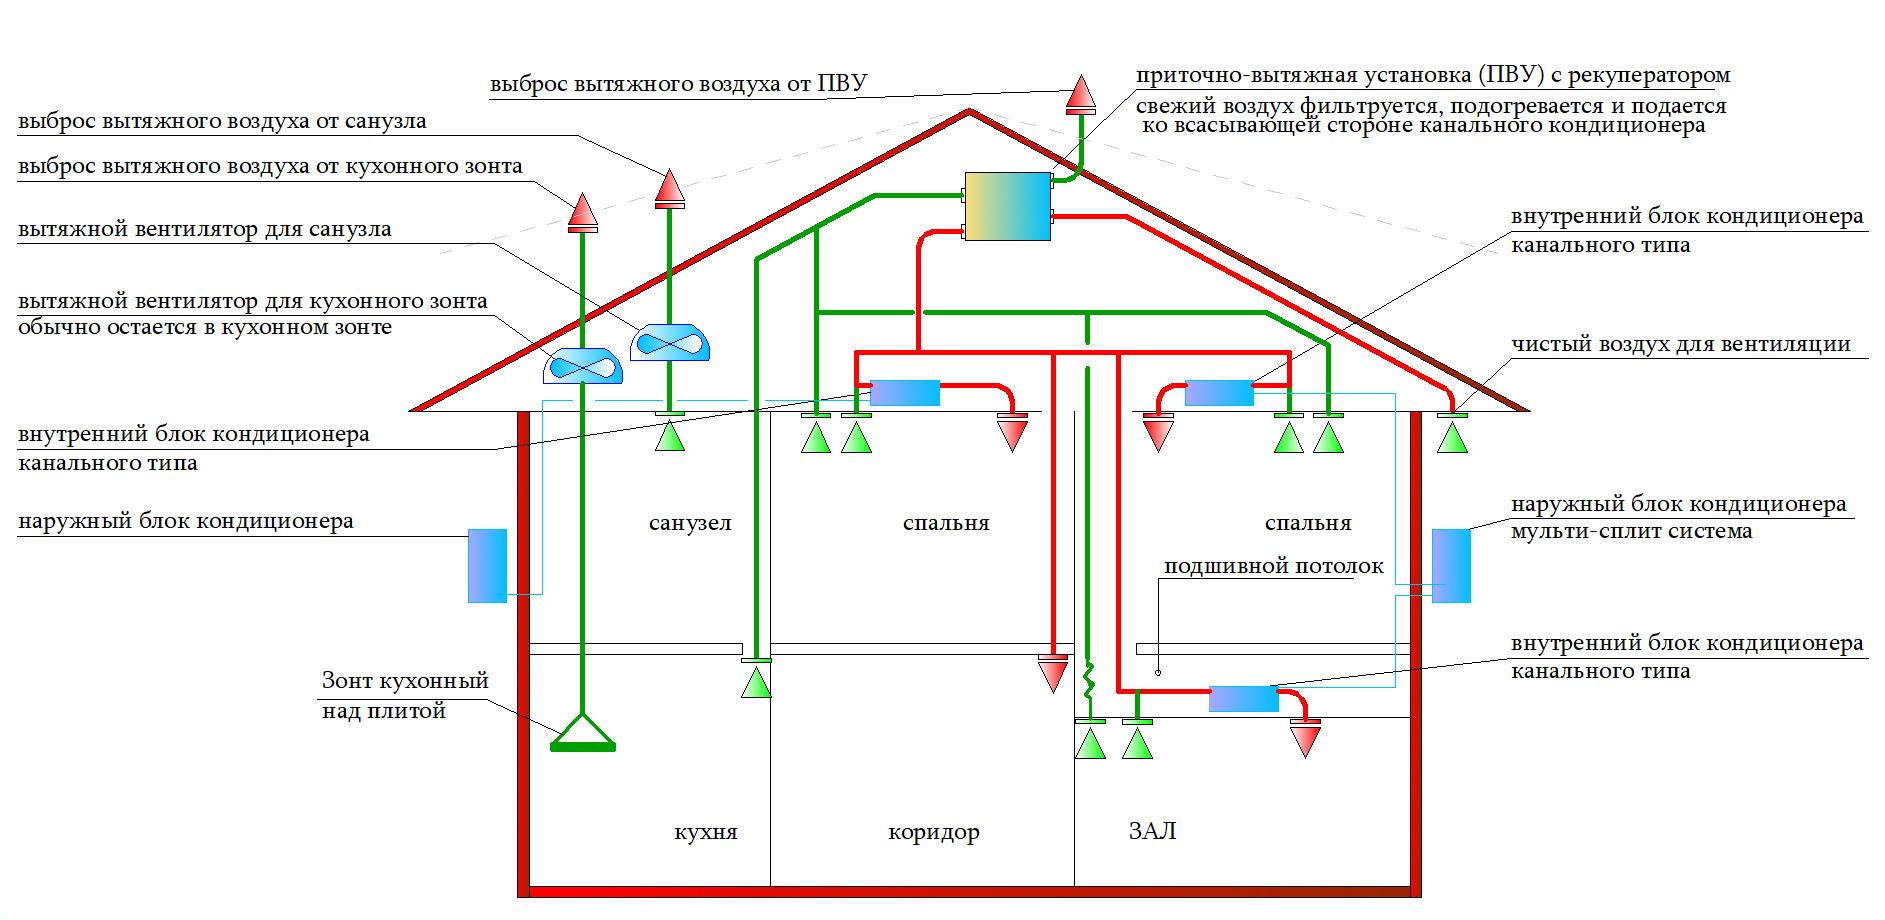
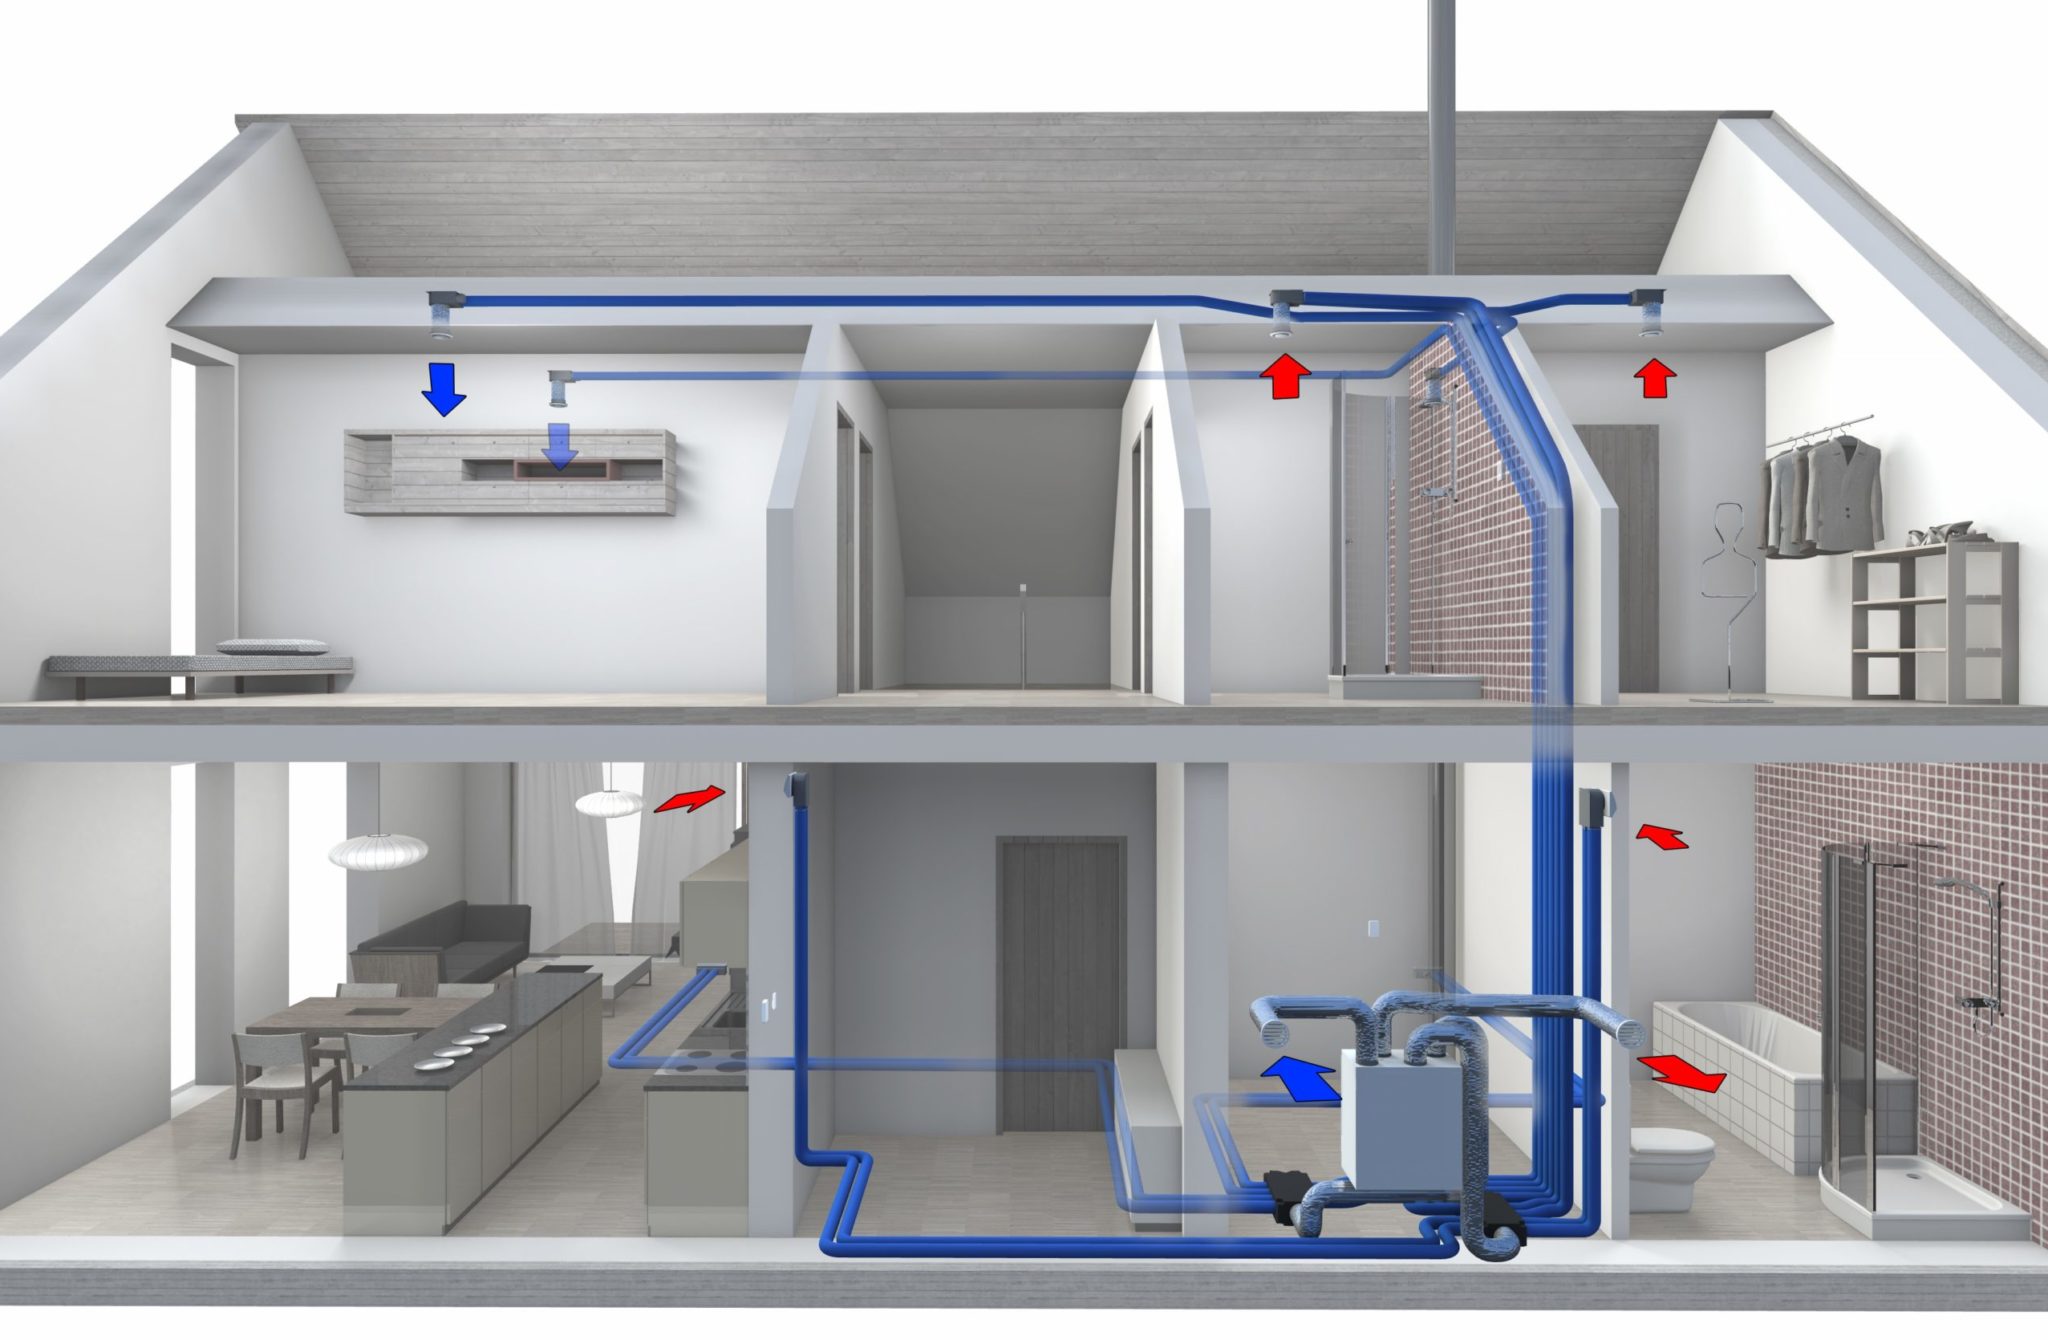
Installation of ventilation equipment
Mounting and installation of ventilation equipment are carried out after all finishing work, except for fine finishing. This stage involves the fastening of mechanisms, the set of which is different, but the algorithm of actions is the same for everyone.
The elements must be installed in the following order, starting from the air inlet into the inside of the ventilation duct.
- Cleaning filter system.
- A heater that heats the air during cold periods. In more expensive models, it is equipped with a remote control.
- Fan.
- Recuperator.
- Air conditioning system for cooling the air flow during a hot period of time. As a rule, this block should be the last block before the outlet.
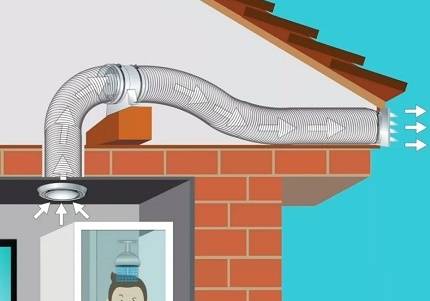
If the domestic ventilation duct passes through an unheated roof, then the pipes must be insulated. If ventilation implies not only a supply circuit, but also a forced outflow of air, then the next step is the installation of an exhaust fan. In conclusion, they carry out the laying of electrical networks, the supply of electricity to the mechanisms and their grounding. If the ventilation complex consists of several sections, then it is necessary to assemble each network separately and conduct pre-start tests of each unit.
Supply
Installation schemes may vary, due to the configuration of the ventilation complex.
The standard installation option involves several steps.
- Selection and marking of places for ventilation holes.
- Drilling of the intended entrances and exits with a slight slope towards the street to allow condensate to drain. The diameter should not be less than 12-13 cm.
- The duct pipe is cut to the required dimensions.
- Installation of the ventilation duct and outlet valves.
- Elimination of gaps between the pipe and the walls using mounting foam.
- Fastening the entire installation to a wall or ceiling.
- Installing a filter in the supply air duct.
- Mounting the heater and its connection.
- Installation of protective grilles on outlets.
- Power supply.
The simplest option for supply ventilation is a wall valve.It is a plastic pipe, inside of which there are sequentially located an external air distributor, a filter, noise and thermal insulation, a regulator, an internal distributor. It is more efficient to install such a device between the window sill and the radiator. To do this, a channel with a cross section of 5-6 cm is drilled in the wall, into which the valve body is inserted - a pipe. Then the external distributor is attached from the outside, and the internal one from the inside.
Do-it-yourself hood
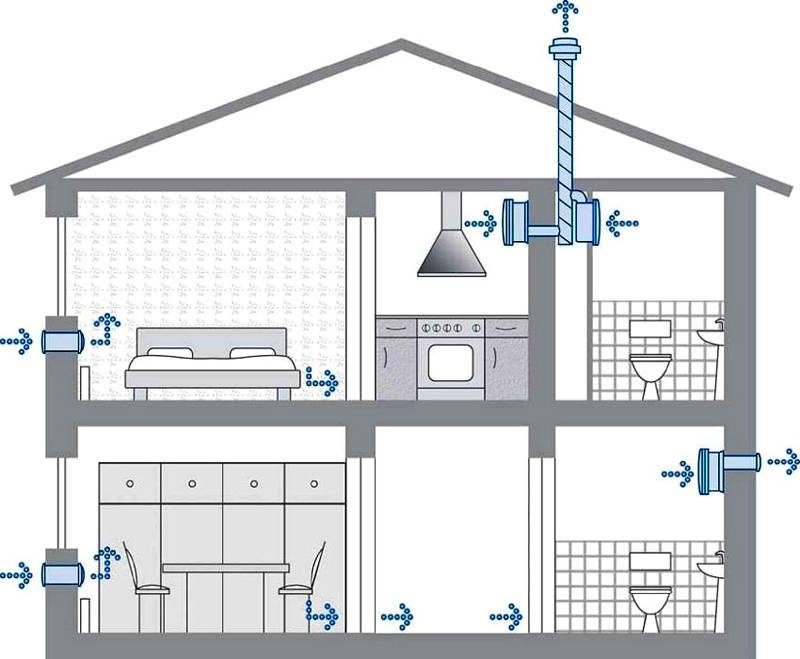
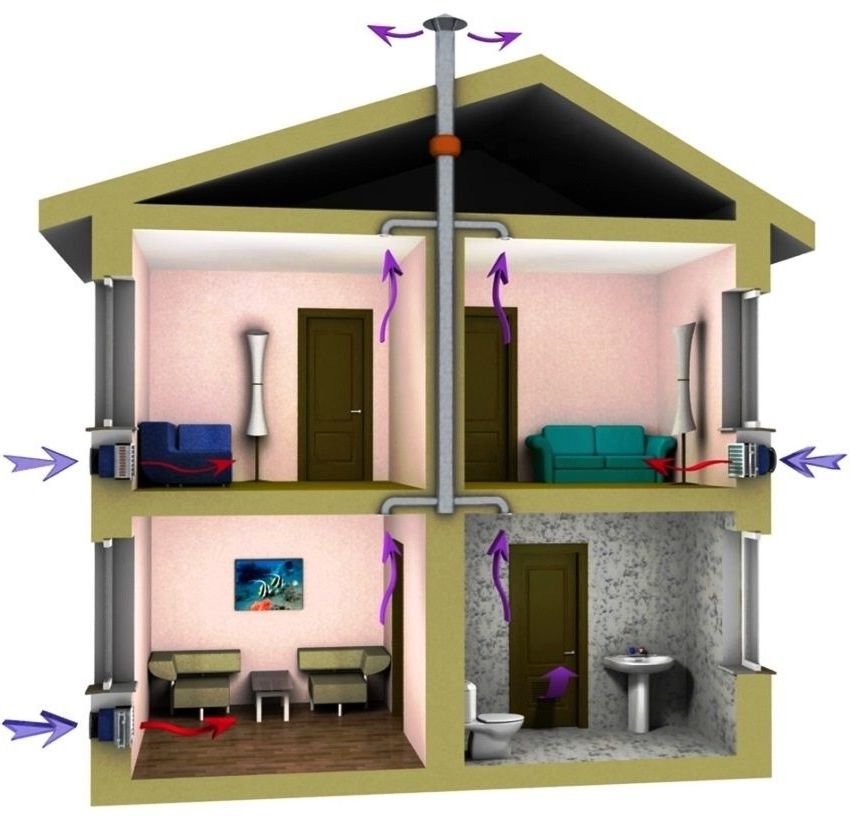
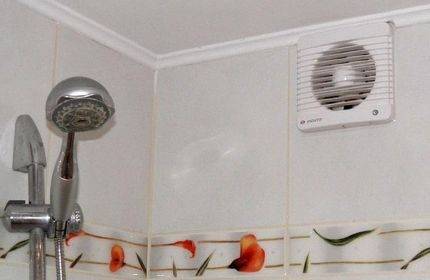
Sometimes natural ventilation is not enough, then experts suggest installing an additional exhaust system to increase the outflow of used air. As a rule, they are installed in the kitchen above the stove and in the bathroom. It should be understood that all devices in the forced circuit are powered by electricity. However, an ordinary low-power fan can even be powered from a light bulb regulator in a bathroom.
Natural ventilation in the apartment is focused on the exit of air into a single shaft. In order for the flows from the bath and the toilet not to overlap each other, the fans are equipped with a check valve. As a result, air penetrates through it, but can no longer come out. Smaller models are fixed with ordinary screws, dowels or with fasteners supplied with the model by the manufacturer. If there are no installation skills for such products, then it is recommended to follow the instructions that are present in the configuration of any product.


Operation features

The hood with a ventilation outlet must be regularly maintained. The outside is dusted once a week. First of all, for safety, you must disconnect the equipment from the power supply, then wipe the case with a dry cloth.
If stains remain on the surface, wash with dishwashing detergent or kitchen furniture, then dry with a napkin.
The metal filter is removed and soaked in soapy water. Then they wash with a sponge or brush, rinse with running water, dry and put in place.
Fans and channels are cleaned according to the instructions in the data sheet. To do this, remove the cover and clean with a vacuum cleaner at minimum power.
After assembly, the hood is plugged into the outlet and, having set it to the minimum power mode, let it work. Then they take a short break, and the equipment is ready for operation.
Installing a hood in the kitchen
The best place to place the hood in the kitchen is above the stove. In this case, the exhaust hood should protrude 10-15 cm beyond the stove. To calculate the performance, it is better to resort to the formula: P \u003d S x H x 12, where P is the installation power, S is the area, and H is the height of the room. Air ducts are usually placed in an indirect path, which can reduce the capacity of the exhaust system. To get the most accurate calculation results, 30% of it should be added to the obtained value.
Calculations, selection and purchase of the hood are the most difficult, while the installation itself will not take much time, subject to the correct technology. If there is no built-in exhaust system initially, you first need to make a hole in the wall, which will match in diameter with the section of the exhaust pipe. With equal readings, the system will work without noise and provide optimal air draft. The structure itself should be located above 70 cm from the surface of the electric stove and 80 cm from the gas stove.
Next is the markup of the mount.If a special template is included in the hood kit, the work is greatly simplified. Otherwise, you need to use a tape measure and a level. Attach the hood so that it is horizontal. Connect the structure to the outlet in the ceiling, connect to the mains and check the functionality. If there is a geyser in the house, you can lead the ventilation pipe directly into chimney of a heating furnace or boiler.
Which ventilation scheme to choose?
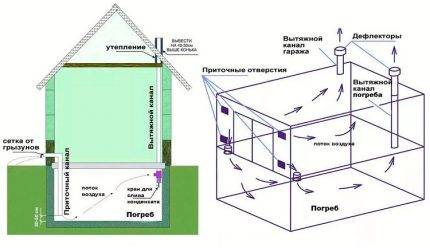
So, we figured out whether an underfloor ventilation system is needed, and now it remains to decide which scheme to choose for specific conditions. There are several important points to consider when choosing a system. The operation of ventilation largely depends on the type of climate in a particular area, the average street temperature, etc.
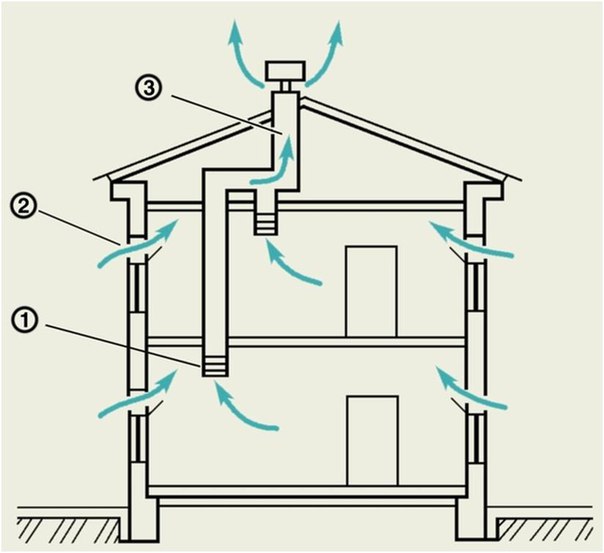
 In the device of natural ventilation, it is imperative to observe the main rule: the inlet openings are located below the exhaust ones. The greater the height distance between them, the more efficient the system operates.
Natural ventilation is more efficient in winter, since it is at this time that a large difference is recorded between the temperature inside the underground and outside, which ensures good circulation of air masses.
However, with an even greater decrease in temperature, there is a possibility of an excessive increase in air exchange, which is also not particularly good, as it can lead to freezing of structures. Therefore, with a significant decrease in temperature, the vents must be closed.
In summer, the temperature difference inside the underground and outside is minimized, so air circulation may stop.Therefore, natural ventilation, even with a supply and exhaust system, is not the best option for hot regions. Here you should install a combined ventilation system with pipes.
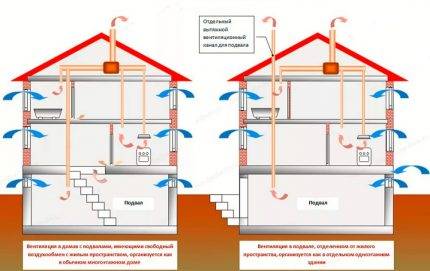 If the house has supply and exhaust ventilation, it makes sense to connect the extract from the basement to the general scheme. So the outflow of air will be stimulated in any weather.
To equip a combined ventilation system for a small subfloor, it will be enough to install one pipe. So that it can provide both the output and reception of air masses, it must be divided vertically into 2 channels.
Such ventilation pipes are sold in hardware stores. Each channel has its own valve to adjust the flow rate. The functioning of such ventilation is checked quite simply: you need to attach a sheet of paper to the outlets in turn.
Classification
Before directly choosing a suitable ventilation scheme, you need to consider in more detail the existing options for mounting these devices with your own hands. Their variety. Ventilation can be natural or forced. There are also mixed schemes, when these two types are combined with each other. It can also be classified according to other parameters.


Depending on the purpose, the method of moving air and what promotes its circulation, it is customary to classify the existing types of ventilation as follows:
- supply;
- Recirculation;
- Channelless;
- exhaust;
- Channel.

Calculation of the ventilation system
According to building standards, the entire airspace of the boiler room must be replaced with a new one every 20 minutes. To ensure the appropriate air circulation, you will have to arm yourself with a calculator and formulas.
If the ceilings are located at a height of 6 meters, then without special devices the air in the room is updated three times per hour. Six-meter ceilings are a luxury for a private house. The decrease in ceilings is compensated for in calculations in the following proportion - for every meter below, air exchange increases by 25%.
Suppose there is a boiler room with dimensions: length - 3 m, width - 4 m, height - 3.5 m. To solve this problem, you need to perform a number of actions.
Step 1. Find out the volume of airspace. We use the formula v \u003d b * l * h, where b is the width, l is the length, h is the height of the ceiling. In our example, the volume will be 3 m * 4 m * 3.5 m = 42 m3.
Step 2. Let's make a correction for a low ceiling according to the formula: k \u003d (6 - h) * 0.25 + 3, where h is the height of the room. In our boiler room, the correction turned out: (6 m - 3.5 m) * 0.25 + 3 ≈ 3.6.
Step 3. Calculate the air exchange provided by natural ventilation. Formula: V = k * v, where v is the volume of air in the room, k is the correction for lowering the height of the ceiling. We got a volume equal to 151.2 m3 (3.6 * 42 m3 = 151.2 m3).
Step 4. It remains to obtain the cross-sectional area of the exhaust pipe: S = V / (w * t), where V is the air exchange calculated above, w is the air flow velocity (in these calculations it is taken as 1 m / s) and t is the time in seconds. We get: 151.2 m3 / (1 m / s * 3600 s) \u003d 0.042 m2 \u003d 4.2 cm2.
The dimensions of the channel also depend on the area of the inner surface of the boiler. This number is indicated by the manufacturer in the technical documentation of the device. If this number is not indicated, calculate it yourself based on the volume of the device. Then compare the area with the section radius according to the inequality:
2πR*L > S, where
R is the inner radius of the chimney section,
L is its length,
S is the area of the inner surface of the boiler.
If for some reason such a calculation is difficult, you can use the table.
| Boiler power, kW | Chimney pipe diameter, mm |
|---|---|
| 24 | 120 |
| 30 | 130 |
| 40 | 170 |
| 60 | 190 |
| 80 | 220 |
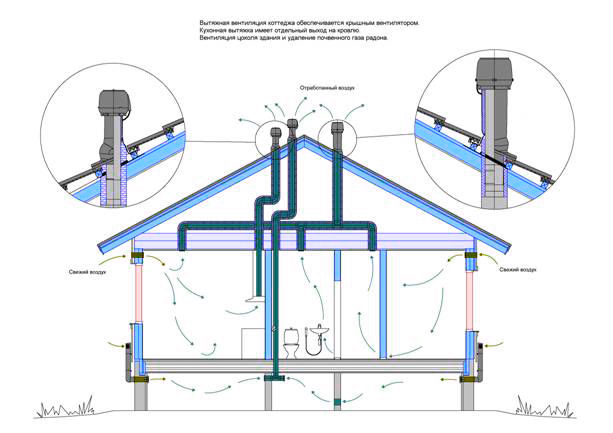
The last stage of the calculation is the height of the weather vane relative to the roof ridge. The need for this is due to the creation of additional traction by the wind, which increases the efficiency of the entire exhaust structure. At this stage, the following principles are followed:
- the height of the wind vane above a flat roof, or at a distance of up to 1.5 meters from its ridge, must be at least 0.5 meters;
- at a distance of 1.5 to 3 meters - not lower than the roof ridge;
- at a distance of more than 3 meters - not lower than a conditional line drawn from the roof ridge at an angle of 10˚;
- the weather vane should be 0.5 meters higher than the building, which is attached to the heated room;
- if the roof is made of combustible materials, the chimney must be raised 1-1.5 meters above the roof ridge.
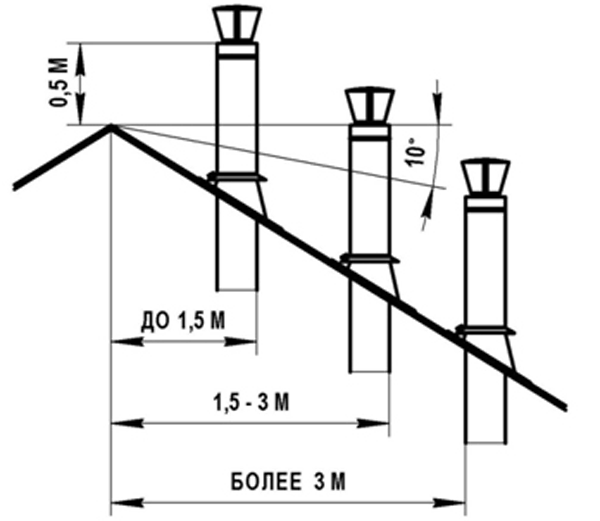
Calculation of the height of the chimney relative to the roof
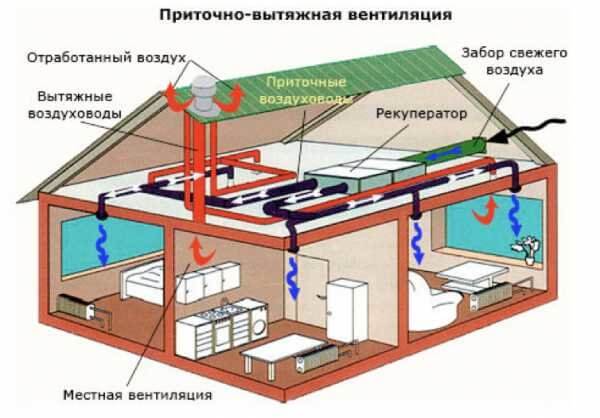
Classification and types of ventilation systems
The creation of ventilation in the cottage is due to the fact that a continuous exchange of air masses must occur in it. Old, used air with a large amount of carbon dioxide must be removed from the premises, replacing the constantly oxygenated air with fresh air from the street.


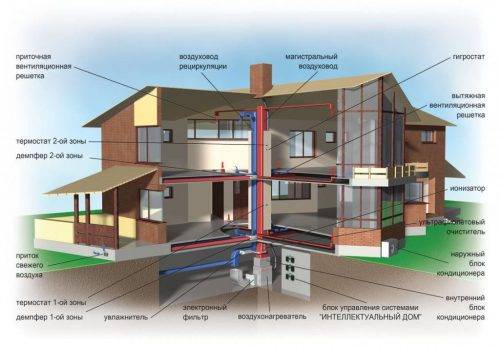


If you stop this air exchange, then the microclimate inside will quickly become far from favorable for human health.
According to the norms for living rooms, the optimal atmosphere is a temperature in the region of 20–25 degrees and a relative humidity of 30–60%, depending on the season and the readings on the thermometer outside the window
In order to maintain the air exchange parameters established by GOSTs, the ventilation system in the house, made by oneself or with the involvement of third-party installers, must continuously change the air in the premises.
For example, for living rooms in a cottage, the air exchange rate per hour is set to "1". That is, in an hour, the entire volume of air must be completely replaced in them.
The purpose of ventilation is to combat the following factors:
- excess heat;
- constantly appearing dust;
- excessive air humidity;
- harmful gases and vapours.
Every person in the house exhales carbon dioxide around the clock. Also in the residential building there are fireplaces, gas and electric stoves, numerous household appliances, that is, there are a lot of sources of heat, moisture, dust and gases in the cottage. And all this must be removed from the premises so that the microclimate in them is suitable for living.
According to the method of moving air, ventilation systems are:
- With natural traction.
- With a mechanical drive.
The first option involves the movement of air masses due to the existence of a pressure difference outside and inside the ventilated building. At the same time, it can be organized - using adjustable valves, and unorganized - exclusively through windows, doors and vents in the foundation.
In the second case, the air is forced to move through the premises and ventilation ducts using mechanical devices. This option is volatile, but more efficient.
The main disadvantage of a mechanical ventilation system is its dependence on the power supply.Without power from the mains, the fans will stop spinning, and the air exchange efficiency will immediately drop sharply
By purpose, ventilation systems are divided into:
- supply;
- exhaust;
- combined.
Natural or mechanical: which one to choose
Being a person in the house in terms of comfort is a quality indoor air environment, a certain temperature and the optimal air flow rate, which should be small in order to provide favorable living conditions. When organizing air exchange using mechanics, it is necessary to install fans on both the inlet and outlet. The flow rate is much higher than usual.
This state of affairs is due to the difference in the norms regarding the speed of air flows within a particular environment. Mechanical ventilation ensures the movement of air masses at a speed of 2 to 3 m3 per hour. As for natural ventilation, for it this figure is approximately 1 m3 per hour. In this regard, this system is considered the most comfortable for a person.
The only drawback of natural ventilation is the impossibility of its installation in certain conditions. This problem is connected with the fact that a decrease in the speed of the air flow requires an increase in the cross section of a special opening in the wall. In particular, in order to pass 300 m3 of air in a natural way per hour, a channel of 250 by 400 mm is required, which corresponds to a diameter of 350 mm. In the case of a mechanical system, we get lower values in relation to the duct channel, namely 160 by 200 mm, which in relation to the diameter is 200 mm.
In addition, situations are not uncommon when there is no possibility of organizing natural ventilation due to the large cross section of the channel, since this does not allow it to be installed indoors, and installation outside the building violates the appearance of the building. Because of this or other similar reasons, houses with a large area are often equipped with a mechanical air exchange system.
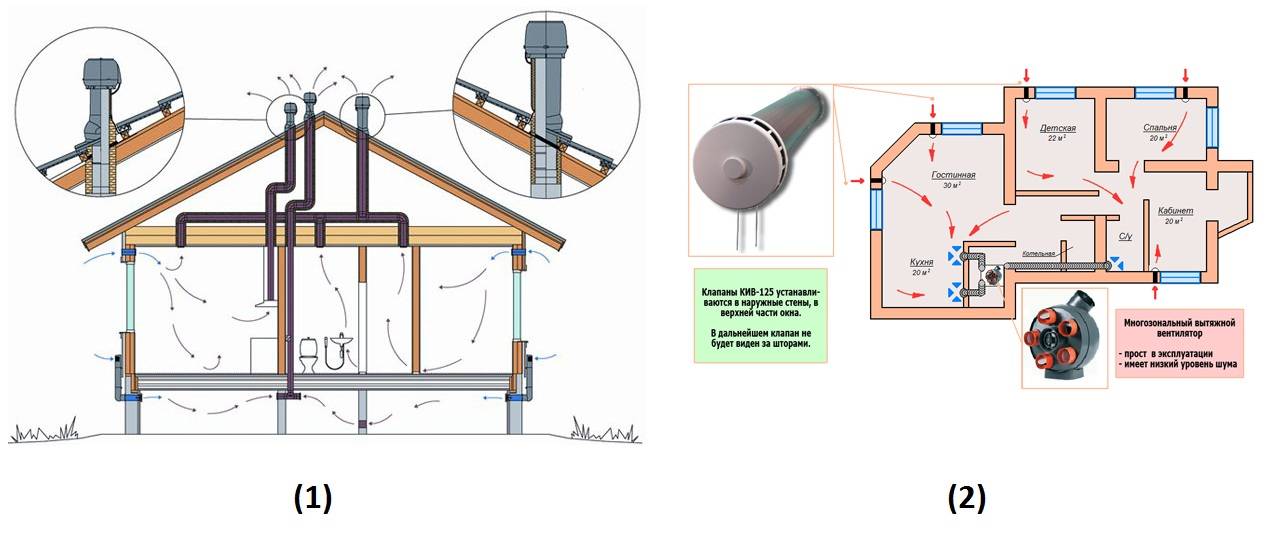
Recommendations for individual rooms
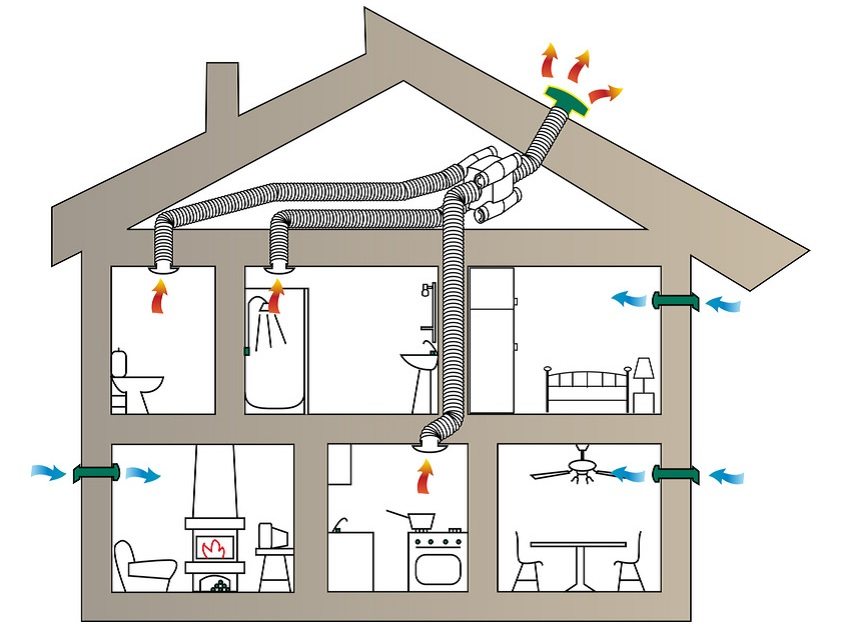
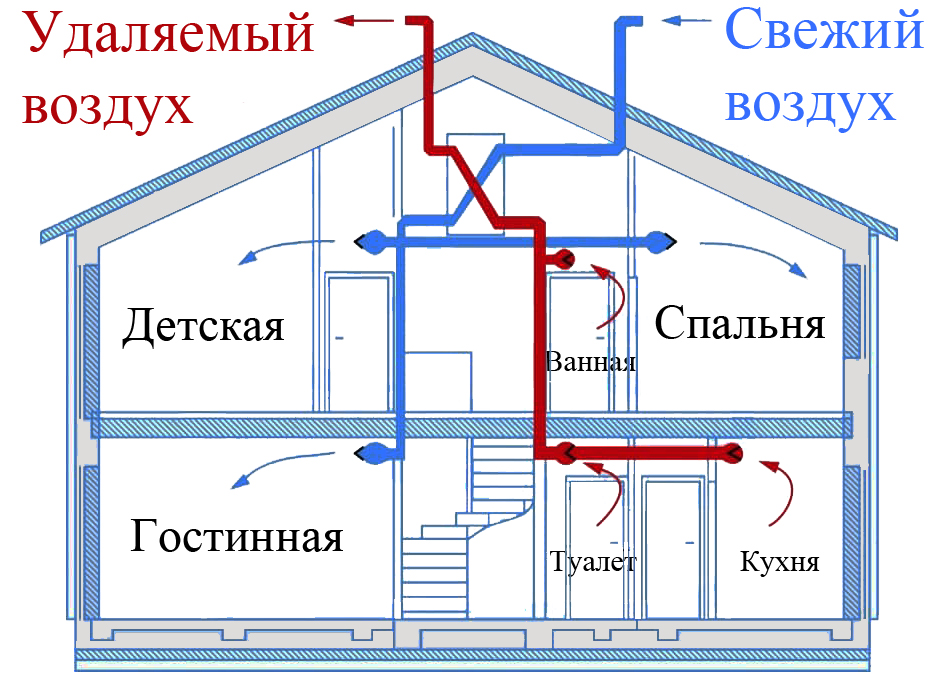
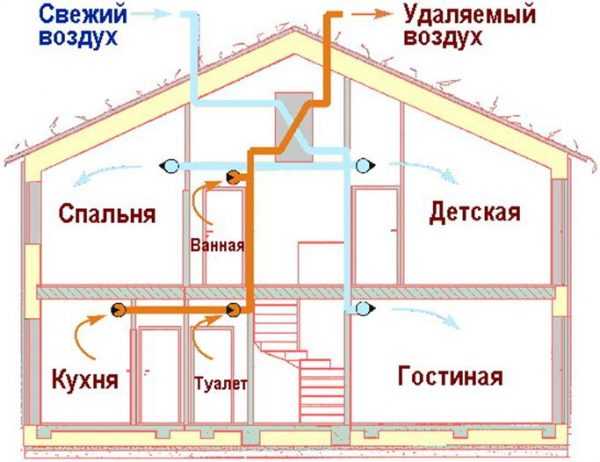
When arranging any ventilation in a private house, air flows are arranged in such a way that clean outdoor air first enters the living room, bedrooms, office and library.
And then, along the corridors, he should go to the kitchen, to the bathroom and to the pantry with access to the exhaust ventilation shaft.
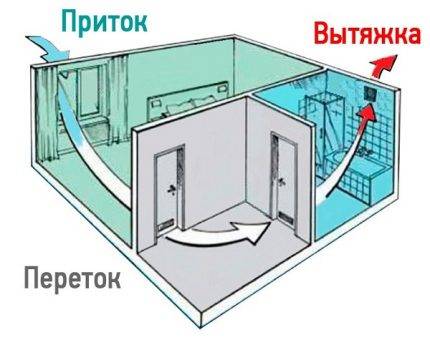 To ensure unhindered natural air flow through the cottage, all interior doors must have a gap of 2–3 cm between the door leaf and the threshold.
 If the cottage is wooden, then an additional hood should also be provided in the bathroom. The humidity in this room is high, it will be difficult to do without an exhaust fan
In the kitchen, in addition to the ventilation hole, it is recommended to additionally install an extractor fan above the stove in the ventilation duct. It will allow you to quickly remove the smells of cooking, preventing them from spreading to the rest of the rooms in the house.


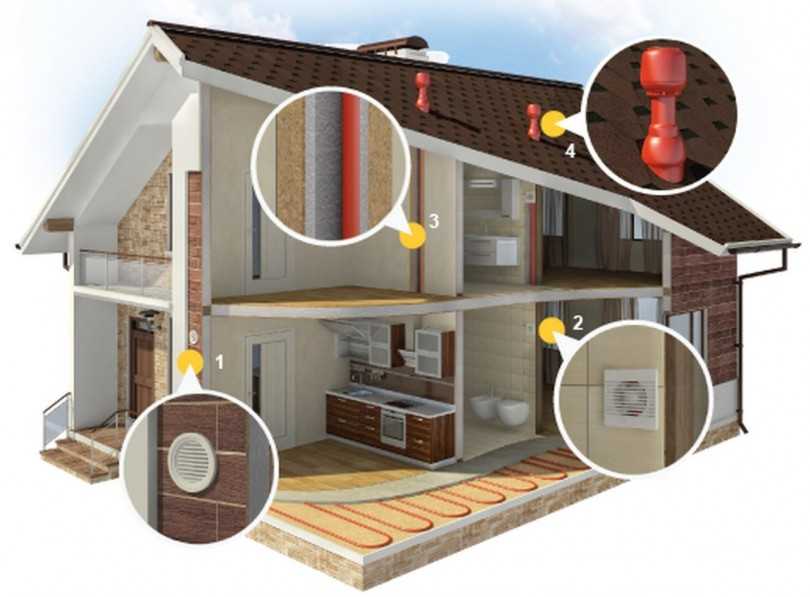
Separate moment - boiler room and kitchen with gas equipment. They must be equipped with a separate channel for air flow directly from the street. Plus, don't forget the chimney.
This way, oxygen for combustion will enter the furnace in the right amount, and carbon monoxide will immediately leave the room.
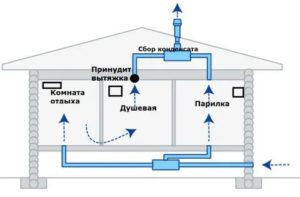
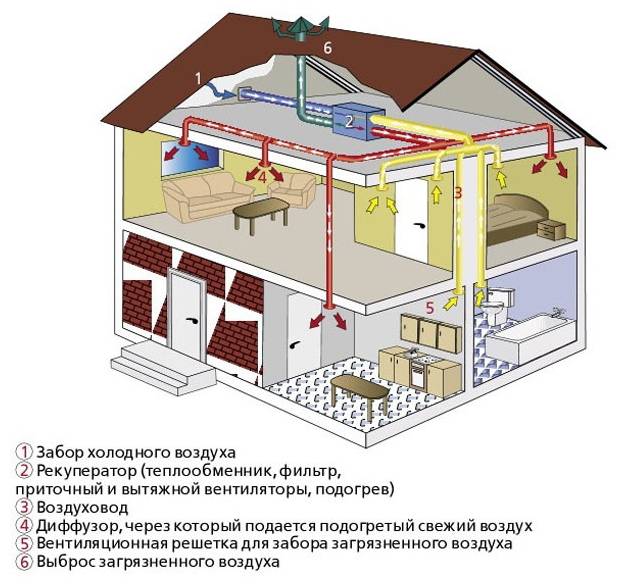
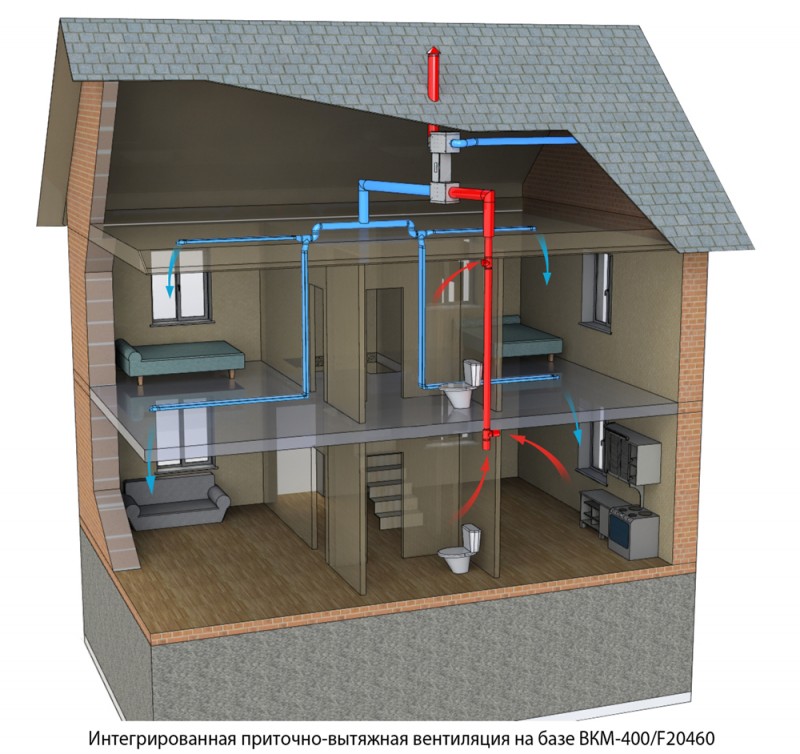
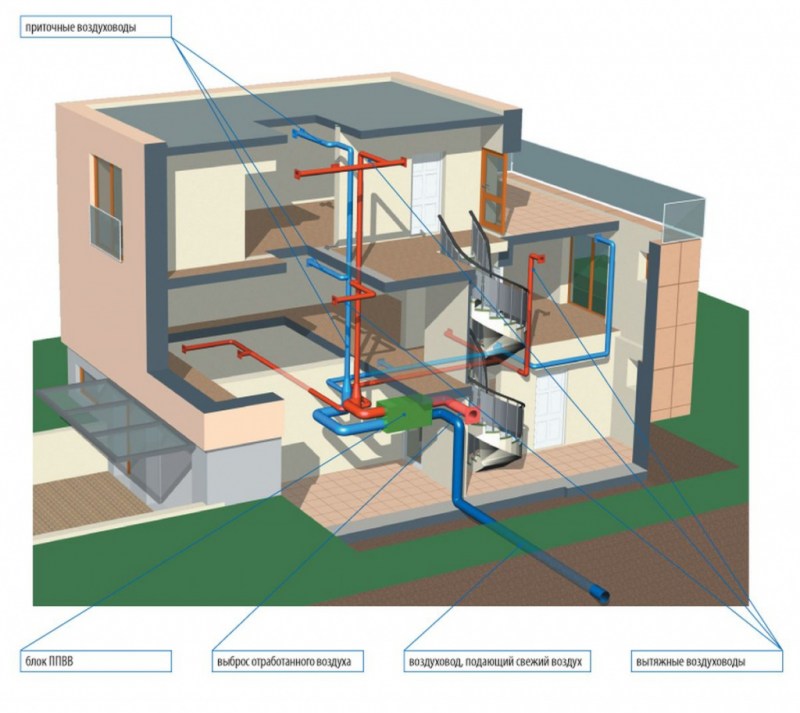
Combined ventilation output to the attic
A good solution for a simple ventilation system is:
- a separate outlet to the attic of the exhaust pipes of the kitchen and bathroom with forced exhaust;
- a separate outlet to the attic with further connection to the fan riser (or without connection) of exhaust pipes from other living quarters.
This is the easiest and most effective way to provide ventilation at home without a supply and exhaust ventilation system with a heat exchanger.
In combined ventilation schemes, a device for forcing air movement is installed either in exhaust or inlet openings.
Fans of combined ventilation systems operate either for exhaust or supply. In the first case, fresh air itself enters, trying to fill the vacated space. In the second case, the portion injected from the street displaces the spent air mass from the room.
Conclusions and useful video on the topic
The following video will acquaint you with the rules and principles of the ventilation device in the subfield:
Foundation vent guide:
How to deal with dampness in a country house:
The underground is a closed unventilated space in which all favorable conditions are created for the development of mold, dampness, fungus, and the formation of condensate. The creation of an effective ventilation system will help to get rid of destructive processes. This problem can be solved both at the stage of building a house, and later - at the stage of operation of the building.
Would you like to talk about how the ventilation system works in your subfield? Maybe you have methods to improve its effectiveness that are worth sharing with site visitors? Write comments, please, in the block below, ask questions, post photos on the topic of the article.


