- The main parameters of the hood for the bath
- Timer, humidistat, non-return valve
- Steps for connecting an exhaust fan
- Fan without built-in timer
- Fan with built-in timer
- How to make ventilation with your own hands?
- Kitchen design with a box
- Requirements
- Features of forced ventilation of a bathroom in a private house
- Kitchen hoods without ventilation
- Construction type
- Features of the ventilation device in the bathroom of a private house
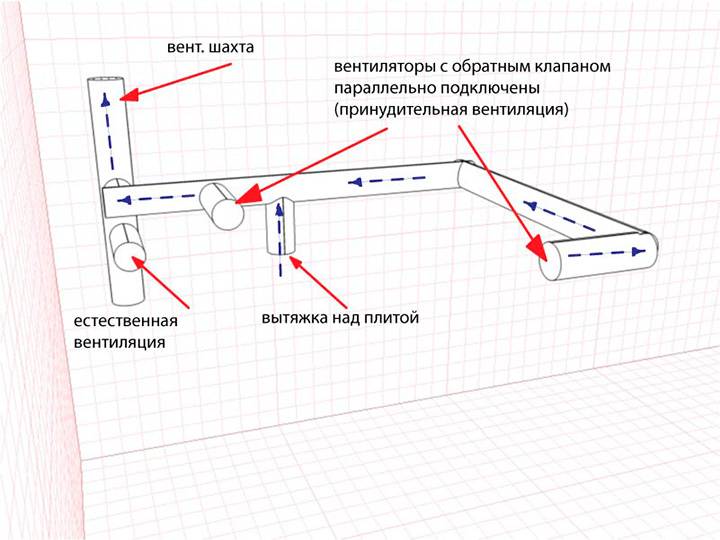
- natural ventilation
- Forced ventilation
- Ventilation in the toilet of a private house: regulatory requirements
- Fan mounting
The main parameters of the hood for the bath
The specifics of the bathroom prompted developers to produce appliances adapted to rooms with high humidity. The case of a fan powered by electricity must be sealed. The internal design of the equipment is reliably protected from all sides from the effects of wet steam.
Attention to the characteristics of the device
For consumers, the International Electrotechnical Commission has developed a certain standard for the reliability of electronic devices. It is denoted by IP and consists of two digits.
The value of the first can be from 0 to 6 and indicates the degree of protection against the penetration of impurities. The second digit determines the level of protection against moisture.To use the product in the bathroom, the indicator must be at least 4.
Each product must have a certificate that determines the level of its safety. For the bathroom, it is better to choose a device whose IP is greater than 34
Power and performance are closely related. The higher the first indicator, the greater the second will be. You can find out the performance indicator by multiplying the footage of the bathroom by the number of people living in the house.
If the fan is equipped with many additional functions, its power can be up to 10% higher than the calculated one. The most popular are economical and almost silent devices that consume from 7 to 20 watts.
When devices with a high power indicator are operating, a draft is observed in the room, and besides, it will not be able to warm up enough.
Another important characteristic is the level of noise that the blades of the device create during operation. It is much quieter than when operating a kitchen hood. The norm acceptable for an exhaust device is considered to be a sound of 30 dB or less. This is due to the fact that a person perceives all sounds above 35 dB as unpleasant and intrusive.
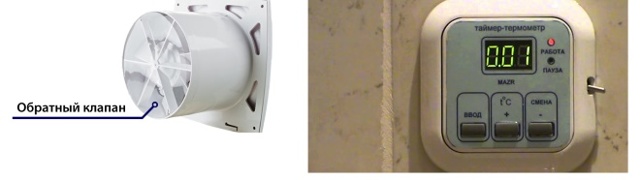
Timer, humidistat, non-return valve
Standard bathroom ventilation devices are mechanically controlled or operate in a slow, continuous mode. A timer is an additional device that allows you to half automate the process.
After the person left the bathroom, the exhaust fan, thanks to the timer, continues to evacuate the exhaust air for some more time. Upon completion, it turns itself off.
You will find a guide for installing and connecting an exhaust device to a standard switch in the following article, which covers these difficult issues in detail.
Smoky air, steam fumes and smells of food being prepared in the kitchen do not favor a normal microclimate in an apartment or house. To solve this problem, it is recommended to install hoods in the bathroom and in the kitchen.
The presence of a humidity sensor is the best option for a bathroom. The hygrometer is considered the best control method, as it allows you to set the humidity threshold from 40 to 100%, upon reaching which the fan automatically turns on. The hygrostat and timer are rarely used together. Usually, if a humidity sensor is present, a timer is not required.
When equipping ventilation in a country house, it is necessary to measure the hole in the bathroom or in the bathroom, which will determine the diameter of the duct. The standard landing size of the hood is from 100 to 130 mm. If necessary, the hole in the bathroom wall can be enlarged using a perforator.
The best option for ensuring normal air exchange and a comfortable indoor climate is to choose a ventilation device of the required size
The check valve is a small and simple device that will not give unpleasant smells from neighbors enter your apartment. It is practically indispensable in urban baths and bathrooms connected to a common ventilation duct.


Steps for connecting an exhaust fan
Connecting a fan in the bathroom and toilet is necessary to ensure air exchange in the room.
For normal operation of the device, it is required to perform correctly all the stages of installation, from planning to connecting to the switch.
Before installing the device, make sure that all conditions for its connection are met:
- The common air duct is not polluted, and although the draft is weak, it is there.
- The diameter of the hole in which you want to mount the unit and the dimensions of the fan itself are the same.
- Prepared wiring for connecting the selected model.
If ventilation is installed in houses of old construction, then in the bathroom, in the toilet and in the kitchen there are already ventilation holes made at the construction stage of the house. They can be used.
However, if redevelopment was carried out and it is required to move the air outlet to another place, it is permissible to install an additional pipe in this hole.
To connect the fan, you need to bring the appropriate electrical wires to it. It is best to remove them into the wall, but the use of a cable channel is also acceptable.
The second method can spoil the interior of the room, but at the same time makes installation easier and more affordable.
The following requirements apply to wires and sockets:
it is important to choose a cable with a cross section that would correspond to the expected load;
it is forbidden to install wires in a metal braid;
complete insulation of all wires is required;
it is important to provide the system with a residual current device and grounding.
The fan is assembled simultaneously with its installation in the ventilation system. The body is assembled first. Then you need to connect the electrical wires. And the last stage is the installation of a decorative grille.
Fan without built-in timer
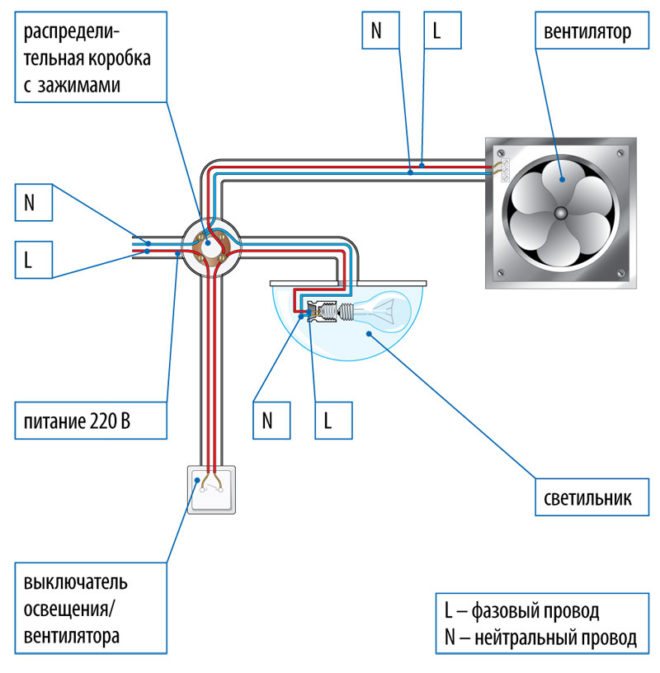
The easiest fan models to connect without a timer. In this case, the optimal scheme is to connect in the bathroom through a switch.Even a novice master can do the job.
The location of the switch itself may vary. It can be installed at the entrance both outside the room and inside. The main thing is to provide protection from moisture.
It is recommended to use a three-wire cable to connect the fan. However, one wire is not always possible to use. Many simple and cheap models of fans do not provide for the possibility of grounding.
The fan can be connected either to one key with lighting, or to a separate one.
After connecting the wiring, the device is mounted in the ventilation box.
Fan with built-in timer
Many, equipping the bathroom, choose a fan with a timer for more efficient operation of the air exchange system. However, not everyone knows how connect it correctly.


If necessary, you can independently connect the exhaust fan with a timer in the bathroom. To do this, first of all, you need to buy an overhead structure that can be mounted on a vent on the wall.
Before starting installation, carefully read the instructions for use. Despite the fact that all fans are essentially the same, there may be nuances in the operation and installation of the device.
There are several schemes for connecting a device with a built-in timer. Optimal is the use of a four-wire wire.
In this case, a separate switch is mounted for the device, and an additional core, which is usually used for grounding, is connected to the timer.
How to make ventilation with your own hands?
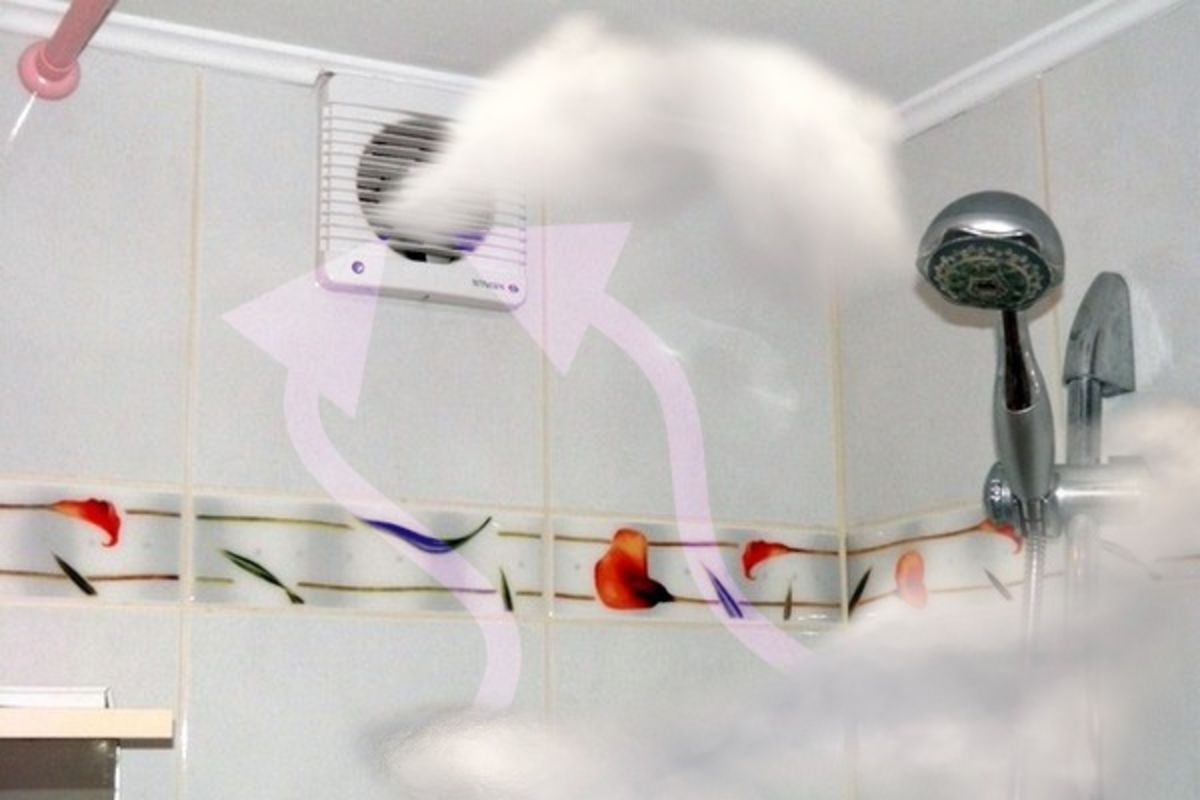
After the fan is purchased, you can proceed with its installation.One of the most time-consuming jobs when installing an exhaust fan in a bathroom and toilet is hidden wiring. The wiring must be exactly hidden, as required by the rules for laying wiring and installing sockets in rooms with high humidity. Therefore, it is advisable to install the fan before the tiles are laid on the walls. If the walls are finished with plastic panels, then installation is greatly simplified - you only need to dismantle 1-2 panels to lay the electrical cable. The ventilation duct must be cleaned of debris and dust, connect the fan to an electrical cable using a terminal block and strengthen the fan depending on the method of its installation - by gluing it to the finish with liquid nails or inserting it inside the ventilation duct. A video of installing a Soler&Palau exhaust fan in a bathroom is shown below (click the triangle to play):
*** As you can see, making ventilation in the bathroom and toilet is not so difficult. If necessary, you can easily perform all the necessary operations with your own hands.
Ventilation in the bathroom in a private house - we do it ourselves! Ventilation in the bathroom against mold and mildew
Exhaust fan for bathroom: selection and installation
How to make ventilation in the bathroom?
- <Ventilation in the bathroom against mold and mildew
- How to make ventilation in the bathroom?>
Kitchen design with a box
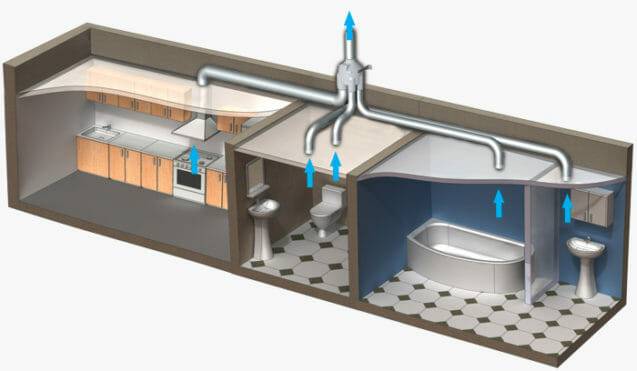
Inside some typical apartments there is a kitchen with a ledge - these are ventilation ducts, inside which exhaust air removal shafts pass. Ventilation of the kitchen and living rooms, kitchens and bathrooms, as a rule, are divided into autonomous ventilation ducts.
Ventilation ducts can be:
- small (depth, width up to 60 cm);
- large (more than 60 cm);
- rectangular;
- complex shape.
Such ventilation boxes form niches inside the kitchen, which, with the right approach, can be functionally used. It is strictly forbidden to clean, close, carry out installation work with such structures, as this will disrupt the natural ventilation of the entire house.
Options for arrangement, use of a ventilation box:
inside the kitchen, niches can be used as a cabinet for storing kitchen utensils;
- a small corner ventilation box can fit perfectly into the design of kitchen furniture;
- include in the overall interior as an element of decor;
- if the area allows, you can install a fireplace;
- you can hang a mirror on the wall of the box;
- place a panel for storing small kitchen utensils, knives, and other utensils.
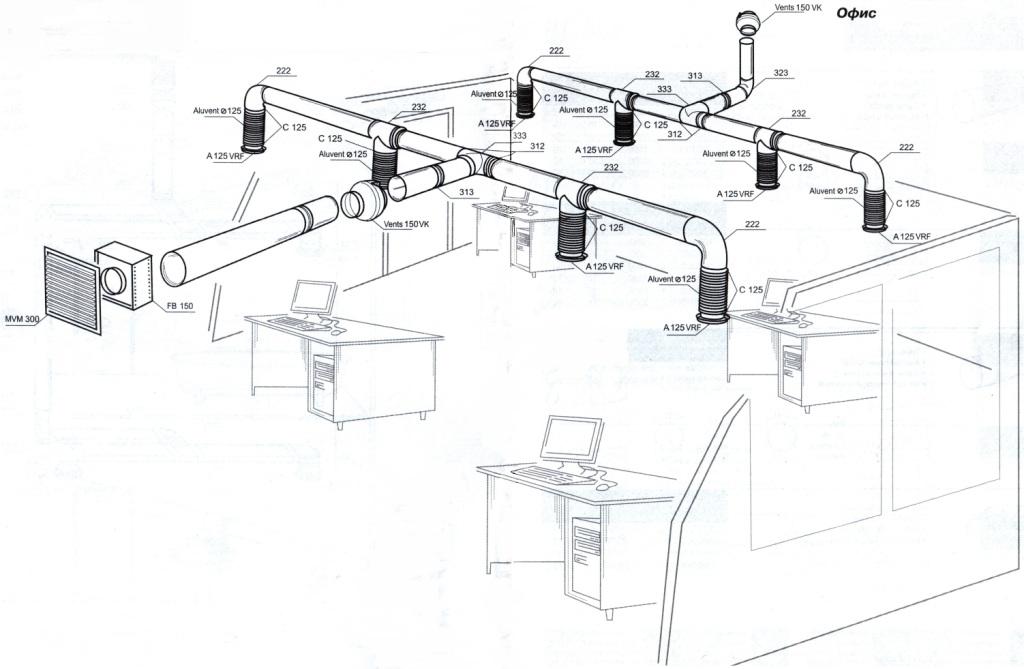
For a private house, this problem is not relevant due to the peculiarities of the layout. Here, the calculation of kitchen ventilation is carried out at the design stage of the house.
When deciding how to make ventilation in a house, apartment, you should separately calculate the ventilation of the kitchen, since a comfortable stay inside the living space largely depends on this.
Related videos


Requirements
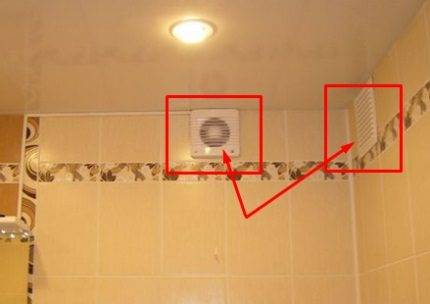
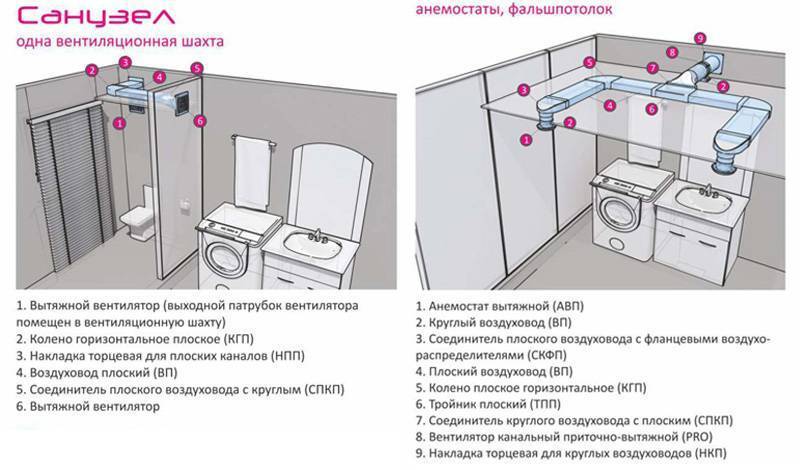
Ventilation in the bathroom and toilet is a finely organized system, on the work of which the microclimate of these rooms depends. The cause of problems in the functioning of equipment is most often errors in the design and installation of do-it-yourself. Experienced craftsmen advise to clean the ventilation duct before changing the device of the system. The following requirements are imposed on the design of ventilation in a sanitary room:
- The noise level of ventilation equipment installed in residential buildings should not exceed 30 dB. Therefore, only low-noise household fans are suitable for the bathroom.
Do-it-yourself bathroom hood
- To ensure the maximum level of draft in the channel, it is placed against the wall opposite the front door, from which it takes in fresh air for the operation of the system.
- Ventilation equipment is installed away from electric heaters, as they can only withstand temperatures up to 50 degrees. The heating of the fans leads to breakdowns, and also reduces the level of thrust in the channel.
- The power and performance of the equipment is selected in accordance with the volume of the room and the frequency of use.
- To save energy, you can make ventilation with an air humidity sensor, a motion sensor or a timer to automate the operation of the equipment.
- The channel shaft is made straight, even and smooth to facilitate the movement of air currents.
Requirements for the bathroom ventilation system are regulated by SNiP 41-01-2003. This regulation describes the maximum content of dust, carbon dioxide and the rate of air exchange. If the air in the sanitary rooms does not meet the requirements, it is necessary to clean the ventilation duct and assess whether additional equipment is required.
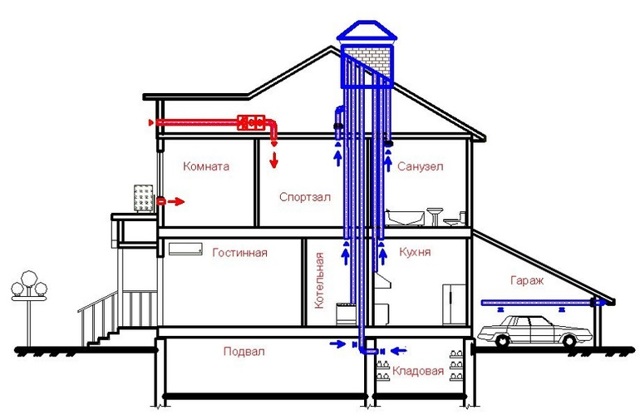
Features of forced ventilation of a bathroom in a private house
In the process of construction or repair work in a private house, the question arises as to how to install a hood in the toilet. There are two layout options.
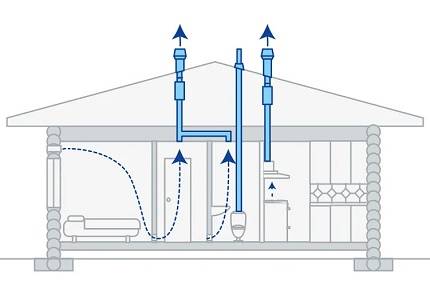
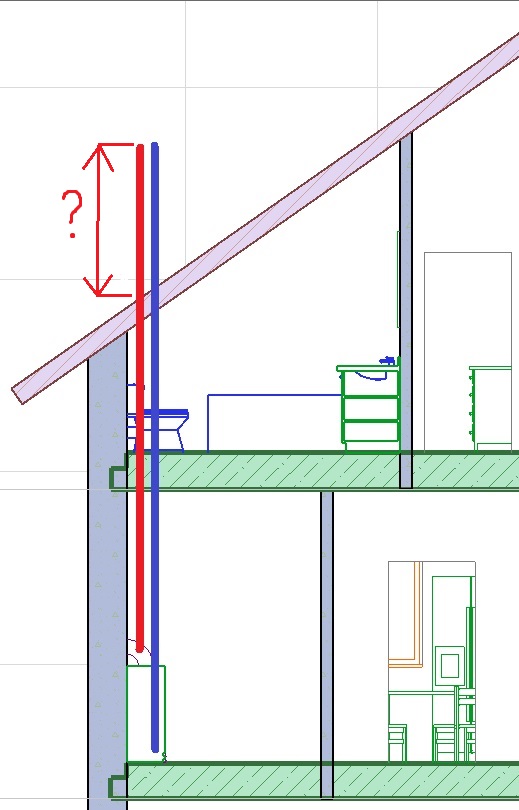
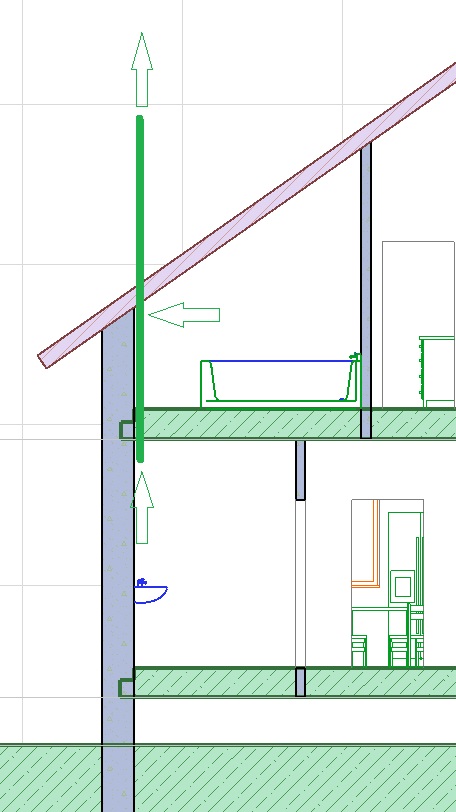
The first is a natural way of ventilation, while it is necessary to take into account the layout of the room and the location of other rooms.In each room, installation of separate channels is carried out, which are then reduced to one exit. In order for the air to circulate well, it is necessary to bring the common pipe above the roof to a height of at least half a meter.
The second option is a mechanical hood in the toilet and bathroom. There is no need to take into account the layout of the house in general. Air circulation will be carried out due to the operation of fans. The outlet of the channel is planned directly through the wall or roof, there is no need to bring the outlet to another ventilation shaft.
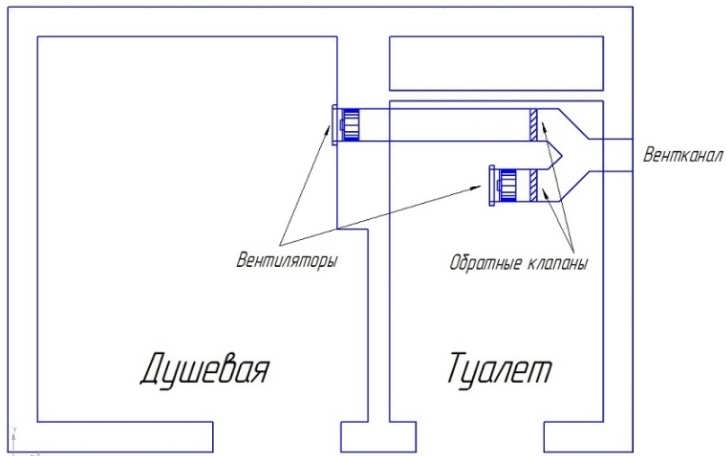
If the installation of ventilation in the bathroom is too complicated, and the toilet is located in an adjacent room, then you need to consider a special transition. It is enough to make a hole in the wall, which will be located as close as possible to the place where a large amount of moisture accumulates. The hole must be closed on both sides with plastic gratings.
Next, the ventilation in the toilet is equipped. Thus, moisture from one room passes through a hole in the wall into another. Air is drawn from the second room thanks to fans. Output to the street through the wall does not require special arrangements. When removing the channel through the roof, you need to make the pipe a little longer so that moist air does not spoil the wooden elements of the facade of the house.
Kitchen hoods without ventilation
It happens that the opening for ventilation is far from the stove, it becomes problematic to bring taps to it. Then it might help. kitchen hood without outlet box. It works on the principle of filtering polluted air, which allows it to be reused.
The main part of the recirculation hood is filters that purify the air of fat, water vapor, and are able to adsorb odor.As a rule, the filtration scheme consists of two parts:
- coarse filters that clean the air stream from moisture, grease particles, oil, dust, etc. They are a plastic or metal grill that can be used many times;
- filters for fine, thorough cleaning, retaining water vapor, odors. The most commonly used carbon filters are characterized by adsorbing properties.
Charcoal filters for recirculating hoods need to be changed frequently, which will lead to certain material costs. With intensive, frequent cooking, the filtration system will clog quickly, the filter will have to be changed after a month. If the use of the hood is infrequent, a change is possible after 2-3 months. Over time, the carbon filter loses its absorbing properties, caking. The passage of air flow becomes more difficult, slows down.
Recirculating hoods are equipped with powerful fans that can draw air through a dense carbon filter. The operating noise of the devices is slightly higher than traditional analogues.
Structurally divided into:
- flat;
- embedded;
- suspended;
- oblique.
Inclined devices are the most effective.
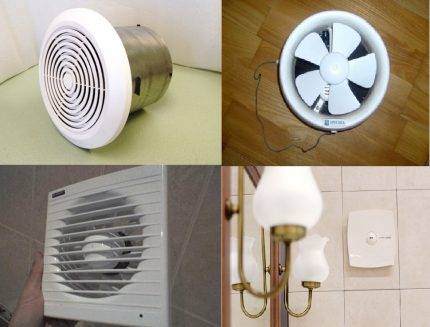
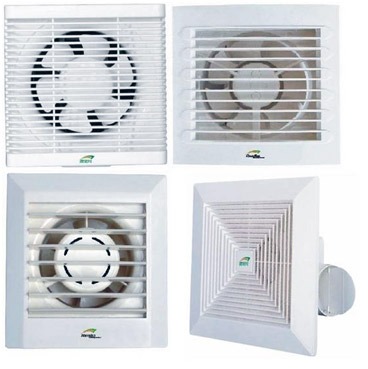
Construction type
The first criterion that you need to pay attention to when buying is the type of device design. Manufacturers offer several options:
- Axial hoods. The design is installed directly in the ventilation shaft. Its device is very simple: an impeller is located in a plastic or metal case, the blades of which are directed inward. During operation, the fan quickly draws out stagnant air masses, preventing the accumulation of moisture on walls, ceilings and other surfaces.
- Centrifugal or radial type of construction. The air is pulled by a turbine located behind the impeller. Externally, the device is identical to the first. Due to the development of centrifugal force, such an extract is very effective.
- Surface or wall fan. This type is considered the simplest, it does not require the installation of an air duct in the ventilation shaft.
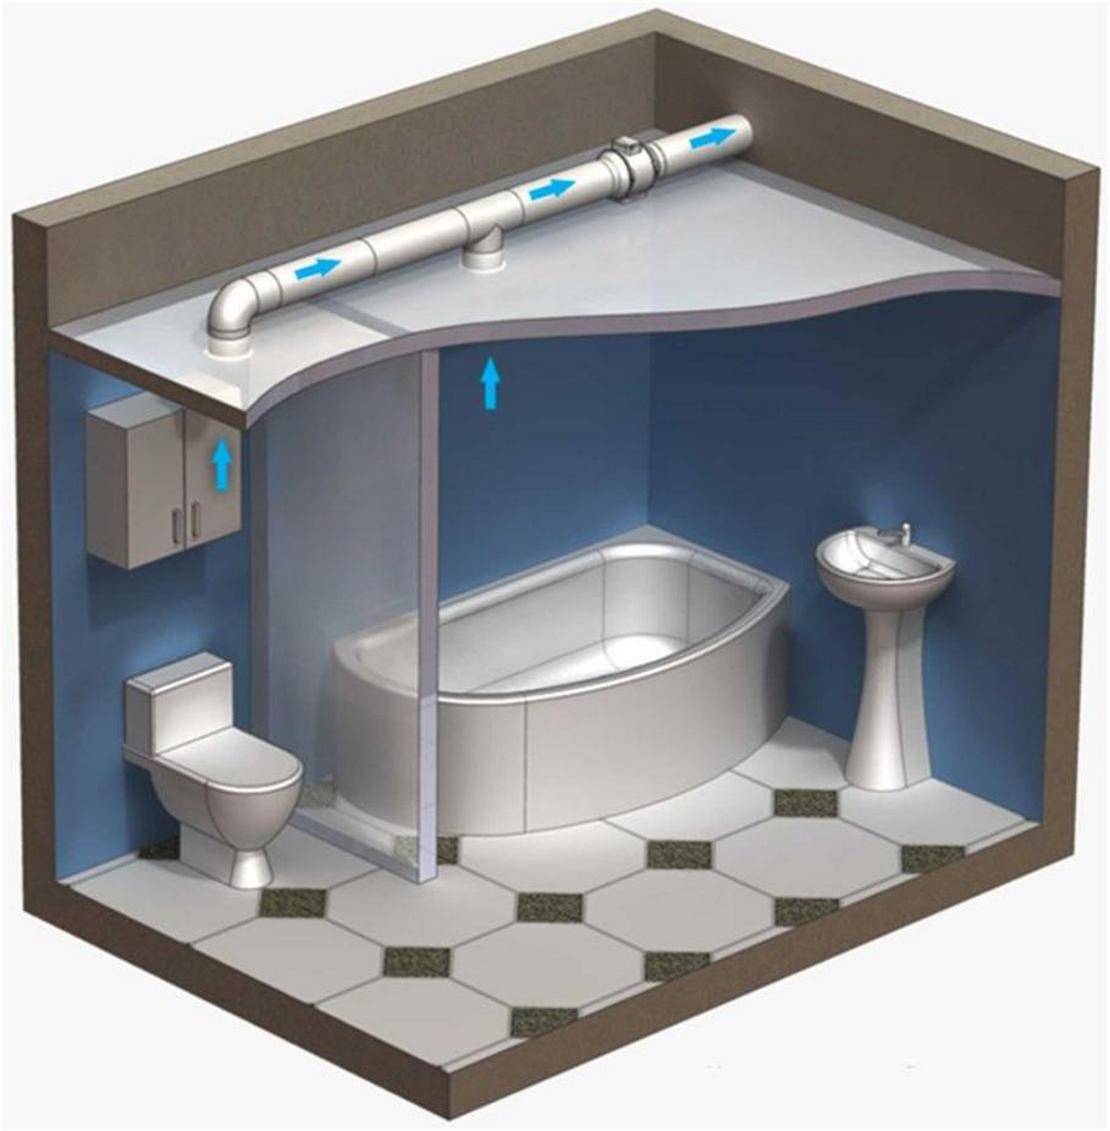
- Channel hoods. They provide for the installation of an impeller and a frame for it, as well as a tube that brings air directly into the ventilation shaft. The air sleeve prevents the return of air into the room. For small bathrooms, this is especially necessary, since poor ventilation not only worsens the condition of the surfaces, but also negatively affects human health.
Features of the ventilation device in the bathroom of a private house
The type of ventilation system is determined at the stage of creating a house project. There are two types of systems used in bathrooms:
- natural;
- forced.
In natural air exchange, the movement of air occurs under the influence of temperature differences. The work of forced ventilation in the toilet of a private house is provided by a special exhaust device - a fan installed in the duct.


natural ventilation
A 2-3 cm gap between the floor and the door leaf, which is provided when installing the door, serves as an inlet. Sometimes special doors are used for this purpose, having ventilation holes or grilles in the lower part.
The exhaust ducts are vertical ventilation shafts, to which ventilation is supplied in the toilet of a private house through the wall - in its upper part or through holes in the ceiling of the bathroom.
When installing a natural air exchange system, the following recommendations should be observed:
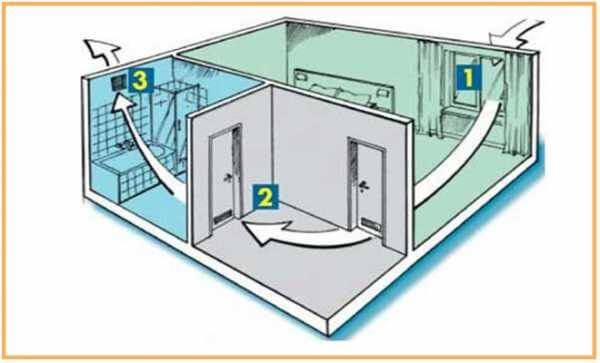
- For the bathroom, a vertical air duct is required, which cannot be combined with air ducts in other rooms.
- You can combine the ventilation ducts of the bathroom and toilet, but only if they are located on the same floor. In addition, you can combine hoods from different rooms in the attic if they are located on one side of the cottage.
-
When installing the ventilation grille, it is necessary to provide a check valve designed to protect against the penetration of cold outside air into the room.
Forced ventilation
Often, cottage owners are faced with the problem of excess humidity in the bathrooms due to insufficient natural ventilation.
This is especially true for rooms in which a shower cabin is installed, since the air exchange rate of more than 75 m3 / hour must be ensured. In addition, in summer, the difference between indoor and outdoor temperatures is not large, and there may be problems with draft.
The influx of fresh air can be organized in the same way as with natural ventilation - through the gap between the door and the floor. Air circulation is enhanced by the use of an exhaust fan.

There are many fans of various shapes and capacities, but they all have the same principle of operation.
When the installation of the ventilation system is completed, you can check the effectiveness of its operation.This can be done with a burning candle or match: bring it to the vent and observe if the flame bends, then the system is working.
Ventilation in the toilet of a private house: regulatory requirements
The main indicator on which ventilation is calculated is the amount of air passing through the pipe section in 1 hour. This is the so-called air exchange rate.
For a bathroom, the required value depends on the type and number of plumbing fixtures:
- for a toilet bowl it is assumed to be 50 m3 / hour;
- when placing a shower cabin, bathtub or jacuzzi - 75 m3 / hour;
- in the presence of a bidet or sinks requires 25 m3 / h;
The given values are necessary for determining the total air exchange. But keep in mind that, as a rule, plumbing fixtures are not used all at the same time. Therefore, when arranging a forced exhaust, the fan power rarely exceeds 110 m3 / h.
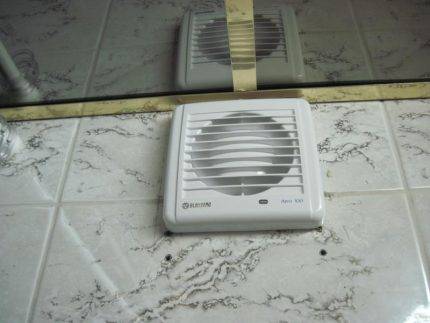
Fan mounting
The fan is installed on mounting foam. Typically, an exhaust fan is sold with a thin 100 mm diameter pipe, which should be foamed in a large hole in the wall. To prevent the pipe from being compressed during the expansion of the foam, the fan must either be inserted into it immediately, or instead of a standard pipe, a more durable sewer pipe of the same diameter (usually 100 mm) should be bought. The body of the device does not fit tightly into such a pipe, but this inconvenience can be easily eliminated by putting tight rubber rings on the fan case, which can be purchased at hardware stores.
When creating ventilation in the toilet, it is important to remember that ideally it should be a separate duct, not combined with any other.It is strictly forbidden to combine the exhaust duct with a forced fan and any other air ducts operating on the principle of natural draft
A single ventilation system that effectively removes exhaust air from all rooms in a house or apartment requires a detailed calculation. The process of creating such a scheme for a qualified specialist takes several hours.


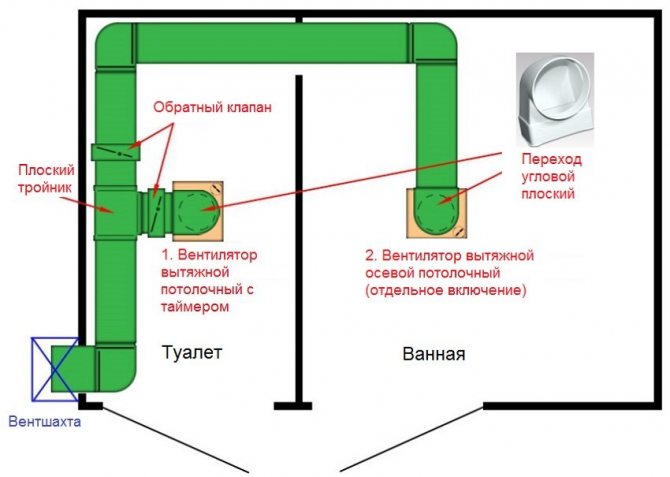

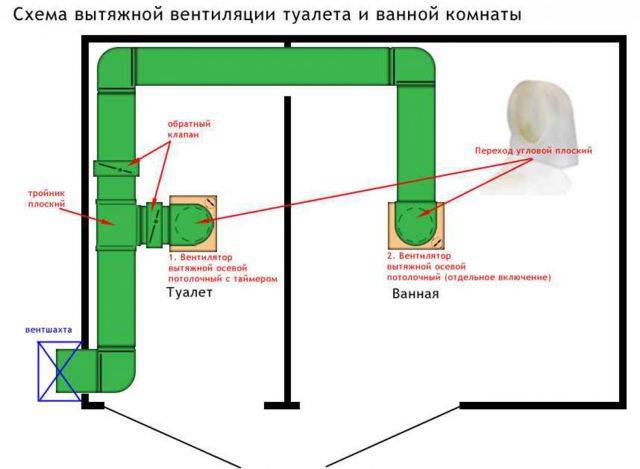


To organize a high-quality hood in the toilet with your own hands, it is better to create a separate ventilation duct once than to invest a lot of time and effort later on achieving the correct distribution of air flows inside the combined duct. At the same time, we must not forget about the influx of fresh air, it must necessarily be less intense than its outflow.


