- Filters for hoods operating in recirculation mode
- Selection criteria for exhaust device
- Ways to install hoods for the kitchen
- Built-in hood. Varieties, features and indications for use
- Connecting the hood in the kitchen to ventilation - step by step instructions
- Diamond drilling motor prices
- Carrying out measurements and calculations
- Installing the hood
- Training
- Installation
- Installation options for exhaust technology
- Used as filters
- How to install (fix) a flat cooker hood?
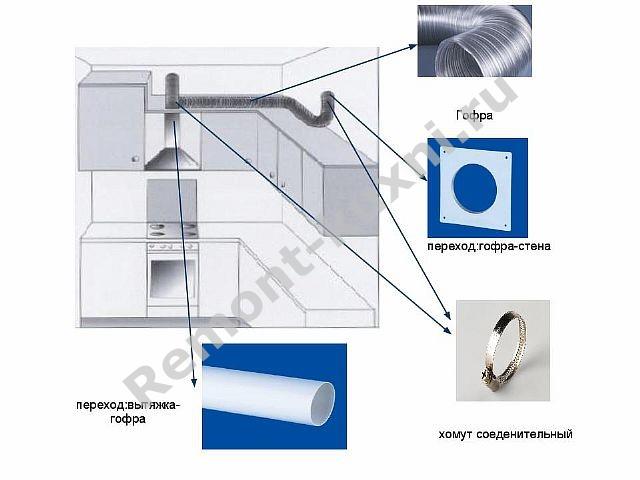
- Which air duct is better - plastic or corrugated?
- Advantages and disadvantages
- Is it always possible to install a hood?
- Features of mounting a built-in hood
- Conclusion
- Instructions for bringing the hood in the kitchen to the ventilation
- Foundation preparation
- Installation work
- electrical equipment
- How to improve traction
Filters for hoods operating in recirculation mode
Hoods operating in the air purification and recirculation mode are sometimes called coal hoods. This is not entirely correct, since, as we have seen, their design, in fact, does not change.
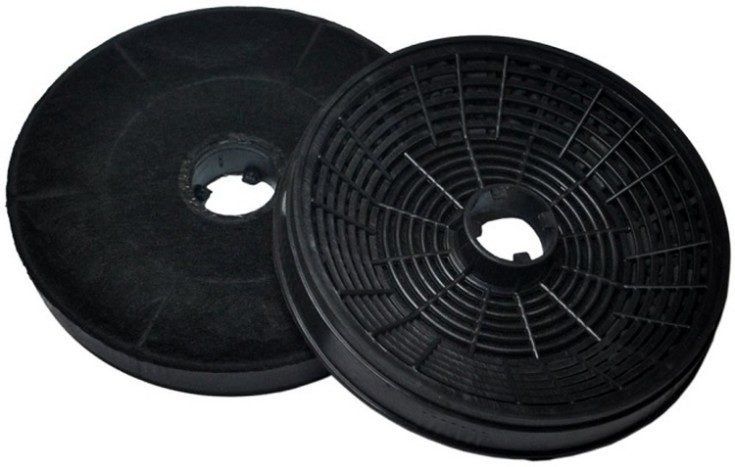
The filter is a plastic or metal cassette of a rectangular or round shape, the inner space of which is filled with activated carbon.
Some modern models of hoods are equipped with a self-diagnostic system that shows how much the life of the carbon filter has been used up. That is, it is easier for the owners of the device to keep the situation under control.
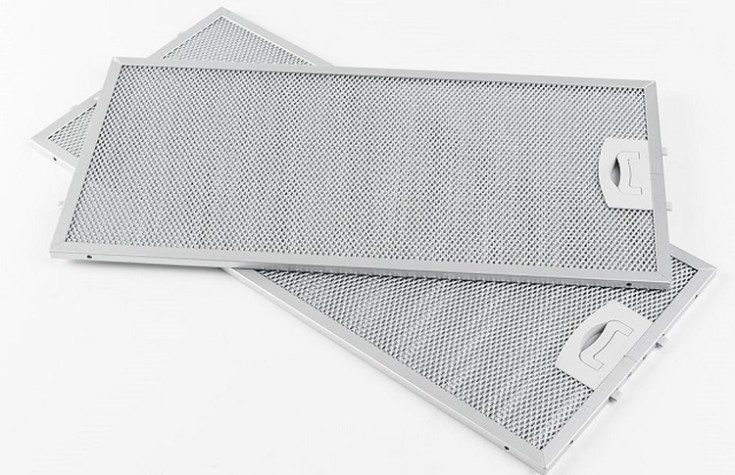
It's about a grease trap. If you do not install it, then after a very short time, all the insides of the hood, including fan blades, valve flaps, channel walls, will become overgrown with a thick fatty coating, which will be extremely difficult, if not impossible, to remove.
It can be a thin metal (aluminum) mesh, in the cells of which fat evaporation is retained. Another option is fabric or paper liners, which also effectively retain fat.
Thus, particles of fat from the steam rising from the stove remain on this filter, and unpleasant odors and other contaminants are finally “cleaned up” in the coal filter.
As a rule, these parts of the hood are well washed in a dishwasher or by hand, with a preliminary soak in hot water with the addition of a detergent that does not contain abrasive components.
By the way, they can be original, that is, produced by the manufacturer of the hood, and universal, which are suitable for various models. The cost of the latter is somewhat lower than the original products, but the quality, I must say, is “thinner”.
The problem with filters, by the way, is one of the most serious. Many homeowners who once made their choice in favor of a recirculating kitchen hood have already regretted it.
And therefore, there are quite common pictures when the owners gave up on this matter, they stopped changing the carbon filters, they are content with natural ventilation.And the hood itself is not removed above the stove just because they are already used to its presence and the fact that it provides illumination.
So think ahead...
Selection criteria for exhaust device
Scheme for calculating the required power of a kitchen hood
Hoods for the kitchen are selected according to the volume of the room and the power of the equipment. The air in the kitchen should be changed 10-12 times within an hour. Then odors, moisture, soot and grease will be completely removed from the kitchen.
Before you go for an air filter device, you need to determine the size of the kitchen. For this, the length, width and height of the room are measured with an ordinary tape measure.
The minimum extraction capacity is calculated by the formula:
(a × b × h) × 12 × 1.3
where: (a × b × h) - the volume of the kitchen;
12 - the number of complete air changes per hour;
1.3 is a correction factor that takes into account power losses during ventilation in the pipe and filters.
The resulting figure must be compared with the power indicated in the technical data sheet for the model you like. You need to choose a little more powerful, by 10 - 15%, so that the equipment does not work constantly with maximum load.


A weak hood will not provide complete air purification. Aromas and steam will accumulate in the kitchen and get into the rooms, soak into the walls and the surface of the furniture.
Devices that are too powerful are more expensive and consume more electricity even when operating in economy mode. On the other hand, in emergency cases, they are able to clear the kitchen from the smoke of food forgotten on the fire in a matter of minutes.
The design of the hood is selected based on the dimensions of the kitchen, the style of its design, the convenience of placing it above the stove and matching it in size.The lower, air intake part of the appliance must not be smaller than the hob.
Dome and fireplace models are suitable for rooms with high ceilings. If the height of the kitchen is small, it will be problematic to install an outlet channel.
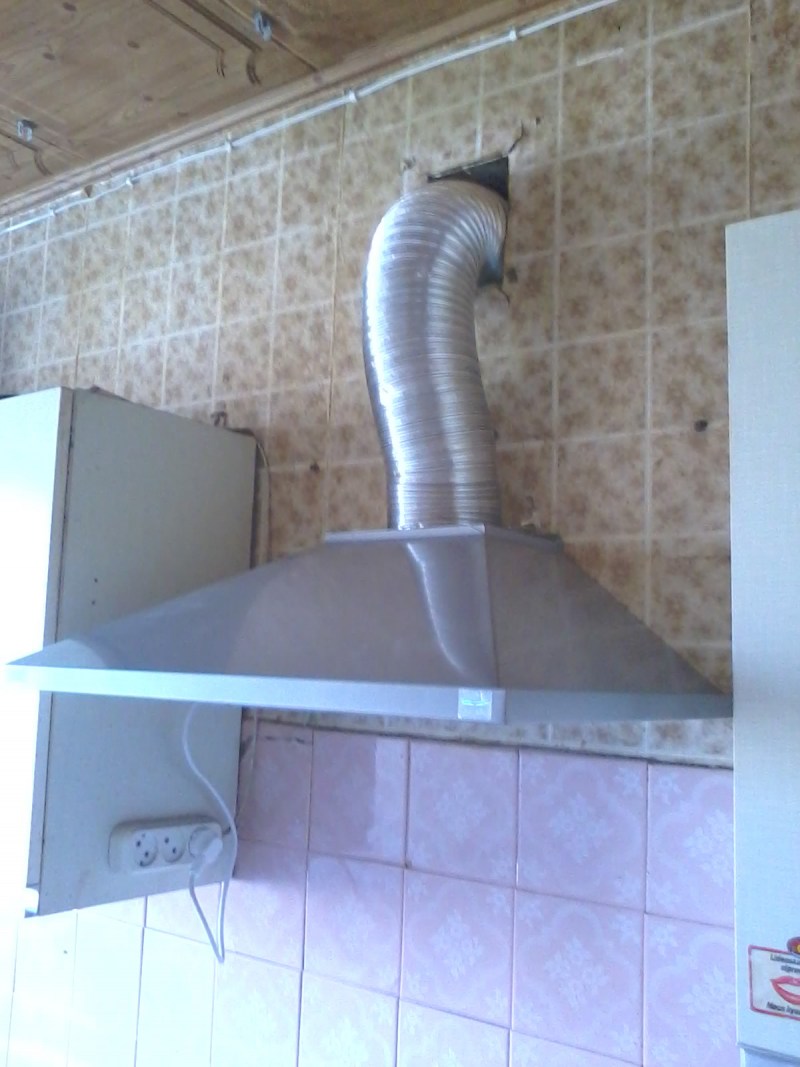
The length of the exhaust pipe must be within 5 meters and have no more than 3 bends. If the stove is located far away, against the outer wall, it is worth considering the option of recirculating air purification.
In small kitchens, wall-mounted and retractable models will fit well. Dome and suspended hoods are appropriate in a large room with a high ceiling and in the kitchen-dining room.
When buying, you should ask the seller to turn on the hood and listen to how much it makes noise. Most low-end and mid-range equipment has fans that make a lot of noise during operation. Noise can reach 70 dB. A sound level of 40 dB is considered normal, with which you can stay in the kitchen for a long time. It is quieter than the calm conversation of people.
The control panel should be located on the front of the device so that it is easy to switch operating modes when cooking. The touchpad responds to touch, but is very sensitive to dirt. The push-button switching system requires little effort when pressed, stronger and more durable.
The backlight does not affect the operation of the hood, but it creates additional convenience for the hostess when cooking. In modern models, mainly halogen lamps and incandescent lamps are used. From above, they are closed with a transparent or frosted glass cover that protects them from moisture and hot air. In some expensive models, you can find diode and other types of lamps.
When buying equipment, you should pay attention to the type of lamp and its availability for replacement. The light should be directed downwards, not scattered in all directions and not blind to the eyes.
The hood can be additionally equipped with a timer that turns it off after a certain time. The air purity sensor determines the degree of pollution and automatically turns on the equipment.
Ways to install hoods for the kitchen
According to the installation method, kitchen air purification systems are divided into:
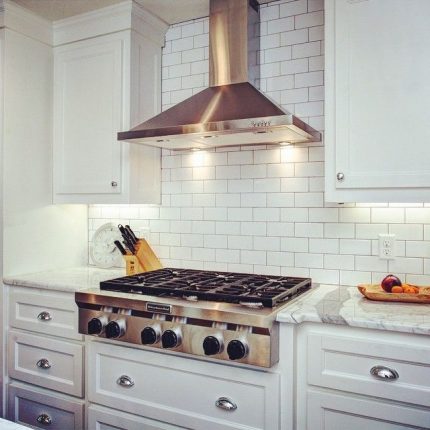
 Dome hood
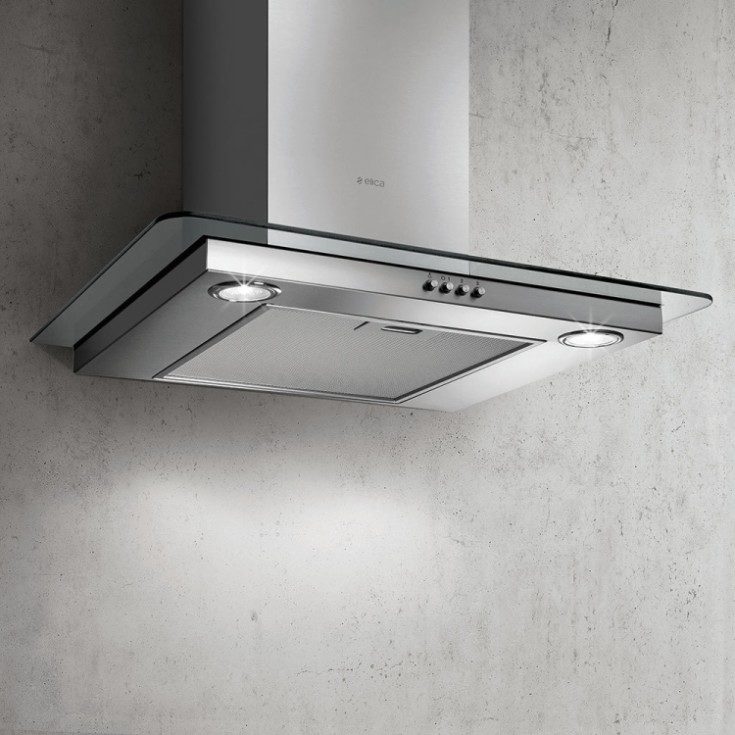
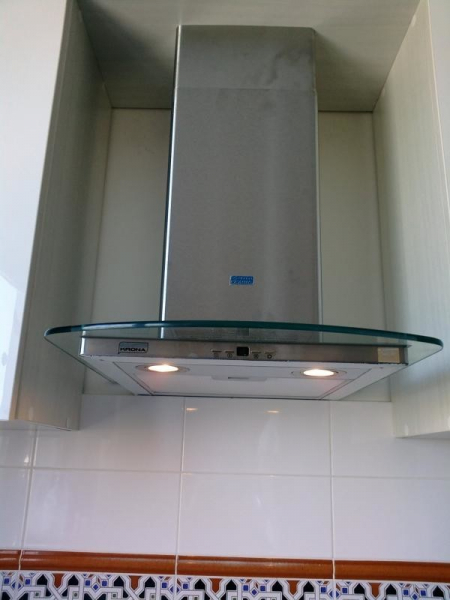
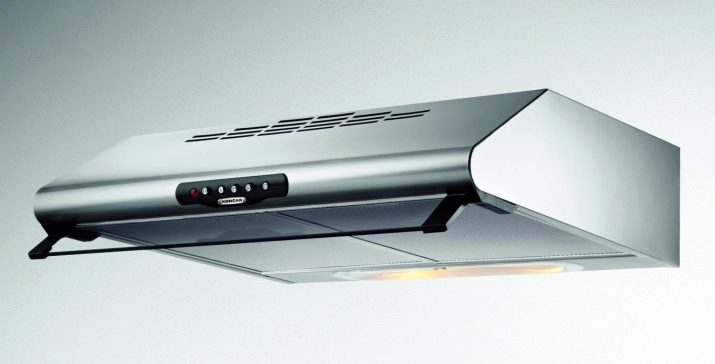
- Dome hoods (also called chimney-type hoods). The most popular form factor, they are an "umbrella" that continues upwards with a pipe. They are usually mounted on the wall above the hob.
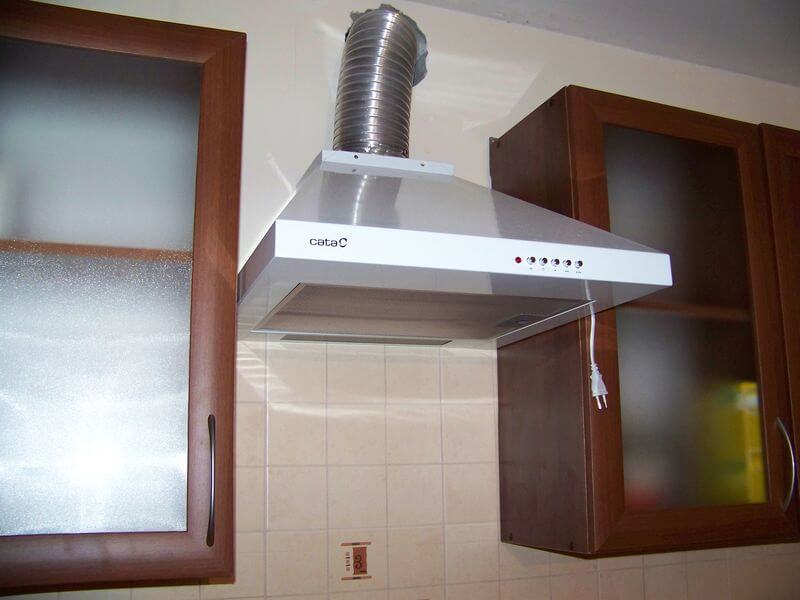
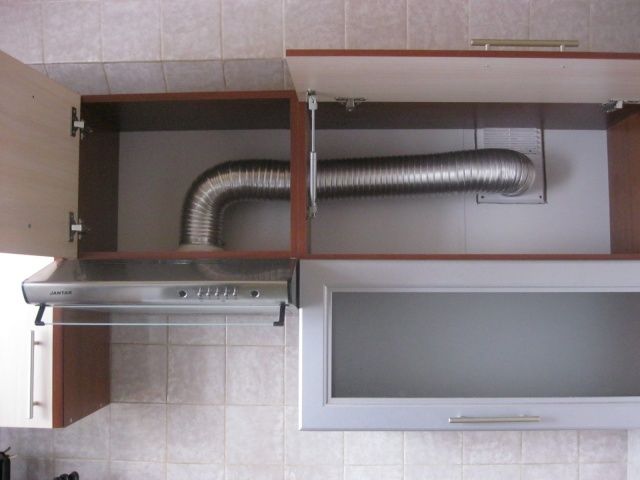
- Hanging hoods. They are installed under the cabinet, located above the stove. Such models are very compact, so they are also called flat.
- Built-in hoods. Mounted inside a wall cabinet, or in a table, due to which they perfectly complement any interior solution.
- Corner hoods. Their feature is clear from the name - this design is easily installed in a corner.
- Island hoods. Designed for island-type kitchen sets, the working area of which is located in the center of the kitchen. They are mounted using special ceiling mounts.
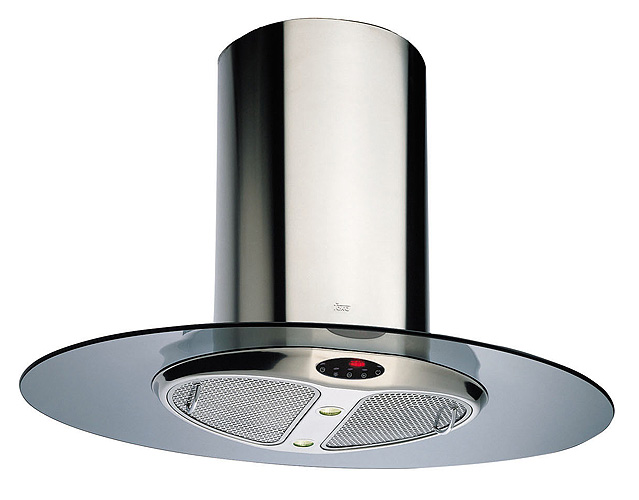 Island hood
Built-in hood. Varieties, features and indications for use
The feature of the built-in hood lies in the design features. The device is partially or completely "hidden" in a special cabinet, which provides an aesthetic appearance. Hence the name of this device.But it should be noted that the hood is, first of all, not a decor in the kitchen, but a technique that must do its job with high quality.
Devices differ from each other according to several criteria:
Mounting:
- The most common mounting method is when the device is mounted in a special, hollow kitchen cabinet. The necessary holes are cut out in the lower part of the cabinet, and the air duct can be “hidden” in the cabinet itself.
- Vertical built-in hoods are mounted in the countertop and are necessary when they need to be placed at a small distance from the stove. For example, when the hob itself is built into the headset. This method is rarely used in practice.
Principle of operation:
- Withdrawal type. It is distinguished by the presence of an air duct through which the drawn air is ejected into the main ventilation duct. This type of technique is appropriate if the main vent. the channel in the house is in good condition.
- The recirculation system does not imply removal, but cleaning of the intake air. Therefore, hoods of this type are additionally equipped with carbon filters. The principle of operation is that air is sucked in, cleaned with a grease filter, then cleaned with a carbon filter and thrown back. This type of device will be optimal with a poor central exhaust system at home.
- Discharge-recirculation type. A universal device in which both methods of air purification are combined. At any time, you can change the operation of the hood, referring to the functions you need at the moment.
Performance. From this parameter depends on whether the technique will cope with the work or not.The parameter varies from 150 m3/h to 1000 m3/h. The choice of performance parameter directly depends on the area of \u200b\u200bthe room. So, for small kitchens, manufacturers advise installing devices with a parameter of 200-300 m3 / h. But practice shows that the choice must be approached with a "margin". You can find tables and examples of calculating the recommended performance for your area on the Internet.
Control:
- Mechanical or push-button control is the most common and budget option. A simple and familiar control method is installed on more hoods, but has some disadvantages. For example, over time, the risk of contamination and failure of buttons increases.
- Slider or slider control is often combined with a mechanical option. It is installed on models that allow you to adjust the power or speed of work.
- Touch control is a modern solution that has not only functionality, but also aesthetics. There is no possibility of contamination of the controls.
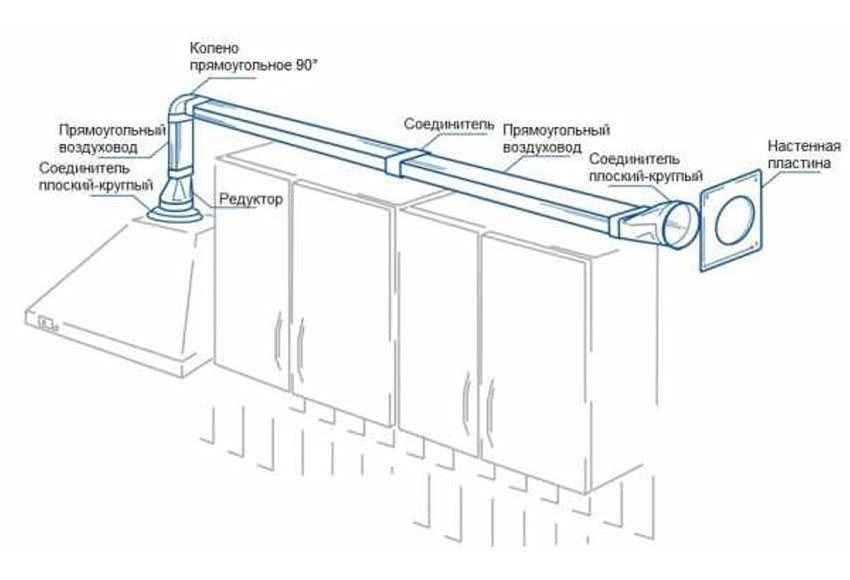
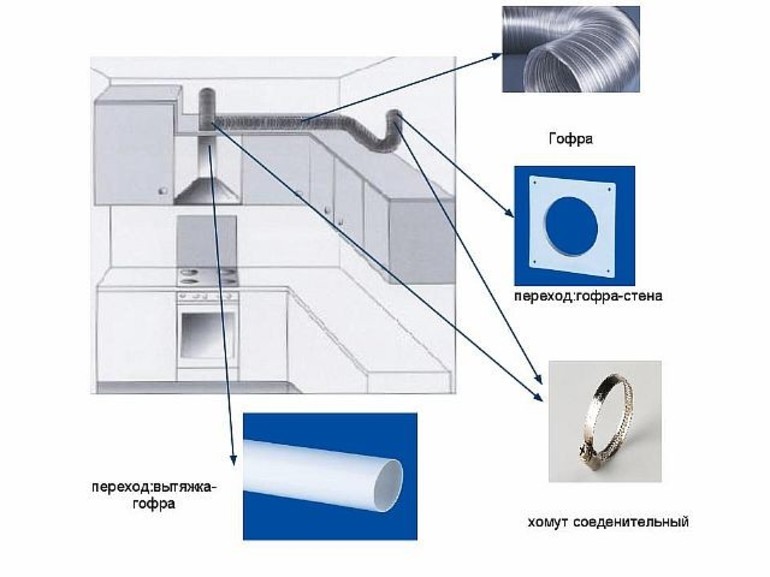
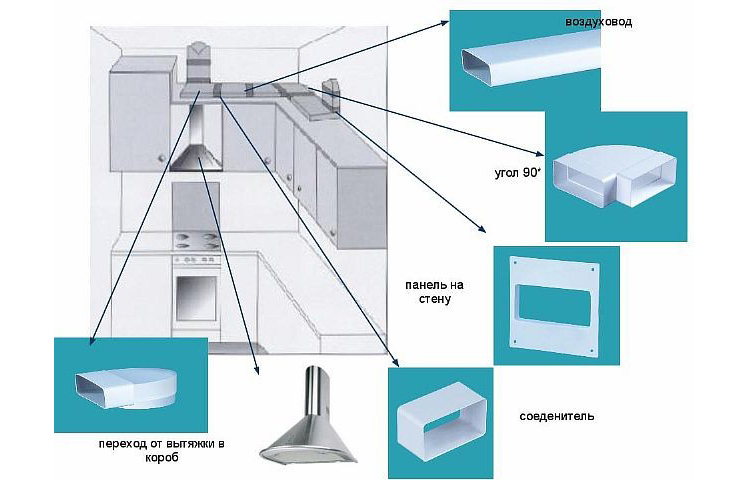
Connecting the hood in the kitchen to ventilation - step by step instructions
If you decide to connect the hood in the kitchen yourself, then you should carry out a number of preparatory work. You may need to purchase missing parts. This can be an air duct, sealant, metal tape, adapters and clamps.
Step 1. Preparation for connection.
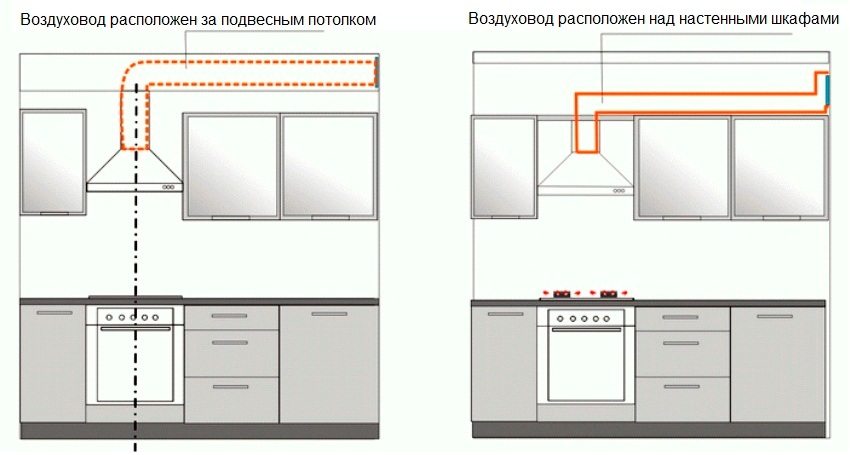
The preparatory stage should include the choice of a method of connecting to ventilation. Connect either to a common ventilation system, or make an independent exit to the street for exhaust. In the latter case, it is advisable to perform these works at the stage of repairing the premises.


 Air duct for island hood
We take careful measurements.
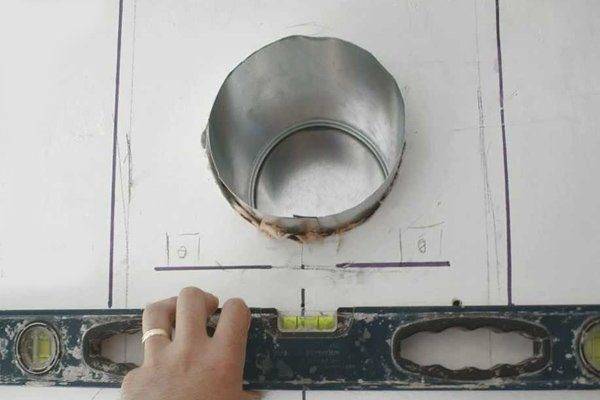 Marking for a ventilation hole in the wall
Drilling a hole for an air duct.
Diamond drilling motor prices
Diamond drilling motor
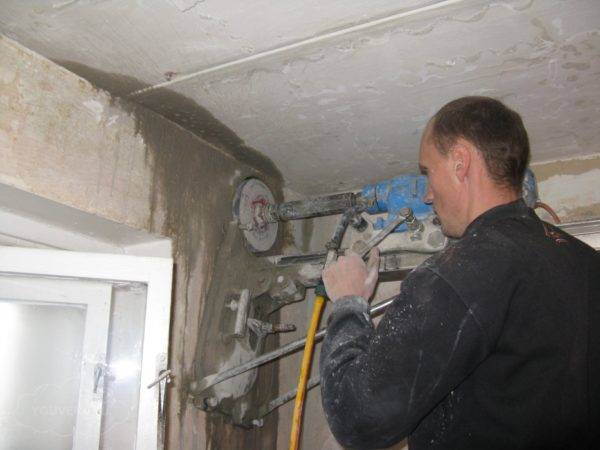 Properly prepared hole in the wall is the key to efficient operation of the exhaust system
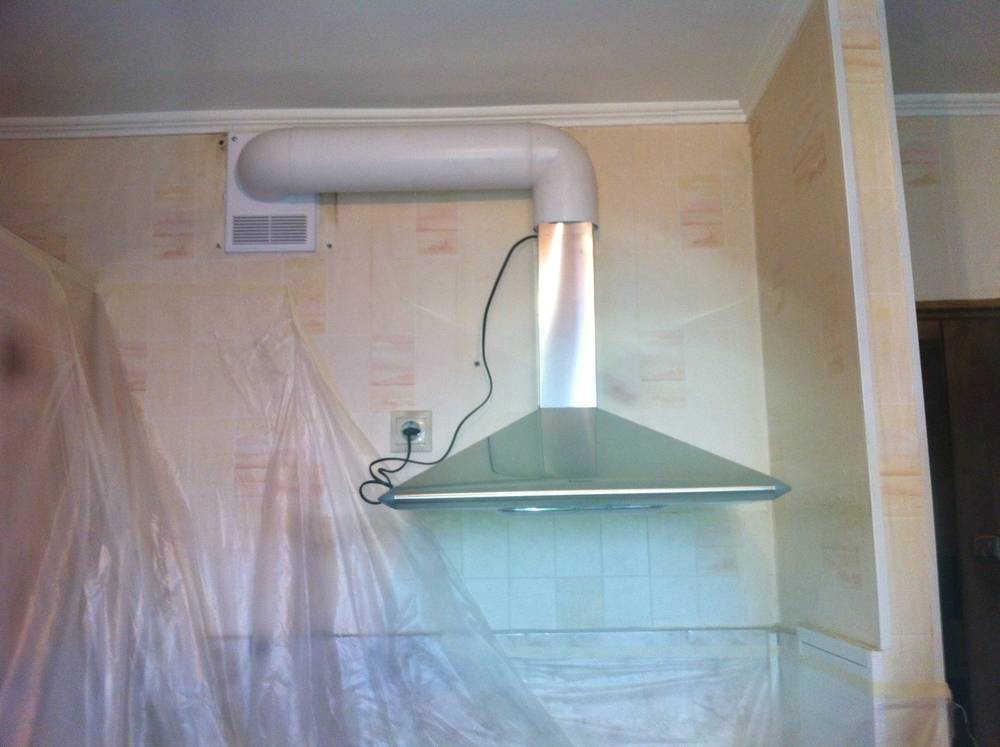
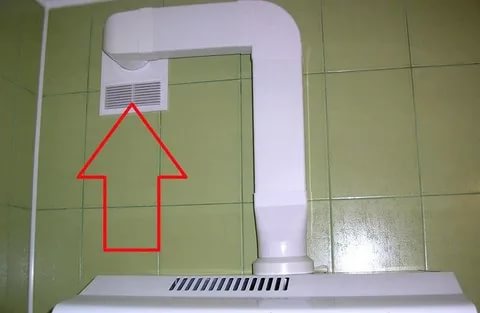
If the ventilation pipe is led out through the wall, it is worth considering its design from the outside. A nozzle and a grate or head are installed to prevent foreign objects, debris and insects from entering.
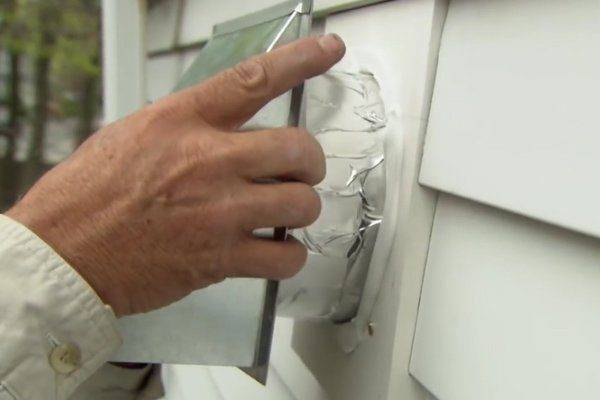 Arrangement from the side of the street - a security measure
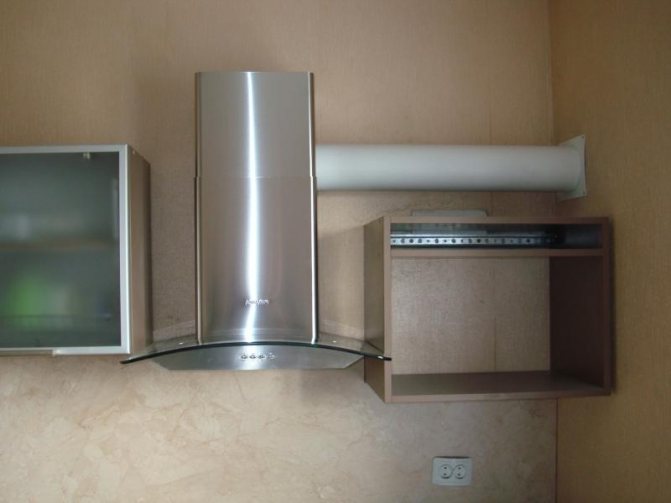
Mounting the hood to the wall. Carried out according to the manufacturer's instructions.
Step 2. Connecting to the ventilation system.
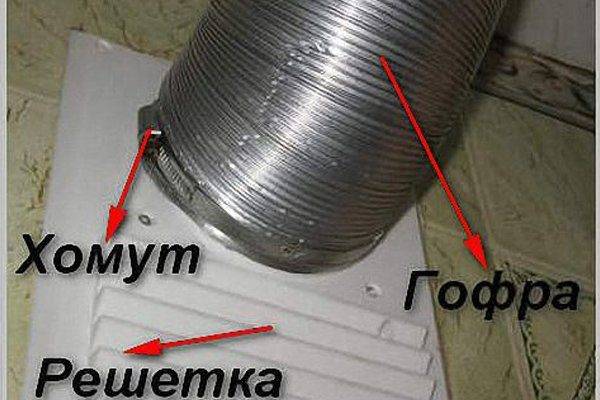
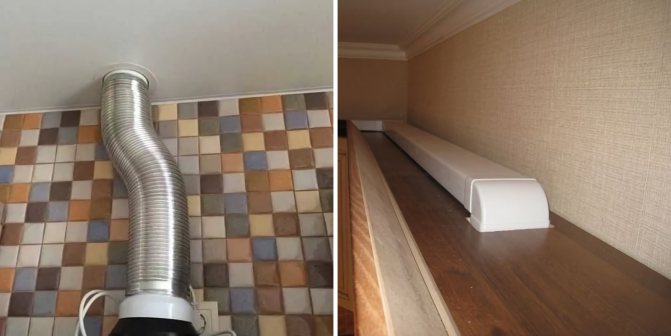
Preparation of materials. For this purpose, it is allowed to use various types of pipes. It can be a metal corrugated pipe, corrugated plastic, stainless steel pipe (round section), as well as plastic with a rectangular or round section.
The list of necessities will include a collar, metal tape, a ventilation grill for entering the general system of air shafts at home.
Assembly of pipes and preparation of corrugations.
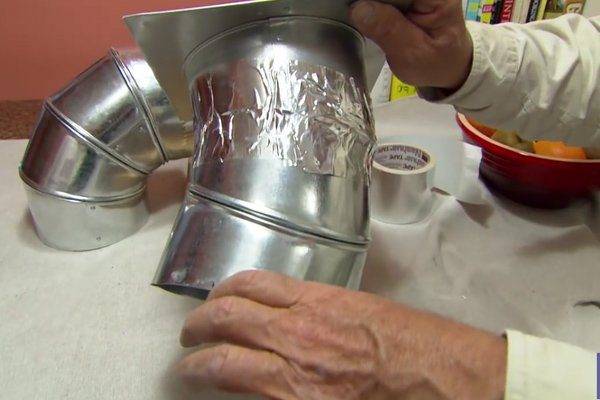 Pipes are hermetically fixed with metal tape
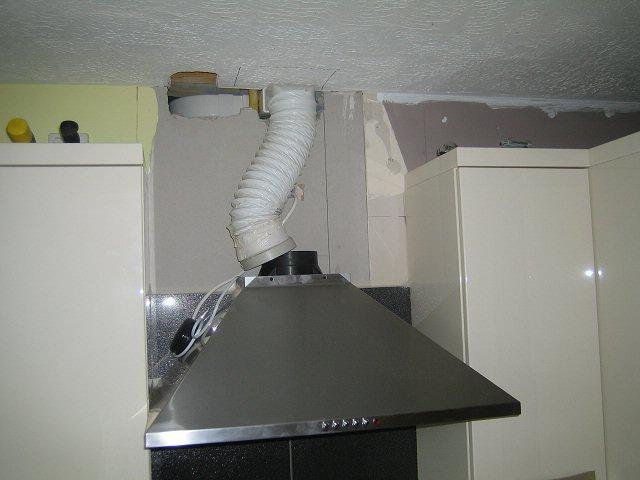
Fixing a branch pipe or corrugated duct.
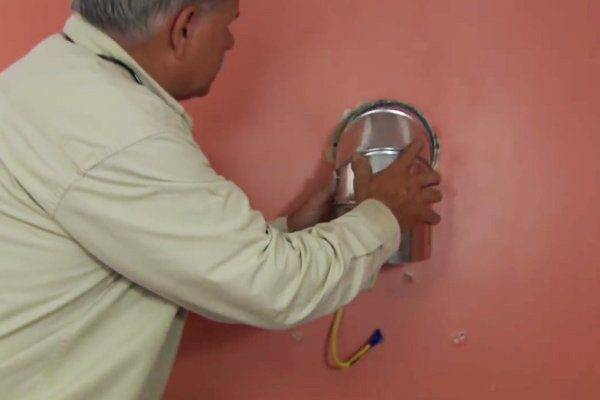 Fix the desired section of the duct in the hole made
Actual in the case of creating a separate ventilation outlet for the exhaust system.
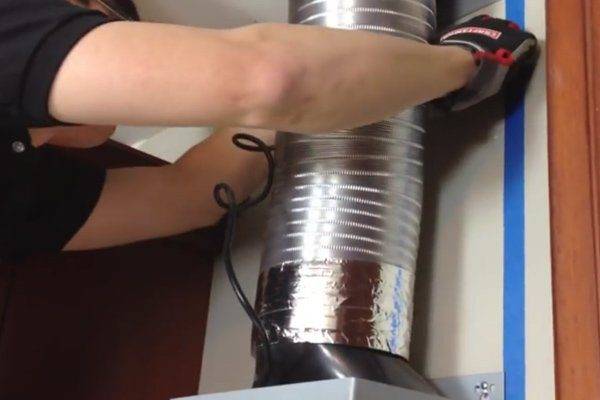
 When using corrugations, we fasten it with a clamp to the ventilation grill
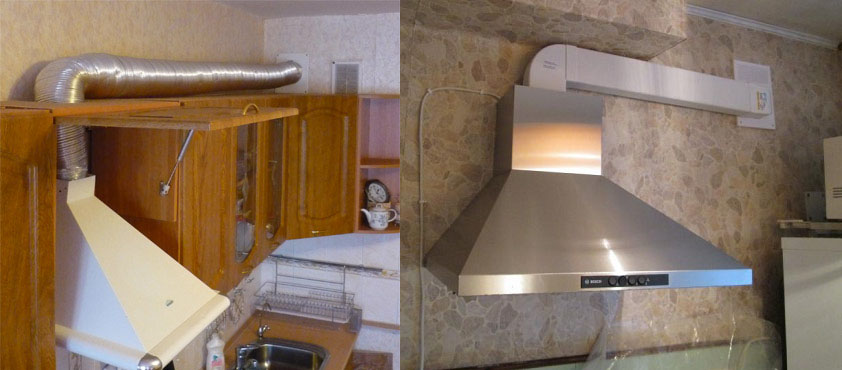
Connecting the pipe to the hood. For this purpose, it is convenient to use metal tape or a clamp.
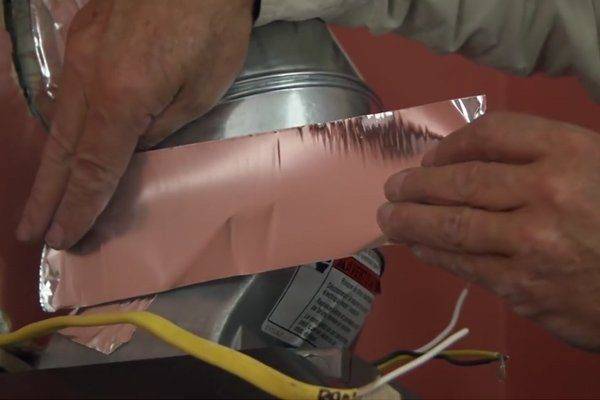 Tightness is essential
Step 3. Finishing work.
Connection to the power supply network.
 If the hood has wires, you must connect them to the power cable.
 In the case when there is a plug, we connect it to a pre-selected outlet
Installation of a decorative box.
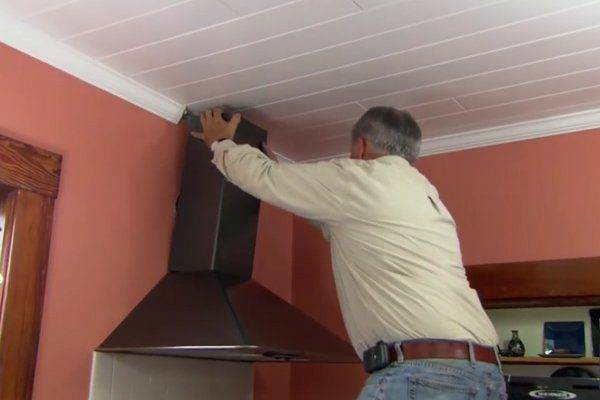 The box hides the functional elements of the hood, fasteners and wires
Properly installed hood forms a single whole with the duct. Works without excess noise and in full power. To check the operation of the equipment, the hood is turned on and the indicators are evaluated according to the manufacturer's instructions.
Carrying out measurements and calculations
As you can see, it is quite difficult to take into account all the factors and make an accurate calculation. But you need to try not to regret purchasing a device that does not cope with the tasks assigned to it.


There are criteria developed by manufacturers:
- A device with a capacity of 200 to 300 cubic meters. m / h is suitable for those who cook a little or a small kitchen. That is, 1-2 burners are constantly used.
- Hood with a capacity of 300 to 400 cubic meters. m/h is recommended for families of 3-4 people, or for a medium-sized kitchen, as well as where 2-3 burners are used daily.
- A device with a capacity of 500-600 cubic meters. m / h will purify the air in a large kitchen, cover the needs of a large family. Such a hood will be indispensable if the stove is actively used daily and all burners are turned on (there may be 5-6 of them).
For indicative indicators, you can use special tables or data from manufacturers.
For a quick calculation of performance, two values \u200b\u200bare used, the area of \u200b\u200bthe kitchen and the height of the ceilings. This approximate data can be multiplied by the slab factor
If the kitchen has non-standard dimensions or its area does not exceed 40 cubic meters.m, then calculate this value for a particular room by simply multiplying the length of the kitchen by its width and by the height of the ceilings. The result obtained must be multiplied by 10 or 12
The numbers 10 or 12 are constant coefficients based on sanitary standards. They mean that the air must be cleaned every 5 minutes, that is, 10-12 times per hour. Therefore, productivity exceeds the volume of the kitchen at least 10-12 times.
Sometimes this coefficient increases due to the frequency of switching on and the characteristics of the stove used. For example, for a gas stove with large burners that are turned on every day, this number can be up to 20. For an electric stove, a factor of 15 can be taken.
 If the stove is non-standard and is prepared daily, then to calculate the productivity, it is worth using additional coefficients for the number of storeys, for the stove, for smokers. But you should not buy a device with a large margin of power.
For example, the length and width of the kitchen are 2 and 3 m, respectively, and the ceiling height is 2.5 m.
Therefore, the estimated performance will be: 2 * 3 * 2.5 * 10 = 150 cubic meters. m/hour.
This figure can be multiplied by a factor of 1.3. It complies with health standards.
If someone smokes in the kitchen, then another 15% is added to the productivity for each smoker of the total.
The data obtained are correct for enclosed spaces. If the kitchen is not closed by a door, but is separated from other rooms by a passage, then another 30% of the received power should be added.
On our website there are detailed instructions for calculating the hood for the kitchen.
The next indicator is the height of the cook
It is very important that the hood does not touch your head and does not interfere with reaching far burners or placing large pots.
Therefore, before buying and installing, take measurements and simulate the process of working behind the stove. To avoid errors when taking measurements, remember that the inclined hood should be measured from the lowest point to the burners.
All straight hoods (domed or built-in) should be measured from the filters to the surface of the stove.
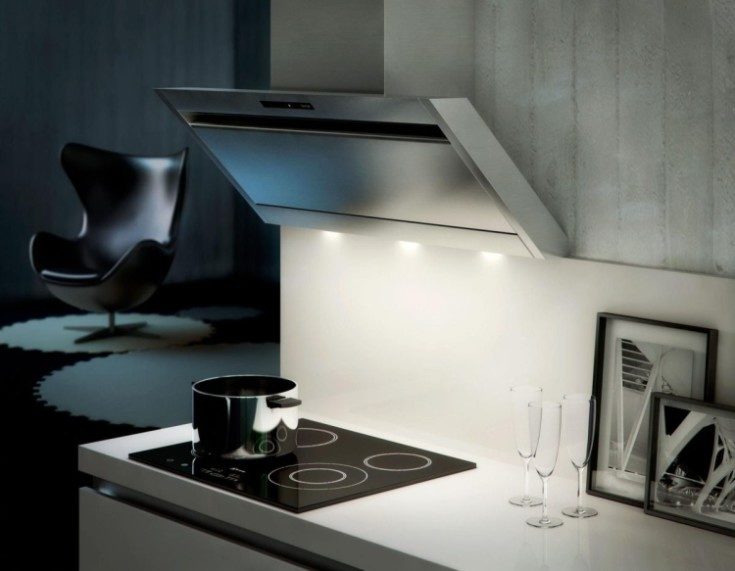
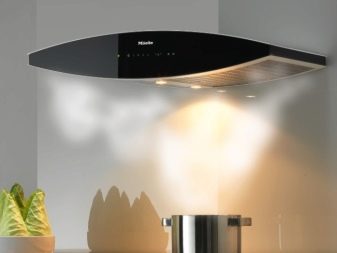
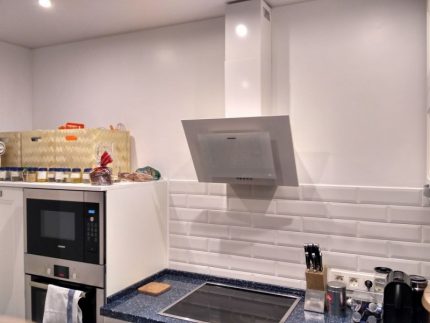 Inclined hoods experts recommend choosing for electronic, halogen and induction cookers. They do not require much space and do an excellent job of purifying the air.
You should also consider the length of the hood. Determine how much it will protrude forward above the hob, how convenient it will be to cook and replace coal and grease filters, as well as wash the stove and reach for distant burners.
All the described factors affecting the distance must be agreed upon. Otherwise, there is a risk that the hood will not cope with its tasks. Even the most powerful device, installed too high, will not cope with all the impurities in the air. Or, soot deposited on the bottom of a hood set too low can ignite.
Proper choice of installation height will extend the life of the hood, allow the device to work at full capacity with minimal cost. In the worst case, the device may not cope with its functions or simply burn out.
Installing the hood
Training
Before proceeding with the installation, choose the right place for equipment - gas stove + hood. In the photo there is an electric stove - the recommendations are also relevant for gas facilities.
Before you install the hood over the gas stove, you must first prepare the room.
- Mark on the kitchen plan the location of all communications, as well as installed appliances, if the installation is carried out in an already operated room.
- The volatility of the hood assumes the presence of an outlet (but not above the stove!) With 220 V connected. A model with an automatic switch is preferable: it will always turn off in time in the event of a short circuit or fire. If the kitchen is not equipped with a grounded outlet, the rules for installing a hood over a gas stove require that a separate RCD (16 A) be provided in the electrical cabinet. Connect to the network a line of three wires "zero", phase, "ground" in yellow insulation with a green strip drawn along it.
- The value between the exhaust device (lower edge) and the surface of the stove (burner) is measured.
- The completeness of the package is checked for the presence of the necessary fasteners, hooks, dowels, etc.
- The place of fastening of the structure is marked.
Installation
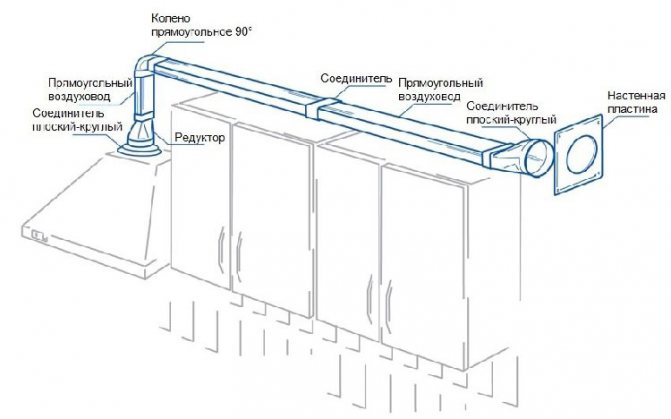
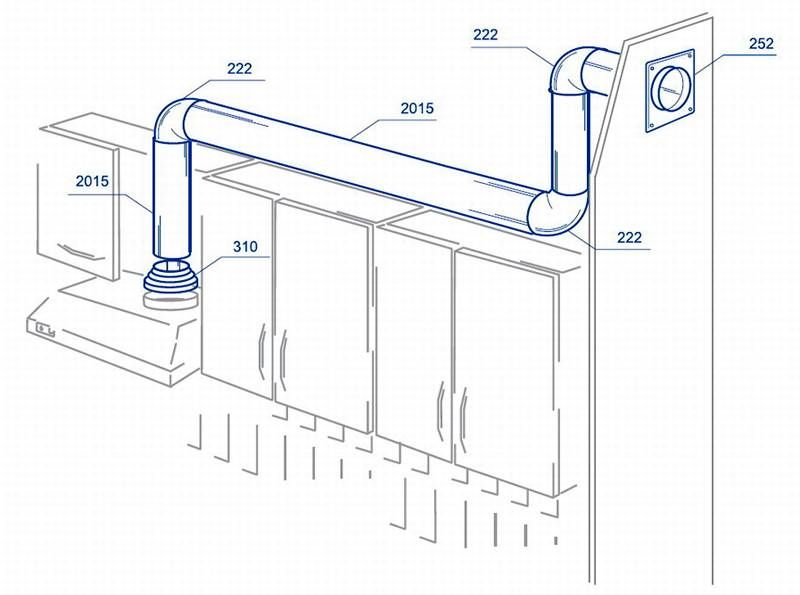
- air duct is assembled. It can be square or round. Standard version - size 130x130 mm It is better to choose a plastic construction with smooth internal surfaces. Its diameter should be the same along its entire length, correspond to the cross section of the ventilation hole and, preferably, have a check valve.
- Holes are drilled with a perforator for the hood clamps.
- Screws are screwed in.
- Using the level, the horizontal installation is checked.
- A hood is hung (without a box).
- Connects to an exhaust pipe connected to a duct.
- The hood is connected to an electrical outlet. If the cord is missing or short, an autonomous line is drawn from the shield or is diverted from the socket closest to the hood.It is strictly forbidden to make twists insulated with insulating tape at the places where the missing part of the cord is added.
- A test run of the technical device is carried out in all modes.
- During normal operation, the box is fixed at the final stage.
Installation options for exhaust technology
Comparative illustration: gas stove and electric
According to the installation version, exhaust devices are:
- built-in type - the entire installation is masked in a hanging cabinet;
- fireplace and dome type - the structures are fixed on the wall;
- island model - assembled on the ceiling;
- corner hood - placed in the corner;
- flat model - involves two planes of fixation: behind - to the wall, from above - into the hanging cabinet.
In any of the models, a certain type of filter elements is provided that absorb pungent odors, grease and other secretions.
Used as filters
- Grease traps - are installed only in kitchens with a ventilation shaft.
- Coal filters are elements of modern cleaning systems with a recirculation mode of operation.
Even with the observance of the rules for installing the exhaust system and operation, the efficiency of work will be underestimated if preventive maintenance is not carried out in time: clean surfaces, change filters. Thus, it is not difficult to create the conditions necessary for a safe and comfortable stay in the kitchen. For this, different methods are used. But it is the forced system with local exhaust above the stove that is considered the most optimal and common option.


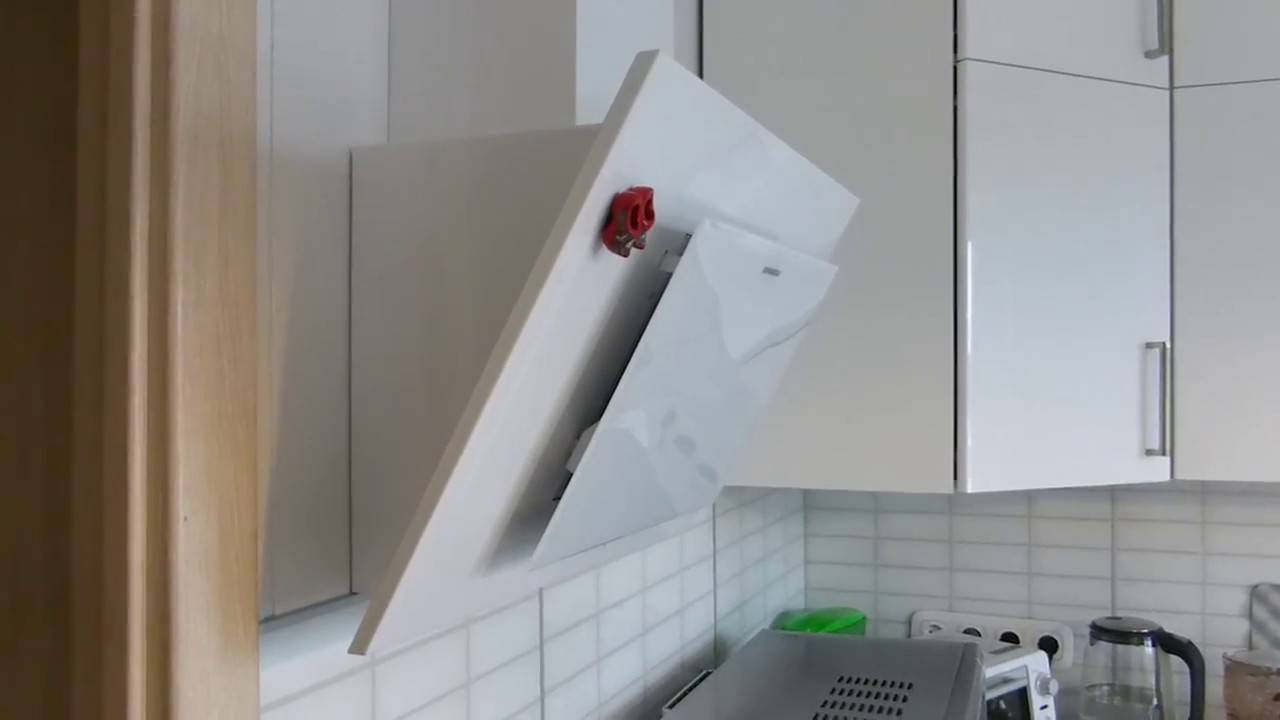
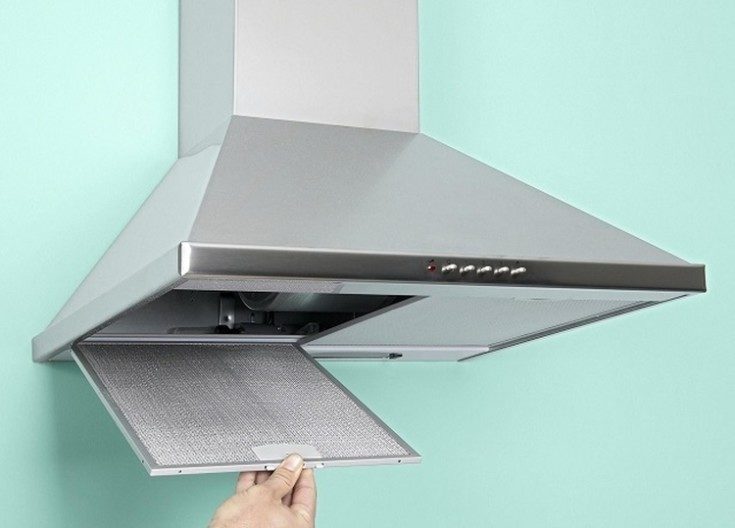
How to install (fix) a flat cooker hood?
A flat, or as it is also called, suspended hood usually does not have an air duct, but is equipped with an air filter.
By the way, any hood model can be run in recirculation mode (air purification with a built-in filter) or in the mode of air exhaust to the street, depending on your desire and capabilities.
Remember that filters should be changed at least twice a year.
The installation of a hanging hood is very simple. The exhaust device has a special mount, you only need to transfer marks to the wall, the distances between which will correspond to the holes on the mount.
It remains to drill the wall, hammer in the dowels and attach the canopies with a screwdriver or screwdriver. We fix the exhaust device on them and connect it to the network.
Which air duct is better - plastic or corrugated?
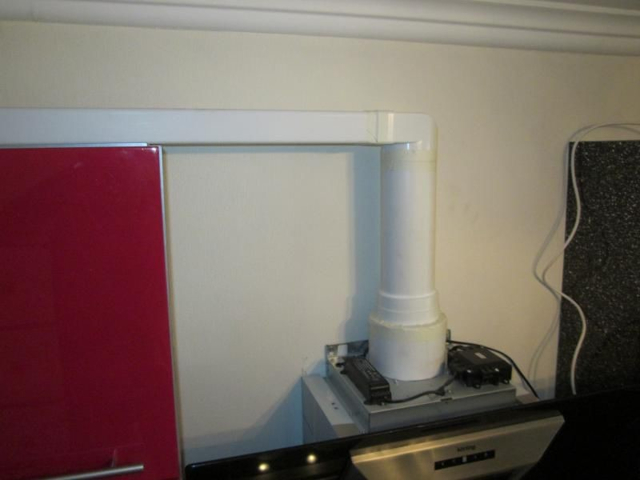
When buying a plastic air duct, you can make a choice in favor of both round and rectangular sections. In order to properly mount them, L-shaped knees are purchased that provide a 90-degree bend. A properly installed plastic duct has the following advantages:
- Low noise during operation
- The absence of gaps on the surface of the duct, where dust and dirt accumulate
- Light weight for easy transport and installation
- Sufficiently low air resistance (if you prefer a round section system)
 Plastic air duct, an alternative to metal
The corrugated duct is easier to install, as it does not require the use of special elbows. To fix it, stock up in advance with the necessary: fittings and clamps. Here are the pros of corrugated pipe:
- Very low price
- No need to purchase adapters
- Ease of installation
Advantages and disadvantages
There are different opinions among consumers about the use of kitchen hoods without an air duct: some oppose such equipment exclusively and call it “useless” in the kitchen, while others prefer modern models of hoods with carbon filters and a recirculation system.

Let's talk about the features of such hoods in order to form a preliminary opinion about their work:
- A hood without a pipe does not interfere with the air circulation in your kitchen and apartment as a whole, since the hole where the air outlet is usually installed is free. With an alternative hood operation system, when the air outlet is installed in accordance with all the rules and regulations, but the hood is not turned on, the air passage is difficult.
- Recirculation is light in weight and small in size, which makes it easy to purchase the model you like and bring it home without picking up additional equipment for it, such as labor and fastening structures. A compact and lightweight hood without an air vent can be stored in any part of a small apartment and not interfere with the completion of the repair.
- Installing such a model is simple: the hood is mounted in a cabinet (where there is no lower shelf) using simple tools and connected to the power supply system. There is no need to purchase additional adapters.
- The pricing policy of recirculation hoods is lower than traditional dome hoods and others that have an air vent. Of course, the price per unit of the hood depends on the brand and its characteristics: size, power, set of functions.
- Care of the hood is reduced to a minimum of effort: it is worth wiping its visible surface (panel) and changing the filters inside in a timely manner.By the way, it may be necessary to replace the bulbs on its panel, or the backlight of the hood, and this is done extremely simply.
- A few more words about the filtration system: it usually consists of two types of filters: carbon and metal. Coal change much more often than the last, after 3-6 months they are simply removed and thrown away. Metal filters can be washed - remove the accessory and rinse under the tap or put in the dishwasher.
- An extractor hood without a bulky air outlet pipe is ideal for a small kitchen or a room where installing the same pipe will cost much more and more difficult (impossibility of installation, loss of attractiveness of the room). Often, an air recirculation hood is chosen for a minimalist or high-tech kitchen interior, when you want to maintain a concise atmosphere and save space from unnecessary details like a pipe.
Now we note the possible disadvantages of the electric model of the hood:
Replacing filters in an extractor hood without an air outlet is a task that must be performed in order to avoid disrupting the operation of the air purification system. To some, this may seem like an expensive procedure, others will note unnecessary obligations for themselves and prefer the traditional model. But in the event of a breakdown, a small recirculation model is easier to inspect for damage and repair than to understand a large hood and its pipe in search of an answer to your question.
There is an opinion that a recirculation hood does a worse job of cleaning the air in the kitchen, and especially in conditions of intensive cooking.
This opinion is extremely wrong, it is important to follow the regime for replacing its filters and correctly install the structure - lower to the hob.
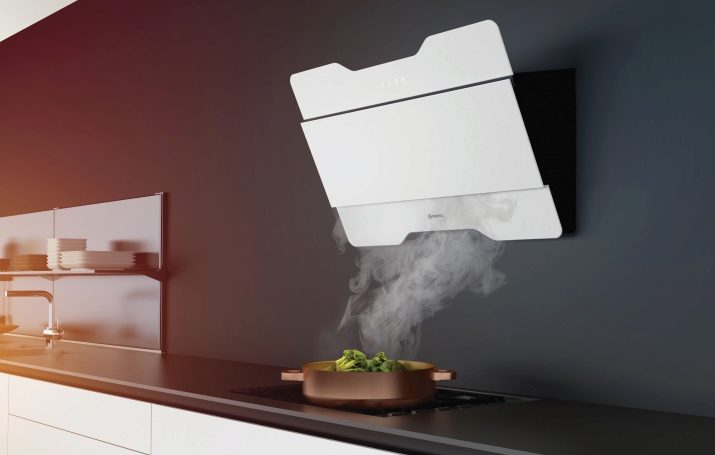
The design of the hood without an exhaust hood is monotonous - a rectangular, more often horizontal design, without a fan and the ability to further transform the interior of the kitchen. The hood panel can be as narrow as possible, thin, the model can be a visor with a heat-resistant glass element or have a familiar design
You can “play” with the color of the hood - white, metallic, glossy or matte shade. The visor hood model is considered the most original of the range presented.
Reviews of the recirculation system hoods are mixed, some are satisfied with their choice, others would prefer the traditional model
You should get used to such an air exhaust system and enjoy it as a modern way to clean your kitchen from unpleasant and excess odors when cooking, and when choosing, pay attention to a trusted brand and a good installer who will allow the model to be functional.
Is it always possible to install a hood?
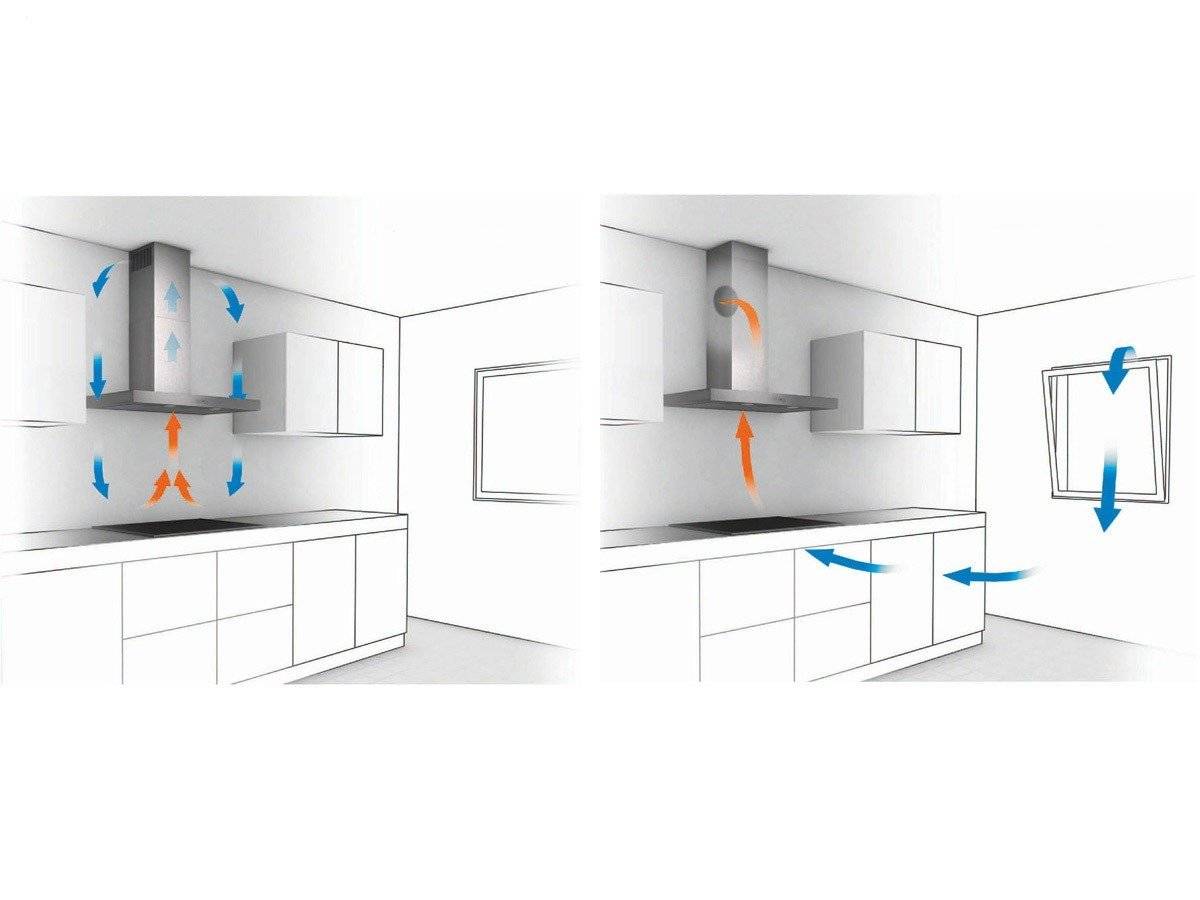
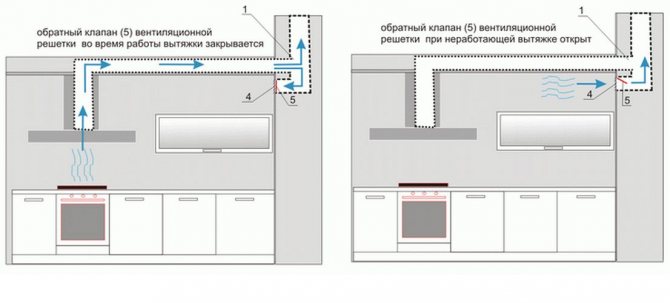
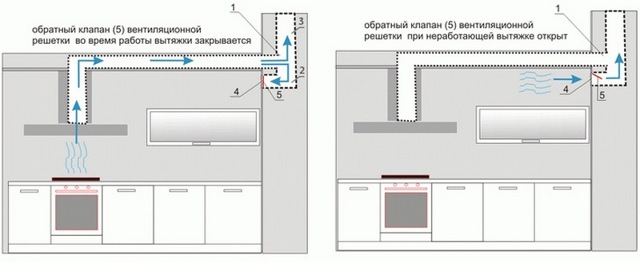
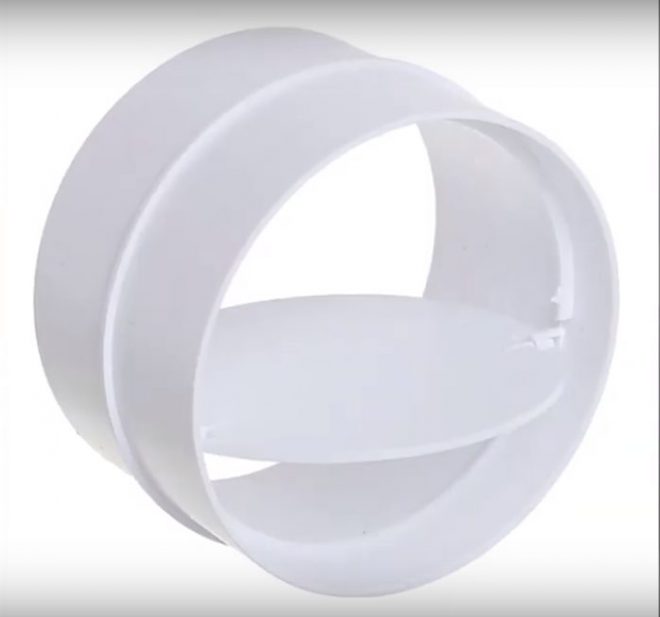
It is forbidden to tightly connect the duct to natural ventilation. On the way to the exit, the air must overcome obstacles from the oily mesh, motor and turbine. In addition, the air intake is carried out not under the ceiling, as expected, but from the level of the hood. All this makes ventilation inefficient, especially in summer, when the draft is weak. In addition, a complete blockage of the general ventilation can lead to the accumulation of natural gas in the event of a malfunction of the gas equipment and cause an explosion.
Therefore, air ducts for exhaust are mounted in special ventilation grilles with a check valve.In such a grille, there is a hole for the air duct on the top, and slots for ventilation on the bottom. When the hood is turned off, air flows freely through the openings and the duct. During the operation of the appliance, the valve does not allow the exhaust air taken by the umbrella to return to the kitchen. The check valve can be in the form:
- films,
- plastic disc on the axle,
- whole partition.
It must be installed vertically at an angle of 2 degrees. In this case, the valve opens under the influence of its own gravity, although it does not protect 100% from the return of dust.
It rarely happens that there is no ventilation shaft in the house, there is no inlet in the right room. Or in old houses, natural ventilation is severely disrupted, and the exhaust air from the kitchen gets to the neighbors. For such cases, recirculating hoods are suitable. The principle of their work: they take air from the kitchen, pass it through filters (charcoal, fat) and return it back. The disadvantage of such a system is the need to constantly change filters. This is expensive and inconvenient. In addition, such hoods do not solve the problem of high humidity in the room.
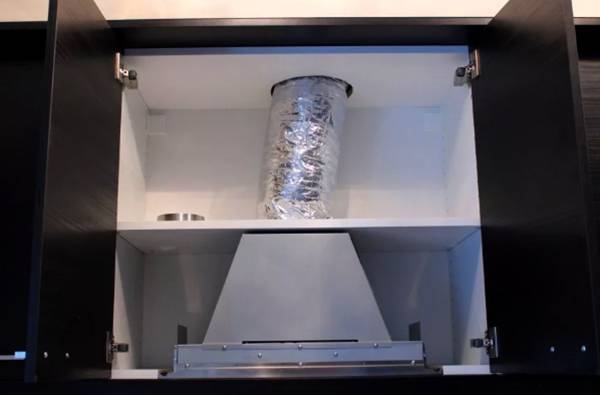
Features of mounting a built-in hood
Installing a built-in hood with your own hands is quite possible, although it has its own characteristics. Here you also need to correctly calculate the height above the plate, but the main nuance is how the device is attached.
The built-in model in the kitchen does not need to be hung against the wall - it is fixed in the kitchen furniture, in a cabinet with a specially made hidden cavity. By the way, recirculation hoods can be connected in the same way - their power will be quite enough for small kitchens.
After the equipment is fully connected, its performance is checked. The final stage is the installation of a protective casing that hides the air ducts. After that, you can enjoy clean air.
Hood in the kitchen - what you need to pay attention to when buying
What size should a kitchen hood be?
We repair the kitchen hood yourself
Your own master - install the oven
Built-in refrigerator - the nuances of choice and installation
How to embed a regular refrigerator in a headset
Conclusion
The hood in the kitchen in a private house should include a local hood above the stove and an organized exhaust duct for the whole house. The hood above the stove can be mounted after finishing, the exhaust duct is best done at the construction stage
Instructions for bringing the hood in the kitchen to the ventilation
Foundation preparation
Work, as a rule, begins after the installation of furniture and fine finishing. The foundation must be solid
If the fastening is carried out on the finish, it is important not to damage it. To prevent the tile from cracking, the back side of the case is covered with a damper tape
The surface is cleaned and treated with antiseptics that prevent the appearance of bacteria. Mold can form in the gap between the wall and the cabinet. Moisture and sediment always accumulate in these areas, which brings steam with it.


Walls do not always have sufficient bearing capacity. If they crumble, wide holes are made in them and plugs are driven in. Sometimes these measures do not help. Then the base is moistened with water and filled with a cement mixture. While it is not frozen, dowels are immersed in it. After that, installation can be carried out without fear that the system will fall on the slab.
Installation work
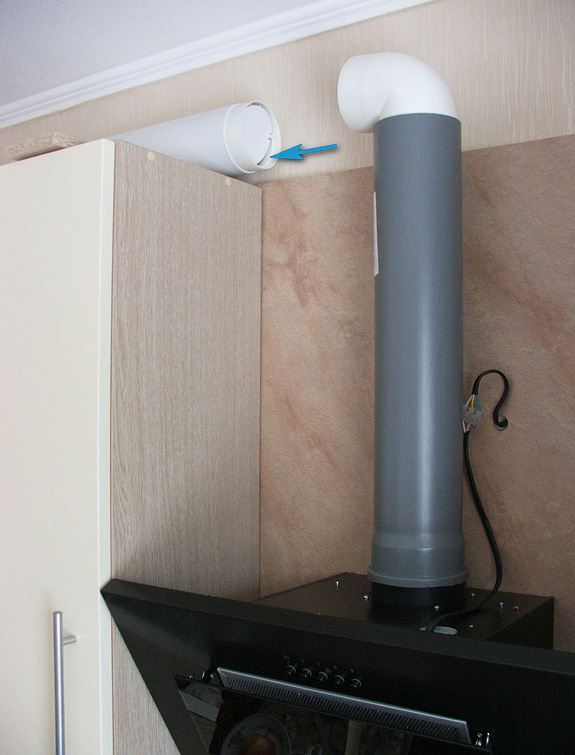
They begin with fastening the dome to self-tapping screws with dowels. Then a channel leading to the mine is connected to it. Its end is coated with glue or sealant and put on the upper part of the body. The joint is fixed with a clamp, tightened with a screw. In the same way, plastic straight and angled pipes are connected.
ShutterStock
ShutterStock
ShutterStock
ShutterStock
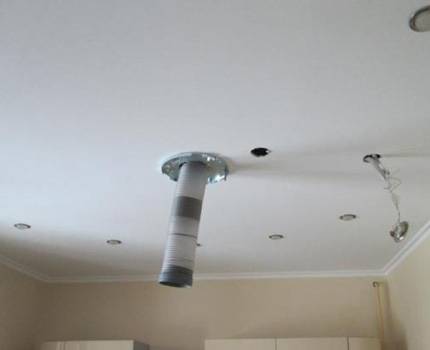
The channel is mounted to the ceiling on metal hangers or brackets pressing it against the wall. A hole of a suitable diameter is drilled in the shaft under the ceiling using a diamond crown. A flange is screwed to it with screws. An adapter is attached to it, if necessary. A sleeve covered with glue or sealant is inserted into the adapter. The clamp is tightened on top. There are special T-shaped elements with a check valve. There is a grid underneath. It must be at the bottom. If you move it up, the flow from the hood, rising up and under pressure, will flow back through it. The lower crossbar of the letter "T" is parallel to the wall. One side of the upper crossbar is inserted into the shaft, the other, facing the kitchen, is supplied with a rotary damper. When the air inlet is turned on, the damper closes. When the supply is turned off, it is opened, increasing the width of the entrance to the riser.
Rotations should be avoided when designing. The fewer of them, the less obstacles to the flow, and the easier it is to clean the inner surface. To smooth out sharp turns, instead of an L-shaped adapter, two elements with a 45-degree bend are placed.
The channel is left in plain sight or hidden under a removable drywall or plastic box.To get rid of excess noise, the box is filled from the inside with mineral wool or foam rubber. In the case when the eyeliner is not visible behind the furniture, masking measures will not be required.
electrical equipment
To connect electricians, kitchen sockets with a residual current device and a three-wire VVGng-Ls cable 3*2.5mm2. Sockets are placed at the top of the wall. Do not use extension cords in wet environments. The wires are hidden behind the front panel. It is usually not necessary to lay the lines. If such a need arises, it should be remembered that chasing wall panels and floor slabs is prohibited. Gutters are allowed to be laid in the finishing layer. If you plunge into reinforced concrete by more than 1 cm, you can damage or expose the reinforcement. Upon contact with the external environment, it will begin to quickly rust and collapse.
How to improve traction
One of the conditions that ensure normal draft is a constant supply of fresh air to replace the exhaust. In winter, the problem is difficult to solve by frequent ventilation through the windows and transoms, then the apartment will be too cold. One solution is a wall or window inlet valve. Wall units are produced with an adjustable damper and a heat-insulating inner shell. Window cuts into the upper part of the double-glazed window frame. There are special doors with internal channels. Air from the street enters the slot on the top side of the frame. The cold stream descends along the profile, gradually heating up from its body, and exits from below.
There are devices that connect to devices that measure the temperature and humidity in the room. They can be programmed to maintain a certain climate regime. Comes with a timer.


