- Normative base
- Definition and functions of the screed
- Regulatory documents
- Requirements for the screed and its elements
- How to choose the optimal height?
- Installation of steel plumbing equipment
- Altitude standards and distances
- Baths
- Sinks, sinks, wash basins
- Toilets, urinals, bidets
- Faucets, taps, watering cans
- Accessories
- On the right place to install a bath?
- Bath height from the floor - standard and installation tolerances
- Standards, norms
- Tolerances
- Installation methods
- Bath types
- Steel
- Acrylic
- Cast iron
- Installation rules and standards
- Types and dimensions of washbasins
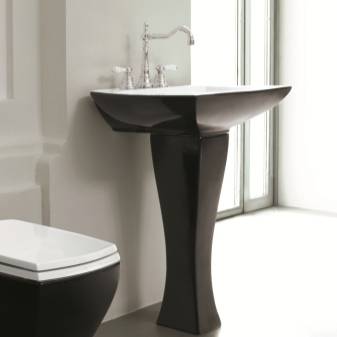
- "Tulip"
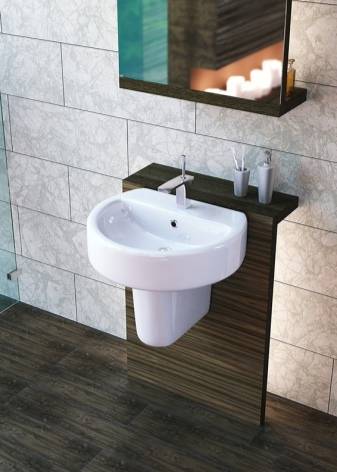
- suspended
- Sink with cabinet
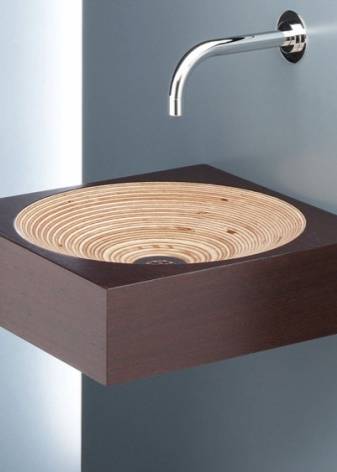
- Glass sinks
- Faience or porcelain
- Metal
Normative base
Definition and functions of the screed
According to the definition given in building codes, floor screed is an element of its overall design and is a layer of cement-sand mortar laid on a solid foundation.
The main purpose of the screed is to form an even base for the floor covering. Also, the high mechanical strength of the layer is one of the primary requirements. In addition, the screed must perceive and distribute the loads transmitted from covering to subfloor.
Other functions of this structural element include:
- Masking and protection of communications (pipelines, electrical cables, heating elements, etc.).
- Uniform distribution of loads on heat and sound insulation materials.
- Ensuring proper floor resistance to heat transfer.
- Formation or compensation of the slope of the surface.
Due to the fact that during operation this layer is under a decorative coating, it does not carry an aesthetic function. It is enough that the poured surface is resistant to damage and deformation, relatively even and durable.
Regulatory documents
What standards should be guided by when designing and laying screeds?
- Previously, a document published back in 1988, SNiP 2.03.13 - 88, was used as the main SNiP for floor screed. and the emergence of new materials have led to changes in regulations.
- To date, the current document is SP 29-13330-2011. This standard is an updated version of the SNiP for the arrangement of floors from 1988.
- It should be noted that these standards apply only to the design of structures. In the course of the work, SNiP 3.04.01 - 87 is fundamental. This provision describes the technology for performing finishing work, as well as the requirements for finished surfaces and permissible deviations.
- Since the rules are being gradually modernized, there are sometimes legal conflicts.So, SNiP 3.04.01 is not included in the order No. 1047 dated 06/21/10, regulating mandatory norms, therefore today it is exclusively advisory in nature.

Design marks
Requirements for the screed and its elements
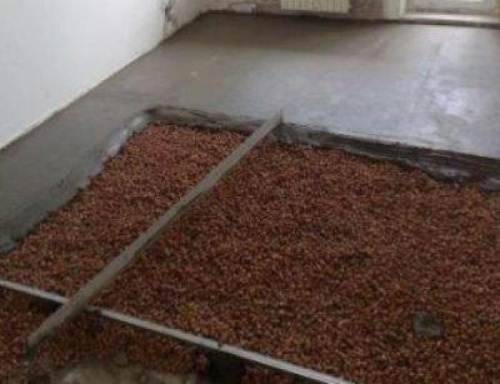
Expanded clay coating
For pouring screeds, SNiP provides for the following requirements:
The minimum thickness when laying on a solid concrete floor base is 20 mm, when laying on heat or sound insulating materials - 40 mm. If a pipeline is placed inside the cement layer, then there must be at least 20 mm of mortar on top of it.
Note!
If a compressible material is used for heat or sound insulation, then the bending strength of the cement-sand filling should be selected at least 2.5 MPa.
In this case, the layer thickness should exclude deformation of the underlying materials.
- The minimum strength of the solution is 15 MPa (for laying under bulk polyurethane coatings - 20 MPa).
- Self-leveling compounds that are laid to form a flat surface under the floor covering must have a thickness of at least 2 mm.
To control the plane, use the rule
To check the geometrical parameters of the laid layer, a 2 m long rule is used.
In this case, deviations from the plane cannot exceed the following values:
- Under parquet, laminate, linoleum and polymer self-leveling floors - 2 mm per 2 m.
- Under other coatings (tiles, etc.) - 4 mm per 2 m.
During the control, these deviations from the SNiP for the floor screed are identified and eliminated in the first place, since they have a serious impact on the quality of the installation of the finish coating.
How to choose the optimal height?
Modern families consist of at least three people. Each of them has a different body structure and height.Each of them should be comfortable using plumbing.
In principle, you can not take the initiative and place the sink according to the standards of the Soviet era. But in this case, it will be inconvenient for each family member to carry out water procedures.
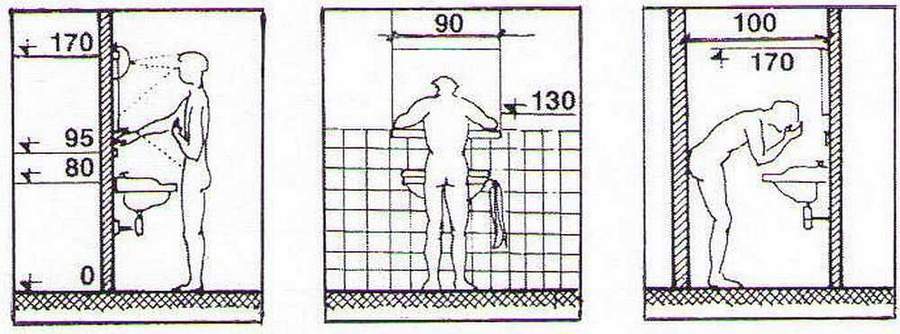
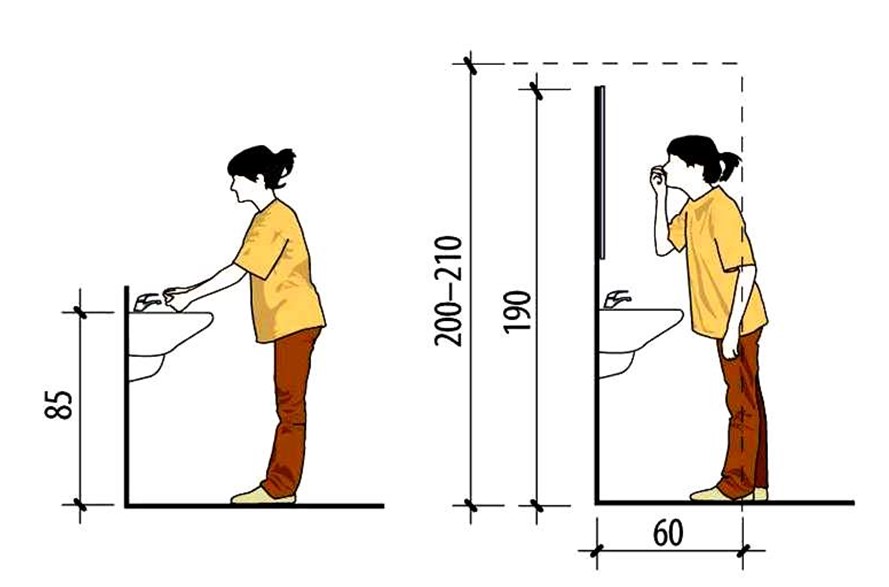
Thanks to many experiments, employees of standardization institutes were able to determine at what distance it is preferable to hang the sink. At the same time, indicators for representatives of the stronger and weaker sex have differences. For men, the suitable height of the washbasin ranges from 85-102 cm. It is more comfortable for women to carry out morning and evening hygiene procedures when the sink is fixed at a height of 80-92 cm above the floor. A child who is, for example, a middle school student can comfortably use a sink located at a height of 65 cm.
Knowing these indicators, you can safely proceed to the calculation of the optimal height of the washbasin. To do this, it is enough to recall the rule for finding the arithmetic mean. The average indicators of the above standards for men and women are taken as terms. It turns out the following: 93.5 cm (average height standard for men) + 86 cm (average standard height for women) + 65 cm (standard height for middle school students) = 244.5 cm.
Next, the amount received must be divided by the number of terms used: 244.5 cm / 3 (the number of averages) = 81.5 cm. The resulting number is rounded to the nearest whole value, it turns out 82 cm. This height is the most optimal for this family.
However, the presented version of the calculation is not the only one. There is an easier way to calculate. It consists in measuring the height of human growth from the elbow to the floor.Surely many are aware that it is most convenient and comfortable to wash hands in a sink located 100 mm below the elbow joint. To begin with, measurements are taken of the growth of each family member from the floor to the elbow. 10 cm are subtracted from the received data. Then the arithmetic mean is calculated. However, the presented calculation does not make much sense for young children and adolescents, as they will grow up over time.


Earlier it was said that, according to the approved standards, it is allowed to make small changes in the height of the installation of the sink with a maximum deviation of 2 cm. In simple words, SNiP assumes 85 cm, but a deviation from the norm is allowed up to 83 or 87 cm.
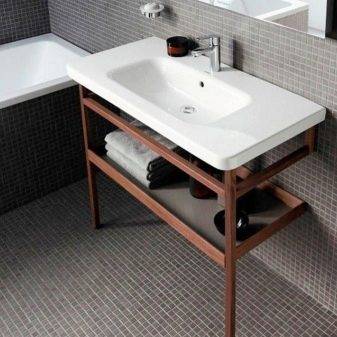
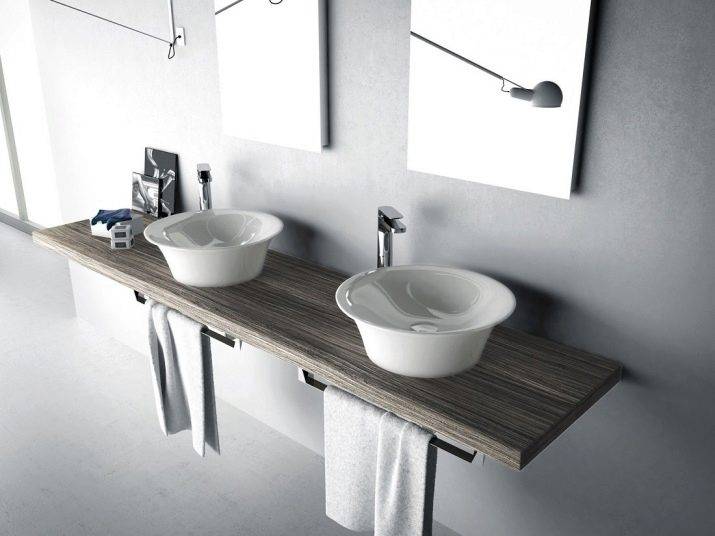
It is much more difficult to figure out the required height of the overhead sink when the bowl for hygiene procedures is mounted in the bathroom on the countertop. From an aesthetic point of view, it looks very attractive. In terms of convenience - a moot point. The tabletop has a standard height of 80-85 cm. A bowl with high sides is installed on top. Accordingly, the height of the structure becomes even greater. In order to avoid mistakes, you should choose a lower tabletop so that, together with the bowl, its height is the standard for SNiP.
About, how to properly position bathroom sink, see below.
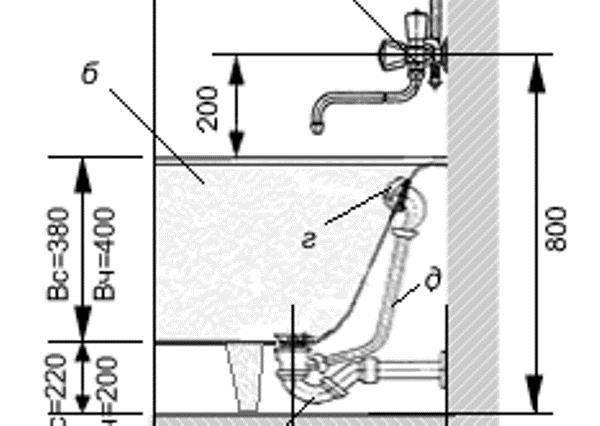
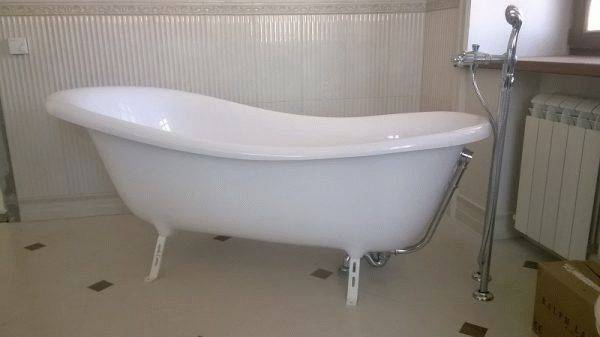
Installation of steel plumbing equipment
So, what is its specialty? As mentioned earlier, this type of plumbing is one of the most popular. However, since the equipment has a low weight, it is imperative to install a steel bath on legs.These can be rubber substrates or ordinary metal plates. Such nuances are not of fundamental importance.
Steel plumbing can be installed in any part of the room due to its low weight. In addition, they are equipped with strong, reliable and durable supports, thereby achieving a high level of safety during operation. On each leg of the steel bath there is a special regulator, with which you can get the ideal height for yourself. At the same time, plumbing is installed approximately 30 cm from the sewer hole, after which a bath siphon with overflow is connected and screwed with nuts.
Altitude standards and distances
The placement of plumbing should provide:
- safety;
- functionality and comfort;
- maintainability;
- aesthetics.
Baths
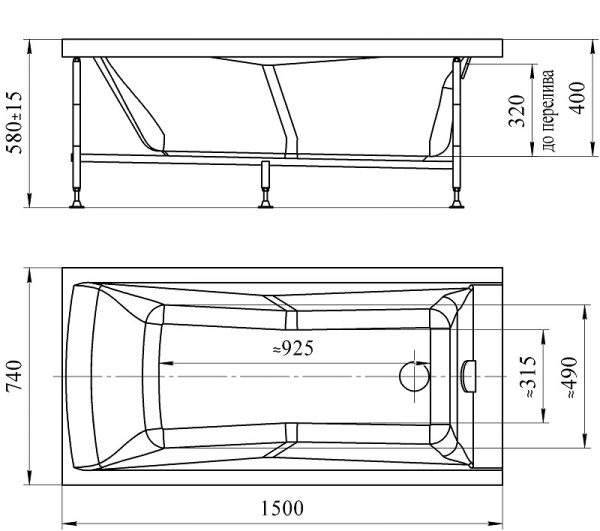
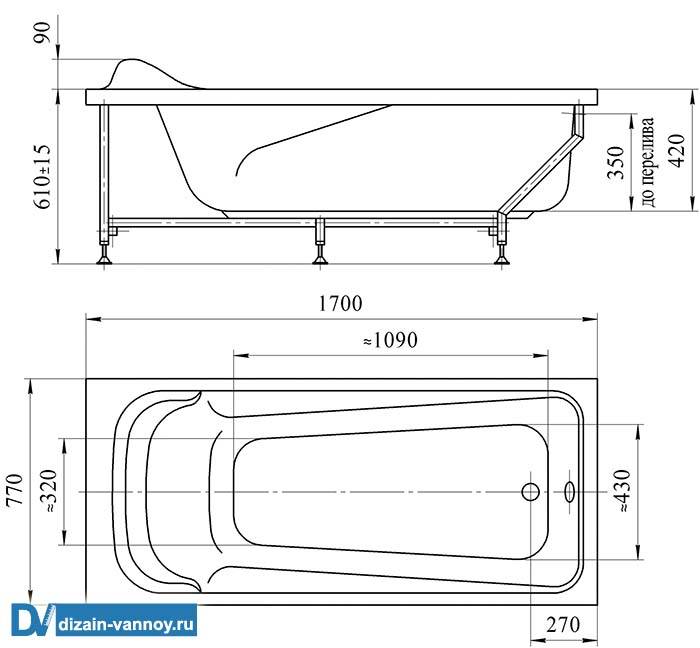
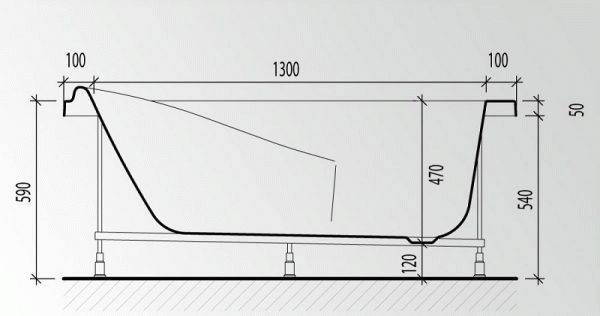
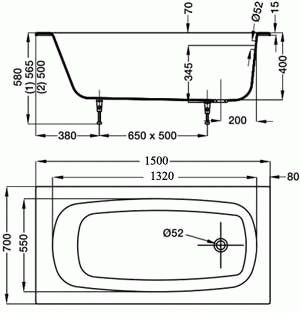
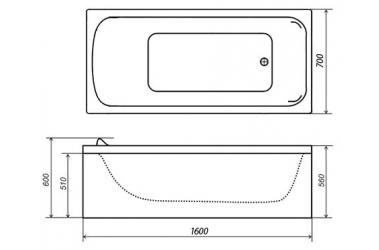
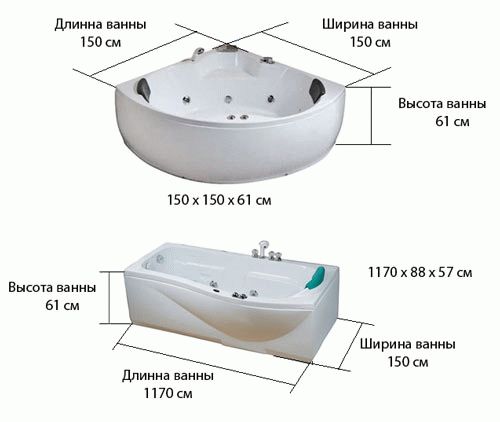
Standard bathtub height from the floor is 600 mm regardless of dimensions. The distance from the floor to the side of cast iron models (H1) according to GOST 18297-96 should not exceed 630 mm. The height of the installation of the bathtub is adjusted by adjustable legs or pads.
Dimensions according to GOST and adjustable supports of a cast-iron bath.
The bathroom occupies a key place in terms of size and functionality among the equipment. Manufactured series: 170x70; 160x70; 150x70 cm correspond to the dimensions of typical rooms.
Typical bathrooms, bathrooms.
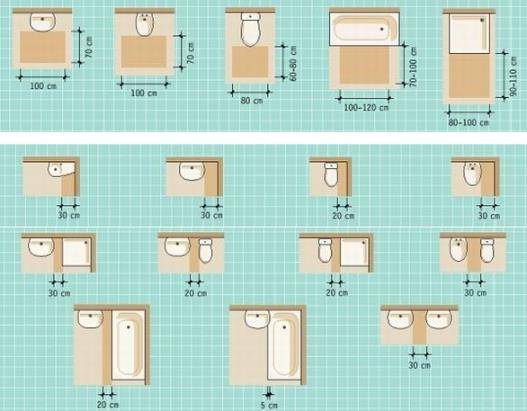
Compact combined bathrooms are equipped with floor shower trays. The level of the top of the board according to the current norm is 400 mm, according to the instructions of the manufacturers - up to 300. Corner modifications require a minimum of area.
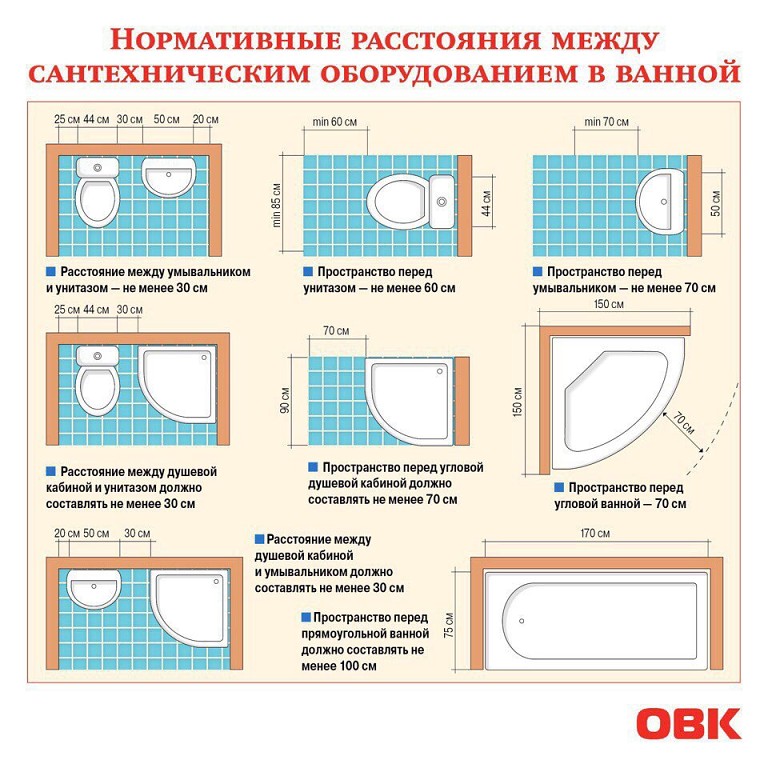
The minimum free zone along the front: bathroom - 100 × 70 cm, shower cabin - 80 × 90 cm. Based on ergonomics, the distance to neighboring plumbing fixtures is 20 - 30 cm.
Distances and free zones.
Sinks, sinks, wash basins
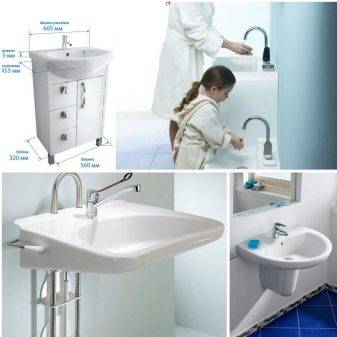
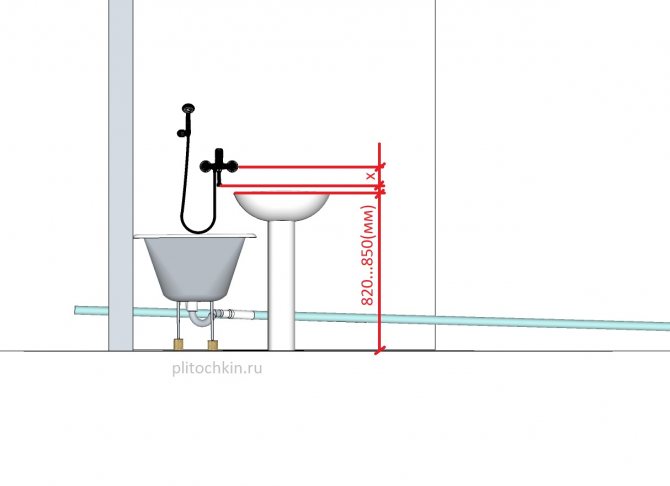
Mounting at a level of 0.85 m from the floor provides comfortable use of the sink, similarly they mount the kitchen sink. Washbasins found in dormitories, according to SNiP 3.05.01-85, are fixed at around 0.8 m.
Suspended models allow height adjustment during installation.
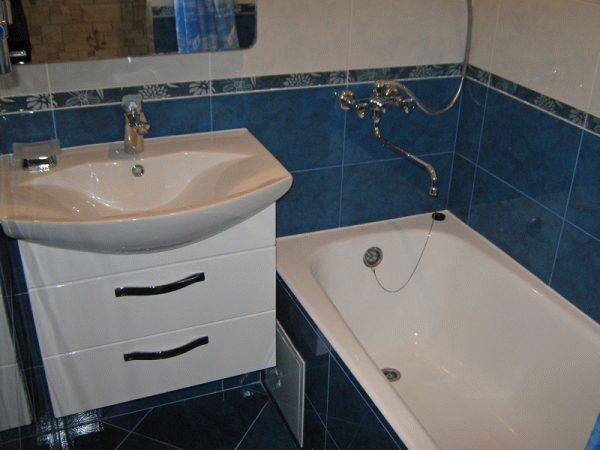
The floor stand excludes height adjustment. With a combined faucet, the sink is placed with the bathtub edge overlapping by 5 cm. The dimensions of the empty area in front of the sink with a mirror are 1.0 × 0.7 m.
The height of the floor pedestals is determined by the manufacturer.
Toilets, urinals, bidets
For people of average height, the optimal distance from the "ground" to the top of the faience rim of the toilet bowl is 40 cm. This is the standard value for floor models, hanging toilet bowls allow you to slightly change the value based on individual needs.
The installation height of the urinal according to the standard should be 650 mm from the “clean floor”. A bidet is recommended to be installed similarly to a toilet bowl.
Ergonomic bidet installation. Urinal dimensions
For the "clean floor level" take the top of the finish flooring. Foreign analogue - AFF: "Above Finish Floor".
In front of the devices, an area of \u200b\u200b60 × 80 cm is reserved, gaps of at least 20 cm are provided on the sides.
Center distance between bidet, toilet. Free space around the toilet.


Faucets, taps, watering cans
The fittings are placed vertically from the finished floor (mm):
- 800 - bath mixers;
- 1100 - combined taps, shower mixers;
- 2100 - 2250 - the bottom of the grid of a stationary shower head;
- 1700 - 1850 - also in cabins for the disabled.
Wall mixers are placed 200 - 250 mm above sinks, fonts. The holder of the shower set is screwed to the partition within 2000 mm from the bottom of the tank.
Location of shower fittings. Excerpt SNiP 3.05.01-85
Accessories
Most toilet accessories are placed in the range of 1000 - 1700 mm. Soap dishes, corner shelves for bottles, shaving sets are mounted 200 - 300 mm above the side of the sink, bathroom, so as not to interfere with the user bending over, also in order to reduce water ingress. Shelves for rarely used items, household chemicals occupy the upper tier within arm's reach.
The mirror, protecting from splashes, is suspended above the sink and floor by 20, 120 cm, respectively. The upper edge is taken approximately along the border of the door - up to 200 cm. The toilet paper holder is hung at around 0.6 - 0.7 m, stepping forward from the toilet bowl 0.2 m.
Mirror mountPaper holder
The minimum distance from the bottom of the heated towel rail to the floor is 0.6 m, from the top - a maximum of 1.7. The rule applies to heated towel rails - hangers, hot water coils, the norms for placing heaters do not apply to the latter. Shower doors, curtains - should not obscure the heated towel rail when opened.
Hot water heated towel rail.
Anthropometry and ergonomics.
This is interesting: How to choose an electric stove with an oven - we set out in detail
On the right place to install a bath?
The height determined by building codes will allow more economical and aesthetically pleasing facing tiles in two or three rows, without resorting to trimming or unnecessary fragmentation of the material.
In order to perfectly install the bath, you must follow the advice of experts:
- Position it strictly horizontally, while to achieve maximum accuracy it is better to use the building level.
- The angle at which the side meets the wall must be exactly 90 degrees.
- If it is impossible to install the bath in a perfectly horizontal position, you will have to use substrates. For example, you can adjust the position using metal plates. Most often, small pads are taken with a thickness of about five millimeters and sides of 10 centimeters. The use of aluminum plates is unacceptable due to the high softness of the metal.
- In order to prevent subsidence of a heavy, for example, cast-iron product, gaskets must be installed on a relatively soft base. Most often, in such a situation, wooden bars with strong wood are used.
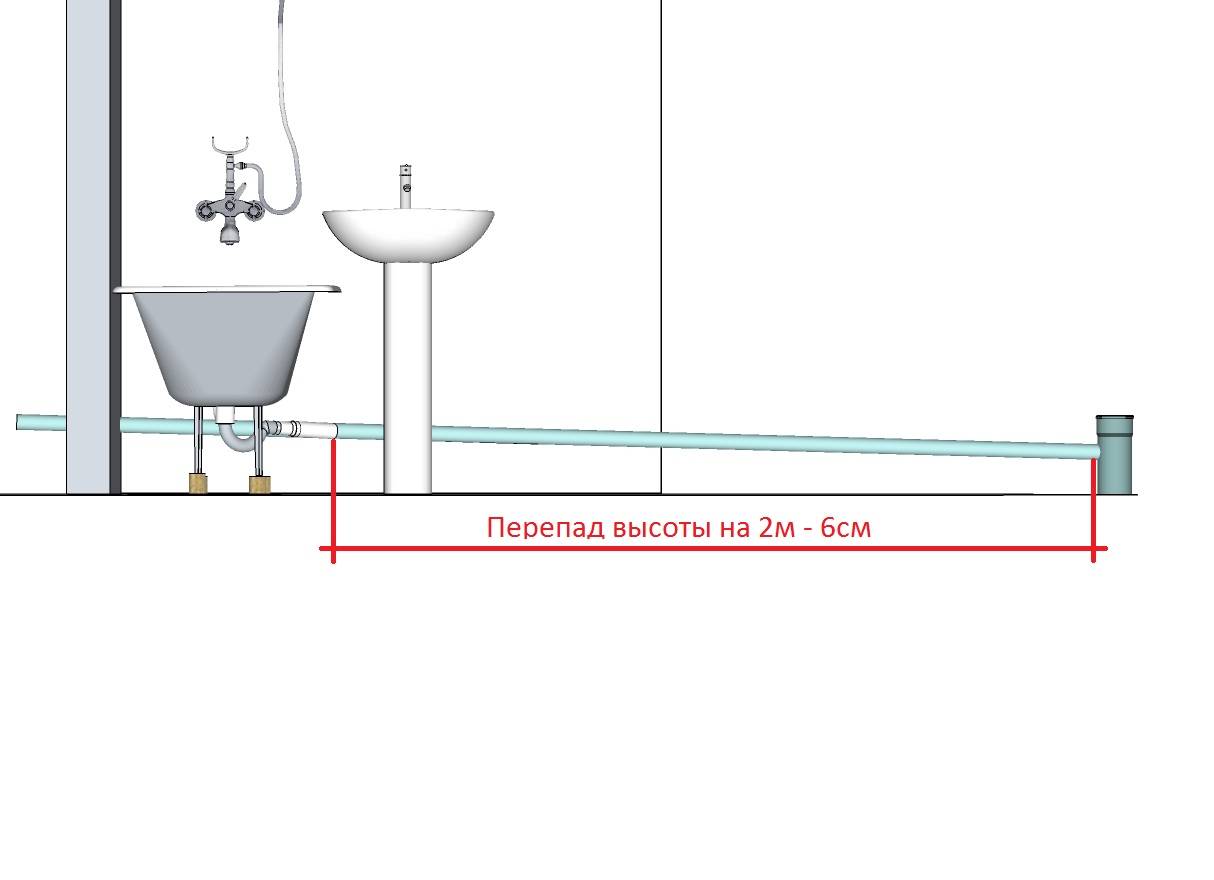
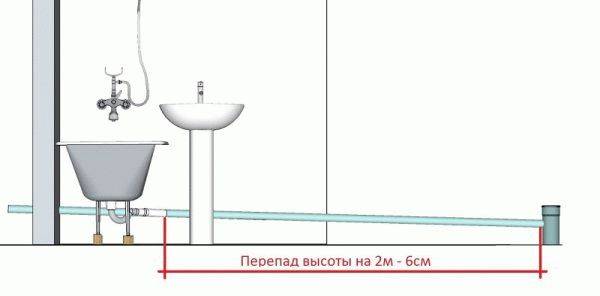
For the full functioning of the siphon, it should be noted that the required height of the drain hole in relation to the floor must be at least 15 centimeters. Otherwise, stagnation may occur, and in some cases the impossibility of using the bath due to the lack of outflow.
When choosing and installing a bath, you should follow a not-so-long list of recommendations for a quality installation. Compliance with state standards during installation will protect against possible dangers in the operation of the product. Therefore, the installer is required to be attentive, knowledge of technology and respect for building legislation.
Well-chosen materials and the bath itself will make the room cozy and safe for all family members.
Watch a video on how to properly install a bathtub using a laser level:
Bath height from the floor - standard and installation tolerances
A bath is the central element of every bathroom, without which it is impossible to imagine living in a modern, comfortable home. Fortunately, hardware stores offer a wide range of plumbing fixtures to suit every taste or budget, from cast iron, steel to acrylic.
To ensure the convenience of using a washing container, it is important not only to choose a quality container, but also to install it correctly. In this article we will tell you what should be the height of the bath from the floor according to generally accepted building codes.
Standards, norms
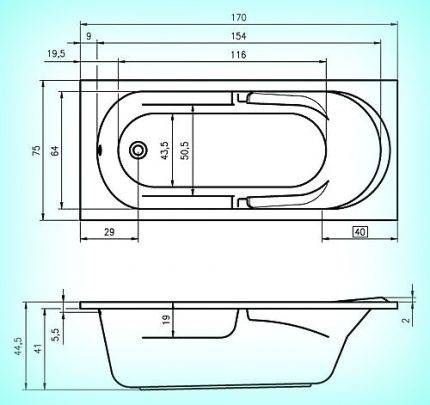
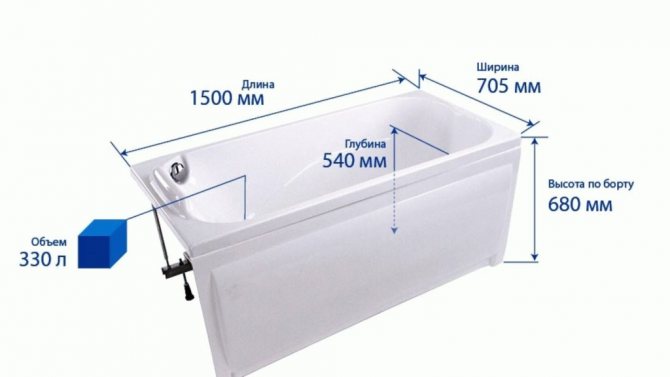
The height of the bathroom from the floor is an important factor responsible for the safety and usability of this plumbing fixture, which is not affected by its size or shape. This indicator consists of the depth of the bowl, which for different models is 50-65 cm and the height of the supports used for installation. The installation height of the tank is strictly regulated by building codes:
The height of the bathtub from the floor, which is recommended by the current standard, is 60 cm. Setting the bowl at this level is considered optimal, as it is safe when entering or leaving the bathtub.


Note! The standard installation height of the washing container specified in building codes is a recommendation. In children's or health institutions, this figure is reduced to 50 cm in order to increase the comfort of hygiene procedures.
Tolerances
The recommended bathtub installation height of 60 cm is calculated taking into account the average height of a person and the standard depth of the bowl. However, when installing plumbing equipment, you need to approach this indicator individually, taking into account the wishes of the homeowners, as well as the size of the product.The permissible range of height to which the bathtub is raised above the floor is 50-70 cm.
The optimal distance from the edge of the bowl to the floor depends on the following factors:
- Average human height. The smaller the height of the person who uses the bathroom, the lower it should be installed. You need to understand that with a height of 150 cm, raising your leg above 70 cm is problematic, and besides, it is not safe. It is more convenient for a tall person to use a bathtub installed at a level of 65-70 cm, since you do not need to lean low towards it.
- Living in an apartment for children and elderly family members. If children, elderly relatives or people with limited mobility use the bathroom, it is recommended to install a bath no higher than 50 cm in order to simplify and secure hygiene procedures.
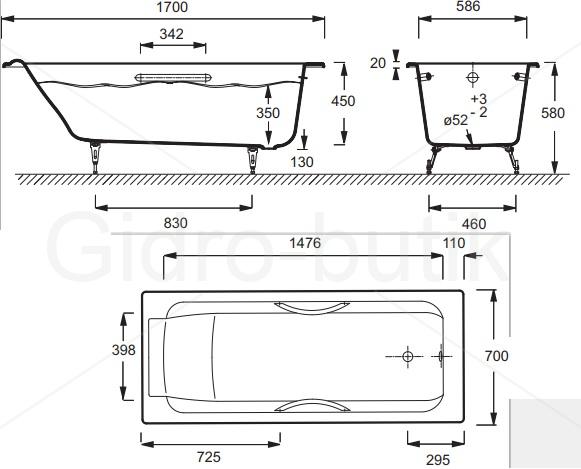
- Depth of plumbing equipment. If the depth of the bowl is 50 cm, then the minimum level at which the bath can be installed is 65 cm, since 15 cm will be required to connect the siphon.
- bowl size and weight. The height of the installation is influenced by the size and weight of the plumbing fixture. Cast iron models have a significant weight of 100-150 kg, so they are not installed closer to the floor surface.
Important! To determine to what height to raise the washing container during installation, you need to put the entrusted legs under it and try to climb into it. It is better to take into account the growth of the shortest family member or calculate the average
Installation methods
When deciding what the height of the bathtub should be from the floor, keep in mind that the minimum distance for installing a siphon is 15 cm. To prevent injury and discomfort from using this plumbing fixture, you can adjust this indicator during installation.Installation of sanitary equipment is carried out by the following methods:
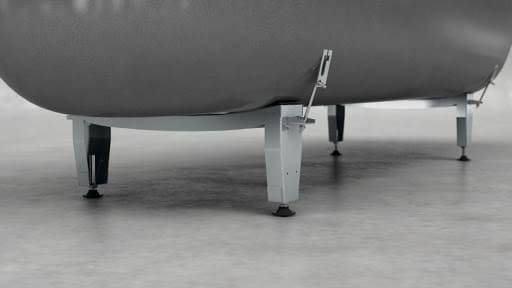
With the help of a framework. With the help of a metal support frame, steel and acrylic models are most often installed, which have thin walls and can be deformed. Whatever the shape and size of the bowl, with the help of this design it can be raised to any height, securely fixed.
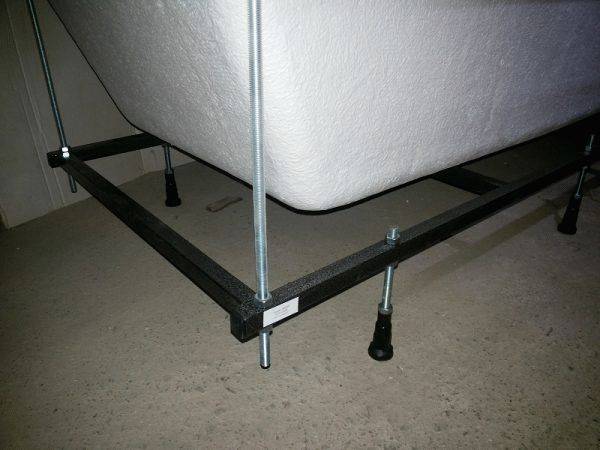
Experienced craftsmen say that it is most convenient to determine the optimal distance from the floor to the bottom of the bath using sliding legs with screws. These supports are fixed to the bottom of the bath and then adjustable in height so that getting in and out of the bath is easy. Precise determination of the height of the bath allows you to reduce the risk of injury during hygiene procedures, as well as to ensure the maximum level of comfort.
Bath types
In addition to the established norms, when installing a bowl, the material (weight, structure, wear resistance) from which it was made matters.
Steel
Steel enameled models differ from bathtubs made of other materials. Not only are they comparatively cheaper, but they are also lighter, so installation is fairly easy. Transportation is also not a problem. They have a relatively large range of different shapes, sizes and colors. When installing a steel bathtub, the support structure must be carefully selected, and it is recommended to lean the bathtub against the walls for greater stability.
The material is subject to mechanical stress, as a result of which the enamel coating may break off. Also inferior in terms of sound insulation and heat retention.

A mounting stud is used to fix the tub to the walls for greater stability.
The most reliable are the adjustable self-adhesive support structure, which follows the curve of the bathtub bottom. The factory equipment is equipped with support tips made of plastic. The height of the bathtub from the floor is adjusted using the adjusting pins.

Varieties of wall fixtures for bathtubs
The service life is much lower than that of competing products of other materials.
Mounting on support legs
Acrylic
When installing an acrylic bath, it is necessary to take into account the fact that it has a fragile structure, but a high rate of heat retention. The fall is fatal to her. The more intricate shape an acrylic bathtub has, the less durable it is. They are often supplied with a metal frame, if one is not included in the standard package, they make a kind of podium into which the bath is lowered. A bathtub made of this material lends itself perfectly to restoration. When installing it, it is customary to use fasteners made from materials of natural origin.


Installation of an acrylic bathtub on a steel frame
Cast iron
Models made of this material are durable, but do not have a variety of shapes. They are popular due to the fact that they are able to retain heat for a long time, but the cost is much higher than that of models made from other materials.
When choosing a cast-iron structure, it is necessary to calculate the height of the bathroom for many years to come. Since this is a durable and very heavy construction, it is often mounted on cast or rigidly attached to the body, legs that do not have the ability to adjust. If the components include cast-non-adjustable supports, then they are customized by cutting and grinding.
The installation of the bath is carried out using metal wedges or tie bolts.For convenience, the cast-iron bath is fixed as low as possible.
If the surface on which the bath rests with the legs does not differ in strength sufficient for such a weight, metal gaskets are placed under the supports. The thickness of the gaskets is usually at least 5 mm, and the diameter depends on the area of contact with the floor (approximately 5 cm).

Combined installation on metal legs and bricks. Prevents "punching" and its sliding
In case of contact of a cast-iron bath with a steel sewer structure, there is a strict requirement - the presence of grounding.
Installation rules and standards
Plumbing companies develop bath designs according to the standards and requirements provided by the research centers. The height of the bathtub from the floor is dictated by the SNiP standards. According to building codes, it is placed at a distance of 60 cm from the floor. With this installation, the side is comfortable in order to bring the leg over it.
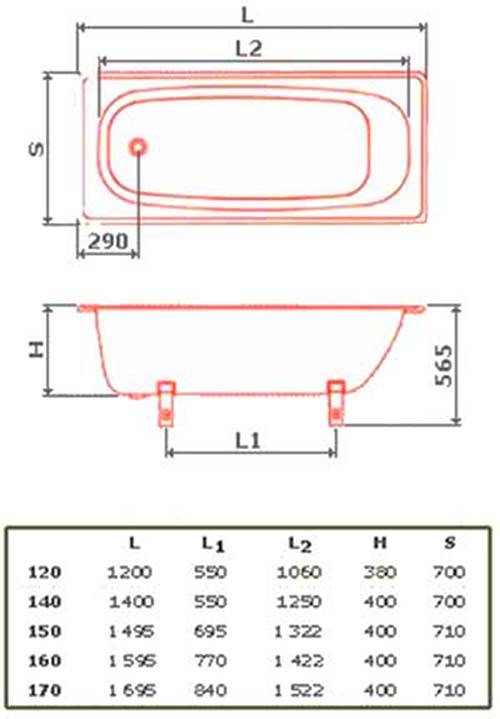
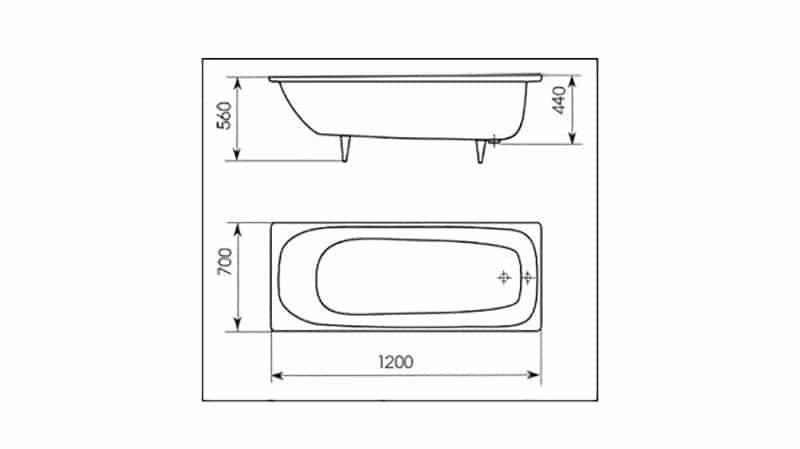
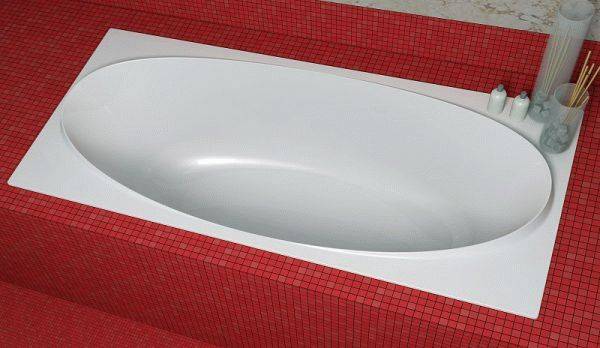
The bowl itself also has dimensions designed in accordance with the research. For example, the parameters of a standard bathtub made in Russia are 150 × 70 cm.
Foreign manufacturers produce plumbing structures with standards of 180 × 80 cm. But it is worth noting that almost all models are equipped with legs, since they allow you to place the bowls at the right level.
Locations of the bowl in the room:
- the center of the room;
- close to the wall.
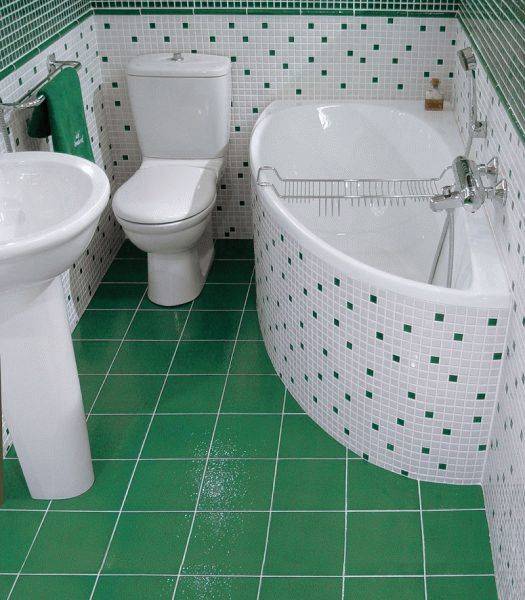
Often the bathroom has small dimensions, so the bath is placed along the wall. This saves space and allows you to secure the process of its operation. If a person slips, he will be able to maintain balance by leaning against the wall.
In private houses, where more space is allocated for the bathroom, there are structures that are installed in the center of the room. But even in such a situation, the height of the bowl on the legs should be 60 centimeters from the floor. The distance to the nearest walls is not allowed less than one meter, since reducing this distance makes it difficult to move around the room.
The standard height of the bowl from the floor is calculated based on the average human height. Take into account the depth of the container.
During installation, they are guided by the wishes, but at the same time take into account that there is an allowable distance range. The height of the bath from the floor can be from 50 to 70 cm.
Types and dimensions of washbasins
Plumbing manufacturers to date offer the widest selection of washbasin models that differ in material, height, shape and even capacity.
"Tulip"
This is a washbasin, which has the shape of a blossoming flower, located on a thin stem. In many cases, such products are made of ceramics, but glass or metal models are not uncommon. The bowl is made in the form of petals, complemented by a pedestal, which performs two important functions: it serves as a strong support for the bowl and masks the inlets and outlets of water inside the "stem", making the bathroom look more attractive and stylish. In such models, the base can either be integral with the bowl, or sold separately in a set.
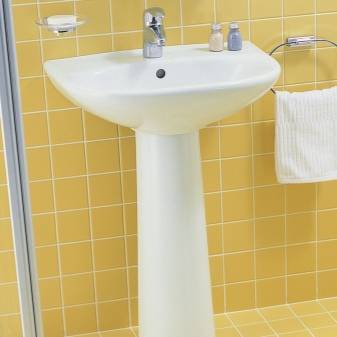
Such a sink is adjustable in height, so it has become widespread in large families. However, its cost is also appropriate - the price of a "tulip" is several times higher than the cost of similar products of other modifications.Not every Russian family can afford such an expensive attribute, so the products are not in great demand and are not sold in every building supermarket.


suspended
The sink is usually installed in a small-sized bathroom, because it allows you to save the already small space of the bathroom.
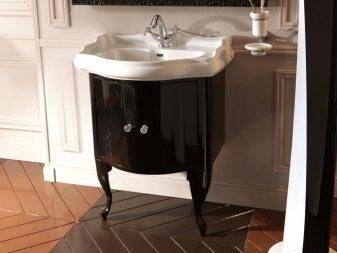
Sink with cabinet
It looks like a bowl embedded in the cabinet, where it is located. It is not realistic to adjust such models in height, therefore it is better to determine the size of the dresser-stand at the planning stage of work.


Traditionally, the materials for the manufacture of washbasins are ceramics, glass, stone or metal. Each of them has its own advantages and disadvantages.
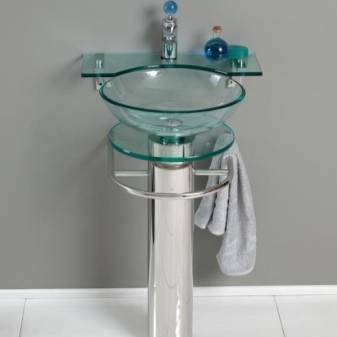
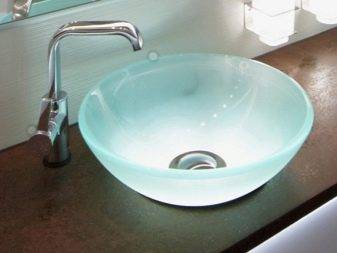
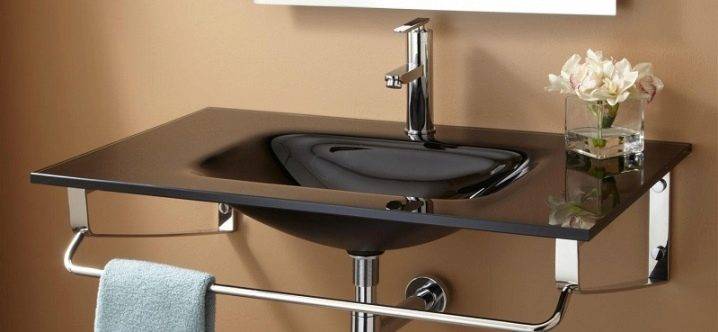
Glass sinks
These are stylish and modern high-tech models that look great with chrome surfaces.
The advantages of the material include the following features:
- attractive design;
- resistance to high and low temperatures;
- light weight;
- glass is not afraid of brilliant green, red wine, fucorcin, iodine and other coloring liquids;
- can be cleaned with any standard detergent.
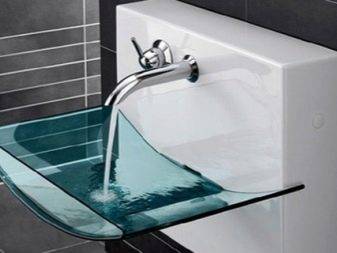
Of the shortcomings, the following should be noted:
- high price;
- brittleness, low resistance to mechanical damage.
In addition, streaks and drops of water are more visible on the glass surface than on any other.
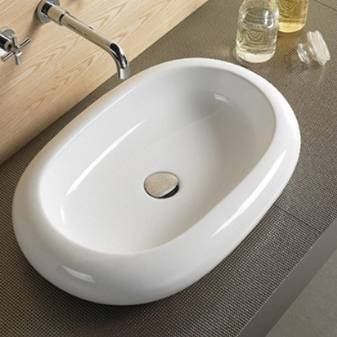
Faience or porcelain
These are ceramic sinks that look almost indistinguishable from each other. However, porcelain is a better and more durable material, it retains its unchanged appearance for many years, while on faience traces of water and other liquids appear over time.
In general, ceramic sinks have such advantages as:
- aesthetic design;
- resistance to high temperatures;
- resistance to any type of cleaners, including abrasives;
- noiselessness in contact with beating jets of water.
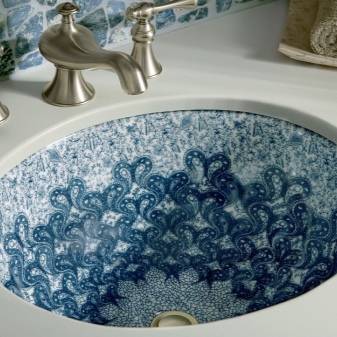
Cons are more inherent in faience models. They lose color over time and can become covered with a fine mesh of cracks, and are also heavier than metal or glass. The disadvantages of porcelain washbasins include their high cost.
Metal
Such shells were common in previous years, when they were made of steel. To date, the choice of models is not limited to stainless steel. Plumbing is often made of brass, cast iron and bronze. There are also bronze and even gold items. Metal washbasins have a long service life, they retain an aesthetic appearance for several decades. They are resistant to dirt and can be easily cleaned with any detergent (except abrasive).
A big plus is the low price - this applies only to steel installations. Models made of more expensive metals, as a rule, are produced exclusively and are very expensive. Of the minuses, one can note the noise when in contact with water. As for the dimensions, here the choice of modifications is quite wide. In the assortment list of leading manufacturers of plumbing, there are models with a width of 35 to 100 cm, sometimes even more. The optimal parameter is considered to be 50–70 cm.


