- Choice of a different mixer installation height
- Video tutorial installation and connection of the sink on the pedestal
- When did toilet paper appear in Russia?
- Average social standards
- The nuances of installing a toilet
- What determines the height of the installation of the mixer
- On-Board Faucet Installation
- Instructions for drilling holes in an enamelled bath
- Tips for Drilling Holes in an Acrylic Bathtub
- How to remove an old faucet
- Soviet sink installation standard
- What you need to know about the height of the mirror above the sink
- Bathroom Sink Tips
- Is it possible to transfer and what is needed for this
- Schemes and standards for the placement and installation of plumbing equipment and appliances
- Flat sink drain
- Height standards
- What does SNiP say
Choice of a different mixer installation height
It will not be difficult to decide at what height to place the faucet above the bath. It is not so important if the mark differs slightly from the standard according to SNiP (SP).

The distance from the mixer to the bath can be changed. The main thing is to be guided by certain principles when placing a mixer in the bathroom. And then the result will be both convenient and safe.
Here's what to consider when choosing a height and a place to install a crane with your own hands:
First, before connecting, it is worth approximately determining the place of attachment to the wall above the bathroom
Then you should take the faucet that will be installed, attach it there and make sure that it will be aesthetically pleasing, convenient and safe.
It is also important to take into account not only the height of the bathtub from the floor, but also the height of the floor legs on which it is installed or will be placed. If the bowl is not yet installed, then an error often occurs
When working, they do not take into account that the bathtub will be higher after installation.
Finally, it is required to take into account the shape of the product that will be hung. If it is somehow atypical, then it is better first of all to be guided not by the standard, but by common sense. Sometimes faucets are equipped with additional devices, which is worth considering before putting them in the bathroom. For example, so that devices do not touch the sink. After all, some are large.

After all this, you will be able to determine the minimum installation height from the floor and the distance to the edge of the bath
Once you've managed to hang the faucet, it's important to make sure everything is done correctly. To do this, turn on the water at different pressures and see if there are splashes outside the tub.
Here are some important nuances. Firstly, such splashes are possible even with a standard height and standard bath material. And all this over time can be the result of an unusual mixer that does not comply with GOST. For example, there are products that do not have an aerator. That is, they do not have a part in the spout that is responsible for creating a uniform flow.
In such mixers, unlike standard ones, water flows randomly. Often twisted. Often such products have a flat shape.

When water falls from such a mixer, it is not a solid stream, but a mass of small uneven streams. And of course, splashes fly from them in different directions. It is better to avoid such options, after all, the flow should be uniform.
In addition, non-standard options are sold at a higher price. And they disappear from the shelves quickly. And if you have to change, then this will be hard to find.
This is not the case with the classic versions, because they will be supplied regularly. Of course, it is better to take the option of metal, even if it is single-lever. Others, including polypropylene, are not the most reliable technology.

Today, there are many ordinary mixers that look original, but differ in the classic design. The devices function as such a water consumer should ideally work. And there will be no extra splashes from this design.
If, after checking, the water flows normally at different pressures and there are no problems, then everything is installed correctly. But it is worth considering not only your convenience, but also the comfort of everyone who will use the device. If for someone else such height parameters are inconvenient, it is better to choose some kind of compromise.
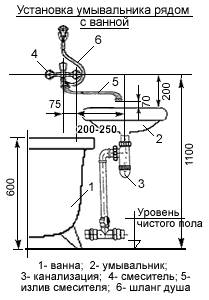
Video tutorial installation and connection of the sink on the pedestal
When installing the washbasin and connecting the system, consider a number of points:
When planning to connect a double sink, choose a special siphon that has access to two pipes. The height of the sewer outlet under the sink in the bathroom should not exceed 500-550 mm
When connecting to the sewer, it is important to securely seal all joints, otherwise unpleasant odors will appear in the bathroom over time.
If, when checking the tightness of the connections, you notice water leakage, remove the cuff and, after allowing all the elements to dry, lubricate the connecting cuff with sealant and “plant” it in its original place.
Installing and connecting the sink is not a particularly difficult, but rather time-consuming job. At some stages of installation, you can not do without an assistant. But in general, if desired, any home master will be able to easily cope with the installation of the washbasin on their own.


| Name | Europe, mm | Russia, mm |
| Sink | 850 on VK | 850 on VK |
| Mirror over the sink | 1200 NK | — |
| Soap stand (sink) | 950-1000 for NK | — |
| Towel holder (sink) | 800 C | — |
| Toilet paper holder | 750-950 VK | — |
| Spare toilet roll holder | 300 for NK | — |
| brush holder | 200 by VC flask | — |
| Wall hung toilet | 400 by VK | — |
| Bidet | 400 by VK | — |
| Towel ring (bidet) | 800 C | — |
| Soap stand (bidet) | 700 C | — |
| Bath | 600 on VK | 600 on VK |
| Hand shower (bath) / hose must not be in the bath / hose length 1.25 m / 200 mm from the vertical axis of the mixer | 500 according to the NK bracket from the VK bath | — |
| Spigot for hose (bath) / with hose length 1.25 m / 200 mm from the vertical axis of the mixer | 700 C from VC bath | — |
| Soap stand (bath) | 100 on NK from VK baths | — |
| Bath faucet | 300 C from VC bath | 800 C from the surface of the floor covering |
| Overhead shower head (shower) | 2100-2250 according to NK from the surface of the floor covering | |
| Watering can of a hand shower on a bar (shower cabin) | 2095 by VC from pallet pad | — |
| Side shower jets (3 pcs.) | 600 / 1000 / 1400 C from pallet platform | — |
| Side shower jets (2 pcs.) | 700 / 1300 C from pallet platform | — |
| Shower faucet | 1200 C from pallet pad | 1200 |
| Hose outlet (shower) | 1400 C from pallet pad | — |
| A pen | 1000 NK from the platform of the pallet | — |
| shower tray | — | 400 by VK |
- Unless otherwise noted, all values are from mark clean floor. For example, the value "Sink: 850 mm VK" contains a prescription to install so that the upper edge of the sink (VK; top of the side) is at a height of 850 mm from the surface of the finished floor (covering).
- NK - the value is indicated by bottom edge.
- VC - the value is indicated by top edge (at the top of the side).
- FROM - the value is given according to the mark of the corresponding axial lines (horizon or vertical).
When did toilet paper appear in Russia?
We think that you will be interested to know the history of toilet paper production in our country. Here is what information was published as part of the TheQuestion project:
«
The production of toilet paper in the USSR began only in 1968, when two English paper machines were installed at the Syassk Pulp and Paper Mill (Leningrad Region). On November 3, 1969, the launch took place, but the first batch of hygiene products ran into zero interest from consumers: Soviet citizens simply did not know what they were intended for. Only after a large-scale advertising campaign (rollers about toilet paper from the Syassky plant were played before screenings in cinemas) did a real boom begin. A personal hygiene product, so familiar all over the world, instantly became a shortage in the USSR and until the 80s it could only be obtained by standing in a huge queue.
So, the need for a toilet paper holder arose relatively recently.
Depending on the slope of the sewer pipe:
- for a pipe with a diameter of 100 mm - at least 2 cm per meter
- for a pipe with a diameter of 50 mm - at least 3 cm per meter
At what height is the sewer for plumbing fixtures?
For an attached toilet bowl 160-190 mm (depending on the manufacturer and model), fitting in place will give the most correct answer.
In other cases:
- for wall-mounted toilet 220-240 mm from the floor
- for shower cabin with 60 mm tray
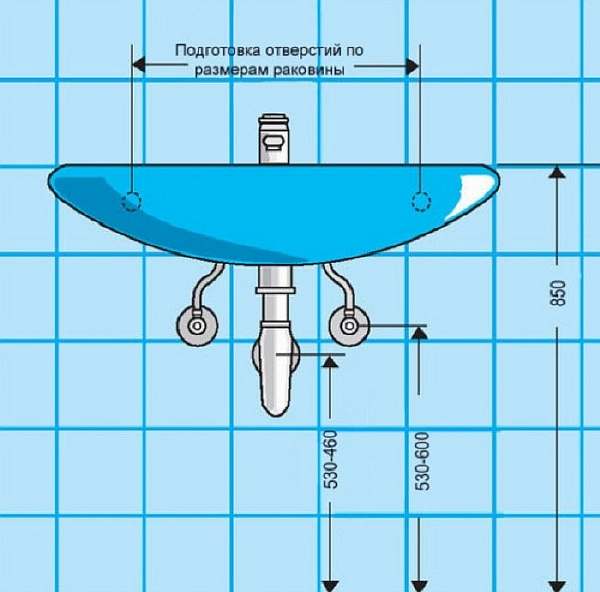
- for washbasin 500-550 mm
- for bathtub 100-150 mm
- for kitchen sink 300-400 mm
- for washing machine and dishwasher 600-700 mm
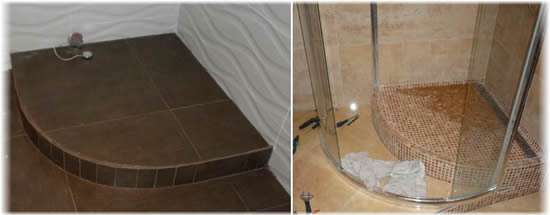
If, for technical reasons, the sewer outlets for the bathroom (shower, toilet) are made higher, then a podium can be made under the bath (shower, toilet) to the required height.
Average social standards
The norms for installing a toilet from the wall are the results of measurements, studies, social and statistical surveys that allow us to develop standards for in-line production. Some of them are included in GOSTs and SanPiN, have become standard standards for the sale of industrial products in construction markets and building materials supermarkets.
The children's toilet bowl was developed according to the standards obtained in pediatrics, where there are standard standards for each age - weight, height. Children who do not meet age standards have to adapt in any preschool educational institution - whether it is kindergarten or school.
At home, not everyone has extra square meters and funds to install a special device. It is much more rational to use a special stand for the toilet.Social regulations refer to standardized equipment and room sizes.

If there are people who do not meet these parameters, they experience inconvenience or (if they have significant funds) create toilet rooms and buy non-standard toilet bowls. The average dimensions are as follows:
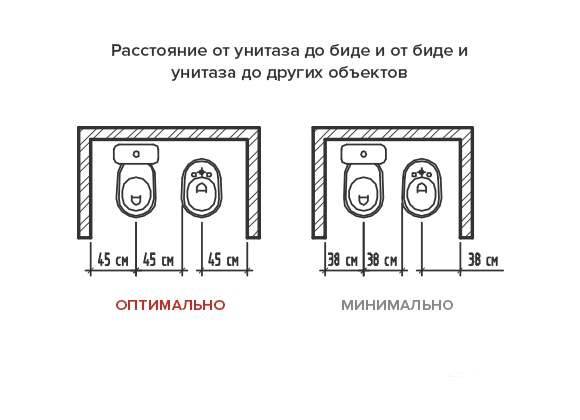
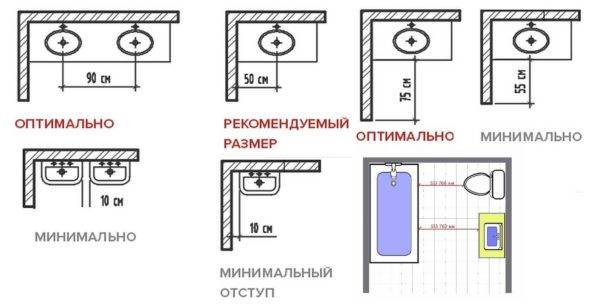
- The most common size of the toilet bowl: the height of the bowl is 40 cm, the tank is 81.5 cm, the drain pipe rises by 185 cm. The compact itself is most often 65 cm long and 35 cm wide. From this it turns out that from the central axis of the device to its edges can be at least 17.5 cm if it is an adult, and not a children's version. Then it is clear from what considerations on the construction forum, when asked how many centimeters should be the minimum distance, they write that it can be 38 cm, and the distance from the toilet to the wall on the side is at least 20 cm. In total, 17.5 cm (almost 18 cm) from the central (longitudinal) axis of the bowl and 20 cm recommended to the wall, and give those 38 cm (minimum). And if you follow the SNiP standards and make 45 cm from the axis to the wall, then this will be the optimal average parameter, convenient for most people.
- For a toilet room in building standards, 80 cm wide and 1 m 20 cm long are considered sufficient for a comfortable stay and the administration of natural needs. When refurbishing old secondary housing, the length and width are often made smaller. Sometimes meters in the hallway or kitchen win this way. At the same time, they usually bring the bathroom and toilet together or expand the space by changing the layout of the bathroom and installing a shower stall.But in houses of mass standard development with a separate toilet, there is often a dimension determined by GOST and SNiP, which complies with SanPiN standards and provides maximum convenience to people living in an apartment.
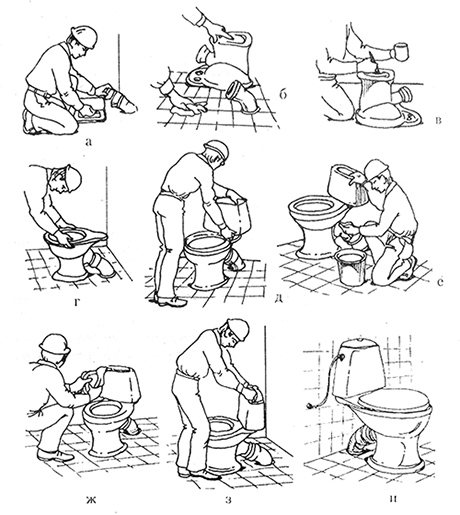
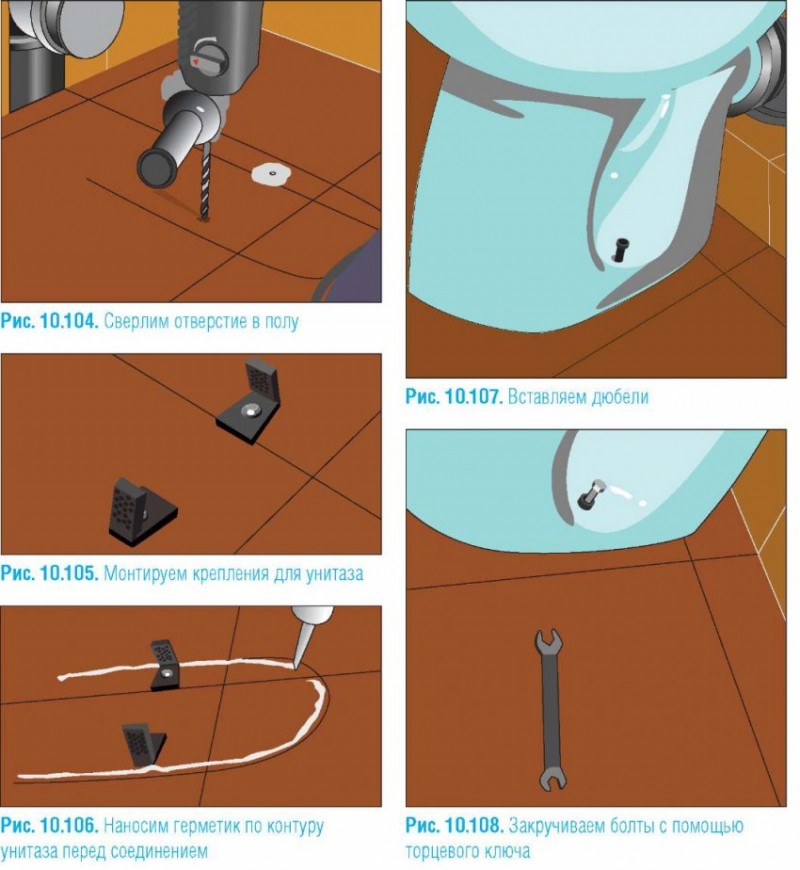
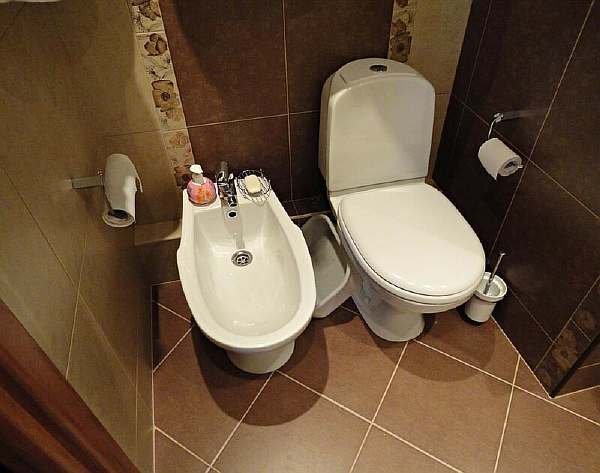
The nuances of installing a toilet
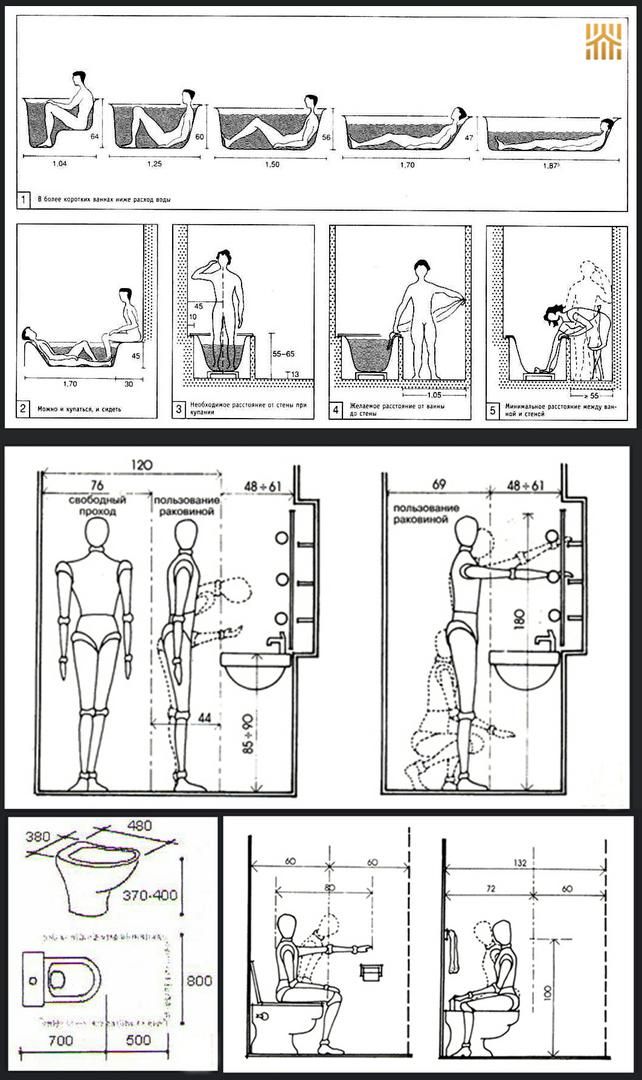
The minimum distance from the toilet bowl in the frontal part cannot be less than 53 cm, otherwise the administration of natural needs will become problematic and harm health. The optimal functional space in the frontal part is 75 cm. It is not limited in the direction of increase, but if this is not possible in the combined bathroom, then a toilet bowl with a tank in the wall or suspended is used.
The equipment of a combined bathroom, according to existing needs, presents particular difficulties in a small apartment. In this case, they resort to installing a shower instead of a bath and draw up a scheme in which none of the devices will block access to the other during operation, or at least cause minor inconvenience.
These standards are easily met when using standard designs and types of sinks, bidets, toilets, washbasins. But if an unusual, exotic shape or unusual dimensions is acquired, careful measurements must be taken so as not to experience difficulties during installation or not to be left with new equipment, the installation of which under existing conditions will be impossible.


What determines the height of the installation of the mixer
It is important to note that all the figures above are only recommendations. After all, the premises and requirements of different consumers differ one from one and are unique.
For this reason, the installation height of the crane will always be different.This parameter, and the installation method itself, depends on various factors. One of them is the type of mixer.
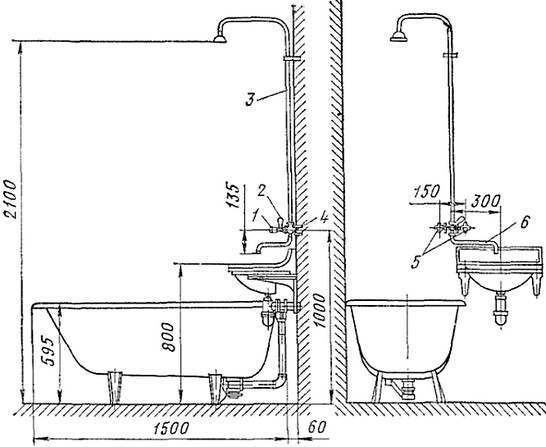
Each of them must be mounted at a different height (as indicated in the previous paragraph). If a for bath and sink two taps are installed (that is, for each of the bowls), then the mixer, which you will use only for the bath, can be mounted at a distance of 20–25 cm from its upper edge.
If for both devices you plan to use only one tap (with a spout of great length), then the installation height above the upper rim of the bath should be at least 30 centimeters. It is recommended to install a faucet above the sink at a distance of at least 25 cm from its upper edge. This height is optimal so that the consumer can easily wash his hands, wash himself and perform the entire set of hygiene procedures.
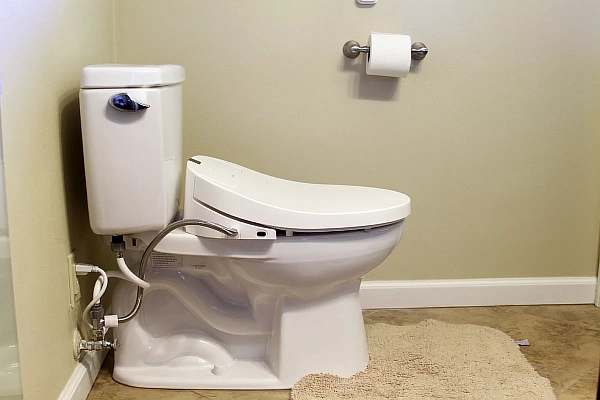
On-Board Faucet Installation
"On-board" means that the appliance will be attached directly to the side of the tub or sink itself. Usually new sinks or bathtubs have a pre-drilled hole, otherwise you will have to drill it yourself.
How to calculate the optimal height of the mixer in the bathroom from the floor, there is no single standard. The value is influenced by several factors: the growth of households, ease of use, mixer model, room size. Plumbers also look along the length of the pipe to prevent excessive tension.
Instructions for drilling holes in an enamelled bath
This is a complex job that requires skills and special equipment.
Main tools:
- marker;
- pen drill;
- screwdriver (a drill will do);
- scotch;
- plasticine.
Operating procedure:
How to install a faucet in the bathroom if there is no main hole? To begin with, establish a place and close it more tightly with a piece of transparent tape.
Fashion a small plasticine collar, the dimensions of which will be x2 greater than the diameter of the future hole, and the height will be 0.5 cm. Attach a home-made collar to the surface of the bath and draw water there.
Carefully drill a hole with a drill (its dimensions are Ø 5–6 mm), focusing on the center of the mark. Set a small speed and do not press the drill too hard. Drill carefully, the thickness of the bath, even cast iron, is small.
When a hole appears, the water will go there. Having cleaned the drilling sites, mold a small cap from the same plasticine and close the hole with it, only from below
It is important to fix tightly, holding water.
Inserting the tip of a 10-12 mm drill into the hole, slowly increase its diameter. After removing the adhesive tape and artificial hill (shoulder), clean the surface. Also remove the plasticine cap from below.
hole finish
Now, to install the faucet on the bathroom yourself, you need to slowly work the edges of the hole with a rubber nozzle and a piece of sandpaper, inserting them onto the cartridge. For protection, it is better to seal the surface of the enamel around with transparent tape.
Also remove the plasticine cap from below.
The hole is ready. Now, to install the faucet on the bathroom yourself, you need to slowly work the edges of the hole with a rubber nozzle and a piece of sandpaper, inserting them onto the cartridge. For protection, it is better to seal the surface of the enamel around with transparent tape.
Tips for Drilling Holes in an Acrylic Bathtub
First, special on-board adapters are mounted for installing a mixer - devices with small spouts.Under the shower you will need a separate hole. It is advisable to carry out installation immediately, while the new bathtub is still being installed. Then it is easy to hide all the pipes and other elements under the tiles.
The installation height of the bathroom faucet must be determined immediately by inserting it into a special hole.
From below, fix the rubber gasket with a large figured washer. Tighten them with a clamping nut. First, screw it in by hand, then tighten it slightly with a wrench (half a turn is enough).


Connect the faucet installation valves to their pipelines. Turn on the water, checking the tightness with a piece of paper.
How to remove an old faucet
All devices have expiration dates and when they expire, dismantling is needed. How to install a new faucet in the bathroom on the wall, if the old one is still hanging there? To begin with, competently get rid of it:
- Inspect the mixer, especially its nuts. Under their size, prepare the necessary tools.
- Carefully remove scale, dirt, solid oxides from the corners of the threaded part.
- Try to unscrew all the nuts with a wrench without applying too much pressure. The nut is jammed - then make 0.5 turns back and unscrew again.
- The mixer is old, installed a long time ago - it is better to pre-wet all its connections with a solution, and several times. The toilet "Duckling" is ideal.
- Check eccentrics. They are working, in addition, the thread is identical to the new mixers - then you should leave them. This simplifies the installation of a new faucet in the bathroom. In addition, earlier eccentrics were mounted from other, high-quality alloys, which is why they are much more durable than modern ones.
Part of the eccentric suddenly fell off, got stuck inside the fitting. The problem is unpleasant. You will have to pull out and change the fitting. Sometimes it is fixed inside the wall, under the tiles.It will be necessary to dismantle part of the wall, then restore it after installing the mixer.
Changing the mixer is an important and large-scale business. If desired, it can be done at home on your own, without waiting for the arrival of a plumber. Flush mounting skills and possession of the necessary tools will come in handy
Flush mounting skills and possession of the necessary tools will come in handy.
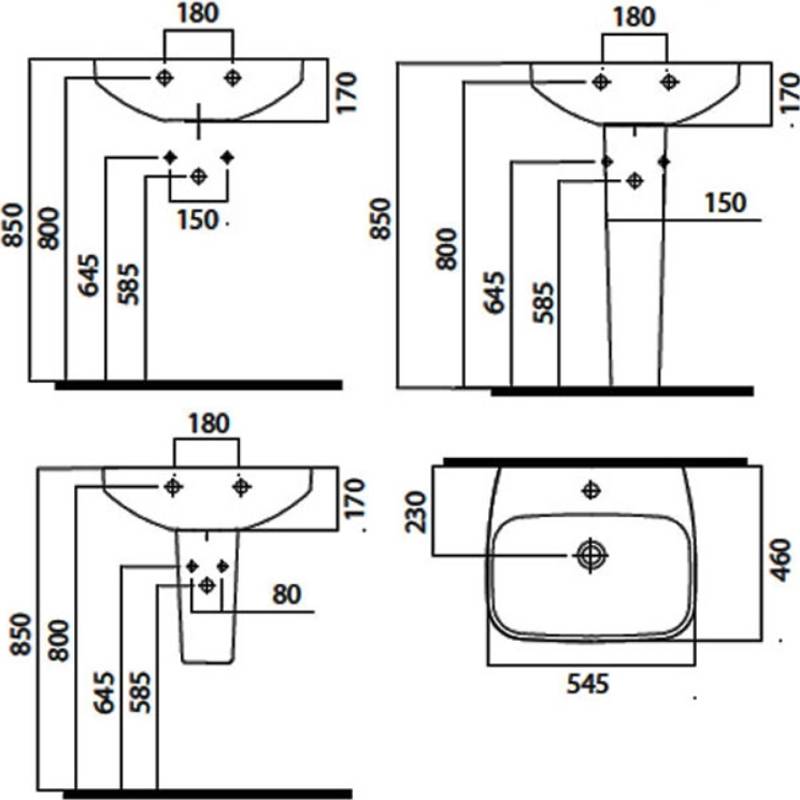
Soviet sink installation standard
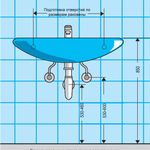
In the Soviet years, the corresponding norms were calculated. These are GOSTs, which specifically indicated at what height it is required to install the sink. In our age, these figures are advisory in nature, since no one checks the distance from the accessory to the surface.
Standard installation height of the product in the bathroom
With any type of installation of the sink, the designed installation height from the floor surface must be taken into account. During the years of the USSR, standardization organizations functioned, which developed uniform standards for fixing accessories.
The study of the details helped to establish the optimal height of the sink in relation to the floor.
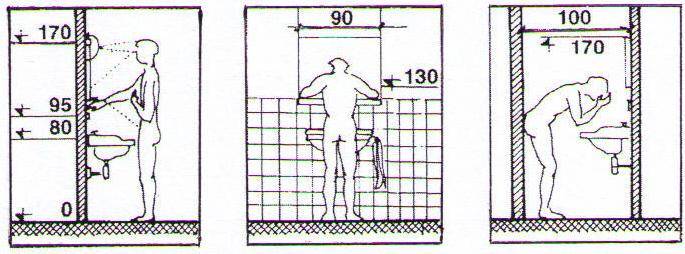
The average height of a woman was included in the calculations. It was found that the most comfortable sink installation height is the range from 80 to 92 cm. If we consider the height of a man, then this figure varies from 85 to 102 cm from gender.
Shell options
This is interesting: Built-in sinks - advantages and features of choice
What you need to know about the height of the mirror above the sink
Usually in small apartments, the interior space of each room is tried to be used as efficiently as possible. And the bathroom is no exception. Traditionally, the sink is combined with a mirror.
If we have already figured out the height at which the sink is hung in the bathroom, then it remains to decide on the mirror. Its height above the washbasin is usually determined based on the following: it should be approximately 120–140 cm from the floor; from the top of the sink - at least 20 cm; if the mirror is small - its installation is carried out at eye level (in this case, the average height of all family members should be taken into account).
The proportional ratio of the parameters of the sink and the mirror should be taken into account, since it will be more comfortable for a person to see his reflection when he is standing at full height. A small distance between the top of the washbasin and the under-mirror shelf or mirror is a sure way to constantly clean the glass surface from dried splashes.


Bathroom Sink Tips
When buying a new washbasin, you should consider some of the nuances. The sink is one of the main elements of the bathroom, it immediately catches the eye, so it should be in harmony in style with the overall interior.
Pay attention to the following characteristics:
- Dimensions. Standard sink 60x40 cm. This is the best option in terms of ergonomics and functionality. Eurostandard is slightly smaller. To ensure that the operation does not cause problems, accurate calculations are necessary. The size of the washbasin directly depends on the area, the features of the bathroom;
- Bowl depth. The volume of the sink should be selected based on its purpose. For a guest toilet, rare hand washing and washing, a mini-sink, up to 10 cm deep, is suitable. When choosing a main washbasin, you can focus on the length of your arm. The greater the depth, the less spatter there will be;
- Manufacturing material. It completely depends on the stylistic direction and personal preferences.If it is decided to abandon the usual ceramics, it is worth considering that the metal makes loud sounds when water gets in, granite, marble products should be hung on special fasteners.

Is it possible to transfer and what is needed for this
The washbasin can be moved within the bathroom without any restrictions. You can be limited only by laid communications - water supply and sewerage. Change washbasin installation height - It's all up to you. Well, maybe more builders who will do the work. It will only be necessary to observe the minimum distances to the walls, bathroom, etc. But this is just for convenience. In your home, in this regard, you have the right to violate the recommendations of SNiP.
The distance between the sink and other equipment in the bathroom
No need to notify anyone about the installation of a new sink if it is placed in "wet" areas. These include all types of bathrooms. That is, if you decide to install a washbasin in the toilet, and before it was not there, you just need to make new connection points to the sewer and water supply. Well, and install and connect the washbasin.
Schemes and standards for the placement and installation of plumbing equipment and appliances
Drains and overflows used to be used in bathrooms, but then they spread to sinks.
Flat sink drain
In case when the sink must be installed above the washing machine, as a rule, it has a flat shape. This saves space and is the most suitable option in this case.
Such a sink, which has the name "water lily", should have a special flat drain.It should come with the package how to pick it up alone is almost impossible.
In addition, the "water lily" is a sink with a side drain. Its feature is that the hole for water drainage is located on the side, and not at the bottom. This can cause some inconvenience, as the water may not drain completely. To avoid blockages in the siphon, it will be necessary to remove the liquid yourself by soaking it with a rag.
If you are willing to put up with these shortcomings, this will allow you to free up additional space in the bathroom.
Thus, the choice of a sink drain should be given special attention, as it will ensure the efficient operation of the system. Sanitary measures in the home can be divided into three types: Sanitary measures in the home can be divided into three types:
Sanitary measures in the home can be divided into three types:
- Maintenance work, such as fixing a leaking faucet or clearing a blockage in a shower drain;
- Works to replace pipes or failed equipment;
- Installation of new plumbing and pipeline communications.
The current repair of plumbing is not regulated by any regulations or standards. However, measures to replace pipes or install new plumbing equipment will necessarily entail the need to coordinate with the relevant organizations, which will require strict adherence to the rules for installing plumbing fixtures in accordance with current standards.
The motivation of bureaucrats is simple and clear:
- The transfer of engineering networks and the installation of plumbing in a new place is called redevelopment, which may lead to changes in the configuration and size of the room, requiring changes in the technical passport of the apartment;
- The transfer of plumbing is also a redevelopment.
Naturally, it is easier to do everything according to the letter of the law, then the execution of technical documentation for housing will not cause problems.
- SNiP 2.08.01−89* "Residential buildings";
- SNiP 2.04.05−91* "Heating, ventilation and air conditioning";
- SNiP 3.05.01−85 "Internal sanitary systems";
- SNiP 2.04.01−85* Internal water supply and sewerage of buildings.
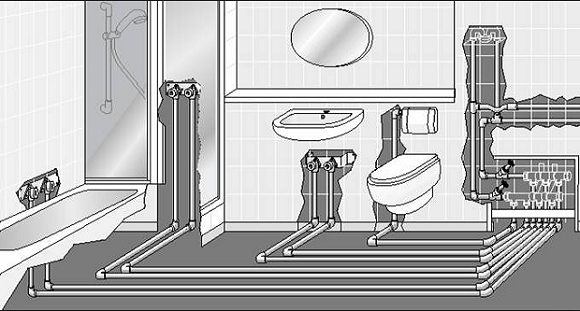
The modern market of sanitary equipment is represented by a wide range of bathtubs, showers, sinks and sinks, toilets and bidets, valves and faucets. Despite all the variety of devices by functionality and management methods their work, the methods of connecting household sanitary equipment with pipeline apartment communications are completely unified and "subject" to the requirements of GOSTs and SNiPs.


Household plumbing is recommended to be installed after the installation of utilities before finishing the premises. Plumbing for the installation of appliances must end with water outlets, which are a mandatory attribute of the water supply system of the home. Water sockets are specially rigidly fixed to protect the water supply from vibrational effects that occur during the operation of connected household plumbing fixtures.
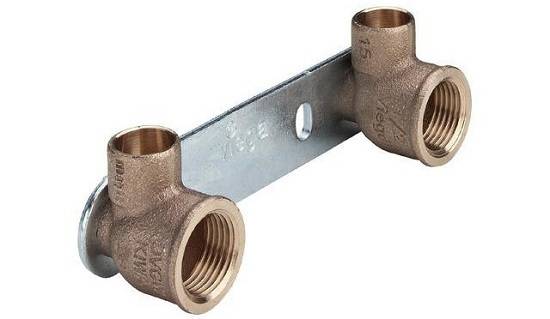
The distance between the axes of the fittings of sockets provided for hot and cold water must be strictly 15 cm.
Instead of sockets, it is allowed to use elbows, tees, couplings or manifolds to connect mixers or other types of taps.
Another generalized requirement for the installation of plumbing fixtures is to provide free access to equipment, for which SNiPs specify the size of free space near each type of fixture (bath, washbasin, etc.).
The height of the placement of plumbing fixtures is regulated in clause 3.11 and clause 3.15 of SNiP 3.05.01−85 "Internal sanitary systems", and pipeline fittings for appliances are installed in accordance with clause 10.5 of SNiP 2.04.01−85 * "Internal plumbing and sewerage of buildings.
Height standards
The color, design or size of the sink is determined very carefully and for a long time. On the contrary, it is extremely rare to hear a discussion of the height of the sink in the bathroom. Usually the height of the sink from the floor is determined by the one who will install the sink, according to the generally accepted standard - 75 cm from the floor. This height was set before and now, in the same way, builders set it. Even if the designer indicates the height in the project description, he does this in terms of the ratio of all items installed in the bathroom. Rarely does a designer match the height of a sink with ergonomic requirements.
It is not natural for a person to wash in a bent position. However, a person is already used to washing in the sink, which in most cases is fixed at a height of 75 cm, and the height of the sink in the toilet usually has an identical parameter. This height, on average, is the height of a writing or dining table. There are ratios of human parameters to the parameters of a sink or other bathroom items.With a quality bathroom design, these indicators should be taken into account.
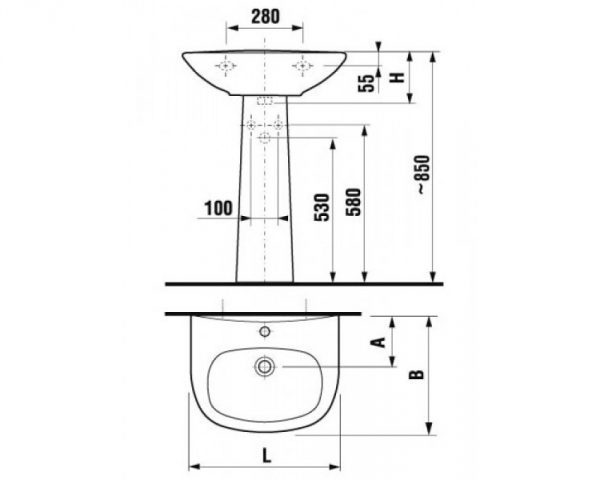
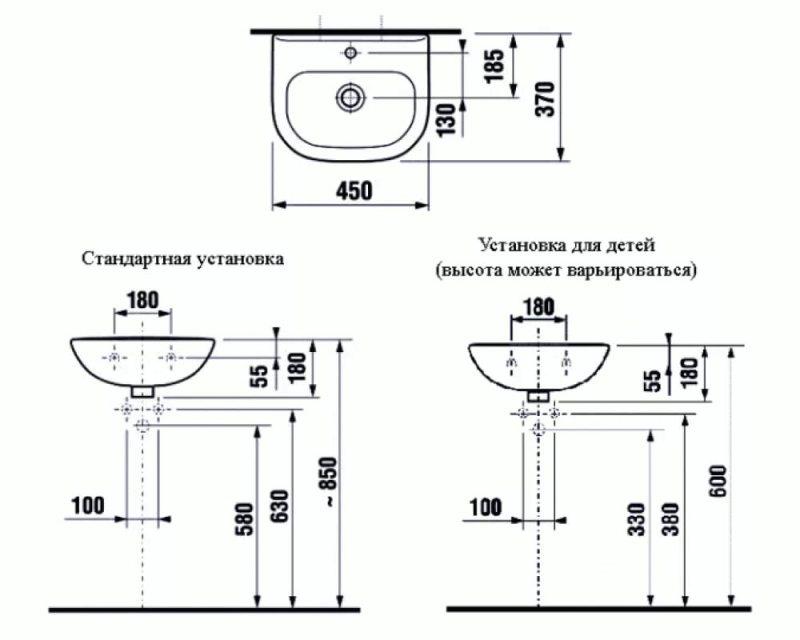
What does SNiP say
The recommended installation height of the sink in the bathroom is indicated in SNiP 3.05.01-85. The standards have been developed for residential, public, industrial premises, preschool and school education institutions. In a residential area, the recommended distance from a clean floor to the top of the bowl is 850 mm.
Models whose height is not adjustable meet the requirements of SNiP. Hanging products can be placed at a convenient height, taking into account the anthropometric parameters of the tallest member of the family. For children, there are special stands for using the "adult" model, and with sufficient space, you can install an individual "children's" washbasin.