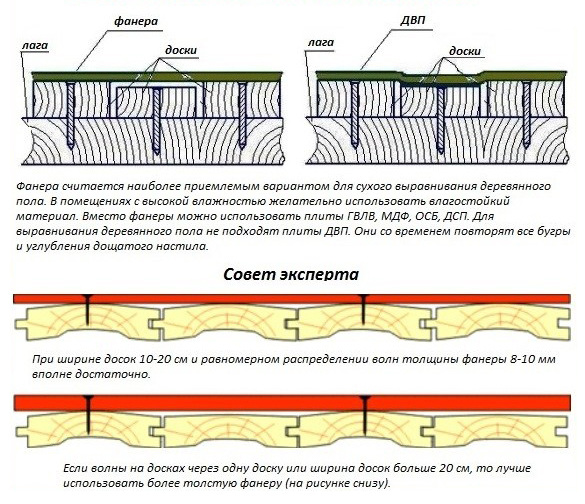
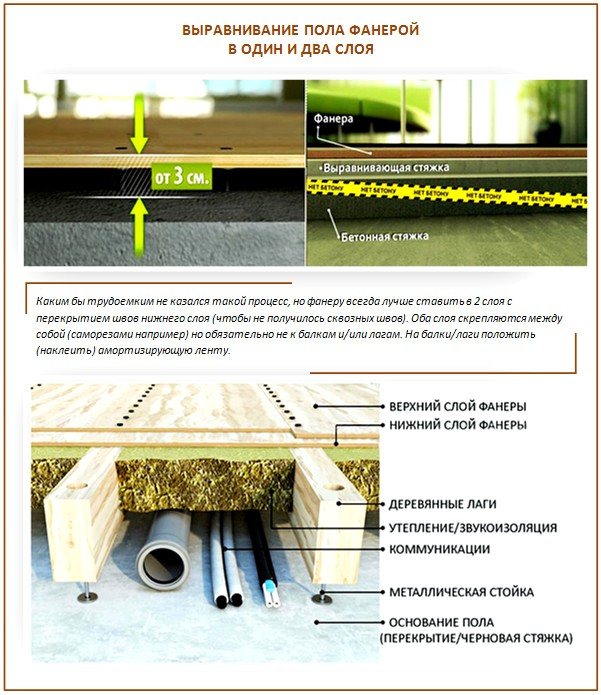
- Popular plywood floor leveling schemes
- Option 1 - installing plywood on the base
- Option 2 - correct minor irregularities
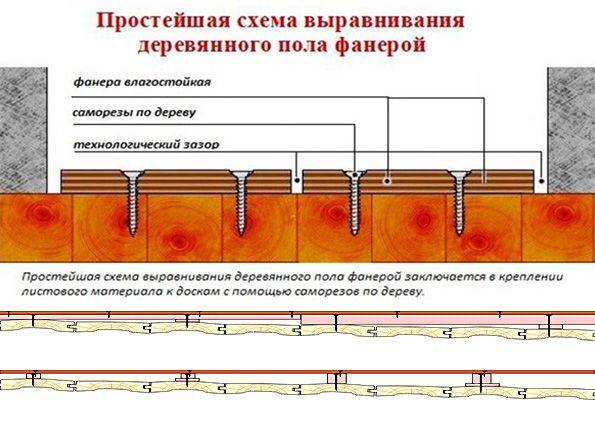
- The easy way to level
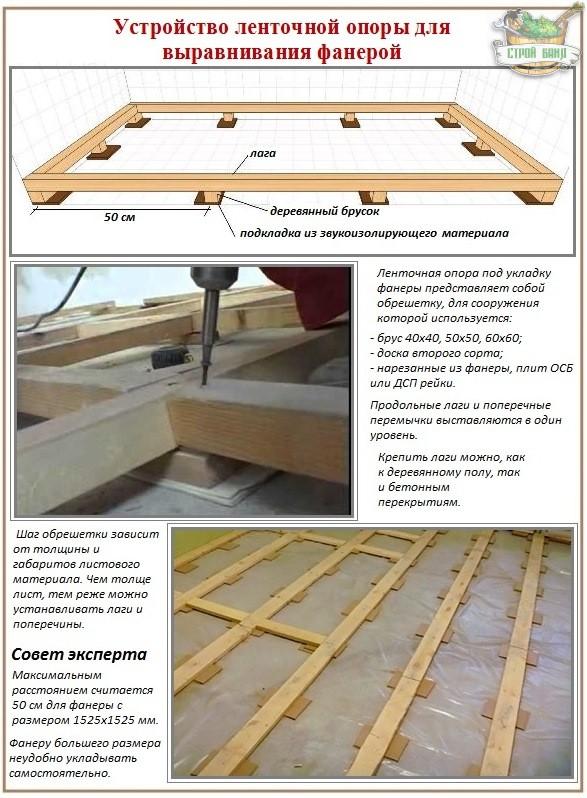
- Leveling with a band support
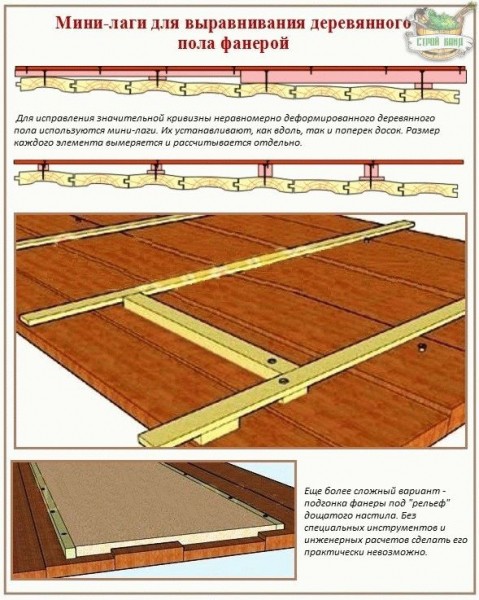
- Option 3 - arranging a mini-lag
- Option 4 - crate of point supports
- How to level the floor with your own hands
- Floor leveling without lag
- Leveling the floor with plywood on a tape support
- Mini-lag alignment
- On point supports
- How to correctly determine the height of the level differences?
- What tools are needed for the job?
- Why plywood?
- Types of floor leveling with plywood sheets
- The technology of leveling the concrete floor without the use of logs
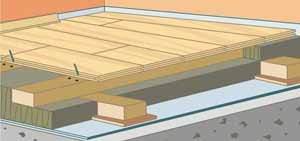
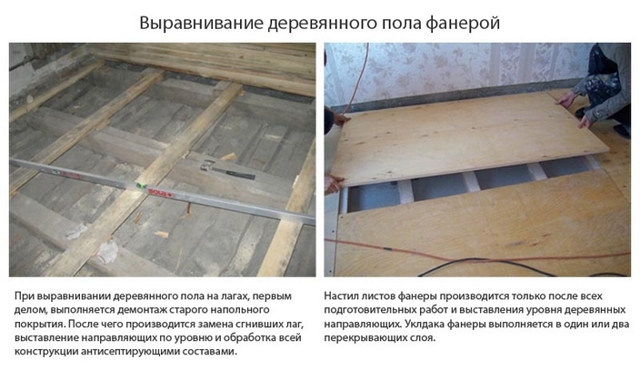
- How to level the floor with plywood on the logs with your own hands
- Laying plywood sheets on logs
- A long-standing method of leveling with success used today
- Plywood characteristics
- Main characteristic
- Dimensions
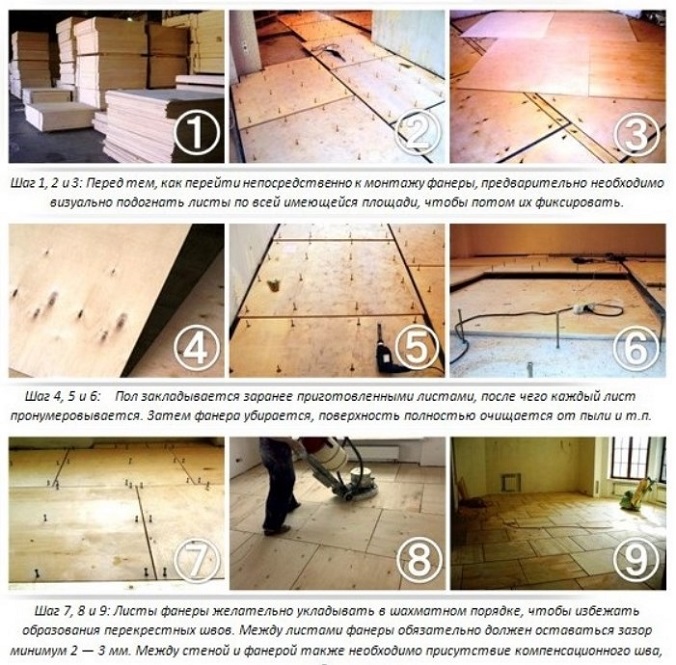
- Stage 5. Formatting the sheets
- Plywood leveling
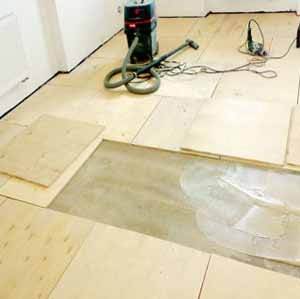
- Preparing the floor
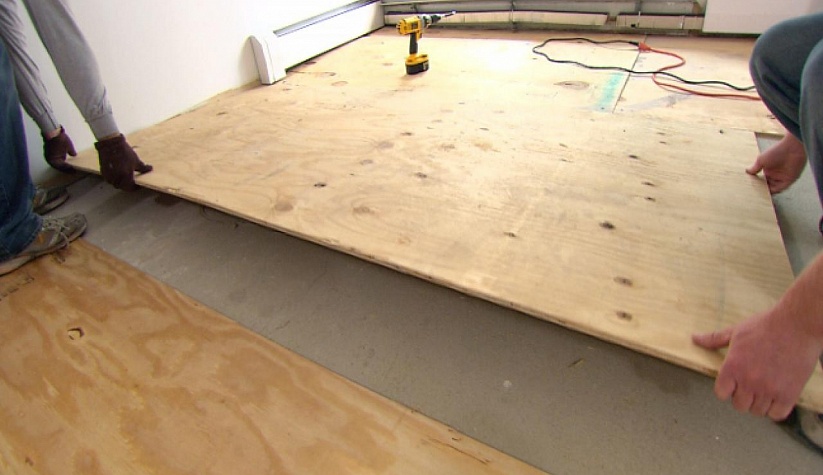
- plywood laying
- Laying plywood on a wooden floor: the main rules
Popular plywood floor leveling schemes
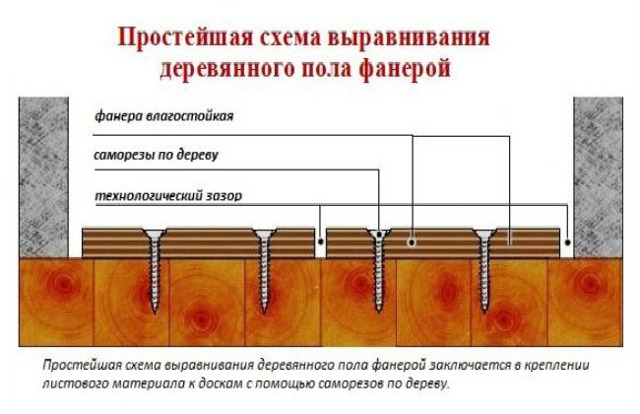
The thickness of the plywood is selected based on a suitable leveling method. Next, we will talk about the most popular ways to level the floor with plywood and figure out how to carry out the leveling work yourself.
Option 1 - installing plywood on the base
It is used in the case when the unevenness of the floor is insignificant (1-5 mm). The leveling material is the substrate (polyethylene foam, interlining, etc.).
 First of all, you need to lay a substrate on the floor under plywood and, if necessary, glue it together with adhesive tape
To level the floor in this way, you need to take plywood 8-10 mm thick. Before installing plywood on the floor, you need to stand indoors for at least two days.
If the plywood will serve as a floor finish, then to give an aesthetic appearance, it must be sawn into symmetrical squares. The main thing is to minimize the waste of material when cutting.
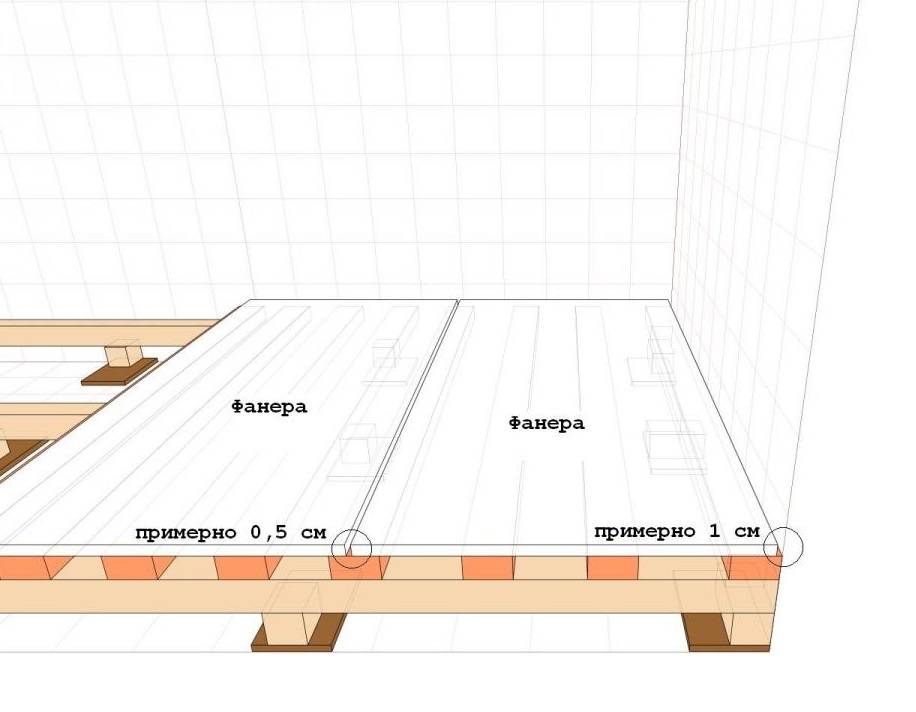
If plywood, after leveling the floor, is covered with linoleum, tiles or other materials, then it can be laid in whole sheets without wasting time on cutting. Be sure to leave a gap between the plate and the wall of 5-10 mm - this is a thermal gap for expansion.
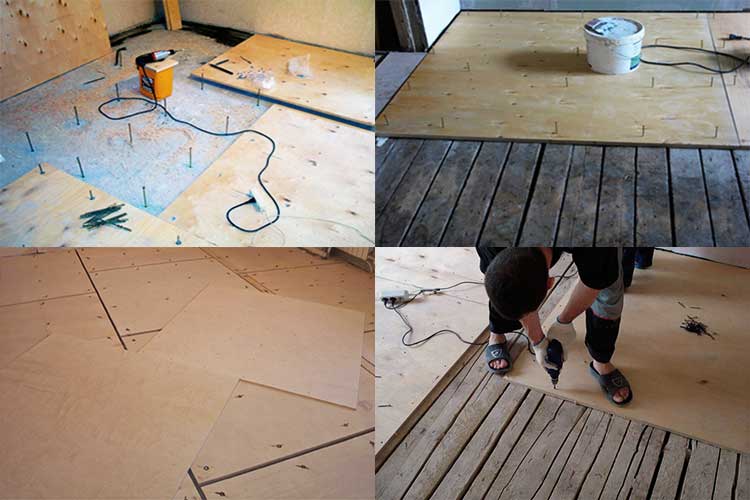
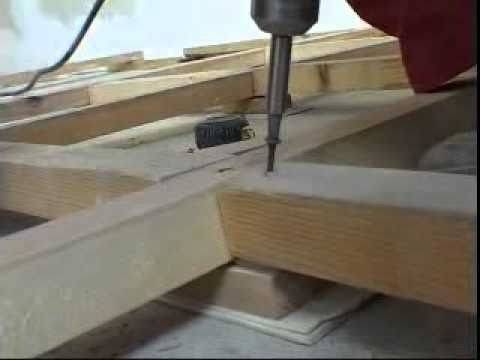
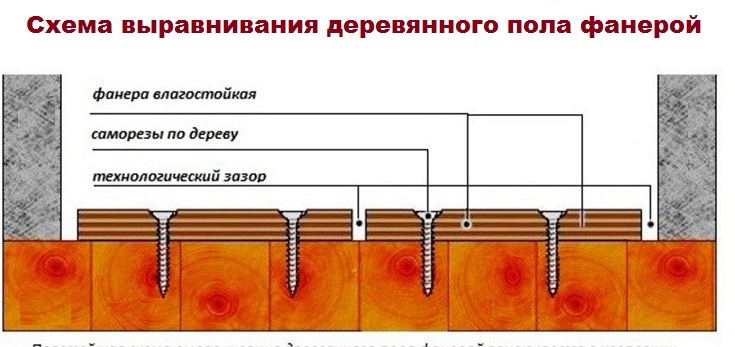
 It is necessary to fasten the plywood sheets to the floor with the help of self-tapping screws, having previously drilled holes in the plywood according to the diameter of the body of the self-tapping screw and sweat under the hat
To fix plywood, you will need 30-50 pieces of self-tapping screws per 1 sq.m. After installation, the caps of the self-tapping screws can be hidden under a thin layer of putty.
Installing plywood on the floor is the easiest and least time consuming way to level a wood floor.
Option 2 - correct minor irregularities
If, when assessing the magnitude of floor irregularities, a slope or a difference of up to 15 mm is detected, then two options can be used to level the floor.
The easy way to level
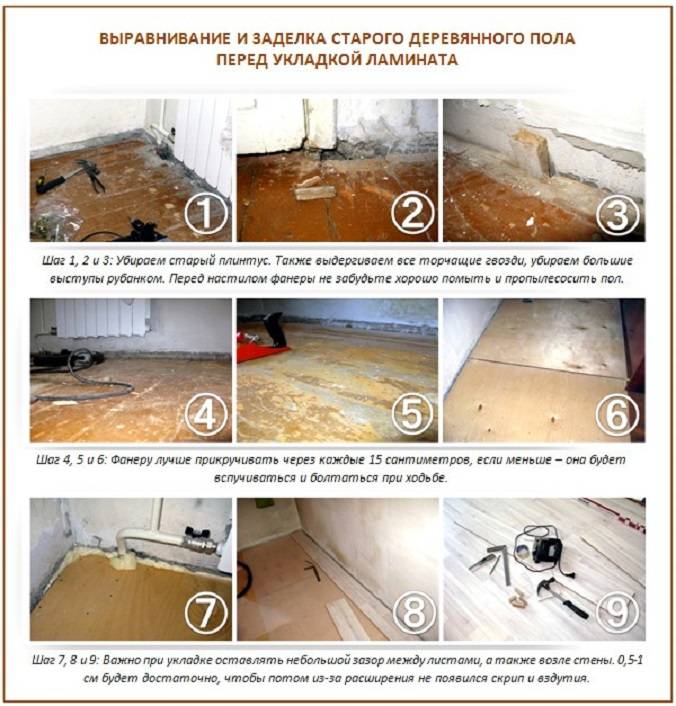
First you need to level the old flooring as much as possible. The protruding parts of the floor must be knocked down using an ax or planer.In places of deflection, we fix the lining with nails or self-tapping screws.
To level the floor in this way, plywood must be chosen with a greater thickness - from 16 mm. The substrate in this option is also needed.
During installation, do not forget about the distance from the wall of 5-10 mm. Plywood sheets are also fastened with the help of self-tapping screws, having previously drilled holes in the plywood along the diameter of the body of the self-tapping screw and sweat under the cap.
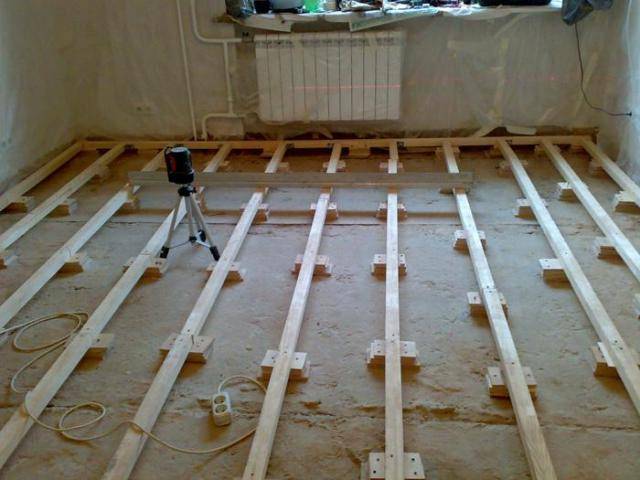
Leveling with a band support
This option is used if the floor slope needs to be leveled over the entire plane or partially in different planes.
This is the most time-consuming process, since it is required to align the transition from the lowest part of the floor to the highest.
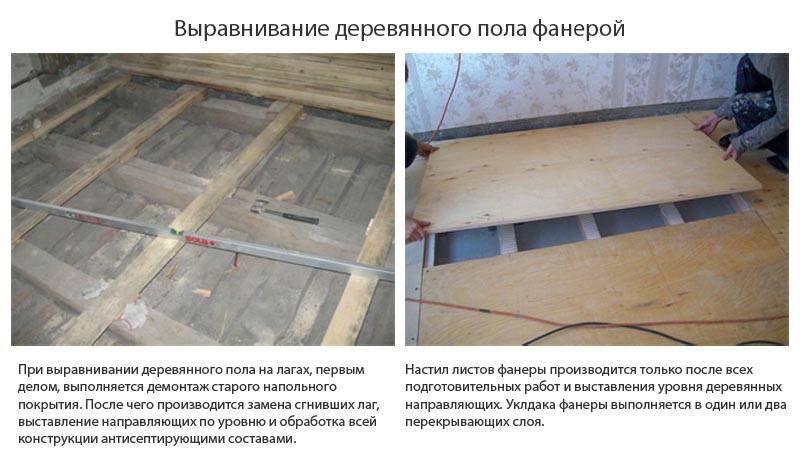
First, using the level, you need to define a plane with a zero level. Next, a crate is built from a wooden beam.
 The lathing of the timber includes cells of longitudinal logs and crossbars, the cell and step of the log should be 40-45 cm in size
The cell must be built taking into account the fact that a sheet of plywood will be attached to it. Therefore, before building the crate, it is necessary to mark the location of the plywood.
To achieve the same height, the construction of the crate must be leveled using linings of different thicknesses under the timber.
As a material for linings, you can use plywood of different thicknesses, slats or bars. In addition, you need to leave a gap between the plate and the wall of 30 mm.
After leveling, the crate is attached to the floor with dowels. When this work is done, you can begin to attach the plywood to the crate. This is done, as in the previous methods, using self-tapping screws.
Option 3 - arranging a mini-lag
It would be advisable to use this method if the differences are quite significant - up to 80 mm.
Mini-lags are wooden linings and slats. They are installed both along and across the boards.
 For this method, you need to choose different shapes of wooden slats for support so that all plywood boards are set on the same level.
Plywood for this method must be selected with a thickness of 16 mm or more. It is immediately worth noting that the method is not easy, as it requires separate calculations for each element of the support separately. Therefore, if you have doubts about your own abilities, it is better to seek help from specialists.
Option 4 - crate of point supports
If the height differences on the floor are insignificant, then a crate of point supports can be used.
 For this method, a mesh is made of dotted supports for plywood, with a cell size of 30-35 cm, after which the plywood is attached to the point support
Plywood should be taken with a thickness of 12-14 mm. Compared to the mini-log crate method, this method is less reliable and stable, but it is faster and less expensive.
It can be used for small spaces. If the area of the room is large, then it is better to use other methods of leveling the floor.
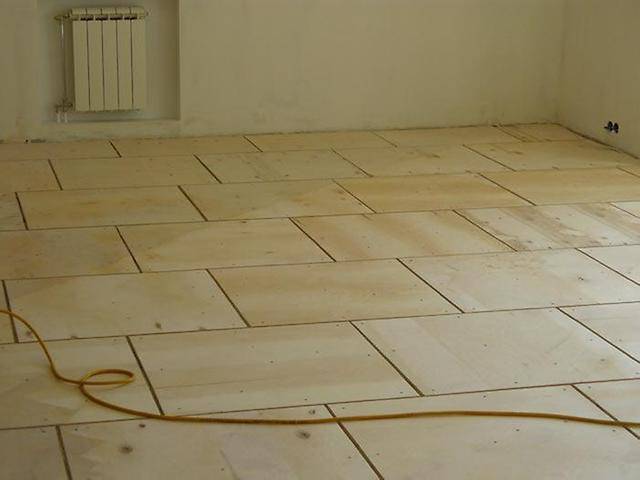
How to level the floor with your own hands
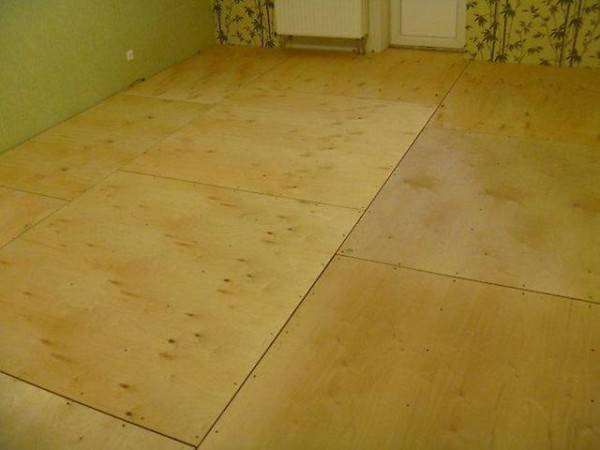
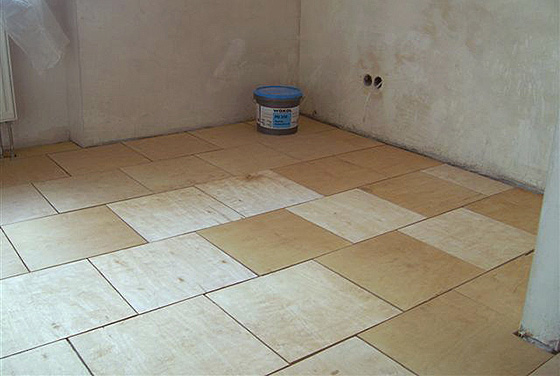
 Finished plywood floor
Knowing the simple rules for leveling different types of floors with plywood, you can easily do the work yourself. When laying plywood as a finishing floor, the sheets begin to be mounted from the middle of the room. Plywood should be fixed with self-tapping screws at a distance of at least 2 cm from the edge of the sheet. After the process is completed, the coating is sanded and opened with varnish.


Creating a subfloor using plywood does not impose special requirements on the fastening and location of the sheets.If two layers of material are supposed, then it is laid with an offset of the sheets in order to prevent the seams of the upper and lower rows from matching. There are a number of methods for laying plywood sheets for laying on a concrete or wood floor.
Floor leveling without lag
 Laying sheets without lag
It happens that the concrete floor requires not only leveling, but also insulation. For this, the option without the use of a log is suitable, which is considered one of the easiest ways to level the floor with plywood. Work with plywood material begins only after it has been kept in a room for several days to get used to the conditions of the room.
The base for laying and the plywood sheet are treated with an antiseptic before laying it. To create the gap required by the technology, bars are placed around the perimeter of the room.
 Sealing seams and irregularities
The arrangement of plywood sheets on the floor is carried out so that they are offset relative to each other (as when laying bricks). The material is fixed with screws evenly along the protruding points of the plywood.
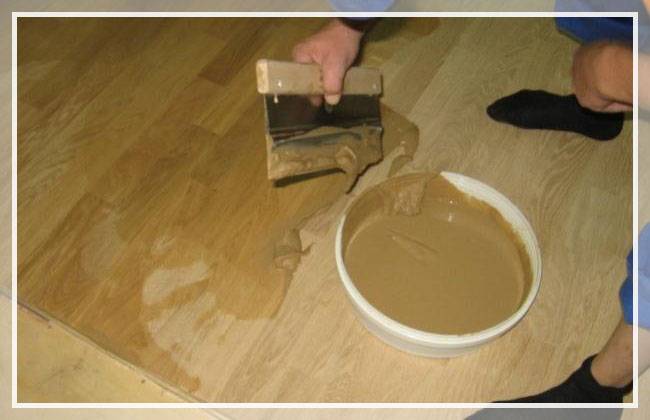
All fasteners and seams are covered with sealant, after which the surface is puttied.
For a wooden floor that is not loose and in good condition, you can also use plywood leveling without using a lag.
 Self-tapping screws
The floor of wooden boards is treated with sealant or putty. It is leveled with sand or sawdust mixed with resin. A vapor barrier film is laid on top, on which plywood is already laid out.
In order that, after fixing with plywood screws, they do not protrude above the coating, the holes are applied in several approaches.First, a hole is drilled according to the size of the self-tapping screw, and then it is processed so that the screw head is level with the surface of the plywood sheet.
Leveling the floor with plywood on a tape support
 Laying on lags
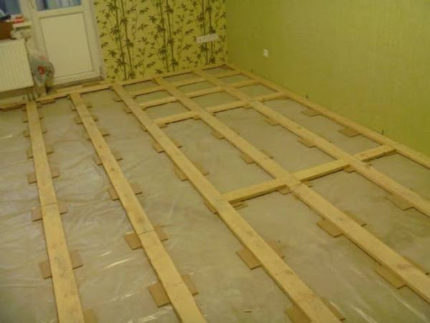
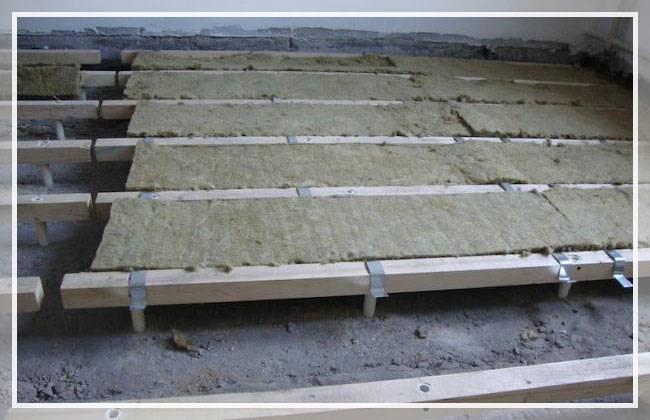
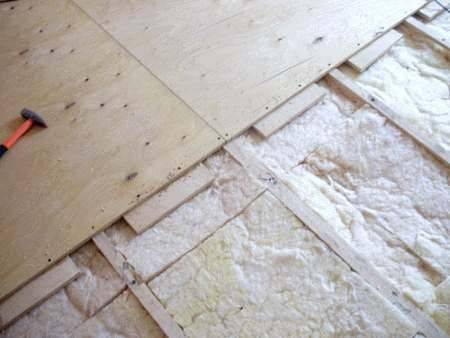
Leveling the floor with plywood on a strip crate can be used for laying under a laminate, tile or linoleum. Such a support is created using square bars and plywood sheets. Lags are laid in increments of 30-50 cm, and indented from the walls at a distance of 20-30 mm. The transverse bars are fixed to the lags in a checkerboard pattern with screws. To add rigidity, you can fix them with metal corners.
To create sound and heat insulation, wood chips mixed with glue are poured between the crate. This mixture dries for 2-3 days. Also, expanded clay or mineral wool can be used for backfilling.
 Laying between the insulation log
Plywood is attached to the support with self-tapping screws. After that, you can lay any floor covering.
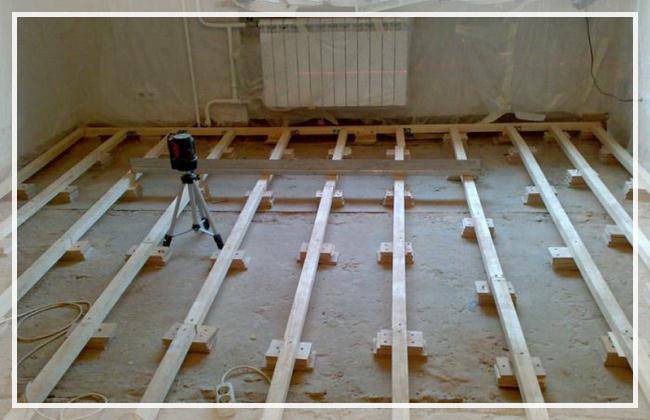
Mini-lag alignment
The method of leveling the floor with plywood along mini logs is selected when there is a slope, or the surface difference is up to 8 cm.
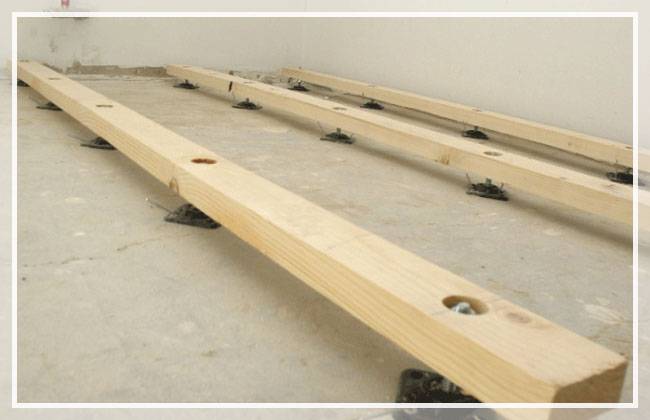 Adjustable lags
The floor surface is marked out for the installation of beams and pads, which create an ideal structure for laying plywood sheets. This work requires careful calculations of the height of each element of the support with markings on the floor and preliminary fitting.
With this flooring, all structural elements will be of different heights. Work in this way is not difficult, but requires a painstaking approach.
On point supports
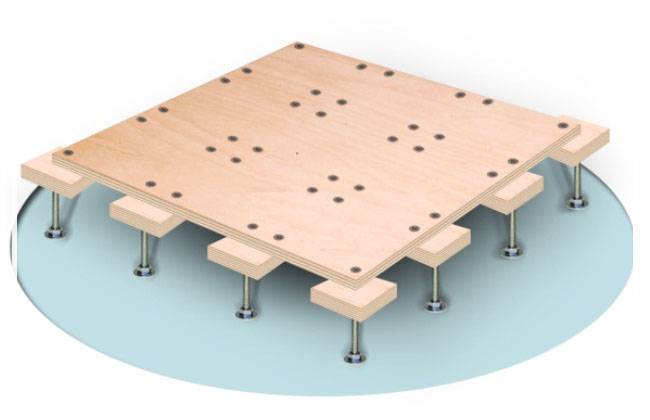 Scheme of laying on point supports
This leveling method requires the presence of supports, self-tapping screws, two layers of plywood coating and glue.
First, sheets for marking and numbering are laid out on the base. The sheets are removed and the height of the finished floor is marked on the wall.
Then threads are stretched across the room, which will show the height of the finished floor. Next, point supports are installed. As a result, you get a grid of supports that are 30-45 cm apart from each other. This method is inferior in reliability and stability to alignment along a tape support.
 Log alignment
After checking the height of the supports with a level, fix them to the base of the floor. Then we level the floor with plywood, laying and fixing the sheets on the supports.
How to correctly determine the height of the level differences?
This procedure must be performed to determine the zero level of the base. It is best to use a laser level for this purpose. However, if it is not there, then you can apply the usual building level.
To begin with, in the center of the walls at the same height, mark the points that you connect with one line. So you define the "horizon line". On it you will determine the zero level. After that, the smallest and largest deviation in the horizontal level is determined on the basis. Video:
Naturally, the subfloor must be prepared for leveling. If the boards have already been laid on the base, and they are in good condition, then you can leave everything as it is. Damaged and rotten elements must be removed. If necessary, it is necessary to eliminate the squeaks of the floorboards, it is better to fix the fasteners, check the heating systems (if any).
What tools are needed for the job?
To level the floor with plywood, it is necessary to assemble all those devices, without which the work cannot be carried out:
- Electric jigsaw with the appropriate blade. It is useful for cutting plywood, as well as laminate.
- Tape measure and pencil for marking.
- Building level
- Screwdriver.
- Self-tapping screws.
Why plywood?
Plywood is one of the most popular and convenient materials that can be used in renovation work. Let's highlight the main advantages of plywood sheets:
- easy to handle and install;
- high-quality grinding of the material;
- no unpleasant odor;
- hard surface;
- lightness of the material;
- high strength;
- moisture resistance and water resistance.
It is worth noting the technical characteristics of the material.
| Type of plywood | Description |
|---|---|
| Plywood FC | moisture-resistant appearance, urea resin is used for gluing veneer sheets. This plywood is designed for indoor use. |
| Plywood FKM | has increased water resistance, is made on the basis of melamine resins. This type of plywood is unique because it is made from environmentally friendly melamine resins. Due to its environmental characteristics, plywood is used in furniture production and for interior finishing work. |
| Plywood FSF | veneer sheets are glued together using phenolic resin. This type of plywood also has increased water resistance. It is not recommended for interior decoration, as phenolic resins are harmful to health. Usually used for outdoor finishing work |
| Laminated plywood | contains FSF plywood, which is covered on both sides with a special film. The plywood laminated is applied to production of a timbering. This type can be used multiple times. |
| Bakelized plywood | Bakelite resin is used for gluing sheets of veneer. This type of plywood is used in aggressive climates, sea water, aggressive environments, sometimes for monolithic work. |
| marine plywood | similar to bakelized, but less durable. Made from foreign woods |
| Plywood Flexible | foreign option. A distinctive feature is the ability to bend well in the transverse and longitudinal directions |
During operation, plywood can be bent, while cracks will not appear on the material and it will not break. The strength of plywood allows you not to worry that the floor will not withstand the loads. In addition, ordinary plywood sheets have a large area, which means that you can quickly cover the desired surface. And, finally, the material is quite unpretentious, and in view of this and its low weight it is convenient to carry it, lift it to the upper floors.


Plywood grades
The use of plywood sheets also allows you to achieve high quality and reliability of the new floor. As a result, instead of the old coating, you get a smooth and durable surface. In this case, the height of the floor will rise by only a few centimeters, which will be almost imperceptible. At the same time, the plywood floor provides a rich space for the implementation of various design solutions.
What are the dimensions of plywood sheets
When buying material, pay attention to the grade. Plywood comes in four varieties:
- first grade - the best quality, no external defects;
- second grade - plywood with wood inserts, sometimes with dents or scratches;
- third grade - material with devilish holes or fallen knots;
- the fourth grade is the worst in quality, many defects.
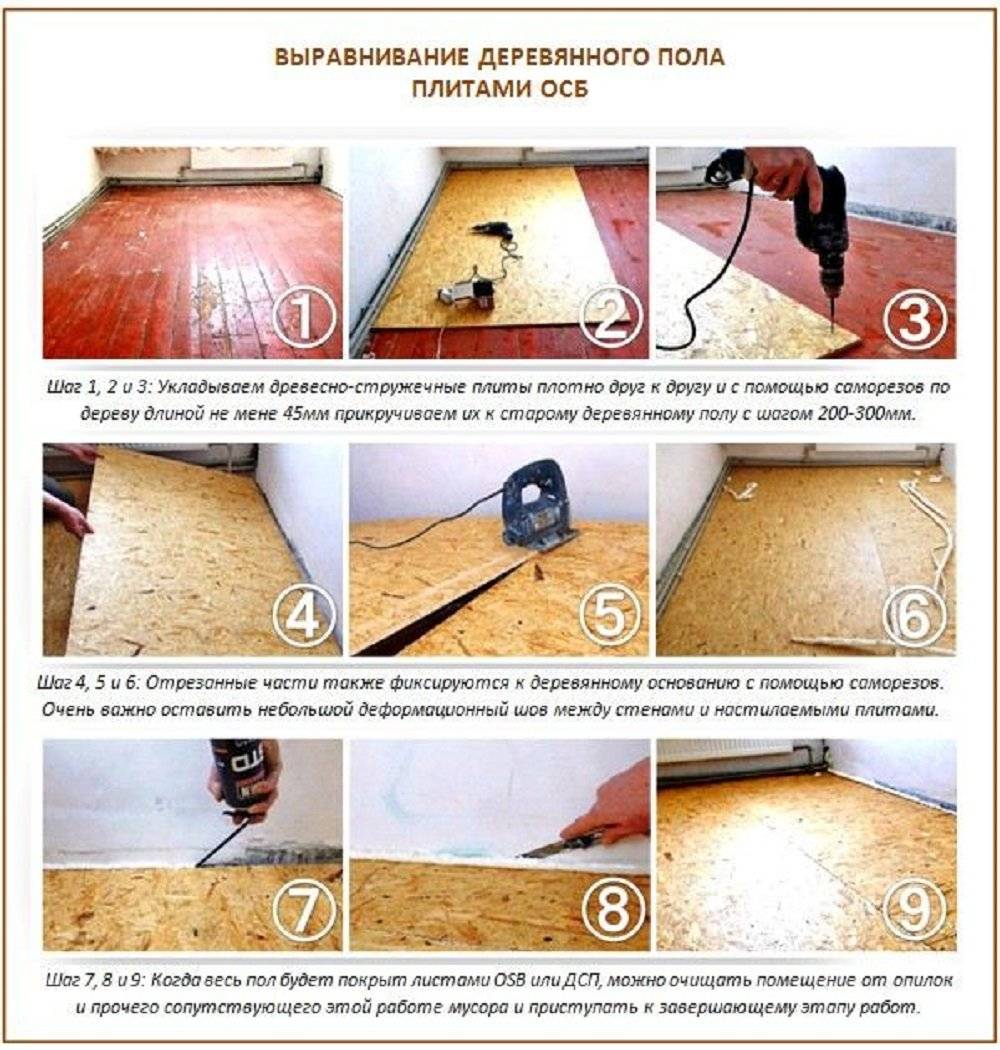
Types of floor leveling with plywood sheets
In order to make the base of the floor even, you can use two methods:
1 way - this is alignment with an additional crate (using a log);
Method 2 - without the use of crates.
The floor base is of two types:
- concrete;
- wooden.
Leveling the floor on a concrete base
When laying plywood on a concrete floor, careful preparation is required. After all, concrete is a fairly complex material. Before starting work on leveling the base, it is necessary to determine how wet this surface is. To do this, lay a small piece of film on the concrete and press it, after a couple of days you should check whether condensation has formed on the inside of the film. If this happens, then the plywood surfaces should be treated with additional agents against fungus and mold.
Floor leveling technology
Tools needed for this job:
- building level;
- roulette;
- perforator;
- self-tapping screws;
- jigsaw;
- electric or cordless screwdriver.
Before laying plywood sheets, we prepare the base. It is necessary to remove the old surface to concrete, clean, vacuum. The concrete surface must be perfectly clean and dry. Now, using the level, you need to determine the boundaries of the new surface, and you can proceed to preparing the lag. For them, you need to purchase ready-made wooden bars. They can be purchased at specialized stores or at construction markets.
When buying, you need to pay attention to what kind of wood they are made of, determine the degree of drying
Under the bars, it is necessary to prepare wooden linings with a width of 10 to 15 cm, and a length of up to 20 cm, a thickness of 2.5 cm.The logs are laid across the direction of the light that falls from the window, observing a distance of 40 to 50 cm.
The space between the wooden blocks can be filled with sound and heat insulating materials, so that as a result the floor surface is not only warm, but also silent. When installing the log, you should leave a little space between the wall and the bar so that the floor covering does not deform due to changes in room temperature.
It is necessary to make the crate exactly according to the pre-marked floor level. After sheathing the concrete surface with the help of a log, you should proceed to fixing the plywood itself. The prepared surface of the plywood sheet should be divided into pieces approximately 75x75 cm in size using an electric jigsaw.
These small pieces of plywood must be screwed to the prepared logs. Be sure to leave a gap of 2 to 4 mm between the plywood. If this is not done, then the floor will creak after a while.
This happens because wooden structures can change their volume. The process depends on the time of year, on the level of humidity in the room. And the gaps will allow the tree to freely change in size, while not changing the integrity of the floor.
To screw plywood, you need to use self-tapping screws and a screwdriver. This should be done, leaving a distance of 50 to 100 mm between the screws.
If you have to level the floor in the hallway, then you need to lay out the logs across the movement. This will make the floor surface more stable, reliable.
Leveling on the battens should be used if the differences in the floor surface are more than 50 mm.
If the floor differences are not more than 10 mm, then it is possible to attach the plywood directly to the concrete pavement without prior lathing.
The technology of leveling the concrete floor without the use of logs
Plywood for such cases should be chosen with a thickness of more than 18 mm. This is the simplest method compared to the previous one.
To fix plywood to the floor surface, you can use the following methods:
- with glue;
- regulation.
When attaching plywood sheets using adhesive solutions, it must be taken into account that there should not be significant level differences on the required floor surface. The concrete surface before applying the adhesive must be perfectly dry, with minimal moisture.


How to level the floor with plywood on the logs with your own hands
This technology is used in two cases - where a new house is being built, and when repairing and leveling the floor in old housing.
You will need a minimum of tools - a laser level, a jigsaw or a circular saw, a square, a tape measure, a screwdriver and a countersink drill.
Lags are laid on a concrete base. Therefore, the first stage of work in the apartment is the dismantling of the old finish floor and boards lying on the logs. Some of the lags may be in good condition and do not require replacement. They should be strengthened by tying additionally to the base with anchors. Where necessary, replace the beam. The horizon is controlled already at this stage. If necessary, lay under the sagging places of the gasket.
Lags are laid on a concrete base
Sometimes the old logs are removed completely. This has its own advantages.
- It is easier to set the lags to a new horizontal level.
- You can slightly increase the height of the room.
- You can install new logs with a pre-calculated step.
For the device lag use a bar of coniferous species. The room is tied around the perimeter, retreating from the walls - this is what the rules for arranging sound insulation require, and the area is covered with longitudinal logs in increments of about 60 cm.
Important!
- Dry wood is used for logs.
- Under the lags you need a gap for ventilation.
- By laying the lags on felt, noise reduction can be achieved.
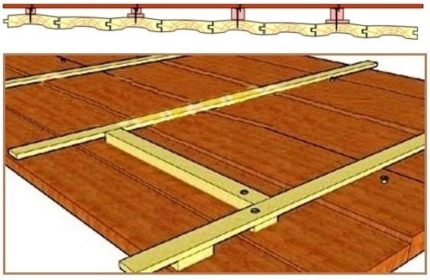
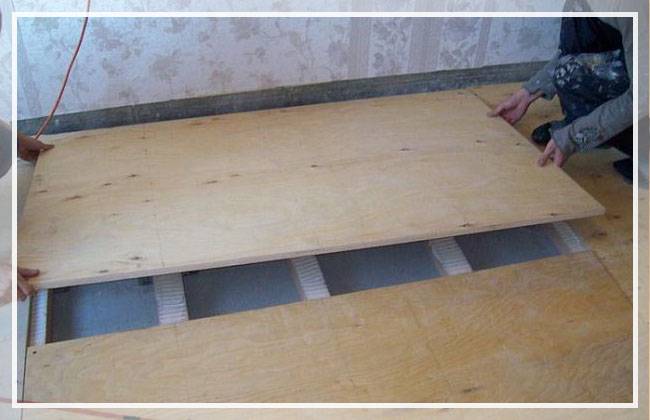
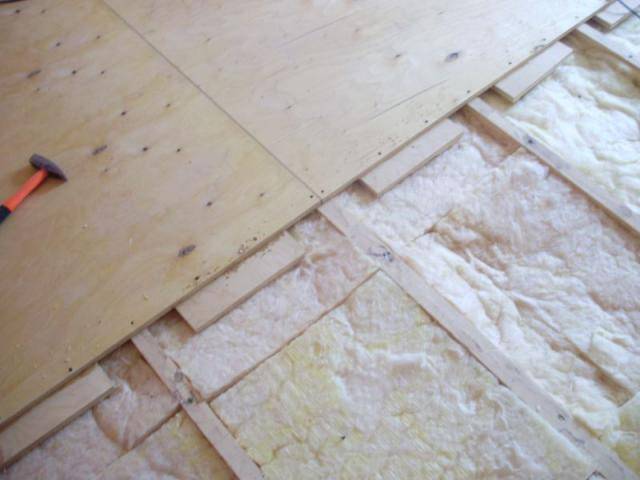
- Plywood during installation is fixed in such a way that the joint does not hang in the air, but lies on a solid support. Therefore, if the lag step is large, only the lag for high-quality styling is not enough. Segments of bars are laid across, and this is done in accordance with the plywood format. The smaller the floor cell, the more reliable the floor will lie. Cross bars can be attached to the corners to the logs.
- The insulation laid under the plywood will not only prevent heat loss, but also prevent the occurrence of sound vibrations. A layer of vapor barrier is placed on the insulation. And only then strengthen the plywood sheets.
floor insulation
Laying plywood sheets on logs
Laying plywood sheets on logs
The first step is to control the corners and calculate the dimensions of the extreme sheets, taking into account the unevenness of the walls.
- Sheets are superimposed with a run-up, at one point 4 corners of the sheet should not be joined.
- There is a small gap between the sheets, 2 mm is enough.
- At the walls, plywood should not reach the edge, leave a free distance of about 2 cm, which will subsequently cover the plinth.
- Plywood is attached to the bars only with self-tapping screws.
- Fasteners suitable for laying plywood are calculated according to its width. To choose the length of the self-tapping screw, multiply the width of the plywood three times.
- So that the caps of the self-tapping screws do not protrude and do not spoil the future floor, the holes for them should be countersunk.
- Plywood is fastened with an indent from the edge, at least 20mm.
- The step between the screws is left small, about 20 cm.
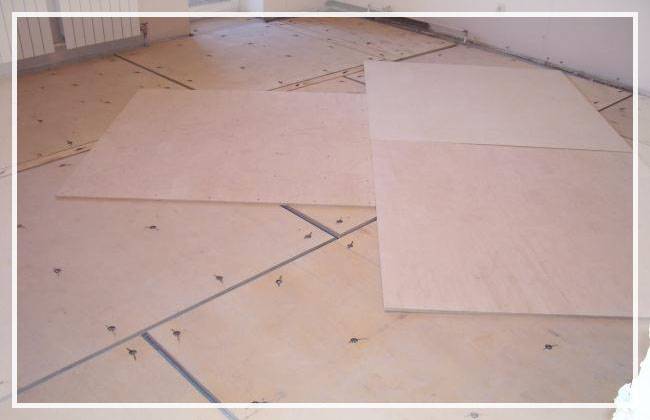
- Plywood is fixed by laying in a strip. Edge sheets may need further adjustment. With a jigsaw, cut holes for pipes and ledges in the walls.
- Having completed the laying of plywood, they get an even, warm and durable floor. Further work with a plywood base may consist of puttying irregularities, if required by the floor finish.
Plywood
A long-standing method of leveling with success used today
The construction boom of the last two decades has given birth to such previously unseen technologies that it is quite possible to abandon central heating by installing three-chamber ventilated plastic windows. You can even re-create the layout of the entire apartment yourself by applying a metal profile. But something still remains from the “old”, good construction times, this is leveling the floor with plywood without a log.
Plywood for leveling the floor serves not only its intended purpose, but also allows you to give the room a neater look, it is the basis for further improvements to the interior
Fast, comfortable and perfectly straight. A large number of offers on the plywood market are the most different sizes and thickness contributes to quick decision-making and the choice of just such a method of alignment.
Leveling the floor with plywood without a log is a very attractive option, although it will never be possible to forget about the minimum of dust and good waterproofing.
But this breadth of choice has its own difficulty - you need to skillfully choose and understand the characteristics of plywood.
Plywood characteristics
When choosing plywood for leveling a wooden floor, the question will definitely arise, which plywood to level the floor with.
First, pay attention to the location of the fibers
According to the arrangement of wood fibers on the outer layers, plywood is distinguished:
- Longitudinal - in such a fiber are directed along the long side, and,
- Transverse - short.
The use of plywood in a variety of areas has led to the creation of another level of classification - by purpose:
- construction - the most suitable for laying floors,
- industrial - may also be suitable, but it must be borne in mind that industrial is of poorer quality,
- packing,
- furniture, and
- structural.
There is also a classification of plywood for moisture resistance, in some situations this is extremely important:
- FBA - this plywood, from the point of view of ecology, is the most suitable for use in residential premises, but it has a drawback - it has insufficient moisture resistance;
- FC - plywood has a normal resistance to moisture, suitable for most applications without direct contact with water;
- PSF - this one already has increased moisture resistance;
- FB - this one is impregnated with bakelite varnish, it can be used even in aggressive environments, but you should not use it at home, especially on insulated floors;
- BS - here it is already continuous impregnation with bakelite glue, it is good for yacht structures, but not in residential premises;
- BV - the species is in many ways similar to BS, but with much less moisture resistance.
Leveling floors with plywood on logs or without - has a strictly defined algorithm of work that must be strictly observed
The procedure for laying plywood to resolve the issue of how to level the floor with plywood will necessarily end with grinding the entire laid area.But this procedure can be avoided if you choose plywood for another feature - the quality of the outer surface treatment.


According to this indicator, plywood is distinguished:
- NSh - unpolished;
- Ш1 - polished on one side;
- Ш2 - polished on both sides.
Main characteristic
Well, the main characteristic that immediately catches your eye when choosing is its quality, determined by the number of knots per square of the outer layer.
There are 5 levels here:
- E - the so-called elite quality, when there are no knots at all. “E” quality plywood is expensive, while leveling the floor is not an operation where such plywood is required, unless, of course, you are going to make the floor gilded;
- I - the maximum length of knots and warpage does not exceed 20 mm;
- II - there are cracks, but not more than 200 mm, wood inserts are allowed, glue seepage is allowed on an area of \u200b\u200bnot more than 2% of the area of the entire sheet;
- III - there cannot be knots with a diameter of up to 6 mm, more than 10 pieces per square. There is also a limit on the total number of flaws - no more than 9;
- IV - the worst quality, possibly with loose knots and edge defects under 5 mm. Such plywood is clearly not even for leveling.
First, explore all the offers and choose the cheapest - let's not forget, after all, leveling is of an auxiliary nature, putty, varnish, painting and finishing, front, flooring will go on.
Dimensions
For alignment purposes, you can not do without a careful selection of plywood sheets by size.
All sizes are strictly standardized, there are four of them:
- 1525x1525 mm;
- 1220 x 2440 mm;
- 1500 x 3000 mm;
- 1525 x 3050 mm.
Therefore, it is reasonable to first simulate the placement of all sheets of different sizes in the room before purchasing.The option that gives the minimum waste, and it will be yours.

In the photo - the task of how to level the floors with plywood is solved in the most obvious way, when everything is done in just half an hour, and the pleasure is "for life"
Stage 5. Formatting the sheets
Standard plywood sheets, as a rule, have dimensions of 125x125 cm. Here is an example of their laying:

However, many experienced craftsmen find it necessary to cut them into four more pieces to get squares with a side of 60 cm.
It is not only more convenient to work with such ones - as a result, they have much more damper joints at the joints, and this is important for compensating for moisture and thermal deformations. And the sheets themselves will be much stronger, because they are now less prone to deformation
But after cutting plywood, it is important to pay attention to the ends of the blanks - they should not have delaminations. If there are any, then just change, the floor will turn out to be of poor quality
If you will lay plywood in two layers, then divide the future thickness of the flooring by two:
If you will lay plywood in two layers, then divide the future thickness of the flooring by two:
Keep the plywood sheets for several days in the room where you will lay them. Just lay them on top of each other so that there is no deformation, even better - put them on edge if the sheets themselves are not too thin. This is necessary to acclimatize the sheets, but if you make a plywood floor immediately, without such preparation, then the laminate laid on top will go in “waves”: the sheets will simply pick up moisture from the air, like everything that is in such a room, and it will happen natural extension.The plywood base will swell, and the laminate will begin to rise in places, breaking fragile locks. Needless to say, the finish coating itself under such circumstances will also not last long.
And it is also important how different was the humidity and temperature in the warehouse. So, if the difference is small or the conditions are the same, it is enough to leave the plywood in the room for the night, if the difference is from 2 to 8 degrees - about three days, and with a larger one - for a whole week
Plywood leveling
Plywood is a board consisting of several layers of wood (veneer). The layers are glued to each other and form a durable building material used in building structures, including for surface leveling.
The technology of leveling the floor with plywood includes two stages - surface preparation and laying the material.
Preparing the floor
To obtain a smooth and durable floor, wood elements are inspected and damaged areas are replaced with new ones. Then the highest point and height difference are determined. Next, the level for the leveling surface is marked using a hydraulic level. It is indicated by a line around the perimeter of the room or a cord is pulled. The height of the leveling layer depends on the size of the joist and the lining under the joists.
Plywood is cut before laying into squares of 600 mm and stands on rib for two days in a repaired room. This will allow the material to adapt to the conditions of future operation (temperature, humidity). Then it is treated with antiseptic agents.


plywood laying
If the floor consists of boards that create uniform waves with a height difference of no more than 3 mm, then the plywood is attached directly to them. The sequence of actions during installation is as follows:
- Provide an equal distance from the walls of 10 mm.
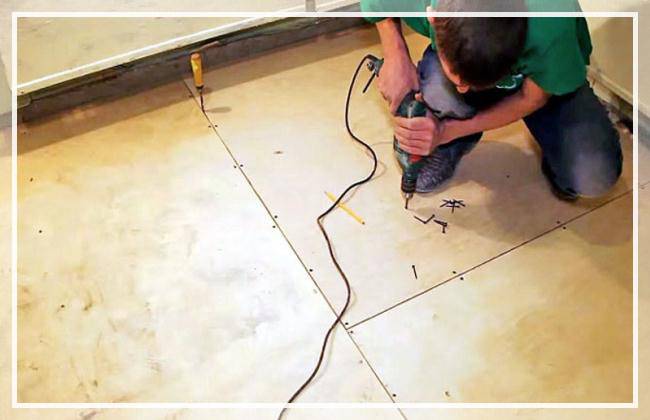
- Drill holes in each square of plywood for fastening. For this, drills of various diameters are used: one is selected according to the diameter of the screw, and the second according to the diameter of the screw head. Self-tapping screws are evenly distributed over the area of the square.
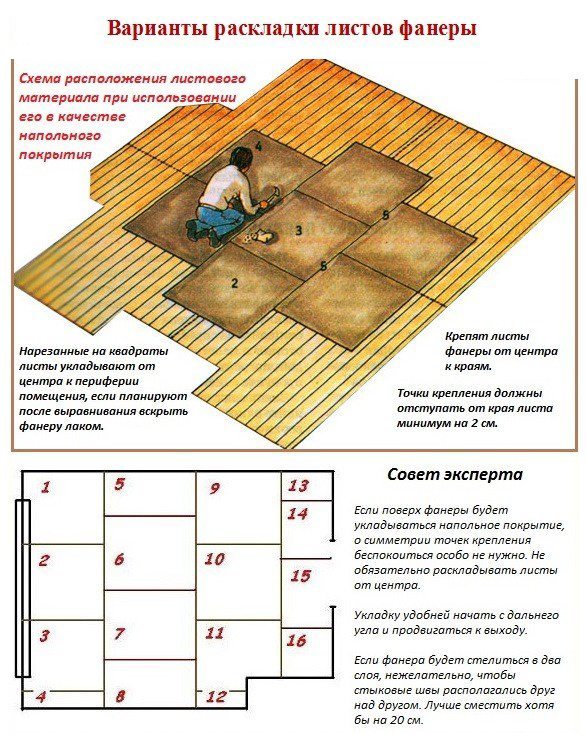
- Plywood is laid in rows, but each row is shifted relative to the previous one according to the principle of brickwork.
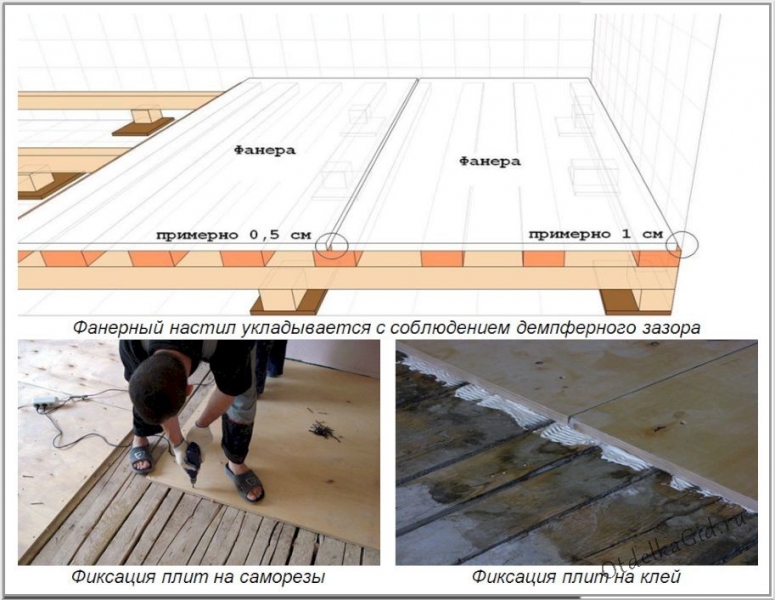
A gap of 3-5 mm is left between adjacent plywood sheets to allow the material to expand under the influence of moisture and temperature.
If the difference in height is more than 3 mm, then the leveling technology is applied using a log or point supports. The sequence of work is as follows:
- Plywood sheets are distributed over the floor area, taking into account the gaps. Using a pencil, an outline of each element of plywood is made. Thus, marking the location of the plywood will remain on the floor.
- In accordance with the markings, install the logs so that each square of plywood has a reliable foothold over the entire area.
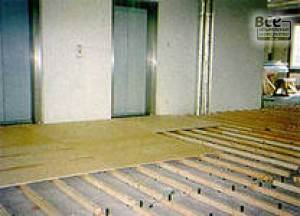
- The installation of longitudinal logs begins along the walls with an indent of 30 mm. Crossbars are installed between the lags, taking into account the dimensions of the plywood. Alignment of the structure on one level is carried out using a sand layer, a roofing material substrate or point supports. The material for the lag is a wooden beam 60x40 mm or plywood strips.
- Logs with crossbars are fastened with metal corners and self-tapping screws. Then the leveled structure is attached to the floor at the corners.
- The resulting frame is sheathed with plywood.
Instead of joists, point supports can be used evenly distributed over the floor area so as to provide an anchor point for each sheet of plywood. All supports are set in the same horizontal plane.They are made of: wooden beam, OSB sheet or plywood.
Leveling a wooden floor with plywood is a matter of three days, but the duration of operation depends on the correct choice of plywood thickness. For example, plywood with a thickness of 15-20 mm is used for sheathing a log structure, if the sheets are attached directly to the floor, then the thickness is 5-12 mm.
Laying plywood on a wooden floor: the main rules
Laying plywood on a wooden floor becomes especially relevant when the plank floors have dried out, loosened and become unusable. Plywood will allow you to make repairs in the most optimal way - quickly, inexpensively and reliably.
First of all, you should check whether the wooden floors sag along the logs (of course, if there are any). If they sag, you will have to completely disassemble the flooring and repair the base of the wooden floor. If it's not about the lags, then the best way out is to lay plywood on a wooden floor.
Remember that plywood is not recommended for use where there are too large temperature fluctuations and high humidity. Plywood is not suitable for bathrooms and unheated rooms. To check if your floor has high humidity, place a sheet of polyethylene 1x1 meter tightly on it and leave it for three days. If condensation does not appear on the inside of the polyethylene, it is ready for further use.
The plywood sheets are stacked "dry" with an offset in such a way that a maximum of three seams converge at one point. So individual sheets are adjusted to the size of the room, bypass the ledges and fill the niches.When carrying out this procedure, remember that a space of about 8-10 mm wide should be left between the scattered sheets - these are the so-called damper seams
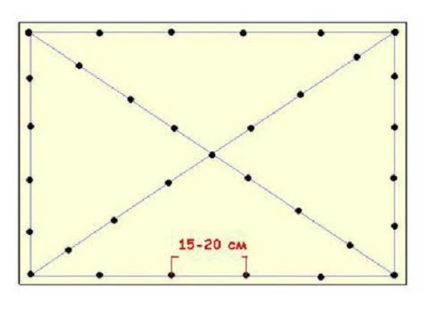
It is important to know: there must be a gap of 15-20 mm between the extreme squares of plywood and the walls. Do not worry that this will spoil the overall look, because later these indents will be covered with skirting boards.
In order not to confuse the fitted sheets during the final assembly, it is worth numbering them and, focusing on the numbers, draw up a small plan of their location.
When choosing plywood, keep in mind that the thickness of the plywood sheet should be at least 12 mm, and even better - 15 mm. On perfectly flat surfaces, sheets with a thickness of 8-10 mm can be used.
If you are planning a solid board flooring, then plywood with a thickness of less than 15 mm will not suit you.
It is recommended to cut plywood sheets into squares with a side of 60 cm. This way you will get the optimal number of damper joints. In addition, it is easier to detect delaminations that are not visible in whole sheets.
Before finally laying the plywood, the base should be very carefully cleaned of dust and debris. In addition, it is recommended to carry out priming - this is the treatment of the floor with a special primer.
It is better to lay plywood on glue, but it is quite possible to do without it. According to numerology, each sheet is placed in its place and fastened with self-tapping screws along the edges and diagonals in increments of 15-20 cm. Indent from the edges - 2 cm.
It is important to know that fasteners must exceed the thickness of the sheet in length by at least 3 times. For example, for a sheet of 12 mm, 40 mm self-tapping screws are suitable.
After laying, the surface must be carefully sanded. This can be done with a parquet sander and coarse sandpaper.
On perfectly flat surfaces, the use of sheets with a thickness of 8-10 mm is allowed. If you are planning a solid board flooring, then plywood with a thickness of less than 15 mm will not suit you.
It is recommended to cut plywood sheets into squares with a side of 60 cm. This way you will get the optimal number of damper joints. In addition, it is easier to detect delaminations that are not visible in whole sheets.
Before finally laying the plywood, the base should be very carefully cleaned of dust and debris. In addition, it is recommended to carry out priming - this is the treatment of the floor with a special primer.
It is better to lay plywood on glue, but it is quite possible to do without it. According to numerology, each sheet is placed in its place and fastened with self-tapping screws along the edges and diagonals in increments of 15-20 cm. Indent from the edges - 2 cm
It is imperative to countersink the self-tapping screws, while countersinking the holes for the fasteners.
It is important to know that fasteners must exceed the thickness of the sheet in length by at least 3 times. For example, for a sheet of 12 mm, 40 mm self-tapping screws are suitable.
After laying, the surface must be carefully sanded.
This can be done with a parquet sander and coarse sandpaper.
So, you have learned how plywood is laid on a wooden floor. Remember that a well-placed flooring will delight all households for many years!


