- At what stage should the facade be fixed?
- The best place for a dishwasher
- How to install a dishwasher: choosing a place
- Connection Features
- The ratio of the size of the opening of the furniture and the dimensions of the dishwasher
- Examples of openings calculation for different PMM
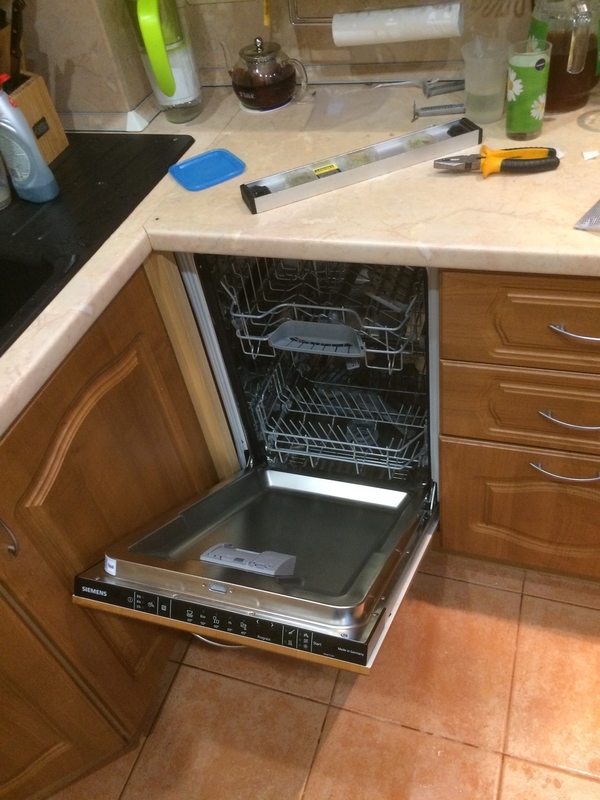
- Dishwasher installation
- Free standing PMM
- Embedded PMM
- Typical mistakes when installing a dishwasher
- How to connect?
- Inventory
- Connection to a sewer drain
- To the water supply
- To electricity
- Features of installing a dishwasher
- Location selection
- What you need to install
- Video
At what stage should the facade be fixed?
Install household appliances in stages. The most crucial moment is the connection to the power grid, water supply and sewerage system. Only after that they start decorating the front wall of the dishwasher.
In the process of fitting the workpiece, the machine is in its permanent place
It is important that the panels of the device are on the same level with similar elements of the kitchen set in the neighborhood. However, before carrying out work on fixing the panel on the door, it is pulled out
This is necessary in order to have convenient access to all sides of the structure.
It is not recommended to turn on the machine without a decorative element installed.The overlay, as you know, performs the function of an additional insulator of heat and noise. In addition, the dishwasher can only work fully if it is closed on all sides.
Sometimes it is allowed to install a facade before connecting a household unit. However, this installation option is used only in exceptional cases. For example, when the connection delay is caused by other repair and construction work carried out on the power line. In order not to waste time, the craftsmen first decorate the device, and then connect it to communications.
The best place for a dishwasher
The best place to place a dishwasher (hereinafter also referred to as dishwashers, PMM) is in the kitchen. It is necessary to decide in which place the equipment will stand before purchasing it. Much depends on whether furniture is installed in the kitchen and whether there is a free opening in it to build in a dishwasher.
Manufacturers produce two types of dishwashers: built-in kitchen furniture and stand-alone. Built-in PMM are of three types (hereinafter W - width, H - height, D - depth):
- full-size - W 54-60 cm, H 80-86 cm, D 54-63 cm;
- narrow - W 44-45 cm, H 80-86 cm, D 54-63 cm;
- compact - W 40 cm, H 44 cm, D 50 cm.
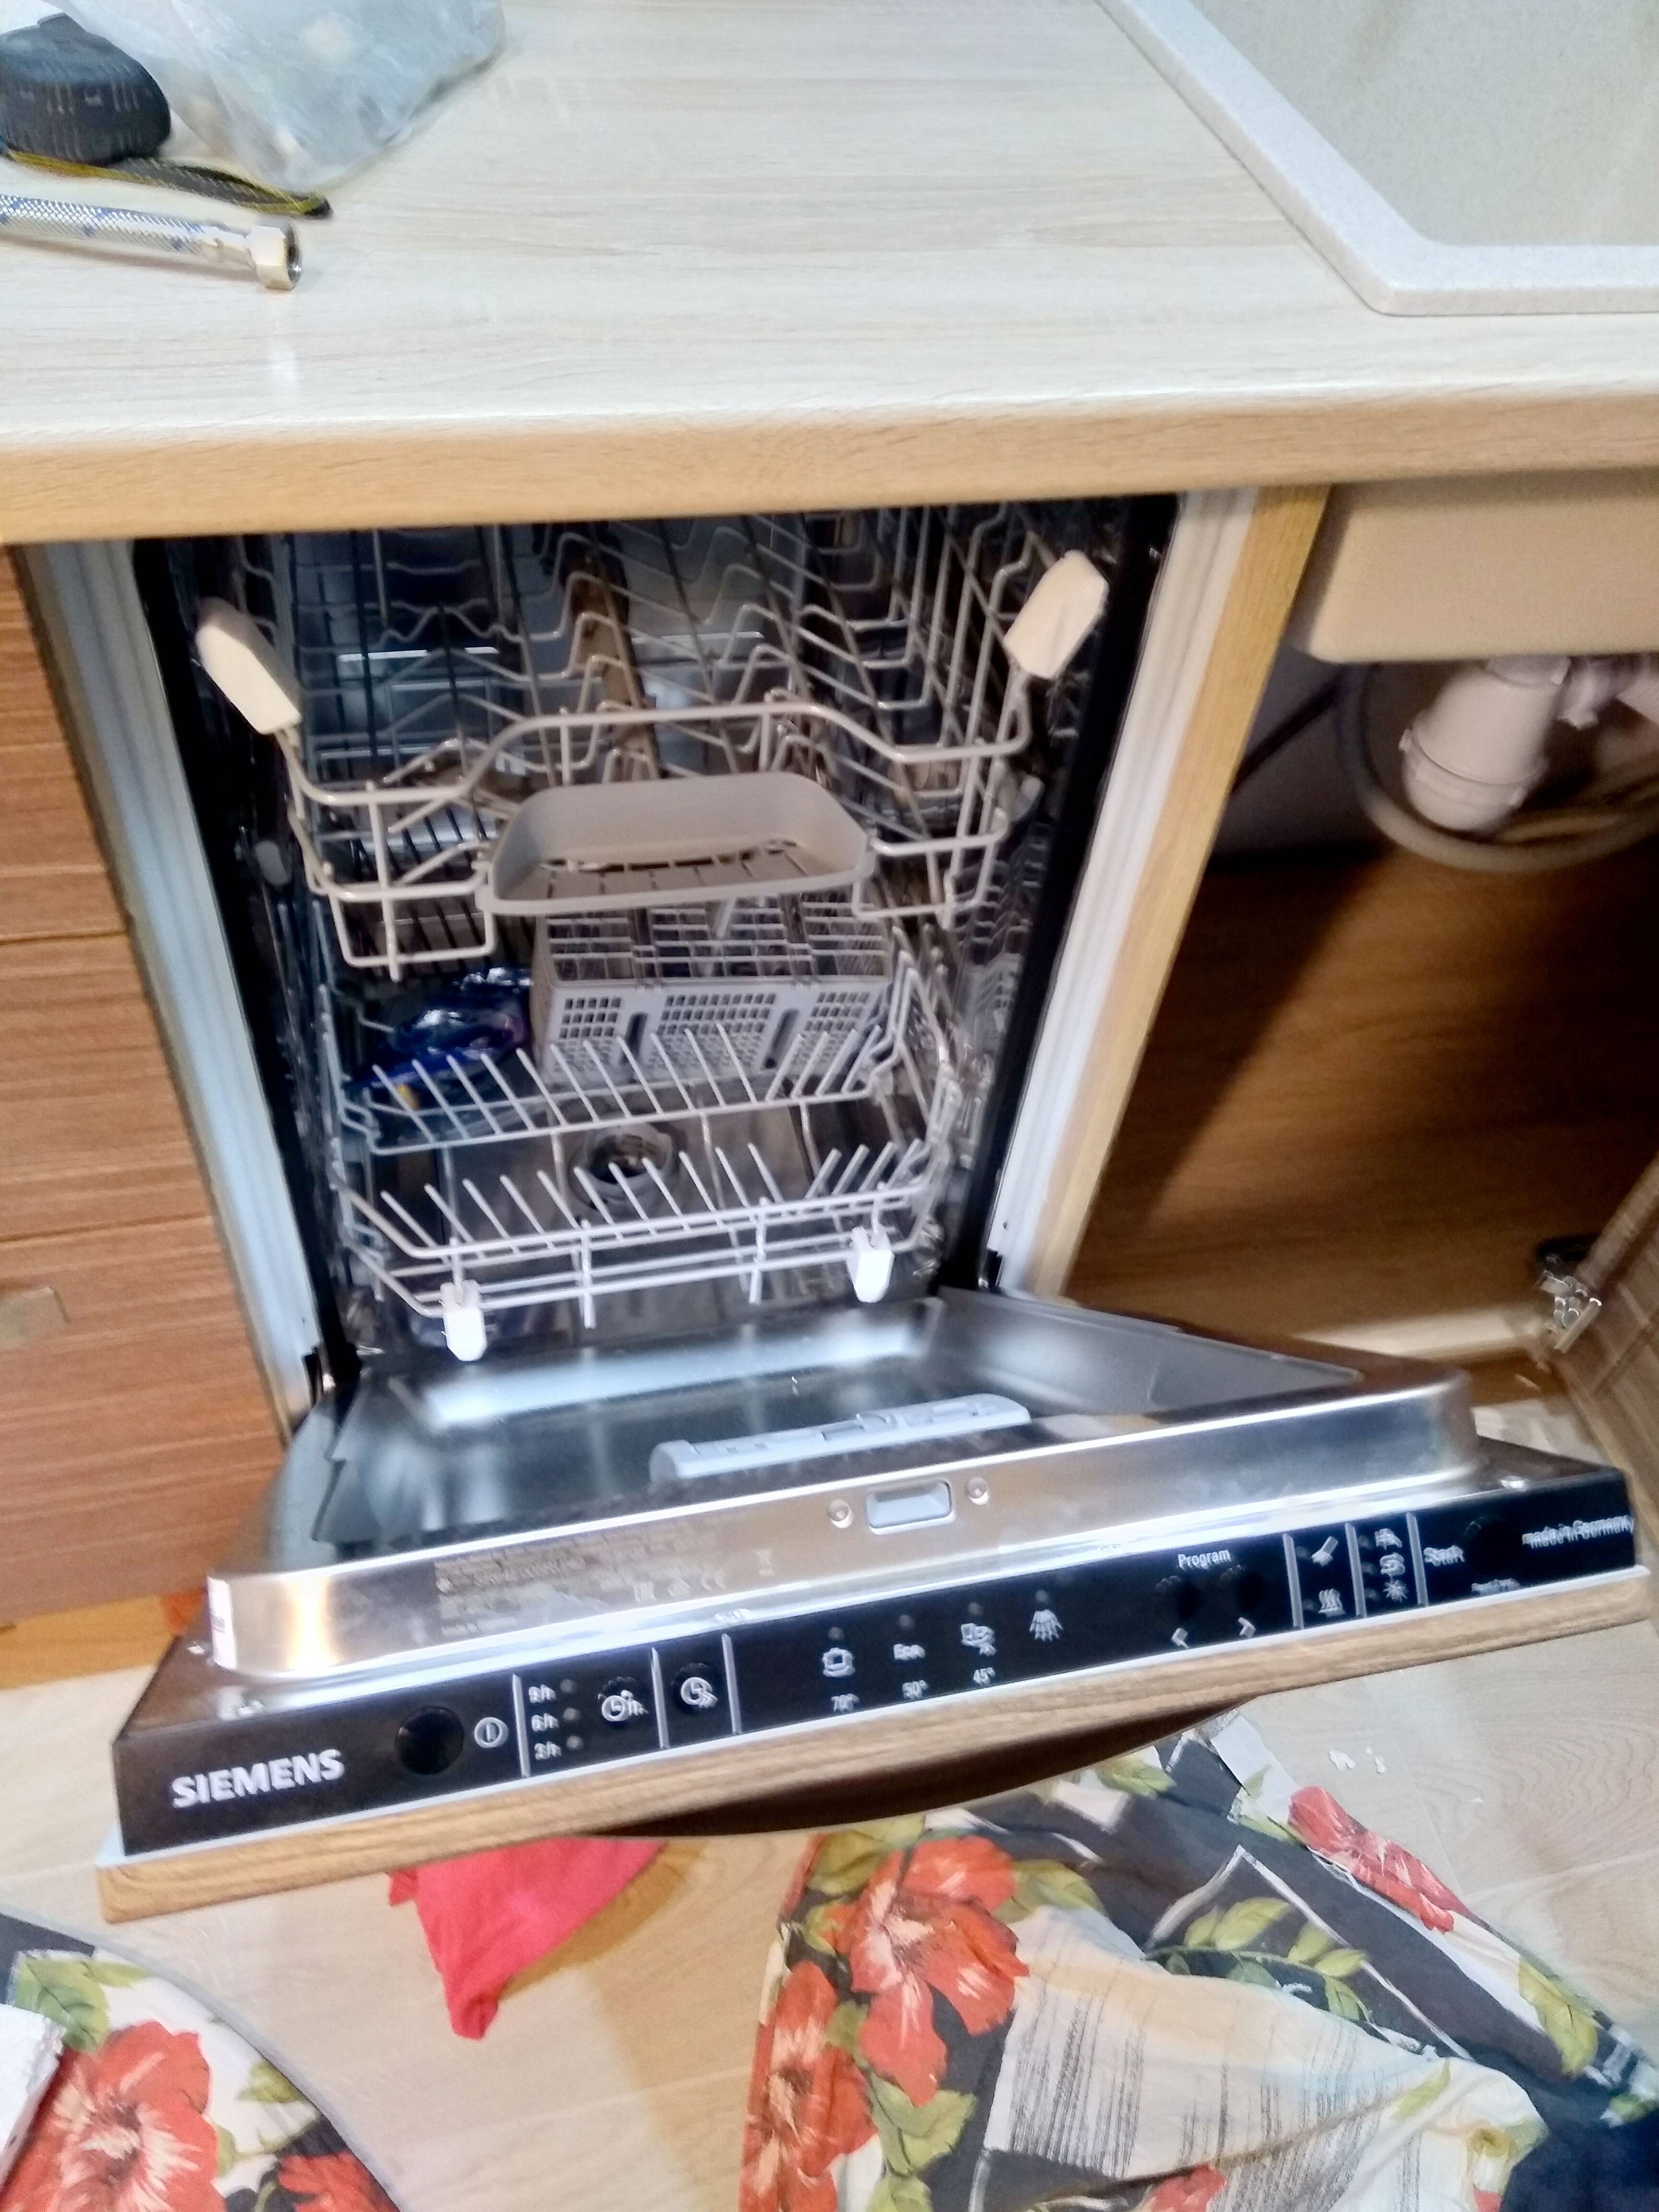
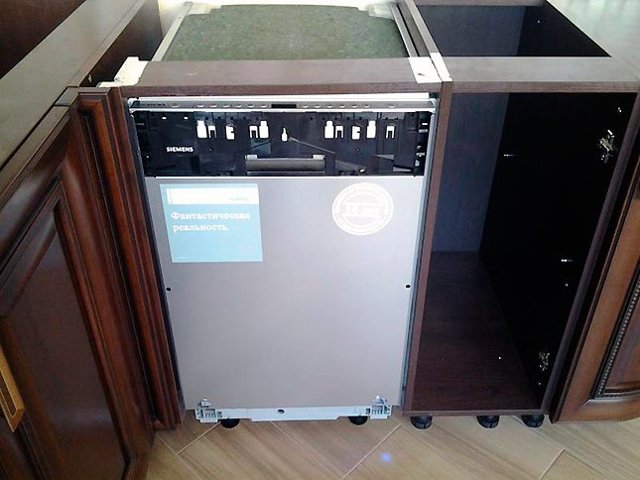
 Fully built-in narrow dishwasher Bosch car
Embedded PMMs are divided into two categories: fully embedded and partially embedded. For the former, the control panel is located at the end of the door and is completely covered by the furniture facade. The doors of partially built-in dishwashers can be partially closed with decor, since the control panel and handle are located outside.
 Partially built-in full size dishwasher
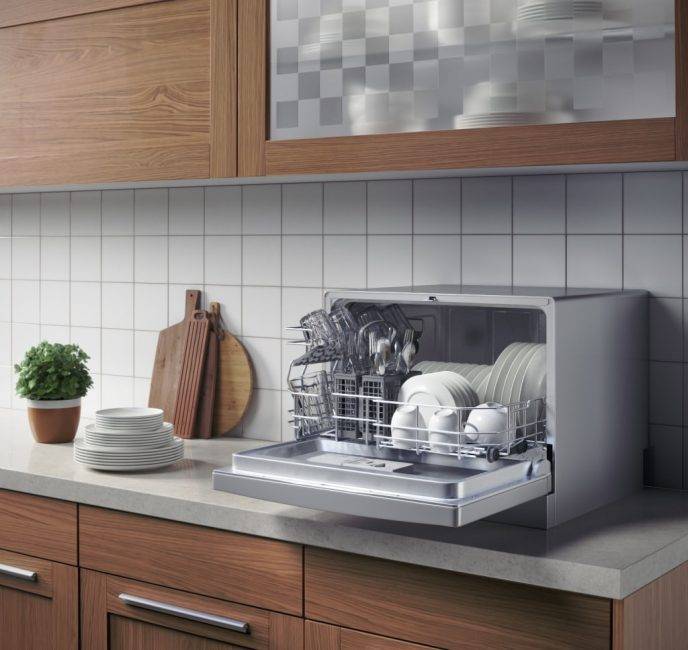
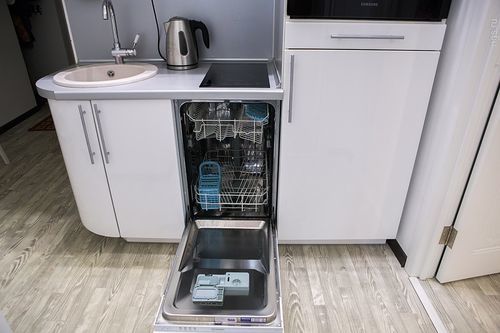
If for some reason it is not possible to install a built-in Bosch dishwasher, choose a model that can be placed separately. A family of two living in a small apartment will need a compact dishwasher that can be installed in a separate cabinet or under the sink (see photo below).
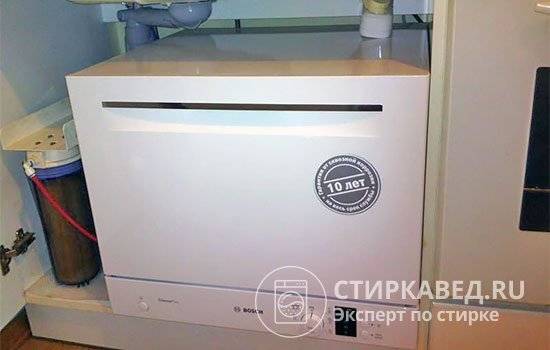 Compact dishwasher "Bosch" in the cabinet under the sink
If you have not yet purchased furniture for the kitchen and want to place full-sized household appliances there, first measure or take its dimensions from the documentation. So you can order cabinets with openings of the right size.
 An example of calculating a furniture opening for the dimensions of the selected PMM model
The best location of the dishwasher in the kitchen is no further than 1.5 m from the sink, near which it is most convenient to connect to the water supply and sewerage. Experts note that otherwise, failures in the operation of this equipment or premature wear of the drain pump are possible.
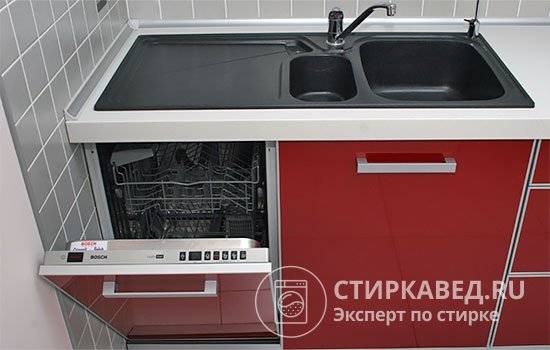
 Dishwasher and washing machine built into the furniture next to the sink
When the installation of a PMM near water and sewer outlets is not possible, it will be necessary to organize the supply and discharge of water through new connections to the nearest pipeline sections. There are no particular difficulties with small water pipes. Drainage will be more difficult to work with. In addition, you will have to buy long hoses, since you rarely find parts longer than 1.5 m in a complete set with products.
The video will acquaint readers with how to calculate the dimensions of the opening for a built-in PMM:


How to install a dishwasher: choosing a place
Before proceeding with the installation of the dishwasher, it is necessary to determine the place in which it will be located.In doing so, several important points should be taken into account. The easiest way is to choose a place for models that are integrated into the kitchen set. Such devices are most often mounted in furniture modules that belong to the first level (floor cabinets). Under the dishwasher should be allocated an area with a small margin of space.
Compact models, if desired, can be built in a place that will be most convenient to get to. They can be placed at chest level in a furniture set. Mistakes in choosing the location of the PMM often lead to difficulties with operation and maintenance, therefore, first of all, it is necessary to build on the type of dishwasher and the features of a particular device. This will allow you to integrate it into the kitchen ensemble as harmoniously as possible.
The most suitable place to install a dishwasher is the module located next to the sink. This is quite logical, since all the water and sewer units that are necessary to connect the PMM are concentrated in this zone. By choosing this place, there will be no problems with connecting hoses to all necessary communications.
The module located next to the sink is considered the most suitable place to install a dishwasher
Models of foreign manufacturers (for example, Electrolux) are best suited for quick embedding. Installing a dishwasher is often accompanied by a variety of minor setbacks. Much more often there are problems if you need to find a place for the dishwasher in the finished headset. In such a situation, there is only one thing left - to adjust the dimensions of the furniture to the dimensions of the device.If this does not work out, then you will have to dismantle the individual modules of the kitchen ensemble.
Thus, the most important rule is to choose in advance a suitable place in which the dishwasher will be placed. This rule applies not only to dishwashers, but also to other kitchen appliances.
The sketch of the kitchen set should be drawn up in the second place.
Connection Features
So, step by step instructions on how to connect the dishwasher in stages:
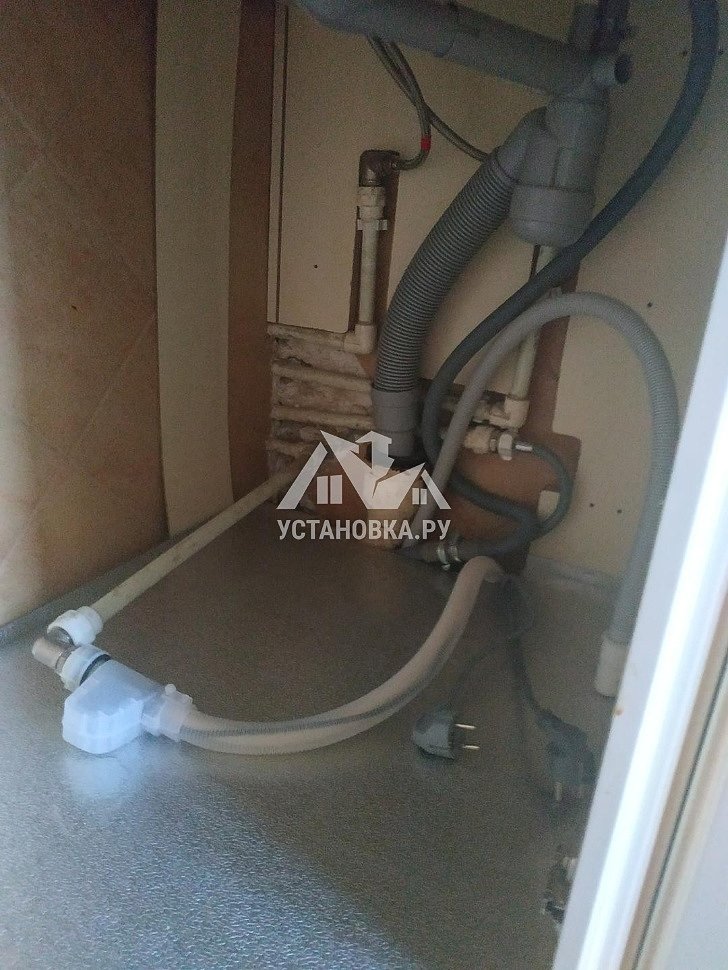
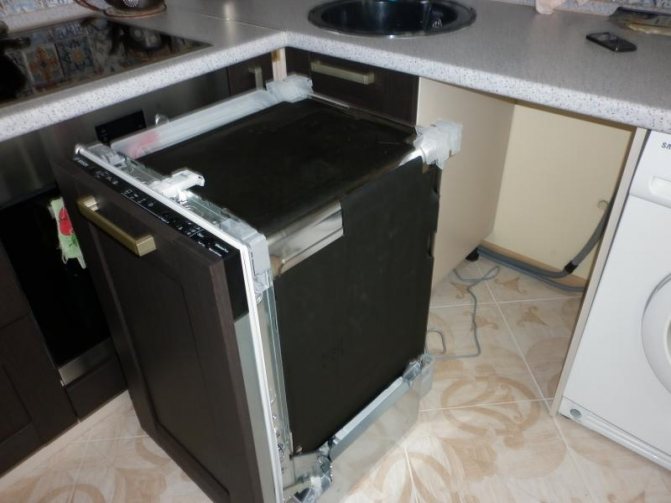
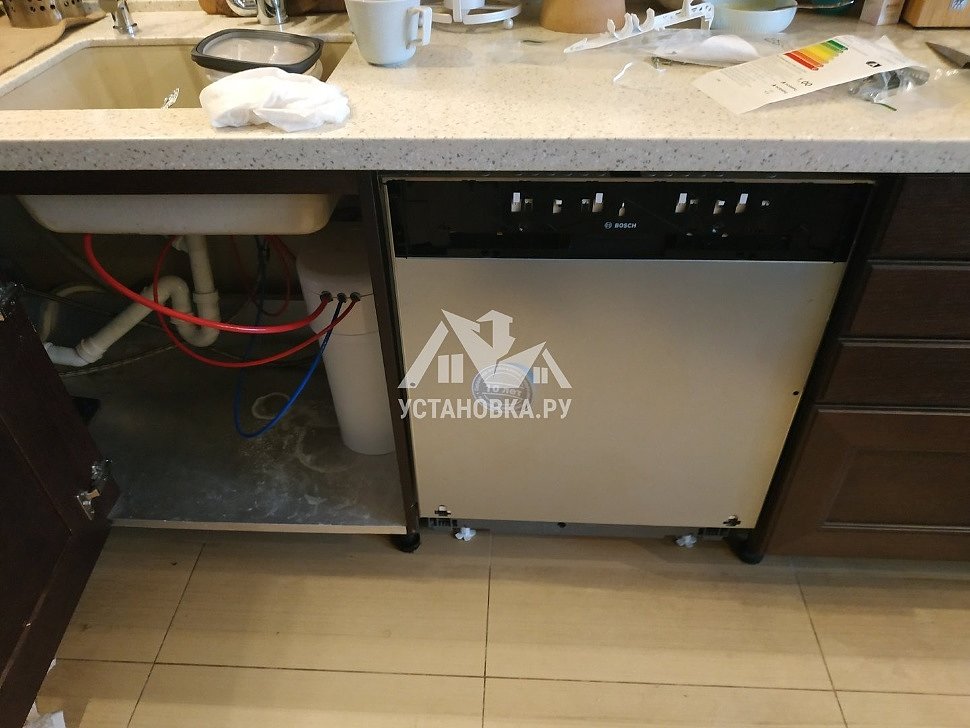
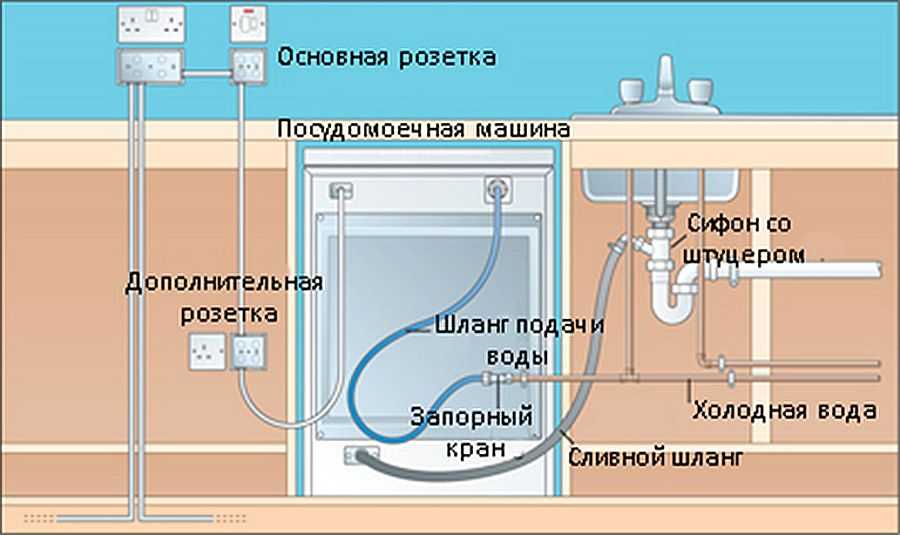
- If you are installing a built-in PMM, then first you need to prepare a niche, which, as a rule, should be 60 cm wide, and for narrow models 45 cm. You can level the machine with the level of the cabinets by removing the countertop and adjusting the legs of the lower cabinets. You also need to drill holes in the cabinet body for drainage, water intake hose and electrical wires.
- Installing a dishwasher under the hob is prohibited;
- The place for installation is chosen so that the length of the drainage hose does not exceed 1.5 meters. It is allowed to increase the length up to 5 meters, but in this case it will be difficult to guarantee the stable operation of the equipment.
- The next step is connecting to electricity. Please note that the socket must be of the "euro" type. You need to replace the socket if it does not meet the standards (but not the plug of the machine). Do not forget that when connected, we ensure safety, and the dishwasher is characterized by significant energy consumption. This determines the ban on the use of tees and extension cords. Installation of the outlet involves the use of a wire with a diameter of more than 2 mm.In addition, a 16A circuit breaker is additionally mounted in the electrical panel. Grounding is also performed using a 3-core wire, and it cannot be led out to pipes.
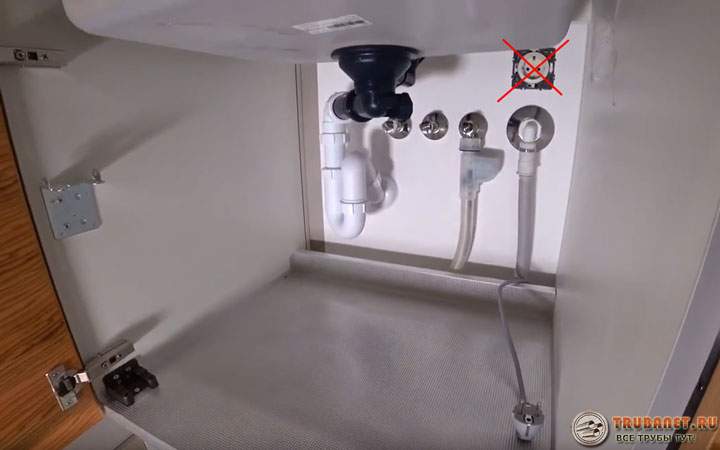
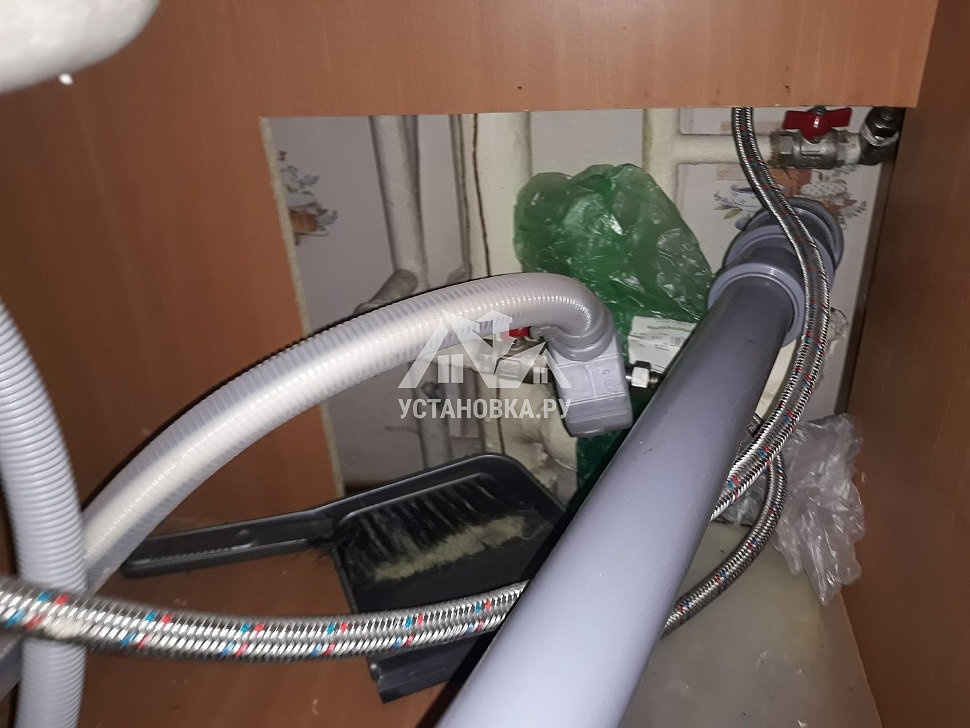
- Next - connect the dishwasher to the water supply. To do this, the water is shut off, a tee is connected to the pipe, then a filter, a ball valve and a hank. All threaded joints are insulated with a fumka - it must be wound at least 10 layers.
It is also mandatory to install a coarse filter, as it will prevent sand and rust from entering the machine from the water pipe.
- As for connecting the equipment to the sewer, here you can go the simple way by installing a siphon with an additional outlet and valve. In order to protect the device from water ingress from the sewer pipe, it is necessary to place the drain hose in a special way - at the exit to the sewer network it is placed at a height of 600 mm along the wall, and then bent to ensure water flow.
- The final step in connecting the dishwasher is to check the device for operability. In this case, the machine is tested idle, controlling the rate of water inflow, its heating, as well as operation in the drying mode. The check is carried out without dishes, but with the obligatory addition of regenerating salt and detergents.
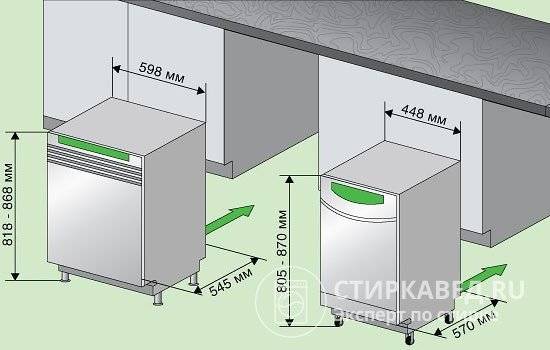
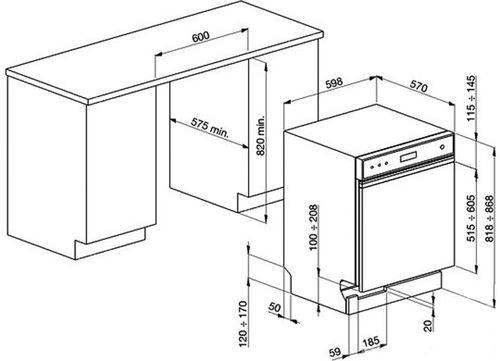
The ratio of the size of the opening of the furniture and the dimensions of the dishwasher
To correctly install the dishwasher in the kitchen set, you need to correctly correlate its dimensions with the dimensions of the niche. Well, if you have already looked after the right PMM model for yourself, but there is no furniture in the kitchen yet. Then you can independently calculate the dimensions of the future opening for the ideal placement and fixing of equipment.
 Approximate ranges of dimensions of different models of dishwashers
The ratio of the dimensions of the openings and the dimensions of the PMM must meet several important conditions:
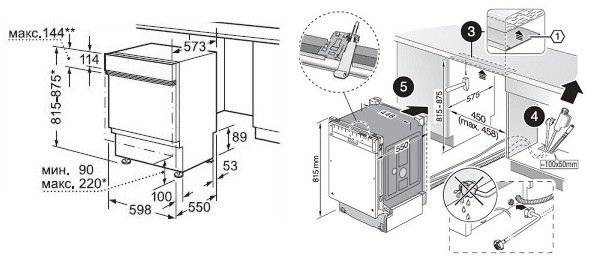
- between the body of the machine and the tabletop, as well as the side walls of the opening, there must be gaps of at least 5 mm on each side;
- there should be a distance of 80 to 100 mm from the back wall of the opening to the back panel of the dishwasher body for convenient placement of the inlet hoses and the electric cord.
It is best if there is no rear wall in the opening at all - this will avoid bending the inlet and drain hoses connected to the PMM.
Examples of openings calculation for different PMM
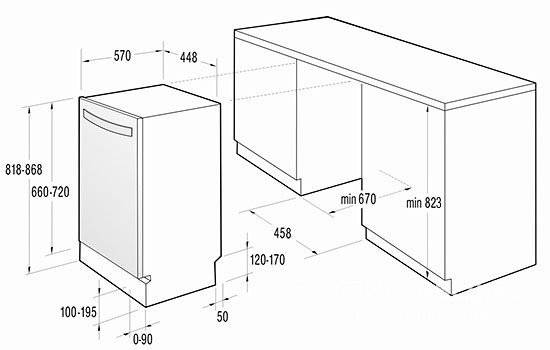 The ratio of the size of the machine and the niche for its installation
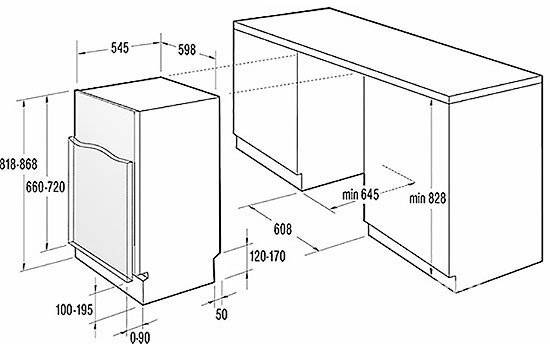
If you purchased or just looked after a model of a narrow PMM with a width of 448 mm, a height of 818 mm and a depth of 570 mm, calculating the dimensions of the opening is not a very difficult task. Add 5 mm to the width of the cabinet on both sides and you get an opening width of at least 458 mm. If a niche height should be 5 mm more than the height of the case, which means that the indicator will correspond to 823 mm. To the body depth - 570 mm - add another 100 mm and get the result - 670 mm (see drawing).
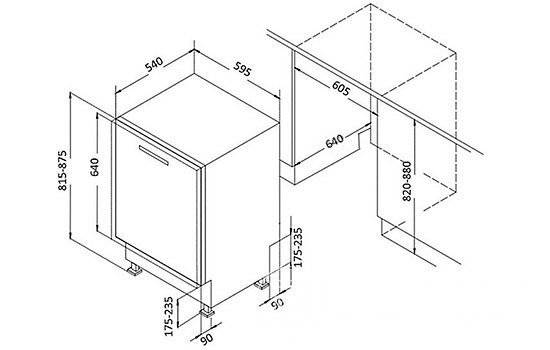 Calculation of the dimensions of the opening for a full-size dishwasher
The dimensions of the niche for installing a full-size dishwasher are calculated in the same way (see drawing).


![[instruction] do-it-yourself dishwasher connection](https://fix.housecope.com/wp-content/uploads/3/e/c/3ecca45b2cb3c4f7ed178aa315b9ec4a.jpeg)


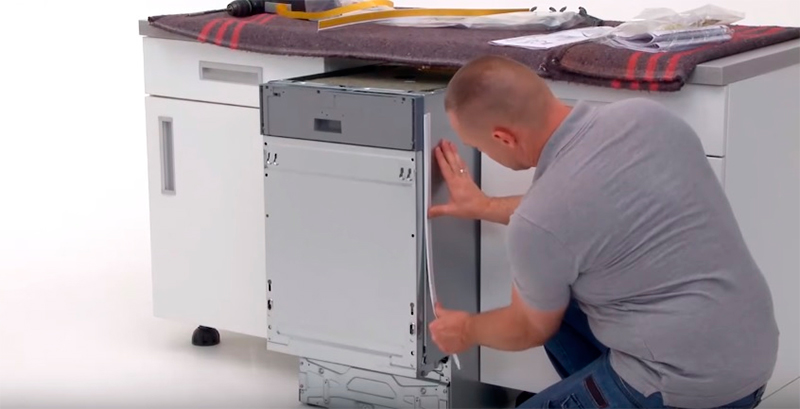
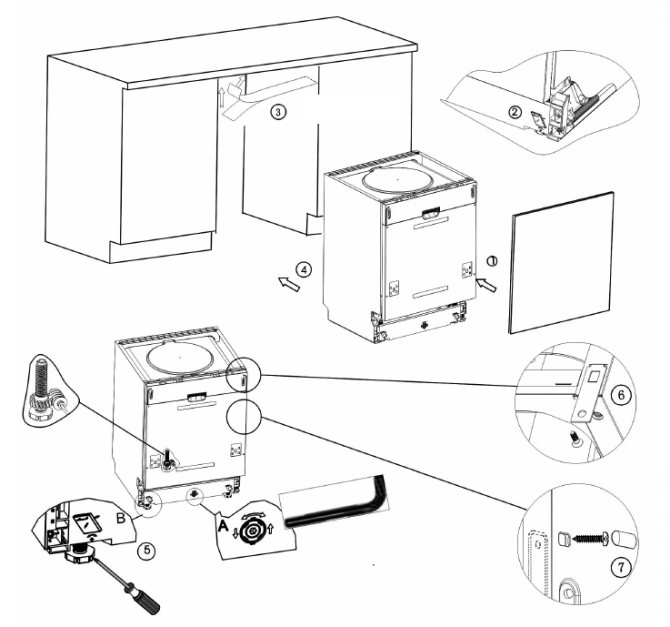
Hanging the facade on the door of the built-in PMM is not difficult. The instructions for the technique contain information on how to mount the fasteners into which the facade is inserted. Then it is fixed and attracted to the door with the help of fasteners.
We bring to the attention of readers a video on how to attach the facade to the door of a Bosch typewriter:
Dishwasher installation
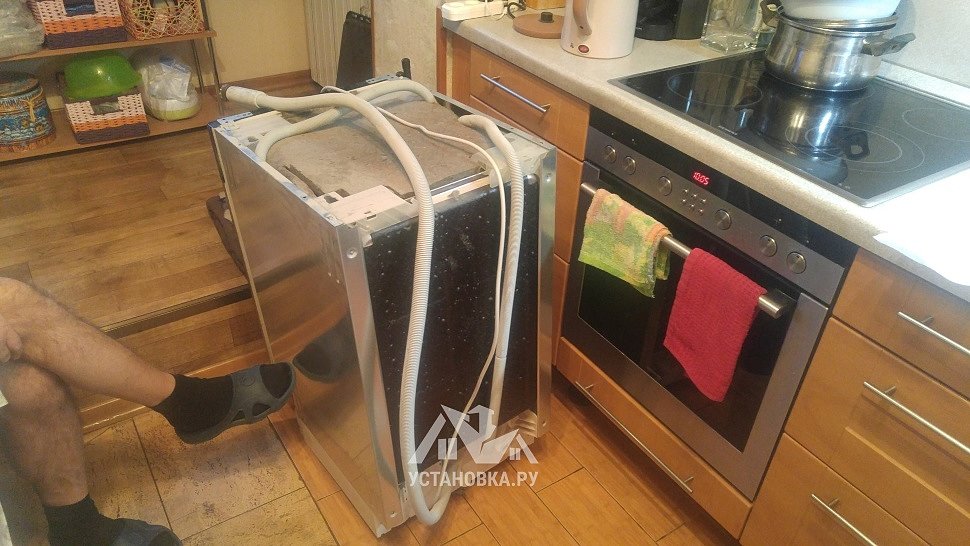
Structurally, dishwashers can be of two types: freestanding and built-in. The former represent the failure of individual electrical appliances in their own housing, which can be installed almost anywhere in the kitchen. The main thing is that it is convenient to bring communications to them and that all necessary norms are observed when they are connected.

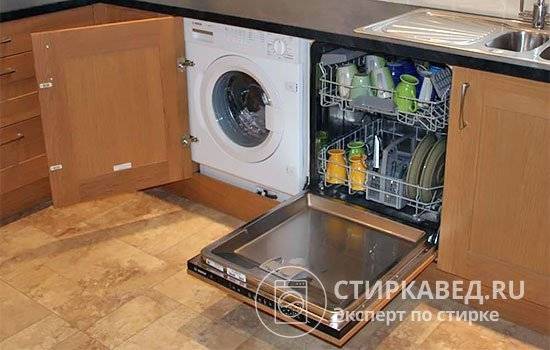
Installation and connection of the dishwasher
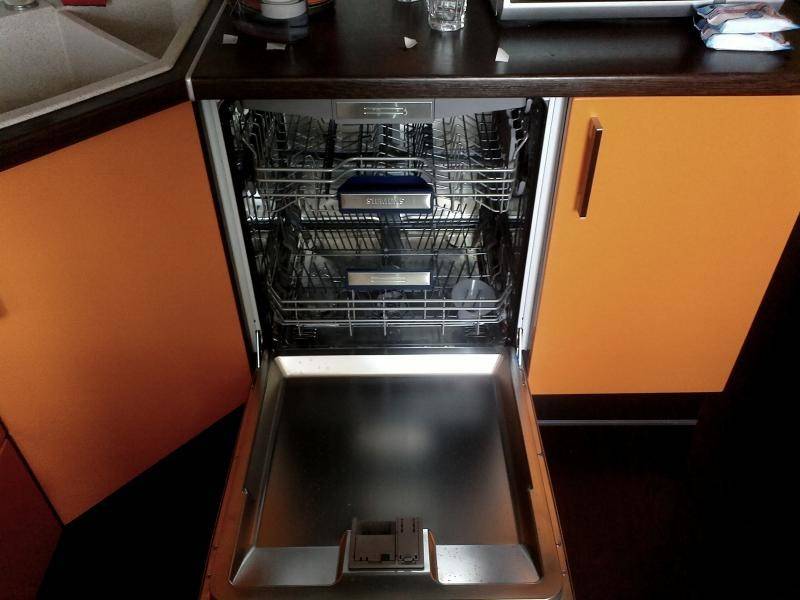
Built-in dishwashers are installed in ready-made kitchen elements (cupboards and niches), to which water and electricity input points are pre-connected. Such PMMs can either have their own front panel with controls, or use a decorative plate made of wood or MDF as a front panel. In this case, the PMM controls will be hidden; most often they are located on the door from the end.
Free standing PMM
Outdoor tabletop dishwasher
Depending on the dimensions of such a dishwasher, it can be installed on the floor or on a special stand. In the role of a stand, for example, a tabletop can act. Usually, PMM with a height of more than 60 cm is installed on the floor, and with a height of 45-60 cm - on a stand.
There are only two main requirements for this installation method:
- The dishwasher must be placed on a level surface. This is necessary, since any violation of perpendicularity in the installation of the machine is fraught not only with instability, but also with water flowing out of it during operation.
- The dishwasher should be located at least 5 cm from the wall.Here, too, everything is simple - a shorter distance will not allow you to properly dilute the communications, and there may be cases when the water hoses are pinched, which will lead to blocking the access of water to the machine
The deviation from the horizontal plane during the installation of the PPM should be no more than 2 °.
Checking the correct installation is done using a level that is applied to the dishwasher lid. All machines are equipped with height-adjustable feet, so leveling the machine should not be a problem.

Adjusting the height of the machine with a special screw
If the communications are already connected to the installation site, then there will be no special problems during the installation of the PPM, but if there are none, then electricity and water will have to be supplied to the installation site of the device.
It should be remembered here that the length of the standard hoses and the electrical connection cable supplied with the machine does not exceed 1.5 m. Therefore, its location should be chosen based on these distances. The use of additional extension cords for water and electricity supply is highly undesirable.
Usually, when choosing a place to install a machine, they try to place it closer to water communications - cold water and sewerage, and electricity is already supplied in any convenient way, since the installation of electricians is less laborious than the installation of water supply. If, in order to conduct electricity, the maximum that has to be done is to punch a wall for wiring and install a socket for an outlet, then in the case of water, the list of activities will be much longer.
Embedded PMM

In this situation, everything is much easier
All built-in dishwashers (except for a very limited number of models) have not only standard dimensions, but also standard positions for the entry points of electricity and water.
The dimensions of dishwashers are quite strictly standardized:
- height - no more than 82 cm for full-size and no more than 46 cm for small-sized
- width - 60 cm for full-size and 45 for narrow or small
- depth - 48 or 58 cm
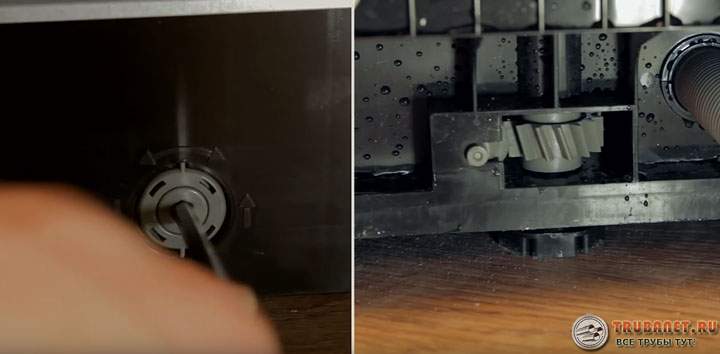
Before you firmly fix the PMM in niches or cabinets, they must also be leveled with a level. This is easy to do, since built-in machines are also equipped with height-adjustable feet.


When installing the machine, it should be raised as much as possible on adjustable legs so that there are no gaps between the top cover of the machine and the tabletop.
An important detail for built-in PMM is vapor protection in the form of a special metal plate. It is installed in the front upper part of the niche and is fixed with self-tapping screws to the bottom of the tabletop.
Thanks to the use of this device, the countertop will not swell from steam when the dishwasher door is opened. Sometimes, instead of this plate, aluminum foil or adhesive tape is used, which is fixed along the perimeter of the door (on the countertop and side walls).

Water filter for the country house: flow, main and other filters (Photo & Video) + Reviews
Typical mistakes when installing a dishwasher
Almost all household appliances used in the home involve the use of electricity and water. Therefore, it is a source of increased danger. For safe operation it is necessary:
- When connecting a dishwasher, it is necessary to use the appropriate power automatic and RCD, or differential automatic.You can not use a modular machine, and even more so - safety plugs.
- Installation of the dishwasher in close proximity to the wall. In this case, deformation of the hoses is possible, the automation of the machine may malfunction or the room will flood.
- The machine must be located strictly horizontally, the slope tolerance is no more than 2 degrees. Adjustment of installation is made by turning out/wrapping up of legs. In some models, the position of the rear supports is adjusted by a special screw that goes to the front side.
- Installing an electrical outlet under the machine. When flooded with water, such installation leads to a short circuit with unpredictable consequences.
When extending the water supply hose, never cut the standard hose
In a number of models, a signal wire is installed inside it, reacting to a hose break and you will lose this important protective function.
Using linen tow to seal threaded joints can be dangerous if you don't know how to use it. Excessive amounts of this material can break the thin plastic union nut due to drag swelling when wet.
Use fum tape.
Watch the video
How to connect?
First you need to study the instructions of the manufacturer of the selected model. Prepare all the required equipment and be patient. The first thing to do is to check the body of the Bosch dishwasher for damage, scratches and cracks, as well as the equipment.
Inventory
List:
- Screwdrivers - Phillips and flat.
- Waterproof tape.
- Wrench of the right size.
- Tee made of plastic or bronze with suitable threads.
- Tap. Helps avoid problems in case of leaks.
- Inlet and drain hose, if the length in the kit does not fit.
- Moisture-resistant socket for safe connection when the device is close to the power supply.
- Filter. Saves the dishwasher from blockages and scale. Its presence is mandatory.
Some PMM models are designed to connect cold and hot water. In this case, 2 tees are needed. However, it is recommended to connect the machine only to cold water, since it has a heating element. With the stopcock on the tee, you can easily turn off the water if necessary.
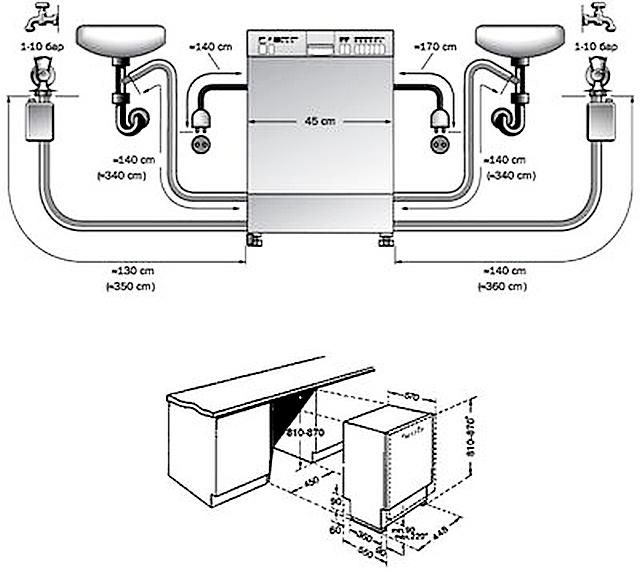
Connection to a sewer drain
The length of the drain hose in the Bosch and Siemens dishwashers is 1.5 m. If you need more, then it is better to purchase original hoses of the same brand. This will make it possible to perform high-quality installation and avoid problems later. It is better to give preference to a corrugated hose.
When installing a drainage hose, you must follow the rules that will save you from problems in the future.
The procedure for connecting to the sewer:
- Connecting and fixing the drain hose to the nozzle on the dishwasher.
- Connecting the hose to the water seal.
- Ensuring the tightness of the drain inlet using an adapter.
To the water supply
When installing the system yourself, it is necessary to clarify exactly where to connect the device, to cold water or to hot. If the machine is equipped with a heating element, then it must be connected only to a source of cold water. This option is less economical.
If the Bosch dishwasher is located near the sink, the tee is easily attached to the channel that the faucet is equipped with.
No need to skimp when it comes to reliability and safe use. Make sure the faucet is working properly
When installing a tee, it is important to take into account the possibility of free access to it if necessary. For machines with the "Aquastop" function, the solenoid valve must be accessible. If other devices are located near the PMM, it is necessary to use a collector with several outputs
It must be inserted into the cold water pipe and connected to all appliances with flexible hoses.
If other devices are located near the PMM, it is necessary to use a collector with several outputs. It must be inserted into the cold water pipe and connected to all appliances with flexible hoses.

![[instruction] do-it-yourself installation and connection of the dishwasher: to the water supply, sewerage and electricity | photo & video](https://fix.housecope.com/wp-content/uploads/2/4/e/24e85f907cb096fdfae6b9bb1d02eb92.jpeg)


To electricity
To connect the device to the mains, it is advisable to use the services of a specialist. The main rule is the observance of security measures. If you are not sure that everything will turn out, it is not worth the risk. In any case, you must carefully read the instructions before starting work.
Household appliances, including Bosch dishwashers, are sensitive to power surges. For this reason, there are a number of socket requirements that must be followed.
- The outlet must be located more than 50 above the floor.
- Must be properly grounded and protected from moisture.
- It is desirable to have a safety device - difavtomat.
After completing the installation steps, you should check the operation of the device by means of a test run.
It is necessary to pay attention to the noise during the program, the absence of leaks and the functioning in various modes.
Have you set the hardness of the water in the PMM?
Yes, of course. No.
Features of installing a dishwasher
If the dishwasher is installed separately, then a little space can be allocated for it on the floor or on one of the tables. Otherwise, if the unit can be built in, then you will have to sacrifice one of the cabinets. However, built-in appliances do not overload the interior of the kitchen with technical details and are generally invisible, hiding behind one of the facades.
 Many manufacturers include detailed instructions on how to connect dishwasher for communications.
Location selection
 The location of the equipment depends on its type.
There are two types of dishwashers: wide and narrow. The first ones have a width of just under 60 cm, and the second ones - 45 cm. Naturally, for a small-sized kitchen, the narrow version looks more preferable. But do not forget about other parameters - height and depth. Often, custom-made headsets may differ from the standards in the height of the countertop and the depth of the cabinets. Therefore, at this stage, it is necessary to be extremely careful, because a small error of only 1 cm can make the installation of the device impossible.
 A compact dishwasher can be built into a niche, hidden in one of the modules, or simply placed on the countertop.
It is possible to use 2 furniture blocks at once, however, then you will have to decide how to fix the dishwasher between the cabinets.
It is worth noting that there are more compact models that differ in height.As a rule, such options are recommended to be built into furniture modules located not on the floor, but above - the second row.
 To ensure that the connection does not cause problems, it is necessary to take into account the proximity of water outlets, sewers and electrical outlets.
What you need to install
When choosing the location of the dishwasher, you need to consider where exactly the plumbing pipes pass in your kitchen and there are electrical outlets. If, in principle, it is not difficult to conduct an electric wire from a socket to any place in the kitchen, then great difficulties can arise with the supply of water and sewer pipes, especially if the kitchen has been repaired and a set has been installed for a long time. That is why, first of all, it is necessary to consider options for installing the machine next to the sink.
 If the machine is further from the water riser, then it will take longer to fill and drain water, the hoses will be more loaded.
Video
Watch the video on how to independently connect the dishwasher to the water supply and sewerage:


![[instruction] do-it-yourself dishwasher connection](https://fix.housecope.com/wp-content/uploads/1/4/6/14647144b9091463dd8697538e98ef6b.jpeg)
About the author:
Electronic engineer with many years of experience. For several years he was engaged in the organization of the repair of household appliances. I am glad to share with readers my knowledge in the field of operation and repair of devices. She loves sport fishing, water tourism and traveling.
Found an error? Select the text with the mouse and click:
Do you know that:
The habit of using the washing machine “economically” can lead to the appearance of an unpleasant odor in it. Washing at temperatures below 60 ℃ and short rinses allow fungi and bacteria from dirty clothes to remain on internal surfaces and actively multiply.
Laundry weight calculator


