- How to arrange an airtight cesspool
- Cesspool Rules
- Waste water does not leave the cesspool: what to do?
- Technical cleaning
- Mechanical cleaning and increase in the volume of the pit
- The use of biological products
- Cesspool
- Cesspool made of plastic
- Septic tank for sewerage
- Construction of cesspools
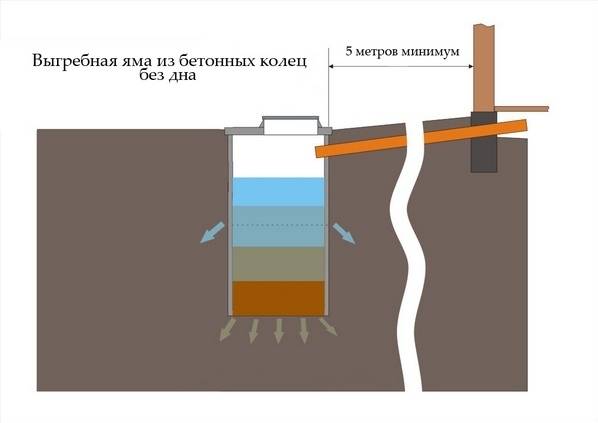
- Cesspool without a bottom
- Sealed cesspool
- SanPin: cesspool operation
- The procedure for pouring the walls of the pit
- The simplest inexpensive ways
- Calculations and technical standards
- Arrangement of a brick cesspool
How to arrange an airtight cesspool
Many believe that a sealed cesspool is an extra problem in the form of a more complex arrangement process and the need to regularly pump out accumulated liquid waste. But if the site is located in a region with high groundwater, then such a design is the only option for arranging sewage.
What you need to consider when working with a cesspool of an airtight type:
- The walls of the pit must be laid out with bricks without leaving gaps, as is the case with an absorbent structure.
- It is desirable to plaster the walls lined with bricks with cement mortar.
- The bottom of the cesspool must be cemented, and before that, waterproofing "procedures" must be carried out. Liquid glass can be used for sealing.
- The lower concrete platform needs to be reinforced - you will need to lay a special concrete mesh on the bottom so that it does not “drown” in the solution, it is installed on pegs.
- You can completely seal the cesspool with bitumen or cement mortar.
- When laying bricks or sealing the pit with bitumen, you need to make a hole for installing / connecting a sewer pipe.
It should be noted that the arrangement of a cesspool in a private house is not a quick matter. At a minimum, you will need to wait for the concrete pad to dry completely. But the absorbing structure is made much faster, because when sealing, it will also be necessary to wait for the mortar to solidify for laying bricks.
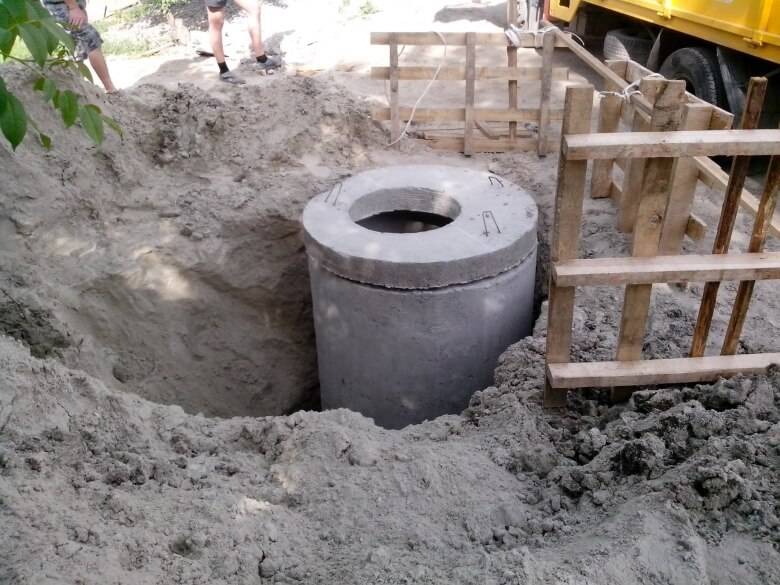
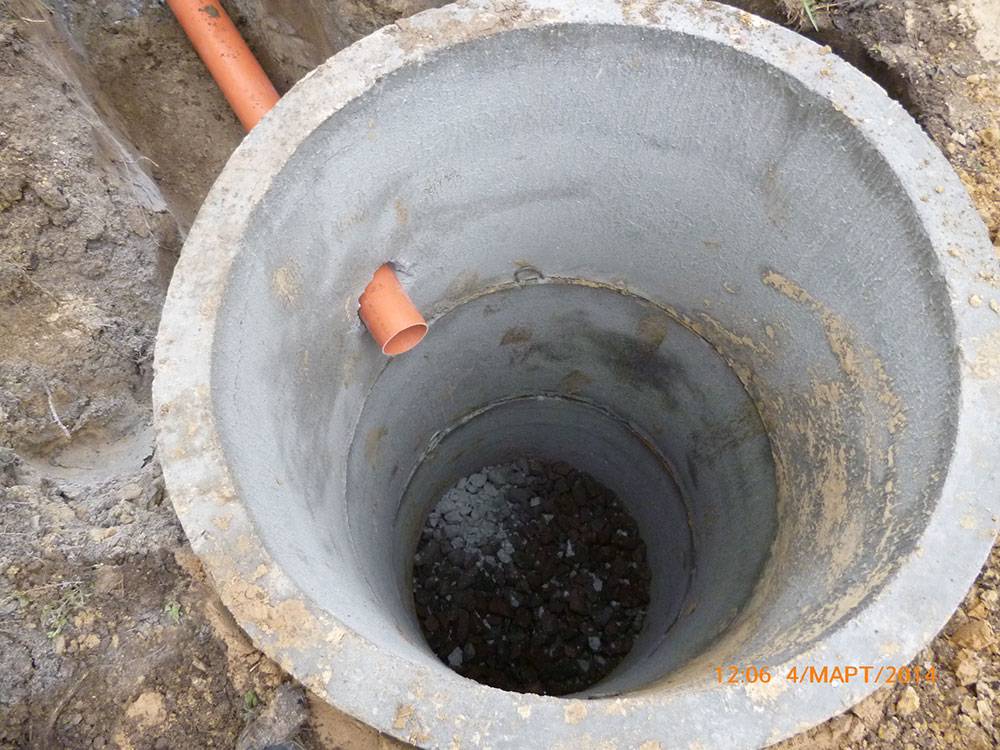
If you plan to make a cesspool of concrete rings, then you can take advantage of special offers on the market - manufacturers offer to purchase a "Lego constructor" - concrete rings, the bottom and cover of the pit. In this case, the time of work is significantly reduced - there is no need to independently pour the concrete pad at the bottom of the pit and make a cover.
Cesspool Rules
 Before building a sewer, you need to choose a place. Keep in mind that it cannot be placed close to the house, and the pipes should not be excessive in length. The sewage truck needs free access for waste removal.
The distance from the cesspool to other objects on the site is regulated by the rules and regulations.
Basic device rules:
- The distance from a private house to the sewerage system is at least 5 m.
- The distance from groundwater to the bottom of the pit is at least 1 m.
- The distance from the fence to the edge of the sewer is not less than 1 m.
- Distance to sources of drinking water with different types of soil: clay - from 20 m, sandy loam - from 50 m, loam - from 30 m.
By correctly determining the volume of the cesspool, you will provide it with a long service life. When calculating, proceed from 0.5 m3 per person. But these figures do not take into account the characteristics of the soil. The absorption rate in clay soil is low. Therefore, the first year the sewer will normally cope with waste. But, the more the soil is saturated with various substances, the filtration capacity will deteriorate.
For better functioning, make a cesspool with a margin (for 3 people 6 m3). This will increase the service life and save money on calling a sewage truck.
After determining the required volume, pipes are laid. The slope should be 2-3 cm per meter. The longer the length, the smaller the slope.
Waste water does not leave the cesspool: what to do?
Below are the most effective drain pit cleaning methods.
Technical cleaning
The main reason why a pit can quickly fill up is siltation. To restore the normal drainage of water, you need to call professional vacuum cleaners or purchase a special pump and pump out the liquid from the pit yourself.


In the second case, it is recommended to do the following.
- Pre-fill the pit with plain water to liquefy its contents.
- After pumping out the contents of the pit, it is necessary to pour over the pressure of water in order to remove wall and bottom sediments of silt. The procedure must be performed several times until the pit is completely cleaned of silt and other deposits that prevent drains from leaving the ground. The final stage of the procedure is that the washed-out sludge must be pumped out.
In some places, the silt layer may have a too dense structure and even under strong water pressure it will not settle.
In this case, you need to take a shovel and manually clean the walls and bottom of the pit. After that, the softened sludge, together with water, is easily pumped out by a pump.
Mechanical cleaning and increase in the volume of the pit
The method involves cleaning the sewage tank from layers that are deeply absorbed into the soil and increasing the volume of the pit with your own hands. This folk method is used upon completion of the pumping of fecal waste by a sewage machine. You need to take a shovel with a bucket, go down into the pit, remove excess deposits from the bottom and walls. Then remove all excess soil from the recess with buckets and dispose of it outside the residential area.
This method is more effective and much cheaper than cleaning with any biochemical preparations.
The use of biological products
Biological products contain non-pathogenic bacteria that contribute to the decomposition of waste organic matter. These substances eliminate both silting and solid waste problems. Also, biological agents effectively eliminate unpleasant odors.
Biological cleaning of the drain pit is carried out by introducing bacteria of 2 types:
- Aerobic. For the development of colonies of these bacteria, a good supply of oxygen is required, which is supplied to the reservoir using a compressor. This type of microorganisms is more suitable for closed drain tanks.
- Anaerobic. These bacteria do not require oxygen to grow. Such bacilli are able to process organic matter within 2-3 days. Anaerobes are less efficient than aerobes, but they are optimal for cleaning open tanks.
The result of the action of bacterial microflora is a completely purified silty sediment, without a repulsive odor. It can be independently removed from the pit and used as a quality fertilizer for crops. A new portion of bacteria is added after each pumping of the contents of the tank. Biopreparations are produced in the form of granules, powders, sometimes tablets.
The main disadvantages of the discussed funds are the following factors:
- strict adherence to temperature standards ranging from 0 to 40 degrees;
- constant maintenance of the level of bacterial microflora;
- negative impact on bacteria of detergent products (chlorine, washing powder and other chemicals).
Biological products eliminate silting, are used as prophylactic agents to prevent the accumulation of silt.
In general, these drugs increase the efficiency of the cesspool by 70-80%.
Cesspool
From drinking wells to the pit, a distance must be maintained that will not be the same for different types of soil: on sand - no closer than 50 meters, on loam - no closer than 30 meters, on clay - no closer than 20 meters.
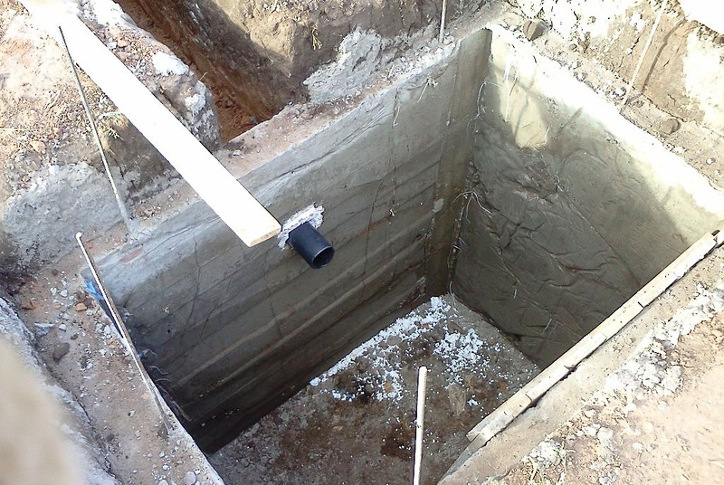
The procedure for constructing a concrete cesspool with a natural filter:
Determine the volume of the pit and its dimensions. Dig a pit of the required size. The formwork is mounted around the perimeter of the pit and poured with a concrete solution. The walls from the outside are coated with bitumen. A layer of crushed stone, broken brick, gravel is poured at the bottom. Roofing material waterproofing, a floor slab with a hatch and a hole for entering a sewer pipe are laid on the walls of the resulting box. The floor slab can be made of concrete. Lay and connect sewer pipes.


There are a lot of design options for choosing a cesspool in the country. When deciding on a specific solution, they proceed from the financial capabilities and conditions of the site. If funds allow, you can purchase a ready-made set of equipment for a sewer pit.
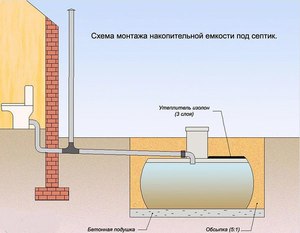
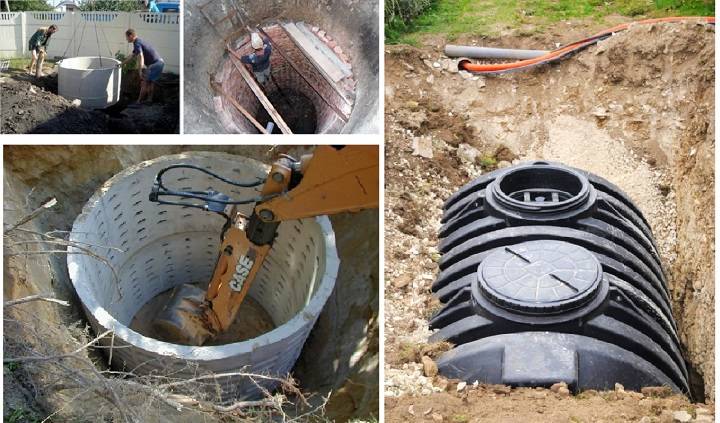
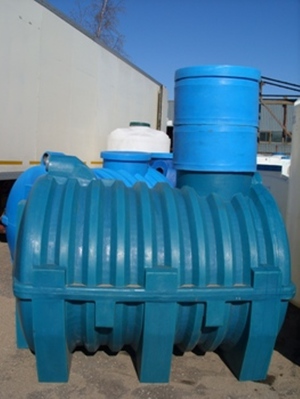
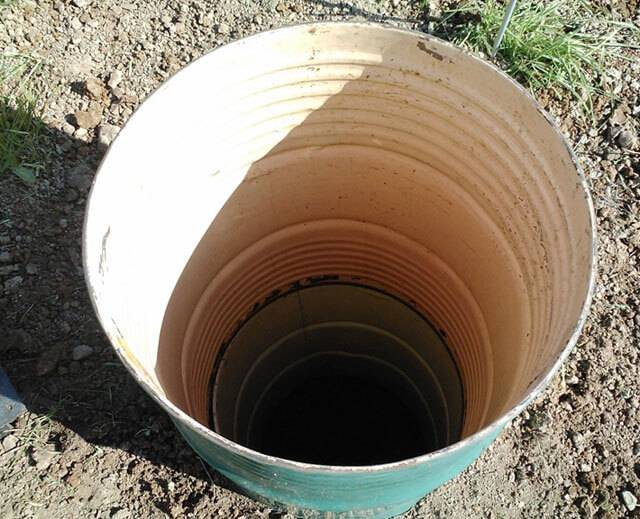
Cesspool made of plastic
A plastic cesspool is the easiest way to create a sewer in a private house.
Installation stages.
- The installation location is determined.
- A hole breaks out.
- A concrete cushion is created at the bottom.
- The pillow is covered with a layer of sand 10 cm.
- The plastic container is lowered into the pit.
- Waste pipes are connected to the tank.
- The perimeter is covered with a mixture of concrete and sand (ratio 1:5).
- The upper part is covered with soil.
installation requirements.
- The container should be placed in such a way that there are no turns and bends in the sewer pipes.
- If pipe turns cannot be avoided, make them at right angles.
- The depth of the pipes is 1-1.5 m, to avoid freezing.
- With a high level of groundwater, a plastic container is installed in a concrete well.
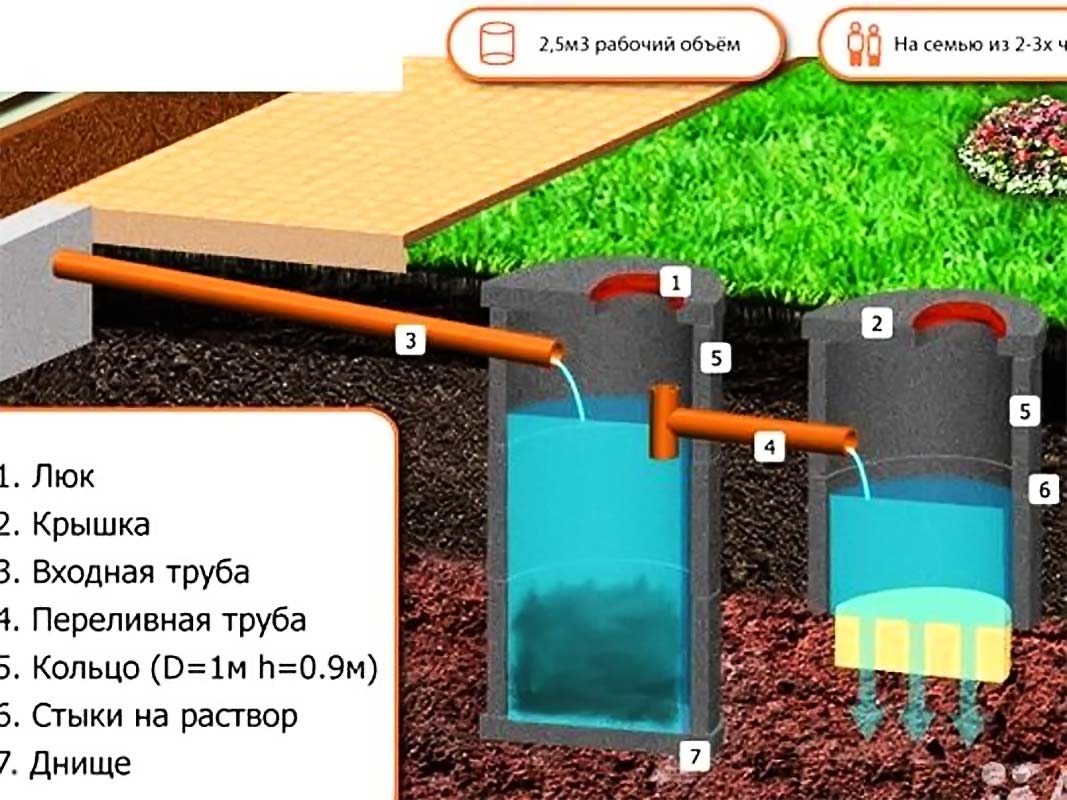
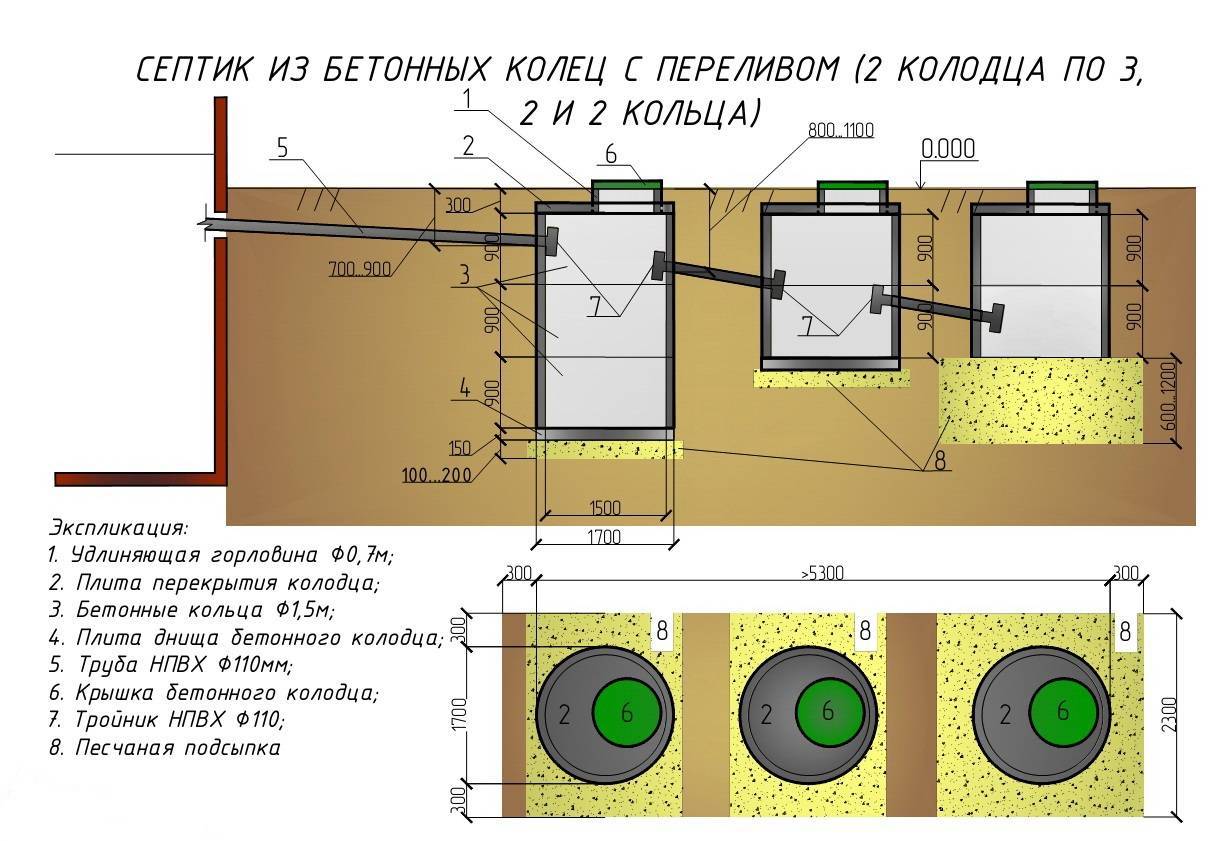
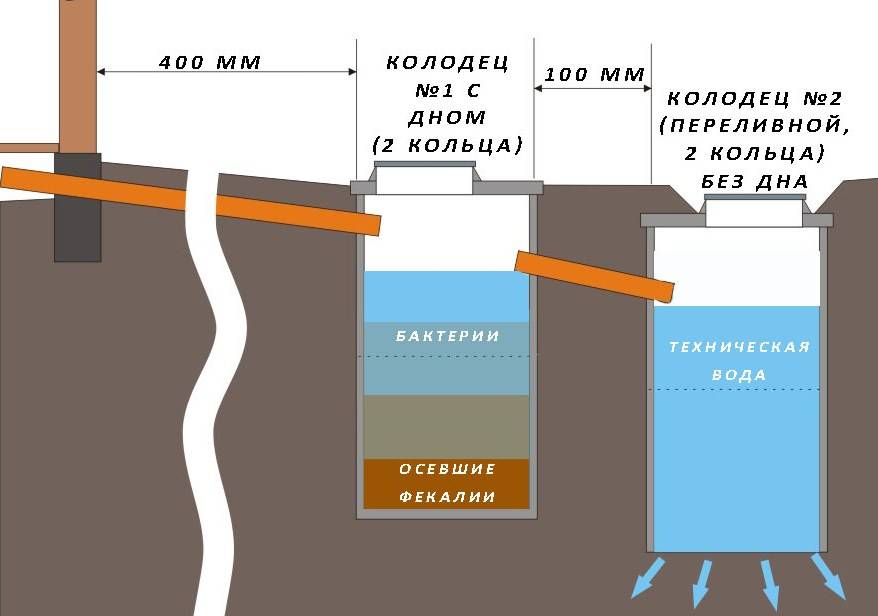
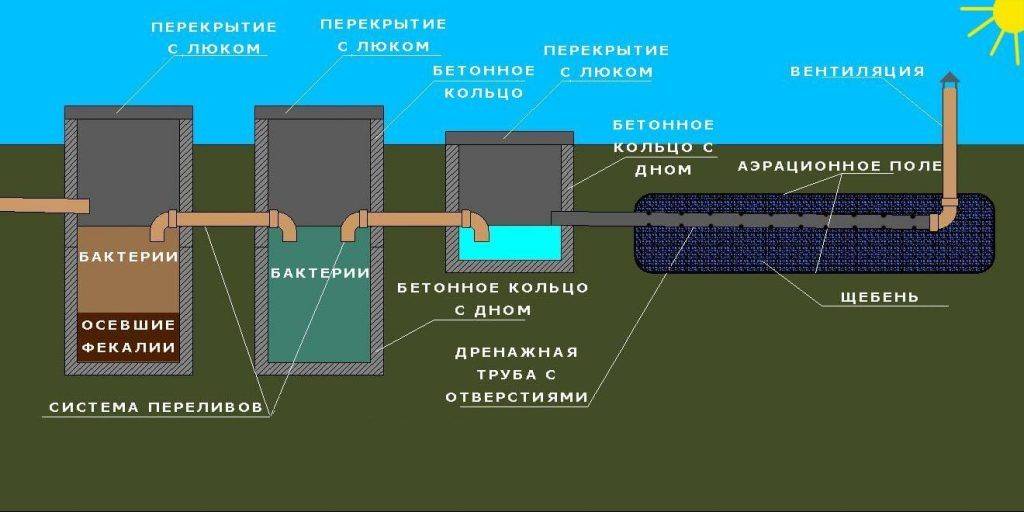
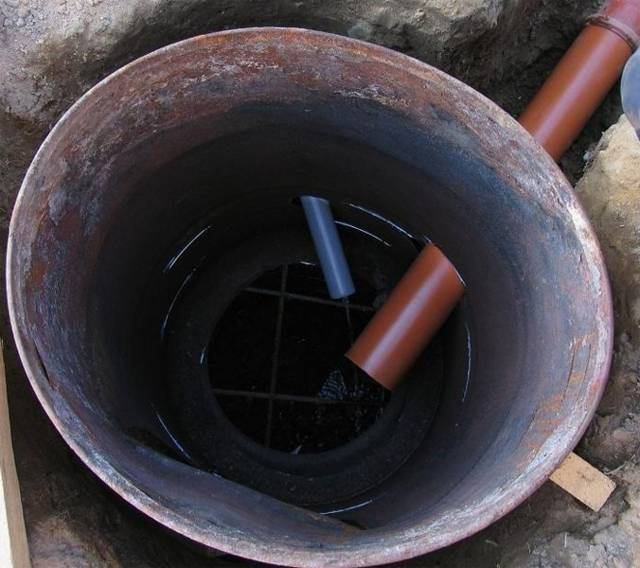
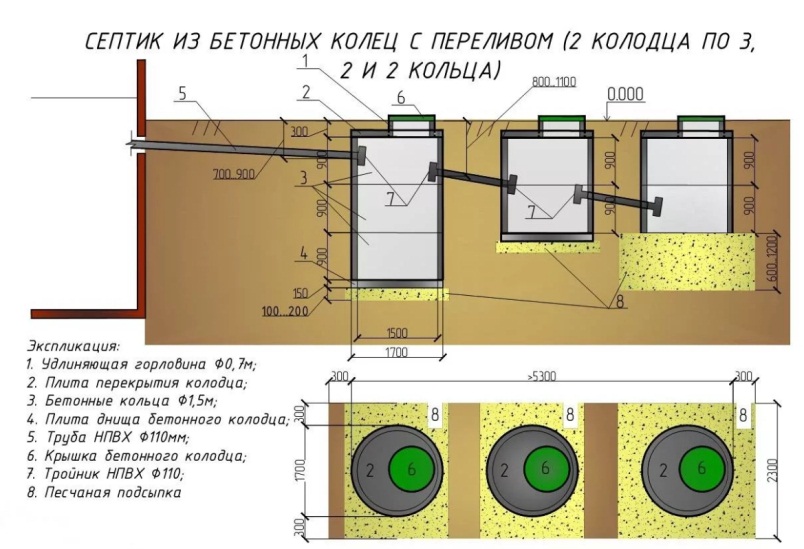
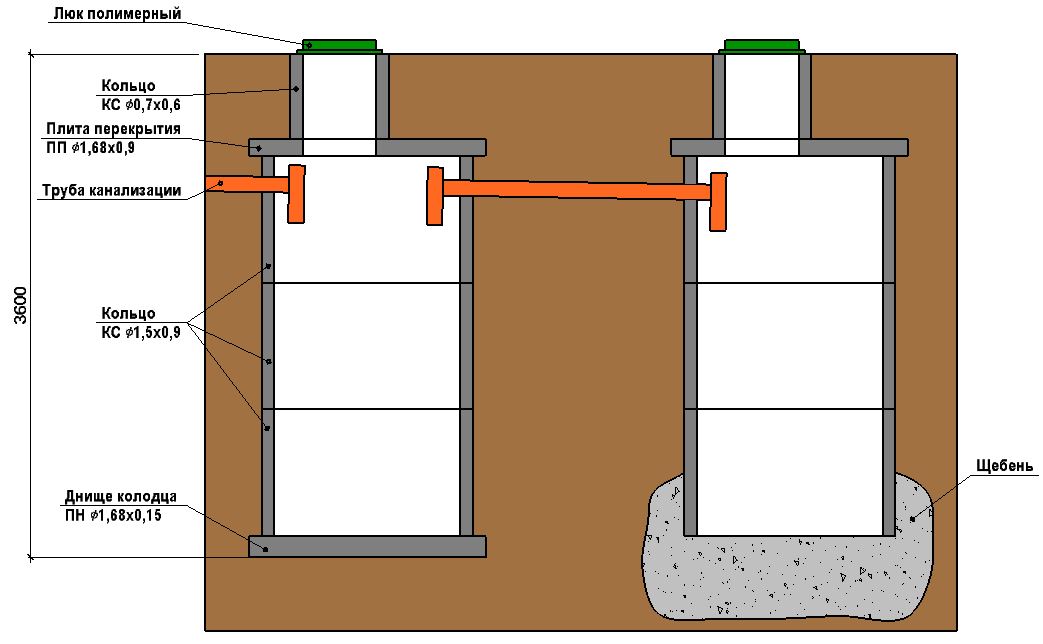
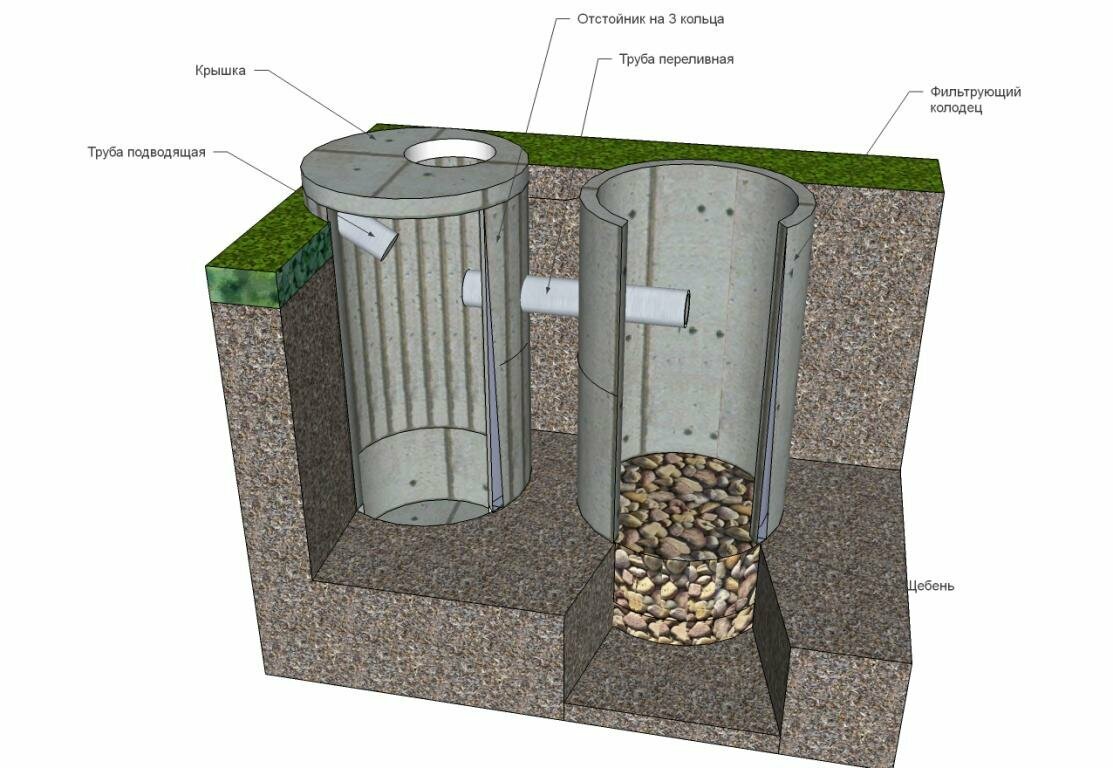
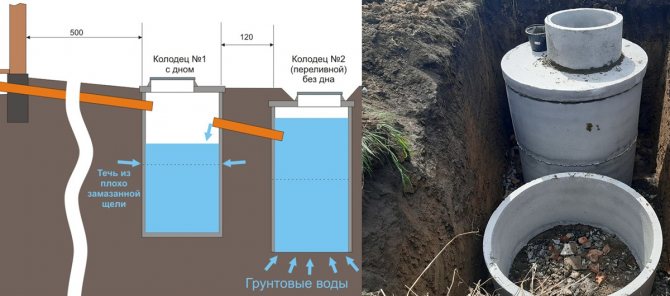
Septic tank for sewerage
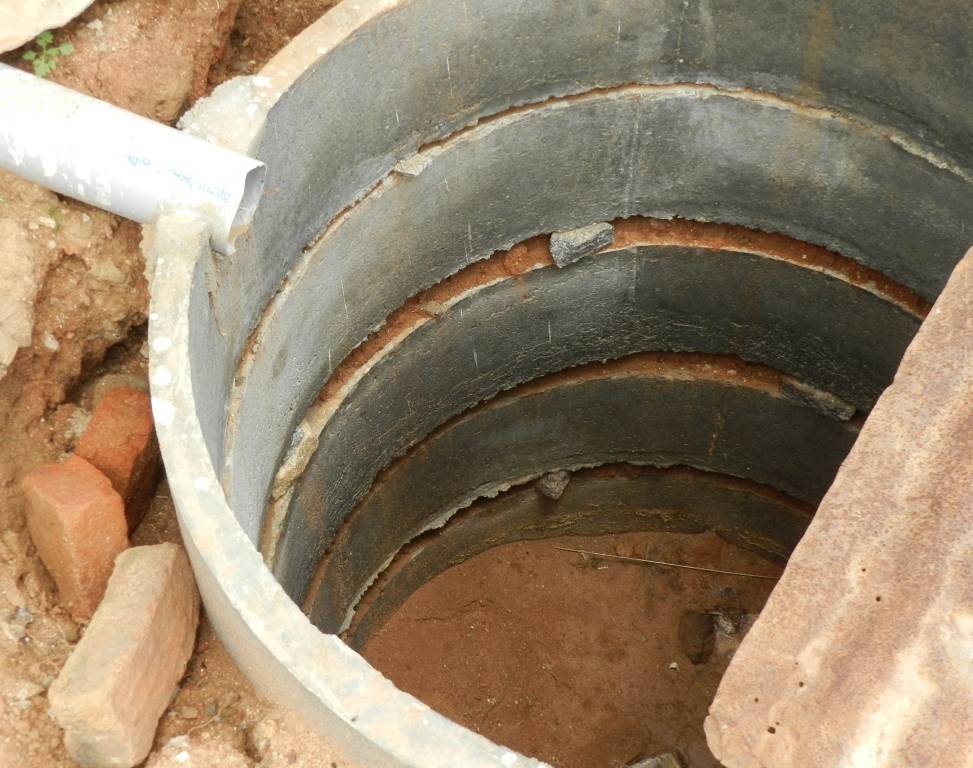
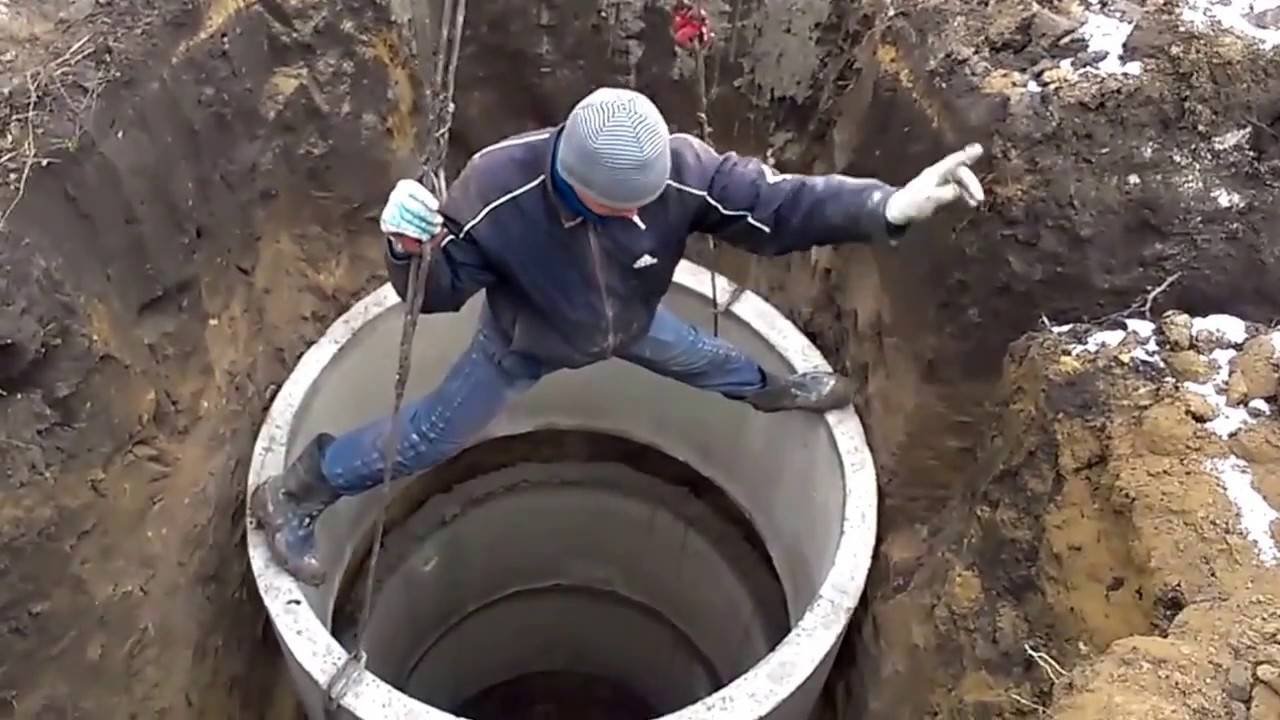
 To build a septic tank, it is necessary to dig an additional hole, which will be deeper than the first. Reinforced concrete rings are installed on the concrete bottom. A hole is made in the upper ring for a pipe, through which liquid is poured from one container to another. Pipes are installed depending on the depth of soil freezing.
For the operation of a septic tank, special biological products are used that process wastewater. Filtered water from the septic tank is transferred to the main pit, from which it flows into the ground. The slope of the pipes during installation is 15 degrees, the width is 15 cm.The trench is dug in after a control run to make sure the system is working properly.
Construction of cesspools
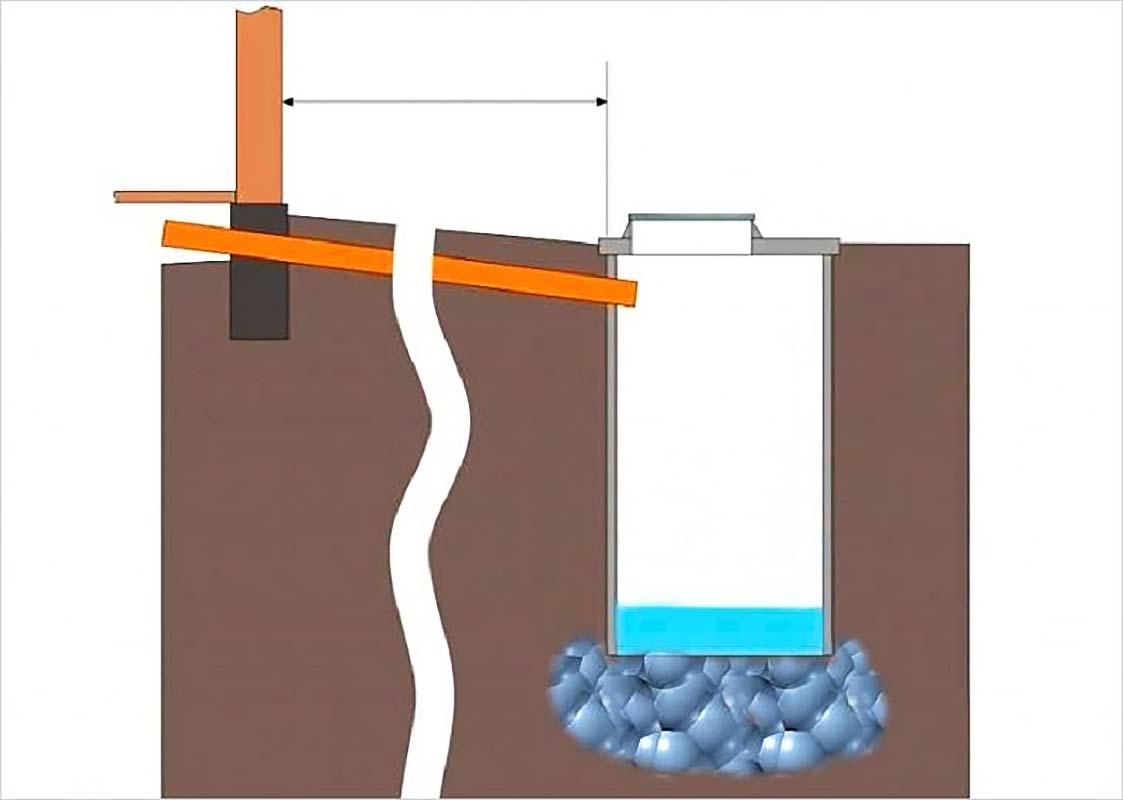
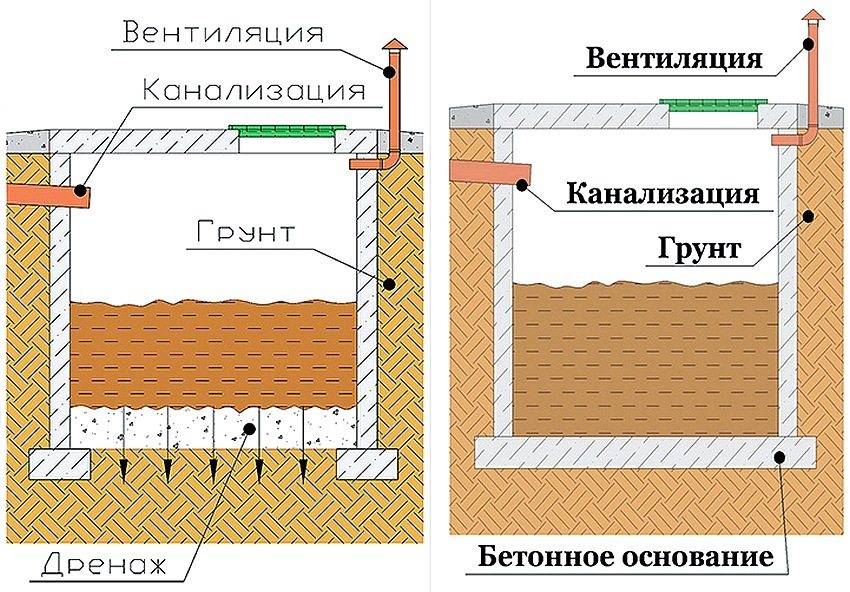
Cesspool without a bottom
At first glance, the construction of such a structure is quite easy:
- The optimal location of the cesspool is selected
- Dig a hole of the right size
- Close the walls with a layer of concrete, brick or concrete rings
- Dig a trench for sewers
- Lay pipes from the building to the cesspool
- Build a ceiling
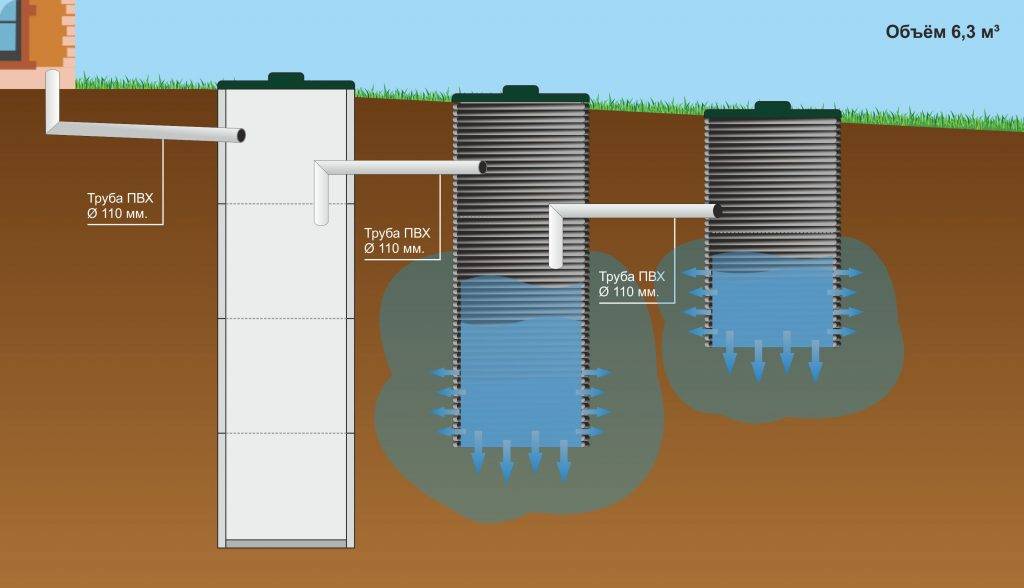
In this type of cesspools, all wastewater eventually seeps into the ground and the tank is automatically cleaned. But at the same time, solid residues will accumulate on the bottom and walls of the pit and compact over time. When the pit becomes unusable, it is dug in, and a new one is built in the next place.
Over time, all waste will be processed by microorganisms and turn into fertilizer for plants.
Sealed cesspool
This type of cesspool is similar to the previous version, but has one fundamental difference - the complete tightness of the tank. This design is cultivated in a similar way, but only with a slight amendment. It is necessary to create a completely sealed wastewater tank.
This type of cesspool can be used for more time than the previous one and will not have to be buried. It will be necessary to clean it from all the waste accumulated in it with the help of special companies mentioned above. Over time, hardened masses can also form in such a reservoir, interfering with the flow of water.


Before building a cesspool, you should choose the right location that does not contradict the designated standards, and later build the structure using the correct technology. Then the cesspool will be able to function for a long time without requiring replacement.
SanPin: cesspool operation
The pit latrine code also specifies standards for effluent management. Regardless of the type of garbage drain, it must be cleaned 2 times a year with sterilizing mixtures. This is done after the sewage cleaning, so that it is possible for some to completely neutralize the action of pathogenic bacteria.
For sterilization, a special acid-based chemical solution, gentle compounds or home-made mixtures are used. It is strictly forbidden to use pure lime chloride. When mixed with water or other chemicals, it releases a hazardous gas. It is odorless, but can cause severe poisoning and burns of the upper respiratory tract.
Mixtures for sterilization
For home self-service, a mixture is used, which includes:
- Bleaching powder;
- Creolin;
- Naphtalizol and some other compounds.
Cleaning is carried out every two weeks, and the cesspool is inspected every season. The pit can be cleaned independently, with the help of a cesspool machine, or cleaned with bioactivators.
- With self-cleaning, a drainage or fecal pump is installed in the tank, which pumps the waste into the tank for further disposal.After draining the drain, its walls are cleaned of growths and silt with iron brushes, the pit itself is washed with clean water;
-
In the sewer cleaning, the work is carried out by a special machine, which is equipped with a tank and a pump. The hose from the pump is lowered into the drain and pumped out. In order to be able to carry out machine cleaning, the depth of the tank must be less than 3 meters;
- Bioactivators are considered the most convenient. With constant use, they solve the problem of the need for sewage cleaning, soil contamination, unpleasant odors, etc. Here, active microorganisms are placed in the drain, which process waste into products that are safe for the environment. Many owners of private houses further use these liquid products as fertilizers. Instead of biological activators, chemical reagents can be used, but they corrode plastic and metal.
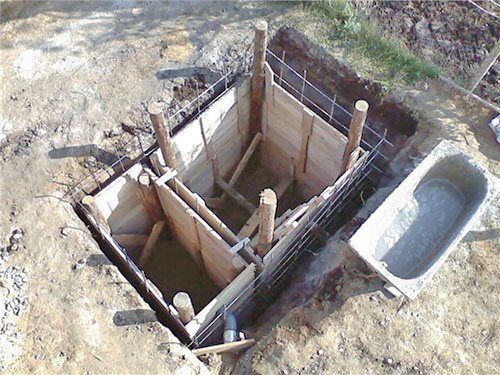
The procedure for pouring the walls of the pit
- Marking the pit, digging a pit, leveling the walls, planning the adjacent territory;
- Formwork manufacturing. The best option is a sliding formwork with a length of 2x0.5 meters. It is assembled from edged boards and wooden beams. On the side of the formwork facing the concrete, a polyethylene film is stuffed;
- Arrangement of drainage holes. Sections of pipes for drainage holes are driven into the walls of the pit in rows (2 rows for the next fill), to a depth of 50 mm. The pitch between the pipes in a row is approximately 300-400 mm, the distance between the rows is 350 mm. The protruding parts of the pipes simultaneously serve as a kind of separation between the wall of the pit and the formwork, which determine the thickness of the concrete wall - 150 mm;
- Formwork installation. Formwork sheets 2 meters long and 0.5 meters wide are installed along the perimeter of the pit.At the same time, the shields from the inside of the pit are wedged between themselves with wooden bars. Pit is ready to fill!
- A concrete solution is prepared in the following proportions: 6 parts of granotsev, 4 parts of sand, 1 part of Portland cement are thoroughly mixed together. Water is added (until the required consistency of "thick sour cream" is obtained) and a superplasticizer (according to the instructions for its use);
- With shovels or buckets, the mortar is poured into the cavity between the wall of the pit and the formwork, inserting reinforcement bars into the middle of the resulting structure in increments of 150-200 mm and tamping by tapping on the formwork and bayoneting with a shovel or a piece of reinforcement;
- The filled structure is left for 72 hours until it completely sets, after which another “portion” of drainage pipes is stuffed into the wall of the pit, the formwork is reinstalled higher and the next pour is made;
- Before the last pouring of the formwork, a sewer pipe should be brought into the pit, placing it at an angle of 3-5 degrees at a depth of about 300 mm from the soil level;
- The last pour is also kept for 72 hours, after which the formwork is dismantled. At the same time, the released boards can be used for arranging a "supporting" formwork for pouring the floor slab.
The simplest inexpensive ways
In the old days, as a typical rural sewer, a do-it-yourself drain pit was built in a private house. To increase the strength, its walls were coated with clay or reinforced with boards. A little later, they began to practice burying old barrels, tanks and cisterns into the ground. As practice has shown, a system of a series of tanks in which wastewater is collected and partially filtered is able to cope with waste volumes of the order of 1 m3 per day.
Using a simple do-it-yourself cesspool without pumping out, you can fill the need for draining country houses with non-permanent residence. However, from the point of view of current sanitary standards, such structures are on the list of undesirable and even prohibited options. Violators are subject to fines and other administrative penalties.
There are several recommendations on how to properly make a cesspool:
- It is necessary to dig 1 m higher than the level rises in spring and autumn. At this time, this indicator has a maximum value.
- A good budget option for a solid drain shaft involves the use of old car tires for this. They simply fit inside the finished barrel and are fastened together with screw jumpers.
- In cases where the cesspool for a permanent residence is located at some distance from the dwelling or toilet cubicle, the top cover is equipped with a side cutout for switching the sewer pipeline.
- The required amount of earth is poured into the gaps between the tires and the shaft (it is desirable to compact it). For safety, a concrete slab is usually laid over the pit. A hole is made in it for a ventilation pipe and a hatch for pumping out sewage.
Calculations and technical standards
In order for the cesspool to function correctly, you need to correctly select a place and calculate the volume of the container. To begin with, it should be remembered that, according to sanitary standards, such a structure cannot be used in areas where groundwater runs high. The bottom of the tank must be at least 1 m above this level.
An approximate calculation of the volume of the pit can be performed on the basis of the average standard: 0.5 cubic meters. m for each person who lives in the house permanently. The depth of the cesspool usually varies within two to three meters. This is dictated by the peculiarities of the work of the sludge pumps, which do not serve structures deeper than three meters.
The distance at which a cesspool without a bottom should be from various objects on the site is dictated by safety considerations in case drains enter the ground
It is also necessary to take into account the following point: the pit is cleaned when the container is filled by two-thirds of the total volume, and not to the very top. The dimensions of these two-thirds are best made in multiples of the dimensions of the sludge tank.


This is beneficial, since the sewers charge not for the amount of sewage pumped out, but for each specific exit, i.e. you will have to pay even the removal of a small amount of wastewater at full cost.
On different soils, there are different standards for the placement of a cesspool. It is usually recommended to place this structure at least five meters from a residential building and at least 25-50 meters from a source of drinking water.
The standards are dictated by the danger of contamination of the soil or source by effluents. This can happen during the spring flood, improper installation of the sewer can also cause such troubles.
The greater the filtration qualities of the soil, the faster the sewage penetrates inside, and the more stringent standards should be followed when designing a cesspool.
The best option is to install a structure with a conditional deepening of the bottom into sandy soil.Filtration of wastewater into clay soils is not possible, therefore, in areas with a loamy or sandy loam base, pits without a bottom are not installed.
When installing the structure on silty or clayey sand, similar in properties to sandy loam, the rate of penetration of effluents into the soil is increased by using perforated rings. The result is a variation of the cesspool without a bottom with permeable walls.
And one moment. If special equipment is used to clean the cesspool, convenient access roads must be provided. The maximum allowable distance between the vacuum cleaner and the object is no more than four meters, but the smaller this distance, the more convenient it will be for the vacuum cleaners to work.
Arrangement of a brick cesspool
When choosing a place, it is recommended to take into account the same parameters as for other species:
- as far as possible from any buildings;
- take into account the direction of groundwater flow;
- provide access for the sewer.
Sizes are always an individual choice. There is no doubt that a deeper device will require less frequent cleaning, but one should never forget the level of groundwater. Closer than 30 cm to them, you can not place the bottom.
How to make a cesspool if the water is close to its location?
In this case, there is simply no alternative to the sealed type of device. In the case of a shallow depth, you can increase the length dimensions or use a multi-tank design. But it is not recommended to dig more than 3 meters even in dry ground.
The standard option for a residential building with 4-5 people living in it is a depth and diameter of 3 meters.
Buy only red ceramic bricks.Silicate and cinder blocks will get wet pretty quickly and will be unusable. The best material is burnt brick, rejected for construction because of its irregular shape.
The construction process consists of several main stages:
- Digging a pit is the most time-consuming procedure. With manual work, two people can dig a 1.5x3 m hole in sandy soil within a couple of days. But clay soil will cause a lot of difficulties and will require the use of hired workers or an excavator. The shape for the pit is usually chosen in the form of a glass with a slight expansion towards the top, giving additional reliability.
- The foundation should begin with the process of backfilling the soil with gravel and sand. This layer is poured with concrete with preliminary laying of reinforcement. Usually the thickness of this layer is 15-20 cm and depends on the diameter of the pit.
- Wall laying is done in half a brick with a size, and in brick - with a large diameter. The proportion of cement and sand in the mortar is usually 1:3 and 1:4. After completion of this stage, bituminous mastic is applied to the walls.
- A ready-made pancake with a hatch hole of the appropriate size is used, as well as a self-poured lid.
- In conclusion, the overlap is covered with a layer of earth with the location of the manhole cover slightly above the ground level.
Video of arranging a cesspool made of bricks:


Over time, any structure becomes clogged. Various methods are used for cleaning. Biologics for latrines remain one of the best methods to ensure accelerated degradation of waste and increase the life of such sewer systems.


