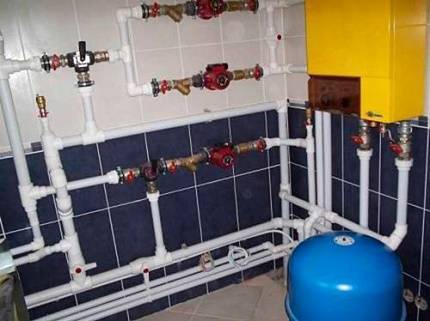
- Overhead care or spigot lining
- Types of tie-in: dependence on pipes
- Working with plastic pipes
- Connecting a cast-iron water supply
- If the track is steel
- How to crash?
- Insert technology
- Detailed description of the main stages of work: tie-in to the water supply
- Materials: cast iron and others
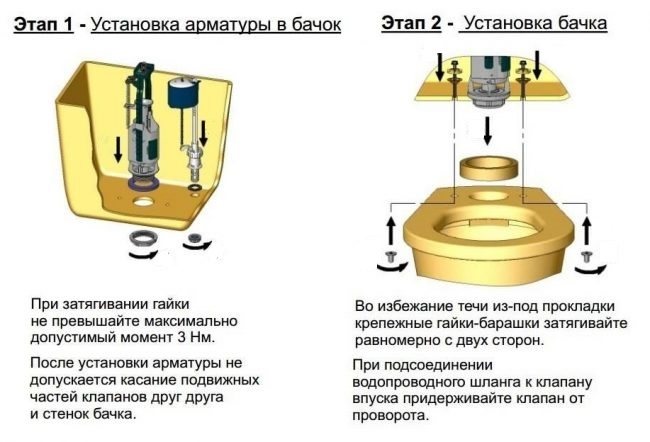
- Do-it-yourself installation in 7 steps: clamp, saddle, sewerage scheme, coupling
- The main clauses of the contract and the necessary acts
- How to get a work permit
- Tapping into the water supply with a pipe
- Punch methods
- How to connect to a common water main
- Conclusions and useful video on the topic
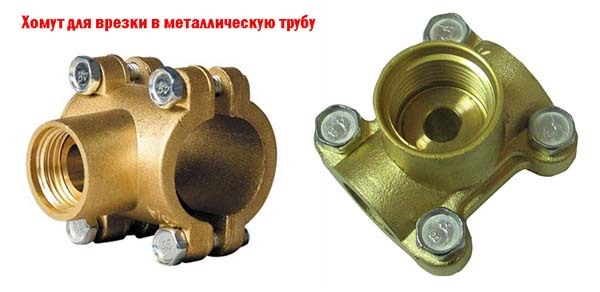
Overhead care or spigot lining
PE100 polyethylene is used for the manufacture of overhead care. The installation of such an element in a low-pressure polyethylene pipe is carried out by welding by electrodiffusion or electrofusion welding. To do this, the lower part of the overhead care is equipped with a special heating coil, which begins to heat up under the influence of current. As a result, the surface of the polyethylene pipe and the bottom of the pipe melt.
The branch pipe has a special overlay from the manufacturing plant with a bar code that contains information for the welding device. Thanks to this, the welding and cooling times and the parameters of the current transmitted to the spiral are automatically adjusted.Pipe manufacturers guarantee the perfect functioning of the finished assembly for a quarter of a century.
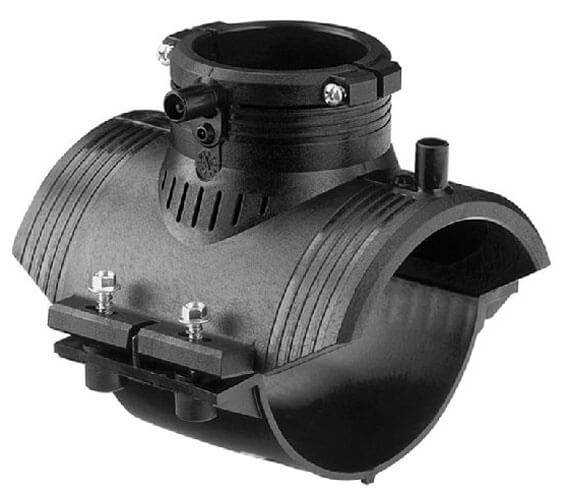
Unlike an electric welded saddle, overhead maintenance does not have a special cutter for tapping into the pipeline, but it is distinguished by low costs for work involving the laying of channels. Despite the fact that the installation of such a fitting can only be performed on disconnected channels, the elements have the correct outlet angle. Branch pipes of this type can be produced in large diameters.
Large dimensions and low weight contribute to easier installation of overhead care. This makes it possible to perform work on pipelines under construction and in operation, in hard-to-reach places, for example, in city manholes. In addition, the installation of such fittings does not require cutting HDPE pipes, so it takes a small amount of time.
Types of tie-in: dependence on pipes
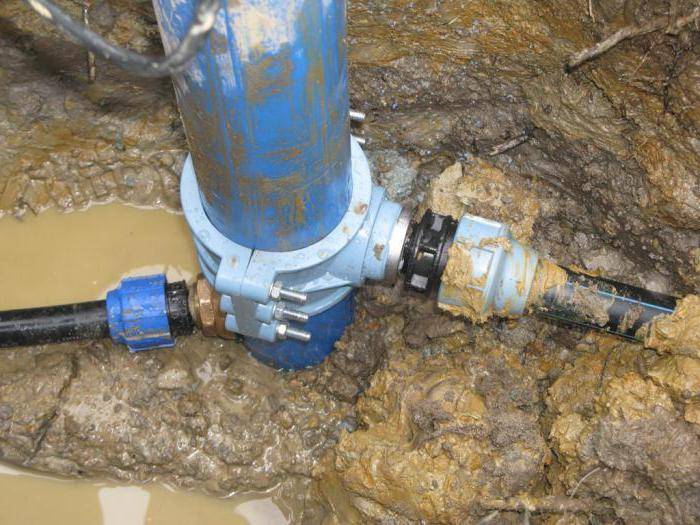
The method of tapping into the central water supply system determines only one factor. This is the material of the pipes themselves. The mains are made of metal, metal-plastic, plastic (polyethylene) or cast iron. The latter species is now quite rare. Naturally, the tie-in assumes that it is necessary to make a hole in the track, which means that water will surely pour out of it. So it is often not possible to turn it off, they acquire special fittings - clamps.
Working with plastic pipes
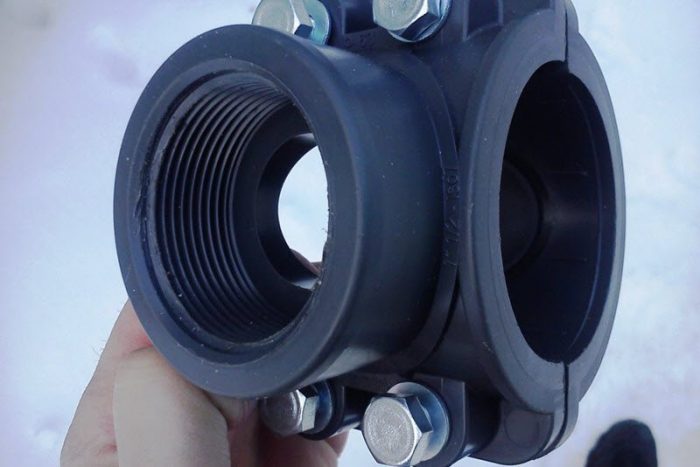
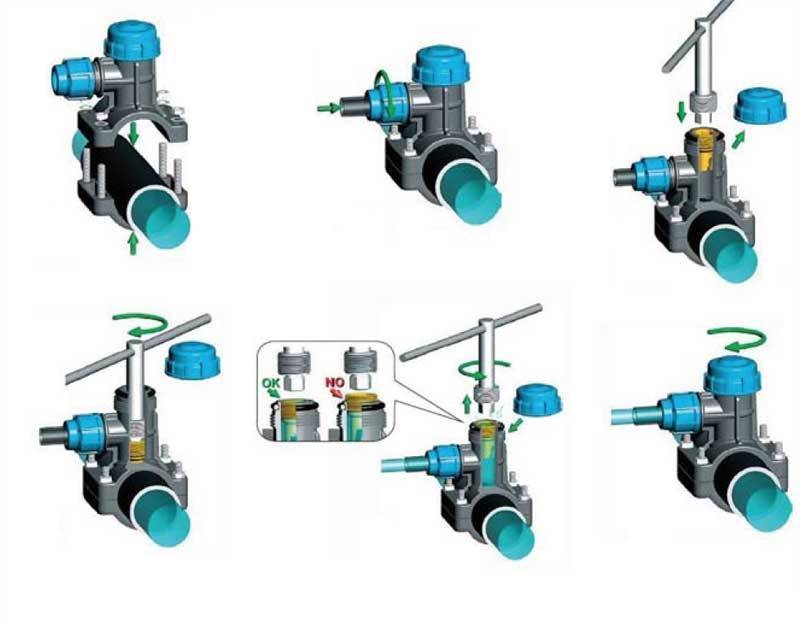
In this case, an electrowelded clamp is used, which is called a saddle. This product looks like a tee, consisting of two halves. The vertical branch pipe has a thread designed for a tap. Through it, a tool is inserted to drill a hole in the water pipe.The clamp is made of plastic, a spiral is built into it for connecting welding equipment.
The connection to the water supply is as follows:
- First, the excavated pipe is cleaned of dirt. A disassembled clamp is installed at the plunging point.
- Then a welding machine is connected to the saddle, the clamp is welded. The junction is left for an hour to cool.
- Screw the valve to the saddle. A drill is inserted through it, a hole is made. It must be less than the top pipe of the clamp.
- After the appearance of the jet, the tool is immediately pulled out, and the water is blocked. Then a pipe leading to the house is connected through the coupling.
In order to “stay alive” after manipulating an electric drill and water, many masters recommend providing reliable protection - building a special home-made “nozzle” on a drill. For example, you can cut a circle out of thick, hard rubber. Its thickness is 3-4 mm, diameter is 150-250 mm. Make a hole in the center for the drill. Such protection is sufficient for both the instrument and the person.
Connecting a cast-iron water supply
Working with cast iron requires caution: despite the seeming reliability of a heavy material, it can burst quite easily. In this case, welding is not used.
Instead, they buy a saddle with rubber seals. For cast iron take a special drill. It should have straight grooves, they are sharpened at a large angle (116-118 °).
In the process, the drills have to be changed, as they become dull very quickly. A more convenient alternative is a special bimetallic crown. During the operation, regular wetting of the instrument with water or oil is mandatory, the revolutions are made small, strong pressure is contraindicated for this alloy.
The process of tapping into cast iron can be divided into two stages:
- The pipe is cleaned of dirt, grease and rust. In the place that is intended for the hole, the grinder removes the layer of metal.
- Install a saddle with a seal. A valve is mounted on the pipe. A tool is inserted through it, then a hole is drilled.
After removing the crown, the tap is quickly closed, then a branch of a new, home line is connected.
If the track is steel
Steel is a hard material, but, unlike brittle cast iron, it is quite ductile. For this reason, a welding machine and a saddle clamp are used for tie-in. The work is carried out in the following sequence:


The surface of the site is cleaned of rust, then the halves of the saddle clamp are installed, they are tightened with bolts.
The seams are well boiled, then they are cooled, checked for leaks.
Then screw on the valve.
A pipe is drilled through it, but they are careful: the last pass is made using a hand drill .. For steel plumbing, there is another way
You can take the same branch pipe (made of steel) with a thread, weld it to the track. Then a valve is attached to it, and then a hole is drilled through it. The result will be similar, but only if the work is done with high quality
For steel plumbing, there is another way. You can take the same branch pipe (made of steel) with a thread, weld it to the track. Then a valve is attached to it, and then a hole is drilled through it. The result will be similar, but only if the work is done with high quality.
For any of the cases, it is mandatory to check the tightness of the new assembly. To ensure its reliability, use kerosene and chalk.The first substance is smeared with the inner surface of the valve, the second is applied from the outside. If greasy spots appear on the chalk, then such work will have to be redone.
How to crash?
When the branch from the main is made by specialists, the customer can independently or with the help of the same professionals lay a line from the tap on the fitting to the site, house or separate building on its territory. Having made an input to the site, you need to install another valve either in the well (if it is installed), or install it in a convenient and warm place in the house, for example, in the basement. It will be needed for an emergency shutdown of the water supply. After the inlet valve, a small section of the pipeline is left of the same diameter as the line to the valve, from which lines of smaller diameter will go along the planned wiring. The open end of the pipe is muffled by welding and a sheet of metal of the appropriate thickness.
With the inlet valve closed, it is convenient to mount the wiring with your own hands, slowly and thinking through to the smallest detail all future tie-ins into the resulting common collector of the home water supply. In a steel pipe, holes are burned by welding with a diameter slightly smaller than the outer diameter of the wiring line, and a fitting is welded with a primary valve on it. It is recommended to drill holes: the hole turns out to be neat and it is difficult to make a mistake with the size if you take the drill taking into account the desired diameter of the outlet pipe.
Wiring around the house from a plastic pipe is done with plastic tees according to the following algorithm:
- a piece of pipe is cut out at the installation site of the tee according to its size;
- both ends of the cut section of the pipe are lubricated with sealant;
- a tee is tightly placed on the place of the cut and tightened with union nuts;
- the tap is screwed into the socket of the tee;
- the pipeline is easy to mount with the help of fitting clamping bushings (collets) having various configurations.
You can independently install an electrofusion clamp or a saddle for working with polyethylene or plastic, and only if there is no water in the system. All other work also requires care and at least some experience, therefore, to eliminate any risks, work with clamps on steel and cast iron water pipes must be entrusted to specialists.
For tapping cold water into the city water supply network, see the following video.
Insert technology
Consider from a practical point of view how to make a hole in a pipe with water. There are two non-specialized rules when tapping into a pipeline:
- The pipe to be cut must be smaller in diameter than the pipe in which the hole is made.
- The diameter of the drill must correspond to the internal diameter of the pipe to be inserted, which, in turn, must be of a smaller diameter than the pipe of the main line.
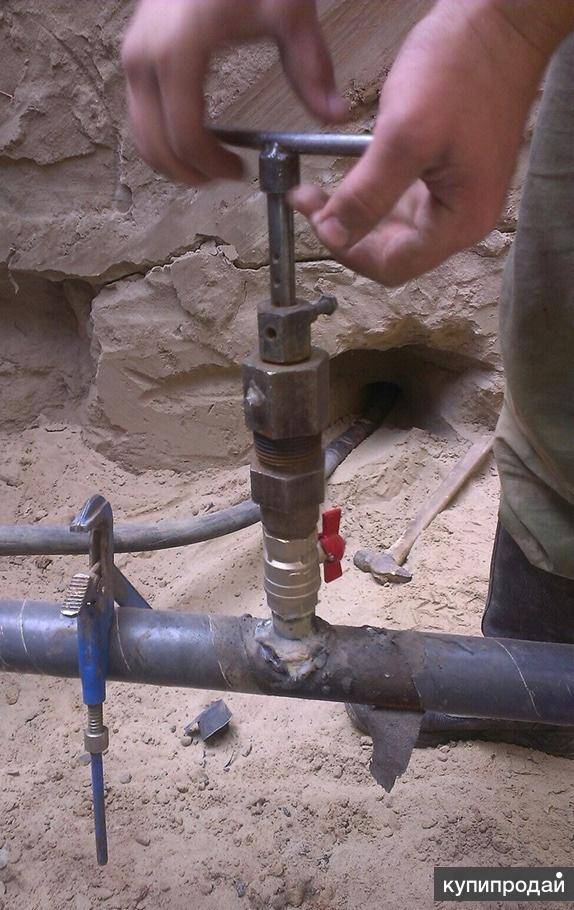
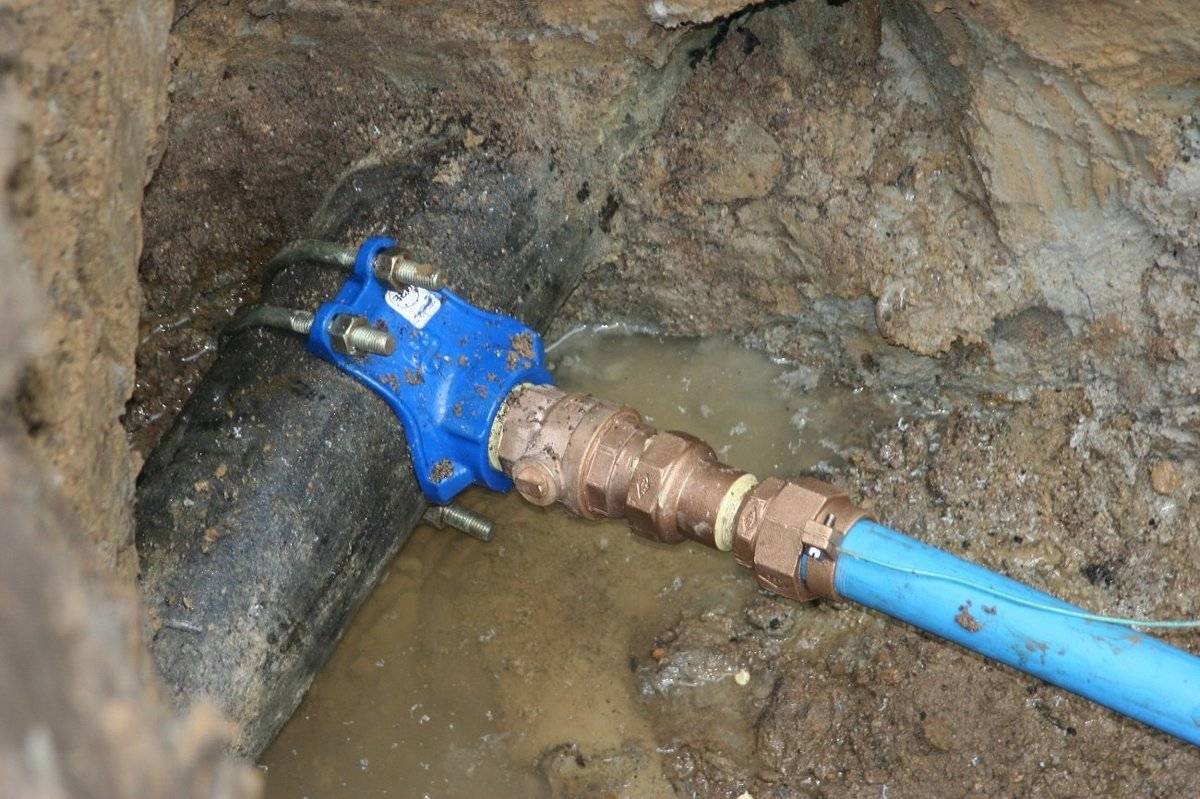
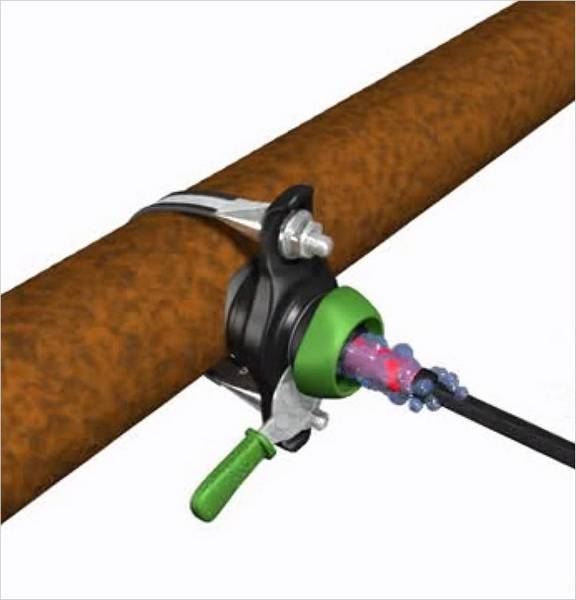
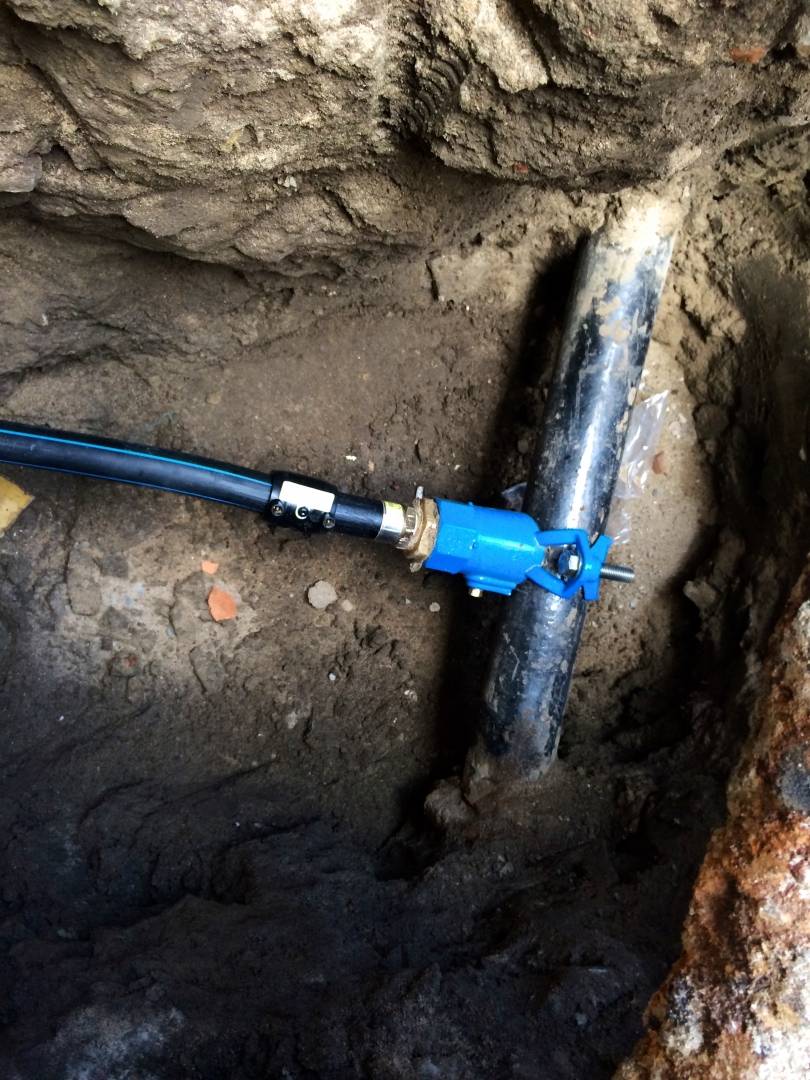
If you need to cut into an iron water pipe, then you will need to use a saddle clamp for tapping with drilling. The saddle clamp is called due to the fact that its lower part is a semicircle that looks like a saddle. There are a couple of varieties of similar clamps. Before installing this device on a pipe, it must be scrupulously cleaned of dirt and rust (if any). The collar, apart from the “saddle”, has a shut-off valve with a hole for drilling and a drill in the upper part.Both parts on the pipe are bolted to each other. The clamp fits well to the surface of the pipe with the help of sealing rubber bands. After fixing it with a drill, a hole is made until water appears. After that, the drill is unscrewed and the plug is closed with a special screw so that water does not flow out of the pipe. In the future, such a clamp can be used as a shut-off valve. In addition, it is possible to use a clamp already with a valve screwed into it.
After the hole is ready, the drill is removed and the valve is closed. Now it is possible to do other work on the installation of water supply. It is also possible to attach a special machine to a simple iron clamp, the main elements of which are a ratchet handle, a locking bolt, a shaft with a drill at the end, and a flushing tap. All this is enclosed in an iron case and is attached to the clamp with the help of sealing rubber bands. The guide sleeve allows drilling in a given direction. With its help, iron and cast iron pipes are drilled.
For drilling a cast-iron pipeline under pressure, bimetallic crowns and clamps of a special design are used. The nuance of working with cast iron is that:
- work with light pressure. Cast iron is a brittle metal, does not "work" well in compression and tension;
- pre-clean the pipe surface from a special layer applied to the surface to prevent corrosion;
- overheating of the crown should not be allowed;
- work to be guided at low speeds.
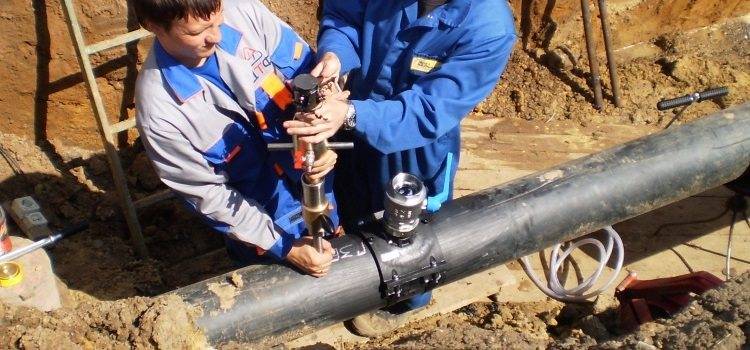
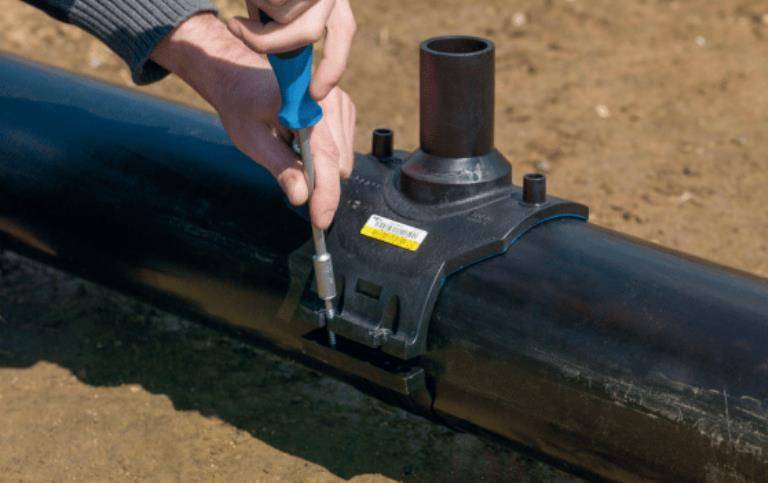
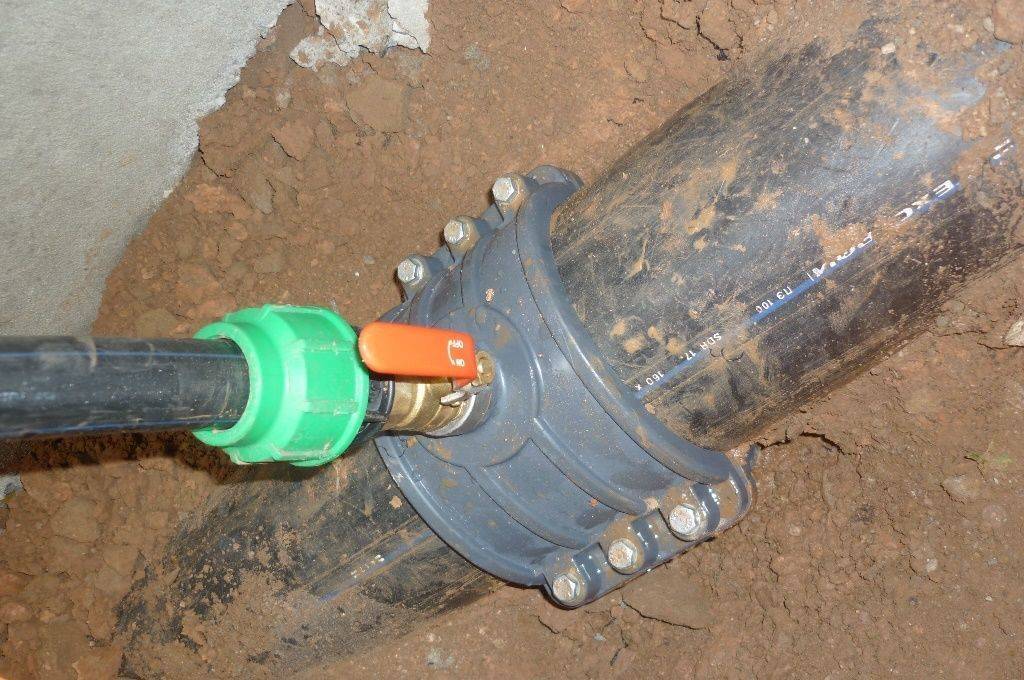
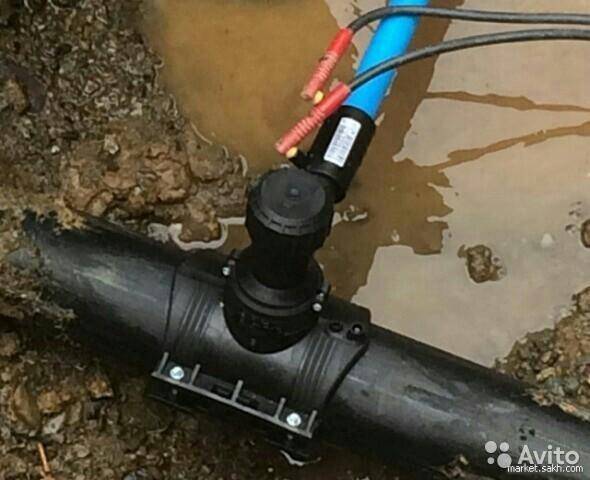
If you want to cut into a plastic pipeline, then it is better to use an electrofusion saddle clamp. It is made of special plastic, equipped with a heating coil and a drilling mechanism.There is a bar code on the saddle body that allows you to accurately enter the desired parameters: welding and cooling times, etc. The clamp is bolted to the pre-cleaned pipe. With the help of a special welding machine, the spiral is heated and the branch is welded (terminals for welding are provided on the clamp). Then, an hour after the end of cooling, a hole is made with a special cutter and a shut-off valve is screwed on.


For the most part, water distribution around the house or apartment is made with metal-plastic. Therefore, the diameter of the pipes is small. If there is no inlet valve and there is no way to shut off the water through special work (housing office, water utility), then you will have to cut in under pressure to supply water to an additional point. The use of clamps in this case is not advisable due to the small diameter of the pipe. How to make such a cut? Quite simply. It is necessary to prepare a water tank, a floor cloth, a tool, a valve and special fasteners. The pipe is cut. The end from which water flows is lowered into a container of water. A nut, a clamp is put on it. After that, a valve is inserted into it in the open position, which is clamped with a nut. Later, by closing the tap, it is possible to continue the installation.
Detailed description of the main stages of work: tie-in to the water supply
When deciding how to make a tie-in to the water supply without turning off the pressure in the central system, you must carefully familiarize yourself with each stage of the work. In the beginning, it is necessary to calculate the route of the pipes. A depth of 1.2 m is considered optimal for them. Pipes should go straight from the central highway to the house.
Materials: cast iron and others
They can be made from the following materials:
- polyethylene;
- cast iron;
- Cink Steel.
Artificial material is preferable, since the tie-in to the water supply does not require welding in this case.
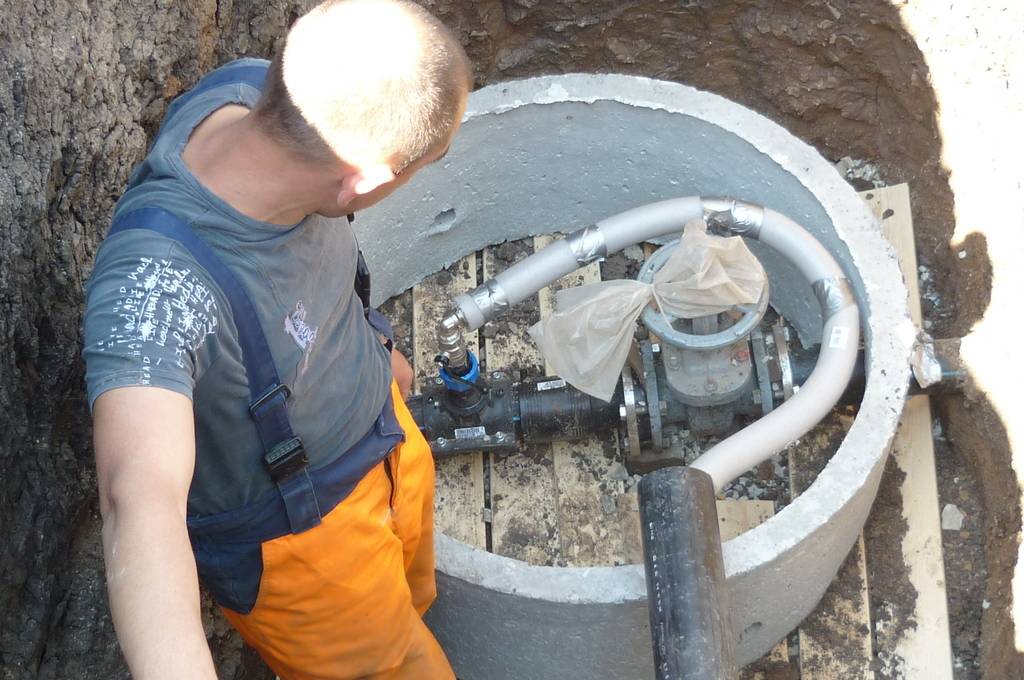
To simplify work on the tie-in place, a well (caisson) is built. For this, the pit is deepened by 500-700 mm. A gravel cushion is filled up at 200 mm. Roofing material is rolled out on it, and concrete 100 mm thick with a reinforcing grid of 4 mm is poured.
A cast plate with a hole for a hatch is installed on the neck. Vertical walls are coated with a waterproofing substance. The pit at this stage is covered with previously selected soil.
The channel breaks through manually or with the help of an excavator. The main thing is that the depth meets the requirements of the project. It is below the border of soil freezing in this climatic zone. But the minimum depth is 1 m.
For tie-in, it is better to use artificial material
Do-it-yourself installation in 7 steps: clamp, saddle, sewerage scheme, coupling
The installation process takes place according to the following technology.
- The device for tapping under pressure is located in a special collar pad. This element is installed on a pipe previously cleaned from thermal insulation. The metal is rubbed with sandpaper. This will remove rust. The cross-sectional diameter of the outgoing pipe will be narrower than that of the central one.
- A clamp with a flange and a branch pipe is installed on the cleaned surface. On the other side, a gate valve with a sleeve is mounted. A device is attached here in which the cutter is located. With her participation, an insertion into the general system is carried out.
- A drill is inserted into the pipe through an open valve and a gland of a blind flange. It must match the size of the hole. Drilling in progress.
- After that, the sleeve and cutter are removed, and the water valve closes in parallel.
- The inlet pipe at this stage must be connected to the flange of the pipeline valve. The protective coating of the surface and insulating materials are restored.
- Along the route from the foundation to the main canal, it is necessary to provide a slope of 2% from the tie-in to the inlet outlet pipe.
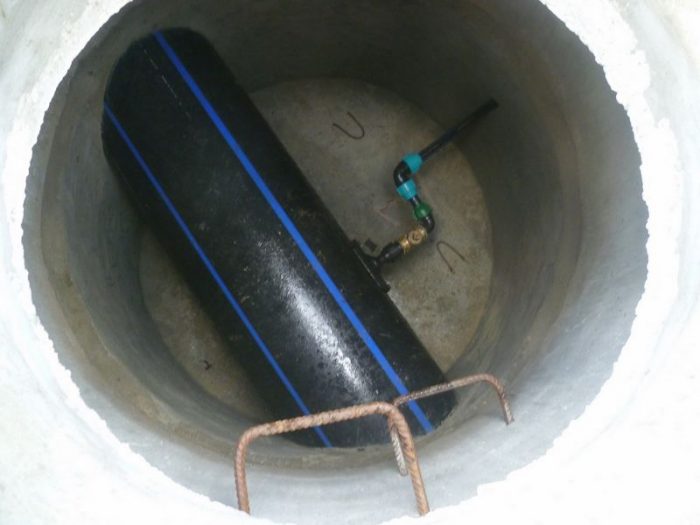
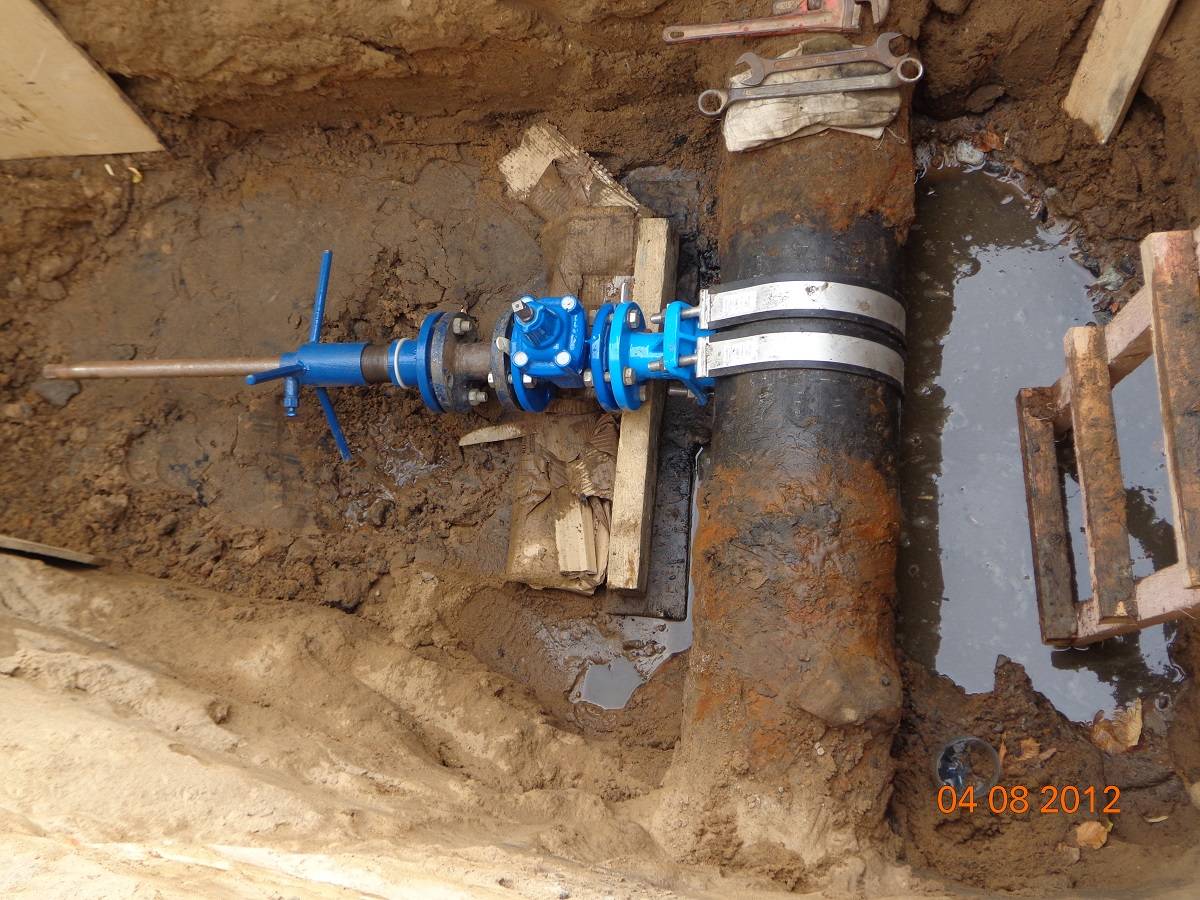
- Then a water meter is installed. A shut-off coupling valve is mounted on both sides. The meter may be in the well or in the house. To calibrate it, the shut-off flange valve is closed and the meter is removed.
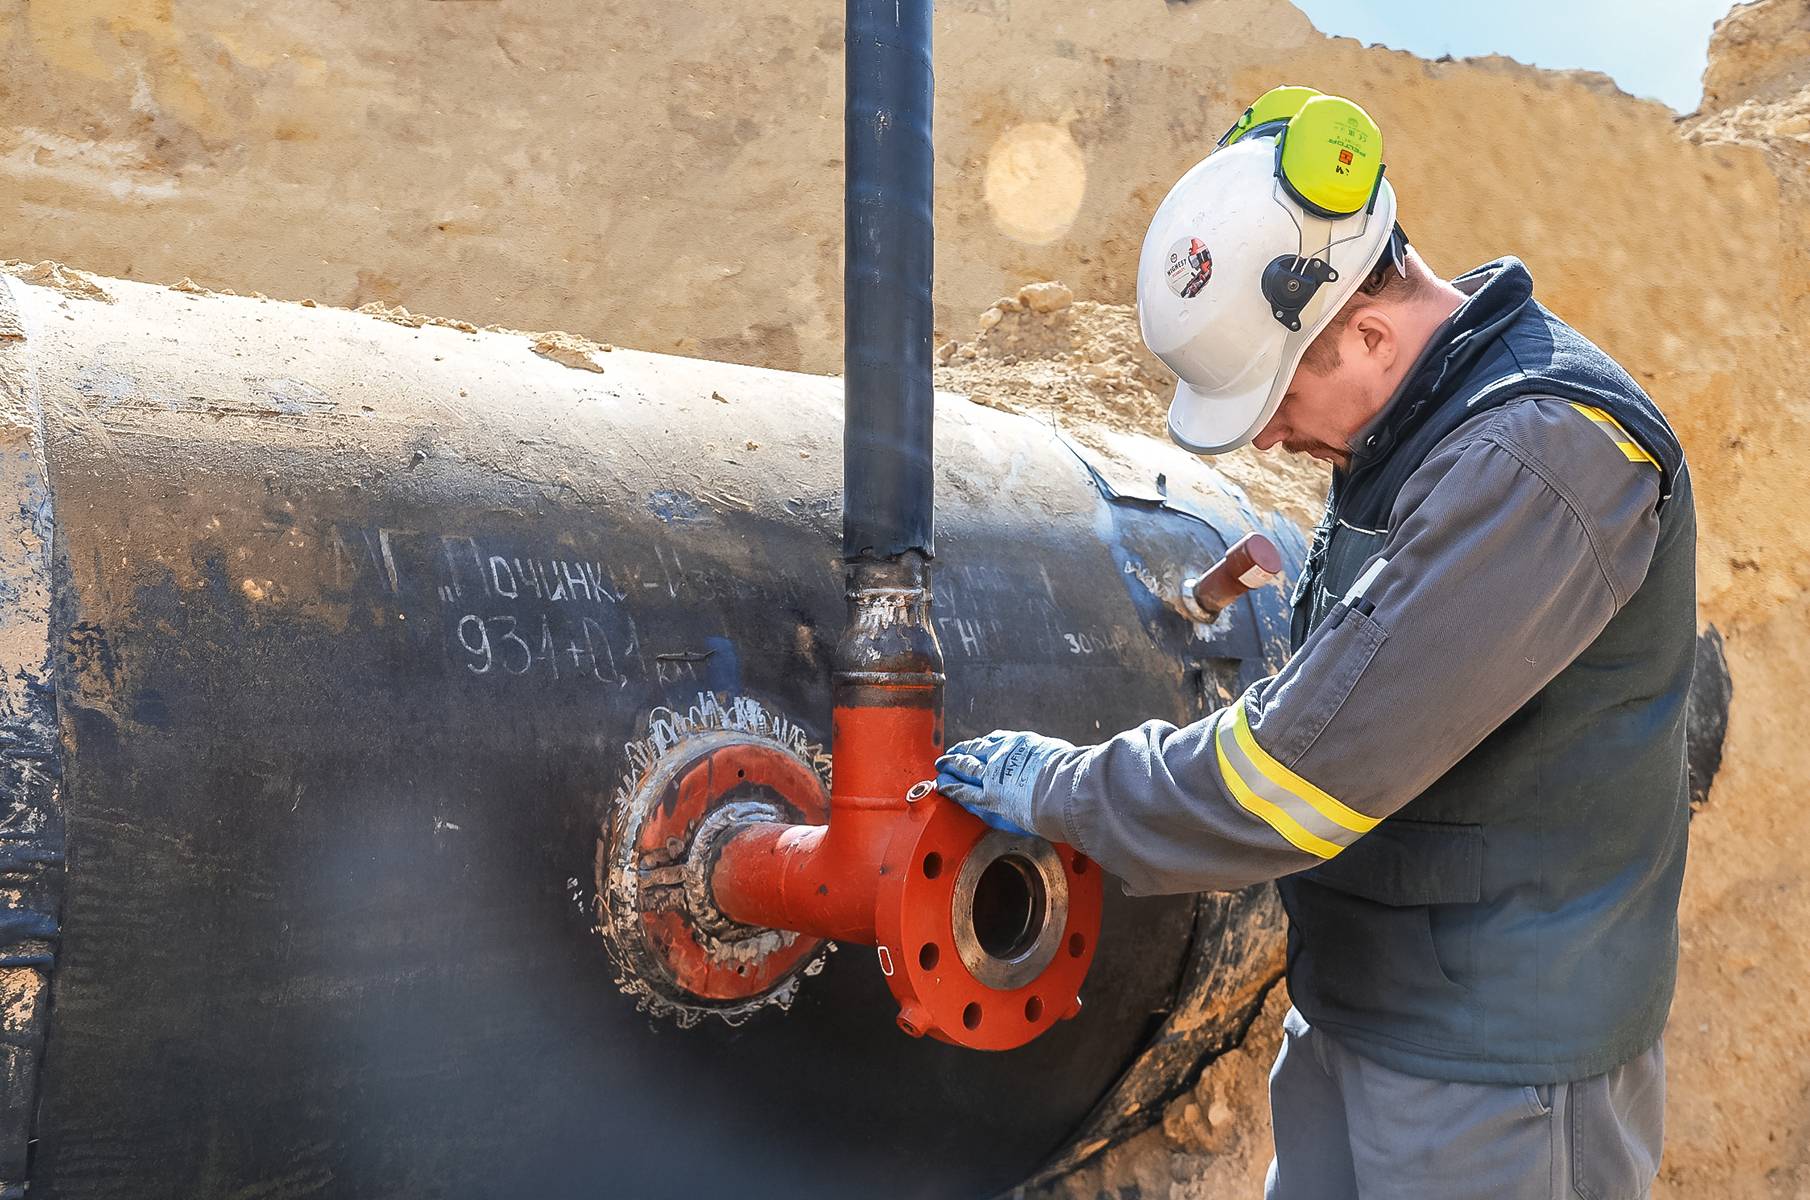
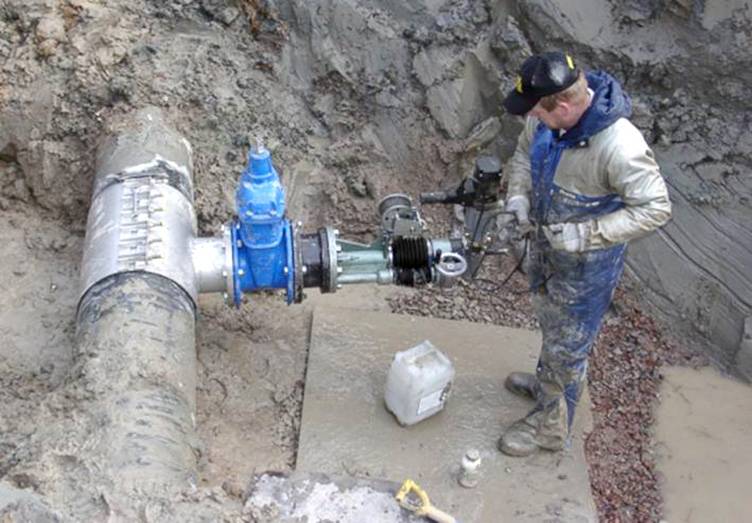
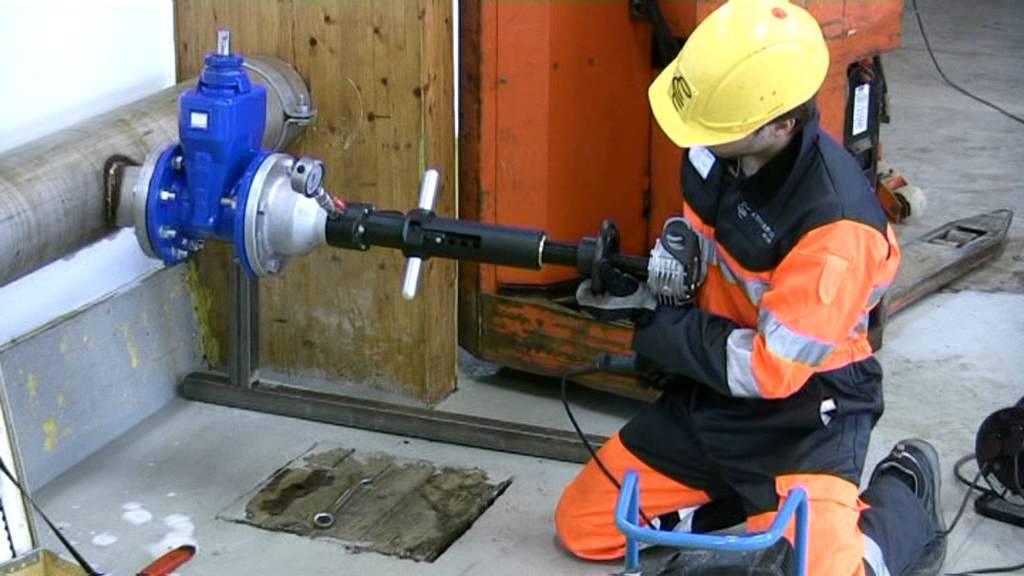
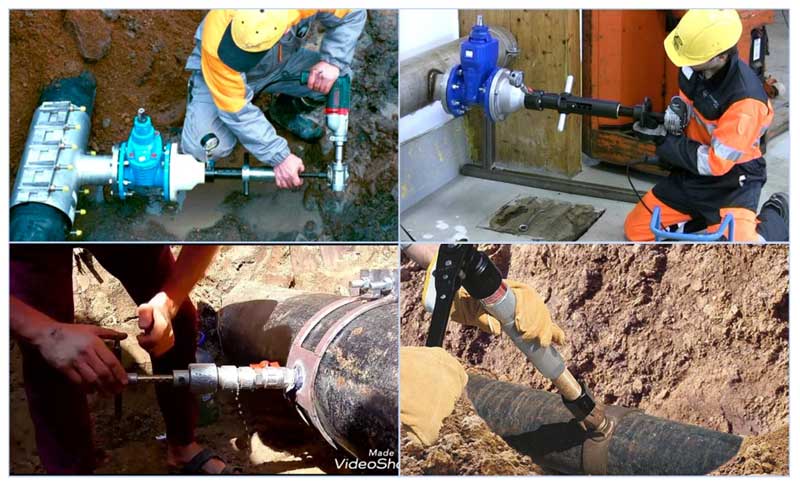
This is a common tapping technique. The puncture is carried out in accordance with the type of material and design of the reinforcement. For cast iron, grinding is performed before work, which allows you to remove the compacted outer layer. A flanged cast-iron gate valve with a rubberized wedge is installed at the tie-in point. The body of the pipe is drilled with a carbide crown. It matters what material the cutting element is made of. A cast iron flanged valve requires only strong crowns, which will have to be changed about 4 times during the tapping process. Tapping under pressure into a water pipe is carried out only by competent specialists.
For steel pipes, it is not necessary to use a clamp. The pipe must be welded to it. And already a valve and a milling device are attached to it. The quality of the weld is assessed. If necessary, it is additionally strengthened.
The polymer pipe is not ground before a pressure tapping tool is put on the puncture site. The crown for such material can be both strong and soft. This is another reason why polymer pipes are considered beneficial.
The next step involves testing. Stop valves (flanged valve, gate valve) and joints are checked for leaks. When pressure is applied through the valve, air is bled. When water begins to flow, the system is inspected with the channel not yet buried.
If the test is successful, they bury the trench and the pit above the tie-in. Works are carried out in compliance with safety regulations and in accordance with the instructions.
This is a reliable, productive method that does not disturb the comfort of other consumers. Work can be done in any weather
Therefore, the presented method is so popular today. Connecting to the water supply is a very important technical event.
The main clauses of the contract and the necessary acts
In order to achieve a connection to the water main with official permits and approvals, it is necessary to draw up an agreement with the water utility, which includes the following provisions:
- registration of the subject of the contract - cold water supply and the mode of its supply (pressure in the line and volume) in accordance with individual technical conditions;
- the period of water supply to the consumer;
- quality indicators of cold water;
- the procedure for monitoring quality characteristics;
- a list of conditions for a short-term suspension of water supply;
- water consumption accounting system;
- terms and conditions of payments for water consumption;
- separation of responsibility for the operation of the water utility and the consumer for water supply networks;
- contractual rights and obligations of the consumer and the water utility for the implementation of water supply;
- liability of the parties for failure to fulfill their contractual obligations;
- the procedure for resolving disputes, disagreements between the consumer and the water supply service and their settlement;
- the procedure for granting access to representatives of the water utility to water sampling points and metering devices for monitoring water consumption;
- terms and methods for submitting data by the subscriber on water consumption in the presence of individual metering devices;
- the procedure for informing the vodokanal when transferring rights to other persons or business entities to facilities in respect of which contractual documents have been drawn up;
- conditions for supplying water to entities connected to the water supply line of the subscriber under contractual obligations with the water utility.
After the installation of the water supply system in the house, an act of work carried out by the contractor is drawn up, which is signed by the subscriber.
Often an act is drawn up for hidden work (there is a special form for this) related to work during the laying of the pipeline.
When flushing the water supply systems connected to the house by the sanitary and epidemiological services with further checking the quality of the water, an act is drawn up for the compliance of the source with sanitary and epidemiological standards.
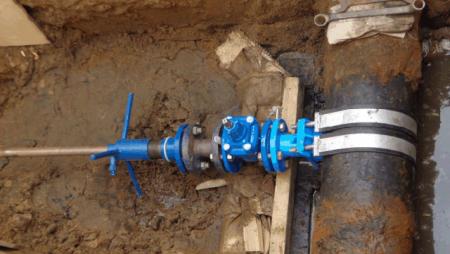
Rice. 5 Tapping by connecting to the water supply network using clamps
How to get a work permit
Given the importance of the water main as an object of providing a vital product, a permit for the production of a tie-in must be obtained from the local water utility department. The method of execution is not important - with or without welding.Unauthorized connection is considered illegal and is followed by administrative measures with financial punishment
Unauthorized connection is considered illegal and is followed by administrative measures with financial punishment.
An approved copy of the site layout is issued by the Federal Center, which registers land ownership, and the technical conditions for connection are formulated by the Vodokanal department. They must contain the following information:
- location of the insertion;
- the size of the pipe of the main water supply;
- data that may be needed in the production of the insert.
Such a document can be executed in a specialized design organization, but this does not cancel its approval in the water utility.
The document for the production of the tie-in will be registered at the local department of the sanitary and epidemiological station. A set of documents submitted to the SES is accompanied by a statement about the need to connect to the central water supply network.


Connection to the water supply under pressure is prohibited under the following conditions:
- the pipeline is made of a large diameter pipe;
- in the absence of connection to the central sewerage scheme;
- if the tie-in does not provide for the installation of water metering devices.
Tapping into the water supply with a pipe
In fact, the answer to the question of how to crash into a water pipe can be very simple. One way of this process does not require cutting the pipeline element at all. To begin with, it is purchased, in any specialized store, a piece of pipe with a pipe, of course, of the same diameter as the water pipe.
Punch without cutting - a few simple steps
A branch pipe must be cut out of the purchased pipe section, but in such a way that an element of the “half-pipe” type is obtained at its end. It is he who should provide a reliable overlap of the place of the future tie-in. Simply put, a second wall of the pipe should form, as it were. A hole is drilled in a predetermined place, the diameter of which must correspond to the diameter of the nozzle.
Any non-drying sealant, for example, "Body 940", is applied to the entire inner surface of the flange in an even layer. You should look for it in car dealerships, in car cosmetics departments. The area around the hole is lubricated with the same composition, but you do not need to reach the hole itself by about 1 cm.
Further, when mounting such a curved flange on a pipe, I will have to use such a fastener as a pipe clamp. Rather, you need two of them to pull the edges on both sides. Tighten the clamps very carefully, but so that the sealant begins to squeeze out from under the flange. Residual grease is removed.
There are times when a more rational solution would be to use a ready-made tee with a large cross-sectional size. At the same time, it is necessary to cut off that section of the pipe where there is no branch pipe. In this case, the general procedure will include cutting the pipe longitudinally, drilling a hole in the remaining segment, and then installing a branch pipe to it.
Punch methods
Often the material of the water supply pipeline determines both the material of the branch line pipe and the method of tie-in. If the central or secondary pipe is steel, then it is also better to use a steel layer.In extreme cases, make a transition section in the form of a fitting from a steel pipe with a valve, to which then connect a pipeline from another material.
Insertion of steel pipes is carried out in two ways, such as:
- using a welding machine by welding the fitting to the water supply;
- by means of a steel collar without welding.
Both methods are used both for tapping into a pipeline that is under pressure and without pressure. But on high-pressure pipelines, welding is recommended only in emergency, emergency cases, as well as when organizing additional safety equipment. In the normal mode of work, actions are needed to completely turn off the section of the water supply system where the tie-in is made using welding.
The algorithm of work using welding on an existing pipeline is as follows:
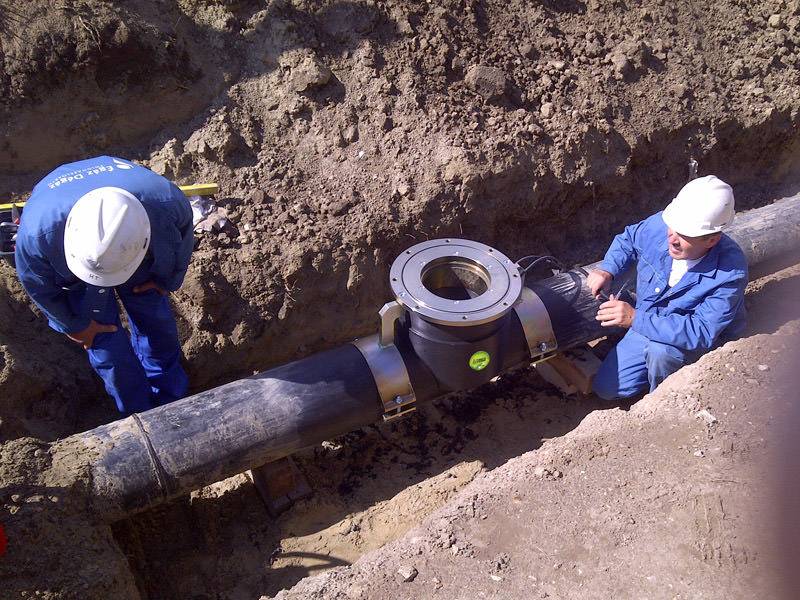
- a pit is dug out by an excavator to a level above the laid pipeline by about 50 cm;
- the section of the pipe into which the tie-in is planned is manually cleared of the soil;
- the tie-in place is freed from the anti-corrosion coating and other protective layers, and the specific area for connecting the fitting or branch pipeline is cleaned to a shiny metal;
- a fitting with a tap is welded;
- after the metal heated by welding has cooled, a drill is inserted through the tap into the fitting and a hole is drilled in the wall of the water pipe;
- when water flows through the fitting, the drill is removed and the tap is closed (the insert is made, further laying of the water supply line starts from the valve on the fitting).
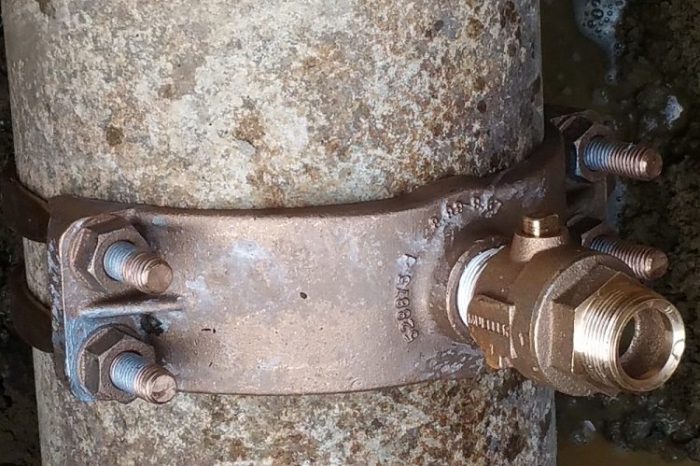
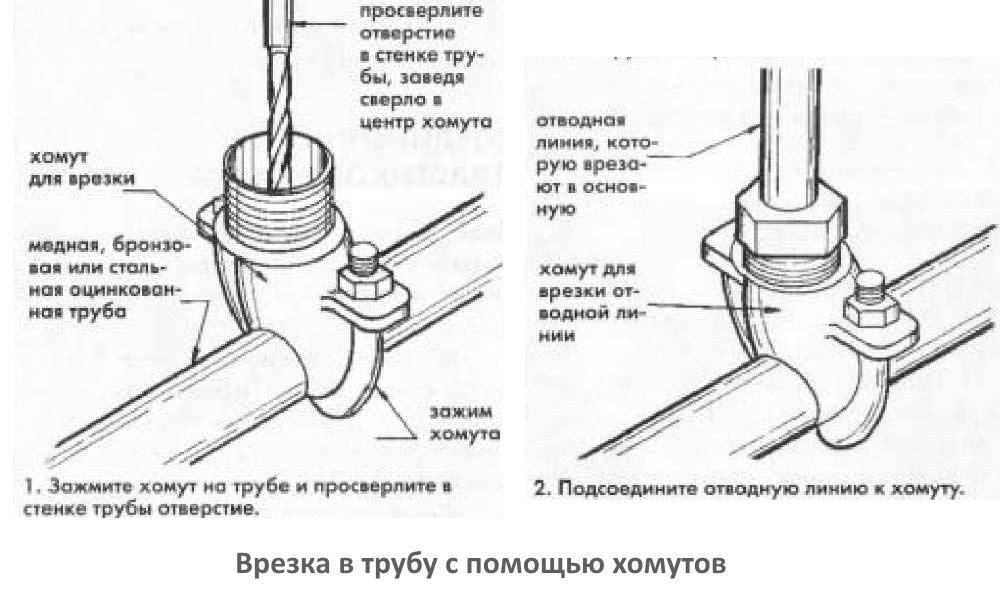
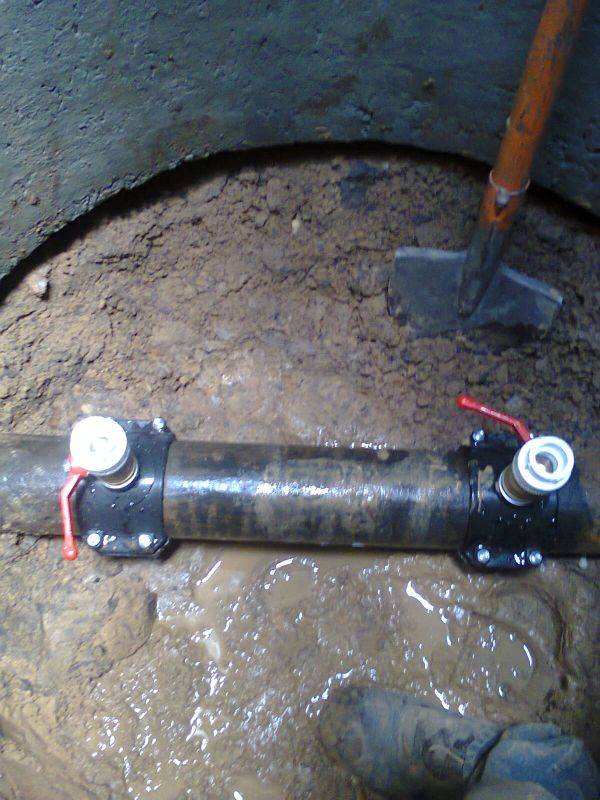
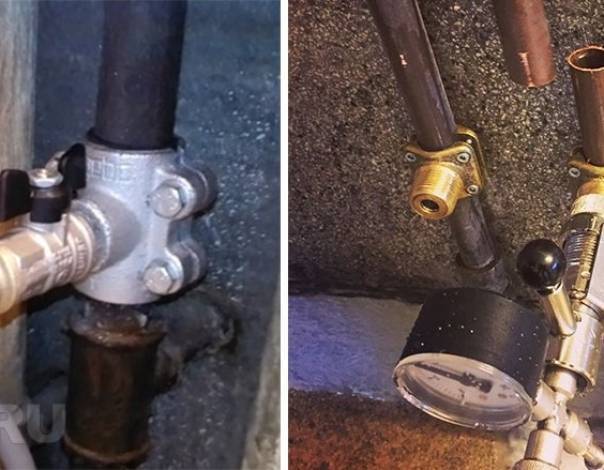
The tie-in clamp is a regular part, consisting of two halves of semicircular shapes.These halves are put on the pipe and pulled together with bolts and nuts. They differ from ordinary clamps only in the presence of a threaded hole on one of the metal parts. A fitting is inserted into this hole, which serves as part of the bypass line. You can position the hole for the pipe anywhere in the water supply, and when screwing in the fitting, it will always be at right angles to the linear plane of the pipeline surface.
The rest of the process is similar to tie-in by welding: a drill is inserted into the fitting through a tap and a hole is drilled. If the outlet is of small diameter and the pressure in the water supply is within 3–4 kgf / cm², then the tap can be screwed on without problems even after drilling (if it is threaded and not welded). Connection of additional lines to the cast-iron line is also carried out using clamps.
Tapping into pipes made of plastic or polyethylene occurs with the help of plastic clamps or saddles (half-clamp with fasteners). Clamps and saddles are simple and welded. Working with simple devices is not much different from tie-in with a clamp into a steel pipe. And in welded saddles or clamps there is all the equipment necessary for welding. Such a saddle assembly is installed on the pipe in the intended place, the terminals are connected to electricity and after a few minutes the tie-in will be automatically performed.


How to connect to a common water main
Before crashing into a water pipe under high fluid pressure, familiarize yourself with three technology options that vary depending on the material of which the pipes are made (they can be polymer (PP), cast iron, galvanized steel).
For a polymer central route, a tie-in into a pressurized water pipe looks like this:
- A trench no less than one and a half meters in size is excavated, the area where the work will be done is exposed, and a trench is being dug from it to the house;
- At the end of the earthmoving work, a saddle is prepared for tapping into the water supply system - this is a collapsible crimp collar that looks like a tee. The straight outlets of the saddle are divided in half, and a valve is installed on the vertical outlet to shut off the pressure. A pipe is drilled through the tap with a special nozzle for tie-in. The most reliable saddle scheme is collapsible welded. It is easy to divide such a clamp into two halves, assemble it over the tie-in section, and weld it to the main route. Thus, the clamp for tapping into the water supply is welded into the body, providing a reliable and absolutely hermetic water supply to the dwelling;
- The pipe is drilled with a conventional drill and an electric drill. Instead of a drill, you can use a crown, but the result is important, not the tool;
- A through hole is drilled until a jet of water comes out of it, after which the drill is removed and the valve is closed. For safety reasons, at the end of the drilling process, the electric tool is replaced with a hand drill or a brace. If you drill a hole not with a drill, but with a crown, then it will automatically ensure the tightness of the drilling site. In addition to these options, there is a solution using a special cutter, which is rotated by an adjustable wrench or an external brace;
- The last stage of the tie-in to the central water supply is the establishment of your own water supply, laid in a trench in advance, and connecting it to the central route with an American compression coupling.
For complete control of the insertion point, it is advisable to equip a revision above it - a well with a hatch. The well is equipped as standard: a gravel-sand cushion is made at the bottom, reinforced concrete rings are lowered into the trench, or the walls are laid out with bricks. Thus, even in winter it will be possible to shut off the water supply if it is necessary to repair it in the house.
For a central water supply pipe made of cast iron, a saddle tie-in looks like this:
- To tap into a cast-iron pipe, it must first be thoroughly cleaned of corrosion. At the very place of drilling, the top layer of cast iron is removed by a grinder by 1-1.5 mm;
- The saddle is built into the pipeline in the same way as in the first paragraph, but to completely seal the joint between the pipe and the crimp, a rubber seal is laid;
- At a further stage, a shut-off valve is attached to the clamp nozzle - a valve through which the cutting tool is inserted.
- Next, the body of the cast iron pipe is drilled, and do not forget about the need to cool the cut site, as well as change the crowns in a timely manner.
- A hole is drilled for tapping into the main water supply with a hard-alloy victorious or diamond crown;
- The last step is the same: the crown is removed, the valve is closed, the insertion point is scalded with special electrodes.
A steel pipe is slightly more ductile than a cast-iron pipe, so the tie-in of the pipes is carried out according to a technique similar to the solution with a polymer line, but the saddle is not used, and before making a tie-in into a galvanized steel water pipeline, the following steps are implemented:
- The pipe is exposed and cleaned;
- A branch pipe of the same material as the main pipe is immediately welded onto the pipe;
- A shut-off valve is welded or screwed onto the pipe;
- The body of the main pipe is drilled through the valve - first with an electric drill, the last millimeters - with a hand tool;
- Connect your water supply to the valve and the pressurized tie-in is ready.
Conclusions and useful video on the topic
How you can crash into a pipe without using a welding machine, you can see in the following videos.
Tapping into a plastic pipe by installing a coupling:
Insertion option with ball valve installation:
There are many connection methods that are a worthy alternative to strong and reliable welding. The main thing is to competently approach the choice of the best option and carry out the insert, strictly adhering to the technology.
Would you like to share the intricacies of tie-in without welding known to you personally? Do you have questions or photos of the mortise work process? Please write comments and post pictures in the block located under the text of the article.