- Sauna stove with a heat exchanger - advantages and features of operation
- Installation of the coil on the chimney
- Making a heat exchanger with your own hands
- Expendable materials
- Assembly algorithm
- How to install?
- Purpose and features of the device
- Structural connection options
- Pipe on tin - simple and durable!
- Corrugation - cheap and cheerful
- Heat exchanger-hood - for heating the attic
- Heat exchanger in baths
- What you need to know when installing a hot water heat exchanger
- The principle of operation and the device of the heat exchanger
- Video
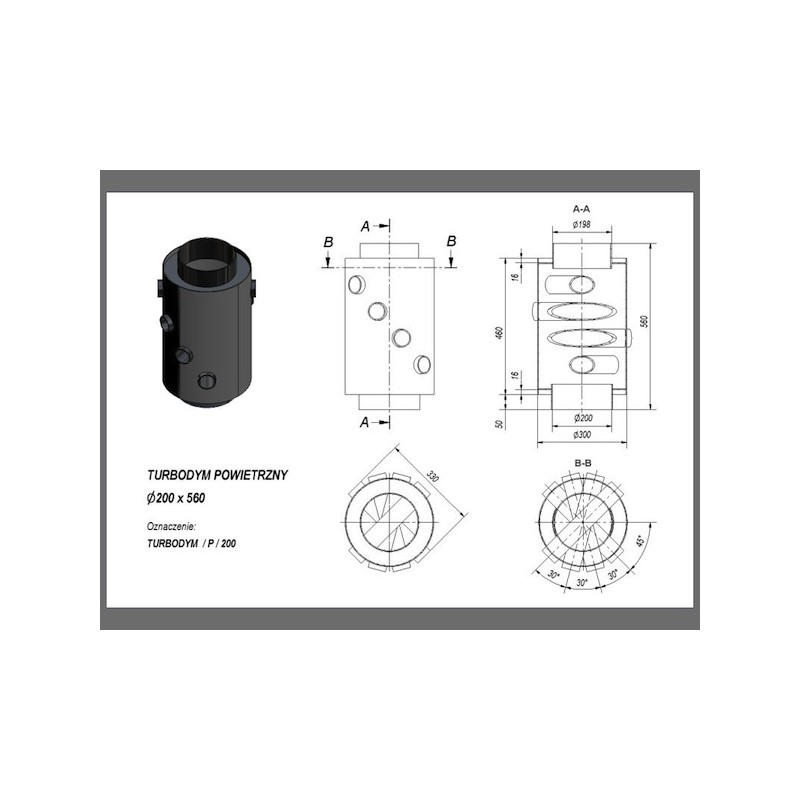
- Air type heat exchanger
- Water
- Types of maintenance
- collapsible
- lamellar
- Shell and tube
- Spiral
- Double-pipe and pipe-in-pipe
- A Few General Tips
- Water heating temperature in the tank
- Boiling water in the heat exchanger
Sauna stove with a heat exchanger - advantages and features of operation
Let us highlight the main advantages of furnaces in a bath with a heat exchanger.
- A bathing system of this design solves two problems at once - it heats the premises of the dressing room and the steam room, and also heats the water.
- It is allowed to place the tank in the room closest to the steam room.
- Despite the relatively low cost of furnaces with a heat exchanger per pipe in a bath, they are characterized by a long service life due to the use of high-quality materials in the manufacture.
- Due to the fact that the firebox of a modern furnace is equipped with refractory glass, it is possible to enjoy the flames and control the combustion process.
- Unpretentiousness of the system in care;
- Attractive appearance.
- The small dimensions of the stove with a heat exchanger on the pipe in the bath help save space in the steam room.
- The power of such a system is quite enough to quickly warm up the steam room to the desired temperature.
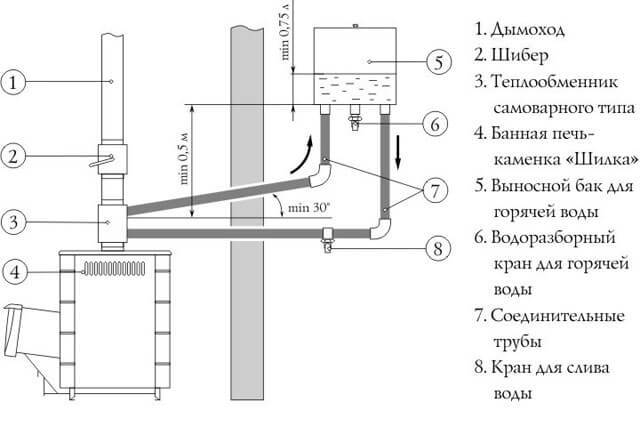
The design of a sauna stove with a heat exchanger is not complicated, and the tank can be placed in a room adjacent to the steam room
Safety issues for each person are in the first place. This factor requires that the system be operated correctly. It is impossible to fix the pipes connecting the tank with other parts of the structure motionlessly to the wall, since their linear parameters change when heated.
The volume of the water tank should be selected taking into account the fact that it must be heated within two hours from the moment of ignition in the fuel furnace. Otherwise, the water will simply turn into steam.
The power of the created heat exchanger on the chimney pipe to the bath should not affect the functioning of the furnace itself. In this case, the level of permissible power reduction should not exceed 10%. When the system is heated to a high temperature, it cannot be filled with water.
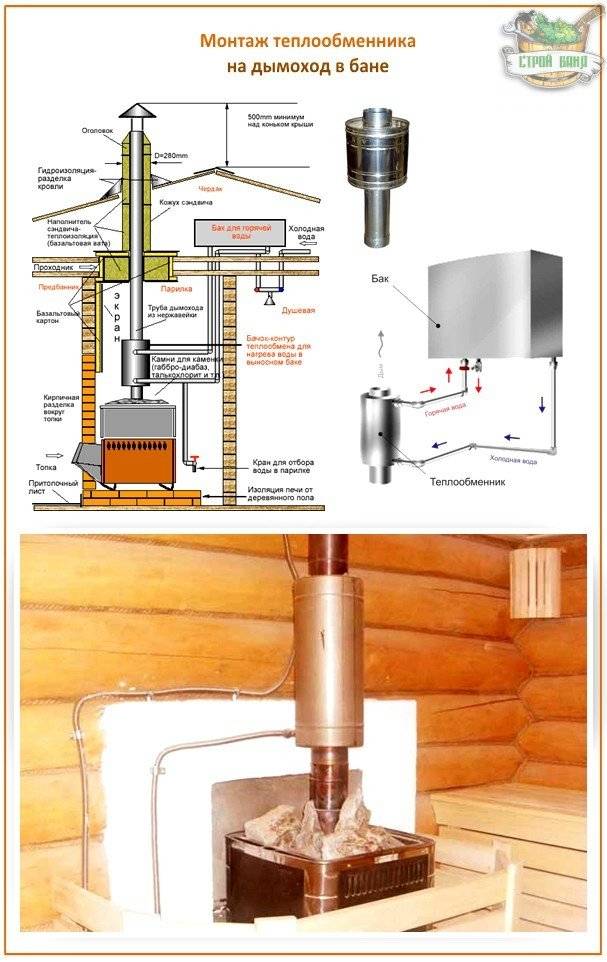
Installation of the coil on the chimney
For stoves of small steam rooms, heat exchangers can be installed directly on the chimney. The design of the hot water coil is practically no different from the built-in heat exchangers, the only inconvenience is the need to install an additional storage tank for hot water.
Many owners of steam rooms install both types of heat exchangers on the stove, the inner one is made of alloy steel and the outer one is made of copper or copper alloy. The first water circuit is used to produce hot water and boiling water, the second is constantly filled with liquid and looped to the heating system.
Making a heat exchanger with your own hands
It is not always possible to buy a ready-made furnace project with a heat exchanger. Also, not everyone can work as a welder. But building a heat exchanger in a heating oven with your own hands is not such a difficult task. By using aluminum or copper, welding can be avoided. With good preparation, correct calculation, this is possible and not burdensome. In addition, it saves the family budget.
Expendable materials
Having chosen a place and size, it is worth considering what it is easier to build a heat exchanger from. You can use both the materials listed above, and cast iron radiators, car radiators and the like. The main thing is to correctly take into account thermal conductivity. Think about exactly what tool you will need and prepare it in advance. All these little things will make installation easier.
Assembly algorithm
You need to start with a project - thinking through the little things and choosing options. It is worth proceeding from the size - if the furnace is weak, then a disproportionately large heat exchanger will only harm. If you use copper as a pipe for the coil, then the length should not exceed three meters.
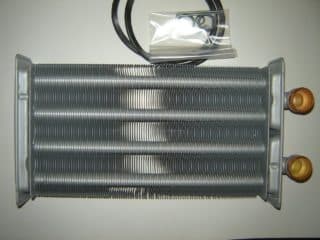
The simplest manufacturing option is a coil. It will require a copper pipe, 2 m to 3 m long.
The heating rate depends on the length of the pipe and the number of turns. But it is worth remembering - you must take into account the size of the furnace, firebox and not abuse the increase in the coil. Distortions in size reduce the life of the furnace.
To twist the pipe into a spiral, you need a template. This is any auxiliary part of a cylindrical shape. The diameter of the template must fit into the furnace size.


Having prepared the materials, we proceed:
- Bending the pipe, we wind it on the prepared blank to obtain a spiral;
- We observe the dimensions in which the coil must be placed;
The average design power of the heat exchanger is 1 kW per 10 meters of area.
If you are not satisfied with this type of heat exchanger, you can make another type, for example by welding steel pipes. It looks something like this:
Examples of drawings on which to carry out work:
How to install?
It is convenient to install the heat exchanger in the furnace during the laying of a new furnace. This will allow you to thoroughly mount it, observing all the gaps and dimensions. With this installation, it is easier to maintain the correct size. Having mounted the heat exchanger on the foundation of the furnace, it is easier to overlay it with bricks than when disassembling the finished furnace, trying to adapt it to its place. But this is also possible.
There are also important points and requirements that should be observed to increase the service life:
- it is not necessary to fix the pipes of structures with metal fasteners;
- do not pour ice water to avoid condensation;
- observe the proportions between the furnace and the heat exchanger, avoiding a big difference;
- use sealing materials with high heat resistance;
- comply with all fire safety measures;
Simple rules will help to avoid dangerous situations, help to extend the life of the furnace. Don't forget about fire safety as well.
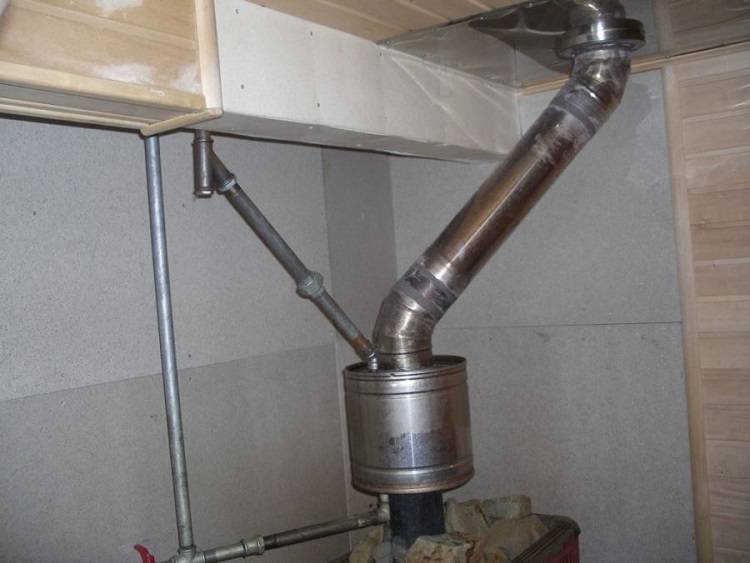
Installation examples in the photo:
Purpose and features of the device
This design is designed to take heat from a heated chimney and transfer it to the coolant circulating in the heat exchanger. The very design of such a device depends on the shape and section of the chimney, the material from which it is made, the power of the heating device and the coolant, which can be air, water, oil and various non-freezing liquids.
According to the coolant circulating inside the device, all heat exchangers can be classified into air and liquid. Air - easier to manufacture, but do not have the highest efficiency. For example, to heat a second room, a waiting room or an attic, it is necessary to run an air duct there, and if such a room is located far enough from the stove, then a fan must be installed to create a forced air flow.
Heat exchangers with a liquid heat carrier are more demanding in terms of workmanship and material, but have greater efficiency. For example, a chimney with a heat exchanger through which water circulates can serve as a complete water heating system for a small country house, if input and output device connect supply and return to one or two radiators.
Structural connection options
The heat exchanger on the chimney can operate in two main modes. And each of them has its own process of heat transfer from smoke to the inner tube of the heat exchanger.
So, in the first mode, we connect an external tank with cold water to the heat exchanger. Then water condenses on the inner pipe, which is why the heat exchanger itself is heated solely due to the heat of condensation of the water vapor of the flue gases. In this case, the temperature on the pipe wall will not exceed 100°C.And the water in the tank will be heated for a long time.
In the second mode, condensation of water vapor on the inner wall of the heat exchanger does not occur. Here, the heat flow through the pipe is more significant, and the water heats up quickly. To understand this process more fully, conduct the following experiment: put a pot of cold water on a gas burner. It will be clearly visible how condensation appears on the walls of the pan, and it begins to drip onto the stove. And despite the flame of 100 ° C, this state will go on for a long time until the water itself in the pan warms up. Therefore, if you use a heat exchanger on a pipe as a register for heating water, then give preference to its small designs with thick walls of the inner pipe - so there will be much less condensate.


Pipe on tin - simple and durable!
This option is simple, practical and convenient. In fact, here the chimney is simply wrapped around a metal or copper pipe, it is constantly heated, and the air distilled through it quickly becomes warm.
You can weld a spiral to your chimney with an argon burner or semi-automatic welding. You can also solder with tin - if you only degrease it in advance with phosphoric acid. The heat exchanger will hold on to it especially firmly - after all, samovars are soldered with tin, and they serve for a really long time.
Corrugation - cheap and cheerful
This is the simplest and least budget option. We take three aluminum corrugations and wrap them around the chimney in the attic or second floor. In the pipes from the walls of the chimney, the air will be heated, and it can be redirected to any other room. Even a fairly large room will be heated to the point of heat while you heat the steam room stove.And to make the heat removal more productive, wrap the corrugated spirals with ordinary food foil.
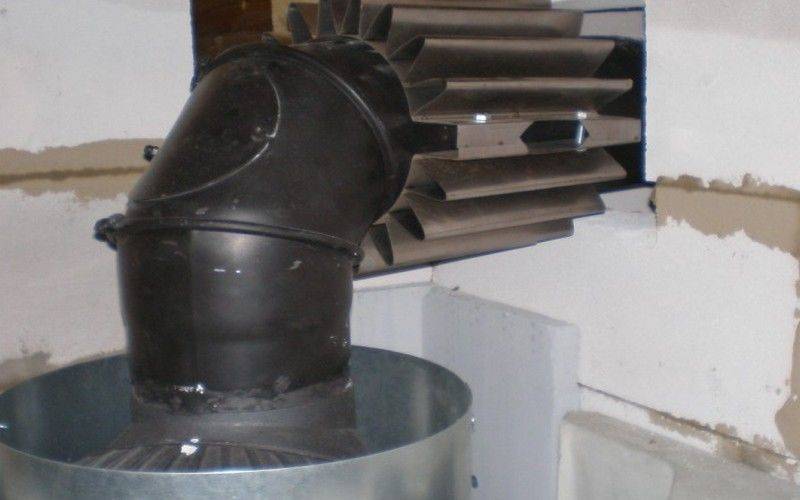
Heat exchanger-hood - for heating the attic
Also, a heat exchanger can be installed on the chimney section in the attic room, which would work on the principle of a bell-type furnace - this is when hot air rises, and when it cools down, it slowly goes down. This design has its own huge plus - an ordinary metal chimney on the second floor usually heats up so that it cannot be touched, and such a heat exchanger will significantly reduce the risk of fire or accidental burns.
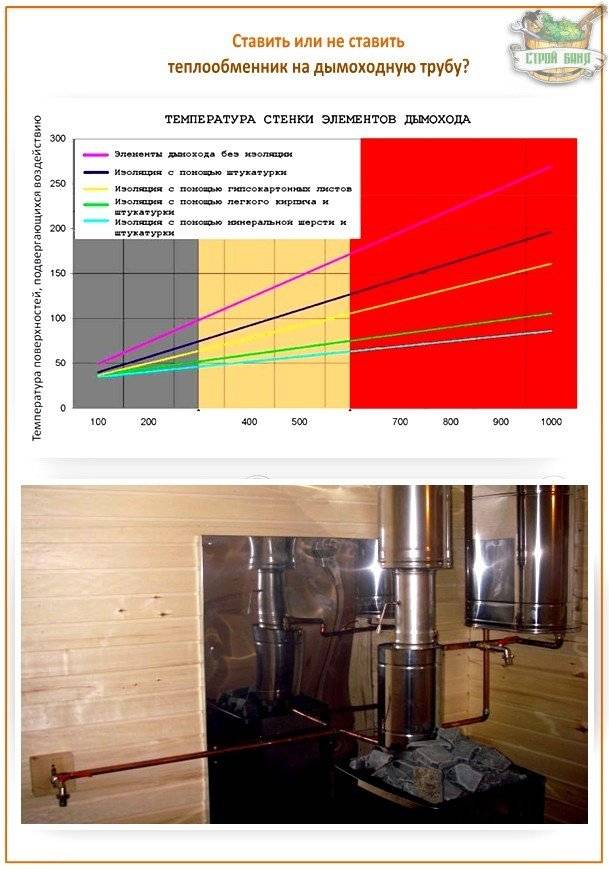
Some craftsmen also cover such heat exchangers with a mesh with stones for heat accumulation and decorate the heat exchanger stand. The attic in this case turns out to be even more comfortable and can be used as a living space. After all, based on practice, the temperature of the pipe of a bath stove does not exceed 160-170 ° C, if there is a heat exchanger on it. And the highest temperature will already be only in the gate area. Warm and safe!
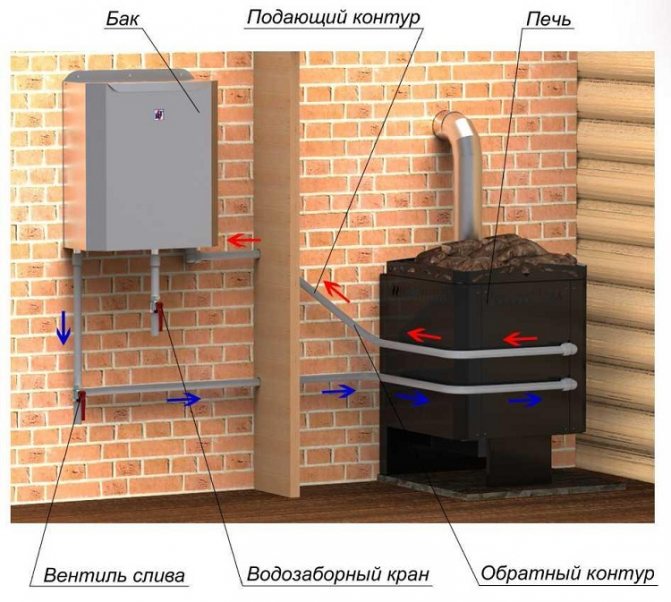
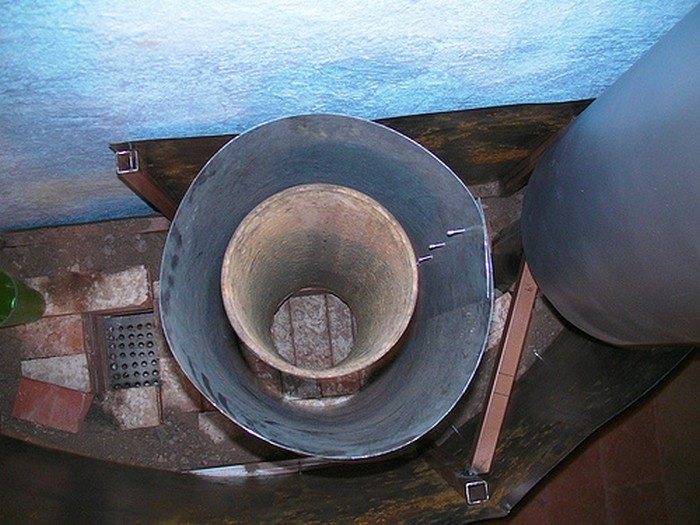
Heat exchanger in baths
It is advisable to make a heat exchanger for a chimney pipe in a bath with hot water systems (hot water supply). An air heat exchanger is used to warm up the bathhouse, and in the steam room there is enough heat without it. A water heat exchanger is used if the bath is a separate building. Usually, a water tank is installed under the ceiling in a room adjacent to the steam room.
What you need to know when installing a hot water heat exchanger
- The water tank must correspond to the power of the stove in the bath - a capacious large container takes longer to heat up. In a small tank capacity, water will quickly boil and give off excess steam.The optimal capacity is 50-100 liters, and 6-10 liters will be enough for the heating element.
- The heat exchanger itself must also correspond to the power of the sauna stove. Ideally, the heat exchanger leaves 10-15% of the furnace heat.
- The water tank must be filled during the heating of the furnace, otherwise the tank will overheat and the entire heat exchange system will collapse.
- The pipes of the heat exchange system should not be rigidly fixed to the walls, as they expand when heated. Excessively rigid mounting will damage the entire heat exchange structure.
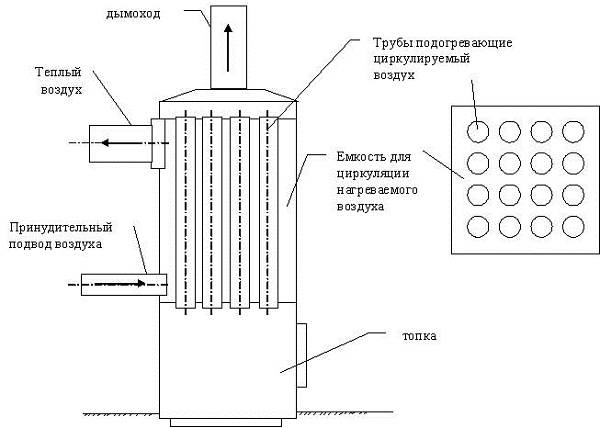
The principle of operation and the device of the heat exchanger
There are several different models of heat exchangers. Their design, as well as the principle of operation, are generally similar. The heat exchanger has a hollow body equipped with outlet and inlet pipes. A so-called brake device is installed inside the housing, designed for flue gases. Most often this is a system of dampers with cutouts installed on the axles. The elements have the ability to rotate, creating a zigzag flue of various lengths. Adjusting the position of the dampers allows you to choose the optimal ratio of heat exchange efficiency and draft in the smoke duct, without violating the rules of safe operation. There are also simpler options without a system of adjustable dampers.

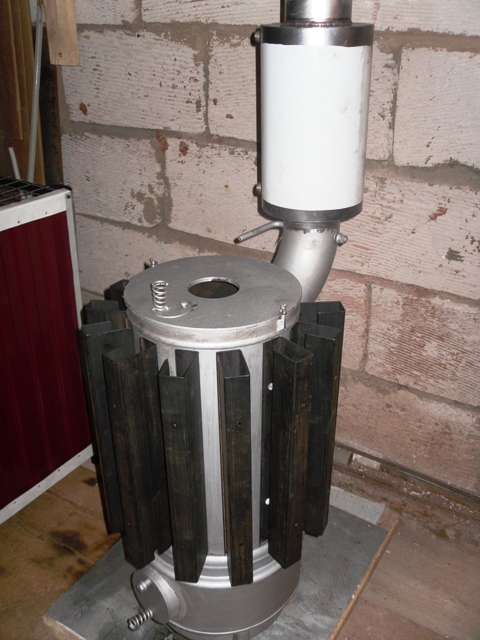
The device of the heat exchanger for the furnace "Bulleryan". Cold air through the holes in the lower part of the device enters the structure, heats up from the combustion products passing through the chimney, and exits
Colder air is drawn in through the holes located in the lower part of the device, according to the principle of convection.It passes through the interior, where the flue gases passing through the flue heat it up. The heated air is expelled through the upper openings into the heated room. Thus, it is possible to increase the efficiency of the heater and significantly reduce the amount of fuel consumed by it. Experiments were carried out that showed that the fuel consumption of a potbelly stove with a heat exchanger installed on the chimney decreased three times.
However, in order to achieve this effect, you should choose the right device. Do not forget that giving up their heat in the flue, the combustion products cool down quite quickly. This leads to a decrease in the temperature difference in the chimney and, accordingly, a drop in draft in the system. To prevent this unpleasant effect, damper adjustments are used or the optimal dimensions of the structure are selected.
Video
Air type heat exchanger
The do-it-yourself air heat exchanger for the chimney has a simple design. It has a metal case, inside which there are inlet and outlet pipes. The principle of operation of the product is simple and can be seen in this photo.


Below is cold air. When it enters the pipes, it heats up and leaves the upper part, heating the room in which it is located. In this case, fuel consumption is reduced by 2-3 times, since the room is heated more efficiently.
Note! The heat exchanger is installed in a horizontal position, as shown in the photo. But there are also options with a vertical arrangement.
Another advantage is that the heat exchanger on the chimney pipe is done by hand. All you need is detailed instructions. Here is a list of tools and materials for work:
- welding machine;
- Bulgarian;
- sheet metal, dimensions 350x350x1 mm;
- pipes of different diameters;
- a piece of pipe with a diameter of 60 mm;
- a metal bucket of 20 liters or a barrel.
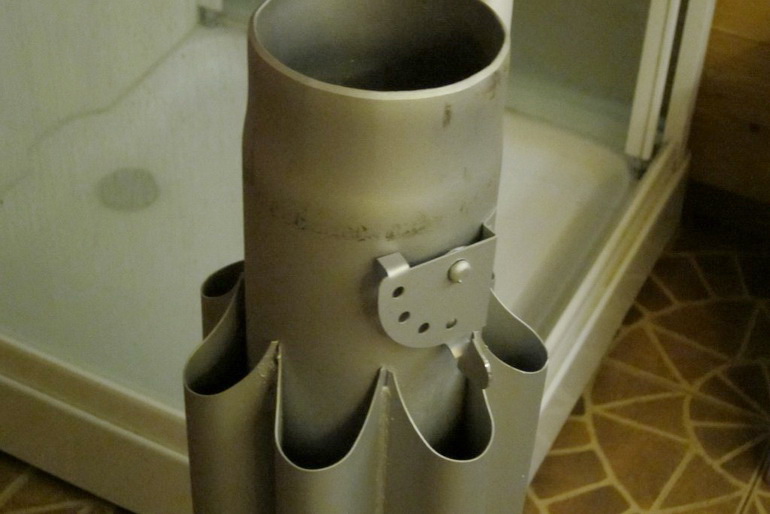
Now you can proceed to a step-by-step review of the creation technology:
End parts are created from sheets 350x350x1 mm. Using a grinder, two identical circles are cut out. In this case, the diameter of the parts (plugs) is equal to the metal container that will be used.
A hole is cut in the center for installing a 60 mm pipe.
Holes for the remaining pipes are marked and cut along the edges. There should be 8. See
a photo
A piece of pipe with a diameter of 60 mm is welded to the central hole.
Pay attention! It is important that all pipes have the same length.
Then all 8 pipes are welded in a circle. And so to each butt
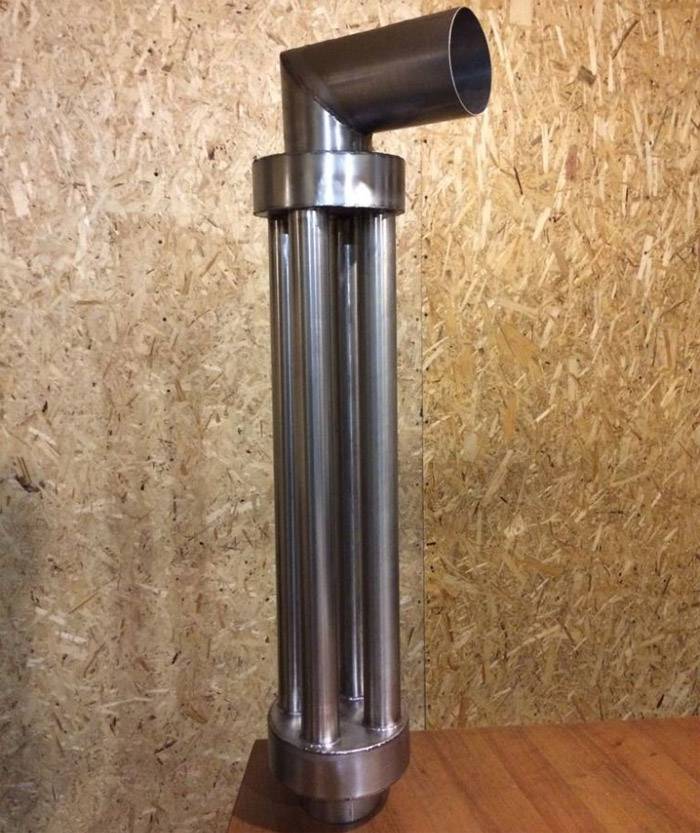
The output should look like this
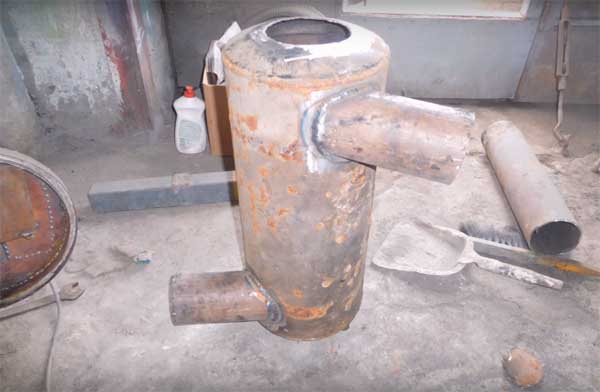
The heat exchanger is almost ready, you just need to make a case for it.
If there is a bottom in the container, then it is cut off.
Holes are made on the sides exactly in the center, identical to the diameter of the chimney pipe.
A pipe is inserted into each hole and welded with a welding machine.
The previously made core of pipes is inserted into the body and fixed to the body by welding. The heat exchanger is ready. It remains to paint it with paint with heat-resistant properties.
A heat exchanger is installed on the chimney pipe to the bathhouse, house or other room. With it, the difference in heating will be felt immediately. Watch the corresponding video to help you cope with the work yourself.
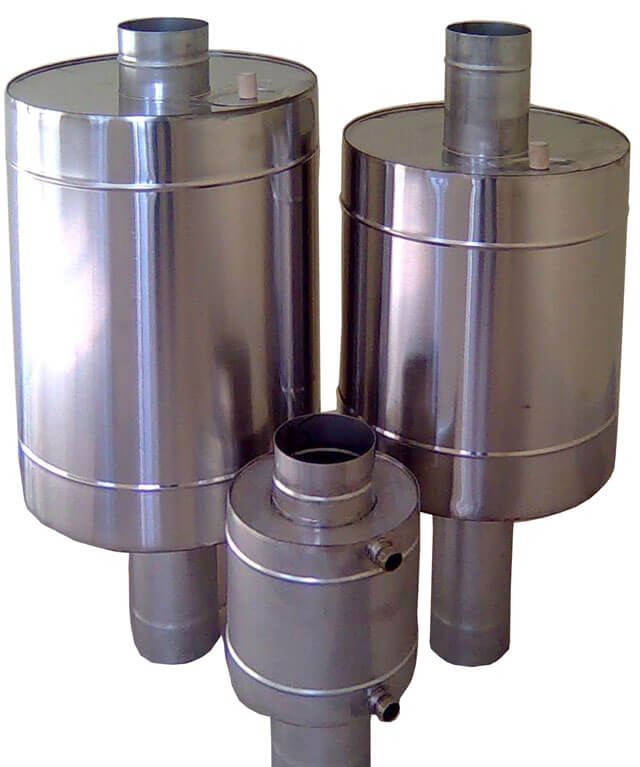
Water
The device has two sectors that heat each other.Water circulation at high power occurs in a closed circuit in the heating system tank, where it heats up to 180 gr. After flowing around the installed pipes, the water is sent to the main system, where the heating temperature increases.
To make a water heat exchanger, prepare:
- Container in the form of a steel tank. Set it to the beginning of the system. For water circulation, 2 branches from pipes are needed, the lower one is for cold water inlet, the upper one is for hot water inlet.
- Check tank for leaks.
- Place copper tubular coils inside the tank, 4 meters of pipe per 100 liters of tank is enough.
- Connect the power regulator to the copper tube.
- To prevent pressure and temperature drops from destroying the container, install the anode closer to the heating element.
- Seal the tank tightly.
- Fill with water.
- Check the system in action.
Types of maintenance

Scheme and principle of operation of a recuperative heat exchanger
According to the principle of operation, the equipment is divided into recuperative and regenerative. In the first, the moving coolants are separated by a wall. This is the most common type, it can be of various shapes and designs. In the second case, hot and cold coolants come into contact with the same surface in turn. The high temperature heats the wall of the equipment during contact with the hot medium, then the temperature is transferred to the cold liquid upon contact with it.
According to their purpose, maintenance is divided into two types: cooling - they work with cold liquid or gaswhile cooling the hot coolant; and heating - interact with a heated environment, giving energy to cold flows.
By design, heat exchangers are of several types.
collapsible
They consist of a frame, two end chambers, separate plates separated by heat-resistant gaskets and fixing bolts. Such equipment is characterized by ease of cleaning and the possibility of increasing efficiency by adding plates. But collapsible maintenance sensitive to water quality. To extend their service life, additional filters are required, which increases the cost of the project.


lamellar
The plate heat exchanger needs to install additional filters on the coolant
They differ in the method of connecting the inner plates:
- In brazed TOs, corrugated stainless steel plates 0.5 mm thick are made by cold stamping. A gasket made of special heat-resistant rubber is installed between them.
- In welded plates, they are welded and form cassettes, which are then assembled inside steel plates.
- In semi-welded TO, the cassettes are held together by means of paronite joints in a structure of a small number of welded modules. These modules are sealed with rubber gaskets and connected by laser welding. Then they are assembled between two plates with bolts.
Plate heat exchangers are used in conditions of high pressure and extreme temperatures. Such devices require minimal maintenance, are economical and are highly efficient. In addition, the efficiency of the equipment can be increased or decreased as needed by increasing or decreasing the number of steel plates.
The only drawback of a corrugated stainless steel heat exchanger is sensitivity to the quality of the coolant, it is necessary to install additional filters.
Shell and tube
They consist of a cylindrical body, where bundles of tubes assembled into lattices are placed. The ends of the pipes are fastened with flaring, welding or soldering. The advantage of such equipment is undemanding to the quality of the coolant and the possibility of using it in technical processes where aggressive media and high pressure are present (in the oil, gas, and chemical industries). The disadvantages of shell-and-tube HE are relatively low heat transfer, large dimensions, high cost and difficulty in repair.
Spiral
They consist of two sheets of metal rolled into a spiral. The inner edges are connected by a partition and fixed with pins. Such heat exchangers are compact and have a self-cleaning effect. They are able to work with liquid inhomogeneous media of any quality. With an increase in the speed of fluid movement, the intensity of heat transfer increases. Disadvantages: difficulty in manufacturing and repair, limiting the pressure of the working fluid to 10 kgf / cm².
Spiral
shell-and-tube
Double-pipe and pipe-in-pipe
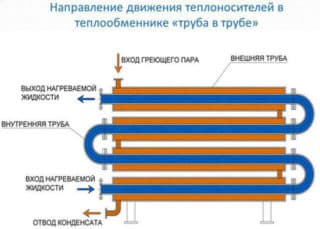
Scheme of the heat exchanger "pipe in pipe"
The first consist of pipes of different diameters. Liquid and gas are used as a heat carrier. The devices are used in places with high pressure, have a high level of heat transfer. They are easy to install and maintain. The only drawback is the high cost.
The "pipe in pipe" heat exchanger consists of two pipes of different diameters connected to each other. They are used at a low coolant flow rate and to equip a chimney.
A Few General Tips
During the use of heat exchangers, some problems arise that can "spoil the mood." What are these problems and how can they be solved?
Water heating temperature in the tank
Water heating temperature in the tank
It is necessary to “catch” the moment when it will be acceptable, but it is almost impossible to catch such a “moment”. The fact is that while taking a shower, the stove continues to burn, respectively, the temperature of the water constantly rises. What to do? Put out the fire in the oven? This, of course, is not an option.
We propose to solve the problem with a mixer. If there is a water conduit in the bath - excellent, it will help not only create a comfortable temperature, but also, using the simplest automation, make filling the water tank automatic. It will be possible to wash without saving water, the risks of its boiling in the heat exchanger are somewhat reduced. If there is no water supply, we recommend installing an additional cold water tank next to the warm water tank. You need to connect it to the shower through a mixer.
Wiring diagram
Boiling water in the heat exchanger
Boiling water in the heat exchanger
Especially often this happens during the installation of the heat exchanger directly in the furnace furnace. We guarantee that you will never be able to calculate the parameters of the heat exchanger in such a way as to completely exclude this phenomenon. These calculations are too complicated and there are too many unknown and unregulated indicators. Speed calculations water flow can only be performed by a qualified design engineer who knows the laws of heat engineering, hydraulic engineering and installation perfectly. But the most important unknown quantity is the flame in the furnace.


No one will ever be able to say exactly how much heat the stove gives in each individual unit of time. It is impossible to quickly increase or decrease the flame burning intensity depending on the water temperature. We propose to solve the problem of boiling water with the help of ordinary single-phase water pumps for heating systems. They are built directly into the pipeline, the power of the devices is 100 ÷ 300 W. Installing a circulation pump not only eliminates the risks of boiling, but also significantly speeds up the time for heating water.
Scheme circulation pump connection
We hope that our information will be useful for owners of baths and will make it possible not to solve problems with heat exchangers, but to prevent their occurrence even at the stage of manufacture and installation.


