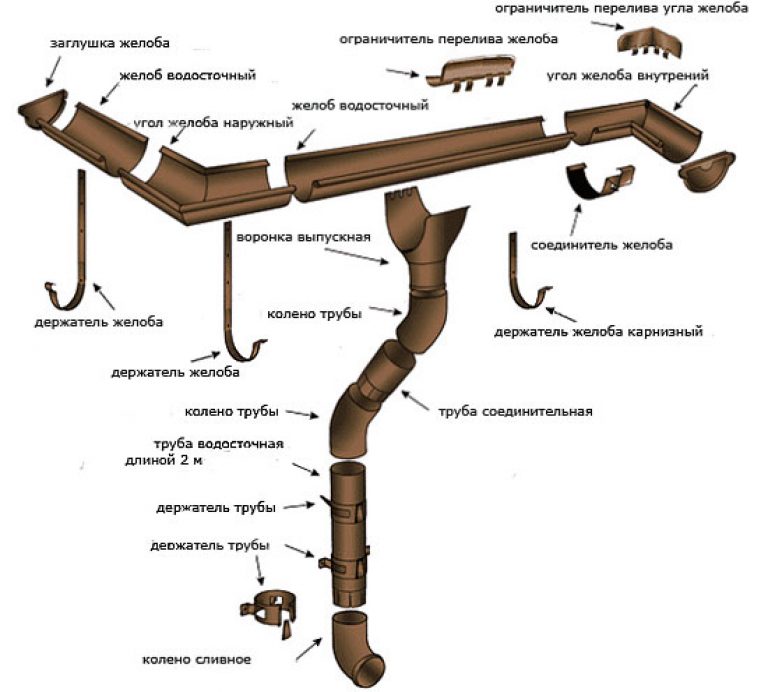
- Drainage system installation technology
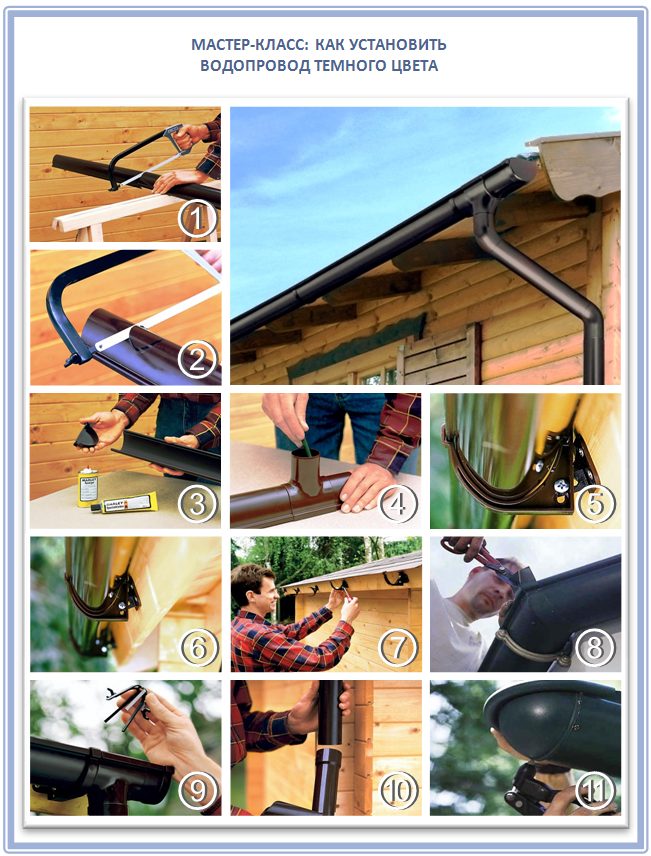
- Gutter manufacturing
- Preparation and installation of brackets
- Installation of gutter risers
- System calculation
- How to choose the right drainage system
- Heating cable in the drainage system
- Varieties of modern drainage systems according to the material of manufacture
- Generalization on the topic
- Installation of a drainage system
- 1 stage of work
- Stage 2
- Stage 3
- Stage 4
- Stage 5
- Drainage from sewer pipes
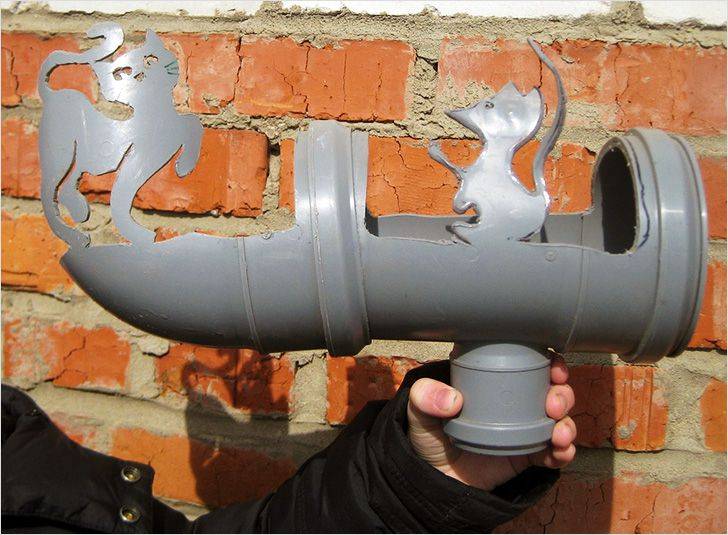
- How to make a gutter with your own hands
- Tools for the job
- Rules for installing an external and internal gutter
- Gutter fastening methods
- Drainage system project
- Type of drain
- Pipe material
- Calculations and dimensions
- Why is a drain necessary?
Drainage system installation technology
In order to understand how to make a drain from sewer pipes, it is necessary to study the requirements for this design. Must have:
- horizontal open gutters - for unimpeded flow of water from the roof;
- vertical drains - to drain the collected liquid;
- sloping arrangement of horizontal and indentation from the walls of the vertical elements of the drainage system.
The assembly and installation process is divided into several stages:
- Installation of gutters on brackets and through couplings.
- Connection with gutters and fastening to drain walls.
- Construction of protective elements.
Gutter manufacturing
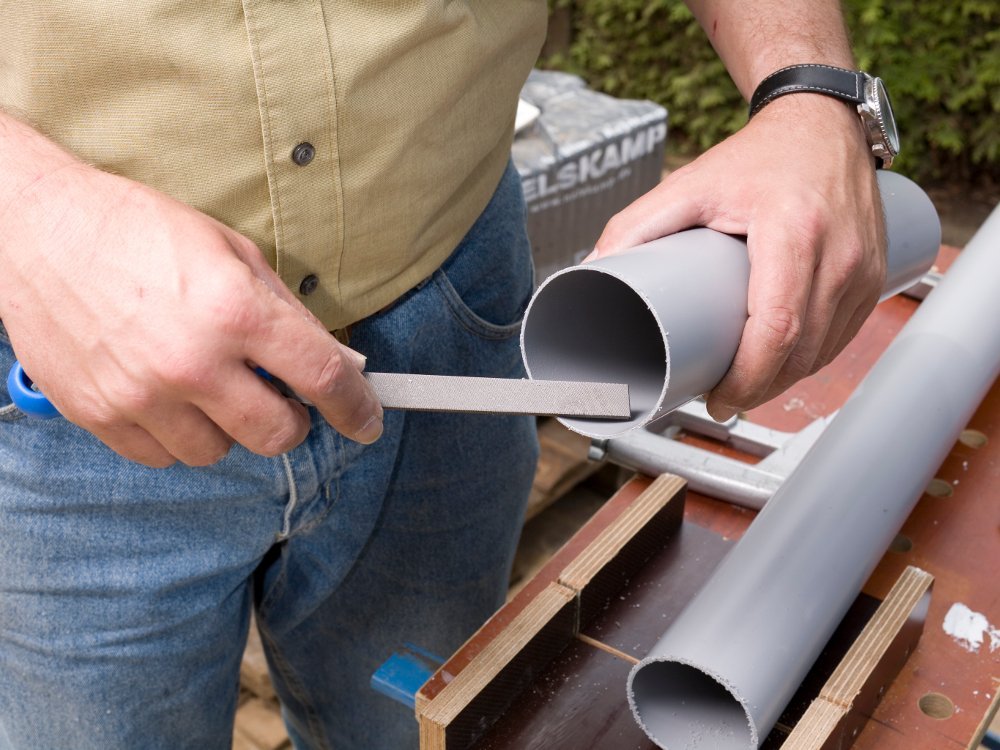
In order to make a gutter out of a sewer pipe with a diameter of 11 cm, it must be sawn along its entire length into 2 equal halves. Therefore, when buying a pipe, you need to calculate that its footage should be 2 times less than the length of the gutter.
When cutting with different tools, there are nuances:
- When cutting with a grinder, you need to purchase a special disk for plastic in order to avoid heating and melting of the material. If there is none, sticking of the molten mass to the protective cover will be observed. Therefore, it should be removed and protected by a mask or goggles.
- When using an electric jigsaw, there is a high risk of a bevel cut, so you need to build guides from wooden slats that will limit the course of the blade.
- If the cut is carried out with a hacksaw, it is enough to fix the ruler with adhesive tape, which will indicate the location of the cut line.
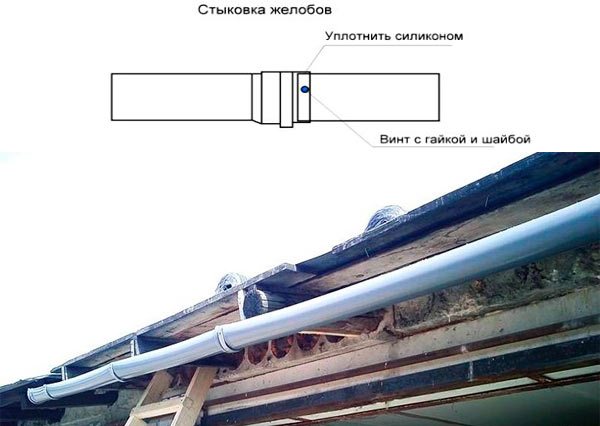
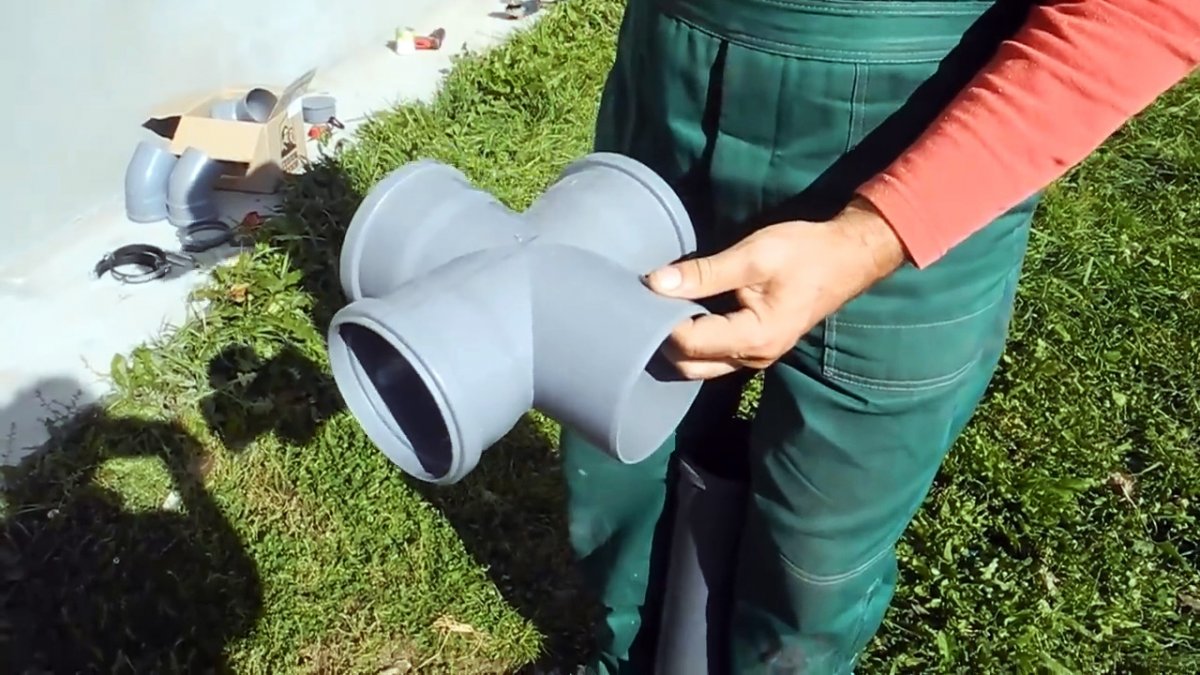
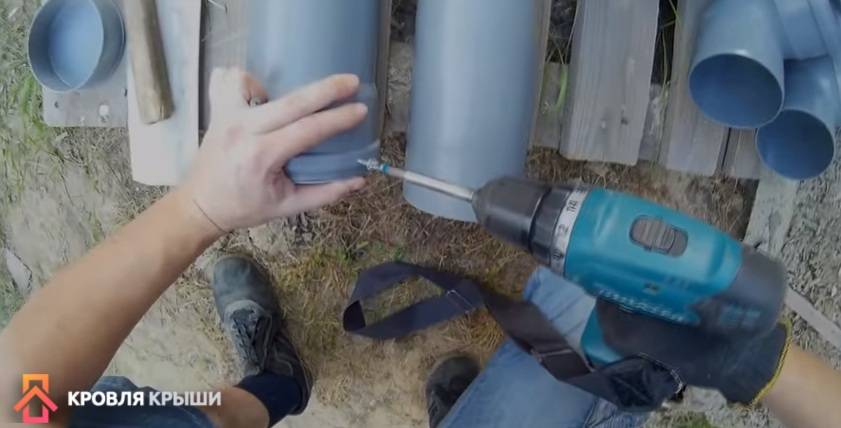
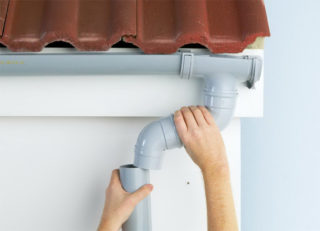
To mount the gutter and dock it with risers, a connection through a tee is required. To ensure reliable adhesion and strength of the structure at the points of departure of vertical elements, the pipe must be left untouched, making a cut without reaching the edge of 10-15 cm.
Preparation and installation of brackets
For mounting gutters to the roof, brackets are used, which can be bought ready-made or made independently by bending fasteners of the appropriate shape and size from metal strips.
Used for fixing brackets several ways:
- on wind boards without dismantling the roof elements;
- to the rafters, if wind boards are not provided for in the structure (without the need to dismantle the roof);
- on the roof lathing during the construction of the roof or with the preliminary dismantling of those parts that block access to them.
When installing, consider the following factors:
- the edge of the roof covering protrudes at least a quarter from the edge of the gutter;
- the outer side of the drain is slightly beveled relative to the plane of the roof;
- a slight slope towards the drainage of rainwater is required.
When all the preparatory and measuring work is completed, proceed directly to the installation of the brackets:
- Fix the extreme elements.
- A string is pulled between them and intermediate fasteners are installed.
- Install plastic tees to connect to the risers.
- Install gutters.
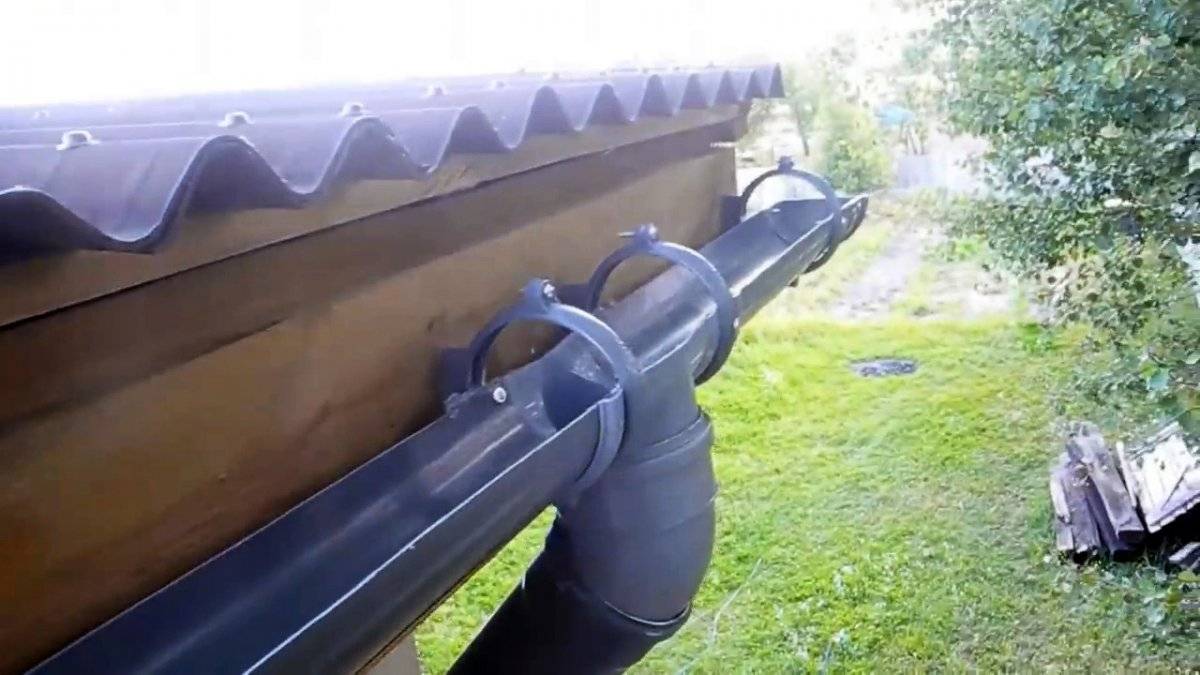
Installation of gutter risers
For the installation of risers of the drainage system, sewer pipes with a diameter of 5 cm are used, which are connected to the gutters through special tees. If necessary, you can make drains from pieces, connecting them with adapters end-to-end with sealant lubrication.
- the distance from the riser to the wall must be at least 10 cm;
- fastening to the surface is carried out by means of clamps, which are installed from the bottom up to the gutters;
- the installation step of the fasteners is allowed no more than 150-200 cm;
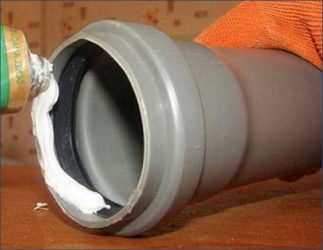
- when connecting to a tee, the edge of the pipe is first coated with a sealant to prevent water from flowing.
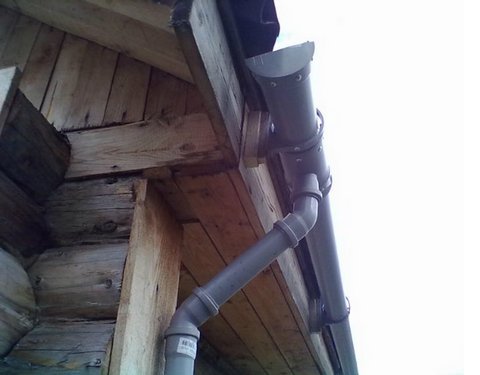
Since the drain is designed to provide reliable protection for the foundation, the lower edge of the riser is connected to the storm sewer. If there is none, you will need to install a specially shaped knee, under which a container for collection of rain and melt water.
System calculation
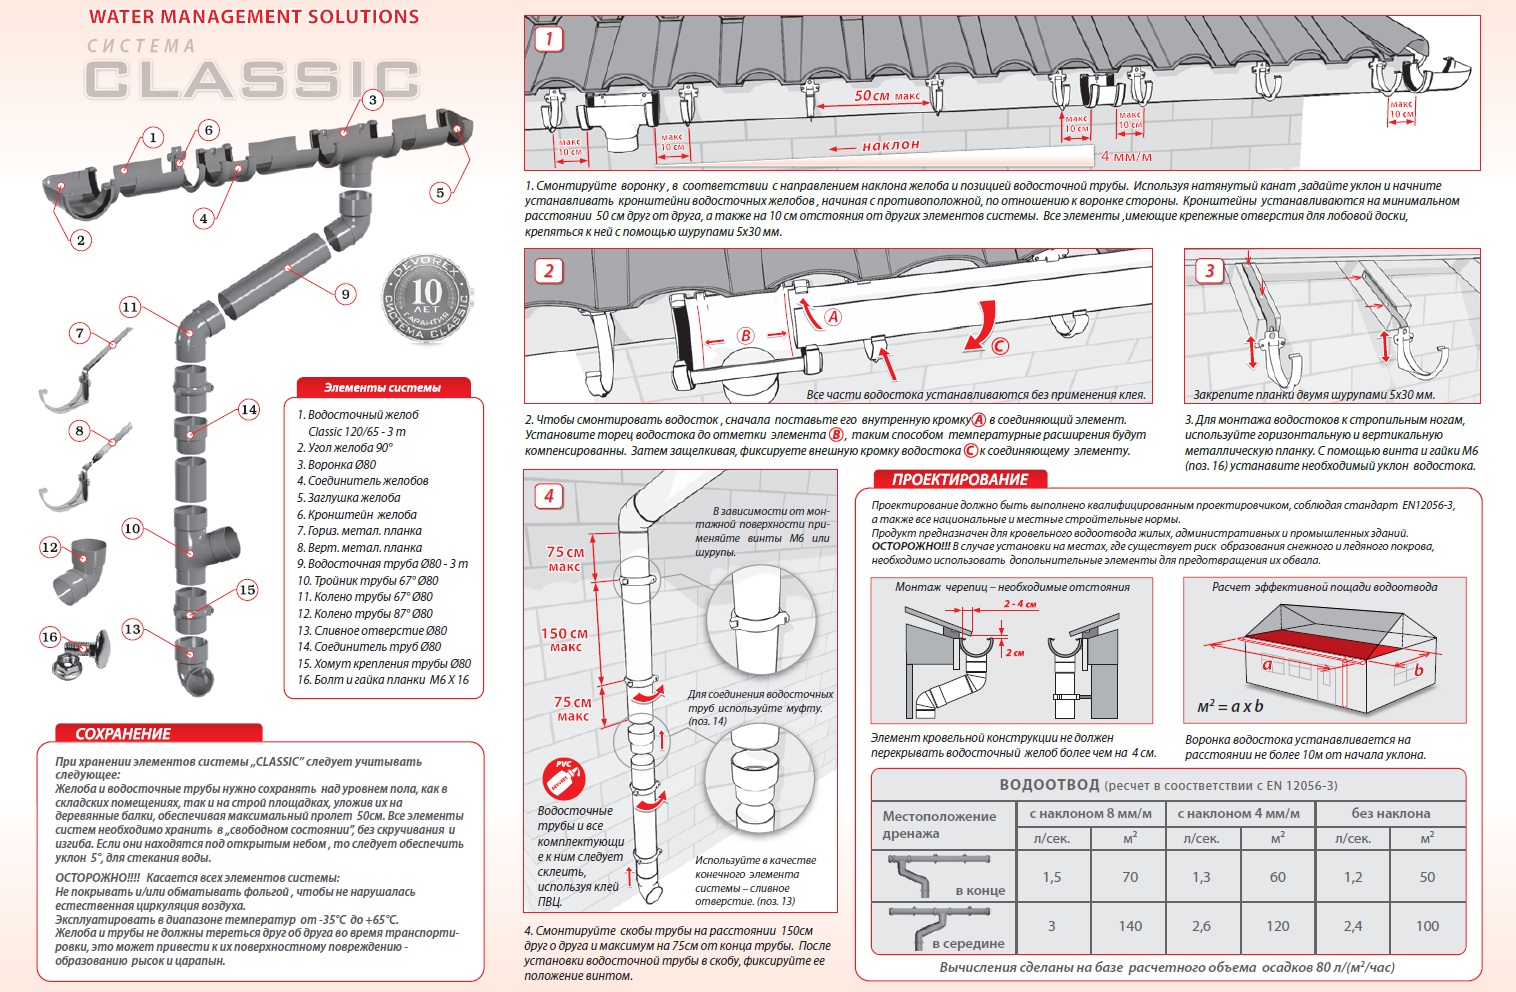
When calculating the drainage system, it is necessary to determine the number of pipes intended for the production of gutters and pipes that will be used as vertical drains, as well as the required number of brackets and clamps for fixing them. The easiest way to depict the results of calculations is as a sketch. This will allow not only to avoid mistakes, but also to make the optimal cutting of the material, based on the fact that the reliability of the system is the higher, the fewer joints there are between its elements.
Related article: Blackout curtains - a highlight in every interior
The total length of the gutters is equal to the perimeter of the roof. The required number of pipes will thus be half as much, since each of them will turn into two gutters when cut.
The number of pipes required to make vertical drains is calculated as follows:
- The distance between two drains should not be more than 12 meters horizontally. So, their number can be determined by dividing the length of the perimeter by 12 (if the sides of the house are less than 12 meters, then you can place drains at each corner of the building). Multiplying the resulting number by the height of the house, we find the total length of the pipes for vertical gutters. When calculating the length of vertical drains, it is also necessary to take into account the drainage system. If the water from the roof will pour immediately onto the ground and soak into the ground, the above algorithm gives a fairly accurate value. When directing runoff into a storm sewer or irrigation tank, it is better to draw a complete diagram of one riser and calculate its length, taking into account the vertical and horizontal components, and then multiply this value by the required number of drains.
-
Calculate the required number of brackets for the drain from the sewer pipes. For reliable fixation, they are placed at a distance of 500-600 mm from each other, in addition, two holders (from different sides) are installed at the corners and at the places where the funnels are installed.
Plastic bracket for mounting gutters
- Fittings are selected depending on the design chosen.
- At the bottom, corners will be required to change the direction of the drains (away from the wall).
- In the upper part, corners may be needed to bring the pipe closer to the wall from the edge of the roof for subsequent fixation to a vertical surface.
- The dead-end sections of the gutters are supplied with plugs, their number is also calculated according to the scheme.

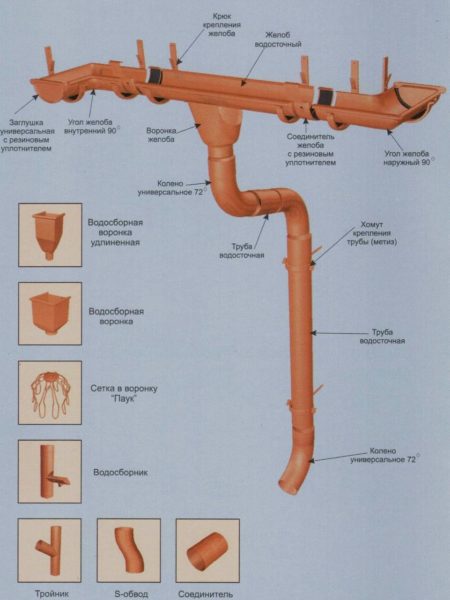
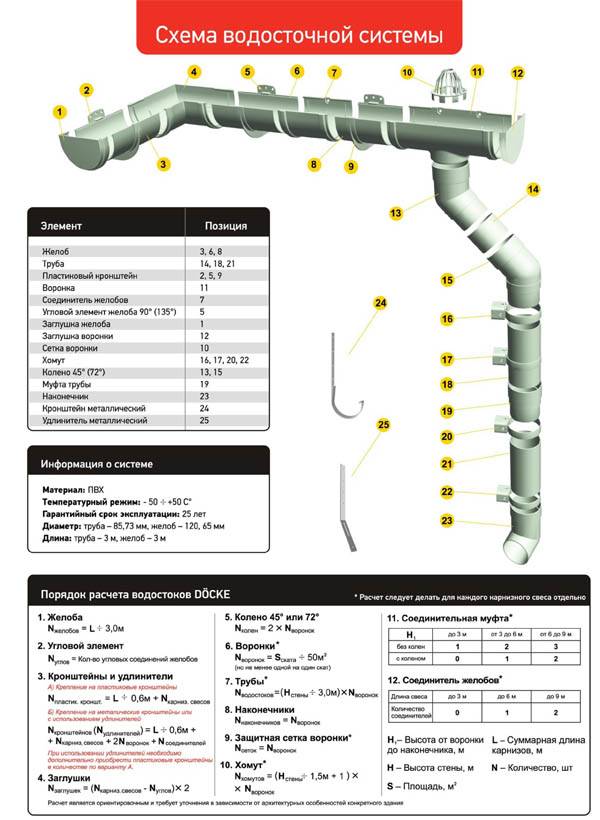
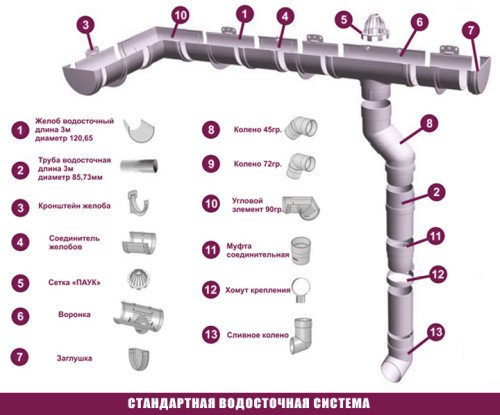
Standard elements of the drainage system
For self-construction drainage systems from sewer pipes use pipes and fittings of various diameters.
- The gutters are made of pipes with a diameter of 110 mm.
- Vertical drains are mounted from pipes 50 mm.
- Tees are purchased with the ability to connect different (50 and 110 mm) pipes.
- Branch corners for changing the direction of vertical pipes for draining water into storm sewers or watering containers have a diameter of 50 mm.
How to choose the right drainage system
Just go to the store and buy a gutter system without deciding on its parameters, it's wasted money. There are certain standards regarding the size of the roof, or rather, the area of \u200b\u200bthe slope from which water will be collected in the drainage system. And the larger the area, the larger the trays and pipes should be in terms of their diameter.Therefore, before proceeding to the installation of a gutter system, it is necessary to accurately select it in size in accordance with the area of the roof slope.


- If the roof slope area does not exceed 50 m², then gutters with a width of 100 mm and pipes with a diameter of 75 mm are installed in the gutter system.
- The area is within 50-100 m², gutters are used - 125 mm, pipes 87-100 mm.
- The slope area is more than 100 m², gutters 150-200 mm, pipes 120-150 mm.
Installation of the drainage system is shown in the video:
Heating cable in the drainage system
Ice and snow inside the drainage system create a blockage (plugs), which prevents the melted water from draining. As a result, it overflows over the edges of the trays, forming icicles. How dangerous they are, everyone knows. In addition, a large amount of ice and snow inside the trays is a high probability of the collapse of the entire structure or the deformation of its elements. To prevent this from happening, a heating cable is installed in the drain. It is a conductor of electric current that releases heat energy.
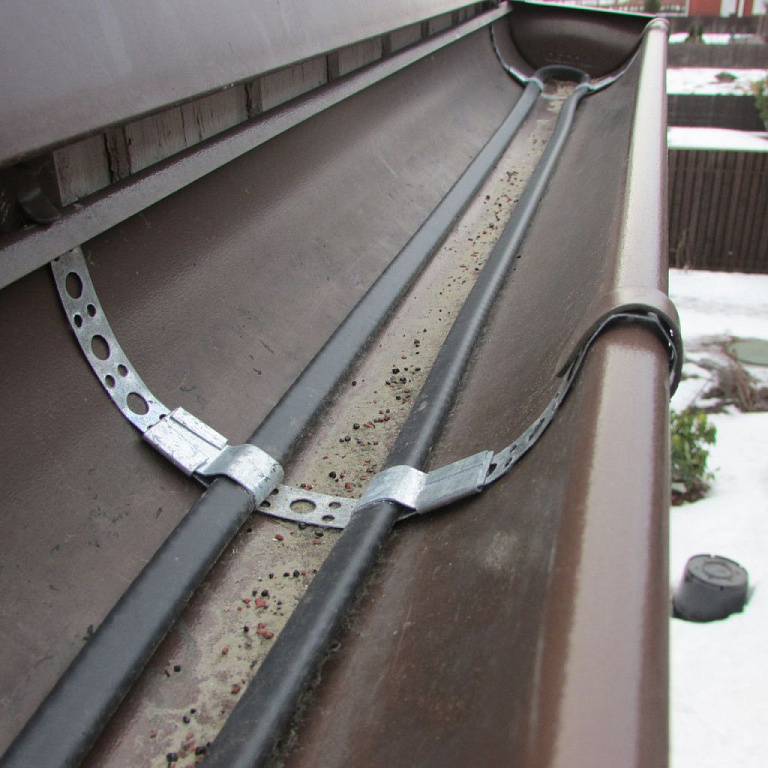
Heating cable inside the gutter systems
The heating cable is installed after drain installation for roofs. It is simply laid inside the gutters (along) and lowered inside the pipe risers. In trays, it is fixed with special clamps made of either stainless steel, or galvanized steel, or plastic.
In addition to the cable itself, the kit comes with a power supply and a thermostat. The first one supplies the current of the required voltage and strength, the second regulates the temperature of the cable depending on the weather conditions. For example, if the temperature outside is within -5C, then the cable does not heat up much. If the temperature drops lower, then the current strength inside the conductor increases, which increases heat transfer.This is what the thermostat controls.
It must be added that the thermostat itself does not determine the temperature. To do this, sensors are added to the system: either temperature or humidity.
Most often, the heating cable is installed not only inside the trays and pipes. They cover part of the roof, or rather the overhang area. Here the conductor is laid with a snake and fixed to the roofing material with special clamps. You can see this clearly in the photo below. At the same time, it should be noted that the heating cable both inside the drain and on the overhang is a single system with one power supply and a thermostat.

Heating cable on roof eaves
How the drainage system works is shown in the video:
Varieties of modern drainage systems according to the material of manufacture
Traditionally, gutter systems were made of galvanized steel. And today this material has not left the market. They simply began to cover the galvanized drain with paint, thereby adjusting it to the color of the roofing material, creating a single design design for the house. Plus, it became possible to extend the service life due to an additional protective layer.
Today, manufacturers offer galvanized gutters, polymer coating. In this case, the polymer coating is applied both from the outside of the galvanized sheet and from the inside. This is better protection and a huge variety of colors, not limited by anything.

Gutter made of plastic
Plastic gutters are the most popular today. They are made from polyvinyl chloride (PVC). But this material is not used in its pure form, because myself by itself, it becomes brittle at low temperatures.Additives are added to it, which increase the strength of the polymer, so PVC gutters are not afraid of temperature extremes and sunlight. And the biggest plus is that plastic is the cheapest material.
The modern market today offers gutter systemsmade of copper or stainless steel.

Copper drain
Generalization on the topic
Installing roof gutters is a serious process. The main task of the manufacturer of works is to correctly select its elements in accordance with the area of the roof slope, correctly set the angle of inclination of the gutters and correctly fasten the structural elements.


Installation of a drainage system
To understand how to make a drain from sewer pipes, it is important to take into account some installation features. Gutters around the perimeter can be installed:
Gutters around the perimeter can be installed:
- to the edge of the truss system,
- on the frontal bar of the eaves,
- on the roof itself.
The first two options are preferable, but they are easy to implement if the drain from the sewer pipes is installed with your own hands at the construction stage, that is, before the top layer of the roof is laid.
 Drainage bracket mounting option
- If the system is installed in an already built house, installation on the edge of the roof is allowed. It is advisable to choose the same method with a large overhang of the roof (the edge is at a considerable distance from the wall of the house).
- The gutters are installed in such a way that they go beyond the edge of the roof by a third of the diameter of the pipe section and protrude by two thirds, “catching water flows”.
- In order to prevent water from stagnating in the gutters, they should be placed with a slight slope towards the funnel (2-5 mm per meter of length).The easiest way is to calculate the total slope along the side, mark the start and end points, and then connect them, marking the installation locations of the brackets. This will ensure the uniformity of the slope.
- The upper edge of the gutter must be at least 3 cm lower than the edge of the roof. Otherwise, the structure can be torn off by snow mass or ice moving from the roof in spring.
Having familiarized yourself with these nuances, you can begin to mount the drain from the roof of the sewer pipes.
For this you will need:
- screws, screwdriver or screwdriver;
- level and tape measure;
- file, sandpaper;
- hacksaw or grinder;
- twine;
- stairs or scaffolding.
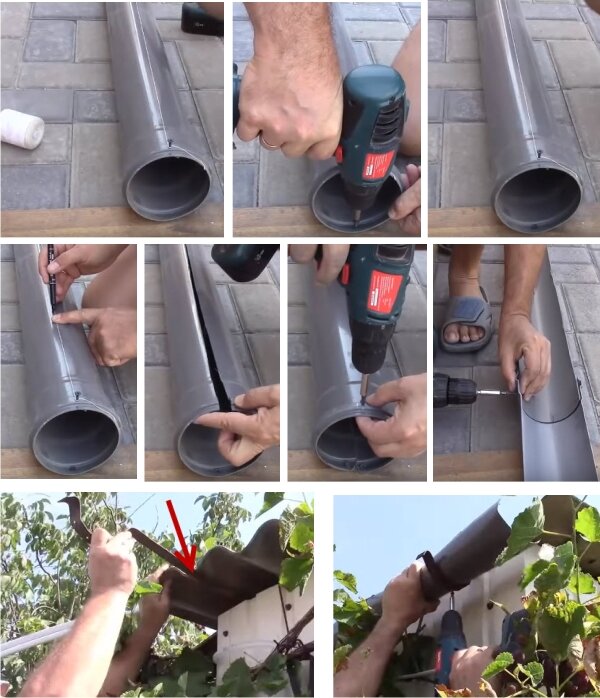
1 stage of work
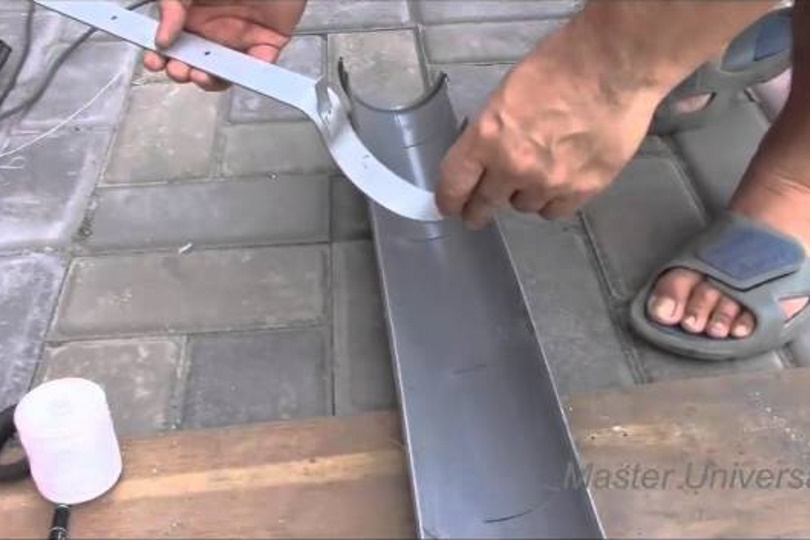
Pipes intended for the manufacture of gutters are sawn in half in the longitudinal direction. To improve accuracy, you can use a template made of wood. The edges (places of cutting) are better to be slightly sanded. When making a cut, refer to the drawn diagram - at the joints it is required to leave solid sections as connecting pipes for fittings.
 A plastic fitting acts as a drain funnel, to which gutters are connected horizontally, and pipes with a diameter of 50 mm are connected vertically
Stage 2
Installation of brackets starts from the extreme positions. The corner elements are fastened with threaded hardware, after which a string is pulled between them to check the slope. Intermediate holders are fixed along the marked line between the extreme positions with an interval of 500-600 mm.
In a similar way, only without a slope, fixation points are marked and clamps for vertical pipes for draining are installed.It should be borne in mind that such risers should not be adjacent to the wall closely. The distance should be about 5-10 cm.
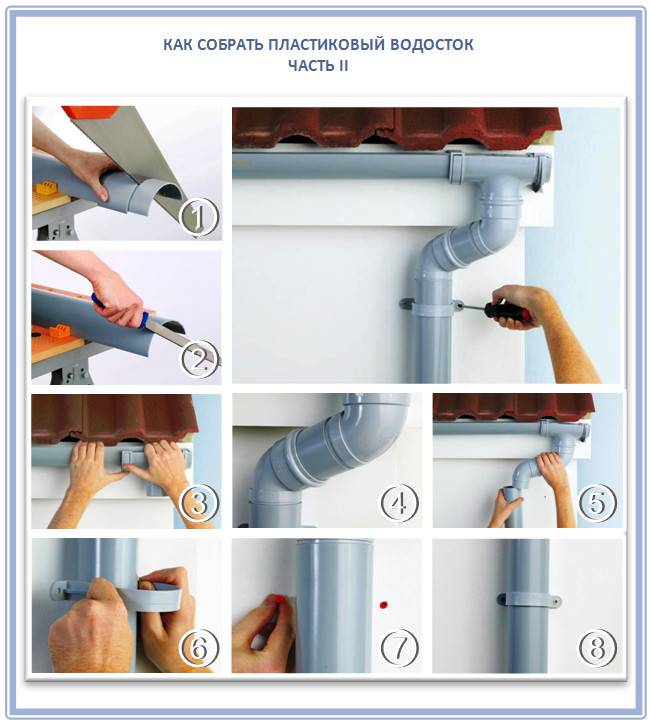
Stage 3
Gutters from sewer pipes are mounted. The elements are connected using special glue or aluminum clips. In the second case, it is necessary to use a sealant to create an impermeable joint. Plugs are installed in the same way.
An exception in terms of the assembly method are funnels. This is the only element of the system that is installed in a glueless way. To seal the joint, rubber gaskets are used, which are available in plastic fittings (tees). Such sections of the structure are assembled, as well as sewer pipes, into a socket.
Stage 4
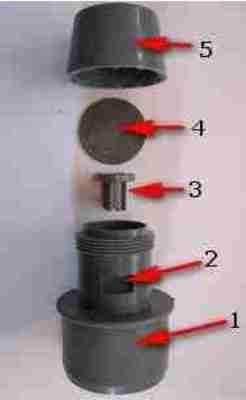
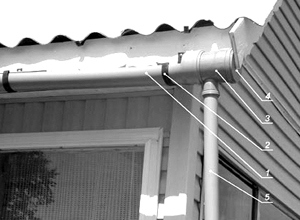 1 - plastic gutter, 2 - bracket, 3 - fitting, 4 - plug, 5 - plastic pipe
The assembled gutter blocks are mounted on brackets and connected. Joints are sealed in a similar way. At the ends of the drain from the sewer pipes, on those that are above the entire system in level, plugs are installed.


Stage 5
Vertical drainage blocks are assembled and installed with lower shaped elements that change the direction of the water flow.
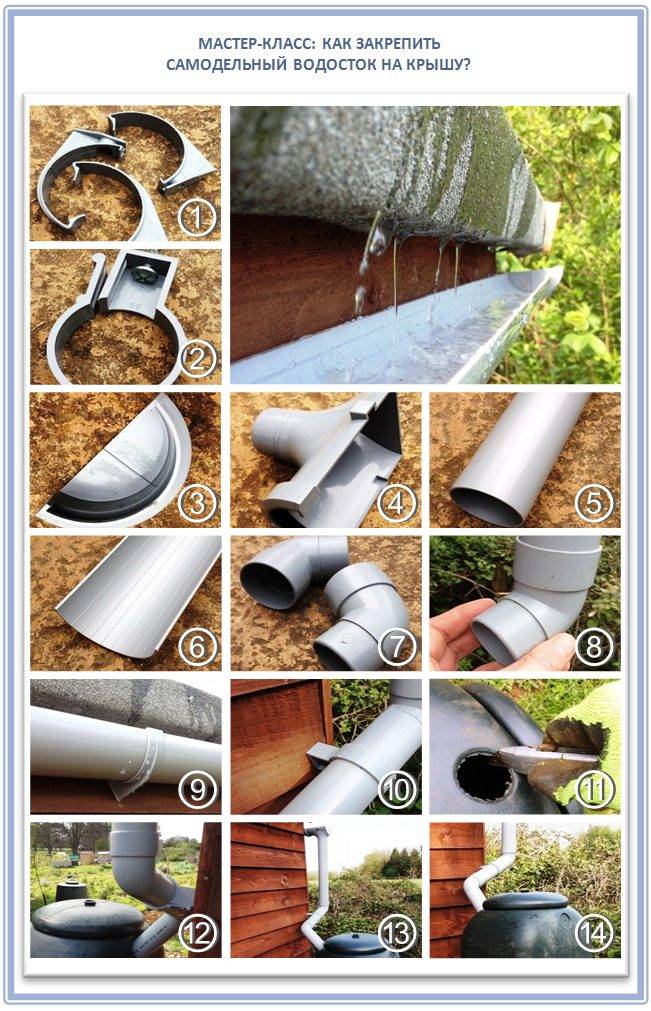
Drainage from sewer pipes
For the hand-made manufacture of a standard drainage system, plastic sewer pipes are often used. They have a number of undoubted advantages:
- affordable price;
- a wide range of pipes and adapters, as well as various mechanisms for fastening;
- light weight, which facilitates transportation and installation;
- the possibility of self-cutting;
- durability.
- White.This type of pipe is used only indoors, when pipes of a different color do not fit into the interior. They are not suitable for external installation.
-
Grey. These pipes are stronger, but do not carry loads and are not intended for use in frost. Suitable only for regions with warm winters.
White and gray pipes are not suitable for outdoor installation
-
Brown or red pipes. They are recommended for outdoor drainage, as they tolerate low temperatures and water pressure well. They cannot stand prolonged exposure to sunlight and become brittle over time.
Brown pipes are most suitable for drainage
How to make a gutter with your own hands
Before buying pipes, a diagram of the entire system is drawn up, including all parts of the structure and their number:
- roof gutters (length is calculated based on the perimeter);
- drain pipes - one per 10 m gutter;
- brackets - 17 pieces per 10 m;
- branches - by the number of drains;
- funnels - according to the number of plums;
- plugs;
- corners (the number depends on the type of roof);
- connecting elements for gutters, they need 1 less;
- knees - depending on the complexity of the scheme;
- transitional couplings;
-
outlet for the storm water inlet or mark.
The easiest way to mount a drainage system from plastic pipes
The cross section of the pipes is selected based on the area of the roof slope. You can use the following scale:
- slope area up to 50 sq. m - pipe diameter 8 cm;
- up to 125 sq. m - 9 cm;
- over 125 sq. m - 10 cm.
The remaining elements are purchased based on the diameter of the pipes from which the gutters are made.
As already noted, before purchasing materials and installing a drain, it is necessary to draw a detailed diagram in which the following should be noted:
- roof perimeter;
- length and number of gutters;
- attachment points for brackets, joints and funnels;
- location of drains.
Based on the perimeter of the roof, the footage of the pipe for future gutters is determined. Since it is sawn in half and two are obtained from one workpiece, the required length of the pipes will be equal to half the perimeter of the roof. Next, the number of drainage risers is calculated. To do this, a plan is drawn on which all elements are marked. The distance between them cannot exceed 5 m. After determining the number of gutters, their length is calculated, for which the distance from the cornice overhang to the ground is measured. This will be the estimated height of the drainage riser. This figure is multiplied by the number of parts and the desired pipe length is obtained. Next on the project, the tees connecting the gutters and risers are calculated. If the risers deviate at an angle, ready-made adapters are purchased. A special universal sealant for joints is also required.
Tools for the job
For work you need:
- wood screws;
- screwdriver;
- grinder, jigsaw;
- hacksaw for metal;
- screwdriver;
- building cord;
- level and tape measure;
You will also need scaffolding.
Rules for installing an external and internal gutter
If you do not follow the rules for installing a drainage system, you can get flooded walls, foundations and basements. To avoid this, you need to follow the simple instructions:
- The outer gutter is installed with a slope of 1%.
- The outer chute must be interrupted no more than three times. In the case when, due to the complex geometry of the roof, this rule cannot be fulfilled, it is necessary to install another downpipe. But its installation is best done on the outer corners of the walls.
The main thing in the drainage system is the correct organization of the direction of the water flow. It should not merge at the entrance doors and near the main paths, as in winter this will lead to the formation of a decent layer of ice, which is fraught with serious injury.
It is also important to provide the desired slope of the external gutters, which depends on the size of the slope. If the value of the length of the roof slope is more than 12 meters, then the slope must be made in both directions and two drainage systems must be installed
It often happens that the cornice is not located in a horizontal plane, and the slope of the gutter must be carried out taking this fact into account.
A pitched roof, compared to a flat one, has another weak point - the so-called valley. This is the internal joint of the roof slopes, which is most subject to the pressure of the water flow, which increases the likelihood of its penetration under the roof in this particular place.
Therefore, it is necessary to pay special attention to the drainage from the valleys and install internal gutters there, which will retain moisture, bring it out, and therefore prevent water from entering under the roof. It is attached to a boardwalk (which should protrude 40 cm beyond the axis of the internal gutter) or a crate
The process itself takes place in several stages:
- Two bars should be nailed onto the crate or boardwalk in 5–10 cm increments. There should be a small gap between the bars and the crate to ensure ventilation.
- Nail the crate, bring the ends of the wooden bars to the axes of the gutter.
- Strengthen the main crate in the valley area, for which nail a few more bars.
-
Drive two wooden blocks between the crate in the place where there is free space.
- Bring the ends of the bars into the middle of the inner groove, clamp them.
-
Bend the gutter so that the bend angle is slightly greater than the valley bend angle.
- Lay the gutter from the eaves in the direction from top to bottom.
- Fasten using metal staples.
Gutter fastening methods
To fix the gutters, you can use brackets that are combined with clamps.
Bracket mounting methods:
- Mounting on the frontal board is the simplest method used when the roof is already laid. This type of bracket is used for plastic drains. And to ensure strength, power ribs are provided in the brackets.
- Mounting on rafters - the method is used for large areas of slopes to the roofing with a rafter pitch of not more than 60 cm. In this case, brackets with an extension are used, with which the bracket is attached to the rafters.
-
Mounting on the wall - in the absence of a frontal board and access to the rafter legs, the gutters are fastened to the walls with the help of crutches and studs.
- Fastening to the crate - with a rafter pitch exceeding 60 cm, the gutter is fastened with long brackets if the roof is made of metal tiles or ondulin. Or use combined brackets in the case of bitumen tiles.
Drainage system project
Like any communication, a drainage system begins with a project. First you need to determine the type of drainage system and the choice of material for pipes. After that, you can start the calculations.


Type of drain
There are two types of drainage systems, which depend on the type of your roof.The vast majority of houses are built with a sloping roof, since a flat roof is not suitable for our winter and snow. Gutters and pipes are hung from the outside of the building. Next, we will talk specifically about external storm water.
The internal drain is mounted on a flat roof. Here the water collection system is different. It is arranged with a slight slope to collect water, which works as a kind of gutter. The storm drain begins at this point and is a vertical pipe embedded in the wall with a funnel on the roof at the place where precipitation is collected.
Pipe material
Plastic sewer pipes are made from polyvinyl chloride (PVC) and polypropylene. For outdoor storm sewer pipe PVC won't work. This material is designed for underground laying. The sun's rays and temperature changes have a destructive effect on it.
Polypropylene pipes are produced in three types: white, gray and brown. The variety of colors does not show the aesthetic preferences of manufacturers, but corresponds to certain operational parameters:
- White and gray sewer pipes made of polypropylene can be chosen for do-it-yourself drainage for residents of the southern regions. They are designed for laying indoors and do not tolerate negative temperatures. The structure of the polymer is also disturbed with a significant difference.
- Brown tubing materials have a thicker wall and are designed for external installation. They are resistant to frost, but do not tolerate high temperatures. This is a good material for installing outdoor drains in the central and northern regions.
Fittings, connection principle, dimensional characteristics of pipes of different colors are the same.
Calculations and dimensions
To make the calculations correctly, you need to know:
- the length of the roof perimeter;
- the height of the house;
- the number of vertical risers;
- number of gutter connections;
- the number of plugs, corners and tees;
- number of fasteners.
Additionally, you need to determine the desired diameter of the pipes for the gutters and for the vertical receivers. A classic drain is made of sewer pipes with a diameter of 110 mm (gutters) and 50-80 mm (racks). This is enough for the safe collection and removal of water during heavy rains. The total length of the gutters is calculated along the perimeter.
After calculating the length of the pipes for the gutters, then it should be divided in two. From one meter of pipe you will get two meters of gutter.
The number of vertical pipes corresponds to the number of risers multiplied by the height of the house to the edge of the roof. Here you need to draw the configuration of the pipe and measure everything on the spot.
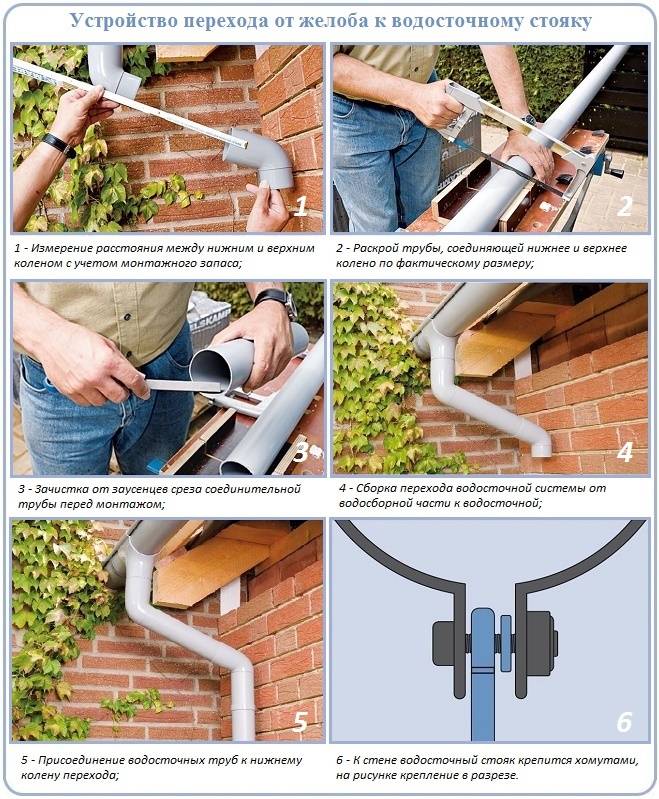
The vertical pipe will not go straight down from the roof slope, but through an S-shaped bend to the wall of the house. It will need to be fixed exactly to the wall, not leaning on it, but at a distance of 10 cm from it.
To install the bend, you will need a 45-degree elbow, plus one corner to drain water from the house.
Fittings will be needed to plug the gutters in the corners of the house and to install the drain funnel. You need to take a plug for a pipe with a section size of 110 mm. The funnel will require a 110mm reducing tee with a 50mm elbow. The number of tees is also determined by vertical drains.
The connection of the gutters is carried out by couplings. Their number is 1 less than the number of gutters themselves.
The number of horizontal fasteners is calculated based on the installation every 50-60 cm. The distance is recommended by experts based on the severity of the structure at its maximum load. With a step of 60 cm, 17 fasteners will go to 10 m of the roof.Vertical pipes are fixed with clamps every 1.5 m.
This is interesting: Wallpaper in the design of the living room - we study in detail
Why is a drain necessary?
 The drain consists of gutters and pipes. Streams along the roof flow into a gutter fixed under the roof of the building and tend down the pipes for a longer time. On the ground, flows are distributed through a drainage system.
By controlling the flow of rainwater, the gutter protects:
- Blind area and foundation from erosion.
- Walls from getting wet and further cracking of the facade in the cold.
- The area in front of the house from the formation of puddles.
In summer cottages and household plots, water can be collected in special containers for irrigation.
Gutters serve as a decoration. They create a finished look for the roof, positively influencing the appearance of the yard.