- Entering the house
- How to connect a pumping station
- Care and repair
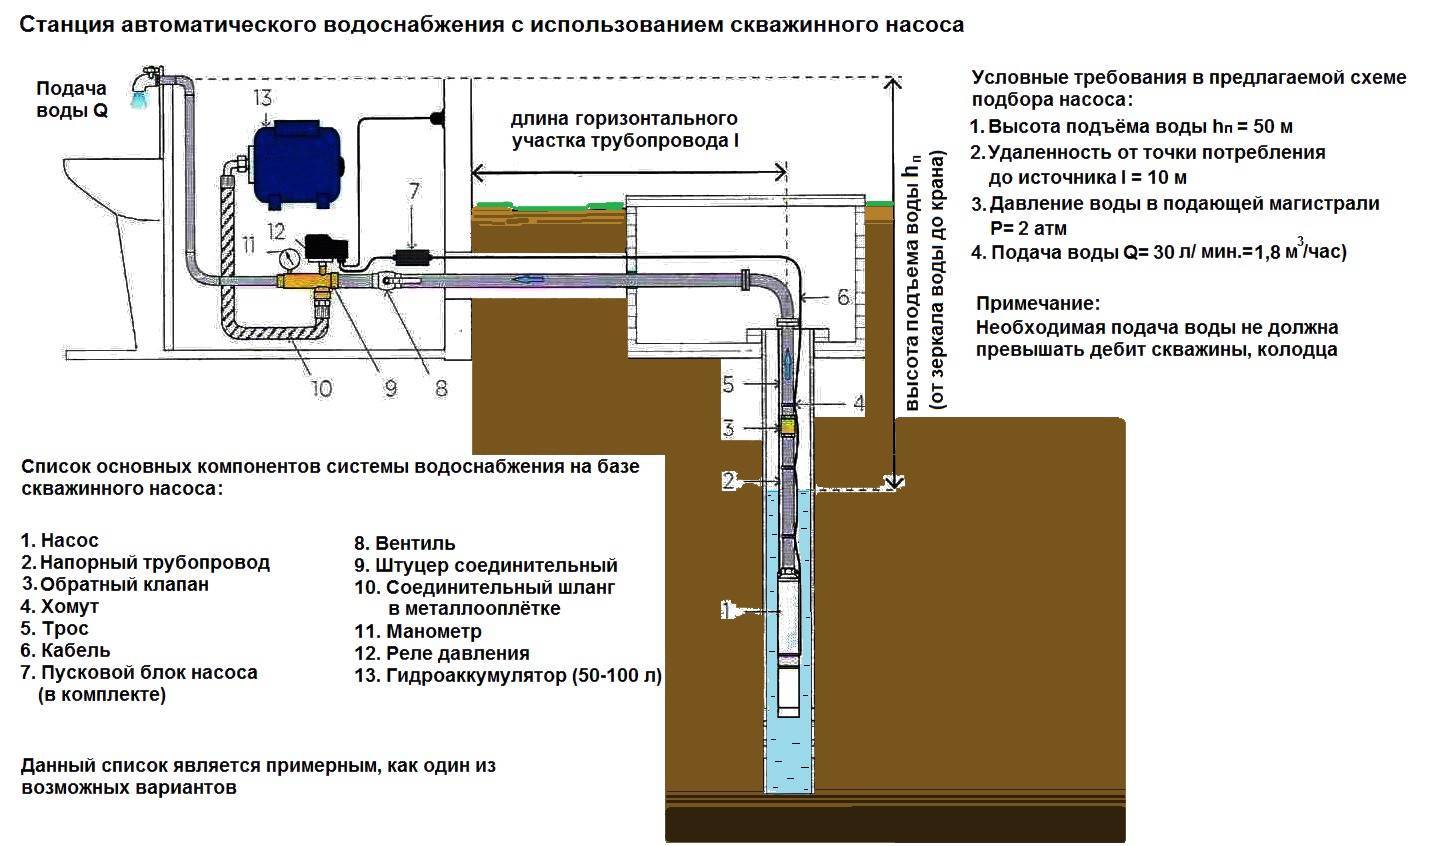
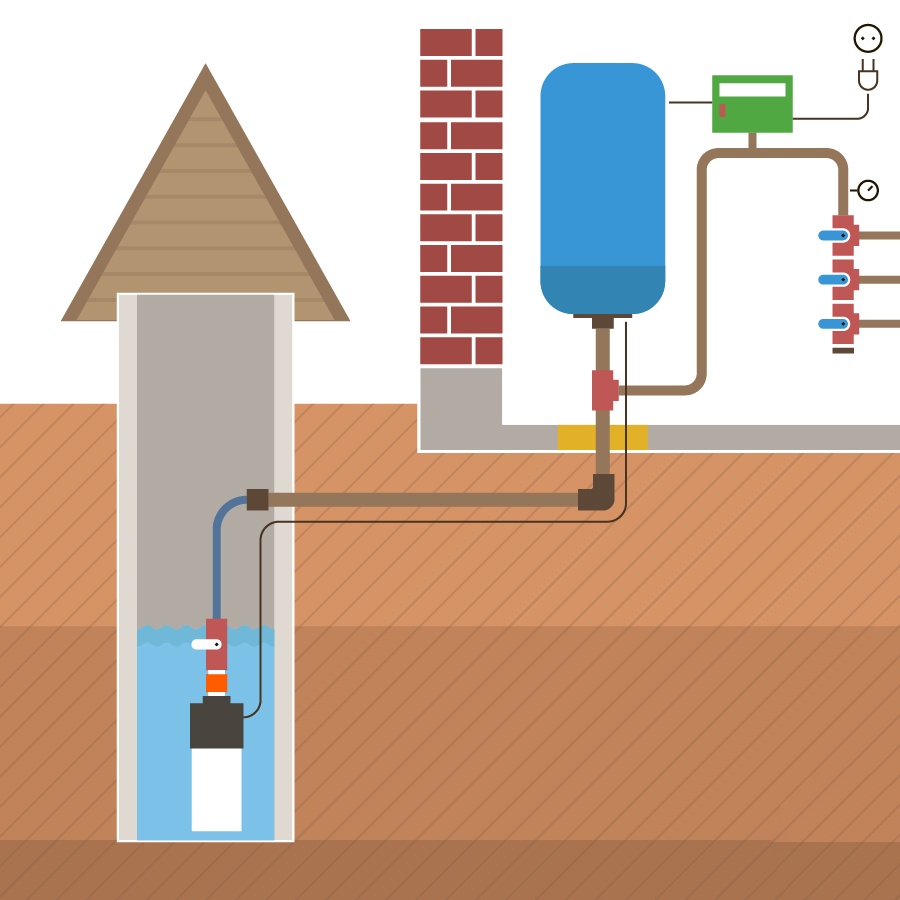
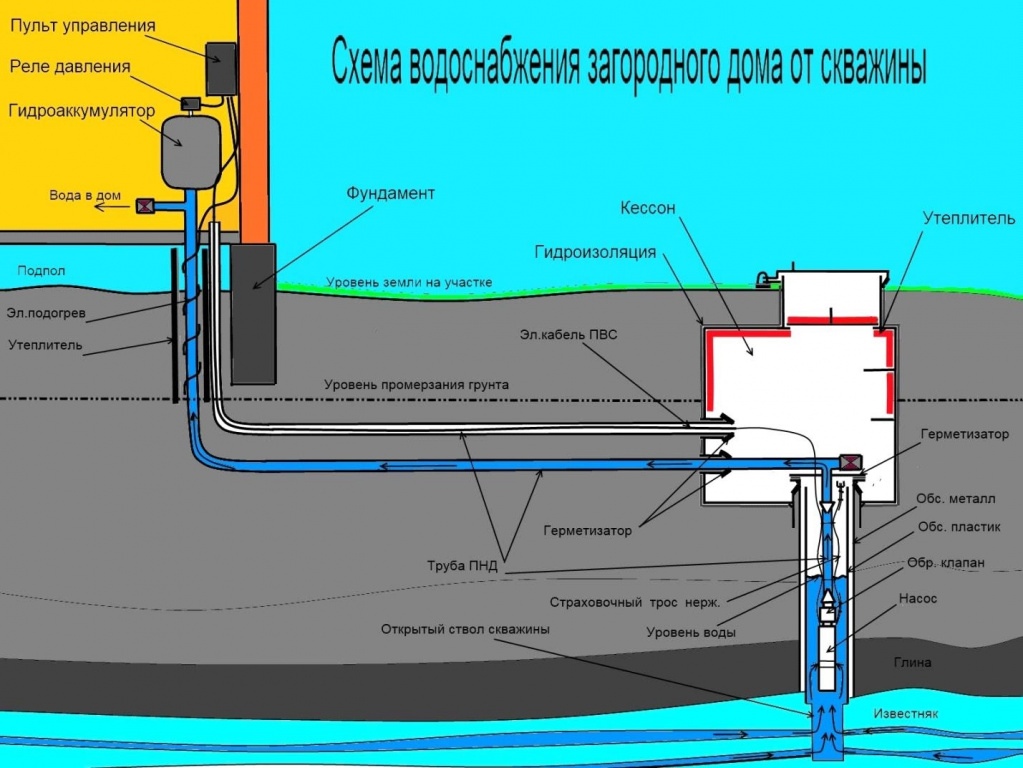
- Scheme of water supply of the site from the well
- Tips & Tricks
- We select pipes
- Do-it-yourself summer water supply in the country - stages of installation work
- underground pipeline
- Well types and pump selection
- Types of pumps
- Use of pumping systems
- The water supply system of a private house: how to organize
- Selection of a hydraulic accumulator for a pumping station
- External and internal plumbing
- Wiring diagrams for the plumbing system around the house
- Serial, tee connection
- Parallel, collector connection
- Step by step installation guide
- Drawing up an action plan
- Preparing the necessary tools
- Water supply device
- Choosing a device for heating water
- Ways to supply water to the house
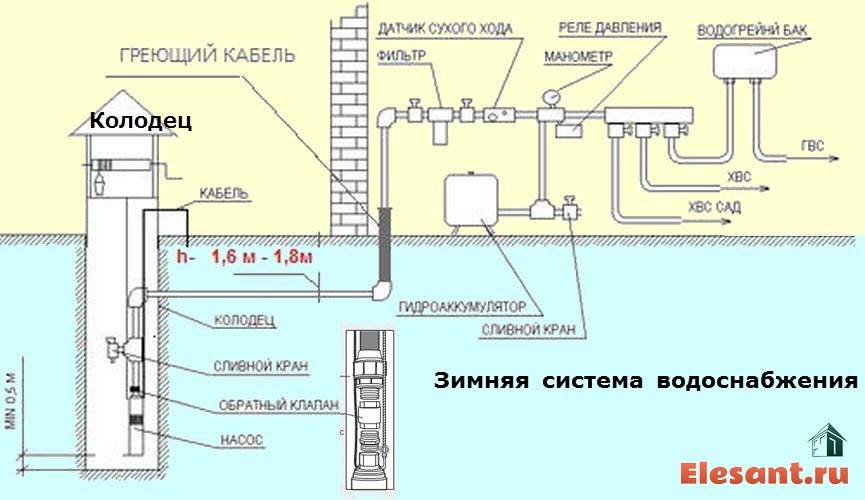
- Organization of winter water supply
- Step # 1 - insulate the pump for water supply
- Step # 2 - insulate the accumulator
- Step #3 - Taking care of the water pipes
- Step # 4 - put the drain valve and pressure switch
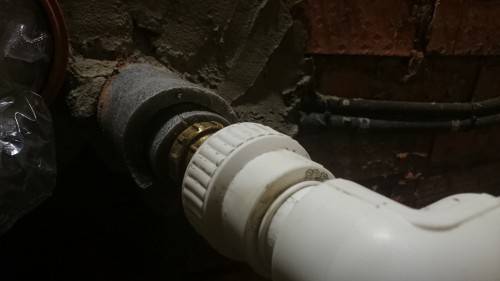
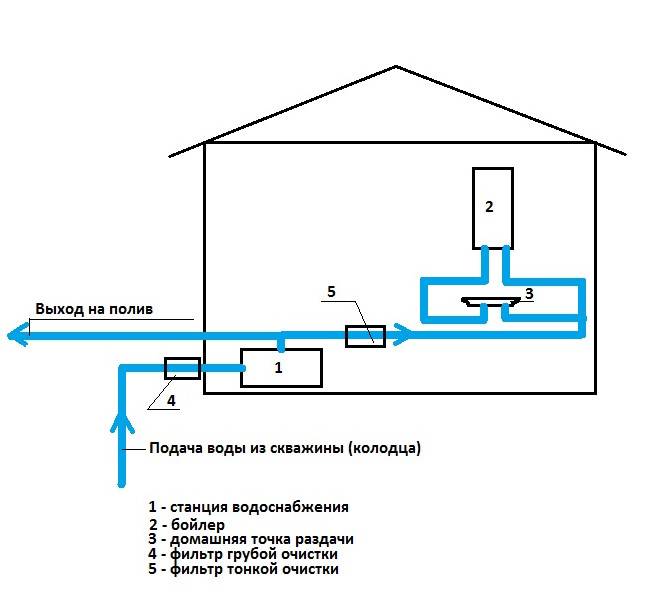
Entering the house
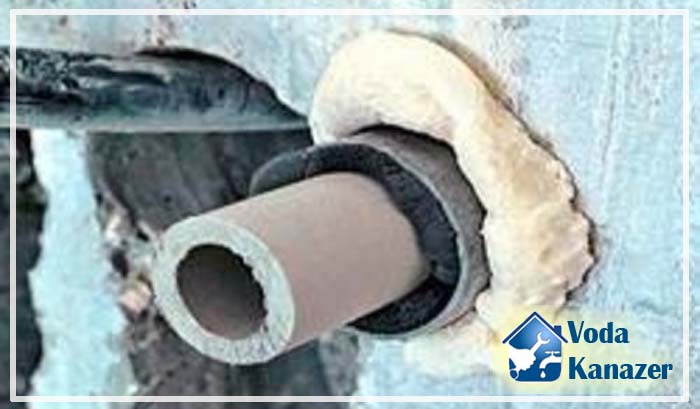
To bring the pipeline into the house, it is necessary to make a hole in the foundation, if it was not provided for at the stage of construction of a country house or cottage. Usually the plumbing freezes exactly at the point of entry into the house.To prevent this from happening, a coupling is installed around the pipe at the entry point - a small section of the pipeline of a larger diameter. In addition, the entry point is carefully insulated. As a rule, for water supply pipes with a diameter of 32 mm, a coupling with a diameter of 50 mm is required.
Insulation and insulation of the input is performed as follows:
- A coupling is inserted into the hole in the foundation.
- A pipeline is passed through the coupling and insulated.
- For waterproofing the input between the pipe and the coupling, a rope is hammered.
- Then this place is filled with sealant, mounting foam or clay mortar.
Video instruction and pipe laying scheme for supplying water from a well to a house:
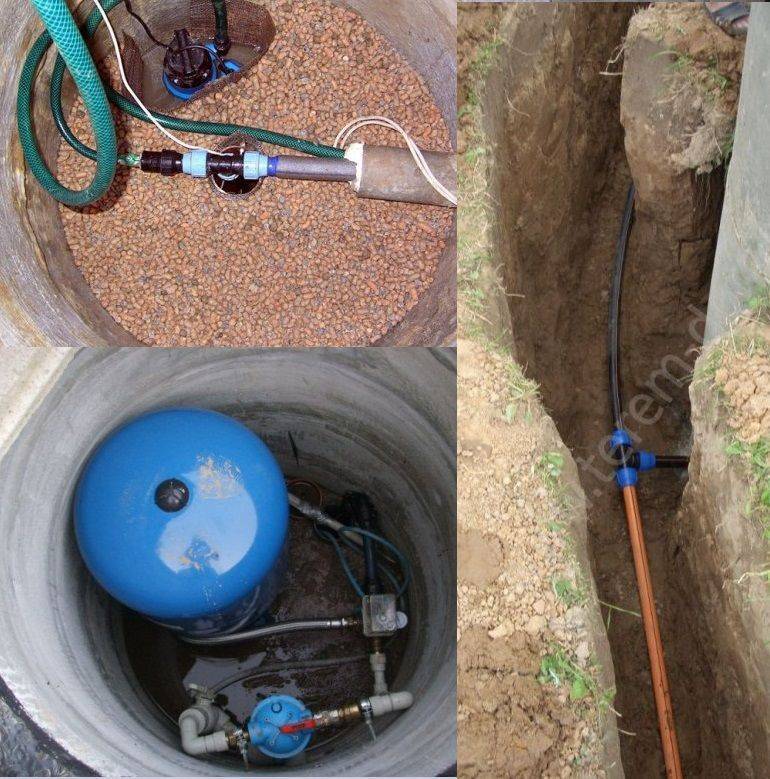
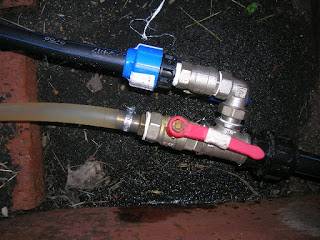
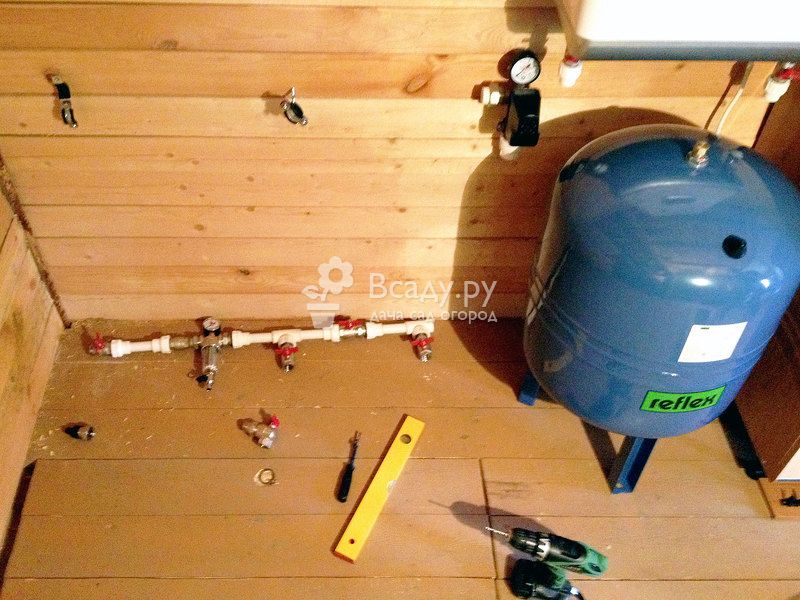
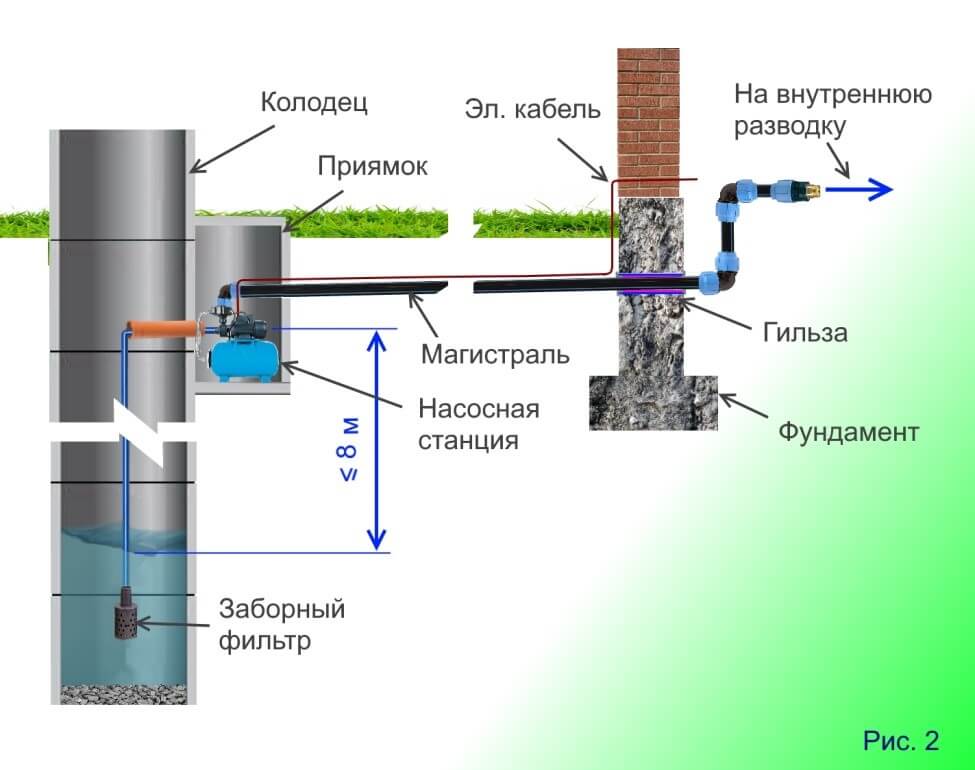
How to connect a pumping station
To ensure that the required amount of water enters the room, pumping station connection. With the help of this device, the liquid rises from the well. The station cannot operate at low temperatures, so it should be located in annexes or basements.
When installing the system, a pipe is supplied to the equipment, on which there is an adapter. A tee is attached to it, at one end of which there is a drain device. Ball valve installed and coarse filter. If necessary, it is possible to turn off and drain the water. A non-return valve is built into the tee. It is necessary to prevent backflow of liquid.
To guide accurately pipe towards the pumping station, a special corner is used. The connection of structural elements is using knots called "American".
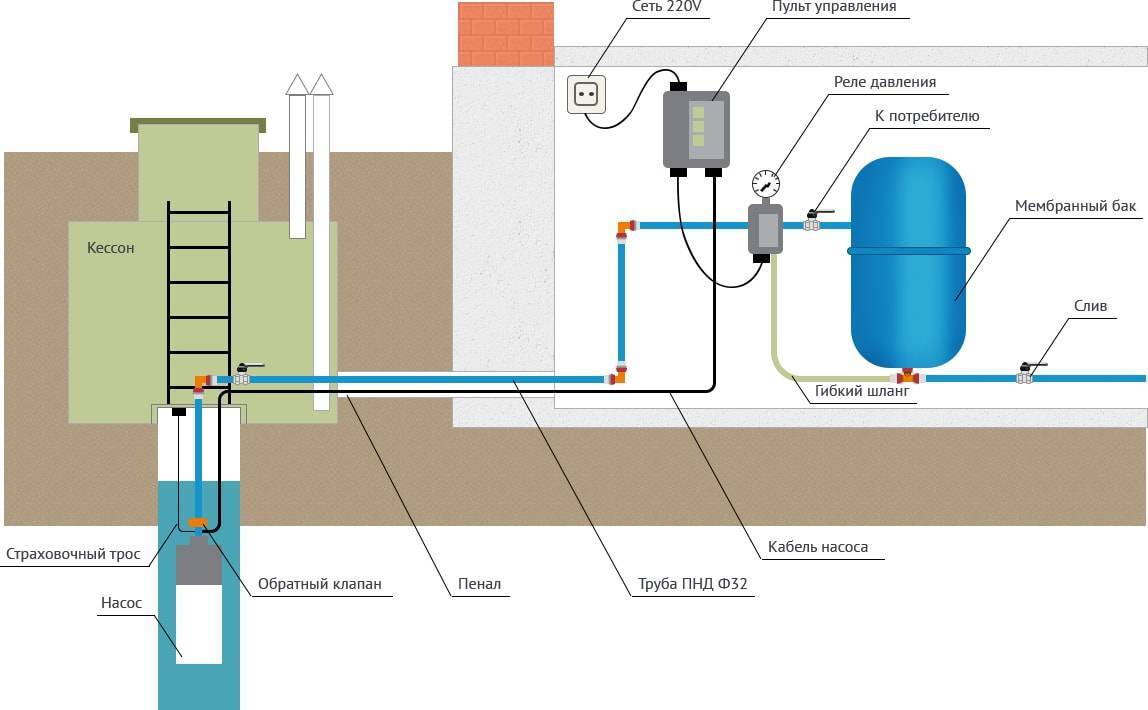
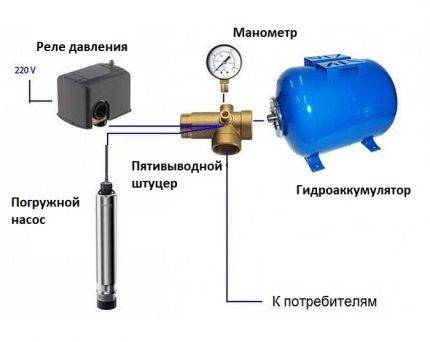
When connecting the station, a damping tank and a pressure switch are being installed. The pump is located in the well, and all other equipment is located indoors.The damper tank is located at the bottom, and the pressure switch is installed on top of the pipes.
An important element of the plumbing system is the dry running sensor. Its job is to stop the pump when there is no water. This eliminates the risk of equipment failure. At the last stage, an adapter with a diameter of 25 mm is installed.
Installed pumping station is necessary verify. To do this, the system is being launched. If all nodes work properly, then the installation was carried out correctly. In the event of interruptions, it is necessary to stop the work and eliminate the malfunctions.
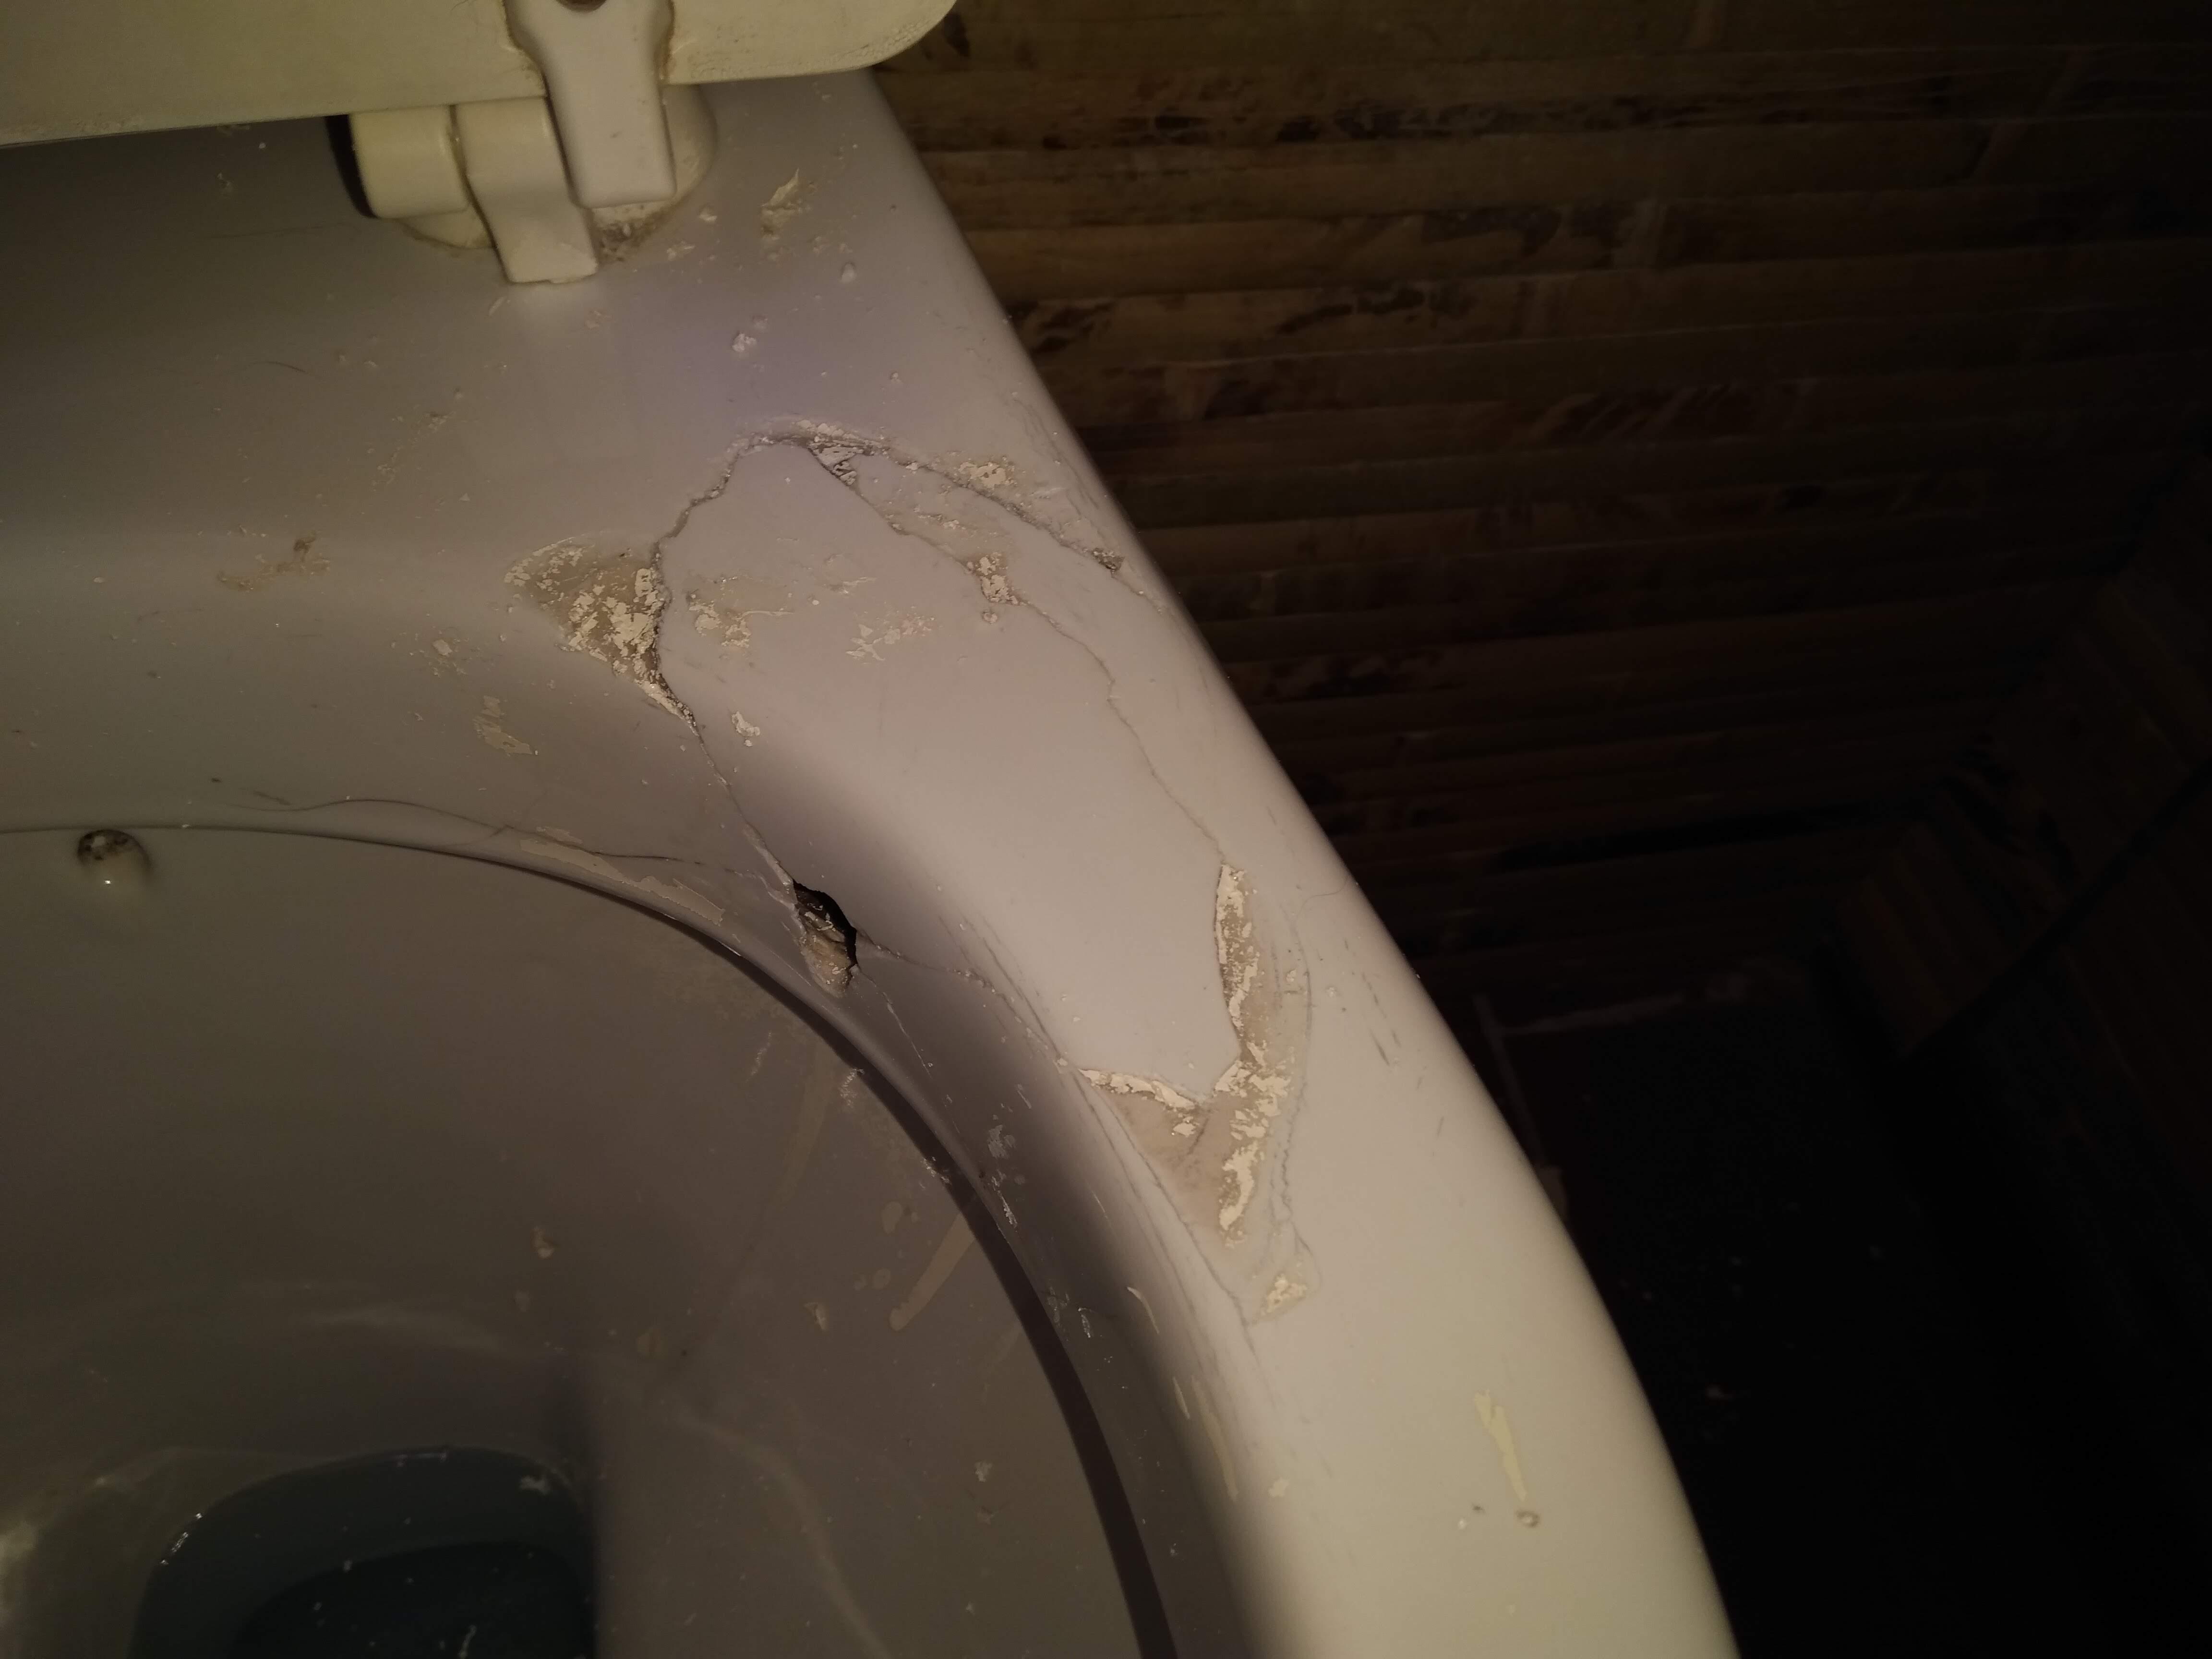
Care and repair
The operation of the system must be constantly monitored. In the event of a malfunction, it is required to immediately turn off the water supply of a private house from the central water supply. If a leak is detected, repair work should be carried out:
- A clamp is cut out of rubber, a hole in the pipe is wrapped and fixed with wire.
- Repairs are carried out using cold welding. Then the surface is degreased and lubricated with acetone.
- If the hole is small, then a bolt is screwed into it. For old pipes, this method is not suitable.
Maintenance of the system consists in monitoring the pressure and purity of the water. Often a decrease in pressure is associated with clogged filters. To do this, they are cleaned. If this is not possible, then they are replaced with new ones.
Do-it-yourself installation of a plumbing system in the private sector is possible. To do this, you need to understand the installation system, prepare a diagram, purchase the necessary materials and begin the assembly process.
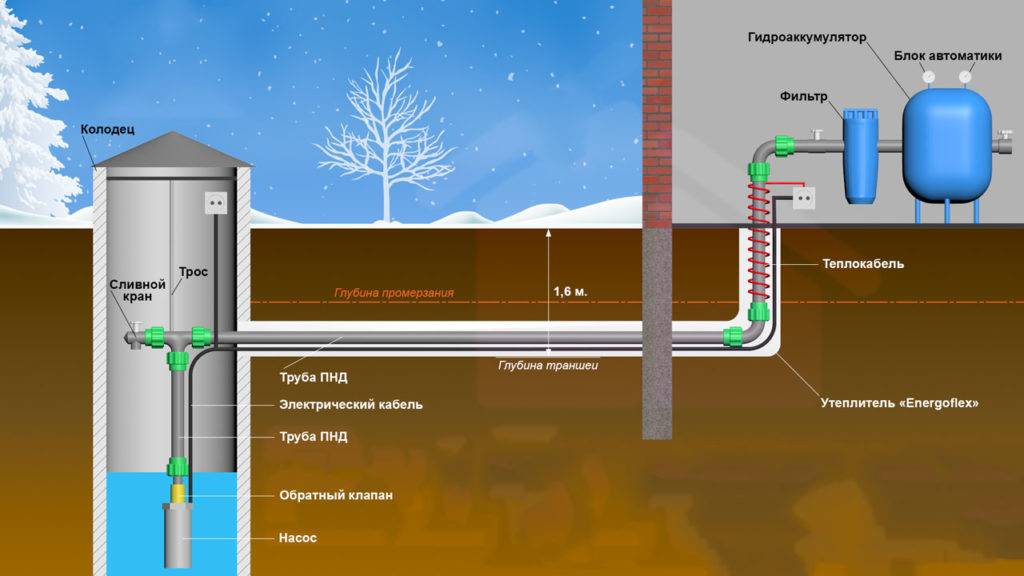
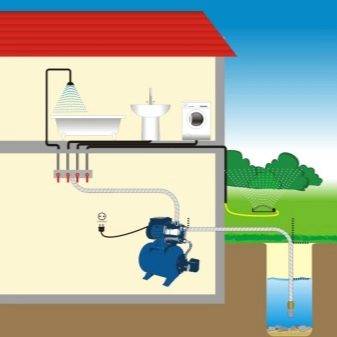
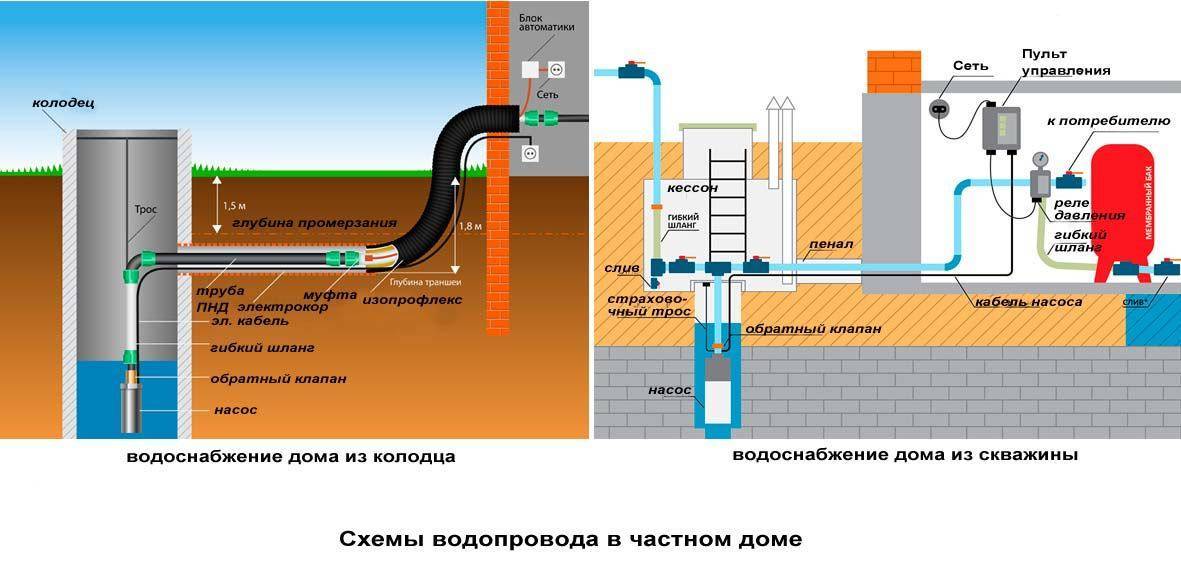
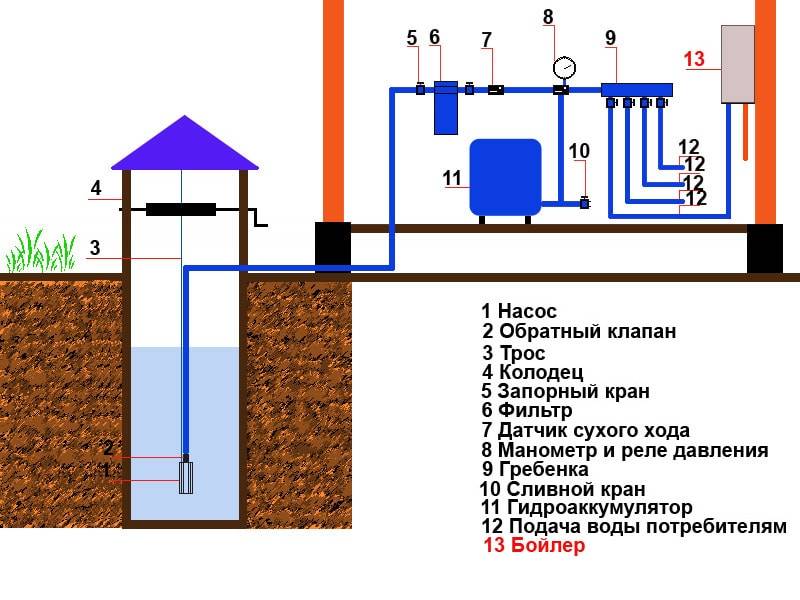
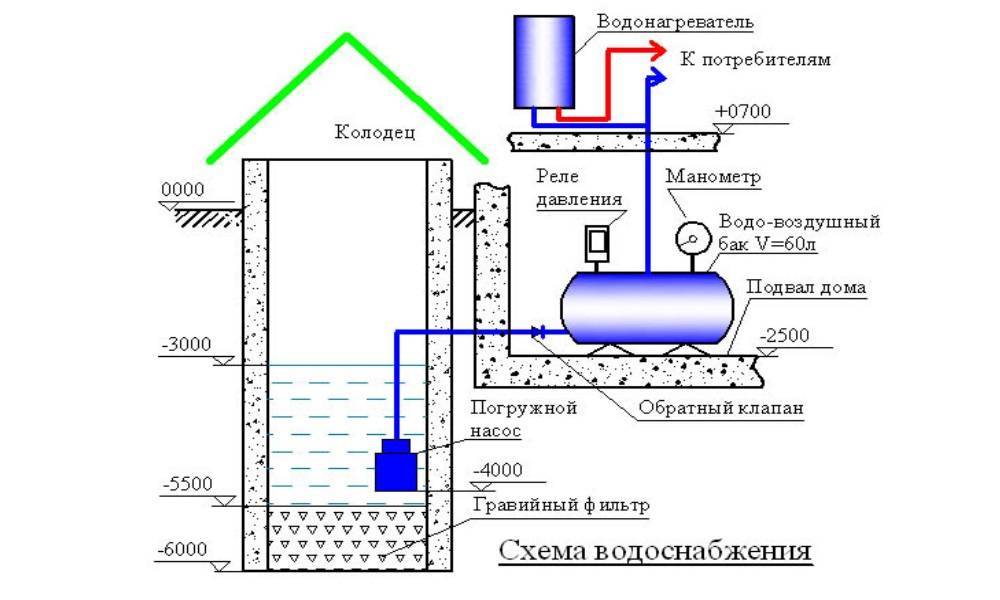
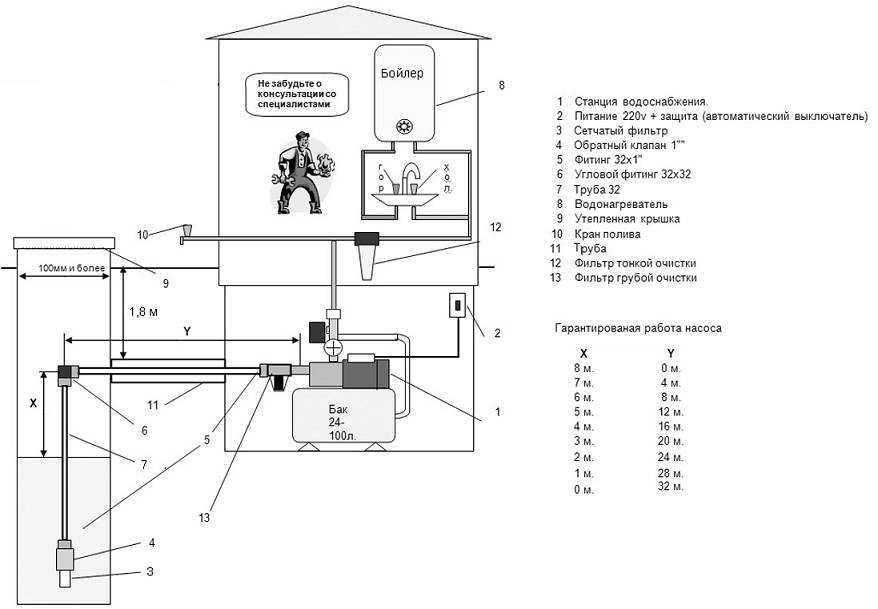
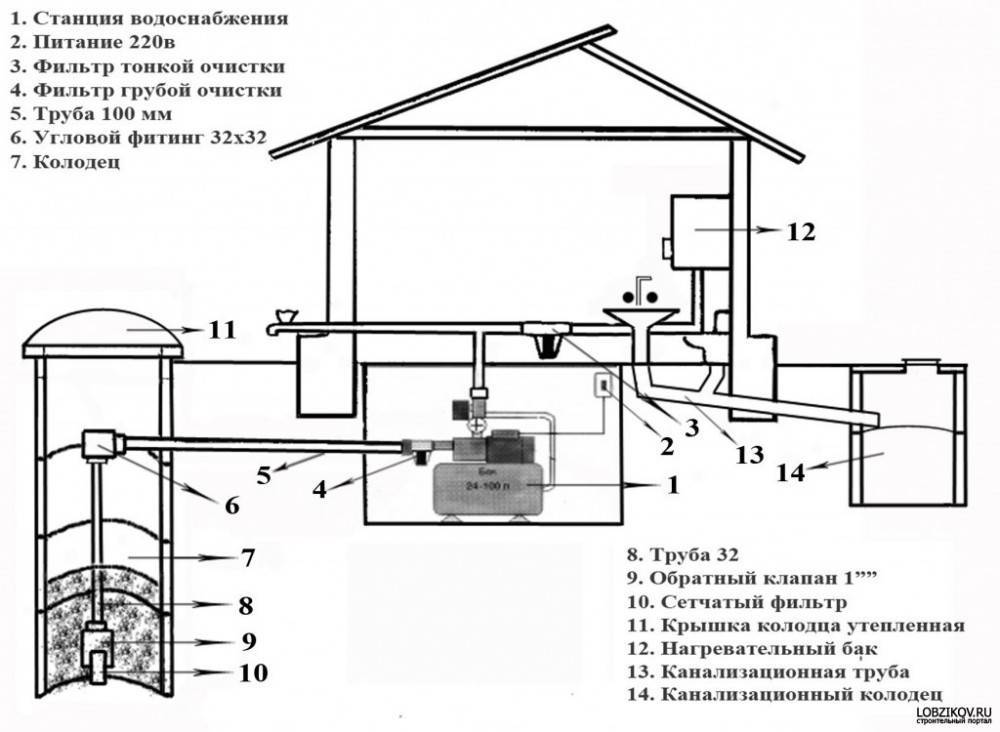
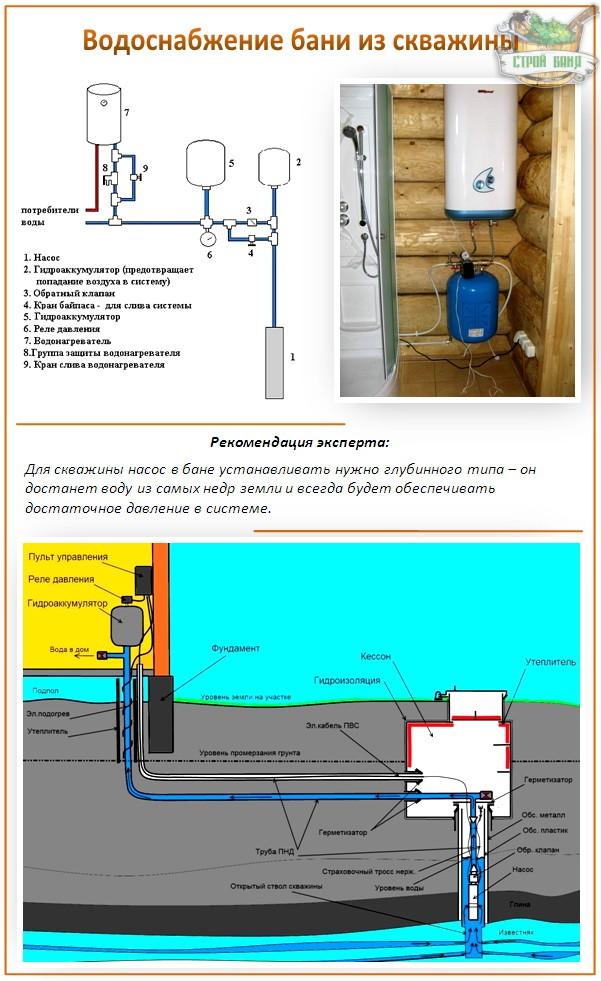
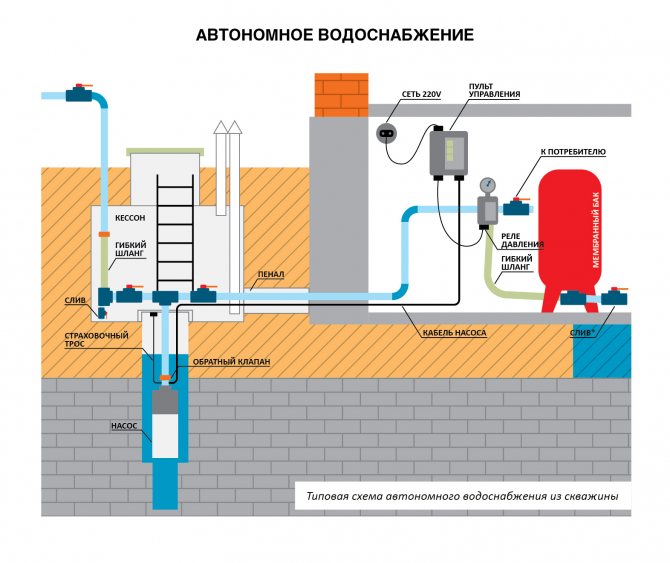
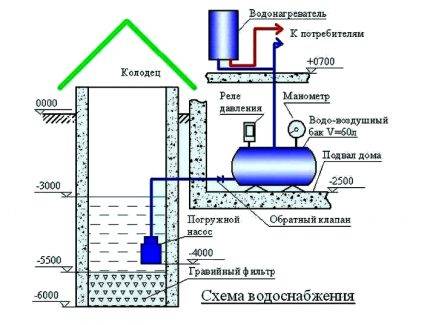
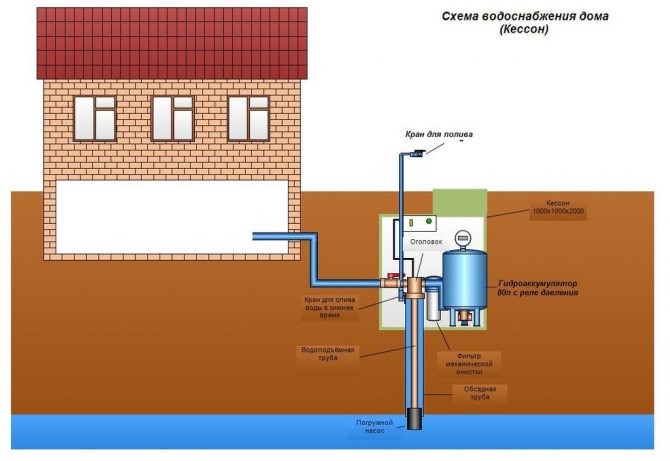
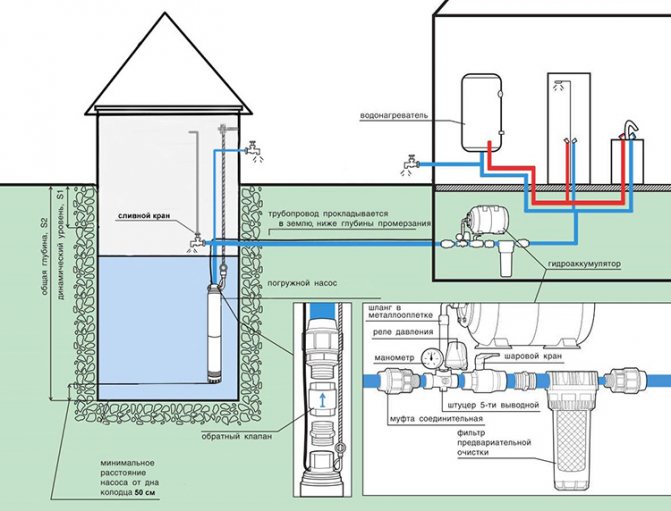
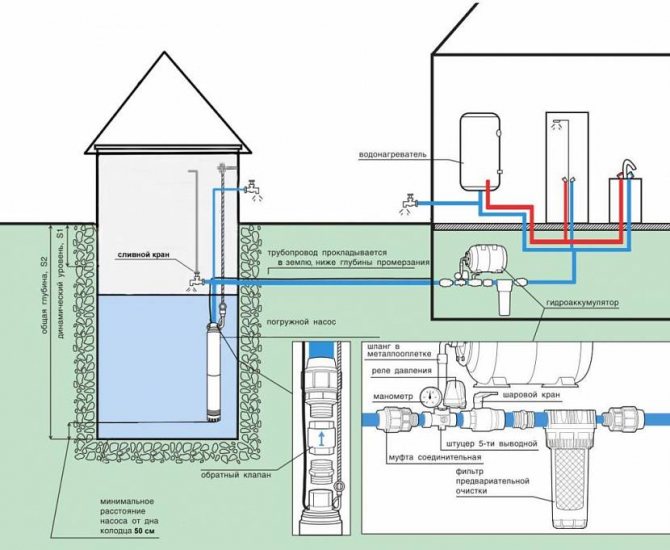
Scheme of water supply of the site from the well
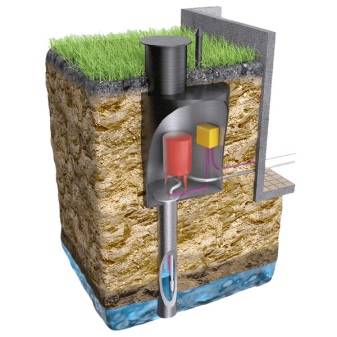
Consider a typical water supply scheme for a private house from a well.The photo shows the main elements of an autonomous system of this type, the only difference is how the water intake is organized - using a submersible pump or pumping station in a caisson.
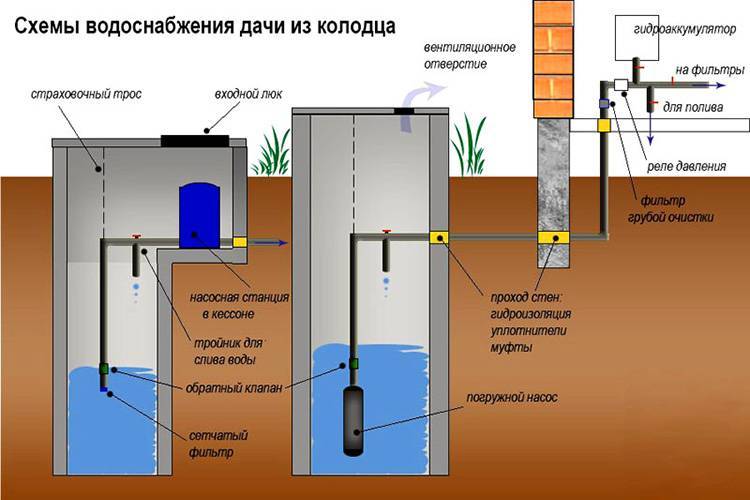
The pumping station can also be installed directly in the house or above the well, this type of pump is called surface.
The type and performance of the pump is best chosen depending on the flow of water and how high it will be pumped. The accumulator is used in almost all modern water supply systems for wells. It creates the necessary pressure, protects against drops in water pressure, and also prevents premature wear of the pumps.
In some systems, special water tanks are used instead of pumps. Their task is to ensure the unimpeded flow of water to all systems. The necessary supply of water is created in the tank in case the pump fails for some reason. With a special switch, you can switch to either the pumping type of service or the tank.
Industrial water used for irrigation and domestic needs does not require treatment. It is usually taken out through a separate pipe with a drain in the area next to the well. Drinking water is usually further purified. This is what that part of the water supply system at home looks like, which is usually located in technical rooms.
Typically, such an analysis includes checking for the following indicators:
- taste, color, smell and the presence of suspensions;
- maximum permissible concentrations of heavy metals and sulfates, chlorides, chemicals of inorganic and organic origin;
- microbiological analysis for harmful microorganisms, including water is tested for the presence of Escherichia coli.
After cleaning, the water enters the pipes and heating tanks.What to consider when choosing a water supply scheme on the site:
- The depth of soil freezing. If pipes are planned to lie above this level, then it is necessary to carry out work on their insulation.
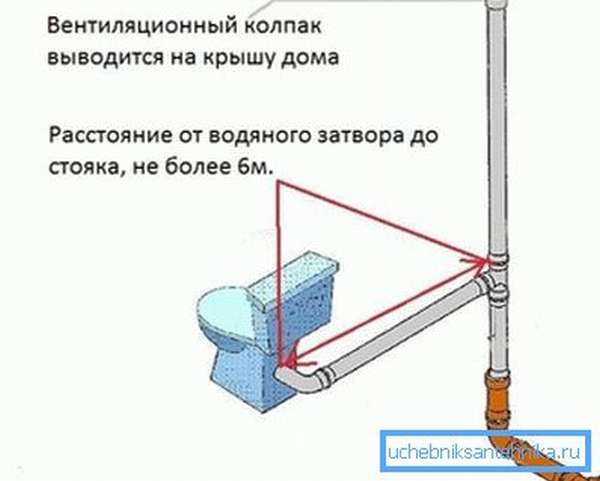
- Sanitary zones are taken into account. It is forbidden to install wells where sewer pits, compost heaps or latrines are located closer than 50 m. Wells cannot be installed at a distance of less than 15 m from residential buildings and buildings and 7 m from fences.
It is best to draw up a water supply scheme for the site in advance, indicating not only the elements of the scheme, but also the location of the pipes, think about how best to bring water into the house from the well, based on its placement on the site.

Tips & Tricks
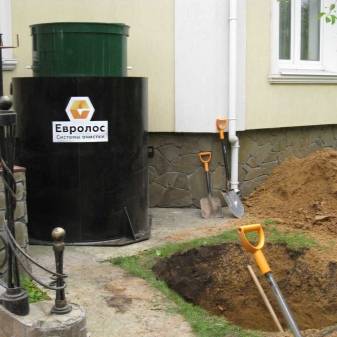
Creation plumbing from a well or a well in a private household requires a number of preparatory work, some of which are quite extensive. Such activities include the arrangement of a well with a waterproofing system or the drilling of a water well with the installation of a casing type pipe. Also, in some cases, it is possible to install a special reservoir, which will be underground - water is supplied to such a storage, which in the future can be fearlessly drunk. All of the above options fit well with the scheme water supply, including a pumping station with a relatively small capacity.


It should be borne in mind that during the first start-up of water supply to a private house from a well in a system that was made on its own, various problems are possible. Naturally, it often happens that the plumbing is debugged almost perfectly, then there will be no problems, but mistakes can happen to anyone.Thus, when starting the system for the first time, you need to carefully monitor how it works, for which you need to check how it functions at home. First of all, you need to closely monitor such an important indicator as pressure.
When pipes don't seem to be buried deep enough to keep the water flowing throughout each season, they can be further insulated with a material such as mineral wool. Then the water will be supplied to the room almost all year round. In addition, you can arrange a hot water supply from a well to solve such an urgent problem once and for all. Outside the city limits, in households, hot water supply is most often done using solid fuel boilers.
In the vast majority of cases, autonomous water supply from a well to a private house is seasonal due to the fact that the pipe from the well goes directly to the surface. Accordingly, it is necessary to install the pipeline in such a way that it is underground at a depth of at least about one and a half meters.
It is also important to remember that if the water in the pipes freezes, and the pump does not have dry running protection, it may simply fail.

How effective an autonomous water supply will be depends largely on the pressure indicator in the system. Whether water is taken from a well or from a well, in any case, the water supply must be arranged in such a way that there is good pressure from the tap. Sometimes it happens that there is simply no way to ensure the correct pressure and, accordingly, a good pressure of water from the tap.Then you can use non-pressure tanks powered by electricity. However, such equipment is sometimes difficult to combine with household appliances such as a washing machine or dishwasher.
The quality of water from such sources is quite enough to water the garden. Moreover, the first stage of filtration provides sufficient cleaning to wash a car with such water without fear of damaging the paint. But in order for the well to be fearlessly drunk and used for cooking, it must be brought separately to impeccable quality.
The main problem is that the chemical and bacterial composition of water from an ordinary, not very deep well or well is extremely unstable. Back in the 50s of the last century, most well owners did not think about whether or not to drink well water, since the upper layers of the soil and, accordingly, the water were not yet so badly spoiled by human activity. Today, water from wells, especially if they are located near cities, can be drunk with great caution.
In modern conditions, even 15 meters of land will not filter the water well enough for its natural purification. Even when a site with a well is located at a considerable distance from megacities and industrial zones, the composition of rivers and precipitation will affect the chemical composition of the water. For this reason, a plumbing system connected to a not very deep well or well requires regular correction and adjustment of the filters installed in the water treatment system.
The following video shows in detail the water supply of a private house.
We select pipes
Here you need to correctly calculate the required amount. Take note of the slope and number of turns.
Having correctly identified, you can take them in the desired manufacture, they differ in the angle of rotation and this will greatly facilitate the work:
The diameter of any pipes made of different materials (steel, polypropylene, metal-plastic) must be from 32 mm.
When choosing pipes, you should pay attention that the material of their manufacture is food grade, not technical.
Check it out for sure;
We need to supply pipes to the premises, trenches from the well and to the foundation of the building must be at least a meter deep
It is important that the level of laying the pipes in the trench is below the freezing ground in your area. It is necessary to provide reliable protection by covering the pipeline with insulation (see. How to insulate a well right)
For this, mineral wool is used.
Even better, if you still lay a special electric cable for heating, which will provide heating and prevent the pipe from freezing;
An above ground piping option is also available. In this case, measures to insulate the external water supply must be carried out. Pipes are laid directly on the ground, or in a preliminary recess. In parallel, a heating cable is laid, but in this embodiment it should already be mandatory.
Do-it-yourself summer water supply in the country - stages of installation work
The sequence of actions for arranging a water supply system looks something like this:
- A detailed network diagram is drawn up in relation to the site plan. It marks not only the equipment (cranes, sprinkler heads, etc.), but also all the details of the pipeline - tees, angles, plugs, etc. The main wiring, as a rule, is made with a pipe with a diameter of 40 mm, and outlets to the points of water intake - with a diameter of 25 or 32 mm. The depth of the trenches is indicated.On average, it is 300 - 400 mm, but if the pipelines are located under the beds or flower beds, here the laying depth should be increased to 500 - 700 mm - in order to avoid damage by a cultivator or a shovel. It is also necessary to consider how the system will drain. Typically, pipes are laid with a slope towards the source or tie-in to the centralized water supply. At the lowest point, it is necessary to provide for the installation of a drain valve. The number and location of water taps are provided in such a way that watering the entire area can be carried out using short lengths of hose from 3 to 5 m long. On a standard six acres, there can be from 7 to 10.
- Based on the scheme, a specification is drawn up, according to which equipment and materials will be purchased.
- If it is supposed to supply the country water supply from a centralized network, it is necessary to make a tie-in. The easiest way, which, moreover, does not require turning off the water, is based on the use of a special part - a saddle. It is a clamp with a seal and a threaded pipe. The saddle is installed on the pipe, then a ball valve is screwed onto its branch pipe and a hole is made right through it in the pipe wall. After that, the valve is immediately closed.
- Next, trenches are prepared for laying pipes.
- The system is assembled by connecting pipelines to taps and other elements by means of fittings.
- The finished water supply should be tested for tightness by supplying water to it and observing the condition of the connections for some time.
- It remains to dig trenches.
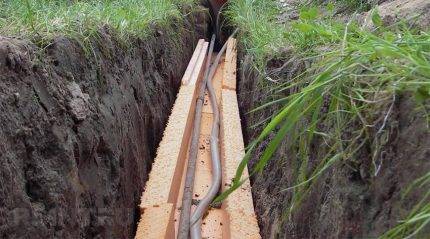
underground pipeline
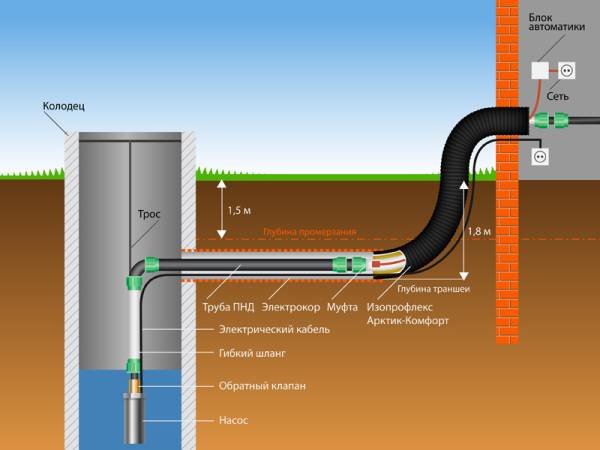
Scheme of an external pipeline with a pipe heating system.
Also useful is a swivel for HDPE pipes and a set of additional fittings. Use only high-quality products, we recommend choosing Italian manufacturers.
So, instructions for laying pipes from the well to the house:
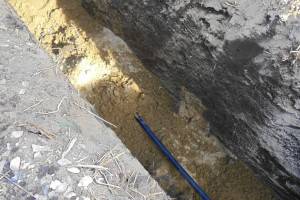
To the depth of soil freezing (each region has its own, the middle strip of Russia is about 5 meters), we dig a trench from the well to the house. It is better to lay communication along the shortest straight line, since then rotary docking nodes will not be needed, and the consumption of materials will be lower;
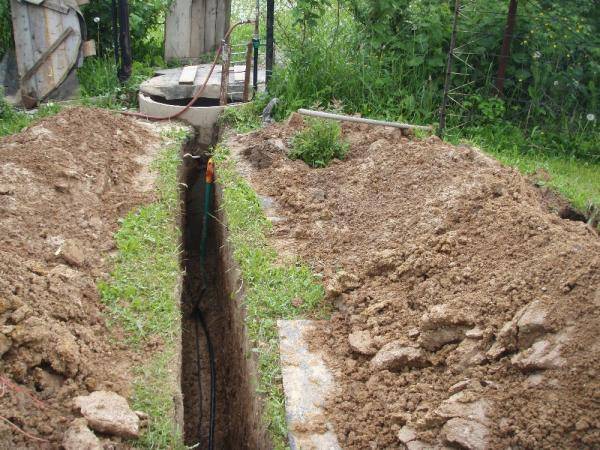
We carry out earthworks
We pour a layer of sand 10–20 cm high at the bottom of the trench, with a slight slope towards the well (1% will be enough). We lay a pipe on this backfill;
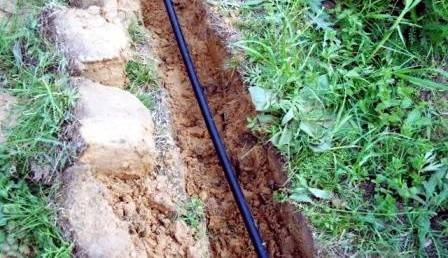
We lay the pipe on a sand cushion.
One end of the hose we start it in a caisson and connect it with a knee and fittings with a water pipe;

We put the pipe into the caisson and connect it to the lifting branch.
We lead the second end into a special hole in the foundation of the house or basement, supply the entry point with a plastic sleeve and carefully seal it with silicone or other sealant;
We make an input through the wall of the foundation or basement.
We cover the pipe with a layer of sand so that it is covered to a height of 15 cm, then we fill the trench with earth. Stones in the ground should not come across, it is impossible to ram the backfill.


We sprinkle the pipe and bury the trench.
In the lower part of the pipe, it is better to provide a drainage valve for draining water from the well in case of conservation of the site for the winter.
At the bottom of a horizontal pipe or in a vertical section inside the well, a tap can be inserted to drain the water.
Well types and pump selection
For autonomous water supply, two types of wells are used: “for sand” and “for lime”.In the first case, drilling is carried out to an aquifer of coarse sand, in the second case, to aquiferous porous limestone formations. Each locality has its own characteristics in terms of the occurrence of such layers, but the common thing is that the depth of drilling into sand is much smaller and is usually in the range of 15–35 m.

1. borehole on limestone. 2. Well on the sand. 3. Abyssinian well
Drill holes in the sand lighter, but they have low productivity, and during long breaks in work (for example, seasonal residence), there is a threat of silting of the galloon filter.
The "heart" of any autonomous water supply system is the pump. Both the sand well and the lime well operate with submersible pumps. The pump is selected depending on the depth of the well and the required performance of the system, and this directly affects its price.

Many different models of borehole pumps are produced and among them it is necessary to choose the best option in terms of technical characteristics and dimensions.
There is another type of well - the Abyssinian well. The difference is that the well is not drilled, but pierced. The “working” lower section of the pipe has a pointed tip, which literally breaks through the ground to the aquifer. As well as for a sand well, this pipe section has a perforation closed with a galloon mesh filter, and in order to keep the filter in place during the puncture, the diameter at the tip is larger than that of the pipe. The pipe itself performs two functions at the same time - casing and transporting water.

Initially the Abyssinian well was conceived for hand pump operation.Now, for the water supply of private houses from the Abyssinian well, surface pumps are used, which, taking into account the depth of the caisson, can work with wells up to 10 meters (and even then, provided that the pipe diameter is not more than 1.5 inches). The advantages of this type of well include:
- ease of manufacture (provided that there is no outcrop of rock on the site);
- the possibility of arranging the head not in the caisson, but in the basement (under the house, garage, outbuilding);
- low cost pumps.
Flaws:
- short service life;
- poor performance;
- unsatisfactory water quality in regions with poor ecology.
Types of pumps
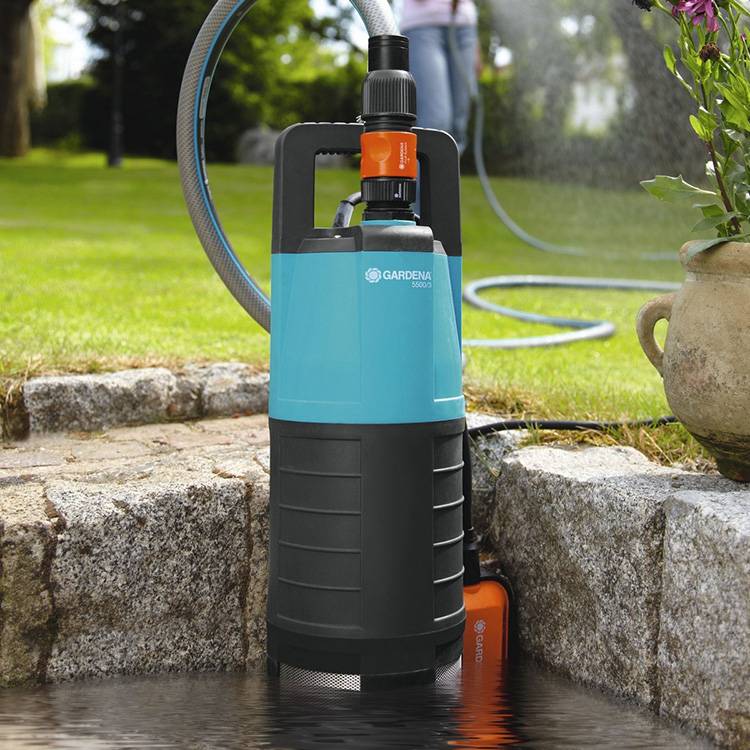
If groundwater is deeper than eight meters, it is better to purchase more efficient submersible pumps designed to draw water from wells or wells.
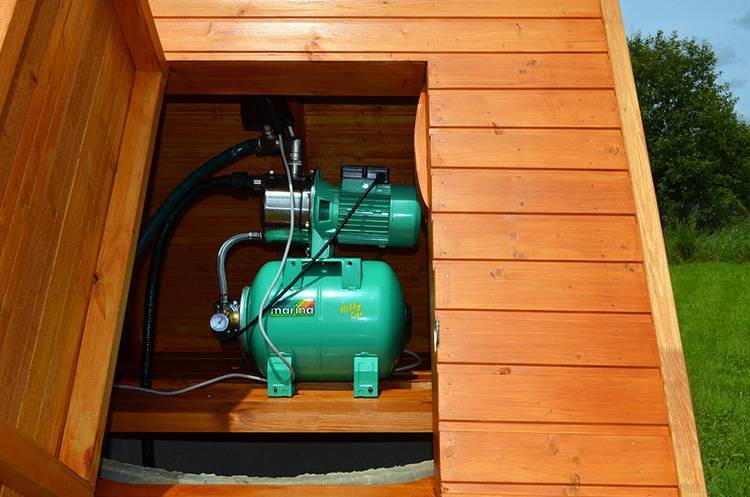
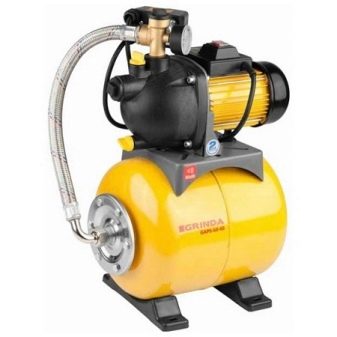
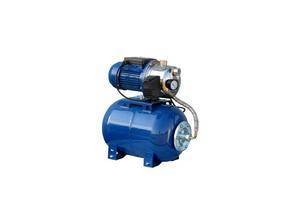
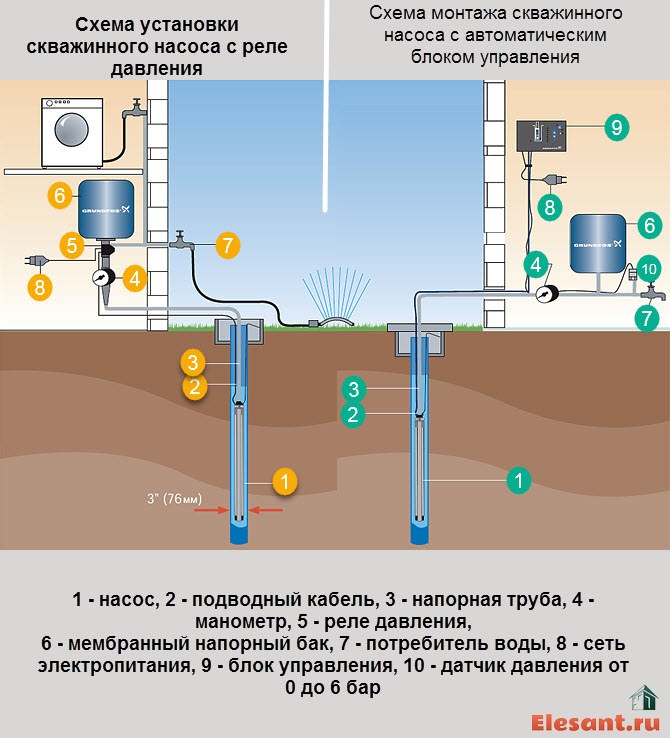
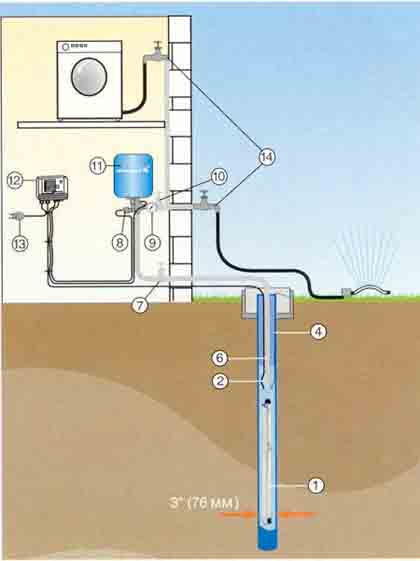
Use of pumping systems
For comfortable drinking water country house and garden site uses pumping stations. This equipment, in addition to the pump, includes a storage tank and an automatic switch-on system when using water. The water tank is filled to the required level, when water is consumed for domestic needs, the automation turns on the pump and replenishes the water in the tank. The cost of pumping stations starts from 5 thousand rubles.
The water supply system of a private house: how to organize
Basically, pumping stations are used for arranging water supply. They are designed to pump water from a source directly into a system or tank. Additional water purification filters are also used.
The system includes:
- pumps;
- storage tanks;
- hydraulic accumulators;
- various water heaters (boilers, boilers, heating elements).
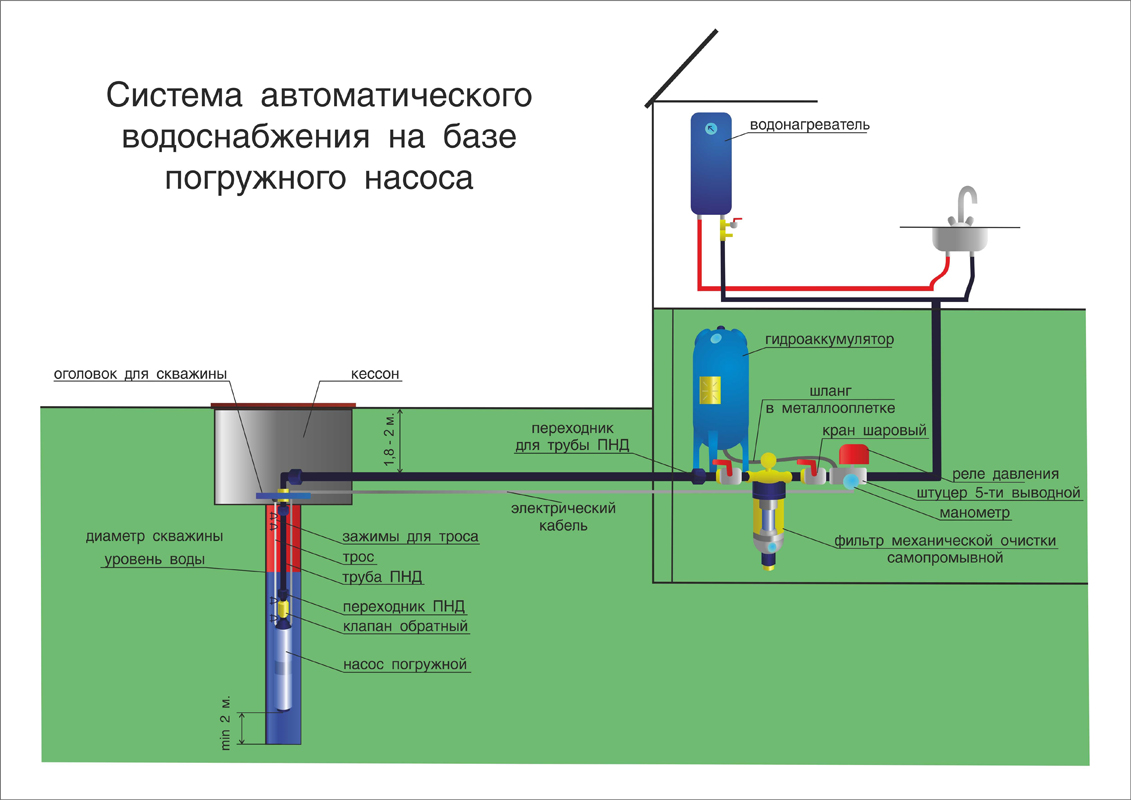
Place the complex closer to consumers, in the basement or basement. A pipe is brought to it, coming from the water intake, with a fitting made of bronze or brass, with a diameter of 32 mm. Next, the drain drain and the check valve are connected in turn.
Then all the required components are connected using a connection, which is popularly called "American".
- A ball valve is connected to open / close the water supply.
- Next, a coarse filter is connected to remove coarse particles. Protects against rust and sand.
- After that, the pumping station system is equipped with a hydraulic tank or a hydraulic accumulator, including a pressure switch. But if the electric pump itself is in the well, and the special equipment is inside the building, you need to install the relay on the top of the pipe, and the tank on the bottom.
- Then an automation sensor is mounted to protect the pump from running dry and timely shutdown.
- The process ends with the installation of a fine (soft) filter.
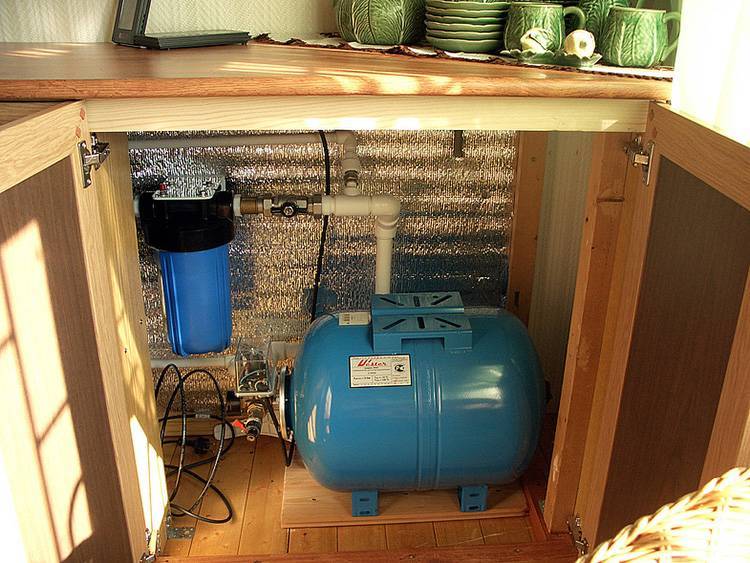
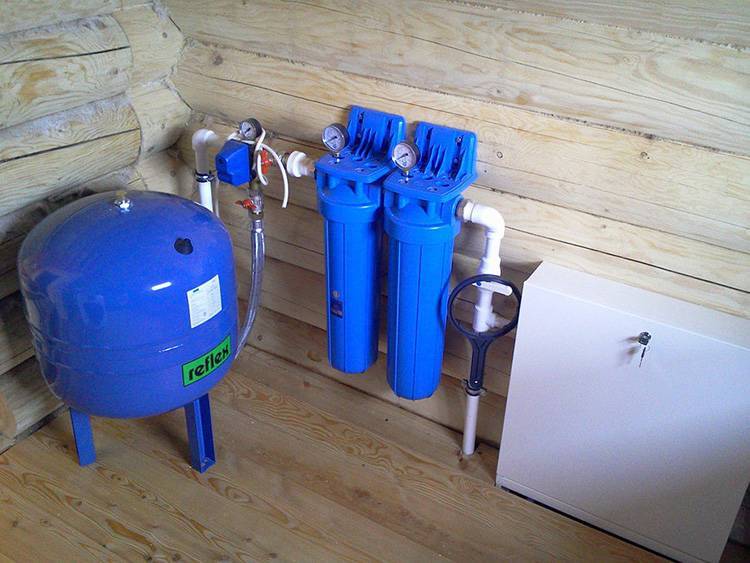
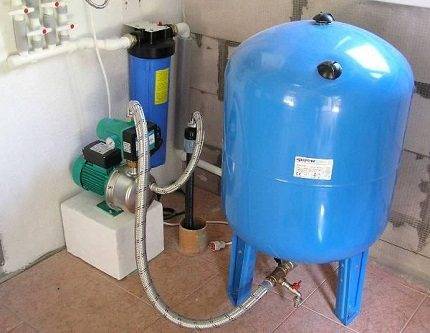
Selection of a hydraulic accumulator for a pumping station
The hydraulic tank is a hermetic container with two sections. One holds water and the other holds air. With its help, the pressure in the system is continuously maintained, and, if necessary, the operation of the pump is regulated.
It is necessary to choose a container model in accordance with the number of residents and daily water consumption. Its volume can be from 25 to 500 liters. For example, Wester WAV 200 Top is designed for 200 liters of liquid, and Unipress is designed for 80 liters.
External and internal plumbing
If the choice between the storage tank and the pumping station is made, it's time to start performing the necessary set of works.Regardless of the system chosen, it is necessary to carry out the installation of the plumbing system, namely its external and internal parts.
Outside, a trench should be dug in such a way that the pipe runs below the freezing level of the soil in this particular area. At the same time, a slope of 3 cm is observed for each meter of the highway.


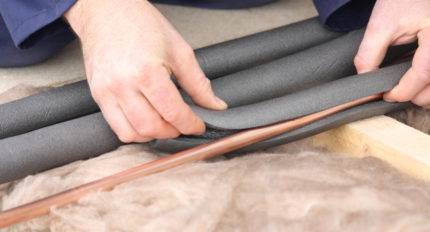
For water pipe insulationlocated above ground level, you can use both ordinary mineral wool and modern thermal insulation materials
The pipe in the area above the freezing horizon before entering the house must be insulated. In cases where the pipeline is laid above the seasonal freezing horizon, the problem is solved with the help of a heating cable. It is convenient to place the electric cable of the pump in the trench under the pipeline. If its length is not enough, the cable can be “stretched”.
But it is best to entrust this operation to an experienced electrician, since in the event of a breakdown, you will have to carry out large-scale earthworks or even completely replace part of the damaged equipment.
For outdoor plumbing, plastic pipes are quite suitable. A trench is brought to the well, a hole is made in its wall through which a pipe is inserted. The pipeline branch inside the well is increased with the help of fittings, which at the same time will provide the cross section necessary for a stable flow of water.
If a submersible pump is included in the water supply scheme, it is attached to the edge of the pipe and lowered into the well. If a pumping station will pump water, the edge of the pipe is equipped with a filter and a check valve.
The distance between the bottom of the well and the lowest point of the pumping system must be at least a meter so that grains of sand stirred up by the operation of the machine do not fall into it.
The hole around the pipe inlet is carefully sealed with cement mortar. To prevent sand and dirt from entering the system, a regular mesh filter is placed at the lower end of the pipe.
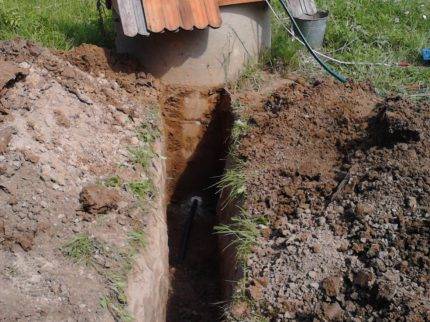
For laying the outer part of the water supply, a trench of sufficient depth should be dug to prevent the pipes from freezing in winter.
A long pin is driven into the bottom of the well. A pipe is attached to it to securely fix its position. The other end of the pipe is connected to a hydraulic accumulator or storage tank, depending on the type of system chosen.
After the trench is dug in, a clay lock should be installed around the well with the following parameters: depth - 40-50 cm, radius - about 150 cm. The lock will protect the well from the penetration of melt and groundwater.
Water supply is introduced into the house in such a way that this place is hidden under the floor. To do this, it is necessary to partially excavate the foundation in order to make a hole in it.
Installation of internal plumbing can be made from metal pipes, but the owners of country houses almost always choose modern plastic structures. They weigh lighter and are easier to install.
A soldering iron for PVC pipes is needed, with which the ends of the pipes are heated and securely connected. Even a beginner can perform such soldering on their own, however, you should familiarize yourself with common mistakes when soldering PVC pipes in order to ensure a really reliable connection.
Here are some helpful rules:
- soldering work should be carried out in a clean room;
- joints, as well as pipes as a whole, should be thoroughly cleaned of any contamination;
- any moisture from the outer and inner parts of the pipes must be carefully removed;
- do not keep the pipes on the soldering iron for a long time to avoid overheating;
- heated pipes should be immediately connected and held in the correct position for several seconds to prevent deformation at the junction;
- possible sagging and excess material is best removed after the pipes have cooled.
If these rules are observed, a really reliable and durable connection is obtained. If the soldering is poor quality, soon such a connection may leak, which will lead to the need for large-scale repair work.
Wiring diagrams for the plumbing system around the house
The plumbing scheme provides for two ways of piping:
- Sequential.
- Parallel.
The choice of one or another option depends on the operational features of the intra-house network - the number of residents, water intake points, the intensity of water consumption, etc.
Serial, tee connection
A sequential water supply scheme in a private house involves the division of one common water supply branch into several "sleeves" using tees.
Therefore, such a scheme is also called a tee. Each branch of the pipeline goes to its point of consumption - kitchen, bathroom, toilet.
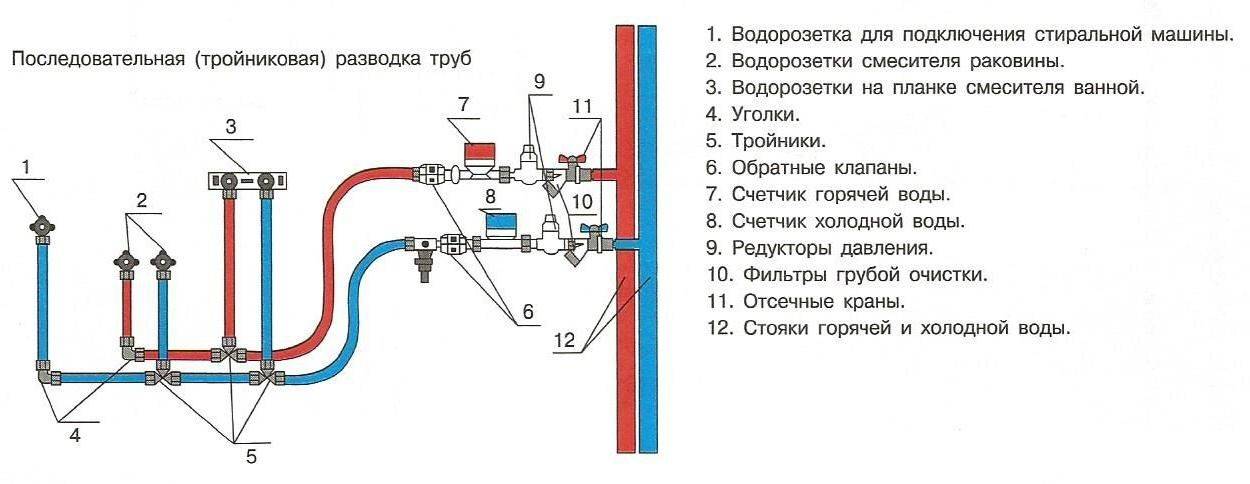
Among the advantages of this option, one can note a more budgetary cost due to lower pipe consumption. The disadvantage of the tee connection is the unequal pressure in each of the pipeline sleeves.
With a large number of branches, the water pressure in them decreases. A sequential scheme is recommended for use in houses with a small number of water points.
Parallel, collector connection

A distinctive feature of the parallel water supply scheme is the installed collector. This is a special water distribution node, separate branches are derived from it to each point of consumption.
The advantage of the collector connection is the ability to provide uniform pressure at each point of water consumption. The disadvantage of parallel connection is the increased consumption of materials compared to the serial version.
Step by step installation guide
Self-construction of a water supply system requires preparation.
Drawing up an action plan
The plan takes into account:
- soil freezing depth;
- at what distance from the surface groundwater;
- relief;
- underground communications;
- buildings on the site and its boundaries;
- points of consumption (house, bathhouse, outdoor shower, watering, etc.).
Draw a plan of the area and a profile image of the water supply to take into account its slope. Pipes are laid 20 cm below the freezing depth of the soil. Outline where and what fittings will be needed. According to the plan, the number of each species is counted, a list is made. Consider the total length of the pipes, buy with a margin of 10%.


Preparing the necessary tools
To mount a capital water supply, you will need tools, including special ones. You can buy a plumbing kit or separately:
- scissors for cutting plastic pipes;
- key gas and adjustable;
- sealant gun;
- knife, sandpaper;
- tape measure, pencil.
If you need a welding machine for them. For earthworks, a shovel and scrap are prepared. If you plan to self-install the electrical part, stock up on electrical tape, screwdrivers, a tester, pliers.
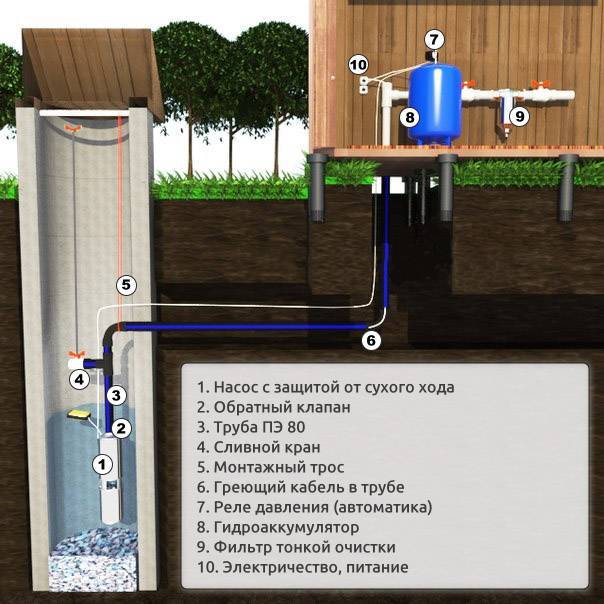
Water supply device
First, dig a trench of the required depth.Further actions are performed in the following sequence:
- Install the pump. Surface - next to the well in the caisson, pit or warm room. The submersible is lowered into the well.
- The water pipe is connected to the pump and laid in a trench. In case of insufficient deepening, they insulate or lay a heating cable. Lay the power cable.
- The second end is connected to a fitting with 5 outlets. A tank, a pressure switch, a pressure gauge are mounted on its free outlets.
- Before entering the pipe into the house, a shut-off valve is installed so that it is possible to shut off the water if necessary.
- Test the system to make sure there are no leaks. Fall asleep trench.
- Mount internal wiring, connect plumbing fixtures
At the inlet of the water supply to the house, a filter is installed, at least coarse cleaning. If the quality of the resulting water is poor, finer purification may be necessary.
Choosing a device for heating water
Hot water for the bathroom, washing dishes is obtained from flow heaters or storage (boilers). In terms of speed, performance, ease of use, gas water heaters are superior. It makes sense to buy if the house is connected to natural gas. Using a balloon to heat water is irrational. The column is connected only by specialists of the gas service.
A flowing electric heater can be installed by yourself, but in terms of heating rate it is inferior to a gas water heater. An electric boiler heats the water even more slowly. But if you use it constantly, do not turn it off, but set the thermostat to the desired temperature, there will always be hot water in the house. The boiler is inexpensive, anyone can install. The capacity is different, they are selected depending on the needs of the family.
Deal with the intricacies of the gasket plumbing in the country video will help.
Ways to supply water to the house
It is possible to provide the cottage and the site with drinking water using centralized or autonomous water supply. These are two fundamentally different ways of obtaining life-giving moisture.
In the first case, a connection is made to the existing water supply system in the village, and in the second case, water intake is organized on an individual basis in the territory adjacent to the residential building. And each of these options has its own merits.
You can simply bring drinking water to the cottage in canisters or from time to time order a water carrier to fill the container installed on the site. However, this method is acceptable only for non-permanent residence and / or for one person. But if a family with a child lives in the house, then the water supply should be arranged more thoroughly.
 The very first question in the water supply of a private house is the definition of a water source, which can be used as a village water supply network or an autonomous water intake
Autonomous water intake is organized on the basis of:
- well;
- wells (pressure or non-pressure);
- spring or other natural body of water.
Most often, among these options, wells and free-flow wells are selected. They are equipped with pumps for pumping water, which is then fed into the house. Their arrangement takes a minimum of time and costs reasonable money.
At the same time, the well is still good in that in the event of a power failure, drinking liquid can be obtained from it with a simple bucket.
The organization of the water supply of the cottage is as follows:
- The source of water is selected - a highway or a well / well.
- A water intake is created - a connection is made to the village water supply or a well is drilled / a well is dug.
- A pipe is laid from the source to the house.
- The water pipeline is being put into the cottage.
- Internal distribution of cold water and hot water pipes is carried out with the connection of all necessary equipment for cleaning, heating and water metering.
- Plumbing is being connected.
Also, it is usually already from the house that the plumbing is carried out in the area for watering the garden and supplying utility rooms with water. Do not forget that the organization of water supply can only be carried out if drainage system devices from a water-supplied cottage.
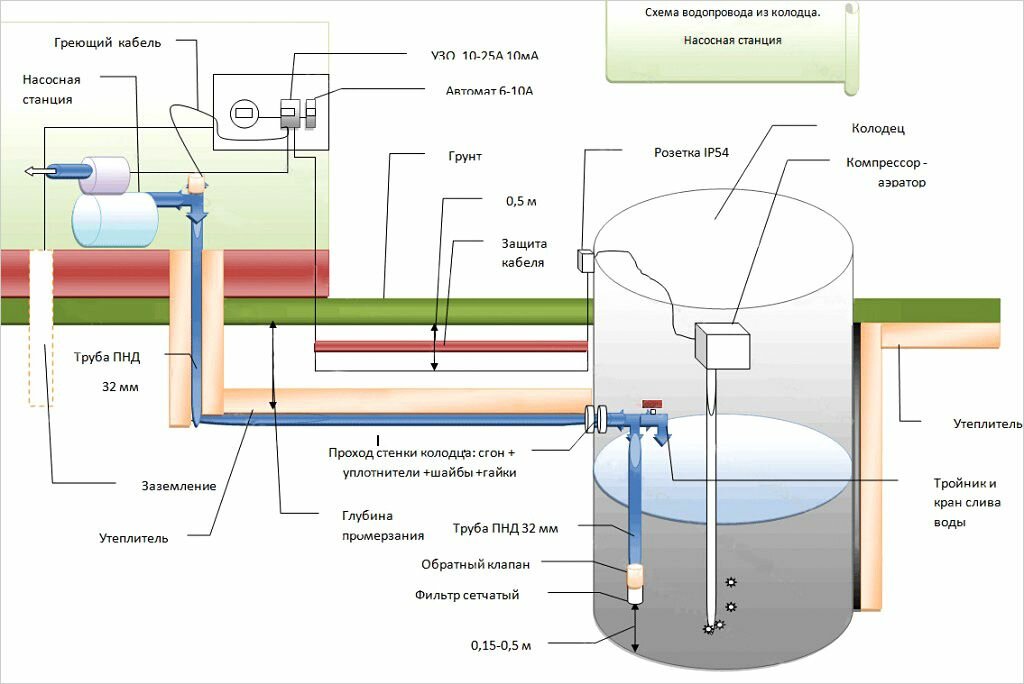
Organization of winter water supply
The composition of the winter water supply system is not much different from the summer water supply system. It also includes the following elements: pump, water pipes, storage tank or hydraulic accumulator, drain valve.
At the same time, the installation of a winter system requires compliance with certain rules.
Step # 1 - insulate the pump for water supply
The pump and the cable that feeds it needs to be insulated. For thermal insulation of the pumping station, you can use ready-made thermal insulation systems or build a casing yourself using mineral wool, foam plastic or other heaters.
The junction of the pump and water pipes (pit) also requires insulation. Typically, the dimensions of the pit are 0.5 x 0.5 x 1.0 m. The walls of the pit are faced with bricks, and the floor is covered with a layer of crushed stone or a concrete screed.
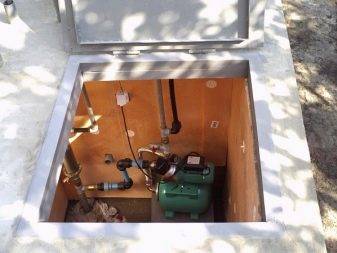
 The equipment included in the winter water supply system does not need to be insulated if it is located in a pit below the level of soil freezing
Step # 2 - insulate the accumulator
storage tank or the accumulator must also be insulated. The tank acts as a storage tank, allowing the water supply system to work smoothly.
In the absence of a storage tank, the system will periodically turn off, which will lead to wear of all its elements.
For thermal insulation of the accumulator, the following types of heaters can be used:
- polystyrene or polystyrene foam;
- mineral and basalt wool;
- polyurethane foam and polyethylene foam;
- rolled fine-mesh heaters with a foil layer.
The process of insulation consists in the device of the outer casing of the accumulator, followed by finishing with the final material, if necessary.
If possible, it is desirable to insulate the technical room in which the accumulator is located. This step will be additional preparation for winter.
Step #3 - Taking care of the water pipes
For insulated winter plumbing with a laying depth of 40-60 cm the best choice would be low pressure polyethylene pipes.
Compared to metal, they have the following advantages:
- not subject to corrosion;
- low specific gravity;
- easy to install;
- much cheaper in cost.
The diameter of the pipes is calculated based on the planned water consumption at the design stage of the water supply system.
Water consumption depends on the number of people living in the house, the availability of water-consuming devices, the volume of water used for irrigation and animal care, and other factors.
For example, a pipe with a diameter of 25 mm has a capacity of 30 l / min, 32 mm - 50 ml / min, 38 mm - 75 l / min. Most often for country and country houses up to 200 m² are used HDPE pipes with a diameter of 32 mm.


Learn more about how to choose insulation for plumbing pipes, read on.
Step # 4 - put the drain valve and pressure switch
The drain valve is necessary for the conservation of the system, thanks to which water can be drained into the well. With a short length of water supply, the drain valve can be replaced with a bypass drain pipe.
The relay performs the function of maintaining pressure in the water supply, ensuring its uninterrupted operation and preventing breaks and stagnation of water. When the maximum indicator of fullness of the pipes is reached, the pressure switch will turn off the pump.
 Installation of the pressure switch and drain valve is not difficult, the main thing is to follow the scheme recommended by the equipment manufacturer