- The main types of summer water pipes
- open plumbing
- hidden option
- Summer plumbing installation
- Plumbing device in the presence of a centralized network
- Plumbing from a well or well
- Tools and materials for installation
- Additional products used in the arrangement of summer water supply
- Types of garden aqueduct
- Summer option
- Scheme
- capital system
- Warming
- How to choose?
- Internal or external laying
- Welding of polypropylene pipes of the heating system
- First stage
- Soldering technology for polypropylene heating pipes
- Features of welding polypropylene pipes
- How to assemble plumbing
- Summer plumbing in the country
- Stage 4. Installation of a new plumbing
- Features and nuances of the practical use of propylene pipes
- Wiring options
- serial wiring
- Parallel wiring
- Installation with compression fittings
- Do-it-yourself polypropylene plumbing
- Installation of water lines - basic recommendations
- Installation rules
The main types of summer water pipes
Previously, all engineering systems in the country were mainly made of metal pipes. Such systems were quite expensive and at the same time could quickly become unusable due to the rapid formation of rust and corrosion in the open air.
Modern materials make it possible to create suburban sewers much easier, faster and much cheaper.
The main feature of the summer water supply over the usual one is that the pipes are buried shallowly or not buried at all. Such a sewerage system does not provide protection against winter freezing. The very word "summer" just implies that this system is used only in the summer.
Usually, when creating a seasonal water supply, two options are used. Let's consider them in more detail.
open plumbing
It is the easiest way to organize watering a garden plot. Pipes when laying water supply are laid on top of the ground.
This installation scheme requires a minimum of costs and effort, but it has a number of disadvantages:
- Pipes can interfere with the owner of the site to move freely around his dacha;
- In the absence of the owners, pipes can be cut and stolen;
- For the winter, such a drain must be disassembled, dried and cleaned in a secluded place. Otherwise, the remaining water when freezing can damage the sewer.
hidden option
A more permanent sewerage device. Pipes are laid in shallow trenches, and only in some places are water supply points brought to the surface.
The hidden option eliminates the disadvantages of the open type:
- Does not create obstacles for movement on the site;
- Does not require annual dismantling and subsequent installation;
- Such systems are less likely to be stolen, as they create additional obstacles for intruders when they try to steal.
The only thing you need to pay attention to when laying such a water supply is laying pipes at a slope, so that before the onset of cold weather, water can be easily drained to prevent it from freezing and damaging pipes.
Summer plumbing installation
So, we figured out the types of pipelines. Now let's talk about the assembly of the plumbing system.
The main stages of the device summer water supply:
- Drawing up a diagram-drawing of a water supply system.
- Purchase of materials.
- Laying sewer, according to the scheme.
- Installation of faucets, sprinklers and other devices.
- Connection to a water supply source.
- Testing.
The summer water supply plan consists of the following steps:
- First you need to draw a sketch. Be sure to mark paths, buildings, beds and other plantings.
- On the site, pegs mark the nodes and places of the future water supply.
- Then the number of branches, bends, taps and other nuances are entered into the project.
- The points of withdrawal of the water supply to the surface are marked.
Depending on the source of water, pipelines have their own characteristics.
Plumbing device in the presence of a centralized network
When installing seasonal water supply, the following plan should be followed:
- A detailed site plan is being drawn up. The places where the water supply will pass, where the taps and sprinklers will be located are outlined. Corners, plugs, sockets and so on are outlined. The number and location of the taps is calculated so that all plantings in the garden are irrigated with a hose of short length, about 3-5 meters. The depth of the trenches is calculated, as a rule it is 30-40 cm. If you plan to carry out engineering communications under the beds, then the depth must be increased to 50-70 cm (for safe work with a shovel or cultivator). The main conduit is made of pipes with a diameter of 40 mm, and branches to the points of water supply - with a diameter of 25 or 32 mm.Laying is best done at a slight slope from the water supply source, for better circulation. A drain valve must be provided at the bottom. It is necessary to consider how the drainage will be organized.
- After drawing up the scheme, the amount of all necessary materials and tools is calculated. After that, you can go to the store.
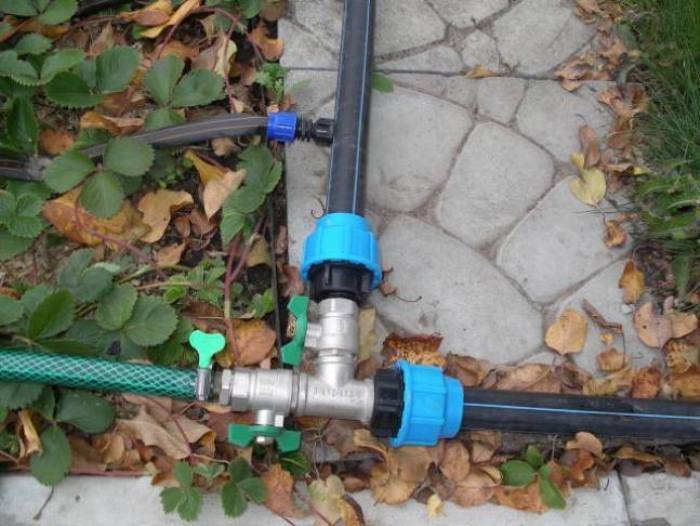
- If the water source of the country water supply is a central network, it will be necessary to make a tie-in. The easiest way that does not involve turning off the water is to use a special “saddle” (clamp with a seal and a threaded pipe). The saddle is installed on the pipe, a ball valve is screwed onto the pipe, through which a hole is made on the surface of the pipe.
- The next step is trench preparation.
- Then the pipeline is assembled, valves and other elements are installed.
- The finished water supply is tested for tightness, when water is supplied, the condition of the joints and connections is checked.
- Plumbing can be buried.
Plumbing from a well or well
If there is no centralized network near the site, then a well or well is used as a source of water. In this case, a pump is needed.
Pump installation methods:
- The submersible pump is suspended on a special cable or chain. This type of pump is capable of pumping water from a depth of no more than 8 meters. A metal cable is not used to install the vibration pump! A nylon cable is used.
- A surface or self-priming pump must be installed on a flat surface. To do this, a flat concrete stand is prepared and the device is protected from rain (using a canopy or booth).
Tools and materials for installation
For the arrangement of seasonal water supply you will need:
- Pipes.
- Fittings and tees.
- Couplings.
- Wrenches: adjustable, gas, wrench No. 17-24.
- A special knife for cutting polymer pipes or a hacksaw for metal carving.
- Shovel.
- Scrap.
- Soldering iron. In some places it will be possible to do without fittings and a gas key using a connection with a special gas soldering iron. Such a tool can be purchased, it is relatively inexpensive. Some shops lend soldering irons.
- Ball valve ½.
- Corner compression 20 mm.
- Tee compression 20 mm.
- Saddle 63 (1/2).
- Fumlenta or fum thread.
- Sanding paper for cleaning pipe connections.
- Roulette.
- Marker or pencil.
Additional products used in the arrangement of summer water supply
The main devices that will be needed when installing the pipeline:
- Union. It will help to quickly connect the hose to the faucet. On one side it is screwed onto the faucet, on the other side the hose is fixed.
- Corrugated hoses. They are inexpensive and take up little space when folded.
- Special hoses for drip irrigation, if provided on the site.
- Sprayers or watering guns.
- Sprinkler or watering heads.
- For automatic watering, you can purchase a special timer or soil moisture sensor.
Types of garden aqueduct
There are two ways to lay a pipeline in a country house - summer and seasonal (capital). Each of them has its own advantages and disadvantages.
Summer option
The method of ground installation of a water supply system in summer cottages is used to organize the irrigation of vegetable beds, berry bushes, and fruit trees. Ground water supply is used to supply a bathhouse, a summer kitchen, a garden house.


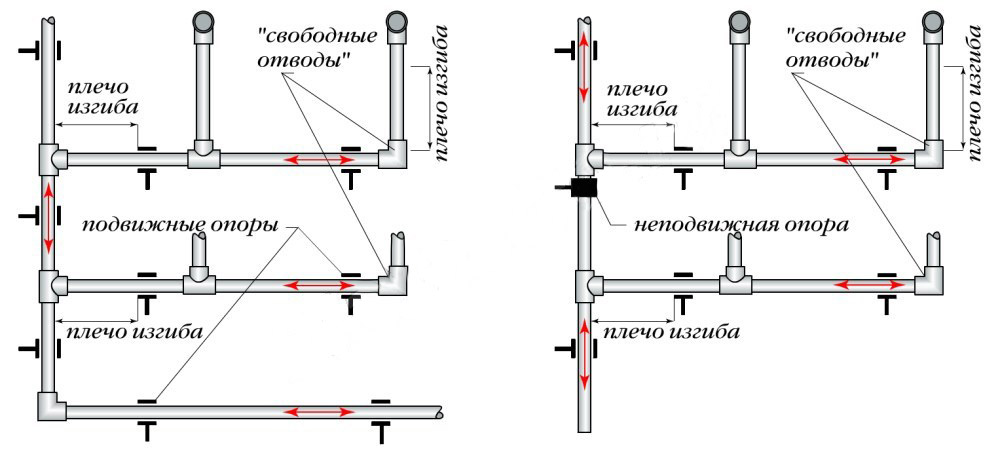
The seasonal plumbing system is a ground loop with long fittings at the branching point. If the site is used exclusively during the warm period, it is reasonable to lay pipes on the surface. Such a system is easy to dismantle for the winter to prevent theft of materials in the off-season.
On a note! To avoid damage to communications by agricultural equipment, summer water supply is laid on special supports.
The main convenience of seasonal polyethylene plumbing is its mobility. If necessary, the configuration can be changed in 10-15 minutes. It is enough to add or remove a few meters of pipe or run it in a different direction.
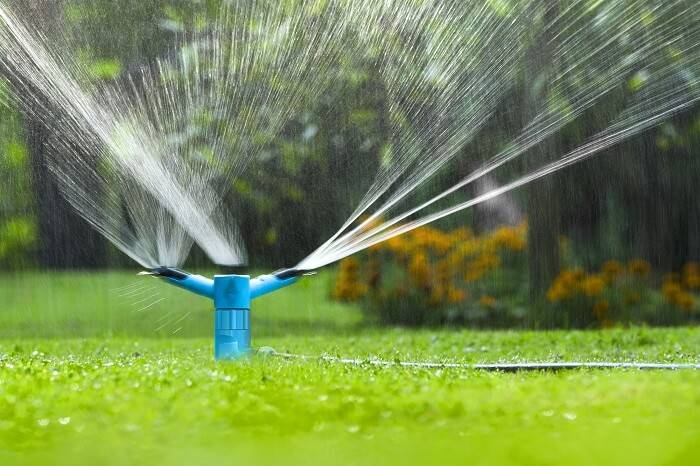
Irrigation system
Scheme
Temporary summer water supply in the country from HDPE pipes they assemble and disassemble with their own hands according to the principle of a children's designer.
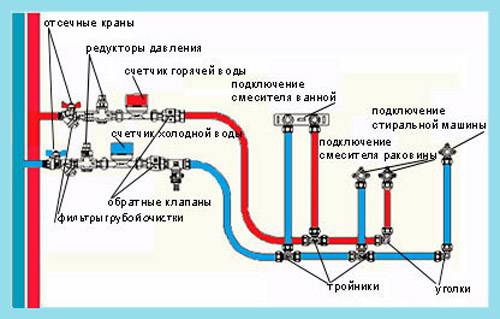
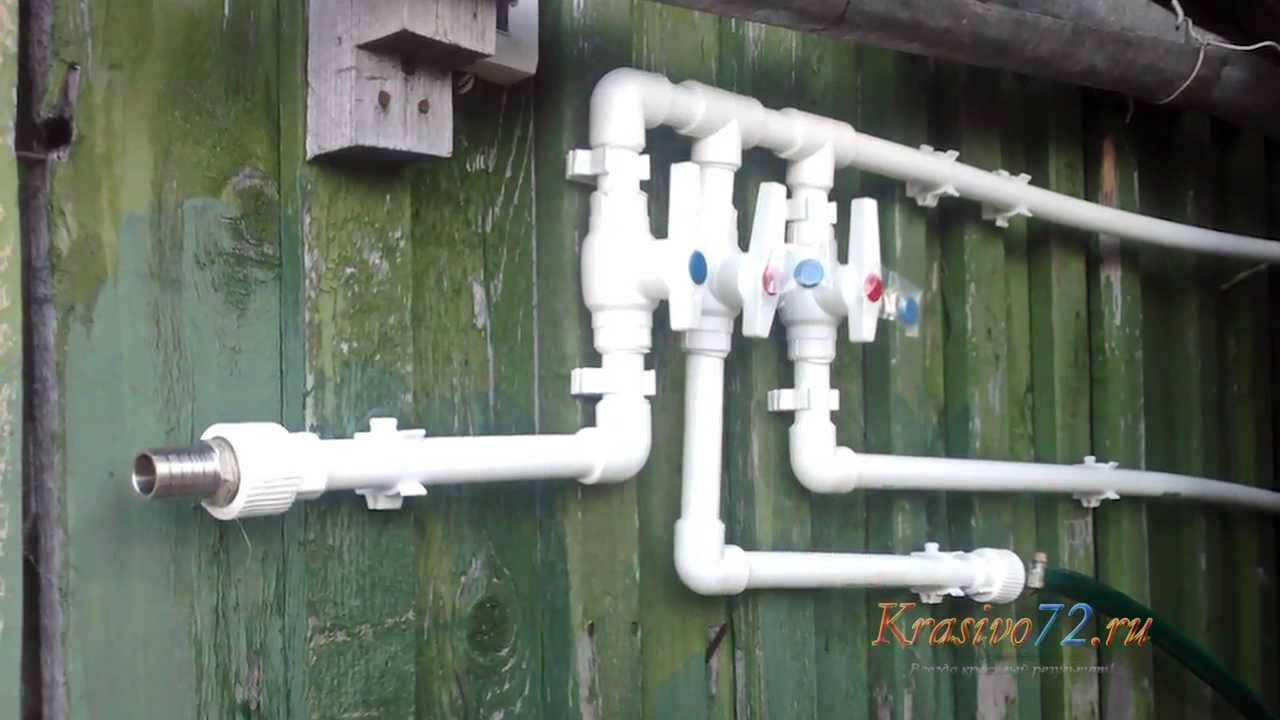
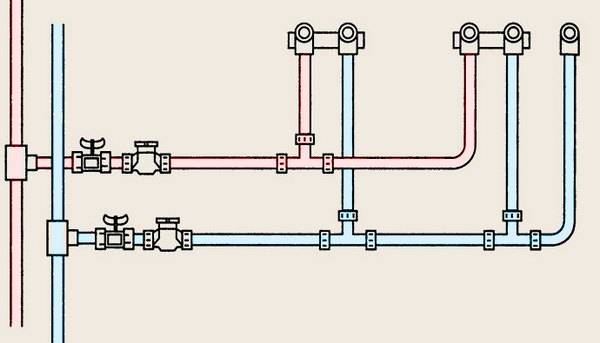
Typical scheme of country water supply
The network diagram is drawn up with reference to a detailed site plan. The drawing marks the location of green spaces, water intake points, a house, a shower, a washbasin.
Important! Pipes are laid with a slope towards the water intake point. At the lowest point of the system provide for the installation of a drain valve
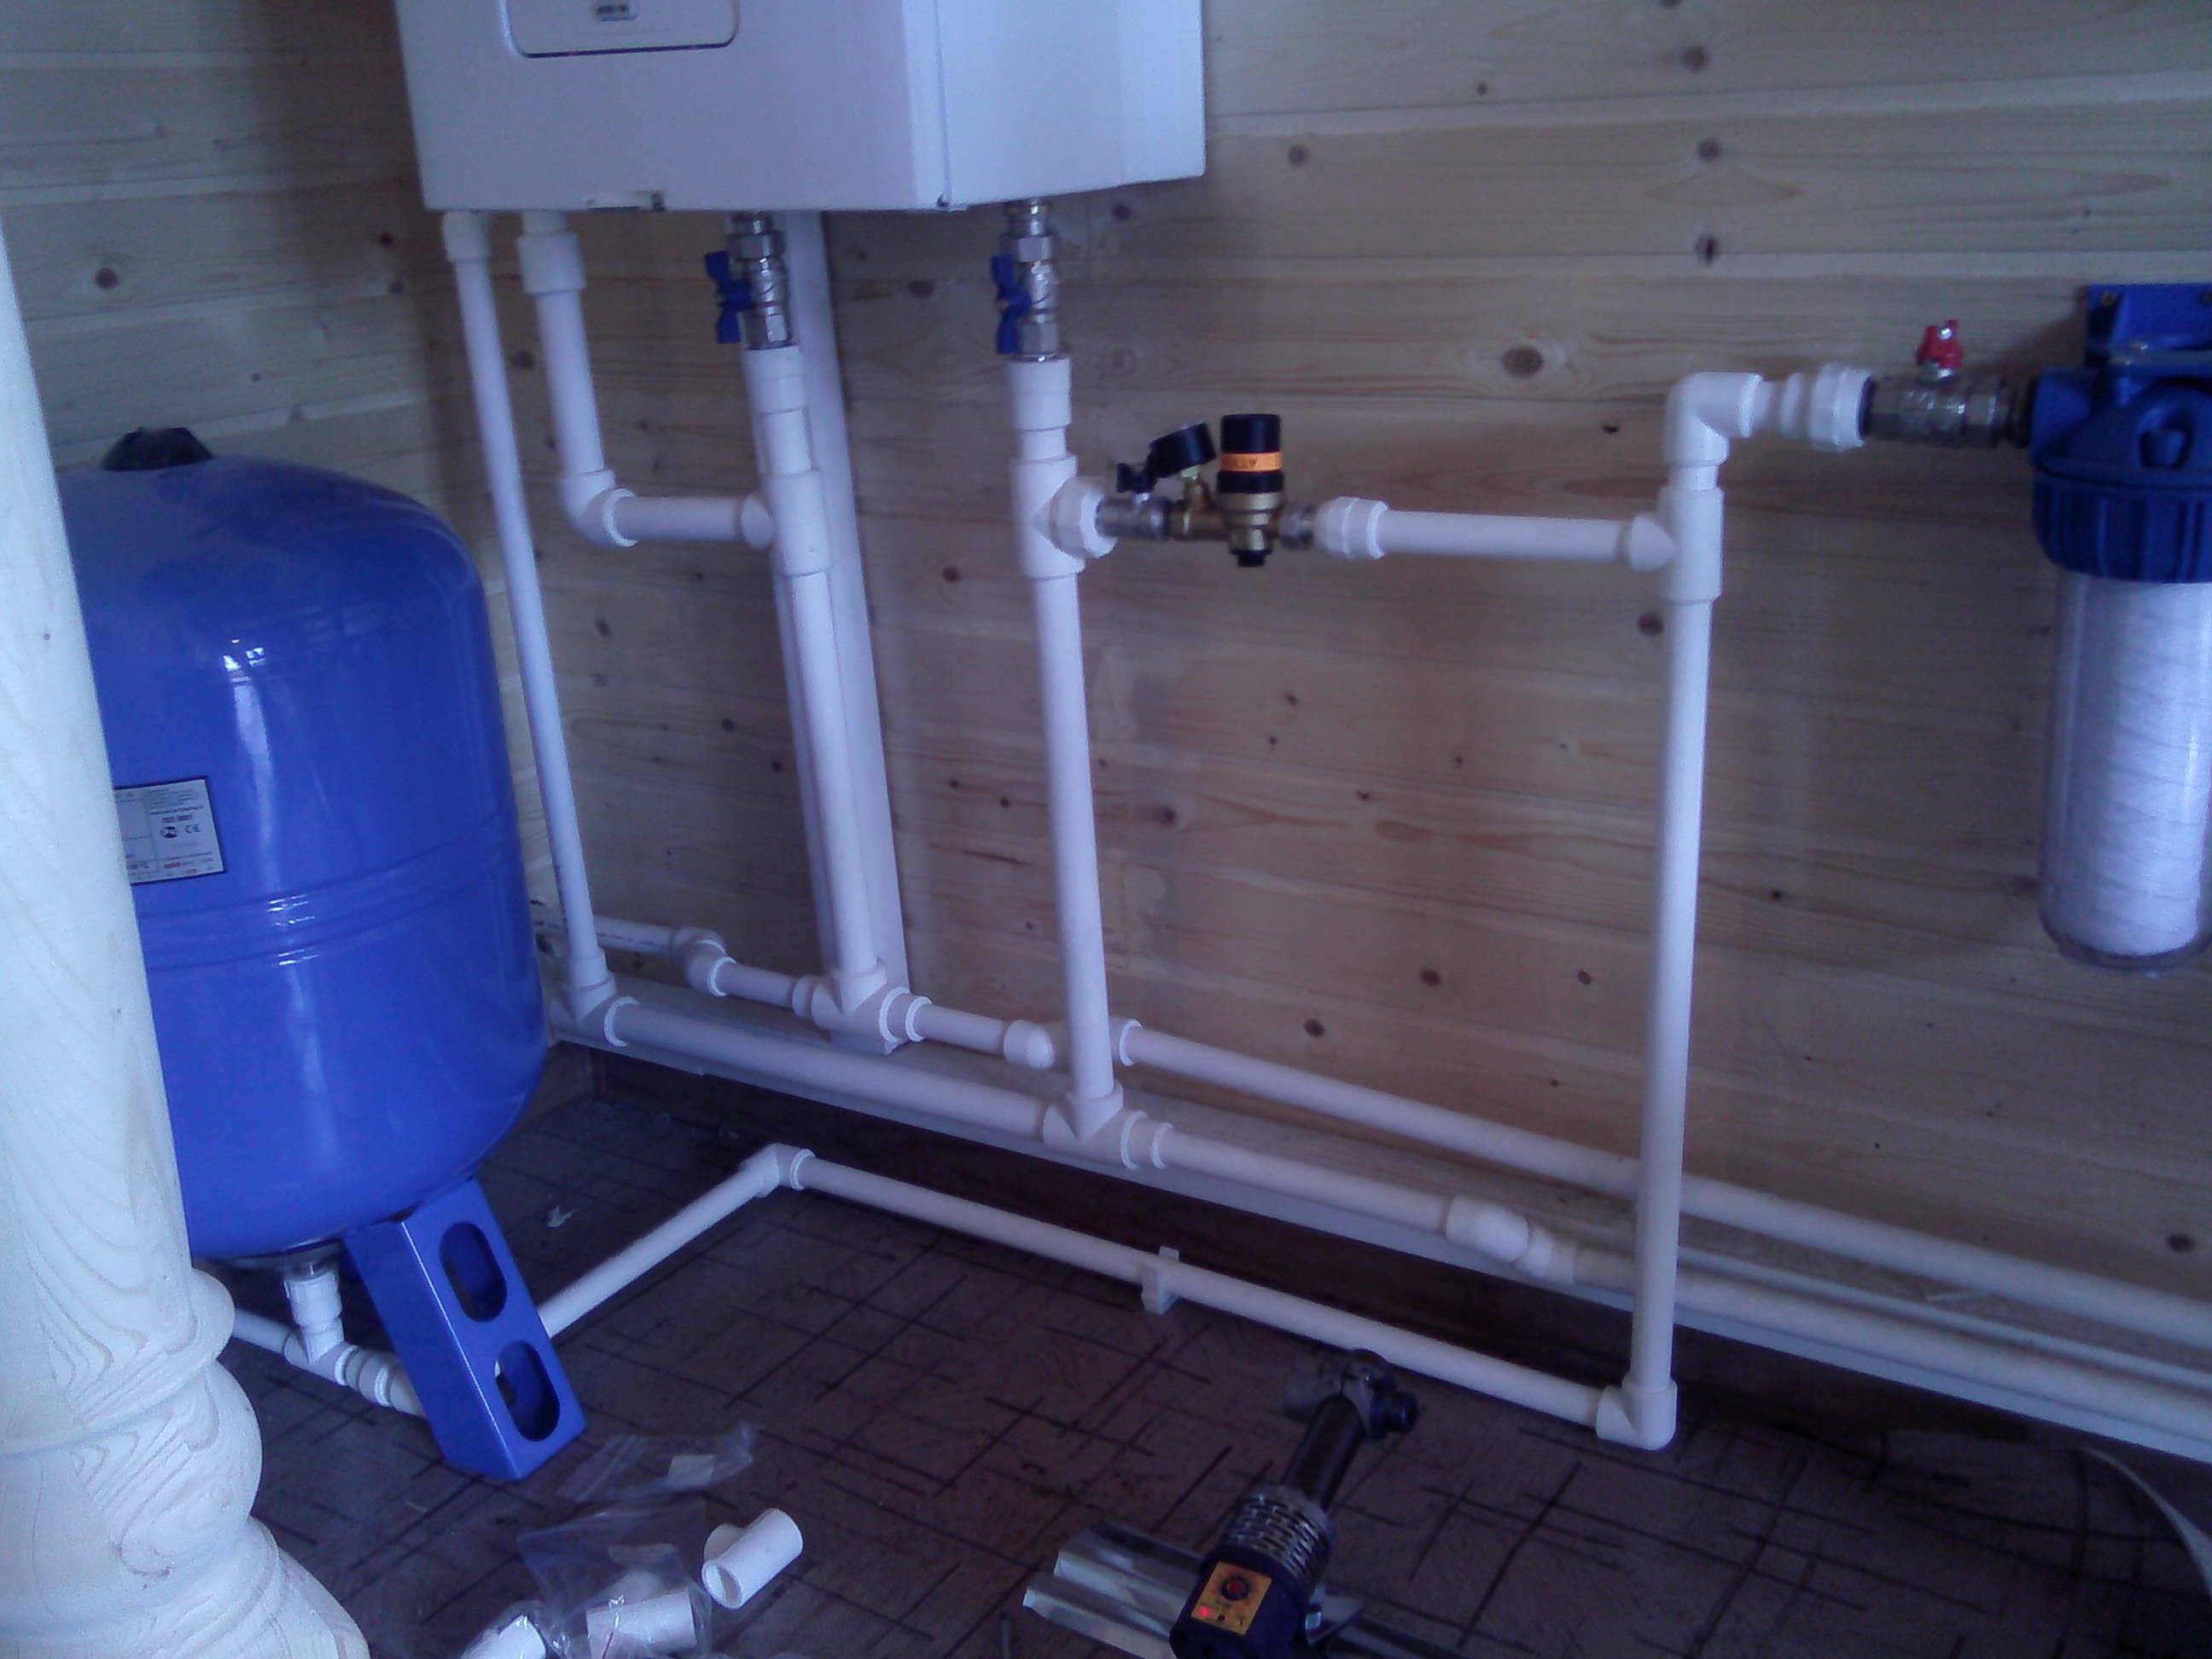
capital system
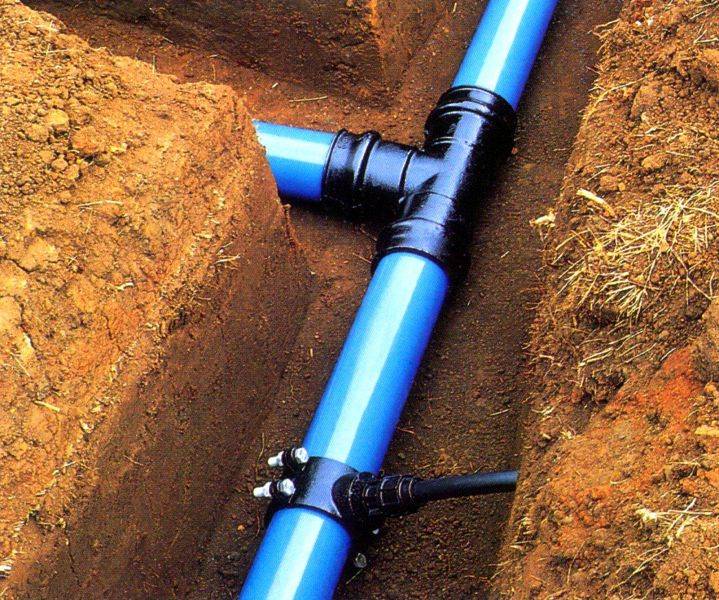
If the site is capitally equipped and used all year round, it is wise to spend time and money on installing a capital plumbing system. The principle of connecting elements in this case does not change. The difference lies in the additional installation of compressor equipment and the closed location. To equip a permanent water supply, communications are laid in trenches below the freezing depth of the soil.
Entering HDPE pipes into the house
Warming
The depth of soil freezing in different regions of the Russian Federation differs significantly. To avoid breaking communications at the time of sudden temperature fluctuations, it is recommended to insulate them.
For the insulation of a capital water supply system from HDPE in a summer cottage, the following materials are used:
- Basalt insulation in the form of finished cylindrical modules.
- Fiberglass cloth in rolls. You will need to buy roofing felt to protect the warm layer from getting wet.
- Styrofoam. Reusable folding modules from two halves, which are used repeatedly, are mounted simply and quickly.
Insulation for pipes made of foamed polyethylene According to statistics, the depth of soil freezing in winter in Russia exceeds 1 meter. For clay and loam of Moscow and the region, this is ...
On a note! Water under high pressure does not freeze. If a receiver is installed in the system, there is no need for additional thermal insulation of the water supply.
In capital construction, when laying a pipeline to a shallow depth, a heating cable is laid parallel to the system and connected to a grounded power source.
Defrosting water and sewer pipes Russia is located in a harsh climatic region, so in winter and early spring there is a risk ...
How to choose?
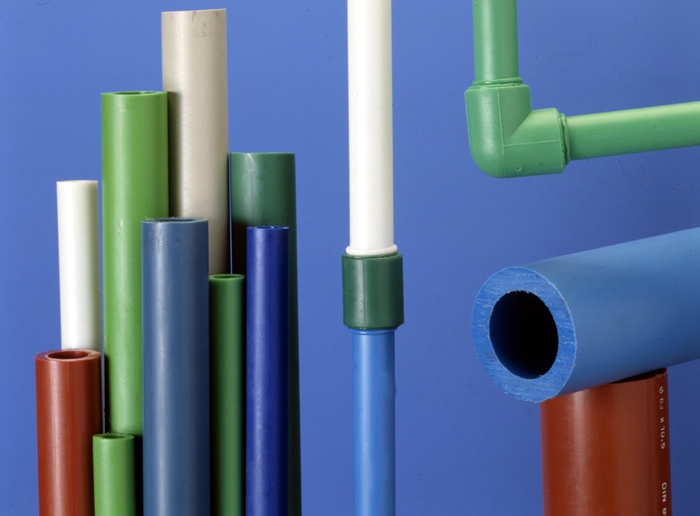
Manufacturers offer several types of polyethylene pipes to choose from. First of all, products are distinguished by the type of transported medium.
For the production of gas pipes, special additives are used that change the composition of water. It is strictly forbidden to use gas pipes with yellow markings for the plumbing system!
To assemble the pipeline underground, two types of polyethylene are used:
- HDPE PE 100, manufactured in accordance with GOST 18599-2001.Product diameter — 20 to 1200 mm. Such pipes are made black with a longitudinal blue stripe along the entire length.
- HDPE PE PROSAFE, produced in accordance with GOST 18599-2001, TU 2248-012-54432486-2013, PAS 1075. Such pipes have an additional mineral protective sheath, 2 mm thick.
For the main line, blanks with a diameter of 40 mm are selected. For secondary - 20 mm or 25 mm.
This is interesting: Rimless toilets - pros and cons, owner reviews
Internal or external laying
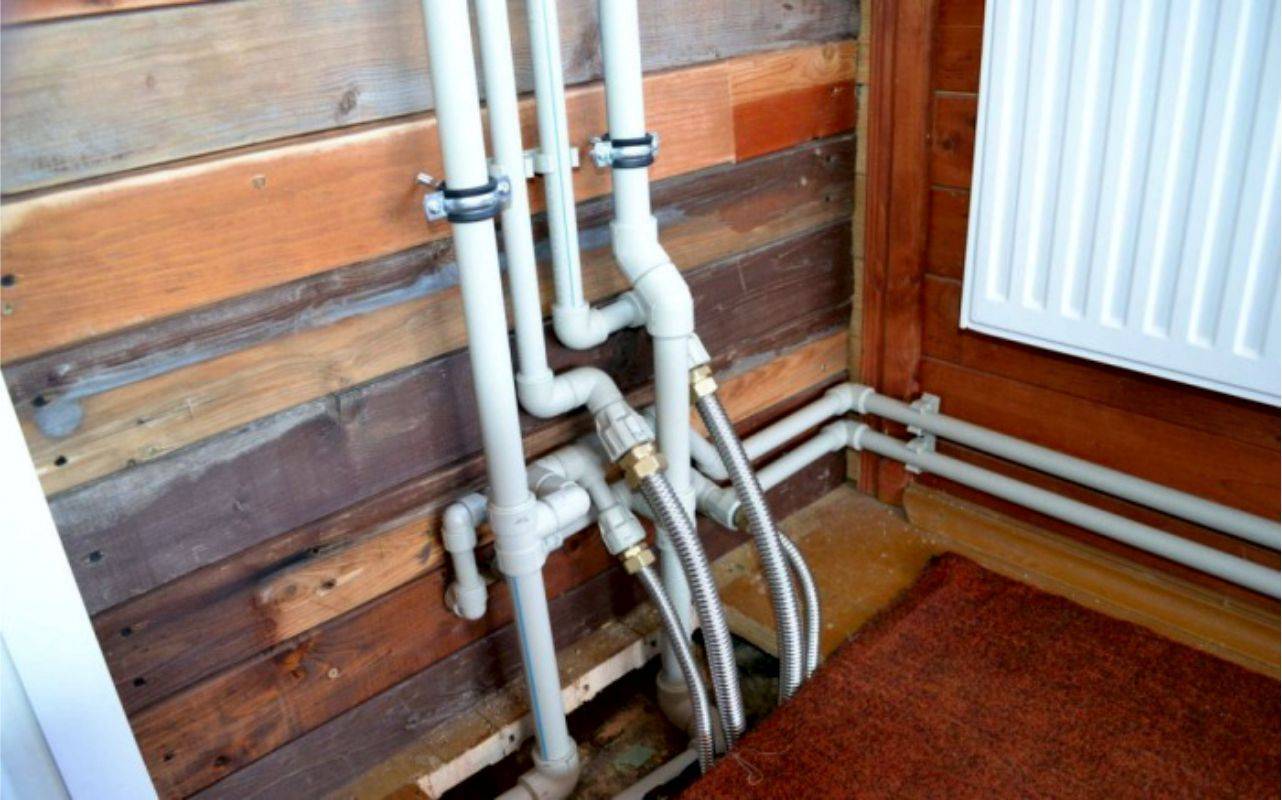
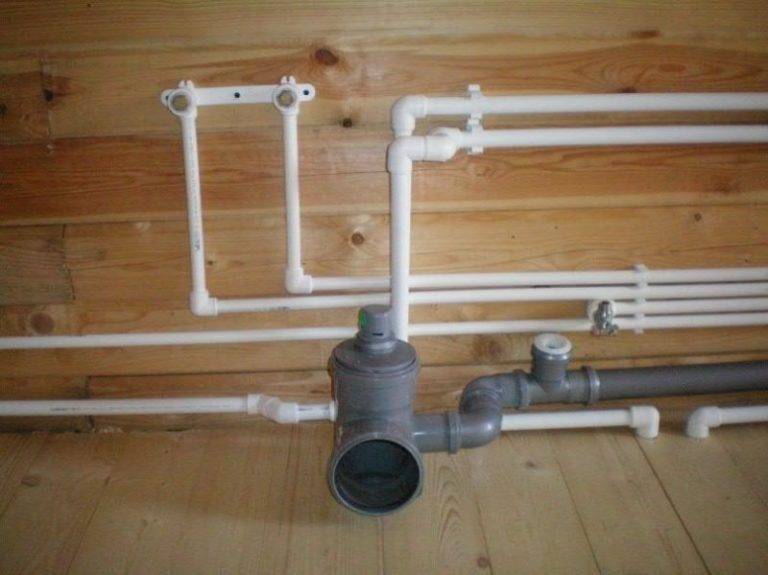
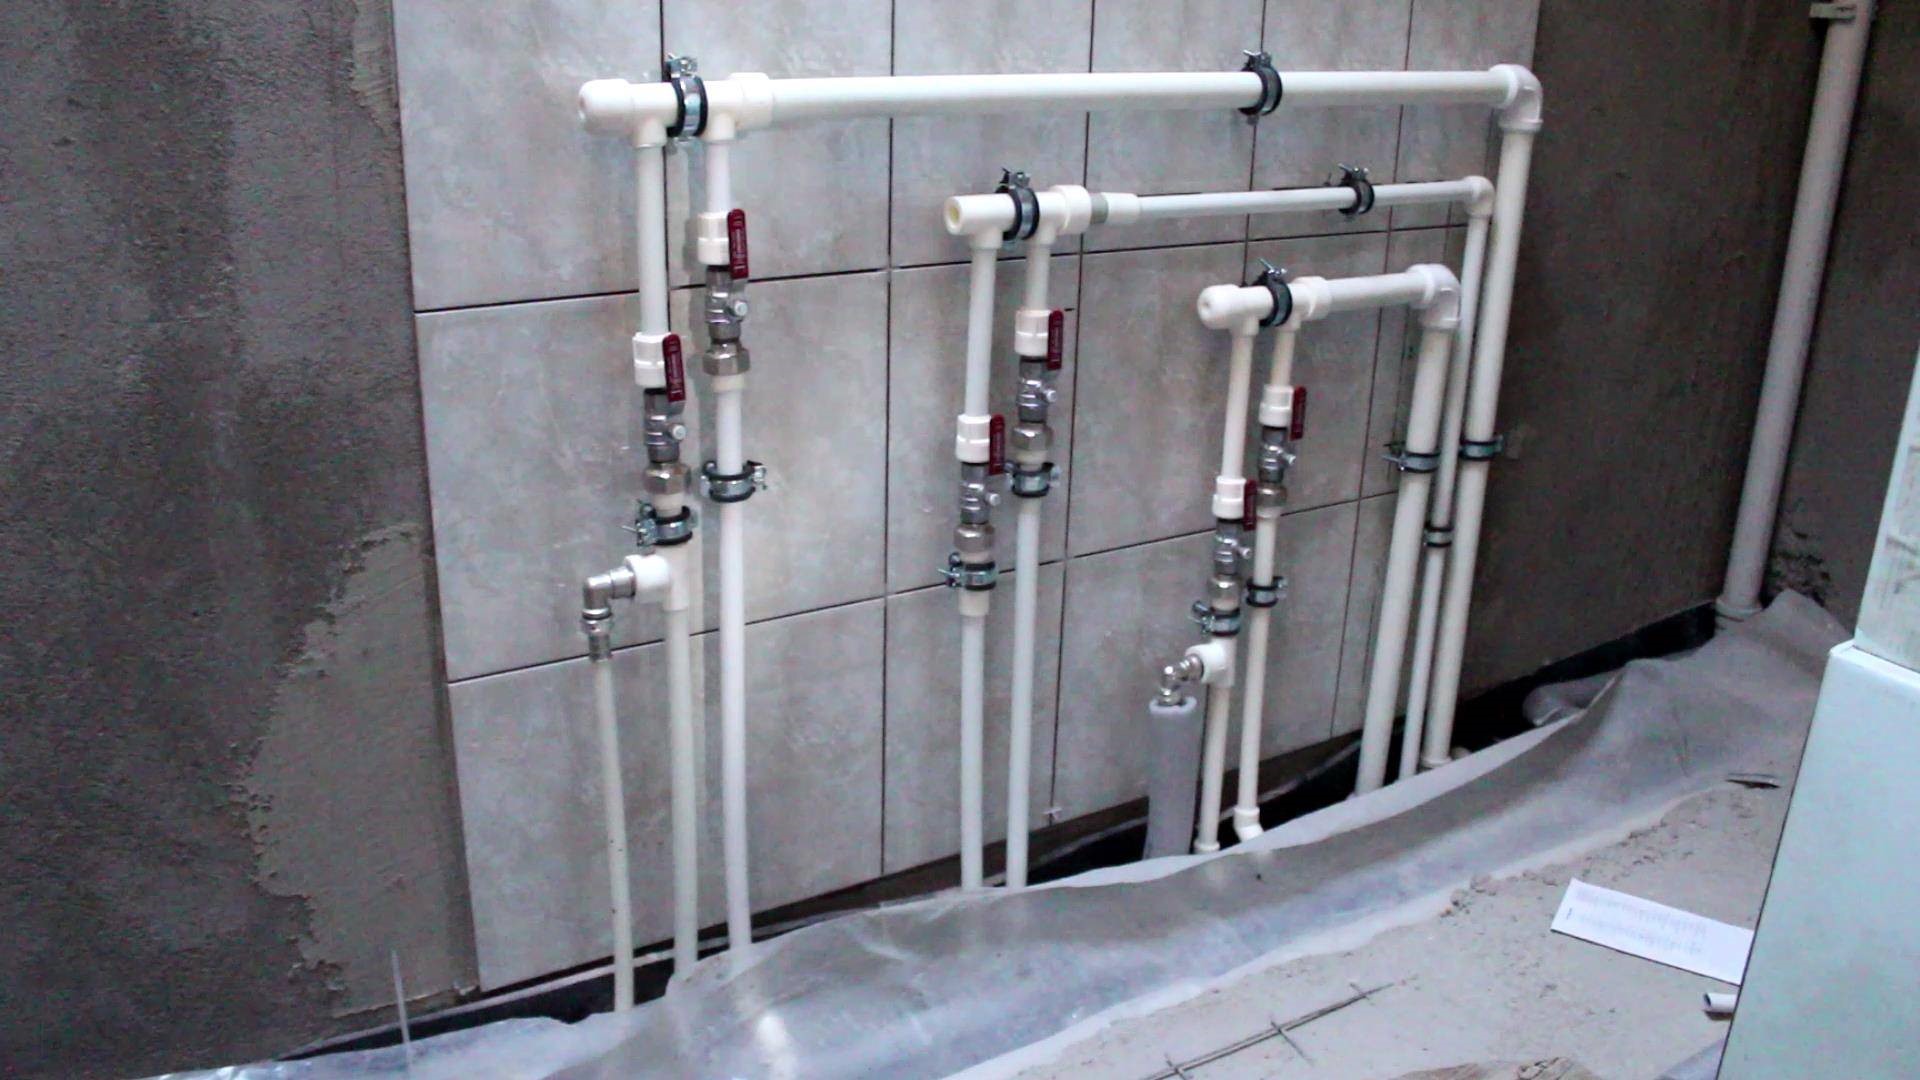
One of the advantages of polypropylene plumbing is that it can be easily embedded in walls and floors. This material does not corrode, does not react with any materials, and does not conduct stray currents. In general, if the connection is made correctly, pipes can be hidden into the wall or into the floor without any problems. The whole catch is to make a quality connection.
Polypropylene plumbing can be hidden in walls or in the floor
To make sure that the assembled system does not leak, it is checked - pressure testing is carried out. There are special devices for this. They connect, pump water, increase pressure. Under this pressure, the water supply is left for several days. If no leaks were found, then at operating pressure everything will work for a long time and without problems.


Welding of polypropylene pipes of the heating system
Plastic (polypropylene) pipes have recently become the most used for creating water heating systems in homes.
You can entrust the installation of heating with plastic pipes to specialists who have all the necessary equipment for welding.But the process of welding polypropylene pipes is not very complicated and is quite accessible to everyone to do it on their own. The main thing is to follow the step-by-step recommendations.
The whole welding process consists in heating the pipe and the coupling, followed by a neat connection of the parts. In this case, strong adhesion occurs due to the mixing of the heated polypropylene of the two connected elements and the formation of a monolithic structure at the junction. The characteristics of the seam in this case practically do not differ from the properties of the original parts.
You can get an idea of how to weld plastic pipes by watching the following video:
First stage
At the initial stage, the parts to be joined are prepared for soldering. In this case, it is necessary:
- Cut the pipes into pieces of the required length.
- Remove the chamfer from the outside of the pipe.
- Remove dirt from the parts to be joined, degrease them.
The chamfer parameters are regulated by both Russian and foreign standards:
- according to the German standard: chamfer slope - 15 degrees, depth - 2-3 mm;
- according to the Russian standard: chamfer slope - 45 degrees, depth - 1/3 of the pipe thickness.
To make a chamfer, you can use any tools that will allow you to remove the required layer of material fairly evenly.
In addition, you will need to find (purchase) and prepare an apparatus for soldering plastic pipes:
- Install the device on a stable special stand.
- Set the temperature controller to 260 °C. This temperature will ensure uniform and safe melting of polypropylene and will not damage the Teflon nozzles of the unit.
Chamfer on a polypropylene pipe for welding
Soldering technology for polypropylene heating pipes
Instructions for welding polypropylene pipes involves the following sequence of actions:
- Wait for the soldering iron to heat up to a certain temperature (usually 260 degrees).
- At the same time, put the fitting on the mandrel (special nozzle on the soldering iron) and insert the pipe into the sleeve.
- Maintain the heating time specified in the instructions for the device. It depends on the wall thickness of the pipe and its diameter.
- At the same time, remove the parts from the nozzles and connect them.
- Wait for spontaneous cooling of the assembled structure.
This, in fact, ends the process. The system is now ready for performance testing.
Features of welding polypropylene pipes
However, there are some features that should be considered in the production of welding work:
The nozzles of the welding machine are made in such a way that they form a cone with a slight inclination (up to 5 degrees) and have a diameter equal to the nominal diameter of the pipe only in the middle. Therefore, the pipe will fit into the sleeve with some effort. The same applies to fitting the fitting on the mandrel. Insert the pipe into the sleeve until it stops. You can't push any further!
Soldering technology for polypropylene pipes
- To designate a “border” that should not be crossed and to control the correctness of the process, you can mark a distance on the outside of the part equal to the depth of the sleeve.
- It is necessary to connect heated parts as quickly as possible to avoid cooling of the molten material.
- It is impossible to displace (shift, rotate) the hot connected parts of the system relative to each other. Otherwise, you can get a poor-quality connection, which will soon fail.
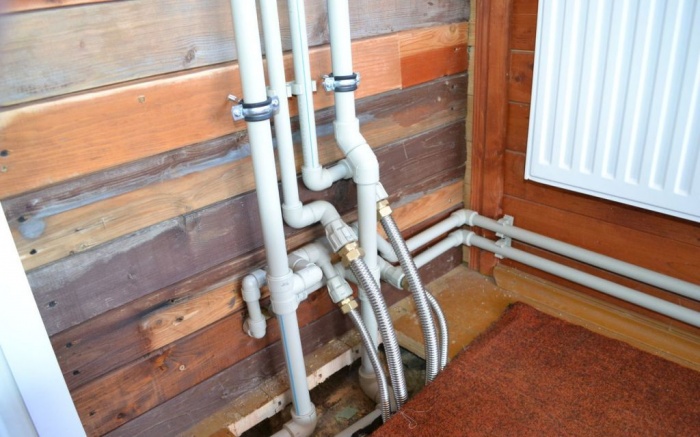
How to assemble plumbing
When collecting water supply in the country with your own hands, you need to decide in which parts of the site you need wiring. The fact that water should be supplied to the house is self-evident. But in addition to distributing the water supply around the house, it is necessary to lay pipes for irrigation in key places of the site, put taps on them. If necessary, connect a hose to them and, shifting it from place to place or installing a sprinkler, water the nearby beds.
How to bring water into the house, read here, and how the plumbing should be done in the summer cottage with our own hands, we'll talk further. It is best to draw the plan to scale. If you already have beds, you can easily determine where you need to deliver water. It is better to make several points of water intake: long hoses are inconvenient and difficult to carry, and having the ability to connect several at the same time, you can handle watering faster.
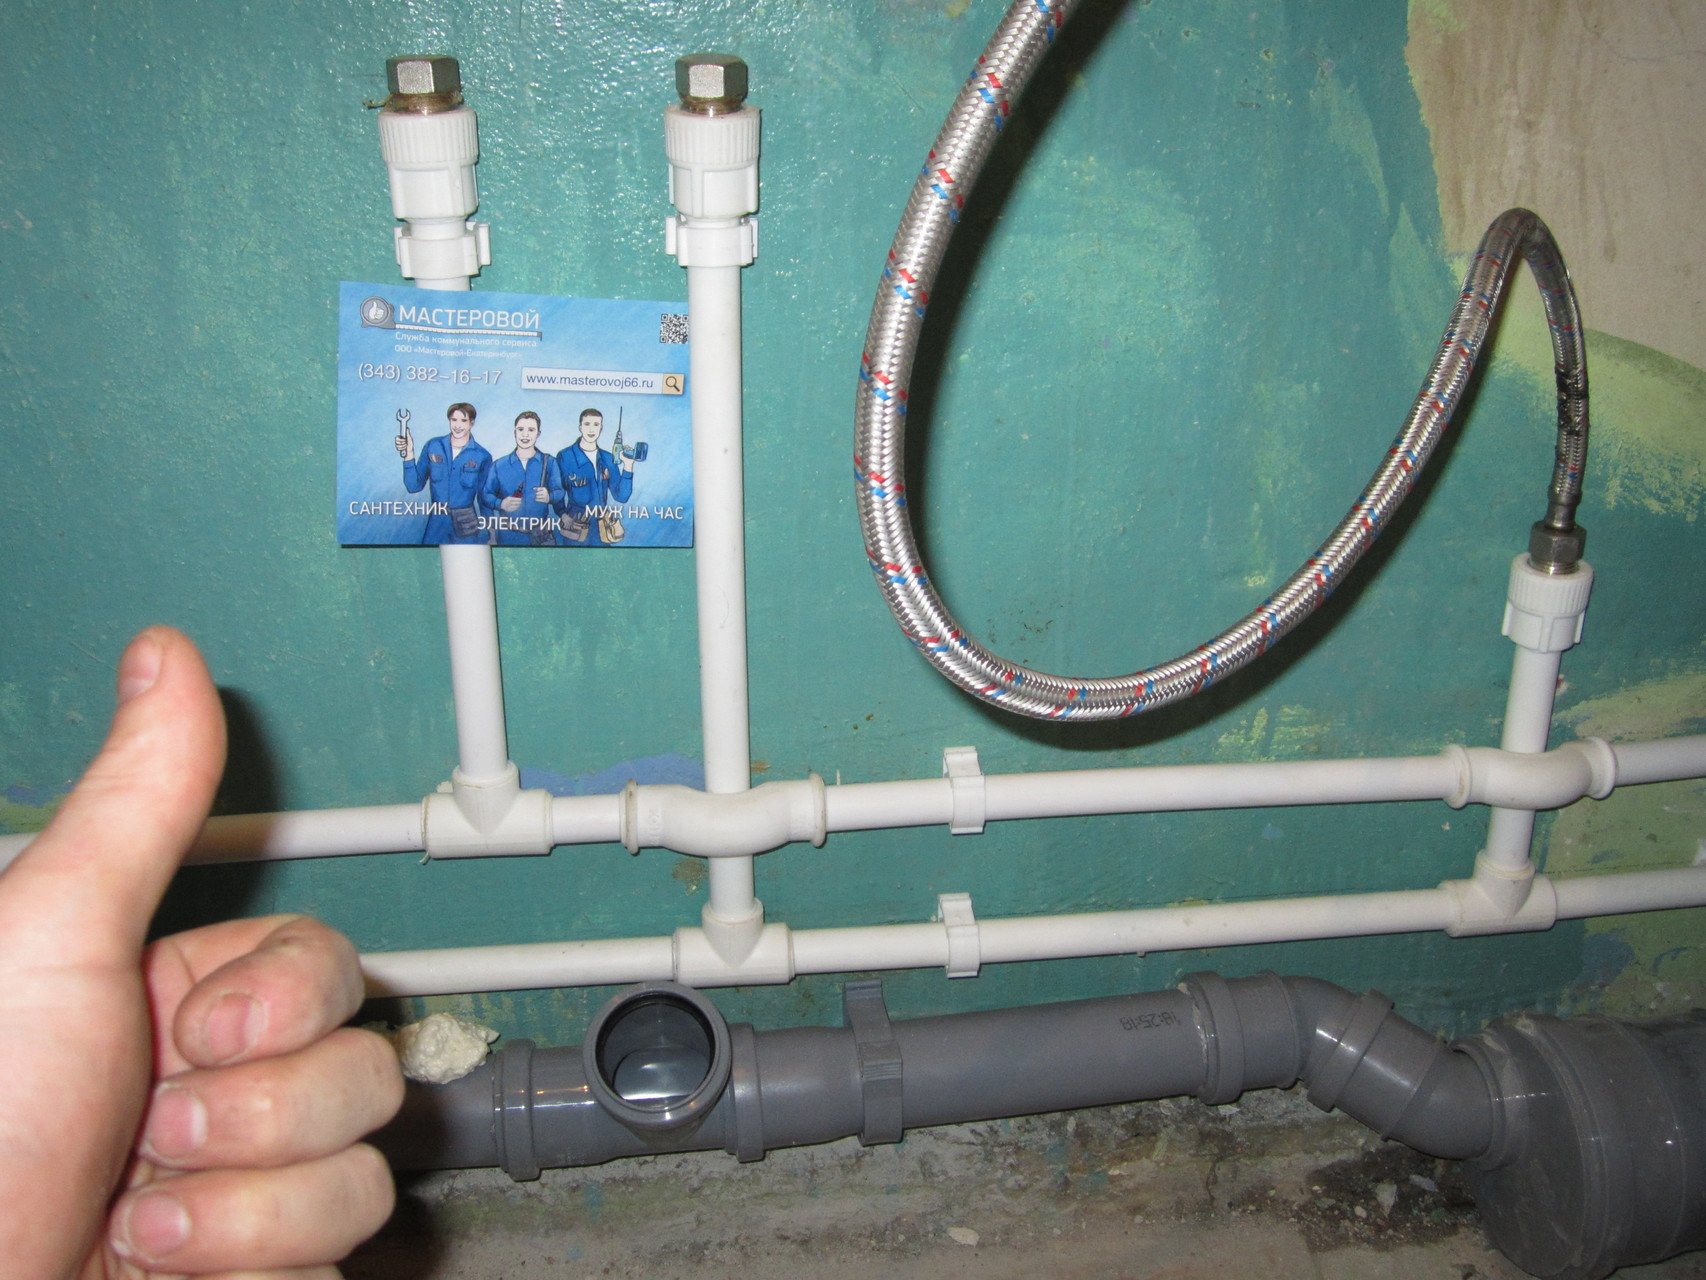
The tap in the system must be at the exit of the house and before the first branch
When drawing up a diagram, do not forget about the need to install taps on the main line: at the cut after the outlet is still in the house, and then, on the site, before the first branch. It is desirable to install cranes further on the highway: in this way it will be possible to turn off the emergency section in case of problems.
Even if summer water supply will be equipped, you will need to drain the water from the pipes so that when it freezes, it does not break them. To do this, you need a drain valve at the lowest point. That's when it will be possible to close the tap in the house, and drain all the water, protecting the water supply from damage in the winter. This is not necessary if the country water supply pipes are made of polyethylene pipes (HDPE).
After drawing the diagram, count the pipe footage, draw and consider what fittings are needed - tees, angles, taps, couplings, adapters, etc.
In order to correctly calculate the material and make the correct layout of the water supply in the country with your own hands, first draw a plan where you can calculate the footage and the number of fittings
Then you need to decide on the mode of use. There are two options: summer and winter plumbing. They differ in the depth to which the pipes are buried. If you have an all-weather dacha, then you will have to lay an insulated water supply in the dacha itself or bury it below the freezing depth. For wiring irrigation pipes in the country, it is more rational to use summer plumbing. You will only need a winter one if you have a greenhouse equipped. Then the section of the water supply to the greenhouse will need to be equipped in a serious way: dig a good ditch and lay insulated pipes.


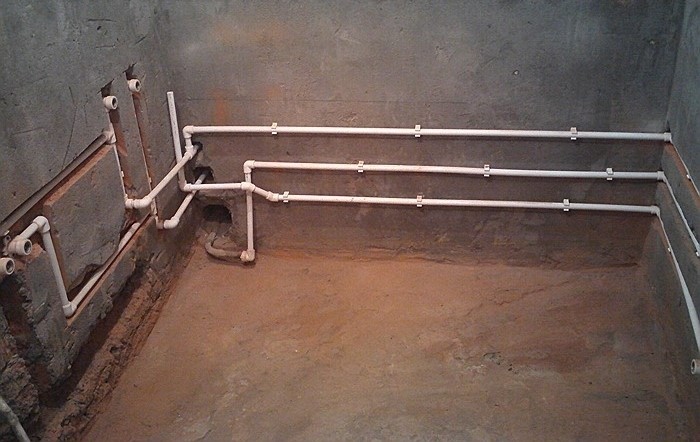
Summer plumbing in the country
Depending on which pipes you will use, they can be left at the top, or they can be laid in shallow ditches. Installing a country water supply underground will take more time, but it is more reliable.
surface wiring water pipes for irrigation in the country with their own hands is done quickly, but the pipes lying on the surface can be damaged
Having decided whether you need trenches or not, and having dug them out, if you have chosen an underground option, the pipes are stretched and laid out over the site. So once again the correctness of the calculations is checked. Then you assemble the system. The final stage - testing - turn on the pump and check the quality of the joints.
Before starting the installation of the water supply at the summer cottage, the pipes are laid out in the right places
Winter water supply differs from flight water supply in that the areas that will be operated in the cold season must be guaranteed to be protected from freezing. They can be laid in trenches below freezing depth and/or insulated and/or heated with heating cables.
You can read about the organization of automatic watering here.
Stage 4. Installation of a new plumbing
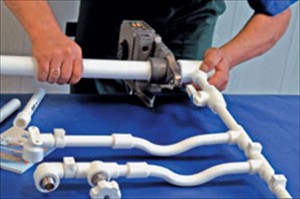
An example of welding a pipe with a fitting on the bench
So, we proceed to the most interesting part of this whole "epopee". Prepare all the necessary tools in advance, stock up on an extension cord (if it can come in handy) and of course patience. It is most convenient to carry out installation of a water supply system together with the partner. But if there is no one to work in the house, it is quite possible to cope on your own.
In the second step of this article, we determined that best option for plumbing - plastic pipes, which will have to be connected using a special apparatus for welding plastic pipes (iron).
- First, cut PVC pipes for the initial stage of plumbing assembly and prepare the necessary fittings and taps. Plumbing installation should start "from the riser".
It is very important to take into account when cutting pipes that some part of the pipe will be inserted into the fitting (extension or angle). Therefore, in advance, using a ruler, measure how far the pipe enters the fitting and, taking this into account, cut the pipe (usually 4-5 mm)
Here the basic rule of home masters applies - "Measure seven times, cut once." Rushing can lead to size deviations from the plan.
Welding plastic pipes "ironing"
Carefully read the instructions for your welding machine (ironing), because. some features of each may differ.Assemble the device according to the instructions, install the nozzle of the required size (depending on the diameter of the pipes used).
For those who do not like to read instructions, we have prepared a video:
2. Clean the ends of the pipes to be welded from dirt and chips (if you cut the pipe with a hacksaw). The cut must be even and clean.
4. Be sure to wear heat-resistant gloves (usually they are included with the welding machine), because. the slightest touch with bare hands to the "ironing" will give a severe burn.
5. When the "iron" is heated to the desired temperature (usually the indicator will indicate this), take the pipe in one hand and the fitting in the other. At the same time, from both sides, insert the pipe and fitting into the heated nozzle almost to the stop (leave a couple of millimeters) and hold for the required time. The time may vary depending on the power of the "ironing" or the diameter of the polyethylene pipe. Usually you need to hold from 5 to 25 seconds.
6
When the indicated time has elapsed and the plastic parts are warm enough, carefully remove the pipe and fitting from the nozzle and immediately carefully insert the pipe into the heated fitting hole. Try to make it as smooth as possible
Hold the pipe and fitting in this position for 5-10 seconds so that the plastic has time to “grab”
It is important to note here that if the fitting is made with an “angle”, consider during welding in which direction the angle will look
Welding of plastic pipes was successful. Such a connection does not leak, simply because it is welded and become one.


So, moving from the beginning of the riser to the final plumbing fixtures or taps, make pipe connections using fittings
Take your time, it is important that the connection is well welded and even.Installing such a water supply system with your own hands is quite simple and at the same time reliable.
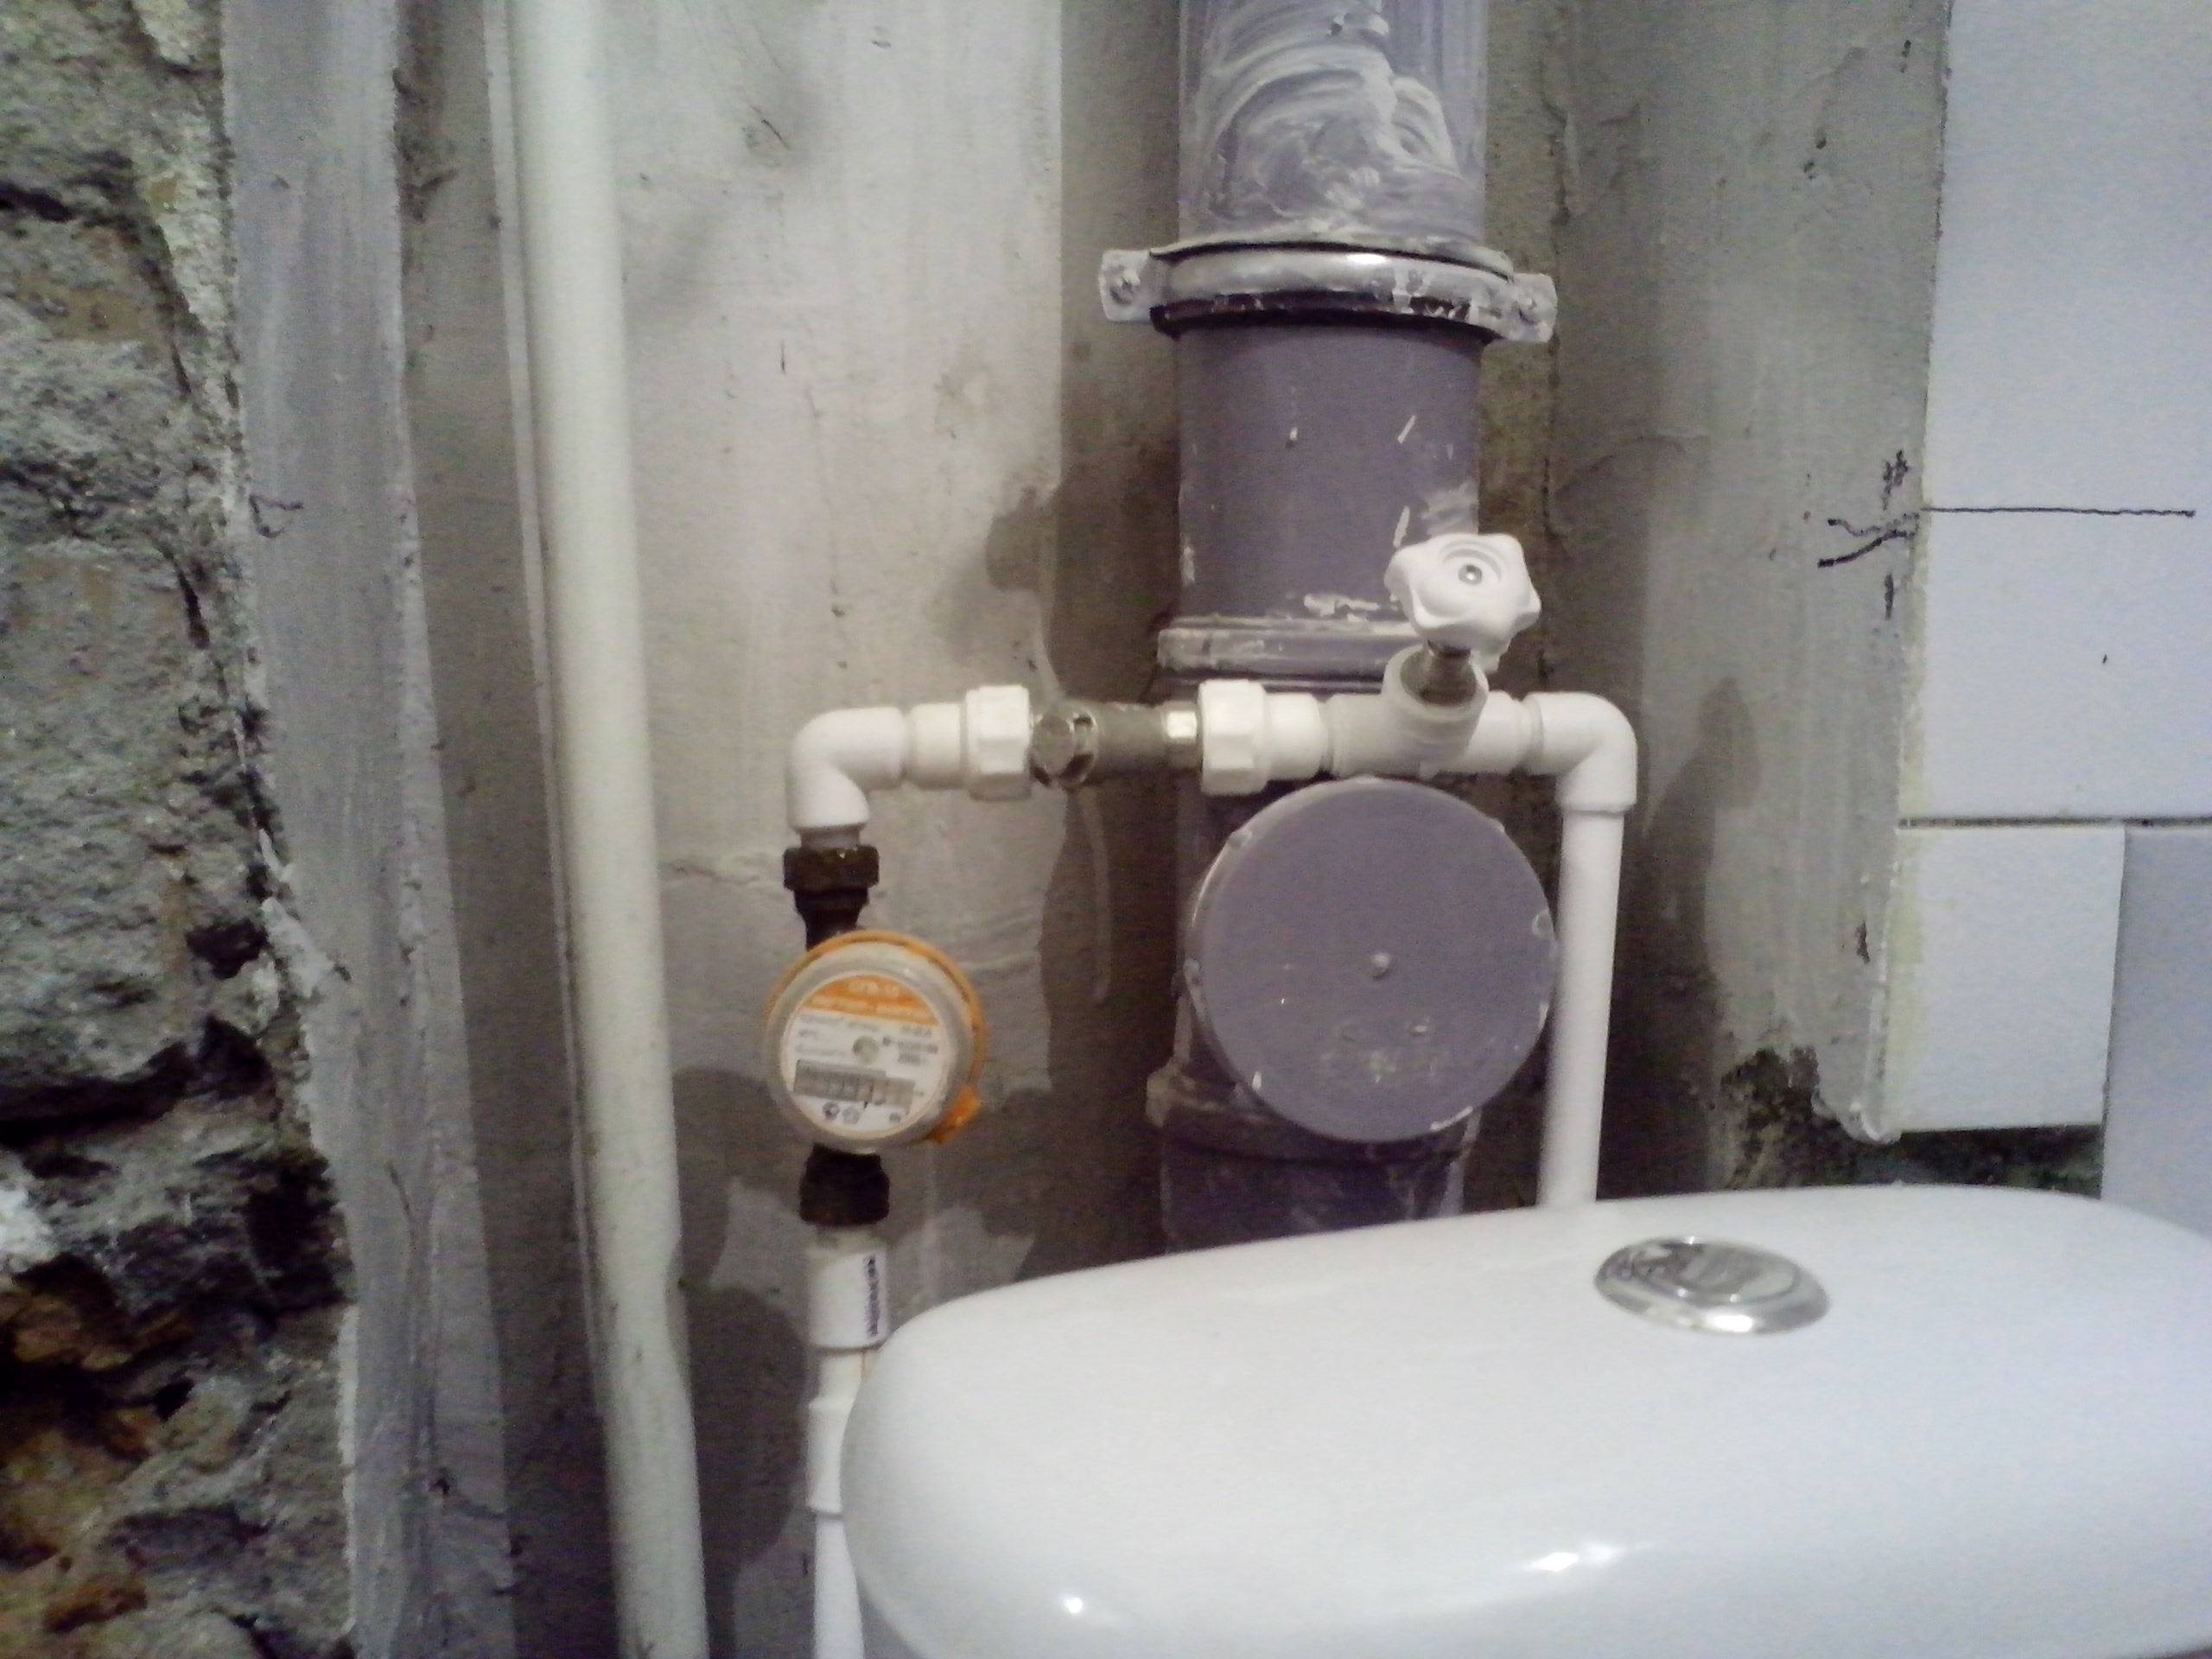
If you have thought over the design of the bathroom in advance with a photo and a detailed estimate, you should take care in advance to hide the water pipes behind plasterboard walls or in special boxes. Thus, the design project will not be disturbed by white pipes, which are quite noticeable to the human eye.
This is how the installation works plumbing pipes in the bathroom. Although this instruction can be used for any other purpose, for example, installing a heating system.
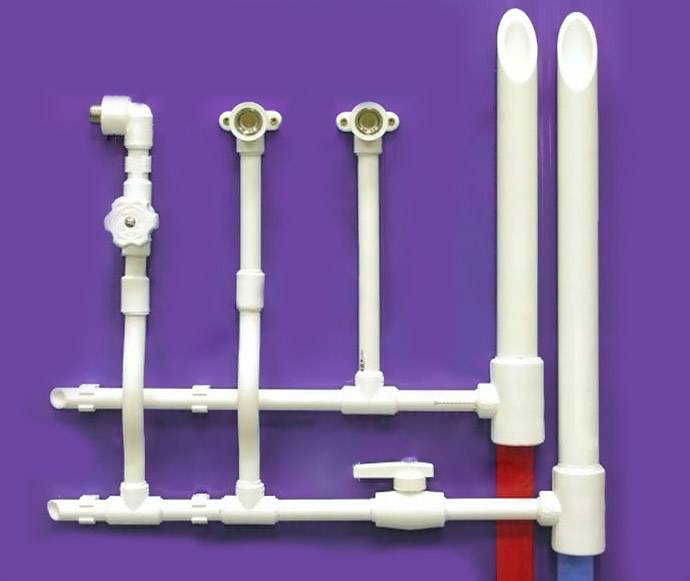
Features and nuances of the practical use of propylene pipes
Installation of heating from propylene pipes is not a complicated process, however, it contains certain subtleties, features and nuances. Every little thing must be taken into account, otherwise your heating will work intermittently, and the hot water pipeline will be a source of additional trouble.
All work begins only after careful preparation of the heating scheme. Based on the working scheme, the type and quantity of consumables, the presence of fittings, pipe diameters and installation methods are determined.
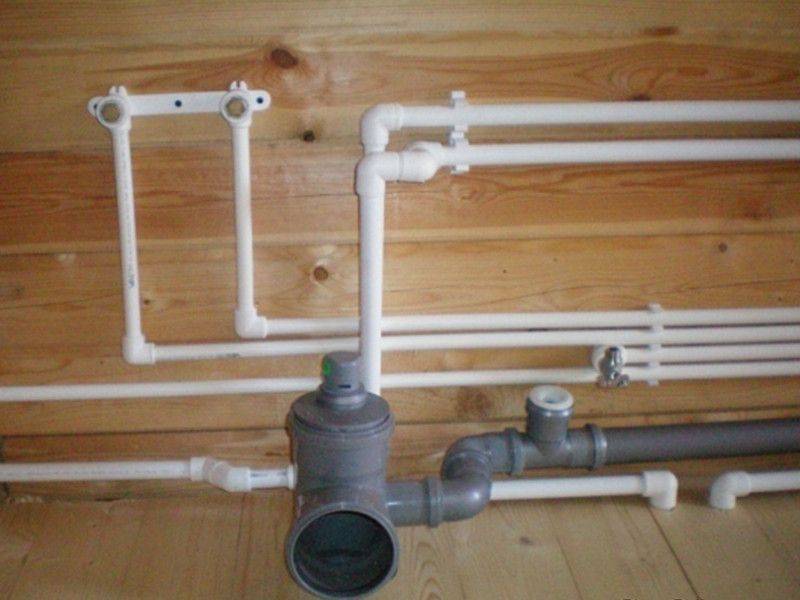
Another equally important point that determines the functionality of the heat main is the choice of products. For heating equipment, only reinforced polypropylene pipes, which have a low coefficient of thermal expansion, can be used. For multi-layer consumables, these values are 0.03 mm/m0C, while for conventional, unreinforced, single-layer products, the coefficient is 0.15 mm/m0C.
In other words, the following happens. Conventional propylene under the influence of high temperature begins to change shape over time.A single-layer pipe becomes plastic, losing its linearity. Thermal linear elongation is triggered, as a result of which the pipeline will begin to sag in long sections and take on an unsightly appearance. In heating pipes reinforced with aluminum or fiberglass, such defects are not observed.
The practical subtleties that should be observed during the installation process are as follows:
- polypropylene pipes are not recommended to be directly connected to heating devices;
- monitor the operation of an autonomous boiler, preventing the coolant from boiling up.
In order to avoid such situations, when connecting the polypropylene line to the boiler, use metal adapters or other devices and equipment. Equip the heating system with automated heating temperature controllers.
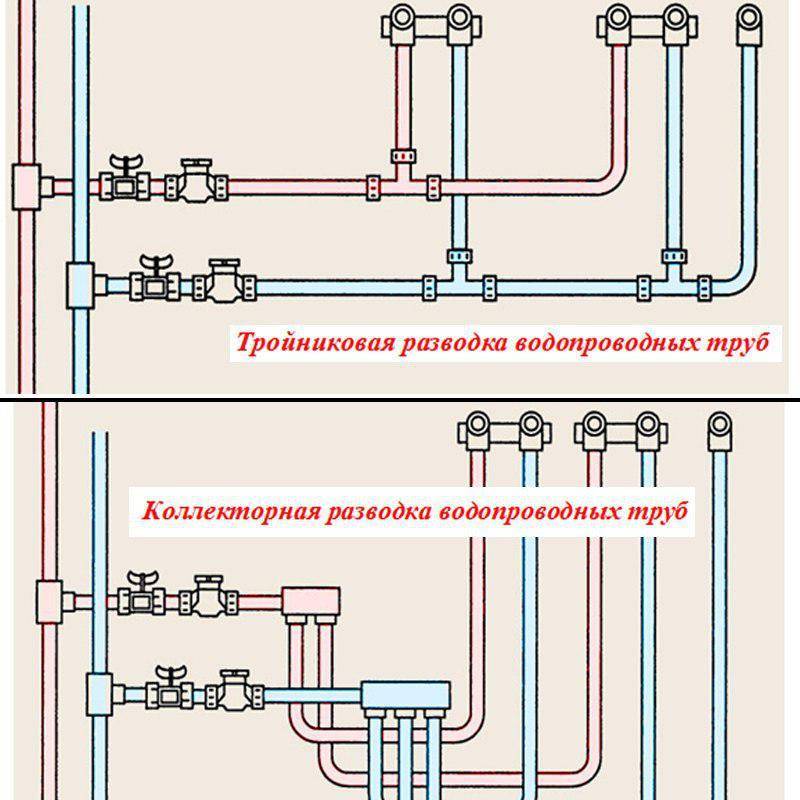
Wiring options
There are two options: serial and parallel (collector) wiring systems. Each has its pros and cons.
serial wiring
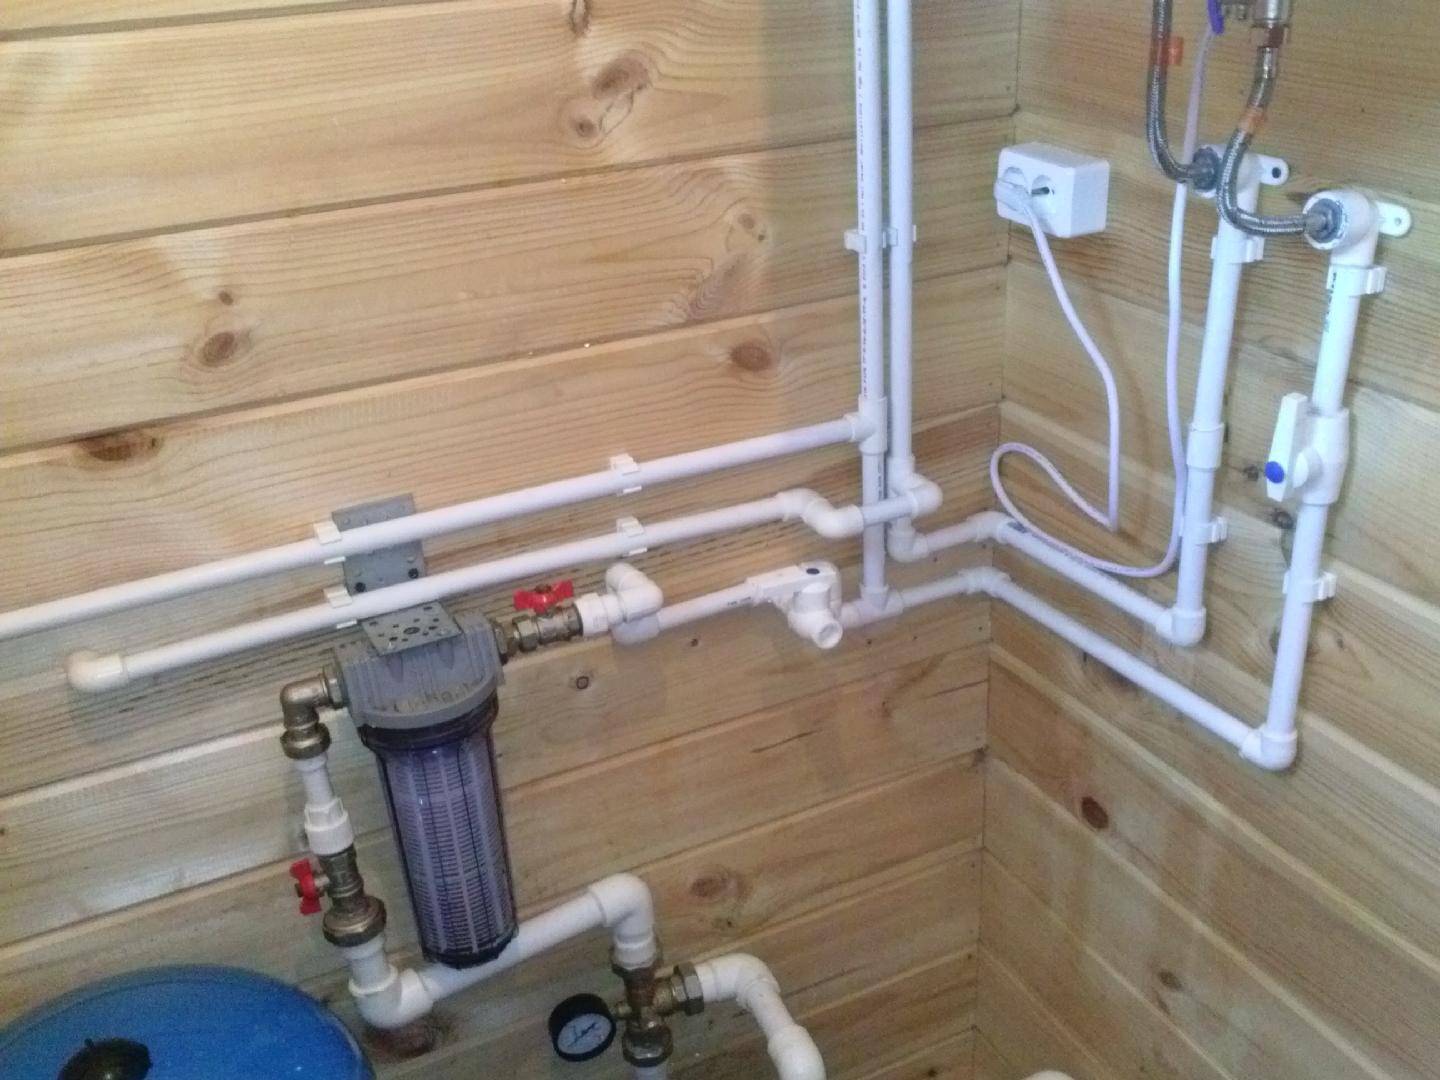
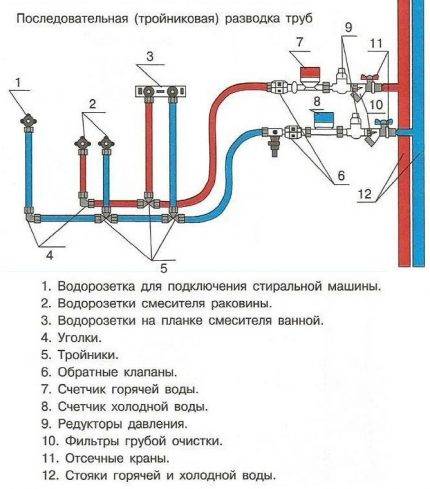
It is also called the tee system. In this case, do-it-yourself installation of polypropylene pipes is carried out from the central highway to the points of water consumption. From one main riser, on which there is an inlet locking device, two pipelines depart: for hot and cold water. Branches to all points of water consumption from them are organized using tees.
 Tee distribution of water supply
- System advantages. easy installation, saving materials.
- Flaws. dependence of water consumption points on each other.To repair or inspect one device or consumer, the entire system is turned off. Water pressure drops occur when all points are opened at the same time.
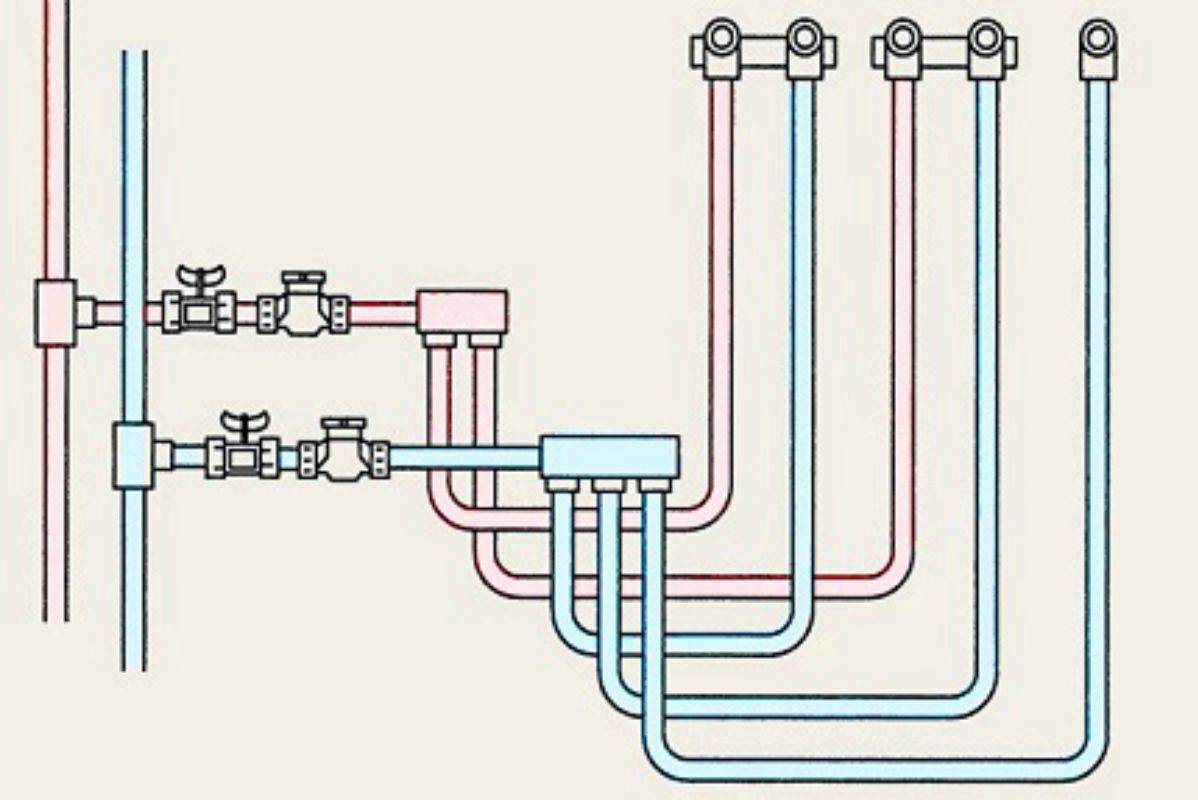
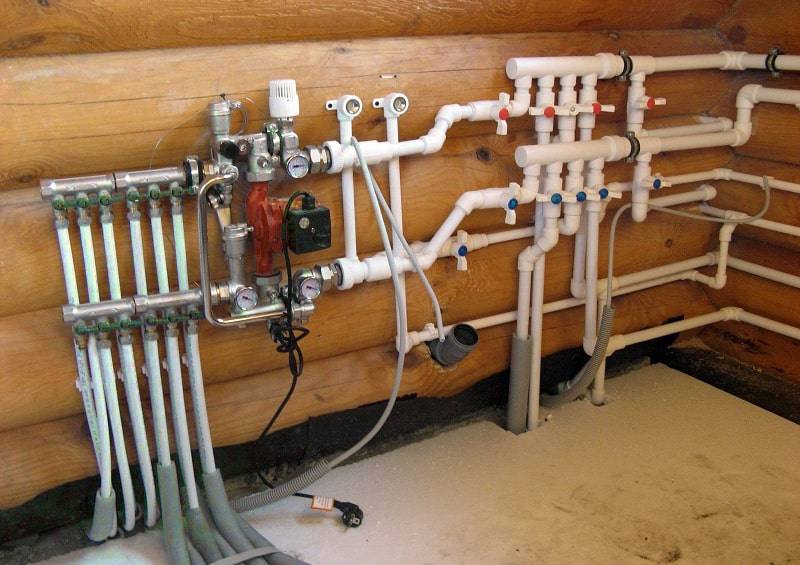
Parallel wiring
This system requires a collector. having one input and a certain number of outputs corresponding to the number of points of water consumption. Each pipeline is displayed individually.
 An example of a collector wiring of a water supply
- Advantages. there is no need to shut down the entire system when repairing or maintaining one area. In the event of a pressure drop, all available appliances and points of consumption receive exactly the same amount of water.
- Flaws. labor-intensive process, high cost, rather large number of layouts.
You can learn how to choose and calculate the diameter of plastic pipes for plumbing from our other article.
More information about wiring tee and collector schemes water supply is in this article.
Installation with compression fittings
This type of fitting belongs to a maintenance-free connection and is much less in its cost.
The compression fitting consists of a compression sleeve and a body. To mount a plastic pipe system with such fittings with your own hands, you will need a special press, which you can buy for relatively little money, or you can rent it.
It is impossible to disassemble such a fitting, although there are cases when they cut out a sleeve and buy a new one. However, this is quite difficult and costly to do. If the press fitting was of high quality, then there will be no leakage at the installation site for the duration of the entire operation.
Read also:
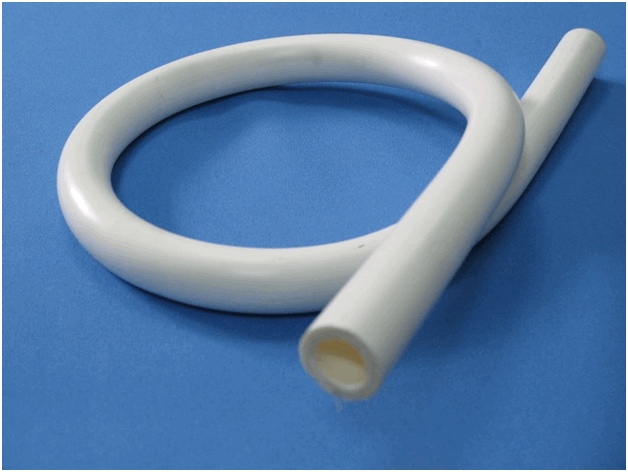
Do-it-yourself polypropylene plumbing
Polypropylene pipes are gradually replacing metal in heating and water supply, and this is primarily due to ease of installation. Polypropylene (PP) is a material with excellent performance and qualities, which is used for both cold and hot water.


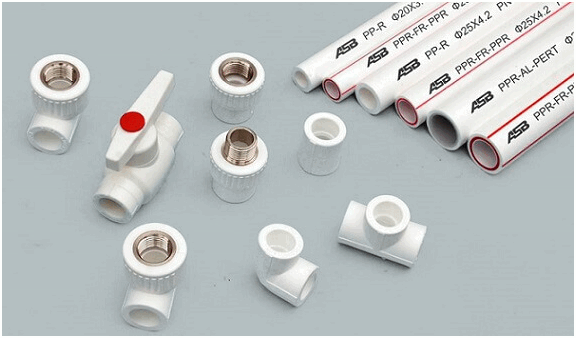
The advantages of polypropylene include:
- long service life;
- a wide range of fittings and other accessories;
- light weight;
- absence of condensate and mineral deposits during operation;
- resistance to corrosion;
- strength;
- ease of installation;
- resistance to aggressive media and high pressure.
Do-it-yourself polypropylene plumbing
The disadvantages include only the inability of most polypropylene pipes to withstand temperatures above 50-60ᵒ. There are several brands that can withstand boiling water (not for long, because already at 90ᵒС the plastic softens and loses its properties).
Important! For hot water (less than 90ᵒС), pipes marked PN25 and PN20 are used, and for cold water (less than 20ᵒС) - PN10 and PN16. Contents of step by step instructions:
Contents of step by step instructions:
Installation of water lines - basic recommendations
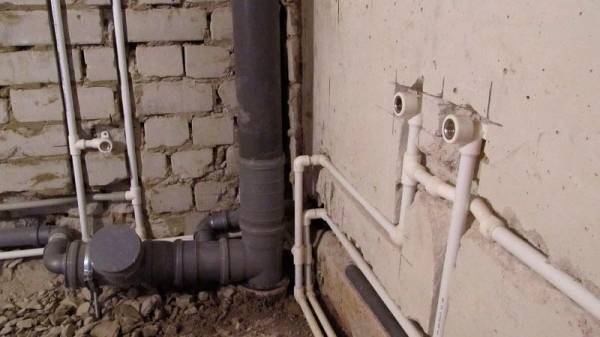
When laying a water pipe made of polypropylene with your own hands, consider the recommendations given in this list.
- When working with threads on risers, be sure to use FUM tape, plumbing thread or linen to seal the connection.
- Install plumbing only after laying sewer pipes.
- Lay cold water pipes above the DHW line, not vice versa - this will prevent condensation.
- Make marks in advance on the pipes for connection with fittings - there will be no time for this and for maintaining the exact dimensions “by eye” directly during the soldering process.
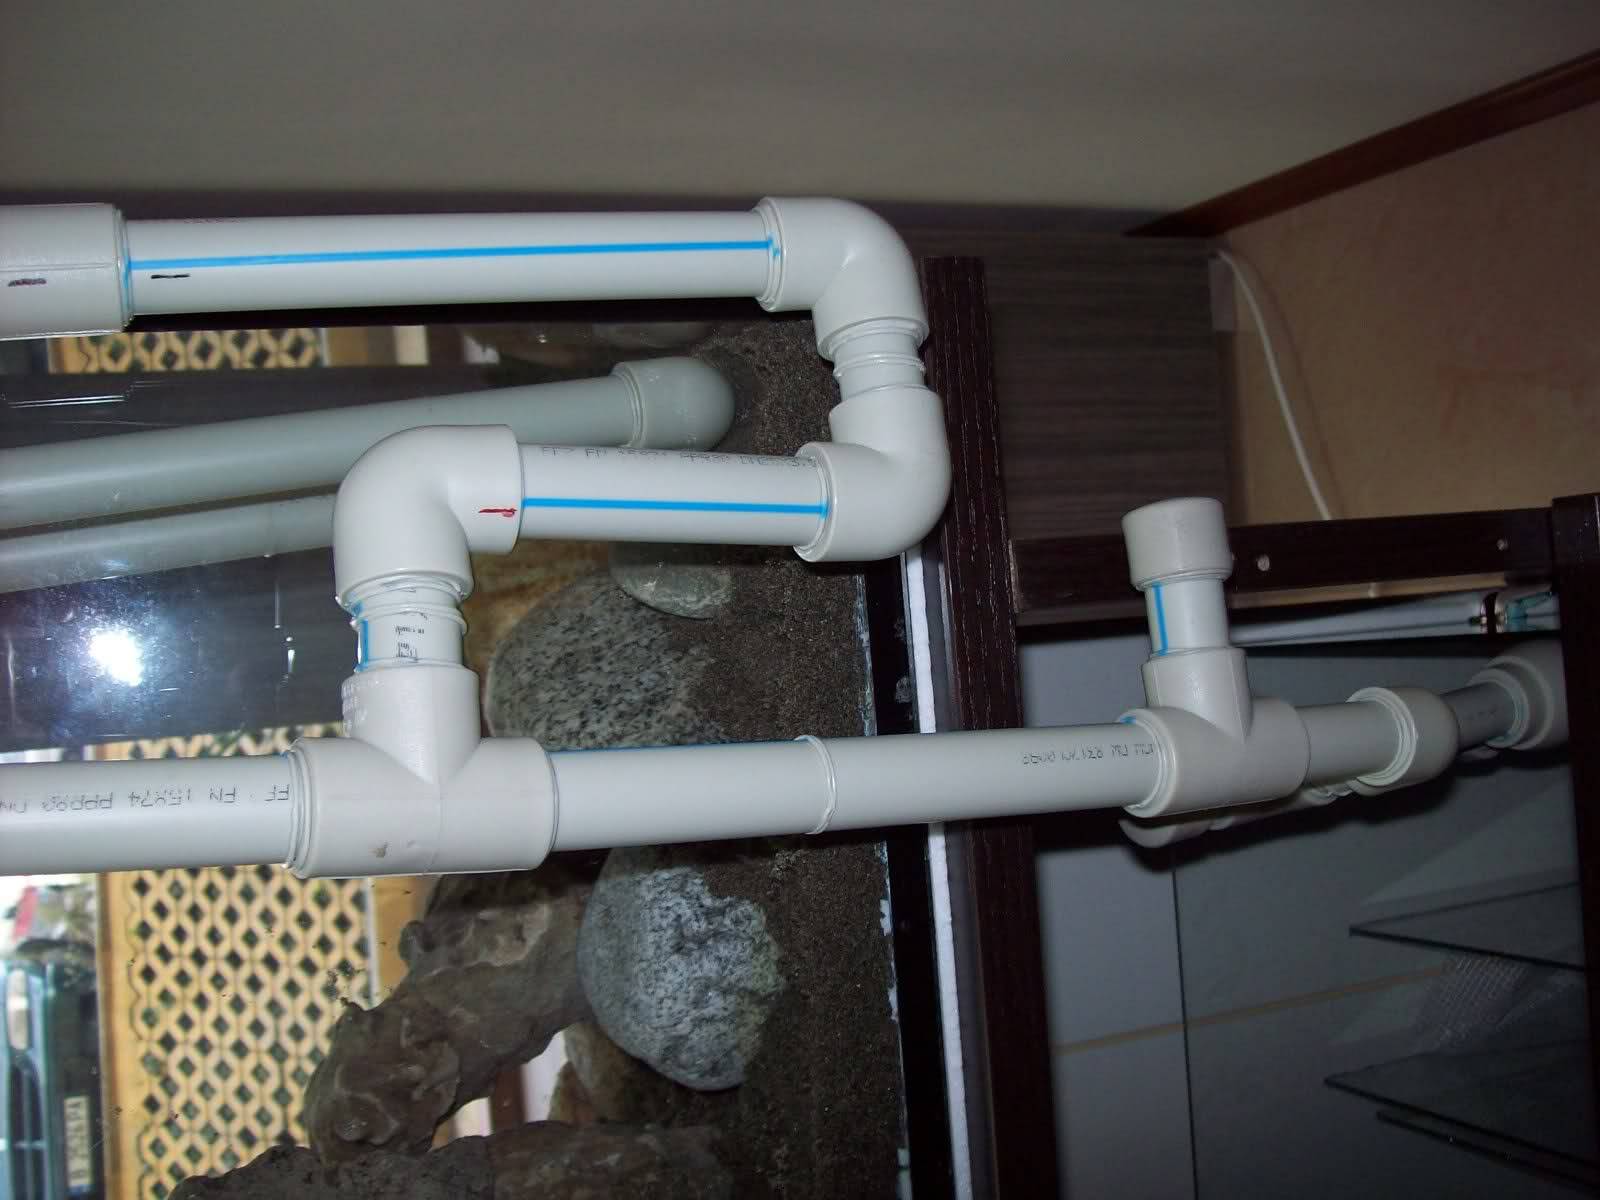
- Pipes for both hot and cold water supply should, if possible, be laid strictly vertically and horizontally. Check it with a level.
- Connections of polypropylene pipes with tees, elbows and other fittings should be made at right angles - skew subsequently may not have the best effect on the tightness and durability of this section of the water supply.
- For soldering polypropylene water pipes in hard-to-reach places, it makes sense to break the lines into small sections connected to each other using couplings.
- Prepare in advance for yourself a comfortable and fairly spacious workplace for soldering polypropylene pipes. The device for such work itself is quite expensive, so it is advisable not to buy it, but to rent it.
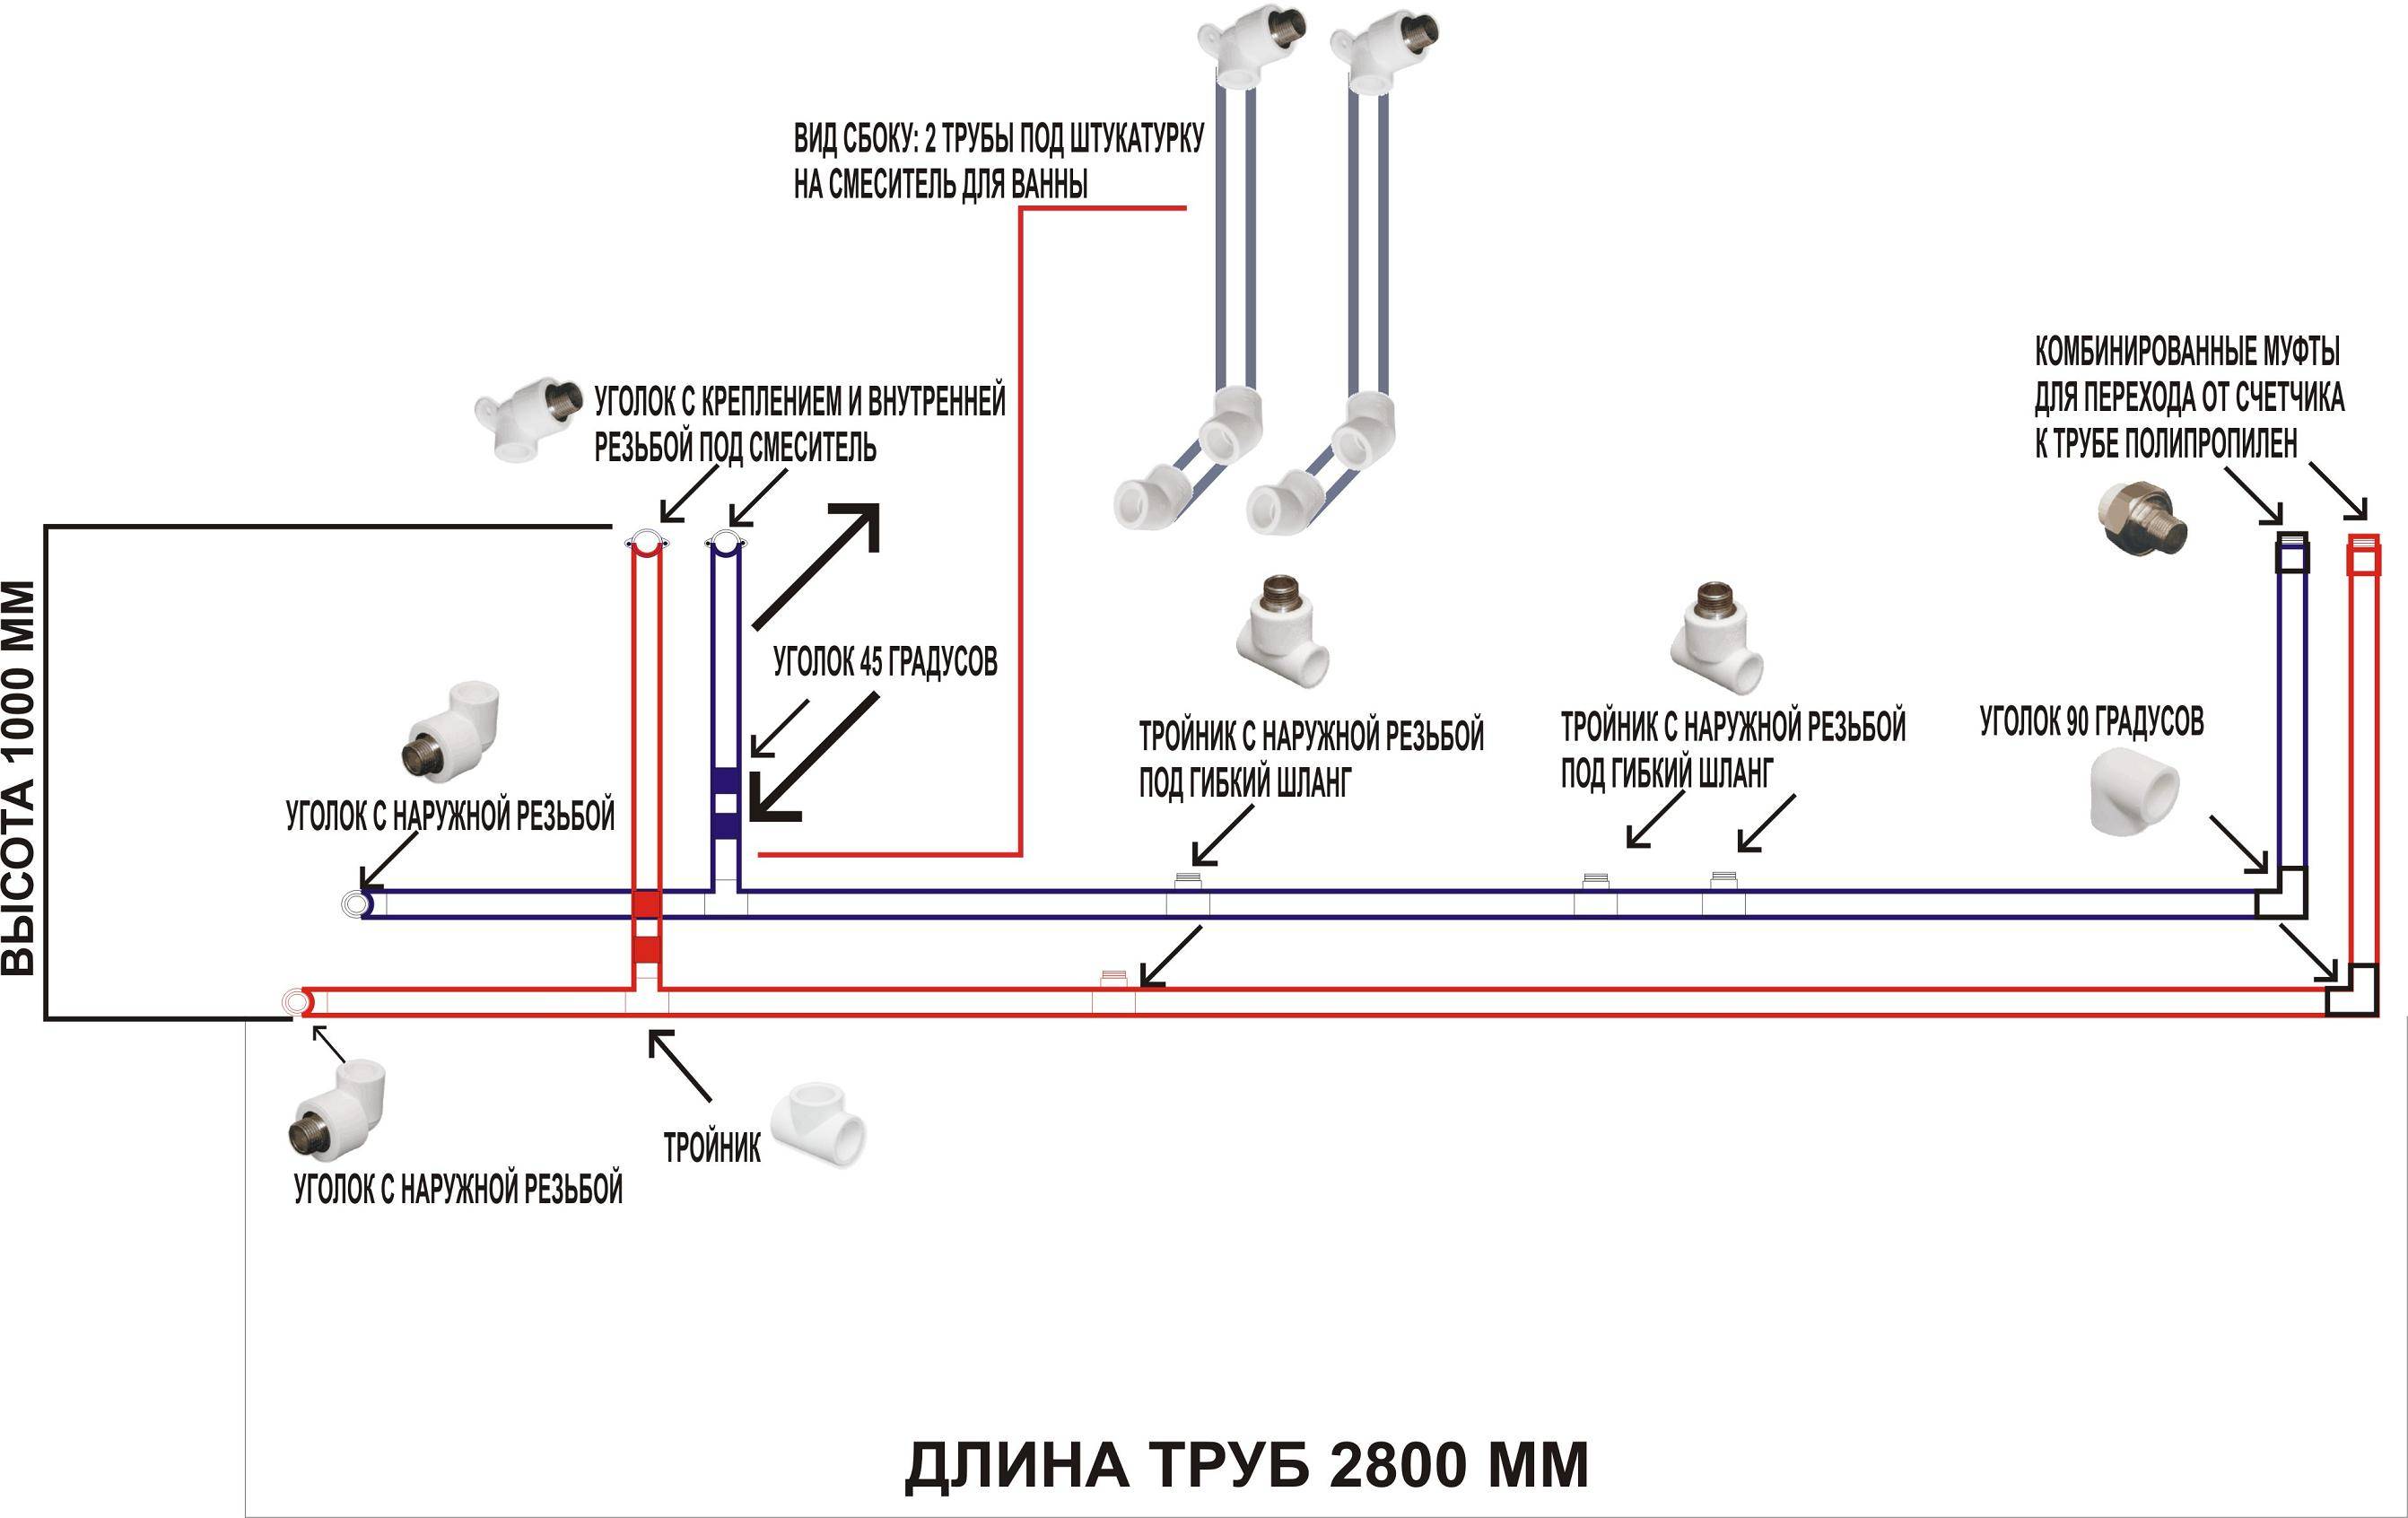
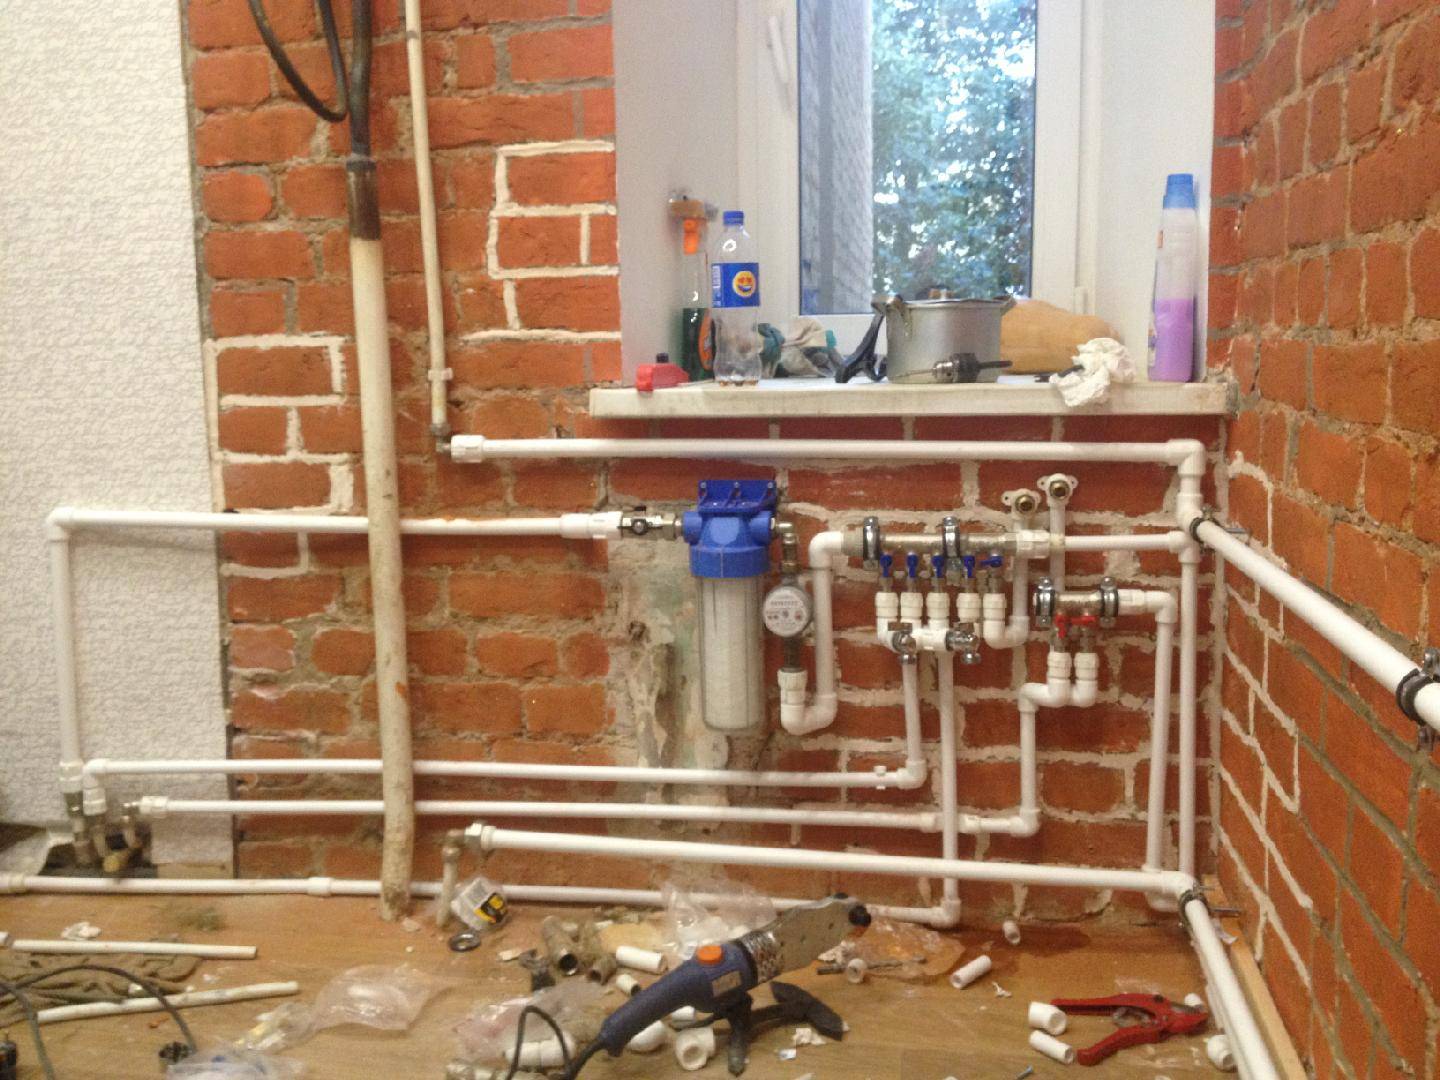
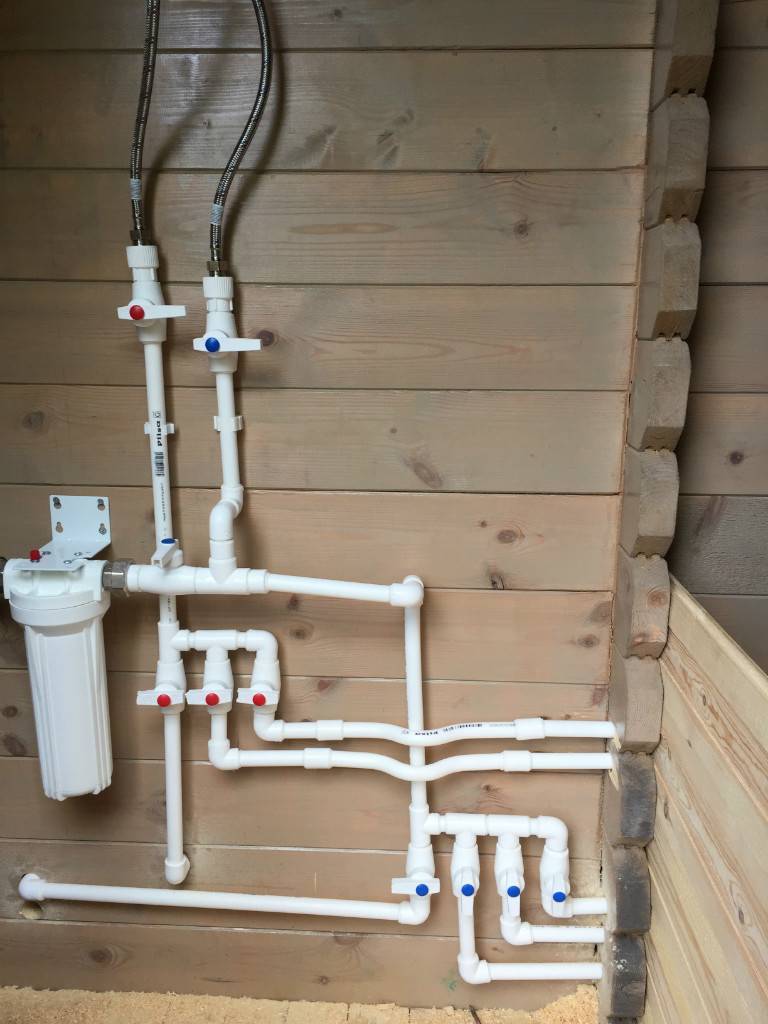
Installation rules
Before starting work, you need to draw up a diagram, mark on it all the necessary fittings and elements of the system (meters, filters, taps, etc.), put down the dimensions of the pipe sections between them. According to this scheme, we then consider what and how much is needed.
When purchasing a pipe, take it with some margin (a meter or two), fittings can be taken exactly according to the list. It does not hurt to agree on the possibility of a return or exchange. This may be necessary, since often in the process, the installation of a water supply system from polypropylene pipes throws up some surprises. They are mainly due to lack of experience, not to the material itself, and happen quite often even with masters.
Plastic clips take the same color
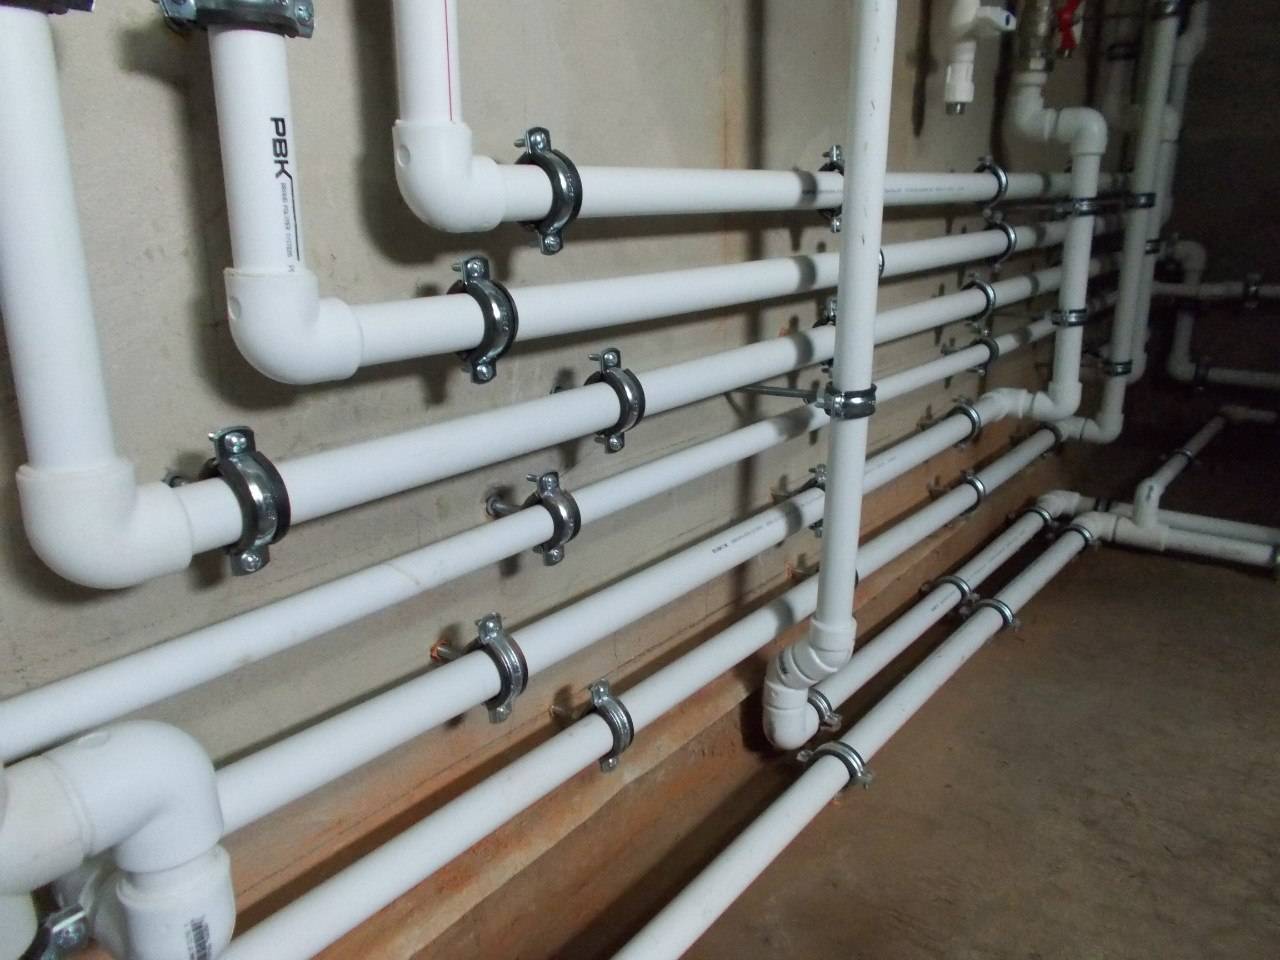
In addition to pipes and fittings, you will also need clips that attach everything to the walls. They are installed on the pipeline after 50 cm, as well as near the end of each branch. These clips are plastic, there are metal - staples and clamps with a rubber gasket.
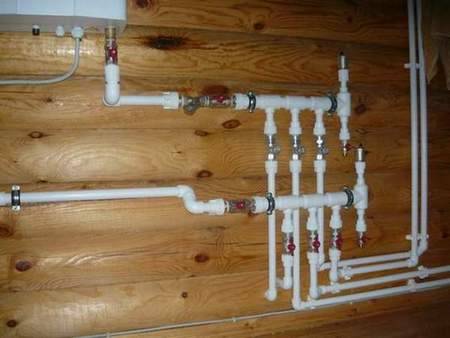
For open laying of pipelines in technical rooms it is more convenient to use brackets, for better aesthetics - for open laying of pipes in the bathroom or in the kitchen - they use plastic clips of the same color as the pipes themselves.
Metal clamps are good in technical rooms
Now a little about assembly rules. The system itself can be assembled immediately by cutting pipe sections of the required length, constantly referring to the diagram. So it is more convenient to solder. But, with a lack of experience, this is fraught with errors - you must accurately measure and do not forget to add 15-18 millimeters (depending on the diameter of the pipes) that go into the fitting.
Therefore, it is more rational to draw a system on the wall, designate all fittings and elements. You can even attach them and trace the contours. This will make it easier to evaluate the system itself and identify shortcomings and errors, if any. This approach is more correct, as it gives greater accuracy.
Next, the pipes are cut as needed, fragments of several elements are connected on the floor or desktop. Then the finished fragment is set in place. This sequence of actions is the most rational.
And about how to quickly and correctly cut pipe sections of the desired length and not be mistaken.