- Do-it-yourself work
- Scheme of the sewer system
- Self-assembly
- Paving depth
- Closed and open drainage systems
- open drainage
- Closed drainage
- Elements of the drainage system
- Trays
- Installation of the drainage system
- Types and types of sewerage and drainage systems
- Choosing a water disposal method
- Plumbing wiring: tips for doing it yourself
- We are planning the wiring
- Search and selection of a building site
- Wastewater treatment plant LEADER
- Gravity scheme for the removal of treated wastewater into a roadside ditch
- Gravity scheme for the removal of treated wastewater into an absorbing (drainage) well
- Pumping scheme for the removal of treated wastewater
- Installation recommendations:
- Do-it-yourself sewerage arrangement in the bath: a step-by-step guide
- A step-by-step guide to building a sewer in a bath with your own hands
- Sewerage construction in a private house: ventilation scheme in the bath
- Step-by-step instruction
- Construction and installation
- Roof construction
- Ground part
- Features of pipe selection
- Pipe selection
Do-it-yourself work
To organize a sewerage device in a house with your own hands, you need a scheme with which you can calculate what types of materials and plumbing will be needed and in what quantity.The drawing must be drawn to scale.
You also need to take into account factors such as:
- Soil type;
- Groundwater level;
- Volume of water use;
- Climatic features of the area.
Several types of laying sewer pipes are possible: under the floor, inside the walls, outside, but this is less aesthetically pleasing. Pipes laid in walls or under the floor are plastered 2 cm or filled with cement. To reduce the noise of the system, the pipes are wound without air gaps.
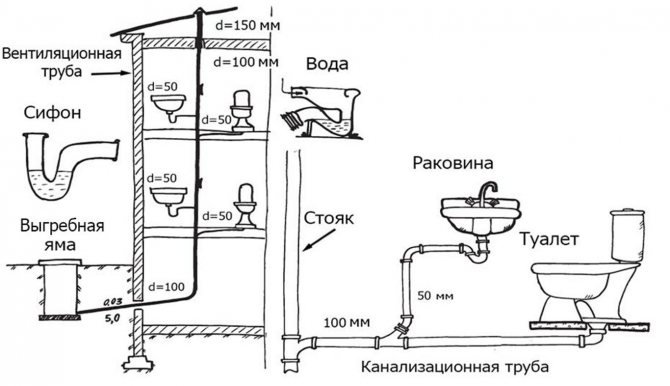
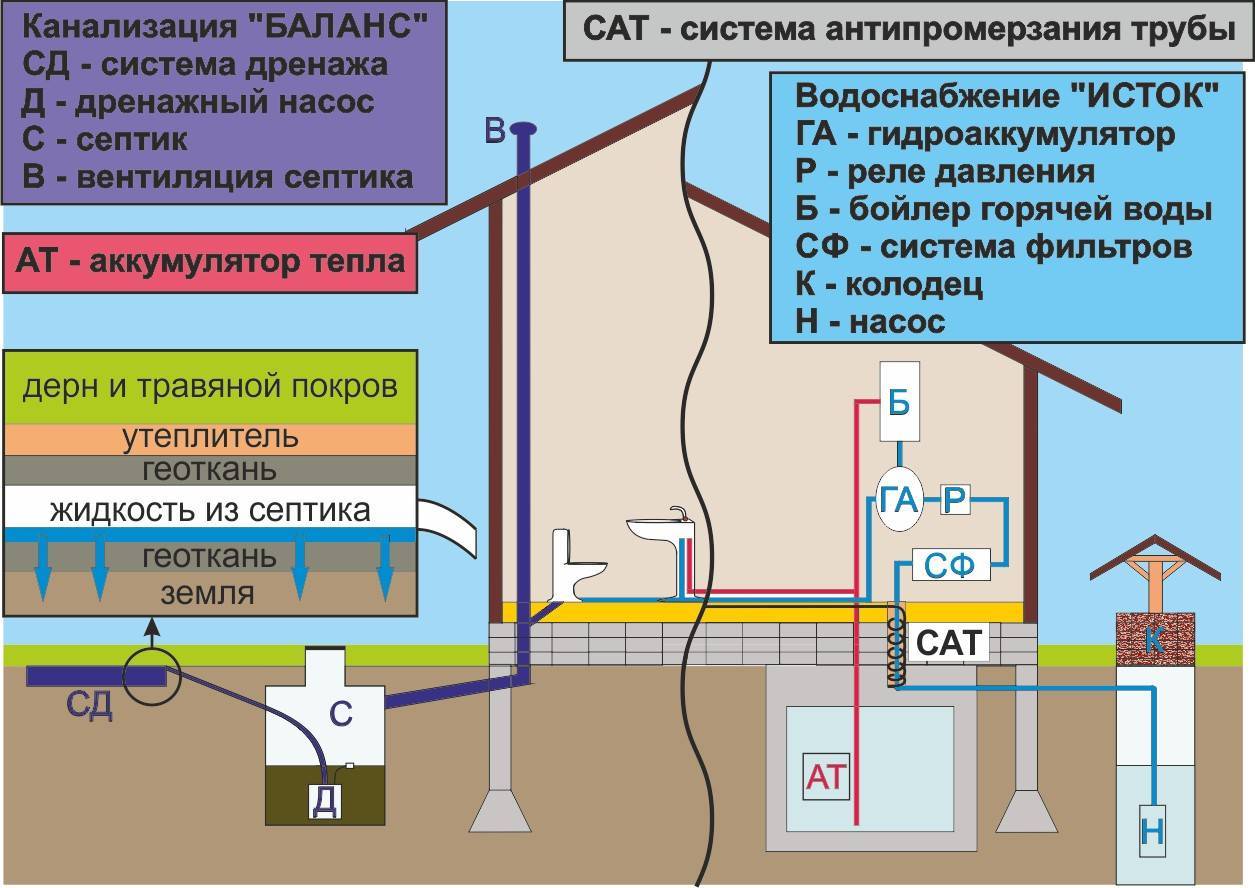
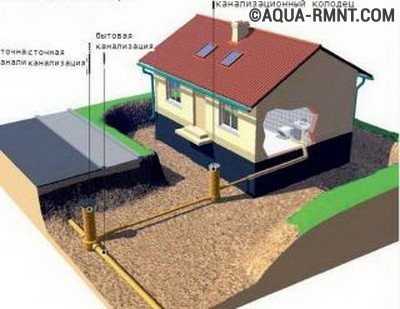
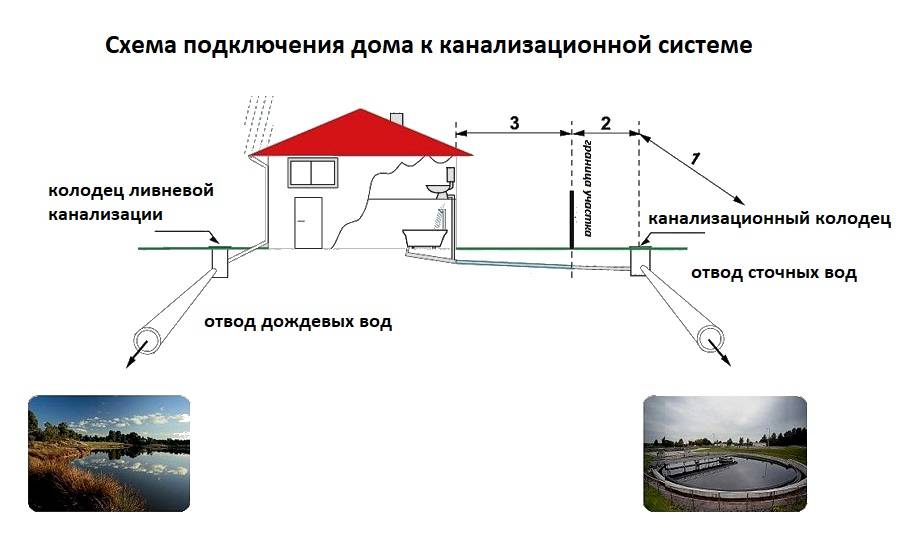
Scheme of the sewer system
The sewer system in a private house has a complicated scheme; it must take into account, in addition to depth and materials, the location, taking into account the requirements.
Namely:
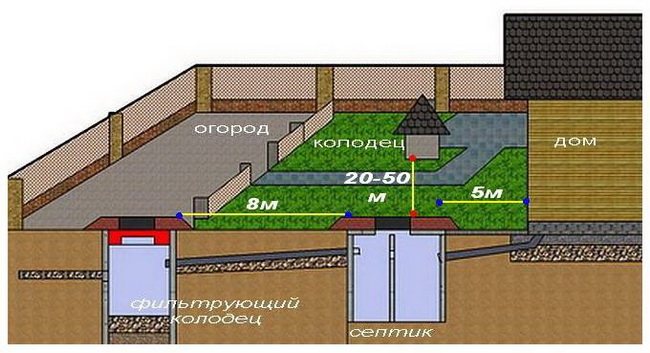
- To install a septic tank or other type of wastewater treatment, the lowest place on the site is selected.
- The distance to the source of drinking water is at least 20 m.
- To the roadway - at least 5 m.
- To an open reservoir - at least 30 m.
- To a residential building - at least 5 m.
Plastic pipes are well suited for arranging sewage
When drawing up a diagram, it is necessary to mark all the water drain points and the riser. The stand must be within easy reach. Usually it is installed in the toilet, because the toilet drain pipe has a diameter of 110 mm, like that of the riser.
Outflow pipes from the bathtub and sink are usually combined into one line.
It is important to remember that the toilet pipe should not have any inlets from other pipes. In addition, the diagram should include the location of the vent pipe.
Self-assembly
It is recommended to start installation in the house on your own from the inside of the sewer, as well as ventilation for it. The sewer system must contain hatches in the pipeline for inspection and repair. Pipes are fastened to the walls with clamps, hangers, etc.Crosses, tees and manifolds of large diameter (about 100 mm) must be used at the joints. Adapters will help to connect pipes of different diameters.
Ventilation is also important, which performs 2 functions at once - air inflow in rarefied areas, exhaust gases. Vacuum is more often formed when water is drained in the toilet bowl and when the pump for draining the washing machine is running. The influx of air prevents the capture of water in the siphon and the formation of a water seal, which has a loud unpleasant sound. A continuation of the riser on the roof is a fan pipe.
To install it correctly, you need to follow the rules:
- The diameter of the fan pipe is 110 mm to prevent ice blocking the passage.
- The height of the pipe on the roof is higher than the rest, including stoves, fireplaces, etc.
- Location at a distance of 4 m from windows and balconies.
- The fan pipe must be separate from the general ventilation and with a subsequent exit to the attic.
When arranging sewerage, safety regulations must be observed
Through a sleeve with a non-return valve, the collector in the foundation exits to the external sewer. The sleeve diameter is 150-160 mm. The reverse flow of wastewater in the presence of a check valve is not possible in the event of contamination of the pipeline or overflow of the wastewater receiver.
Paving depth
At what depth to lay the pipes depends on the deepening of the septic tank and the depth of soil freezing in the region. Moreover, pipes must be laid below this level.
They are laid according to the following scheme and rules:
- Lack of turns from the house to the septic tank to prevent blockages.
- Pipes of the correct diameter.
- The same pipe material in the same pipeline.
- Compliance with the slope (approximately 0.03 m per 1 linear).
If there is no slope or it has an insufficient degree, then you will need to install a sewer pump. Also, additional wells should be included in the external sewerage scheme, especially if there are pipeline turns from the house to the septic tank. They will help in the maintenance of sewers and the elimination of blockages or freezing.
Sewerage, like plumbing, is recommended to be supplemented with thermal insulation made of polyurethane foam and polyethylene or to lay an electric cable.
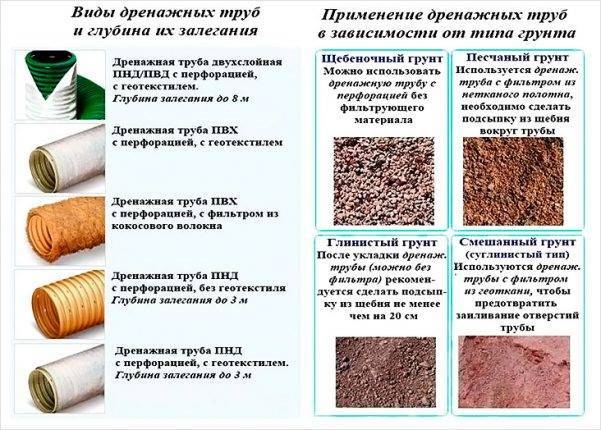
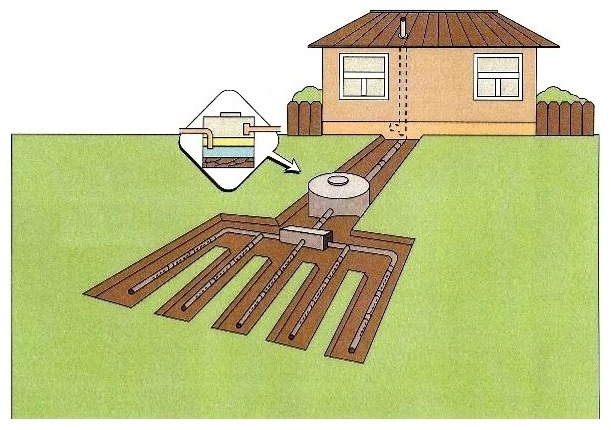
Closed and open drainage systems
Modern drainage systems allow you to quickly and effectively get rid of excess fluid in the area. Simple drainage consists of a pipeline and a water receiver. A stream, lake, river, ravine or ditch can be used as a water intake.
The drainage system is equipped from the water intake to the land plot, observing the optimal distance between its main elements. On dense soils with a high content of clay, the distance between individual drains should be 8–10 meters, on loose and heaving soils - up to 18 meters.


open drainage
The open or French drainage system is a shallow ditches, the bottom of which is filled with fine gravel and stones. Such drainage is arranged quite simply: a ditch of small depth is dug out with the discharge of effluents into a drainage well or a deep trench to the level of the sand layer, which is used as a drainage cushion.

A drainage well measuring 1×1 m can have a closed and open design, its bottom is filled with gravel of the middle fraction and brick breakage. Such structures do not clog, but are filled with soil, which is washed out with water.For this reason, draining this type of well is much more difficult than an open gutter.
Closed drainage
A technically sophisticated device that will quickly remove excess water and prevent it from stagnation. The arrangement of closed drainage is carried out using pipes made of clay or asbestos cement with laying in a certain order - in a straight line or herringbone. Closed-type drainage is suitable for areas located on a slight slope, which provides a natural flow of water.
Closed drains are often combined with drainage systems that allow water to be carried away from the base of the house.
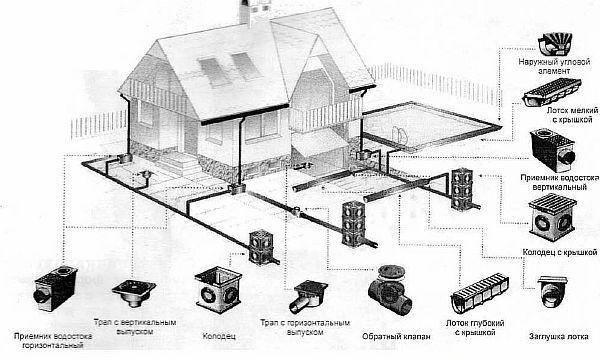
Elements of the drainage system
- The trays that make up the channel.
- Storm water inlets.
- Waste wells.
- Collectors.
- Filters.
- An underground pipe connected to the tank - through it excess moisture is removed from the territory.
The choice of scheme depends on the characteristics of the region and the site itself. So, for example, runoff from the upper gutters can be discharged into a nearby body of water. If it is not nearby, a separate well will be required.
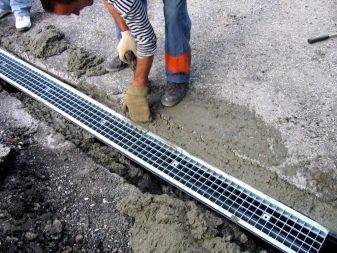
Trays
They are mounted along the tracks, along the edges of the sites, under the roof. They are marked with a strength class. For example, products of class A15 can withstand a load of up to 1.5 tons, B125 - up to 12.5 tons. They can be laid near the gate for a car - they can easily withstand the weight of a heavy SUV. The average length of the part is 1 m. The throughput depends on the hydraulic section, indicated by the DN index. Products with a cross section from DN100 to DN200 are suitable for giving. Prefabricated elements are connected using locks that allow them to be attached to pipes.
Installation of the drainage system
After carrying out research work and drawing up a detailed scheme, you can begin the installation of the drainage system, which is carried out in several stages:
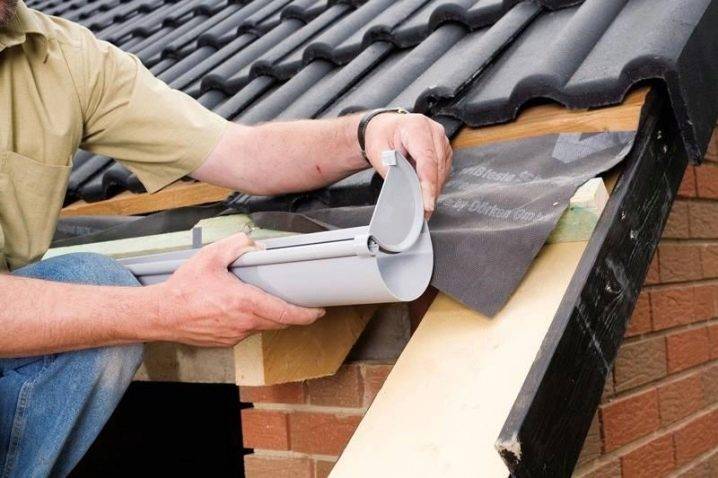
- gutters are installed along the edge of the roof;
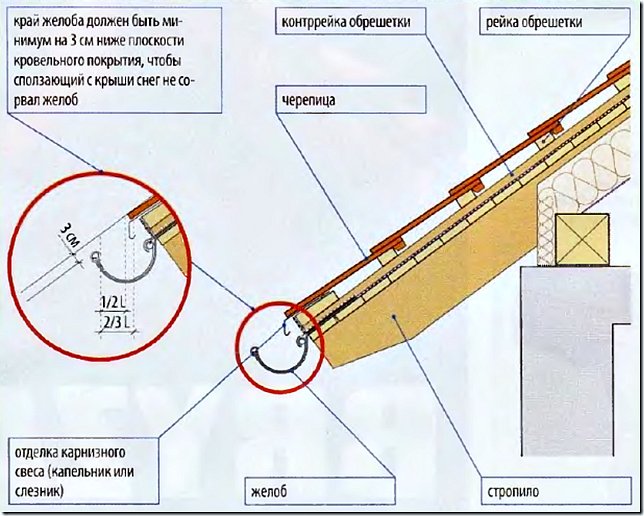
Example of a correct gutter installation
- drainpipes are assembled and installed;
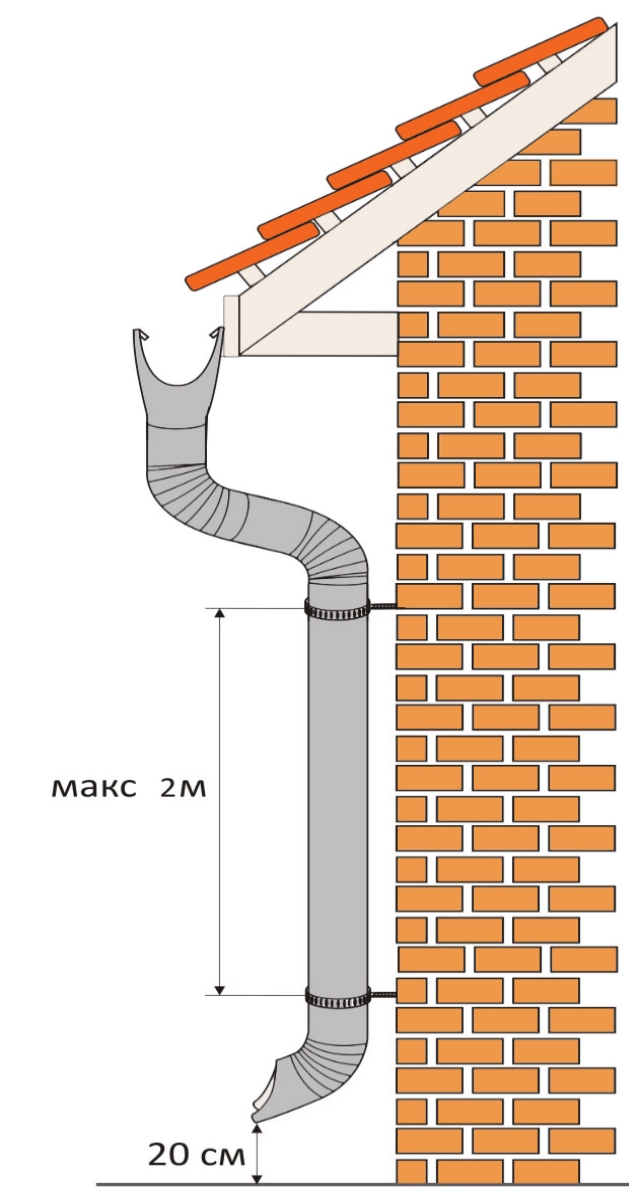
Downpipe installation
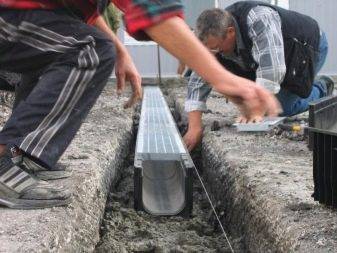
- according to the project, trenches and pits are excavated, necessary for the installation of storm trays, a drainage system and additional equipment;
- a concrete base is poured under the storm trays;

The most common way to install rain gutters
- in the trenches and pits provided for laying the drainage system, a sand-gravel mixture is poured, about 10 cm high;
- storm trays and drainage pipes are laid;

The correct way to lay drainage pipes
- if necessary, a sand trap and drainage wells are installed;

Installation of a drainage well
- drainpipes are connected by funnels or storm water inlets to a surface drainage system;
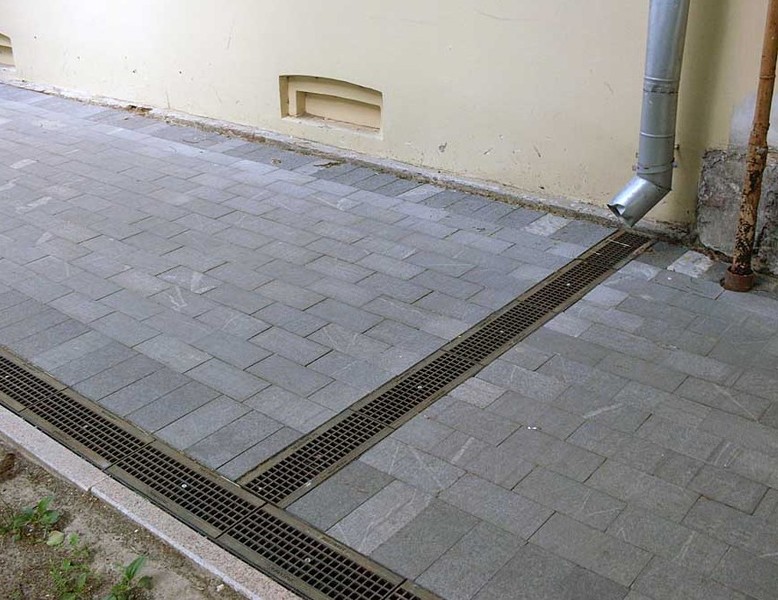
One way to connect a downpipe to a storm sewer system
- storm trays are closed with bars;
- elements of the drainage system are completely covered with crushed stone and gravel;
- all nodes of the drainage system are dug in and laid with a layer of turf.
Installation of the drainage system must be carried out in strict accordance with the project.
With the help of a properly calculated and installed drainage system, the foundation of the house and all other buildings on the plot, as well as the plot itself, will be reliably protected from the harmful effects of the liquid.
Types and types of sewerage and drainage systems

Sewer drainage systems are distinguished by types:
- Industrial. Equip such drainage systems in large industries using a certain installation technology.
- Livnevki. Such treatment facilities are used for relatively small facilities in order to timely remove precipitation.
- Household. Such centralized drainage systems are designed to remove water from separately located buildings.
The external device of the structure helps to remove contaminated water from households to the outside, that is, dirty liquid accumulates in a certain “vessel” for further filtration and removal. This type includes:
- pipes through which water moves;
- pits with septic tanks;
- separate treatment facilities in which water undergoes a disinfection procedure;
- sewer pumping devices.
An external wastewater drainage system can be equipped by self-cleaning or by pumping. Drainage and wastewater treatment usually occurs in pipelines that are located at different heights. Therefore, drainage systems are equipped strictly according to the drainage scheme, so that the water goes through all the stages of purification and does not harm the environment.


The outdoor system can be mounted in three ways:
- A separate design, when one pipe is carried out, which has an exit to the drain pit.
- General, in which several outlet pipes are combined into a single sewer network.
- Half-hearted, when two or more structures are taken out of the house as separate ones, and at some stage merge into one common system.
The internal drainage system is designed to ensure that contaminated water is collected inside the building and discharged through pipes to the outside for further sanitization.
Choosing a water disposal method
Several factors influence the choice.
- Features of the location of the building. If it is in a lowland, serious protective measures will be required - otherwise floods, precipitation and excess moisture will cause serious damage to the house and site. In this case, the drainage of the territory, the laying of diversion channels, the construction of underground mines and other complex activities are carried out.
- The average rainfall in the region is given in SNiP 2.04.03-85. A building located in a dry area and standing on solid ground is not strongly affected by currents. To solve the problem, it is enough to run the gutters into the gutter. There are areas where large-scale work is needed.
- The height of the snow cover - it affects the height of the floods.
- The runoff area is the entire territory, including the roof and paths.
- Soil properties and its relief. Water easily passes through sand and rocky soil, but lingers in layers of alumina for a long time, creating puddles and having a devastating effect on underground structures.
- The layout of the site, as well as the requirements for its design. Open channels do not always fit into the landscape of the territory. Even with low humidity, it is sometimes necessary to lay channels underground.
- With a closed method, you need to know the depth of soil freezing. Pipes must not freeze, otherwise they will not be able to function during spring floods. During this period, they are especially needed. In addition, expanding water when freezing can damage them.When laying in the upper layers, geotextiles or other heat-insulating materials are used.
- You should know the location of already laid communications.
Plumbing wiring: tips for doing it yourself
Before starting work, it is better to draw up a piping layout.
With careful planning, success is guaranteed. In its process, they think through all the nuances regarding both the choice of pipes and drawing up a layout with the obligatory indication of the size of each pipe segment, as well as the connection used.
The most ideal version of the scheme would be the one in which all the components of the system are numbered, it is advisable to do this in the same order in which it will be assembled.
So, the first thing to choose is pipes. Their choice will depend on many factors. But the main, of course, is the required quality of the product and financial capabilities.
Experts advise the use of polypropylene pipes. Their positive qualities include durability, high strength, affordable cost, and most importantly (if the wiring is done by hand) - a fairly simple installation. Even a novice plumber can do it.
The scheme of the future water supply is being developed at the stage of repair.
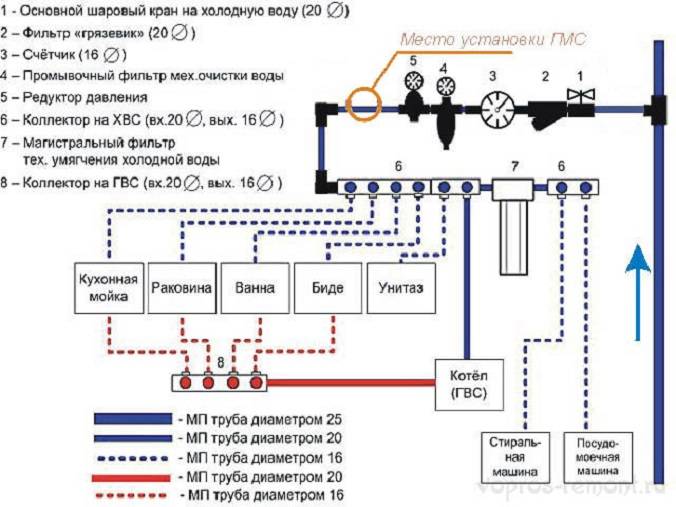
There are two main plumbing options. Both of them can be done independently, with your own hands. The first option is a collector plumbing wiring diagram. The second is tee. Of course, there are a number of other options for distributing water pipes, for example, a combination of elements of the above schemes.
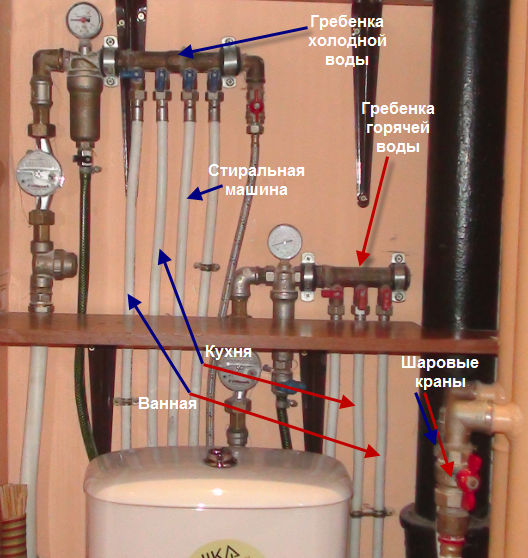
Collector distributing of pipes: 1. Washing machine water outlet 2. Sink faucet water outlets 3. Bathroom faucet bar water outlets 4.Cold water manifold 5. Hot water manifold 6. Check valves 7. Hot water meter 8. Cold water meter 9. Pressure reducer 10. Coarse filters 11. Shut-off valves 12. Hot and cold water risers
As for the collector option, it is an order of magnitude more practical during operation. The downside in this case is the cost of this type of water supply. Such a wiring will cost you more than a tee scheme.
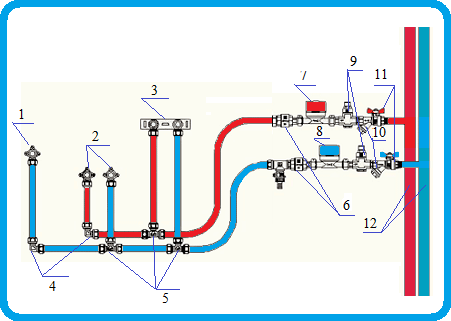
Tee piping: 1. Water outlet for connecting a washing machine 2. Water outlets for a sink faucet 3. Water outlets on a bathroom faucet bar 4. Corners 5. Tees 6. Check valves 7. Hot water meter 8. Cold water meter 9. Pressure reducer 10. Filters coarse cleaning 11. Shut-off valves 12. Hot and cold water risers
This is due to the need for a large number of pipes, the connection of which is carried out directly to each plumbing fixture separately. Such installation is carried out in order to most evenly distribute water at the points of intake (plumbing fixtures).
The number of connections in such a scheme is minimal, installation is quite simple, but if the price does not suit you, then opt for the tee version.
Using a tee wiring diagram, do not forget that for the convenience of subsequent operation, a shut-off valve is installed on each branch.
Having completed this installation, in the event that any equipment fails, you do not have to turn off the water supply of the entire wiring system. And in order to be able to turn off the entire plumbing system at the same time, a stopcock is installed at its very beginning.
We are planning the wiring
Having decided on the laying method and the wiring diagram, knowing the overall dimensions of plumbing fixtures, you can draw on paper the pipe layout, which you need to do with your own hands. The diagram defines the installation locations of all plumbing equipment, which includes:
- Cranes;
- Toilet;
- Bath;
- sink and so on.
All measurements must be made carefully with the highest possible accuracy. In this case, it is desirable to adhere to the following recommendations in the scheme:
- Try to avoid crossing pipes.
- Pipes of water supply and sewerage should be laid side by side as close as possible, so that later they can be closed with one box.
- Don't over-complicate the wiring. Try to keep everything as simple as possible.
- If the main pipes are located below the floor, the water outlets through the tees must be drawn perpendicularly upwards.
- Vertical outlets of sewer pipes are replaced with flexible hoses that are inserted into tees.
- For wiring, professionals advise using polypropylene pipes. They work great in cold and hot water systems; heating and sewerage. According to the technical parameters, these products are characterized by high strength, durability, ease of installation. In addition, they are available in a price range. Connect them using special welding.
Search and selection of a building site
If the building site already exists, proceed to the next step. If not, start searching for a site, keeping in mind the criteria of the locality first of all, where you would like to live.


If possible, choose a site with a slight slope for water flow, not flooded, with a permeable topsoil, with a low groundwater table.
try purchase a site with at least a road suitable for the passage of trucks and an electrical network on the street. Such a site usually costs more, but the presence of communications will significantly reduce further construction costs and speed up the start of construction.
If these communications are not near the site, then in the village administration you will receive information on the timing of their construction and how much will it cost you. Look at the documents confirming the reality of plans for the construction of communications. For example, the existence of an agreement between the administration of the village and the network organization on the technological connection of the village to the electrical network.
Find out how the administration's obligations to you for the construction of roads and other central communications will be formalized. This may be your membership in a cooperative, partnership, non-profit partnership or the conclusion of an agreement. Assess the risk - buy a site and wait for communications for many years! This is not uncommon in Russian practice.
Find out from the seller of the site or the village administration the results radiation monitoring of the intensity of the release of radioactive soil gas radon from the soil.
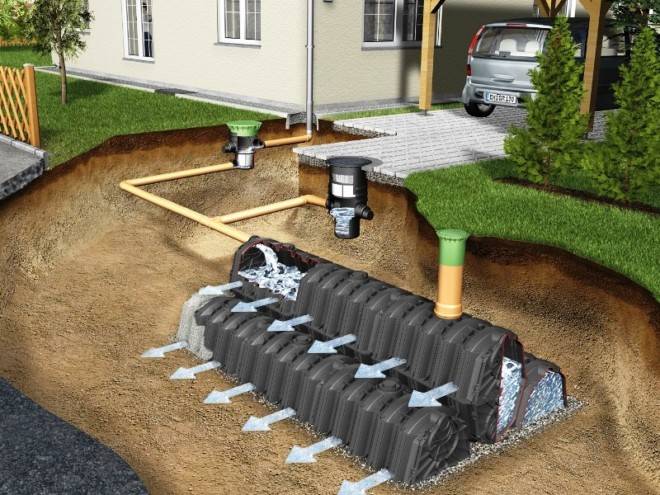
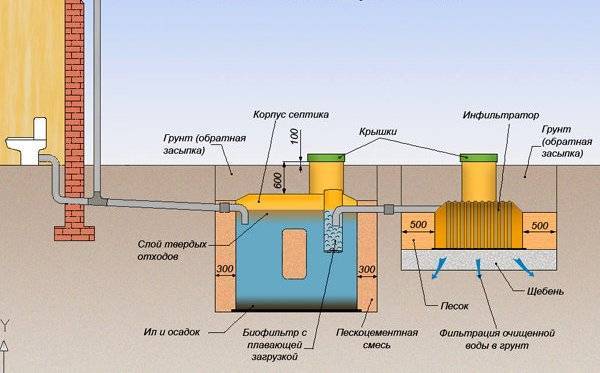
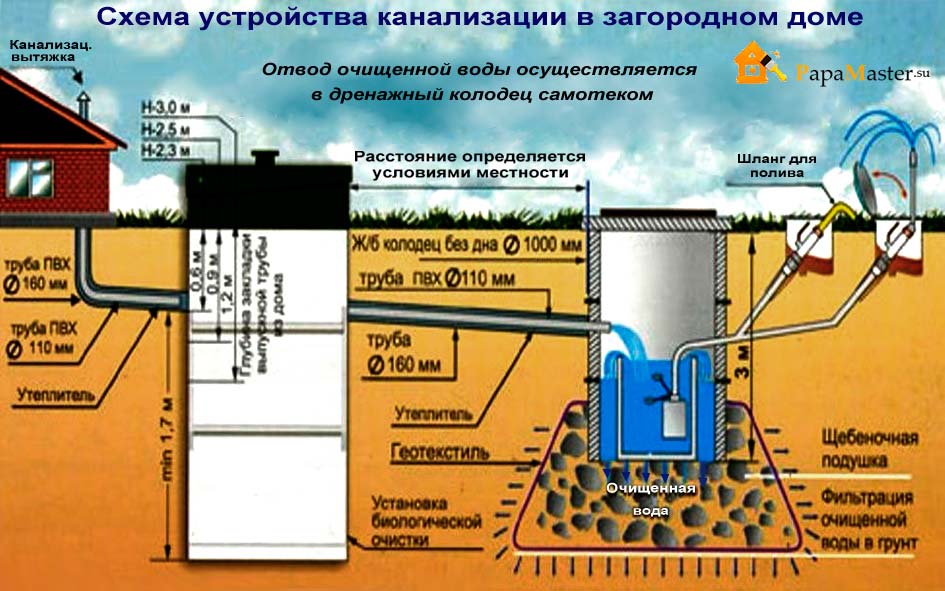
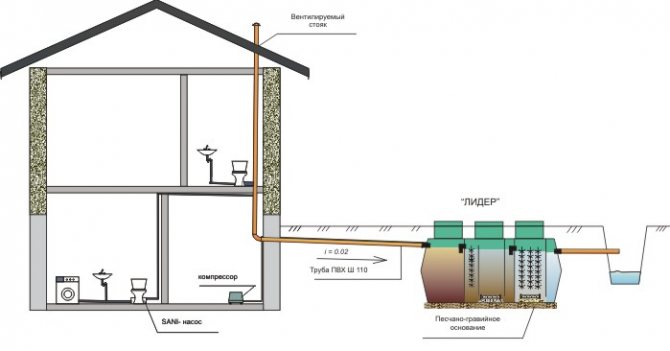
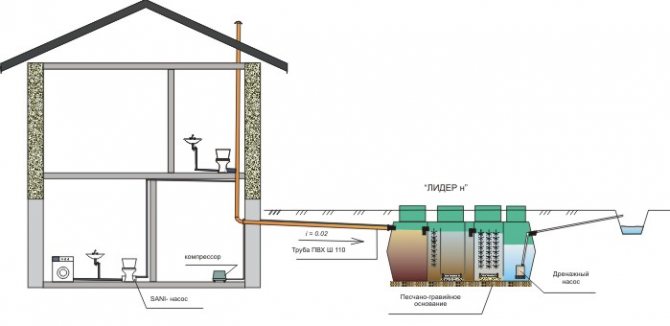
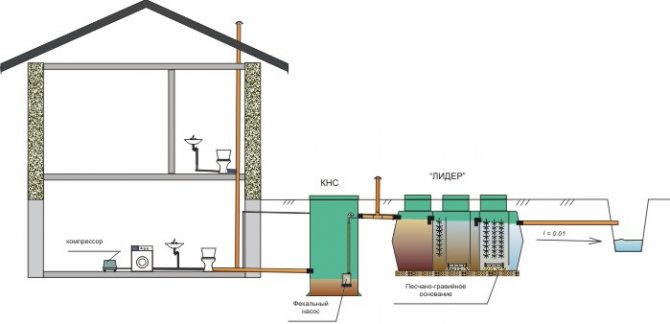
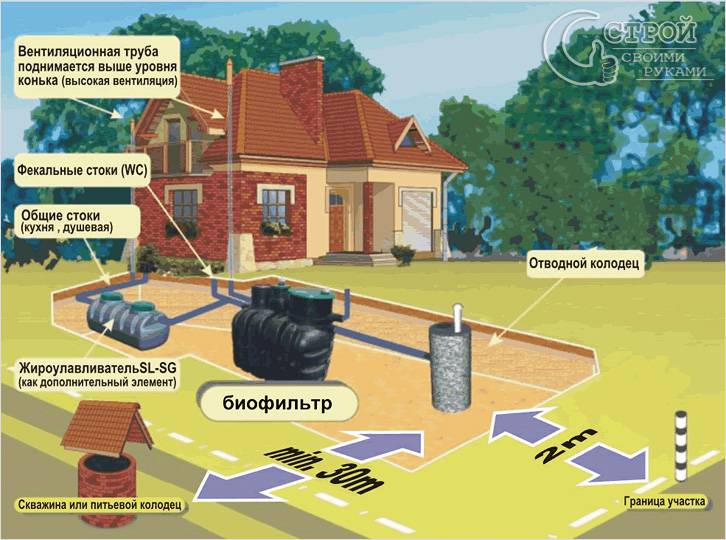
Wastewater treatment plant LEADER
Gravity scheme for the removal of treated wastewater into a roadside ditch
The simplest water purification scheme, without the use of additional equipment and energy costs. Conditions for the application of this scheme for installing a septic tank "LEADER":
- exit from the house of the sewer line at a depth of at least 300 mm from the ground mark;
- finding in the immediate vicinity of the septic tank a working roadside ditch or ditch (with a slope for natural water drainage).
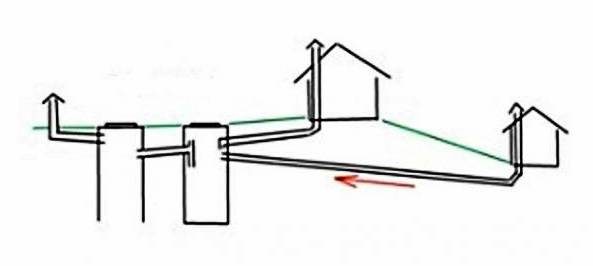
If there are bathrooms in the basement, to maintain the gravity flow of the external sewage system, Grundfos forced sewage installations (Grundfos) - Sololift (Sololift), SFA (Sani-pump) are used.
Gravity scheme for the removal of treated wastewater into an absorbing (drainage) well
It is used in the absence of a roadside ditch or ditch, and the fundamental impossibility or unwillingness of an open discharge of treated wastewater.
Usually used in protected areas or when living next to "harmful" neighbors.
The condition for the application of this scheme for the installation of treatment facilities is the presence of an absorbing layer (not water-bearing sand) in the soil section.

Pumping scheme for the removal of treated wastewater
It is used when gravity drainage is impossible (the roadside ditch is either too shallow or located far from the septic tank), an additional compartment is added at the outlet of the wastewater treatment plant, into which a drainage pump is placed to force the discharge of treated wastewater.
It is used when there is no possibility of gravity flow into the septic tank from the house (the depth of the sewer pipe is below 500 mm).
Installation recommendations:
- The sewage supply pipeline is best assembled from polymer pipes with a diameter of 100 mm and laid with a slope of 20 mm per meter. In the wastewater treatment scheme, when turning on the supply pipe system, it is necessary to provide a well (with a diameter of 315 mm or more with a tray for connecting pipes).
- The compressor must be placed in a heated utility room of the building in which the sewerage system is being installed; the compressor needs to be connected to the mains.
- To avoid the formation of condensate, the air duct that leads from the compressor to the treatment plant must be placed in the same trench as the supply pipe. At the same time, make a slope in the direction of the septic tank.
- The septic tank device must be located underground, after making a base for it from compacted sand or ASG (sand and gravel mixture).
- The discharge pipeline must also be laid at a slope (at least 5 mm per meter).
- The sewage treatment plant must be filled with water to the level of the weirs.
Do-it-yourself sewerage arrangement in the bath: a step-by-step guide
As in the case of a residential building, the sewerage of a bath includes an internal and external system. Even if the building has a dry steam room, it will be necessary to drain the liquid from the shower. The water collection system depends on how the floors are installed. The sewerage scheme is entered into the bath project at the development stage and is laid at the initial stage of construction even before the floors are equipped.
If it is planned to install wooden floors from boards, then the elements can be laid closely or with small gaps. If the coating is installed tightly, the floors are formed with a slope from one wall to another. Next, you should find the lowest point near the wall and leave a gap in this place, where the gutter will be subsequently installed (also with a slope). At the lowest point of its placement, a connection is made to the sewer outlet pipe.
If the wooden flooring will be made with slots, small gaps (5 mm) should be left between the boards.A concrete base is made under the floor with a slope towards the central part of the room. A gutter and a sewer pipe will be installed in this area. Instead of a concrete base, metal pallets can be laid on top of the insulated floor under a wooden deck. If the floors are self-leveling or tiled, a water intake ladder is installed at the lower point of the slope, which drains the drains into the pipe.
Using septic tanks for drains from the bath
A step-by-step guide to building a sewer in a bath with your own hands
For the installation of sewer pipes, it is necessary to form ditches with a slope of 2 cm per 1 m. Their depth is 50-60 cm. A pillow should be made at the bottom of these trenches. To do this, a layer of sand 15 cm thick is poured and carefully compacted. In this case, do not forget about the slope.
Next, the installation of the sewer line is carried out. Polypropylene pipes with a diameter of 100 mm are laid in trenches. If necessary, a sewer riser is equipped. It must be fixed to the wall with clamps. Be sure to organize ventilation. When the system is ready, the flooring is installed using one of the previously discussed methods.
Upon completion of all work, the ladders and gratings provided for by the project are connected to the system at the designated locations. In the area where the water intake is connected to the outlet pipe, it is desirable to install a siphon. It will prevent the penetration of odors from the sewer back into the room. Most often, ladders are equipped with built-in water seals.


Sewer pipes in the bath
On sale you can find gutters made of asbestos cement, plastic or cast iron. It is not recommended to use products made of wood and steel, because. they quickly break down under the influence of moisture.The minimum allowable diameter of the gutter is 5 cm. If the project provides for the presence of a toilet bowl or other sanitary equipment, it is installed and connected. This completes the work on the organization of internal sewage. The external system is carried out in the manner described earlier, and may be a septic tank or a drainage well.
Sewerage construction in a private house: ventilation scheme in the bath
Air exchange in the bath can be organized in various ways. Each of them has its own characteristics and advantages. Having studied the specifics of each method, you can choose the best option for a bath.
The first method involves creating an opening designed to supply fresh air. It should be placed behind the stove-heater at a height of 0.5 m from the floor level. The exhaust air will be discharged through the opening on the opposite side. It must be placed at a height of 0.3 m from the floor. To increase the movement of air flow at the outlet, you need to install an exhaust fan. All openings are closed with gratings.
Sewerage scheme for a toilet in a bath with a septic tank and ventilation
The second method involves placing both holes in the same plane. In this case, the work will affect the wall opposite to the one where the furnace is located. The inlet duct is placed at a height of 0.3 m from the floor level, at a similar distance from the ceiling, an exhaust hole must be made and a fan installed in it. Channels are closed with gratings.
The third method is suitable for flooring where the boards are laid with gaps to drain liquid. The inlet is made at a height of 0.3 m from the floor on the wall behind the stove.In this case, installation of an outlet duct is not required, since the exhaust air will exit through the gaps between the boards.
Step-by-step instruction
In order to organize a traditional drainage system, you will have to do a lot of earthwork and invest a lot of money. However, all this allows you to get a semi-automatic system. In a couple of weeks, water will collect by itself in a drainage well, as it accumulates, the owner will pump it into a ditch, storage tank or nearby free area such as a forest, field, ideally a natural reservoir
It is important that the water level in the drainage well does not exceed the desired groundwater height at the site. Otherwise, the water simply will not drain. Diagram of a soft drainage device
Scheme of the soft drainage device.
However, most owners, in order to save money, use a different method of organizing groundwater drainage. It is more profitable, but less efficient, than the traditional drainage system. When choosing this method, you need to be prepared for high labor costs during operation.
To install a groundwater drainage system, you need to prepare the following:
- Shovels for digging trenches.
- Wheelbarrow.
- Construction level and rail.
- Hacksaw.
- Drainage pipes, fittings and couplings.
- Manual rammer.
- Wells for drainage.
- Crushed stone, sand, geotextiles.
First, along the site, you need to dig parallel trenches at a distance of 4-6 m from each other. The specific step depends on the density of the soil. If the soil is heavy, trenches should be done with a smaller step. Choose a location for the drainage well.The entire system must be made with a smooth slope in the direction of the well so that water flows into it by gravity. Use a building level to check the slope.
Scheme of closed drainage.
The ends of the trenches located below the level must be connected to each other with a new trench and taken to the drainage well. The new trench should also be sloped towards this well. If you can’t connect them according to this scheme, you will have to arrange several drainage wells.
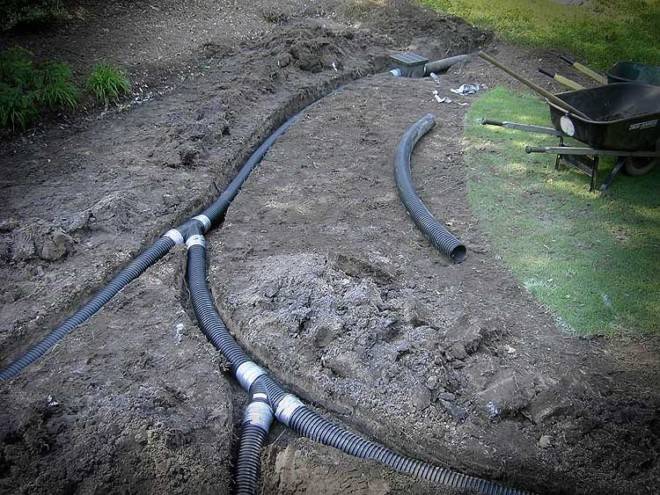
The bottom of the trenches is covered with a mixture of gravel (crushed stone) and river sand. A layer of 30-50 mm thick will suffice. Drainage pipes are being laid. As a rule, polymer pipes with holes along the length are used. To prevent these holes from clogging during operation, the pipes must be wrapped with geotextile. You can also use a more durable analogue of geotextile - coconut fiber.
After laying the pipes, the trenches must be filled to the top with a mixture of gravel and sand. Everything must be arranged so that the pipes do not come into contact with the soil. They need to be surrounded on all sides with a mixture of gravel and sand.
Construction and installation
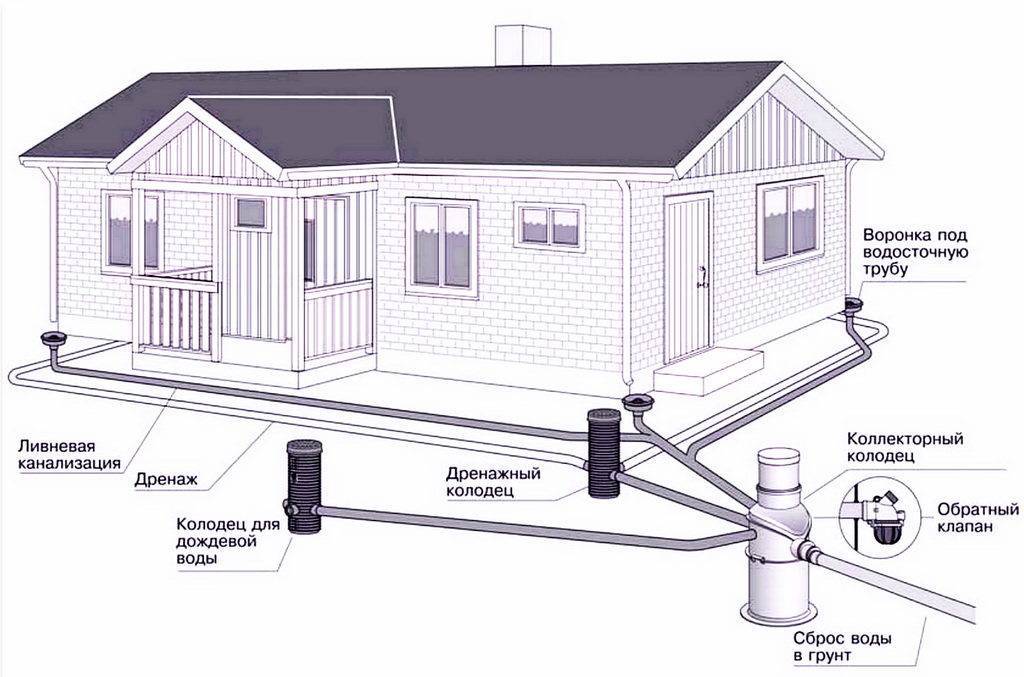
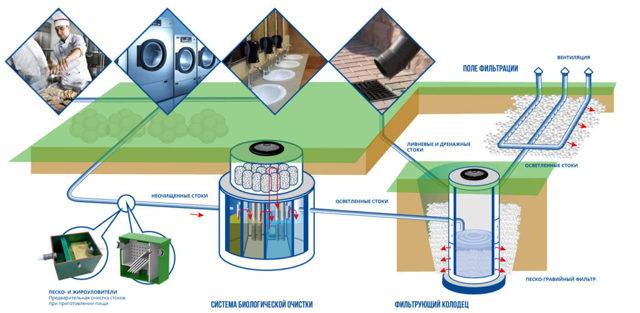
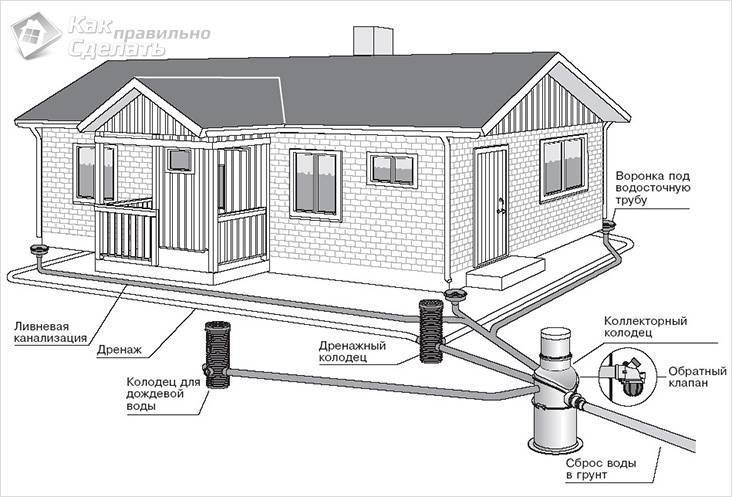
The storm drainage system is equipped according to its own technology, its laying is in many ways similar to the principle of conventional sewer pipelines, however, if there are no drains in the house, then installation should begin with them.
Roof construction
In the roof slabs, it is necessary to make special holes that will be used for storm water inlets. After all devices are installed and fixed to the bituminous mastic, the joints and junctions should be treated with a sealant.Next, sewers and risers are installed, which are fixed to the facade of a private house with clamps.
Ground part
In accordance with the planned plans, which are drawn up taking into account all the existing angles of inclination of the terrain and the depth of the canals adopted in each particular region, it is necessary to dig a trench. Consider the sequence of actions.


- The bottom of the dug trench must be carefully tamped, all the stones that were encountered during excavation should be removed, and the holes formed after them should be covered with soil.
- The bottom of the trench is covered with sand, as a rule, the thickness of the sand cushion is approximately 20 cm.
- A pit is dug for the installation of a collector well. For the collector itself, you can purchase a ready-made plastic container, but you can also build it yourself - for this you need to install the formwork and fill it with a concrete solution.
- In ditches, compacted and reinforced with sand cushions, pipes are attached, which are connected to each other using fittings.
- Inspection wells must be included in stormwater branches with a total length of more than 10 meters, and sand traps are mounted at the junction of the receivers and the pipeline. All these devices must be connected in a common circuit, and the joints must be sealed without fail.
- Before the final backfilling of the trench, it is necessary to test the system for strength, for this, water is poured into the water intake, if the pipes leak, then it is necessary to identify and eliminate the leak.
- If no weaknesses are found in the pipeline, then it is necessary to carefully fill the trench with soil, and equip all gutters and trays with cast-iron and plastic gratings.

The installation of an open system is generally not a problem, since the trays can be installed easier and faster. They are sold as independent elements, which are quite simply assembled into a single chain using a thin nylon cord that forms the required drain angle.
Timely arrangement of storm sewers will significantly extend the life of building structures, eliminate the occurrence of dirt and slush and prevent rotting of plant roots.
The simplest storm drain can be easily equipped by the owner of the site without the use of third-party specialists, but even when contacting professionals, it does not hurt to get acquainted with the features of the sewer and the specifics of its device, since as you use it, the owner will periodically have to repair and clean the system.
For more information on how to install storm sewers, see the following video.
Features of pipe selection
Pipes for home plumbing can be taken plastic, steel, copper or metal-plastic. Copper is the most expensive. But pipelines from it are not subject to corrosion and deformation during heating (cooling), and they are also not afraid of impurities in water and water hammer.
The inner diameter of the pipes is selected based on the estimated volume of water consumption by plumbing fixtures connected to a specific section of the water supply. At the same time, a tubular product with a cross section inside 25 mm is capable of passing about 30 l / min, and with 32 mm - about 50 l / min. Usually these two sizes are most often chosen for the installation of an in-house plumbing system.If you take pipes of a smaller diameter, then they will make noise, since in order to increase their throughput, you will have to increase the water pressure.
Types of pipes for water supply
To conduct the outer section of the water supply with your own hands, they are usually taken from a pipe with thermal insulation with a cross section of 32 mm
This pipeline will lie in the ground, so special attention should be paid to its insulation. He must not freeze in the winter
Pipe selection
The pump in the well is connected by a HDPE pipe. After the head of the well and up to the house, HDPE or metal-plastic can be used. In the southern regions, the piping in the pits can be done with a polypropylene pipe. But it should be borne in mind that at negative temperatures, processes of changing the structure of the material occur in polypropylene, microcracks appear on the surface of the pipe, the service life is significantly reduced, the pipes become brittle.
Plastic pipes for water supply: dimensions and diameters, characteristics of materials The use of plastic pipes for water supply made it possible to get rid of bulky steel networks, which were previously equipped with almost all residential buildings and public buildings. Sturdy and comfortable to…
The diameter of the pipe for connecting the pump determines the diameter of the connected pipe. As a rule, this is 32 mm. To connect a residential building with a family of up to 6 people, a pipe with an internal diameter of 20 mm is sufficient. It should be borne in mind that for plastic pipes the outer diameter is indicated, and the wall thickness of the pipes is different for different manufacturers. Therefore, a plastic pipe is chosen 25-26 mm. However, it will not be superfluous to connect the house with a 32 mm pipe.
The plumbing in the house is performed with polypropylene pipes.It is necessary to take into account their purpose according to the temperature of the carrier, when choosing for hot water from a water heater.


