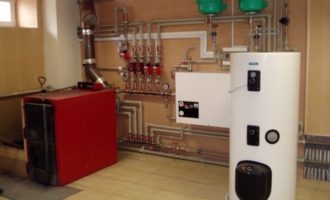
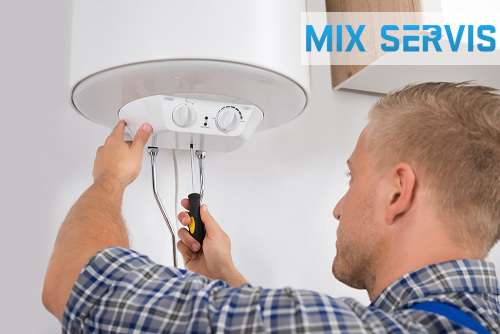
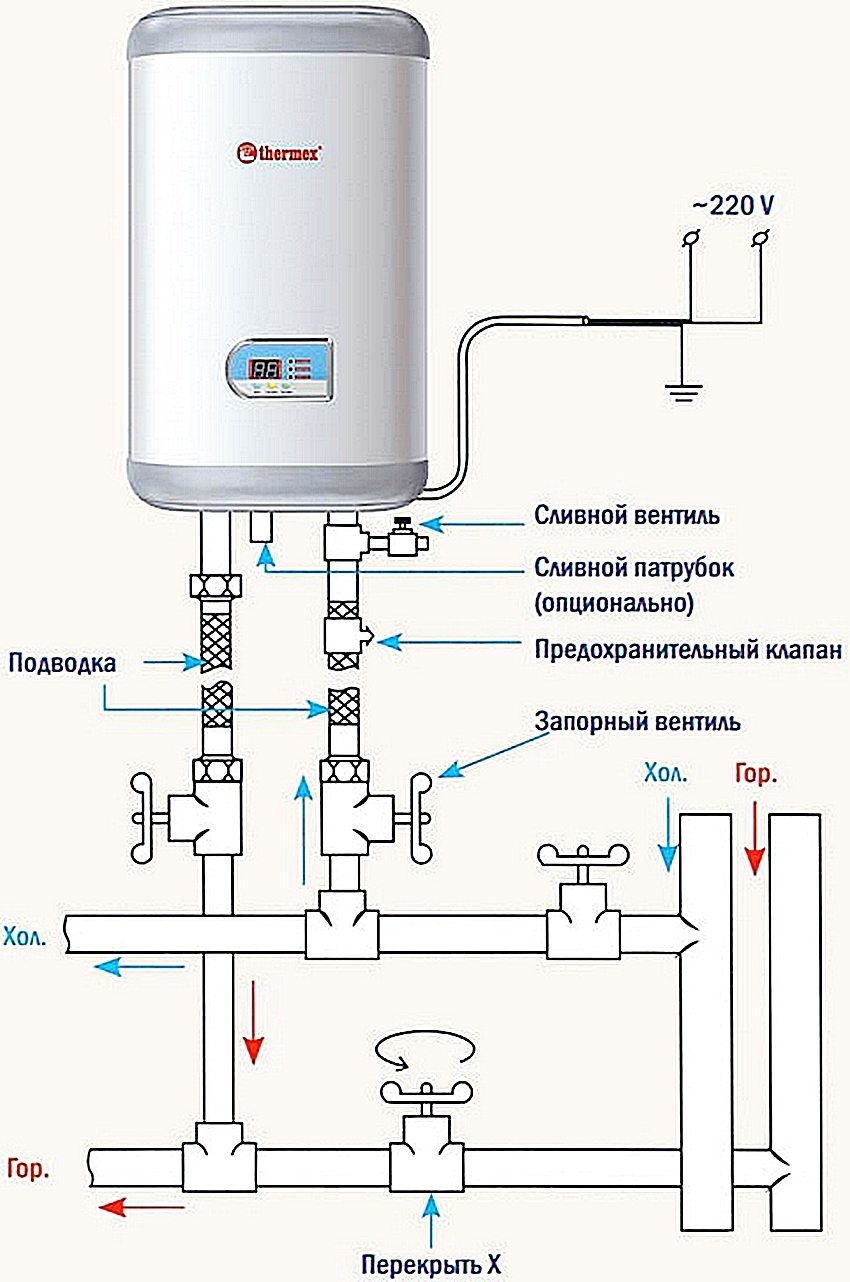
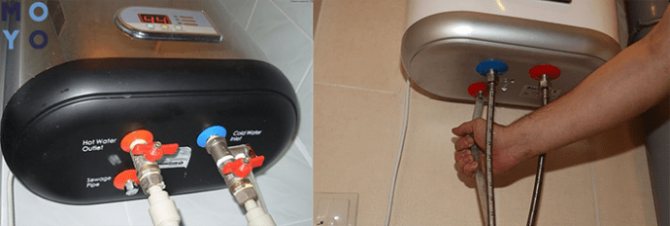
- Installation and connection of the boiler to the network
- The main points when installing Termex water heaters
- When Do You Need Water Heater Repair?
- Situations in which you need to drain the water
- Maintenance (TO) Termex
- Possible malfunctions and methods for their elimination of the Termex electric water heater
- Tips
- Purpose of the heater
- The boiler does not heat the water well. Causes and methods of their elimination.
- Turn on "Termex"
- Safety instructions for working with a water heater
- Troubleshooting and disassembly
- Basic ways
- How to drain water from the Termex water heater?
- From the water heater "Ariston"
- Features of Termex water heaters
- How to disassemble a water heater Termex 10 liters
- Features of gas connections
- Trial run
- The principle of operation of the electric heating tank
- Error codes
Installation and connection of the boiler to the network
The ground wire must never be connected to the neutral wire.
The appliance comes with a standard cord and plug for connecting to the mains. In normal condition, when the Thermex is hanging correctly, the intake tube inside the tank enters in the upper quarter, and the inlet in the lower quarter.
To correct this shortcoming, it is necessary to remove them and give the desired shape, as well as slightly bore the holes for the bolts.
Installing the boiler The first step is to fix the heater on the load-bearing wall, while taking into account the rather large weight of the equipment. Such devices do not need special installation, so how they work from a normal outlet. The device does not withstand thermal conditions.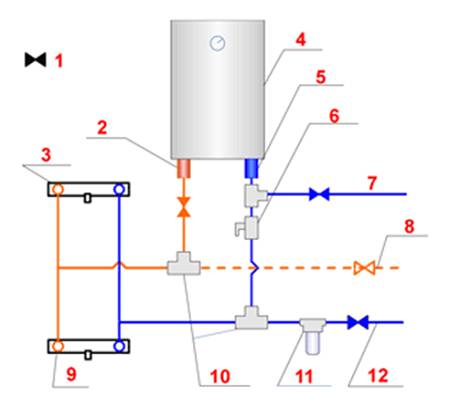
What influences the temperature of water heating? This design feature allows you to change the side slope of the case by simply moving the bottom of the drive. But this is only on condition that the water in the system meets the required standards and does not contain a large amount of impurities and heavy elements, and that the rules for installation, operation and timely maintenance were observed during the use of the device. The electrical circuit for connecting the water heater through a socket connected to a cable laid from the shield: The difavtomat can perfectly replace a bunch of RCDs and a circuit breaker.
Open drain valve 5. Also, the electric circuit of the water heater and the circuit for connecting to the network must be attached to the instruction manual for the equipment. Installing the boiler The first step is to fix the heater on the load-bearing wall, while taking into account the rather large weight of the equipment. Most often, two thermostats are provided in the design of the water heater: the first controls the heating of water, while the second monitors the state of the first.
Replace with fresh if necessary. Failure to perform cleaning work will lead to a decrease in work efficiency and a decrease in the level of efficiency.Note that the manufacturer has set the minimum service life of the Termex water heater to seven years.
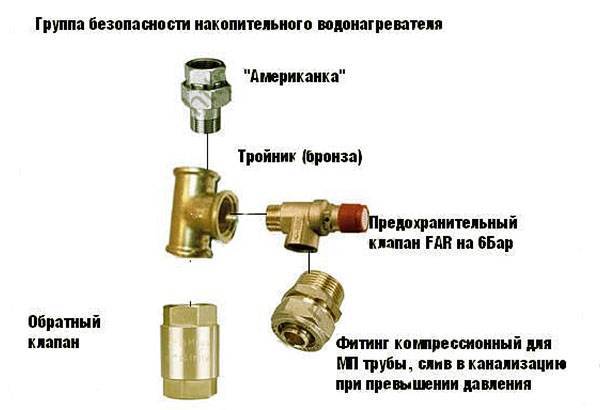
It is able to give in to shaping and is not afraid of temperature changes. If the brackets are held for some time, the characteristic will change quickly. The valve often comes with a water heater, but you can buy it separately. Experts say that using a conventional check valve is highly undesirable. When installing these elements with your own hands, scroll through the thread of revolutions, no more, otherwise damage the pipe.
Scheme connecting the boiler to the water supply
The main points when installing Termex water heaters
Let's take a look at how it's done self-installation of the Termex water heater
Let's pay attention to the moments mentioned in passing. By the way, do not forget - the plumbing is completely dressed for at least three and a half turns
Otherwise, cut the thread. Self-installation of the Termex water heater is carried out according to the standard scheme. We emphasize only the hushed places.
It is impossible to operate the Termex water heater without a magnesium anode. In heating technology, the magnesium anode protects aluminum and steel against galvanic corrosion in circuits with copper elements. This is written in SNiPs. It is forbidden to operate iron and aluminum structures downstream of copper structures.
The same applies to water heaters. Often heating elements use copper. Copper conducts heat well, the efficiency of the device increases. There are steel heating elements. This is due to electrochemical corrosion: the difference in electrical potential between the steel tank and the heating element is zero. Therefore, destruction is blocked.We want to note that the process of electrochemical corrosion is not associated with 220 V from the outlet. Metals in nature have a natural potential. Copper is on the right side of the charge range, magnesium is on the left.
When a conductive medium is formed between two metals, charge transfer begins. As a result, one material becomes a donor, collapsing. Tanks of water heaters, not counting flow models, are made of steel. In some cases, the alloy is alloyed, gets the properties of stainless steel, in others it is covered with enamel. There is no third. If the protective layer is broken, the steel comes into contact with water. As a result, if copper lurks upstream, the process of electrochemical corrosion starts. All the more so because the small scratched area of steel accounts for the full impact force. Due to this, the process of electrochemical corrosion is fast. The tank starts to leak, damage is not subject to replacement under warranty or repair. Draw your own conclusions.
It is difficult to patch the tank - you will have to tear off the external thermal insulation glued (foam) to the walls from the outside. It is necessary to carry out and passivate the places of damage from the inside. The process is not simple and safe. Be clear - the operation of a water heater without a magnesium anode is unacceptable.
When Do You Need Water Heater Repair?
- no power supply signal, no current in the electrical circuit;
- there is power, the indicator is on, but the water does not heat up - the heating element is out of order;
- failed thermostat;
- there were leaks or fistulas;
- the anode needs to be replaced.
For self-repair, you will need a minimum set of tools and spare parts for the device - a spare heater assembly with gaskets, a magnesium electrode and seals.To unwind the fasteners, you will need keys, to descale - a brush, to examine the internal state of the enamel coating - a flashlight. Water heater Termex 80 liters or another, do-it-yourself repair in a certain sequence:
- If there is no power, the socket may be faulty, there is no contact in any wire of the network, or the power supply has simply been turned off in the line. Carefulness and a current indicator will help you find the problem. But power may not be supplied due to the blockages provided in the “dry switching” protection system, with low insulation, RCD operation.
- The heating element does not heat up. Having removed the cover from the housing, free access to the terminals of the heating element and check it for serviceability with a tester. If there is voltage at the terminals, but the element does not heat up, it needs to be replaced. In accordance with the instructions, the system is drained, information about the location of the wires is stored on any medium in order to subsequently connect correctly. Disconnect the wires, remove the temperature sensors and unscrew the flange connection of the platform with the heating element and the anode. Replace the defective heating element, at the same time clean or replace the magnesium electrode. It is mounted in the same flange, but it can be removed separately without disassembling the circuit.
- A leak in the seals that appeared during operation indicates the wear of the sealing gaskets, which need to be replaced or rewound on the flange connections. If a leak appeared after replacing the heating element, when they were repairing the Termex water heater with their own hands, the flange was skewed with uneven tightening. It is necessary to re-install, replace the gasket.
- If the heating element is in good condition, power is supplied, but there is no heating, it is necessary to check the serviceability of the thermostat.To do this, the assembly is dismantled, and it is checked for reaction under operating conditions, that is, in an environment of 60 0 and at room temperature. Deviations in the response to the power supply are considered a malfunction.
Lack of grounding accelerates the corrosion of all elements under water. In order not to rust the tank, the flanges do not wear out, a grounding loop is necessary.
It should be noted that a leak in the storage tank cannot be eliminated for many reasons. The inner tank is covered with enamel, welding will destroy it. But another insurmountable difficulty is the three-layer structure, when it is impossible to dismantle the inner tank without damaging the thermal insulation and the upper casing. Therefore, you need to treat the tank with care, knowing that it cannot be repaired.
Situations in which you need to drain the water
Long-term and trouble-free operation of the device strongly depends on its correct operation. Note that the boiler must be filled with water at any time, since the material from which the tank is made is metal. When exposed to air, it rusts. Water interferes with this process. But there are situations when you just need to drain the water. In accordance with instructions for use in order for the device, it is periodically necessary to do a physical examination and clean it from accumulated dirt. Water heaters are often installed in the country or in other rooms that can freeze through. In these circumstances, the owner has to drain the water from the device. Due to the cost savings, more and more people prefer to perform this procedure on their own.
Maintenance (TO) Termex
During maintenance, the presence of scale on the heating element is checked.At the same time, the sediment that may form in the lower part of the EWH is removed. If scale has formed on the heating element, then it can be removed using special cleaning agents, or mechanically. It is recommended that one year after connecting the EWH, the first maintenance should be carried out by employees of a specialized organization and, based on the intensity of scale and sediment formation, determine the timing of subsequent maintenance. This action will maximize the life of the EWH. In Silver models, it is necessary to replace the silver anode once a year by a specialized organization.
Attention: the accumulation of scale on the heating element can cause damage to it. Note: Damage to the heating element due to scale formation is not covered by the warranty.
Regular maintenance is not included in the warranty obligations of the manufacturer and seller.
To carry out maintenance, you must do the following:
- turn off the EWH power supply;
- allow hot water to cool or use it through a mixer;
- shut off the supply of cold water to EWH;
- unscrew the safety valve or open the drain valve;
- put a rubber hose on the cold water supply pipe or on the drain valve, directing its other end into the sewer;
- open the hot water tap on the mixer and drain the water from the EWH through the hose into the sewer;
- remove the protective cover, disconnect the wires, unscrew and remove the support flange from the housing;
- if necessary, clean the heating element from scale and remove sediment from the tank;
- assemble, fill the EWH with water and turn on the power.
In models with a drain pipe, it is enough to shut off the cold water supply to the EWH, unscrew the plug on the drain pipe and open the hot water tap. After the water has drained, you can open the cold water supply to the EWH for some time for additional washing of the tank. When carrying out maintenance of the EWH by a specialized organization, a corresponding mark must be made in the service ticket. If the rules of installation, operation, maintenance of the EWH are observed and the quality of the water used complies with the current standards, the manufacturer sets the service life of the EWH at 7 years.


Possible malfunctions and methods for their elimination of the Termex electric water heater
| Malfunction | Possible reason | Remedy |
| Decreased hot water pressure from EVN. Cold water pressure | Inlet clogged safety valve | Remove the valve and rinse it in water |
| Increased heating time | TEN covered with a layer of scale | Remove the flange and clean the heating element |
| The mains voltage has dropped | Contact the electrical service | |
| Frequent operation of the thermal switch button | The set temperature is close to the limit | Turn the thermostat knob to decrease the temperature (-) or set a lower temperature on the electronic control panel |
| The thermostat tube is covered with scale | Remove the support flange from the EWH and carefully clean the tube from scale | |
| EVN works, but does not heat the water | Valve "X" (Fig. 1) is not closed or is out of order | Close or replace valve "X" (Fig. 1) |
| EWH connected to the power grid does not heat water. Control the lamp is off | The thermal switch button has worked or not turned on (Fig. 2) | Disconnect the EWH from the network, remove the cover, press the button until it clicks (Fig. 2) thermal switch, install the cover and turn on the power |
| For models with electronic control | ||
| In the event of an internal fault, you will see El, E2 or E3 on the display screen, accompanied by eight warning sounds, after which the power will be turned off | E1 means there is no water inside the tank and the heating element is on | It is necessary to completely fill the tank with water, and then turn on the power |
| E2 means that thermostat out of order | Contact the service center to replace the thermostat | |
| EZ means that the water temperature has exceeded 95 ° C and the thermal switch | Disconnect the EWH from the network, remove the cover, press the button until it clicks (Fig. 2) thermal switch, install the cover and turn on the power |
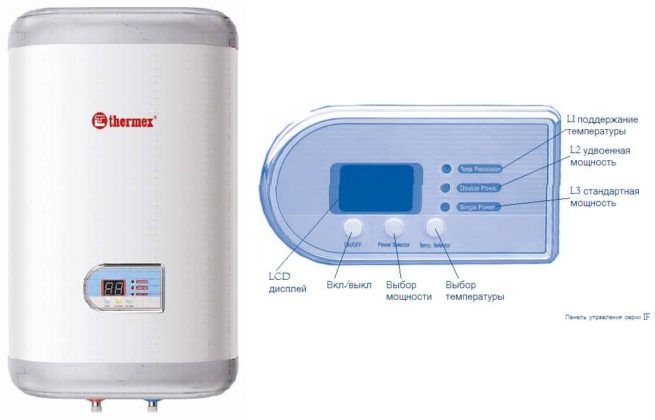
. The layout of the thermoswitch buttonTemp. Preservation (L1) – Temperature maintenanceDouble Power (L2) – Double powerSingle Power (L3) – Standard powerTemp. Selector - Temperature selection


Rice. 3. Mechanical control panel
. Electronic control panel
Tips
After installing the water heater, proceed to its launch. To properly carry out this process, it is recommended to follow the instructions for use of the heating apparatus. Proper start-up determines the duration of the boiler service and the frequency of maintenance. Starting and setting the boiler modes will differ depending on the type of water heater. However, in general, the order of inclusion is based on the same principles. It looks like this:
- before turning on the appliance, it is necessary to close the shut-off valve for supplying hot water from the common riser. This must be done even if a non-return valve is present;
- then proceed to filling the tank with liquid and displacing air;
- after which you should plug the plug into the socket and adjust the settings. You can start using the equipment in a few hours.
To check the operation of the Thermex water heater, you must perform the following steps:
- notice the power indicators turn on (they start to burn);
- determine the temperature of the liquid at the outlet of the mixer;
- after 20-25 minutes you can see increased temperature values on the touch panel.
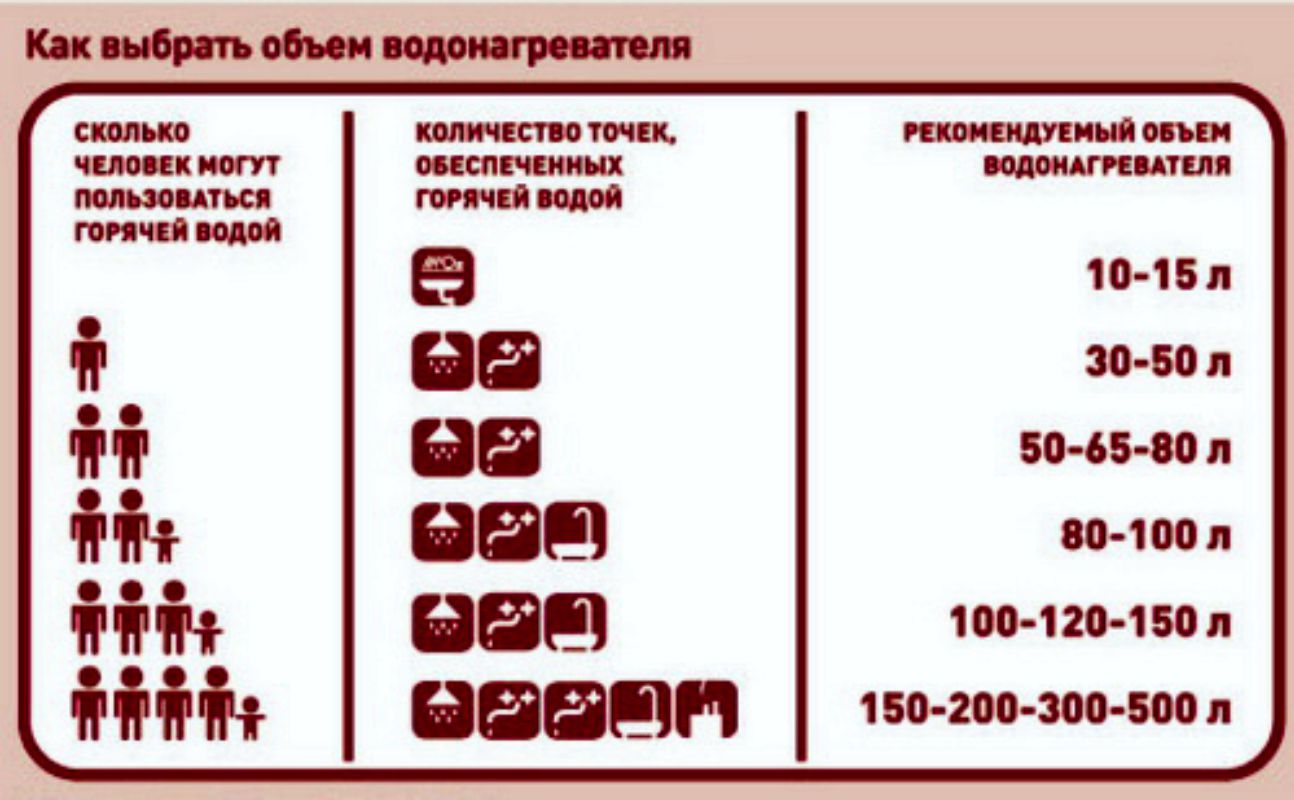
In most cases, all consumers are satisfied with the Thermex water heater with a volume of 50 liters. When choosing the best option for heating equipment, reviews from real buyers will help solve this problem and answer the most exciting questions. Many consumers unanimously concluded that a heater with a capacity of 50 liters is much more economical than larger units. The manufacturer offers a fairly wide selection of models - from the cheapest to designer boilers with electronics and a touch screen.
You can learn how to make a water heater with your own hands by watching the video below.
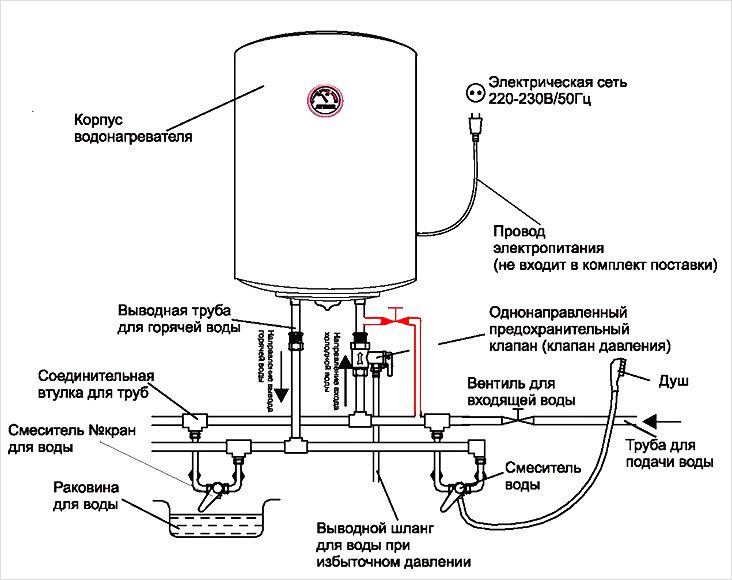
Purpose of the heater
The Thermex heater is made using modern assembly technology using high quality materials. It has a residual current device (RCD) that ensures safety during operation. Termex complies with international standards and the requirements of GOST R IEC 60335-2-21-99. Some models of heaters have a silver anode. This is indicated in the instructions for the water heater.
The device is used for heating running water in domestic and industrial premises.It is very reliable and economical.
Otherwise, the water will not have time to heat up to the desired temperature. In winter, Thermex should be used in well-heated rooms. All models of household appliances are connected to a 220 V power source. The delivery set of the Termex heater includes:
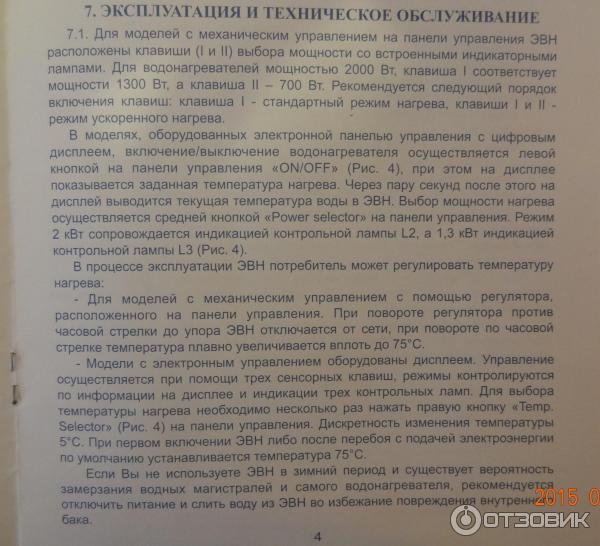
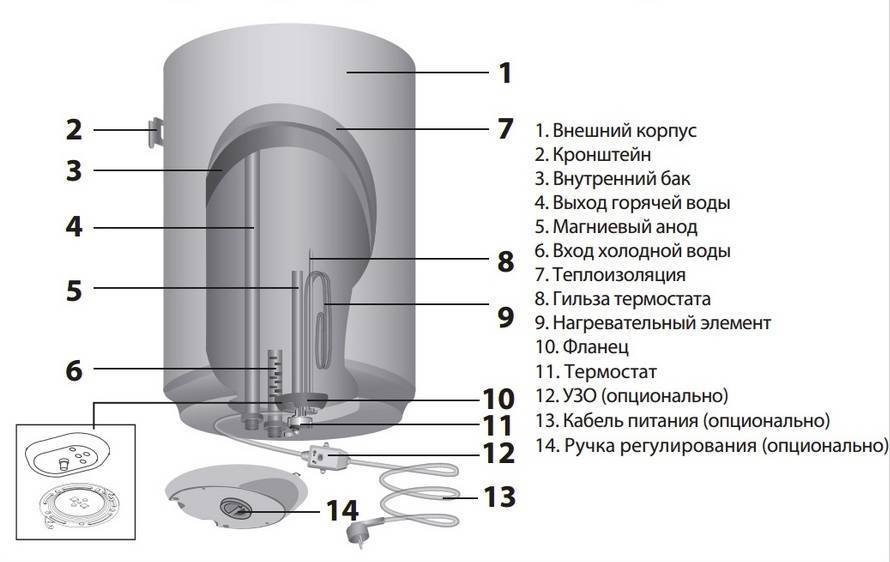
Figure 1. Schematic diagram of the water heater.
- RCD automatic.
- Safety valve.
- User manual.
- Anchors for fasteners.
- Package.
The schematic diagram of the water heater is shown in fig. 1. It shows how the liquid is heated in a technical structure. The body of the Termex heater is made of durable plastic. The inner tank is made of low carbon stainless steel. Thanks to this, Thermex has excellent corrosion resistance and a long service life. The space between the plastic case and the steel tank is filled with heat-insulating material.
To repair a malfunction of the heating element, the flange on which it is held is removed. A temperature controller sensor with a thermostat is installed on the front panel of the product. With this device, Termex maintains the set temperature. The work takes place automatically. The required value is set by the regulator.
How to use the device is indicated in the instructions. The residual current device is mounted on the supply cable. It is triggered by a current leakage of 0.2 mA. Simplified the electrical circuit of the heater is shown on rice. 2, where the safety element is thermal protection. The drawing can be used to troubleshoot the equipment.
The boiler does not heat the water well.Causes and methods of their elimination.
Have you started to notice that you are getting less hot water? It seems that the boiler does not heat water well? Let's see what could be the matter:
1 The valve on the common riser is not completely closed.
The valve is either not closed, or is out of operation, thereby hot water goes to the neighbors below, and you get noticeably less water from the water heater. In order to reliably determine whether hot water goes to the neighbors, it is necessary to check that the hot / warm pipe is below the valve. If the pipe is warm, then it is necessary to replace / close the valve.
2 The temperature regime was changed on the thermostat.
It often happens that children / wife / mother-in-law changed the temperature regime of the boiler without your consent. Thus, you began to receive significantly less hot water. Check if the temperature regime has remained at the same level, or has changed downwards?
3 The first heating element is switched off.
In boilers where two heating elements are installed, one heating element may have been turned off by someone without your consent. Check it out, because one heating element heats water twice as slowly.
Turn on "Termex"
Depending on the design of the water heater, some steps may differ. It mainly depends on the type of device − flow or storage. Meanwhile, there are several basic principles that are applicable to any type of water heating equipment, including not only the Termex brand.
The universal instruction for turning on the boiler consists of three steps:
- The first step is to turn off the hot water supply from the central water supply. If there is a non-return valve on the hot water pipe, it is still necessary to close this branch.This is done so that even with a slight leak, do not give boiling water to the central line.
- In order to force air out of the system, the hot water tap on the device opens, then the mixer and cold water is supplied. After the flow of water began to flow smoothly, the mixer is closed and the boiler is filled with water.
- The last step is connecting the device to the network, setting the required values and waiting, about an hour, before using it.

Instantaneous water heater


With flow type heaters, the procedure is similar, except that boiling water will go almost immediately.
An important step in the operation of the boiler is to check its performance. When turning on the network, you need to make sure that all indicators are highlighted. Measure the initial temperature of the water in the mixer. After about 20 minutes of operation of the device, take another control temperature measurement, making sure that the heating is on. On devices with a touch panel, manipulations with a thermometer are not required, all data is displayed on the screen.
Safety instructions for working with a water heater
To achieve the required level of safety, the device must be grounded in accordance with the current regulations for the installation of electronic devices.
It is forbidden to perform the following actions when installing the water heater:
- Do not connect the water heater to the network without first filling it with water.
- It is not allowed to dismantle the equipment during its operation.
- It is forbidden to use the water heater without grounding
- Do not connect the water pipe to the water heater without using a safety element
- When connecting the device, the pressure in the water supply system should not exceed 0.6 MPa
- Do not use for mounting equipment those elements that are not included in its kit.
- The water in the system must be clean, free of impurities and other heavy elements that may adversely affect the operation of the device.
- Water from such a water heater is not food grade.
- Drain water from the water heater only when the power is off
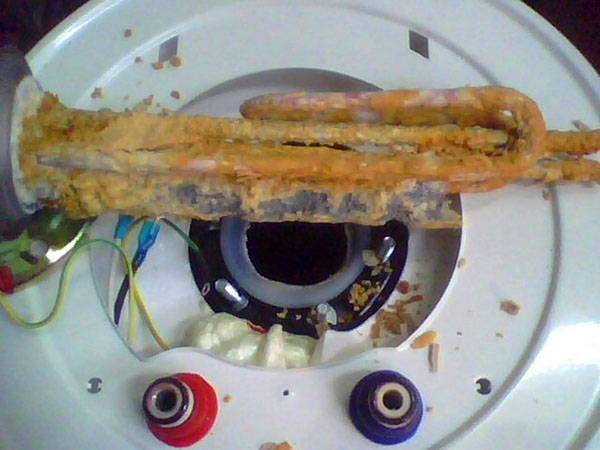
Troubleshooting and disassembly
Then the bottom cover is removed to access the heating elements.
Here you need to be careful, because the entire electrical part of the water heater is hidden under the cover. It should be noted that sometimes the screws on top are sealed with a label
Before you start dismantling the thermostat, it is better if you take a photo or sketch the connections.
The following sequence follows:
the heating element contacts are disconnected;
fastons are released from thermostat contacts;
the nut holding the thermostat is dismantled and removed away;
the thermostat sensors are removed from the tubes of the heating element;
the nuts of the heating element mounting plate are unscrewed;
The heating element is carefully removed from the body of the unit;
The heating element is checked by external inspection for the integrity of the shell;
The heating element is called by a tester for open and short.
Specialist note: in the event of a break, the tester will show infinite resistance, in the event of a short circuit, zero.
Basic ways
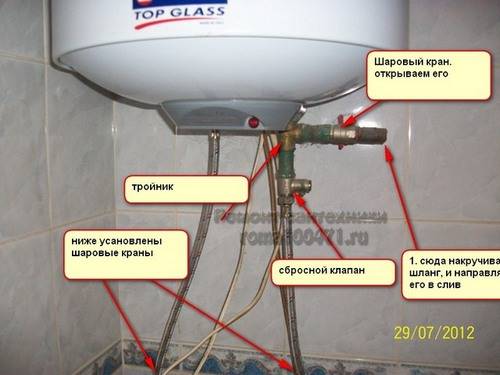
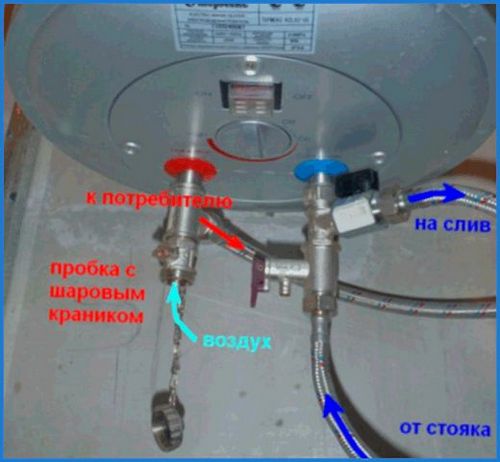
To drain water from boiler, it is necessary to ensure the supply of air inside the tank.
There are several ways to drain water from a water heater. Whichever one is used, you first need to disconnect the device from the network, and then leave it for a certain time so that the liquid in it cools down.
While the water cools down, prepare everything you need to drain it. You can use a bucket or a hose. Its end is lowered into the toilet or bathroom, after which it is attached so as not to hold the hose all this time. The draining process itself takes about 20 minutes. Next, turn off the cold water supply. open on mixer faucet with hot water in order to reduce the pressure in the boiler and allow air to enter the tank.
Finally, connect the drain hose and open the valve to cold water pipe.
Draining process:
- Previously, before work, it is required to turn off the electrical device from the network.
- Then wait a certain time so that the liquid in the boiler tank can cool to a safe temperature, which will reduce the risk of possible burns during the process of draining the water.
- Next, the cold water supply to the device is shut off.
- After that, you need to open hot water on the mixer, or turn the lever to the desired position to remove the pressure inside. You need to wait for all the liquid to come out of the pipe.
- The next step is to unscrew the tap located on the hot water pipe in order to ensure the passage of air into the tank.
- Next, you just need to open the drain valve, which is located on the pipe with cold water leading to the boiler, and by connecting the hose responsible for drainage, release all the liquid into the sewer.
- Finally, make sure that all the water has completely drained from the tank.
How to drain water from the Termex water heater?
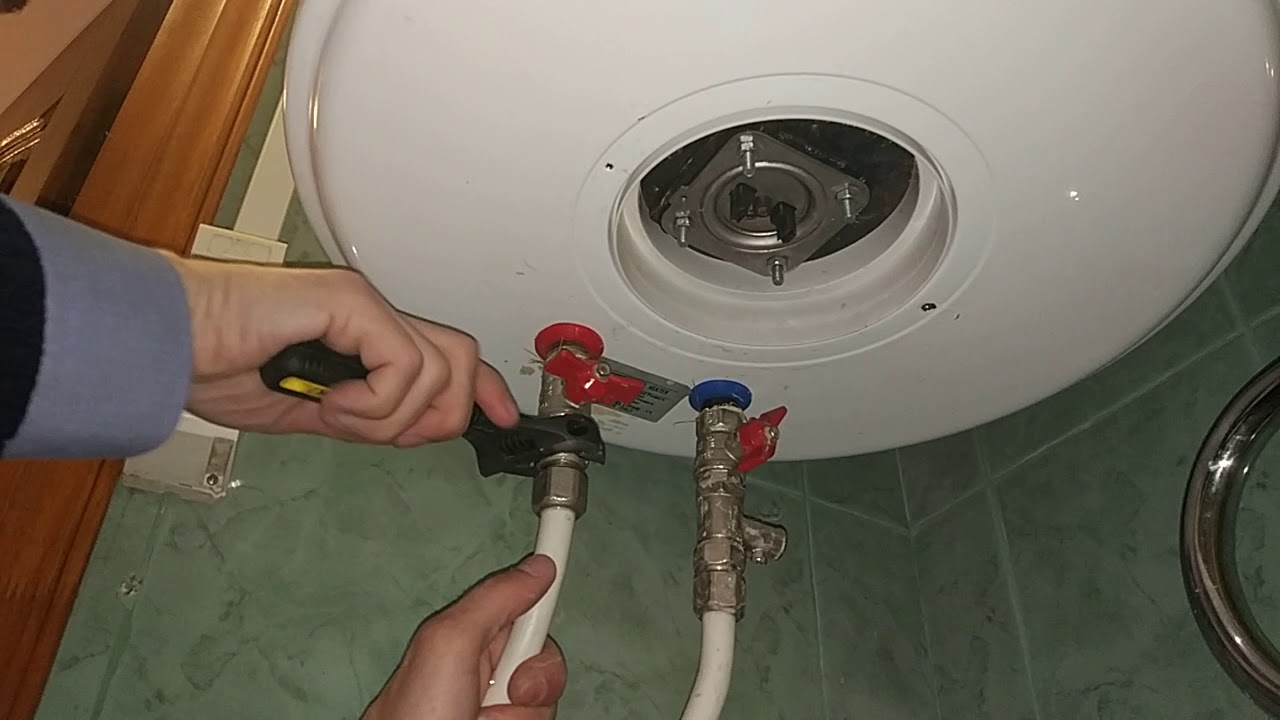
- Close the cold water supply faucet.
- Then unscrew the tap with hot water on the mixer.
- After that, you just need to wait for the water to finish flowing. Draining takes approximately one minute.
- Next, the faucet is turned on.
- Then, using an adjustable wrench, the nuts for supplying cold water to the check valve, which are located below it, are unscrewed. Fears that the boiler will start to flow are groundless, since the design is specially designed in such a way that it does not allow hot water to penetrate into the cold pipe.
- Then the check valve is twisted, having previously prepared a drain hose into the sewer. After this action, water may flow from the nozzle. Therefore, you need to fasten the hose to the pipe as soon as possible.
- The next step is to unscrew the nut on the hot water pipe. After that, air will enter the system, and the liquid will pass inside the hose. If this does not happen, it is necessary to “clean” the hose.
From the water heater "Ariston"
- The mixer tap and the tap with water supply are twisted.
- The shower hose and outlet pipe safety valve are unscrewed.
- The hose that supplies water is unscrewed and sent to the tank. Water will begin to flow from the inlet pipe.
- 2 plastic nuts are unscrewed from the outlet and inlet pipes.
- The cap of the mixer handle is disconnected, then the screw is unscrewed, the handle and plastic gaskets around it are removed.
- The body of the boiler is removed from the tank, in the direction of the mixer, without removing it completely.
- Using a hexagon, the metal plug of the upper part of the mixer is unscrewed.
- Until the end, the liquid is drained from the hole where the plug was located.
Given the fact that water heaters are only used for a few weeks or days, when hot water is turned off, usually in the summer, most people wonder if it is worth draining the water from the boiler if it is not used for a long period.
There is no unequivocal advice on draining the liquid from the water heater, as it depends on the situation. If the boiler is broken and does not perform a heating function, then the liquid does not drain. Then you should contact the service center, in particular, if the device has a warranty card.
In general, before using any household appliances, including a water heater, it is necessary to carefully read all the technical documentation supplied with the device, since it is in it that the answer to the question is often found whether it is necessary to drain the liquid from the boiler during a long period of inactivity .
Features of Termex water heaters
 Wall-mounted water heater Termex
Water heaters differ according to the following criteria:
- storage or flow;
- the material from which the tank is made;
- control option;
- installation method;
- connection to the water supply;
- volume;
- additional options.
Flowing water heaters have several disadvantages - high energy consumption and fragility of the heating element. These are practically disposable products that do not tolerate long breaks in work. Therefore, it is not recommended to use flow devices without special need.


There are three types of materials from which the EWH inner casing is made:
- bioglass porcelain;
- stainless steel;
- glass ceramics.
Practical operation has shown that stainless steel devices have proven themselves better: they are more resistant to mechanical damage and are well repaired. With self-replacement of heating elements and fixing of threaded connections, the case made of bioglass-porcelain or glass-ceramic cracks.
Control options:
- Hydraulic is a change in the operating modes of equipment through pressure sensors. The heating element turns on when the tap is opened and turns off when it is closed. Equipped as standard with two heating positions. A large pressure of water does not always warm up at maximum heating.
- Mechanical - occurs through a mechanical thermostat. Works on the principle of an iron.
- Electronic - all settings are changed via a touch differential, with an extended set of functions and a line of protection.
Mounting method:
- wall vertical;
- wall horizontal;
- floor.
The floor arrangement is typical for volumes over 100 liters.
Connection to the water supply is bottom or top. It all depends on the location of communications and ease of use.
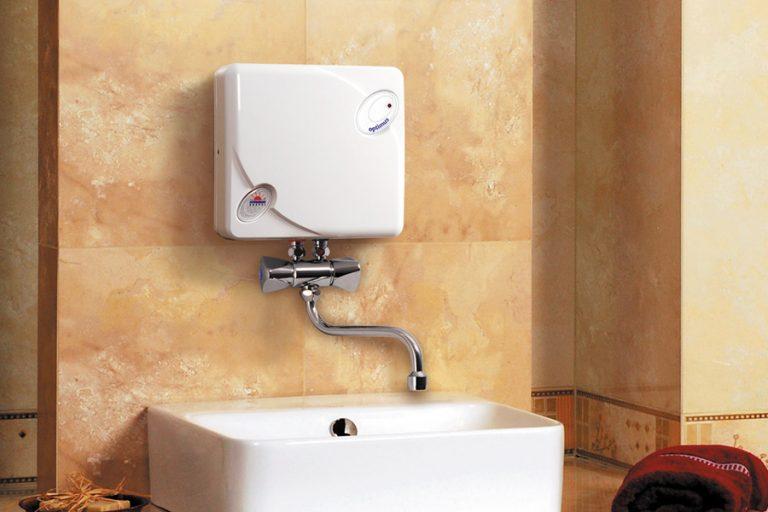
How to disassemble a water heater Termex 10 liters
 Boiler Thermex
Why disassemble the water heater:
- to replace the thermostat;
- to replace or reset the thermal fuse (only for certain models);
- to replace the magnesium anode (anti-corrosion element);
- to replace a defective heating element;
- for cleaning from scale and dirt.
For convenience, you can do it right at the installation site. Dismantling is not required. No special tools are required, a set of screwdrivers and open-end wrenches is enough.
Before starting work, you must disconnect the device from the network. Pull the plug from the socket and turn off the water.
Disassembly is carried out from the front side:
- Dismantle the front panel (unscrew the screw and lift the front panel up).
- Disconnect the electrical wire from the heating element, thermal fuse, thermostat, and mains wire.
- Pull out the thermocouple, but do not disconnect it from the thermostat.
- The thermal fuse is located on the flange next to the heating element - unscrew the two screws to replace the temperature sensor.
- Unscrew 5 nuts on the flange securing the heating block and pull it out.
- To flush out scale and dirt, disconnect the mixer, cover the hole with your palm and turn on the water to the maximum. Rinse with clean water.
Termex water heaters received a good review from our consumer. Inexpensive maintenance, low cost - all these are excellent characteristics for a future purchase.
Features of gas connections
When connecting gas stoves, columns and other types of equipment, flexible connections are also used. Unlike models for water, they are yellow and are not tested for environmental safety. For fixing, end steel or aluminum fittings are used. There are the following types of devices for connecting gas appliances:
- PVC hoses reinforced with polyester thread;
- synthetic rubber with stainless steel braid;
- bellows, made in the form of a corrugated stainless steel tube.
Holding "Santekhkomplekt" offers engineering equipment, fittings, plumbing and fixtures for its connection to communications. The assortment is represented by products and materials of well-known foreign and domestic manufacturers. Discounts apply for bulk purchases, and product quality is confirmed by standard certificates.For information support and assistance, a personal manager is assigned to each client. The ability to arrange delivery within Moscow and other regions of the Russian Federation allows you to quickly receive the purchased goods without any hassle.
Trial run
Boilers are often installed by professionals. It is they who should carry out a test run immediately after installation. But if you installed everything yourself, then be sure to follow these steps.
- Make sure that the water heater is installed qualitatively, according to the instructions for it.
- Check it for leaks. Fill with water, having previously disconnected from the power supply.
- To see when the tank is full, open the hot water valve. If water flows, then the tank is already full.
- Close the valve and examine the outside of the device.
The second boiler connection diagram
Only after that you can safely connect the boiler to the power supply and set it to the desired temperature.
The principle of operation of the electric heating tank
The operation of the water heater is based on the principle of convection:
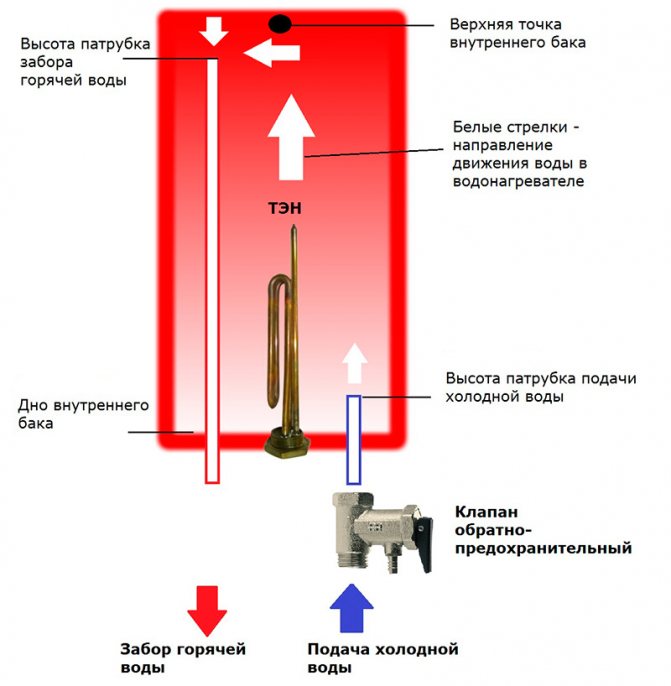
Cold water always enters the storage water heater from below, heating it rises up, where the hot water intake pipe is located.
- cold water enters the tank through the inlet tube;
- the heating element turns on and heats the water to the set temperature (there is a regulator on the dashboard with which the temperature is set);
- due to convection, hot water independently rises to the top of the tank;
- the hot water outlet tube is just located at the top of the device, through which the heated liquid enters the pipeline;
- when the water temperature in the tank drops, the thermostat turns on the heating element, and when the maximum temperature is reached, it turns it off.
Both in the Termex water heater for 80 liters, and in the Termex water heaters for 50 liters, do-it-yourself repairs are carried out in the same way. Their design is identical, only the volumes of the tanks differ.
Error codes
Many Thermex water heaters are equipped with an electronic display that shows the main error codes of the equipment. Knowing how to read these emergency symbols will help you save big on professional repairs. The most common errors are the following.
- E1 or Vacuum - the storage tank cannot be completely filled with water when the heating element is turned on. Solution: turn off the heating element and wait until the container is full, and then turn on the heating element again.
- E2 or Sensor - the temperature sensor does not work. Solution: Unplug the boiler from the power supply for 30 seconds and then restart the equipment.
E3 or Over Heat - the water heating temperature has risen to a critical level (95 degrees or more). Solution: press the safety thermostat button.


Thus, if you notice problems in the operation of the Thermex water heater, this is not a reason to immediately contact the service center - armed with the above recommendations, a number of malfunctions can be eliminated on your own. But when taking on repairs, remember that the main thing is to soberly assess the scale of the breakdown and not exaggerate your strength so as not to provoke even greater problems.