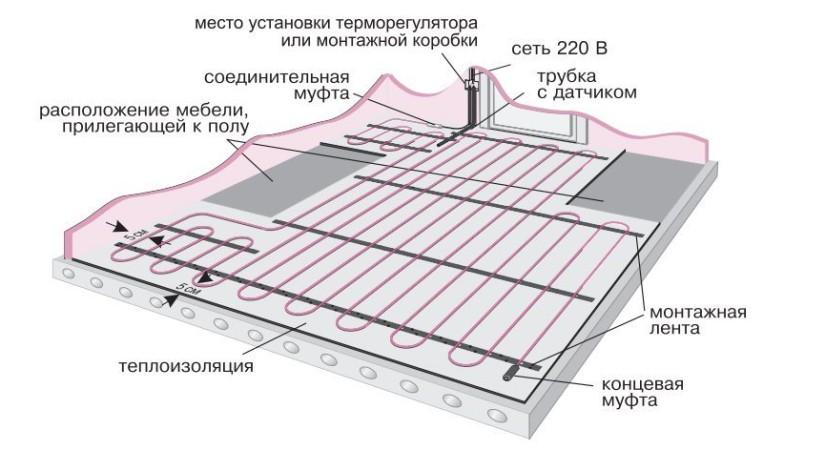
- Understanding the types of underfloor heating
- Infrared film
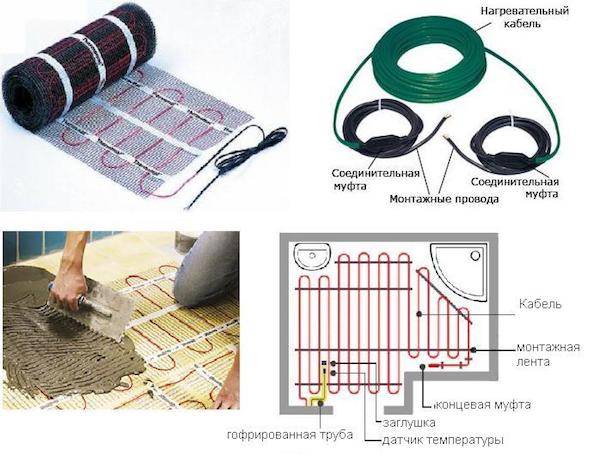
- Heating mats
- heating cable
- Final conclusions
- Laying tiles on electric underfloor heating
- Types of pipes for underfloor heating
- Do-it-yourself pipe laying
- Do-it-yourself installation of a cable underfloor heating under a tile
- Do-it-yourself technology for laying a warm floor under a tile
- Rod warm floor
- Cable underfloor heating
- Mixture for pouring screed
- Water floor installation
- Sequence of work
- Pipe laying
- System testing
- Finishing screed
- Ceramic tile laying
- Varieties of systems
- Water
- Electrical
- Bases and types of heaters
- Expanded polystyrene and foam
- Cork
- Mineral wool
- Foamed polyethylene
Understanding the types of underfloor heating
Installation of underfloor heating under tiles begins with the choice of heating equipment. Some experts and consumers say that it is much more profitable to lay water floors, but this is not always possible. In addition, they have certain disadvantages:
- For laying water pipes, a powerful concrete screed is required - it is poured over the laid pipes, its thickness reaches 70-80 mm;
- Concrete screed creates pressure on subfloors - relevant in multi-storey buildings, where floor slabs are not designed for such loads;
- The water pipe is at risk of failure - this can lead to flooding of neighbors and unnecessary repair costs.
They are more applicable in private households, where it is possible to equip them even at the stage of construction or repair.
Please note that in the event of a breakthrough of water heated floors, you will have to repair not only your apartment, but also someone else's.
Electric underfloor heating for tiles is represented by three main varieties:
- Heating cable is the best option;
- Heating mats - somewhat expensive, but effective;
- Infrared film is not the most reasonable option.
Let's consider the possibility of their use in conjunction with tiles.
Infrared film
When choosing electric underfloor heating for tiles, consumers will certainly get acquainted with infrared film. This film provides heating of floor coverings with the help of infrared radiation, under the influence of which they become warm. But it is not suitable for laying under tiles or porcelain stoneware - a smooth film cannot normally connect with tile adhesive or mortar, which is why the tile simply falls off, if not immediately, but over time.
Also, the electric infrared film will not be able to ensure the connection of the tile adhesive and the main floor, despite the presence of special technological holes. The finished structure turns out to be unreliable and short-lived, it threatens to fall apart piece by piece. We conclude that some other heating equipment is needed under the tiled floor, infrared film is not suitable here.
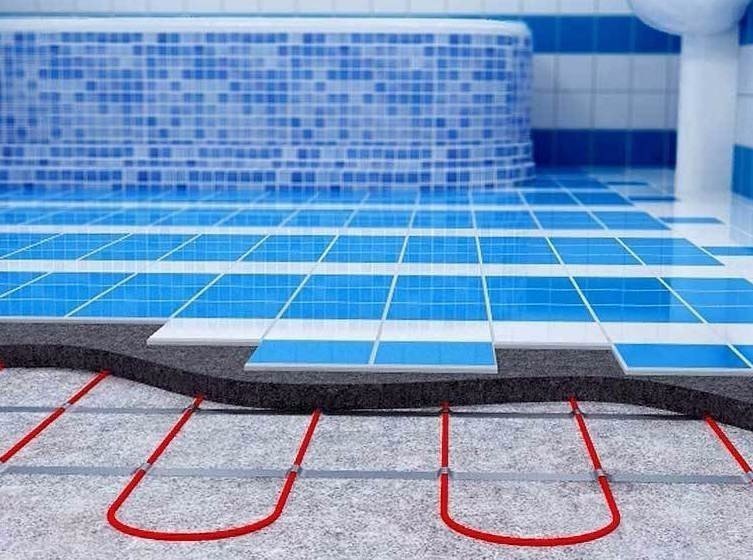
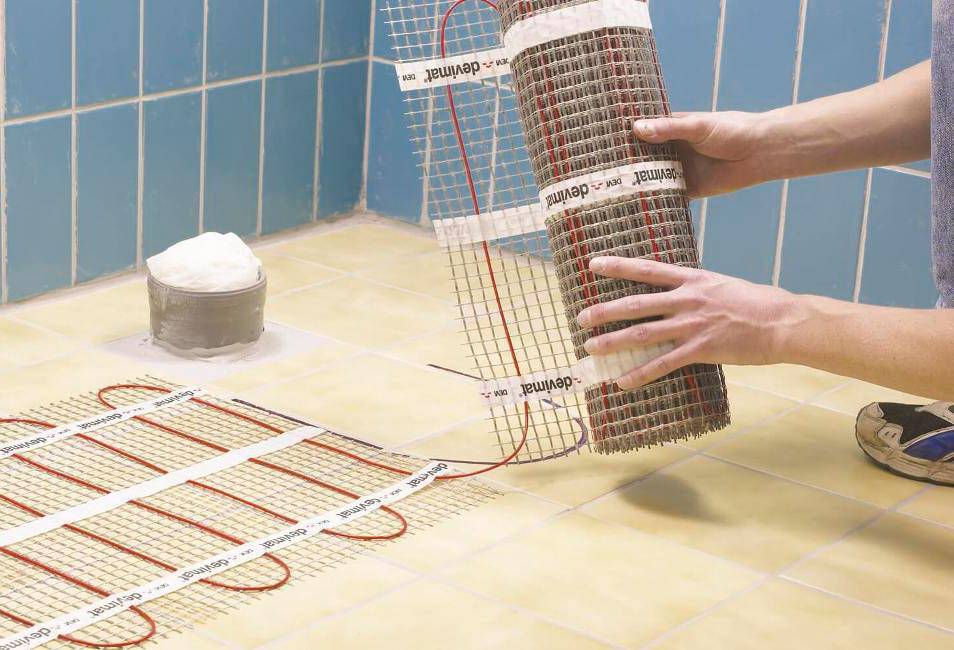
Heating mats
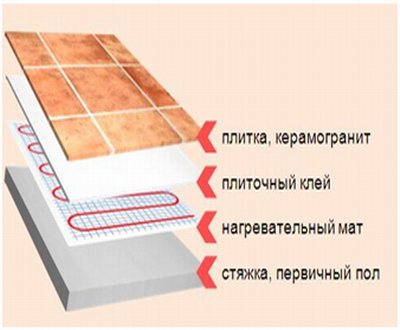
The aforementioned heating mats provide the ability to mount an electric underfloor heating without a screed under the tiles.They are modular structures, ready for installation work - these are small sections of a strong mesh, on which sections of the heating cable are fixed. We roll it out on a flat surface, apply glue, lay the tiles, let it dry - now everything is ready, you can safely walk on it and put furniture.
Electric underfloor heating for tiles, created on the basis of heating mats, pleases with ease of installation. They do not require a bulky and heavy cement screed, but they are distinguished by their high cost - this is a small minus that you have to put up with. But we can safely mount them on rough surfaces and immediately start laying tiles or porcelain tiles.
heating cable
Underfloor heating under tile is a more standard and cheaper solution than the aforementioned mats. It will please you with warmth and long service life, as well as a low probability of breakage. Electric heated floors of this type are mounted on the basis of three types of cable:
- Single-core is not the most worthy solution. The thing is that this cable format requires connecting wires to two ends at once, and not to one. This is not very convenient and leads to noticeable labor costs;
- Two-core - a more advanced cable for installing an electric underfloor heating under a tile. It is easy to install, as it does not require a ring connection;
- Self-regulating cable - it can be easily cut to almost any length, thanks to the special internal structure, it can automatically adjust the heating temperature.
Using a self-regulating cable for installing an electric underfloor heating under a tile, you get the opportunity to save on electricity.Also, experts and consumers note a more uniform heating, which is difficult to achieve when using heating elements of a different type.
Final conclusions
We can implement electric floor heating under tiles in two ways - using a heating mat or a heating cable. Infrared film is not suitable for our purposes, it is better to use it with a laminate. More precisely, you can use it, but only at your own peril and risk - if you put tiles directly on the film, then no one can guarantee the long service life of such a structure. There is a high probability of its failure in the very near future.
Laying tiles on electric underfloor heating
Laying the flooring is one of the final stages of repair work. Specifically, there is no clear framework in what sequence the construction process should be carried out, and whether the laying of the flooring will be the final stage or not. But, nevertheless, this moment is very important and responsible, especially if ceramic tiles act as a floor covering.
It is worth paying special attention if it is placed on an electric underfloor heating, a qualified specialist is required to perform this work. Laying tiles on cable electric underfloor heating includes a number of important steps: 1) First, you need to use a special tile adhesive for underfloor heating, which would withstand temperatures of at least 50-60 degrees. Since the first time the heating element is turned on, the temperature on the thermostat is set to the maximum, and it can be 40-50 degrees. You need to be sure that the glue will withstand it.
You need to be sure that the glue will withstand it.
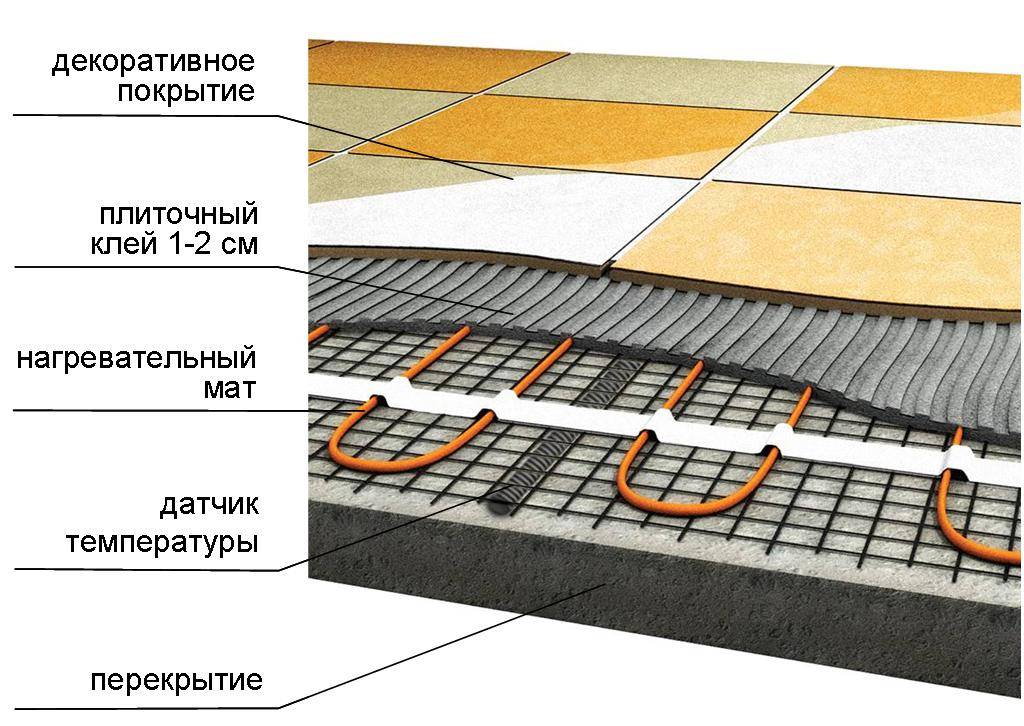
2) Secondly, the floor sensor from the thermostat must be in the corrugation. A canvas is cut under the corrugation, which is smeared with glue in such a way that the level of the heating cable is the same everywhere.
3) Thirdly, if a heating mat is used as a warm floor, many experts recommend pre-tightening it with a thin layer of tile adhesive. This is done so that during the tiling process, the heating cable is not accidentally damaged, otherwise the entire floor will completely fail. And only after complete drying, you can proceed to the next stage of work.


4) Before you start working with tiles, you should calculate where to start. If there is a drawing, then it is necessary to build on it (it should be in the central part of the room), if the tile passes from one room to another, then the transition and trimming of the tile in the area of the doorway should not be visible. It is recommended to calculate in such a way that there is as little trimming as possible, and it is located in the most inconspicuous places. 5) Glue with a comb of 7-8 mm is applied to the work surface, as well as to the tile. Its inner side is pre-wiped with a damp cloth, if necessary, in order to remove dust (otherwise, it is likely that the tile can quickly move away due to lack of proper adhesion). In this case, you always need to monitor the level of the floor, removing excess glue if necessary, and also use crosses to maintain the same distance between the tiles, which in turn have a different size.
6) After the glue has dried, you can start sealing the seams. For this, special putties are used, of different colors.If this is a production facility and beauty is not so important, or there is a financial constraint, the same tile adhesive can be used as a putty. All seams are preliminarily cleaned of dust with a knife, if necessary, an industrial vacuum cleaner is used. The adhesive is applied using a special flexible (rubber) spatula. After 10-20 minutes (depending on the air temperature in the room), all excess is wiped off with a damp sponge (rag). After that, walking on the tiles is prohibited until the joints are completely dry, at least a couple of hours.
Another important point is that under no circumstances should underfloor heating be turned on until the tile adhesive has completely dried. If, when laying the tiles, the rough screed was completely dry, then the underfloor heating system can be put into operation no earlier than after 14-16 days. If before this the screed was insulated and poured, then the drying time increases to a month. When you turn on the underfloor heating earlier than the specified dates, in most cases the tile may move away from the base.
«Do it yourself - do it yourself "- a site of interesting homemade products made from improvised materials and items at home. Step-by-step master classes with photos and descriptions, technologies, examples of work - everything a real master or just a craftsman needs for needlework. Crafts of any complexity, a large selection of directions and ideas for creativity.
Types of pipes for underfloor heating
On sale there are at least 4 types of pipes used to make a floor heating system. We list them in descending order of their heat transfer properties:
- Copper - the most effective types of pipeline for heating. They better transfer heat to the floor due to the high thermal conductivity. The main nuance of their use is that they are much more expensive than the most popular alternative - metal-plastic.
- Metal-plastic pipes are the most popular of materials for laying underfloor heating. Its advantages lie in the fact that they are relatively cheap and also give off heat well from the coolant, but in a significant proportion less than copper ones. This is due to their structure - inside there is a thin polypropylene shell, on top of which there is aluminum foil 1 mm thick. Outside the pipe is protected by a layer of polypropylene. Bends to almost any radius of at least 20 cm for a pipe with a diameter of 16 mm. With its help, lay the heating circuit without breaking up to the collector itself.
- Polypropylene pipes are a convenient material from which it is easy to make supplies for underfloor heating, to the collector and to the boiler. The pipe is connected using a welding machine.
- Cross-linked polyethylene pipes are a modern, very durable material with good heat dissipation. It is convenient in that it can be used to lay a heating main throughout the space. Available in coils of 300 m.
Do-it-yourself pipe laying
First, determine the place where the pipes will be located. It is not difficult to do this, the main thing is to adhere to the following rules:
- It is undesirable to lay a warm floor in places where wooden furniture will be located, because it can easily deteriorate, dry out and deform.
- Pipes should not be laid only in certain places. The fact is that if the room does not warm up completely, then a place with a warm surface will not save the situation.
If a warm floor water system is installed in the bathroom, then you should take into account the fact that this room has high humidity, so it is undesirable to save on the number of heating lines, otherwise there will be no proper effect.
Before laying the pipes, they should be unwound and laid in a spiral on the floor. The distance between parallel lines should be 30-50 cm. The ends of the pipes are brought out to the collector and to the water drain point. Using a perforator, pipes are attached to the floor surface.
Do-it-yourself installation of a cable underfloor heating under a tile
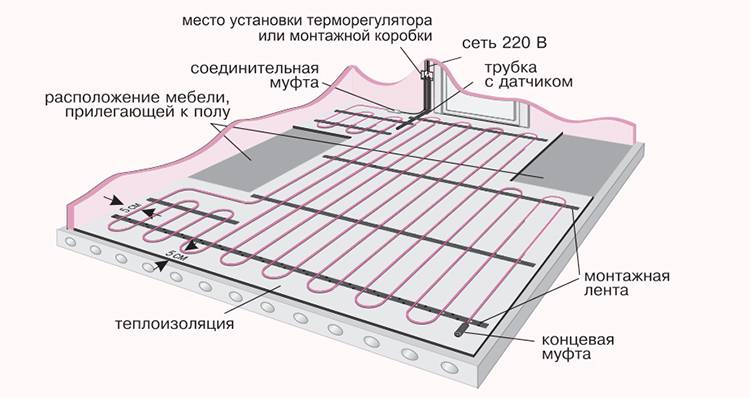
When choosing this type of heating system, two aspects are important - the correct laying of the cable itself (taking into account the intensity of its heating, the location of massive furnishings) and the correct filling of the screed. Finishing work is carried out according to standard rules, we will not dwell on the nuances of laying tiles here.
The preparation of the floor is carried out in the same way as with the installation of a conventional screed - the partially destroyed and lost strength of the old coating, fragments of the old screed must be removed, all debris and dust are removed. Taking into account the fact that a cable will be laid in the screed, it is necessary to take the waterproofing of the ceiling (subfloor) as carefully as possible and perform thermal insulation under the screed.


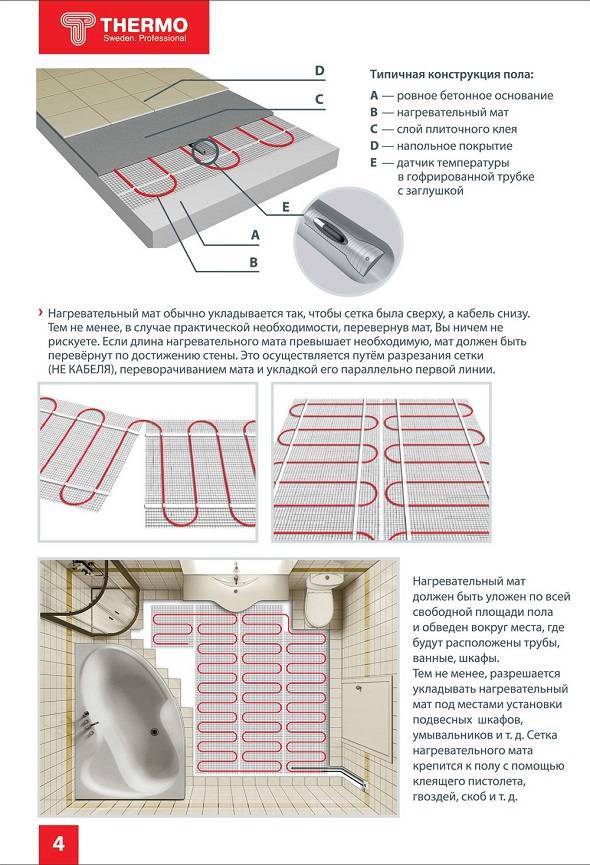
Next, the cable laying scheme is determined. The choice depends on the area of \u200b\u200bthe room, the number of individual pieces of wire, its type (single or two-core). Below are some popular schemes.
When choosing a scheme, be sure to take into account the position of furniture that is heavy and tightly attached to the floor, as well as sanitary equipment (if we are talking about a bathroom, toilet or combined bathroom).
The laying spacing (h) is determined based on the total laying area and the required level of heat transfer. Let's say for a bathroom with a total area of 8 sq.m. the laying area will be (minus the dimensions of the shower stall, sink, toilet bowl and washing machine) 4 sq.m. The level of comfortable floor heating requires at least 140…150 W/sq.m. (see table above), and this figure refers to the WHOLE area of the room. Accordingly, when the laying area is halved compared to the total area, 280 ... 300 W / m.kv are required
Next, you need to take into account the heat transfer coefficient of the screed (for ceramic tiles, as mentioned earlier, it may not be taken into account)
If we take an ordinary mortar (cement-sand) with a coefficient of 0.76, about 400 W are required for each square meter to obtain a heat amount of 300 W of initial heating.
Taking the data from the table above, we get a wire length of 91 m (total power 1665 ... 1820 W) for all 4 sq.m. styling. In this case, the laying step is chosen at least 5 ... 10 cable diameters, the first turns are located at least 5 cm from vertical surfaces. You can approximately calculate the laying step using the formula
H=S*100/L,
Where S is the laying area (namely, laying, not premises!); L is the length of the wire.
With the selected parameters
H=4*100/91=4.39cm
Given the need for indentation from the walls, you can take 4 cm.
When planning the installation, it is important to follow the following rules:
- no loops or twists! The cable should not be laid in loops, it is possible to connect individual fragments only with the help of special terminals;
- it is unacceptable to connect the "warm floor" to the house electrical network directly, exclusively through a special regulator (usually included in the delivery);
- to extend the life of the system, protect it from power surges (stabilizers, fuses) and follow the installation technique recommended by the manufacturer.
The sequence of work is as follows:
- the primary layer of the screed is poured, a strobe is made in the material for laying a channel - supplying a cable to the thermostat, usually the supply is made in a corrugated tube;
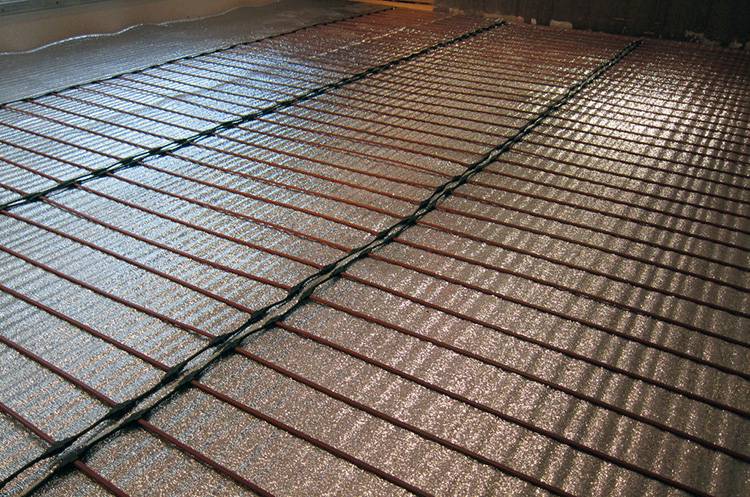
- on it (after complete curing, of course) thermal insulation is mounted with a heat-reflecting layer;
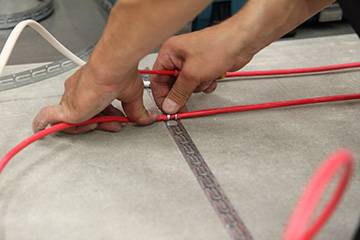
- cable laying with a reinforcing mesh or tape in compliance with the planned step;
- cable outlet to the thermostat;
- pouring the top layer of the screed (3 ... 4 cm). Connecting the cable to the mains is only permissible after the screed has completely cured.
Unfortunately, if the cable is incorrectly installed or damaged, an error can be detected only when you try to turn it on, therefore, for repairs, you will have to open and redo the screed. Therefore, the masters recommend checking the cable's performance throughout its entire length (including connections and external control devices) before pouring the mixture.
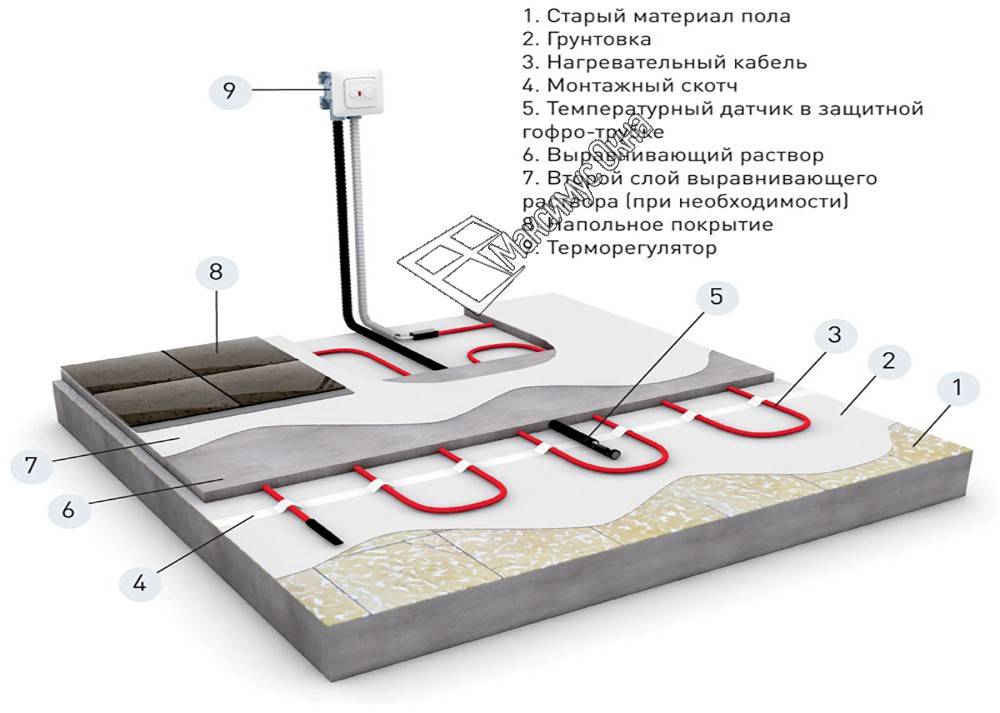
Do-it-yourself technology for laying a warm floor under a tile
According to experts, it is advisable to use a heating infrared film or heating mats as additional heating, and if necessary, to equip the main heating system, it is advisable to give preference to installing a heating cable. Standard power of heating elements:
- in the bedroom - 100-150 W/m²;
- in the kitchen and corridor - 150 W/m²;
- on the balcony and loggia - 200 W/m²;
- in the plumbing unit - 150-180 W / mV².
We lay underfloor heating under the tiles
The spacing of the heating elements must be calculated according to the formula: 100 x total floor area / length of one cable section.
Rod warm floor
Rod-type "warm floors" are elastic thermomats, which are based on carbon rods, combined with power cables. The most commonly implemented systems have width indicators of at least 0.82 m.


A design feature is the presence of conductive tires and heating elements located at a distance of 100 mm. The maximum possible continuous length is 25.0 m.
Rod floor for insulation
The popularity of the installation of the rod system is due to the versatility and compatibility with any type of flooring, as well as complete fire safety and low load. Such heating elements can be installed in rooms with a very complex layout and a large amount of furniture or carpets.
The obvious disadvantages include the need to dismantle and open the screed in order to repair the system, the high price, and the inability to use a foil substrate in the arrangement.
Despite the fact that manufacturers claim a service life of ten years, according to consumers, even under conditions of professional installation and compliance with operating rules, the system must be replaced after about five years.
Cable underfloor heating
 As practice shows, "warm floor" cable systems are currently the best option for tiling.
Heating cables are mounted in a screed, and in accordance with the laying technology, the minimum floor thickness can vary within 30-50 mm.
In modern realities of arranging a heating system, it is practiced to use several types of cables, presented:
- resistor elements based on one or two cores. This option is distinguished by a very simple device that works only for heating, the intensity level of which is regulated by a thermostat;
- self-regulating elements based on two cores with a heat-releasing matrix located between them. There is no thermostat in the system, and the heating level directly depends on the air temperature inside the room. The disadvantages of this option include high cost and lack of efficiency;
- electric cable mats, which are optimally suited for arranging the "warm floor" system in rooms with low ceilings. Installation is very simple, and consists in the correct laying of the mats and their connection to the power source.
Underfloor heating scheme
It is the cable version that is characterized by ease of installation, compared with laying water IR heating systems or structures. The easiest way is to self-install the heating system by laying a self-regulating cable under the finishing tile, which is due to the absence of the need to use a thermostat when arranging.
Using a two-core heating cable, it is possible to independently, with the help of a minimum set of tools, equip the heating system in rooms with a complex layout, crowded with a significant amount of furniture.
Mixture for pouring screed
Filling the floor or screed is a procedure that requires great care and accuracy. It is possible to avoid cracking of the floor during drying and during the operation of the system by carefully observing the temperature regime and strictly following the instructions for preparing solutions.
For pouring, ready-made self-leveling mixtures for underfloor heating or self-mixed on a concrete base are used.
In the first case, the mixtures are made on the basis of gypsum, they require dilution with water to the consistency of sour cream. The floor drying time in this case is from 3 to 5 days. During this period, it is recommended to minimize air humidity.
From the use of these solutions for floor screed in rooms that are constantly exposed to water (bathroom, cellar), it is better to refrain.
Homemade mixtures are made on the basis of cement. The recommended brand is M300 and above. The composition of the mixture is as follows:
- Cement - 1 part.
- Fine-grained sand - 4 parts.
- Water. Water is added until the mixture has the consistency of dough. When adding water, constant stirring is necessary.
- plasticizer. It facilitates the screeding, is applied in concentrations recommended by the manufacturer, ranging from 1 to 10% by volume.
The criterion for the correct consistency of the mixture is the ability to sculpt lumps from it that do not crumble and do not spread. If the plasticity of the composition is not sufficient, the ball cracks, which means that there is little liquid in the mixture. If the mixture is too liquid, it is necessary to add sand with cement.
Before pouring, the perimeter of the room is covered with a damper tape, which serves to soundproof and prevent cracking of the floor when heated.
Pipes and cables are fixed with rigid clamps.
The screed is produced at an air temperature of 5 ° to 30 ° (a number of professional mixtures allow laying at lower temperatures, they have a special marking).
The maximum area for a one-time pour is 30 sq. m. It is better to divide large spaces into sections. In places where the surface is divided into sections, protective corrugated hoses are put on the pipes.
The shelf life of the finished solution is 1 hour, after which it can not be used.
The filling of one section is carried out promptly and in one step.
Immediately after the procedure, the mixture should be pierced in several places with an awl or a thin knitting needle to ensure the release of air bubbles. For the same purposes and additional alignment, a spiked roller or a stiff brush is used. The needle should be longer than the thickness of the solution layer.
Drying home-made mixtures occurs within 20-30 days and has a number of features:
- Sudden temperature changes in the room, exposure to direct sunlight are unacceptable. This is fraught with uneven drying and subsequent deformation.
It is better to cover the floor surface with plastic wrap and periodically (every few days) moisten with liquid.
After drying, it is recommended to turn on the heating system for several hours in the mode of moderate heat supply.
The recommended air humidity is 60-85%.
Before laying tiles, linoleum, parquet or wooden flooring, the heating must be switched off.
When using materials prone to cracking and swelling, the air humidity must be reduced to 65%.
The tile keeps within on tile glue, a carpet, linoleum and a laminate directly on a coupler.
Self-installation of a warm water floor is possible only if there is enough time, accurate and precise compliance with all instructions and rules.
We offer you to watch a video that tells in detail about the installation of water heated floors:


Water floor installation
To install the system with your own hands, you will need the following materials and tools:
- pipes;
- valves;
- fitting;
- clips;
- pump;
- reinforced mesh;
- collector;
- damper tape;
- waterproofing materials;
- thermal insulation materials;
- construction tape;
- fasteners;
- a set of screws;
- perforator;
- roulette;
- building level;
- screwdriver;
- wrenches.
Sequence of work
First of all, it is necessary to clean the surface from dirt, all kinds of bulges and small cracks. The quality of the surface leveling should be checked with a building level, since if the surface is uneven, the balance of heat transfer may be disturbed.
The next step is to install the collector, where the main components of the system will be located. When installing the cabinet, you need to choose the correct height from the floor surface in order to avoid problems with pipe kinks.
Collector for water floor heating
After installing the switch cabinet, you need to start laying the waterproofing. The cheapest cost is polyethylene, which is overlapped. The seams are joined with adhesive tape.
Next is the insulation. As heat-insulating materials, you can use:
- foamed foil polyethylene;
- extruded polystyrene foam;
- foam plastic (thickness in the range of 50-100 millimeters).
After laying the heat-insulating material, you need to decompose the damper tape.It is designed to compensate for the expansion of the screed due to surface heating.
Damper tape laying
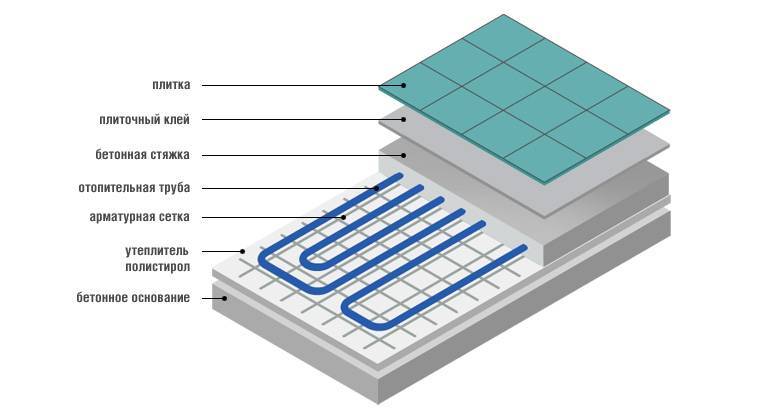
Next, a reinforcing mesh is placed. It is needed to strengthen the screed. If you use special plastic puffs, the pipes can be attached to the reinforcing mesh, which will save on the purchase of clips.
Reinforcing mesh for underfloor heating
Pipe laying
When laying pipes, you can use one of three main methods: double helix, ordinary helix or "snake". It is better to use a spiral in interior spaces, and where there are windows it is better to use a “snake”. Pipe laying starts from a colder wall - this will allow the heated air to be distributed more evenly.
Underfloor heating pipe laying scheme
For rooms that have a balcony, loggia, veranda or attic, an additional circuit will be required, otherwise there will be serious losses of thermal energy.
During installation, the pipe must be connected to the switch cabinet. Also, the pipe is joined to the return manifold. At the joints of the pipe, corrugated gaskets should be worn.
System testing
After creating a warm floor, it is necessary to carry out a hydraulic test (pressure test). This is necessary to identify defects in the system. To do this, the system is filled with water at a pressure 1.5 times higher than normal. Testing can also be done with an air compressor. The test period is one day. If leaks and other pipe defects are not detected, you can start creating a screed.
Finishing screed
The thickness of the screed under the tile can vary between 3-6 centimeters.Laying tiles can be done only one month after the creation of the screed. To speed up the drying of the screed, you can turn on the heating system, but the temperature should not be higher than 30 degrees.
The screed can be made in one of two materials:
- sand-cement mortar (an economical option, but it will take 25 days to dry such a screed);
- self-leveling mixture (dries 10 days).
Until completely dry, the screed must be under high pressure. After the mortar has hardened, you can start laying the tiles with your own hands.
Ceramic tile laying
Laying ceramic tiles on underfloor heating
The process of laying tiles with your own hands on a water floor is the same as when working with other surfaces. It can only be noted that it is more convenient to use smooth tiles. A layer of glue is applied using a special notched trowel. After applying the tile to the surface, it must be carefully pressed and held for a while. The seams must be very even, so it is better to use special crosses. Grouting is done only after the glue has completely dried, which can take up to 2 days.
During the laying of tiles, the water floor should not be turned on. Its functioning is possible only after grouting.
If you follow the instructions, then creating a warm floor is quite possible on your own. Although this work is very laborious, the result will justify the effort. A properly installed water-heated floor will serve the inhabitants of the house for many years.
Varieties of systems
The main advantage of a warm floor is to evenly heat a large area, which is necessary with the onset of cold weather.Underfloor heating can be both the main source of heating the bathroom and additional. This solution is much more profitable than using a traditional heater or battery.
There are two main types of underfloor heating for a bathroom under a tile - water and electric. You need to connect it to the central electrical panel, you will need to create an additional switch.


Water

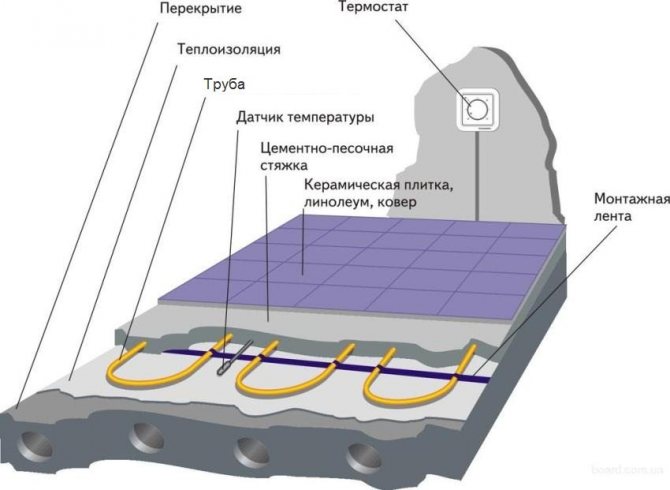
This type of heating system is suitable for heating large rooms. The main element that creates heat is a built-in network of pipes filled with hot water and located around the perimeter of the entire room. Great importance is given to the material that conducts heat from the pipe to the tile, usually a concrete or wooden base is used.
The main advantage of a water floor is the uniform heating of the room, and not just its upper layer. Also, the advantages of this type are called:
- Safety.
- Provides uniform heating of the room, creates comfortable conditions for the person. Maintains the optimum temperature - 22-24 degrees. You can walk barefoot on this floor, it does not cause pain.
- Low power consumption and high-quality heating of the bathroom.
- Prevents the growth of fungi and mold, which can harm human health. Dries the air, relieves the bathroom of high humidity.
- Water pipes are hidden under the tiles, so they do not spoil the interior and do not make it heavier. No interference in the form of radiators.
Electrical
The electric floor loses to the water floor in durability and safety: there is, although minimal, the risk of exposure to electric current. At the same time, the electric field has clear advantages:
- Compatible with any type of flooring.Depending on the thickness of the material, the power of the electric floor changes.
- Ease of installation and ease of cable installation.
- Does not spoil the interior due to the lack of visible details.
- It is possible to regulate the temperature of the floor with a thermostat.
- Installation does not require special tools.
- Uniform heating over the entire area of the room.
An electric floor is more expensive than a water floor and can create an electromagnetic field. However, this type of heating system is competitive and very popular.
Bases and types of heaters
A variety of foundations can serve as a foundation.
concrete option. Such a floor, often found among all types of installation. For it, a cement-sand screed is used.
wooden version. This base uses edged boards, chipboard, plywood, MDF and more.
In order to choose the right thermal insulation material, it is recommended to take into account the technical features of the room and the type of base. Heaters have the same degree of thermal conductivity, but the layer thickness must be selected. Today, such heaters are most in demand: glass wool, cork cloth, polystyrene foam, foam plastic, foamed heat insulator. When buying, you should first familiarize yourself with the characteristics of the material.
Expanded polystyrene and foam
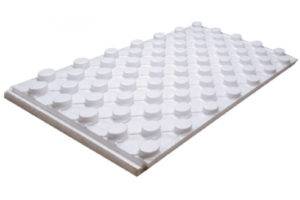
For the manufacture of the first option, technology is used when the texture acquires tubules for the movement of steam and air. The second copy is lighter in weight, "breathes" (let water vapor through). Expanded polystyrene has sufficient strength, withstands high mechanical pressure.
Penoplex sheets are available in different sizes, for example: 120 X 240 cm, 50 X 130 cm, 90 X 500 cm.The density of polystyrene is 150 kg / m³, polystyrene - 125 kg / m³. Characteristics of materials can be changed by the manufacturer, depending on specific applications.
Comparative characteristics: the foam is inferior in density to "extrusion", it is subjected to deformation from various physical influences, which reduces the thermal insulation qualities. It is advisable to use it in floor structures between the lags.
Cork
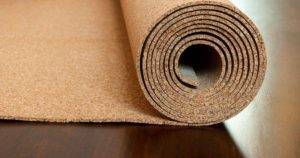
This is an expensive natural material, made from oak bark. It is sold in stores in the form of rolls or sheets. Both forms have no differences in technological characteristics. They differ only in size and thickness. Cork gaskets are different:
- Low thermal conductivity.
- Waterproof.
- Environmental friendliness.
- Light fastness.
- Fire safety.
- Resistant to temperature fluctuations.
- Resistance to chemical reactions.
If there is a choice between products, it is better to take a cork. This substrate saves heat resources, especially if the structure is installed on the ground. The material does not change, does not shrink when exposed to a concrete screed. It is avoided by harmful insects, mice. It also does not damage mold fungus. However, it is worth considering that the cork substrate "hides" the height of the room.
Mineral wool
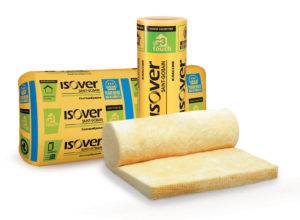
This is an old-generation insulation, it is fire resistant, so it is an order of magnitude more expensive than similar materials. It is produced in the form of plates, which is very convenient for installation. If the insulation is laid on an aluminum base, then the efficiency of the material increases significantly, even on the ground. It also absorbs noise and retains heat for a long time, the rigid structure is resistant to chemicals.Despite the positive properties, cotton wool has a minus - the content of toxins and carcinogens that are harmful to humans. Mineral fiber, in addition to everything, is hygroscopic. When laying on the floor, it must be protected from moisture.
Foamed polyethylene
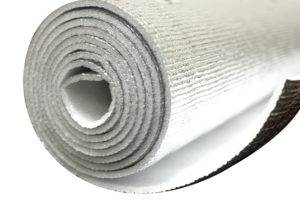
Penofol is now readily used by consumers. The material is produced in rolls, with a wall thickness of 3-10 millimeters. The surface of the canvas consists of a foil coating, which has reflective properties. Allows you to reduce the height of the overall laying of the base, because you do not need to additionally place waterproofing. Foamed polyethylene is available in the following types:
- with a one-sided layer of foil - under the letter A;
- double-sided material - indicated by the letter B;
- self-adhesive - marked with the letter C (one side with foil, the other with an adhesive base);
- combined - "ALP" (the top is covered with foil, the bottom is covered with a special film).
All of them are designed for the device of the base of the water floor, they do a good job of thermal insulation in the device of the water floor. The technical characteristics of polyethylene are not inferior to polystyrene, both have high efficiency. It should be noted that the material is able to absorb moisture, as a result, the thermal insulation properties of the product are reduced.
Also, a wet screed containing chemicals in the composition simply corrodes the foil layer. Given this problem, manufacturers had to change the technology. They began to produce sheets where a layer of lavsan film is applied over the foil. This design perfectly protects the screed and the floor covering from the aggressive alkaline environment.


