
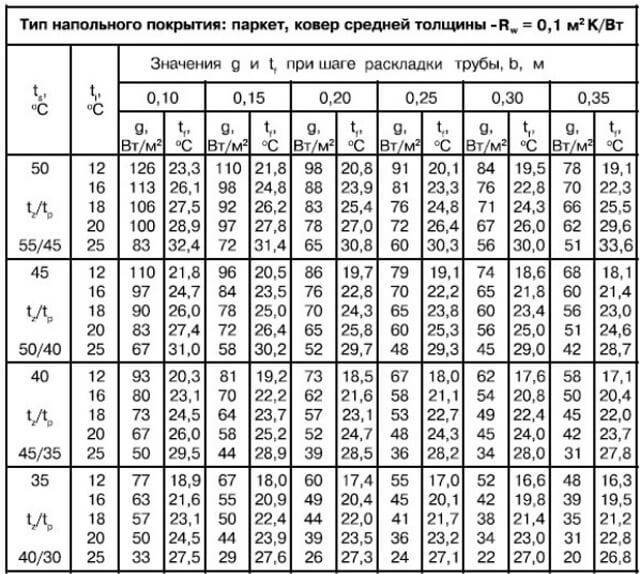
- Calculations
- Preparatory work
- Video - Installation of a warm floor. Manifold installation
- Laying a warm water floor
- Which system to choose
- Designing a water heated floor
- How pipes are laid
- What else you need to consider in the process of designing a warm floor
- Step 5. Checking the tightness of the connections
- Required materials for the device
- Operating rules
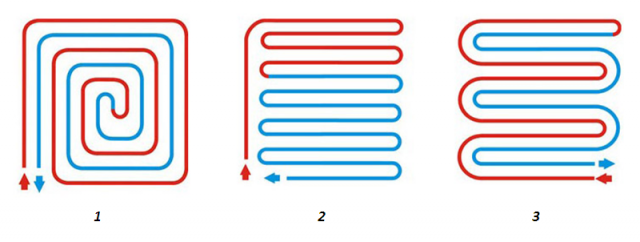
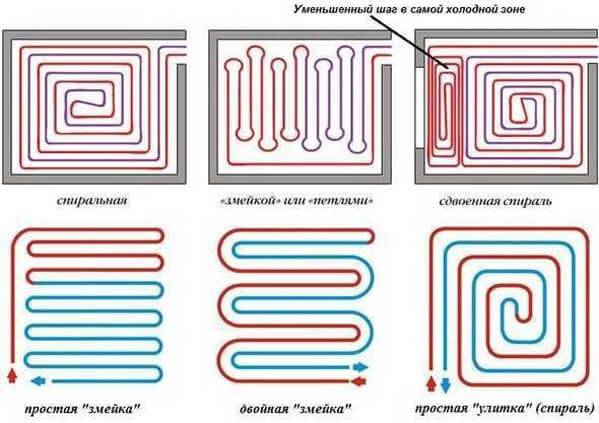
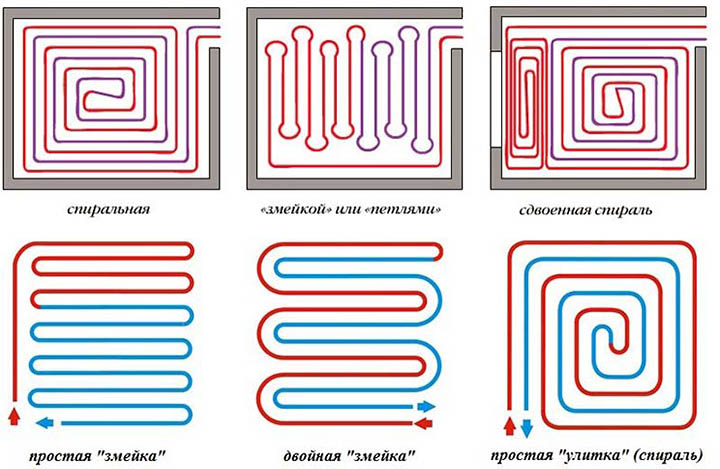
- Water floor wiring diagrams
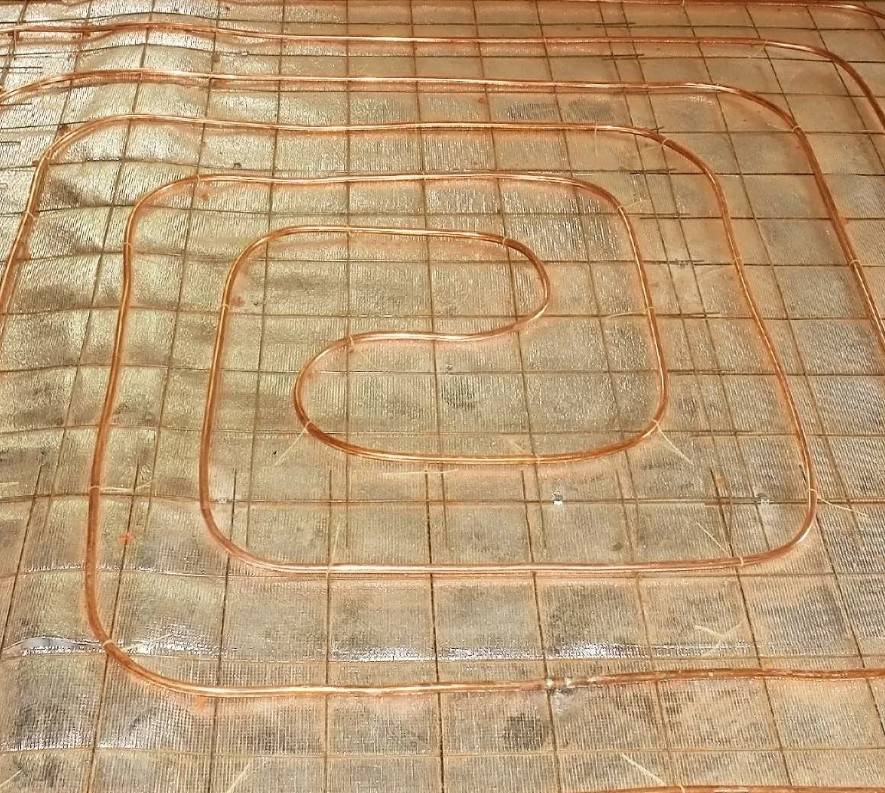
- Scheme # 1 - classic "snail"
- Scheme # 2 - laying with a snake
- Scheme # 3 - combined option
- Underfloor heating materials
Calculations
You can calculate the water floor on your own or with the help of special programs. Most often, these are online calculators that installation companies offer on their websites. More serious programs need to be downloaded and installed on your computer. Of the most accessible, it should be noted RAUCAD / RAUWIN 7.0 (from the manufacturer of profiles and polymer pipes REHAU). And carrying out complex design on the universal Loop CAD2011 software, you will have both digital values and a scheme for laying a water-heated floor at the output.
In most cases, the following information is required for a complete calculation:
- the area of the heated room;
- material of load-bearing structures, walls and ceilings, their thermal resistance;
- thermal insulation material used as a base for underfloor heating;
- type of flooring;
- boiler power;
- maximum and operating temperature of the coolant;
- diameter and material of pipes for installing a water-heated floor, etc.
Pipe laying is recommended to be designed in the following ways:
- A spiral (snail) is the best option for placing communications for large areas - their coatings will warm up evenly. Pipe laying starts from the center of the room in a spiral. Return and supply run parallel to each other.
- snake. It is advisable to use it for heating small rooms: bathrooms, toilets, kitchens. The highest temperature of the flooring will be at the beginning of the circuit, so it is recommended to start from the outside wall or window.
- Double snake. Well suited for a medium-sized room - 15-20 m2. The return and supply are placed parallel to the far wall, which allows for a more even distribution of heat throughout the room.
Preparatory work
The preparation stage begins with measurements and calculations to determine the power of the system. The location of the room, its area, the presence of a balcony are taken into account. When the apartment is located on the first floor, or it has an unglazed balcony, the heat loss is higher. Therefore, the power of the water floor should be greater.
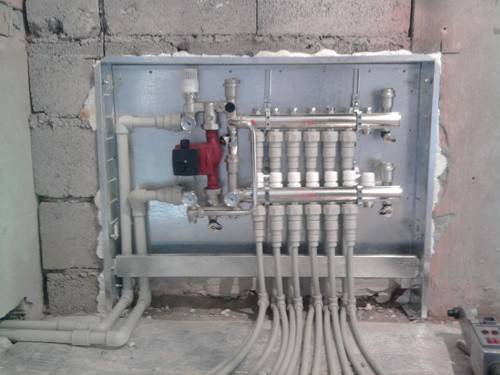
Collector connection
Initially, a niche in the wall is prepared for the collector. The distribution manifold is installed in a special cabinet, into which all the necessary pipeline is supplied. When buying a collector, you need to consider the number of possible connections. Shut-off valves, an air vent and the necessary splitters are mounted together with the manifold.For proper circulation of water, a pump is installed on the pipeline.
Video - Installation of a warm floor. Manifold installation
When the installation of the distribution manifold is completed, you can begin to prepare the surface of the subfloor. Completely remove the old floor covering, clean it from small debris and chips. Check the level of the floor, the unevenness of the base must be eliminated. With significant flaws, additional leveling with a cement screed may be required.
Laying a warm water floor
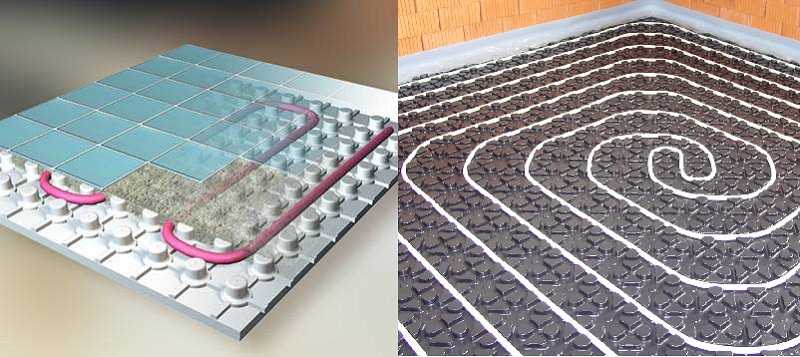
One of the key components of the system is pipes and their fixation system. There are two technologies:
-
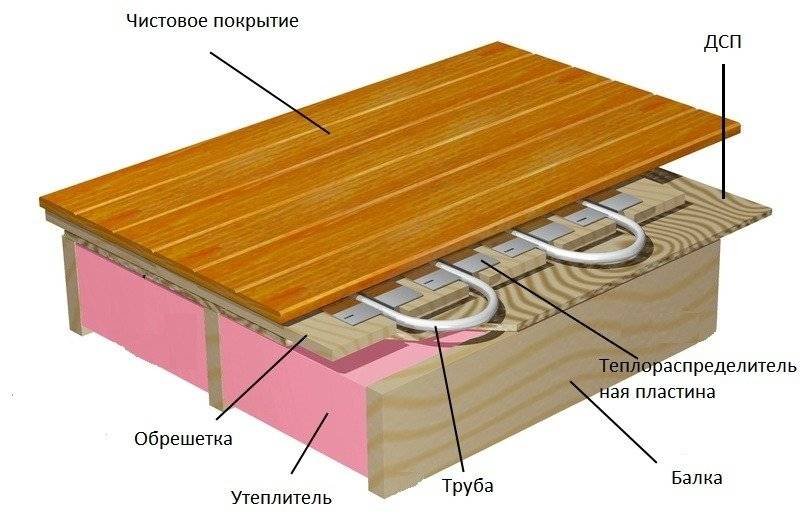
Dry - polystyrene and wood. Metal strips with formed channels for laying pipes are laid on a system of polystyrene foam mats or wooden plates. They are necessary for a more even distribution of heat. Pipes are inserted into recesses. Rigid material is laid on top - plywood, OSB, GVL, etc. A soft floor covering can be laid on this base. It is possible to lay tiles on tile adhesive, parquet or laminate.
-
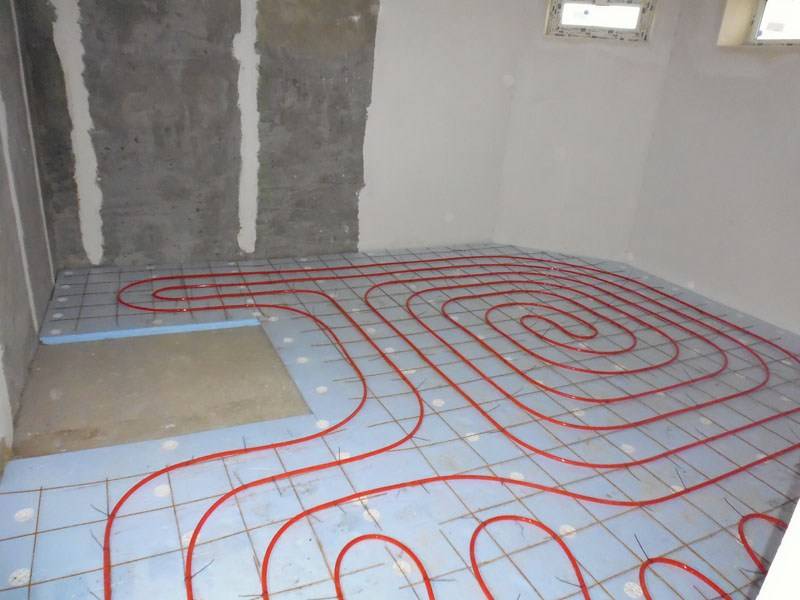
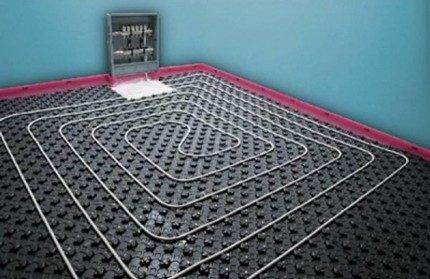
Laying in a coupler or so-called "wet" technology. It consists of several layers: insulation, fixation system (tapes or mesh), pipes, screed. On top of this “pie”, after setting the screed, the floor covering is already laid. If necessary, a layer of waterproofing is laid under the insulation so as not to flood the neighbors. A reinforcing mesh may also be present, which is laid over the floor heating pipes. It redistributes the load, preventing damage to the system. A mandatory element of the system is a damper tape, which is rolled around the perimeter of the room and placed at the junction of two circuits.
Both systems are not ideal, but laying pipes in a screed is cheaper. Although it has a lot of disadvantages, it is because of its lower cost that it is more popular.
Which system to choose
In terms of cost, dry systems are more expensive: their components (if you take ready-made, factory ones) cost more. But they weigh much less and are put into operation faster. There are several reasons why you should use them.
First: the heavy weight of the screed. Not all foundations and ceilings of houses are able to withstand the load created by a water-heated floor in a concrete screed. Above the surface of the pipes there must be a layer of concrete of at least 3 cm. If we take into account that the outer diameter of the pipe is also about 3 cm, then the total thickness of the screed is 6 cm. The weight is more than significant. And on top there is often a tile on a layer of glue. Well, if the foundation is designed with a margin, it will withstand, and if not, problems will begin. If there is a suspicion that the ceiling or foundation will not withstand the load, it is better to make a wooden or polystyrene system.
Second: low maintainability of the system in the screed. Although it is recommended to lay only solid coils of pipes without joints when laying underfloor heating contours, periodically the pipes are damaged. Either during the repair they hit with a drill, or burst due to marriage. The place of damage can be determined by a wet spot, but it is difficult to repair: you have to break the screed. In this case, adjacent loops can be damaged, due to which the damage zone becomes larger. Even if you managed to do it carefully, you have to make two seams, and they are the potential sites for the next damage.
The process of installing a water heated floor
Third: the commissioning of a heated floor in a screed is possible only after the concrete has gained 100% strength. This takes at least 28 days. Before this period, it is impossible to turn on the warm floor.


Fourth: you have a wooden floor. By itself, a tie on a wooden floor is not the best idea, but also a screed with an elevated temperature. The wood will quickly collapse, the whole system will collapse.
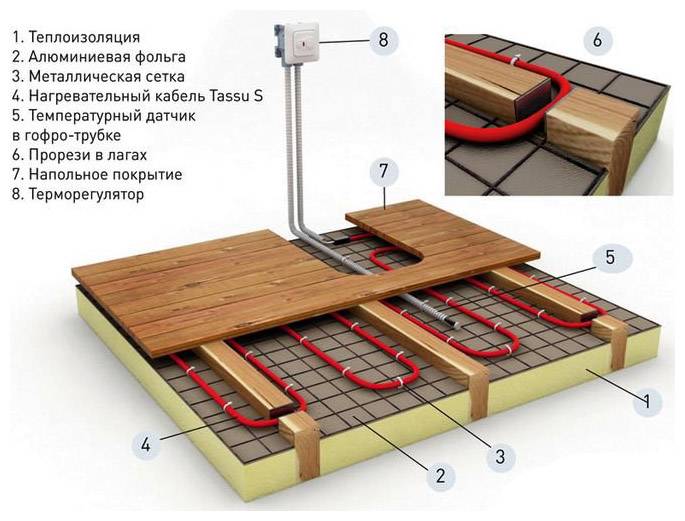
The reasons are serious. Therefore, in some cases, it is more expedient to use dry technologies. Moreover, a do-it-yourself wooden water-heated floor is not so expensive. The most expensive component is metal plates, but they can also be made from thin sheet metal and, better, aluminum.
It is important to be able to bend, forming grooves for pipes
A variant of a polystyrene underfloor heating system without a screed is shown in the video.
Designing a water heated floor
The first question that needs to be dealt with right away is in what capacity the water heated floor will be used. The arrangement of a warm floor for independent use has some differences from combined heating, in which there are several sources of space heating.
The key difference between underfloor heating, which is the only source of heat, is the absence of the need to use a mixing unit. The heating circuit is connected directly to the boiler. The heating temperature in this case is brought to 45 degrees, and its setting is carried out directly on the boiler.
To combine underfloor heating and radiator heating, a mixing unit is required.It's all about the operating temperature of the radiators, which should reach 70 degrees - and this is too much for underfloor heating. It is for these purposes that a mixer is used - it adjusts the temperature of the coolant separately for each circuit.
Each floor of a multi-storey private house should have its own collector unit and mixer, and all of them should be connected to a single riser. Collector nodes are best installed at the central point of the floor - in this case, the length of the pipes to each room turns out to be the same, and it turns out to be an order of magnitude easier to set up the system due to this.
The best option would be to use factory manifold cabinets that have passed a series of suitability tests. To select a cabinet, you need to know the number of inputs and outputs, the pump power and the characteristics of the mixing unit. The collector cabinet is installed in the wall, after which all the necessary circuits can be connected to it. Of course, such cabinets are expensive, but high reliability and safety are worth it.
Also at the design stage, it is necessary to determine the number of pipes required to equip the system. You can take an approximate value, according to which 5 m of pipes are required per 1 m2 of room area. The best and most popular option is XLPE pipes, which are lightweight, easy to install and have a long service life. Metal pipes are also quite reliable, but they are more difficult to work with, and they are more expensive.
The next design stage is the selection of a pipe laying scheme from the following list:
- "Snake". This layout method is best suited for small spaces. The laying step is about 20-30 cm.The "snake" is quite simple, but it is not advisable to use it in large rooms - the laying step for effective heating will have to be made very small, and even in this case the heat will be distributed unevenly throughout the room.
- "Spiral". This method is more complicated than the previous one, but the efficiency of this layout is much higher. The entire floor, with proper installation, will warm up evenly, and the load on the pipes will decrease. Typically, spiral layout is used in rooms larger than 15 m2.
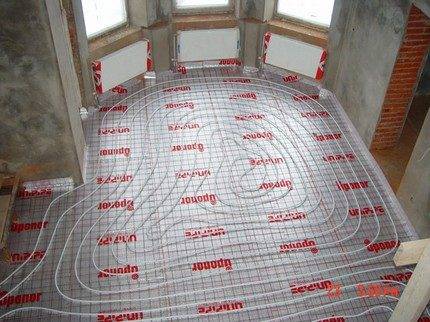
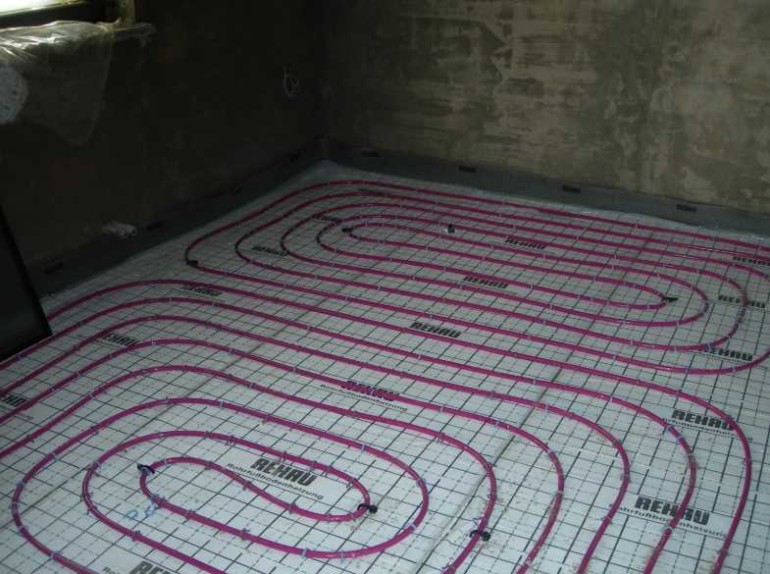
How pipes are laid
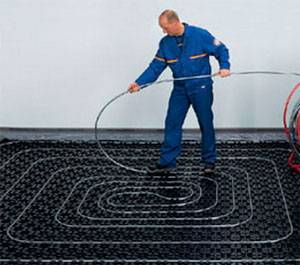 Polystyrene boards are laid on the leveled floor surface. They serve as thermal insulation and prevent the spread of heat in all directions.
The actual pipe laying is carried out in two main ways: bifilar (parallel rows) and meander (spiral).
The first variety is used when there is a slope of the floors, there is no need for strictly uniform heating. The second - requires great effort and accuracy, is used when using pumps of lower power.
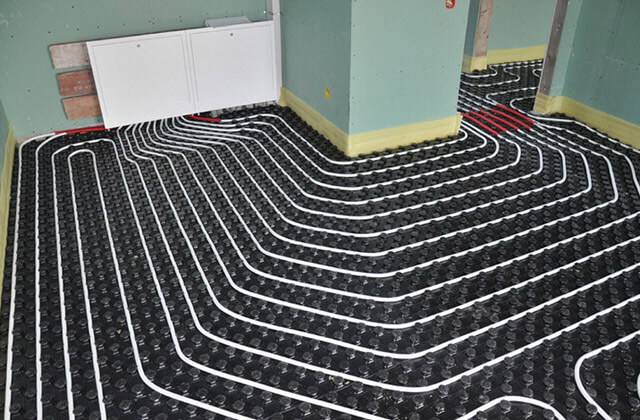
The number of circuits depends on the size of the heated room. The maximum area for placing one circuit is 40 sq m. The laying step can be either uniform throughout its entire length or vary depending on the need for enhanced heating in certain areas. The average step length is 15-30 cm.


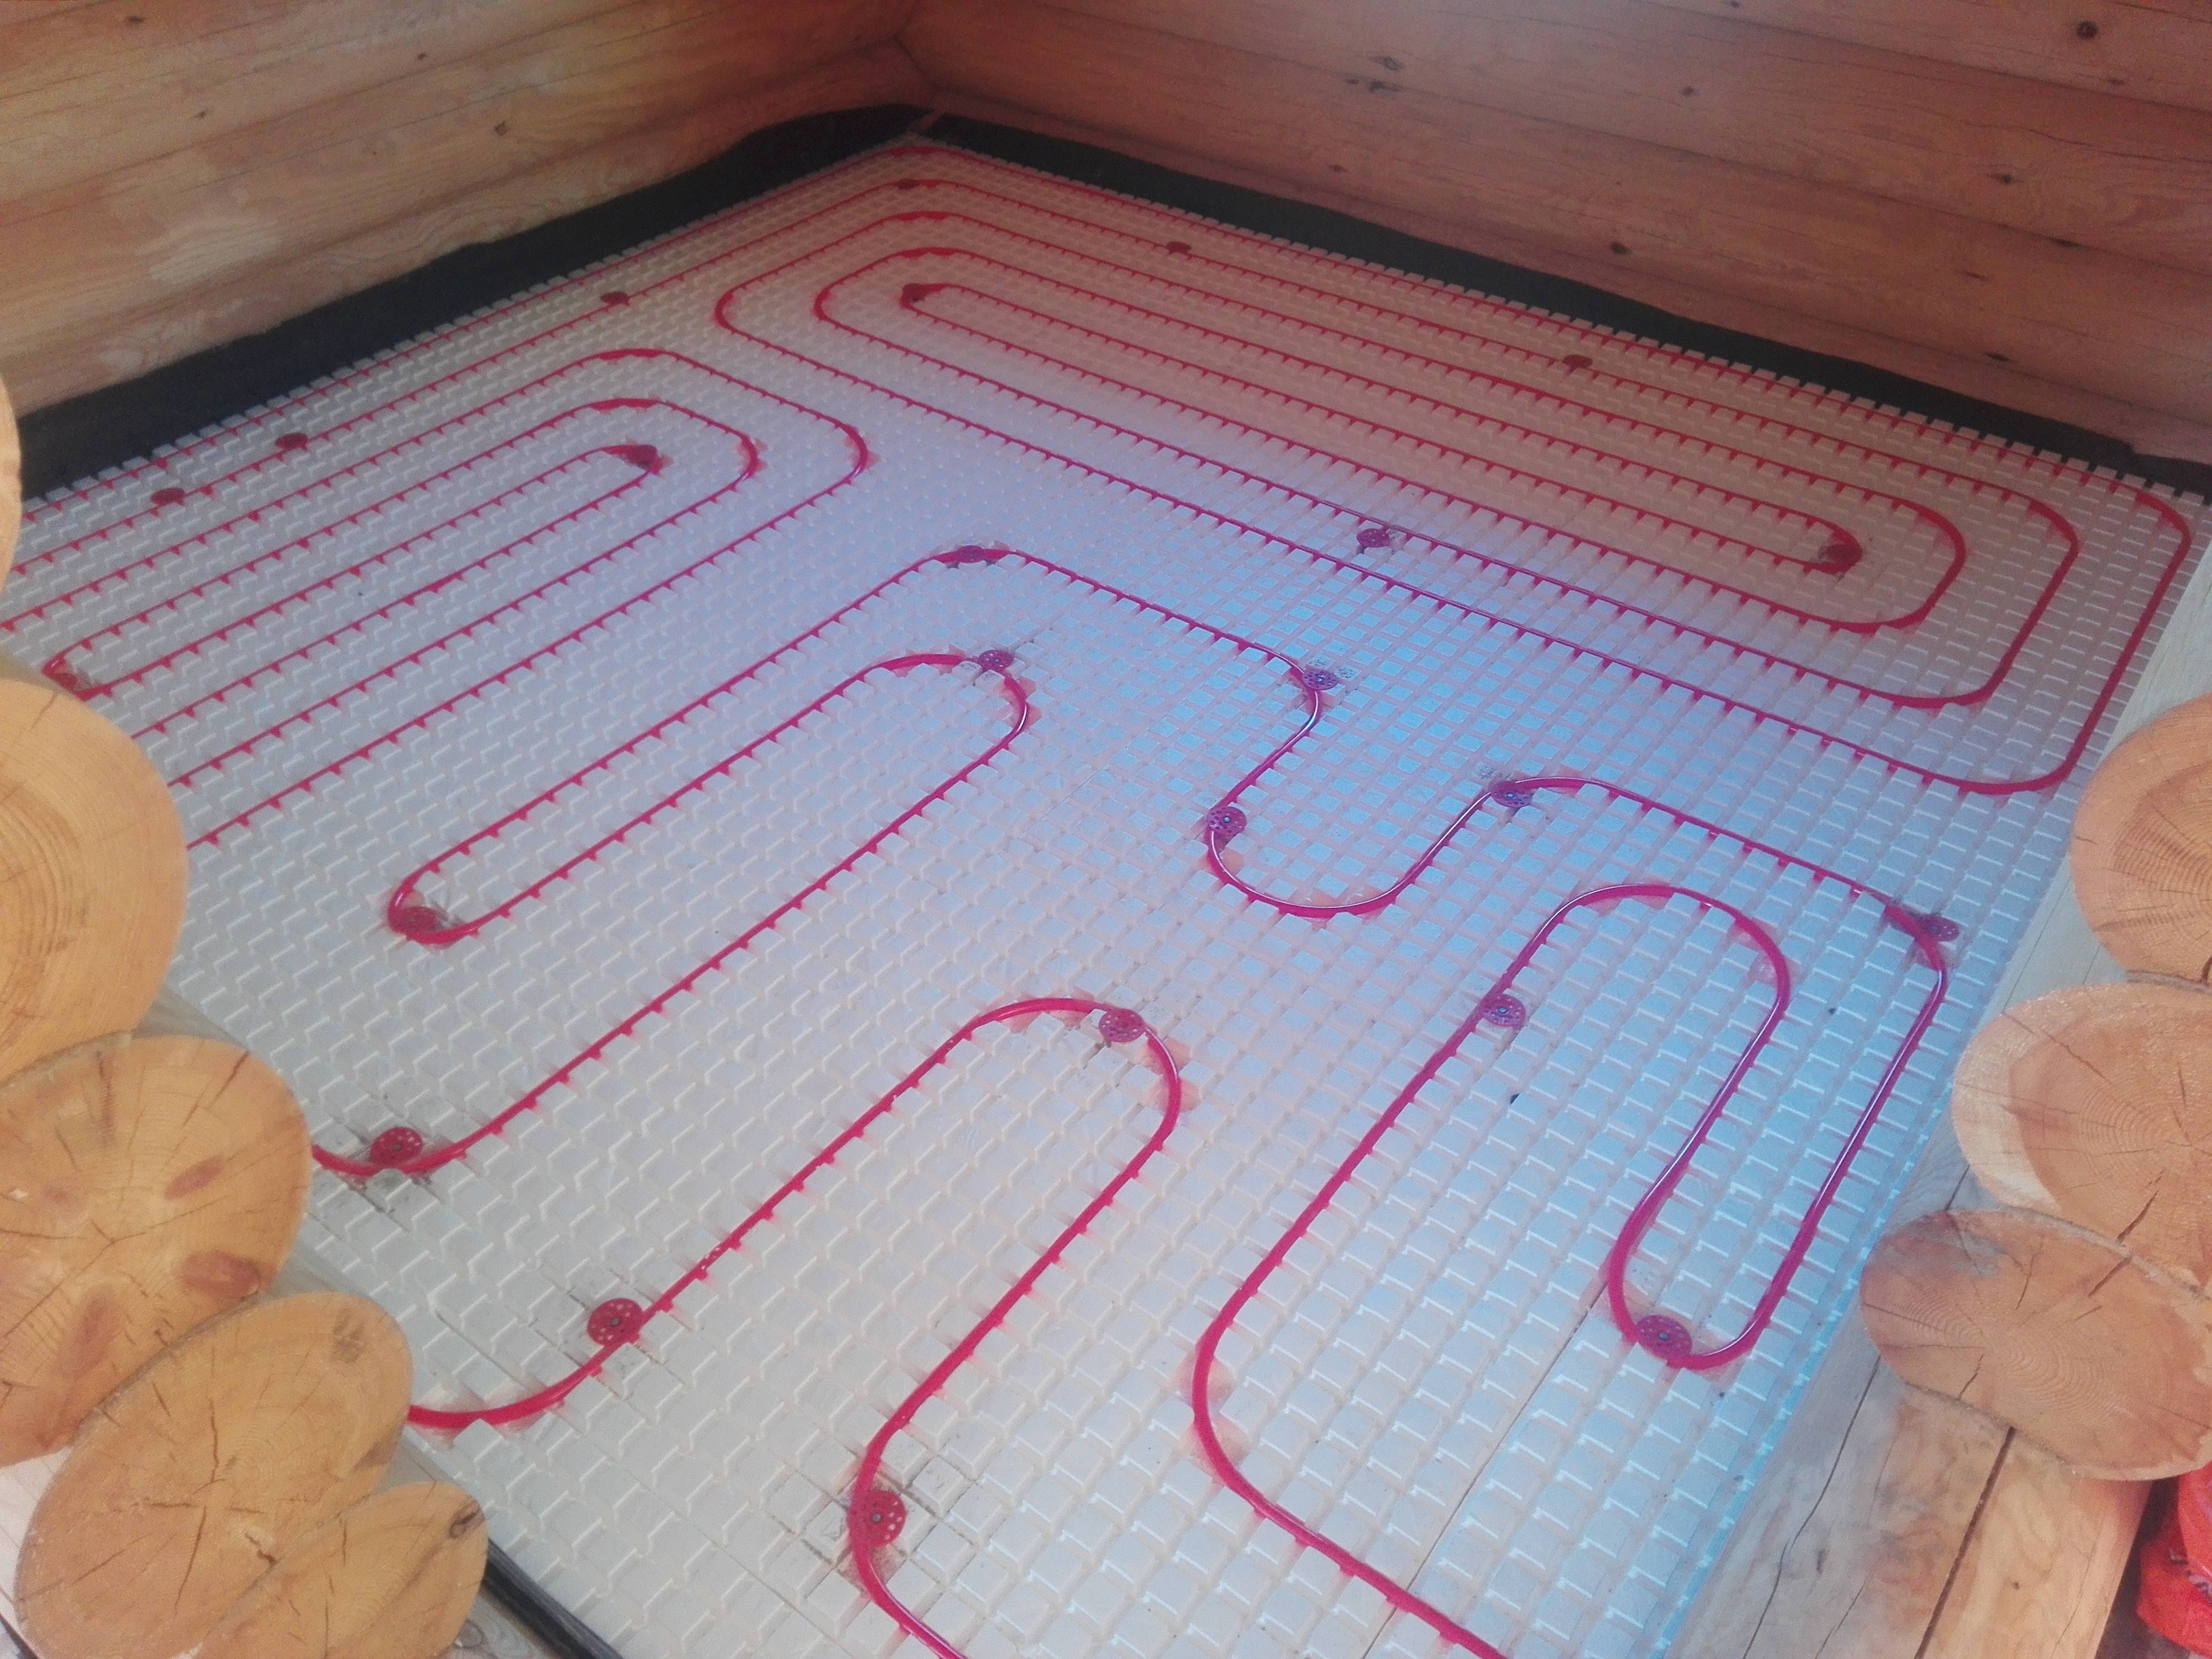

Since the pipes are under strong hydraulic pressure, when installing a water-heated floor, it is unacceptable to connect them with couplings. Only one coupling can be used for each circuit.
It is recommended to use one circuit for heating each room, including the bathroom, loggia, pantry, barn.The smaller the circuit, the higher its heat transfer, which is especially important for corner rooms.
What else you need to consider in the process of designing a warm floor
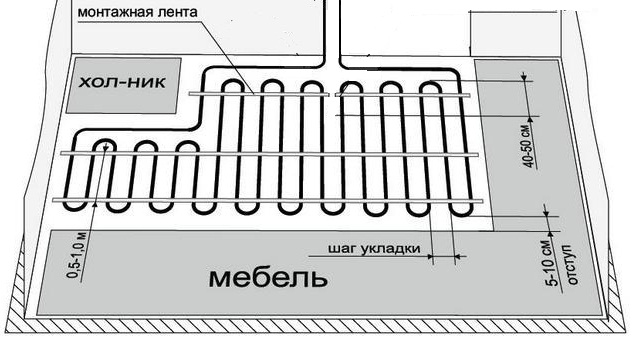
In the process of developing a project for a warm floor system, it is recommended to make a schematic drawing indicating pipe laying, basic dimensions, distances and indents, and furniture arrangement.
Collector group
At the design stage, the type of coolant is determined: in 70% of cases, water is used, since it is the most accessible and cheapest substance. Its only drawback is the reaction to temperature changes, as a result of which the physical properties of water change.
Floor pie with pipes in screed
Antifreeze based on ethylene glycol or propylene glycol with special additives that reduce the chemical and physical activity of liquids are often used as a heat carrier for underfloor heating. In any case, the type of coolant must be taken into account at the design stage, since its properties form the basis of hydraulic calculations.
Antifreeze as a coolant
You will also need to take into account the following nuances:
One circuit is laid per room.
To place the collector, choose the center of the house. If this is not possible, then to adjust the uniformity of the coolant flow through circuits of different lengths, flow meters are used, which are installed on the collector.
The number of circuits connected to one collector depends on their length
So, with contour length 90 m or more, no more than 9 loops can be connected to one collector, and with a loop length of 60 - 80 m - up to 11 loops.
If there are several collectors, each has its own pump.
When choosing a mixing unit (mixing module), it is important to take into account the length of the circuit pipe.
A more accurate calculation will be based not only on data on heat losses in the room, but also on information on the influx of heat from household equipment and appliances, from the ceiling, if a warm floor is also installed on the upper floor. This is relevant when calculating for a multi-storey building, which is carried out from the upper floors to the lower ones.
For the first and basement floors, the thickness of the insulation is taken at least 5 cm, for the higher floors - at least 3 cm
Insulation on the second floor is used to prevent heat loss through the concrete base.
If the pressure loss in the circuit is more than 15 kPa, and the optimal value is 13 kPa, it is necessary to change the coolant flow in the direction of decrease. You can lay several smaller circuits indoors.
The minimum allowable coolant flow rate in one loop is 28-30 l/h. If this value is higher, then the loops are combined. Low coolant flow leads to the fact that it cools down without passing the entire length of the circuit, which indicates the inoperability of the system. To fix the minimum value of the coolant flow in each loop, a flow meter (regulating valve) installed on the manifold is used.
Connecting pipes to the manifold
Step 5. Checking the tightness of the connections
Without checking, it is strictly forbidden to make a finishing screed, this must always be remembered. How to check the system?
- Disconnect the inlet and outlet of the circuit. Shut off the output, put a tee on the input. Connect an accurate pressure gauge and valve to it.
- Connect a compressor to the valve, create an air pressure of at least 2 atm in the circuit. The exact value must be determined taking into account the operating pressure of the coolant. During testing, the air pressure should be approximately two to three times higher. After the air has been pumped into the pipeline, close the valve and leave it in this position for about twelve hours.
- After the time has elapsed, check the pressure gauge readings. Any drop in pressure indicates a leak, you need to find the problem area and eliminate the cause.
If the bleeding is large, then you can find it “by ear”, if it is small, then you will have to use soapy water. In this way, leaks in gas pipes are detected.
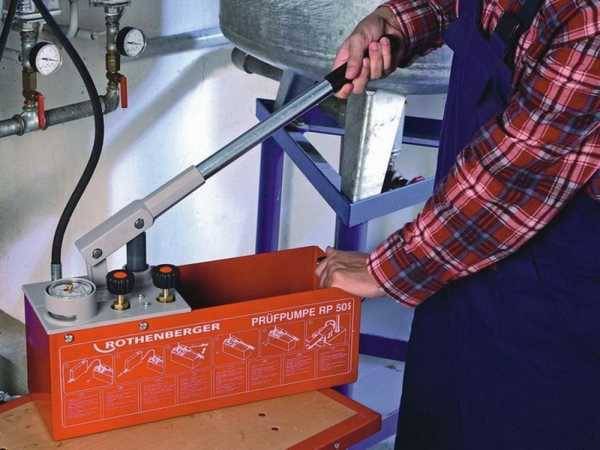
Pressurization of a water heated floor
Required materials for the device
Based on the indicator of the thickness of the screed, performed after laying the heating system, you will need a specific volume of mortar, which also needs to be calculated. The volume of water is determined by the method of samples
It is important to get a non-spreadable mixture. However, the solution should not be very thick, as this may affect the difficulty of finishing and polishing the surface.
Sand and cement are taken in a ratio of 3/1. It is not always necessary to make the composition of the screed yourself - you can buy a special dry mix for the self-leveling floor.


Fast laying of a warm floor occurs due to the minimum amount of water in the sand-cement mortar of the screed
For the purpose of thermal insulation, they take the material (aluminum foil) in the amount that is needed for a specific area of \u200b\u200bthe room. To do this, you need to multiply the width of the room by its length - the value comes out in square meters. Then you should take into account the commodity formation of the material and carry out the subsequent calculation.Laminated canvases are considered optimal here. Aluminum-based foil makes it possible to distribute heat evenly and prevent its loss. The foil is a substrate for the main insulation.
Pipes are laid on a layer of waterproofing
All elements for the implementation of the heating system should be taken with a margin. You will need:
- self-tapping screws,
- dowels,
- hose fittings,
- lighthouses.
Operating rules
Knowing how to professionally make a water-heated floor in a house, it will be useful to follow the rules of use. The requirements are simple and accessible:
- Warm floors in a private house, the wiring of which is made in compliance with the technology, always gain t ° gradually. By starting the circuit at the maximum level after a long period of inactivity, the owner will receive a reduction in service life.
- An increase in the t ° regime should be gradual, no more than 4-5 ° C per day.
- The t° mode index of the incoming coolant is not higher than 45⁰С.
- Frequent start-ups and shutdowns of the system are fraught with rapid wear, but not cost savings.
Water floor wiring diagrams
There are not so many wiring diagrams for laying warm water floors:
- snake. Installation is carried out with hinges.
- Snail. Pipes are arranged in a spiral.
- Combined.
Scheme # 1 - classic "snail"
When a snail-shaped installation is used, the pipes through which hot water is supplied to the room, and those through which the cooled water returns, are placed over the entire area of the room and run parallel to each other.
The space is heated evenly. If the room in which the installation takes place has a wall facing the street, a double helix can be used in it.A small spiral is placed along the cold wall, and a second spiral is placed on the remaining area.
 The spiral really looks like a snail. When its turns are located close to the “cold” outer wall of the room, the step between the structural elements can be reduced
Advantages:
- heating is uniform
- hydraulic resistance decreases;
- the spiral requires fewer pipes;
- the bend is smooth, so the step can be shortened.
The disadvantages of such a scheme are laborious laying, and design complexity compared to other layout options.
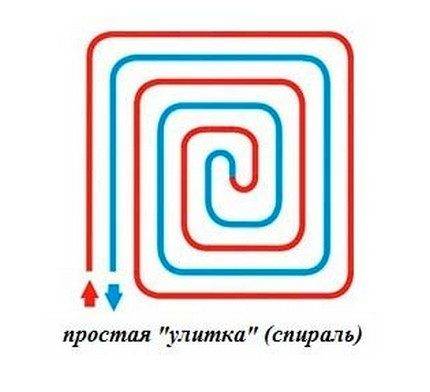 The coils of the spiral evenly cover the entire room, giving off heat equally actively over the entire surface of the floor. The pipe shown in blue in the diagram, which drains the cooled water, also runs throughout the room.
Scheme # 2 - laying with a snake
This laying option is appropriate in a room that is divided into functional zones in which the use of different temperature regimes is expected.
If the first coil is launched around the perimeter of the room, and a single snake is created inside it, then one half of the room will be well warmed by the incoming hot water, and in the second half the cooled water will circulate and it will be cool.
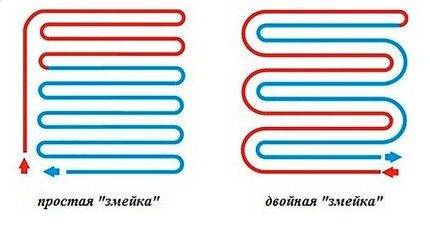 A simple snake is most often used in rooms where zoning is used: somewhere the floor surface can be warmer, and somewhere cooler
You can apply another version of the same styling - a double snake. With it, the return and supply pipes pass throughout the room next to each other.
The third option is a corner snake.It is used for corner rooms in which not one, but two walls face the street.


 Snake loops can also cover the room evenly, but the fact that the pipes in this case are more curved than when laying a spiral is immediately striking
Advantages:
such a scheme is simple to design and implement.
Flaws:
- temperature difference in one room;
- the bend of the pipes is steep enough to lead to a break with a small step.
Scheme # 3 - combined option
Not all rooms are rectangular. For such rooms and for those that have two outer walls, combined styling options are being developed.
If the room next to the outer walls needs to be heated more intensively, it is possible to lay hot pipes there, located in loops, which are sometimes located almost at right angles to each other.
Another possibility of heating the room along a cold wall is to reduce the pipe spacing in this particular place.
 Not every room in modern individual buildings can retain a rectangular shape. To cover such a surface with water-heated floors, combined laying is necessary.
If you want to install underfloor heating in your city apartment located in an apartment building, you will most likely need special permission.
And this type of heating can only function during the heating season. But modern new houses, even at the stage of project creation, provide for just such warm floors. They operate from a single autonomous boiler and can operate year-round.
 Combined installation is an excellent installation option that helps out when the room requires separation into heating zones
Underfloor heating materials
The scheme of such a floor in the picture always looks rather complicated - a mass of interconnected communications, through which water also flows. However, in reality, the system does not include such an extensive list of elements.
materials for hot water gender
Accessories for water floor heating:
- in the absence of the possibility of connecting to a central heating system - a heating boiler;
- a pump that is either built into the boiler or purchased separately. It will pump water into the system;
- directly the pipes through which the coolant will move;
- a collector that will be responsible for distributing water through pipes (not always necessary);
- for collectors, a special cabinet, splitters distributing cold and hot water, as well as valves, an emergency drain system, devices for venting air from the system will be needed;
- fittings, ball valves, etc.
One of the options for the heating scheme in a private house with underfloor heating on the ground floor
Also, for arranging a warm floor, you will need material for thermal insulation, fasteners, reinforcing mesh, damper tape. If the raw installation method is performed, then also the concrete mixture from which the screed will be made.
Fastenings for pipes of a water heat-insulated floor
Mounting plate for underfloor heating
The choice of materials and tools for the floor heating system will often depend on the installation technique. There are two types of installation of equipment - it is dry and wet.


-
Wet technology involves the use of insulation, fastening system, pipes, concrete screed.After all the elements are filled with a screed, the floor covering itself is laid on top. A damper tape must be laid around the perimeter of the room. It is desirable to place a waterproofing layer under the insulation in case of water leakage - it will protect neighbors from a possible flood.
-
dry technology. In this case, the heating system is laid on wooden plates or polystyrene mats in specially made channels. Sheets of plywood or GVL are laid on top of the system. The floor covering is installed on top. By the way, you should not lay on top of the chipboard or OSB system, since they contain substances that, under the influence of elevated temperatures, begin to evaporate and negatively affect the human body.
Neither the first nor the second methods are ideal - each has its own advantages and disadvantages. However, it is the wet method that is most often used, when the underfloor heating system is laid in a screed. The reason is simple - cheapness, although this type is quite difficult to maintain. For example, it will not be easy to repair pipes in a screed.
Screed for underfloor heating


