- Heating boiler and pump
- Selection of pipes and manifold assembly
- You can lay tiles on a warm floor without a screed
- Advantages and disadvantages
- Above the pipes
- Understanding the types of underfloor heating
- Infrared film
- Heating mats
- heating cable
- Final conclusions
- How to make a water heated floor?
- Preparatory work
- How to make a water heated floor: types of styling
- Concrete paving system
- Polystyrene system
- How to make a warm floor from heating?
- How much does the device cost, calculation of the cost of work
- Laying tiles
- Comparative analysis of two systems
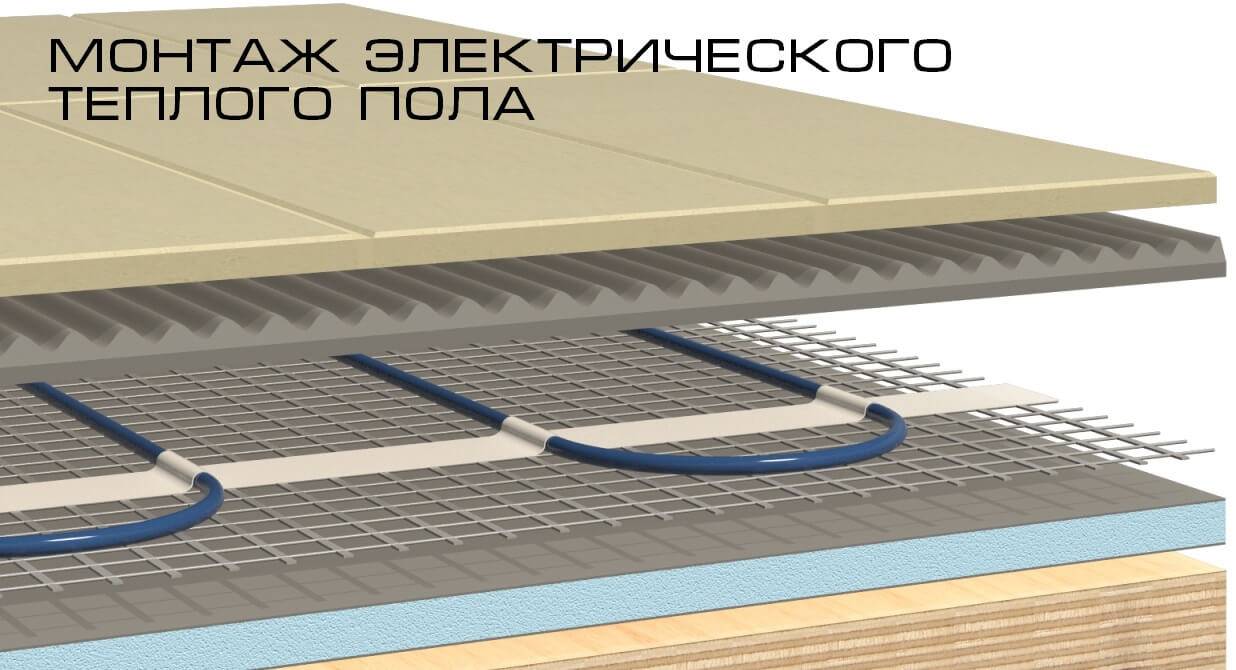
- Laying tiles on electric underfloor heating
- Calculation of a warm water floor
- The sequence and features of installation
- Tips & Tricks
- Conclusions and useful video on the topic
Heating boiler and pump
The main thing to consider when choosing a water-heating boiler for a warm hydrofloor is power. It must correspond to the sum of the capacities of all sectors of the floor, plus - there must also be a power reserve of 20% (at least 15%, but not less).
To circulate water, you need a pump. Modern boilers are designed so that the pump is included with the boiler, built into the boiler. One pump is enough for 100-120 sq. m. If the area is larger, you will need an additional one (one or more). Additional pumps require separate manifold cabinets.
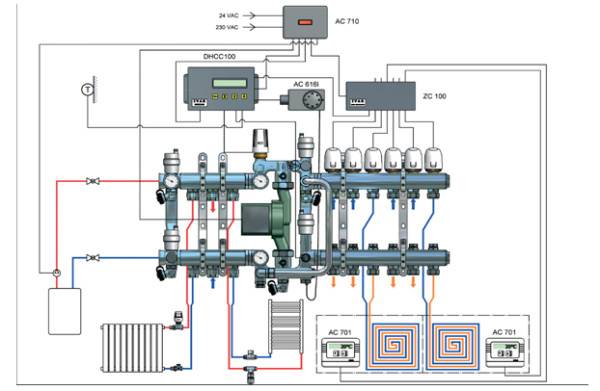
Wiring diagram
The boiler has an inlet/outlet for water. Shut-off valves are installed at the inlet/outlet. They are necessary to turn off the boiler in case of minor breakdowns or stop the boiler for preventive purposes, so as not to completely drain the water from the entire system.
If several collector cabinets are provided, you will need a splitter to the central supply so that the water is distributed evenly through the hydraulic system, and narrowing adapters.
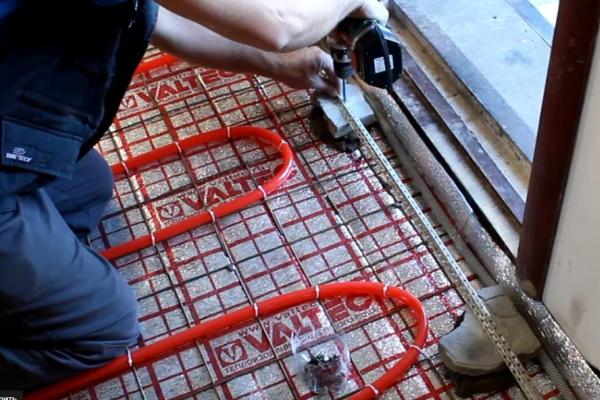
Selection of pipes and manifold assembly
An analysis of all types of pipes showed that the best option is products made of reinforced polymer with the PERT marking and cross-linked polyethylene, which have the PEX designation.
Moreover, in the matter of laying heating systems in the area of \u200b\u200bfloors, PEX is still better, since they are elastic and work perfectly in low-temperature circuits.
Rehau PE-Xa cross-pierced pipes are characterized by optimum flexibility. For ease of installation, the products are equipped with axial fittings. Maximum density, memory effect and slip ring fittings are excellent features for use in underfloor heating systems
Typical dimensions of pipes: diameter 16, 17 and 20 mm, wall thickness - 2 mm. If you prefer high quality, we recommend the brands Uponor, Tece, Rehau, Valtec. Sewn polyethylene pipes can be replaced with metal-plastic or polypropylene products.
In addition to pipes, which are inherently heating devices, you will need a collector-mixing unit that distributes the coolant along the circuits. It also has additional useful functions: removes air from pipes, regulates water temperature, and controls flow.
The design of the collector assembly is quite complex and consists of the following parts:
- manifolds with balancing valves, shut-off valves and flow meters;
- automatic air vent;
- a set of fittings for connecting individual elements;
- drainage drain taps;
- fixing brackets.
If the underfloor heating is connected to a common riser, the mixing unit must be equipped with a pump, a bypass and a thermostatic valve. There are so many possible devices that it is better to consult a specialist to select a design.
For ease of maintenance and additional protection, the manifold-mixing unit is placed in a cabinet located in an accessible place. It can be disguised in a niche, built-in wardrobe or dressing room, and also left open
It is desirable that all circuits extending from the collector assembly have the same length and are close to each other.
You can lay tiles on a warm floor without a screed
You can, of course, and sometimes you need to. Moreover, in the instructions for underfloor heating, it is precisely about this that it is said that the mats of their design make it possible to do without a screed. We installed floor heating ourselves twice in both apartments in the bathroom. Rather, in both cases, the toilet and bathroom are combined. The husband applied the following technology for the first time.
A heat-insulating layer is laid on the floor. Holes are cut in it, where there will be no heating mats, so that the glue adheres to the floor surface. It is rational to stick it on the surface so that it lies flat. Then a heating mat is spread on top. It won't lie flat. To fix it, there are special devices. But we didn't buy them. There they cost some exorbitant price. We got out of the situation in a worker-peasant way.I took a needle and thread, and stupidly sewed the heater with stitches to the base, in increments of about 10 cm. It was made of a material somewhat similar to foam rubber, and it turned out to be effective. The first time they didn't tie. The husband applied glue to the floor, and the one that applied to the tile smeared it with a thin layer. After a wet sponge, he removed his remnants from the ends of the tile. But at the first estimates, it turned out that the tile, which will lie where there is no heater, lies lower by these same 5 mm. It was necessary to do something quickly, and my husband came up with the following. I ran to the nearest hardware store and bought a dozen plastic nets that they put in the sink in the kitchen. They cost a penny, but they allow you to compensate for the height. They were laid out where there is no heater. It came out cheap and cheerful.
In the second apartment, they did not go this way, but made a semblance of a screed. Namely, they used a self-leveling floor. 4 bags made it possible to fill the floor with a layer of about 1 cm. Thus, the heater closed and the level came out perfect. Laying tiles on such a smooth surface is then a pleasure.
the author of the question chose this answer as the best
add to favorites link thank you
If the warm floor is made with water pipes, then a screed is necessary, even if the pipes are laid in special heat-insulating mats, which also have damping properties. And if the warm floor is made with mats with electric heaters, then the screed will even be redundant - the thermal conductivity from the heaters to the surface of the tile decreases, and as a result, energy costs increase.But most importantly, both in the first and in the second cases, for laying tiles on top of a warm floor, it is necessary to use a special tile adhesive with damping properties, otherwise the tiles will “swell” over time. For example, I used UNIS glue in red bags.
add to favorites link thank you
If the warm floor is based on pipes, then a screed is required. Make a screed at least 3 cm to cover the pipes. If the warm floor is cable-based, then you can do this:
Treat a solid, even concrete base with cement-based waterproofing. Lay a warm floor, smear it with tile glue on top, where you can simply lay the gaps with glue
Work with a spatula carefully so as not to damage the warm floor. Glue should be for a warm floor. In this option, the heat will be worse
In this option, the heat will be worse.
add to favorites link thank you
Advantages and disadvantages
Warm floors are quite popular today and are used by many owners of private houses. Heat transfer in these systems is carried out by pipes located under the floor covering, through which the heated coolant circulates, or by means of electric heating elements.


As a result, the floor heats up and becomes warm to the touch, which in itself significantly increases the level of comfort in the house.
Among the positive qualities of a warm floor, the following stand out most clearly:
- High level of comfort. The floor heated to a certain temperature allows you to walk on it barefoot, without fear of any discomfort.
- Profitability.Savings when using underfloor heating is achieved due to the efficient distribution of energy - it moves from the bottom up and heats only the volume of the room in which heat is needed, i.e. there are no extra expenses.
- Possibility to set the temperature. Underfloor heating is strongly recommended to be equipped with an electronic control unit, which will allow the system to monitor the current temperature in the room and keep it within user-defined limits.
- Ease of installation. Arranging underfloor heating is a fairly simple task, especially when it comes to the electrical version of the system. It is more difficult to lay a water circuit, but even if desired, it is quite possible to install it yourself.
There are also disadvantages:
- High cost. To install a warm floor, you will need a lot of materials, and you will have to fork out for some tools. There is only one way to reduce the level of costs - to do all the work on arranging heating yourself.
- Reducing the volume of the room. The thickness of the warm floor can vary from 7 to 12 cm - and it is to this height that the entire floor rises. If the ceilings are high, then there will be no special problems because of this (unless you have to redo the thresholds).
- Demanding for flooring. It is possible to cover a warm floor only with those coatings that transmit heat well. It is best to purchase specialized materials designed for use in combination with underfloor heating. Improper coating will not allow the system to work effectively, and in the case of electric heaters, there is also the possibility of their failure due to overheating.
The advantages of underfloor heating are significant, and the disadvantages are not critical, so such heating systems can be used for heating, both as the main and as an additional source of heat.
Above the pipes
Before laying water heating pipes, it is imperative to perform a rough fill
It is important that it is made with high quality and can last for a long time, since its replacement will require the destruction of all subsequent layers. There is a significant load on the rough screed
She needs to withstand not only physical exertion, but also possible significant changes in temperature (for example, when the system is turned on or off abruptly).
A mixture for rough pouring is made independently from sand, cement and a plasticizer or bought. The recommended amount of plasticizer is 1 liter per 100 kg of cement. Sometimes, in the absence of a plasticizer, it is replaced with the same amount of PVA glue. According to experts, the thickness of the screed for warm water floors is optimal within 2.5-3 cm.
Thin - will help save fuel, but will not be able to provide uniform coverage. This will lead to a decrease in the comfort of using a warm field and rapid destruction. Too thick a layer reduces the efficiency of a warm floor, which will lead to an increase in fuel costs.
Many factors influence the choice of the optimal thickness:
- the thickness of the pipes used;
- the quality of the subfloor;
- required room temperature;
- ceiling height;
- type of tie.
The minimum thickness of the screed over a warm water floor of 2 cm can only be obtained using 1.6 cm pipes.In this case, you will need to use special mixtures and cover the floor with ceramic tiles. Otherwise, the floor will quickly become unusable.
Cement mortars cannot be poured so thinly. The minimum allowable thickness is 4 cm. It can be achieved using thin pipes and a flat surface. Surface irregularities can increase the thickness of the screed up to 7 cm.
READ MORE: Blind area around the house: views, device, schematic drawings, instructions on how to do it yourself (30 Photos & Videos)
In the case of using a semi-dry screed, the minimum thickness, when using the thinnest pipes, reaches 5 cm.
In some cases, it is possible to lay pipes without prior screed. This happens when:
- a wooden base that cannot withstand the concrete load;
- with low ceilings;
- in the absence of experience in pouring the screed;
- in the absence of time for the coating to harden (the screed dries qualitatively for about 1 month).
Installing a water floor without a screed has the following advantages:
- the installation process is quite simplified;
- the load on the floor is reduced;
- the height of the room decreases significantly less;
- even without soundproofing, it reduces the ingress of noise into the room;
- acceleration of the installation process due to the exclusion of some steps (rough filling and drying);
- a significant reduction in the cost of installing a water-heated floor.
However, this option also has disadvantages:
- rapid cooling of the room when the system is turned off;
- in the absence of high-quality waterproofing, slight deformation is possible due to exposure to moisture.
Sometimes the screed is replaced with a coating of polystyrene plates.
There are no restrictions on the thickness (maximum) of the screed.Here it is necessary to be guided by common sense.
Most often, the thickest screed is used:
- if the subfloor is too uneven;
- the screed is also the foundation (for example, in a garage or a private house).
It is believed that for a warm floor, a screed with a thickness of more than 17 cm is not rational.
The most optimal total screed thickness of 4.5-7 cm creates a good coating of pipes and is able to withstand heavy loads. The thickness of the screed above the pipes in this case is 2.5-3 cm.
The process of installing a warm floor is quite simple and does not require experience. It is quite possible to install it yourself.
Before laying the floor covering, it is imperative to check the quality of the screed. 2 weeks after pouring, it is necessary to dry the screed, covering it with a film, for maximum saturation with moisture. After about a month, the solution that covered the pipes will completely harden. The finished surface must be even, the color must be uniform, chips and cracks are not allowed. When tapping with a wooden block, the surface should have the same ringing sound.
It is important to correctly pour the concrete mixture of the required height before and above the pipes, so that the result will please for many years.
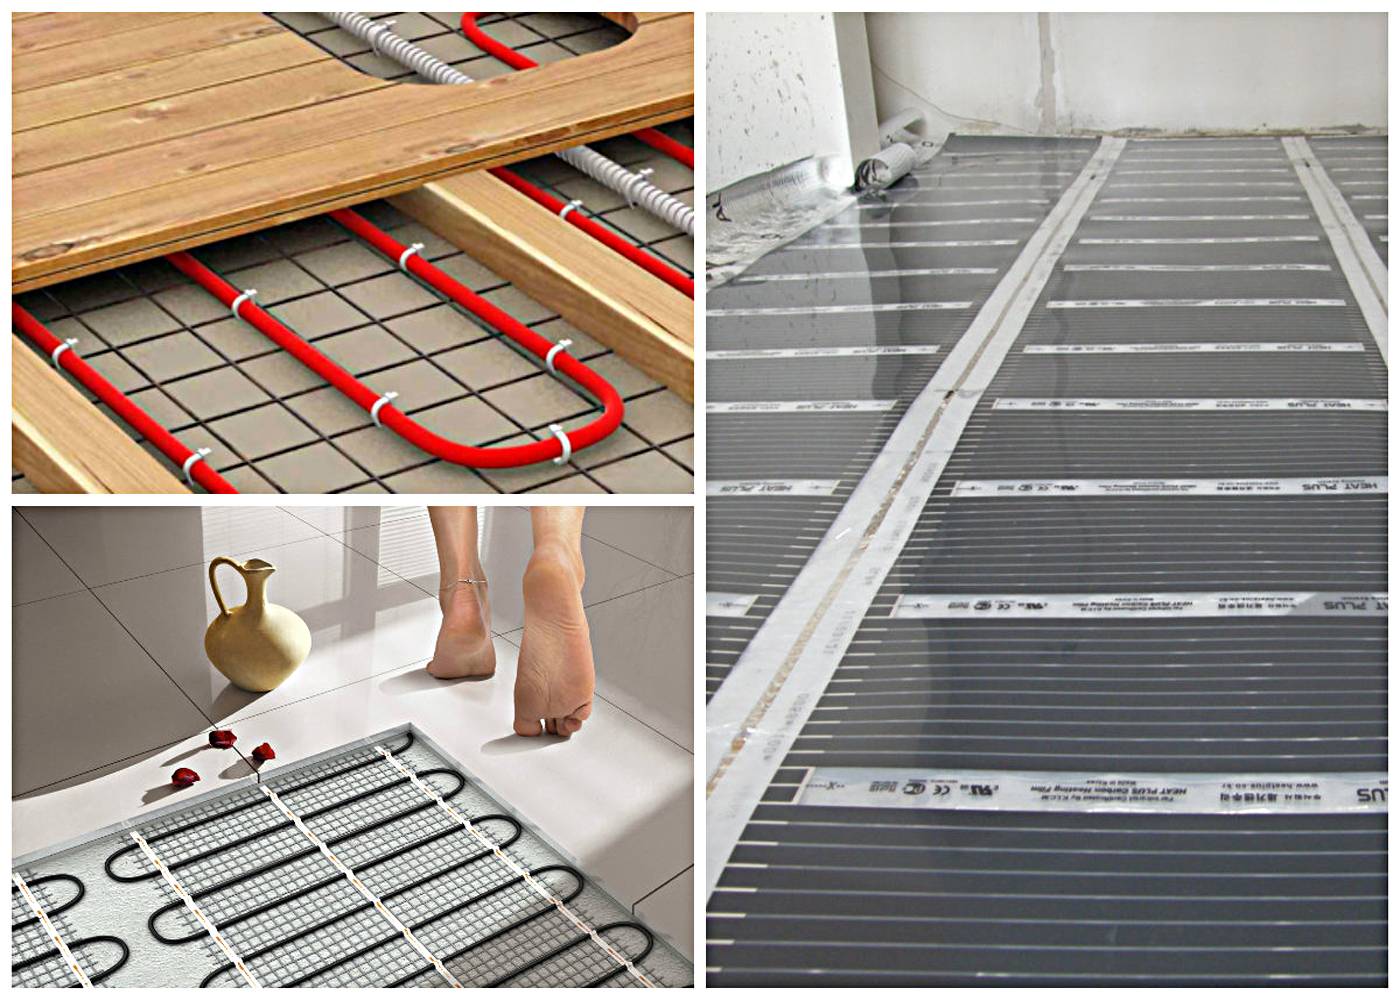
Understanding the types of underfloor heating
Installation of underfloor heating under tiles begins with the choice of heating equipment. Some experts and consumers say that it is much more profitable to lay water floors, but this is not always possible. In addition, they have certain disadvantages:


- For laying water pipes, a powerful concrete screed is required - it is poured over the laid pipes, its thickness reaches 70-80 mm;
- Concrete screed creates pressure on subfloors - relevant in multi-storey buildings, where floor slabs are not designed for such loads;
- The water pipe is at risk of failure - this can lead to flooding of neighbors and unnecessary repair costs.
They are more applicable in private households, where it is possible to equip them even at the stage of construction or repair.
Please note that in the event of a breakthrough of water heated floors, you will have to repair not only your apartment, but also someone else's.
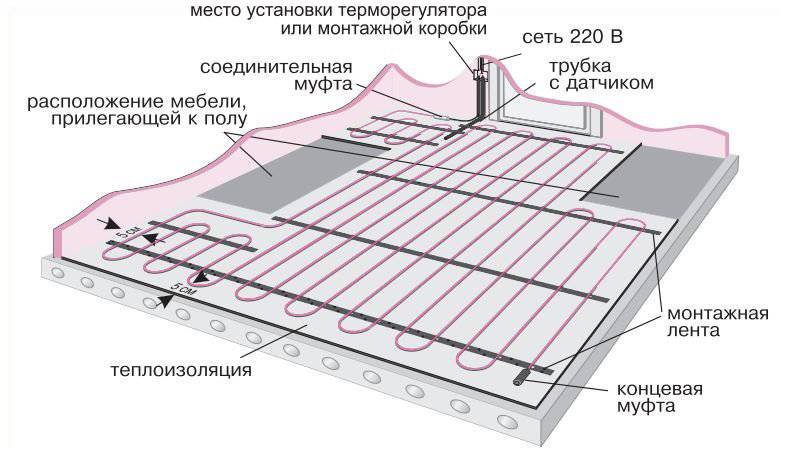
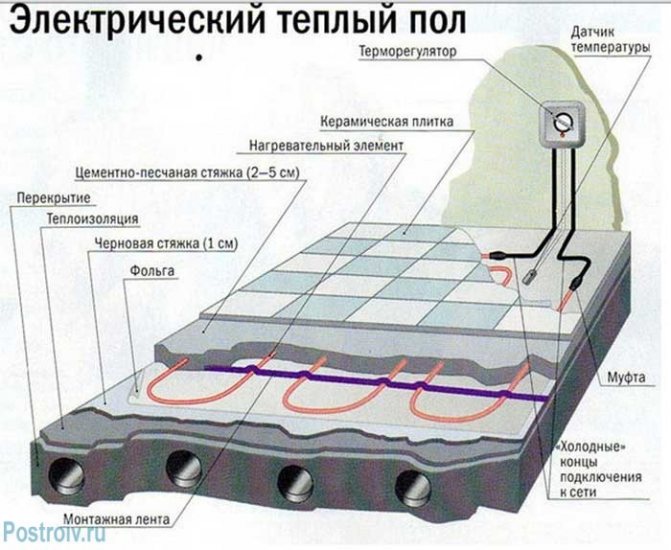
Electric underfloor heating for tiles is represented by three main varieties:
- Heating cable is the best option;
- Heating mats - somewhat expensive, but effective;
- Infrared film is not the most reasonable option.
Let's consider the possibility of their use in conjunction with tiles.
Infrared film
When choosing electric underfloor heating for tiles, consumers will certainly get acquainted with infrared film. This film provides heating of floor coverings with the help of infrared radiation, under the influence of which they become warm. But it is not suitable for laying under tiles or porcelain stoneware - a smooth film cannot normally connect with tile adhesive or mortar, which is why the tile simply falls off, if not immediately, but over time.
Also, the electric infrared film will not be able to ensure the connection of the tile adhesive and the main floor, despite the presence of special technological holes. The finished structure turns out to be unreliable and short-lived, it threatens to fall apart piece by piece. We conclude that some other heating equipment is needed under the tiled floor, infrared film is not suitable here.
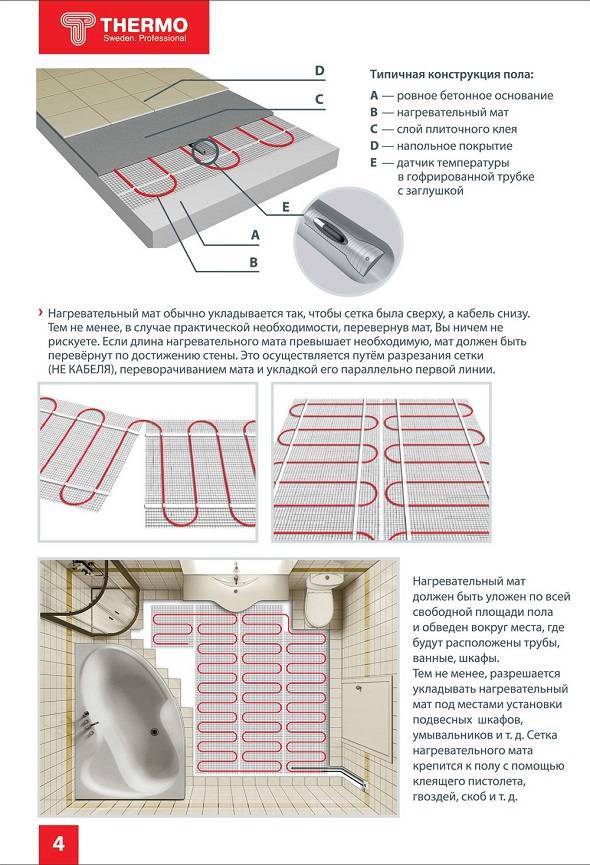
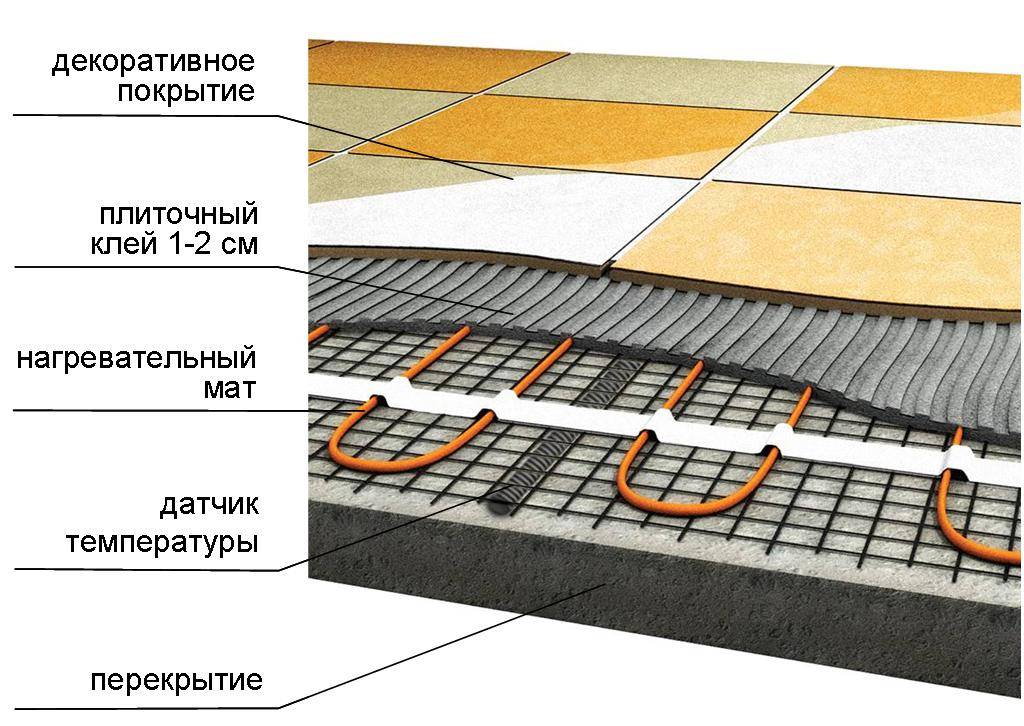
Heating mats
The aforementioned heating mats provide the ability to mount an electric underfloor heating without a screed under the tiles. They are modular structures, ready for installation work - these are small sections of a strong mesh, on which sections of the heating cable are fixed. We roll it out on a flat surface, apply glue, lay the tiles, let it dry - now everything is ready, you can safely walk on it and put furniture.
Electric underfloor heating for tiles, created on the basis of heating mats, pleases with ease of installation. They do not require a bulky and heavy cement screed, but they are distinguished by their high cost - this is a small minus that you have to put up with. But we can safely mount them on rough surfaces and immediately start laying tiles or porcelain tiles.
heating cable
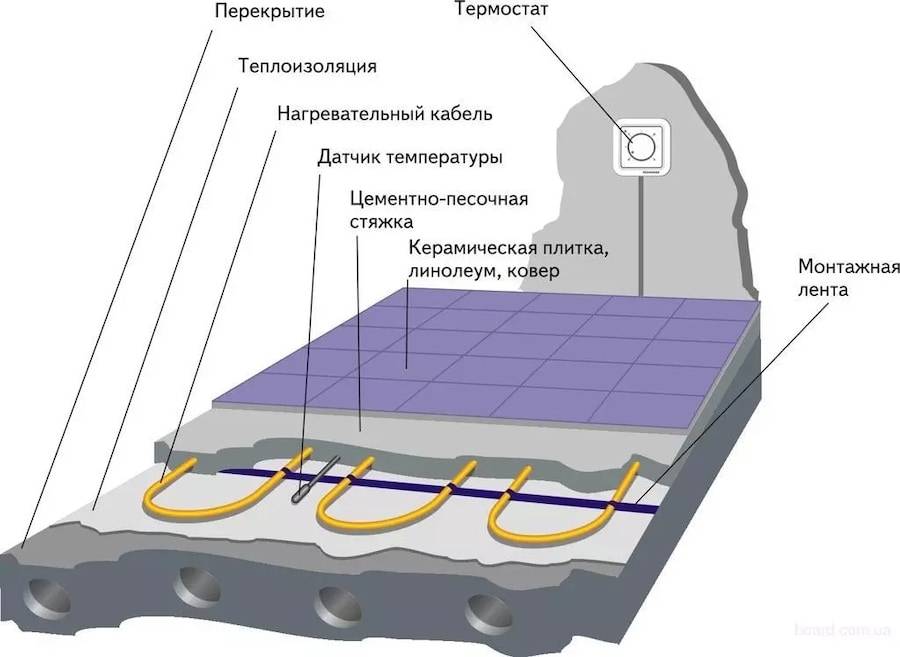
Underfloor heating under tile is a more standard and cheaper solution than the aforementioned mats. It will please you with warmth and long service life, as well as a low probability of breakage. Electric heated floors of this type are mounted on the basis of three types of cable:
- Single-core is not the most worthy solution. The thing is that this cable format requires connecting wires to two ends at once, and not to one. This is not very convenient and leads to noticeable labor costs;
- Two-core - a more advanced cable for installing an electric underfloor heating under a tile. It is easy to install, as it does not require a ring connection;
- Self-regulating cable - it can be easily cut to almost any length, thanks to the special internal structure, it can automatically adjust the heating temperature.
Using a self-regulating cable for installing an electric underfloor heating under a tile, you get the opportunity to save on electricity. Also, experts and consumers note a more uniform heating, which is difficult to achieve when using heating elements of a different type.
Final conclusions
We can implement electric floor heating under tiles in two ways - using a heating mat or a heating cable. Infrared film is not suitable for our purposes, it is better to use it with a laminate. More precisely, you can use it, but only at your own peril and risk - if you put tiles directly on the film, then no one can guarantee the long service life of such a structure. There is a high probability of its failure in the very near future.
How to make a water heated floor?
The role of the heat carrier in such floors is performed by liquid. Circulating under the floor with pipes, heating the room from water heating. This type of floor allows you to use almost any type of boiler.
The following is a concise instruction on how to make a water-heated floor yourself:
installation of a group of collectors;
- installation of a mortise cabinet designed for the installation of collectors;
- laying pipes that supply and divert water. Each pipe must be equipped with shut-off valves;
- the manifold must be connected to a shut-off valve. On one side of the valve, it is necessary to install an air outlet, and on the opposite side, a drain cock.
Preparatory work
- Calculation of the power of the heating system for your room, taking into account heat losses and characteristics.
- Substrate preparation and surface leveling.
- The choice of a suitable scheme according to which pipes will be laid.
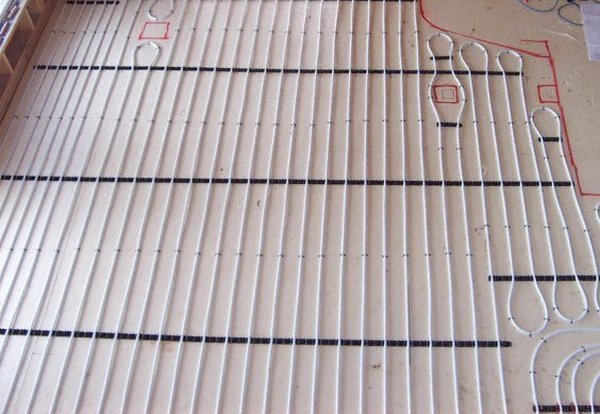
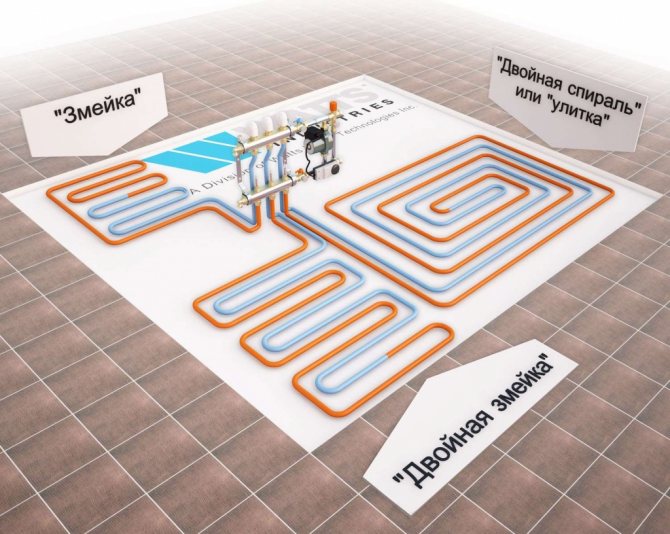
When the floor is already in the process of laying, the question arises - how to make the most suitable pipe laying. There are three most popular schemes that provide uniform floor heating:
"Snail". Spiral in two rows with alternating hot and cold pipes. The scheme is practical in rooms with a large area;
"Snake". It is better to start from the outer wall. The farther from the beginning of the pipe, the colder. Suitable for small spaces;
"Meander" or, as they also call it, "double snake". The forward and reverse lines of pipes run parallel in a serpentine pattern throughout the floor.
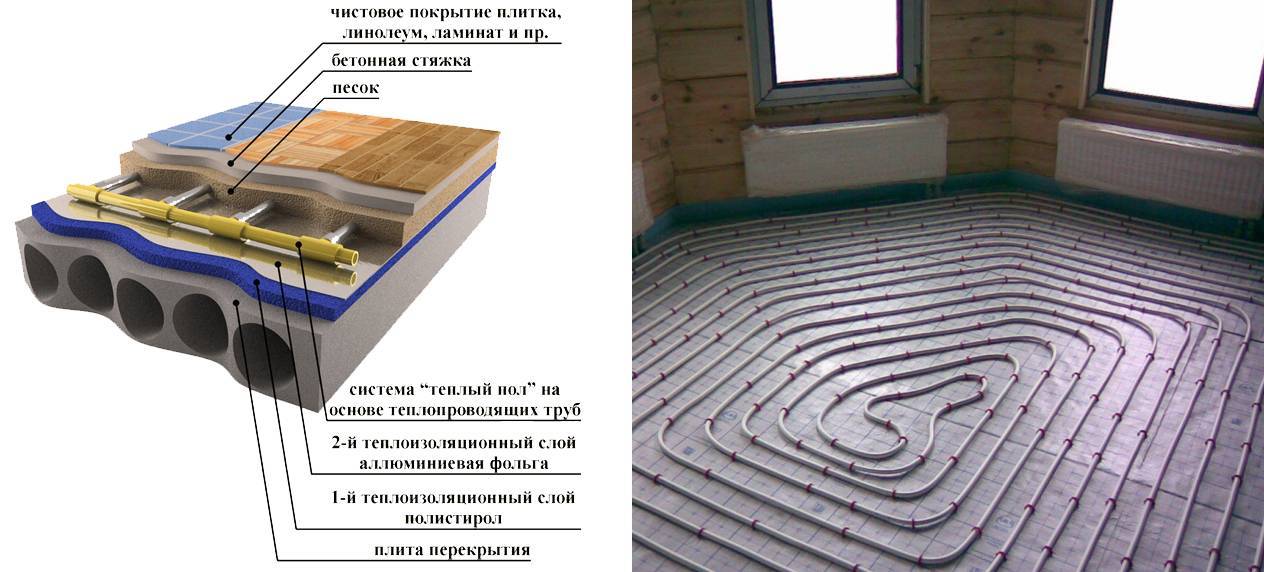
How to make a water heated floor: types of styling
In order to avoid mistakes in the process of laying a warm water floor, you need to immediately decide on the installation method.
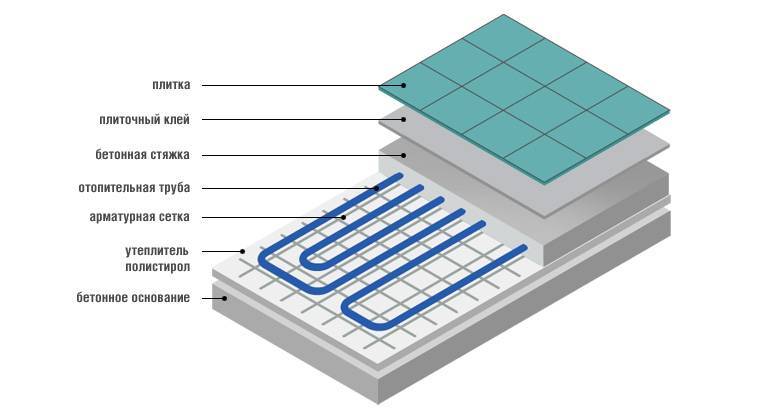
Concrete paving system
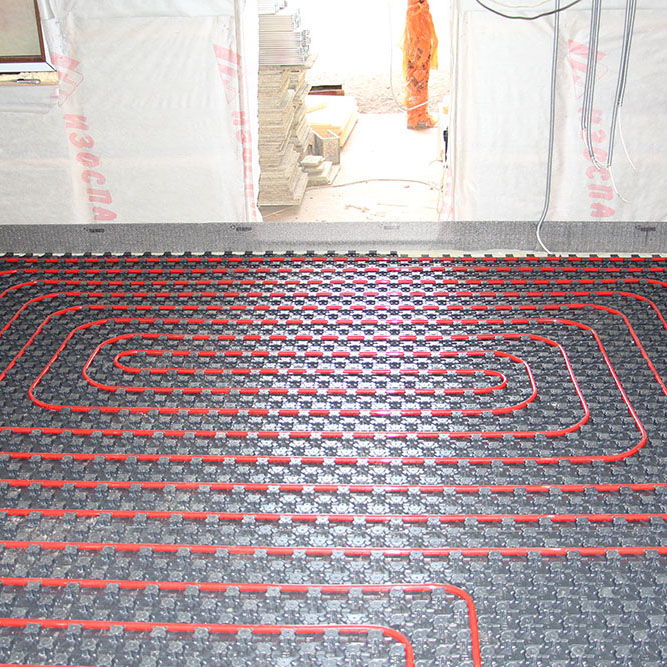
Laying of thermal insulation, which will have the following parameters: layer thickness from 30 mm with a density coefficient from 35 kg/m3. It is recommended to use polystyrene or foam insulation.
Special mats with clamps can be a good alternative:
- attaching damper tape around the entire perimeter of the wall. This is done in order to compensate for the expansion of the ties;
- laying a thick polyethylene film;
- wire mesh, which will serve as the basis for fixing the pipe;
- hydraulic tests. Pipes are checked for tightness and strength. Performed within 24 hours at a pressure of 3-4 bar;
- laying concrete mix for screed. The screed itself is installed at a level not lower than 3 and not higher than 15 cm above the pipes. On sale there is a ready-made specialized mixture for floor screed;
- drying of the screed lasts at least 28 days, during which the floor must not be turned on;
- tab of the selected coverage.
Polystyrene system
A feature of this system is the smaller thickness of the floor, which is achieved by the absence of a concrete screed. A layer of gypsum-fiber sheet (GVL) is laid out on top of the system, in the case of a laminate or ceramic tile, two layers of GVL:
- laying of polystyrene boards as planned on the drawings;
- good and high-quality aluminum plates that provide uniform heating and should cover at least 80% of the area, and pipes;
- installation of gypsum fiber sheets for structural strength;
- cover installation.
If the room is heated from a radiator heating system, then a warm floor can be laid from the system.
How to make a warm floor from heating?
Installing underfloor heating without changing the boiler becomes even faster. Therefore, now you will receive tips on how to make a warm floor from heating easier.
Floor preparation, screed and laying the contour is done according to the previous instructions
Pay attention to the difference in composition, as the screed mixture affects the proper functioning of the floor
At the same time, it is very important to take into account all the features of the heated room, possible heat losses and know exactly how to properly make a water heated floor. Might be interesting
Might be interesting
How much does the device cost, calculation of the cost of work
To determine the total cost of the work, several factors should be considered:
- The type of insulation used.
- Laying method - polystyrene system is sold in sets. The composition includes pipes, mats, collector, pump. It is better to install ready-made systems for large rooms, as this reduces the cost of purchasing the system.
- Pipe type.
- The type of finish coating - ceramic tiling is the most economical option, but only if you install it yourself.
If we take into account all the stages of laying work, the average amount will be equal to 1500 rubles. for 1 m². The cost may vary depending on the final coating and control equipment purchased.


Calculation of power and temperature of a warm water floor
Laying tiles
During the installation of underfloor heating with their own hands, as a rule, traditional materials are used:
- Porcelain stoneware;
- Stone;
- Tiles.
Underfloor heating involves laying smooth tiles that have the lowest heat loss. During the laying of this tile, it is necessary to ensure that no voids appear under the material, otherwise this will subsequently lead to temperature deformations - the tile will simply begin to crack.
It is possible to lay tiles after pressure testing and testing of the system, when the screed is completely dry. To speed up this process, you can use a heat generator.
 Tiles according to preliminary markings are laid on the base of the floor. According to another scheme, tile laying is carried out from the corner or from the center of the room. From the wrong side, the tile is smeared with special glue using a notched trowel. The tile must be immediately pressed to the floor and held for a few seconds until fully set. Why use ordinary tile adhesive, and the seams are sealed with a special grout.
After laying the tiles, it is necessary to process the seams. It is necessary to achieve the same thickness (2-3 mm) and their evenness. Why use special crosses that are installed at the corners of the tile.
When laying tiles, you need to achieve a result without any flaws.Therefore, it is desirable to use special flexible mixtures in the work, which can ensure the quality of the installation.
Then, when the work on laying the tiles is completed, it is necessary to wait until it is completely dry. If necessary, you can once again grout the seams.
Careful observance of all technological processes and stages, as well as strict adherence to the recommendations when laying underfloor heating under the tiles with your own hands guarantees efficient and high-quality operation of the entire system for quite a long time.
Comparative analysis of two systems

A comparison of the electric and water floors is presented in the table, which reflects the main points that are important during the repair.
| Criterion | Electric | Water |
| Cost price | It wins in terms of installation complexity, but the cost of materials is much higher. You will need to additionally purchase a temperature sensor and the cables themselves | The main disadvantage is a complex installation (due to lack of experience). You only need to buy water pipes and laying mats |
| Safety | On such a floor it is comfortable to move not only in shoes, but also barefoot. The risk of electric shock is extremely small, it can occur in the event of a rare mains short circuit | Water pipes are absolutely safe for human health. Possible leaks |
| Reliability | High strength, durability. The cables themselves cannot fail; over time, it may be necessary to replace the temperature sensor or power regulator | Robust and reliable water circuit. In the event of a leak, the screed will have to be completely removed and replaced with a new one. |
| Power | Range from 15 to 30 degrees. | Temperature up to 50 degrees |
Laying tiles on electric underfloor heating
Laying the flooring is one of the final stages of repair work. Specifically, there is no clear framework in what sequence the construction process should be carried out, and whether the laying of the flooring will be the final stage or not. But, nevertheless, this moment is very important and responsible, especially if ceramic tiles act as a floor covering.
It is worth paying special attention if it is placed on an electric underfloor heating, a qualified specialist is required to perform this work. Laying tiles on cable electric underfloor heating includes a number of important steps: 1) First, you need to use a special tile adhesive for underfloor heating, which would withstand temperatures of at least 50-60 degrees. Since the first time the heating element is turned on, the temperature on the thermostat is set to the maximum, and it can be 40-50 degrees. You need to be sure that the glue will withstand it.
You need to be sure that the glue will withstand it.
2) Secondly, the floor sensor from the thermostat must be in the corrugation. A canvas is cut under the corrugation, which is smeared with glue in such a way that the level of the heating cable is the same everywhere.
3) Thirdly, if a heating mat is used as a warm floor, many experts recommend pre-tightening it with a thin layer of tile adhesive. This is done so that during the tiling process, the heating cable is not accidentally damaged, otherwise the entire floor will completely fail. And only after complete drying, you can proceed to the next stage of work.
4) Before you start working with tiles, you should calculate where to start. If there is a drawing, then it is necessary to build on it (it should be in the central part of the room), if the tile passes from one room to another, then the transition and trimming of the tile in the area of the doorway should not be visible. It is recommended to calculate in such a way that there is as little trimming as possible, and it is located in the most inconspicuous places. 5) Glue with a comb of 7-8 mm is applied to the work surface, as well as to the tile. Its inner side is pre-wiped with a damp cloth, if necessary, in order to remove dust (otherwise, it is likely that the tile can quickly move away due to lack of proper adhesion). In this case, you always need to monitor the level of the floor, removing excess glue if necessary, and also use crosses to maintain the same distance between the tiles, which in turn have a different size.
6) After the glue has dried, you can start sealing the seams. For this, special putties are used, of different colors. If this is a production facility and beauty is not so important, or there is a financial constraint, the same tile adhesive can be used as a putty. All seams are preliminarily cleaned of dust with a knife, if necessary, an industrial vacuum cleaner is used. The adhesive is applied using a special flexible (rubber) spatula. After 10-20 minutes (depending on the air temperature in the room), all excess is wiped off with a damp sponge (rag). After that, walking on the tiles is prohibited until the joints are completely dry, at least a couple of hours.


Another important point is that under no circumstances should underfloor heating be turned on until the tile adhesive has completely dried. If, when laying the tiles, the rough screed was completely dry, then the underfloor heating system can be put into operation no earlier than after 14-16 days. If before this the screed was insulated and poured, then the drying time increases to a month. When you turn on the underfloor heating earlier than the specified dates, in most cases the tile may move away from the base.
«Do it yourself - do it yourself "- a site of interesting homemade products made from improvised materials and items at home. Step-by-step master classes with photos and descriptions, technologies, examples of work - everything a real master or just a craftsman needs for needlework. Crafts of any complexity, a large selection of directions and ideas for creativity.
Calculation of a warm water floor
Before installation and purchase of materials, it is imperative to calculate the underfloor heating. To do this, they draw a diagram with contours, which will then come in handy during repair work in order to know the position of the pipes.
- If you are sure that furniture or plumbing will always stand in a certain place, pipes are not laid in this place.
- The length of the circuit with a diameter of 16 mm must not exceed 100 m (maximum for 20 mm is 120 m), otherwise the pressure in the system will be bad. Thus, each circuit approximately occupies no more than 15 square meters. m.
- The difference between the length of several circuits should be small (less than 15 m), that is, they should all be of uniform length. Large rooms, respectively, are divided into several circuits.
- The optimum pipe spacing is 15 cm when using good thermal insulation.If in winter there are often frosts below -20, then the step is reduced to 10 cm (only possible at the outer walls). And in the north you can not do without additional radiators.
- With a laying step of 15 cm, the consumption of pipes is approximately 6.7 m for each square of the room, when laying every 10 cm - 10 m.
In general, the question of how to calculate a warm water floor requires separate consideration, because many nuances are taken into account when designing: heat loss, power, etc.
The graph shows the dependence of the flux density on the average coolant temperature. Dotted lines indicate pipes with a diameter of 20 mm, and solid lines - 16 mm.
- To find the flux density, the sum of the heat loss of the room in watts is divided by the pipe laying area (the distance from the walls is subtracted).
- The average temperature is calculated as the average value at the inlet to the circuit and the outlet from the return.
To calculate the length of the circuit, the active heating area in square meters is divided by the laying step in meters. To this value is added the size of the bends and the distance to the collector.
According to the above diagram, you can only perform a rough calculation and make the final adjustment due to the mixing unit and thermostats. For accurate design, be sure to contact professional heating engineers.
The sequence and features of installation
Screed for underfloor heating. Scheme
The most popular and demanded option for laying warm water floors is the use of a concrete screed, which is performed after careful preparation of the surface to be equipped and markings for the location of the collector and pipes. All work is carried out in stages, in compliance with the following sequence of main actions:
-
laying thermal insulation based on polystyrene foam or expanded polystyrene;
polystyrene foam -
laying damper tape to prevent excessive stretching of the concrete base during heating;
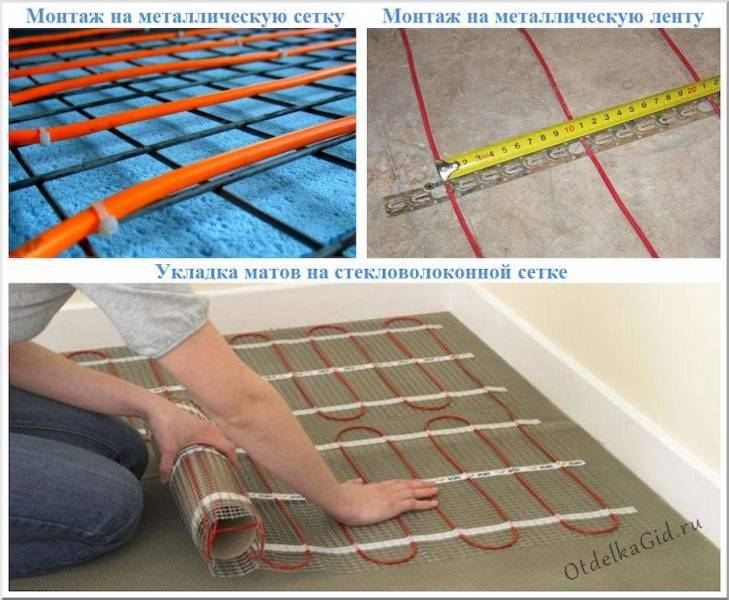
- laying a reinforcing mesh over the heat-insulating layer to increase the strength characteristics of the structure and additional fastening of the pipe system;
-
direct laying of the pipe system in combination with the gradual association of pipes with each other by means of special clamps and fixation to the reinforcing mesh;
- connecting the pipe system to the manifold.
You should carefully monitor the quality, but not too tight fastening, so as not to provoke deformation changes during operation. The presence of several circuits requires serial connection. The output end of the pipes is fixed on the return manifold. The final stage of installation consists in pouring the entire system with concrete mortar and thoroughly drying the screed. Next, work is carried out on textured screed and finishing with any floor material.
Concreting process
Tips & Tricks
When performing installation work, areas of the room near the outer walls are made out by using a smaller step, which makes it possible to stabilize the heating.
Laying the pipe system according to the "snake" type involves the implementation of the smallest step, and with spiral installation, the step can be from two to fifteen centimeters.
Types of water floor heating systems
To improve the quality of the concrete composition and facilitate pouring, it is advisable to add a standard amount of polypropylene fiber to the working solution, which will increase the strength of the screed during shrinkage.
Do not neglect the use of a damper tape, which allows you to qualitatively compensate for the expansion of the concrete screed.
Compliance with the technology allows you to get a high-quality and durable system of underfloor heating, which will improve the microclimate of the room and create comfortable living conditions.
Screed for water floor heating
Conclusions and useful video on the topic
Video #1 A visual demonstration of the installation steps of the electric mat:


Video #2 The process of installing and connecting an electric cable floor:
Video #2 Rules and steps for installing pipes for a water-heated floor:
Today, every family can make underfloor heating available; a bathroom with such floors will change and become more comfortable. The underfloor heating system will last a long time if technical inspection and preventive maintenance are carried out in a timely manner.
What kind of underfloor heating is in your bathroom? Tell us about how you chose the best option for you, how you installed and connected the system. Please write comments in the block below, post photos and ask questions on the topic of the article.


