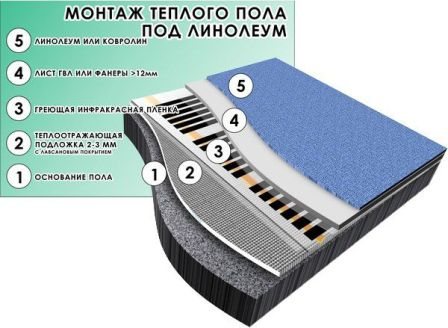
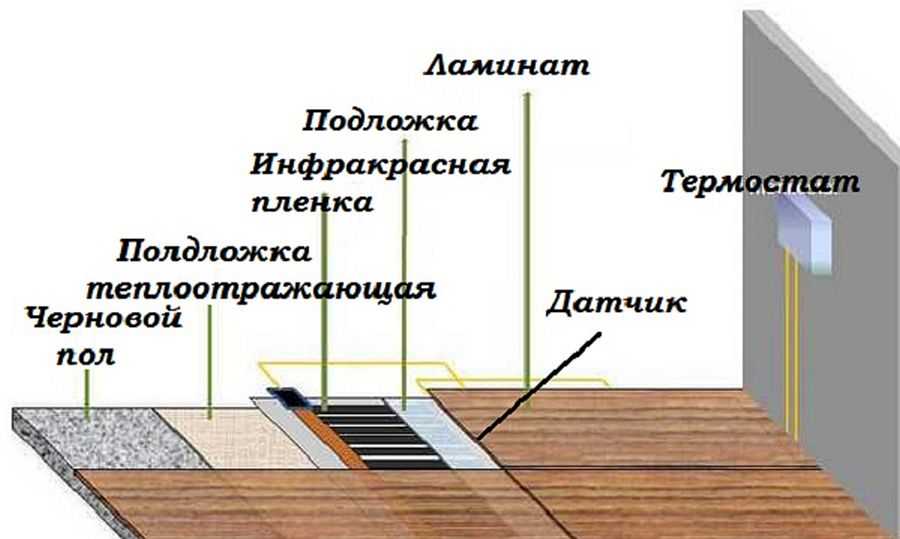
- Classification of infrared floors
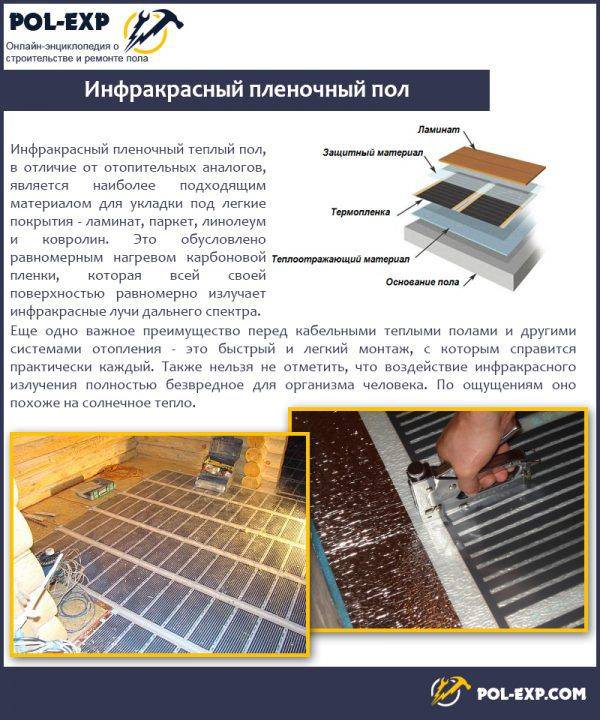
- Film floor heating
- Rod warm floor
- How to connect film underfloor heating
- Technology nuances
- Advantages and disadvantages
- Drying the floor and its launch
- How to lay the substrate: step by step instructions
- Training
- Waterproofing
- Substrate
- Fixation
- Laying linoleum
- Underfloor heating screed
- expansion joints
- Cracks in the screed
- Screed mortar
- Step by step instructions for laying the underfloor heating system
- Overview of system design steps
- Laying tiles
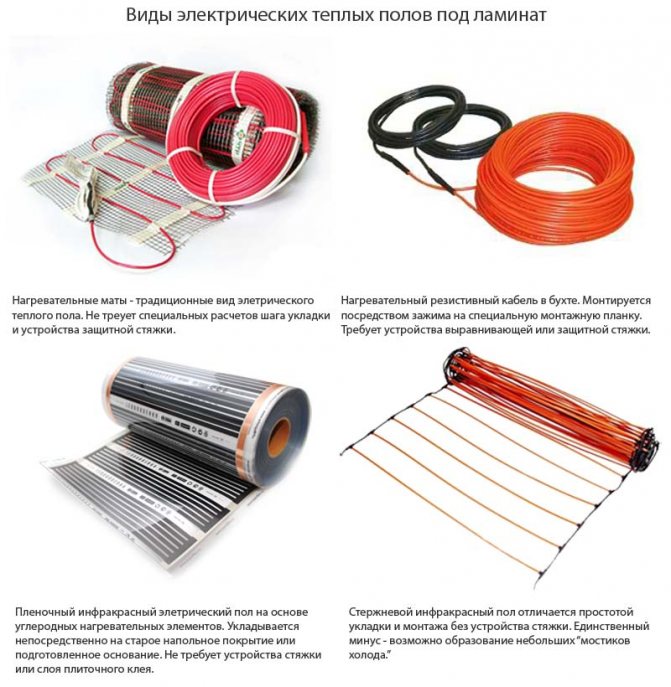
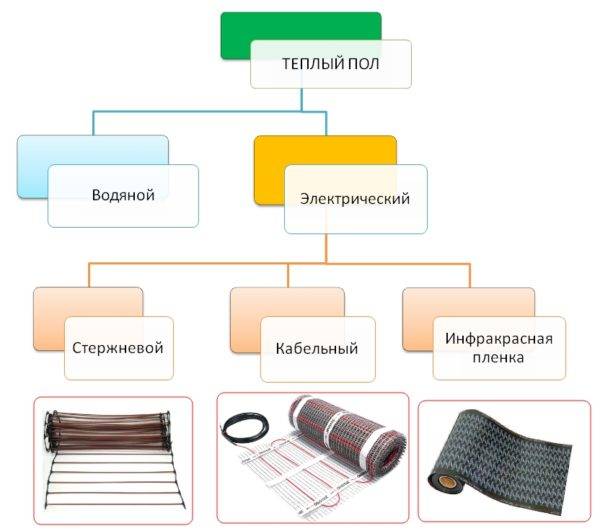
- Types of underfloor heating
Classification of infrared floors
Infrared warm floor is found in different types. This should be guided by the choice of material for flooring and the equipment itself. Connecting an infrared warm floor also depends on its type and characteristics. Allocate film, tape and rod floors. Film and tape operate on a similar principle, so they can be considered as one variety.
Film and tape underfloor heating have a similar principle of operation
Consider the features, advantages and disadvantages of film and rod underfloor heating.
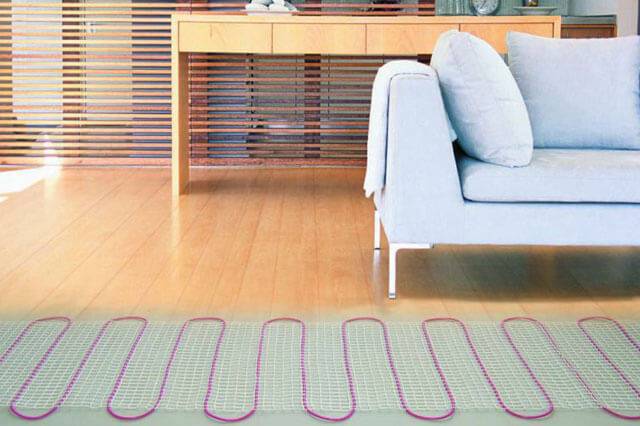
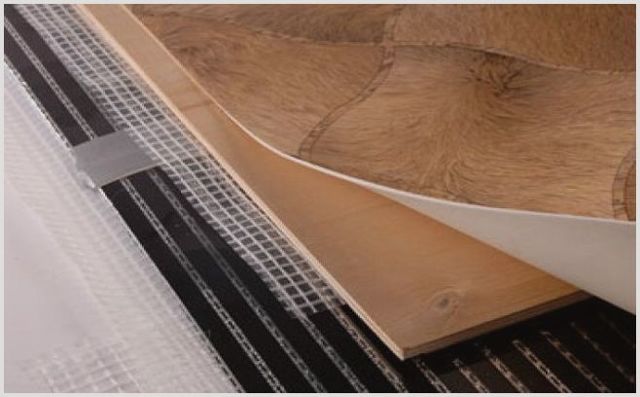
Film floor heating
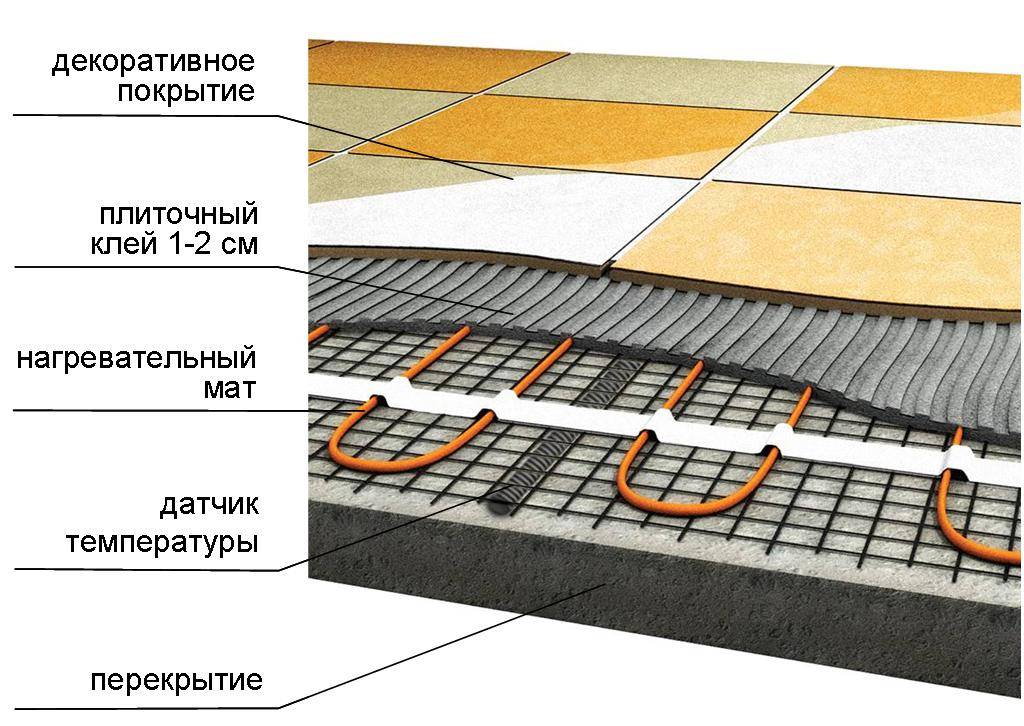
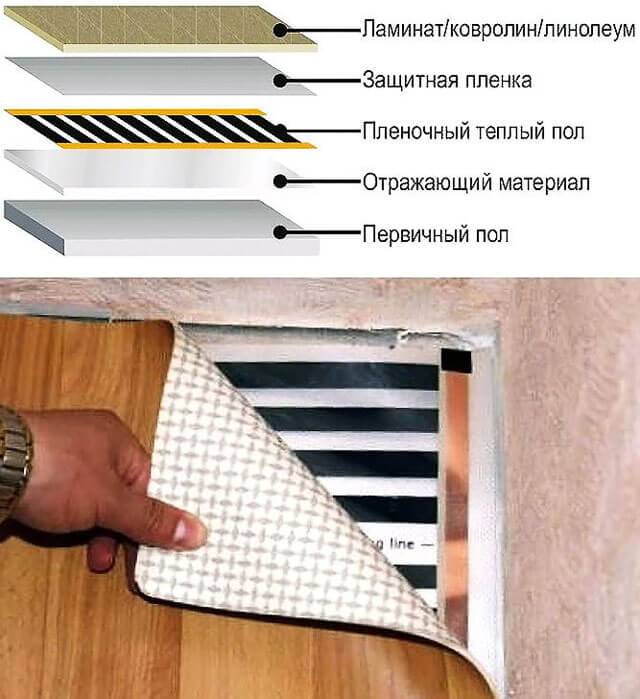
Underfloor heating film is the most efficient heating system. It is a special two-layer canvas in which a heating device is placed.Film infrared floors are also divided into two types: carbon and bimetallic. The former are mainly used, because the level of heating efficiency is much higher than that of bimetallic floors.
Film infrared heat-insulated floor
The following features of the film underfloor heating are distinguished:
- does not dry out the air;
- small material thickness;
- the elements are connected in parallel, which increases the overall reliability of the system;
- for installation, a microfiber mesh is used;
- The material is very durable and does not warp.
Among the advantages are the reliability of the device, rapid heating of the room, low level of infrared radiation, versatility of installation, ease of installation. The disadvantages include the relatively high cost. It is also necessary to additionally purchase fiberglass and drywall for reliable laying of the base.
Rod warm floor
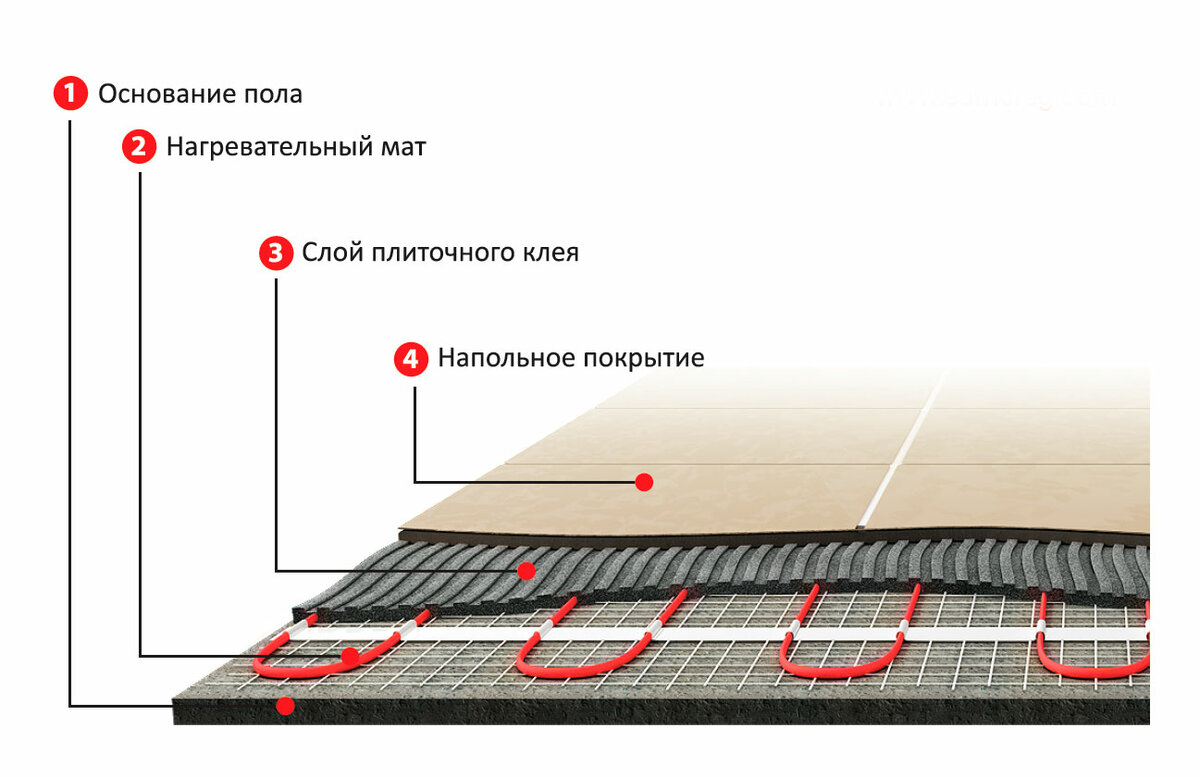
Such an infrared warm floor consists of several mats on which rods with a heating element are located. They are at a distance of 9-10 cm from each other. The device functions in the same way as film underfloor heating.
Rod infrared warm floor
The following features of the rod device can be distinguished:
- suitable for any type of flooring;
- are not subject to mechanical damage and are highly durable;
- compatible with all kinds of adhesives;
- no need to additionally lay the substrate;
- sections of the core floor function independently of each other, as evidenced by the parallel connection;
- the device does not overheat, does not damage the coating and withstands any mechanical stress.
The guarantee for high-quality warm floors is at least 10 years, during which you can count on their uninterrupted operation.
Benefits of Eastec underfloor heating
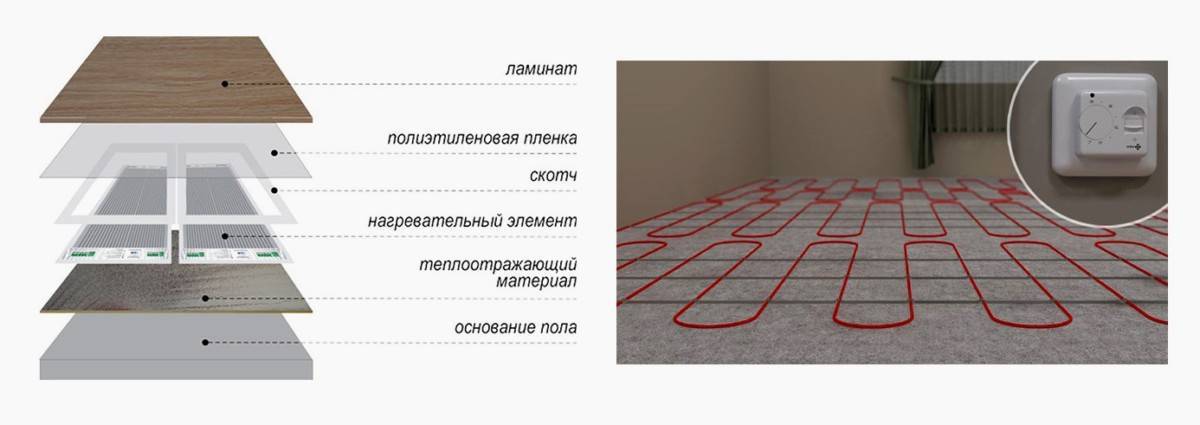
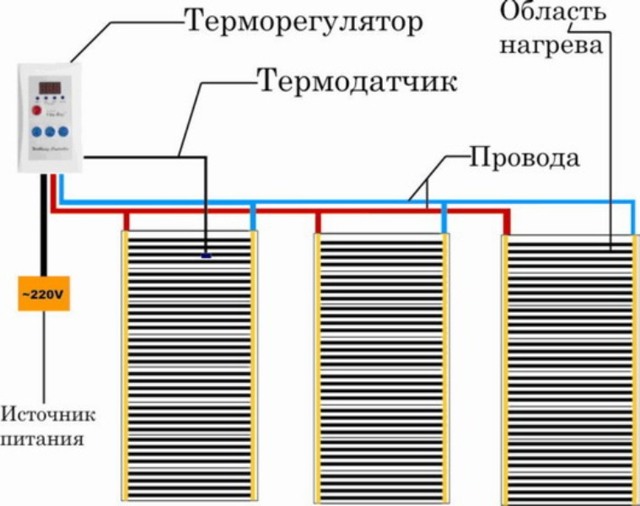
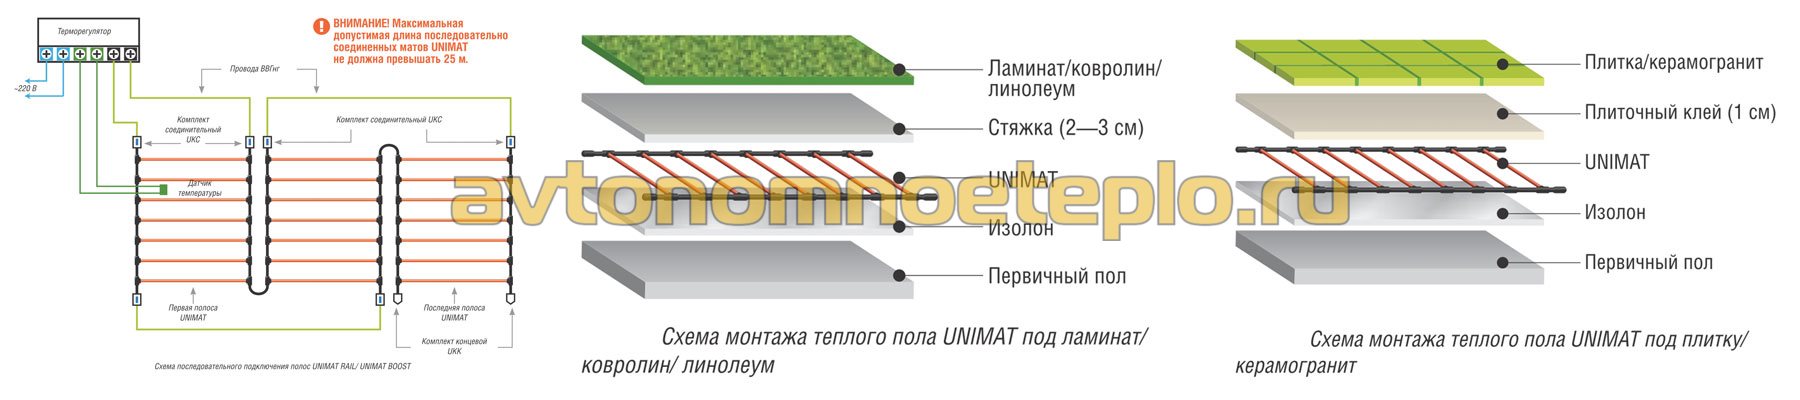
How to connect film underfloor heating
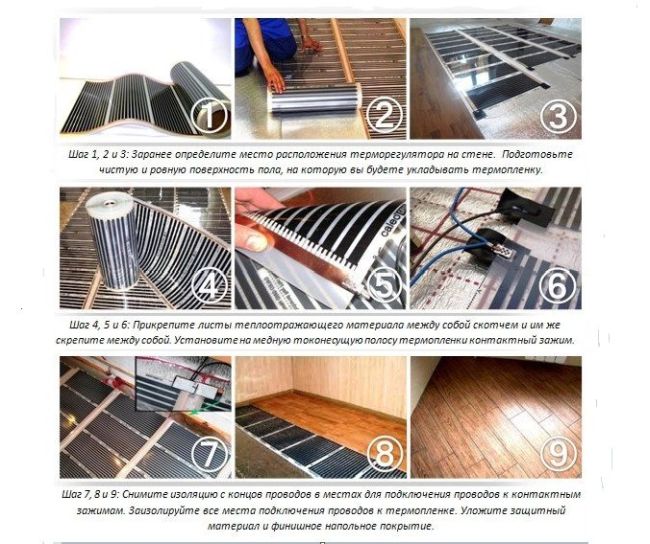
The connection begins with the connections of the film to each other. Use clamps from the kit. It is dangerous to use other clamps or some kind of improvised material.
The strips are connected strictly in parallel. A detailed diagram is attached to the instructions.
Contacts that are not used to connect wires (on the opposite side) must be insulated with overlays from the kit.
The temperature sensor is installed in the center of the thermal film strip, not far from the place where the thermostat is attached. A recess is cut out in the heat insulator for the temperature sensor.
Then proceed to connect the film and the temperature sensor to the thermostat. The entire system is connected to the mains only through a differential circuit breaker.
Before you mount the finish coating, you need to make sure that everything is done correctly. The warm floor is turned on at full power and wait a few minutes. If the entire floor has warmed up, there is no smell of burnt plastic, no extraneous clicking is heard, there is no spark, then everything is fine.
Technology nuances
A prerequisite for installing a warm floor on a wooden floor under linoleum is control over the generated power, it should not exceed 150 W / m2. GOST R 50571.25-2001 serves as a regulatory guideline for the requirements for electrically heated surfaces, according to which all heating elements require double or reinforced insulation. The same nuances are relevant for concrete floors and other types of bases.It is forbidden to start testing the heating system without a thorough check of the insulation.
To achieve the desired result when laying a warm floor under linoleum, it is recommended:
- Use a special insulating sealant on cut sections in rooms with high humidity.
- When choosing a side, focus on the manufacturer's instructions for underfloor heating.
- During installation under linoleum, protect the heating elements from mechanical damage (including falling tools).
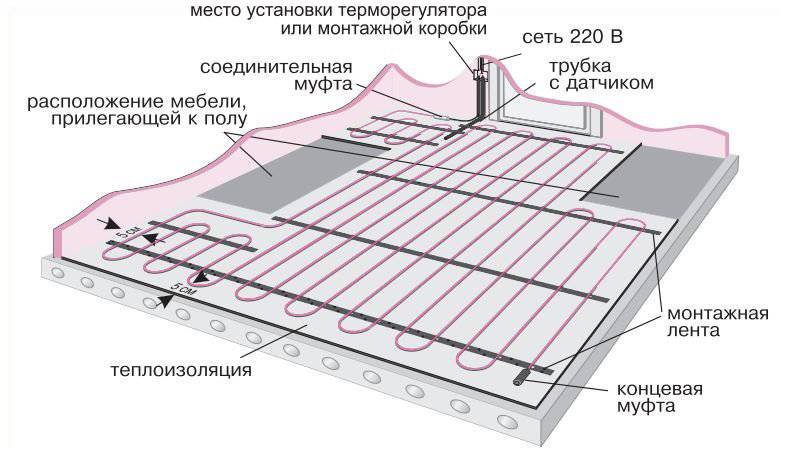
- Place the film at least 10 cm from the walls, 20 cm from other heating devices and radiators.
The errors of installing an infrared heated floor under linoleum include placement on an uneven or soft base, the use of an unsuitable coating. The grossest violation of the technology is the overlap of adjacent strips of film on each other, their unreliable fixation or isolation. The thermostat is installed in the absence of mains voltage, ideally a separate line is allocated for it, the upper limit of the scale is 30 ° C. Laying a warm floor under linoleum is carried out at an air temperature of about 18 ° C, with the heaters turned off. All work is carried out in conditions of normal humidity; placement on a wet base is unacceptable.


Installation on a concrete floor
The advantage of this option is the rigidity of the surface and the absence of heat loss through the cracks in the boards; all stages of work are still do-it-yourself. The infrared film is placed under the linoleum on a completely dry concrete base, to prevent moisture from getting on top of it, polyethylene or membranes are spread, and only then - a thin foam insulation. For dust removal and protection against fungus, it is recommended to treat the plane with deep penetration soils.
It is allowed to place the film under the linoleum on the old concrete floor, but in the absence of level differences (no more than 1-2 mm) and cracks. Leveling work is mandatory, for this purpose it is convenient to use self-spreading building mixtures with a fraction size in the range of 3-6 mm. The remaining steps for installing an infrared film on a concrete floor are carried out according to the step-by-step instructions mentioned above. In this case, in addition to polyethylene insulation, plywood or chipboard is laid on top of the strips exclusively with a groove system (it is almost impossible to fix it otherwise with your own hands). The main nuance is the need for waterproofing from below, unlike wood, concrete does not let through, but accumulates moisture.
It should be noted that installing an infrared floor on your own is considered an economical option, but in terms of reliability and durability, the film is inferior to water-heated floors. At the same time, linoleum is one of the acceptable, but not optimal coatings for all systems of this kind, with the exception of expensive core mats. It is suitable for any type of heating element, but its sensitivity to high temperatures limits its use in case such heating is the main one. According to consumer reviews, laying linoleum on a warm floor without a protective layer of plywood is pointless, the risk of damaging the cable or carbon strips is too high. However, this material is easier than others to put on their own, without contacting construction companies.
Advantages and disadvantages
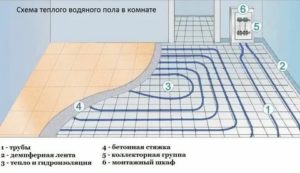
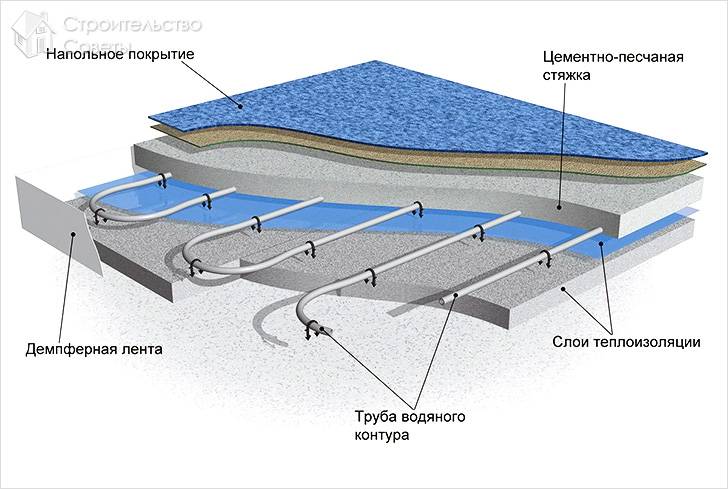
Warm floors are quite popular today and are used by many owners of private houses.Heat transfer in these systems is carried out by pipes located under the floor covering, through which the heated coolant circulates, or by means of electric heating elements.
As a result, the floor heats up and becomes warm to the touch, which in itself significantly increases the level of comfort in the house.
Among the positive qualities of a warm floor, the following stand out most clearly:
- High level of comfort. The floor heated to a certain temperature allows you to walk on it barefoot, without fear of any discomfort.
- Profitability. Savings when using underfloor heating is achieved due to the efficient distribution of energy - it moves from the bottom up and heats only the volume of the room in which heat is needed, i.e. there are no extra expenses.
- Possibility to set the temperature. Underfloor heating is strongly recommended to be equipped with an electronic control unit, which will allow the system to monitor the current temperature in the room and keep it within user-defined limits.
- Ease of installation. Arranging underfloor heating is a fairly simple task, especially when it comes to the electrical version of the system. It is more difficult to lay a water circuit, but even if desired, it is quite possible to install it yourself.
There are also disadvantages:
- High cost. To install a warm floor, you will need a lot of materials, and you will have to fork out for some tools. There is only one way to reduce the level of costs - to do all the work on arranging heating yourself.
- Reducing the volume of the room. The thickness of the warm floor can vary from 7 to 12 cm - and it is to this height that the entire floor rises.If the ceilings are high, then there will be no special problems because of this (unless you have to redo the thresholds).
- Demanding for flooring. It is possible to cover a warm floor only with those coatings that transmit heat well. It is best to purchase specialized materials designed for use in combination with underfloor heating. Improper coating will not allow the system to work effectively, and in the case of electric heaters, there is also the possibility of their failure due to overheating.
The advantages of underfloor heating are significant, and the disadvantages are not critical, so such heating systems can be used for heating, both as the main and as an additional source of heat.
Drying the floor and its launch
The main recommendation in the process of drying the floor is to exclude direct sunlight from falling on it, which will quickly dry out the surface. It is best to completely close the windows for a while. After the filling of the solution is completed, it is necessary from time to time to pierce the solution with a knitting needle - due to this procedure, the air bubbles that have accumulated at the bottom will come out.
The room temperature at which drying is carried out must not fall below +5°C. As soon as the drying process is completed, turn off the system and equalize the humidity level in the room.
Operating procedure
- Once the solution has completely hardened, the system can be activated. Normal operating power should not be reached until a few days after the first start at minimum power. At the same time, the temperature of the water is raised very slowly.
- The main task after launch is to eliminate air from the tubes.To this end, the pressure level exceeds the design standard by 15%.
- Already at the next stage, you can turn on the pump, close all pipe branches except for one, and also wait for all the air to escape completely.
Work on the installation of such a floor can be done independently. However, the process is quite laborious and time consuming, and in some cases requires the use of special tools. In addition, a rather important stage is the planning of a future floor project.
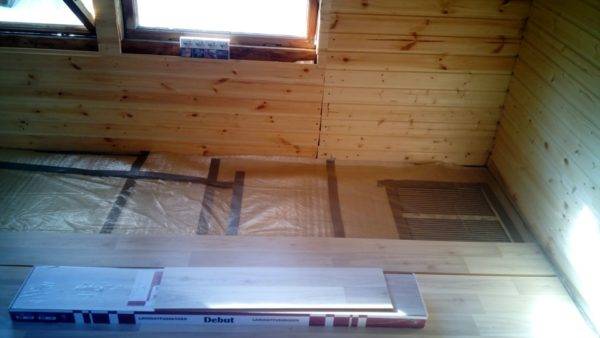
How to lay the substrate: step by step instructions
After lining under the new linoleum on concrete gender selected, remains
just do the installation work.
The floor renovation process consists of several stages:
- Preparing the concrete base.
- Surface waterproofing.
- Lining installation.
- Fixation of the middle layer.
- Laying linoleum flooring.
Each stage has its own nuances that must be followed.
take into account when performing work independently.
Training
First you need to try so that the surface of the concrete
was as smooth as possible. All debris and tools are removed from the surface. At
With the help of a broom and a vacuum cleaner, you need to get rid of dust.
If the floor is even, you can immediately proceed to the second stage.
If not, you will have to repair it. First, concrete must be primed,
then a screed will be required to repair the damage, this will mask the defects and
level the floor.
Well prepared base
If the damage is minor, patching will be required only in their
places. For this, ordinary cement mortar or laying glue is suitable.
ceramic tiles.
Waterproofing
This is an optional step, but in some cases it can
significantly extend the life of both the substrate itself and the entire
floor structures. To check for moisture problems, you need to lay
plastic film, moisture will accumulate in places of evaporation.


The film will protect against getting wet
If possible, try to find a piece
waterproofing polyethylene over the area of \u200b\u200bthe room. If you couldn't find
such a large canvas, it can be glued together from several parts using
adhesive tape. All this is laid simply on top of concrete, and fixation will be provided
the next layers are the substrate and linoleum.
Substrate
The main requirement for its installation is the most solid
design. Linoleum is sensitive to various kinds of irregularities, and through
for several years, the joints of the lining tapes will be noticeable. As a result, instead of
leveling the floor litter, on the contrary, will make it crooked.
To avoid such a problem, everything must be done strictly according to
rules. Laying instructions on the example of a roll substrate:
- You need to buy a lining taking into account the area
rooms plus a small margin. - For "addiction" the material must be left in
unfolded for 24 hours. - At the joints of the rolls,
double-sided adhesive tape for fixation.
Decomposed synthetic backing
After that, you need to leave the material for a while
for adaptation and after - go to the next step.
Fixation
To ensure that the lining is securely attached to the concrete
base, you need to glue it. For thin and light synthetic substrates
use double sided tape. Suitable for heavier options
adhesive compositions based on polyurethane.
Another fixing option is self-tapping screws. It fits those
cases where waterproofing is installed under the substrate, but a strong
fixing the structure to the base.
Process video
styling will help to get acquainted with the nuances in more detail
How to lay underlayment on the floor
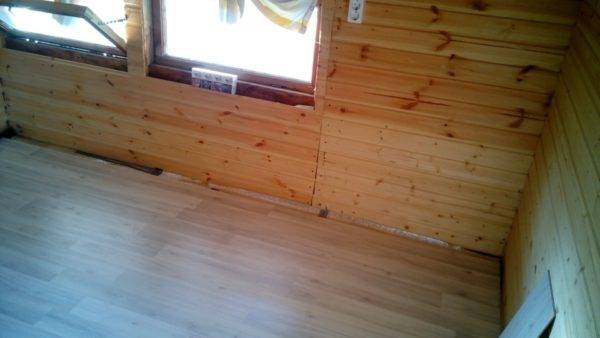
Laying linoleum
Before proceeding with the installation of the linoleum itself, you need
repeat part of the preparatory stage, namely cleaning the surface. Same way
as in the case of the lining, linoleum needs to “lie down” in expanded form
day in the styling room.
Stock flooring
Laying process:
- Linoleum is spread in the room so that it
the edges "came" a little on the wall. - It stays in this position.
- Fixation. Adhesive or double sided applied
scotch. In this case, either the entire canvas can be processed, or only
the edges. - The room is ventilated.
- Plinths are installed.
A glueless method of coating flooring is also possible. Then linoleum
fixed only with skirting boards. The advantage of this option is the possibility
easy dismantling and maintaining the integrity of the coatings.
Underfloor heating screed
Filling the screed is done only after the installation of all circuits and hydraulic tests. It is recommended to use concrete not lower than M-300 (B-22.5) with crushed stone with a fraction of 5-20 mm. A minimum thickness of 3 cm above the pipe is made not only to obtain the desired strength, but also to evenly distribute heat over the surface. Weight 1 sq. m. screed with a thickness of 5 cm is up to 125 kg.
expansion joints
Examples of dividing a large room into zones
The absence or incorrect position of thermal gaps is the most common cause of screed failure.
Shrink joints are made in the following cases:
- The premises are over 30 sq. m.;
- walls have a length of more than 8 m;
- the length and width of the room differ by more than 2 times;
- over expansion joints of structures;
- the room is too curved.
To do this, a damper tape is laid around the perimeter of the seams. At the seam, the reinforcing mesh must be divided. The expansion gap must be 10 mm thick at the base. The upper part is treated with a sealant. If the room has a non-standard shape, it must be divided into simpler rectangular or square elements. If the pipes pass through expansion joints in the screed, in these places they are laid in a corrugated pipe, 30 cm of corrugations in each direction (according to SP 41-102-98 - 50 cm on each side). It is recommended not to separate one circuit with expansion joints; supply and return pipes must pass through it.
Correct passage of contours through technological seams
Partial profile expansion joints can be used for additional separation. They are made with a trowel, 1/3 of the thickness. After the concrete has hardened, they are also sealed with sealant. If pipes pass through them, they are also protected by corrugation.


Cracks in the screed
A fairly common occurrence is the appearance of cracks on the screed after drying. This can be caused by a number of reasons:
- low density insulation;
- poor compaction of the solution;
- lack of plasticizers;
- too thick screed;
- lack of shrinkage seams;
- too fast drying of concrete;
- incorrect proportions of the solution.
It's very easy to avoid them:
- insulation must be used with a density above 35-40 kg / m3;
- the screed solution must be plastic when laying and with the addition of fiber and plasticizer;
- in large rooms, shrink joints should be made (see below);
- also, concrete should not be allowed to set quickly, for this it is covered with plastic wrap the next day (for a week).
Screed mortar
For a warm floor, it is imperative to use a plasticizer to increase the elasticity and strength of concrete. But you need to use special types of non-air-entraining plasticizers for underfloor heating.
A solution of M-300 from cement grade M-400, washed sand and gravel is made in the following proportions.
- Mass composition C: P: W (kg) = 1: 1.9: 3.7.
- Volumetric composition per 10 liters of cement P: W (l) = 17:32.
- From 10 liters of cement, 41 liters of mortar will be obtained.
- The volumetric weight of such concrete M300 will be 2300-2500 kg / m3 (heavy concrete)
There is also another option using granite screenings instead of sand, the following elements were used for its preparation:
- 2 buckets of crushed stone with a fraction of 5-20 mm;
- water 7-8 liters;
- superplasticizer SP1 400 ml of solution (1.8 liters of powder is diluted in 5 liters of hot water);
- 1 bucket of cement;
- 3-4 buckets of granite screenings with a fraction of 0-5 mm;
- bucket volume - 12 liters.
After 3 days after pouring, the screed will gain half its strength, and will completely harden only after 28 days. It is not recommended to turn on the heating system until this moment.
Step by step instructions for laying the underfloor heating system
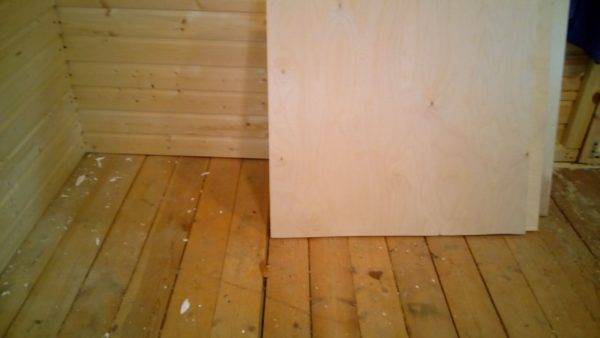
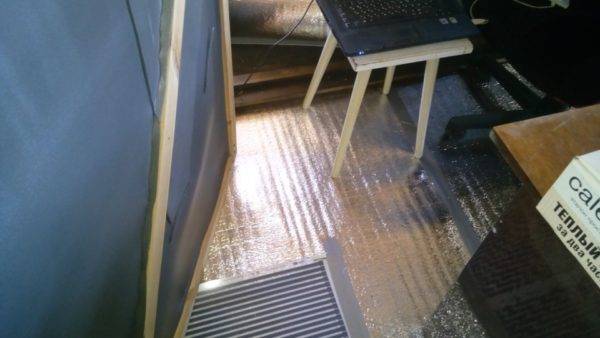
Consider the installation process using the example of laying Caleo Line underfloor heating film. The example also uses a 3mm reflective backing and regular polyethylene film. The furniture in our example had nowhere to take out, and therefore the author had to drag it around the room. Well, let's proceed directly to the workflow.
Step 1.The author began, as mentioned above, with manipulations with pieces of furniture.
Start with furniture
Step 2. Then all debris and dust had to be removed from the floor (otherwise they could push through the film heating elements in the future). You definitely can't do without a vacuum cleaner here.
The floor needs to be cleared of debris.
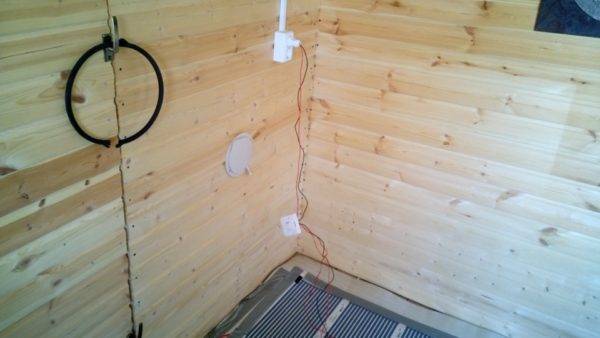
Step 3. All things were shifted to one half of the room, while work was carried out in the other.
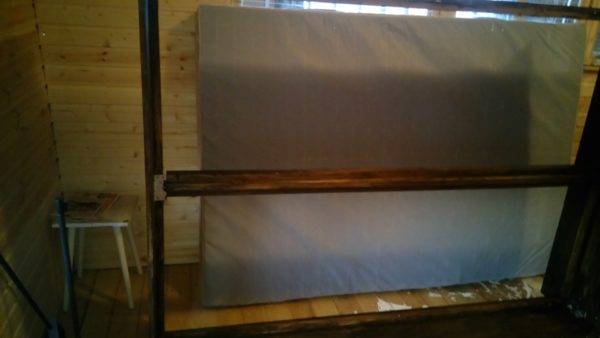
All things are shifted to one half of the room.
Step 4. Next, the tapes of the film floor itself were rolled out. It is recommended to start from the connection side.
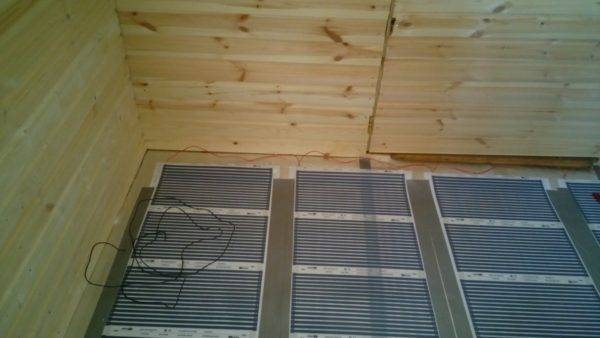
Underfloor heating film installation
Step 5. The film was attached to the substrate with adhesive tape (used ordinary reinforced). Also in the photo you can see the already installed temperature sensor.
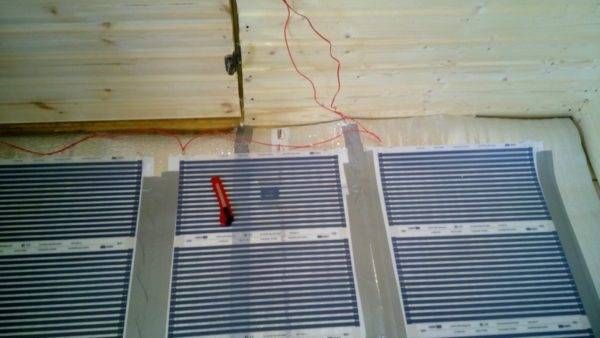
The film is attached with adhesive tape
Step 6. The author had to cover the floor with a film in parts, as seen in the photo.


Laying process
Step 7. Another fragment is glued. Care must be taken not to damage the infrared film in the work.
Do not damage the heating elements
Step 8. After the installation of the film was completed, the operability of the system was checked - the latter was connected for a while.
System health check
Step 8. After that, a plastic film was laid, which was also fastened with adhesive tape.

The floor is covered with foil
Step 9. Next, the finishing floor covering was laid (in our example, laminate). Here are the first 4 rows of lamellas laid.
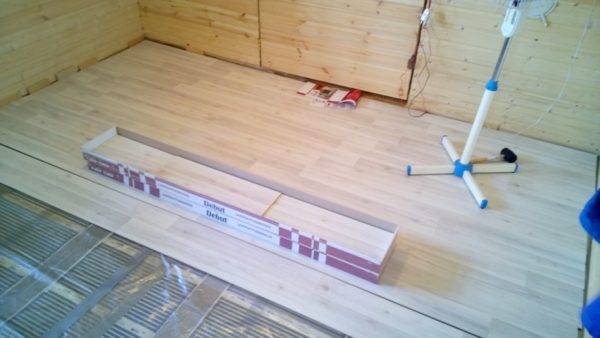
Laminate installation has begun
Step 10. The laying process continued and now we have smoothly come to an end.
Laminate installation process
Step 11. The last row remains. It, as is usually the case, had to be cut.
Laid last row
Step 12This series was the most difficult, I had to spend a lot of time and effort.

The last row is the hardest.
Step 13. As a result, a small insert came out, but it would not have been if the area of the room had been at least 50 mm larger.


Perhaps this insert would not have to be done
The advantage of the system is that the floor warms up evenly and quickly (in an hour the temperature rose by about 15 degrees, but it was warm outside). Also, heat goes from bottom to top, that is, the entire volume of the room is heated.
Overview of system design steps
The technology for installing a water floor heating system under linoleum involves the use of the following types of equipment:
- pump and manifold cabinet;
- pipe made of metal polymers;
- expanded polystyrene panels;
- steam and thermal insulation;
- concrete mortar with additives of plasticizers;
- thermostats to control the pressure in the system.
As a tool that allows you to arrange the structure yourself, you can use a pipe cutter, a spring jig and press tongs. Install the water heating system in the following order:
- Installation in the room of a collector cabinet that provides system control, as well as water distribution.
- Installation of a pumping and mixing unit that creates a circuit for a heating system with an adjustable temperature water level.
- Assembling a collector block responsible for supplying water to different floor circuits.
- Placement of the assembled equipment in a manifold cabinet with subsequent connection to the circuit.
For further installation of a water heating system under a linoleum coating, it will be necessary to sequentially perform several stages of installation work:
- Develop a layout plan.
- Prepare the base for the system.
- Attach damper tape.
- Lay a layer of insulation.
- Perform pipe installation.
- Pour concrete screed.
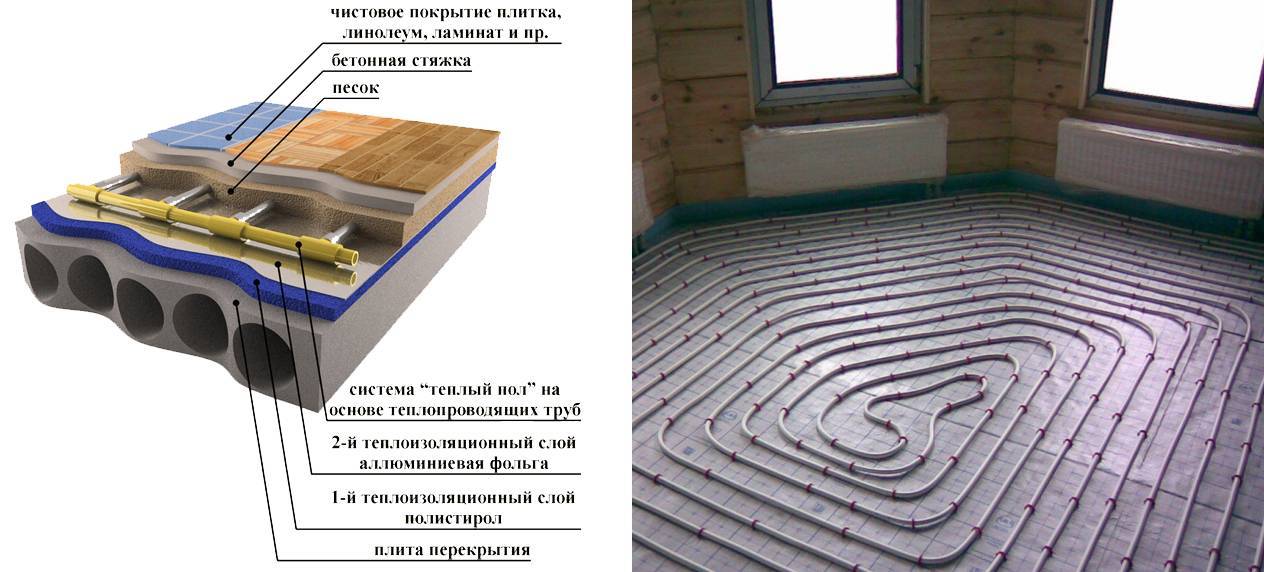
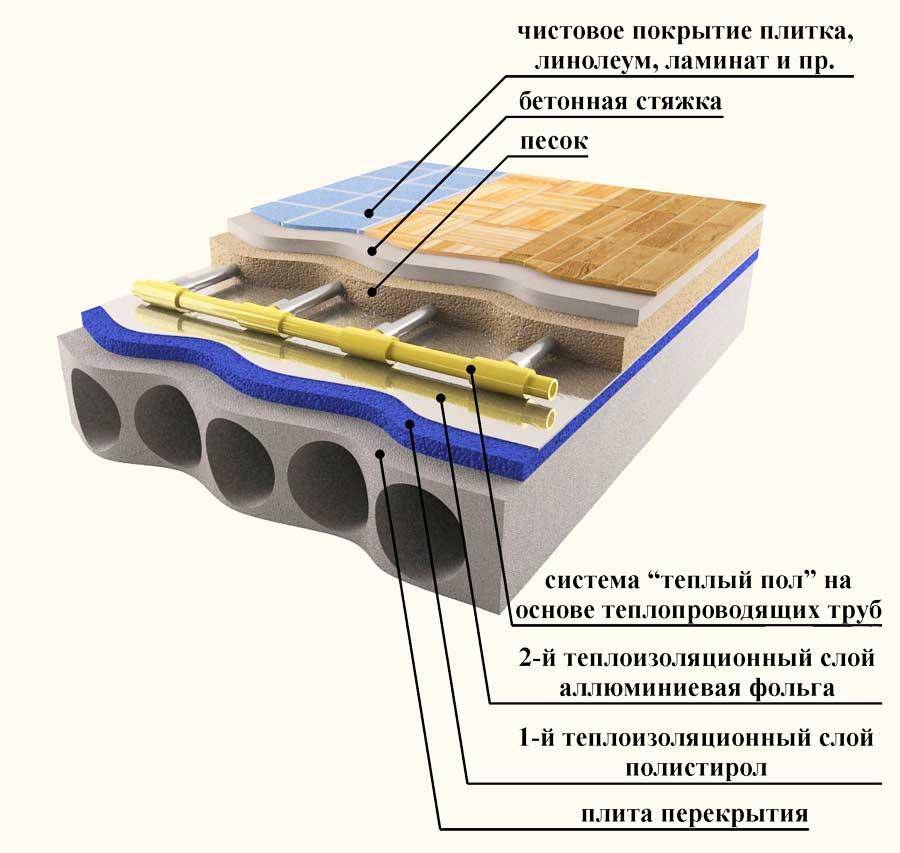
Before performing the floor screed, the base surface is leveled, cracks, irregularities are eliminated, and all debris is removed. The floor is covered with a vapor barrier film with a margin of 10 cm at each wall. A layer of heat insulator made of polystyrene plates connected with a groove is placed on top of the film. If there is a wooden floor in the room or it is impossible to deliver concrete to it or the arrangement of the screed cannot be carried out in accordance with the rules, then the floor water heating system is mounted on a polystyrene substrate.
Laying tiles
For laying tiles
you will need a spatula with teeth, plastic stops, a primer and
grout composition.
Lay tiles
should be on a flat and clean surface. Start, need from the middle
rooms, going in different directions. The position of each tile is controlled by
help level.
Notched trowel for
most of the tiles are applied with adhesive, and the other with sealant. They are
distributed evenly over the surface of the product. Sealant should be applied to
two layers. After that, the tile is placed on the base and pressed tightly. AT
the gap between the floor and the tiles, you need to add a little sealant, and
Remove any excess with a rag. This action is repeated until
the whole room is laid.
After laying each
row it is necessary to check the evenness of the laid tiles with a level. Between tiles
cruciform stops are installed, they will help to make seams of one
size.
When the whole area
room is laid, you need to let the glue dry. This will require at least 12
hours.
Types of underfloor heating
Underfloor heating can have two design options:
- Water. The source of heating is hot water circulating through pipes located inside the thickness of the floor.
- Electric. A heating cable or infrared radiation is used.
In addition to design differences, there is another important circumstance that fundamentally separates these types from each other: a water heated floor uses a coolant that has certain individual properties and qualities, in particular, heating-cooling inertia. The electric option depends only on the presence of an AC connection, which makes its use more convenient, maintainable


