- We calculate the power of the future wind generator
- What you need
- To create from a washing machine
- To create from an induction motor
- To create from plastic bottles
- To create from an electric motor
- The legality of installing a wind turbine
- Beginning of work
- How to make a vertical type wind generator yourself
- Compare the pros and cons of the installation
- Main problems and common mistakes
- What is a wind generator?
- Self-made home wind blower from a stepper motor
- What to prepare for work
- Drawings and sketches
- Manufacturing technology
- Health check
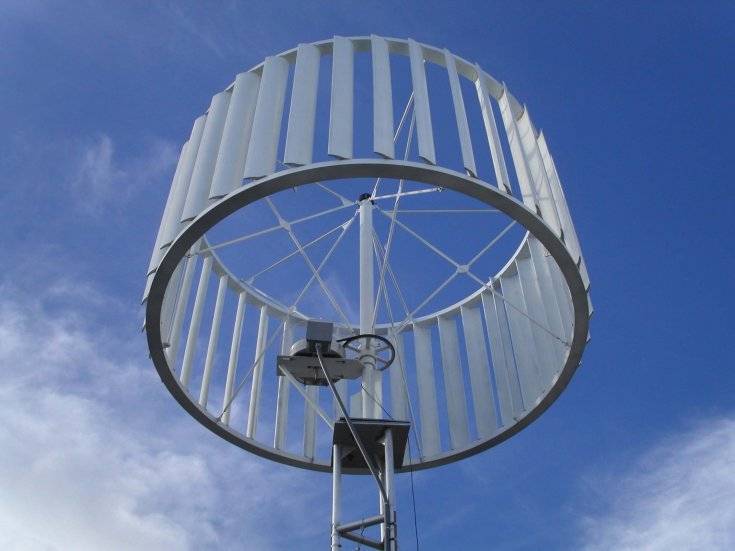
- wind wheel
- Operating principle
- We wind the coil
- Mini and micro
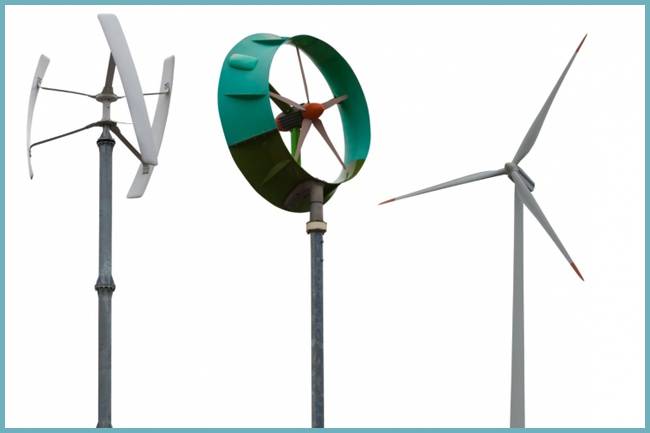
- Types of wind turbines and the principle of their operation
- The principle of operation of a wind generator and types of equipment
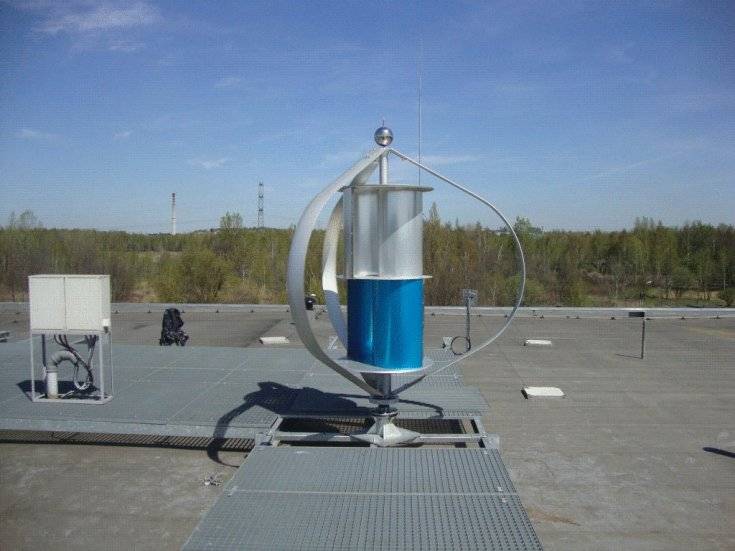
- Vertical option
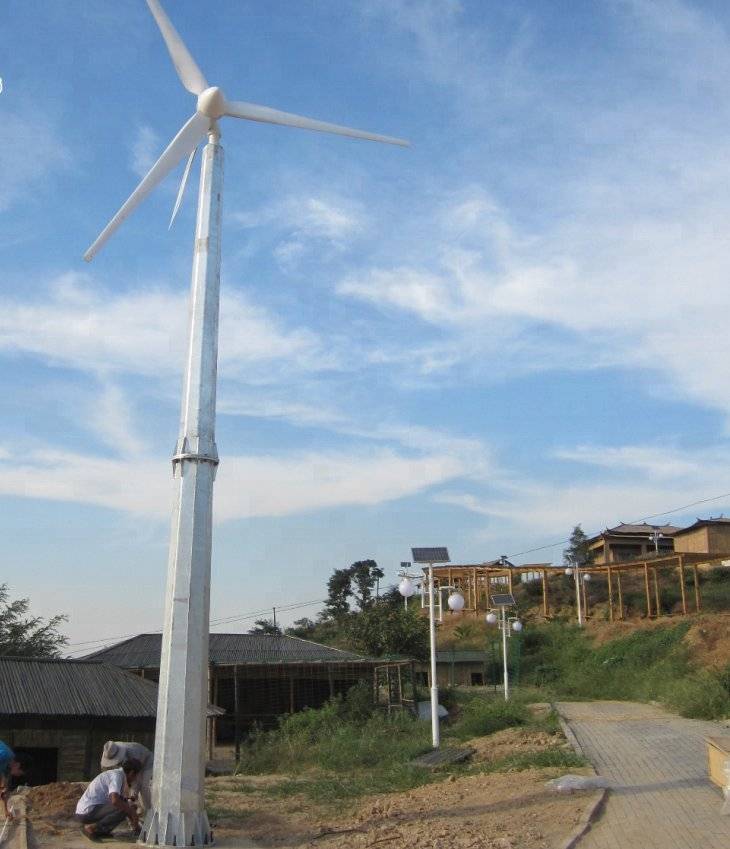
- Horizontal Models
- How to do it yourself?
We calculate the power of the future wind generator
First you need to find out how much power a wind generator should have with your own hands, what are the functions and loads that it will face. As a rule, alternative sources of electricity are used as auxiliary, that is, designed to help the main power supply.Therefore, if the power of the system is even from 500 watts, this is already quite good.
However, the final power of the wind turbine depends on other factors, including:
- wind speed;
- number of blades.
To find out the appropriate ratio for horizontal type fixtures, we recommend that you familiarize yourself with the table below. The numbers in it at the intersection are the required power (indicated in watts).
Table. Calculation of the required power for horizontal wind generators.
| 1m | 3 | 8 | 15 | 27 | 42 | 63 | 90 | 122 | 143 |
| 2m | 13 | 31 | 63 | 107 | 168 | 250 | 357 | 490 | 650 |
| 3m | 30 | 71 | 137 | 236 | 376 | 564 | 804 | 1102 | 1467 |
| 4m | 53 | 128 | 245 | 423 | 672 | 1000 | 1423 | 1960 | 2600 |
| 5m | 83 | 166 | 383 | 662 | 1050 | 1570 | 2233 | 3063 | 4076 |
| 6m | 120 | 283 | 551 | 953 | 1513 | 2258 | 3215 | 4410 | 5866 |
| 7m | 162 | 384 | 750 | 1300 | 2060 | 3070 | 4310 | 6000 | 8000 |
| 8m | 212 | 502 | 980 | 1693 | 2689 | 4014 | 5715 | 7840 | 10435 |
| 9m | 268 | 653 | 1240 | 2140 | 3403 | 5080 | 7230 | 9923 | 13207 |
For example, if in your region the wind speed is predominantly from 5 to 8 meters per second, and the required power of the wind generator is 1.5-2 kilowatts, then the diameter of the structure should correspond to about 6 meters or more.
What you need
As the initial base for the construction of devices, various components from household appliances and cars can be used. Some of the tools and materials required during operation may vary depending on the basis of the device.
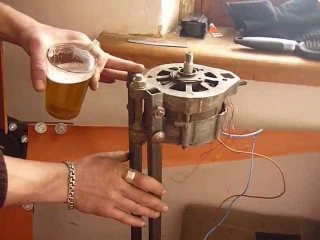
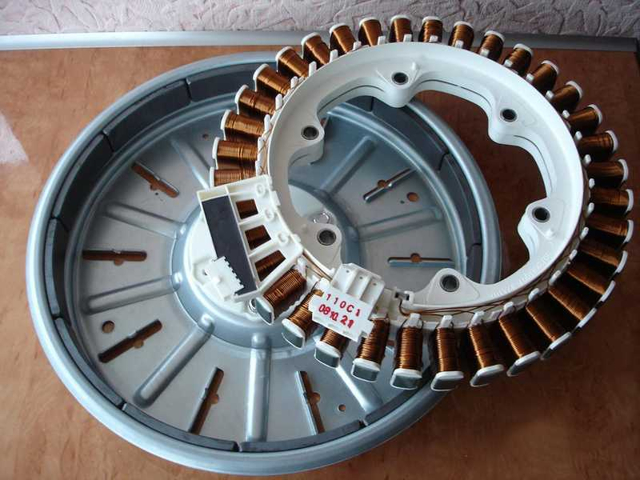
To create from a washing machine
To complete the work on creating a wind generator from a washing machine, you will need:
- an electric motor from a washing machine with a power of 1.4-1.6 kW;
- 32 neodymium magnets with a diameter of 10-12 mm;
- sandpaper;
- epoxy or cold welding;
- screwdriver;
- current rectifier;
- tester.
To create from an induction motor
To make a device from an asynchronous motor for a private house, you may need:
- steel water pipe with an outer diameter of 70-80 mm for building a mast;
- material for impeller blades (aluminum tube, thin wooden boards, fiberglass) or prefabricated blades;
- materials for the manufacture of the foundation (boards, pipe or profile trimmings, cement mortar);
- steel rope;
- thin sheet metal or moisture-resistant plywood for the shank;
- asynchronous motor (the most popular models are AIR80 or AIR71);
- additional neodymium magnets.
To create from plastic bottles
To make a small wind generator based plastic bottles do not require expensive materials.
Materials and tools for assembling a wind turbine from plastic bottles:
- steel or chrome-plated tube with a diameter of 25 mm and a wall thickness of up to 1.0 mm with a total length of 3000 mm;
- cylindrical plastic bottles with a volume of 1.5 liters - 16 pieces (when using bottles of a larger volume, you may have to recalculate the dimensions of the shaft);
- bottle caps in the amount of 16 units;
- ball bearings No. 205 (other series with a shaft hole diameter of 25 mm are also suitable);
- a pair of clamps with a size of 6/4 "(used as bearing housings);
- two 3/4″ clamps that will serve as attachment points for the wind turbine;
- an additional clamp for installing the generator (in the example below, a product with a size of 3.5 ″ is used);
- nine M4*35 size screws with M4 nuts;
- 32 M5 washers for installing covers;
- rubber tube with an inner diameter of 25 mm (length 150-200 mm);
- bushing with an outer diameter of 25 mm and an inner hole of 9-10 mm;
- stepper motor up to 10 W;
- bicycle generator;
- lantern with dynamo;
- drill or screwdriver;
- hacksaw for metal;
- drills for making holes in a metal pipe with a diameter of 4 and 8 mm;
- a screwdriver with a cross-shaped and flat sting;
- wrench 7 mm.
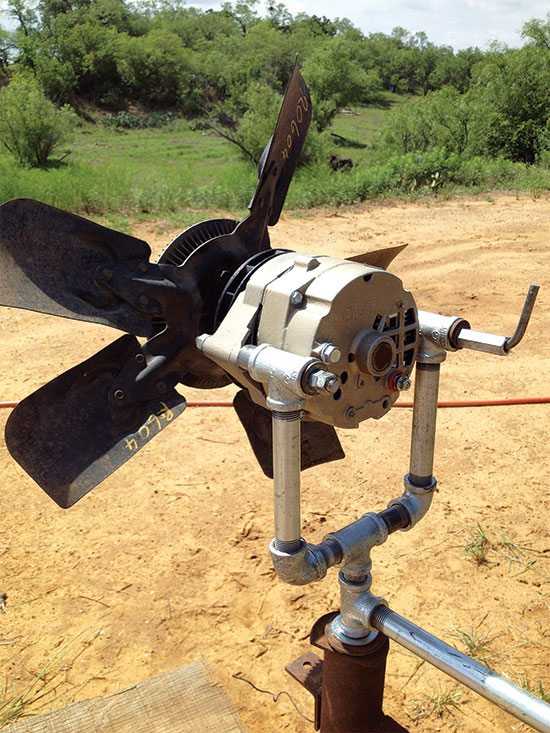
To create from an electric motor
Necessary materials:
- generator from the car;
- serviceable battery 12 v;
- an inverter with a power of at least 1 kW for converting direct current with a voltage of 12 volts to alternating current 220 volts;
- a barrel of 200 liters for the manufacture of blades;
- 12 V light bulb for control;
- switch and voltmeter;
- copper wiring with a wire cross section of 2.5 mm²;
- a pipe with a diameter of about 45-50 mm for the axis;
- pipes with a diameter of 100 mm or more for the construction of a mast;
- bearings;
- welding machine;
- cement mortar;
- guy ropes with a diameter of 6 mm and anchors for fixing to the ground;
- fasteners (hardware, clamps, etc.).
Tools:
- roulette;
- pencil and scriber for metal;
- set of wrenches;
- drill or screwdriver;
- container for mixing the solution;
- drills for metal;
- grinder and several spare laps;
- metal scissors;
- files and sandpaper.
The legality of installing a wind turbine
Alternative energy sources are the dream of any summer resident or homeowner whose site is located far from the central networks. However, when we receive bills for electricity consumed in a city apartment, and looking at the increased tariffs, we realize that a wind generator created for domestic needs would not hurt us.
After reading this article, perhaps you will make your dream come true.
A wind generator is an excellent solution for providing a suburban facility with electricity. Moreover, in some cases, its installation is the only possible way out.
In order not to waste money, effort and time, let's decide: are there any external circumstances that will create obstacles for us in the process of operating a wind turbine?
To provide electricity to a dacha or a small cottage, a small wind power plant is sufficient, the power of which will not exceed 1 kW. Such devices in Russia are equated to household products. Their installation does not require certificates, permits or any additional approvals.
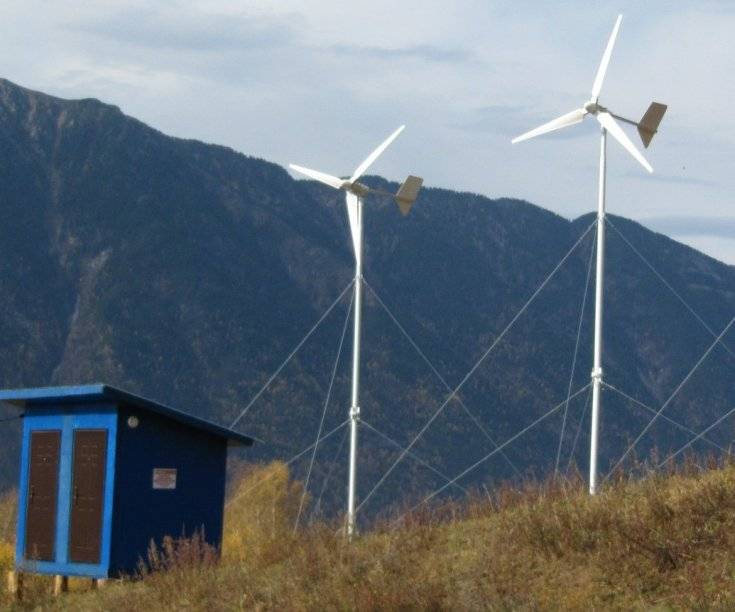
In order to determine the feasibility of installing a wind generator, it is necessary to find out the wind energy potential of a particular area (click to enlarge)
However, just in case, you should ask if there are any local regulations regarding individual power supply that could create obstacles in the installation and operation of this device.
Claims may arise from your neighbors if they experience inconvenience associated with the operation of the windmill. Remember that our rights end where other people's rights begin.
Therefore, when buying or self-manufacturing a wind turbine for a home, you need to pay serious attention to the following parameters:
Mast height. When assembling a wind turbine, it is necessary to take into account the restrictions on the height of individual buildings that exist in a number of countries of the world, as well as the location of your own site. Be aware that near bridges, airports and tunnels, buildings that are more than 15 meters high are prohibited.
Noise from gearbox and blades. The parameters of the generated noise can be set using a special device, after which the measurement results can be documented
It is important that they do not exceed the established noise standards.
Ether interference.Ideally, when creating a windmill, protection against tele-interference should be provided where your device can provide such trouble.
environmental claims. This organization can prevent you from operating the facility only if it interferes with the migration of migratory birds. But this is unlikely.
When creating and installing the device yourself, learn these points, and when buying a finished product, pay attention to the parameters that are in its passport. It is better to protect yourself in advance than to be upset later.
- The expediency of a windmill is justified primarily by a sufficiently high and stable wind pressure in the area;
- It is necessary to have a sufficiently large area, the useful area of \u200b\u200bwhich will not be significantly reduced due to the installation of the system;
- Due to the noise accompanying the work of the windmill, it is desirable that there be at least 200 m between the neighbors' housing and the installation;
- The steadily increasing cost of electricity convincingly argues in favor of a wind generator;
- The installation of a wind generator is possible only in areas whose authorities do not interfere, but rather encourage the use of green types of energy;
- If there are frequent interruptions in the construction area of the mini wind power plant, the installation minimizes the inconvenience;
- The owner of the system must be prepared for the fact that the funds invested in the finished product will not pay off immediately. The economic effect may become tangible in 10-15 years;
- If the payback of the system is not the last moment, you should think about building a mini power plant with your own hands.
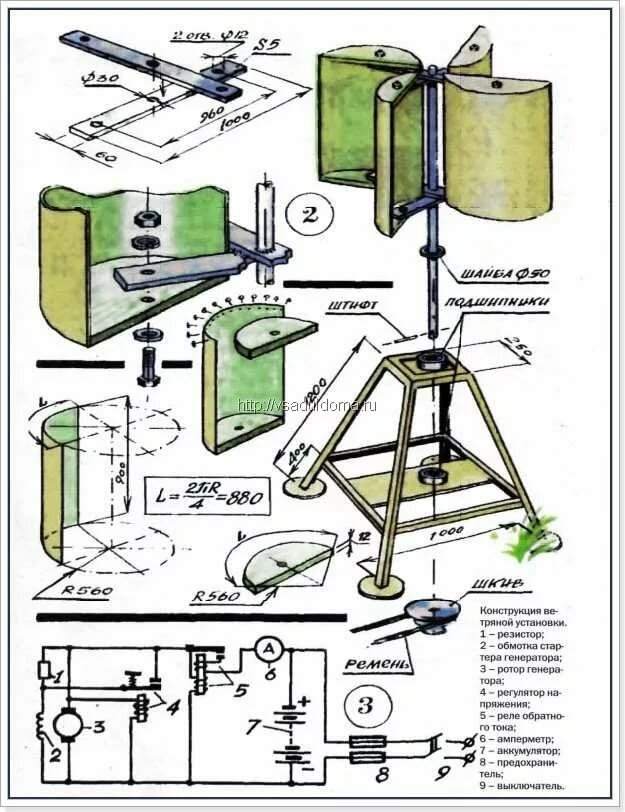
Beginning of work
Work on the manufacture of a wind power generator begins with the fact that you need to take a container made of stainless steel or aluminum. Most often, a bucket, a large saucepan, boiling water, etc. are used. This will be the basis for the future windmill.


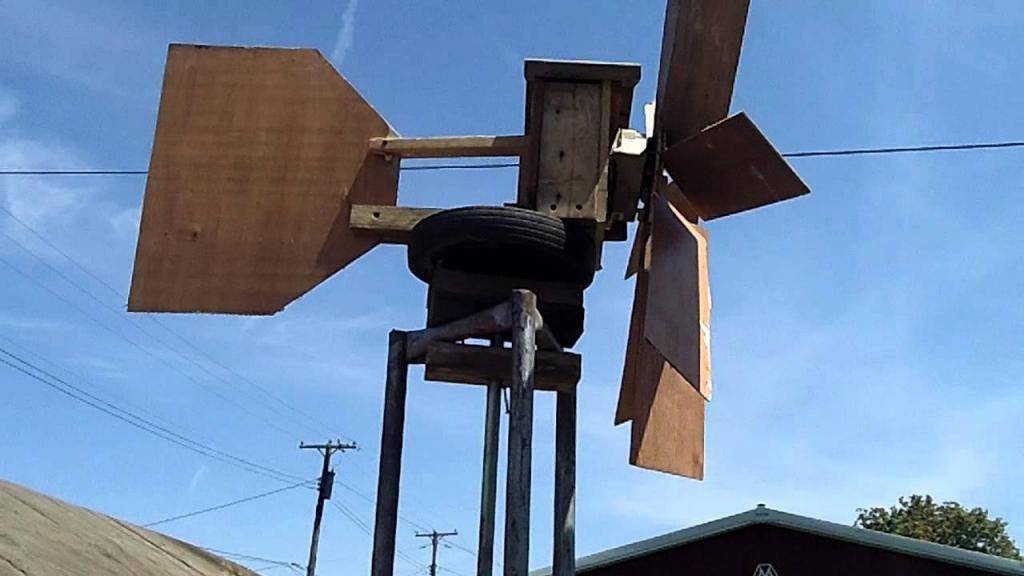


Using a tape measure and a marker or pencil, you need to divide the container into 4 equal parts. Further, of course, it is necessary to cut this metal according to the markup. A grinder is usually used for this, however, if the base is made of a material such as galvanized metal or painted tin, then you will have to work with scissors, since such materials will simply overheat during cutting with a grinder. These will be the blades, but you should not cut the structure completely. Now you need to start reworking the generator pulley.
Both in the bottom of the tank and in the generator pulley, you need to make markings and drill holes for the bolts
Here it is very important to monitor the symmetrical arrangement so that there is no imbalance during rotation.
After that, it is necessary to bend the blades, but not too much.
It is important to consider the direction in which the generator will rotate. Most often, the direction is clockwise. As for the bending of the blades, the area of these devices will directly affect the speed of rotation, as the plane of the impact of the air flow on the device changes.
As for the bending of the blades, the area of these devices will directly affect the speed of rotation, as the plane of the impact of the air flow on the device changes.
After all these manipulations, a bucket or other container with ready-made bolt holes is attached to the generator pulley.
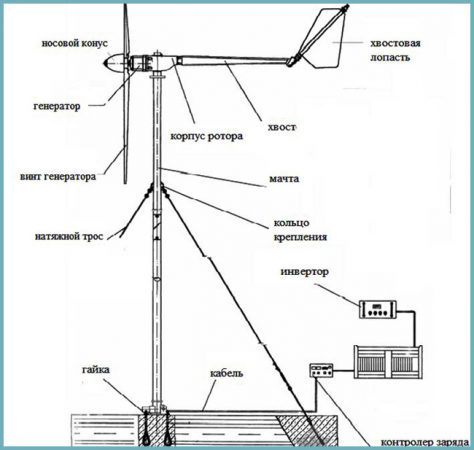
The generator is attached to the mast and fixed with prepared clamps.After that, you need to connect the wires and assemble the electrical circuit.
Here you will have to have a diagram on hand, you will have to remember the colors of all the wires and the marking of the contacts. Later, all this will definitely be needed, but for now, you can also attach the wires to the windmill mast.
A home wind generator also requires a battery connection. To connect it, you will need previously purchased wires with a cross section of 4 mm2. A length of 1 meter will be enough. To connect a load to this network, that is, consumers of electrical energy (light lamps, household appliances, etc.), 2.5 mm2 wires are enough. After that, you will need to install and connect an inverter to the circuit, for this again you need 4 mm2 wires.
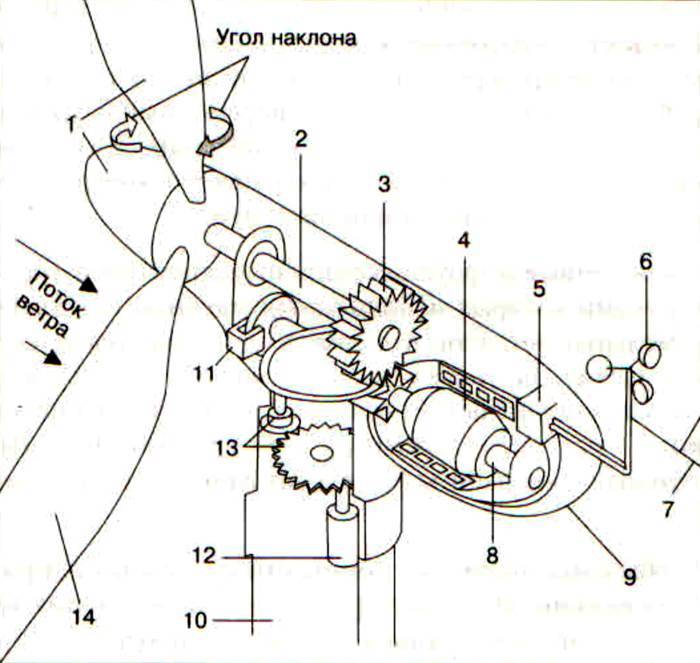
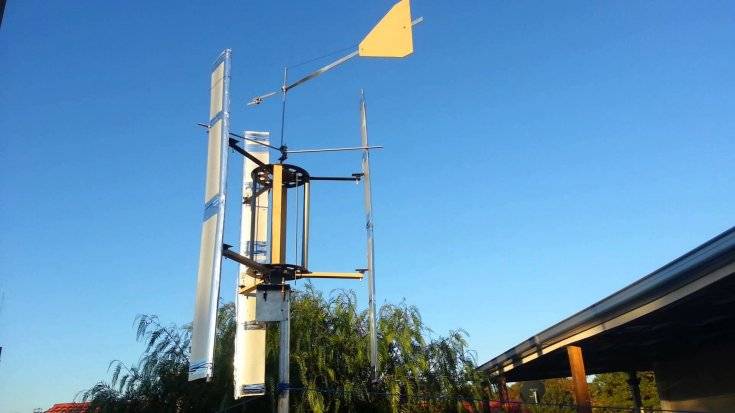
How to make a vertical type wind generator yourself
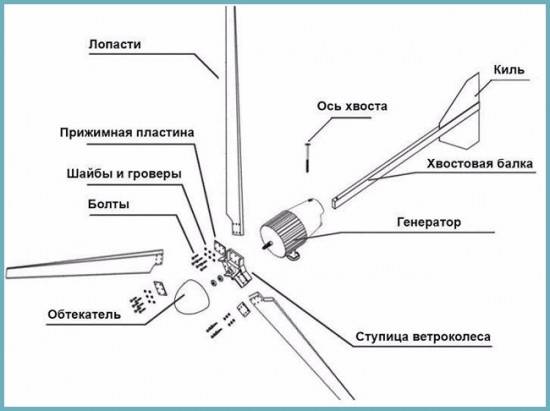
Self-manufacturing of a wind generator is quite possible, although not as simple as it might seem at first glance. You will need to either assemble the entire set of equipment, which is very difficult, or purchase some of its elements, which is quite expensive. The kit may include:
- wind generator
- inverter
- controller
- battery pack
- wires, cables, accessories
The best option would be the partial purchase of finished equipment, partial do-it-yourself manufacturing. The fact is that the prices for nodes and elements are very high, not accessible to everyone. In addition, the high one-time investment makes one wonder if these funds could be spent in a more efficient way.
The system works like this:
- the windmill rotates and transmits torque to the generator
- an electric current is generated that charges the battery
- the battery is connected to an inverter that converts direct current to 220 V 50 Hz alternating current.
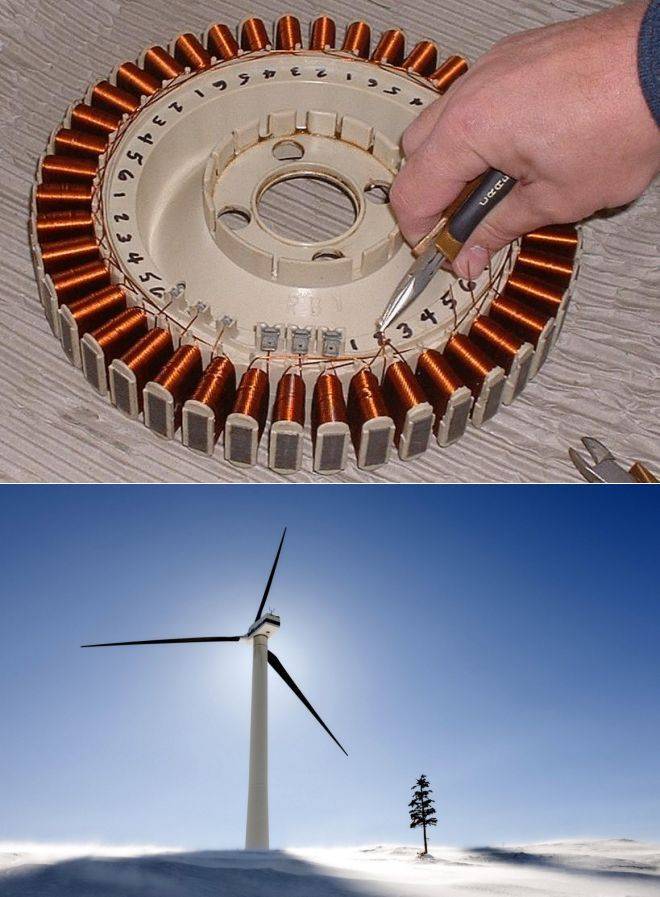
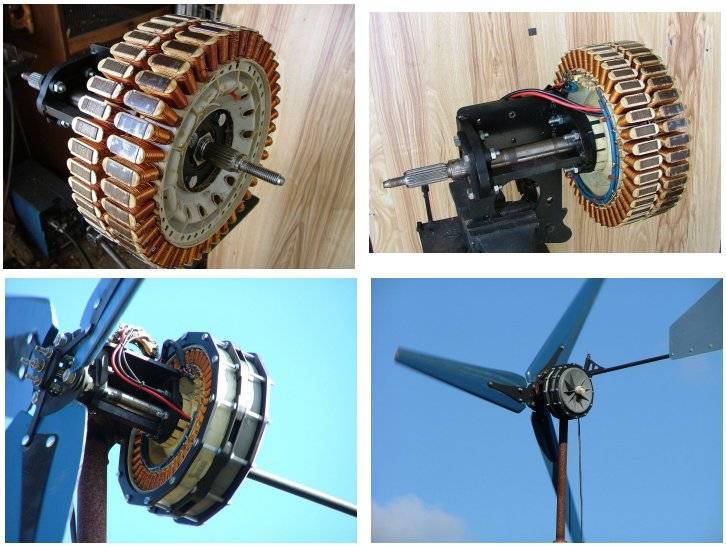
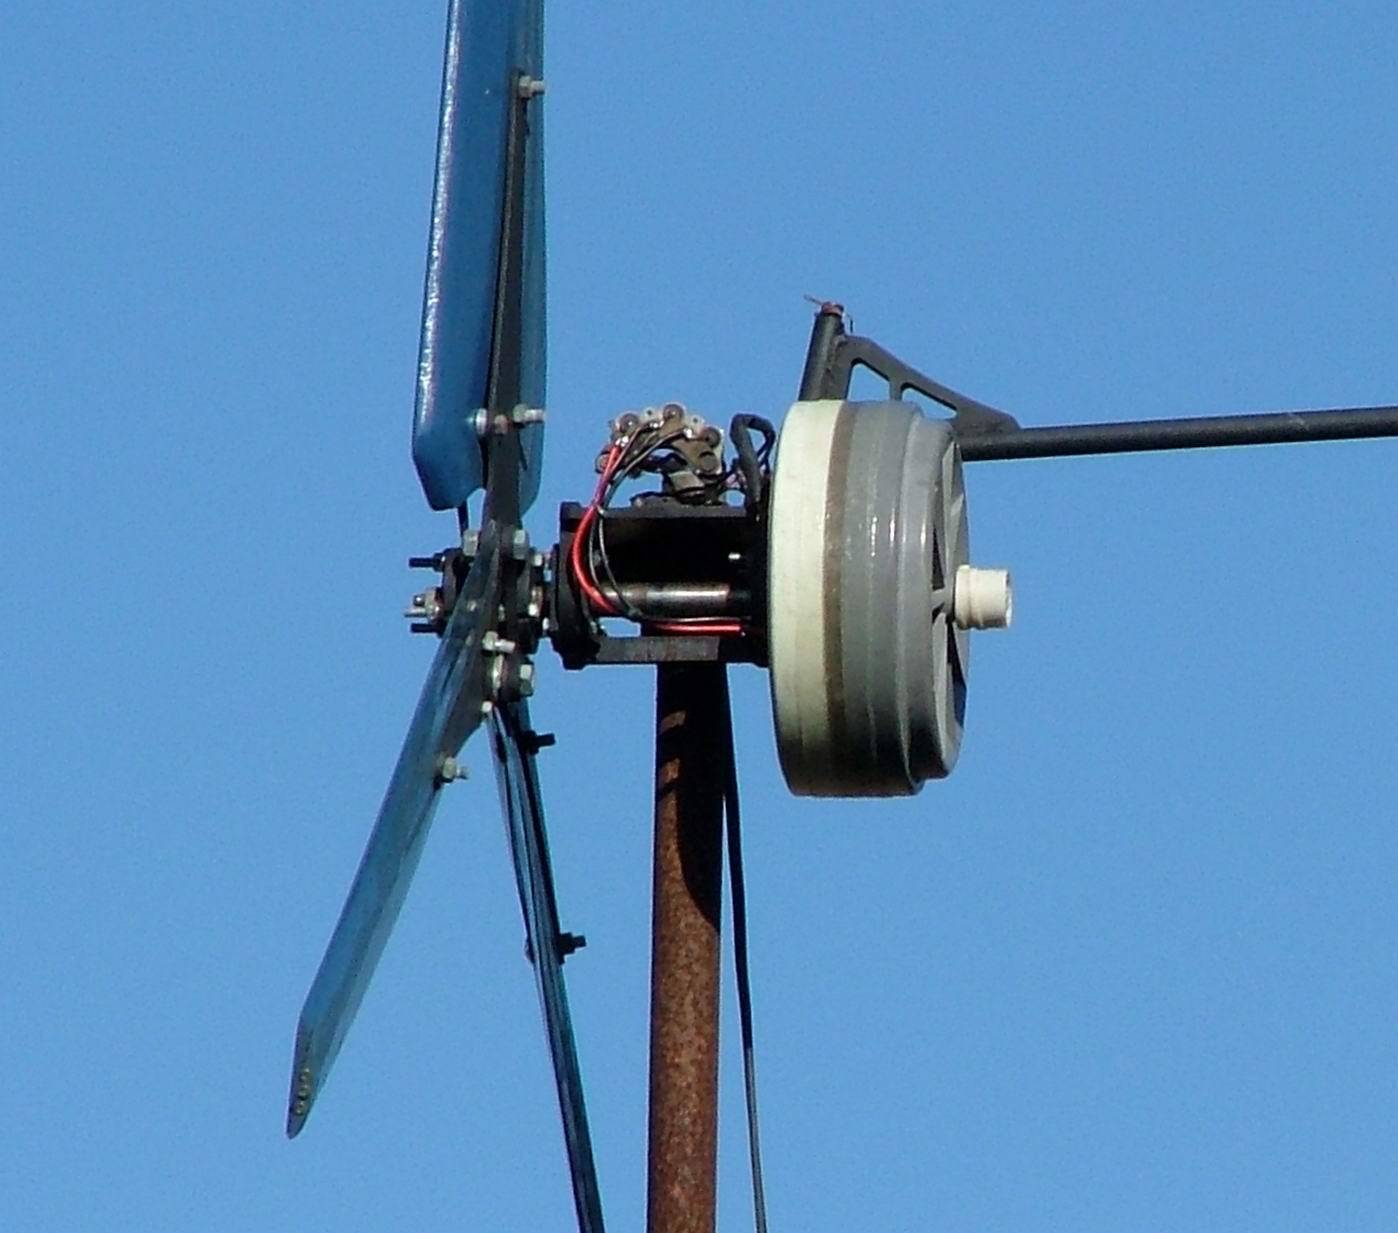
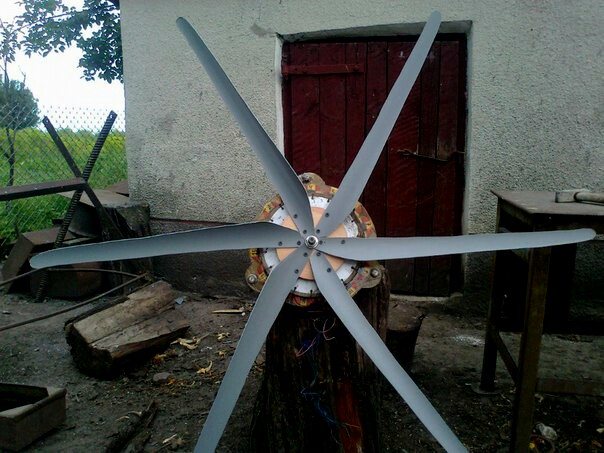
Assembly usually starts with a generator. The most successful option is to assemble a 3-phase design on neodymium magnets, which allows you to generate the appropriate current.
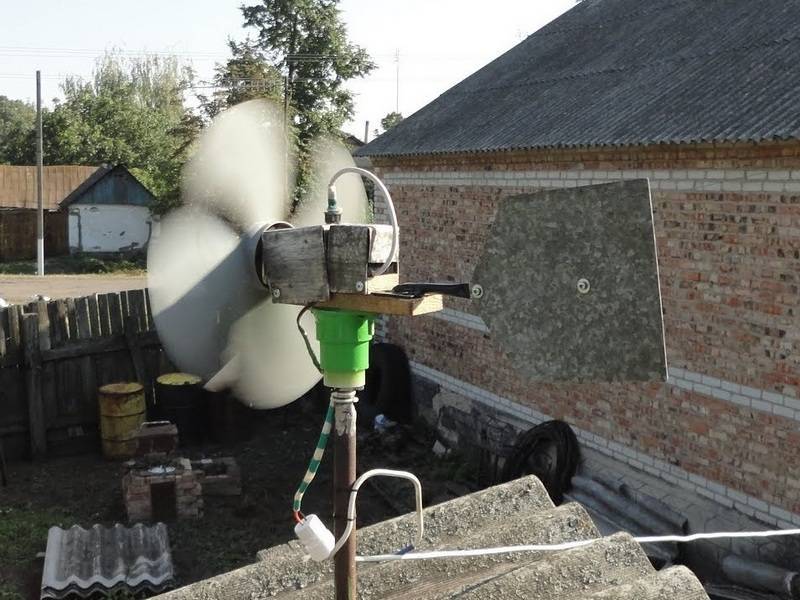
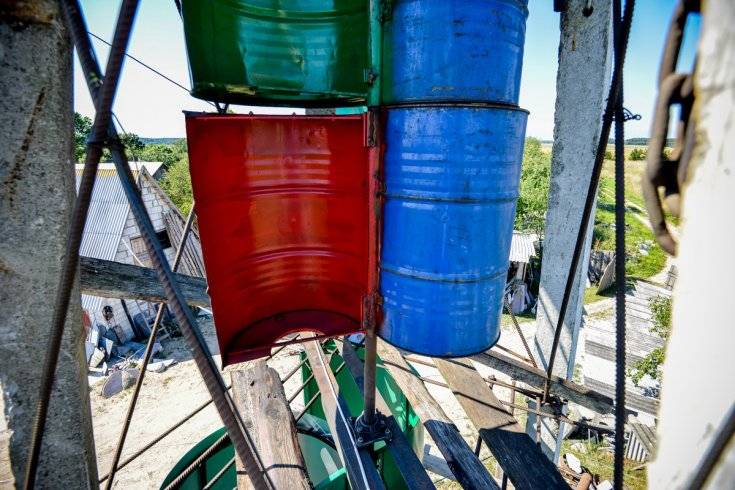
Rotating parts are made on the basis of one of the most accessible systems for recreating with your own hands. The blades are made from pipe sections, metal barrels sawn in half or sheet metal bent in a certain way.
The mast is welded on the ground and installed in a vertical position already finished. As an option, it is made of wood immediately at the installation site of the generator. For a solid and reliable installation, a foundation should be made for the supports and the mast should be fixed with anchors. At a high height, it should be additionally secured with stretch marks.
All components and parts of the system require adjustment to each other in terms of power, performance settings. It is impossible to say in advance how efficient a wind turbine will be, since too many unknown parameters will not allow us to calculate the characteristics of the system. At the same time, if you initially lay the system under a certain power, then the output is always quite close values. The main requirement is the strength and accuracy of the manufacture of nodes so that the operation of the generator is sufficiently stable and reliable.
Compare the pros and cons of the installation
Wind generators have been used for many years, their designs are constantly being improved, and wind is an easily accessible source of energy.
Devices powered by it are absolutely safe for the environment and convenient, because. located on masts and do not occupy usable area. They are easy to maintain and repair.
Due to the instability of wind turbines, it is necessary to invent ways to provide houses with additional energy. A good option is a combination of wind and solar installations
Windmills are noisy during operation. The sound can be louder or quieter, but it is always there. Sometimes this disturbs home owners and even neighbors.


Other inconveniences can also be noted. The wind is an unpredictable element, so the operation of generators is unstable and you have to accumulate energy so as not to be left without electricity during periods of calm.
Main problems and common mistakes
The main problem faced by the creators of homemade wind turbines is insufficient output current. This is possible if a weak generator was used during assembly. Before starting installation, you should carefully calculate the electrical circuit of the wind generator
If the assembly is assembled independently - with coil winding - it is important to correctly calculate the wire diameter and the number of turns
Common mistakes that are made during assembly:
- Wrong choice of materials leads to either complete or partial destruction. Most often this happens with the propeller. It is recommended to rely on the existing experience gained during the creation of working structures.
- Weak strengthening of the mast threatens with the collapse of the wind turbine. Most masters use additional extensions, which take up additional space, but guarantee the stability of the wind turbine.
- The absence of a braking mechanism in generators leads to premature wear of bearings and seats, as well as to overheating of the entire assembly in strong winds. In some cases, the shaft may jam.
- Problems with the electrical part arise when the assembly rules are violated or the use of unusable components is used.
 If the device is assembled correctly, there should be no problems in its operation.
On wind vane-type wind turbines that rotate around their axis, it is imperative to install a limiter that will prevent spinning during strong winds.
Making a windmill on your own is a feasible task for a person who knows how to use household power tools. There are many schemes and designs on the network, among which you can choose the appropriate option for a particular situation. Combinations of wind turbines with solar panels systems are possible, this will make the home energy system more efficient.
The main advantage of home-made devices is that the owner is well aware of the installation device and is able to upgrade or repair it in a short time.
What is a wind generator?
A wind generator is a complex of mechanical devices related to an alternative source of electricity that converts the kinetic energy of the wind into mechanical energy using blades, and then into electricity.
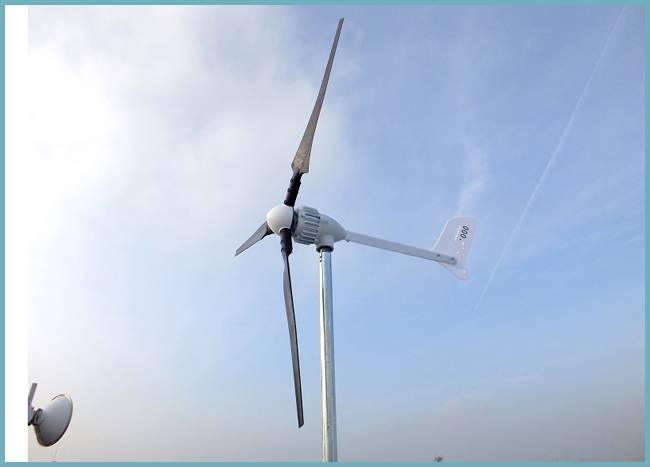
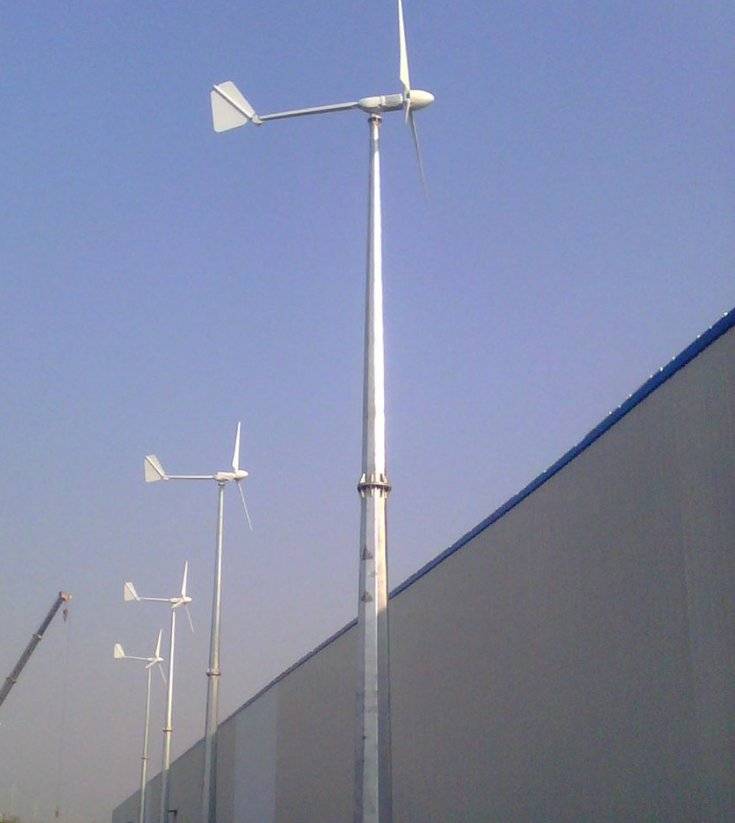
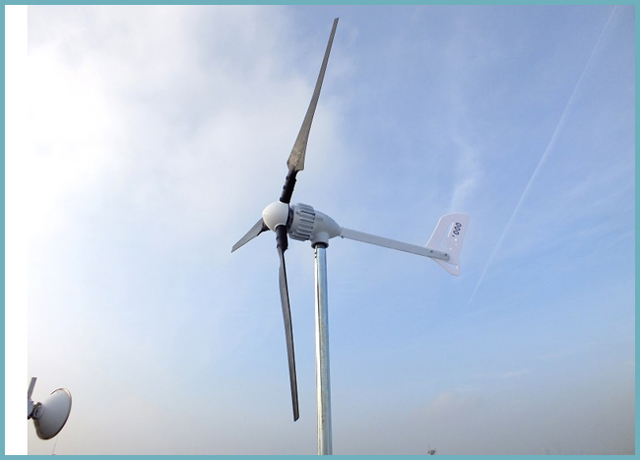
Wind generator - alternative energy source for a private house
Modern models have three blades, this provides a greater efficiency of the installation. The minimum wind speed at which the windmill starts is 2-3 m / s. Also, the technical specifications always indicate the nominal speed - the wind indicator at which the installation gives the maximum efficiency indicator, usually 9-10 m / s.At wind speeds closer to 25 m/s, the blades take on a perpendicular position relative to the wind, due to which energy production drops significantly.
In order to provide a private house with electricity, with a wind speed of 4 m / s, it is enough:
- 0.15-0.2 kW for basic needs: room lighting, TV;
- 1-5 kW to ensure the operation of basic electrical appliances (refrigerator, washing machine, computer, iron, etc.) and lighting;
- 20 kW will provide energy for the whole house, including heating.
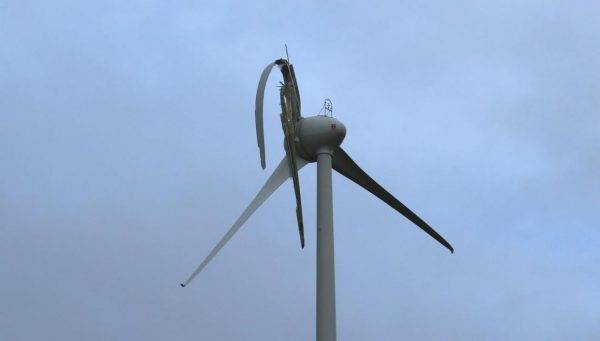
Because the wind can stop at any time, the windmill is not connected directly to electrical appliances, but to batteries with a charge controller. Because batteries produce alternating current, and for household appliances you need a constant 220V, install an inverter, to which all electrical appliances are connected. The disadvantages of wind turbines include the noise and vibration produced from them, especially for powerful installations, more than 100 kW.
Types of wind turbine blades
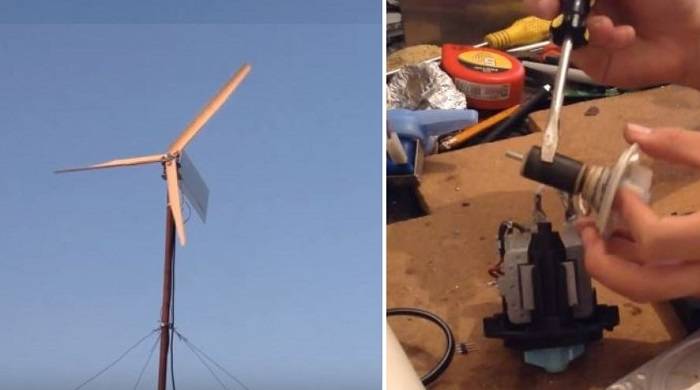
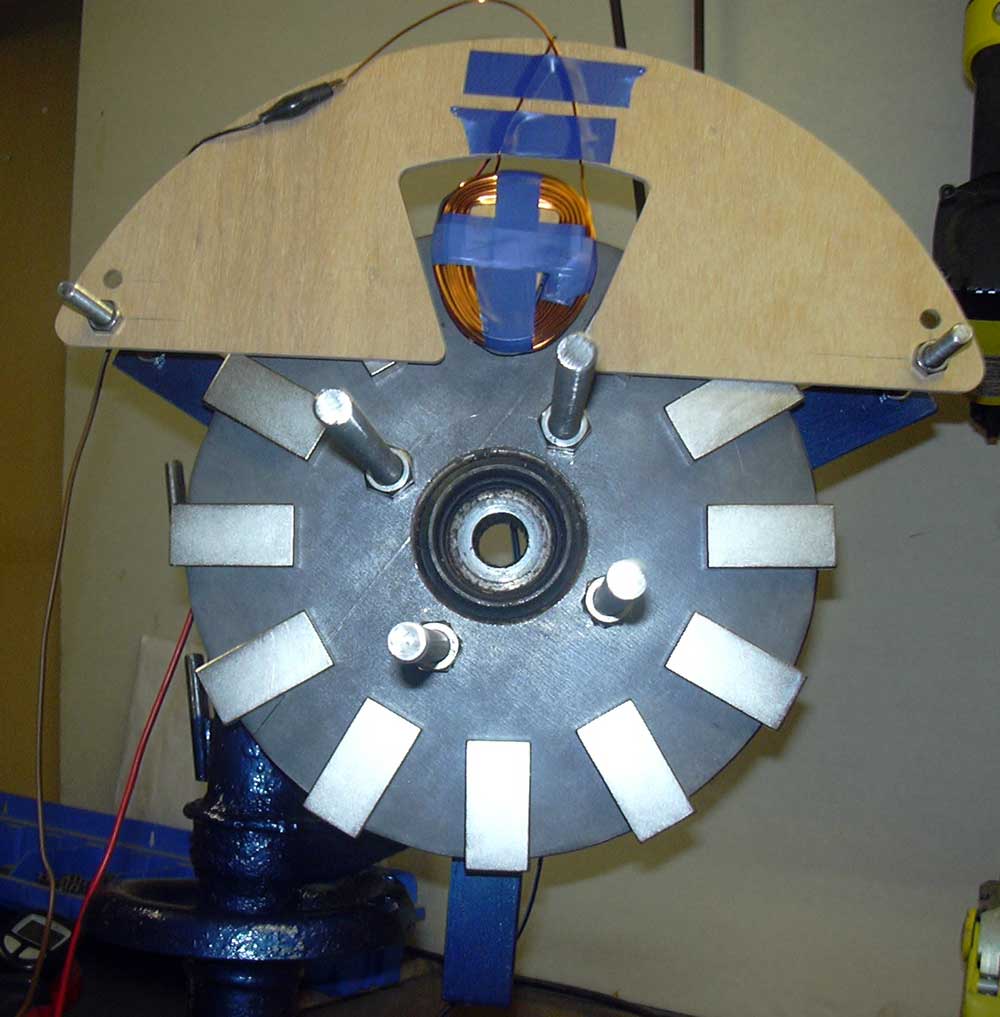
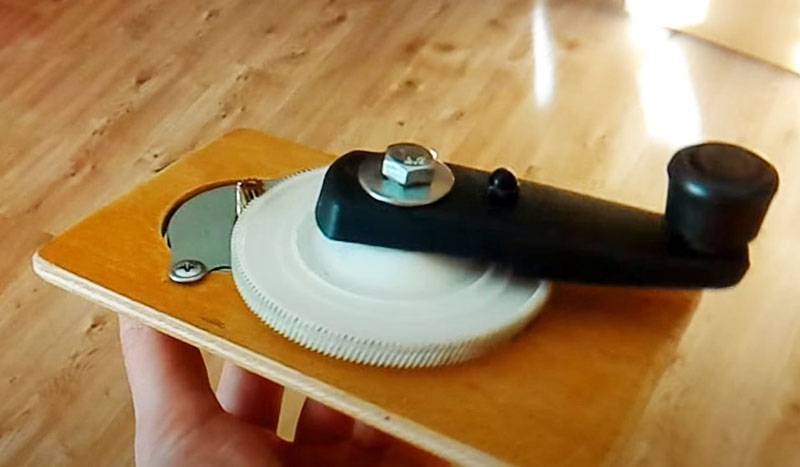
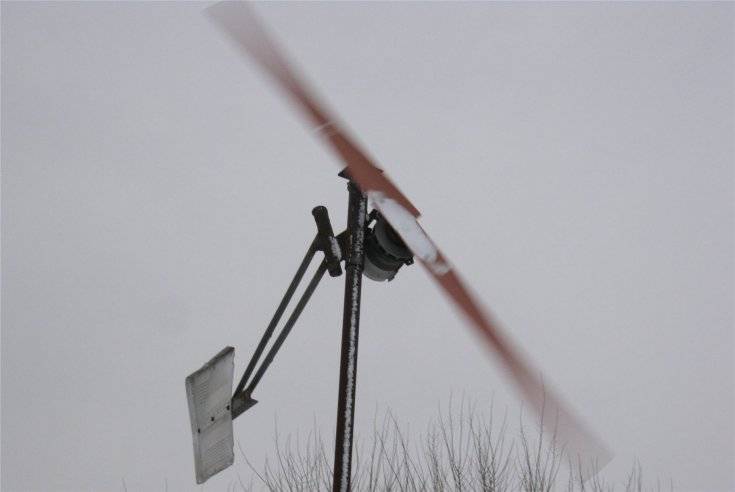
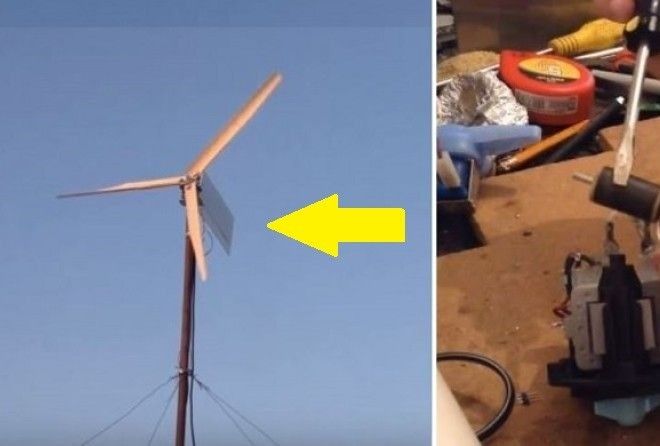
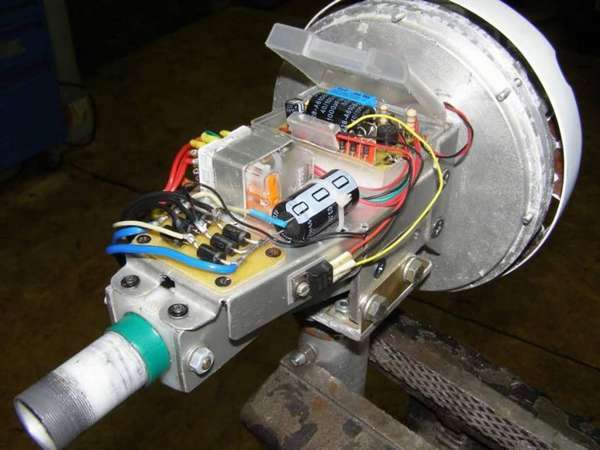
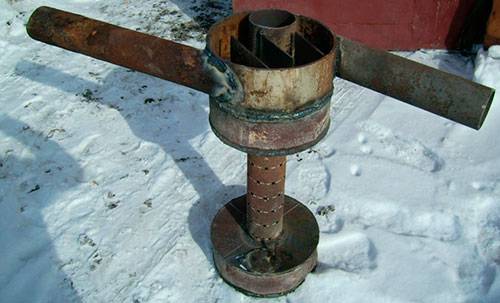
Self-made home wind blower from a stepper motor
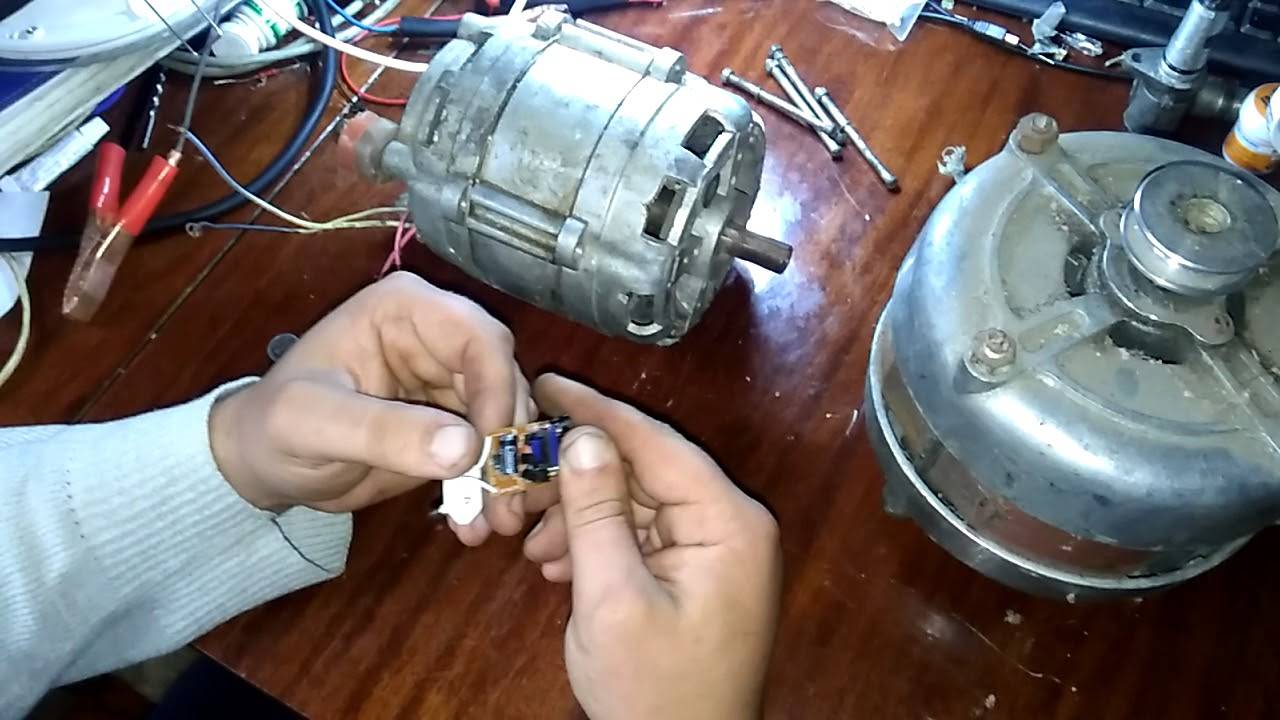
Stepper motors are used in many electromechanical devices such as printers. If you start to rotate the shaft of such an engine, then an electrical voltage will appear on its terminals. This means that the stepper motor can be used as an electric generator.
What to prepare for work
Before starting work, you should acquire a small stepper motor, for example, from a printer. Prepare electronic components and wires in order to assemble the rectifier circuit. It will require trimming of thin sheet steel or aluminum to create a structure. And of course - small fasteners. You need a simple locksmith tool and a soldering iron.
Drawings and sketches
The design part can be drawn up in the form of sketches. The electric motor is mounted on a plywood plate along the mounting holes on the motor housing. The rectifier circuit is shown in the figure below.
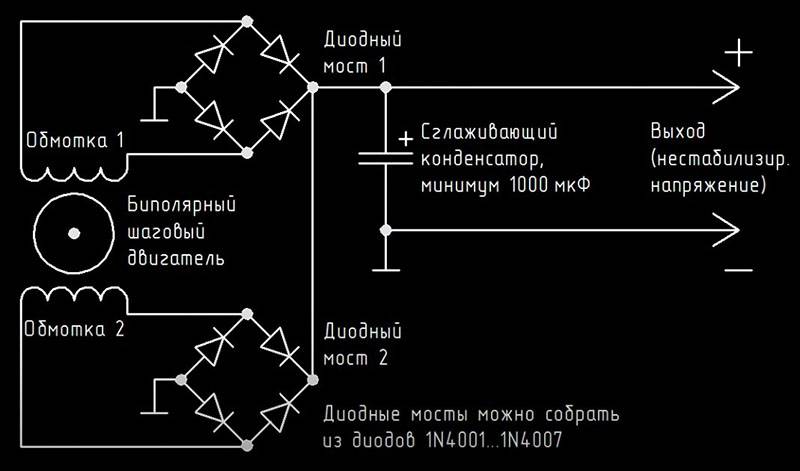 Rectifier wiring diagram for a stepper motor generator
Manufacturing technology
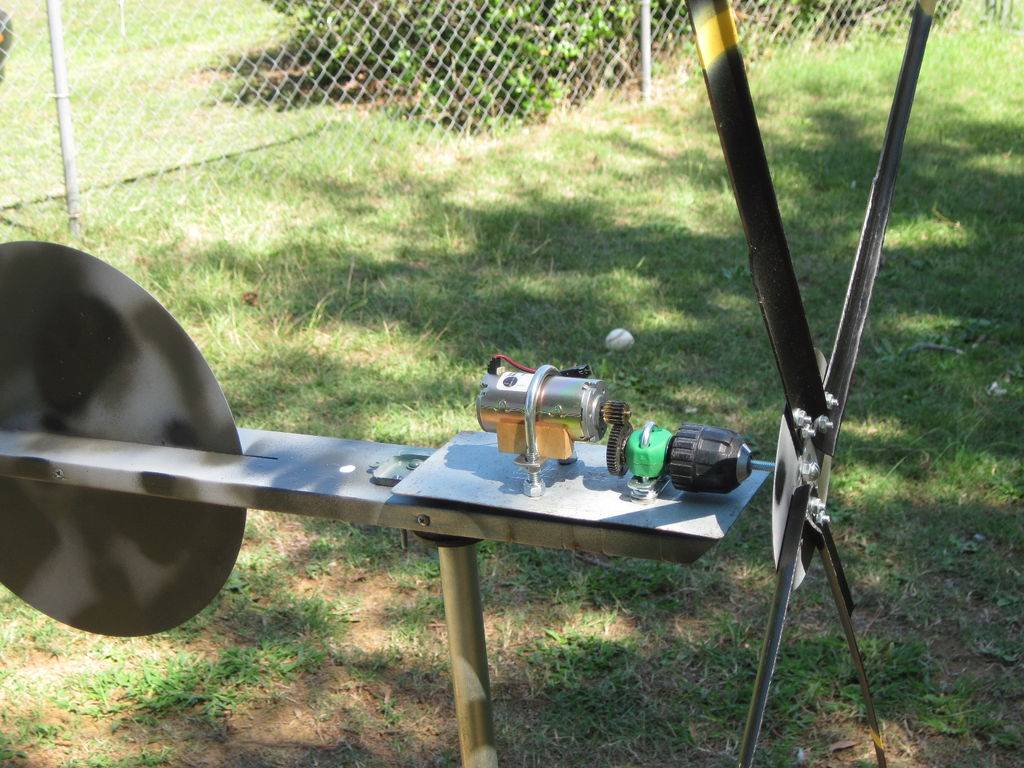
Screw the engine to the plywood plate. To increase its speed and obtain increased voltage, you can make a speed-increasing gearbox. To do this, after carefully determining the center-to-center distance and selecting the parameters of the tooth, you need to install a gear of a larger diameter on the same base plate on the axis.
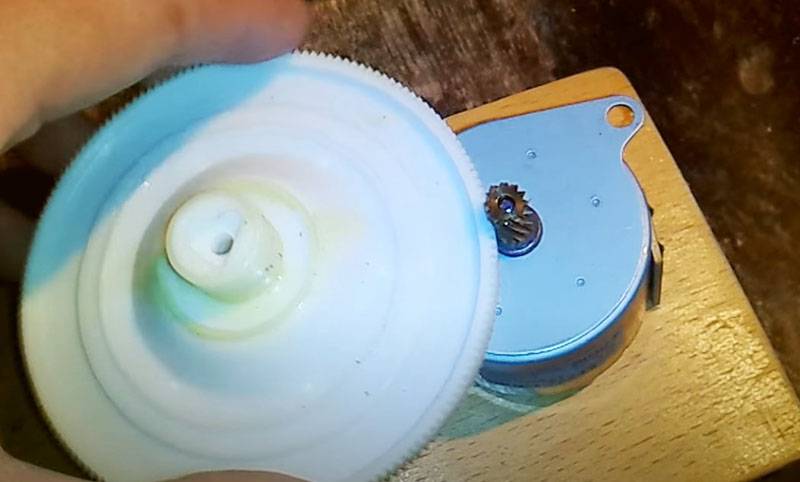 speed booster gearbox
The handle on the drive gear is needed for testing work and for generating current when urgently charging microaccumulators.
 Complete device to check its operation
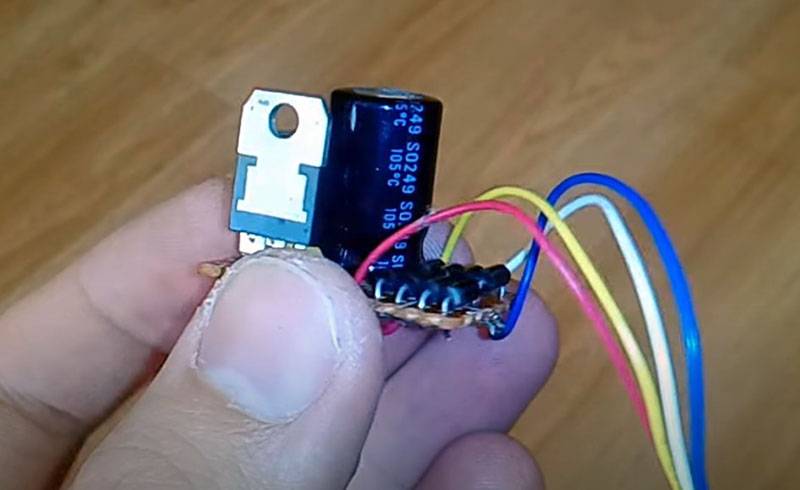 The board contains a motor-generator and a rectifier unit.
Health check
To check the operability of the finished device, a USB tester is connected to it. When the knob is rotated, the value of the electrical voltage appears on the tester monitor.
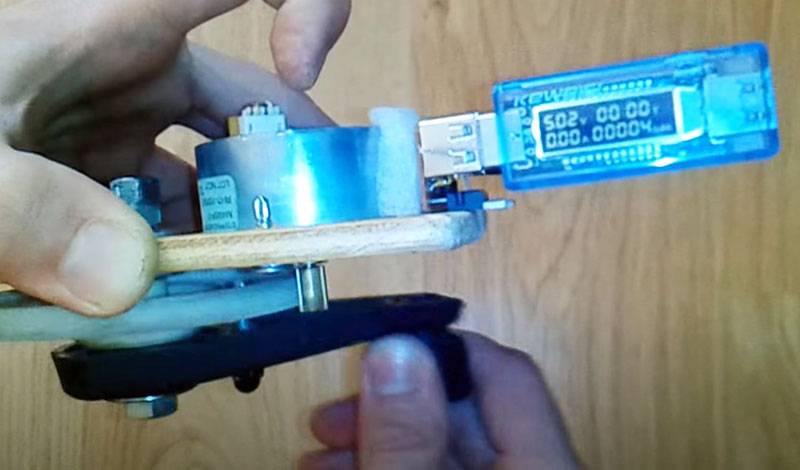 Device health check
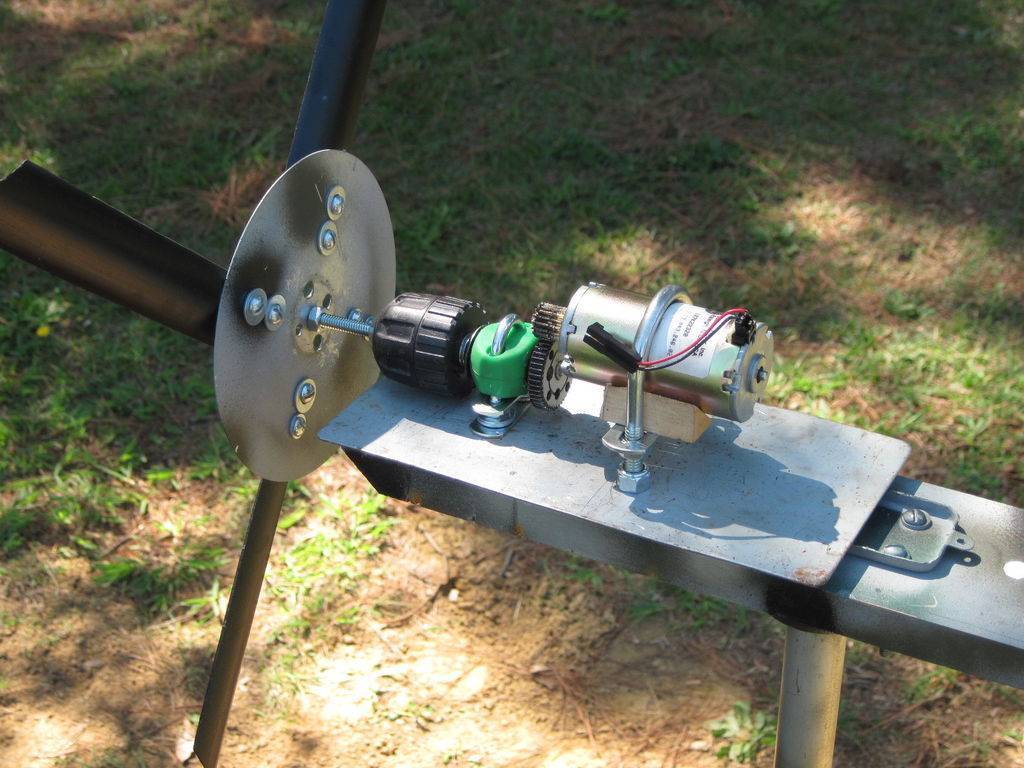
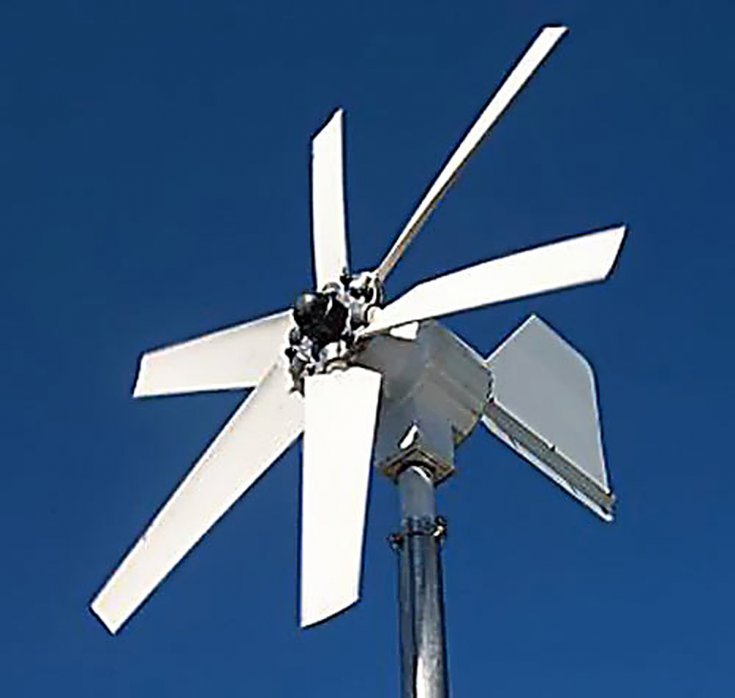
To work as a wind generator, an impeller should be put on the motor shaft.
wind wheel
The blades are perhaps the most important part of a wind turbine. The operation of the remaining components of the device will depend on the design. They are made from different materials. Even from a plastic sewer pipe. Blades from a pipe are easy to manufacture, are cheap and are not affected by moisture. The wind turbine manufacturing process is as follows:


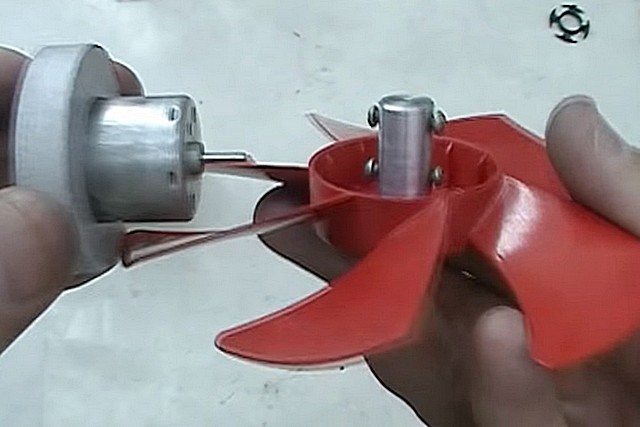
- It is necessary to calculate the length of the blade. The diameter of the pipe should be equal to 1/5 of the total footage. For example, if the blade is meter long, then a pipe with a diameter of 20 cm will do.
- We cut the pipe with a jigsaw along into 4 parts.
- We make a wing from one part, which will serve as a template for cutting subsequent blades.
- We smooth out the burr on the edges with an abrasive.
- The blades are fixed to an aluminum disk with welded strips for fastening.
- Next, the generator is screwed to this disk.
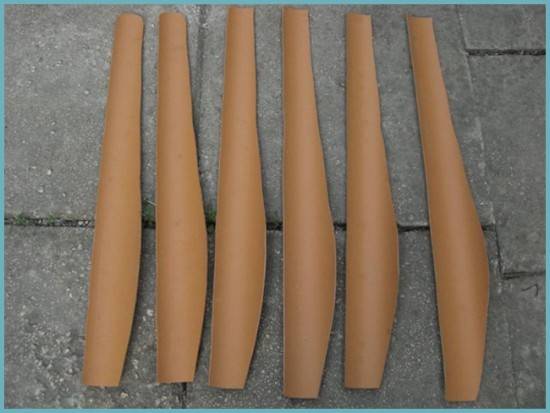 Blades for wind wheel
After assembly, the wind wheel needs to be balanced. It is fixed on a tripod horizontally. The operation is carried out in a room closed from the wind. If the balance is correct, the wheel should not move. If the blades rotate on their own, then they need to be sharpened to balance the entire structure.
Only after the successful completion of this procedure, you should proceed to check the accuracy of rotation of the blades, they should rotate in the same plane without skew. An error of 2 mm is allowed.
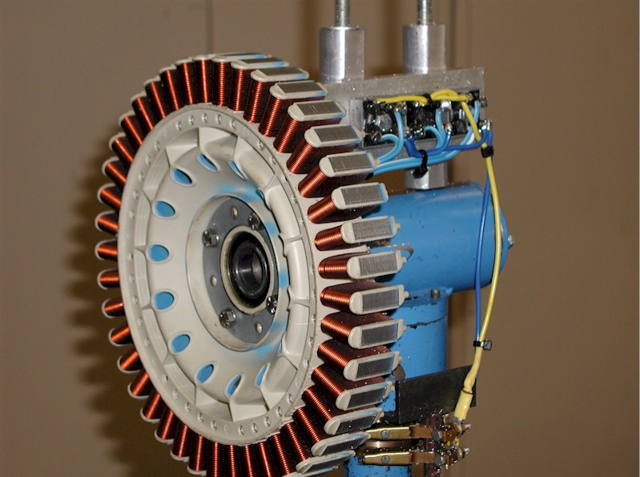
 Generator Assembly Diagram
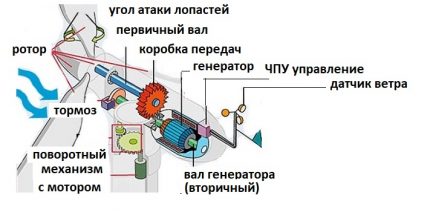
Operating principle
The device and schematic diagram of the operation of wind turbines. The flow of wind causes the blades to rotate, and those, in turn, set in motion the rotor of the generator, which generates current. Its strength is directly proportional to the wind speed.
Magnets fixed on the rotor, rotating in the stator, create an alternating current. Such a current must be rectified, that is, converted to direct current, since only direct current can charge batteries.
Electricity is stored in the battery and consumed in the absence of wind.
The stability of the battery charge current is controlled by a device that regulates the speed of rotation of the blades depending on the amount of battery charge.

We wind the coil
Choosing a not very high-speed option, charging a 12V battery starts at 100-150 rpm. The number of turns for this should correspond to 1000-1200.By dividing the turns on all coils, we get their number for one.
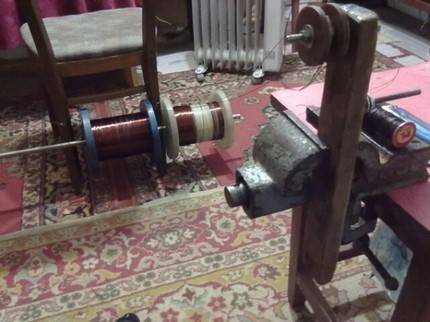
If a large wire is used for turns, the resistance decreases and the current strength increases.
The characteristics of hand-assembled wind turbines are affected by the thickness of the magnets on the disk and their number.
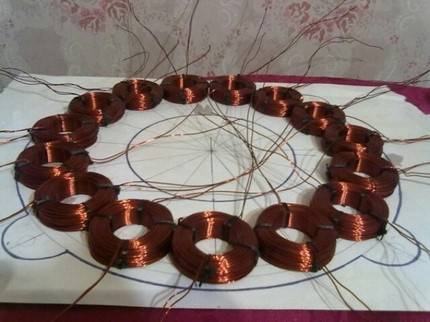
Coils are usually made in a round shape, but by slightly stretching them, it will be possible to straighten the turns. Finished, the coils should be equal to or slightly larger than the magnets. The thickness of the stator must also be related to the magnets.
If the latter is larger due to more turns, the space between the disks increases and the magnetic flux decreases.
But more resistance coils will lead to a decrease in current. Plywood is suitable for the shape of the stator. To increase the strength of the product, fiberglass is placed on top of the coils (at the bottom of the mold). Before applying the epoxy resin, the mold is treated with petroleum jelly or wax, or tape is used.
The generator is tested by turning it by hand. For a voltage of 40V, the current reaches 10 A.
Mini and micro
But as the size of the blade decreases, the difficulty decreases with the square of the wheel diameter. It is already possible to manufacture a horizontal bladed APU on its own for a power of up to 100 W. 6-blade will be optimal. With more blades, the diameter of the rotor, designed for the same power, will be smaller, but it will be difficult to firmly fix them on the hub. Rotors with less than 6 blades can be ignored: a 2-blade 100 W needs a rotor with a diameter of 6.34 m, and a 4-blade of the same power - 4.5 m. For a 6-blade power-diameter relationship is expressed as follows :
- 10 W - 1.16 m.
- 20 W - 1.64 m.
- 30 W - 2 m.
- 40 W - 2.32 m.
- 50 W - 2.6 m.
- 60 W - 2.84 m.
- 70 W - 3.08 m.
- 80 W - 3.28 m.
- 90 W - 3.48 m.
- 100 W - 3.68 m.
- 300 W - 6.34 m.
It will be optimal to count on a power of 10-20 watts. Firstly, a plastic blade with a span of more than 0.8 m will not withstand winds of more than 20 m/s without additional protection measures. Secondly, with a blade span of up to the same 0.8 m, the linear speed of its ends will not exceed the wind speed by more than three times, and the requirements for profiling with twist are reduced by orders of magnitude; here the “trough” with a segmented profile from a pipe will already work quite satisfactorily, pos. B in fig. And 10-20 W will provide power to the tablet, recharge the smartphone or light up the housekeeper light bulb.

Mini and micro wind generators
Next, choose a generator. A Chinese motor is perfect - a wheel hub for electric bicycles, pos. 1 in fig. Its power as a motor is 200-300 watts, but in generator mode it will give up to about 100 watts. But will it fit us in terms of turnover?


The speed factor z for 6 blades is 3. The formula for calculating the speed of rotation under load is N = v / l * z * 60, where N is the speed of rotation, 1 / min, v is the wind speed, and l is the circumference of the rotor. With a blade span of 0.8 m and a wind of 5 m/s, we get 72 rpm; at 20 m/s - 288 rpm. A bicycle wheel also rotates at about the same speed, so we will remove our 10-20 watts from a generator that can give 100. You can put the rotor directly on its shaft.
But here the following problem arises: having spent a lot of work and money, at least for a motor, we got ... a toy! What is 10-20, well, 50 watts? And a bladed windmill that can power at least a TV set cannot be made at home. Is it possible to buy a ready-made mini-wind generator, and will it not cost less? Still as possible, and even as cheaper, see pos.4 and 5. In addition, it will also be mobile. Put it on a stump - and use it.
The second option is if somewhere a stepper motor is lying around from an old 5- or 8-inch drive, or from a paper drive or carriage of an unusable inkjet or dot matrix printer. It can work as a generator, and attaching a carousel rotor from cans (pos. 6) to it is easier than assembling a structure like that shown in pos. 3.
In general, according to the “blades”, the conclusion is unambiguous: home-made - rather in order to make one's heart's content, but not for real long-term energy efficiency.
Types of wind turbines and the principle of their operation
Both industrial and homemade wind turbines are different.
They are classified according to several criteria:
- Features of the rotation of the rotor with blades attached to it - vertical or horizontal. The former are less responsive to negative environmental factors, while the latter are characterized by higher efficiency.
- Number of blades. Three-blade installations are considered the most practical, but there can be more or less blades.
- Material. For the manufacture of blades, various materials are used - rigid or sail. The former are usually more durable, while the latter are cheaper.
- Blade pitch. It can be fixed or changeable.
 The easiest way to make a horizontal wind generator. People without much experience choose just such a design, however, some craftsmen prefer to make a low-noise and efficient vertical installation for the manufacture
Horizontal windmills are convenient because they do not require high-precision calculations to create them, the design itself is easier to manufacture and starts at the slightest wind. Cons - a lot of noise during operation and bulkiness.
A vertical wind generator is suitable for people who are ready to spend time and effort on assembling and maintaining a complex, but compact design. We recommend that you look at the step-by-step instructions for making a vertical wind generator with your own hands.
 Converting devices of the wind generator transform the electric current, which leads to large energy losses. Depending on the characteristics of the devices, these losses can reach 15-20%
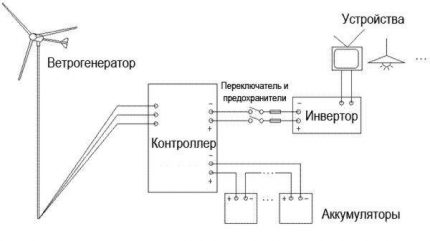
The wind generator works due to the rotation of the blades attached to the rotor. The rotor itself is fixed on the generator shaftthat generates electricity. Energy is transferred to batteries. Here it accumulates and feeds household electrical appliances.
The wind turbine is equipped with a controller that converts three-phase alternating current into direct current and controls the battery charging. The installation diagram must take into account that an inverter must be connected after the battery.
The principle of operation of a wind generator and types of equipment
All wind turbines consist of a blade, a turbine rotor, a generator, a generator shaft, an inverter, and a battery. It is conditionally possible to divide all models into industrial and home ones, while the principle of operation will be the same for them.
Purchase Model Scheme Example
Rotating, the rotor creates an alternating current with three phases, which goes through the controller to the battery, and then, in the inverter, it is converted into a stable one for supply to electrical appliances.

Simple scheme of work
The rotation of the blades occurs due to the physical impact with the help of an impulse or lifting force, as a result of which the flywheel comes into action, as well as under the influence of a braking force.In the process, the flywheel begins to spin, and the rotor creates a magnetic field on the fixed part of the generator, after which the current is reproduced.
In general, wind turbines are divided into vertical and horizontal. What is connected with the location of the axis of rotation.
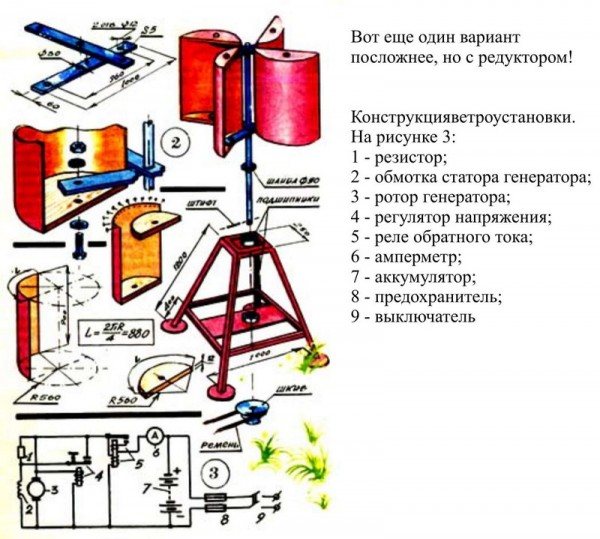
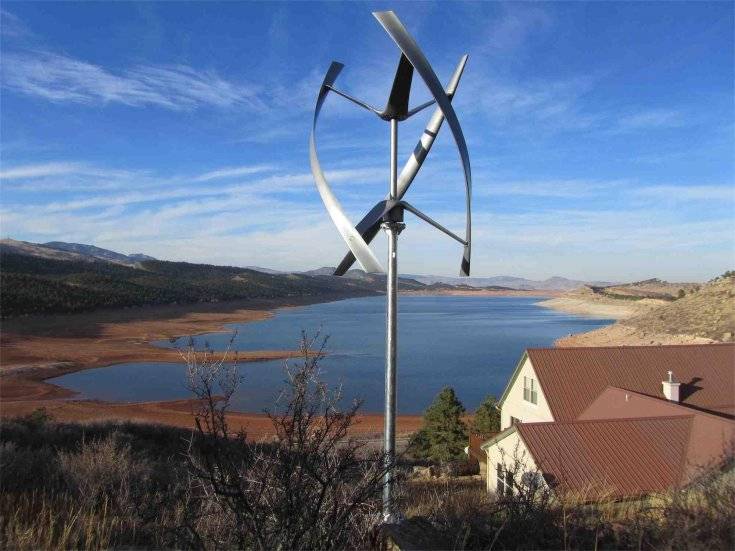
Vertical option
When planning to create a 220V windmill with your own hands, first of all, think over the vertical options. Among them are:
Savonius rotor. The simplest, which appeared back in 1924. It is based on two half-cylinders on a vertical axis. The disadvantages include low use of wind energy.
Savonius rotor variant
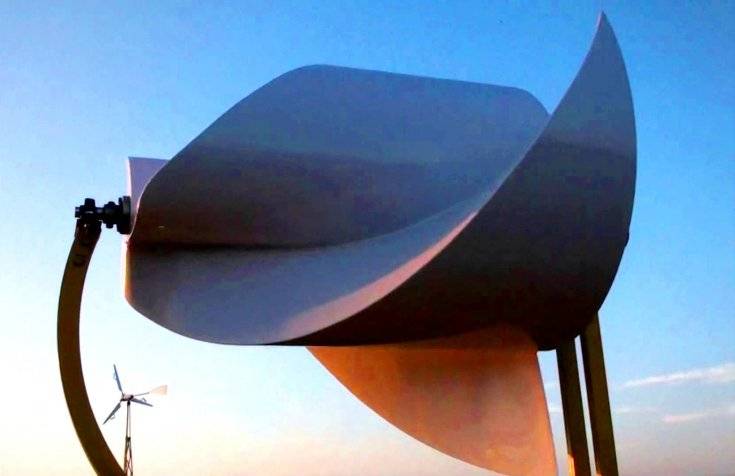
With Darrieus rotor. Appeared in 1931, the spin-up occurs due to the difference in the resistance of the aerodynamic hump and the tape pocket, so the disadvantages include a small torque, as well as the need to mount an odd number of blades.
 A kind of wind generator Daria
Helicoid. The blades have a twisted shape, reducing the load on the bearing, increasing the service life. The disadvantage is the high price.


Helicoid
A homemade version will come out cheaper if it is properly thought out and mounted.
Horizontal Models
Horizontal models are divided by the number of blades. Their efficiency is higher, but there is a need to install a weather vane to constantly search for the direction of the wind. All models have high rotational speeds, instead of blades they mount a counterweight, which affects the air resistance.
Variant of horizontal models
Multi-blade models can have up to 50 high-inertia blades. They can be used to operate water pumps.
How to do it yourself?
The most reliable and simple design is considered to be a rotary wind turbine, which is an installation with a vertical axis of rotation. A ready-made home-made generator of this type is able to fully ensure the energy consumption of the dacha, including equipping the living quarters, outbuildings and street lighting (though not too bright).
If you get an inverter with indicators of 100 volts and a battery of 75 amperes, then the windmill will be much more powerful and productive: there will be enough electricity for both video surveillance and an alarm.
To make a wind generator, you will need construction details, consumables and tools. The first step is to find suitable windmill components, many of which can be found among old stocks:
- Generator from a car with a power of about 12 V;
- Rechargeable battery for 12 V;
- Push-button semi-hermetic switch;
- Inventory;
- Car relay used to charge the battery.
You will also need consumables:
- Fasteners (bolts, nuts, insulating tape);
- Steel or aluminum container;
- Wiring with a cross section of 4 square meters. mm (two meters) and 2.5 sq. mm (one meter);
- Mast, tripod and other elements to enhance stability;
- Strong rope.
Having prepared everything you need, you can start assembling, focusing on step-by-step instructions that tell you how to make a wind generator with your own hands:
- Cut out blades of the same size from a metal container, leaving an untouched strip of metal a few centimeters at the base.
- Symmetrically make holes with a drill for the existing bolts in the bottom of the base of the tank and the generator pulley.
- Bend the blades.
- Fix on the blade pulley.
- Install and secure the generator on the mast with clamps or a rope, stepping back from the top about ten centimeters.
- Establish wiring (to connect the battery, a meter-long core with a cross section of 4 sq. Mm is enough, for loading with lighting and electrical appliances - 2.5 sq. Mm).
- Mark the connection diagram, color and letter marking for future repairs.
- Install the transmitter with quarter wire.
- If necessary, decorate the structure with a weather vane and paint.
- Secure the wires by winding the installation mast.
Do-it-yourself wind generators for 220 volts are an opportunity to provide a summer house or a country house with free electricity in the shortest possible time. Even a beginner can set up such an installation, and most of the details for the structure have long been idle in the garage.