- Assembly and testing of the generator
- Prospects for using such a generator
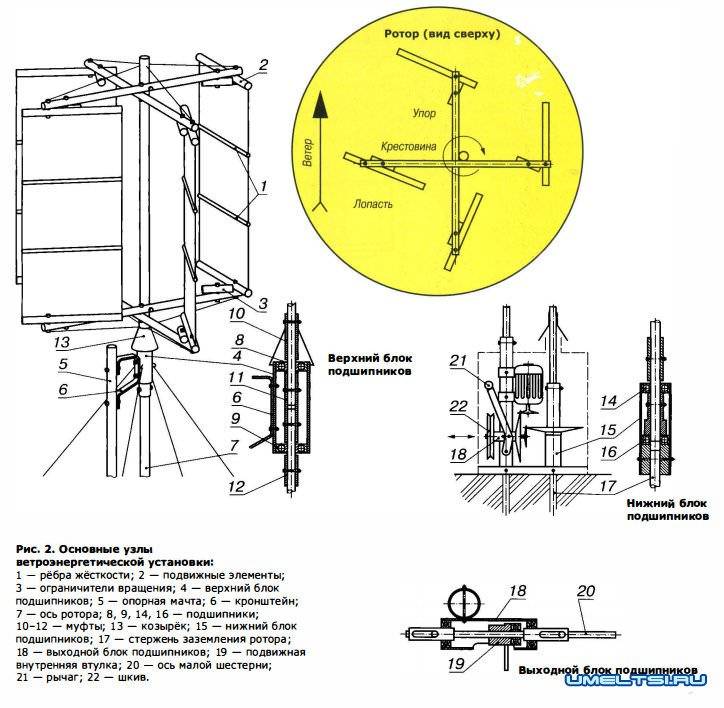
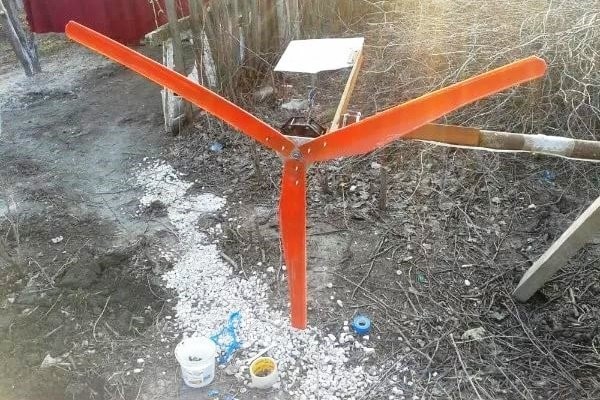
- The basis of a home wind generator
- Rotary wind turbine
- Starting stage of the plant manufacturing
- Advantages and disadvantages of a rotary windmill model
- We make a lathe for wood from a washing machine
- We make a windmill with our own hands
- Varieties
- Wind generator - a source of electricity
- Varieties and modifications of vertical windmills
- Car Alternator Preparation
- Legal Aspects of Installing a Wind Turbine
- Classification and principles of operation
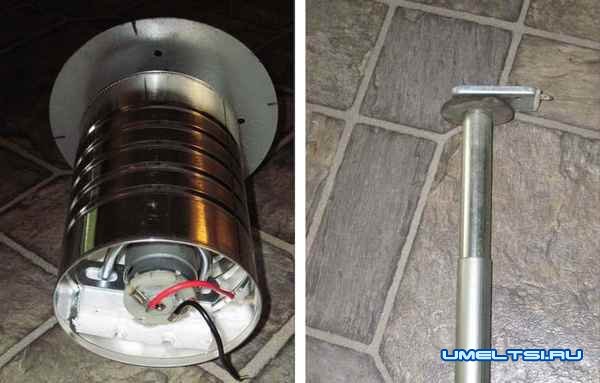
Assembly and testing of the generator
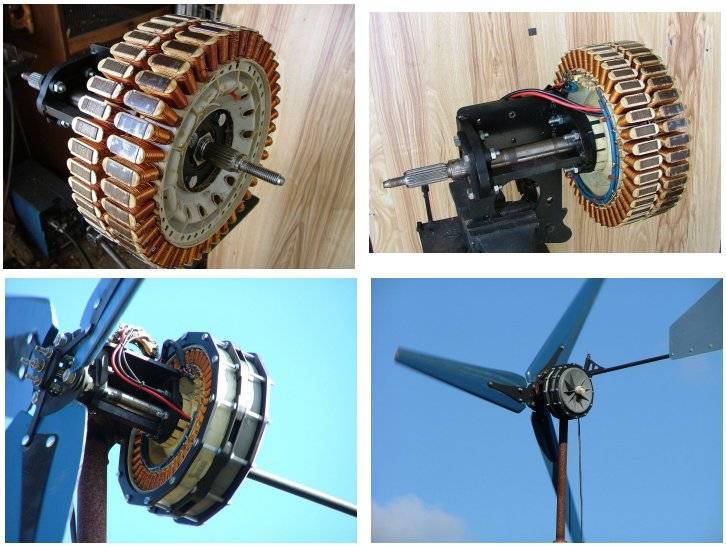
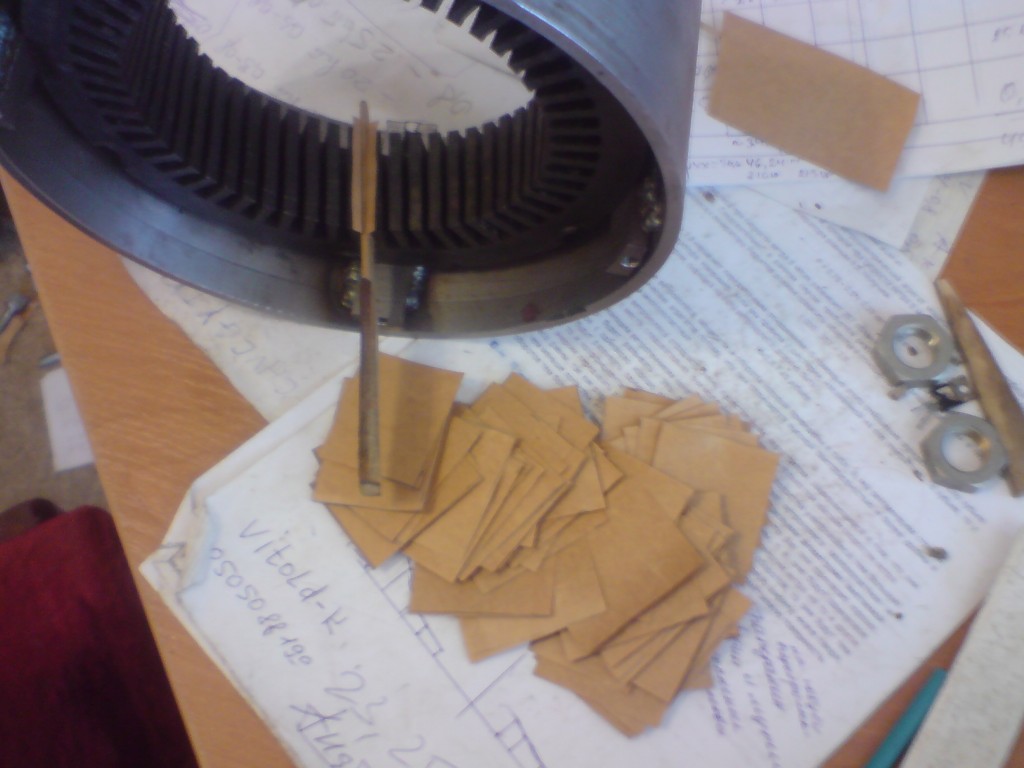
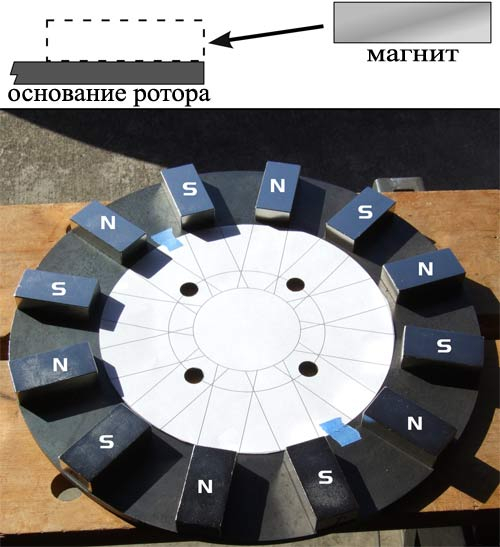
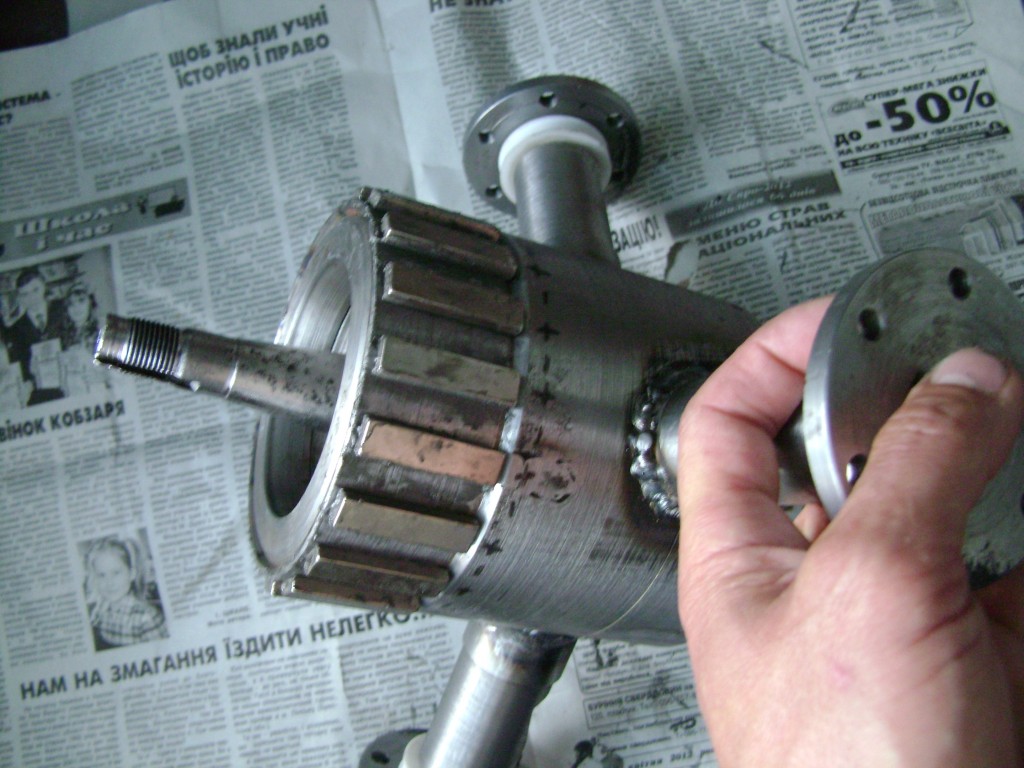
- We begin to make a magnetic rotor of the engine to turn it into a generator. We glue our tin template for magnets across the engine.
- A homemade generator needs magnets, so we, according to the risks noted in advance, put magnets in two rows on superglue.
- Carefully fill the space between the magnets with carefully kneaded cold welding. It has the consistency of plasticine, so there should be no problems.
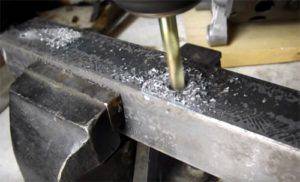
- With our own hands, we grind the generator made from the engine of the washing machine with sandpaper. To speed up the process, you can clamp the body in a drilling machine, but you can do everything yourself without tools, it will take a little longer.
- rectifier;
- solar charge controller;
- multimeter;
- motorcycle battery;
- the generator itself.
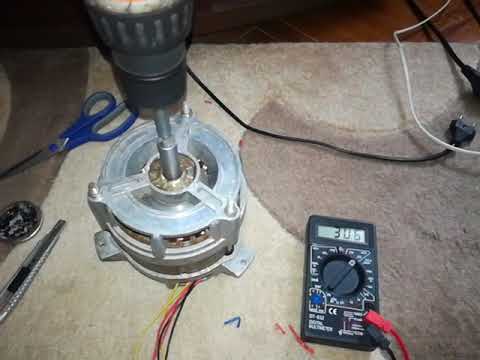
You also need to think about how you will turn the generator. Fingers are not an option, you will not be able to provide enough turns. It is best to use a screwdriver or an electric drill for these purposes. We find two wires of the working winding on our generator, and cut the rest. We connect these wires through a rectifier to the charge controller, and in turn we connect it to the battery. We throw the multimeter crocodiles on the battery terminals - that's all and it's ready to test the generator.
We charge an electric drill into the chuck (you can use a screwdriver), a generator pulley and spin it up to 800-1000 revolutions. At the output, we get 270 volts with moderate sticking of the magnets - not a bad result.
Prospects for using such a generator
Many are wondering, well, we made such a generator, and what, how to use it in the household so that it brings benefits? Personally, we made this generator with an eye on the independent production of a gasoline power plant from an obsolete, but working Soviet Druzhba chainsaw.
According to our calculations, the design should have turned out to be cheap, which cannot be said about factory gasoline stations.
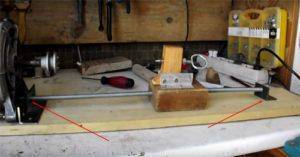
As a result, we managed to realize our idea. We connected the chainsaw engine to our generator through a drive belt, securing everything on the frame from the same chainsaw. I didn’t even have to weld the frame separately. Our power plant has been working properly for the second year, supplying all energy consumers in the country house. There is enough power to light two rooms, to ensure the operation of a computer and a TV.
There are other options for using a homemade generator. The article eloquently describes the process of manufacturing an installation that, using the natural power of the wind, can supply energy to the same country house or garage. Some suggest using this generator to power the ski lift. In general, connect your imagination, and you will also find a couple of ways.
In conclusion, we note that the manufacture of a home-made generator is fraught with certain difficulties. The main difficulty lies in gluing the magnets when creating the rotor. But you can go in a simple way - order a ready-made magnetic rotor. In this case, the generator will cost you 200 rubles more, but you will save a lot of time.
Problems with electrical energy, which usually arise unexpectedly, force many consumers to think about building an autonomous power source. Moreover, exorbitant bills for the use of the industrial network are also pushing for this. Installing an autonomous power source in the house is considered a profitable business. This device is able to come to the rescue when the industrial power supply is turned off.
Its power indicator is relatively small, but this is quite enough to act as a backup power source. Purchasing a generator on purpose is an expensive pleasure, but making it yourself is quite realistic. Today we will consider how to make a generator from a washing machine engine with your own hands.
The basis of a home wind generator
The topic of manufacturing and installing homemade wind generators is very widely represented on the Internet.However, most of the material is a banal description of the principles for obtaining electrical energy from natural sources.
The theoretical method for the device (installation) of wind turbines has long been known and is quite understandable. But how things are practically in the domestic sector - a question that is far from being fully disclosed.
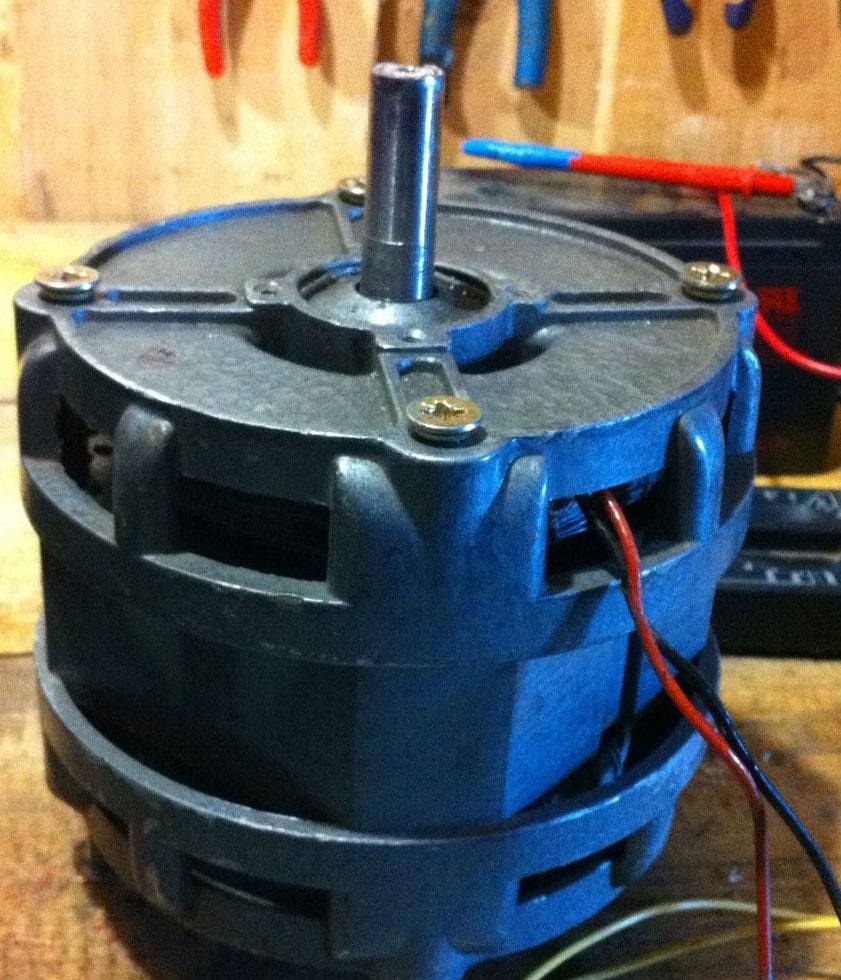
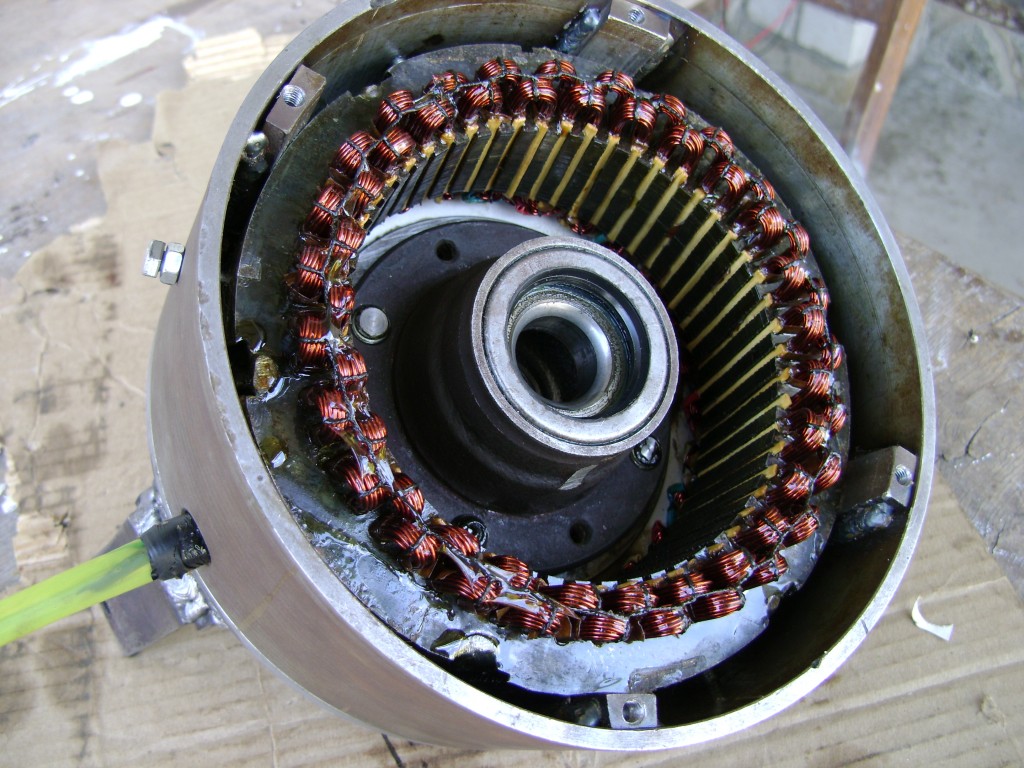
Most often, it is recommended to choose car generators or AC induction motors supplemented with neodymium magnets as a current source for home-made home wind generators.
The procedure for converting an asynchronous AC motor into a generator for a windmill. It consists in the manufacture of a “fur coat” of the rotor from neodymium magnets. Extremely complex and lengthy process
However, both options require significant refinement, often complex, expensive, and time-consuming.
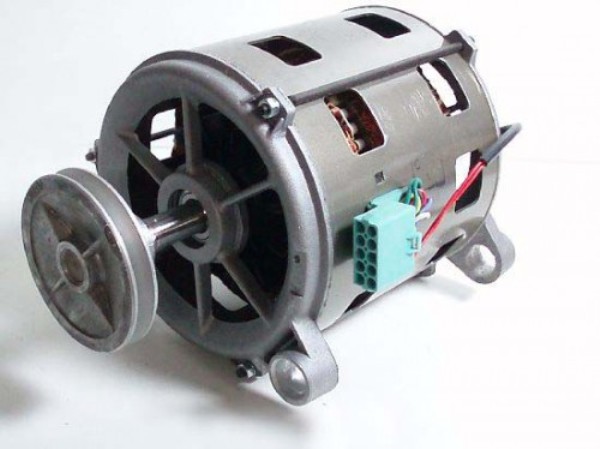
It is much simpler and easier in every way to install electric motors like those that were produced before and are now produced by Ametek (example) and others.
For a home wind turbine, DC motors with a voltage of 30 - 100 volts are suitable. In generator mode, approximately 50% of the declared operating voltage can be obtained from them.
It should be noted: when operating in the generation mode, DC motors must be untwisted to a speed higher than the nominal one.
At the same time, each individual motor from a dozen identical copies can show completely different characteristics.
Therefore, the optimal selection of an electric motor for a home wind generator is logical with the following indicators:
- High operating voltage setting.
- Low parameter RPM (angular speed of rotation).
- High operating current.
So, a motor manufactured by Ametek with an operating voltage of 36 volts and an angular speed of rotation of 325 rpm looks good for installation.
It is such an electric motor that is used in the design of a wind generator - an installation that is described below as an example of a home windmill.
DC motor for home wind generator. The best option among the products manufactured by Ametek. Similar electric motors manufactured by other companies are also well suited.


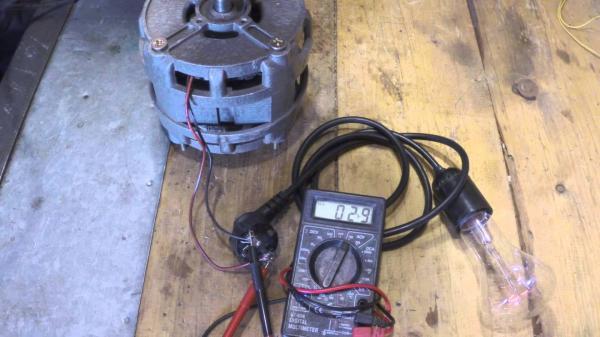
Checking the efficiency of any similar motor is easy. It is enough to connect a conventional 12 volt incandescent automotive lamp to the electrical terminals and turn the motor shaft by hand. With good technical indicators of the electric motor, the lamp will definitely light up.
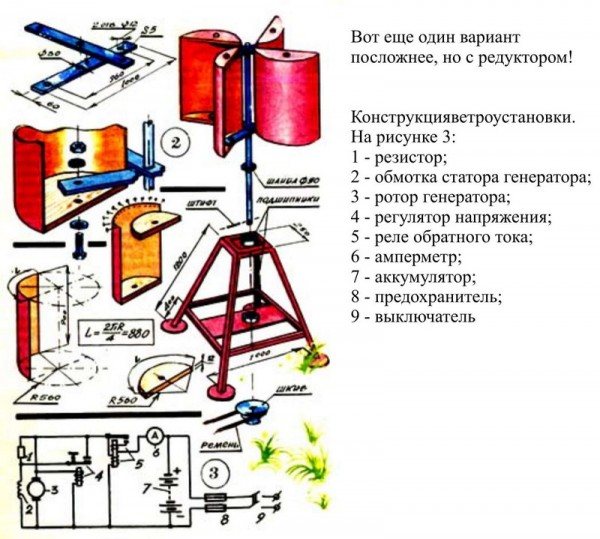
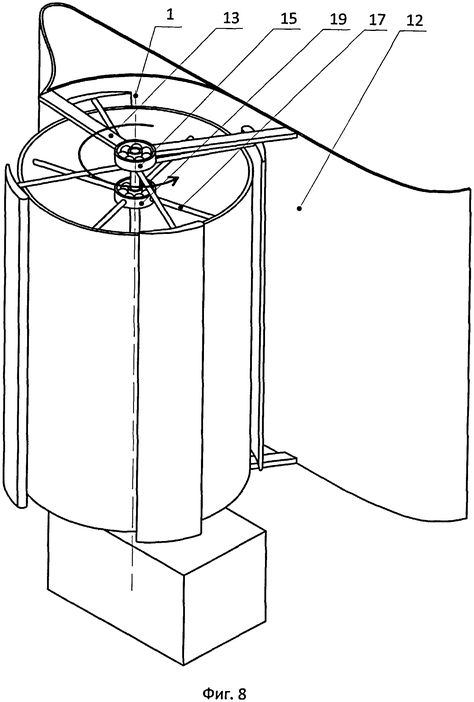
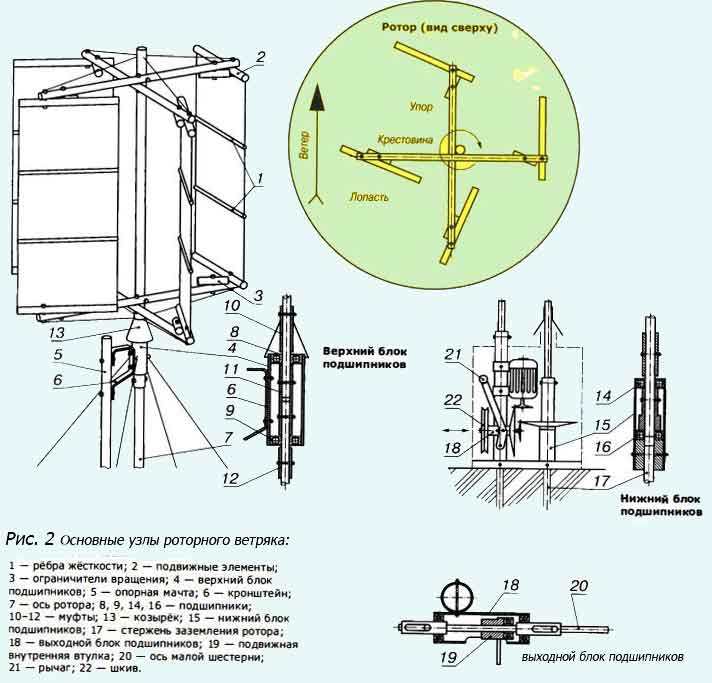
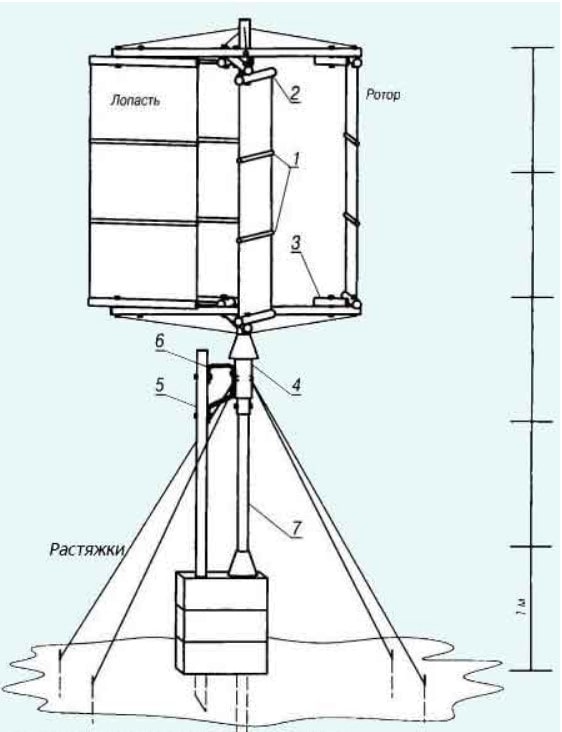
Rotary wind turbine
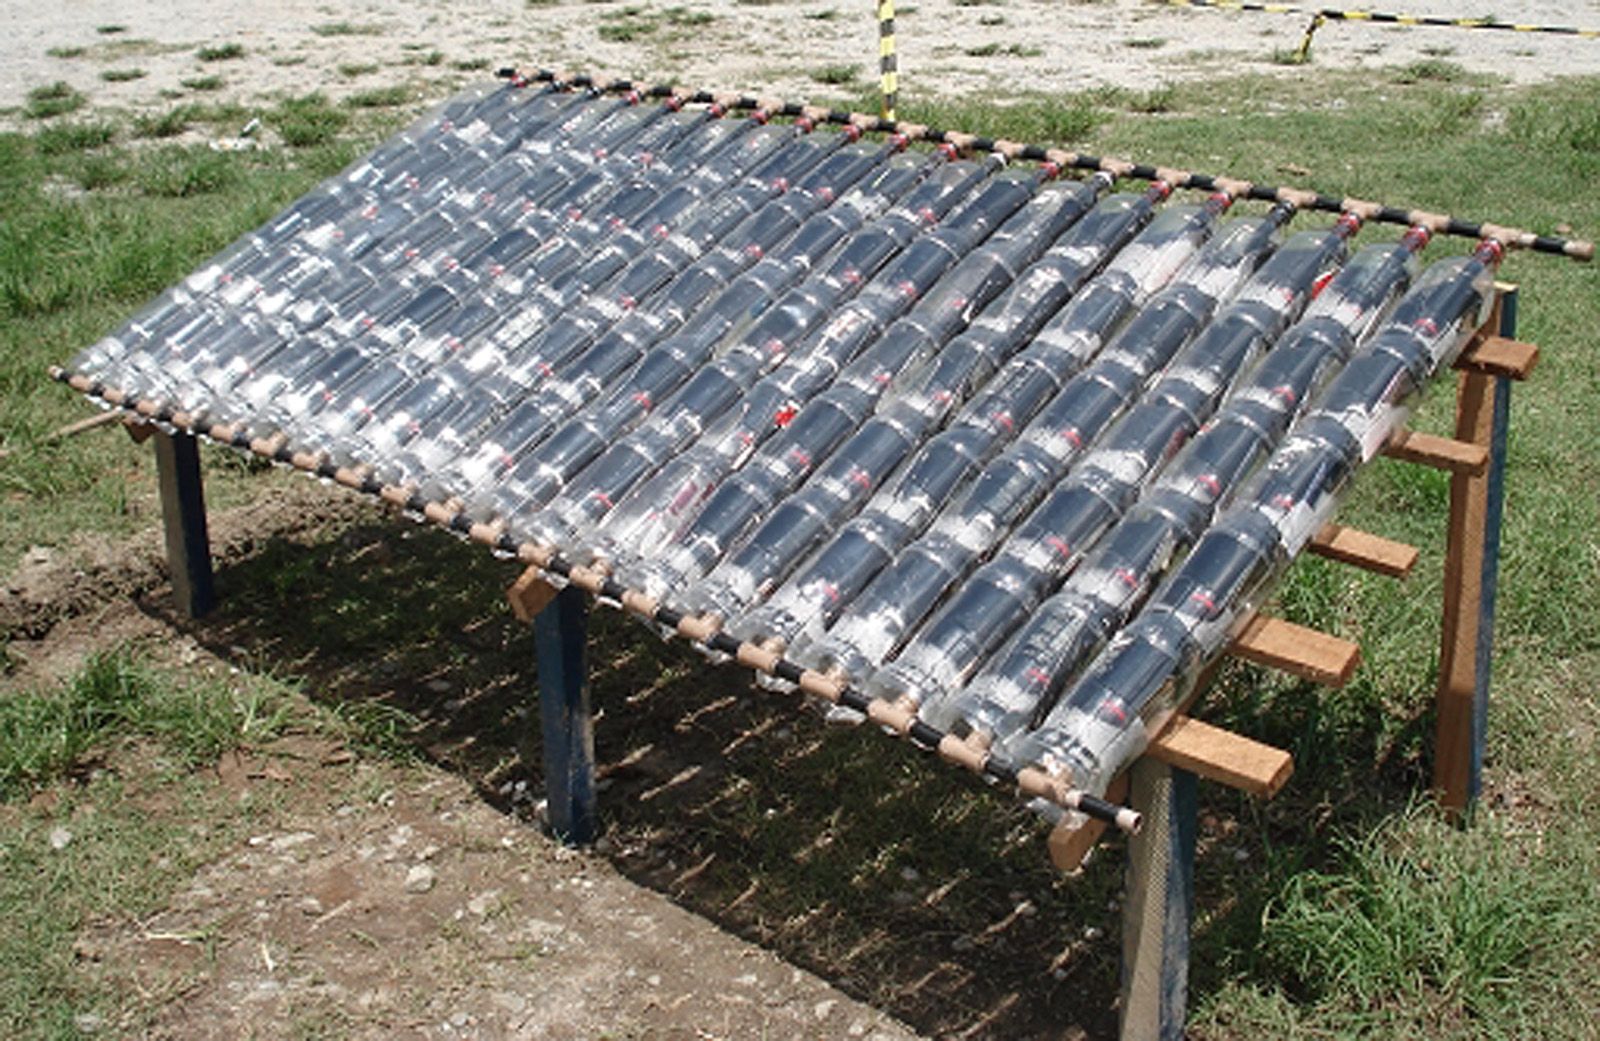
Let's figure out how to make a simple windmill with a vertical axis of rotation of the rotary type with your own hands.
Such a model may well meet the electricity needs of a garden house, a variety of outbuildings, as well as highlight the local area and garden paths at night.
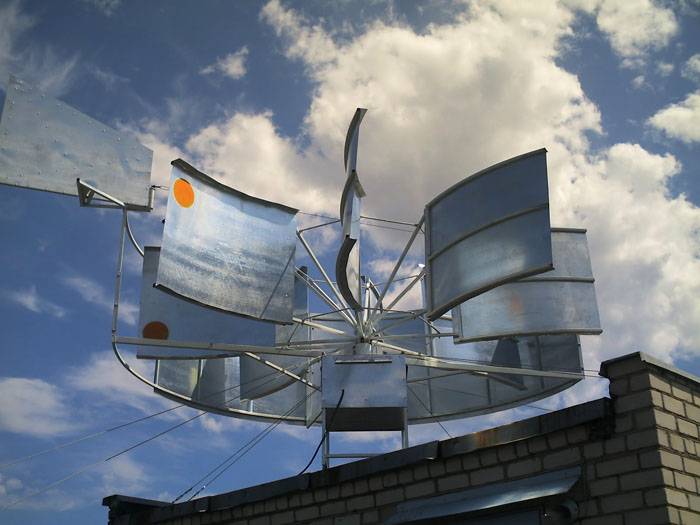
The blades of this rotary type installation with a vertical axis of rotation are clearly made from elements cut from a metal barrel.
Our goal is to manufacture a windmill with a maximum power of 1.5 kW. To do this, we need the following elements and materials:
- car generator for 12 V;
- helium or acid battery 12 V;
- semi-hermetic switch of the “button” variety for 12 V;
- converter 700 W - 1500 W and 12V - 220V;
- bucket, large saucepan or other capacious container made of stainless steel or aluminum;
- automobile relay of a control lamp of a charge or charging of the accumulator;
- automobile voltmeter (any one is possible);
- bolts with nuts and washers;
- wires with a cross section of 4 square mm and 2.5 square mm;
- two clamps for fixing the generator on the mast.
In the process of doing the work, we will need a grinder or metal shears, a construction pencil or marker, a tape measure, wire cutters, a drill, a drill, keys and a screwdriver.
Starting stage of the plant manufacturing
We start making a homemade windmill by taking a large cylindrical metal container. Usually, an old boiling pot, bucket or pan is used for this purpose. It will be the basis for our future WPP.
Using a tape measure and a construction pencil (marker), we will mark up: we will divide our container into four identical parts.
When making cuts in accordance with the instructions contained in the text, in no case cut through the metal to the end
The metal will have to be cut. To do this, you can use the grinder. It is not used to cut a container made of galvanized steel or painted tin, because this type of metal will overheat.
For such cases, it is better to use scissors. We cut out the blades, but do not cut them through to the very end.
Now, along with the continuation of work on the tank, we will redo the generator pulley.
In the bottom of the former pan and in the pulley, you need to mark and drill holes for the bolts. The work at this stage should be taken as carefully as possible: all holes should be located symmetrically so that no imbalance occurs during the rotation of the installation.
This is how the blades of another design with a vertical axis of rotation look like. Each blade is made separately, and then mounted in a common device
We bend the blades so that they do not stick out too much. When we do this part of the work, we must take into account in which direction the generator will rotate.
Usually the direction of its rotation is oriented clockwise. The angle of the blades bend affects the area of influence of air currents and the speed of rotation of the propeller.
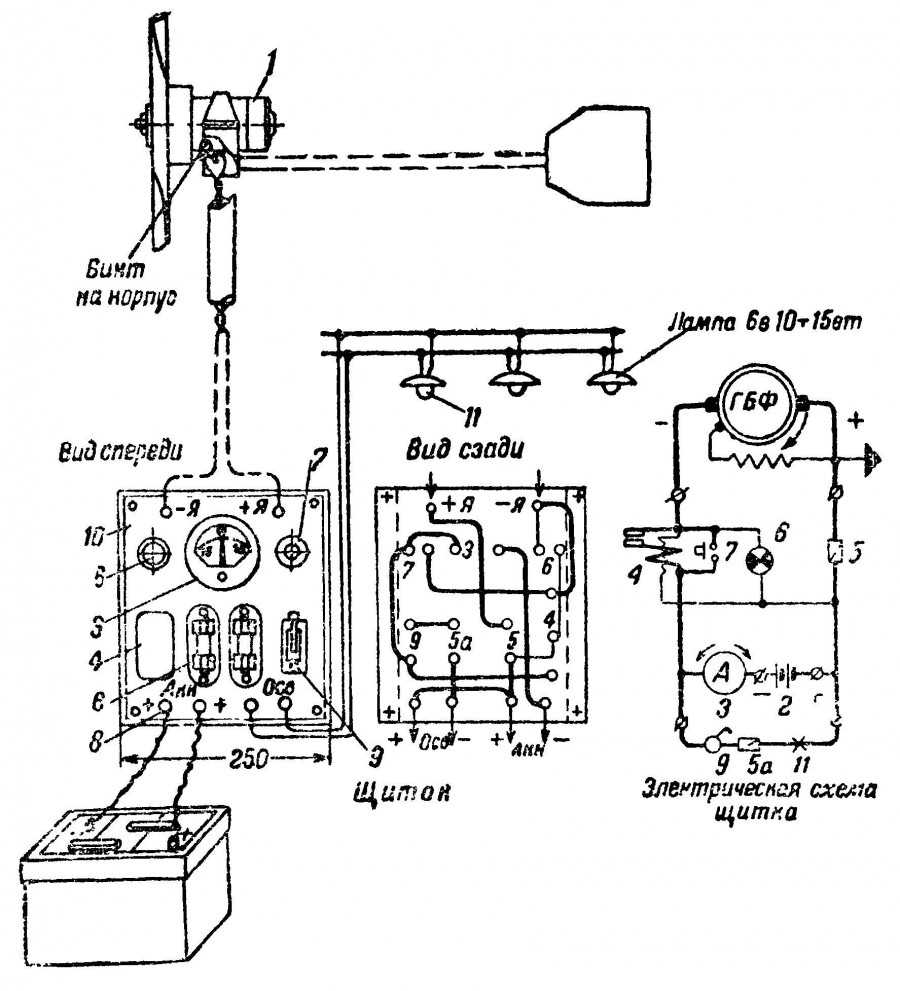
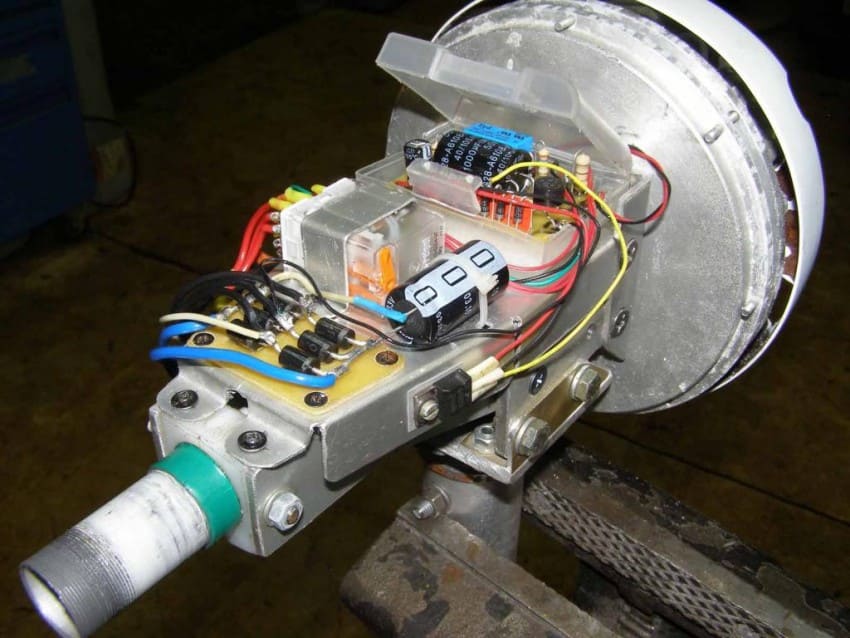
Now you need to fix the bucket with the blades prepared for work on the pulley. We install the generator on the mast, while fixing it with clamps. It remains to connect the wires and assemble the circuit.
Prepare to write down the wiring diagram, wire colors, and pin markings. You will definitely need it later. We fix the wires on the mast of the device.
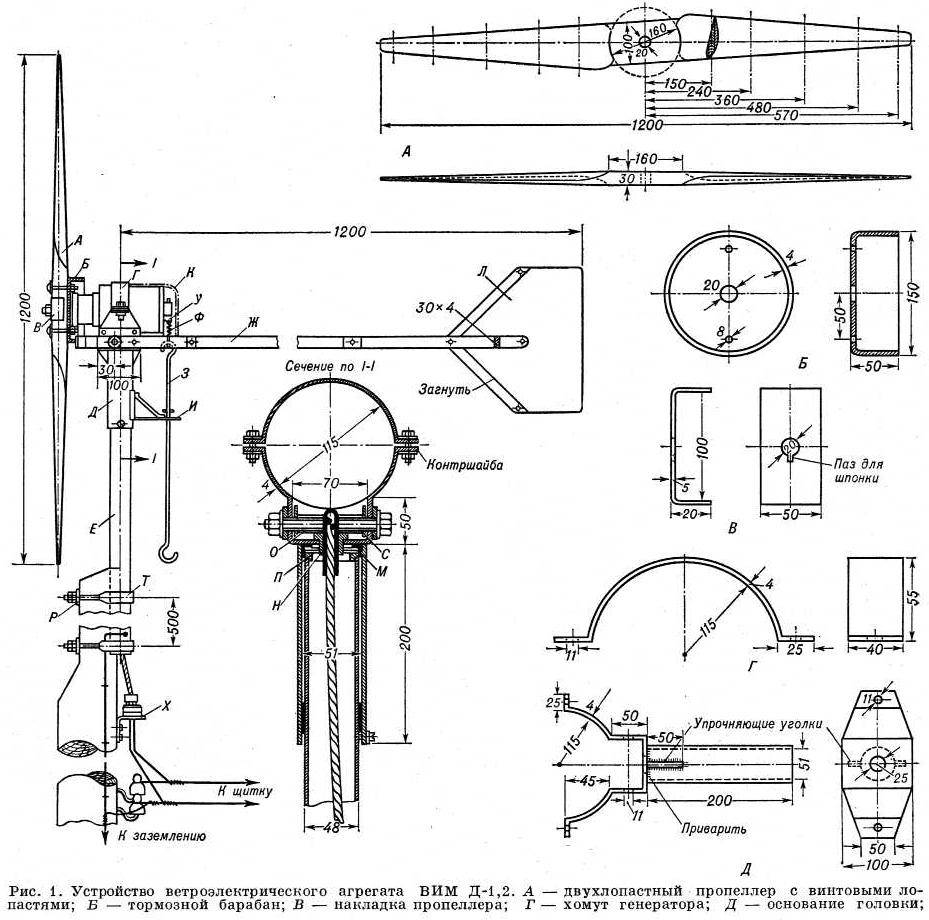
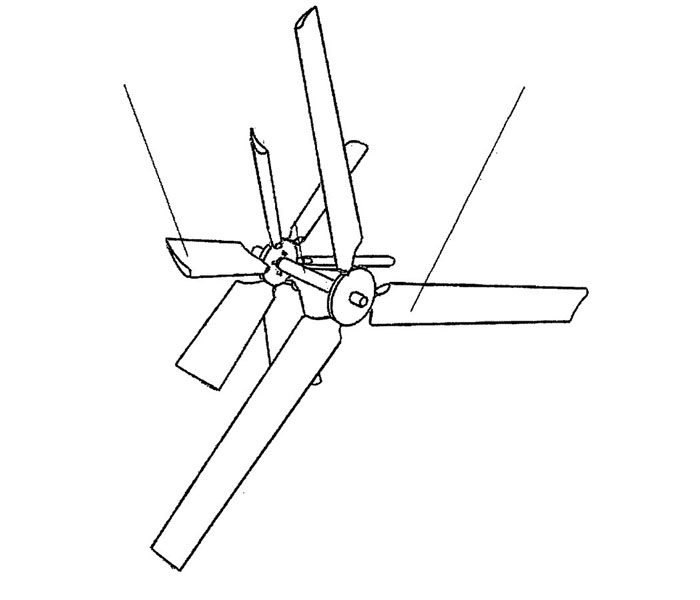
This drawing contains detailed recommendations for assembling the overall structure and a general view of the device already assembled and ready for use.
To connect the battery, you need to use wires with a cross section of 4 mm². It is enough to take a segment with a length of 1 meter. That's enough.


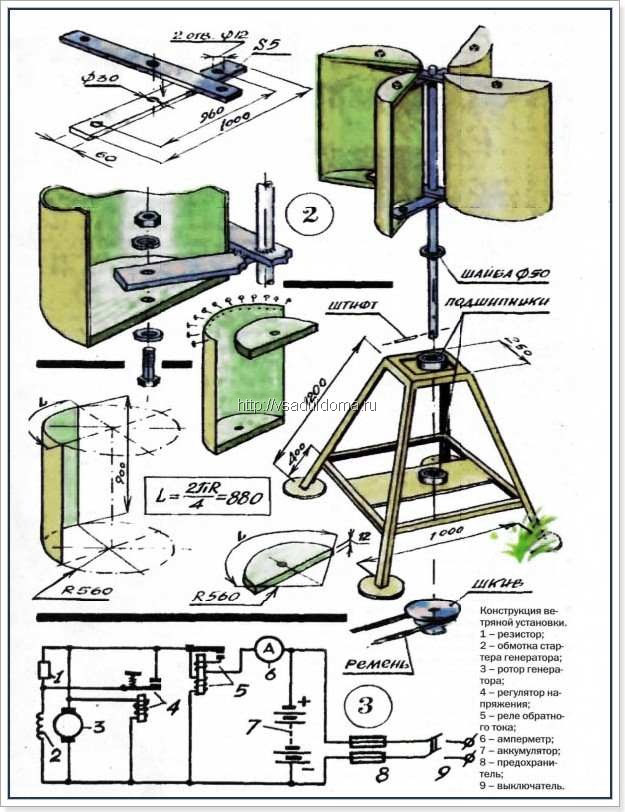
And in order to connect a load to the network, which includes, for example, lighting and electrical appliances, wires with a cross section of 2.5 mm² are sufficient. We install the inverter (converter). This will also require a 4 mm² wire.
Advantages and disadvantages of a rotary windmill model
If you did everything carefully and consistently, then this wind generator will work successfully. At the same time, there will be no problems during its operation.
If you use a 1000 W converter and a 75A battery, this installation will provide electricity for video surveillance devices, burglar alarms and even street lighting.
The advantages of this model are:
- economical;
- elements can be easily replaced with new ones or repaired;
- special conditions for functioning are not needed;
- reliable in operation;
- provides complete acoustic comfort.
There are also disadvantages, but they are not so many: the performance of this device is not very high, and it has a significant dependence on sudden gusts of wind. Air currents can simply disrupt an impromptu propeller.
We make a lathe for wood from a washing machine
What else can be done with the engine from the washer? One of the popular ideas is lathe by tree. Let's look at the step by step process.
| Illustration | Action Description |
|---|---|
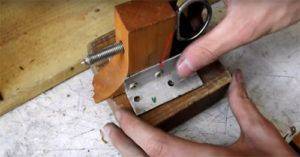
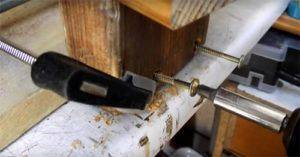
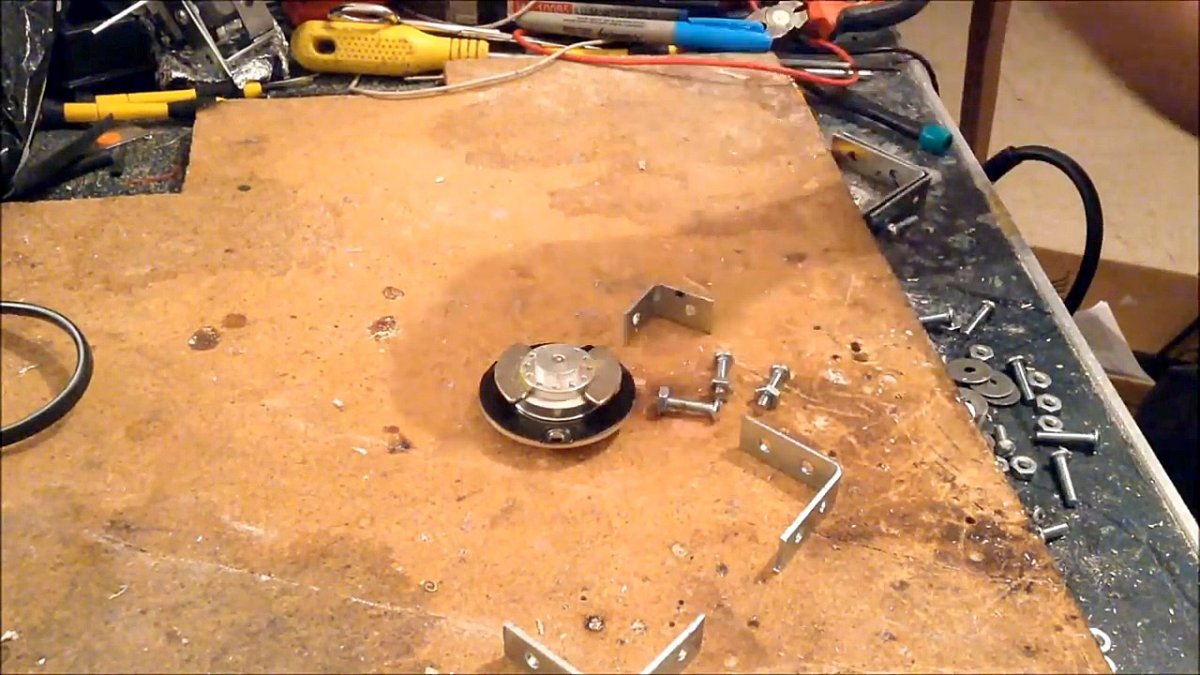
 | To firmly fix the engine on the workbench, make fasteners from a metal corner. To do this, drill holes for fixing to the motor legs and the table. |
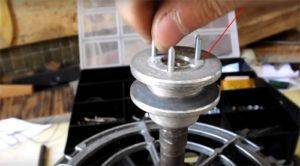 | To fasten a wooden part, you will need a flange fixed on the motor shaft, and these are the studs made from ordinary sheared bolts. Screw these pins into the base. You will need 3 pins. |
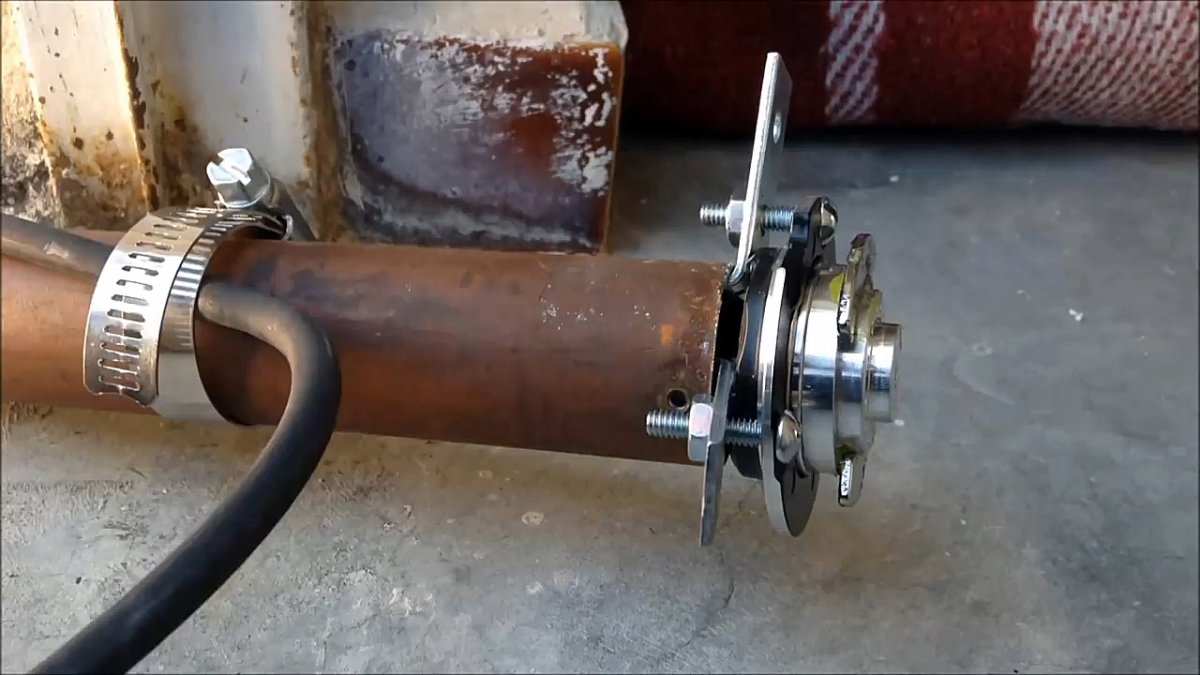
 | The motor is fixed to the table with self-tapping screws, to the metal part - with bolts. |
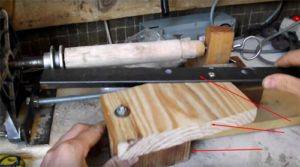
 | The opposite end of the wooden part is attached with such a device. It consists of a screw with a loop, two wooden stands perpendicularly fixed to the corners. |
 | This wooden part must be movable so that different blanks can be used. For mobility, it is mounted on a threaded stud with bolts. |
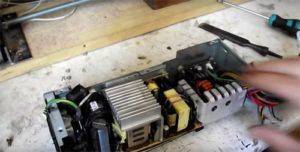 | To control the motor, you need a power supply.Can use one of the computer blocks. You will need to install switches to adjust the rotation speed. |
 | How to connect the motor to the power supply in animation. |
 | To guide the tools, make a tooltip. It consists of two wooden parts and a metal corner. All parts are movable due to fastening with one bolt. |
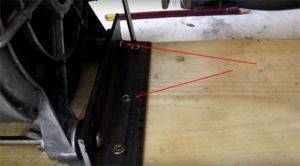
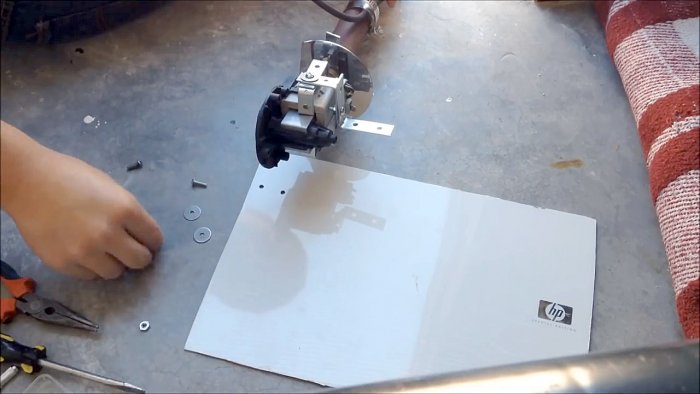
 | The lower part of the handrest is rigidly fixed on the workbench using self-tapping screws and corners. |
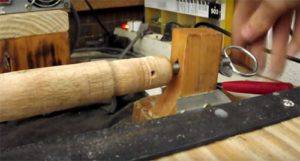 | The workpiece is fixed on the machine from two sides: on the left - on studs, on the right - on a bolt with a handle. For fixing in the workpiece, you need to drill the appropriate holes. |
 | To work, you will need sharpened tools - cutters. |
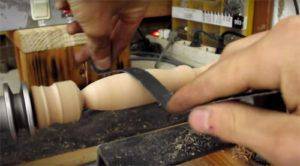 | The final polishing of the workpiece is done with a strip of sandpaper. |
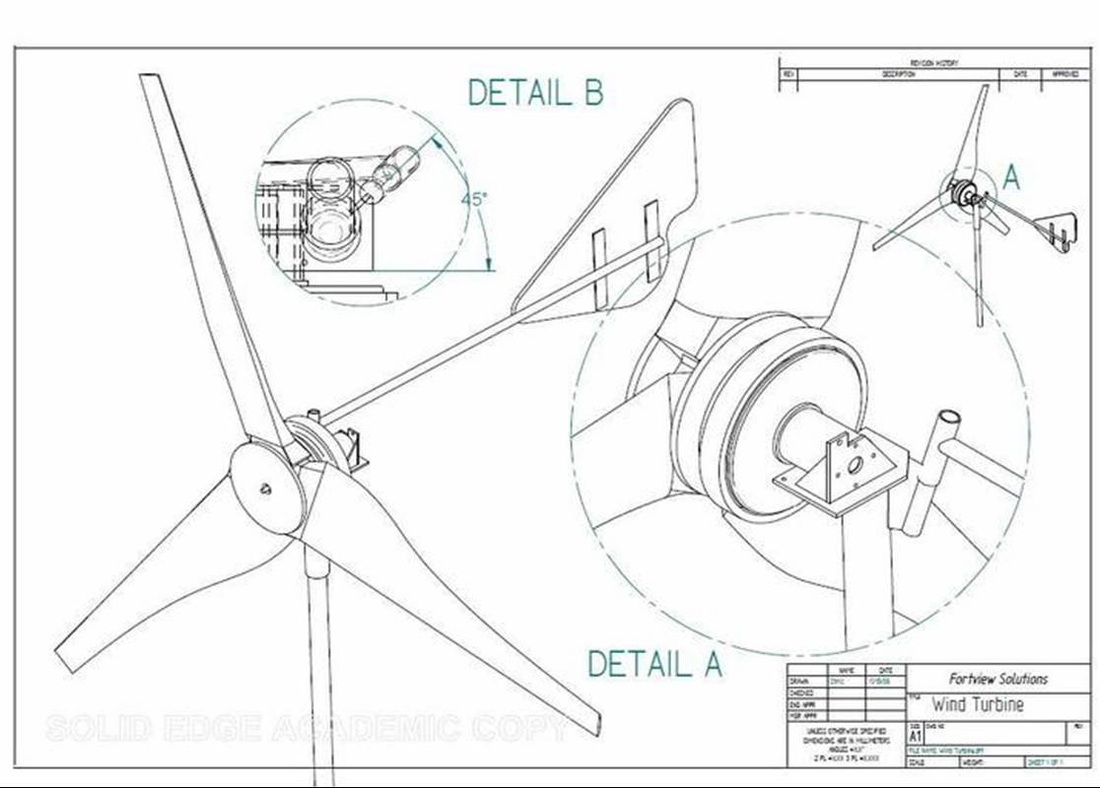
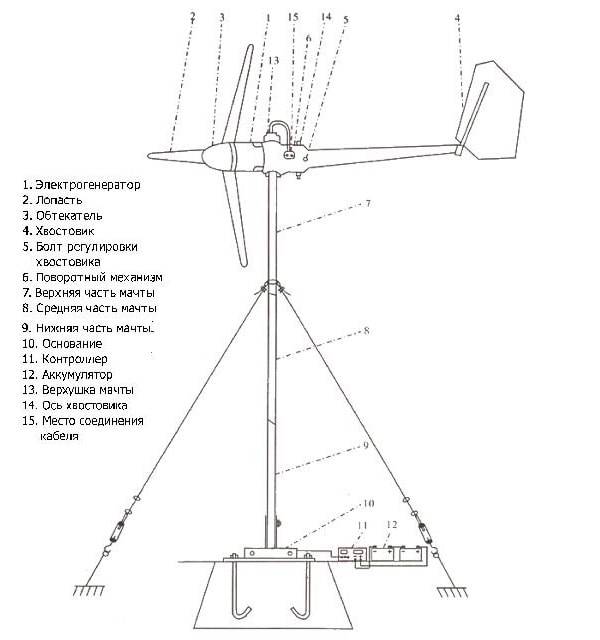
We make a windmill with our own hands
1. Wind turbine blades
The wind wheel is the most significant structural element of the device. It converts wind force into mechanical energy. Thus, the selection of all other elements depends on its structure.
The most common and effective types of blades are sail and vane. For the manufacture of the first option, it is necessary to fix a sheet of material on the axis, placing it at an angle to the wind flow. However, during rotational movements, such a blade will have significant aerodynamic resistance. In addition, it will increase with an increase in the attacking angle, which reduces the effectiveness of their functioning.
The second type of blades works with higher productivity - winged ones.In their outlines, they resemble the wing of an aircraft, and the costs of the friction force are reduced to a minimum. This type of wind turbine has a high utilization rate of wind energy at low material costs.
The blades can be made from plastic or plastic pipe as it will be more productive than wood. The most efficient is the wind wheel structure with a diameter of two meters and six blades.
2. Wind turbine generator
The most acceptable option for wind generating equipment is a converting asynchronous generating mechanism with alternating current. Its main advantages are low cost, ease of acquisition and breadth of distribution of models, the possibility of re-equipment and excellent operation at low speeds.
It can be transformed into a permanent magnet generator. Studies have shown that such a device can be operated at low speeds, but quickly loses efficiency at high speeds.
3. Wind turbine mount
To fix the blades to the casing of the generator, it is necessary to use the head of the wind turbine, which is a steel disk with a thickness of up to 10 mm. Six metal strips with holes are welded to it for attaching the blades to them. The disk itself is attached to the generating mechanism using bolts with locknuts.


Since the generating device is able to withstand maximum loads, including from gyroscopic forces, it must be firmly fixed.On the device, the generator is installed on one side, for this the shaft must be connected to the body, which looks like a steel element with threaded holes for screwing onto the generator axis of the same diameter.
For the production of a support frame for wind-generating equipment, on which all other elements will be placed, it is necessary to use a metal plate with a thickness of up to 10 mm or a piece of a beam of the same dimensions.
4. Wind turbine swivel
The rotary mechanism provides rotational movements of the windmill around a vertical axis. Thus, it makes it possible to turn the device in the direction of the wind. For its manufacture, it is better to use roller bearings, which more effectively perceive axial loads.
5. Current receiver
The pantograph functions to reduce the likelihood of twisting and breaking the wires coming from the generator on the windmill. It contains in its design a sleeve made of insulating material, contacts and brushes. To create protection from weather phenomena, the contact nodes of the current receiver must be closed.
Varieties
Windmills are classified according to several parameters:
- axis position relative to the ground. On this basis, windmills are horizontal (having higher power, reliability) and vertical. These do-it-yourself wind turbines are much more sensitive to wind gusts;
- propeller pitch, which can be fixed (more common) and variable. The latter has an increased rotation speed, but the installation is very difficult to perform and massive.
Making a windmill with your own hands will turn out to be practically free if there are unnecessary parts lying around somewhere in the garage: an old car engine, cut sewer pipes, etc.
Wind generator - a source of electricity
Utility tariffs are raised at least once a year. And if you look closely, then in some years the price of the same electricity rises twice - the numbers in payment documents grow like mushrooms after rain. Naturally, all this hits the pocket of the consumer, whose income does not show such a steady growth. And real incomes, as statistics show, show a downward trend.
More recently, it was possible to fight against the growth of electricity tariffs in one simple, but illegal way - with the help of a neodymium magnet. This product was applied to the body of the flowmeter, as a result of which it stopped. But we strongly do not recommend using this technique - it is unsafe, illegal, and the fine upon capture will be such that it will not seem small.
The scheme was just great, but subsequently it stopped working for the following reasons:
The frequent control rounds began to massively identify unscrupulous owners.
- Control rounds have become more frequent - representatives of regulatory authorities go from house to house;
- Special stickers began to be pasted on the counters - under the influence of a magnetic field they darken, exposing the intruder;
- The counters have become immune to the magnetic field - electronic accounting units are installed here.
Therefore, people began to pay attention to alternative sources of electricity, such as wind turbines.Another way to expose the violator who steals electricity is to conduct an examination of the level of magnetization of the meter, which easily reveals the facts of theft.
Another way to expose the violator who steals electricity is to conduct an examination of the level of magnetization of the meter, which easily reveals the facts of theft.
Windmills for the home are becoming commonplace in areas where winds often blow. The wind power generator uses the energy of wind air currents to generate electricity. To do this, they are equipped with blades that drive the rotors of the generators. The resulting electricity is converted into direct current, after which it is transmitted to consumers or stored in batteries.


Wind turbines for a private house, both homemade and factory assembled, can be the main or auxiliary sources of electricity. Here's a typical example of an auxiliary source running - it heats water in a boiler or feeds low-voltage home lights, while the rest of the home appliances are powered by the main power supply. It is also possible to work as the main source of electricity in houses that are not connected to electrical networks. Here they feed:
- Chandeliers and lamps;
- Large household appliances;
- Heating appliances and more.
Accordingly, in order to heat your home, you need to make or purchase a 10 kW wind farm - this should be enough for all needs.
The wind farm can power both traditional electrical appliances and low-voltage ones - they operate on 12 or 24 volts.A 220 V wind generator is carried out according to a scheme using inverter converters with the accumulation of electricity in batteries. Wind generators for 12, 24 or 36 V are simpler - simpler battery charge controllers with stabilizers are used here.
Varieties and modifications of vertical windmills
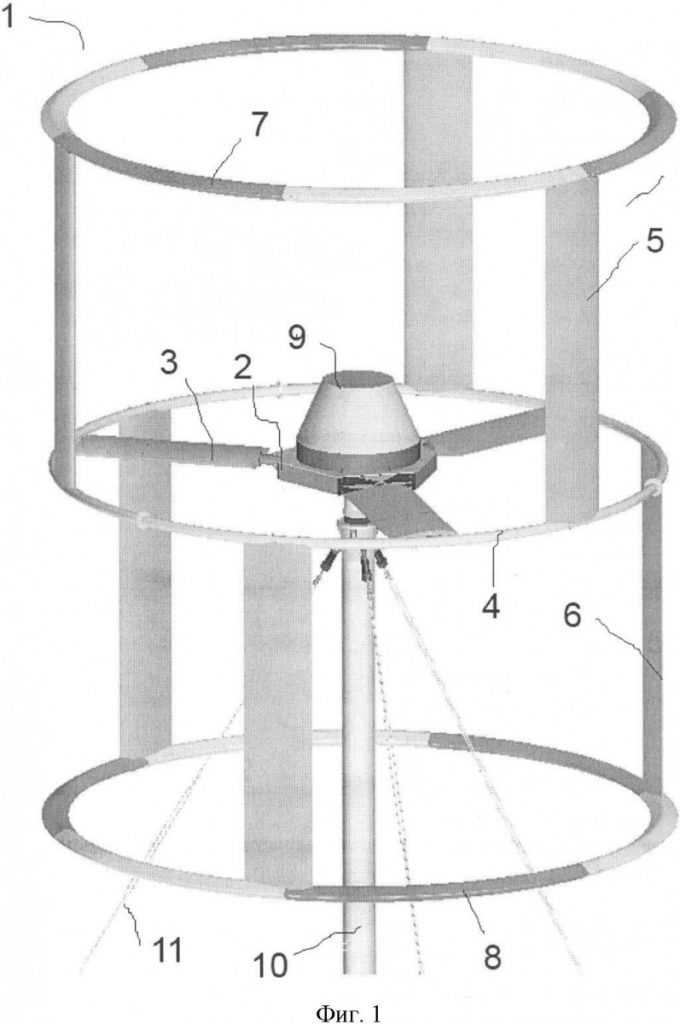
An orthogonal wind generator is equipped with several blades located at a certain distance parallel to the axis of rotation. These windmills are also known as the Darrieus rotor. These units have proven to be the most efficient and functional.
The rotation of the blades is provided by their wing-like shape, which creates the necessary lifting force. However, the normal operation of the device requires considerable effort, so the performance of the generator can be increased by installing additional static screens. As disadvantages, it should be noted excessive noise, high dynamic loads (vibration), which often lead to premature wear of the support units and failure of the bearings.
There are wind turbines with a Savonius rotor that are most suitable for domestic conditions. The wind wheel consists of several semi-cylinders that rotate continuously around their axis. Rotation is always carried out in the same direction and does not depend on the direction of the wind.
The disadvantage of such installations is the rocking of the structure under the action of the wind. Due to this, tension is created in the axis and the rotor rotation bearing fails. In addition, the rotation cannot start on its own if only two or three blades are installed in the wind generator.In this regard, it is recommended to fix two rotors on the axis at an angle of 90 degrees relative to each other.
The vertical multiblade wind generator is one of the most functional devices of this model range. It has high performance with little load on the load-bearing elements.
The internal part of the structure consists of additional static blades placed in one row. They compress the air flow and regulate its direction, thereby increasing the efficiency of the rotor. The main disadvantage is the high price due to the large number of parts and elements.
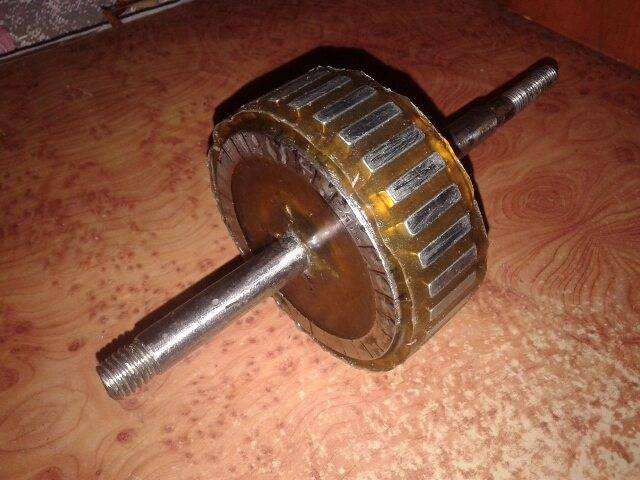
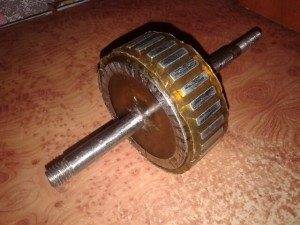
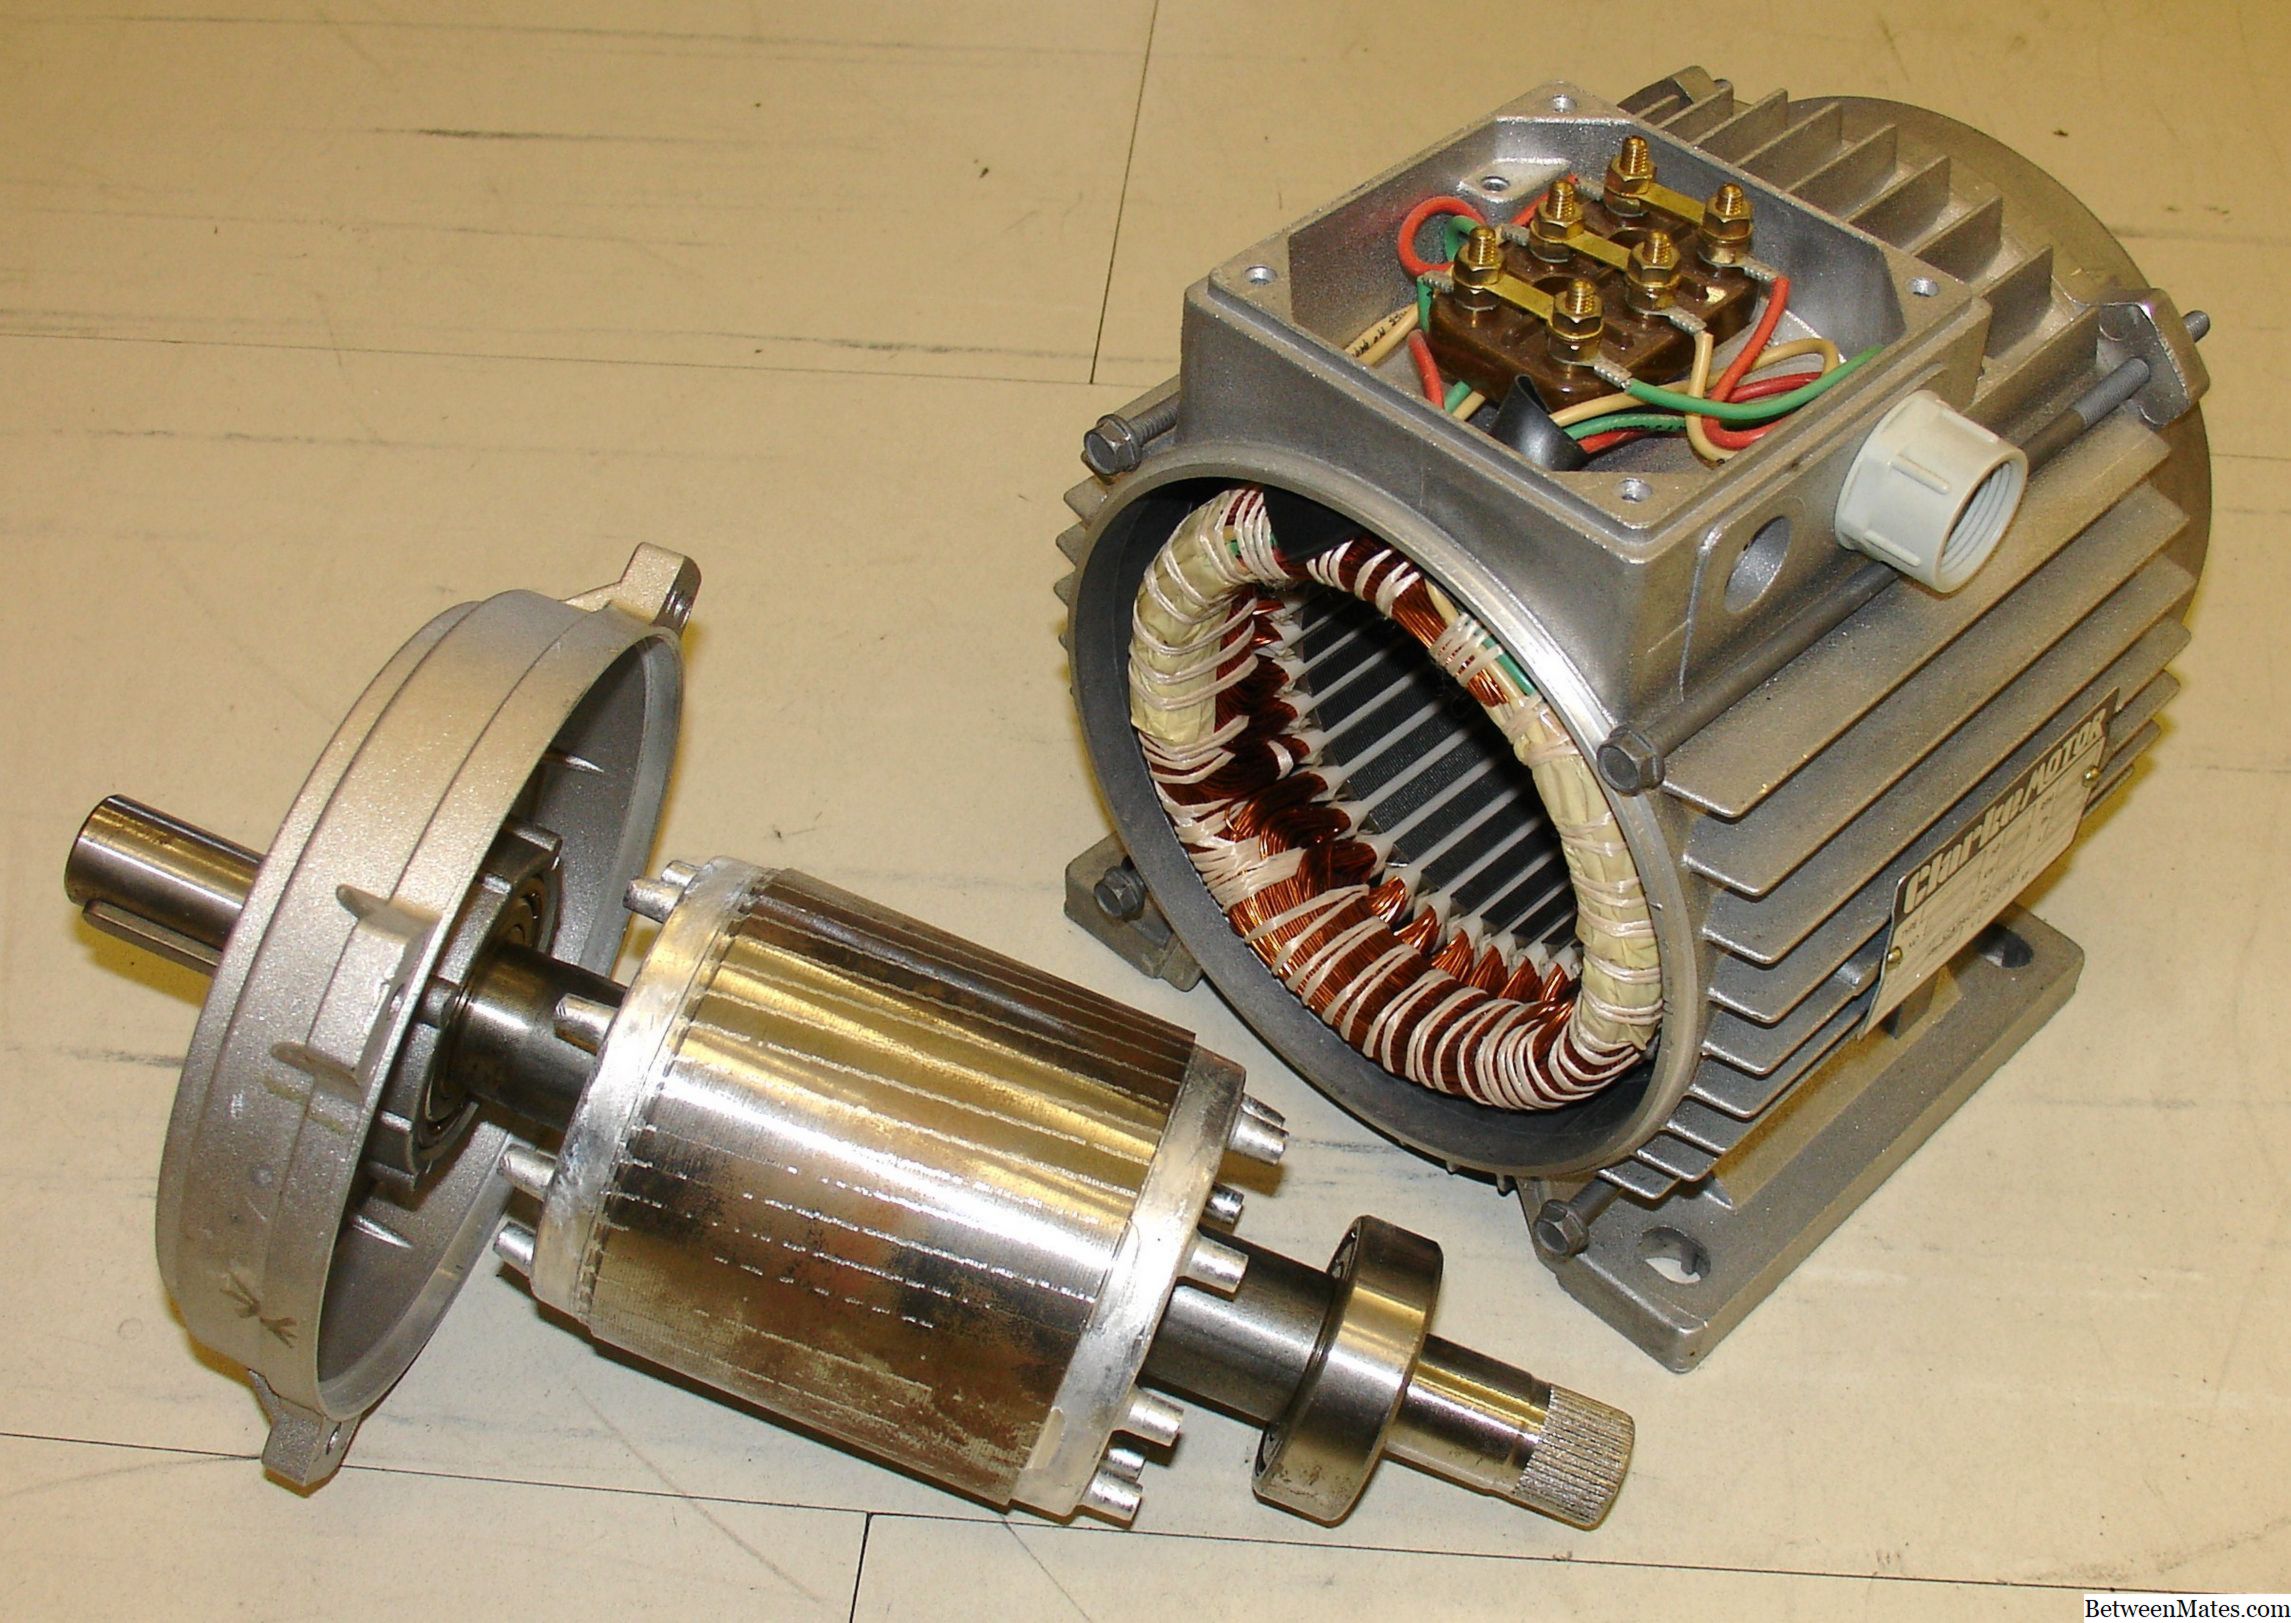
Car Alternator Preparation
In order to make a wind generator with your own hands from a car generator? you will need to install a power of 95A with a voltage of 12 V. At 125 rpm it produces 15.5 watts, and at 630 rpm this figure will be 85.7 watts. If we talk about a load of 630 rpm, then the voltmeter will show 31.2 volts, and the ammeter - 13.5 amperes. Thus, the generator power will be 421.2 watts. To achieve this indicator, it is necessary to use neodymium magnets, which are 7 times more effective than ferrite ones.
At the beginning of the preparation of the automobile generator, it is necessary to remove the rotor winding of the magnetic excitation and the electronic brushes with the collector. In place of the ring ferromagnets, you need to install neodymium magnets in the amount of 3 pieces, the size of each of them should be 85 x 35 x 15 millimeters. The disadvantage of using powerful magnets can be "sticking", which makes it difficult to move the shaft. To reduce it, the magnets should be placed at a slight angle relative to each other.
During the operation of the wind turbine, it is recommended to periodically check the reliability of the fasteners at the base of the mast, lubricate the bearings of the rotary device, and balance the tilt of the installation. Once every six months it is recommended to check and change the electrical insulation, which is often damaged due to use in adverse conditions.
A homemade wind generator, assembled from a car generator and simple parts, is able to provide electricity to a small house and become an autonomous backup power source. Environmentally friendly and low maintenance, it will pay for itself within 2-4 years depending on and last for decades.
Legal Aspects of Installing a Wind Turbine
A wind generator is an unusual property, the possession of this device is associated with compliance with certain rules and laws. If the device is installed near bridges, airports and tunnels, then the height of the mast should not exceed 15 m. The level of generated noise should not exceed 70 dB during the day and 60 dB at night. Requires protection from tele-interference. Environmental services should not make claims regarding the creation of obstacles to the migration of migratory birds. It is advisable to conduct a legal consultation on each parameter and have official documents before starting construction. There is no taxation for the production of electricity for own domestic needs by laws.
Windmill
Classification and principles of operation
It is possible to find a great many different examples of assembling wind generators on the net, but they are all divided into two classes: vertical and horizontal. Each class has subspecies:
- Vertical:
- Industrial.The height of such power plants can reach more than 100 meters, the power varies from 4 to 6 MW.
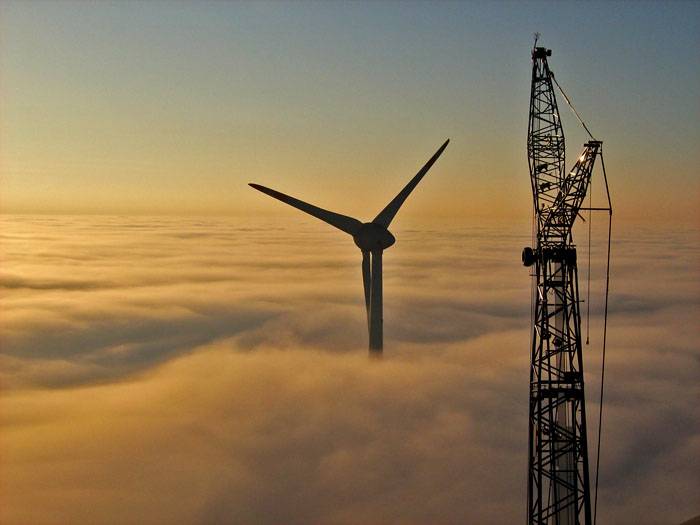
One of the most powerful wind farms Enercon E-126
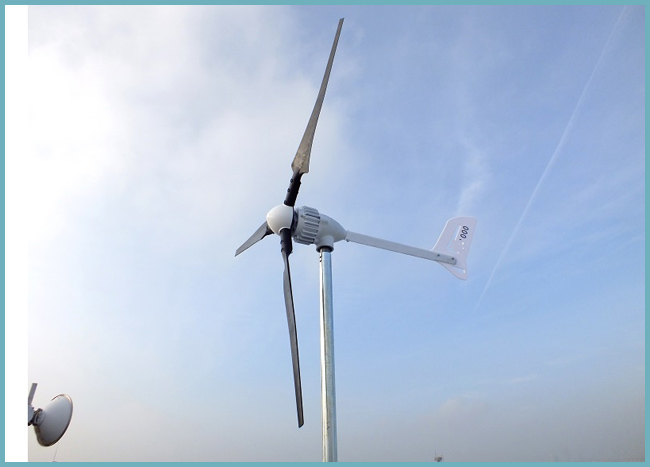
Devices for household purposes. There are models made in specialized factories and do-it-yourself devices;
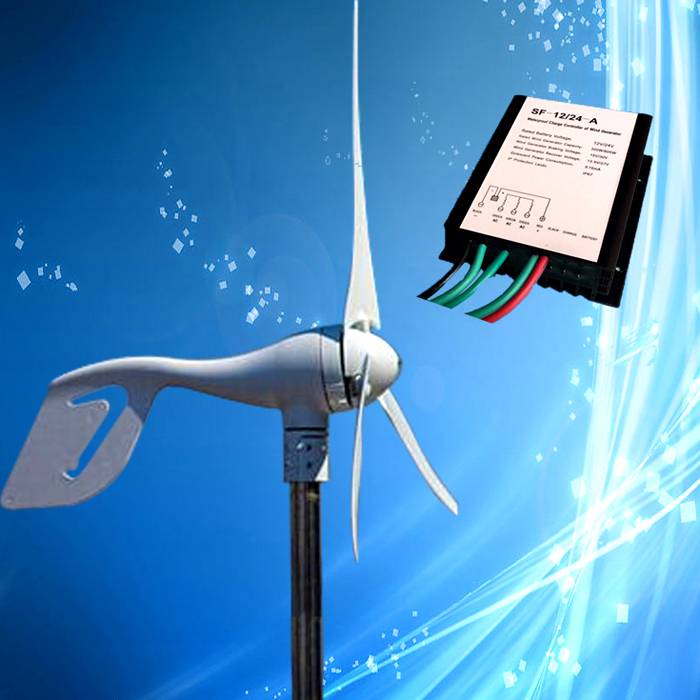
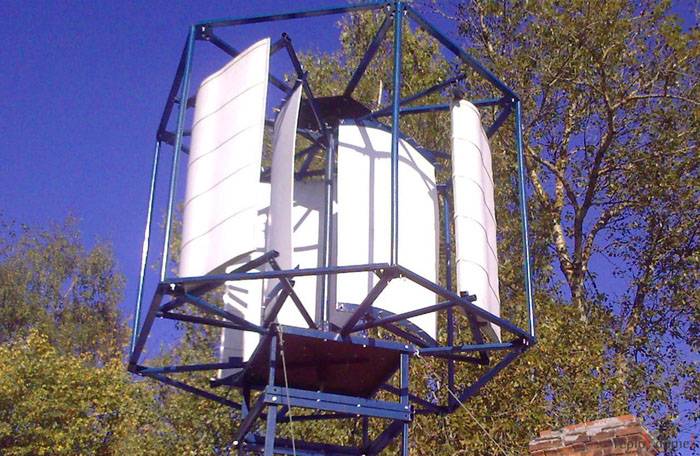
Device with a power of 600 W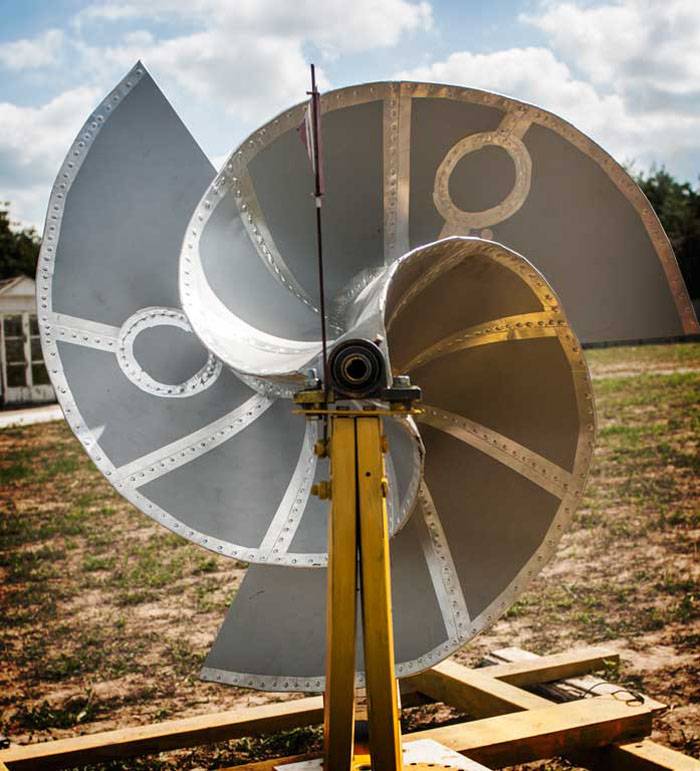
spiral device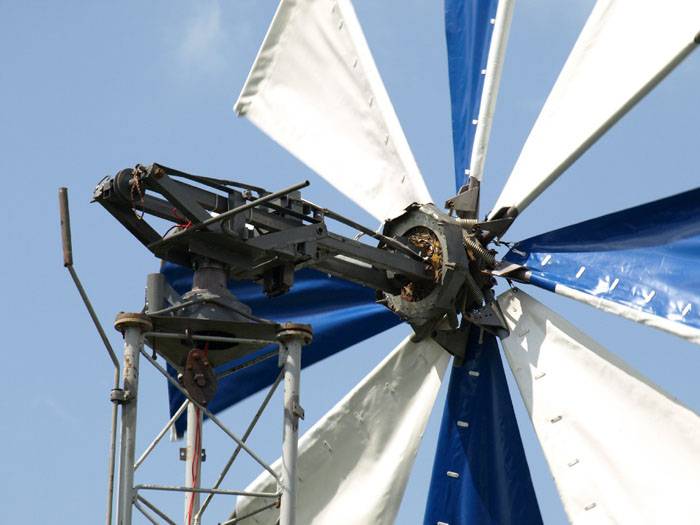
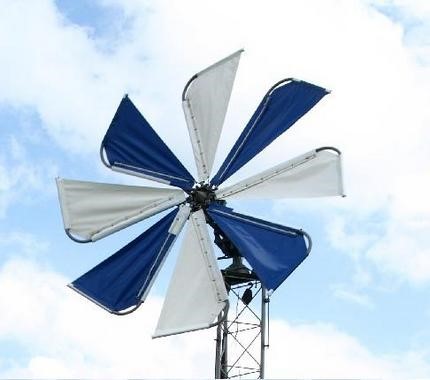
Sample with blades made of fabric materials
Windmill with metal blades
- Horizontal:
- Standard;
The unit with the classic arrangement of the blades
Rotary.
The structural elements of such devices can be located at different angles.
The entire class of do-it-yourself devices, whether they are wind farms or industrial ones, work on the principle of electromagnetic induction, that is, magnets fixed in the rotor generate alternating current when the blades rotate. It is supplied to the storage batteries through the controller. This is a device that converts alternating current to direct current and controls the degree of charge of batteries.


The next node is an inverter that converts direct current into alternating current and equalizes the fluctuation of electricity to a value of 50 Hz, then the current is supplied to consumers.
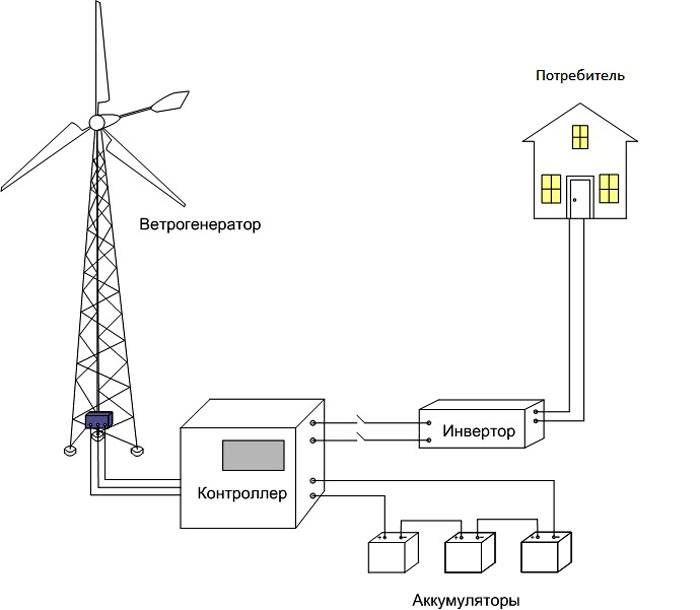
Standard scheme of operation of a wind farm