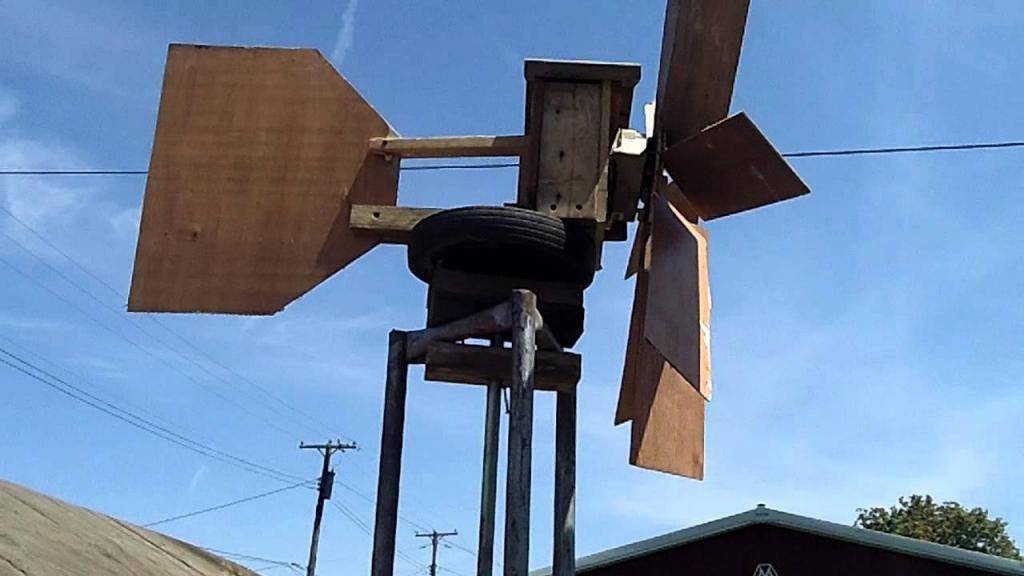
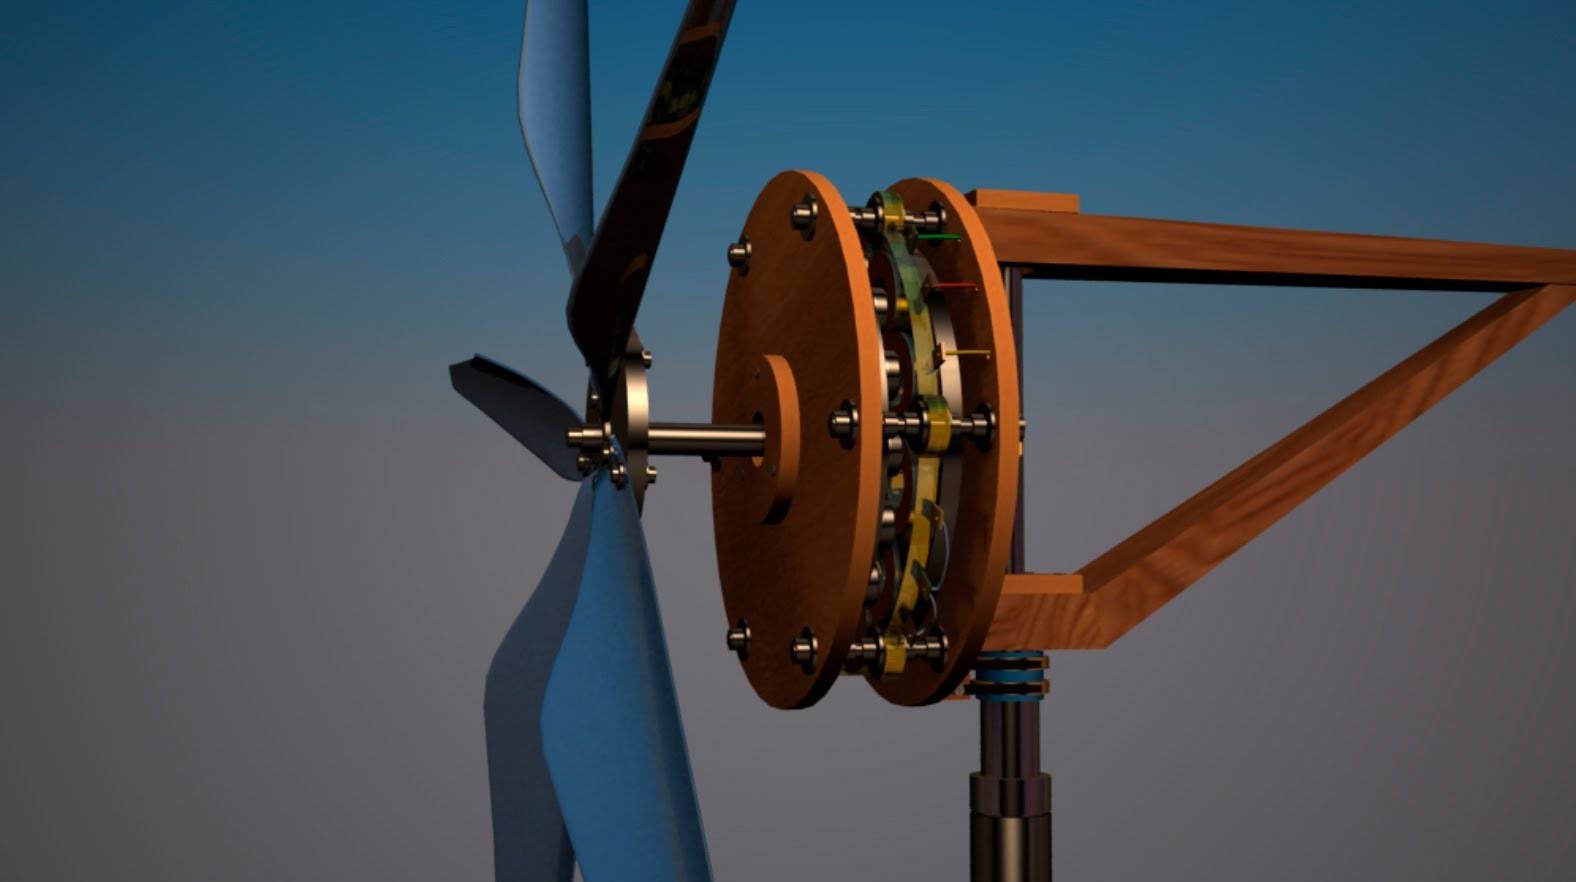
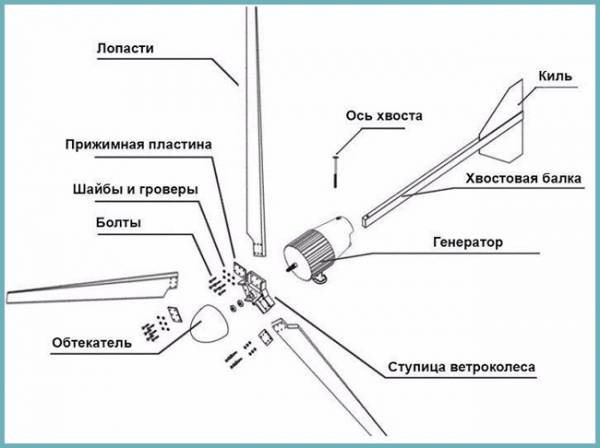
- The design of a windmill based on an autogenerator
- Wind farm from a car generator: advantages and disadvantages
- Wind turbine maintenance
- Step by step description of the rework process
- Making a wind wheel
- How to make a wind generator?
- What can be made from?
- Device maintenance
- Completion of wind turbine assembly
- Recharging the battery
- Making a wind wheel
- Legality of the installation
- Generator selection
- Mast installation features
- How to install a wind generator with your own hands
- Do-it-yourself principles for making blades for a wind generator
- Materials and tools
- Drawings and calculations
- Production from plastic pipes
- Making blades from billets of aluminum
- fiberglass screw
- How to make a blade out of wood?
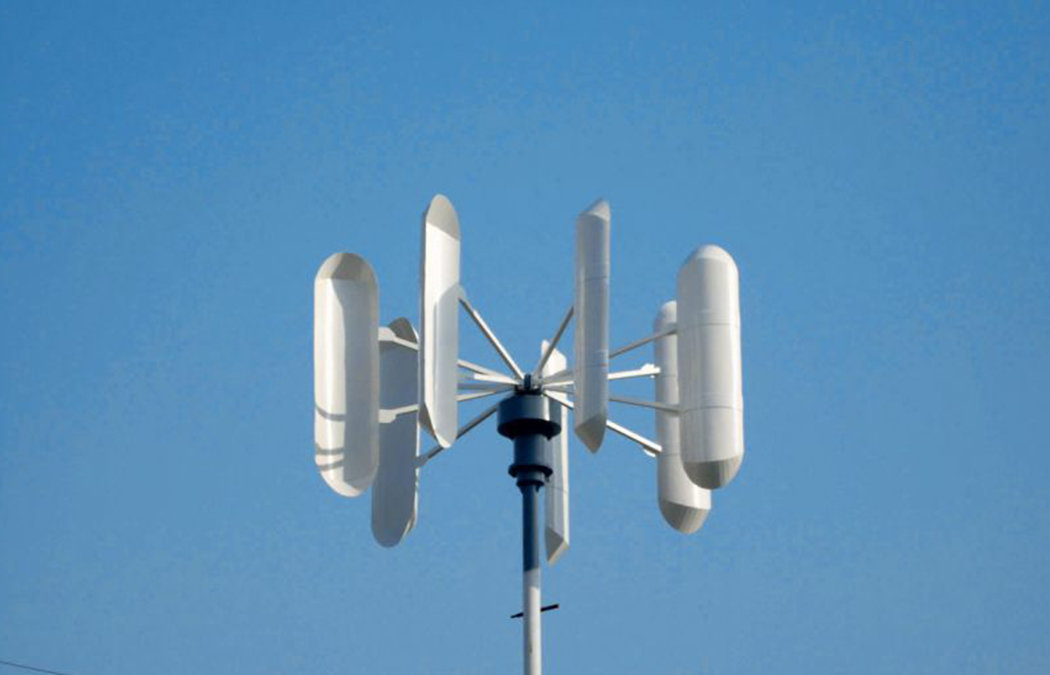
- Device types
- How to choose a generator for a home wind farm?
- From car
- Homemade generator
- AC, asynchronous
- Direct current
- With permanent magnets
- low speed
- Asynchronous
- Preparations before work
- Manufacturing from a hub
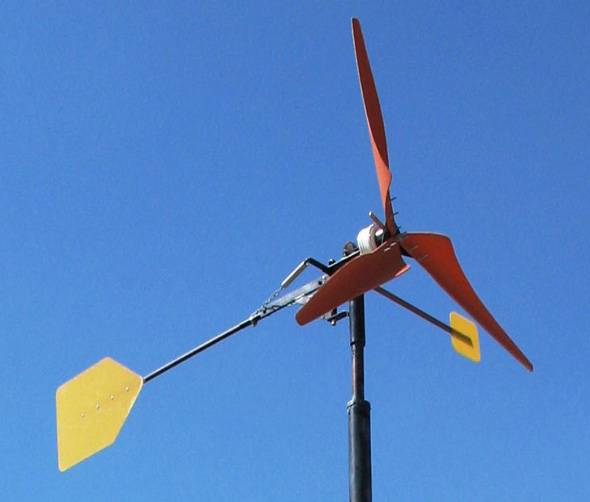
The design of a windmill based on an autogenerator
The manufacturing process of a wind turbine consists of two stages:
- First of all, you need to make blades.These parts are made of PVC pipes. The diameter and size of the PVC pipes must be in accordance with the required area of the blades. For the manufacture of blades, the pipe is cut along the length into three identical parts. Trapezoidal blades are cut from the segments. Further, these parts of the system are fixed on a base made, for example, from a decommissioned circular saw. In this case, the saw teeth must be removed. The propeller thus obtained is fixed on the generator shaft.
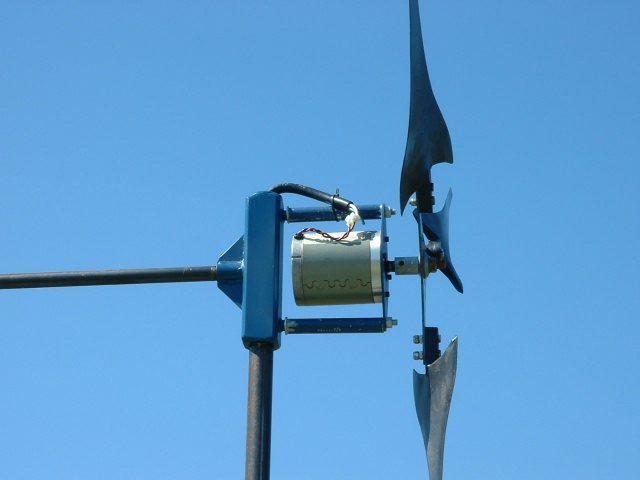
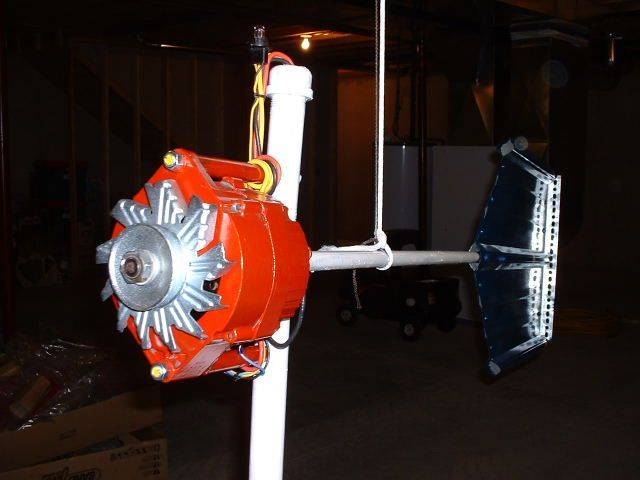
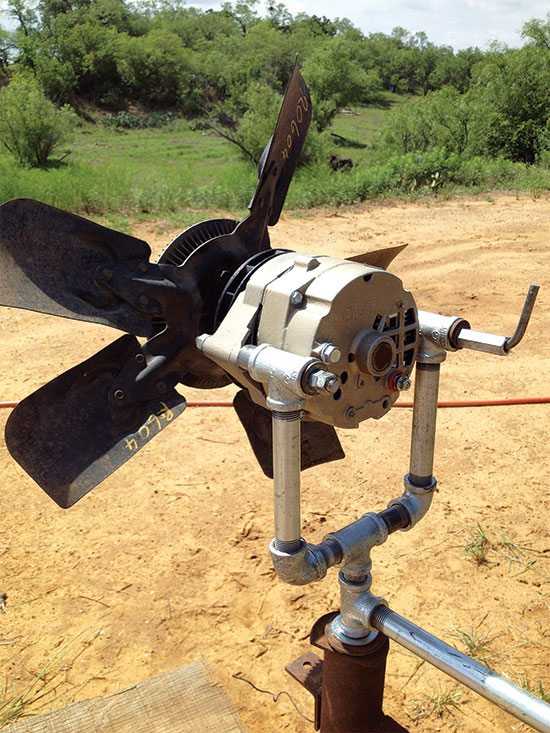
- At the second stage, it is necessary to assemble the rotary part of the wind power unit. For this, a square-shaped pipe of 25 × 20 millimeters is taken. On one side, a cut is made in the pipe, where a weather vane made of sheet steel is installed. On the other side of the pipe, a generator with a propeller is mounted and fixed with clamps.
Wind farm from a car generator: advantages and disadvantages
A homemade wind generator can be constructed from:
- an electric motor dismantled from a milling machine;
- rotary part of a screwdriver or drill;
- scooter motor-wheels;
- computer cooler;
- engine from a washing machine;
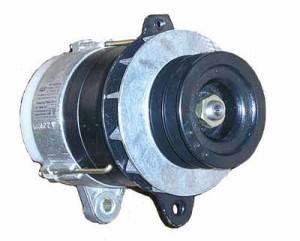
- car generator.
The latter option is used most often, since it has a lot of advantages, and is also the most affordable for many.
Advantages of a wind farm based on a car generator:
- construction speed;
- cheapness;
- maintainability;
- quiet work;
- synchronism (stable voltage is given out);
- the ability to use standard 12 volt batteries.
As for the shortcomings, there are only three of them:
- This type of wind generator needs a high speed of up to 2000 rpm, so it is less reliable than specialized devices.
- Vehicle generators are warranted for approximately 4,000 hours of operation. Given this, it is easy to guess that the wind turbine will require annual repairs. However, in this case, you don’t have to spend too much, you can simply replace the device that has failed.
- Many generators have electromagnetic excitation, which reduces efficiency (about 15% of the energy falls on the excitation coil).
Wind turbine maintenance
A wind generator, like any other device, needs technical control and maintenance. For the smooth operation of the windmill, the following work is periodically carried out.
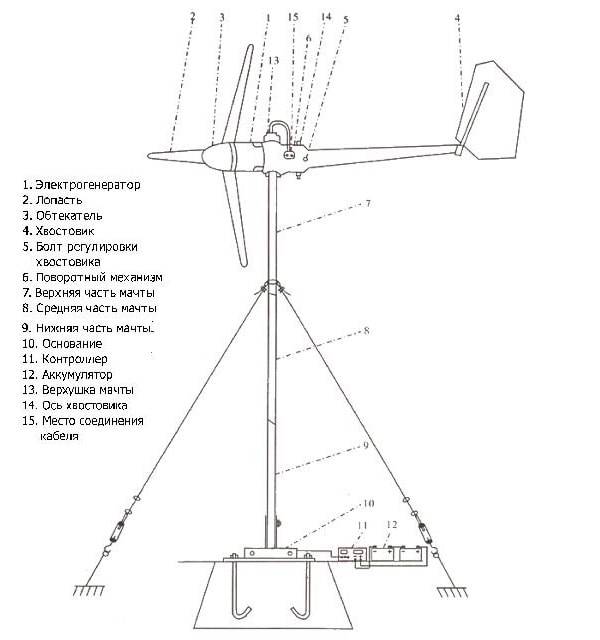
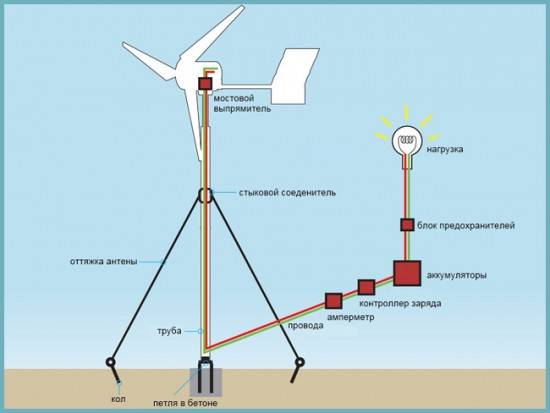 Scheme of the wind generator
- The current collector requires the most attention. Generator brushes need cleaning, lubrication and preventive adjustment every two months.
- At the first sign of a blade malfunction (trembling and wheel imbalance), the wind generator is lowered to the ground and repaired.
- Once every three years, metal parts are coated with anti-corrosion paint.
- Regularly check the fastenings and tension of the cables.
Now that the installation is complete, you can connect appliances and use electricity. At least as long as it's windy.
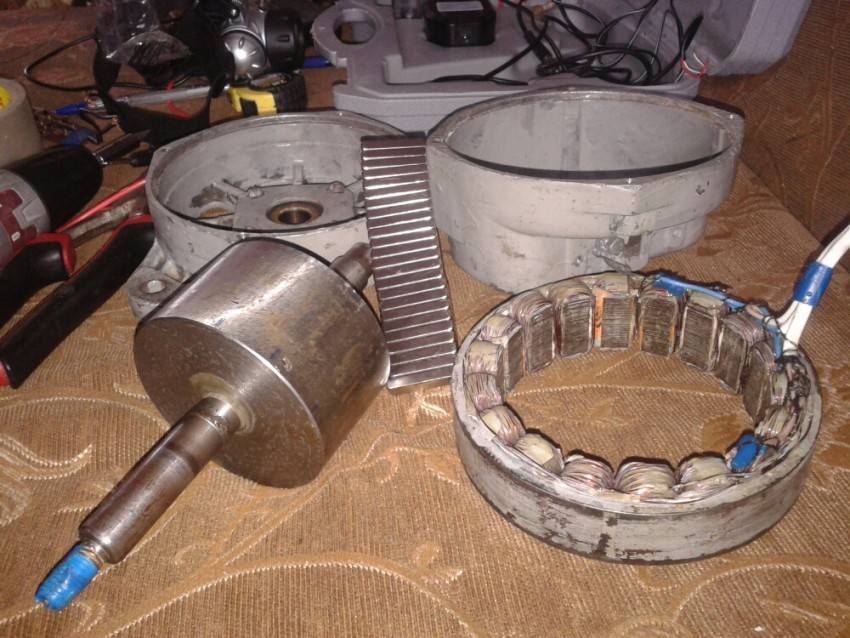
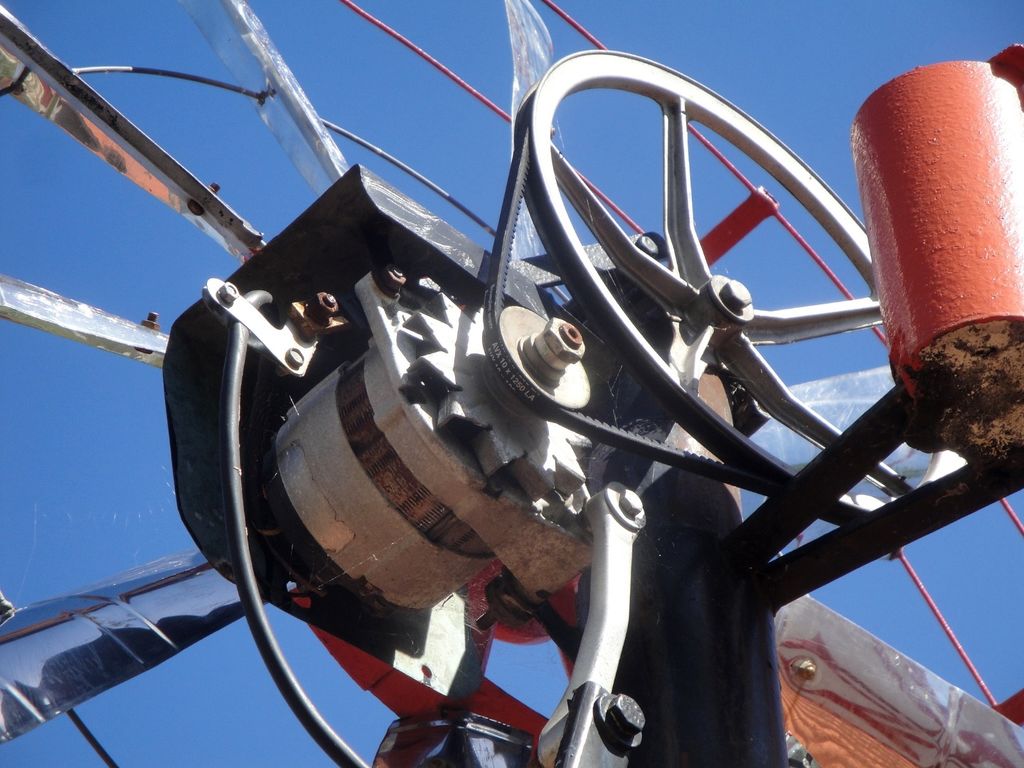
Step by step description of the rework process
 Rebuilds a car alternator in just a few easy steps
- 1st step. Make a new shaft from a non-magnetic material, such as titanium, in the likeness of the old one.
- 2nd step. Rewind the oscillator stator, increasing the number of turns seven times, and reduce the diameter. This is necessary to increase the generation of energy at low speeds.
- 3rd step.You can make a new rotor either from an aluminum bucket, dividing it into 4 blades, or cut it out of a water pipe. Attach to generator with bolts.
- 4th step. Install a bandage, for example, from a pipe, and glue a pair of neodymium magnets, alternating poles.
Making a wind wheel
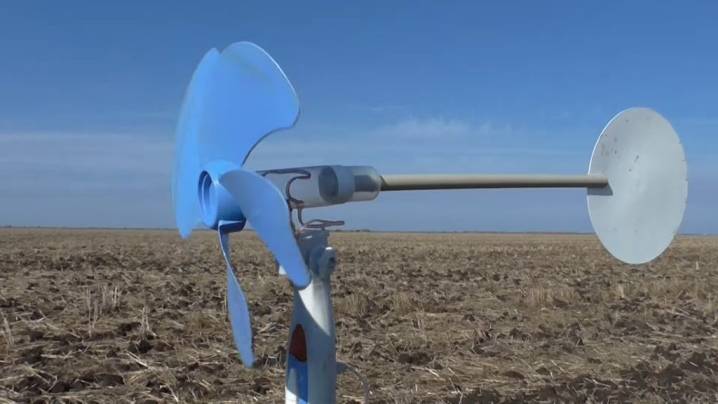
It is required to know the strength of the wind, the operating speed of the generator and its maximum resistance. Taking into account the initial data, the type of wind wheel, the number and geometry of the blades and their location are selected. The axis can be located vertically or horizontally, according to the type of blades, the devices are vaned, carousel and drum. Each type has its own strengths and weaknesses. The calculations are complex, the work of the wheel surface will be determined depending on the kinetic energy of the wind.
- wind direction and axis coincide;
- blades of minimal width, but an infinitely large number;
- constant circulation of air flows along the blade, and their resistance is zero;
- the angular velocity tends to infinity, and the lost flow velocity is constant.
Ideal indicators cannot be achieved, but they must be strived for. The blades are recommended to be made of lightweight, durable and weather-resistant materials. The best option is aluminum alloy sheet metal. The geometry is selected based on the calculated data for each specific case.
How to make a wind generator?
- The first stage is the preparation of the rotor. A metal container (pot, bucket) is taken. Using a marker and tape measure, four identical parts are marked. The container is cut into blades with metal scissors or a grinder, without cutting to the end.The blades bend slightly at the edges, so the rotation speed increases. You cannot use thin-walled tin materials for the blades or take a galvanized container - these materials can deform and heat up under load.
- The direction in which the pulley rotates is determined. Rotate it to the right and left. Usually the pulley rotates clockwise, but it can also be counterclockwise.
- Connect the rotor to the generator. Using a drill, holes are made in the bottom of the tank and the generator pulley. They must be symmetrical so that an imbalance does not occur during the movement of the blades. Attach the container with the blades to the generator (pulley) with bolts of the appropriate diameter.
- The resulting device is placed on a mast, which is made from stocked old pipe. If there are buildings at a distance of 30 m from the structure, the height of the mast must be increased. It is necessary that it be 1 m higher than these buildings, then the windmill will work better, because there will be no obstacles for the wind. We fix it with a metal clamp.
- Then the electrical wiring is installed and a closed circuit is assembled. All contacts are connected to the corresponding connectors. The wiring is fixed on the mast.
- At the last stage, the inverter, battery, instrumentation and lighting are connected. Connect the inverter and the battery with a cable (section 3 mm square and size 1 meter), and for the remaining parts it is enough with a diameter of 2 mm square.
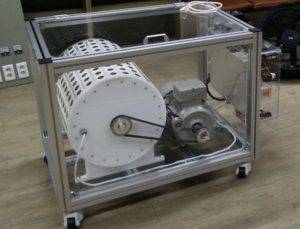
Homemade wind generator from a car generator ready.
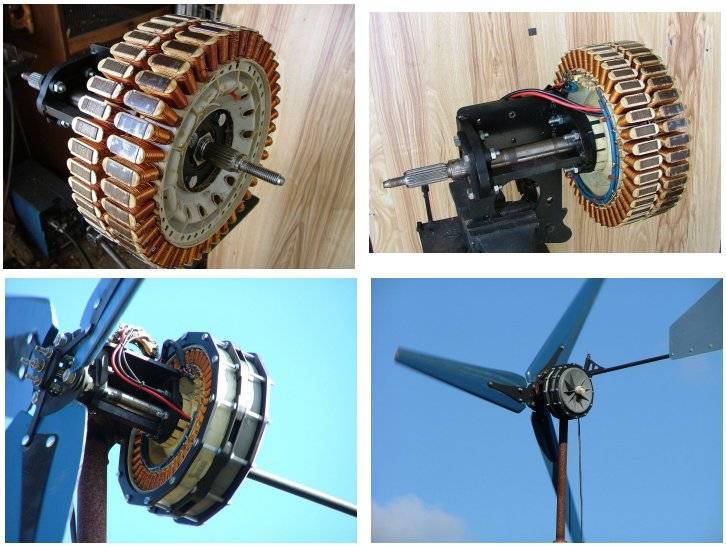
What can be made from?
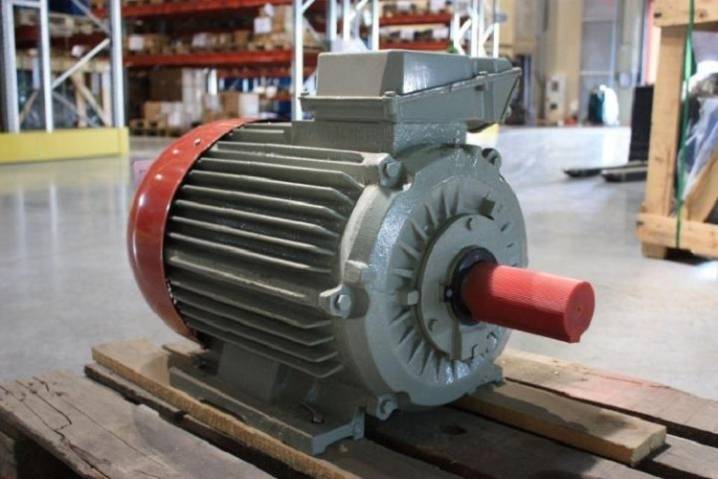
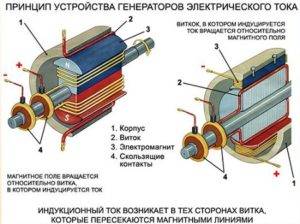
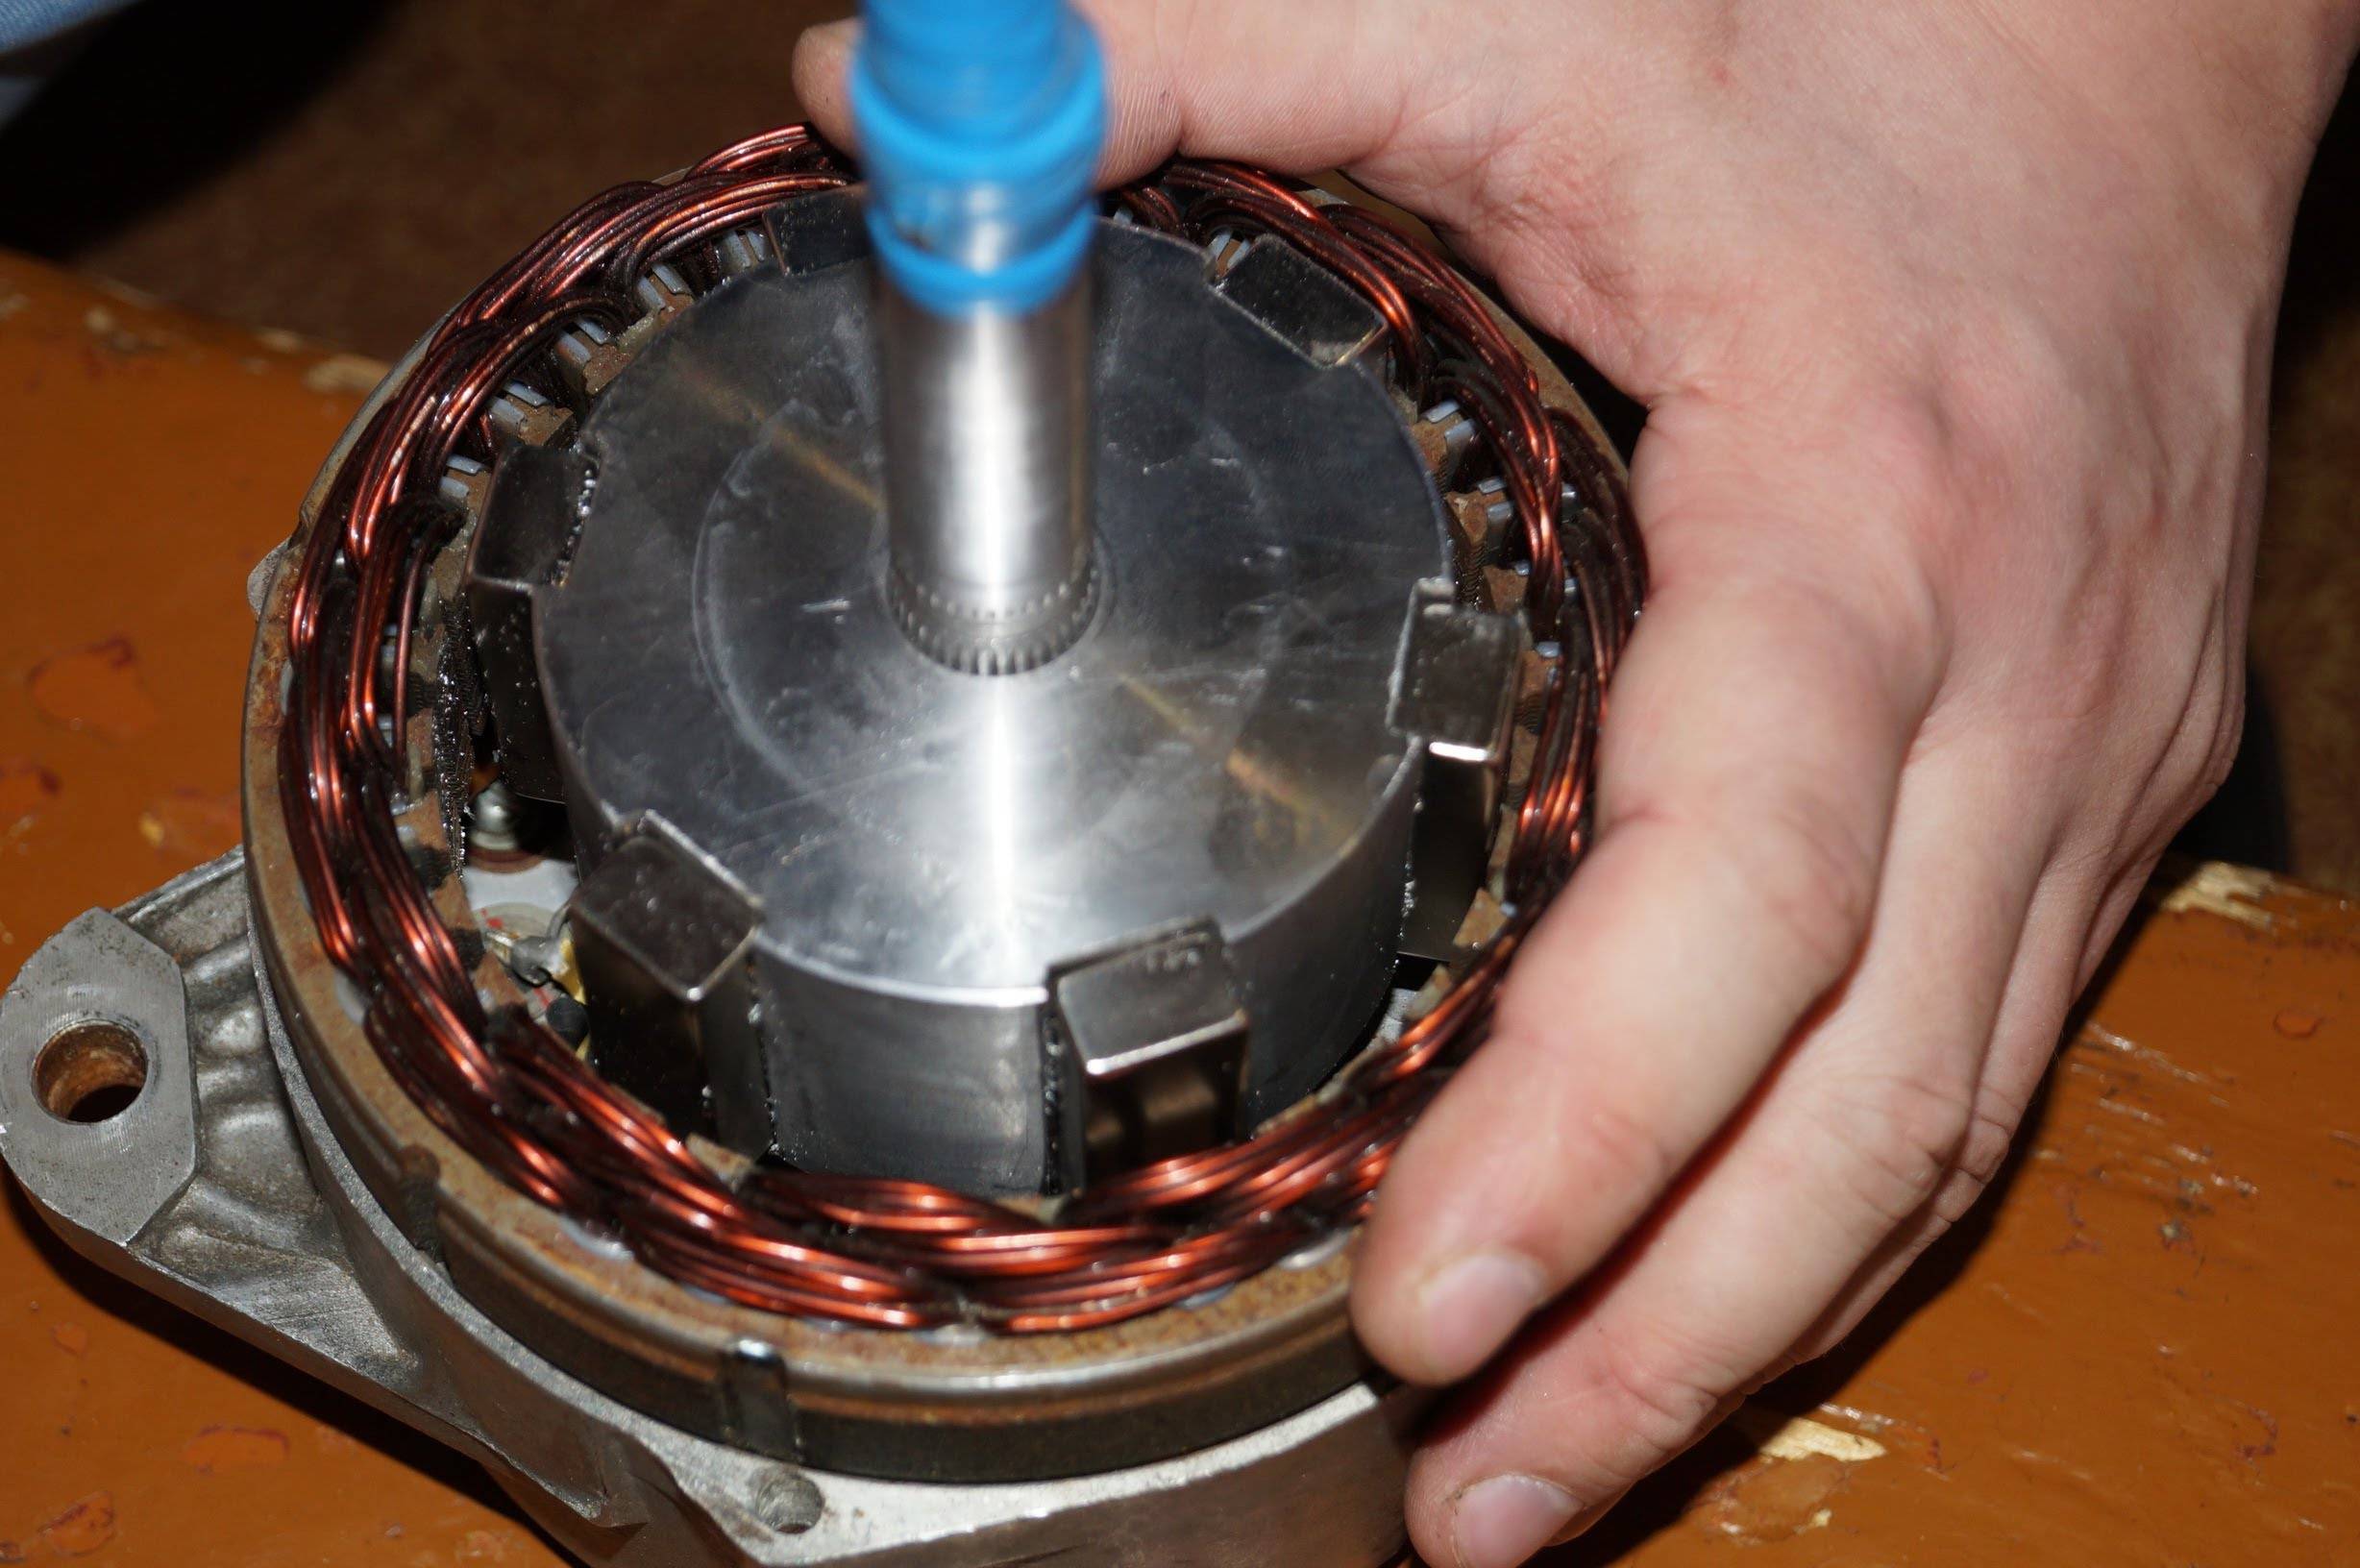
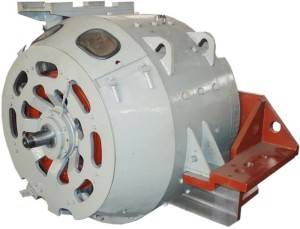
The main element of any wind farm model is a motor-generator. It works like a motor - direct or alternating current makes the rotor (and with it the shaft) of the installation spin.Working the other way around - as a generator - is also possible.
Among the motors used as generators, there are collector-brush, brushless asynchronous and step motors. It is these three types of motors that are popular with amateurs who assemble wind turbines with their own hands.
In a collector motor, the rotor windings (armatures) are located in a constant magnetic field of stator magnets. The constant voltage removed from the terminals of such a motor when its shaft is untwisted with an armature is transmitted from the current-carrying contacts of the armature through the brushes. The brushes themselves are the weak point of such an engine - they quickly wear out their resource. As a rule, such a generator is under constant load; when the armature moves, the brushes spark. Several days of continuous operation of such an installation can completely wear out the brushes, as a result of which replacement of the latter will be required.
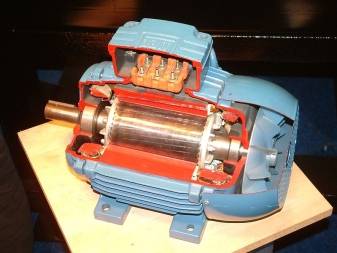
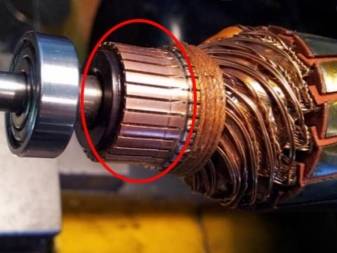
The best option is a brushless motor. In it, the rotor with magnets rotates in the space between the stator windings. The windings themselves remain stationary, they do not need sliding contacts


Thanks to such a simple solution, the installation can work for decades - it is important only once a season or every six months to lubricate the engine bearings, which are responsible for the ideal, play-free, rotation of the rotor. Popular solutions based on a brushless motor - asynchronous or stepper - are available to almost every home "do-it-yourselfer"
An asynchronous motor is used in power tools - for example, in a grinder.Stepper can be found in a wide variety of devices - from a bicycle motor-wheel to a mechanical drive of a printer or disk drive.
The variable brush motor used in punchers, grinders, screwdrivers, electric jigsaws, and electric planers stands apart. Their disadvantage is the need to remove the brushes and groove the rotor for neodymium magnets. As a result, only the stator winding remains from the existing windings - the rotor winding is completely removed.

A wind generator made from a fan will require the rotor to be machined for neodymium magnets. The design of the household fan motor is not designed to receive electric current by spinning the rotor. A computer cooler (chip cooler) falls under the same alteration - a fan of the system unit PC or laptop.
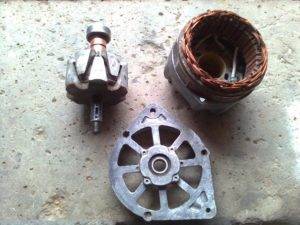
A tractor or car generator uses an additional excitation winding powered by the car's battery. In order for the generator to produce, for example, an alternating current of 135 amperes with a voltage of 15 volts, the rotor winding of the excitation, after turning on the ignition, consumes a direct current of 3 A with a voltage of 12.6-14 V. The main source of energy for the generator is still the crankshaft of an internal combustion engine running petrol, diesel or methane/propane. A tractor or car generator will require the removal of the excitation winding and the installation of neodymium magnets instead.
Device maintenance
To make the windmill work for many years and without interruption, it is necessary to carry out periodic technical control and maintenance.
- Clean, lubricate and adjust the current collector once every 2 months.
- Repair blades if vibration and imbalance occur during rotation.
- Once every 3 years, paint metal elements with anti-corrosion paint.
- Check and adjust mast anchors and cable.
The efficiency of the device is affected by the area where the wind generator is installed (wasteland, the presence of winds). But in any case, having this source of energy, independent of a stationary power supply, will never be superfluous.
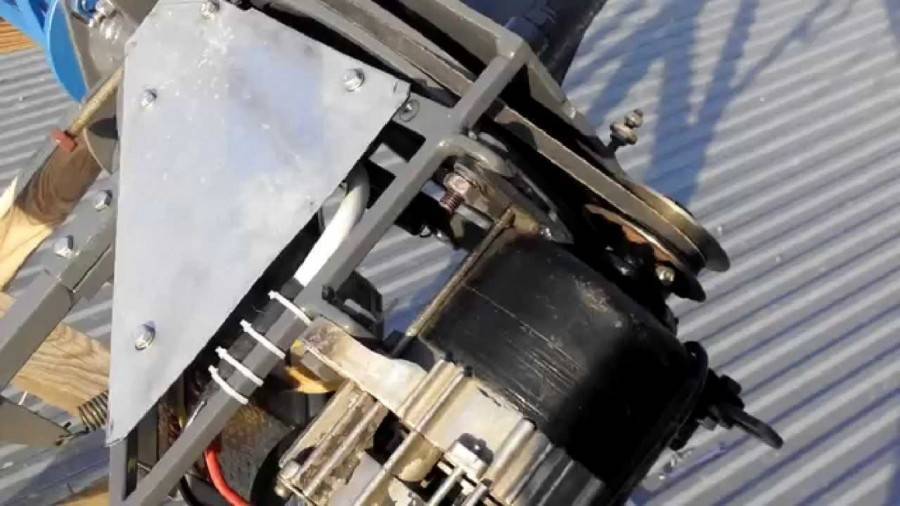
Completion of wind turbine assembly
For the manufacture of the generator frame, a profile pipe is used, for the tail - galvanized sheet. The design of the rotary axis consists of a tube with two bearings. The generator is attached to the mast in such a way that the distance from the mast to the blades is at least 25 cm. In order to ensure safe assembly and installation, all work should be carried out in calm weather. A strong wind can bend the blades, and they will break on the mast.
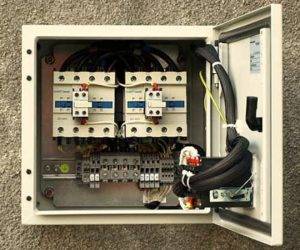
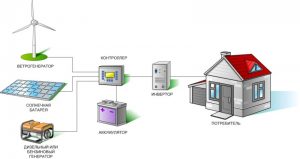
If it is planned to use batteries to power consumers operating from a 220-volt network, then in this case it will be necessary to install an inverter that performs voltage conversion. The battery capacity is selected depending on the technical characteristics of the generator. This indicator is influenced by the wind speed in the area, the total power of connected consumers and the frequency of their use.
In order to prevent batteries from failing under the influence of excessive charging, it is necessary to use a voltage controller, which can be homemade or factory-made. The finished wind generator must be periodically serviced and timely scheduled maintenance.
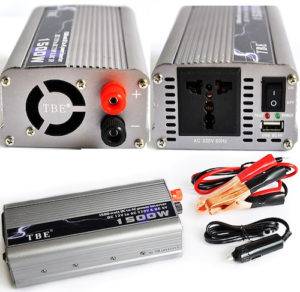
Car inverter from 12 to 220
electromagnetic generator
ATS for generator
Alternator: working principle
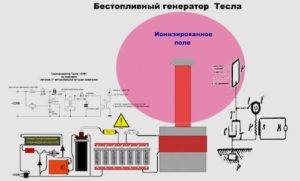
Tesla generator
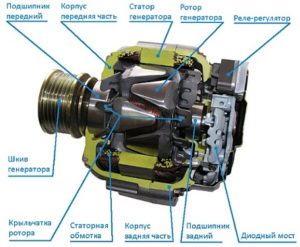
Generator device: principle of operation
Recharging the battery
The generator does not always undercharge the battery, it often happens when overcharging occurs, that is, the generator unit generates voltage in excess of the prescribed norm. As a rule, the cause of overcharging is a faulty voltage regulator, it does not work as it should, and the generator continues to produce current when the battery is fully charged.


Without removing the generator from the car, the relay-regulator is checked in the same way as in case of undercharging, only in this case the multimeter shows the voltage of the on-board network with the load on more than 14.7 V (the readings can be even higher, for example, even more than 17 Volts) . Constant recharging is dangerous because because of it:
- the electrolyte begins to boil in the battery banks;
- battery lead plates are exposed;
- sulfation occurs (destruction of the plates), the battery becomes inoperable;
- due to increased voltage, light bulbs can burn out, electrical equipment fails, fuses burn.
There is still a danger of a battery explosion, which occurs due to clogging of holes in the plugs of battery cans with boiling electrolyte.

On many VAZ cars of the Classic family (in particular, on the VAZ-2106), the voltage relay changes quite easily, as it is located separately, next to the front fender of the car. The relay-regulator of the VAZ-2105 and 2107 type is located in the generator itself, it is a little more difficult to get to it, but replacing it is also easy.
Making a wind wheel
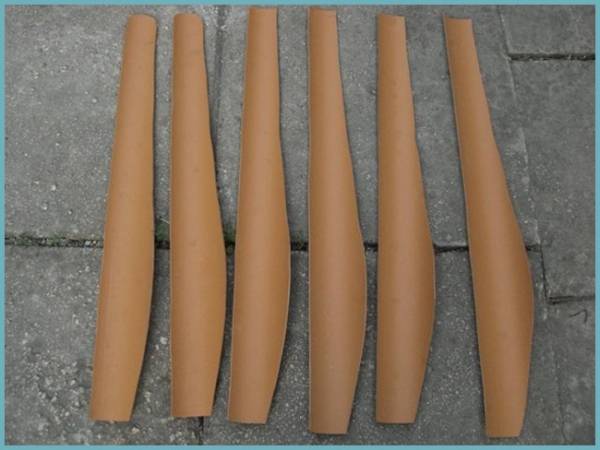
The blades are perhaps the most important part of a wind turbine. The operation of the remaining components of the device will depend on the design. They are made from different materials. Even from a plastic sewer pipe. Blades from a pipe are easy to manufacture, are cheap and are not affected by moisture. The wind turbine manufacturing process is as follows:
- It is necessary to calculate the length of the blade. The diameter of the pipe should be equal to 1/5 of the total footage. For example, if the blade is meter long, then a pipe with a diameter of 20 cm will do.
- We cut the pipe with a jigsaw along into 4 parts.
- We make a wing from one part, which will serve as a template for cutting subsequent blades.
- We smooth out the burr on the edges with an abrasive.
- The blades are fixed to an aluminum disk with welded strips for fastening.
- Next, the generator is screwed to this disk.
After assembly, the wind wheel needs to be balanced. It is fixed on a tripod horizontally. The operation is carried out in a room closed from the wind. If the balance is correct, the wheel should not move. If the blades rotate on their own, then they need to be sharpened to balance the entire structure.
Only after the successful completion of this procedure, you should proceed to check the accuracy of rotation of the blades, they should rotate in the same plane without skew. An error of 2 mm is allowed.
Legality of the installation
Installations with an output power of up to 75 kW are not prohibited from being installed on their own territory, and no approvals will be required (a fact enshrined in the Decree of the Cabinet of Ministers of Russia).
And if you need to install a powerful generator of an industrial or commercial type, then you will need special training related to the creation of the foundation and fencing of the site - and this is already considered capital construction.
It is recommended to read the local laws regarding energy and utilities before installing the VEL. Different regions may have their own rules.
Generator selection
Creating a generator of your own making will require skills that not everyone has. For example, turning work. Therefore, it is necessary to consider the problem of acquiring a factory device that could be used on a wind turbine.
Types and features:
- Alternators (asynchronous) are very easy to find and adapt for a wind turbine. Cons - insufficient power, the unit will require modifications during installation.
- DC generators work great at low speeds, require almost no modifications. Disadvantages - it is difficult to find generators of high power.
- Asynchronous ones are not a problem to buy a generator for little money, but such units are ineffective at high shaft speeds, and internal resistance limits their power.
Generators are divided into two types according to the number of phases at the output. Single-phase generators are simple in design, but under high loads vibrate strongly and can hum. Three-phase devices are devoid of these shortcomings, and in some modes they work more efficiently.
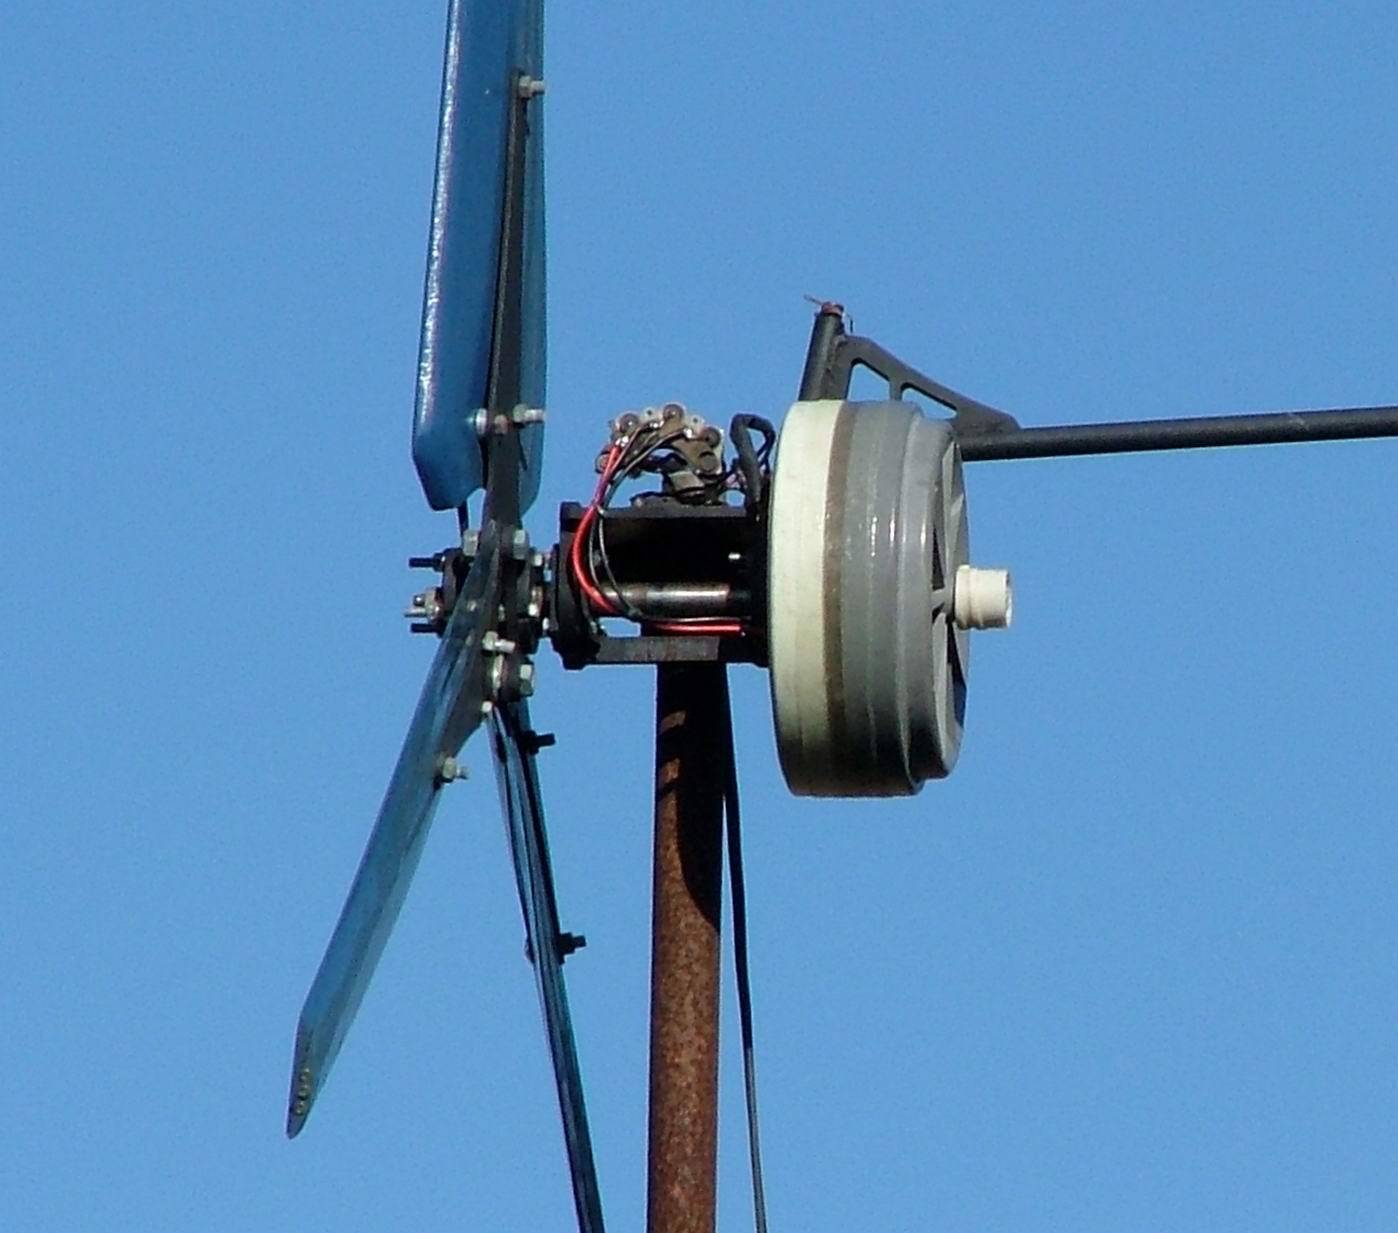
Mast installation features
Most often, the mast is made from metal blanks - either in the form of a complex frame (for large and powerful installations), or they use one pipe (round / square section), which is dug into the ground. In both cases, it is recommended to reinforce the mast with 3-4 wire rope braces.
How to install a wind generator with your own hands
When all the components are ready, you should wait for calm weather to install the wind generator. To install a windmill on the roof of the house, you must perform a number of actions:
 Do-it-yourself detailed wiring diagram for a wind generator
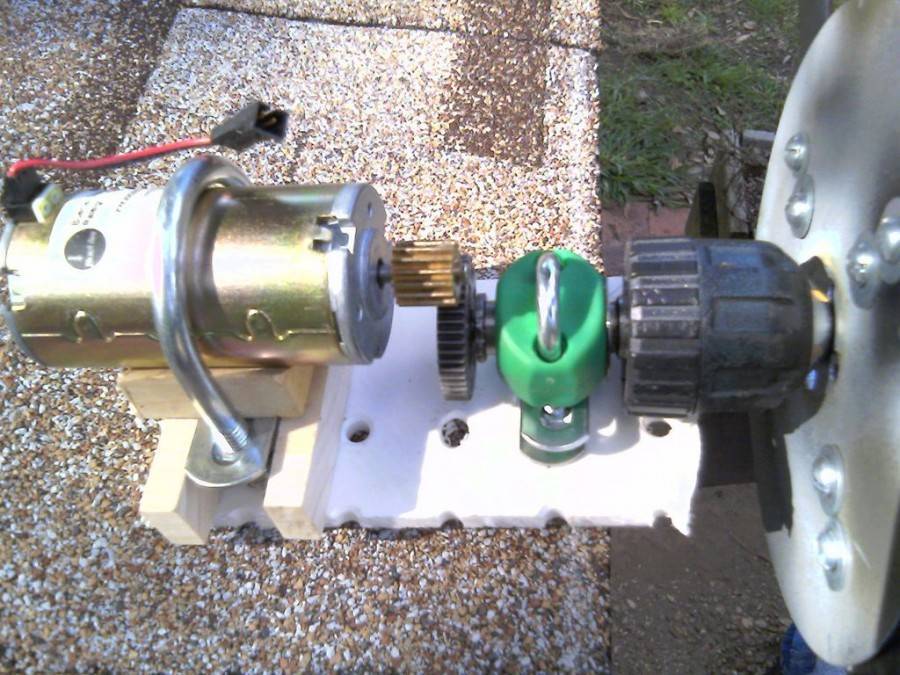
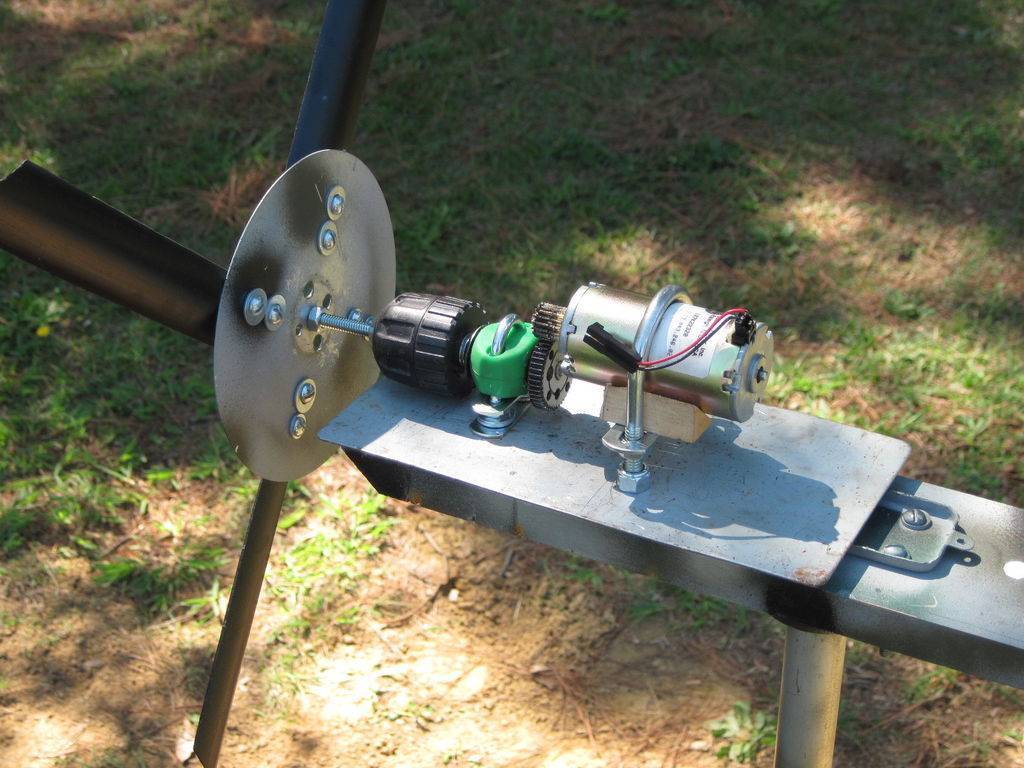
- On the basis of the weather vane, the autotractor generator is strengthened with clamps.
- The mast is installed at a distance of 1.5–2 meters from the ground and the weather vane is fixed with the main bolt on the bearing.
- Until the bolt is fully fixed, pass the wire from the generator through the bolt, from the inside of the pipe to the lower exit point.
- A little below the base of the weather vane, a limiter is installed, with the help of which the weather vane rotates 360 °.
- The mast is fully raised and secured with cable braces.
- Connect the ends of the cable to the receiving device (usually through a converter to the battery).
Wind power generator assembled. There are still quite a few individual parts to refine that need to be done so that the wind generator begins to delight the house with cheap electricity.
Do-it-yourself principles for making blades for a wind generator
Often, the main difficulty is determining the optimal dimensions, since its performance depends on the length and shape of the wind turbine blades.
Materials and tools
The following materials form the basis:
- plywood or wood in another form;
- fiberglass sheets;
- rolled aluminum;
- PVC pipes, components for plastic pipelines.
DIY wind turbine blades
Choose one type of what is available in the form of residues after repair, for example. For their subsequent processing, you will need a marker or a pencil for drawing, a jigsaw, sandpaper, metal scissors, a hacksaw.


Drawings and calculations
If we are talking about low-power generators, the performance of which does not exceed 50 watts, a screw is made for them according to the table below, it is he who is able to provide high speeds.
Next, a low-speed three-blade propeller is calculated, which has a high starting rate of breakaway. This part will fully serve high-speed generators, whose performance reaches 100 watts. The screw functions in tandem with stepper motors, low-voltage low-power motors, car generators with weak magnets.
From the point of view of aerodynamics, the propeller drawing should look like this:
Production from plastic pipes
Sewer PVC pipes are considered the most convenient material; with a final screw diameter of up to 2 m, workpieces with a diameter of up to 160 mm are suitable. The material attracts with ease of processing, affordable cost, ubiquity and abundance of already developed drawings, diagrams
It is important to choose high-quality plastic to prevent cracking of the blades.
The most convenient product, which is a smooth gutter, it only needs to be cut in accordance with the drawing. The resource is not afraid of exposure to moisture and is undemanding in care, but can become brittle at sub-zero temperatures.
Making blades from billets of aluminum
Such screws are characterized by durability and reliability, they are resistant to external influences and are very durable. But keep in mind that they turn out to be heavier as a result, when compared with plastic ones, the wheel in this case is subjected to scrupulous balancing. Despite the fact that aluminum is considered quite malleable, working with metal requires the presence of convenient tools and minimal skills in handling them.
The form of material supply can complicate the process, since common aluminum sheet turns into blades only after giving the blanks a characteristic profile; for this purpose, a special template must first be created. Many novice designers first bend the metal along the mandrel, after which they move on to marking and cutting blanks.
Blades made of billet aluminum
Aluminum blades show high resistance to loads, do not react to atmospheric phenomena and temperature changes.
fiberglass screw
It is preferred by experts, as the material is capricious and difficult to process. Sequencing:
- cut out a wooden template, rub it with mastic or wax - the coating should repel glue;
- first, one half of the workpiece is made - the template is smeared with a layer of epoxy, fiberglass is laid on top. The procedure is promptly repeated until the first layer has had time to dry. Thus, the workpiece receives the required thickness;
- perform the second half in a similar way;
- when the glue hardens, both halves can be connected with epoxy with careful grinding of the joints.
The end is equipped with a sleeve, through which the product is connected to the hub.
How to make a blade out of wood?
This is a difficult task due to the specific shape of the product, in addition, all the working elements of the screw should eventually turn out to be identical. The disadvantage of the solution also recognizes the need for subsequent protection of the workpiece from moisture, for this it is painted, impregnated with oil or drying oil.
Wood is not desirable as a material for a wind wheel, as it is prone to cracking, warping, and rotting. Due to the fact that it quickly gives and absorbs moisture, that is, it changes mass, the balance of the impeller is arbitrarily adjusted, this negatively affects the efficiency of the design.
Device types
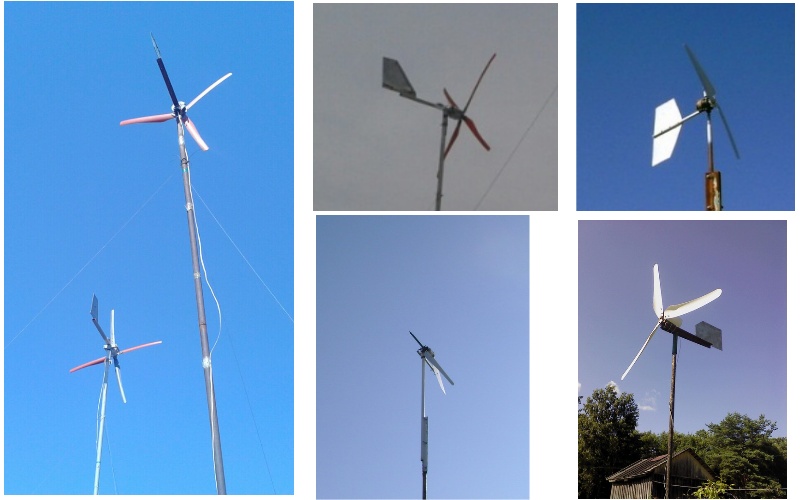
To date, there are several signs by which it is possible to divide wind generators made by hand or purchased into several groups.
The difference may be in the number of blades that the propeller has. The material from which these blades are made also plays an important role. It can be divided into different groups according to the location of the axis of rotation in relation to the surface of the earth. The last one is the pitch sign of the screw.
To date, you can find models that have one, two or three blades, and there may also be multi-blade devices. A distinctive feature of multi-blade is that they will rotate even in light winds. However, it is worth noting that such wind generators for a private house are more often used if the turning process itself is more important than electricity generation. In other words, it can be used to lift water from a deep well, for example.
The blades themselves can be of two types - rigid or sail. The difference lies in the material used for assembly. Sailing boats are less durable and are usually made of metal or fiberglass. In addition, they are much cheaper than rigid ones, but at the same time they will have to be changed or repaired quite often, since they are less durable.
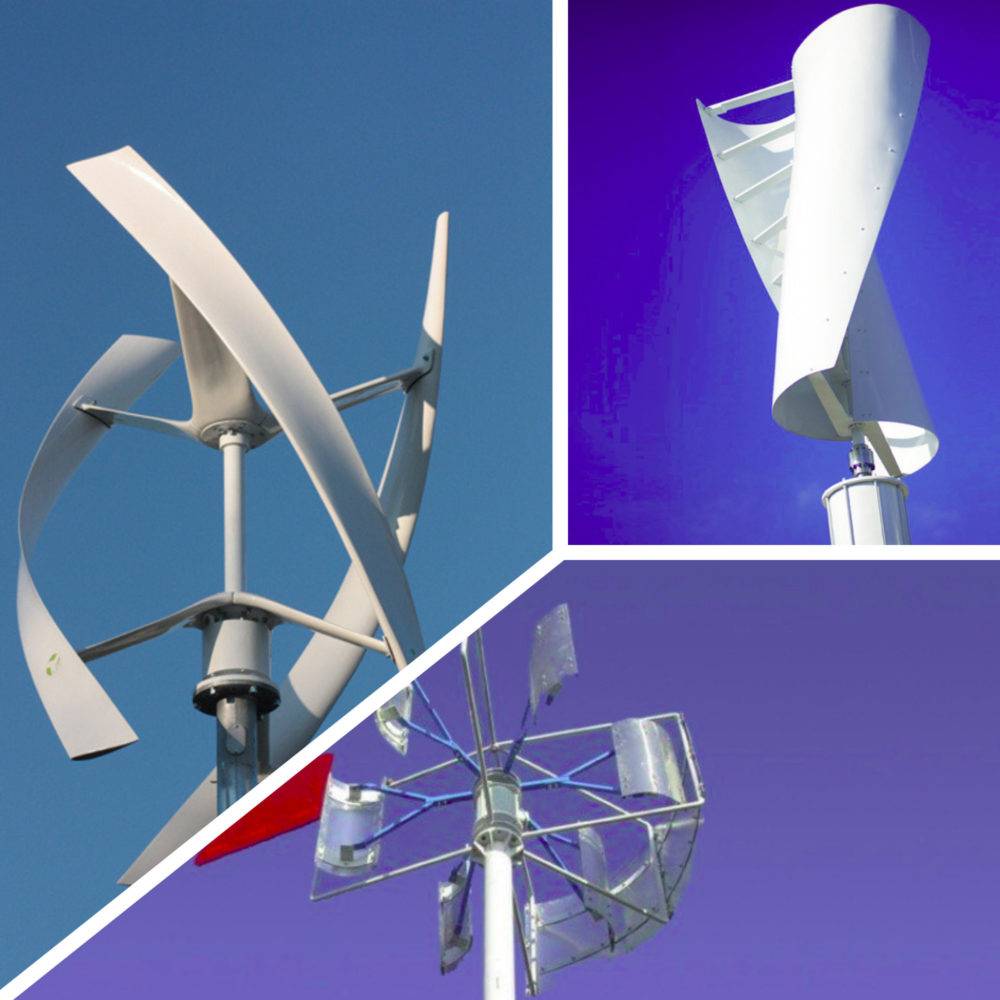
As for the difference in the location of the axis of rotation, then, naturally, there can be only two types - horizontal and vertical. Each of them has its positive qualities. Horizontal arrangement of the blades gives more power output, and the vertical arrangement will allow them to respond to almost any slight puff of wind. On a step basis, the model can be fixed or changeable. It is quite difficult to make a wind generator for the home with a variable pitch with your own hands, but in this case it will be possible to adjust the speed of rotation of the blades. Fixed structures are much simpler and more reliable in this case.


How to choose a generator for a home wind farm?
From car
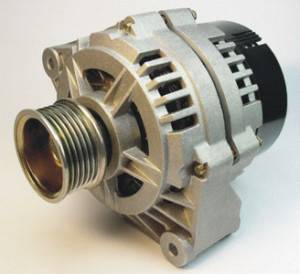
- Advantages: not expensive, very easy to find, already fully assembled.
- Disadvantages: for operation, a high rotation speed is required, therefore, the installation of additional pulleys is required. Unproductive.
Price: Depends on the model and brand of car.
Homemade generator

- Advantages: the cost of the entire package is not high, quite good productivity, relative to a car generator, with proper assembly, it is possible to obtain high power, very strong and indestructible assembly.
- Disadvantages: a very difficult undertaking for an untrained person, requires processing on a lathe.
Price: Depends on the spare parts you bought and the nominal, desired power.
AC, asynchronous
- Advantages: not high cost, very easy to find and purchase, not difficult to convert to a windmill, very good productivity at low speeds.
- Disadvantages: the maximum power is limited, since the unit has internal resistance, at high speeds of the blade, the generator does not produce enough electricity in order to be installed on a windmill, it must be processed on a lathe.
Price: can be found from one thousand rubles.
Direct current
- Advantages: simple and clear design, already assembled and ready to use, works quite well at low speeds.
- Disadvantages: it is very difficult to find generators of the required power, because small units do not produce the necessary power, very lascivious.
Price: starts from 7 thousand rubles.
With permanent magnets
- Advantages: Very high efficiency, it is possible to get a lot of power, the design is strong and stable.
- Disadvantages: If you do it yourself, then a very complex project, it requires processing on a lathe.
Price: for a 500 W design, it fluctuates around 14 - 15 thousand rubles.
low speed
- Pros: Easy to use, low cost, works well at low rpm.
- Disadvantages: Will not work at high speeds, weak power.
Price: About 10 thousand rubles.
Asynchronous
- Pros: Inexpensive, easy to find, easy to convert to a windmill, works great at low RPMs.
- Disadvantages: Internal resistance limits power, low efficiency at high speeds.
Price: There is a very huge assortment of this product, the price fluctuates around 5 thousand rubles, up to five hundred thousand, the price range is guided by power.
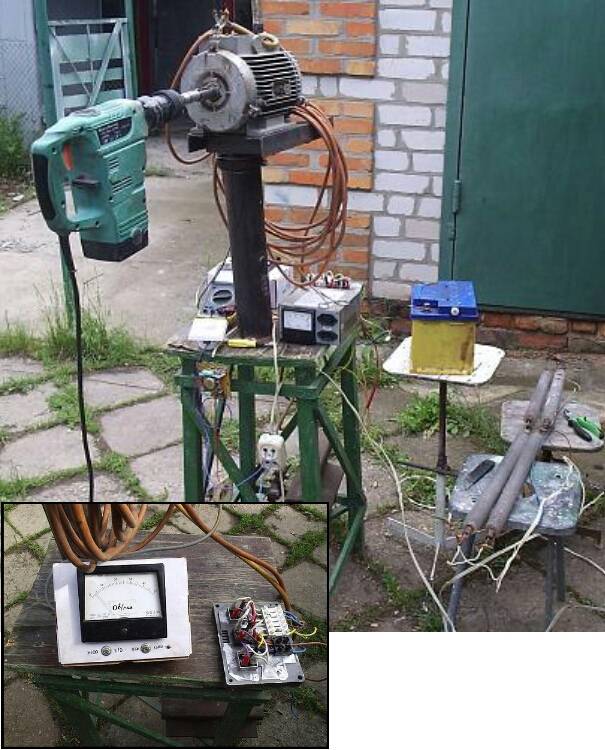
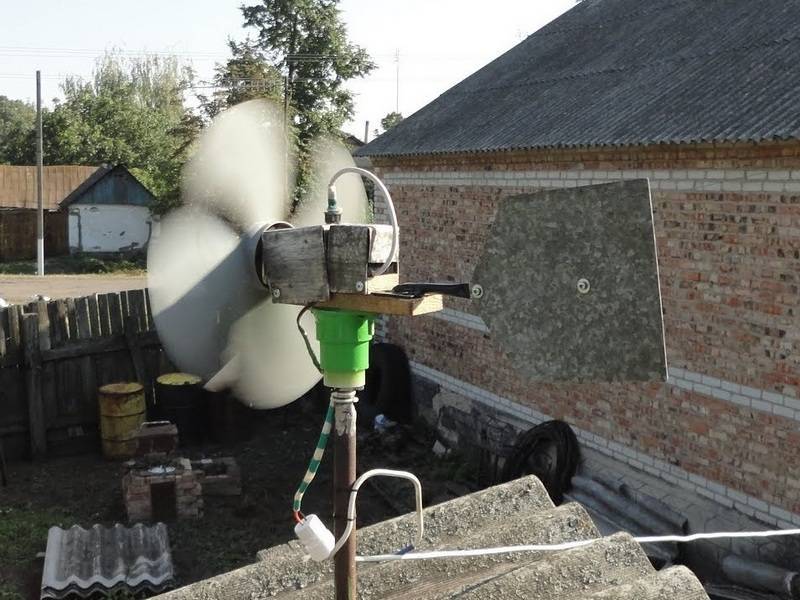
The fossils that give humanity energy will soon run out, we need to look for a way out. One of these outputs is a wind generator. Its construction and installation is expensive, however, by installing it now, you provide a bright future for your children.
Preparations before work
Before starting work, you need to decide what kind of device you want to make, since there are several types of wind turbines:
- rotary;
- axial, on magnets, etc.
There are two axis positions:
- horizontal - the most common, the efficiency of this type is 2 times greater;
- vertical - installed at the bottom, as it has a lot of weight. And the wind below is quieter by 2 times and, therefore, the power of the device decreases by 8 times. The advantage is less noise and ease of use.
Regardless of the type of construction, for the manufacture of a homemade wind generator, you should stock up:
- car generator;
- voltmeter;
- battery charging relay;
- voltage regulator for alternating current;
- material for the manufacture of blades;
- acid or helium battery;
- a box for closing the wire;
- capacity (stainless pan or aluminum bucket);
- 12 volt switch;
- electric three-core cable (section not less than 2.5 mm2);
- old water pipe (diameter not less than 15 mm, length 7 m);
- charging light;
- four bolts with nuts and washers;
- metal clamps for fastening.
In addition, you need to have special tools for work:
- grinder with discs;
- marker;
- screwdriver;
- drill and drills;
- metal scissors;
- set of spanners;
- gas keys of different numbers;
- wire cutters;
- roulette.
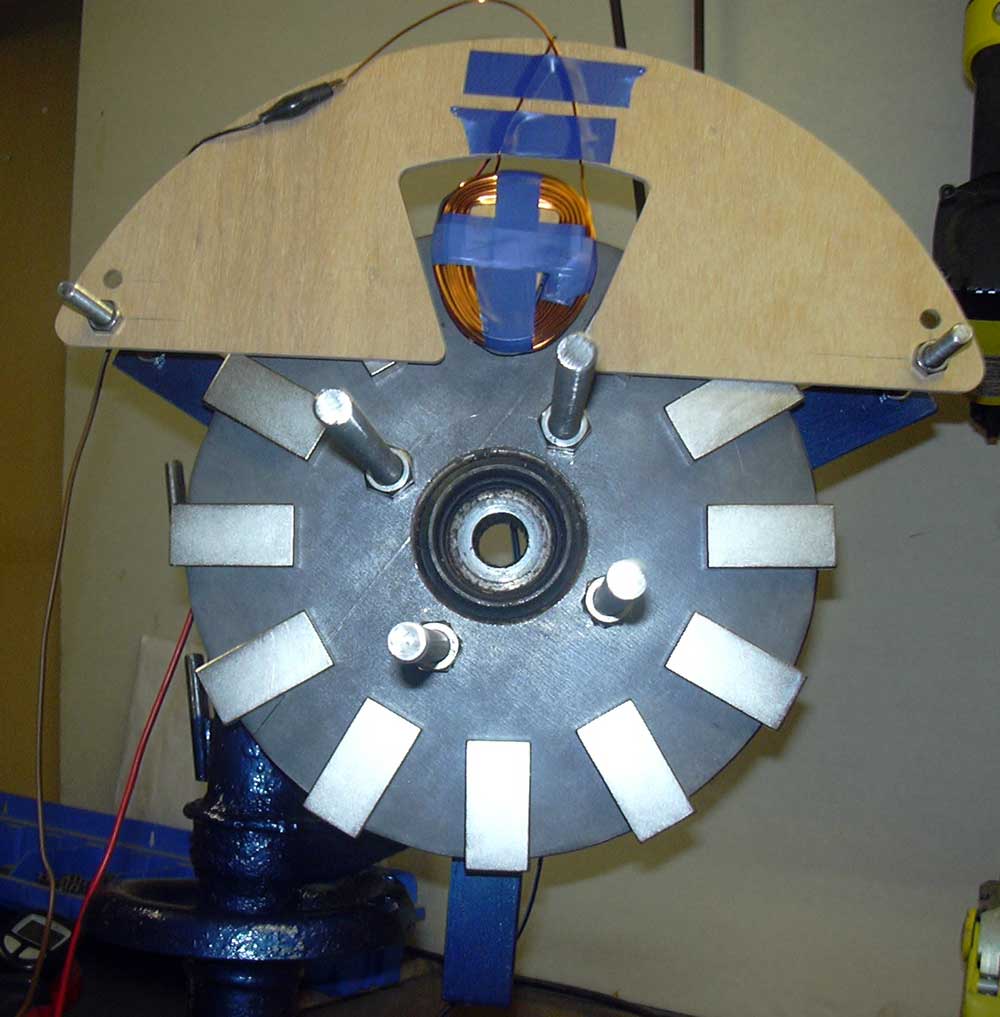
Manufacturing from a hub
The most publicized of all the options is the usual homemade disk generator for a windmill, which is created using neodymium magnets. Its main advantages are: ease of assembly, does not require special knowledge, the ability not to adhere to the exact parameters. Even if mistakes are made, this is not scary, since in any case, electricity is generated by a windmill and it can be brought to mind with the advent of practice.
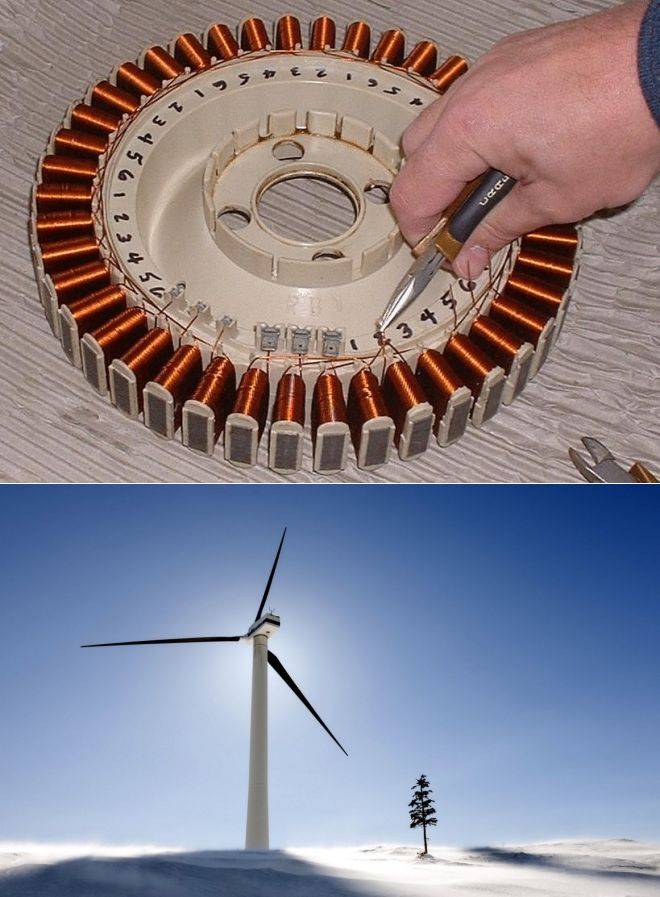


So, first we need to prepare the main elements for assembling the wind turbine:
- hub;
- brake discs;
- neodymium magnets 30x10 mm;
- copper varnished wire with a diameter of 1.35 mm;
- glue;
- plywood;
- fiberglass;
- epoxy or polyester resin.
Home-made disc generators are made on the basis of a hub and two brake discs from the VAZ 2108. It is safe to say that almost any owner will find these parts of the car in the garage.
Neomagnets can be used in any shape. Try to fill the entire wheel completely with minimal gaps between the elements. Coils need to be wound so that the total number of turns is in the range of 1000-1200. This will enable the alternator to produce 30V and 6A at 200 rpm. It will also be much better to make them oval rather than round. The wind power generator will become more powerful thanks to this solution.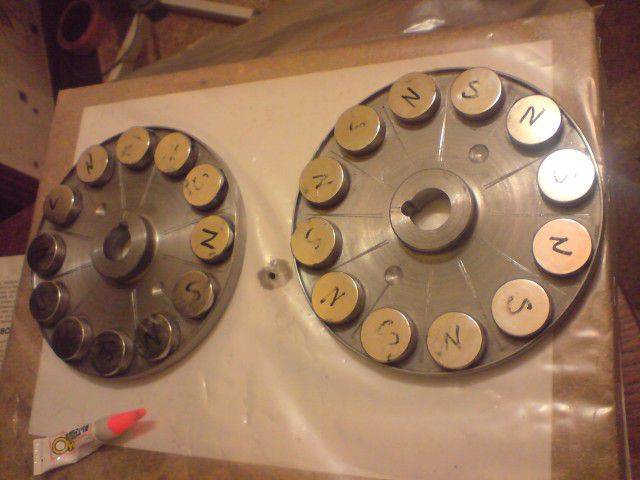 ="Neomagnets for wind turbine" width="640" height="480" class="aligncenter size-full wp-image-697" />
As for the stator of our future generator for a windmill, its thickness must necessarily be less than the size of the magnets, for example, if the magnets are 10 mm thick, then the stator is best made 8 mm (leave 1 mm gap). The dimensions of the disks must be greater than the thickness of the magnets. The thing is that all the magnets feed each other through iron, and in order for all the power to go into useful work, this condition must be met. Given this, making an electric generator with your own hands, you can slightly increase its efficiency.