- How to bend a pipe
- Manufacturing process
- Furniture items - an unusual way to save money
- Pipe desk
- Water pipe table
- Choice of construction and design
- What materials are needed
- Manufacturing
- The process of assembling and installing the gate
- Where to start looking for the “perfect” hallway hanger?
- How to sew a wigwam for children?
- Various shapes and designs
- Plank model
- Chandelier manufacturing technology
- Assembly process
- Why plastic?
- Variations and interesting ideas
- Manufacturing and assembly process
- Armchair
- Bed
- Table
- Rack
- Pipe connection methods
- Making hangers from perforated sheet
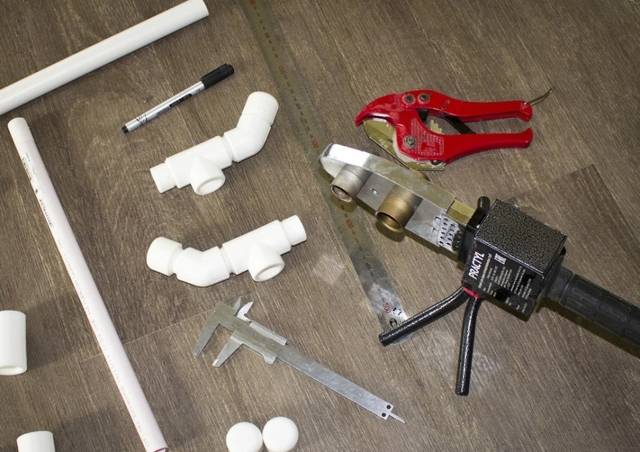
- Materials used
- Materials and tools
- Pipe toilet paper holder
- Conclusions and useful video on the topic
How to bend a pipe
Products made from this material look unusual. They will look even more interesting if they consist of curved parts. For example, a table with curved legs. In addition, various decorative elements are made from pipes, which come in different shapes. In such cases, bending the pipe is simply necessary.
For this you will need:
- funnel;
- sand;
- scotch;
- plate;
- metal container;
- gloves;
- saw (hacksaw);
- knife (scissors);
- sandpaper;
- a device for bending pipes (it can be different, mostly improvised materials are used).
The process looks like this:
- cut a piece of the required length;
- seal one end with tape;
- using a funnel, pour in as much sand as will go in;
- heat the measured amount of sand in a metal container;
- put on protective gloves for safety, carefully pour sand into the pipe through a funnel;
- seal the other end with adhesive tape, then the sand will not spill out during the bending process;
- leave for a while, it will warm up from the inside;
- when it warms up, start bending;
- give the pipe the desired shape;
- at the end of the work, tear off the adhesive tape, pour out the sand;
- when the pipe cools down, it will be the required shape.
One end of the pipe is sealed with tape
Using a funnel, pour sand into the pipe
Having measured the required amount of sand, pour it into a metal bowl and warm it up well
Using the same funnel, pour the prepared sand back into the pipe.
Cover the other end of the pipe with tape. This is necessary so that the sand does not spill out during work.
Leave the pipe like this for a couple of minutes. During this time, it will warm up from the inside. The material will become soft and pliable.
While the sand is still hot, you can shape the cut piece of pipe into the desired curve or shape. After that, remove the tape and pour the sand back.
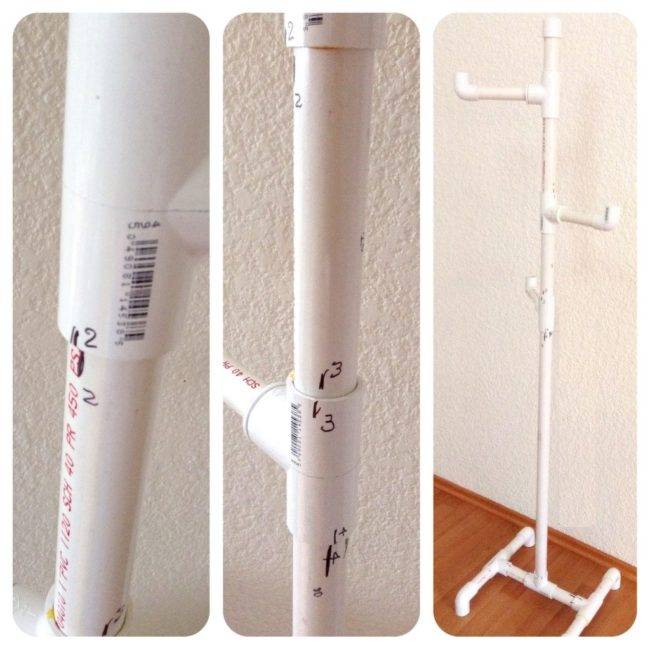
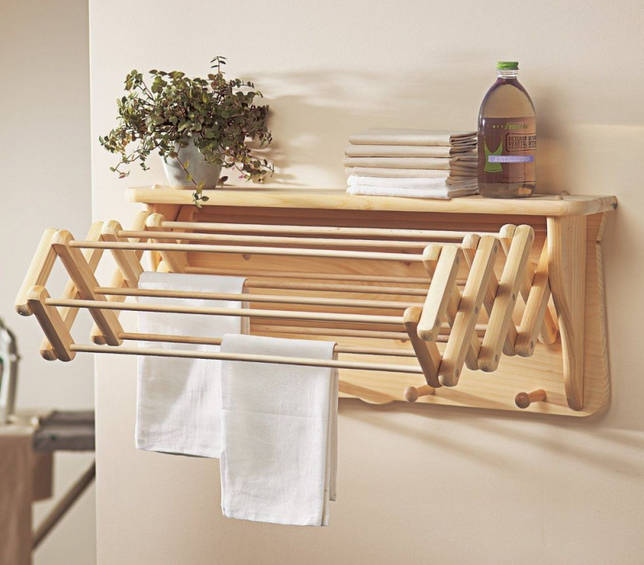
Manufacturing process
 When a floor structure is made, then in general the algorithm of actions is the same. First of all, you need to assemble the cross. In the case of a specific type of wood chosen, all elements must be made from it in order for the product to look good. For work, bars will be needed, the length of which is about 60-70 cm. They are sawn into 2 equal parts and treated with emery cloth. Then they are connected at an angle of 90˚. It is necessary to fit them at the junction as much as possible so that the connection is as tight as possible.The sequence of work is as follows:
- 4 points of support of the rack are made with a fitting, screwing it with screws to the legs;
- attach a rectangle with attached hooks to the top of the rack;
- coated with varnish and stain after the final treatment with sandpaper.
Stain is used to make the natural pattern that is present on the tree more expressive. The stain will give it more clarity. So that the wooden product does not damage the floor covering and does not slip, rubber is glued to the bottom of the cross. To do this, you can use any adhesive compositions for working with wood and rubber.
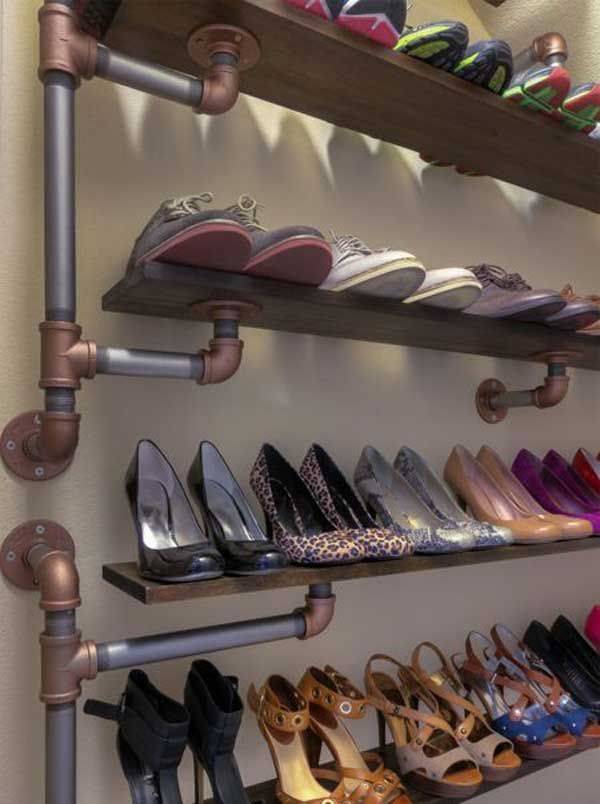
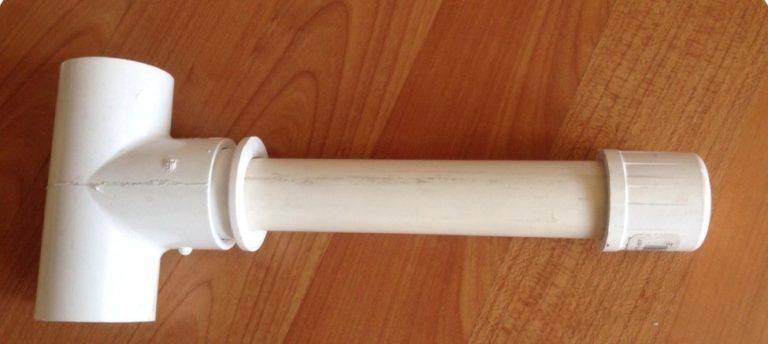
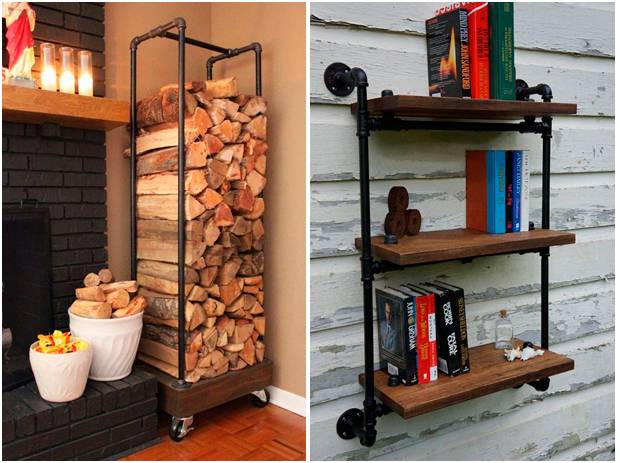
Copper products do not lose popularity and they have a pleasant appearance. Often, copper pipe hangers are used not only as furniture, but also as an interior item to complete the overall composition in vintage style. Copper products look good in interiors that have more warm tones, massive pieces of semi-antique furniture are used. To make a hanger with your own hands from pipes, which will look no worse than in the photo, you will need the following consumables:
- copper tubes 60 cm - 4 pcs.;
- copper pipes 1.5 m - 2 pcs.;
- copper tees - 2 pcs.;
- copper tube 90 cm - 1 pc.;
- epoxy glue;
- copper corners - 2 pcs.

Do-it-yourself deck chair for summer cottages: diagrams, instructions, photos Beaches and areas near pools are more often equipped with sunbeds. However, even in the backyard, the deck chair plays an important role ....
The base is made by connecting 2 tubes 60 cm long with a tee, the attachment point is additionally reinforced with epoxy glue. Similar actions are performed for two other copper tubes of the same size. 2 corners are attached to a 90 cm long tube - this is the future crossbar for hanging things.Then two tubes 1.5 m long are inserted into the tees, fastening them with corners at the top. After the epoxy adhesive has dried, the product can be used.
Note! It is also possible to add a stand made of wood, on which the base of the copper hanger will be fixed. This element can then be used to store shoes.
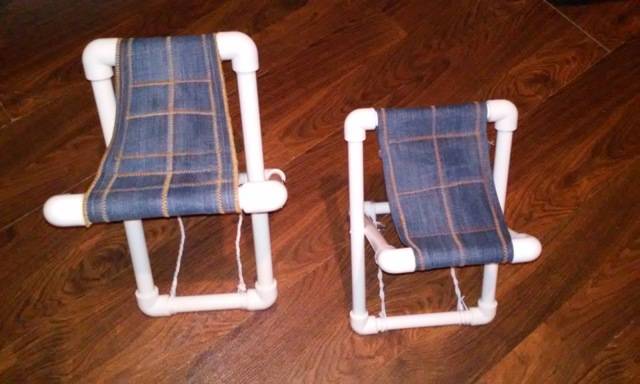
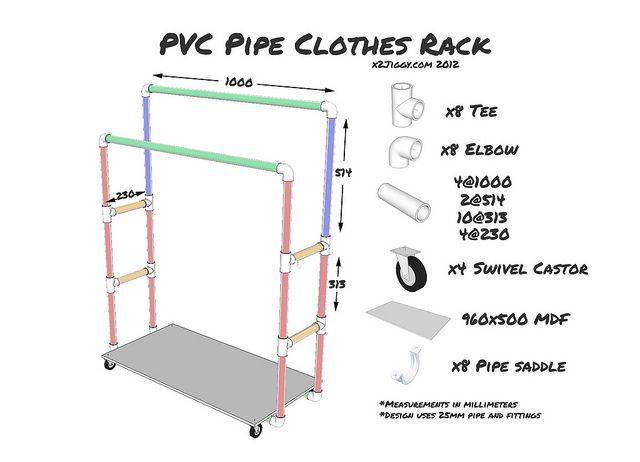
An economical homemade option is furniture assembled from plastic (PVC) pipes. But, the product without additional decoration does not have a pleasant enough appearance. Therefore, it is necessary to decide in advance how to improve such furniture - make a fabric cover, paint it or arrange it in another way. It is made of PVC pipes in the same way as copper. The length of plastic tubes, the number of angles and tees is similar.
Furniture items - an unusual way to save money
Pipes can be used to produce furniture that is distinguished by its durability. Thanks to bold decisions, you can significantly save the family budget. Let's talk about the most popular types of furniture.

Chairs. Perhaps these are the most necessary pieces of furniture in the apartment. From the material you can make chairs: folding, stools, armchairs and high chairs.

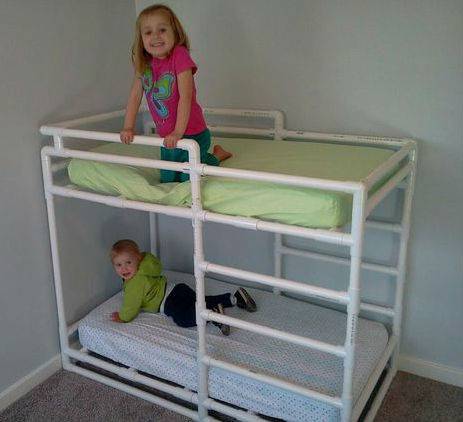
Two-story children's bed. An excellent solution for those who want to save money in the family and not buy an expensive bed. In addition, when the children grow out of it, you can disassemble the bed and make other necessary products.

A small table with a glass cover is an exquisite solution for those who love coziness and comfort.
Rack. The design of the many shelves - will fit into any room and accommodate a lot of household utensils.

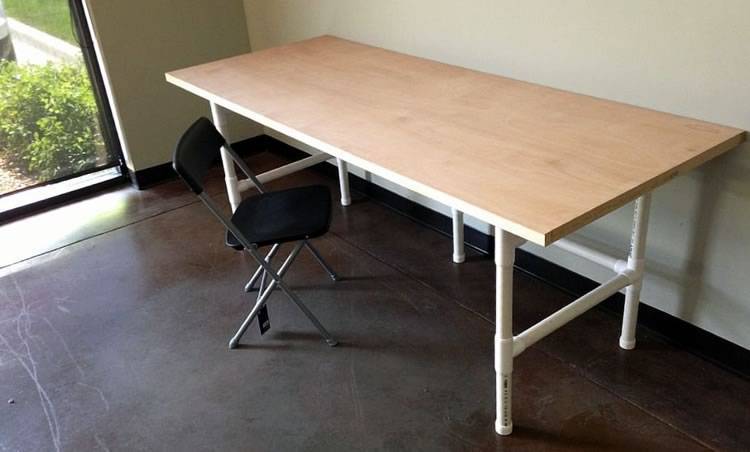
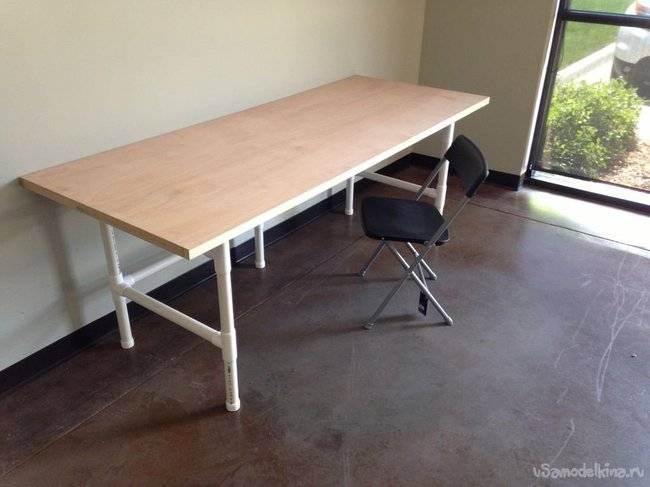
Pipe desk
See how to make a very cool writing pipe table with your own hands. From start to finish, the table was assembled in about 40 minutes.
So, you need 20 mm pipes:
- 4 things.15 cm long (one end threaded)
- 4 things. 57 cm (both threaded ends)
- 4 things. 23 cm (both threaded ends)
- 1 PC. 122 cm (both threaded ends)
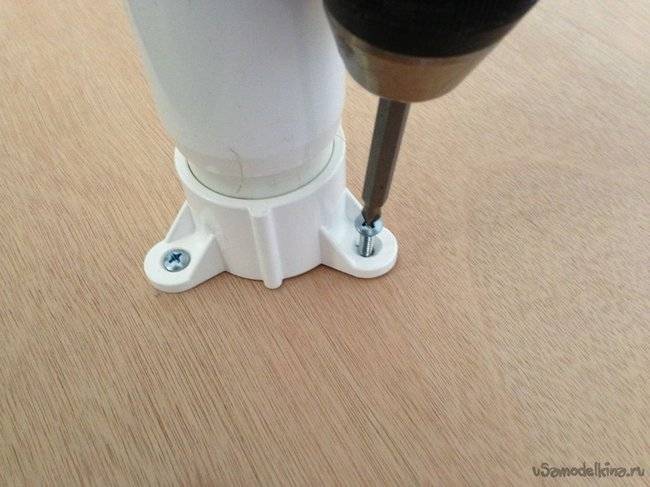
- 4 flanges 3/4″
- 6 tees 3/4″
First, screw two tees to the ends of the 122 cm pipe. Then screw 23 cm of pipe to the ends of the tees. Screw the tees to the ends of the 23 cm pipes and add 15 cm of pipe to the bottom and 57 cm to the top. To attach the base to the top of the tabletop, use the 3/4″ flanges. Cut 4cm sections out of the 3/4″ dowel and drill holes in each piece. Then screw the parts of the dowel rod to the rollers and fix with a nut.
That's all, the pipe desk is ready. Have a good day!
Source


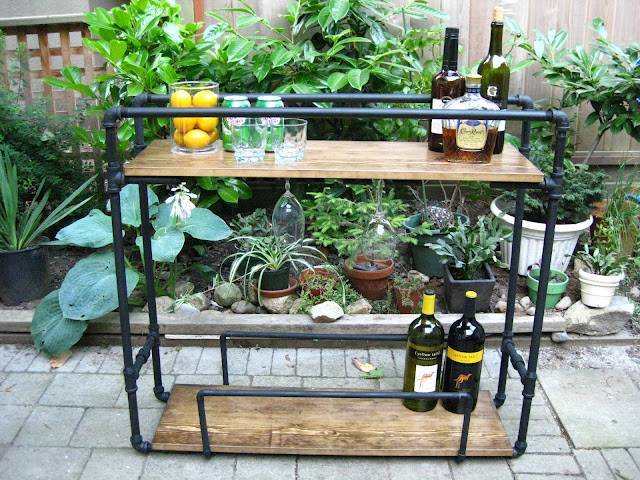
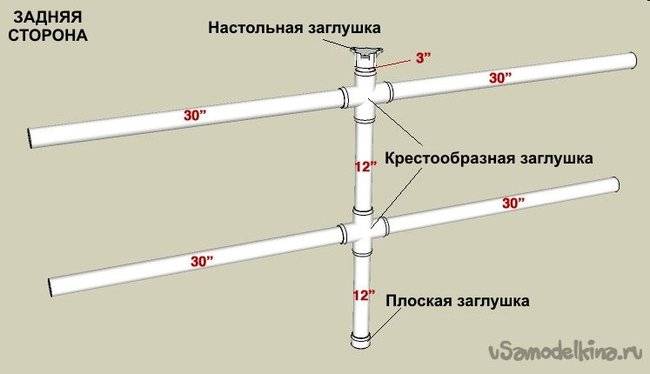
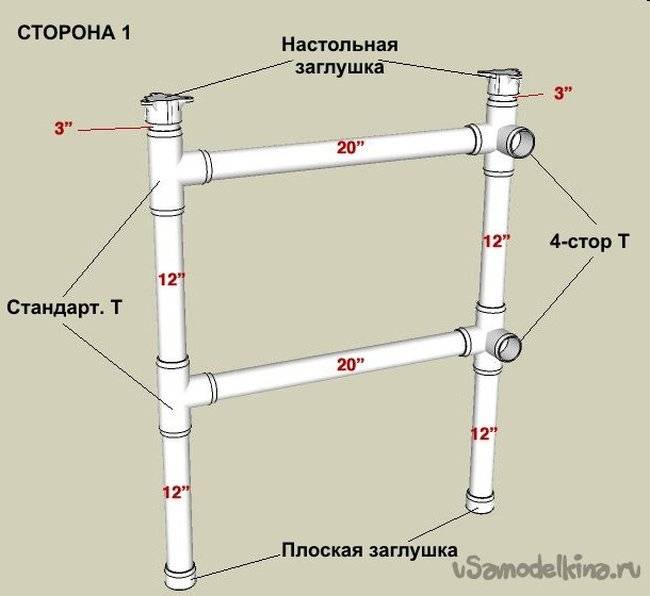
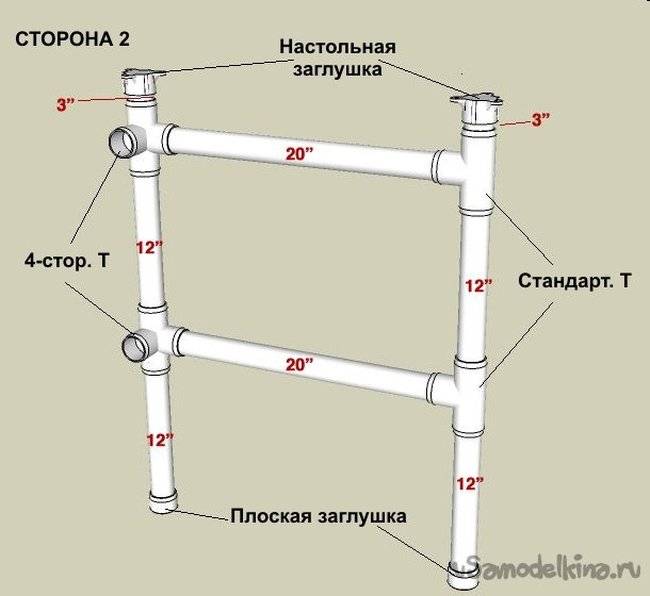
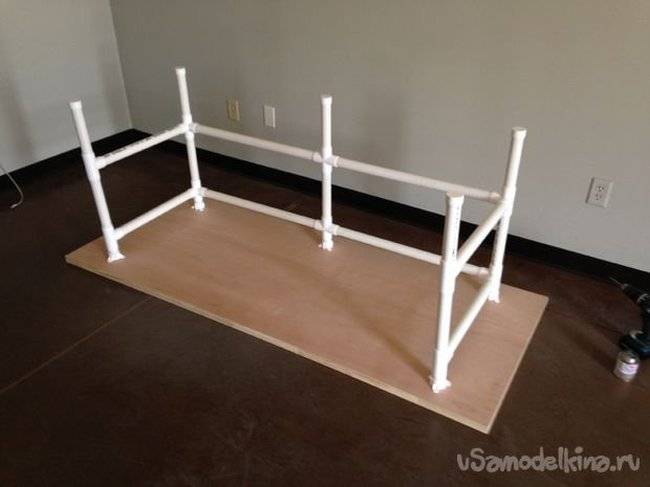
Water pipe table
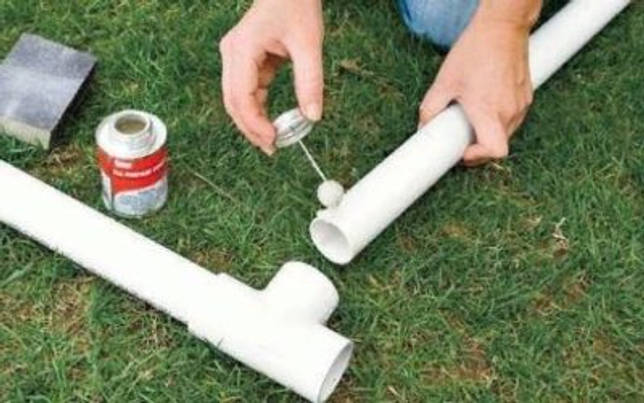
Make a stylish DIY water pipe table for everyday use or special occasions. When extra space is needed, the table disassembles in seconds. Clean the pipes and fittings and let dry. Position the parts for the two fasteners and screw on the caps. Connect the tees to the cross using the threaded nipple (5), but do not fully tighten.
- Lay the H-shaped knots on a flat surface to make sure they don't wobble. Then connect them with a pipe (6).
- Measure the distance between the two pipes in the H-joint. Rotate the end until they are the same distance apart at both ends. Tighten all fittings as much as possible while maintaining distances.
- Apply the finish of your choice (aged copper finish shown).
- Mark the holes. Place the top piece on the board and drill two holes.
- The finished table will be approximately 122 cm long and 50 cm deep with a height that varies slightly depending on the distance between the pipes. You can shorten it a little, but this will bring the legs together and the table will not be as stable. Draw lines from the end of the board to the edges of the holes. Use a jigsaw with a thin blade to cut along the lines.
- Sand the edges of the notch, then the entire panel and both lower shelves with sandpaper.
- Apply the finish to the countertop and lower shelves.
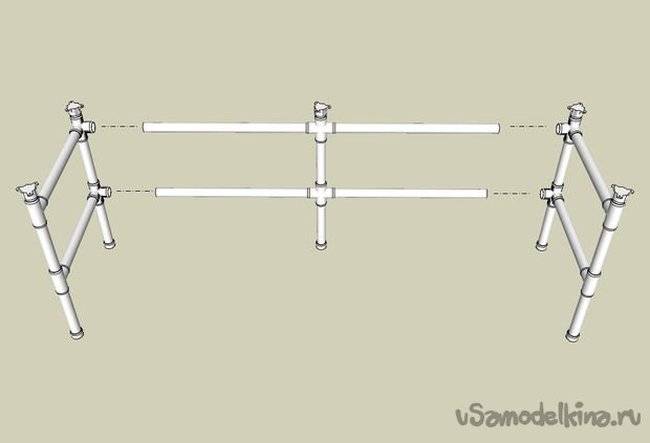
Now, how to assemble a coffee table from pipes.
Do it better with an assistant.
Compilation of the table will be faster with an assistant. Start by sliding the top H-frame as far as you can into the groove at both ends of the table top. The bottom pair of pipes should be about 30 cm closer to the center of the table than the top pair.
Notice how the top tubes grab the top one.
Install the bottom shelf. Straighten your legs a short distance to slide the shelves into place
(The wood should rest on the raised edges of the crosses and tees, as well as the caps.)
Continue tilting your legs and adjusting the position of the top and shelves until the structure is stable. Advice. To use the table on hard floors, attach felt pads to the bottom of the pipe caps.
Source
Choice of construction and design
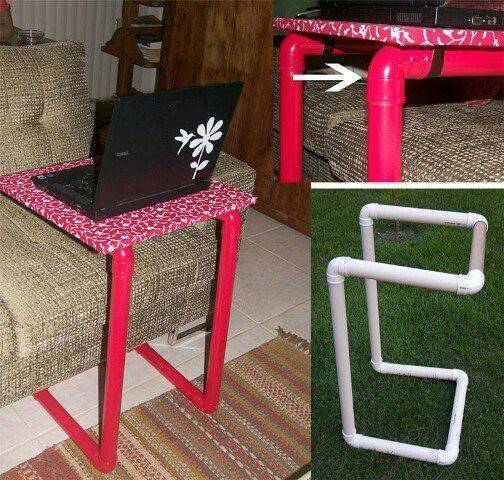
Glamorous pink plastic tube laptop stand
The manufacture of furniture begins with the choice of design and the variant of its design implementation. It is necessary to build on the function that the furniture will perform. Then select the design parameters:
- collapsible or solid;
- dimensions of the entire product;
- the number of elements and their sizes;
- method of connecting parts of the structure.
Convenient bar counter for giving from plastic pipes
When thinking about design, you can be inspired by browsing magazines and furniture catalogs, websites about furniture on the Internet. Optionally, it will be furniture made of polypropylene pipes. Original ideas may arise when viewing furniture options made of rattan, wood, metal.

Stand for storing things from plastic pipes for the boiler room
This stage of work ends with drawing up sketches, determining the necessary materials, and drawing up a cost estimate. At the same time, it is necessary to take into account how you can use those materials that are already available, as well as availability, if materials need to be purchased in addition.
Large and beautiful table with PVC pipe legs
What materials are needed

Necessary materials for creating furniture from PVC pipes
After the design is selected, it is necessary to draw up a list of materials and tools needed to create crafts. For this you may need:
- plastic pipes;
- fasteners: glue, screws, self-tapping screws;
- fitting.

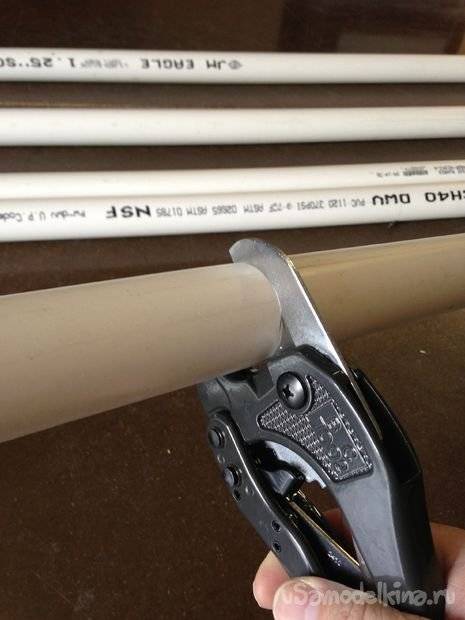
Stages of the plastic pipe welding process
Plastic pipes are easy to cut. After that, a sharp edge with burrs remains, which must be cleaned. Just cut the thread. When heated, polymer pipes bend well, retaining a new shape after cooling. Sometimes the frame is easier to bend than to assemble with pieces of pipes and fittings.

Plastic pipes of various shapes and fittings for them
They are divided by purpose:
- plumbing
- sewer.

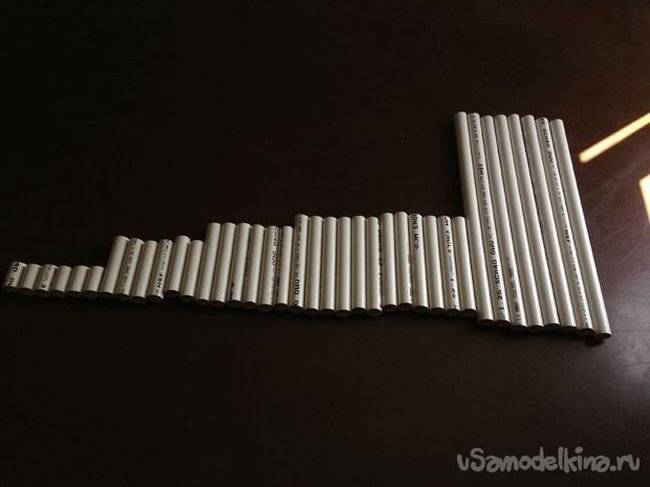
Variety of types of plastic pipes
From the point of view of the manufacture of furniture and useful household appliances, sewer pipes, unlike water pipes, benefit from a lower price.They are made in large diameters.
According to the type of polymer from which the pipes are made, they are divided into:
polyvinyl chloride (PVC);
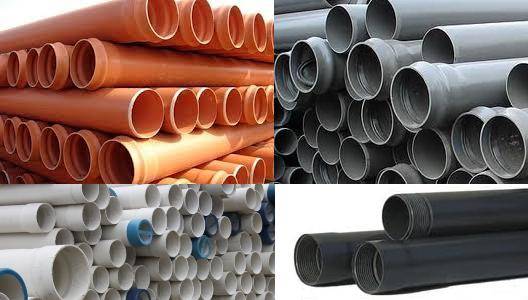
PVC pipes of different diameters and colors
polyethylene (PE);

Polyethylene pipes of large diameter, straight and corrugated
polypropylene (PP).

Polypropylene pipes and fittings
They differ slightly from each other in properties. Polyethylene behaves worse at elevated temperatures and under the influence of sunlight, it is elastic. Polypropylene pipes are more durable and rigid. The positive quality of PVC pipes is increased resistance to chemical attack and reduced flammability. They tolerate ultraviolet exposure very well. The difference in the performance of polymers in most cases will not be critical for the manufacture of furniture. But the difference in price is a factor that should be taken into account. The most expensive are polypropylene. PVC pipes have the best price-quality ratio for creating furniture structures.


In addition, pipes are reinforced and non-reinforced. Polymer pipes are most often reinforced with fiberglass or aluminum. The reinforcing layer is soldered between two polymer layers. This is done to increase strength, rigidity, and reduce linear expansion when heated. Reinforced polypropylene pipes are used for hot water supply. The letters RC are added to the designation of the reinforced pipe. In appearance, they can also be distinguished. In addition, some manufacturers apply a colored strip along the pipe, informing about the scope of the product. Pipes with a blue stripe are used for cold water supply, with a red stripe for hot water or pipelines with a coolant.The presence of both bands indicates the versatility of the pipe. It should be borne in mind that reinforced pipes, although stronger, are much more expensive. Make a decision on the advisability of additional costs to the master.

Trolley with fastening made of plastic pipes
Manufacturing
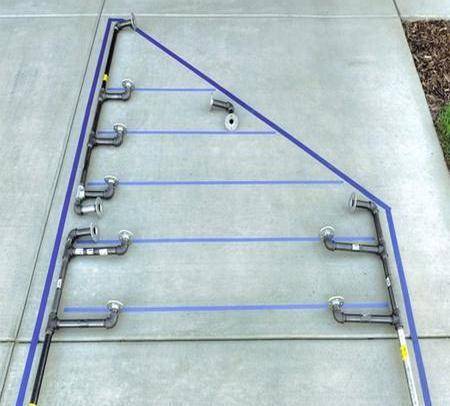
A homemade PVC pipe bow is a structure of three main parts, the central part of which is the handle, the peripheral ones are the bowstring and shoulders.
Manufacturing process:
- We cut a piece of the desired length from the PVC pipe, the most common is the size of 1.5 meters. Such a bow will be convenient for an adult man and a physically developed teenager.
- Using a ruler (tape measure), we find the middle of the workpiece, mark it with a marker and measure from the middle two segments of 5 cm in both directions. This part will be the handle, before continuing, you need to try on the handle. The palm should be completely included in this gap. If your palm is wider, then you need to increase the size to the desired one, and make marks with a marker.
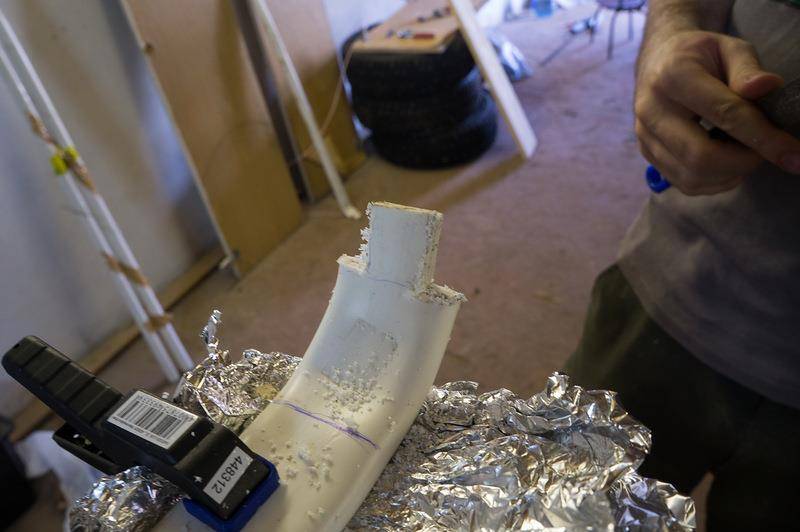
- Using a heating device, we heat one half of the pipe from the edge to the first mark at a temperature of about 150-180 degrees. We use foil so that the ignition of improvised means does not occur. The pipe must be heated until it becomes plastic and pliable from the action of the hand along its entire length.
- We lay the heated pipe on the table, press the molding board to it with clamps, put wooden blocks under the future onion handle.
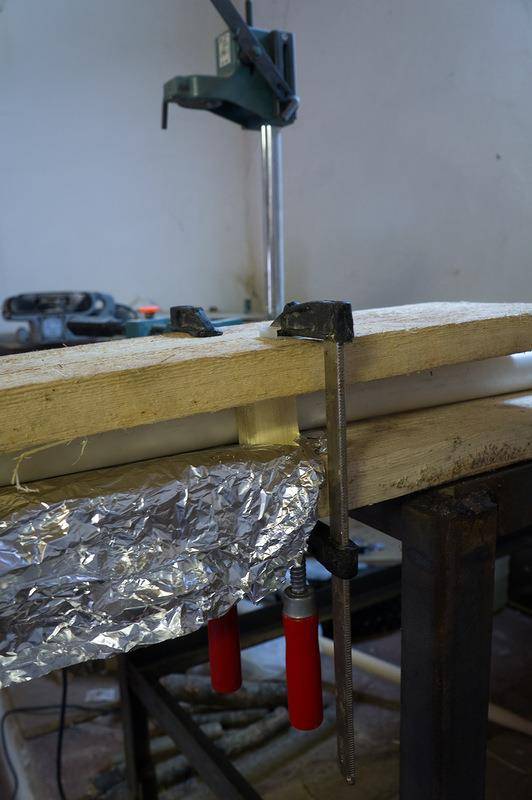
We put wooden blocks under the future bow handle
- We wait for the time until complete cooling and the formation of the pipe. Outwardly, it should look flat at the edge with a diameter increasing towards the center. We have formed one shoulder of the bow, the second is done in a similar way.You need to try to keep the details the same.
- We also form the handle by heating and flattening in the direction perpendicular to the shoulders. You need to form it by wrapping it with a thick cloth and squeezing it with your fingers, under your palm.
- To fix the bowstring, we measure 8 cm from the edges of the shoulders on both sides, mark with a marker and make protrusions for attaching the bowstring. For this:
- We heat the end section to a pliable state;
- Bend it at an angle of about 90 degrees;
- We mark the future protrusion with a marker and a ruler and cut it out with a hacksaw;
- We process the protrusion with a file and sandpaper to remove burrs and form a finished product;
- We repeat steps 7.1 - 7.4 and make a ledge on the other shoulder.
We form the tip on which we will fix the bowstring
- We stretch the bowstring from the propylene rope. The pulling force of such a bow is 19 kg.
The process of assembling and installing the gate
Before starting the assembly process, you should choose a suitable place to install the gate. Do not mount them in front of windows or breakable objects, such as floor vases at the entrance to the house, or opposite the place where the car is parked. It is also not desirable that the ball constantly hit when playing in the garden, this can break the plantings. The best option would be to place the football attribute in front of the fence if it is made of a metal mesh.
The assembly process of the structure consists of the following steps:
- Connect the two pipes that will act as rods to the third top pipe using a plastic elbow.
- Attach tees to the bottom of the rods.
- To create the depth of the structure, insert one pipe into each tee and use two more elbows to connect the pipe to the back bottom of the structure.
- Secure all connections with self-tapping screws.
So that the goal does not fly away with the ball when it hits them, it is necessary to give them stability. To do this, dig two holes 150-200 mm deep. Next, to the tees, which are located at the bottom of the rods, attach small pipes, the length of which corresponds to the depth of the dug holes, insert into them and tamp well with earth. The rear lower part of the gate also needs to be fixed. To do this, bend three bars of thick wire to make staples, and drive them into the ground with a hammer, grabbing the rear pipe adjacent to the ground in three places.
Where to start looking for the “perfect” hallway hanger?
There are a few factors to consider first.
- The size of the room (it should complement, but not overcrowd the room).
- Room design. If the hallway is made in a minimalist style, and you liked a bright hanger with remarkable patterns, you should consider this option several times before making a decision.
- The presence of children. This factor is relevant when choosing any furniture. If the hanger has original shapes with sharp corners and can fall at the slightest push, you should abandon this idea. After all, children are very curious and want to touch everything in the house.
Choosing a wooden hanger will require a good sense of style and experience from the designer.
How to sew a wigwam for children?
Stock up on thin bamboo or ordinary sticks if you plan to install a wigwam in a residential area.Their optimal number for the most spacious hut is nine pieces. In the place of the proposed intersection, these rods must be secured with a rope. The rods are installed not pressed against each other, but inclined by 25 degrees so that a figure resembling a cone is obtained. Then you need to fix the base with additional sticks, tying them to each rack. To make the wigwam as high as possible, you need to use longer rods. For a better bond, you can drill holes in them and pass the rope through.
The next step is to decide on the coverage of the structure. For this, simple pieces of fabric or a specially sewn cover are used. To make the latter, you will need a wigwam pattern for children. The sewing process is very simple and does not require special skills. The segments of such a cover are in the form of triangles. To calculate the required dimensions, measure the openings between the bars.
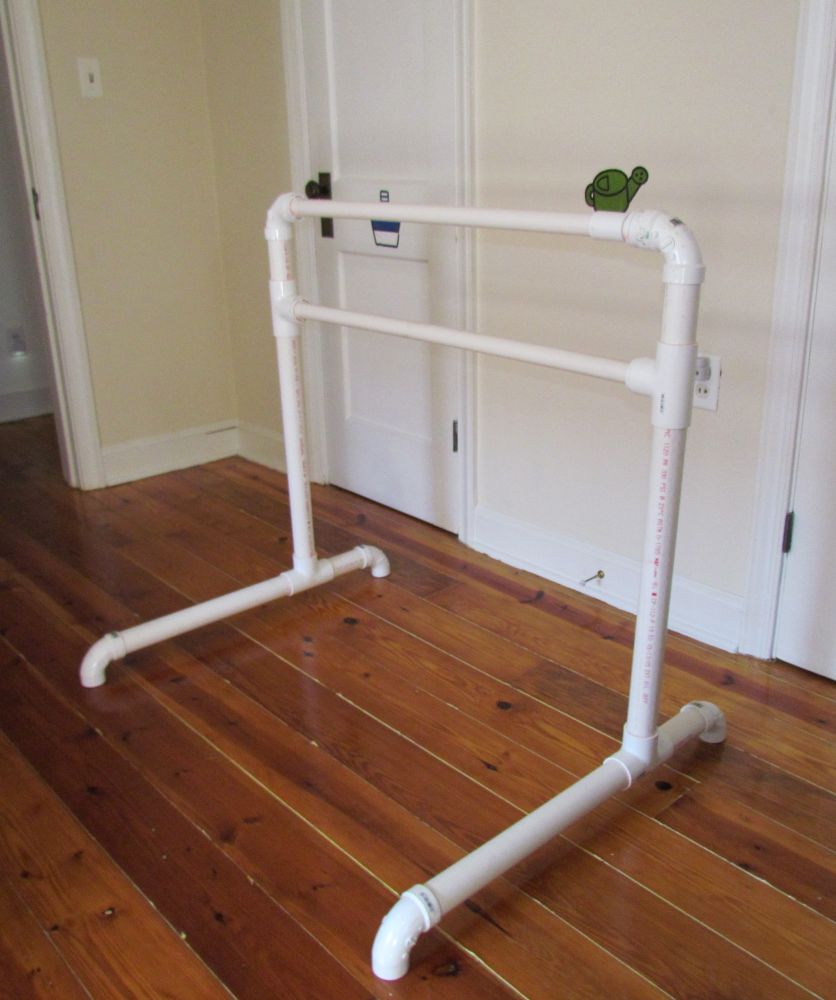
Various shapes and designs
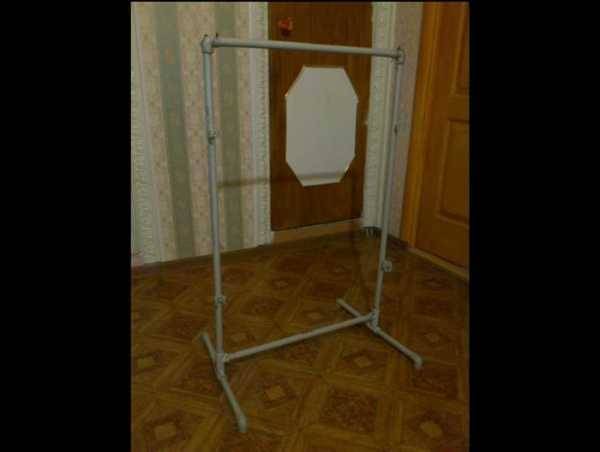
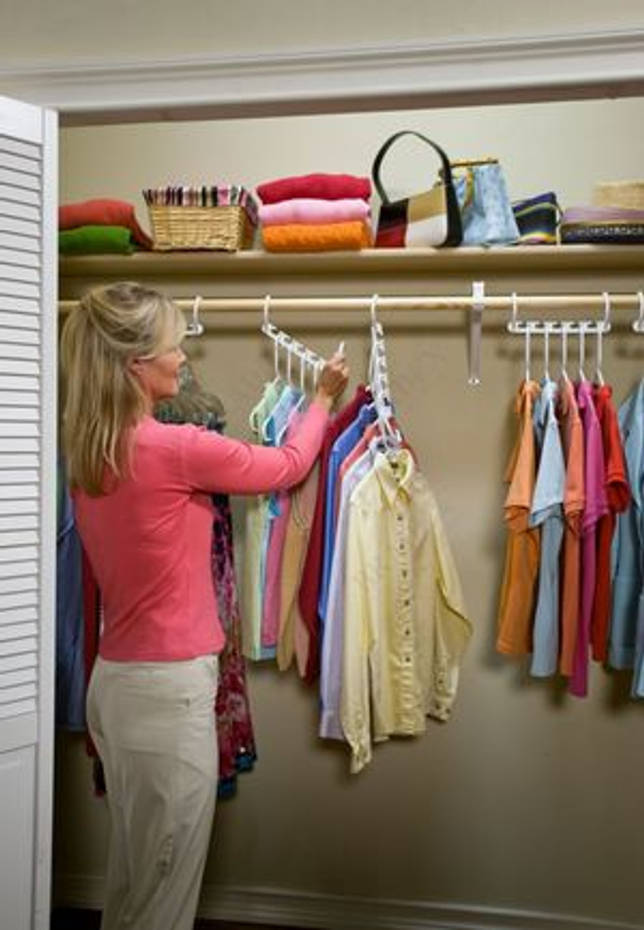
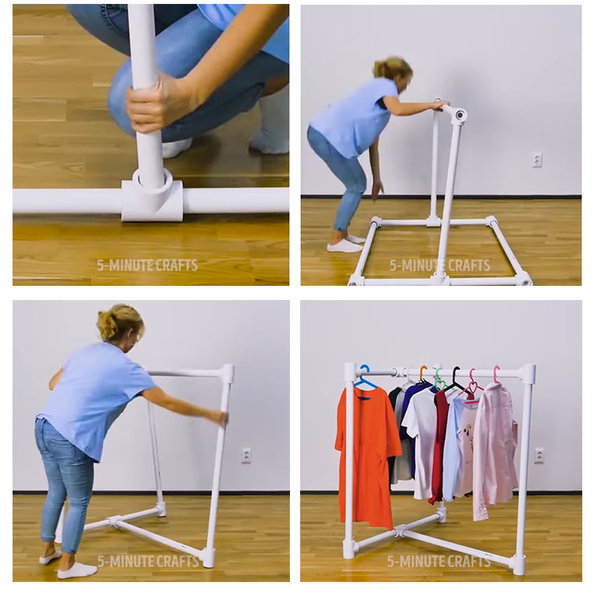
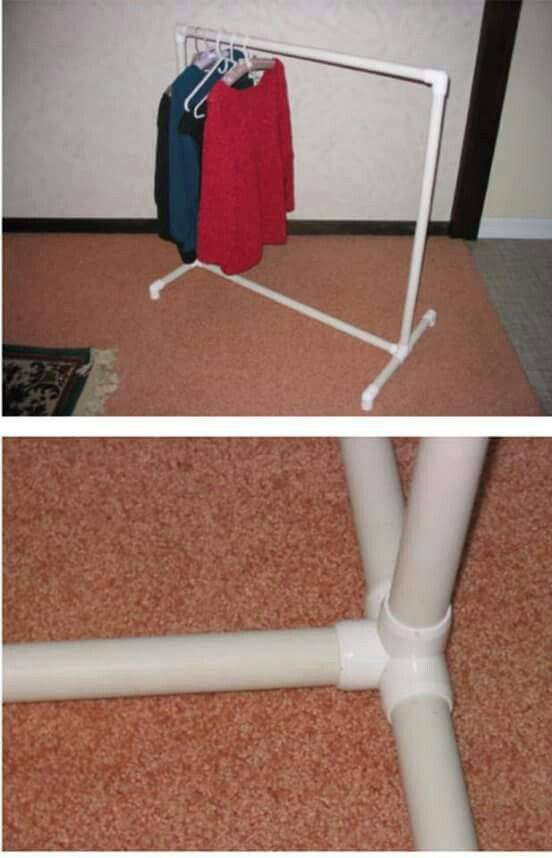
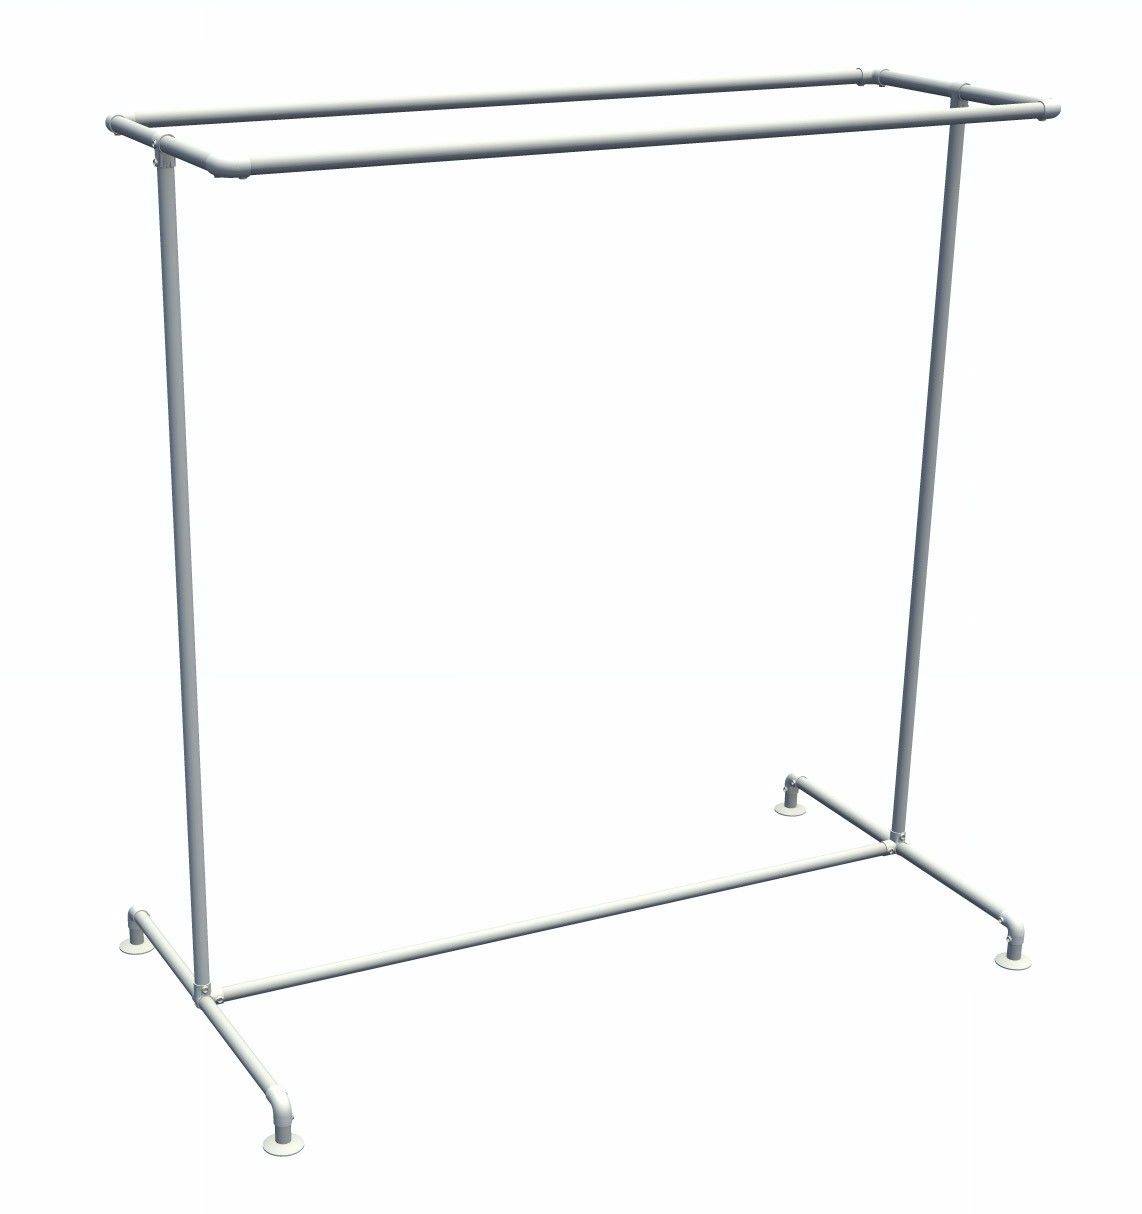
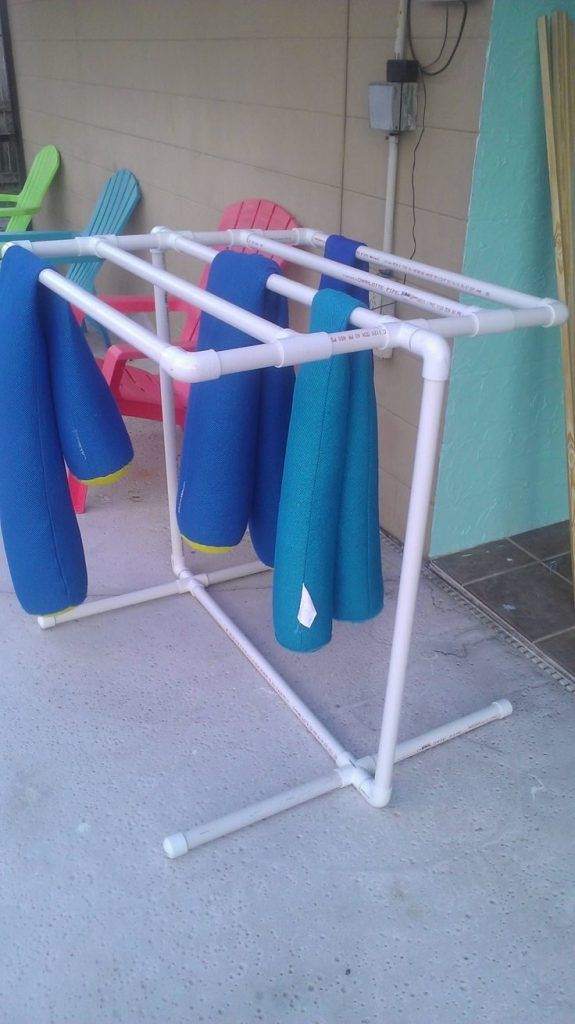
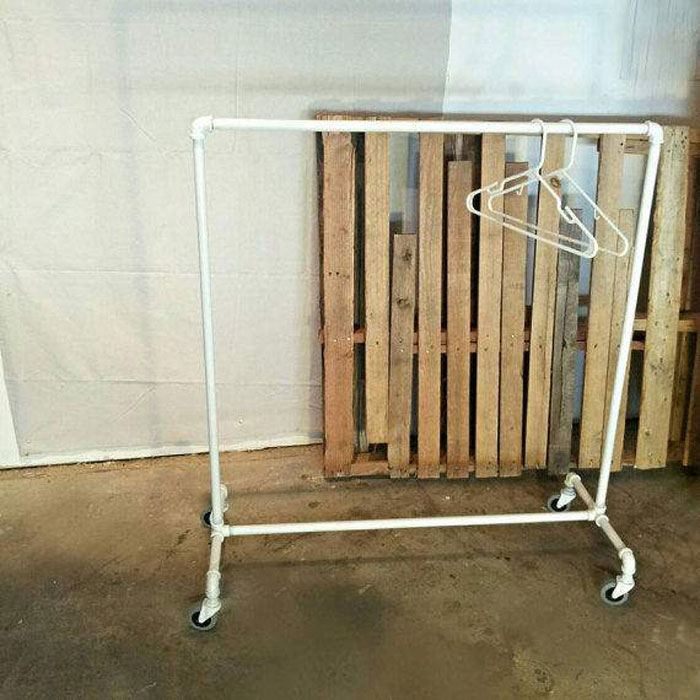
Floor type hangers are an integral part of today's life. These items are found both in apartments, residential buildings, and in office premises, restaurants. Today, such products are represented by a wide variety of designs. They can be made from completely different materials, including being constructed from PVC pipes, which every householder can do.
To make the plastic hanger stable, you can fix it to the wall, install a spacer between the legs, or fill the tubes with some kind of weighting agent, such as sand or small gravel. If a hanger is required for dresses and shirts, then preference should be given to the design in the shape of the letter "P" with the connection of vertical elements using horizontal ones.
To prevent sagging of the upper crossbar under the weight of clothing, a metal rod is installed under the part.
For the corridor, the best option would be a floor structure with hooks for clothes. It can be placed in one of the corners of the room and, if necessary, moved to another place.
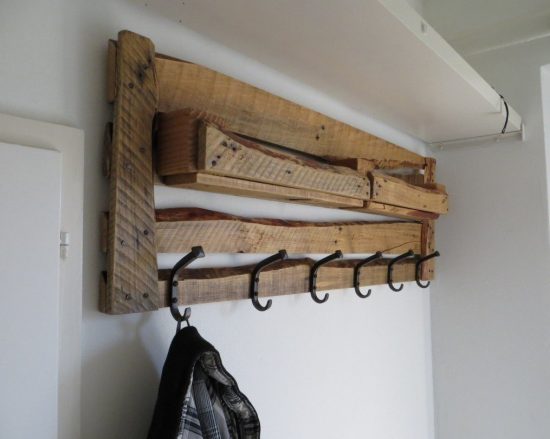
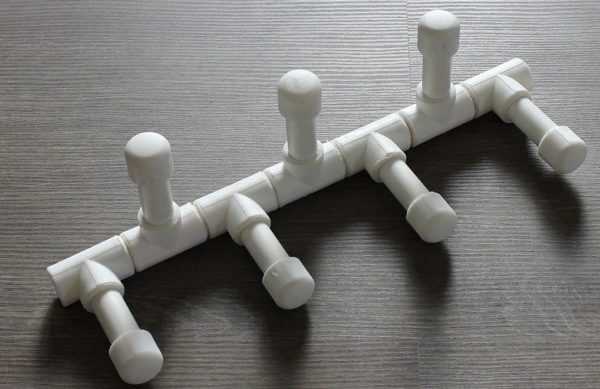
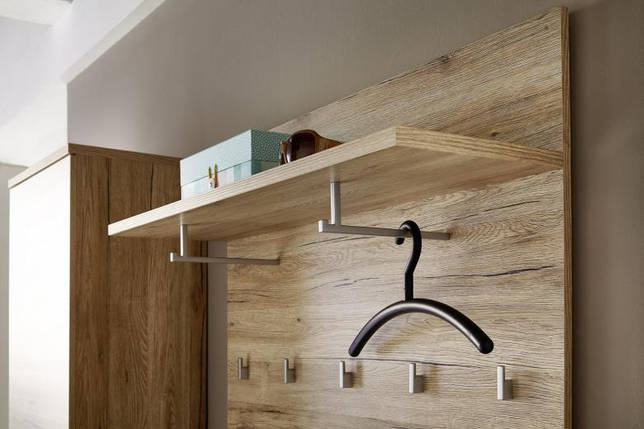
Plank model
The simplest model of such an accessory in the hallway is a plank on which hooks are nailed. The description turned out to be not colorful, but if you take an exclusive material for its manufacture, then the product will turn out to be exclusive.
 If a wooden plank is taken for a product, then it can be processed by various methods: grinding, painting, etc. Hanger hooks can be made from real wooden hooks, metal hooks, door handles and other material. They can be all the same or different, which looks very unusual.
So that the child always undresses himself, he needs a funny hanger. In this case, you can look after children's hooks in the form of cartoon characters or favorite animals. Since children's things are not so heavy, any interesting plastic toys can serve as hooks for the product, for example: balls, cups, etc.
Small rubber animals can be attached to the bar with superglue or special rubber glue.
Old forks or spoons should not be thrown away, they can make excellent hooks for a hanger if the end is slightly bent. If old, useless skis take up space in the pantry, then they can also be used as a hanger bar. It is worth refreshing them a little with paint, and nailing decorative elements, which will be hooks. Seeing such beauty, made by yourself, your guests will envy you.
For those who do not know how to work with wood, but want to have an original product, there is a way out. In the store you need to buy a special decorative self-adhesive film that imitates a wall hanger and stick it on the wall. It remains only to choose the material for the hooks and attach them to the wall.
You can find many fresh ideas, as well as workshops on making a wall structure, on the Internet.
Chandelier manufacturing technology
It may seem to many that when using pipes and plumbing accessories, the chandelier will look rustic and even clumsy, but this is not so. With the right approach and careful execution, they create a work of art even from such simple materials.


Assembly process
For manufacturing, you will need pieces of metal-plastic pipes, splitters, a ceiling socket, cartridges.
Watch this video on YouTube
To begin with, they think over the design of the future product and the number of lamps that will be installed. In the center of the whole structure there will be a splitter, to which pipes are connected and bent into the desired shape. Wires are passed through the resulting workpiece. Since the cord will pass through several endpoints, it is recommended to run parallel lines into each individual branch, connecting them only under the ceiling outlet, excluding breaks inside the chandelier.
Cartridges are fixed to each pipe at the ends, having previously connected them to the cable. Through a small piece, connect the outlet to the splitter. Then the electricity is connected.
The finished product is painted and supplied with shades. The main thing is that the result pleases the inhabitants of the house.
Why plastic?
By plastic, of course, we mean all types of materials that are used in the production of pipes.
And pipes are made of PVC or polypropylene materials. PVC or polyvinyl chloride is a cheaper type of plastic. It is used mainly in sewerage, as it has all the advantages of polymers. Among them: durability, low cost, good strength, easy installation, etc.
But PVC pipes are characterized by one serious vulnerability - they quickly deform when the carrier temperature rises.
For polypropylene products, the picture is the same, except for one detail. They react better to high temperatures, are able to tolerate water with temperatures up to + 60 degrees, and even higher if there is reinforcement. Polypropylene is stronger, but more expensive than PVC.
Both options are perfect for home craftsmen. Plastic furniture and any other structures are assembled very easily. All you need to think over is a sketch, purchase pipes and assemble them in the right order.
The simple design of the fittings and the ability to glue the pipes with chemistry make the assembly process a fun and easy task. The result is furniture with unique properties:
- durable;
- stable;
- not afraid of moisture;
- easy to assemble, and if such an option is provided, then it can be disassembled;
- weighs almost nothing;
- safe;
- very cheap;
- durable;
- easily transformed and modified.
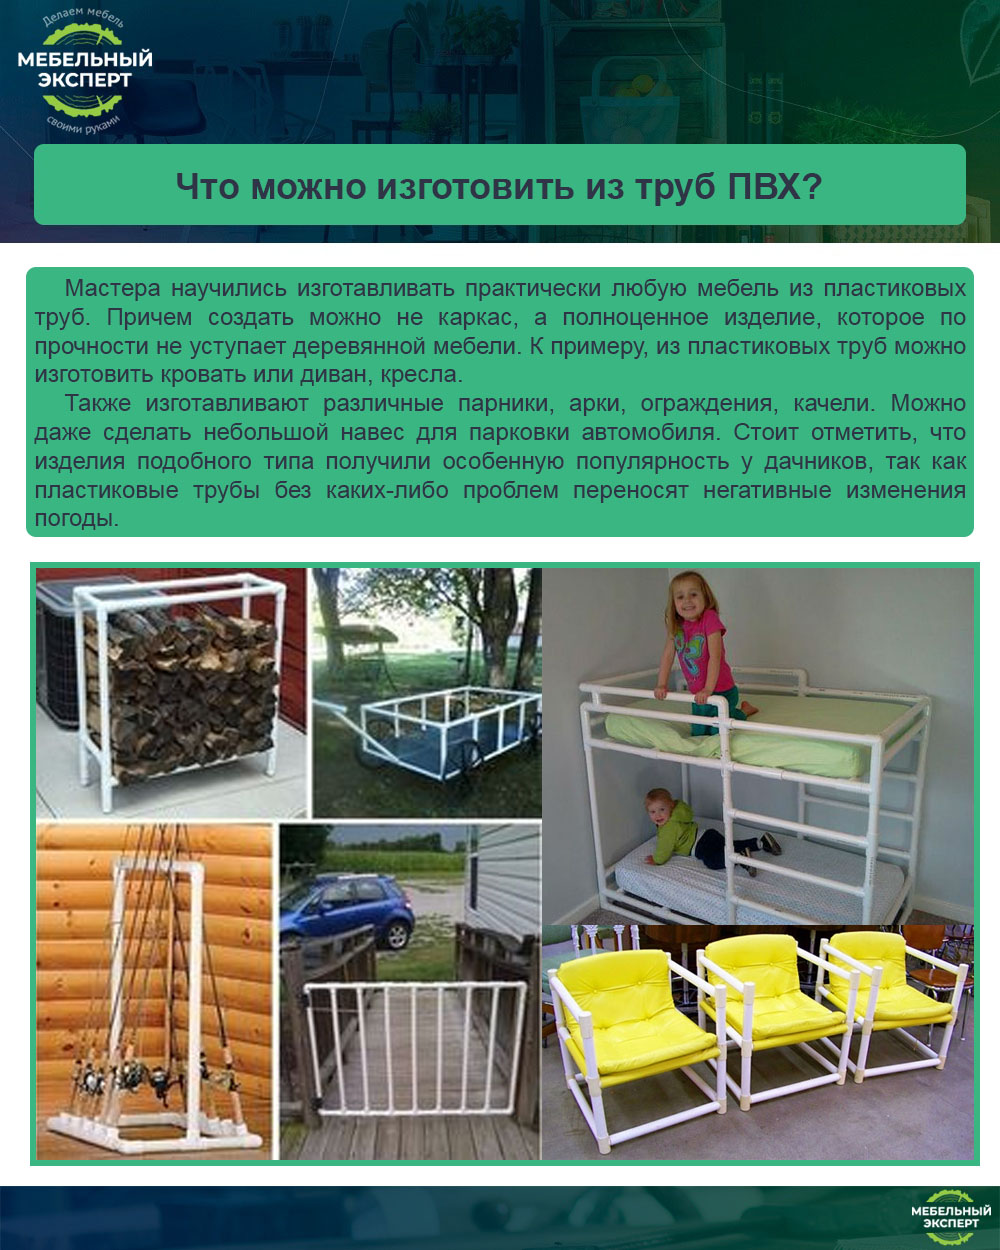
Variations and interesting ideas
It seems that we have already convinced you that at least trying to assemble furniture from plastic pipes with your own hands is still worth it. But what exactly can be designed? Yes, almost everything. You are limited only by your imagination.
From plastic or PVC pipes are collected:
- lockers;
- stands;
- tables and chairs;
- decorative elements;
- portable structures;
- building.
Variations in the use of PVC pipes for furniture assembly
Yes, yes, even small buildings can be assembled from plastic pipes with your own hands. Of course, this will not be a capital building, but a small architectural structure, but still.
For example, on the Internet there are a lot of instructions for assembling gazebos, aviaries and even greenhouses from a profile and round plastic pipe. Anyone would be smart enough to implement such schemes, there would be a desire to work with their own hands and the availability of the necessary materials.
Manufacturing and assembly process
Below are the diagrams, drawings necessary for the manufacture of furniture from pipes. With their help, you can make armchairs, chairs, beds, racks, tables, a huge number of decorative elements. Products are interesting, durable and safe.
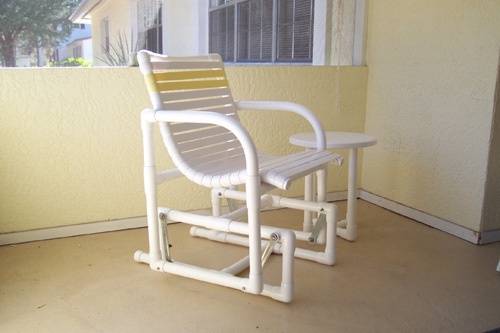
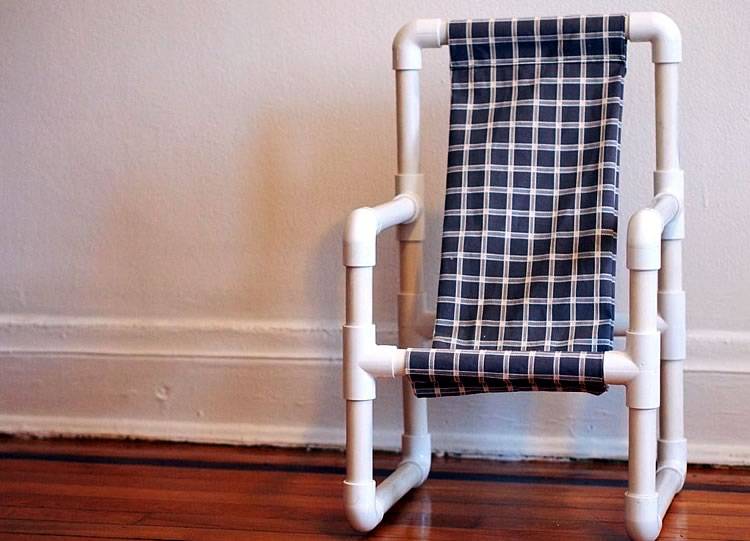
Armchair
The original way to use plastic pipes is to make a chair out of them. There are many options for its manufacture. It all depends on the desire, capabilities and imagination of the master. Plastic pipelines can become a material for the manufacture of a chair. You can make it with pvc pipes, a knife and glue.
To get an unusual chair, you need to do the following:
- First, cut pieces of different lengths. The main thing is that the longest segments should be the same length. They will act as supports;
- long will be needed for the back, armrests;
- then the segments are glued together so that the surface of the armrests and the backrest is on the same level. To the bottom, the length of the segments changes.
Thus, it turns out an interesting chair that will decorate any room in the house. To make it even more comfortable, pillows are placed on it or sheathed with foam rubber. In such an armchair it is pleasant to spend time, read a book, watch TV.
 Details under the letter "A" determine the width and depth of the seat. The length of the pipes "B" determines the height of the seat from the ground. Details under the number "C" are the height of the armrests, and under the number "D" are the height of the backrest.

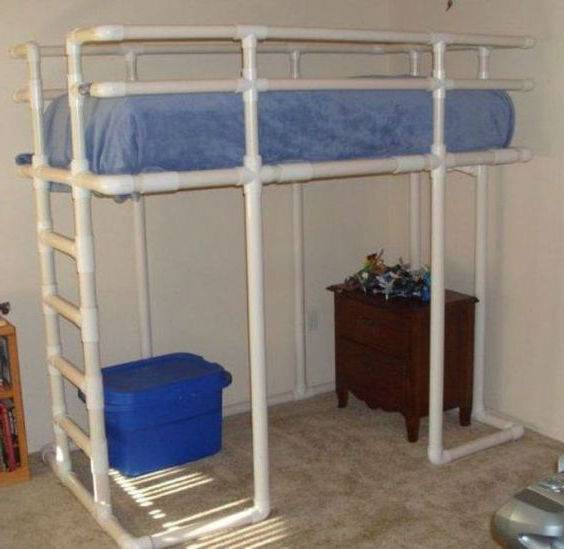
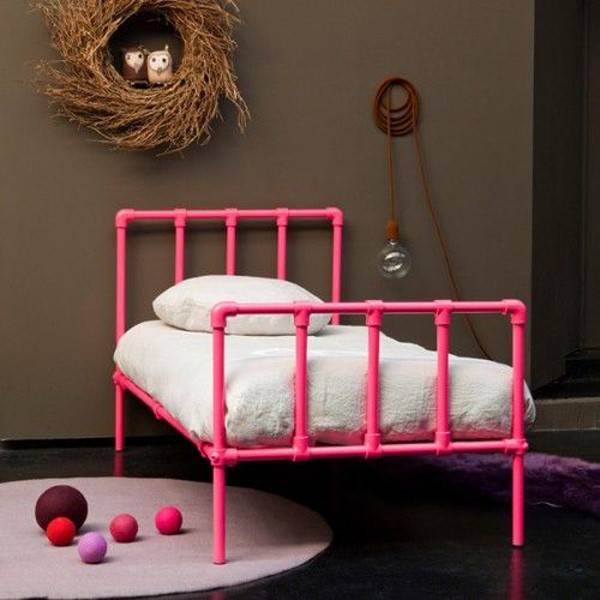
Bed
The above method makes a table, a bed. Different segments are glued together - the base of the bed is obtained. On top of it you need to put a comfortable mattress, pillows, blanket. This is a perfect place to sleep and rest.
In addition, cribs are made from this material. To do this, you need to study the diagrams and drawings. Then prepare the desired size segments. They are connected with fittings. If you fasten the parts together with glue, they will be very strong and durable. Without the use of glue, the structure will turn out to be collapsible and can be removed at any time. The bed for the kid will be unusual, reliable and strong. If there is more than one child in the family, several beds can be made.

Table
You can make such furniture from polypropylene pipes with your own hands, like a table. Its frame will be made of pipes, and the countertop will be made of any other material. At the same time, it must be remembered that PVC pipes are not suitable for heavy loads. The lighter the table top, the better.


The size of the countertop in this case will be 91.5 x 203 cm. The following materials and tools will be needed:
- door leaf as a tabletop;
- fasteners for connecting parts;
- drill;
- saw.
You will also need segments of the size:
- 30 cm - 10 pcs;
- 7.5 cm - 5 pcs;
- 50 cm - 4 pcs;
- 75 cm - 4 pcs.
To assemble the frame, prepare:
- t-shaped fittings - 4 pcs;
- plugs for pipes, fittings - 10 pcs;
- 4-way fitting - 4 pcs;
- cross fitting - 2 pcs.
According to the scheme, first assemble the side elements. Then proceed to the back of the table
Pay attention to the stability of the structure. All details must be the same
The last step is to collect all the elements in one design. Inspect the product for irregularities, sharp parts. Carefully process everything, glue the connections. A table is made in such a simple way.
 Tool
Tool
 materials
 Preparing parts of the right size
 Connecting Fragments
 Tabletop fixing
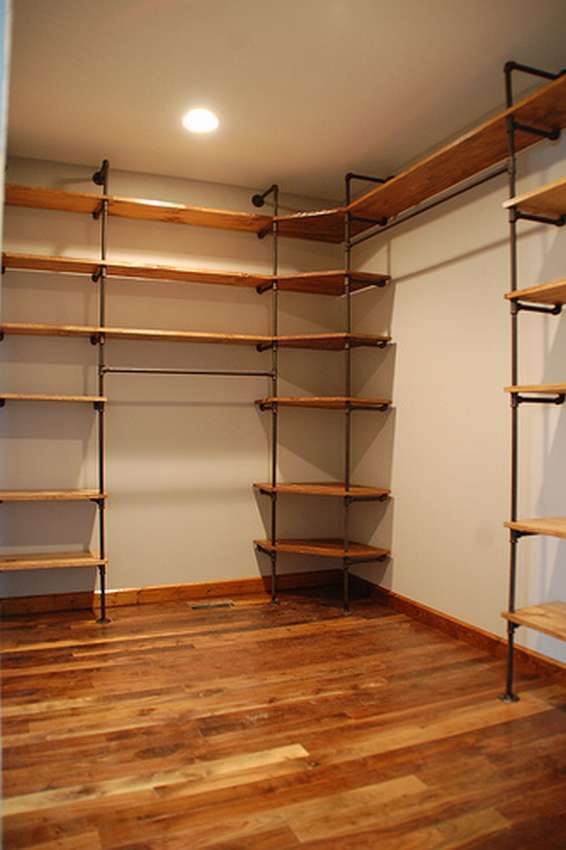
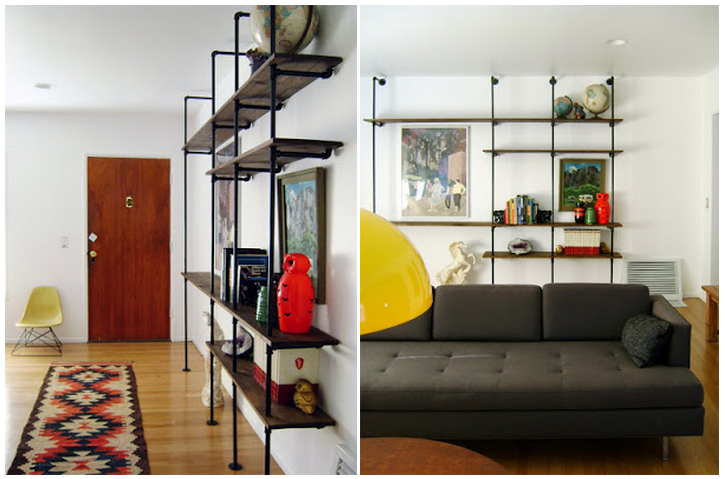
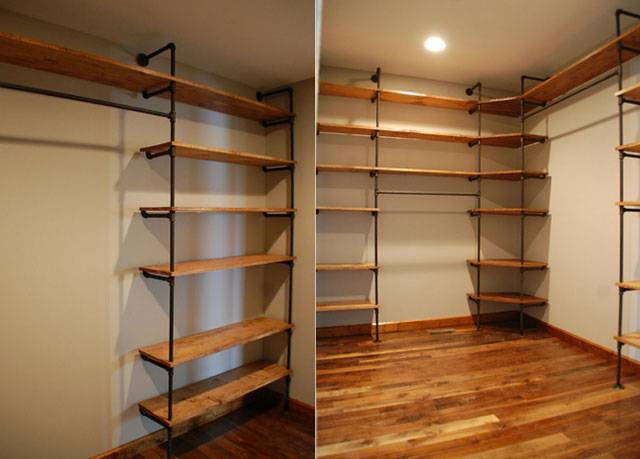
Rack
Armchairs, beds, tables - not the whole list of products that can be made from this material. Another useful piece of furniture is a shelving unit. Design parameters can be very different. It all depends on the size of the room where it will be installed, and the desire of the master.
First of all, it is recommended to make a drawing, a diagram of the future product. Next, prepare the required amount of a certain size of parts for them. Connect everything together. Plywood or other material can act as the base of the shelves. The only thing to keep in mind is that the materials are not suitable for heavy loads.
Such racks are used for flowers, toys in the children's room. Shelving can be installed in the garage. There products will be a great place to store tools and other things. You can place garden tools on the shelves: pots, tools. PVC products look unusual, neat, do not require additional decoration. Plastic shelves, racks do not harm the health of others, they are durable and environmentally friendly.

Pipe connection methods
To make any structure from pipes, you need to know how to fasten parts. Sometimes polypropylene pipes are fixed to each other using a welding machine (if it is not in the arsenal, then you can try to rent it).But, not everyone can cope with such a device, so you have to look for other ways to connect PVC pipes.
Table 2. Plastic pipe connection options
| Variant, illustration | Comment |
|---|---|
|
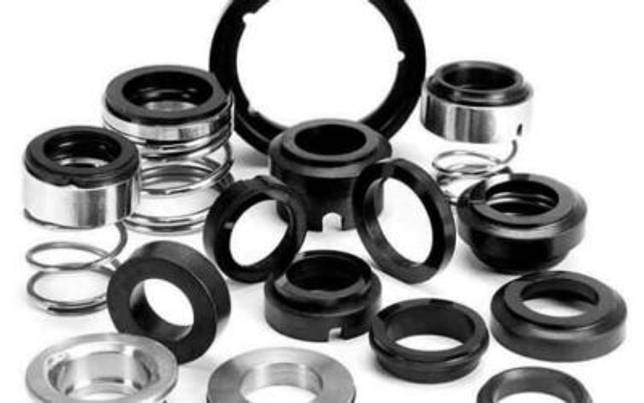
With a seal | This method involves connecting one end of the pipe to the other through an extension and a rubber seal. Despite the fact that formally the structure remains collapsible, it is undesirable to move the pipes after assembly, because the connections are too rigid. Sometimes rubber seals are additionally coated with sealant to make the junction monolithic. |
|
With glue | This is the most popular way to connect parts of a product to each other. For such purposes, only strong glue is used. It is best to use silicone sealants, as they give the structure some flexibility, and the pipes will not crack at the joints if they are awkwardly moved or dropped. |
Making hangers from perforated sheet
Materials used
To make this hanger you will need:
- Perforated plastic or metal panel.
- Threads of different colors (mulina or yarn for knitting).
- 4 hooks ending with a ball.
- Scissors.
Perforated panels can be purchased at specialized hardware or furniture stores.
Manufacturing steps:
- The size is determined and a panel of necessary parameters is purchased.
- The favorite plot or word for embroidery is selected.
- Embroidery is created on a perforated sheet with existing threads. After the embroidery is completed, hooks are attached to the panel, and it is hung on the wall using the existing holes.
Materials and tools
The amount of material will depend on the design features of the selected gate option.For our master class, you will need the following set of materials:
- pipe with a diameter of 5 cm, up to 8 m in total length;
- tees and elbows of the corresponding diameter, 4 pcs each, rotated by 87 degrees;
- cord for weaving mesh;
- self-tapping screws for fixing the mesh (several dozen);
- wire cut up to 2.5 m.
Also prepare some tools:
- shovel;
- jigsaw or hacksaw for metal;
- screwdriver;
- marker, tape measure (ruler);
- a hammer;
- any lubricant to connect the elements.
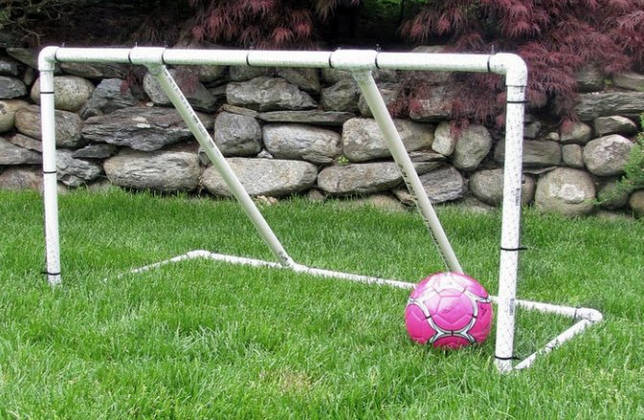
Football goal for children.
Pipe toilet paper holder
Do you like industrial style? Start with the bathroom design. If you're not a fan of all things shiny, chrome, or fake antiques, making your own toilet paper holder out of pipes is a good start for an upgrade. First, find or buy the parts you need. Inch pipes are ideal, well, if you use standard rolls. You will need:


- 1- T-fitting
- 1- wall mount
- 2- elbow connections 90°
- 1- long nipple
- 2- caps
Before assembly, it is important to clean and degrease all parts, because they will have to be varnished to prevent rust. The author for cleaning pipes from grease offers a proven way to buy any engine wash in a car shop. Sprinkle on the pipe, rinse with plain water after two minutes, wipe with a rag and you're done.
Make sure the surface is dry and can be varnished. Apply at least two coats. Check that there is no rust in the corners, moisture usually accumulates there. The author used Veratane varnish so that it does not shine
Spray on the pipe, rinse with plain water after two minutes, wipe with a rag and you're done.Make sure the surface is dry and can be varnished. Apply at least two coats. Check that there is no rust in the corners, moisture usually accumulates there. The author used Veratane varnish so that it does not shine.
When the varnish is dry, the only thing left is to assemble the parts and fix them to the wall with screws. Make sure the screw heads are large enough to support the load. Put toilet paper on each holder and screw on the caps. To change the rolls, you just need to unscrew the caps.
This is just one example, the toilet paper holder can be made in a variety of ways, which is enough for imagination. Some ideas can be gleaned from the presented photos in this gallery.
Conclusions and useful video on the topic
Video recommendations on creating a pipe partition with your own hands:
A partition made of plastic tubes can become not only an active participant in children's games or a room divider, but also a spectacular element in interior design.
Moreover, it is quite possible to make a decorative screen with your own hands. What can you use plastic pipes and improvised materials for. And also show a little imagination. And then the result will definitely please you.
Have you ever had to build a screen out of PVC pipes yourself? Please share photos of your own crafts and instructions for making them. Leave your comments in the box below.


