- What material is better to make a workbench in the garage with your own hands
- Advantages and disadvantages of a wooden workbench in the garage
- Advantages and disadvantages of a metal workbench for a garage
- Installation and assembly features
- Assembly and installation
- Safety
- Model Features
- Video description
- Conclusion
- Preparatory work
- Material used
- Preparatory work
- Necessary tools and materials
- How to make a workbench with your own hands
- Basic equipment
- Assembly steps
- Installation location
- Final work
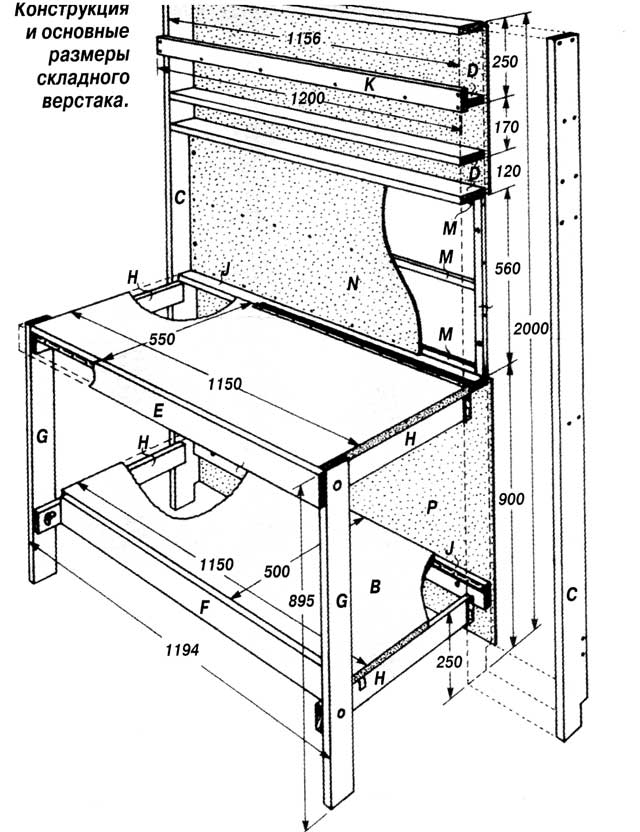
- Purpose and design of a typical carpentry workbench
- Do-it-yourself wooden desktop in the garage - photo and video step by step instructions
- The purpose of the workbench in the garage
What material is better to make a workbench in the garage with your own hands
There are several options for making a desktop. According to the type of material used for the manufacture of workbenches, there are:
- wooden;
- metal;
- combined.
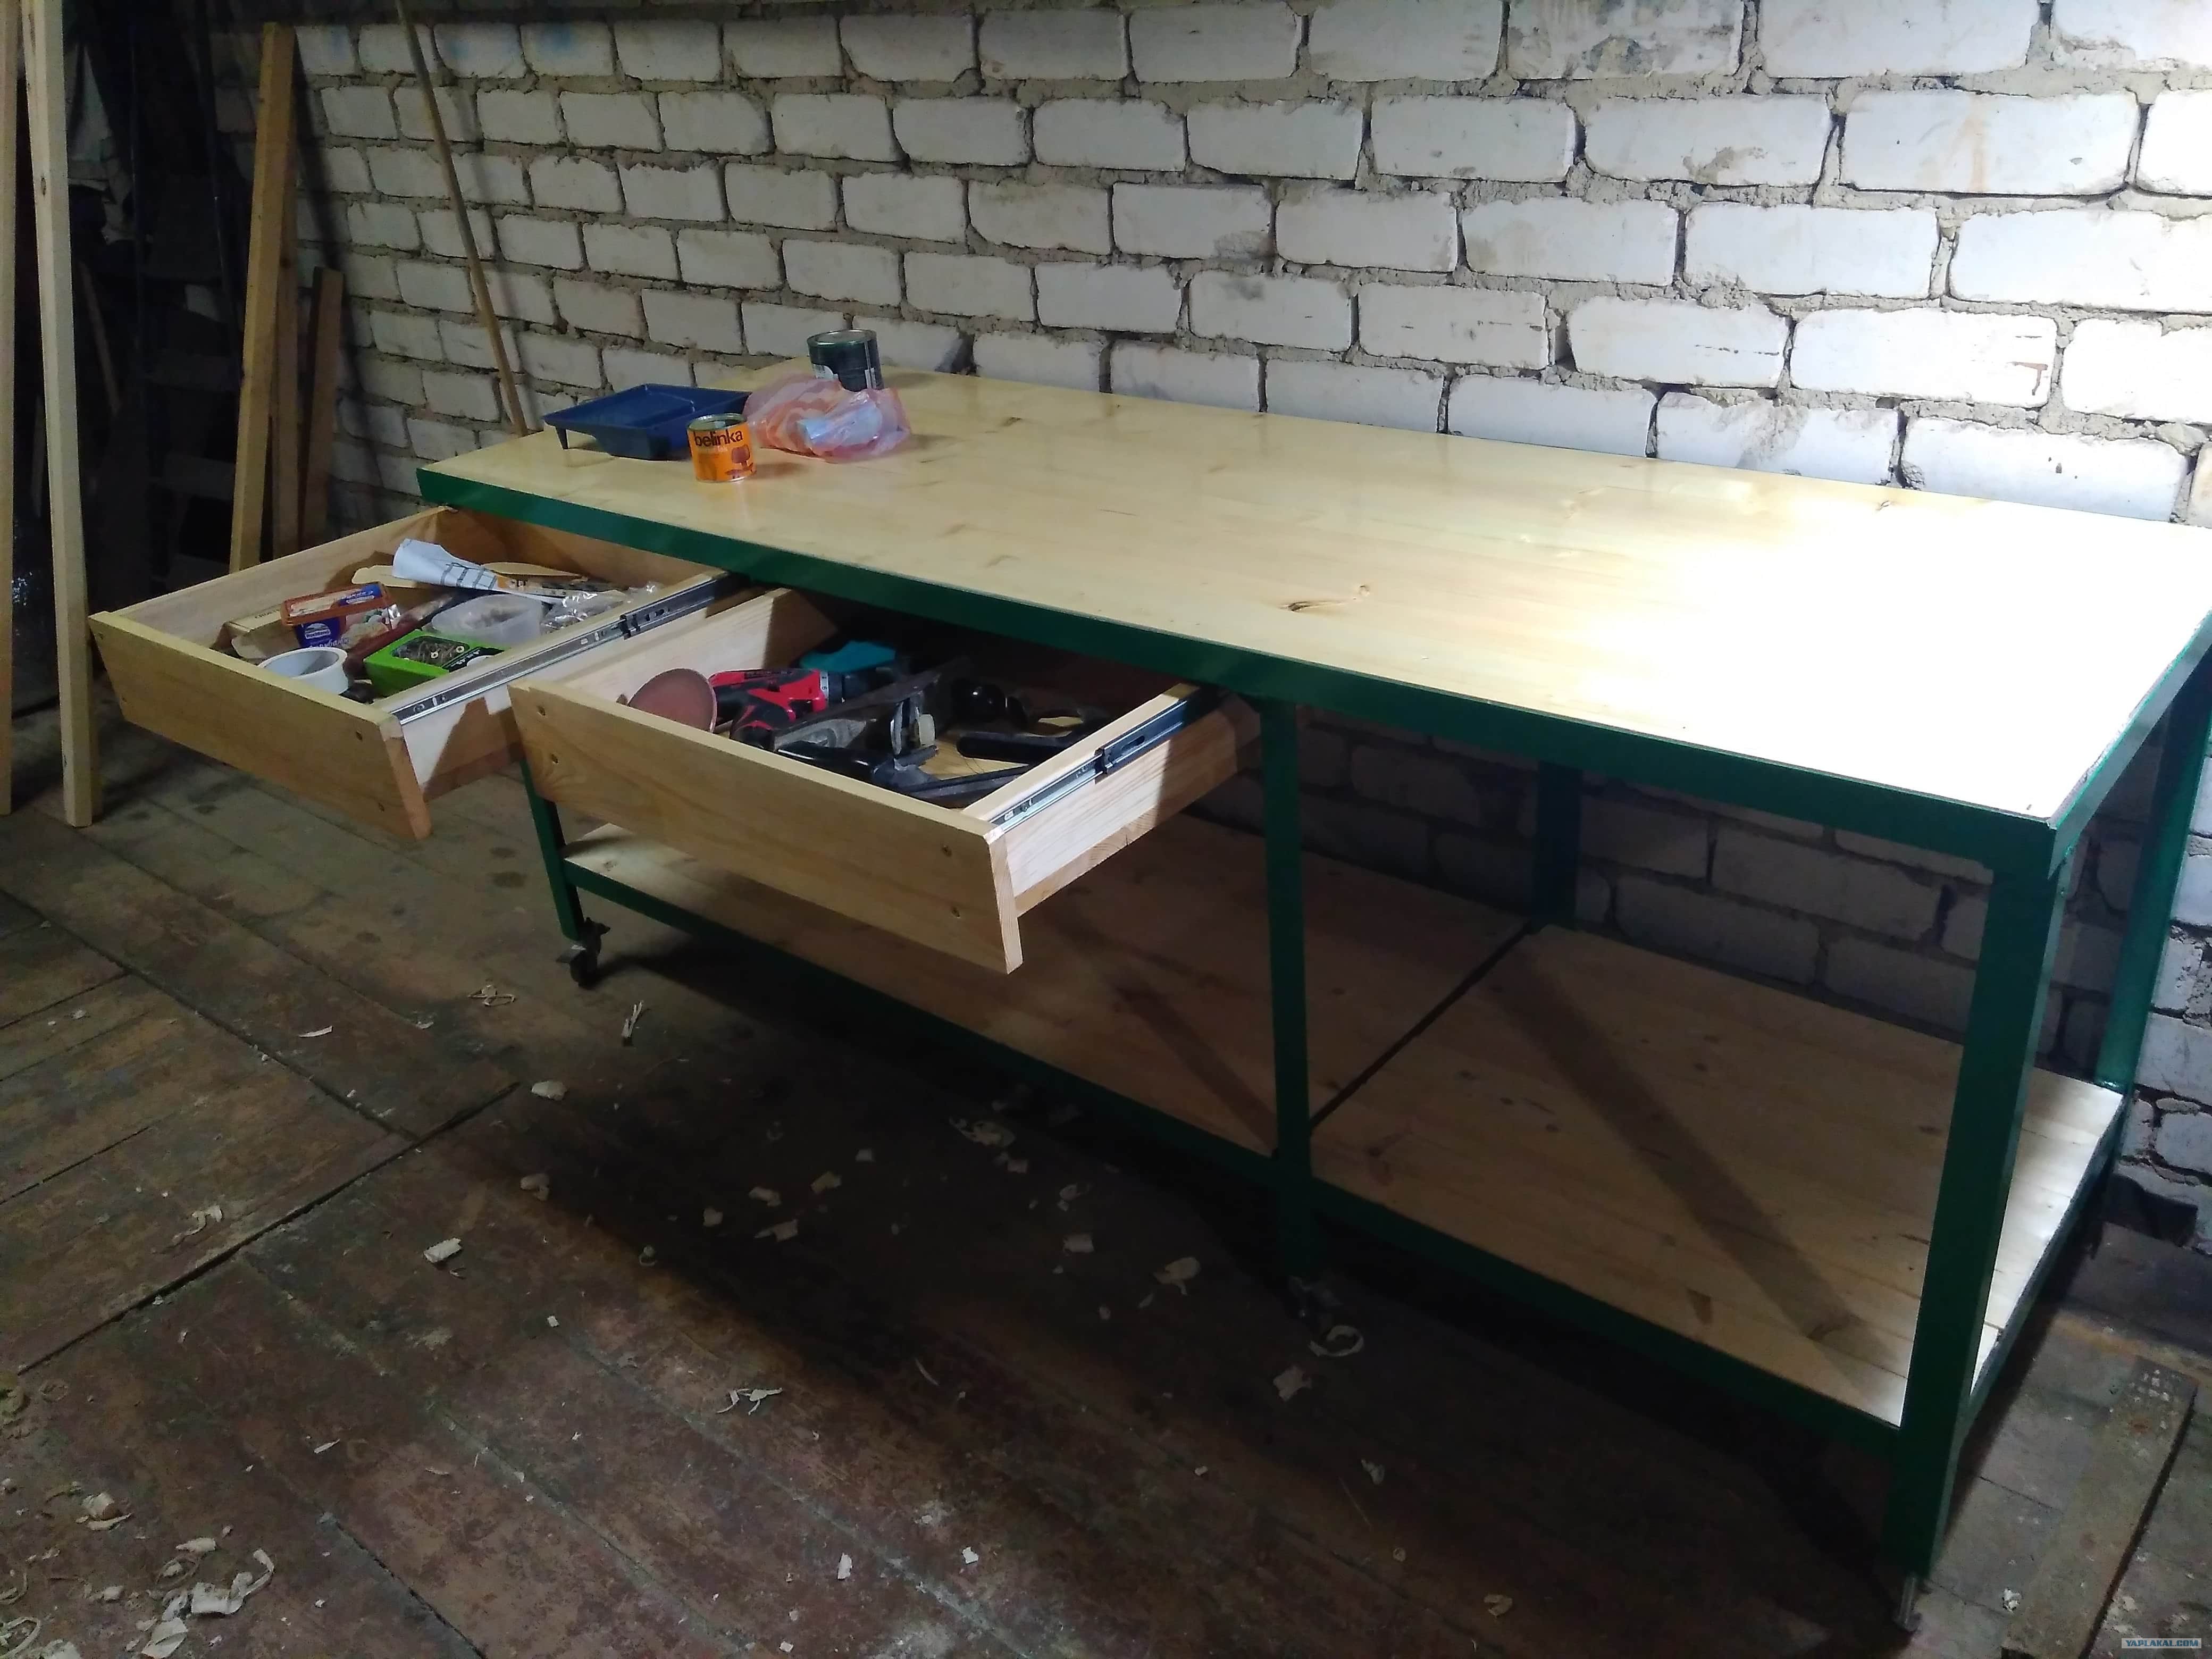
Combined workbenches use a wooden base and a metal sheet as a countertop reinforcement. In addition, the design contains metal combs, as well as threaded screws. Combined devices include metal tables with drawers and tool shelves made of wood.
Advantages and disadvantages of a wooden workbench in the garage
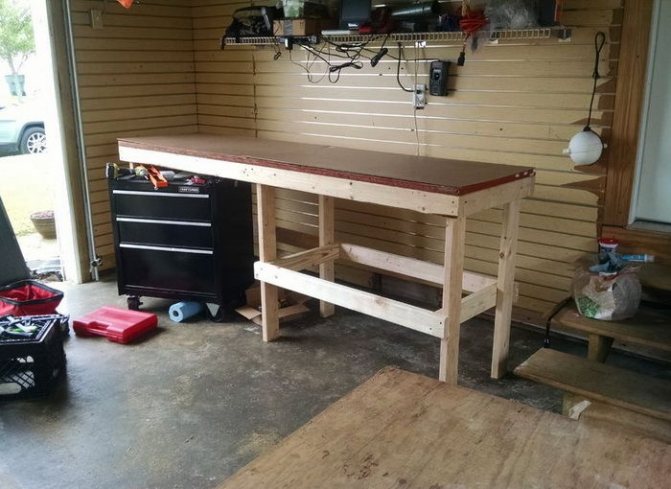
The choice of material for the manufacture of the table is primarily determined by its purpose. A wooden workbench in the garage is usually installed in cases where you need to quickly organize a workplace for simple operations. To create the frame part, you can use boards 4x8 cm in size or a bar 5x10 cm in size. The rectangular base is assembled taking into account standard dimensions, and its components are fixed with nails or self-tapping screws.
A wooden workbench is installed in cases where it is necessary to quickly organize a workplace
To strengthen the structure, wooden spacers are installed in the upper and lower parts between the legs. The lower ones, which are located at a height of 15 cm from the floor, can be used as the basis for a shelf. To assemble the countertop, a planed tongue-and-groove board made of oak or beech is suitable. You can also use a pair of sheets of moisture-resistant plywood 1.8 cm thick, which are glued together and sheathed along the edge.
To create a do-it-yourself workbench in a wooden garage, you do not need much effort and skills in handling a welding machine. The set of tools is minimal (an electric jigsaw and a drill), and the process itself takes much less time than making a metal structure.
On the other hand, a wooden table has many disadvantages:
- not able to withstand significant power loads;
- the working surface is not intended for the installation of several tools, which does not allow the simultaneous use of heavy metalwork vise and sharpening or drilling;
- the wooden bed is short-lived;
- wood reacts poorly to moisture and contact with various paints, oils and other substances;
- there is a risk of fire.
The disadvantage of a wooden workbench is the inability to withstand large power loads.
Advantages and disadvantages of a metal workbench for a garage
To assemble a welder's table with your own hands, you will need special equipment and skills in handling it. The elements of the workbench are connected by welding. Qualitatively to make a metal structure is far from being possible for every master. In addition, the table turns out to be very heavy, and the material itself, unlike wood, is not cheap.
Related article:
On the other hand, workbenches in a metal garage have many advantages that many car owners will appreciate:
- compactness with a high degree of reliability;
- the ability to withstand severe mechanical stress;
- increased weight of the structure, making it more stable;
- a large selection of modifications (the design can be folding, mobile, shortened or with a folding tabletop);
- strength and reliability of all connections;
- fire safety;
- durability and ease of care;
- the absence of sharp corners makes the countertop safe;
- the working surface allows you to install two sets of vise;
- due to the high strength of the material on the table, it is possible to perform cutting and sawing, as well as grinding and turning metal and wooden parts;
- the space under the countertop can be used to install shelves, organizers, grids and tool boxes;
- metal chips do not damage the surface.
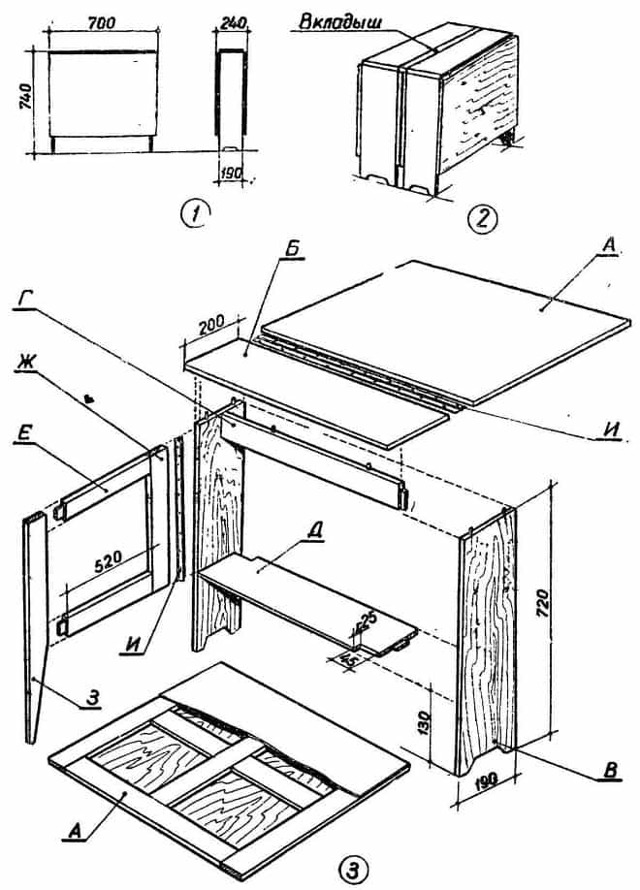
Installation and assembly features
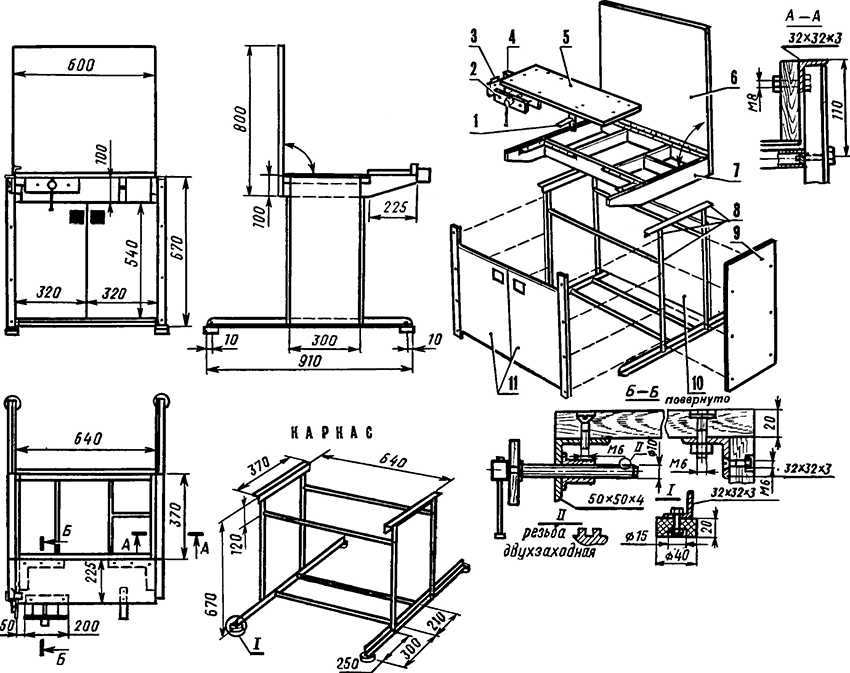
The stationary and mobile model of the workbench is assembled in the same way as a regular table.Sidewalls and auxiliary guides, the profile are supplied with holes of the appropriate diameter. All parts are standard, without any problems they are connected and fastened together with self-tapping screws according to the diagram attached to the product.
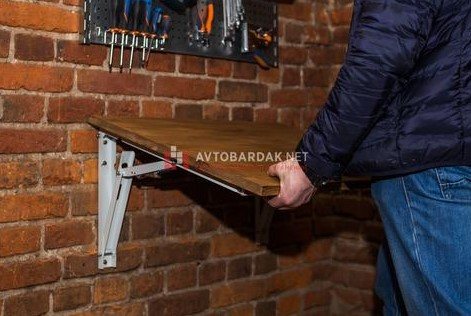
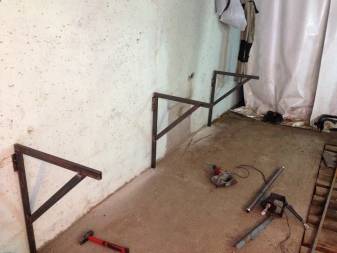
Fastening to the wall of the folding table is carried out in 3 stages:
Check out the toolbox:
- perforator (garage walls brick, concrete), drill;
- metalwork punch for holes, hammer;
- wrench (open end) 8 mm, 10 mm;
- keys: hex (2.5 mm), tubular;
- Phillips screwdriver, level for marking.
Preparation for work:
- Lay the table frame on a flat surface, retaining the factory plastic ties until installation is complete.
- Remove the 2 center hinges from the swing frame, unscrew and pull out the bolts, nuts on both legs of the wall frame, remove it from the hinges.
- Check the location of the outer sleeve of the anchor, the expansion collet must be turned towards the expansion nut.
- Make marks on the wall where the wall frame is to be mounted.
- Using an 8mm drill, drill a hole 15mm longer than the anchor.
- Insert the anchor into the hole in the frame, deepen it into the wall to the end, fix the nut, leaving the frame movable.
- Check the level of the horizontal position of the upper beam, fix the frame with anchors, drill the remaining holes for fasteners through it.
- Alternately insert and tighten the anchors, with a large gap between the anchor and the wall, use mounting gaskets.
- Install the swing frame (after releasing 2 legs) on the hinges of the wall frame, fix them with bolts.
- Raising the swing frame to a horizontal position, put on and bolt the previously removed hinges.
- Lower the table to its working position, install the tabletop, fix it with self-tapping screws to the swivel frame.
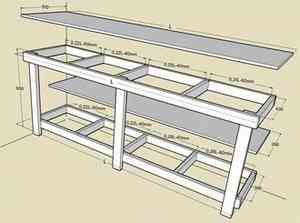
Assembly and installation
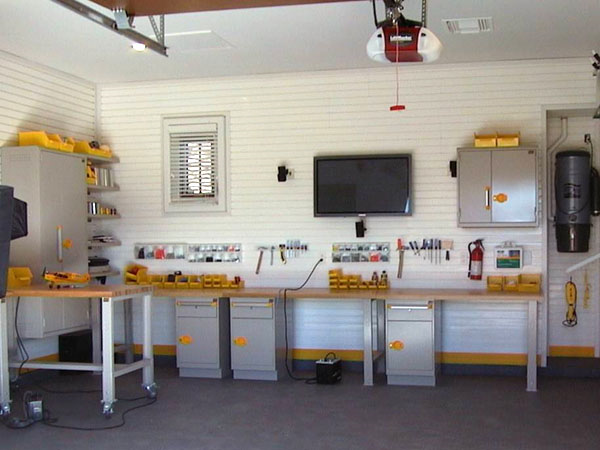
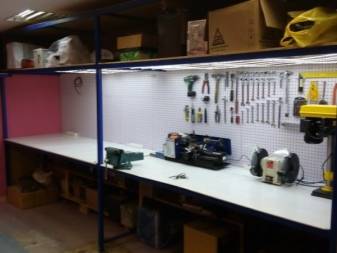
Photo of a garage with a workshop equipped with GarageTek workbenches
After completing all the preparatory work, you can begin to assemble the base of the workbench. To do this, take 4 supports from a wooden beam or a steel corner. Pre-prepare the grooves and spikes according to the existing drawing. To fasten parts, use self-tapping screws, anchor bolts or welding.


Install horizontal jumpers between the legs of the workbench, and in the middle, along the entire length of the structure, a narrow bar connecting the parts to stabilize the entire structure. If necessary, mount additional racks to which the shelves and drawer rails will be attached.
The next step is the manufacture of countertops for the workbench. The dimensions of the working surface are determined according to the calculations made earlier. Lay the boards on the frame, fit them tightly together and secure with bolts. Make a series of holes for fasteners around the perimeter of the connecting parts of the base.
After the tabletop is fixed, it is polished or sheathed with metal. For this, galvanized iron is usually used. The metal sheet is cut out according to the dimensions indicated in the diagram, then it is fixed to the work surface using self-tapping screws. The edges of the coating should be treated with a file from nicks and burrs that form when cutting metal.
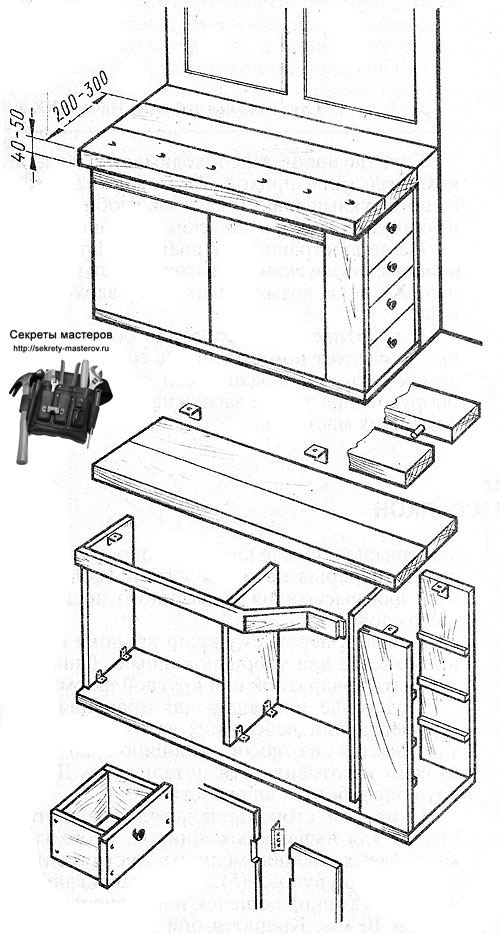
At the final stage, it is necessary to equip the tool table in the garage. Attach the vise to the workbench first.To do this, recesses in the countertop must be provided. Fasten plywood at the installation site on the inside of the working canvas. Before you mount the vise, attach it to the table, mark the place of attachment.
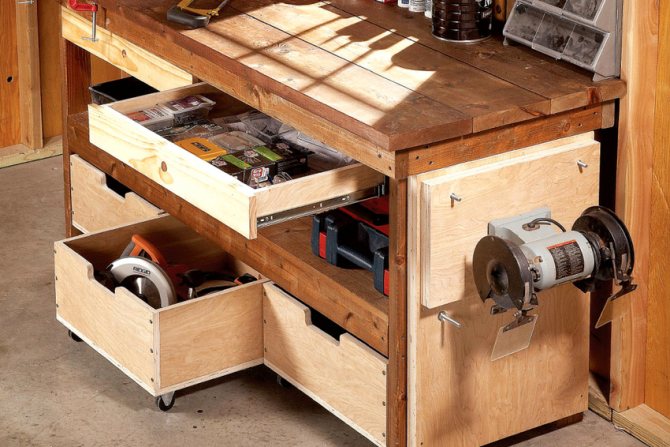
The workbench is complemented by shelves, drawers and fixtures for equipment. You can mount a special screen on which it is convenient to place pliers, screwdrivers, wire cutters and other tools. When installing equipment on a workbench, check the strength of all fasteners to avoid accidental injury.
A small workbench, made by hand and in accordance with all the rules, can temporarily replace the purchased
But if you don’t have enough time to design and make a desktop in your garage yourself, then pay attention to GarageTek furniture.
Other Tips
- Storage of PVC boats in winter in a garage under the ceiling, proper storage of a boat in winter
- How to make racks in the garage with your own hands, photos, options
- How to make a rack for storing wheels in the garage with your own hands, photos, ideas
Safety
Be sure to ground the workbench. The fact is that electromechanics are mainly motors, and during operation, when current is applied to the windings, an alternating magnetic field is induced in the cores of the coils and circuits. This applies to all motors that do not operate on direct current - a voltage of up to several tens of volts arises between the housing and the ground. For their removal, the workbench itself and all these devices are grounded. Grounding is possible both through the reinforcement of the building, and through a separate metal sheet with a reinforcing bar, buried in the ground next to the garage where the master works.
Fix the stationary (non-movable) workbench to the floor and walls - this will prevent the entire structure from suddenly falling when the work requires swinging efforts.
The cross section of the wires must be sufficient to withstand power, for example, 5-10 kilowatts. The main consumers are a puncher, a grinder, a welding machine and a saw machine.
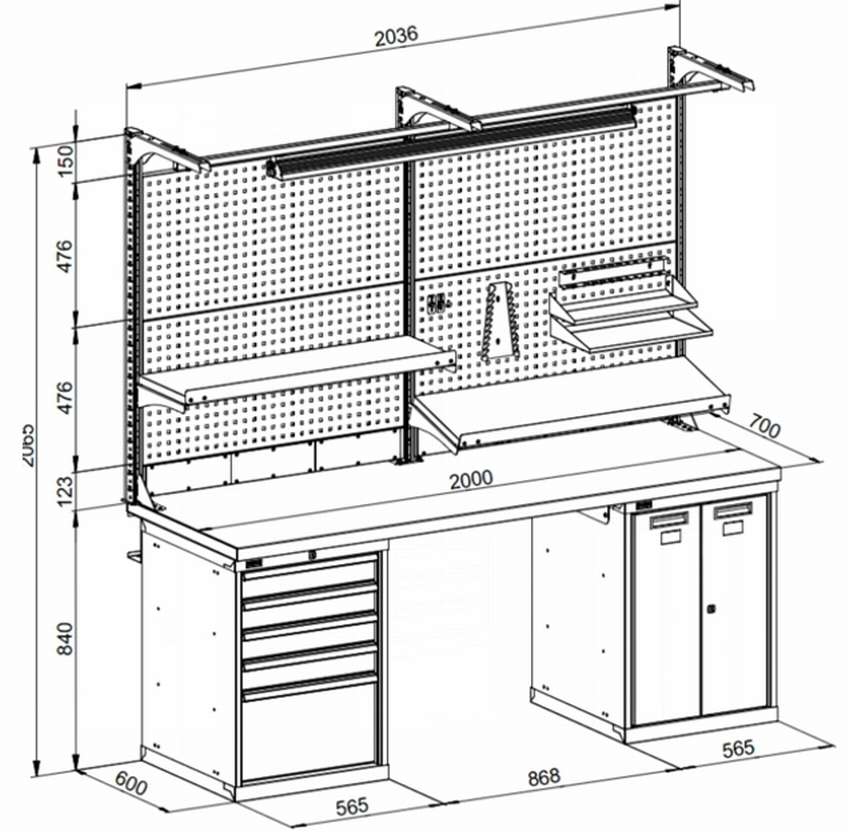
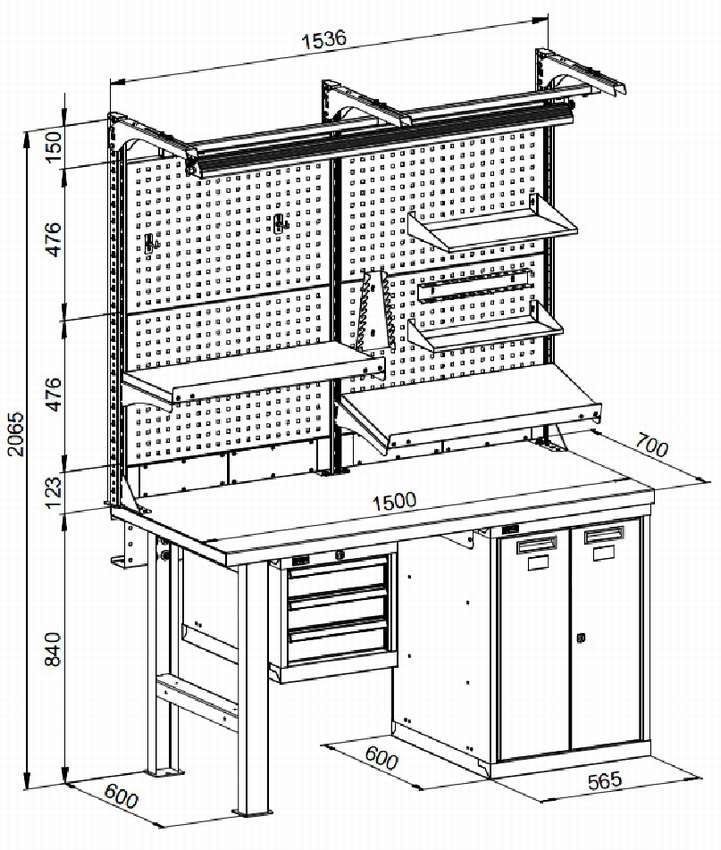
Model Features
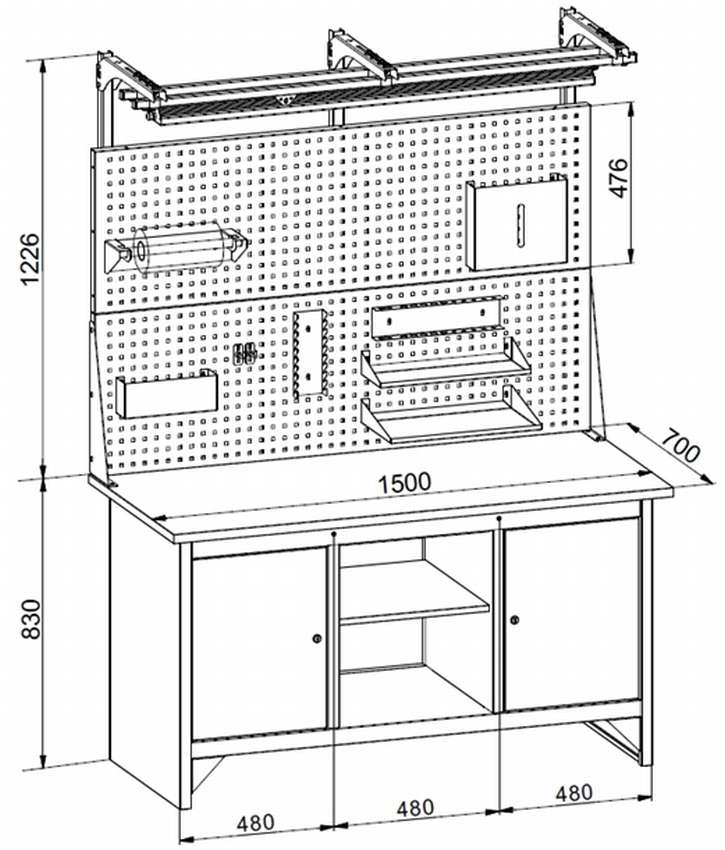
Mass-produced workbenches are convenient in that their characteristics are set during production and correspond to their intended use. Depending on the technical conditions under which this or that workbench will work, various models may have the following parameters:
Table top material. Moisture resistant plywood or MDF covered with galvanized metal. The thickness of the tabletop varies between 24-30 mm.

Professional approach
- Permissible load on the tabletop. Serial models allow a load of 300-350 kg. The workbench of the strengthened series is calculated on 400 kg and more.
- Permissible load on a shelf in a pedestal is 20-30 kg, on a bench shelf - up to 40-50 kg.
- Protection. A lock, key or: high security (pin) can be installed on the cabinet.
- Accessories. Various shelves, holders, screens and hooks.
Factory-made workbenches are delivered unassembled; By design, they can be divided into three groups:
Bestumbovy. The perfect small workbench for a modest-sized garage. The easy-to-assemble design is characterized by a sufficient size of the working surface, which, if necessary, is folded (folding workbench). Stability is provided by adjustable legs. Standless models can be additionally equipped with drawers on bearing guides.


Video description
About the organization of the workplace in the following video:
- Single pedestal. Robust prefabricated structure with a reinforced top and a weight of 96-105 kg. Such a workbench is equipped with both a comfortable work surface and a cabinet with drivers (drawers on ball guides with different heights) or adjustable shelves. The drawers are locked with a central lock. Some models are equipped with a toolbar.
-
Two-pedestal. The weight of such models is 100-115 kg; they are completed with two drivers with drawers of different heights. The maximum allowable load per drawer (if evenly distributed) is 30 kg. The kit may include a perforated screen - a panel designed to accommodate holders and hooks.

Combined workbench
Conclusion
A garage work table is a type of industrial furniture that should be durable and comfortable in everyday use. These properties help the owner to fully concentrate on work, thereby reducing the risk of accidental injury. A workbench for a garage will be as effective as possible if its characteristics (load capacity, dimensions, equipment) correspond to the tasks being solved.
Preparatory work
Preparation for the assembly of the workbench consists in determining the design features, choosing the dimensions and installation location of the structure. In order for not a single moment to escape attention and not be forgotten, it is recommended to create a working drawing of a workbench, made to scale with reference to the dimensions of the garage
Particular attention should be paid to the height of the countertop - it differs significantly from the height of a regular dining table.The best option is the height from the floor to the bend of the elbows of a person standing straight
Given the difference in height between different people, assembling the optimal workbench for yourself can be a very rewarding event.
In addition, we must remember that the width of the countertop should not be too large. The size of the garage is relatively small, often you have to work next to the car standing inside.
You will need a place for a person to pass, so 50 cm is considered the optimal width. You also need to decide on the size of the shield for the tools that are needed most often.
The devices at hand will save time and effort that goes into finding the necessary items in drawers and shelves.
Material used
To make a workbench in the garage with your own hands, two materials are used: wood and metal. The difference between these designs will be in reliability and resistance to various force and mechanical influences. In this regard, a metal workbench will significantly outperform a wooden one. There are other points that should be mentioned:
It is difficult to make a metal structure with your own hands, because you will need to carry out welding work, and you also need to have skills in working with metal. It is also quite difficult to process an iron billet. Therefore, in order to make a desktop of this type with your own hands, you will need special equipment and specific knowledge.
A tree is a completely different matter. To make a wooden workbench for the garage with your own hands, you will only need a standard set of home tools - a grinder, a screwdriver, an electric jigsaw, a hammer, etc.d
You can even use only a hand saw, but the work in this case will become a little more complicated.
If we take into account the operational and technical aspects of a desktop made of a particular material, then it is necessary to highlight the large weight of a metal product and the rather low strength of a wooden workbench. The ideal option would be to combine these two materials in one product, for example, make a workbench out of wood, and cover its countertop with a thin layer of iron
In this case, even the use of a vice and other similar devices will not be able to harm him.
Thus, combining materials is the ideal solution for making a workbench in the garage with your own hands. However, if the desktop will not be used too often, but from time to time, then it is best to get by with a completely wooden structure.
Preparatory work
When equipping a garage with your own hands, it is very important to choose the right place where the workbench will be installed. The best option would be considered a part of the garage where there is good lighting and electrical outlets are equipped.
It is necessary to take into account such a moment as the direction of natural light. The light should fall from the left side or straight ahead. In this case, the work surface will always be illuminated.


The length of the countertop should be such that it can easily accommodate the tools and large parts that are required for the job. Its width should not be more than 50 - 60 cm. This allows you to easily reach the opposite edge. One side can be equipped to work with an electric cutting tool: a circular saw, a jigsaw, etc.For this purpose, the plank is fixed in such a way that it protrudes beyond the edge of the workbench by 200 - 300 mm.
Also, before you make a workbench in the garage with your own hands, you need to clarify one more parameter - its height. The convenience of carrying out the work depends on how correctly it will be determined. To determine the height, you need to stand up straight, bend your arms at the elbows and mentally lean on an imaginary table. The distance between the floor and bent arms will be the ideal height for future construction.
Necessary tools and materials
To make a workbench in the garage, you will need the following tools:
- a grinder with a grinding disc and a circle for cutting metal;
- level;
- screwdriver;
- drill;
- welding machine and electrodes;
- roulette;
- jigsaw for cutting plywood.
Materials:
- corner 4 mm thick;
- steel strip 4 mm thick;
- steel sheet required for the manufacture of holders for boxes 2 mm thick;
- plywood for the manufacture of back, side walls of the table and drawers 15 mm thick;
- screws;
- anchor bolts;
- square pipe 2 mm thick;
- steel sheet to be used for the countertop, 2 mm thick;
- wooden boards for countertops 50 mm thick;
- guides for drawers;
- self-tapping screws for metal;
- paint for metal and wood.
The design made of these materials will be reliable and very durable. Planks will be used for niches and shelves, and steel strips will be needed to create rims on the table surface.
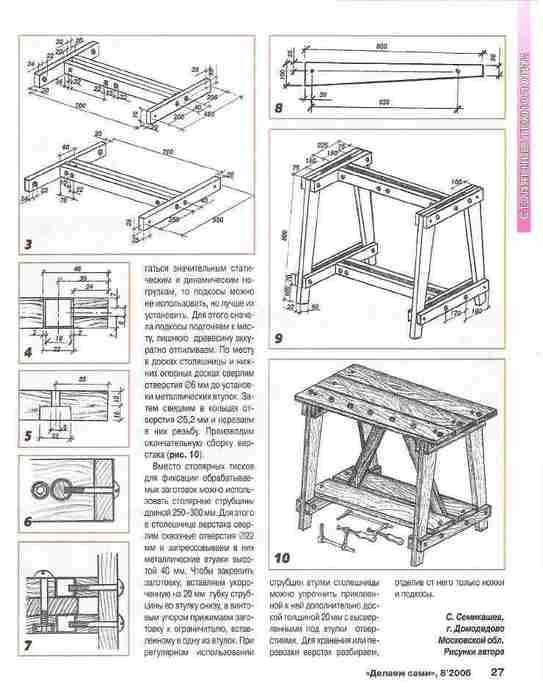
How to make a workbench with your own hands
Tools for making a metal workbench
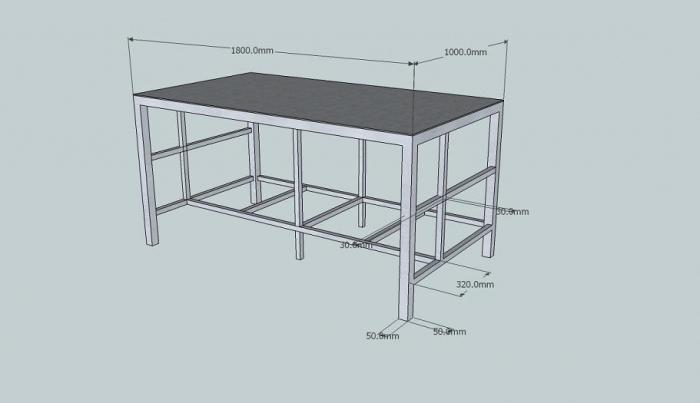
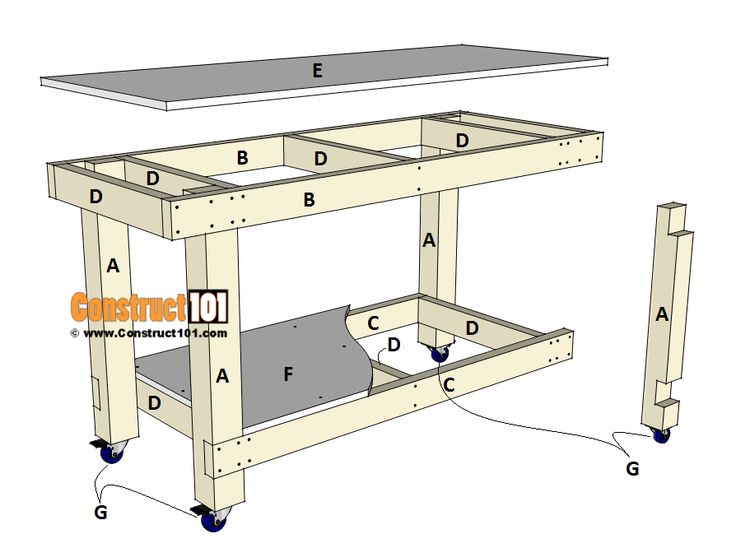
For a standard table, a certain number of parts are prepared. Vertical racks are cut in two sizes: 90 and 150 cm.The difference arises from the need to equip a screen for storing tools, which is higher than the legs.
Preparing details:
- racks for legs - 4 pcs.;
- cross supports - 5 pcs. 60 cm;
- horizontal runs - 2 pcs. 2 m for the top of the frame;
- connecting beams - 2 pcs. 60 cm for the bottom.
Horizontal elements connect the support posts at the top and serve as the basis for the table top. At the bottom, the legs are connected by beams on two sides, spacers are attached. Steel elements are joined by welding; bolted connection with nuts can be used. For the instrument panel, thick plywood is taken, into the body of which hooks are inserted for hanging, removable and stationary containers are attached to the surface.
The workbench is connected to a common ground loop. The upper shelves and the shield with fixtures are firmly fixed to the walls and floor. Metal anchors are used, and screws and self-tapping screws will not withstand the effort. The electrician is hidden in PVC wire channels or corrugated special hoses. Lighting is done from above and on the left side.
Basic equipment
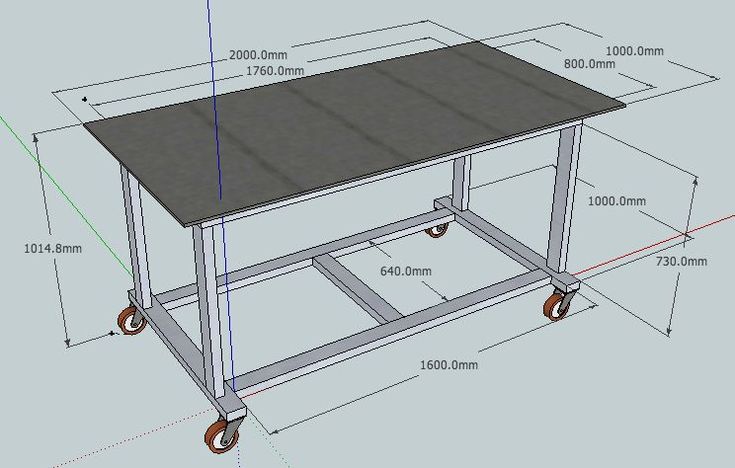
The metal frame (frame) is a load-bearing structure that can withstand a weight of up to 350 kg, depending on the structure and configuration. The workbench includes various modules and reinforcement parts. Tables for servicing large car parts, such as aggregates or wheels, are reinforced with an additional pair of diagonals.
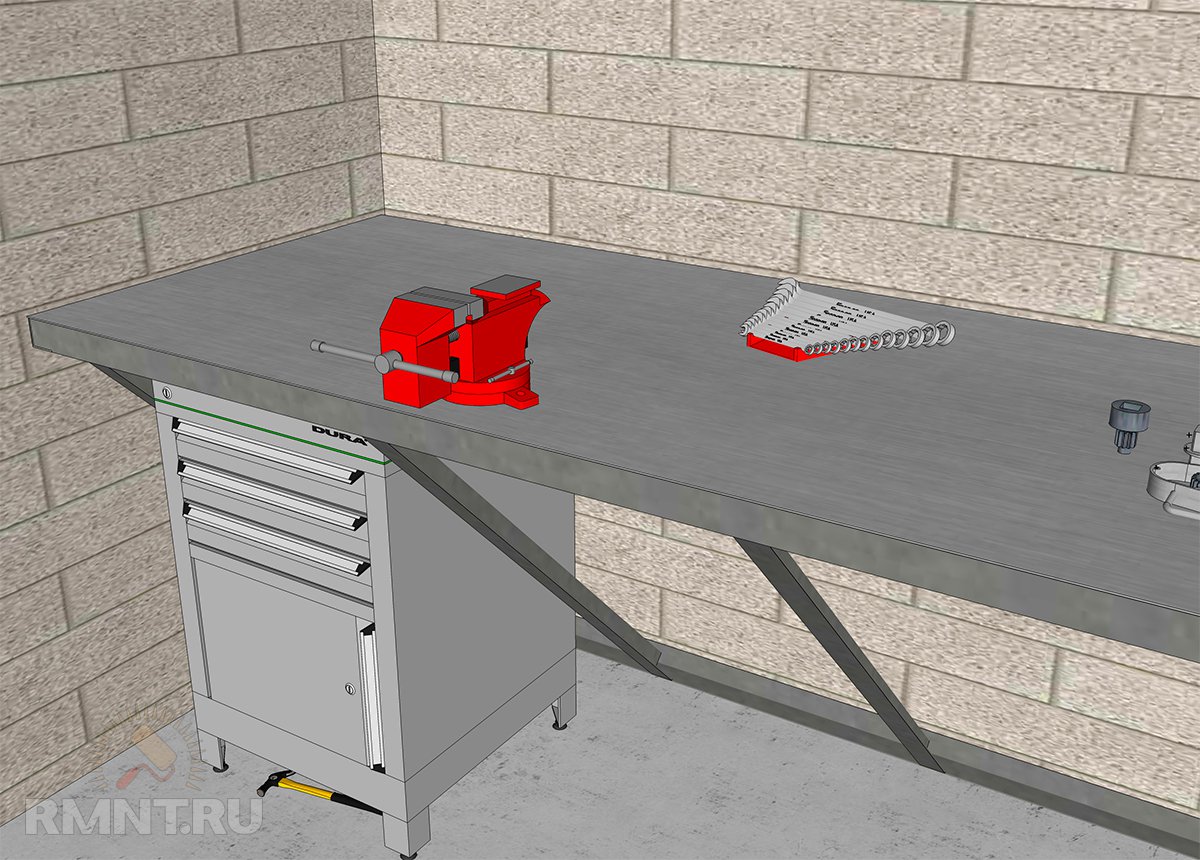
The tabletop is made according to the type of work. Depending on this, the material of the plate and the type of coating on the working plane are selected. A vice is installed to fix workpieces and parts during metalwork and assembly
Take into account the size of the jaws, the depth of capture and the working range, take into account the dimensions of the device and its weight.Distinguish between fixed and rotary vise
Assembly steps
For the manufacture of the frame will need welding experience
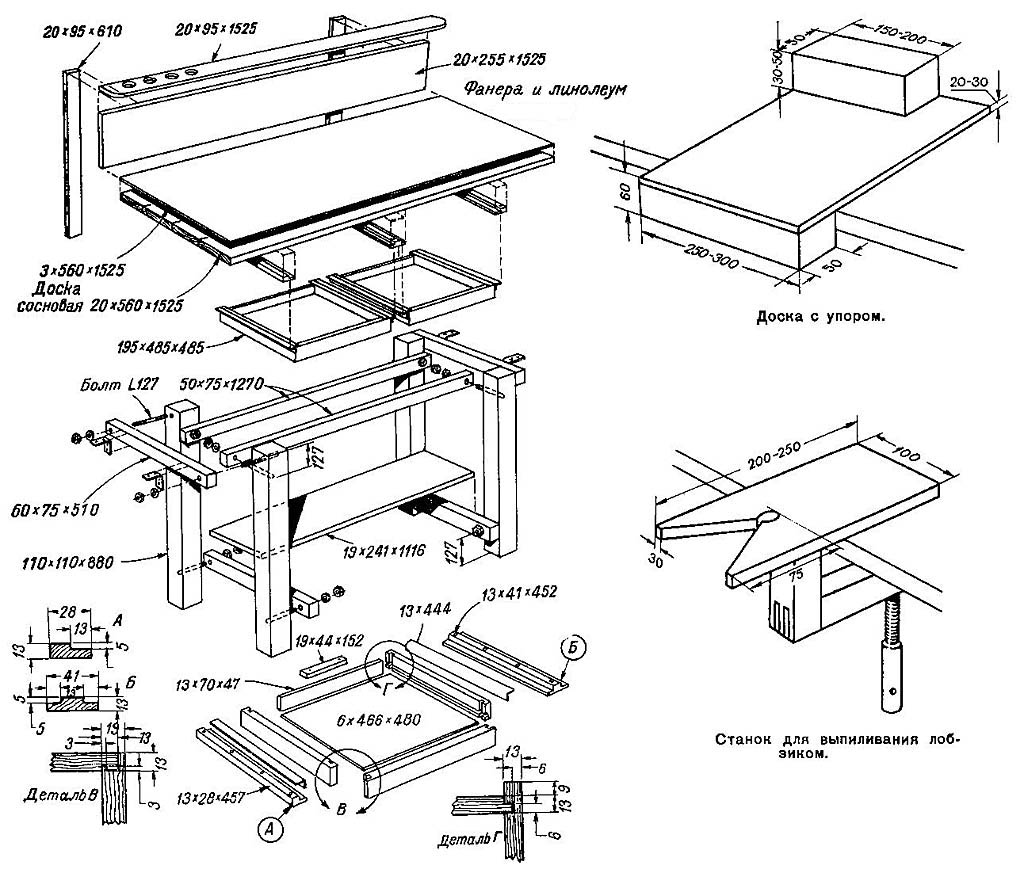
The frame is welded first. To do this, make a base platform under the countertop.


A phased scheme for assembling and arranging a garage workbench:
- The support platform is turned over, the bedside table frame and leg racks are welded to it. All supports are connected by struts, longitudinal and diagonal (rear) amplifiers.
- To level and clean the seams, a grinder is used, burrs are removed at the edges, and sharp edges from cutting iron are smoothed out.
- The workbench is turned over to the usual position, and fixed in the chosen place. The countertop is made of wood or metal. The boards are fixed to the support with bolts, and the steel cover is welded.
- They install and fix the back wall, draw up the internal filling of the side cabinets, racks.
The main steps are listed, but additional processes may be added depending on the design.
Installation location
The choice of location is determined by the size of the workbench. If you need to do certain work from time to time, a small table will do, it will be more convenient for it to choose a place. The need for constant work leads to an increase in dimensions; for this, a significant area is allocated in the garage space.
Criteria for choosing a workplace:
- enough free space to keep even a folding workbench in a position ready for work, and not remove it after work is completed;
- the structure is placed perpendicular to the light source or window opening;
- it is possible to stretch the iron safety net when grinding, milling, turning;
- on the front side of the table there is a strip 50 cm wide or more for free movement of a person during work.
Final work
After finishing work, the workbench must be painted
Finishing consists in processing with a primer for metal or wood, if we are talking about wooden parts. The primer dries completely, after which the surface of the structure is covered with oil, enamel, latex paint. It is recommended to apply 2 layers.
Painting protects the metal surface from corrosion, rust, and wood will not absorb moisture. You can varnish the workbench on top.
Purpose and design of a typical carpentry workbench
Sturdy and reliable carpentry workbench will provide convenience and comfort during long work with wooden parts
The carpenter's workbench, in fact, is a massive, reliable table for processing wooden products of any size. The main requirements for this type of equipment are strength and stability. In addition, the machine must be equipped with at least a minimum set of fixtures for securing and holding workpieces. The dimensions of the working table are selected depending on the size and weight of the parts to be processed, as well as free space in the workshop or garage. By the way, there are designs of compact workbenches that can be placed even on the balcony.
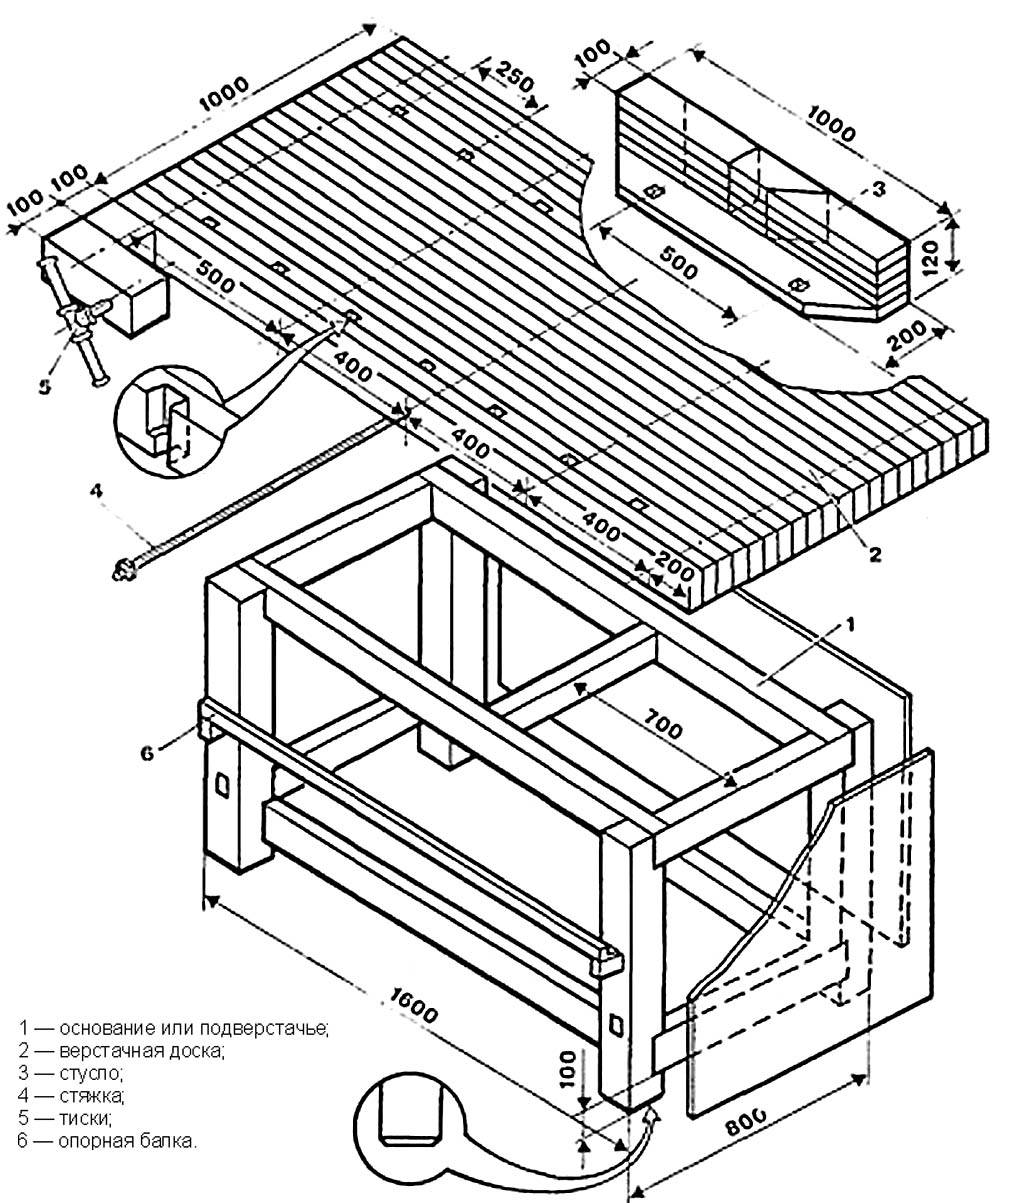
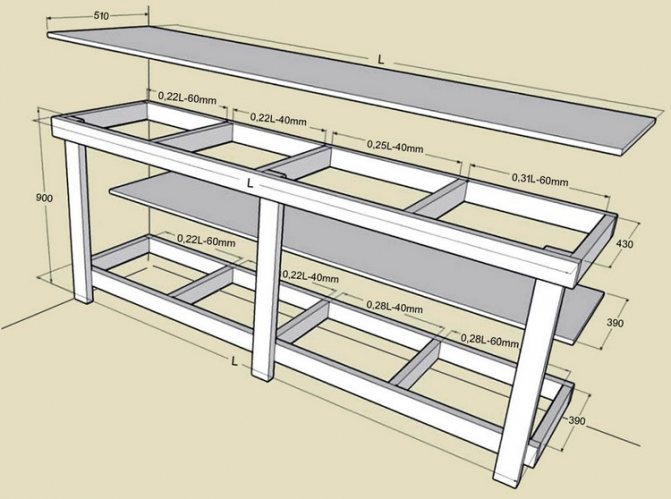
The design of a carpentry workbench with a type-setting worktop. In the figure: 1 - base or bench; 2 - workbench; 3 - miter box; 4 - coupler; 5 - vice; 6 - support beam
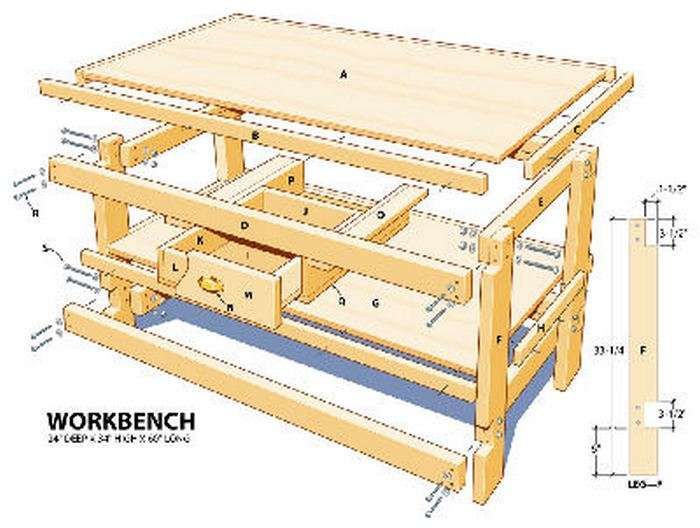
Since the work that is carried out on the carpentry machine is carried out with the help of manual and electric tools, the workbench is made of massive timber and thick boards.By the way, the work surface, or in another way the workbench, is assembled only from hardwood. In the manufacture of countertops, dry oak, beech or hornbeam boards with a thickness of at least 60 mm are used. If the countertop is made of pine, alder or linden, then its surface will wear out quickly and will require periodic updating. Often, a bench cover is assembled from several narrow and thick boards, placing them on edge.
In order to facilitate the construction, the supporting legs of the desktop, on the contrary, are made of soft wood. Between themselves, the vertical supports are connected by a longitudinally installed beam to increase the stability of the product.
Typical scheme of a carpentry workbench
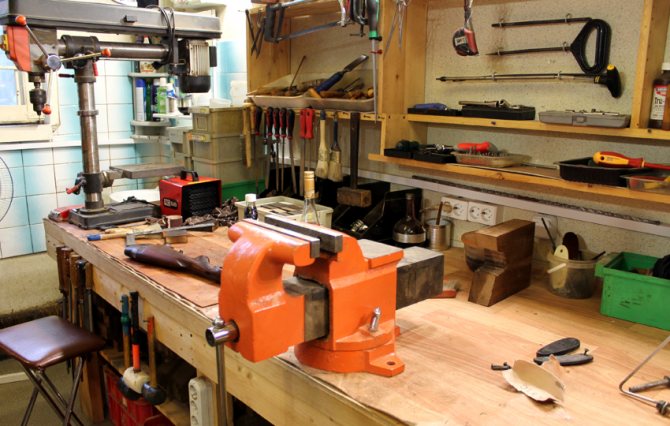
A specially designed vise is hung on the front and side of the workbench for fixing workpieces. In addition, on overall machines, separate clamping devices for large and small parts are mounted. The optimal location for the carpentry vise is the left side of the front apron and the near part of the right sidewall.
For convenience, a recess is made in the back of the tabletop for fittings and small parts. Often, a recess that is difficult to manufacture is replaced with a frame knocked down from wooden slats.
Do-it-yourself wooden desktop in the garage - photo and video step by step instructions
For its manufacture, it is necessary to prepare photo materials and a project. Photos and drawings of the table in the garage with your own hands will help you understand what and how the workbench is made of. When building a workbench made of wood, you will need the following tools:


- Bulgarian with a set of circles,
- Apparatus for welding and a set of electrodes,
- Level and 2-5 meter tape measure,
- Self-tapping screws with a screwdriver,
- Manual jigsaw for cutting plywood sheet,
- Electric drill.
Also, pre-prepare the materials for the working folding table in the garage:
- Several corners 50x50 mm with a shelf thickness of 4 mm and a length of 5 m,
- Square pipe 60x40 mm,
- Steel strip for the curb with a width of 40 mm and a thickness of 4 mm,
- Metal sheet for the table surface 2.2x0.75 m,
- Boards for wooden crates (beam 50x50 mm),
- Pieces of plywood for drawers and desktop walls,
- Metal guides for cabinets and a set of self-tapping screws / screws for connecting all elements.
The purpose of the workbench in the garage
 If you plan to use the garage, including as a workshop, you can’t do without a workbench.
A workbench is a desktop that is convenient for performing various technical operations. The main purpose is locksmith work using manual or electric tools, processing parts, assembling or disassembling mechanisms, manufacturing or repairing individual parts, etc.
In addition, the workbench is a place to store tools. If it is properly organized, all manual or electric tools and devices are in full view and located in the most convenient way, you just need to reach out. Sockets for power tools, a vise for fixing workpieces and other elements of the arrangement are installed nearby.
The result of performing any work directly depends on the conditions in which they were carried out, so the workbench allows you to get high-quality and expected results from your efforts.


