- Benefits of suspended ceilings
- How to choose?
- Reasons for the need to ventilate the canvas
- Natural ventilation in the room
- Ventilation grilles and openings in the room
- Bathroom ventilation device
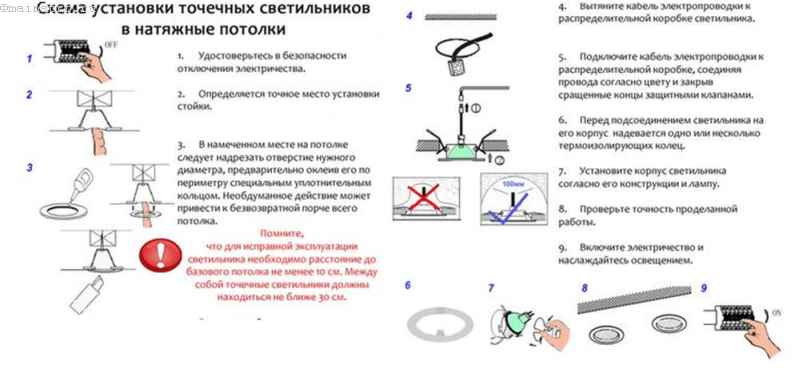
- Main design stages
- Development of technical specifications
- Choosing the best ventilation scheme
- How to arrange ventilation in a false ceiling
- Installation order
- Is it possible to stretch the ceiling alone
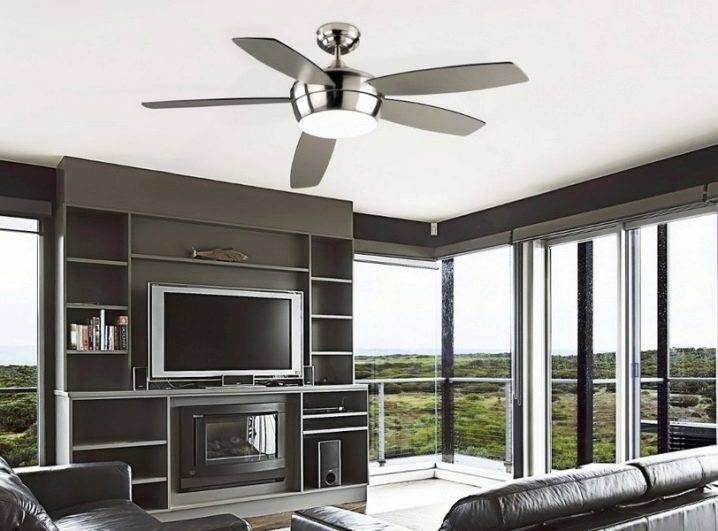
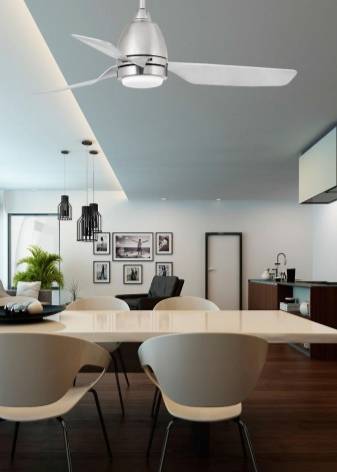
- Installation of ceiling fans with light
- Wiring diagrams
- Network connection
- Fastening
- Calculation of the necessary materials
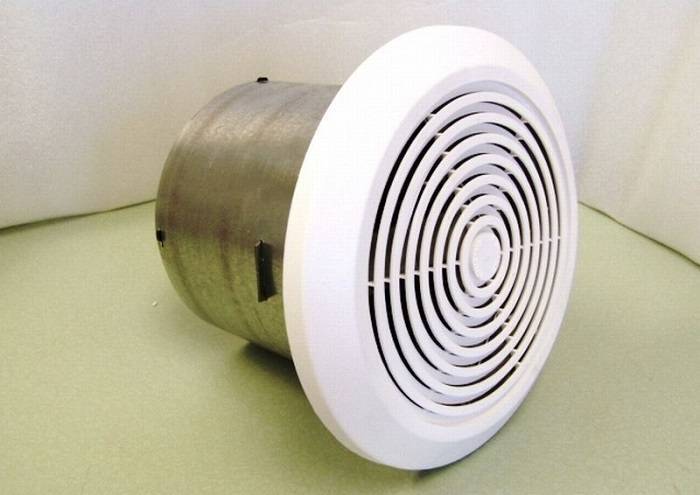
- Selecting an extractor fan
- Performance (power)
- Noise level
- Mounting
Benefits of suspended ceilings
Suspended ceiling systems allow you to easily, quickly and at a reasonable price get a finished ceiling that will hide cracks and defects in the base, as well as hide electrical wiring, ventilation and communication cables.
Suspended ceilings are universal, they can be used to decorate almost any residential, office, commercial and industrial facilities.
 The great advantage of installing suspended ceilings is the ability to build complex geometric structures with all sorts of combinations of textures, colors and patterns.
Such ceilings make the height of the room smaller and due to this they have good thermal insulation, which is especially important for owners of apartments on the upper floors.
Some types of false ceiling materials can provide soundproofing in the room, which will be very helpful if you have noisy neighbors upstairs.
How to choose?
The main criterion when choosing a ceiling fan is its power. It is on the value of this indicator that the volume of air processed by each blade per unit of time depends. To accurately calculate the required power, you should use the universal formula: P \u003d Sx2, where P denotes the power of the device in Watts, and S is the area of \u200b\u200bthe room in square meters.
After the required power is determined, you can proceed to the choice of size, which indicates the span of the blades and is indicated in inches. So, for a small room of 9 m2, a 30-inch fan with a blade span of 762 mm will suffice. Medium-sized fans with 42´´ or 1066 mm impeller, designed for spacious bedrooms and children's rooms with an area of 16 m2. In large rooms, the area of which exceeds 32 m2, you should choose models with blades of 52´´, which corresponds to 1320 mm.

The next selection criterion is the availability of additional functions. The most convenient models in operation are those with the ability to control the intensity of blowing and are able to smoothly or stepwise change the speed of rotation of the impeller. Often such devices have a remote control and are equipped with a remote control. Some high-tech devices are equipped with electronic timers that allow you to program the engine for a day or even a week.So, in hot daytime hours, the fan will operate at maximum speed, in the evening - at moderate speed, and at night it will automatically switch to standby mode.
Motion and humidity sensors are also quite handy options. They allow you to save energy by starting the fan only in the presence of people, as well as automatically turn on the device when the humidity level rises above the set mark. In addition, many devices are equipped with sources of ionizing radiation and fragrances that saturate the air in the room with negative ions and a pleasant smell.

Reasons for the need to ventilate the canvas
There are some points that affect the need for placement ventilation in the stretch ceiling:
- It happens that the advantages of stretch ceilings are appreciated not only by people, but also by harmful fungi. The latter feel great in warm, damp and dark areas of space. These organisms poison the air and can cause respiratory problems ranging from allergies to asthma. And then ventilation in the stretch ceiling becomes critical.
- Swelling or reverse deflection of the canvas is not dangerous, but spoils the overall appearance of the room, and also requires elimination.
- The bathroom is a room that is particularly prone to mold due to dampness and condensation from temperature changes. Moisture with fungal spores can penetrate the thickness of the wall, and the owner of the apartment runs the risk of getting wet stains with black spots.
Natural ventilation in the room
Natural ventilation in the stretch ceiling is provided by installing grids in the canvas diagonally or in different corners of the room.This will be enough if the room has good air circulation or a high-quality exhaust system.
Please note: the hood and mounted air ducts, as well as cracks in the walls and floors, can create pressure drops and cause the PVC sheet to sag in one direction or another. To avoid this problem, all joints should be properly sealed.
Ventilation grilles and openings in the room
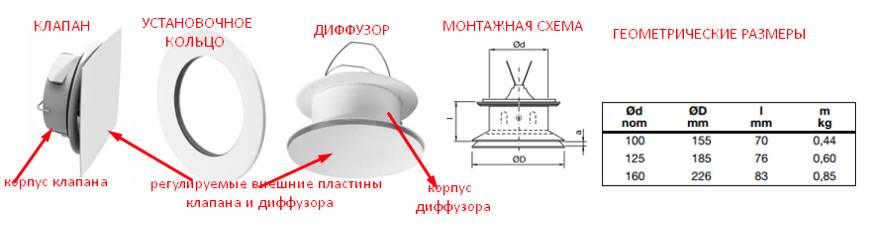
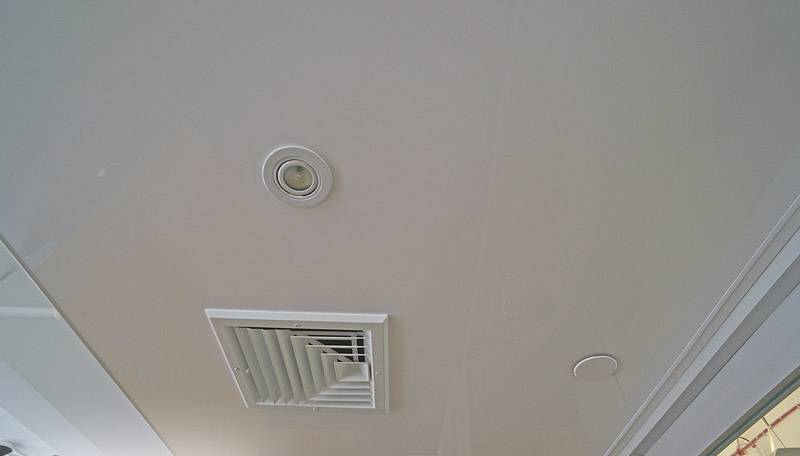
It may seem to some that the installation of gratings in a stretch ceiling is unrealistic, but in practice it resembles the preparation for the installation of recessed fixtures. Nothing complicated! It is only necessary to correctly position the grilles and other elements of the system, preferably in inconspicuous places, for example, behind curtains or above a cabinet.
Before installing grilles and diffusers, the canvas is reinforced with a special tread ring, and the larger the diameter of the opening, the wider it is. The ring is glued at the exit point of the duct. After that, a hole is cut, an air duct is connected to it, diffusers and grilles are installed. Now you can forget about dampness, stale air and deflections of the PVC sheet forever!
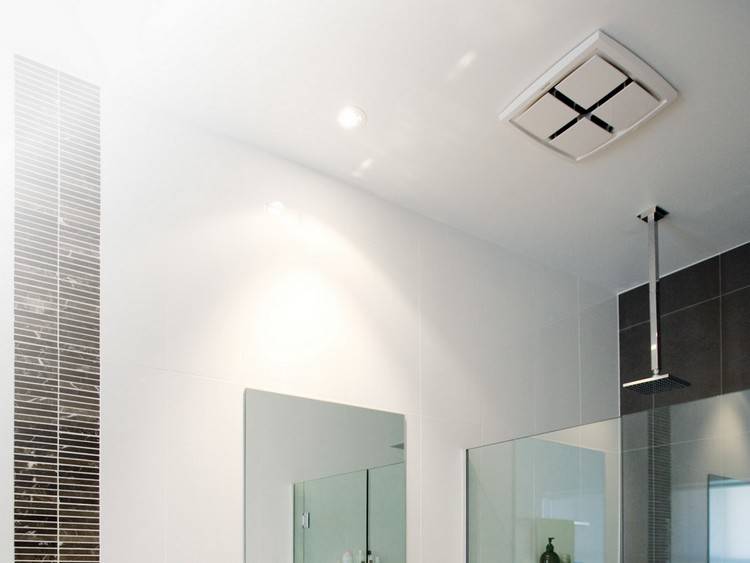
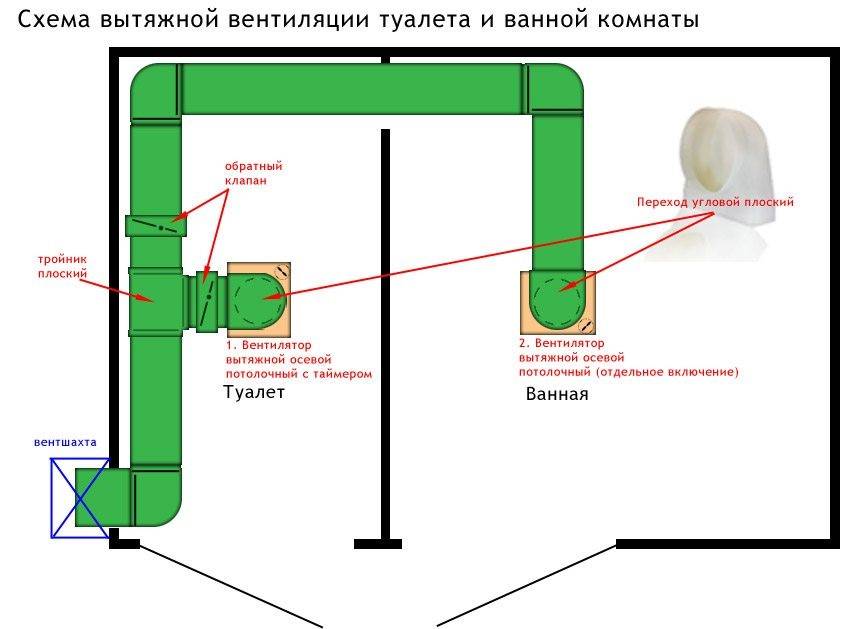
Bathroom ventilation device
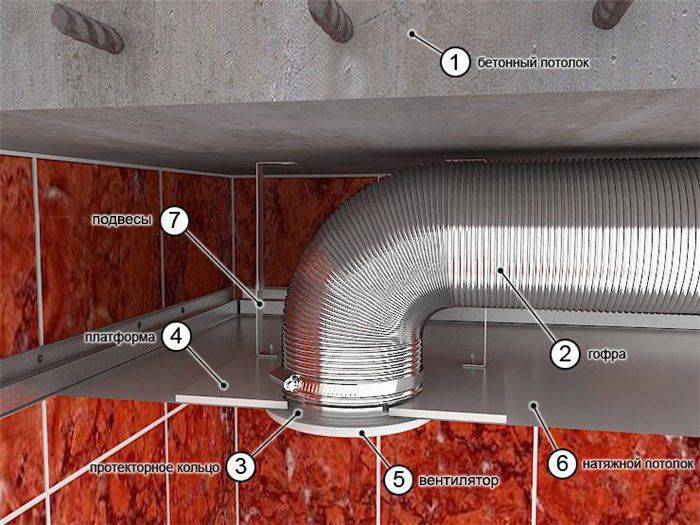
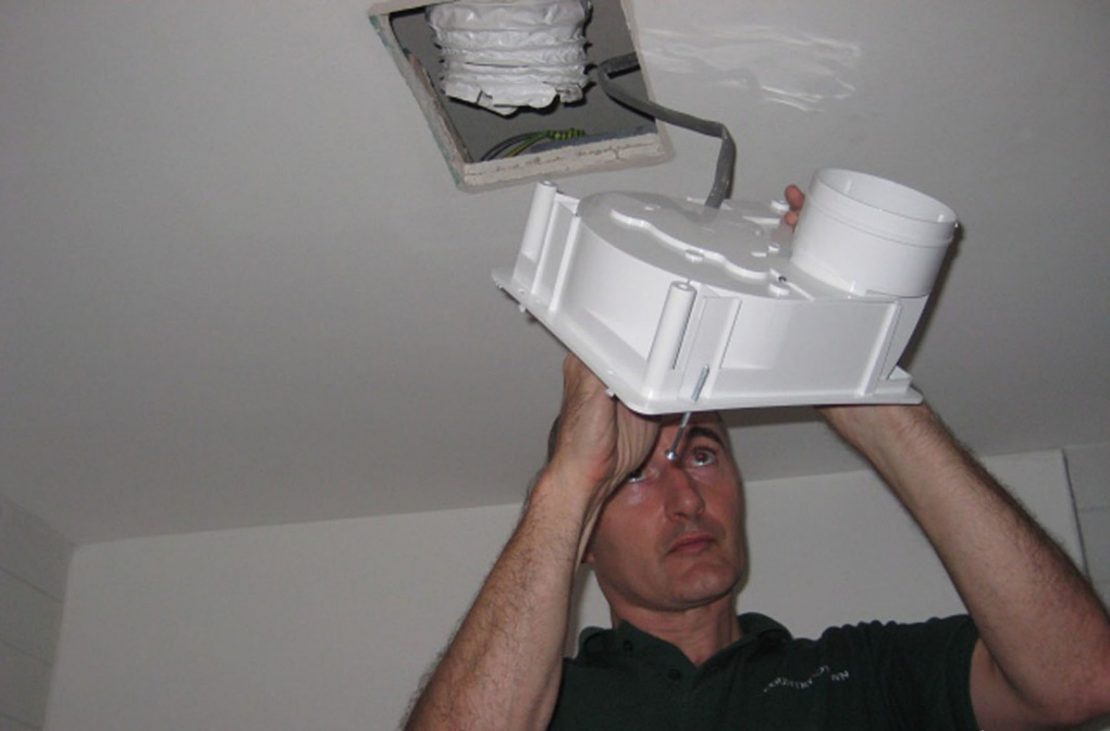
If you are going to mount a stretch ceiling in the bathroom, you must immediately provide for a forced ventilation system. It can be exhaust, supply or mixed type. In the first case, the air is drawn into the common ventilation duct, in the second, it is injected from the outside and pushed out in the same way. The main part of such a system is a powerful fan, designed for high humidity. The location of the fan depends on where the ventilation duct opening is located:
- The hole is located below the expected level of the tension fabric, then the fan is attached directly to the channel hole.
- The hole is located above the level, then a structure of a platform and an air duct connected to the channel is mounted to the ceiling, and the fan is already attached to the platform itself.
Ventilation equipment can also become a source of condensation. Therefore, it is necessary to carefully plaster or foam the cracks, and then insulate the base ceiling.
If it is required to place air ducts in the room, the entire ventilation system is assembled first, and then the canvas is stretched. Today, the construction market offers galvanized and plastic round and square air ducts. When installing a hood with a corrugated pipe, it must be fixed very well so that vibration is not transmitted to the canvas.
Main design stages
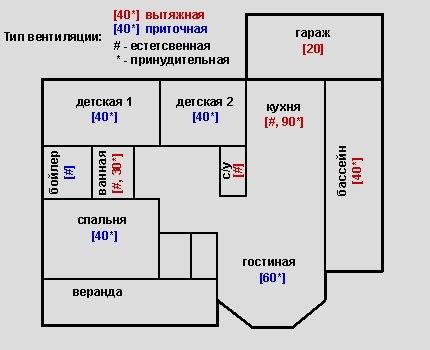
There are no standard schemes for residential and amenity premises due to the architectural and functional diversity of buildings.
 To make a decision on creating an optimal air exchange system, it is necessary to adhere to the general principles of organizing ventilation, observing the air balance, the rules for developing technical specifications and recommendations for its practical implementation (+)
Development of technical specifications
Drawing up a technical task is the first stage in the design of ventilation. Here it is necessary to prescribe the requirements for the volume and type of air exchange for all rooms of the house.


An example of a technical task (in terms of air exchange) for the development of a ventilation system for a house. You can create such a document yourself.
For each individual room, depending on its purpose, the parameters of air exchange are determined.
So, for apartments and private houses, ventilation should be used as follows:
- Living rooms, living rooms, gyms. Constant flow. The volume depends on the average daily number of people in the room. Requirements for the temperature and humidity of the incoming stream are possible.
- Bathroom, toilet, laundry. Permanent natural extraction. The operation of mechanical devices during the use of the premises.
- Kitchen. Permanent natural extraction. Activation of forced draft during intensive use of gas, or in the event of significant emissions of steam into the air during open cooking methods.
- Corridor and hallway. Free movement of air.
- Pantry. Natural exhaust ventilation.
- Boiler or furnace. When calculating the air balance, it is necessary to take into account the presence of exhaust ventilation due to the removal of combustion products through the chimney.
- Working premises (workshop, garage). Autonomous ventilation depending on the purpose of the rooms.
The terms of reference can be developed independently or by third-party specialists. In the latter case, when concluding a contract, designers will have to adhere to Russian regulatory documents regulating the air speed in the duct and the air exchange rate.
Choosing the best ventilation scheme
Based on the terms of reference, a diagram of the ventilation system is created. The plan for the location of its elements must be agreed before the interior decoration of the premises. Otherwise, in the case of installation after repair, there will be an additional task of fitting them into the interface of the house.

Air circulation in the house.A separate exhaust from the pool is necessary to reduce the amount of condensate in the heat exchanger. A separate cycle in the boiler room - fire safety requirements. Separate cycle in the garage - technical simplicity of the solution
As a rule, any ventilation plan can be implemented in several ways.
The best solution should fully meet the requirements of the technical specifications and take into account the following wishes:
- contain a minimum number of nodes and elements that are prone to breakage;
- regular maintenance should be simple and, if possible, carried out by residents;
- the use of ventilation in climate control should be understandable to people who do not have special knowledge about the technical nuances of the system;
- availability of backup solutions in case of failure of one of the nodes;
- the system should be inconspicuously integrated into the interior of the apartment or house.
In financial calculations, it is necessary to take into account both a one-time investment in the purchase of system elements and their installation, as well as regular costs for periodic maintenance and electricity spent on heating and humidifying the air.
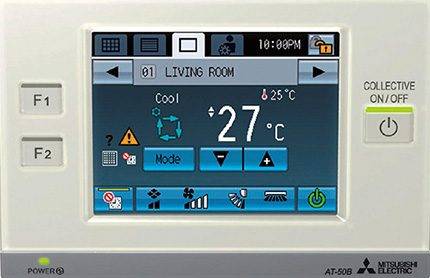
Modern solutions for domestic ventilation systems contain a compact electronic control unit, with which you can easily adjust the microclimate of any room in the house
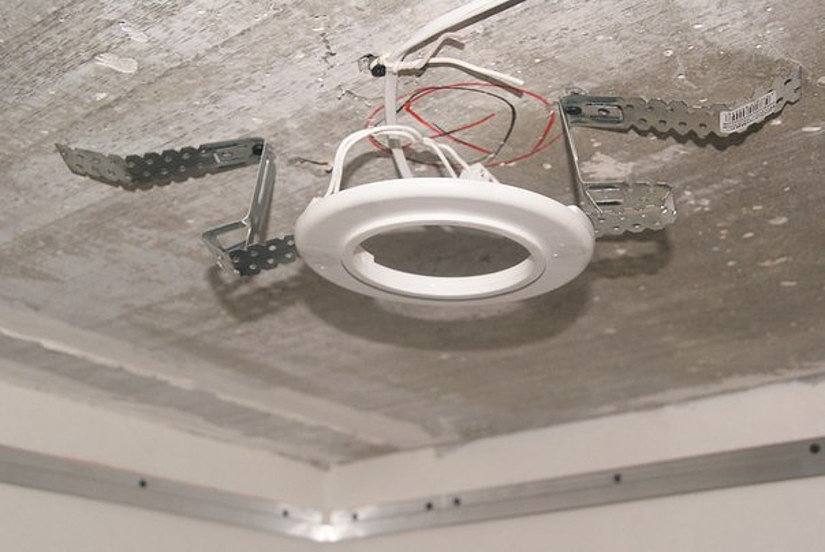
How to arrange ventilation in a false ceiling
For suspended ceilings, ventilation pipes are installed under the frame.
When installing a false ceiling, a ventilation system is necessary not only for air conditioning, but also for air convection. Ventilation ducts are mounted to the crate, which is arranged directly in the false ceiling.
When installing suspended ceilings, ventilation is necessary, since the opening formed between the ceiling and the suspended structure must be ventilated. If there is no ventilation, then condensate vapors will accumulate in these places, which can lead to a short circuit of the wires, and this, in turn, can cause a fire. Vapors destroy plates over time and spoil the appearance.
To reduce the effect of condensate on the elements, a vapor barrier can be applied, but only a ventilation device will completely eliminate the accumulation of vapors. The ventilation system is mounted together with a guide profile for a suspended ceiling, as the profile also functions as brackets for ventilated ducts.
Installation order
The general algorithm, like , is the following:
- First of all, the layout and sketch of the room is carried out, indicating all dimensions;
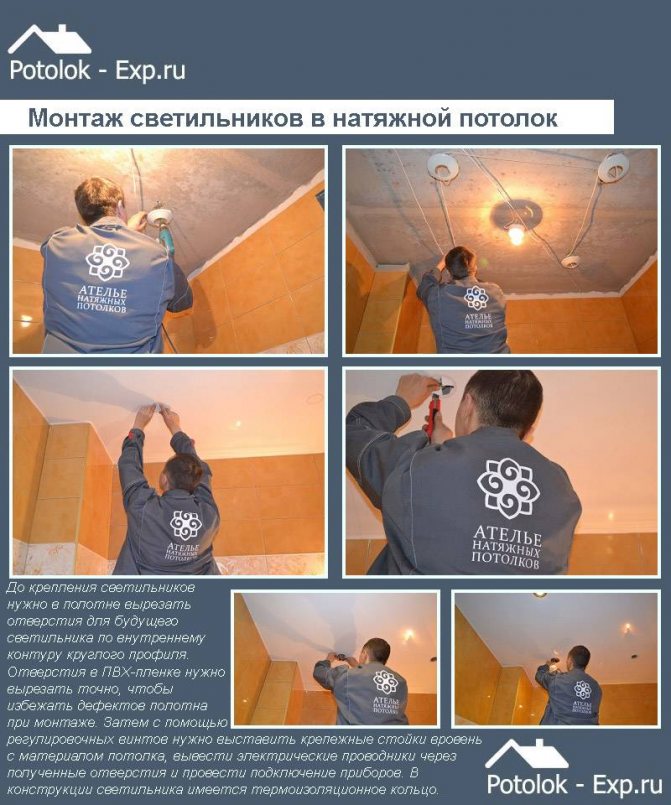
- Based on the design data, a detailed design and layout of the future suspension cover is prepared, taking into account the location of the fasteners and lighting elements;
- PVC film is cut. The canvas is cut in production, taking into account the stretching of the material when heated. Therefore, it is better to entrust this stage to competent professionals;
- According to the sketches, the frame is marked;
- A box of profiles is attached;
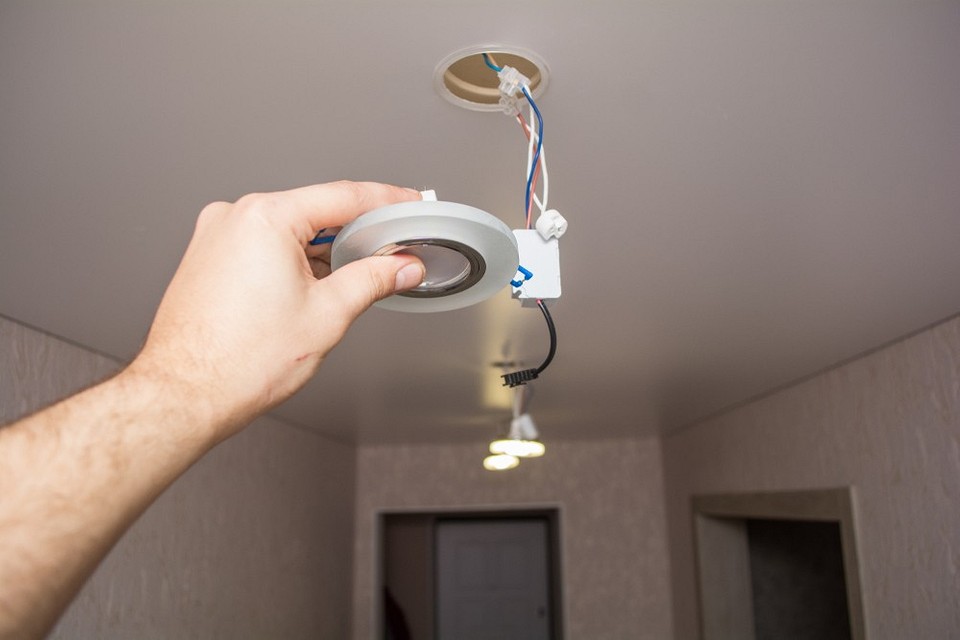
- According to the layout of power tools, electrical wires are mounted. Places are being prepared for the installation of light elements;
- Next, the stage of direct tension of a fabric or PVC panel;
- Electrical appliances are connected;
- Finishing decorative stage
Is it possible to stretch the ceiling alone
The usual single-level structure can be mounted alone. The basic principles of installation remain the same, although it will take more time.But the installation of a two-level ceiling or more complex forms will require assistants.
If the work is done alone, when marking, the laser level is installed on a platform stand or a special holder (a bar that is fixed at a distance between the floor and the ceiling). During the beating, a screw is screwed in at the mark point and a cord is pulled from it. You can attach the rope and tape.
The second likely problem is the installation of a large heavy chandelier by one person. Such a lamp is difficult to hold and fasten at the same time. If possible, it is better to choose something simpler and lighter (compact chandelier or built-in lights).
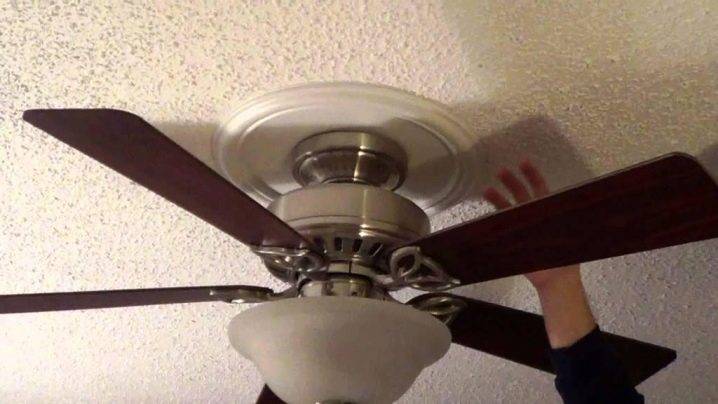
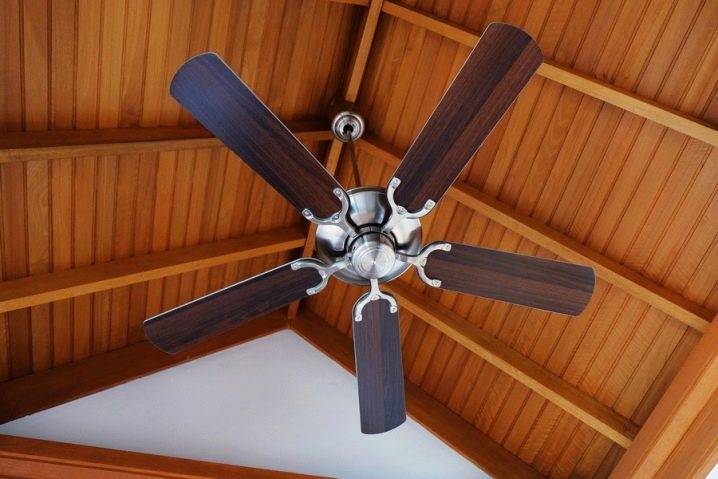
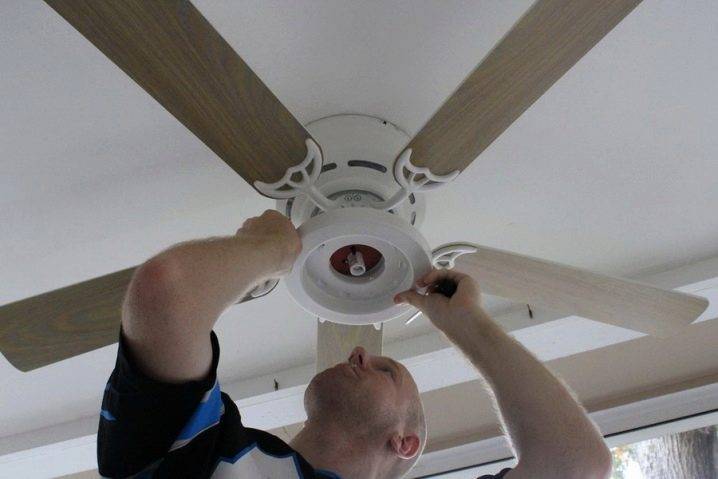
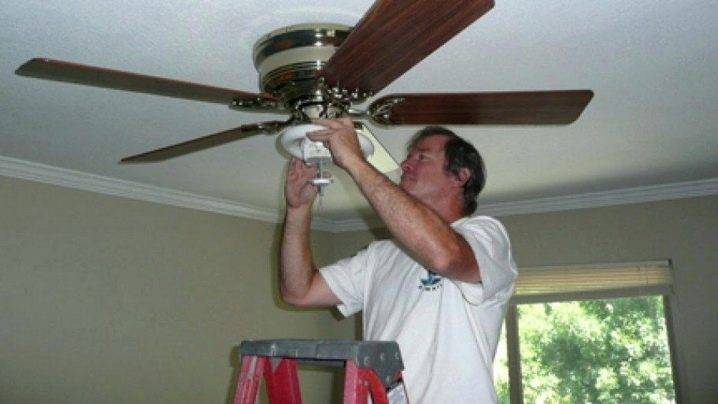
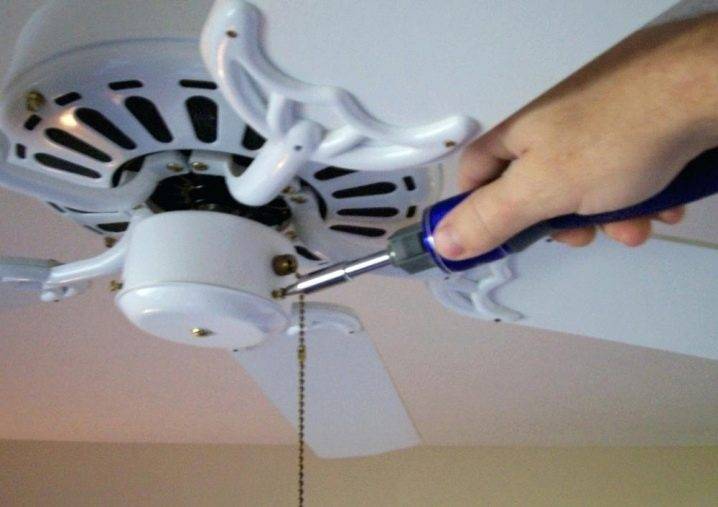
Installation of ceiling fans with light
You can install a fan with a lamp yourself. To do this, you need to study the instructions in detail and have an idea of \u200b\u200bhow to carry out electrical work.
The algorithm of work is as follows:
Take precautions. To do this, turn off the electricity in the entire house or apartment.
It is important to consider that a ceiling fan with a lamp is heavy, so a special hook or beam must be installed at the attachment point
After that, you can proceed to the installation of the terminal box and brackets.
Before connecting electricity, it is necessary to study the design in detail and understand how the cables should be connected.
When the lamp is installed, you can attach the blades. As a rule, they are attached to the body with the help of fasteners that come with the device.


With the help of a lamp in which a fan is built-in, you can diversify the design interior of the room.
Attention! It is not recommended to mount the device on a stretch ceiling or plasterboard.
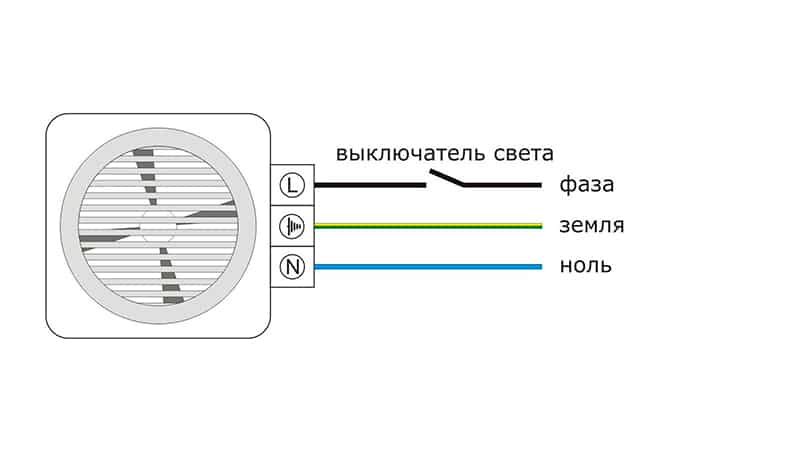
Wiring diagrams
In order to find out how to properly install a fan in the bathroom, it is enough to carefully study the phased sequence of work shown in detail in the presented video.
In addition to the established installation procedure, attention should be paid to labor safety - all work is carried out with the power turned off. There is no particular difficulty in installing the fan, however, in order not to disrupt the operation of the electrical wiring as a result of a short circuit, an experienced electrician must indicate the connection diagram
Further, it is possible to install a fan in the bathroom with your own hands.
 Installing a fan in the bathroom with your own hands
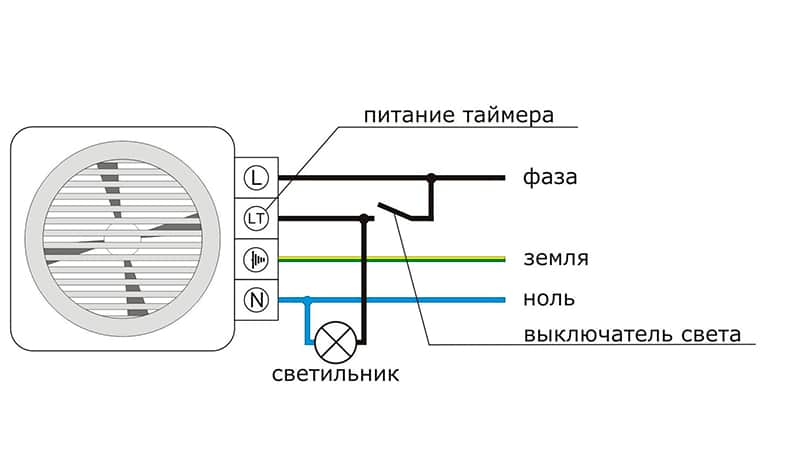
There are two main options for connecting the hood:
- The simplest scheme is to connect it in parallel with any of the lighting fixtures. In this case, the hood will start working at the same time as the lighting is turned on.
- If there is a need for the fan to operate in an independent mode from its own switch, a separate electrical wiring line with a cross section of 0.75-1.5 is carried out, for which it will be necessary to violate the integrity of the walls. This method is best used if the apartment is undergoing primary or major repairs. You can also use the phase from the lighting switch by installing a double switch. Zero - from a junction box located nearby. Such work is easier to do if the bathroom has a false ceiling where cables can be easily placed. You can hide the wiring from the switch to the ceiling by ditching the wall, or by carefully laying the wiring in a plastic channel that will not violate the integrity of the interior.
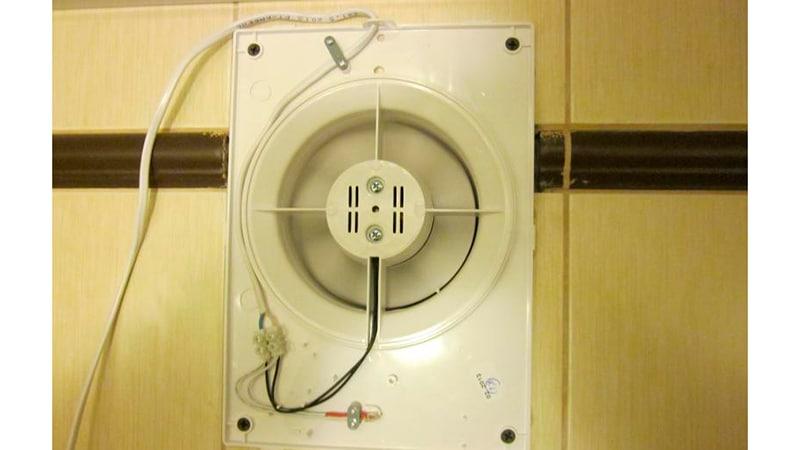
Now you can proceed to the direct installation of the fan on a previously prepared place on the wall of the ventilation duct. Having figured out how to install a fan in the bathroom and having completed the wiring work, it will not be difficult to independently connect the device to the mains.
Network connection
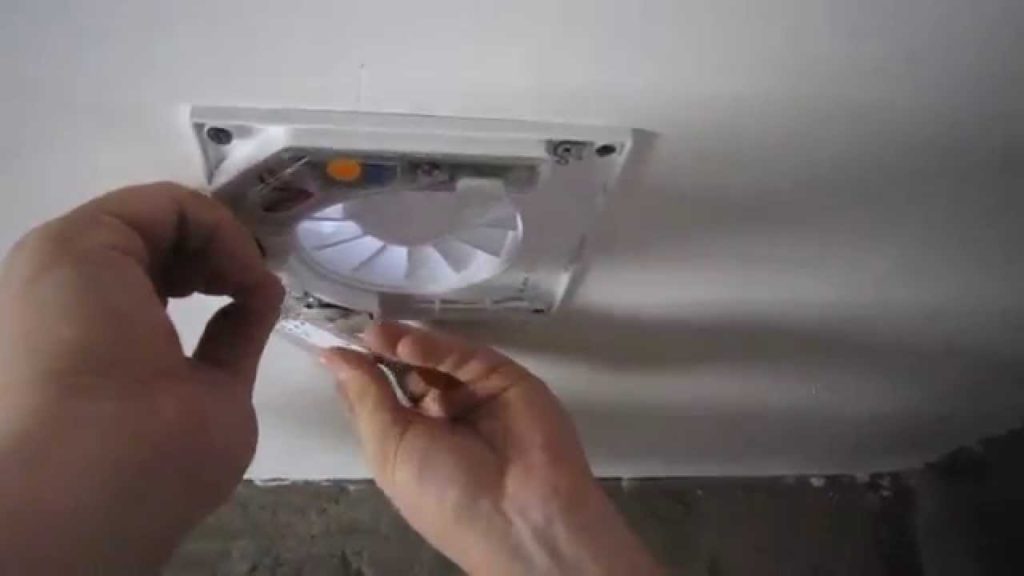
To connect the fan to the network, use the terminals installed on the wires of the device. In the new fan, the terminals and wires are protected by a cover that is attached to the case with a small screw. By unscrewing the screw located on the cover and holding it closed, you will get access to the wires, at the ends of which there are terminals with devices (mini-couplings) for connecting to electrical wiring wires. Insert the wires into the holes of the mini couplings and fix them with the screws supplied with the couplings. Check the tightness of the connections by hand, and if the ends of the wires are fixed, close the cover with a screw. The fan is ready to work. Turn it on according to your wiring diagram with the switch or with a cord and check how it works. After that, you can proceed to the installation and fastening of the fan in the ventilation duct.
 Fan installation - wiring diagram
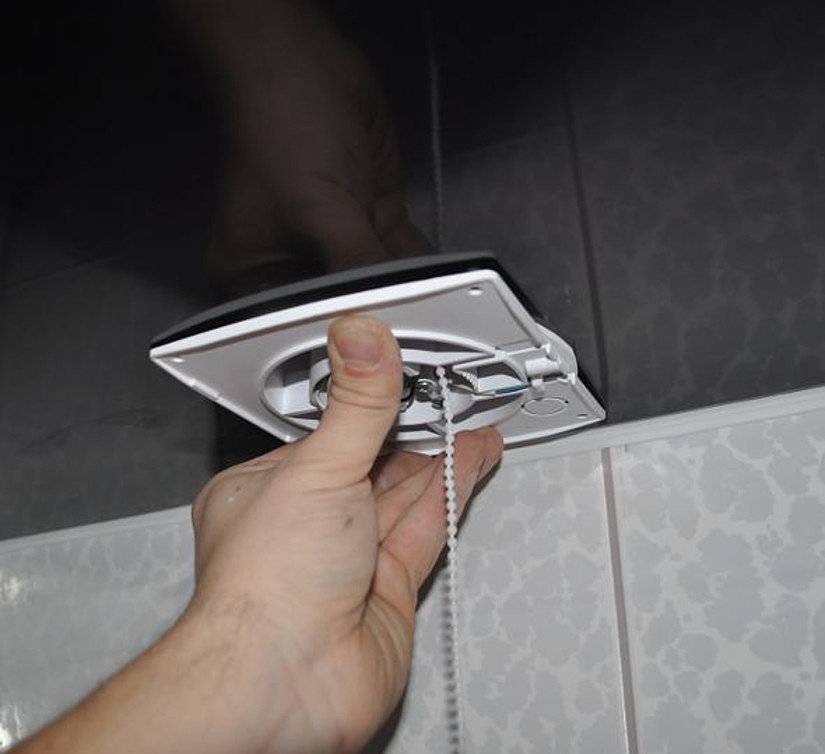
Fastening
Options for mounting the fan to the installation site in the ventilation duct may be different. Most often, manufacturers attach an additional set of fasteners to the kit, with which the fan is attached to the tile with self-tapping screws, but there is a serious risk that the tile may break, breaking the lined surface, which entails additional costs.Craftsmen and experienced craftsmen offer various alternative methods, one of which is to mount the fan on ordinary silicone - gluing the device to the tile and fixing it in a certain position for 30 minutes using adhesive tape.
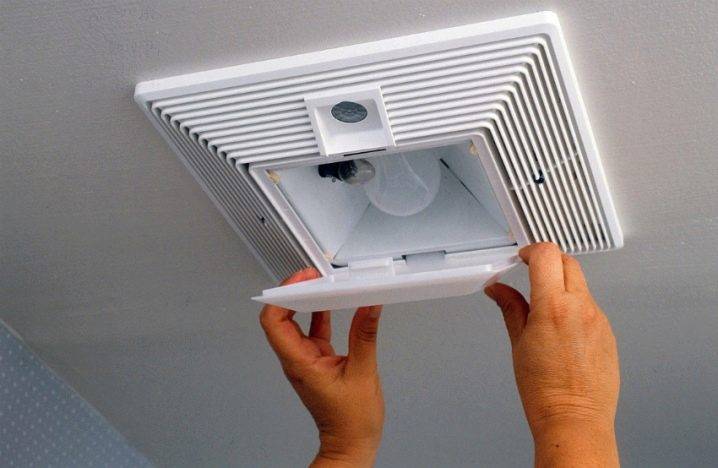
 Installation and connection of the fan
This is where you can complete the description of the work on the selection, installation, connection of an exhaust fan for the bathroom with your own hands. A simple procedure, a small amount of additional materials, a large selection of fans in stores - all this greatly facilitates the installation of a fan, even if there is no experience in performing such work.
The problem is also simplified thanks to detailed technical descriptions of the device, instructions for its installation and connection, as well as instructions for safety during work.
Calculation of the necessary materials
After choosing the type of false ceiling, you should decide on the required amount of materials. To do this, you need to measure the area of \u200b\u200bthe ceiling and it is desirable to develop a sketch, which will greatly facilitate the upcoming work.
Frame materials for almost all types of ceilings will be similar, so let's give an example calculation of the necessary materials for Armstrong type panel ceiling.
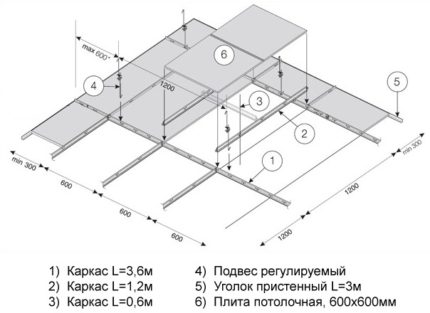 The frame structure for a false ceiling consists of longitudinal and transverse profiles and suspensions. The selected material of the suspended ceiling will be attached to it.
In order to understand the consumption rates of materials for an Armstrong suspended ceiling frame, let's imagine that we have a square room of 25 m2.
To install a panel ceiling, you will need the following materials:
- main profile 3.6 m long;
- cross profile 1.2 m long;
- cross profile 0.6 m long;
- suspensions;
- wall corner 3.0 m long;
- dowels-screws;
- anchor dowels;
- panel plates 600*600 mm.
The installation of the main profile is carried out with a step of 1200 mm. To find out the number of rows of the main guide, divide the width of the room 5 m by 1.2 (step) and get 4.17 rows. The next step is to find out how many running meters of this profile will be required. To do this, we multiply the length of the room 5 m by the number of rows 4.17 and get 20.9 m.p.


Installation of a transverse profile 1.2 m long is carried out in increments of 600 mm. To find out the number of rows of the transverse profile, we divide the length of the room 5 m by 0.6 (step) and get 8.33 rows. Next, find out the required number of profiles in running meters. To do this, we multiply the width of the room 5 m by 8.33 (rows) and get 41.7 m.
The mounting step of the transverse profile with a length of 0.6 m is 1200 mm. The number of rows of the transverse profile is calculated by dividing the length of the room 5 m by 1.2 (step). We get 4.17 rows. The resulting value is multiplied by 5 m - the width of the room and we get 20.9 m.p. - this amount is needed for an area of \u200b\u200b25 m2.
Suspensions are installed on the main rails with a step of 1200 mm. To find out the number of hangers per 1 row of the main rails, we divide the length of the room 5 m by the step of the hangers 1.2 and get 4.17 hangers per 1 row.
Earlier we found out that we have 4.17 rows of main guides. Accordingly, for a room of 5 x 5 m, it will take 4.17 rows to multiply by 4.17 and we will get 17.39 pieces of suspensions.
 Next, you need to install a wall corner 3.0 m long around the perimeter of the entire room. In this case, the perimeter is 2 x (5+5)=20 m
Therefore, 20 m of wall corner will be required.
To calculate the number of panel slabs, it is enough to know the area of one slab (0.6 x 0.6 = 0.36) and then divide the ceiling area 25 by the area of one slab 0.36. In total, we get 70 pieces.
 It should be noted that after the installation of ceiling panels or slabs, joints are formed, which can be eliminated with a special finishing tape.
Fasteners should be purchased on the basis that one dowel is needed per 0.5 m of the profile.
To install a plasterboard ceiling, you will need the following materials:
- guide profile 27 x 28 cm;
- ceiling profile 60 x 27 cm;
- direct U-shaped suspensions;
- dowel-nails;
- self-tapping screws;
- drywall sheets 9.5 mm thick.
For finishing plasterboard ceilings, additional materials will be required, such as a primer, putty and water-based paint.
Selecting an extractor fan
Before buying a specific model of electric fan, you should first carefully study the classification of these bathroom ventilation devices.
Such devices are of 2 types:
- axial;
- radial (centrifugal).
Axial fans are equipped with a rotary motor. An impeller with several blades is installed on its axis. To improve aerodynamics, a manifold is integrated into the ventilation inlet.
Axial devices are often installed in the bathroom. They have low performance and operate at low power.
The radial fan, installed in the stretch ceiling in the bathroom, is equipped with a rotor with helical blades. Air enters such a device from the front, and is blown out from the side, at a right angle.
Radial electric fans are mounted on the ceilings of large bathrooms. The volume of these premises is 12 cubic meters. m or more, and the distance from the entry point to the ventilation duct is 2 m at least.
Depending on the installation methods, fans are:
- ceiling;
- wall;
- wall-ceiling;
- channel - installed in the gap of the ventilation duct, can be used to ventilate several rooms.
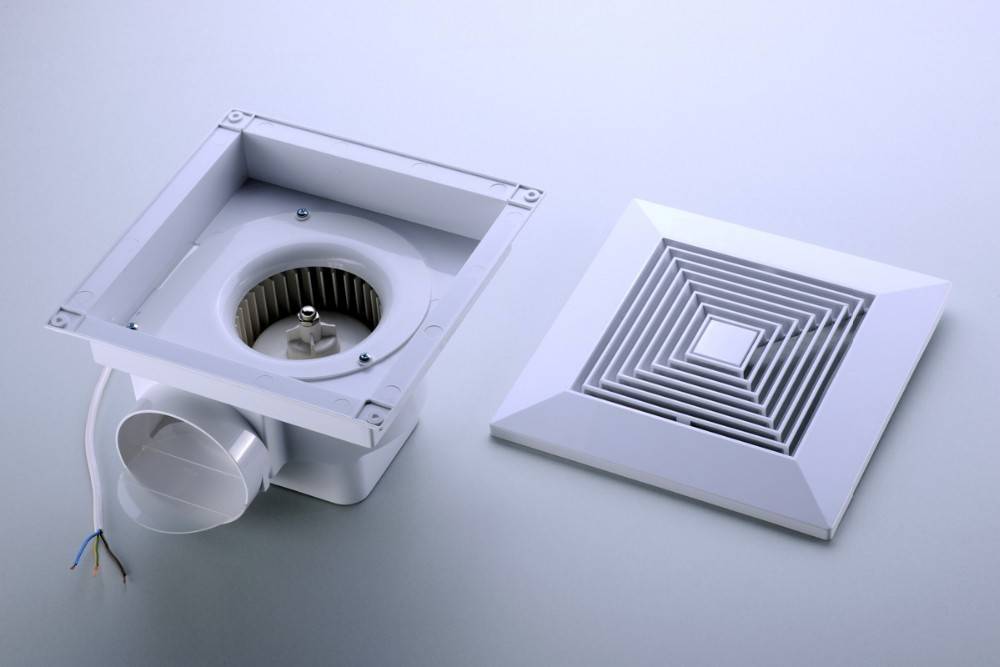
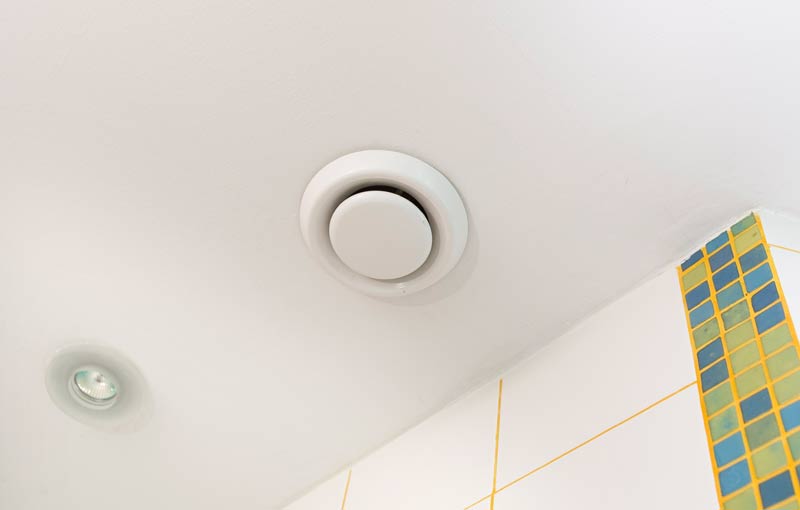
An exhaust electric fan, like any household appliance, is selected according to its technical characteristics. The case of such a device is made of moisture-resistant plastic.
The type and shape of the ventilation grilles are chosen in accordance with the design of the room.
When choosing a ceiling electric fan in the bathroom, its technical characteristics are taken into account:
- performance;
- noise level;
- safety;
- power;
- additional functions.
Performance (power)


The performance of the ventilation device is considered the main parameter that ensures good air exchange in the bathroom.
The desired fan is selected based on the area of \u200b\u200bthe room and the air exchange rate, which is indicated in SanPiN.
For a bathroom, the second indicator is 6-8 volumes per hour. It depends on the number of people living in the apartment.
The fan performance is calculated according to the following formula: C \u003d A × B
where A is the volume of the bathroom (the height is multiplied by the length and width of the room),
B is the multiplicity.
For example, the area is 2.2 × 2.5 × 2.7 m = 14.85 cubic meters. m (approximately 15 cubic meters). Then for 4 residents of the apartment, the air exchange rate is 8.
As a result, 15 × 8 = 120 cubic meters. m / h - a highly efficient electric fan will have such a performance.
Noise level
The noise level is considered another technical parameter that you should pay attention to when buying a ceiling fan. In this case, proceed from the operating mode of the device. If the ceiling fan is turned on only during the daytime, then its noise should be equal to 30-35 dB
To ensure round-the-clock exhaust in the bathroom, radial devices are bought at 20-25 dB
If the ceiling fan is turned on only during the daytime, then its noise should be equal to 30-35 dB. To ensure round-the-clock exhaust in the bathroom, radial devices are bought at 20-25 dB.
Axial fans are noisier due to strong motor vibration.
Sometimes the air duct also makes noise if it is made of metal. Therefore, when installing the hood in the ceiling of the bathroom, silent plastic or noise-suppressing building materials are often used.
Also, when choosing an electric fan for the bathroom, close attention is paid to its safety. For this room, they buy a moisture-resistant model. Such a device does not fail even with constant high humidity in the room.
Such a device does not fail even with constant high humidity in the room.
The only disadvantage of the fan is that it cannot be connected to a conventional electrical network. Otherwise, if water gets on a working device, a short circuit will occur in the house and a fire will occur, so it’s better not to risk it.
Also, when buying a ceiling fan in the bathroom, pay attention to the presence of additional functions.
This is important from the point of view of ease of use of the device. Ceiling high-performance fans can be equipped with the following additional devices:.Ceiling high-efficiency fans can be equipped with the following additional devices:
Ceiling high-efficiency fans can be equipped with the following additional devices:
- a motion sensor that automatically turns on the device when a person appears in the room;
- timer - allows you to set the operating time;
- humidity sensor;
- check valve.
In addition, on such devices there is a regulator of the speed of rotation of the blades.
Mounting
The trouble-free and safe operation of the fan largely depends on its proper installation. This is due to the fact that an improperly fixed device will create significant vibration and produce a lot of noise. Therefore, before installing the device with your own hands, you must read the instructions and clearly follow the connection diagram.


It must be understood that at least 4 mounting holes should be used for the mounting bracket equipment, otherwise, due to the high dynamic load, the device will quickly loosen the fasteners and begin to vibrate intensely. In addition, the body of the instrument should be attached to the mounting bracket using movable swivel joints, leaving small gaps.
Reducing the recommended distance may not only affect the safety of using the device. The lower the blades are above the floor, the lower the performance of each of them and the more time it takes to completely replace the air volume when using exhaust models.However, the location of the impeller too close to the ceiling is also undesirable, especially for fabric stretch ceilings: during prolonged operation of the blades, the fabric cannot withstand constant vibration and quickly breaks.
- When installing fans in high rooms or attics with sloping roofs, it is recommended to use an extension rod and arrange the units in such a way that 2.4-2.8 meters are obtained from the impeller to the ceiling.
- When installing on reinforced concrete bases, it is recommended to use dowels and self-tapping screws, while when installing on tension or suspended structures, it is necessary to use spacers connecting the mounting brackets with the main floor.