- What to do if it is impossible to make a cut into the riser
- Wall valve installation
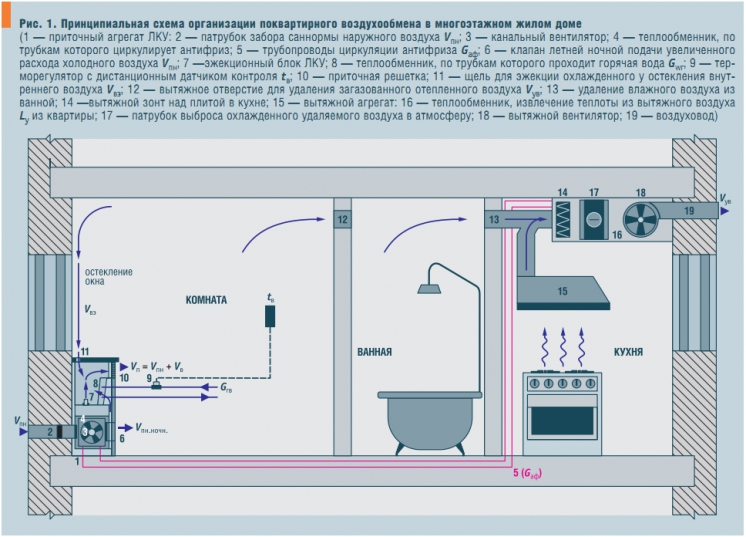
- Recirculation systems
- Why is everyone betting, but we can't?
- Regulation for the low-rise sector SP 55.13330.2016
- Varieties of exhaust valves
- What is needed to install a fan
- Fan connection diagrams
- From a light bulb
- From the switch
- Through automation
- Air exchange requirements
- Assembling an additional ventilation duct
- Why install a fan
- Exhaust fan selection rules
- Performance
- Safety
- Noise level
- Additional Fan Features
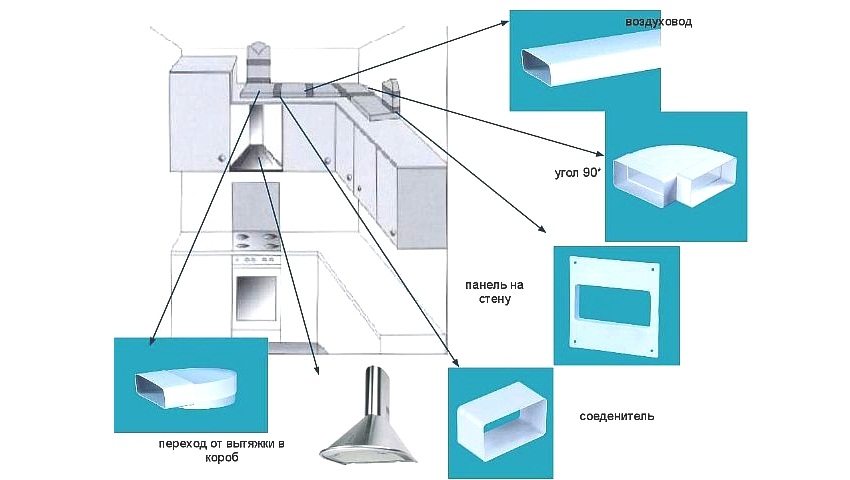
- Instructions for bringing the hood in the kitchen to the ventilation
- Foundation preparation
- Installation work
- electrical equipment
- How to improve traction
What to do if it is impossible to make a cut into the riser
In this case, two options remain - the removal of gases to the street through a hole in the wall and the use of recirculation systems.
Wall valve installation
This method may not always be applicable. Before purchasing equipment, it is necessary to consult with representatives of the engineering company. There are several restrictions that cannot be ignored before bringing the hood to the ventilation in the kitchen.
According to SP 54 13330.2011, it is allowed to use wall devices for the forced removal of exhaust air. It also says that the distance from it to the windows of the neighboring apartment should be at least 8 m. In most houses, the kitchen windows are next to the neighboring ones, which makes the use of wall systems impossible. In summer, when airing, odors will penetrate inside into the adjacent window. A layer of fatty deposits will appear on the windows.
To solve the problem, you can install powerful filters that clean the waste stream. However, in this case, it is easier not to punch a hole in the wall, but to direct the air back into your apartment.
The grille is clearly visible from the outside. In houses that are architectural monuments, its installation will be banned, otherwise the facade will lose its appearance.
If conditions permit, the valve is connected using plastic pipes and aluminum corrugations. Do not punch the channel with a perforator - after it there are crumbling edges that require sealing with cement mortar. In addition, cracks may appear in the load-bearing structures when impacted by a perforator. It is better to use a diamond crown - it leaves perfectly smooth edges. The diameter can be selected in accordance with the dimensions of the case.
Recirculation systems
They work just as efficiently as those that remove gas from the room. When installing them, you do not need to decide how to connect the hood to the ventilation in the kitchen. Air ducting is not required, which greatly simplifies installation. There are no restrictions on use. You don't have to approve the project. The installation of the case and its dimensions do not differ from the previous options. The absence of an outlet from above helps to save space behind the furniture facade.
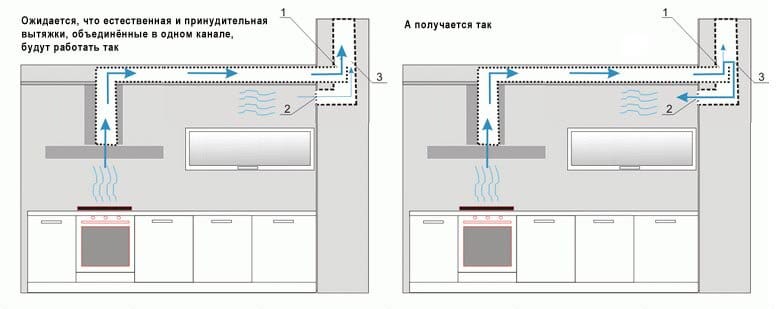
Why is everyone betting, but we can't?
In old houses, the issue with the hood was never raised, so everyone installed the device and connected it to the ventilation shaft to get rid of the smells of cooking. Also, the absence of installation problems is explained by the fact that individual channels for air exchange were used in the aging housing stock. Each apartment had its own shaft, to which none of the neighbors can connect.
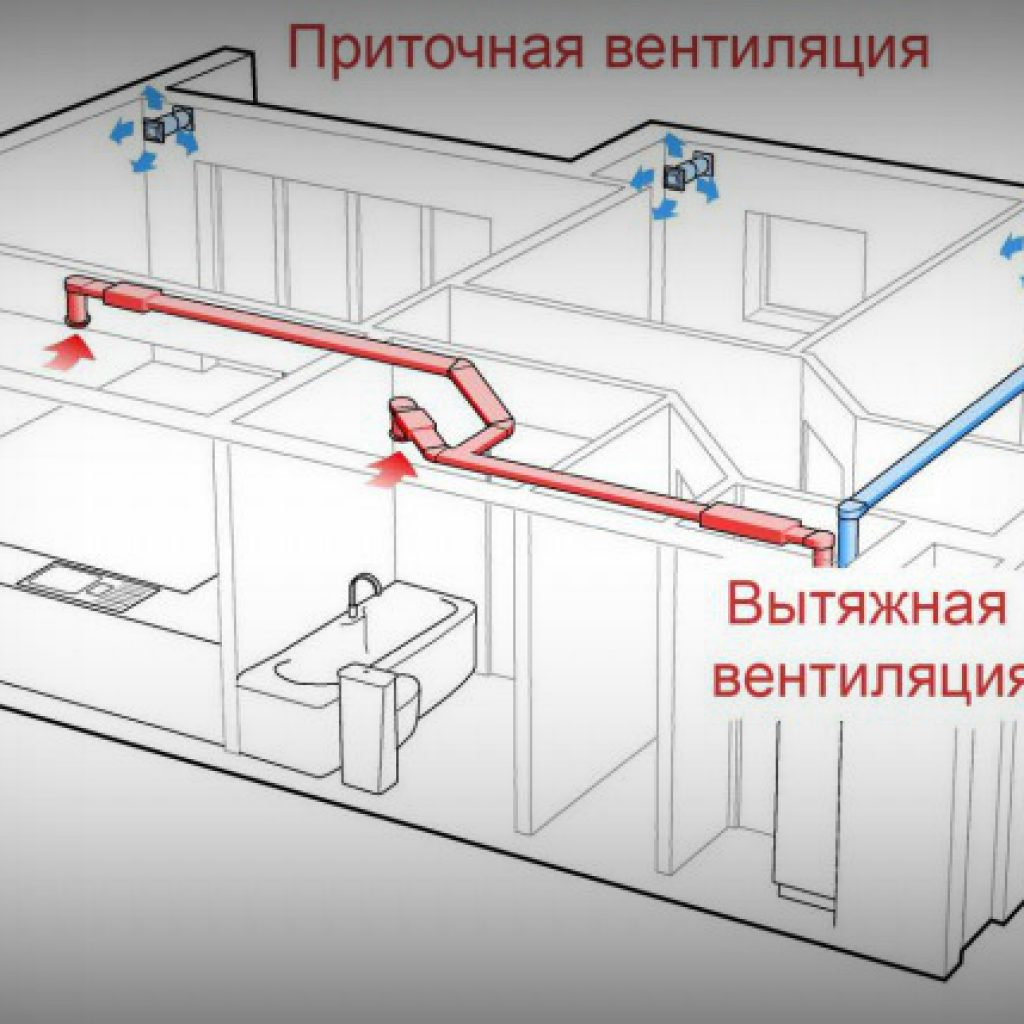
In modern houses, especially in multi-storey new buildings, a common ventilation shaft is used to speed up construction and standardize air exchange. The design provides branches for each apartment and one common air outlet. If the mine is massive, there are several channels in it, isolated from each other. This is required to separate the ventilation of the bathroom, toilet, kitchen, etc.
It is important to understand that the laws are intended exclusively for apartments where gas stoves are used. The fact is that the presence of an exhaust hood impairs the operation of natural ventilation and gas can accumulate in the apartment
Without an influx of fresh air, the room becomes a reservoir for a hazardous substance, and when a critical concentration is reached, the situation becomes explosive. The options “keep the window open” or “the room is constantly ventilated” do not alleviate the situation, because you cannot constantly control the ventilation of the apartment. Air exchange must be natural and correct!
If all the neighbors put up a hood, do not follow their example. For non-compliance with the rules, the owner of the apartment will be fined, and he will also be forced to dismantle the device. Do not follow stupid examples, because this is not about breaking the rules, but about the safety of life.
Regulation for the low-rise sector SP 55.13330.2016
This is one of the main sets of rules applied to the design development of residential buildings with one apartment. The standards for ventilation of a private house collected in it relate to the design of autonomously located residential buildings, the height of which is limited to three floors.
A comfortable microclimate is created in the interior of the building with the help of ventilation equipment. Its characteristics are given by GOST 30494-2011.
In most cases, an individual house is heated by an autonomous heating boiler. It is installed in rooms with good ventilation on the first or basement floors. Possibility of accommodation in the basement of the cottage. With a heat generator power of up to 35 kW, it can be installed in the kitchen.
The design of any building, regardless of its area, number of storeys, purpose, without fail includes the section "Ventilation" with the development of a scheme, calculations and recommendations for construction
If the heating unit runs on gas or liquid fuel in the boiler room, measures are taken to insulate equipment and pipelines in accordance with the terms of SP 61.13330.2012.
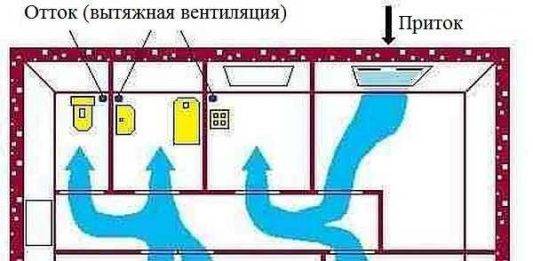
The collection offers three principles for ventilation:
- The exhaust air is removed from the premises by natural draft through the ventilation ducts. The influx of fresh air occurs due to the ventilation of the rooms.
- Supply and removal of air mechanically.
- The intake of air in a natural way and the same removal through the ventilation ducts and the incomplete use of mechanical force.
In individual houses, air outflow is most often arranged from the kitchen and bathrooms. In other rooms it is organized on demand and need.
The flow of air from kitchens, bathrooms, latrines with strong and not always pleasant odors is removed immediately to the outside. It must not enter other rooms.
For natural ventilation, windows are equipped with vents, valves, transoms.
An important advantage of the supply and exhaust system is the stability of operation, which does not depend on temperature and air density within the room and outside the window.
The efficiency of ventilation equipment is calculated taking into account a single change of air for one hour in rooms with a constant presence of people.
Minimum volume of air escape in operating mode:
- from the kitchen - 60 m3 / hour;
- from the bathroom - 25 m3 / hour.
The air exchange rate for other rooms, as well as for all ventilated rooms with ventilation, but when it is turned off, is 0.2 of the total cubic capacity of the space.
Air ducts laid in an open way are fixed to building structures using brackets. To reduce sound vibrations, the holders are equipped with noise-absorbing elastomer gaskets.
Cylindrical or rectangular air ducts are attached to building structures using various devices: hangers, brackets, eyes, brackets. All fastening methods must ensure the stability of the ventilation lines and exclude deflection of the ventilation pipes or ducts.


The surface temperature of the air ducts is limited to 40°C.
Outdoor appliances are protected from low negative temperatures. All structural parts of the ventilation system are provided with free passage for routine inspection or repair.
In addition, there are also collections of standards such as NP ABOK 5.2-2012. These are instructions for regulating the air circulation in the premises of residential buildings.They were developed by specialists of the non-commercial partnership ABOK in the development of the normative acts discussed above.
Varieties of exhaust valves
The low efficiency of exhaust ventilation is most often due to various reasons, for example, a violation of the patency of the channels or their tightness.
In multi-storey buildings, such situations often arise due to flaws during repairs, and it is not always possible to eliminate the consequences of errors and restore the normal state of the ventilation ducts.
Depending on the location of the exhaust ventilation, a horizontal or vertical valve model and a fan with a sufficiently high performance are used (+)
In this case, exhaust valves may be more than appropriate. The design of these devices is very simple, their main purpose is to allow air flows to the outside and not allow them to penetrate back. According to the type of installation, such valves are divided into horizontal and vertical, it all depends on the direction of air flow.
If the exhaust flow must move vertically, choose a valve with a horizontal installation. A vertical valve is needed to vent air horizontally. Typically, models of exhaust valves are equipped with a fan. They are used where the removal of air from the room must be carried out forcibly.
Another significant point is the noise level that the device emits. The lower the sound effects from the flapping valve blades and/or rotating fan, the better. A lot of useful information can be found in the product data sheet.
When choosing an exhaust valve that will be installed in a wall, you should consider the thickness of this wall, as well as the material in which you have to make a hole
What is needed to install a fan

Checking the draft in the ventilation system First of all, before installing the exhaust fan, check the presence of draft in the ventilation ducts.
In order to establish whether there is movement of air currents, a simple test should be carried out. It is necessary to light a candle or a match and bring it as close as possible to the air duct.
When air moves, the flame will deflect. The better the pull, the stronger the displacement of the flames will be. You can also use a sheet of paper to check. With sufficient traction, it should be attracted to the ventilation grille and held by air currents.
If there is no draft, first of all, you should make sure that the ventilation duct is not clogged. If this did not help, or the air current is still insufficient, then an additional device is required to create a forced air outlet.
After checking the state of natural ventilation in the room, a decision is made on the need to install an exhaust fan. However, before installation, make sure that fresh air enters the room.
Most often, a gap under the door leading to the room is used for this. To improve air exchange, it is also possible to install special grilles in the door.
Many people worry about whether installing a fan will interfere with the natural air circulation in the room. It has been verified that even if the device is turned off, air passes freely past the blades, slightly spinning them.
Before connecting a fan in the bathroom, you need to choose a model based on a number of criteria:
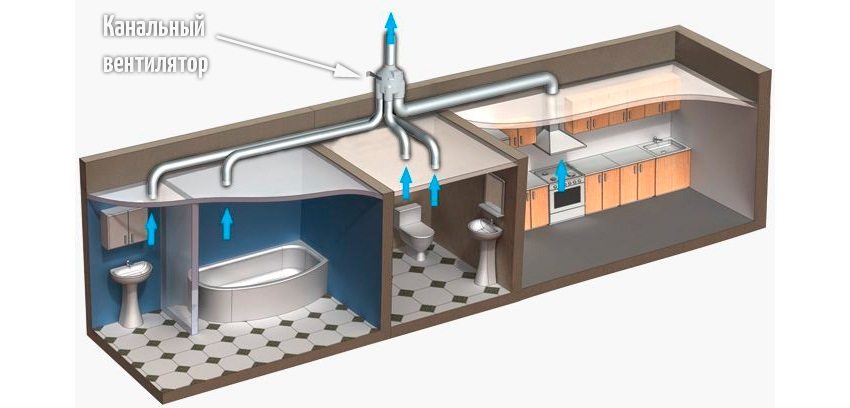
- Installation location and installation method. For city apartments, it is possible to use only overhead devices of a round or square shape. They are mounted in an air vent. For a private house, it is possible to install a duct fan, the advantages of which are high power and quiet operation.
- Device design. There are axial and radial fans. In the bathroom, axial devices are most often used.
- Appearance. The design of the device is also important. It should organically fit into the interior of the room.
In addition to these parameters, it is also important to take into account the technical characteristics of the installed device:
- Performance. This parameter shows how much air the device is able to move in a certain period of time. The larger the area of \u200b\u200bthe room, the higher this indicator should be.
- Noise level. A characteristic that directly affects the comfort of staying in the room. Preference should be given to quieter models.
- Hull protection class. For the bathroom, you should choose a model that has protection against moisture.
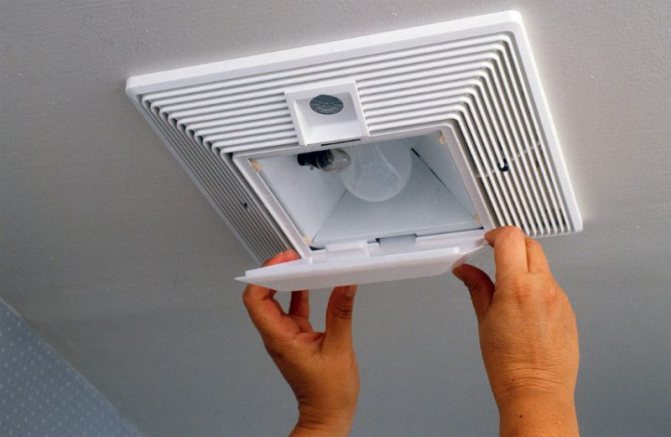
Having decided on the basic parameters and the installation location of the device, you should pay attention to the equipment of its additional functions. This is how the switch for the hood and light might look like
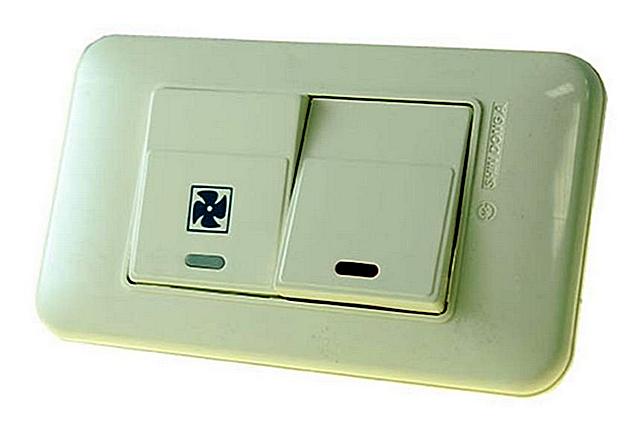
This is how the switch for the hood and light might look like
Pay attention to the following options:
- Built-in switch. In some cases, autonomous switching on and off of the fan can be convenient, but most often these are unnecessary problems.
- Timer.A useful feature that allows you to program the device so that the hood will continue to work for some time after the person leaves the room. This will allow for more efficient air exchange.
- Motion Sensor. A convenient option, but it is irrational to use it in the bathroom and toilet.
- Humidity sensor. In this case, the device starts to work if the humidity in the room has reached a certain limit. Cons: unexpected inclusion, impossibility when taking a bath to heat the room due to steam.
- Check valve. Prevents back draft. A useful option that does not allow unpleasant odors from outside to enter the room. The main thing is to choose a quality device that does not interfere with natural ventilation.
- Overheat protection. Availability is mandatory, as it is primarily the safety of operation.
- Mosquito net. Protects the house from penetration of insects. Of the minuses, it should be noted that the grid needs to be periodically cleaned of dirt and dust.
After choosing the most suitable device, you can proceed to drawing up the installation diagram and directly to the connection itself.
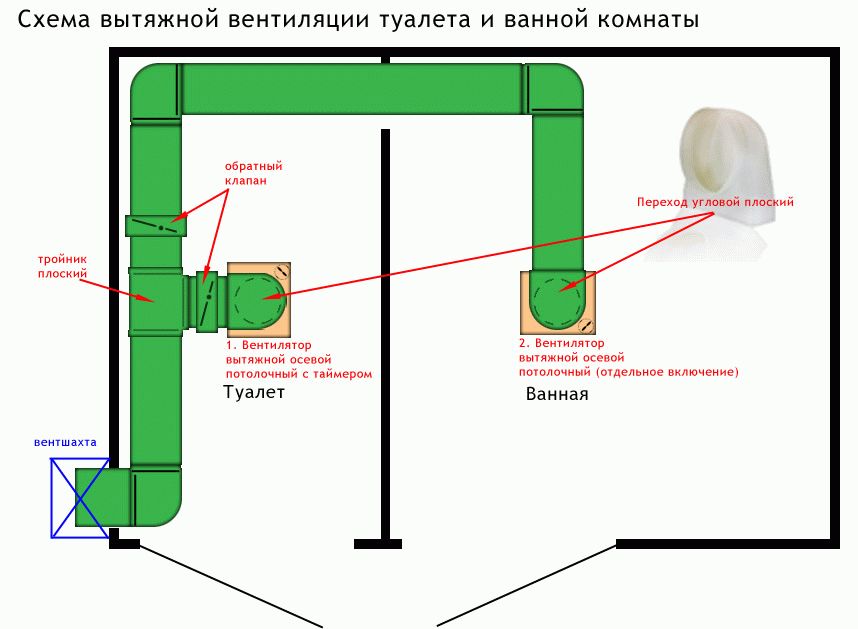
Fan connection diagrams
There are several different schemes for connecting an exhaust fan in a toilet or bathroom. The difference lies in the power supply to the device.


The wiring itself should be installed during repairs in the room, since the most correct from an aesthetic point of view would be to remove it into the wall. If this is not possible, you should think about decorative overlays or boxes.
There are three ways to connect to the mains:
- With a light bulb. When implementing this scheme, the device is connected in parallel with the light.Accordingly, while the lighting in the room is on, the fan will work.
- Separate switch. Not the most convenient scheme, since you have to constantly remember to turn on the hood. Of the benefits: if necessary, it is possible to turn on the device autonomously.
- Through automation. For this, a timer or a special sensor is used. Convenient, but more expensive way.
From a light bulb
The question is often asked on the forums how to properly connect the hood in the bathroom using the method of connecting the fan wiring in parallel with the light switch.
The light bulb mounting method is the cheapest and easiest way to connect the exhaust fan wiring. In this case, when you turn on the light in the room, the hood also starts to work.
The device turns off only when the light is off.
To implement this scheme, it is important to understand how to connect the fan to the light switch, and what are the pros and cons of this connection. The pluses include:
The pluses include:
- ease of installation;
- low cost.
The downside can be considered that the hood works even when it is not needed (for example, during the adoption of water procedures).
It is also important to remember that often the fan operation time in this case is simply not enough, and you have to leave the light on for a while. This leads to wasted energy
In addition, with frequent turning on and off of the device, the resource of the motor is generated, which leads to its speedy breakdown.
From the switch
Many people, having studied how to connect a bathroom fan to a light switch, as well as the pros and cons of this method, find that it does not suit them. For ease of use, you need to connect the device separately from the light.
This is necessary for those cases when long-term ventilation of the room is required after people have left it. For example, after taking water procedures with a lot of steam.
Such a scheme for connecting an exhaust fan in the bathroom and toilet is more expensive and difficult to install. To implement it, you will need an additional cable, as well as a device responsible for turning on the device.
In fact, the circuit itself repeats the circuit for connecting a light bulb, only instead of a lighting fixture there is a fan. All this can be displayed on a two-key switch, one button of which will be responsible for the light, and the other for the hood.
Of the pluses, it should be noted the possibility of autonomous activation of the hood. The disadvantages include the lack of automatic shutdown (a forgotten device can work for a very long time).
Through automation
The most modern is the scheme for connecting a fan in a bathroom with automation elements - with a timer and a humidity sensor. The most interesting should be considered the possibility of connecting a timer.
This allows you to program the fan run time. For example, you can set the settings so that the device works for a while after a person leaves the room, and then turns itself off.
Thus, the room is sufficiently ventilated, and at the same time there will be no unnecessary energy consumption.
The installation scheme itself is quite simple - it is similar to connecting a fan through a switch.The main difference is that, in addition to the zero and phase terminals, there is also a signal wire that is connected to a lighting bulb.


The standard workflow is as follows:
- The fan turns on at the same time as the light.
- As long as the light is on, the extractor is working.
- After turning off the lighting, the fan runs for a while and automatically turns off.
- The main difference between a fan with a humidity sensor is that the device has a built-in sensor that measures the amount of water vapor in the air. When the humidity rises to a certain level, it sends a signal to the relay, which closes the circuit.
The fan starts to work. When the humidity in the room decreases, the circuit opens, stopping the operation of the hood.
Air exchange requirements
When designing ventilation in kitchens with gas stoves, it is necessary to comply with the requirements of both sanitary and fire safety standards (GOSTs, SNiPs, SanPiNs and SPs). Gas supply to apartments and cottages is an undoubted boon, as it can significantly reduce utility costs. But there are a number of points.
Both delivery options: main gas transported through pipes and LPG from a gas tank or cylinder are a source of danger. It is impossible to neglect the regulations and forget about the safety rules.
 The design and installation of kitchens with gas stoves are regulated by several documents at once. Plus, there are all sorts of recommendations based on the given standards.
If the exhaust and air supply in a gasified kitchen room is not organized correctly, then the room can become a source of serious problems associated with open fire and a possible explosion of "blue fuel".
Gas stoves are allowed to be installed both in private houses and in apartment buildings. The height of the building can be no more than 10 floors. At the same time, the premises for them should have a window and be well lit by natural sunlight.
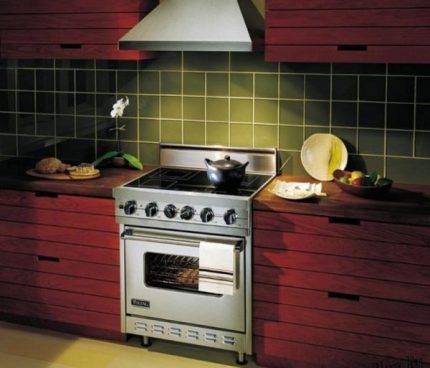 If the air exhaust in the kitchen with a gas stove is insufficient, then when the burner attenuates or the pipe breaks, the gas will accumulate in the room and sooner or later will explode
A kitchen for installing a gas stove must:
- be with ceilings from 2.2 m and above;
- have ventilation with natural air supply / removal;
- have a window that has an opening sash either at the top of a transom or a vent.
The cubic capacity of a room with a household stove on gas should be at a minimum (and preferably more):
- 8 m3 - with two burners;
- 12 m3 - with three burners;
- 15 m3 - with four burners.
In some cases, it is permissible to deviate slightly from these norms, but only if such deviations are agreed with the inspectors from the Ministry of Emergency Situations and other regulatory bodies.
 In order to avoid problems with the stove, the air in the kitchen should be enough to burn the gas, and it should also be constantly replaced by a new street
When organizing air exchange in the kitchen, it is important to ensure that new air comes exclusively from the street. This will prevent air masses with excess odors and moisture, as well as low oxygen content from entering the kitchen room.
Only methane or propane-butane gas stoves are not enough to work.
The air exchange rate for a kitchen with a gas stove is 100 m3 / hour. At the same time, in most apartment buildings, ventilation ducts with a width of 130–150 mm of the general ventilation system are designed for a flow rate of up to 180 m3/hour.
It is only necessary to provide the required air flow from the outside. In a private house, everything depends on the project.Here it is necessary to look at a specific example, what the existing ventilation system is designed for.
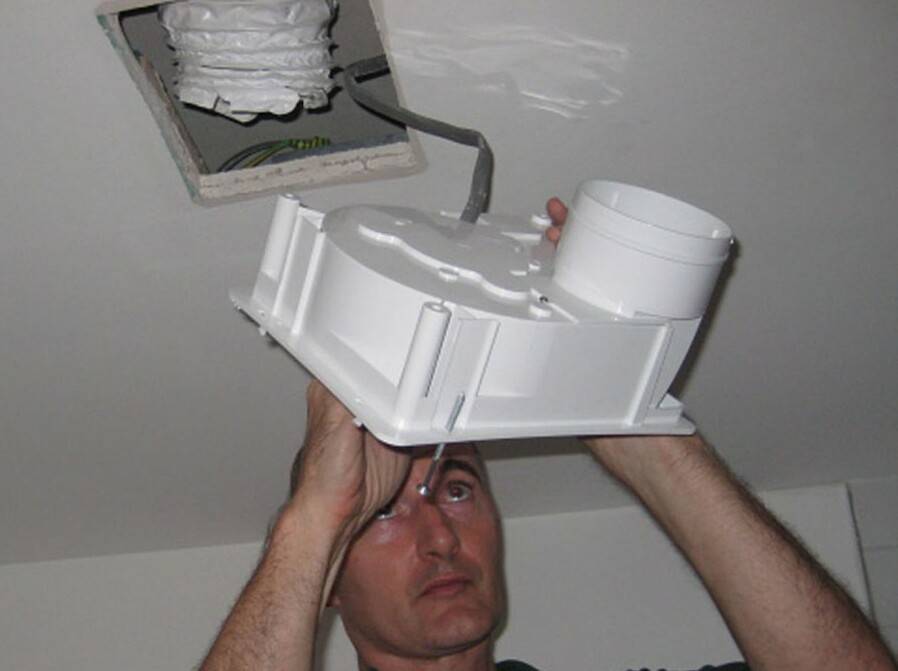
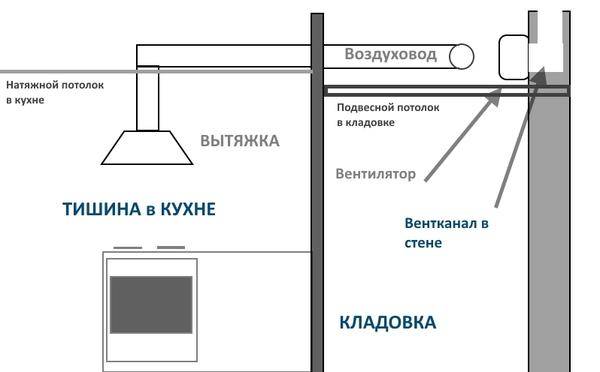
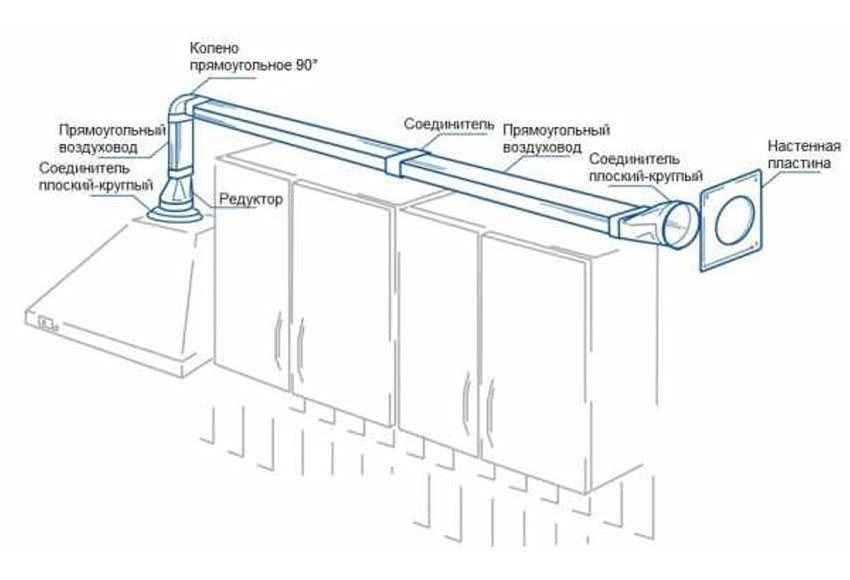
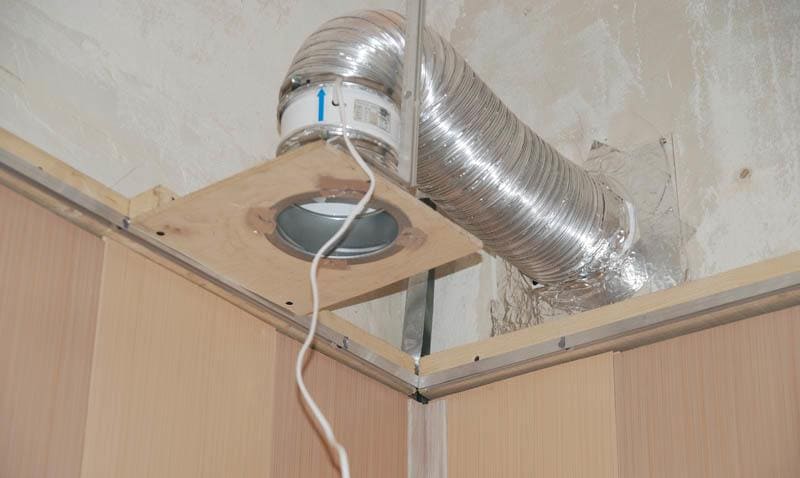
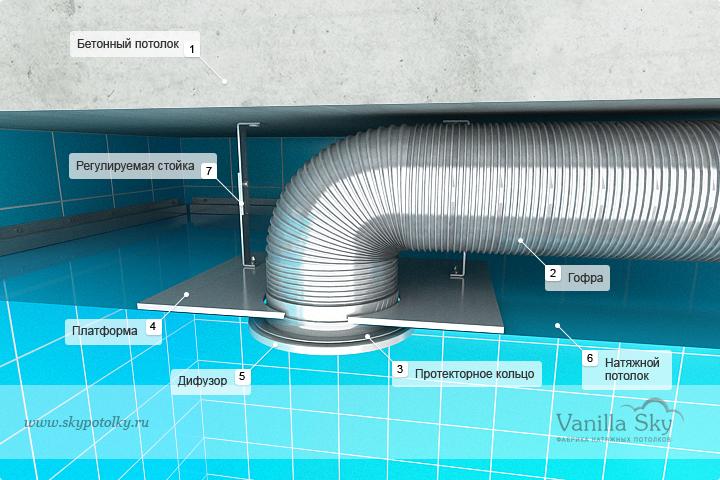
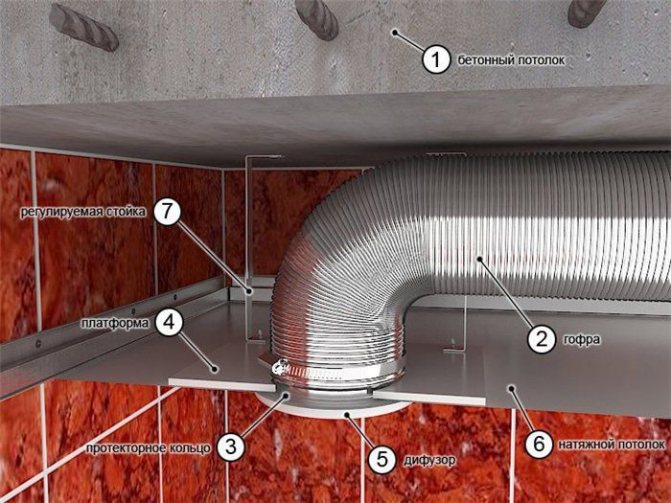
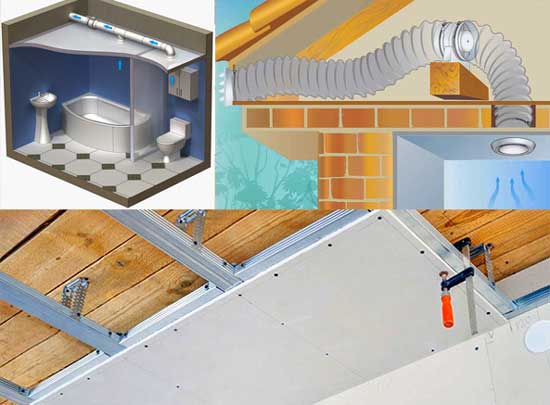
Assembling an additional ventilation duct
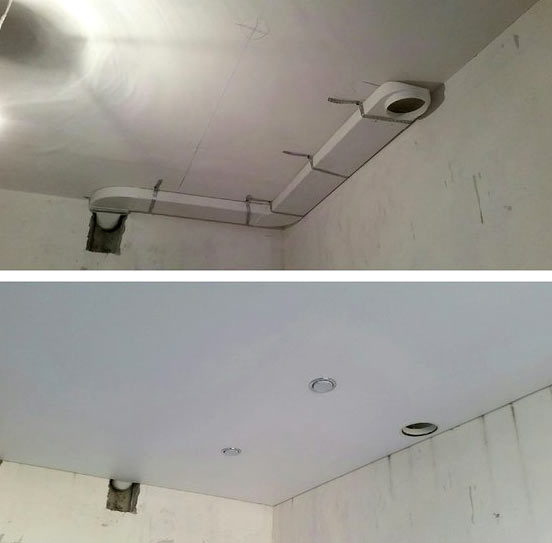
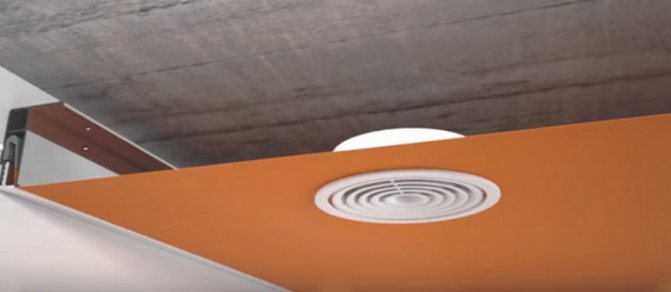
The first stage includes the mandatory placement of the duct. It is made before fixing a stretch or suspended ceiling. The ventilation additional channel has two ends. One is inserted into the ventilation shaft, the other is connected to the device. At the same time, it must be brought flush with the future stretch or suspended ceiling.
The air duct can be made of rigid material (PVC) or soft corrugation. In the first case, the ventilation duct is fixed at the ceiling with special plastic holders. In the second case, it is enough to stretch the pipe from the shaft to the location of the device.
Pipe pulling
Why install a fan
get rid of mold
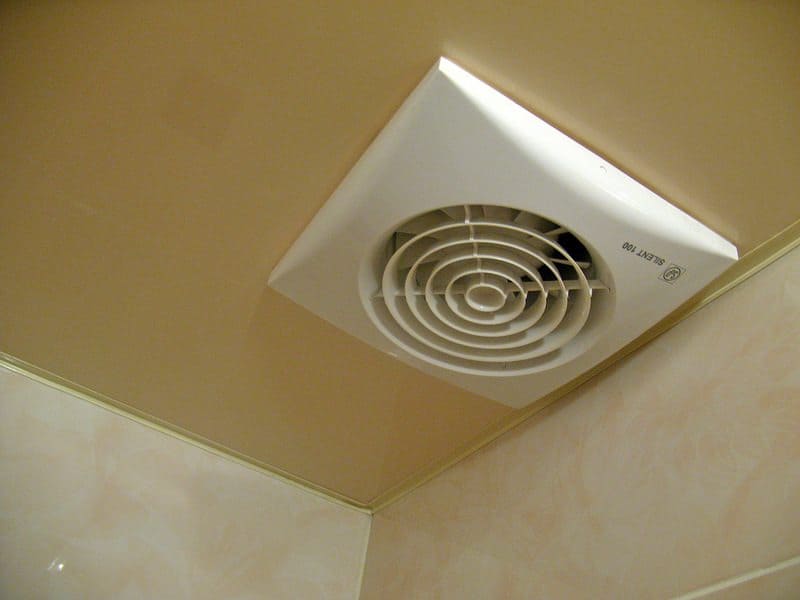
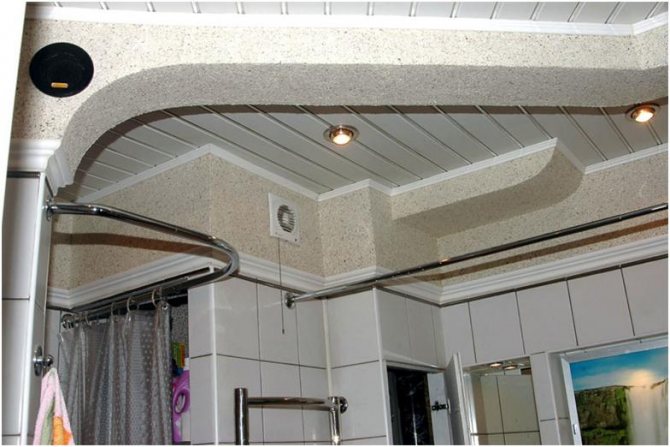
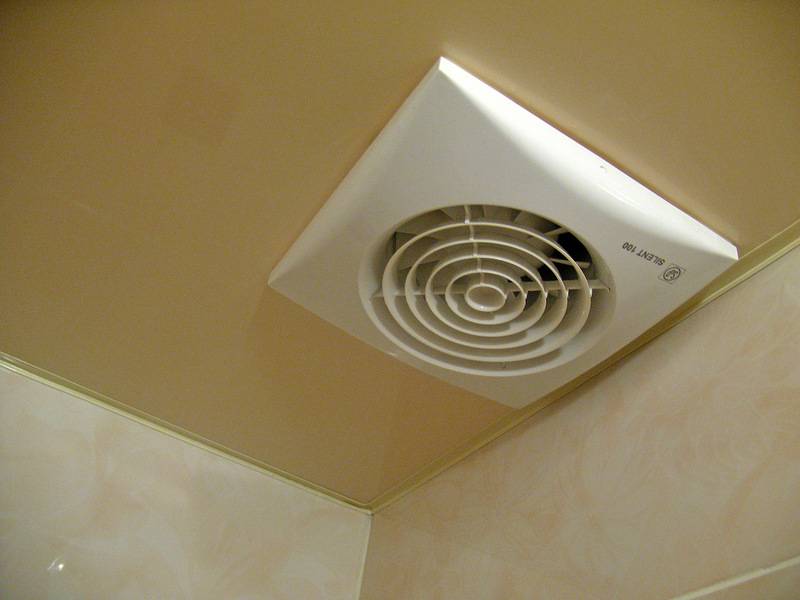
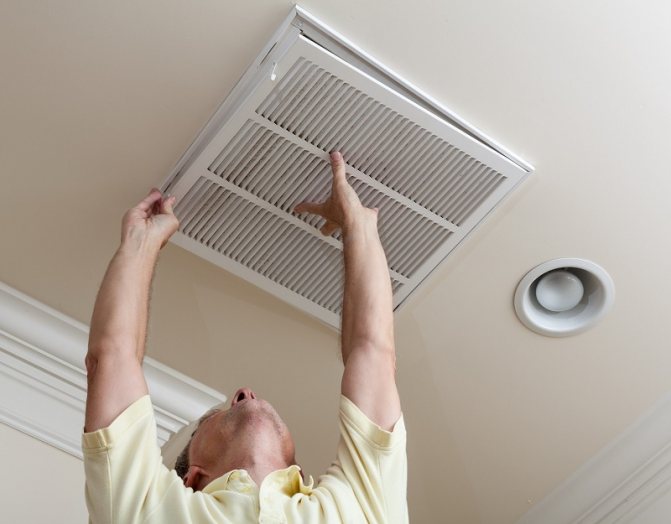
ceiling fan
Installing ventilation will help ensure proper protection against the negative effects of water on the surface of the bathroom. It will help to establish a normal level of humidity and temperature, get rid of the presence of a constant unpleasant smell, which is often worth it if the bathroom and toilet are combined.
Forced ventilation is installed if natural exhaust is faulty or ineffective.
Forced exhaust is built in in the following situations:
• rust has appeared on the metal parts of the equipment or pipes;
• Condensation constantly forms on windows, glass and other objects in the room;
• black dots, mold, rot appear on the wall surfaces.
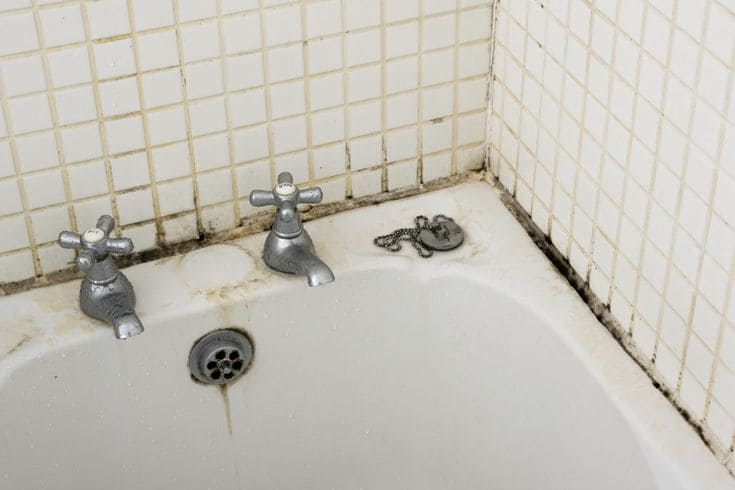
Mold in the bathroom
Exhaust fan selection rules
So, if the decision to buy a fan is made, you need to choose the right model so as not to be disappointed later.You need to choose at once according to several parameters - performance, safety, noise level and, of course, in terms of quality-price ratio.


Performance
This criterion is the main one, because the efficiency of air exchange depends on it.
Here it is important to choose the right power of the device in relation to the area, since the same fan gives a different result in a small and large bathroom. According to building codes, the air exchange rate for a bathroom is 6-8 units, that is, in an hour the entire volume of air in the room should change from 6 to 8 times
As a rule, if no more than three people use the bathroom, they choose a multiplicity of 6, if more than three - a multiplicity of 8. The calculations are not difficult to perform: you need to find the volume of the room and multiply it by the air exchange rate.
It turns out that for such a bathroom, a device with a capacity of 54 m3 / h will be the best choice. Of course, it is not always possible to find a model that best matches the calculated parameters, so you can choose a fan with a small margin of performance.
Air exchange rate for different rooms
Typically, the performance of bathroom fans is 95 - 100 m3 / h
Safety
For bathrooms and toilets, fans are produced with additional protection of electrical contacts from moisture, which must be indicated in the instructions and on the packaging. If you put an ordinary model, and water gets into it, this can cause a short circuit and even a fire, so you can’t risk it in any case.
Now you can find low-voltage extractors specifically designed for bathrooms and saunas. They have moisture and thermal protection, and can work effectively at 100% humidity and high temperatures. True, the cost of such fans is higher, and they cannot be connected to a conventional electrical network, which entails additional costs, but the safety of the residents is worth it.
Look for fans in stores that are designed specifically for the bathroom
Noise level
The noise produced by the fan should not exceed 30 dB, otherwise it will irritate the household. If you plan to turn on the fan at night, choose a model with a noise level of up to 25 dB. The lower this indicator, the more comfortable you will be in the bathroom with the hood turned on. This is especially true for those whose fan runs continuously.
Noise, which is more than 35 dB, irritates the human psyche
As for the quality of fans, it is better to focus on well-known trade brands, whose products have already been tested by time. For example, household fans of the brand Soler & Palau (Spain), VENTS (Ukraine), Electrolux (Sweden) have a lot of positive reviews.
Surface fan Soler & Palau
Hoods VENTS
Color variety of Electrolux EAFR exhaust fans
These companies value their reputation, so their products are of high build quality and durability. The main thing is to buy fans in specialized stores, where they can present an appropriate certificate for the product and issue a warranty card. So you avoid the risk of buying a cheap fake, not branded equipment.
Additional Fan Features
| A photo | Name of add. functions |
|---|---|
| Timer | |
| Hydrostat or bathroom fan with humidity sensor | |
| Motion Sensor | |
| Constant ventilation | |
| Clock on the front of the fan | |
| check valve |
Instructions for bringing the hood in the kitchen to the ventilation
Foundation preparation
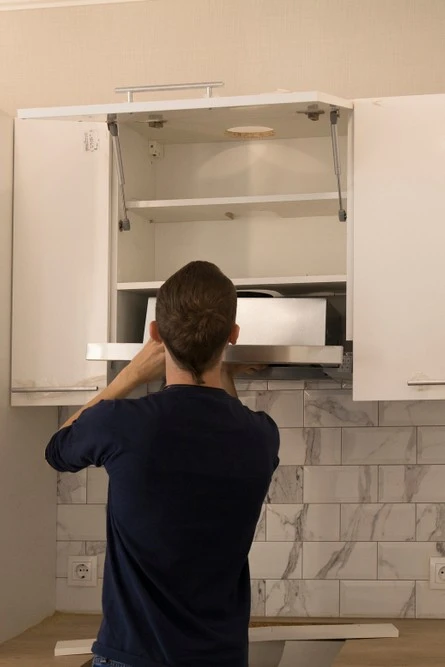
Work, as a rule, begins after the installation of furniture and fine finishing. The foundation must be solid
If the fastening is carried out on the finish, it is important not to damage it. To prevent the tile from cracking, the back side of the case is covered with a damper tape
The surface is cleaned and treated with antiseptics that prevent the appearance of bacteria. Mold can form in the gap between the wall and the cabinet. Moisture and sediment always accumulate in these areas, which brings steam with it.


Walls do not always have sufficient bearing capacity. If they crumble, wide holes are made in them and plugs are driven in. Sometimes these measures do not help. Then the base is moistened with water and filled with a cement mixture. While it is not frozen, dowels are immersed in it. After that, installation can be carried out without fear that the system will fall on the slab.
Installation work
They begin with fastening the dome to self-tapping screws with dowels. Then a channel leading to the mine is connected to it. Its end is coated with glue or sealant and put on the upper part of the body. The joint is fixed with a clamp, tightened with a screw. In the same way, plastic straight and angled pipes are connected.
ShutterStock
ShutterStock
ShutterStock
ShutterStock
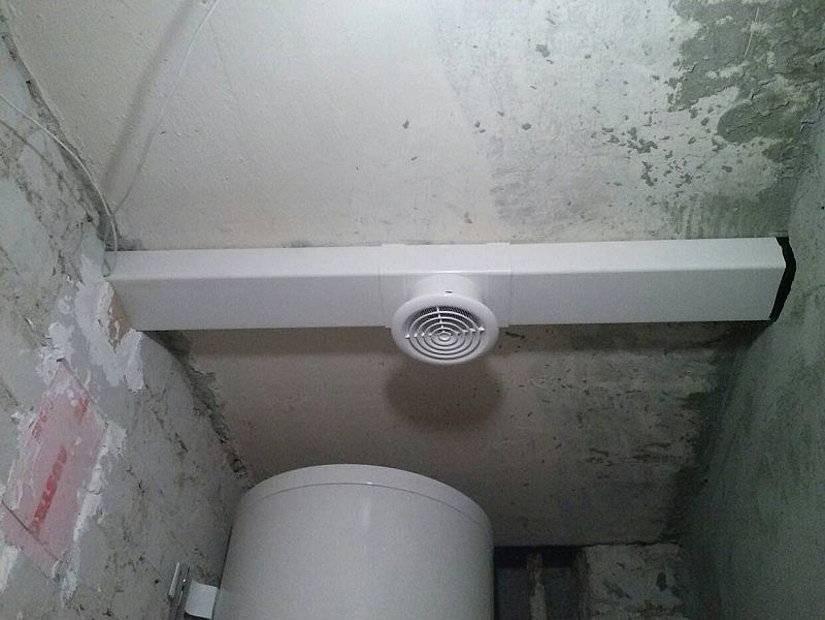
The channel is mounted to the ceiling on metal hangers or brackets pressing it against the wall. A hole of a suitable diameter is drilled in the shaft under the ceiling using a diamond crown. A flange is screwed to it with screws.An adapter is attached to it, if necessary. A sleeve covered with glue or sealant is inserted into the adapter. The clamp is tightened on top. There are special T-shaped elements with a check valve. There is a grid underneath. It must be at the bottom. If you move it up, the flow from the hood, rising up and under pressure, will flow back through it. The lower crossbar of the letter "T" is parallel to the wall. One side of the upper crossbar is inserted into the shaft, the other, facing the kitchen, is supplied with a rotary damper. When the air inlet is turned on, the damper closes. When the supply is turned off, it is opened, increasing the width of the entrance to the riser.
Rotations should be avoided when designing. The fewer of them, the less obstacles to the flow, and the easier it is to clean the inner surface. To smooth out sharp turns, instead of an L-shaped adapter, two elements with a 45-degree bend are placed.
The channel is left in plain sight or hidden under a removable drywall or plastic box. To get rid of excess noise, the box is filled from the inside with mineral wool or foam rubber. In the case when the eyeliner is not visible behind the furniture, masking measures will not be required.
electrical equipment
To connect electricians, kitchen sockets with a residual current device and a three-core cable VVGng-Ls 3 * 2.5 mm2 are used. Sockets are placed at the top of the wall. Do not use extension cords in wet environments. The wires are hidden behind the front panel. It is usually not necessary to lay the lines. If such a need arises, it should be remembered that chasing wall panels and floor slabs is prohibited.Gutters are allowed to be laid in the finishing layer. If you plunge into reinforced concrete by more than 1 cm, you can damage or expose the reinforcement. Upon contact with the external environment, it will begin to quickly rust and collapse.
How to improve traction
One of the conditions that ensure normal draft is a constant supply of fresh air to replace the exhaust. In winter, the problem is difficult to solve by frequent ventilation through the windows and transoms, then the apartment will be too cold. One solution is a wall or window inlet valve. Wall units are produced with an adjustable damper and a heat-insulating inner shell. Window cuts into the upper part of the double-glazed window frame. There are special doors with internal channels. Air from the street enters the slot on the top side of the frame. The cold stream descends along the profile, gradually heating up from its body, and exits from below.
There are devices that connect to devices that measure the temperature and humidity in the room. They can be programmed to maintain a certain climate regime. Comes with a timer.


