- Choosing the Right Toilet Fan
- The main criteria for choosing equipment
- Steps for connecting an exhaust fan
- Fan without built-in timer
- Fan with built-in timer
- Installation of the ventilation duct
- Choosing the Right Materials
- Cutting ventilation holes
- Insulation of the walls of the ventilation pipe
- Air vent device
- Ventilation in the bathroom in a private house
- Types of ventilation
- Bathroom fans: a little more about the types
- Fans and requirements for them
- Fan connection diagrams
- From a light bulb
- From the switch
- Through automation
- How to make ventilation in the bathroom and toilet
- Features of ventilation installation
- Conclusion
Choosing the Right Toilet Fan
In typical urban apartments, a vertical ventilation duct is usually installed, for which a centrifugal fan is the best option.
Worse results will be shown by a duct ventilation device. Such fans are best used when combining several ventilation ducts or when it becomes necessary to hide the device in a hemmed ceiling structure.
Mounting an axial fan only makes sense for short horizontal ducts.
We recommend paying attention to fan models equipped with additional options (you will need to lay a separate power line):
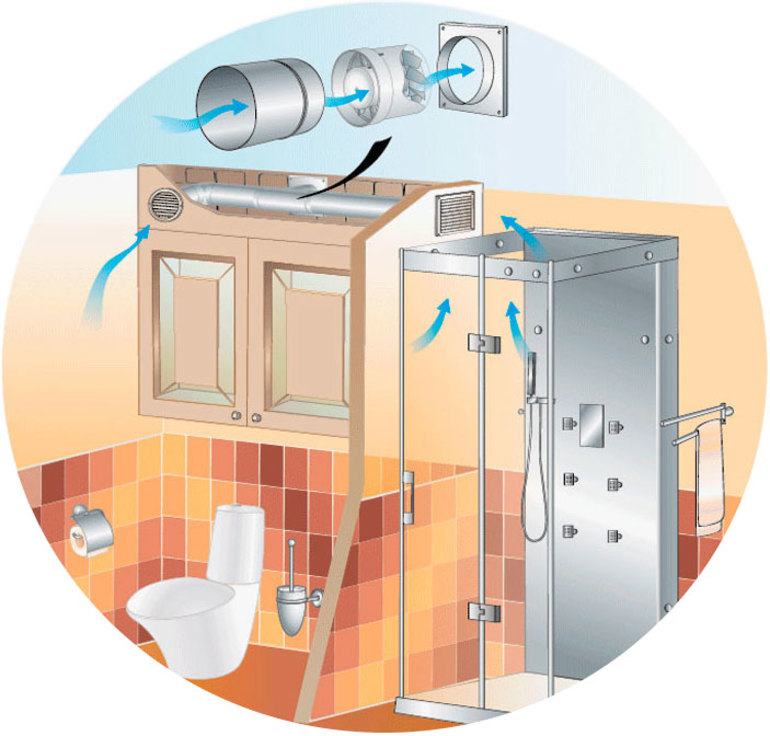
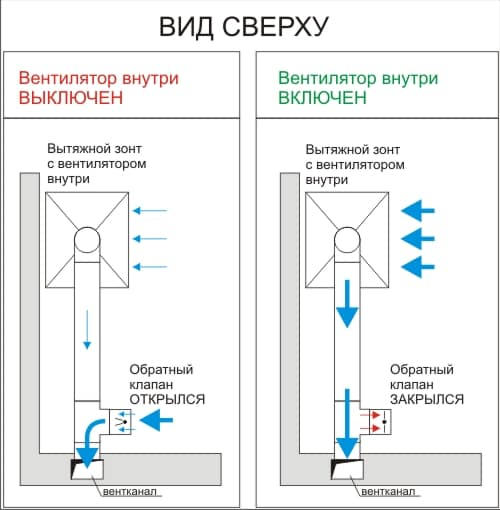
- With check valve. Due to its design features, such a fan will not allow air from the mine to pass back into the room. Residents of apartment buildings will benefit from the fact that they will no longer be forced to inhale the odors that enter through the ventilation from neighboring apartments.
- With motion sensor. The device will turn on when a person enters the toilet, and when he leaves, the fan turns off.
- With a timer. A certain program is set to ensure continuous operation of the fan for 2-30 minutes.
- With humidity sensor. Automatic inclusion of the device at achievement of humidity in the room of a certain level.
- with ventilation mode. The fan does not stop its work, but carries it out at minimum speed.

The main criteria for choosing equipment
Manufacturers offer just a huge range of fans for exhaust systems. Therefore, it is not surprising that every unprepared buyer falls into a stupor and does not even suspect that it is better for him to order.
When buying an exhaust device for a bathroom and toilet, you need to pay attention to the following points:
Air duct diameter. Depending on this characteristic, the fan nozzle is selected. As a rule, standard models have a diameter of 150, 125 or 100 mm.
The presence / absence of air ducts, as well as their location in the room. These criteria affect where the fan will be installed.
Power. The characteristic is important when choosing, so that in the future the exhaust equipment can cope with the functions assigned to it.
The presence of protection against moisture. This indicator is marked in Latin letters IP. The minimum required value for a plumbing unit is IP30, but it’s better to invest a little and order a device with IP44
In the latter case, it will be located in a special sealed casing, protected from moisture and splashes.
Noise level
Few people pay due attention to this important characteristic, but in vain. After all, a silent exhaust system will make being in the bathroom and toilet more comfortable.
Given these subtleties, you can choose a model that will be inexpensive and satisfy all wishes.
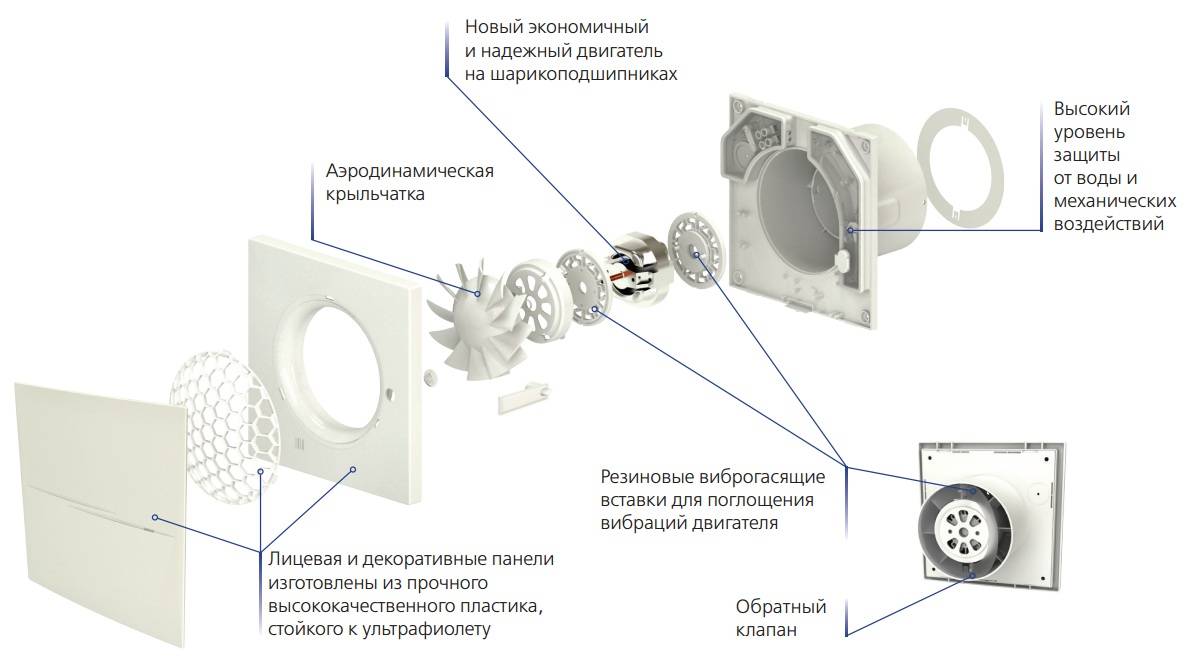
Typically, the fan package includes the device itself and four dowels that will be needed for its installation. In most cases, a cardboard box is used to pack the device.
Steps for connecting an exhaust fan
Connecting a fan in the bathroom and toilet is necessary to ensure air exchange in the room.
For normal operation of the device, it is required to perform correctly all the stages of installation, from planning to connecting to the switch.
Before installing the device, make sure that all conditions for its connection are met:
- The common air duct is not polluted, and although the draft is weak, it is there.
- The diameter of the hole in which you want to mount the unit and the dimensions of the fan itself are the same.
- Prepared wiring for connecting the selected model.
If ventilation is installed in houses of old construction, then in the bathroom, in the toilet and in the kitchen there are already ventilation holes made at the construction stage of the house. They can be used.
However, if redevelopment was carried out and it is required to move the air outlet to another place, it is permissible to install an additional pipe in this hole.
To connect the fan, you need to bring the appropriate electrical wires to it. It is best to remove them into the wall, but the use of a cable channel is also acceptable.
The second method can spoil the interior of the room, but at the same time makes installation easier and more affordable.
The following requirements apply to wires and sockets:
it is important to choose a cable with a cross section that would correspond to the expected load;
it is forbidden to install wires in a metal braid;
complete insulation of all wires is required;
it is important to provide the system with a residual current device and grounding.
The fan is assembled simultaneously with its installation in the ventilation system. The body is assembled first. Then you need to connect the electrical wires. And the last stage is the installation of a decorative grille.

Fan without built-in timer
The easiest fan models to connect without a timer. In this case, the optimal scheme is to connect in the bathroom through a switch. Even a novice master can do the job.
The location of the switch itself may vary. It can be installed at the entrance both outside the room and inside. The main thing is to provide protection from moisture.
It is recommended to use a three-wire cable to connect the fan. However, one wire is not always possible to use. Many simple and cheap models of fans do not provide for the possibility of grounding.
The fan can be connected either to one key with lighting, or to a separate one.
After connecting the wiring, the device is mounted in the ventilation box.
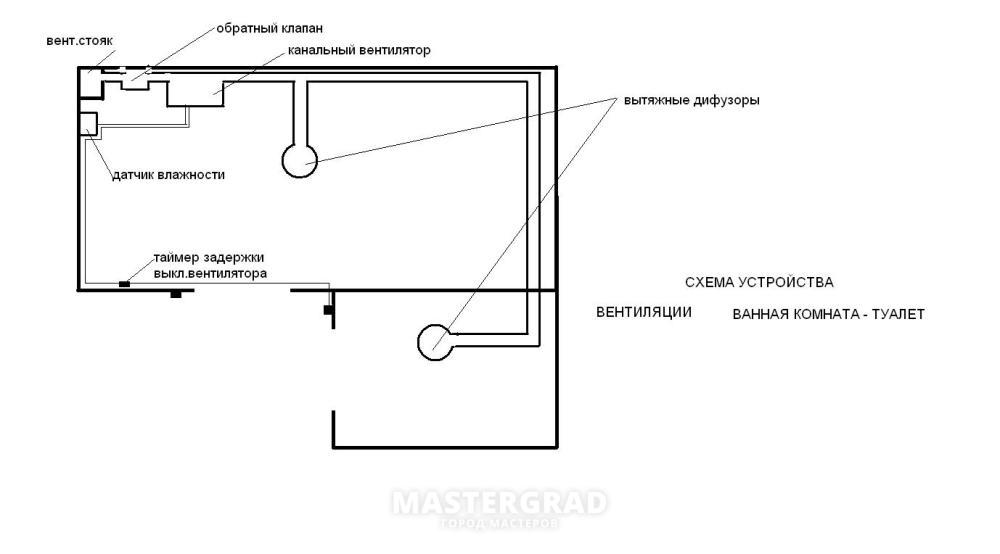
Fan with built-in timer
Many, equipping the bathroom, choose a fan with a timer for more efficient operation of the air exchange system. However, not everyone knows how to connect it correctly.
If necessary, you can independently connect the exhaust fan with a timer in the bathroom. To do this, first of all, you need to buy an overhead structure that can be mounted on a vent on the wall.
Before starting installation, carefully read the instructions for use. Despite the fact that all fans are essentially the same, there may be nuances in the operation and installation of the device.
There are several schemes for connecting a device with a built-in timer. Optimal is the use of a four-wire wire.
In this case, a separate switch is mounted for the device, and an additional core, which is usually used for grounding, is connected to the timer.
Installation of the ventilation duct
It is possible to assemble and install a ventilation duct in a private house that discharges exhaust air directly to the street from ready-made insulated elements. Such ventilation systems are produced by well-known manufacturers and are assembled as a designer. Their cost is high.
Choosing the Right Materials
Orange sewer pipes, which are used to conduct the outer part of the autonomous sewer network, help to solve the problem in a cheaper way. The walls of these pipes do not crack in the cold.
Choose the diameter of the pipe from the area of the room: 100 or 150 mm.The length of the entire pipe is calculated based on the fact that the ventilation duct should be located half a meter above the roof. The higher the pipe, the stronger the thrust.
Cutting ventilation holes
Put a plug on the upper end of the pipe so that precipitation does not get inside the ventilation pipe-channel. To remove air in the upper part of the plastic pipe, make oblong slots in a circle, the width of which is 20 mm, and the distance between adjacent holes is 30 mm. The length of the sawn rectangular windows should reach 250 mm.
Insulation of the walls of the ventilation pipe
In order to prevent condensation from forming in the installed ventilation duct due to the temperature difference in the attic and on the street, its walls must be well insulated. Suitable basalt wool or isolon.
- We wrap the entire pipe with foil insulation with the shiny side to the walls.
- We glue the connecting seam with foil tape.
- Then we wrap it with insulation again so that the seam falls on the other side of the pipe.
- And again glued with tape.
- After that, a home-made ventilation pipe-mine is wrapped around in a circle all completely with adhesive tape.
Air vent device
A hole is made in the ceiling of the bathroom in a private house, equal to the diameter of the insulated pipe. The upper end of the exhaust pipe is inserted into the opening made in the roof, and the lower end is inserted into the ventilation window cut out in the ceiling.
A home-made ventilation duct must be fixed in a strictly vertical position with clamps to the roof rafters or to other structures in the attic of the house. In the bathroom, a hole in the ceiling is decorated with a lattice, matched in size and color.For fastening use self-tapping screws or liquid nails.
Ventilation in the bathroom in a private house
Ventilation in the bathroom is very important. This is easy to explain by the fact that there is a systematic accumulation of wet steam and moisture, which provokes the development of mold.
As for mold, it settles in the lungs of a person, and this is fraught with the development of dangerous pathologies of the respiratory organs, ranging from a common cold to allergies and bronchial asthma.
In addition to the threat to health, life, mold adversely affects the condition of furniture, objects, materials. That is why, the correct installation of ventilation in this room is not a whim, but an urgent need.


The bathroom is a special room in the house, where there is a fairly high level of humidity, and the microclimate differs significantly from the rest of the private house. Given building codes, the temperature in the warm season should not fall below twenty degrees, and in the cold - less than twenty-five.
As for the level of humidity, the indicator should not exceed 65 percent. Such characteristics are able to ensure hygiene, comfort of all procedures. Exhaust ventilation is being built in the room, this helps to maintain an optimal level of humidity. Types of ventilation:
- natural as well as forced;
- rings in the door;
- it is possible to install a grate for ventilation;
- inlet.
The simplest and most affordable is the process of installing the lattice, rings. These materials are made of metal, wood, as well as polymeric materials. To install the rings, you will have to drill the appropriate holes, sand them and varnish them, after which you can put the rings.In a similar way, you can install a grille for ventilation, but you will have to make a larger hole in the door. Having completed the installation of the grate, rings, you should make sure that they are firmly held and cannot fall out.

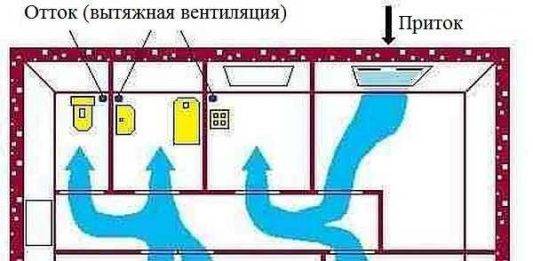
Ventilation scheme in the bathroom and toilet in a private house
Some owners of cottages equip bathrooms with air conditioners, but they are not able to provide full-fledged, high-quality ventilation. Thanks to him, it will be possible to change the temperature indicators, but the humidity level will remain unchanged. Often, these types are equipped with hidden ventilation shafts, they are decorated with appropriate grilles.
We recommend another useful article: Which is the best fan for extractor hoods in the bathroom to choose.
In a wooden house, the hood experiences much more stress, given the type of material. This also applies to those bathrooms that are equipped with wooden furniture.
It is important to remember that such material suffers from exposure to moisture, so an exhaust hood and an additional ventilation duct are required. It is not advisable to use the air conditioner, because it dries the air too much, and this is fraught with cracking of the wood.
The scheme of ventilation of the bathroom of a private house directly depends on the system used. This is a kind of drawing, thanks to which you can understand the principle of the arrangement of nodes, all elements and the air duct network. Regarding the axonometric scheme, it allows you to specify the places where there is an unorganized air flow and the location of the supply system.
You can even install ventilation with your own hands, using a detailed diagram.The main difficulty may lie in the fact that the base ventilation duct is located far from the bathroom, so it is necessary to prepare high-quality air exchange. For such purposes, it is worth equipping a ventilation sleeve exclusively for the bathroom with a stationary air duct orientation. If it comes to the exhaust shaft, then it must be located not behind the door, but strictly behind the wall. When the room is not too impressive in size, and the channel runs close, you can easily install forced ventilation using step by step instructions and diagram.
Types of ventilation
All types of ventilation in the bathroom can be divided into several types.
By air exchange
Natural ventilation in the bathroom - fresh air is provided by open doors and windows. Also, air exchange can be supplied by a ventilation grill in the bathroom. Air exchange is created due to the pressure difference between the external and internal. Today, the violation of the natural influx of freshness is associated with the installation of sealed double-glazed windows and doorways.
Bathroom fans: a little more about the types
If the installation of forced ventilation in the bathroom is a must, it is important to choose the right device and learn how to ventilate the bathroom. By appointment, all fans are divided into:
- exhaust - air flows are removed through the ventilation shafts;
- supply air - creating an additional supply of air masses and excess pressure, due to which the exhaust air goes into the mine;
- mixed or supply and exhaust, working in any direction.
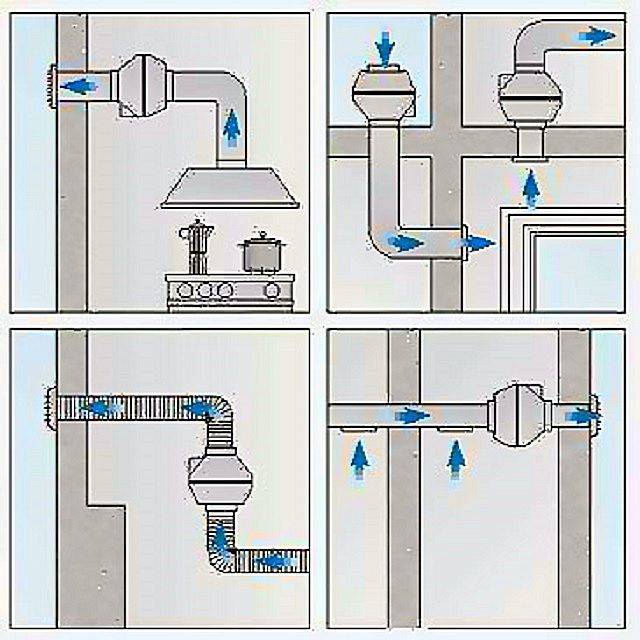
By design, ventilation happens:
- channelless - an option when the movement of air flows is carried out through a vent, the outlet of which is covered with a grill;
- channel - air masses are sent to areas where intensive cleaning from dust, moisture and dirt is required.
Fans and requirements for them
Types of bathroom fans
By type, fans can be divided as follows:
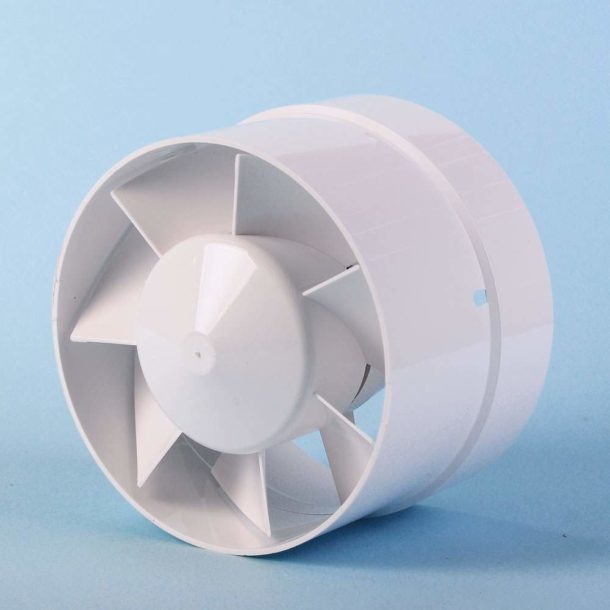
- channel - installation is carried out directly in the ventilation duct;
- radial - mounted at the outlet of the ventilation shaft and has a nice-looking case, where all the details are hidden;
- axial - the air flow is forced by the blades. The device is intended for installation in a ductless system, for example - ventilation in a bathroom on the ceiling;
- diametrically, where the functioning system looks like a drum (the efficiency of such a fan is very low);
- centrifugal - noisy in operation, but very productive fans;
- axial-centrifugal - the best type of device. The combination of good performance and low noise level makes it possible to mount this type in homes where there are small children or the elderly.
The list of requirements for ventilation devices is small:
- low noise level;
- ease of installation;
- convenience of work;
- case strength and protection against water splashes (if installation is planned in the bathroom);
- long service life;
- affordable price.
According to your needs, you can choose a fan according to your capabilities and install the equipment with your own hands.
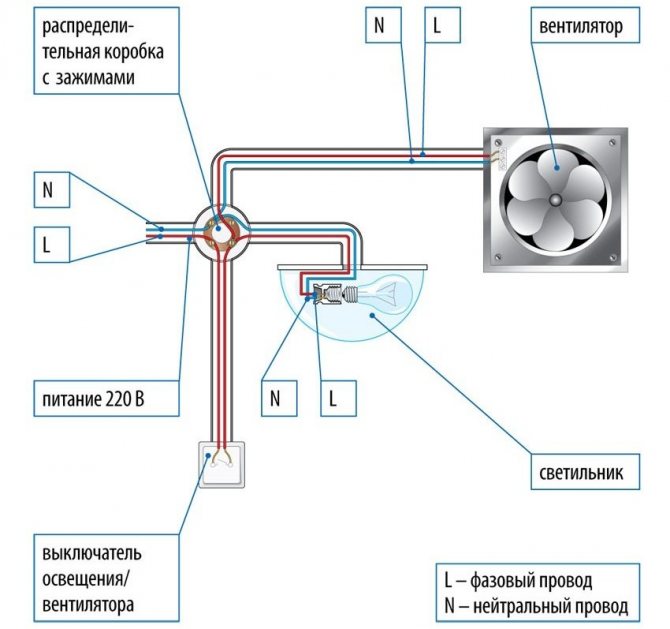
Fan connection diagrams
There are several different schemes for connecting an exhaust fan in a toilet or bathroom. The difference lies in the power supply to the device.


The wiring itself should be installed during repairs in the room, since the most correct from an aesthetic point of view would be to remove it into the wall. If this is not possible, you should think about decorative overlays or boxes.
There are three ways to connect to the mains:
- With a light bulb. When implementing this scheme, the device is connected in parallel with the light. Accordingly, while the lighting in the room is on, the fan will work.
- Separate switch. Not the most convenient scheme, since you have to constantly remember to turn on the hood. Of the benefits: if necessary, it is possible to turn on the device autonomously.
- Through automation. For this, a timer or a special sensor is used. Convenient, but more expensive way.
From a light bulb
The question is often asked on the forums how to properly connect the hood in the bathroom using the method of connecting the fan wiring in parallel with the light switch.
The light bulb mounting method is the cheapest and easiest way to connect the exhaust fan wiring. In this case, when you turn on the light in the room, the hood also starts to work.
The device turns off only when the light is off.
To implement this scheme, it is important to understand how to connect the fan to the light switch, and what are the pros and cons of this connection. The pluses include:
The pluses include:
- ease of installation;
- low cost.
The downside can be considered that the hood works even when it is not needed (for example, during the adoption of water procedures).
It is also important to remember that often the fan operation time in this case is simply not enough, and you have to leave the light on for a while.This leads to wasted energy
In addition, with frequent turning on and off of the device, the resource of the motor is generated, which leads to its speedy breakdown.
From the switch
Many people, having studied how to connect a bathroom fan to a light switch, as well as the pros and cons of this method, find that it does not suit them. For ease of use, you need to connect the device separately from the light.
This is necessary for those cases when long-term ventilation of the room is required after people have left it. For example, after taking water procedures with a lot of steam.
Such a scheme for connecting an exhaust fan in the bathroom and toilet is more expensive and difficult to install. To implement it, you will need an additional cable, as well as a device responsible for turning on the device.
In fact, the circuit itself repeats the circuit for connecting a light bulb, only instead of a lighting fixture there is a fan. All this can be displayed on a two-key switch, one button of which will be responsible for the light, and the other for the hood.
Of the pluses, it should be noted the possibility of autonomous activation of the hood. The disadvantages include the lack of automatic shutdown (a forgotten device can work for a very long time).
Through automation
The most modern is the scheme for connecting a fan in a bathroom with automation elements - with a timer and a humidity sensor. The most interesting should be considered the possibility of connecting a timer.


This allows you to program the fan run time. For example, you can set the settings so that the device works for a while after a person leaves the room, and then turns itself off.
Thus, the room is sufficiently ventilated, and at the same time there will be no unnecessary energy consumption.
The installation scheme itself is quite simple - it is similar to connecting a fan through a switch. The main difference is that, in addition to the zero and phase terminals, there is also a signal wire that is connected to a lighting bulb.
The standard workflow is as follows:
- The fan turns on at the same time as the light.
- As long as the light is on, the extractor is working.
- After turning off the lighting, the fan runs for a while and automatically turns off.
- The main difference between a fan with a humidity sensor is that the device has a built-in sensor that measures the amount of water vapor in the air. When the humidity rises to a certain level, it sends a signal to the relay, which closes the circuit.
The fan starts to work. When the humidity in the room decreases, the circuit opens, stopping the operation of the hood.
How to make ventilation in the bathroom and toilet
The process of installing ventilation can be done on your own, following some recommendations and rules:
- Using a brush, clean the channel of the system.
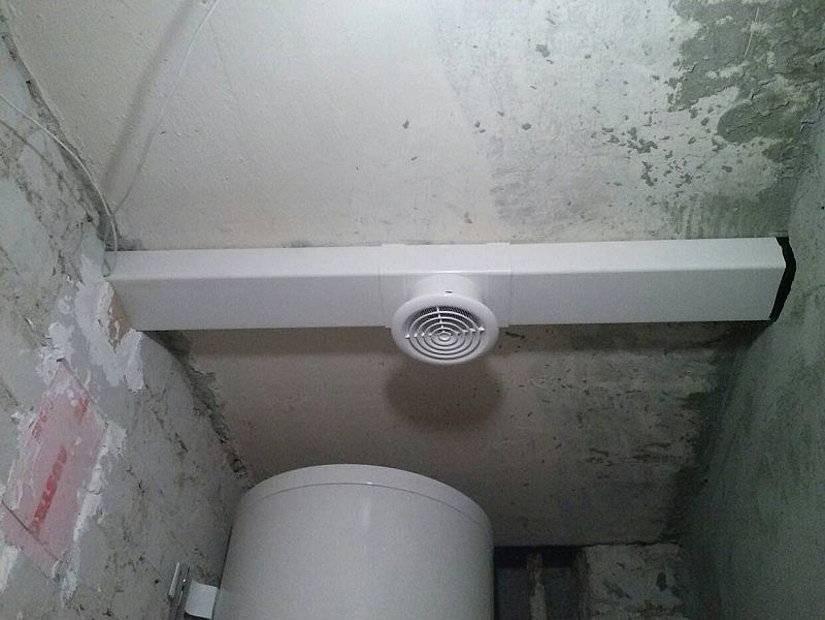
- Fixation of ventilation is carried out in a zone of high humidity, namely under the ceiling and always opposite the air source.
- It is necessary to make an accurate marking of the installation, the location of the wiring, taking into account the location of the source of electricity, the size of the fan.
- Installation work is carried out using glue, grating, dowels, screwdrivers. A hose is useful for the air duct, and a drywall box is used to mask the unit and pipes.
- Place a special fan in the duct. If an overhead model is used, then the box is first attached.Connect the terminals to the cable line, but only two-wire.
- Install the case, for which there are built-in latches. If they are not, you can use dowels.
- When there is no possibility of a direct connection, you need to build up an air duct that is masked or decorated. You will need any type of hose - flexible or rigid.
- In order to consume the minimum amount of electricity, it is rational to use the device, it is desirable to activate the fan at the moment when the light turns on. To do this, you need to run a special cable to the switch.
- After completing the installation, connecting to the network, you can apply voltage, this is required to check the operation of forced-type ventilation.
When the equipment is not chosen exactly, and the calculations are not made correctly, the system will not work very efficiently. In simple words, it will work with the opposite effect, as the air will be blown back into the room.

The exhaust fan was installed next.
It is easy to solve the problem if you put a check valve. The selection of this device directly depends on ventilation. If the channel is vertical, then it is necessary to take a horizontal valve with the opposite effect. In the case of a longitudinal duct, the help of a vertical valve will be required. To automate the entire ventilation process in the bathroom and toilet, you can use the timer. With its help, the established regime will be maintained, regardless of the presence and absence of the owners.
Summing up, it should be noted that ventilation plays an important role in the normal functioning, the operation of appliances, the condition of furniture, and most importantly, human health. Constant humidity, lack of full air circulation, are accompanied by the appearance of mold, dampness, and unpleasant odors. Given the wide choice of ways of ventilation and ventilation, you can choose exactly the one that you can mount with your own hands.
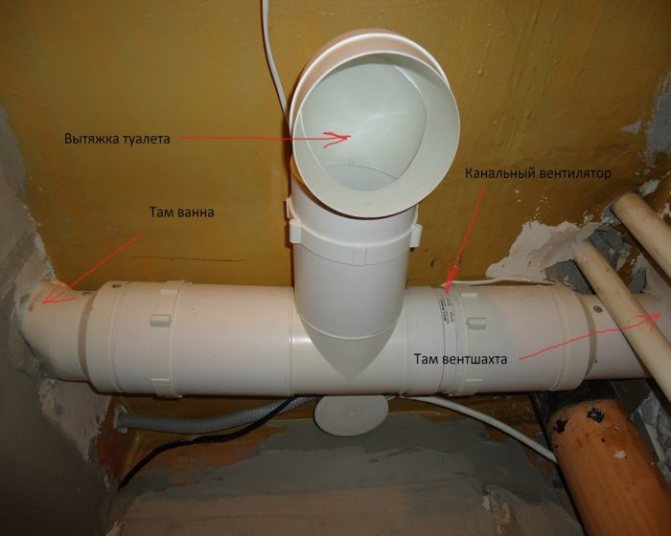
Features of ventilation installation
If for some reason there is no ventilation in the bathroom, it is not so difficult to create the necessary system.
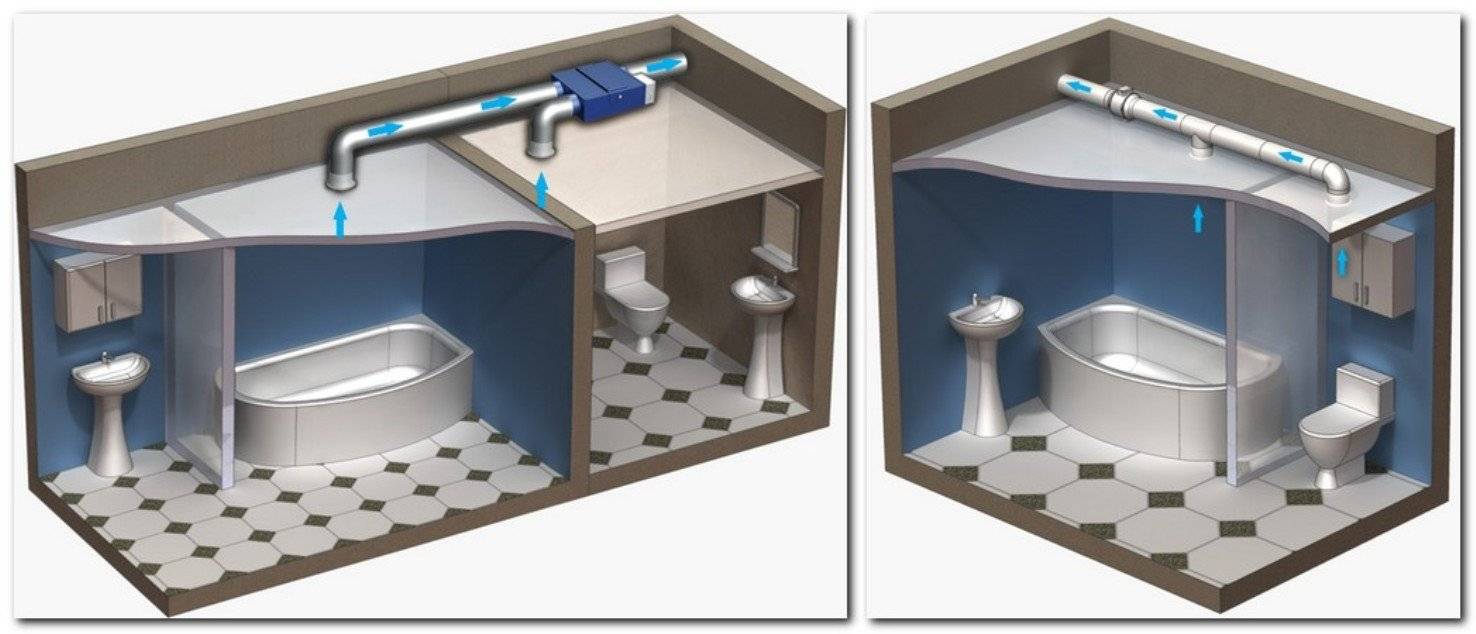
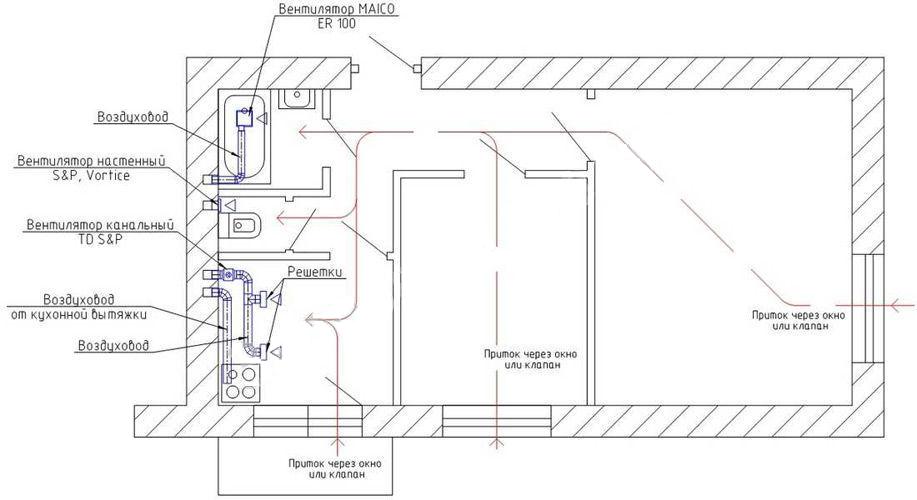
Apartment buildings are usually designed in such a way that the ventilation duct is located directly behind the wall of the bathroom or toilet. It remains only to carefully make a hole in the right place (if there is none) so that it goes into this channel.
A radial axial fan is installed inside the opening. The device is connected to the power supply, observing all the requirements for the operation of electrical appliances in rooms with high humidity.
If necessary, mount additional controls (timer, gyroscope, etc.). The niche is closed with a beautiful decorative lattice.
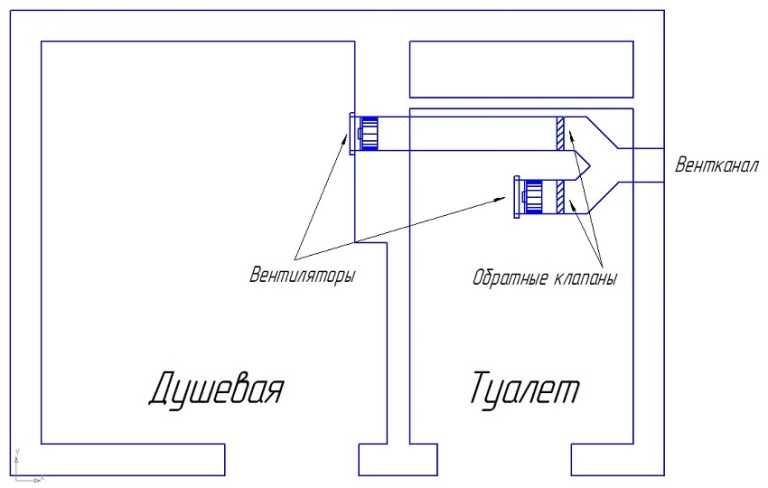
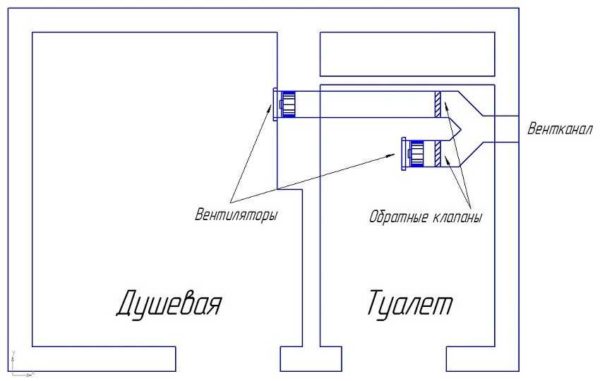
If the apartment has a separate bathroom, and the ventilation duct is located outside the walls of both rooms, the second fan is installed in the same way as described above.
Otherwise, a vent is made in the wall separating the toilet and bathroom. A fan is also placed in this opening and covered with decorative screens on both sides.
Sometimes it is more convenient to use decorative grilles, in which the design provides for mounting the fan in special slots.
The figure clearly shows the connection diagram of the exhaust fan to the power supply using an timer, which allows you to turn off the fan some time after the visitor leaves the bathroom
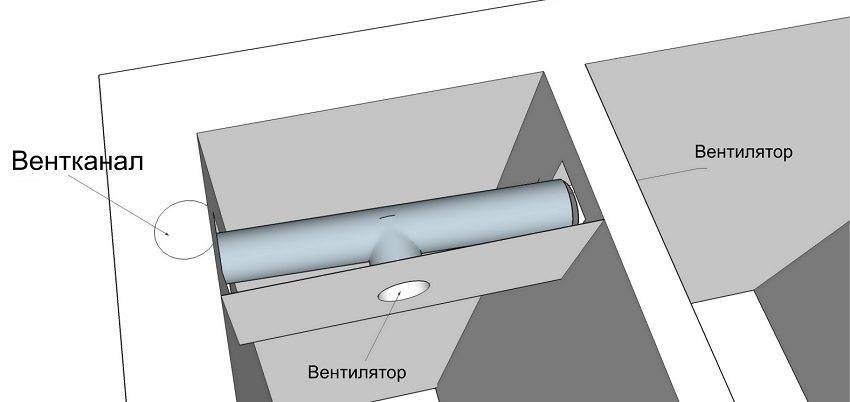
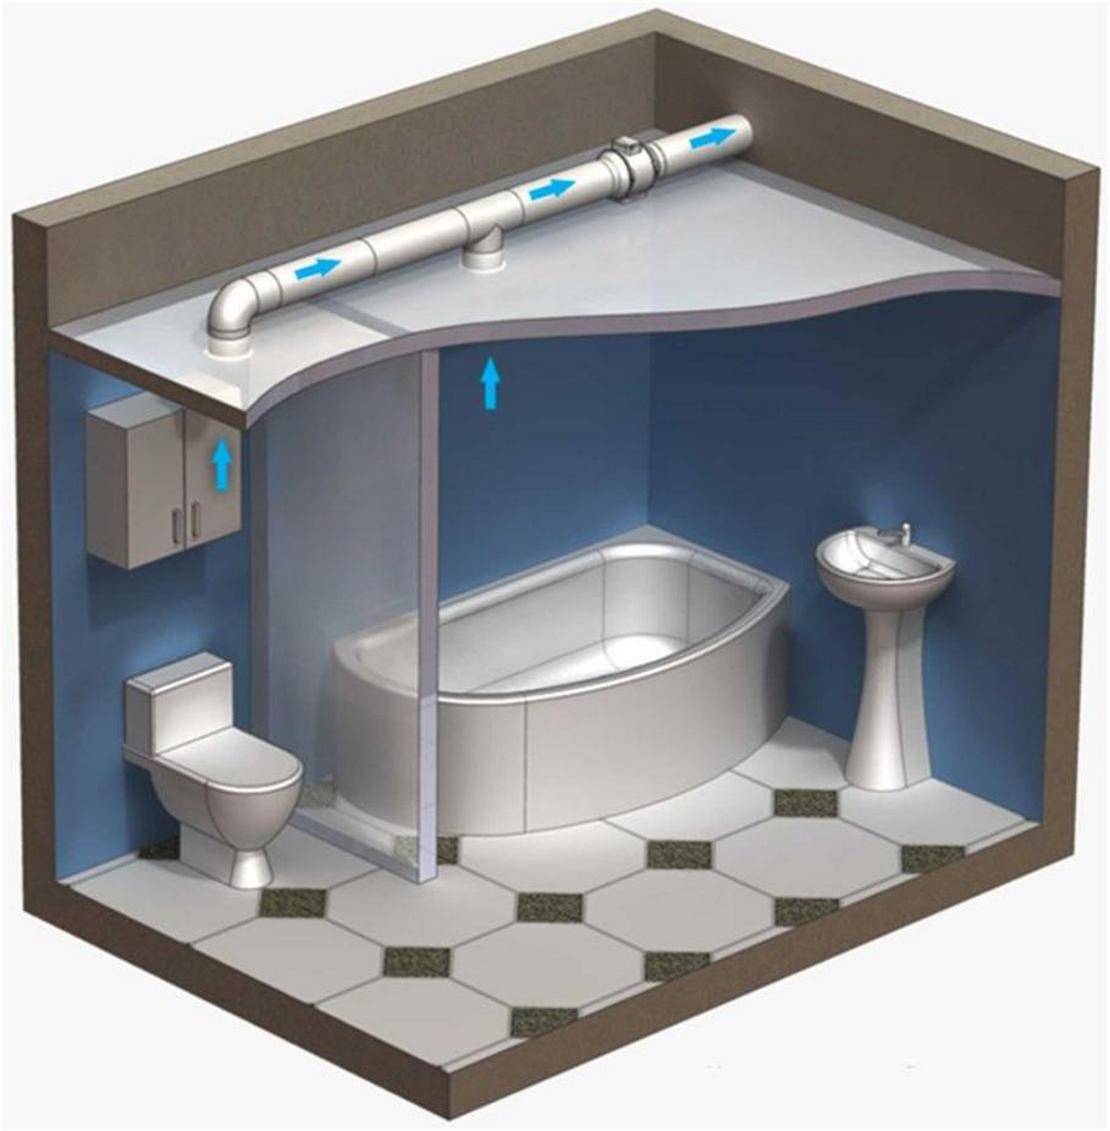
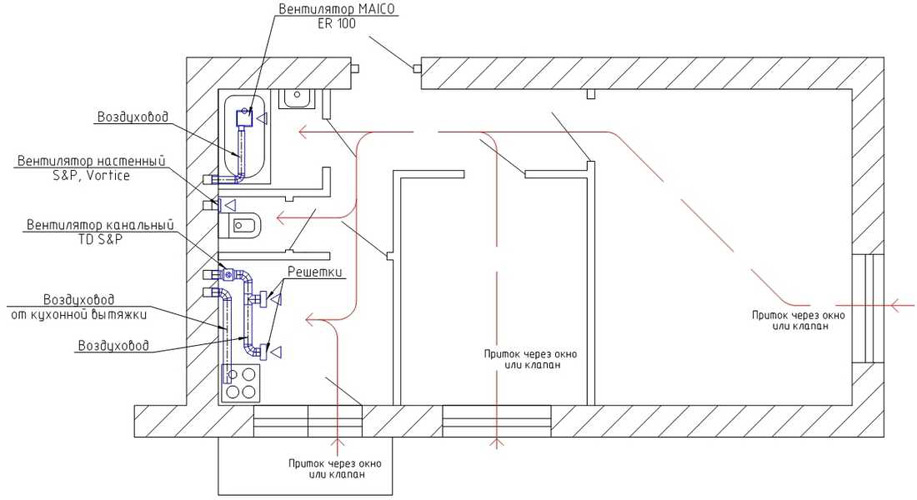
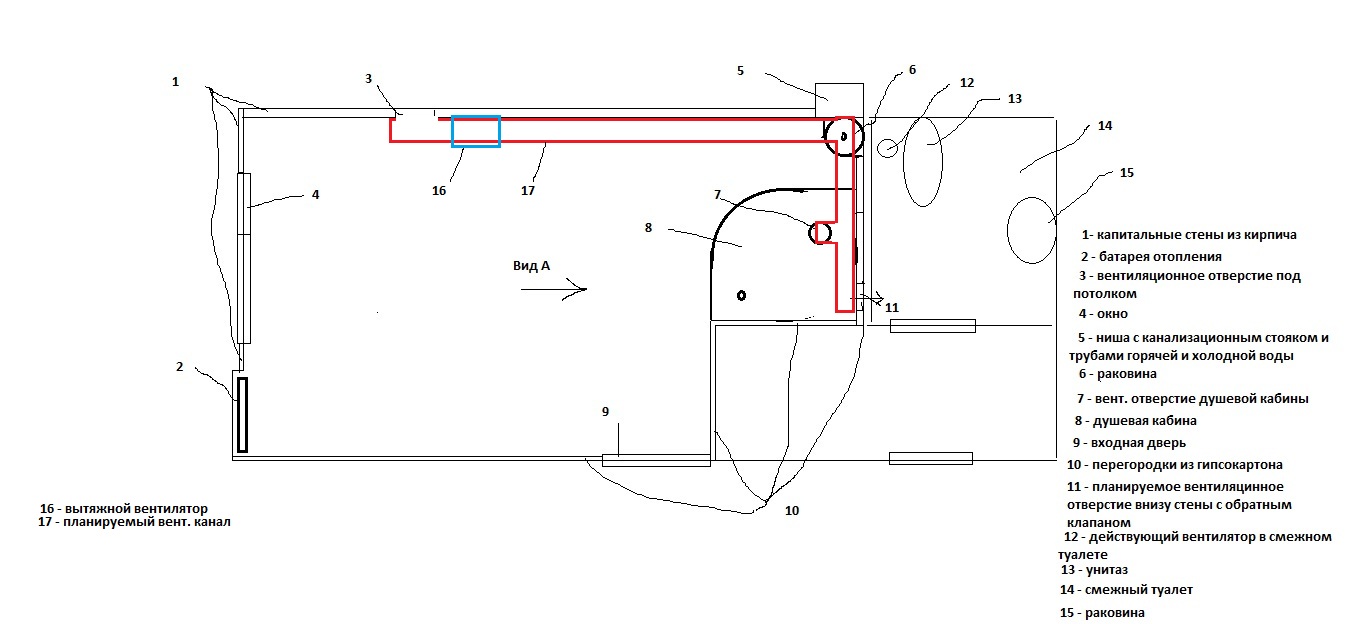
It is somewhat more difficult to solve the problem of ventilating a bathroom when the ventilation duct borders on another room. In this case, you will have to create duct ventilation.

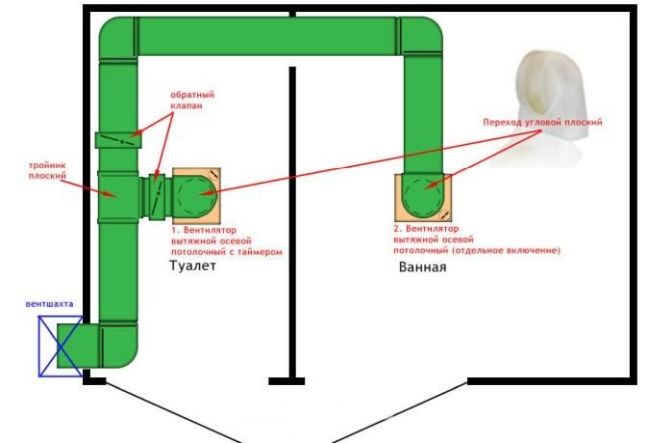


First you need to choose a place for the vent in the bathroom and toilet. Then it is necessary to draw up a plan for the placement of the ventilation duct, along which the air masses will move out.
When creating duct ventilation in the bathroom, a flexible corrugated box is used only in small areas where the installation of other structures is impossible or difficult
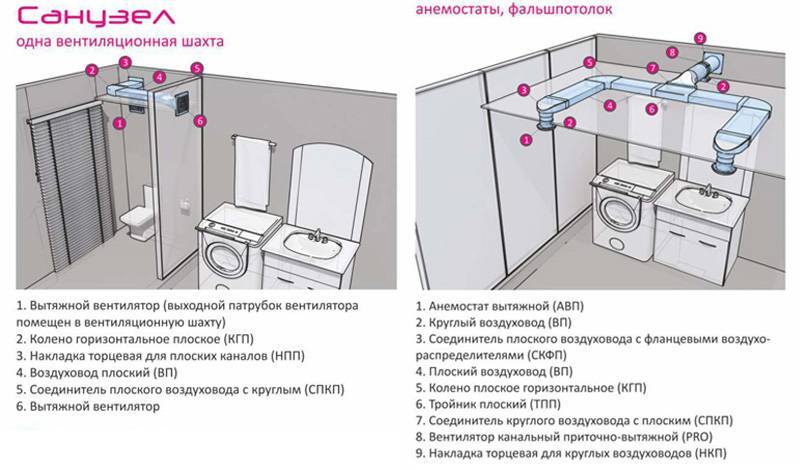
There are the following types of ventilation ducts:
- plastic round or rectangular section;
- hard or soft corrugated metal;
- metal, tin or galvanized, usually rectangular.
Plastic boxes are easier to install and lighter in weight than metal structures, while they are durable and easy to care for.
Therefore, plastic structures are confidently replacing metal from the construction market. Corrugated products are used extremely rarely, they are valid only for short distances and are used only in particularly difficult cases.
It is recommended to install the box even during the repair work in the house or even before they begin, however, the installation of the fan and decorative grilles is carried out after finishing work is completed.
After the installation of the ventilation system is completed, it is necessary to check the operation of the equipment.
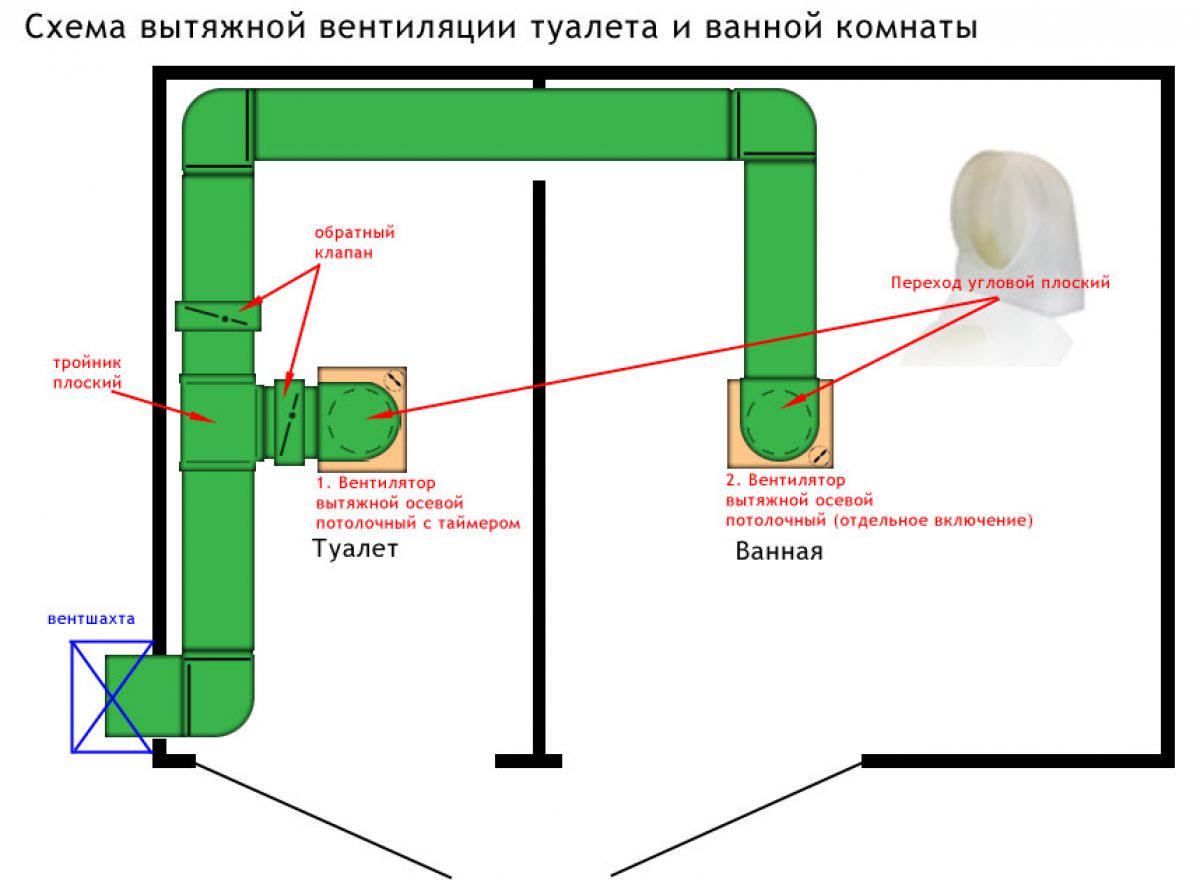
To create duct ventilation in the bathroom, metal or plastic boxes of rectangular or round section should be used.
Conclusion
 The quality of the air a person breathes is of great importance. This affects his well-being and health. Regular airing is not the best solution to ensure the supply of fresh air to your home, since environmental conditions are poor in most cities.
The most reasonable solution in order to maintain the humidity level at an optimal level and ensure the removal of exhaust air from the room is to install a ventilation system in the bathroom and toilet. It helps to avoid the occurrence of such a phenomenon as mold, which often appears in the bathroom, where humidity conditions are constantly high.
Even if you have already figured out how to make a hood in the bathroom, you should not rush to install a new ventilation system. First you need to carefully examine the old system and try to restore its effectiveness. It often happens that the ventilation in the bathroom is simply clogged with debris that appeared in it during repair work. Otherwise, you need to purchase a fan for installation in the bathroom or bathroom
When choosing this element of the ventilation system, it is necessary to pay attention to the number of people living in the apartment, as well as the area of \u200b\u200bthe room


