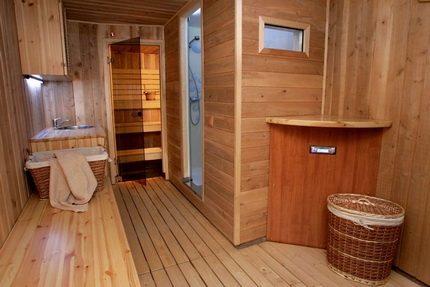
- Proper sauna ventilation: technical requirements
- Variants and layouts of ventilation ducts
- How to make ventilation in the bath with your own hands
- Recommendations for the arrangement of bath ventilation
- The ventilation system in the bath: what can it be?
- Useful video
- Natural ventilation in the bath
- Forced ventilation
- Types of forced ventilation
- Exhaust ventilation
- Forced ventilation
- Supply and exhaust ventilation
- Standard schemes of ventilation systems
- Mechanical scheme
- natural ventilation
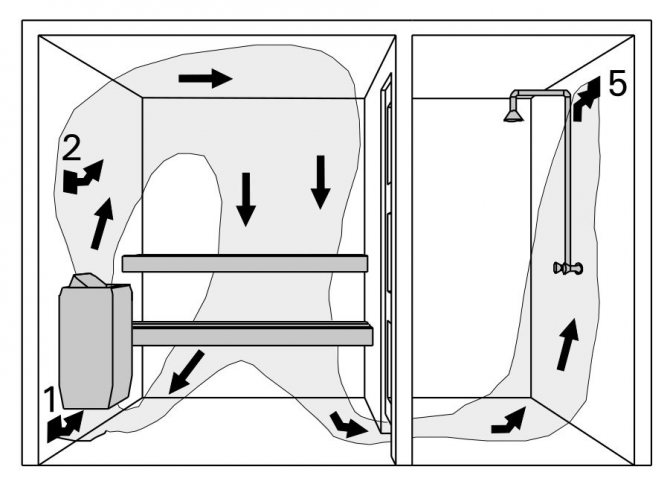
- Supply and exhaust ventilation system
- Proper ventilation of the sauna or bath
- The main laws of proper ventilation in the sauna
- The three simplest sauna ventilation schemes
- How to make ventilation ducts?
- PREPARATION FOR INSTALLATION OF THE ELECTRIC OVEN
Proper sauna ventilation: technical requirements
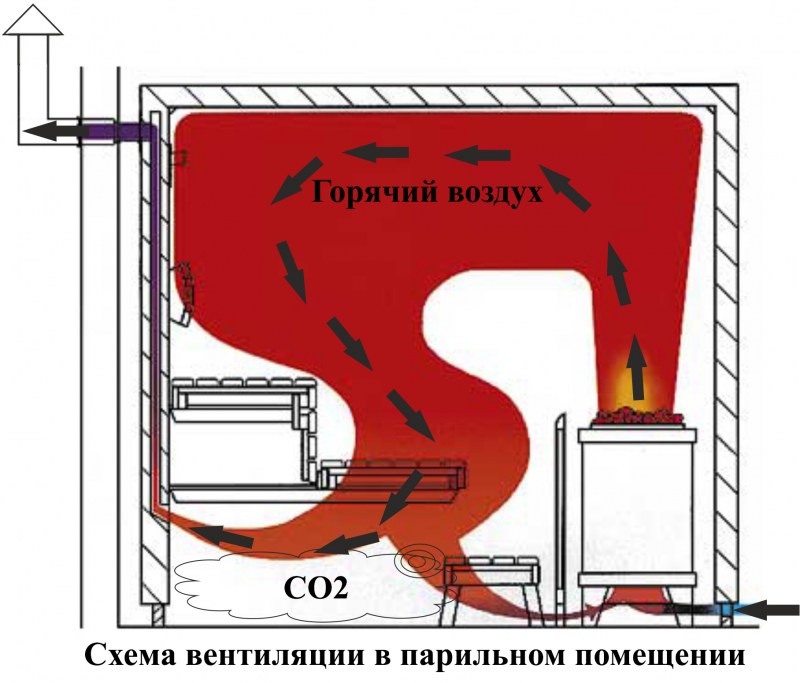
The supply and exhaust ducts in the steam room must be designed in such a way as to create an air balance. The masses should not stagnate or be rapidly withdrawn, the outflow and inflow should be adjustable so that it is possible to predict the direction of the flows. The formation of drafts is unacceptable.
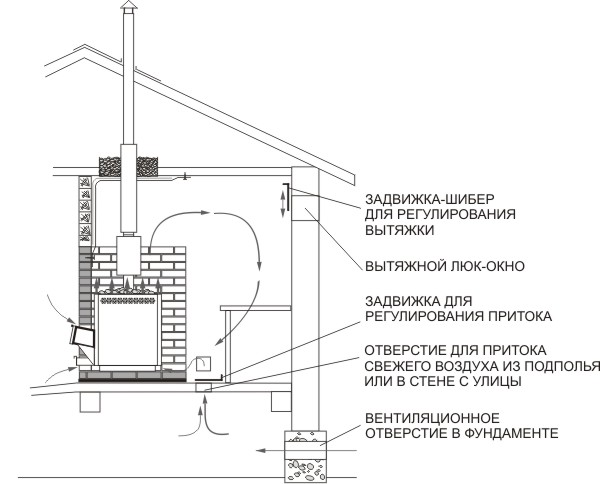
When deciding how to properly ensure air exchange in the sauna, it is necessary to design it correctly at the initial stages: at least one wall of the steam room should border on the street - an exhaust hole will be made in it. Under the door leading directly to the heated zone, it is necessary to provide a two-centimeter gap.
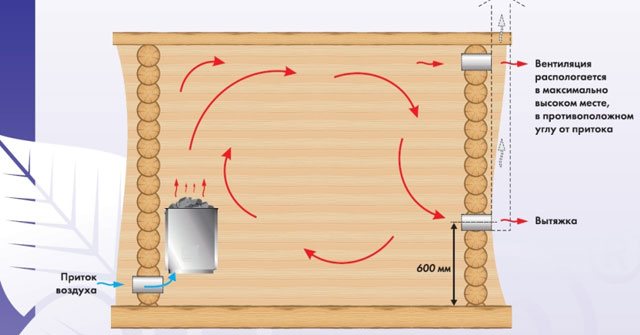
Every hour, at least 4 complete air changes should occur in the room, the flows should be directed from the recreation area to the utility sites, bathrooms. The system is designed so that the air passes from the steam room to the washing room with a toilet, then to the vestibule and already to the street.
The outlet of the exhaust duct must be above the roof level. The inflow, in turn, is arranged at a level not higher than 50 cm from the floor in close proximity to the furnace on the wall opposite the exhaust duct. The introduction of forced air exchange is accompanied by the installation of a ventilation grill, it is located 2 meters above the ground level.
If a gas water heater is used in conjunction with a steam room, a separate exhaust duct is installed for it. It is advisable, if possible, to reuse the hot air generated in the steam room: for example, it can be directed to heat the rooms adjacent to the sauna.
Variants and layouts of ventilation ducts
In the bath, you can use different options for the location of ventilation communications, providing for natural air circulation and the use of a fan.
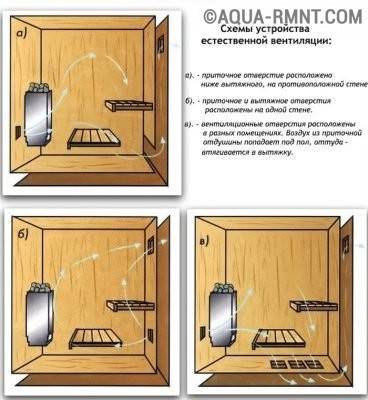
Various options for the ventilation device differ in the location of the channels, but provide high air exchange efficiency
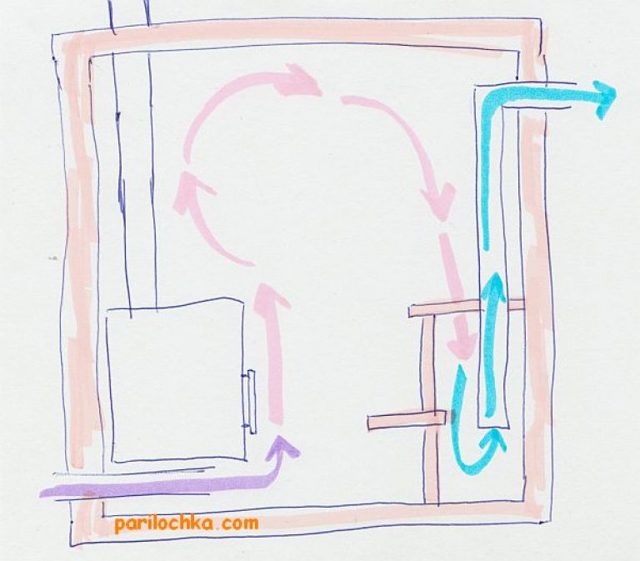
One of the proposed schemes of natural air exchange, providing for the following options for the placement of ventilation lines, will ensure comfortable acceptance of bathing procedures:
-
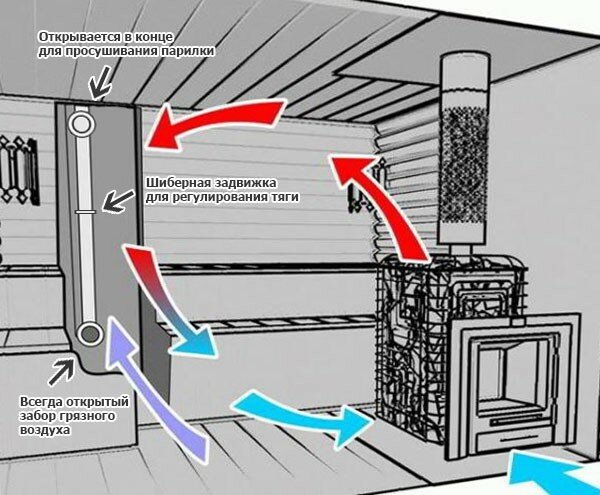
The entrance channel is made above the floor level behind the stove. The exhaust pipe is placed in the ceiling area of the room on the opposite side of the steam room. This arrangement of the holes provides heating of the cold air entering the steam room upon contact with a heated furnace. The air masses enveloping the stove gradually rise to the upper part of the steam room, circulate along the ceiling and gradually decrease, leaving through the exhaust line.
-
The supply channel is located 0.3 m above the floor level in the opposite zone from the heated furnace. At the same time, the inflow and outflow of air masses is carried out through the ajar blower of the sauna stove heated during operation and the chimney. This method provides air exchange in the room only during the operation of the furnace.
- The opening of the inlet channel is made behind the furnace above the floor level by 0.2–0.3 m from its surface. The function of the outlet channel is performed by the gaps in the boards of the ventilated floor. The cold air masses entering the room are heated, in contact with the heated stove, and move to the ceiling. The cold air located in the floor area is displaced through the gaps between the boards and goes outside the building.
To achieve a favorable temperature regime and comfortable humidity, air exchange schemes provide for the installation of a fan:
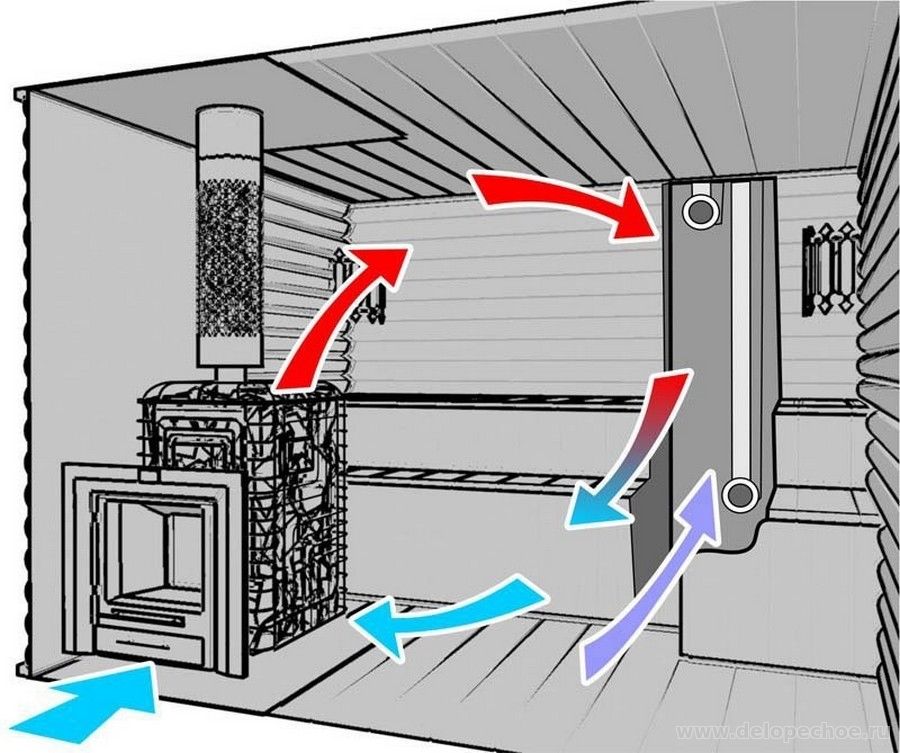
- The inlet channel is located behind the heating device above the floor level at a distance of 0.3 m, and the outlet is in the opposite zone above the floor by 0.2 m.The exhaust fan is mounted in the outlet channel and provides air exchange in the room.
- The exhaust ventilation duct and the inlet are located within the same wall in its upper and lower parts. On the supply line, located 0.3 m above the floor level, a fan of the required capacity is mounted.
-
The supply opening is made at a distance of 0.3 m from the bottom mark behind the heating device and is equipped with a fan. The hood is carried out in the lower part of the opposite wall at a distance of 0.2 m from the surface. The incoming fresh air during circulation is heated by a heated stove and smoothly distributed throughout the steam room. Gradually cooling down, the air masses descend to the floor and leave the room through the exhaust duct.
For example, to determine the required air exchange in a steam room with an area of 10 m2, having a height of 2 meters, it is necessary to multiply the volume by the air exchange coefficient equal to 5 (we already said above that the air in the steam room should be completely updated 5 times per hour). The resulting fan performance value is 10 x 2 x 5 = 100 m3/h.
How to make ventilation in the bath with your own hands
Initial data. The architectural features of the bath do not provide for air to enter through the cracks in the floor, doors, windows or the furnace. It is necessary to make holes for both entry and exit of air. There is no inner and outer wall cladding, the bathhouse is built of sawn timber.
Step 1. Decide on the location of the input and output channels.
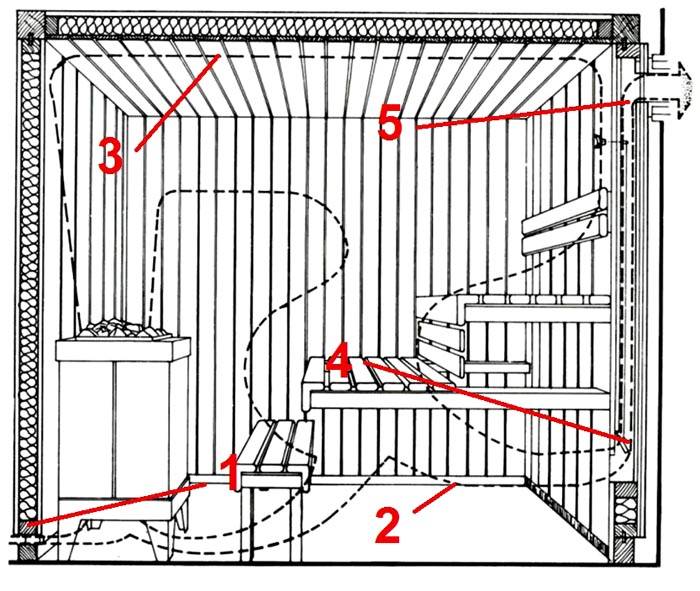
We have already mentioned that it is better to place the inlet channel near the stove at a distance of about 20 centimeters from the floor level. Exit channel diagonally under the ceiling.This position of the inlet and outlet openings will ensure the distribution of air flows throughout the volume of the room. Also, the inlet air will not cool the flooring. Channels should be easily accessible. There are recommendations to make an exit hole in the ceiling. We are opponents of such a decision, humid air will certainly cause great damage to the entire rafter system.
Exhaust opening under the ceiling
Step 2 Purchase or make your own grills and valves.
They can be of various sizes and geometric shapes: round, square or rectangular. At the same time, take into account the materials of the future cladding of external and internal walls, consider how the decorative grilles will be attached to them.
Wooden ventilation grill for a bath
And one more thing - from the outside of the bath, the holes should also be closed. Moreover, the closure should be as tight as possible, to prevent moisture from rain or snow from getting on the log house crowns.


Step 3. Make holes in the walls.
Air vent
The most time-consuming operation, you have to work manually. Pre-in the marked places, you need to drill holes around the perimeter. The closer they are to each other, the easier it is to gouge the wood later. When the holes are drilled, take a chisel, a chisel and a hammer in your hands and begin to destroy the timber lintels remaining between the holes. Ventilation holes should be made 1-2 cm around the perimeter more than the inserted pipe. The fact is that then this pipe must be insulated to prevent the appearance of condensate on wooden structures.
Bit
Use only a sharp chisel and chisel - the timber will have to be cut across the fibers, this is quite difficult.If the thickness of the beam is 20 centimeters, then it is better to make half the depth of the hole from the inside of the bath, and the second half from the outside. If you have extensive experience using a gasoline saw, then you can cut a hole. But we immediately warn you that it is very dangerous to work with a gasoline saw in such conditions. You will have to cut with the end of the tire, while grabbing the tree with the lower part of the chain, the saw will be pulled out of your hands. This way of using the saw is strictly prohibited by safety regulations, remember this.
If there is a need to dilute the inlet in the wall and in the bath, then buy a pipe with an elbow. It is advisable to use not round pipes, but rectangular ones, they take up less space under the lining of the inner walls of the steam room.
Rectangular aluminum pipe is used to create ventilation ducts
Be sure to seal the joints of the elbow and pipe with silicone and wrap with adhesive tape for reliability.
Scotch metallized
Step 4. Lay foil or plastic wrap and mineral wool around the perimeter of the holes, the wool layer should be dense, without gaps. It will not be possible to make the edges of the hole absolutely even, carefully make sure that the waterproofing is not damaged by the sharp protrusions of the timber.
Step 5. Insert the pipes into the holes in the log house. They should enter with little effort, quite tightly. In order to increase the reliability of sealing and fastening, be sure to go around the perimeter of the hole and pipe with foam. Mounting foam eliminates all invisible gaps in thermal insulation between the pipe and the wall and firmly fixes it in the desired position.
We recommend foaming the holes and after wall cladding, the foam will eliminate the gaps between the wall and the vapor barrier. During the expansion of the foam, the vapor barrier will press tightly around the uneven hole, all possible small damages will automatically close.
Air vent
The pipe to the hood may not be insulated, warm air comes out through it. But we advise, just in case, to do all the operations for her. First, you will lose a little time and money. Secondly, you will make additional and reliable protection against penetration of atmospheric moisture to wooden structures.
When both holes are prepared, you can start upholstery and install decorative grilles with adjustable throughput parameters.
Decorative shutters
Recommendations for the arrangement of bath ventilation
To improve air exchange inside the bath rooms and extend the life of wooden structures, experts advise thinking about arranging a ventilated floor. To do this, flooring boards should be laid with a certain gap between the elements. It can reach up to 10 mm. Small supply openings, the so-called vents, are laid in the foundation of the building.
Ventilated floors are easy to recognize by the gaps between the elements. This design contributes to the rapid drying of wooden parts, which significantly extends their service life.
Small vents are also made in opposite walls to help activate air exchange.
Important note. These holes must be protected with a metal mesh, otherwise it is possible that rodents will settle in the bath
It is advisable to lower the level of the blower of the stove below the floor.So in the process of heating, the blower will additionally work as an exhaust hood.
If you plan to equip forced ventilation, it is important to choose the right equipment. It must be remembered that only special moisture-resistant and heat-resistant devices are suitable for installation in the bath.
It is desirable that there is the possibility of regulating their power. In this way, it will be possible to respond as flexibly as possible to changing conditions. For example, in winter, with a significant temperature difference, traction will be very good.


The device will be able to operate at minimum power, while in the summer with a minimum difference it will have to function with greater efficiency. In addition, you should accurately select the type of fan. It can be channel, which is placed inside the duct, or radial. In the latter case, the device is mounted at the outlet of the ventilation shaft.
Another important point is the ventilation ducts. Depending on the type of system and the wishes of the owner, they may be different. The most reliable and durable are the so-called solid products. They are made of galvanized steel or special plastic.
A slightly less reliable, but easier to install option is flexible air ducts. They are made as a corrugated pipe with an internal metal frame.
It is desirable to equip ventilation openings with blinds and adjustable grilles. The latter may look like this. It greatly facilitates the adjustment of the intensity of the air flow.
Installation of bath ventilation is not particularly difficult. First, make all the necessary holes and mount the ventilation ducts. If necessary, fans are mounted inside or outside the box. It depends on the device type.Next, electrical appliances are connected to the network. The way they are connected depends on the mode in which the fan will operate.
The equipment can turn on automatically as the concentration of humidity and carbon dioxide in the air increases. You can turn it on simultaneously with the lighting, using the motion sensor or by pressing a separate key.
Switching off can be carried out using a timer, then it will come after a predetermined time has elapsed, or when the lighting is turned off.
The ventilation system in the bath: what can it be?
Ventilation systems in baths are divided at once according to several parameters:
- forced or natural;
- exhaust, supply or supply and exhaust;
- local or public.
Let us explain that forced differs from natural by the presence of fans that forcibly drive air in or out, local differs from general exchange by its local character, for example, the chimney above the stove is local ventilation, and vents are part of general exchange.
As for the supply, exhaust and their combination, these are indications of which air is directed where: the exhaust drives the exhaust air out, the supply air drives fresh air in, and their combination creates a balanced air exchange inside the room.
These are general terms for any ventilation, but our task is to consider a bathhouse that has its own specifics. We advise you to familiarize yourself with the dependence of ventilation on the type of bath (8 types).
Useful video
Watch a short video, as one of the options for organizing ventilation in the bath:
Natural ventilation in the bath
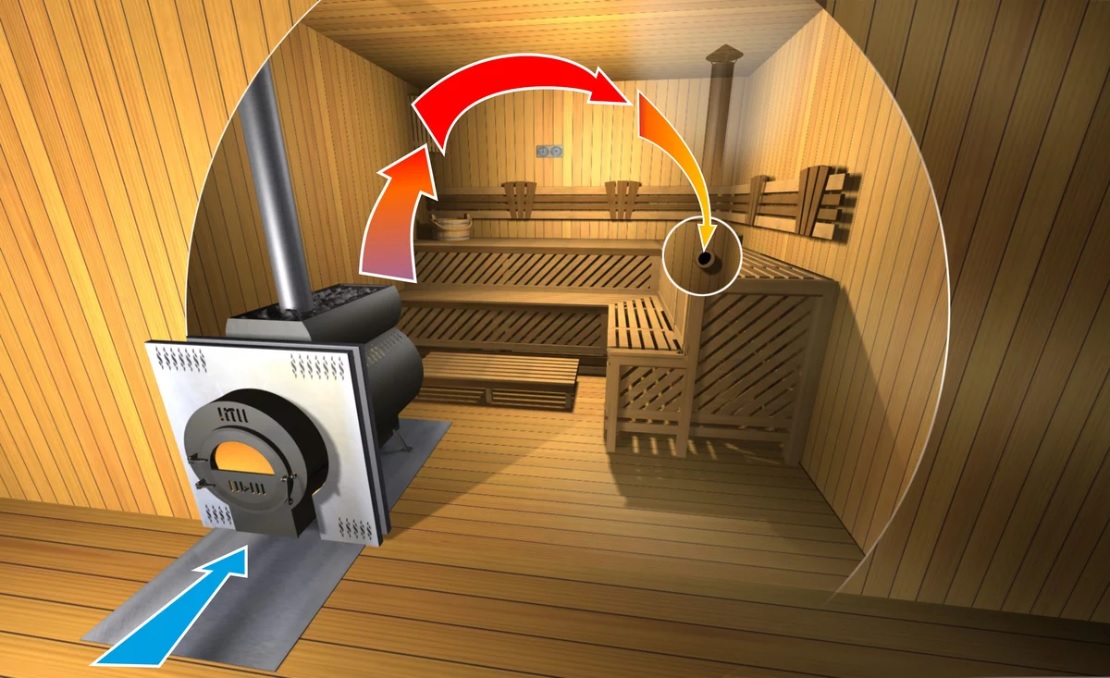
It works on the principles of physics, which say that heating makes air lighter and causes it to rise.And an increase in the volume of cold air accelerates the movement of hot air. Knowing about this property, you can not install any devices at all, there are enough ventilation holes, the location of which will make some of them supply air, and others - exhaust.
And in the bath there is a stove, and this is a very favorable circumstance for the direction of air circulation. If the natural ventilation inlet is located near the floor next to the blower, then the stove itself will draw in fresh air, without any fan. Also, raising the finished floor just above the hole under the firebox contributes to improving traction.
The exhaust opening is usually made on the side that is opposite the wall with the supply opening, but this is not the only option.
Forced ventilation
If fans are placed in the same holes, then you can not be afraid of calmness or other weather conditions that adversely affect the air circulation in the bath.
In principle, there is no big difference between natural and forced ventilation in the circuit itself, it is only a matter of which holes the fans are in. Because you can not put them everywhere, reinforcing only the exhaust or only the inflow. But by creating a large difference between the inflow and outflow, we change the pressure in the room. This is easily detected by the way the door slams. The task is to create a balance between outflow and inflow, and the air during bath procedures should circulate slowly, without causing a draft. And when drying, a draft is only good.
IMPORTANT! The direction in which the fan drives the air depends on the location of its blades, so it is important to ensure that there is no exhaust fan in the supply opening and vice versa.
Types of forced ventilation
There are the following types of forced ventilation (depending on the purpose of the fans):
- exhaust;
- supply;
- supply and exhaust.
Let's talk in more detail about each.
Exhaust ventilation
In the design of exhaust ventilation there is a fan-exhaust. It is installed on the exhaust outlet of the ventilation system. There is also a supply hole in this type of system. Usually these are air ducts with ventilation grilles, windows with plugs, a gap under the door, etc. Exhaust ventilation reduces the air pressure in the steam room (creates a vacuum), which is compensated by the influx of fresh outside air.


Ventilation with an extract effectively removes harmful gases, unpleasant odors, excess moisture. This is especially true in showers, washing rooms, rooms with a pool, bathrooms of a bath.
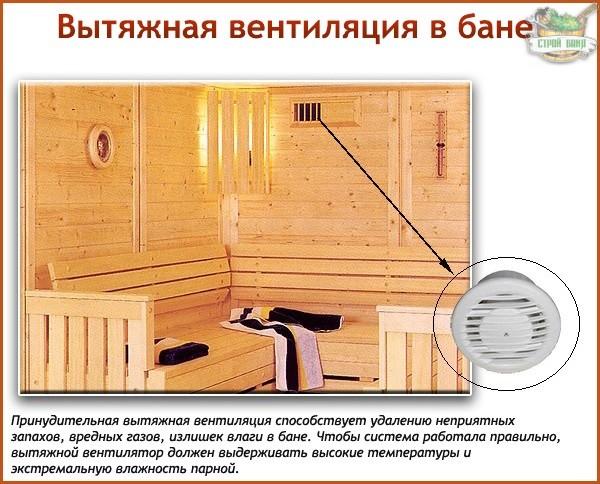
The exhaust ventilation device is simple. Usually it includes a fan and a ventilation duct. Sometimes, when a powerful hood is used, the system is supplemented with a silencer.
Forced ventilation
Supply ventilation almost completely copies the exhaust system. But the fan is not installed to remove the used, but to supply fresh outdoor air.
When the supply system is operating, the pressure in the room increases, respectively, the exhaust air is drawn out through the exhaust ducts, doors, vents, gaps in the floor, ceiling, and walls.
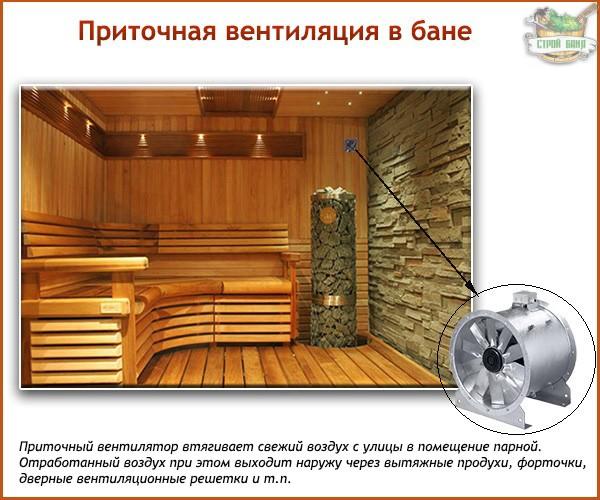
Supply fans work to take in cool (and in winter - cold!) street air.To prevent this from reducing the temperature in the steam room, the ventilation system is equipped with special air heaters. Filters are used to purify the supply air.
Supply and exhaust ventilation
This is a combined system consisting of a device forced air supply and mechanical extraction. In addition to fans, it can be equipped with recuperators, filters, silencers. It is possible to make the supply and exhaust ventilation fully mechanical by equipping it with an automatic control unit.
The design of supply and exhaust ventilation is the most complex
It is very important at the stage of its design to calculate the air exchange in the bath room. The amount of displaced air must be equal to the amount of fresh air
This is ideal. But sometimes this balance is deliberately violated in order to create air flows of the desired direction. For example, if there is a bathroom in the bathhouse, then in order to prevent unpleasant odors from entering other rooms, it is artificially created underpressure. By installing a hood with high power. After that, the air from the room with a higher pressure will be independently directed to the zone of low pressure. That is, go to the bathroom, and not to the steam room, showers, sinks.
Standard schemes of ventilation systems
Mechanical scheme
At the same time it is the most expensive, but also the most effective. For the complete set, you will need ventilation valves for the sauna, filters, diffusers, a noise neutralization device and other components.
natural ventilation
This type of ventilation of the sauna and steam room is considered the easiest to organize with your own hands.But this can only be said about the process of its installation, because sufficient air exchange can be organized only after accurate calculations. In addition, such a system has a number of negative points. For example, it depends on the wind speed and its direction.
Supply and exhaust ventilation system
Such an extract in the sauna can rightly be considered the best solution of engineering. It combines: efficiency, low cost and it is easy to do it yourself.
Proper ventilation of the sauna or bath
 Access to fresh air and maintaining a constant, high temperature can only be achieved through the presence of ventilation in the Finnish sauna. It cannot exist without extract and inflow.
The extract in the sauna is needed to remove carbon dioxide from it, and the inflow creates all the conditions for pure oxygen to enter the room.
Before you start building, you need to know about the unchanging rules and regulations for creating it in the bath.
- After 25-30 minutes of the sauna, it often becomes difficult to breathe in it, the head begins to spin and hurt. The reason for this lies in the fact that there is an incorrect change of musty air filled with steam and human sweat. According to SNIP, the air in such closed spaces must be updated at least 5-6 times per hour. At the same time, its speed can be at least 20 cubic meters for 60 minutes.
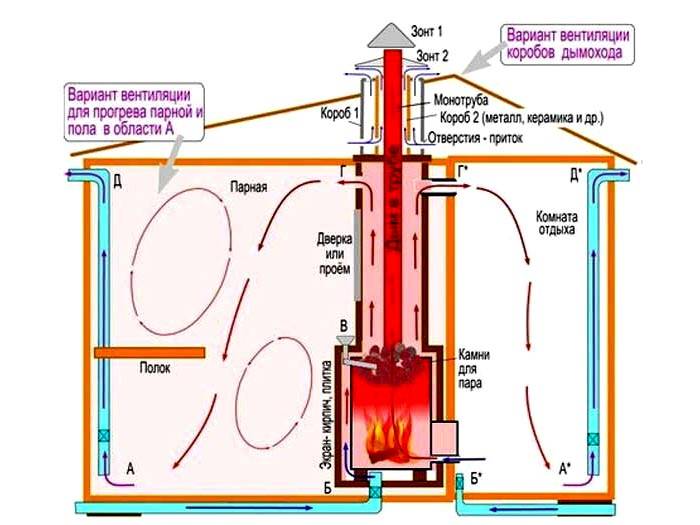
- The chimney should not be very narrow. It is better to make its diameter the same as that of the supply one.
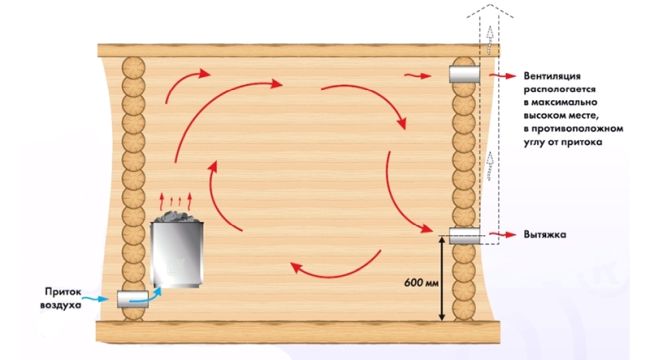
- Inlet openings may only be placed at the bottom. The permissible height from the floor cannot be less than 20 cm. Install it strictly behind the stove.Otherwise, the cold air will not have time to heat up, which will lead to drafts and uncomfortable sensations for people staying in such an enclosed space.
- To know which pipes with which section you need to purchase, you should take into account certain norms and rules: for 1 cubic meter of the equipped room, there must be a pipe with a cross section of at least 24 centimeters.
- The intake and exhaust openings must not be opposite each other.
- It is imperative to think about the possibility of adjusting the air flow, reducing or increasing it. This can be done through valves that are installed in the vents of the bath.
- Often in the sauna, a gap is left between the bottom of the door and the floor due to the lack of a threshold or its very low height. It is needed for natural exhaust in the Finnish sauna.
The oxygen flow pattern will look correct only if there is more than one hood in the room in question
Paying attention to where the inflow is located, strictly on the opposite side of it at a height of up to one meta, the first exhaust hole is equipped. The second must be done directly under the ceiling
The main thing at this stage of work is to connect both holes with a single box leading to the chimney or a common exhaust duct.

Consider the principle of operation of the Finnish sauna:
- Before starting the steam room, it should be thoroughly ventilated, which will freshen the air.
- Close the outlets and doors with the help of valves, which will allow the air in the steam room to heat up quite quickly.
- The inlet valve remains open. This is done in order to avoid air discharge.
- After waiting for the room to warm up completely, we monitor the proper ventilation in the sauna. To do this, slightly open the lower channel. Thus begins the gradual movement of oxygen. At the same time, it must be remembered that the upper channel should not be opened so as not to miss well-heated air from the bath. Fresh, cool air, after entering through the supply duct, slowly warms up due to the furnace and immediately begins to gradually displace the air that has already stagnated.
Such a system for people will not be noticeable if its preliminary installation is performed correctly, adhering to all the advice and recommendations of specialists. Being in it, vacationers will not even feel discomfort and will enjoy a pleasant temperature and comfortable humidity.


An oven plays an equally important role, which is equipped either in the steam room or in a separate room. It is made of metal and lined with brick on the outside. Performs the following functions in the sauna:
- Heats the overall area of the room.
- Heats up water.
- Produces steam.
When choosing this device, you should be guided by the following criteria:
- Size - great if the oven is small, which will save space.
- Must be reliable and secure.
- Have the ability to heat up quickly.
- Have a low cost.
- It must have a long shelf life in order to constantly withstand heavy loads and temperature changes.
- When choosing a stove, first of all, consider its power and size relative to the size of the sauna.
The main laws of proper ventilation in the sauna
The sauna is equipped with combined or fully mechanical ventilation.Since the latter is a very expensive pleasure, most hot rooms are equipped according to the principle of forced exhaust air exhaust. The fresh stream enters the sauna in a natural way through the resulting pressure difference (street/room).
Combined ventilation in a sauna is advantageous in that it is possible to move away from the obligatory cross arrangement of vents (as in the standard natural ventilation scheme), and place them taking into account the design features of the room. It should also be noted that hot and cold air must be well mixed so as not to cause too sharp a temperature drop in the steam room at the level of the floor and ceiling.
For a sauna, ventilation must be subject to several binding laws׃
- The size of the exhaust vent must be greater than or equal to the size of the supply vent
- The cross section of the ventilation openings is proportional to the volume of the room: 24 cm = 1 cu. m of sauna
- Do not place inlet and outlet vents in line with each other
- To control the intensity of the air flow in the sauna, the ventilation openings must be equipped with valves
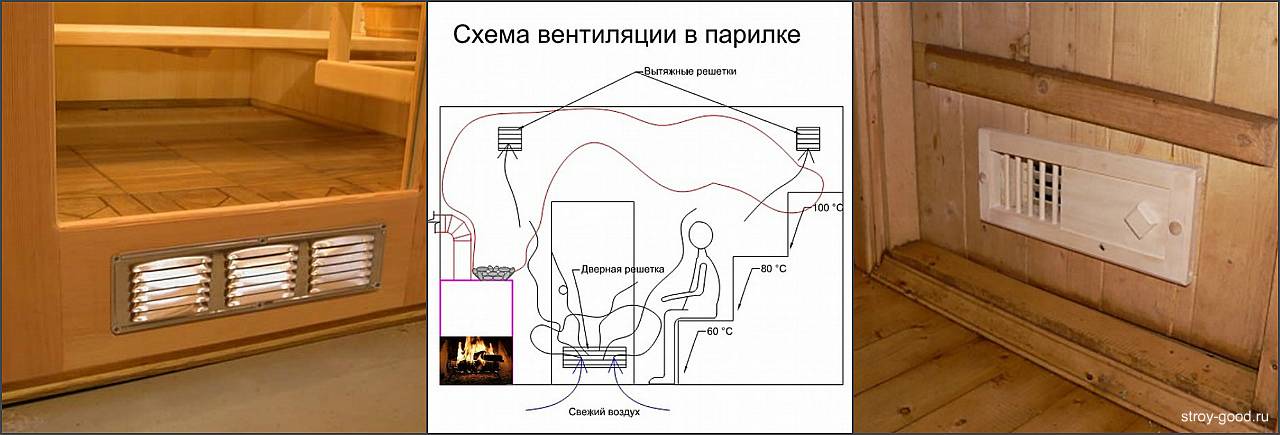
The three simplest sauna ventilation schemes
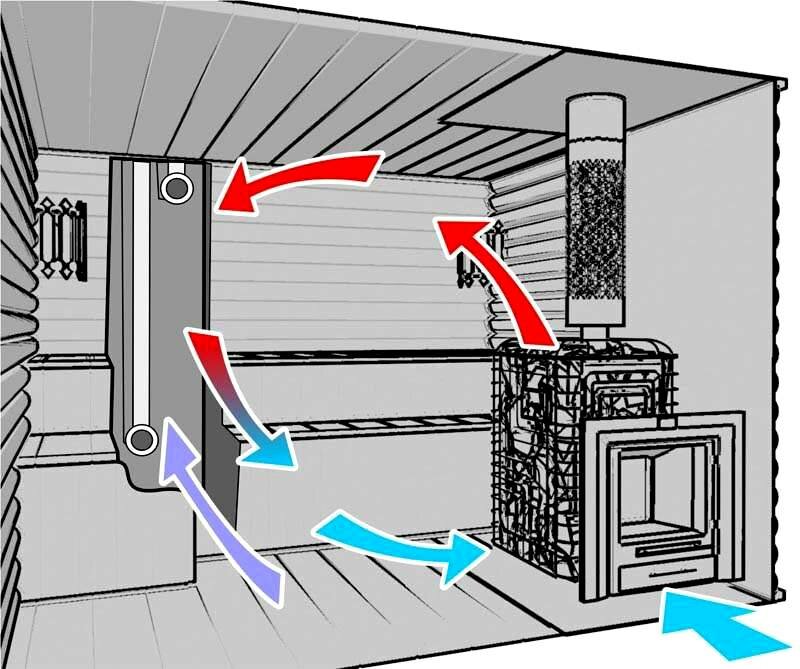
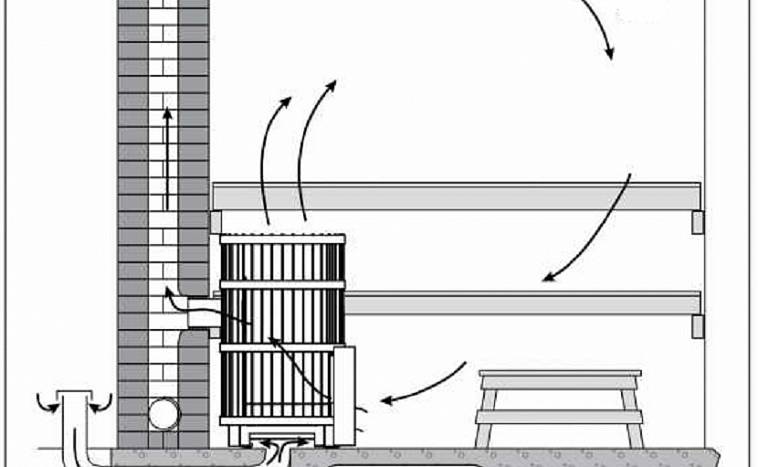
No. 1. speed scheme
The supply vent is located near the floor (20 cm above its level) strictly behind the stove, while the exhaust outlet equipped with a fan is arranged on the opposite wall in the same way in the lowest position (20 cm from the floor).
Cold air, having penetrated into the room, is instantly heated by a red-hot furnace and rises to the ceiling, then gradually cools down, falls down and is brought out.
Such a ventilation system provides the room with a uniform mixing of cold and hot "winds" and contributes to the deep heating of the human body.
No. 2. Scheme for the internal location of the sauna
If for the organization of ventilation the room has only one external wall (three others are adjacent to other rooms), then this version of the scheme will solve the problem.
The inlet and outlet openings are located on the same side (but strictly opposite the furnace) ׃ at the bottom they provide for an influx of fresh air (20 cm from the floor), at the top - forced extraction of mining (20 cm from the ceiling).
The stove quickly heats up a cold stream of air, which hits the hottest part of the heater with a bang. Refreshing the room in a circle, the exhaust gas gets right into the "embrace" of the hood.
Number 3. Scheme for soft warming up
The fresh air inlet is located behind the stove, but at a higher level (50-60 cm) than scheme No. 1 suggests. The exit with forced impulse is located as standard on the opposite wall near the floor (20 cm from the zero mark).
The cold wind heats up and rises under the ceiling, then cools down, "falls" down and is brought out. Such ventilation works more slowly, but it provides visitors with soft and even heating in the sauna.
How to make ventilation ducts?
Installation of ventilation in the bath is performed as follows:
- In selected places, holes are made of such a size that the pipe or box passes freely into it.
- The space around the pipe is sealed so as not to violate the tightness of the room.
- Outside, the holes are covered with gratings.
- Inside, special dampers or adjustable grilles are installed.
It looks simple, but there are a few things to keep in mind.For example, ventilation holes can be made not only round, but also square or rectangular with approximately the same cross-sectional area. In wooden baths, wooden boxes are placed instead of plastic or steel pipes.
In this case, choosing a rectangular hole looks logical, because such a box is easier to make from ordinary boards.
It is best to plan the ventilation at the design stage so that you do not have to hammer the finished wall. Ventilation openings that face the street should be additionally protected with insect protection nets. The cross section of the supply ventilation opening in the bath is calculated based on the standard: 24 sq. cm section for each cubic meter of the volume of the ventilated room.


In this way, for a bath with a volume of 12 cubic meters. m. you need a hole with an area of 284 square meters. see If it is supposed to make a round hole, then its radius is calculated by the inverse formula for the area of a circle. We divide the resulting indicator by 3.14 (the number "pi"), from the result we extract the square root.
In our example, we get a radius of about 9.5 cm, and its diameter is 19 cm. Accurate observance of dimensions in this case is not relevant, so a pipe with a cross section of 200 mm is quite suitable. Or you can take two pipes of 100 mm. If the ventilation section is square, the approximate dimensions will be 17X17 cm.
Natural ventilation has undeniable advantages. Its installation is simple and relatively inexpensive, operation does not require electricity costs or the installation of special devices. The simple design guarantees no breakdowns and a long service life of the ventilation system.
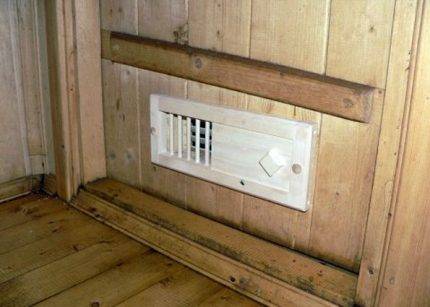
From the inside, special grilles are installed on the ventilation openings, in which gaps can be adjusted, this allows you to adjust the intensity of air flows
In winter, due to the significant temperature difference inside the steam room and outside, the draft can increase noticeably. This can cause slight discomfort due to the air coming in too fast. In addition, smells, which are not always pleasant, can also penetrate into the bathhouse from the outside. Ventilation flow control solves this type of problem.
PREPARATION FOR INSTALLATION OF THE ELECTRIC OVEN
the voltage of the electric furnace and the control panel correspond to the mains voltage; the control panel corresponds to the power and model of the electric furnace;
the power of the electric furnace corresponds to the volume of the steam room. The volume must not be lower than the minimum volume for the selected furnace (see Instructions);
fuse current limit and cross section of the supply cable are sufficient for the power of the furnace. (see instructions);
the location of the electric furnace allows you to provide fireproof gaps around the furnace in accordance with the installation scheme;
the oven control device (thermostat and bath timer) is located on the side that is freely accessible. If necessary, it is possible to transfer the control panel by a qualified electrician to the desired side of the furnace according to the Instructions.


