- Peculiarities
- Useful tips from the masters
- Common misconceptions
- How to do it yourself: step by step instructions
- with a pit
- Equipment and materials
- How to properly ventilate the garage - a summary of information
- Do-it-yourself ventilation device in a private house
- Step #1 Calculations
- Step #2 Natural Ventilation: Improving Parameters
- Step number 3 Supply and exhaust ventilation systems
- Step number 4 Do-it-yourself ventilation in a private house scheme
- About forced exhaust
- Requirements for ventilation in the apartment
- Scheme
- Pre-launch tests
- Ventilation in living quarters
- Device nuances
- The importance of preliminary calculations
- Conclusion
Peculiarities
If the task is set to independently build a ventilation system in the garage, then any car owner is able to cope with it, if, of course, he has an idea of \u200b\u200bhow this is done. There are several types of creating optimal air exchange:
- forced system;
- combined;
- natural.
The last option is characterized by minimal costs. Forced exhaust will be optimal in those rooms that are heated. This is necessary because the difference between the temperatures inside and outside the garage will be quite large.This determines that the constructed ventilation system in a given period of time should be as efficient as possible. To create the right ventilation, it is necessary to develop a detailed scheme for its construction.
Many car owners do not understand why this is necessary. In fact, ventilation affects many aspects and can solve many problems. The system under consideration is necessary for several reasons:
- To protect the vehicle. This is something every car owner should be concerned about. If the machine is in a room with high humidity, then the metal elements will corrode. First of all, all elements that open will suffer. That is, the doors, trunk and hood will begin to rust. In addition, the presence of dampness will adversely affect the functioning of the mechanics and electronics in the vehicle.
- To protect the garage itself. Those materials that were used to build a garage also do not accept dampness. The supports of the building, made of metal, will collapse over time, and the wooden elements will begin to rot. Concrete and other bonding surfaces will be eaten away by mold.
- To protect people. If there is poor ventilation in the garage, then the vapors of fuels and lubricants will have nowhere to go, so they will gradually accumulate in the garage. Visiting this place, a person will be exposed to toxic effects. In some cases, headaches or even poisoning may appear.
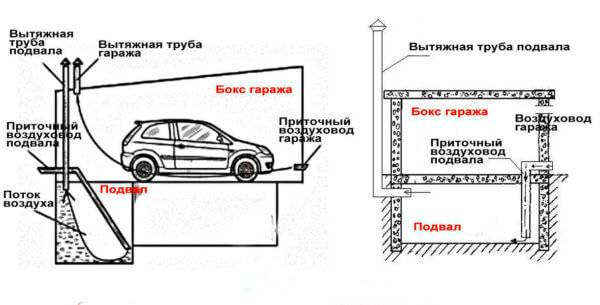
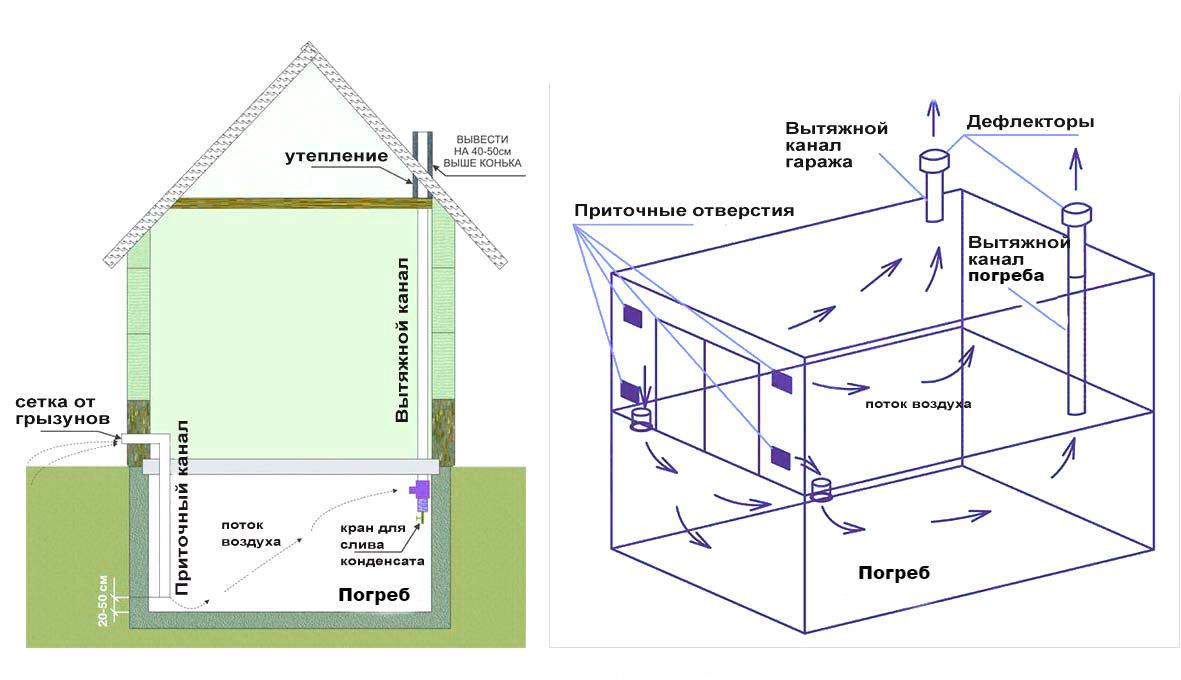
The importance of having ventilation in an existing manhole/basement cannot be ignored. It is required there to remove odors and moisture. This basement must be equipped with its own individual ventilation system.
This basement must be equipped with its own individual ventilation system.
Maintain optimum humidity. It should be borne in mind that in the winter season, along with the car, snow and ice get into the garage. It is warmer indoors than outdoors, so they melt and turn into water vapour. As a result, the humidity in the room increases significantly, which is bad for the car.
If you drove a car in the rain or under the snow, then the body needs to be dried. This procedure can be performed through ventilation.
The ventilation system is able to remove condensate from the walls and ceiling, and can also dry the inspection hole.
Useful tips from the masters
- If the walls of the building are built of brick, then the design and installation of channels should be carried out simultaneously with the construction of the house
- To create air ducts with the same cross-sectional diameter, it is convenient to use cardboard or wooden templates.
- The inner walls of the ventilation channel are laid out from solid bricks with high-quality sealing of all junctions.
- It is convenient to equip the ventilation outlet to the roof with asbestos-cement pipes, connecting it to the wall ventilation duct and qualitatively fixing the structure with cement mortar.
Common misconceptions
- Ventilation problems in the room are easily solved by installing air conditioning equipment. The air conditioner can affect the temperature and humidity of the air, but is not able to saturate it with the oxygen necessary for breathing.
- Periodic ventilation of the room or setting the windows to the micro-ventilation mode are sufficient to ventilate the room. This statement can be called fair only for the warm season.In the winter cold, the room will quickly cool down, not having time to get the necessary amount of oxygen.
How to do it yourself: step by step instructions
with a pit
Garages are often equipped with inspection pits. Consider how to make ventilation in the garage, taking into account this feature. There are several ways to build ventilation in a garage with a pit:
- Air is delivered to the room by drawing two boards from the floor. The outflow occurs due to the lack of one board. The pit should be located strictly longitudinally and inside the garage. One edge is placed near the supply inlets to the boxes, and the other - near the exhaust duct. Open deck boards allow fresh air to partially enter the pit. The opposite edge serves as an outlet for accumulated moisture.
-
The inflow will be provided by the installation of an air outlet pipe. With its help, the incoming air is taken under ventilation. The air duct of the adjacent dump serves as an exhaust hood. The supply channel should be located at the edge of the inspection hole.
Openings in the garage allow incoming fresh air to pass through the pipe in parts. Further, the remaining air is in the pit. Since it is located next to the cellar and is in contact with the air duct, the flow is easy to follow after entering the pit hood to the outside.
-
- The supply pipe has a fan. The pull-out opening is mounted by the mechanism forcibly with the help of fasteners. Space ventilation works automatically.


here
Advice
With this method, fresh air is injected through the duct, driven through the pit, and drawn out by the fan through the second ventilation duct. It can be installed independently or combined with the basement.
Equipment and materials

The puncher must be powerful, otherwise it will not be possible to make a recess in the wall or it will be uneven. It is advisable to have an angle grinder and heat-insulating material on hand.
Fans are selected depending on the type of construction:
- Exhaust duct devices. Available, easy to use. Built-in regulators allow you to change the intensity and speed of the flow of air masses. The optimal diameter is about 160 mm. To save money, it is easier to purchase 120 mm.
- Centrifugal. Difficult to install, but ideal for the hood. It is better to use them in garage boxes in which they work with chemicals, coatings.
- Vortex. Suitable for areas where welding work is regularly carried out.
If the garage is intended only for storing the vehicle and does not involve the performance of work in it, then you can choose the most practical and running option - an exhaust duct fan. This is the cheapest design, and the operation is less complicated.
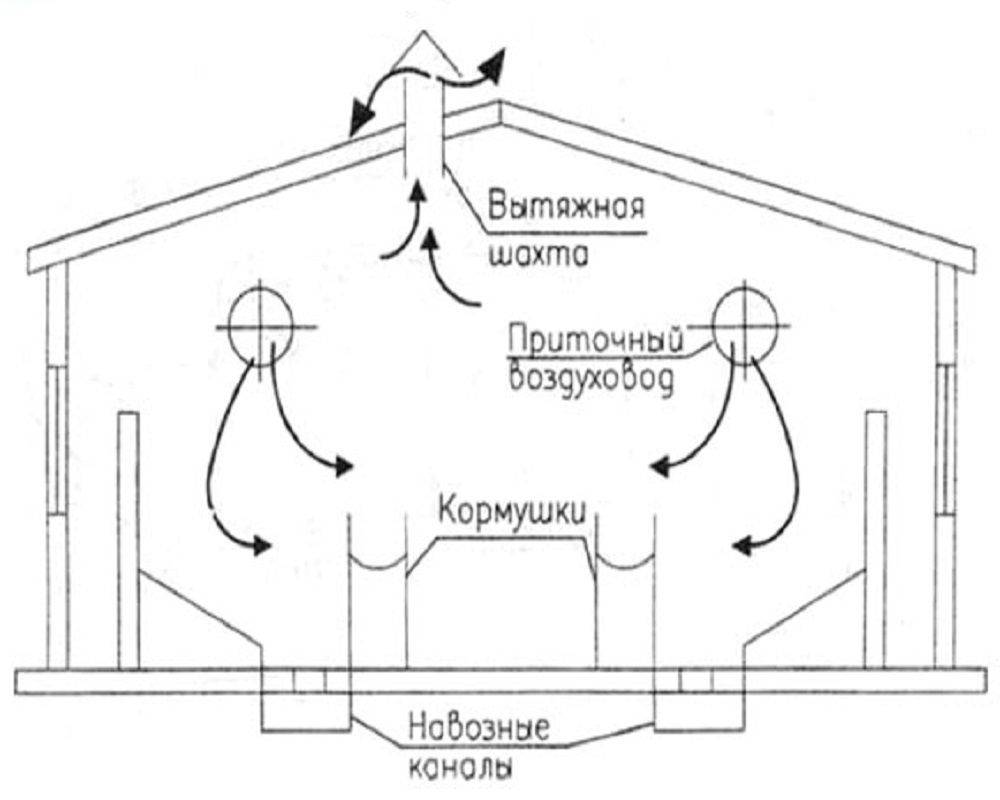
For the construction of air ducts, it is better to use asbestos or galvanized pipes. A through pipe can be mounted through a through method, when the ventilation pipe is carried through the garage floor and taken out through the roof, and wall-mounted, when an exhaust pipe is embedded in the cellar wall and taken out of the building.
Air renewal in a natural way is just achieved by installing a through pipe. There is a temperature difference inside the garage and outside. If the draft needs to be increased, then a deflector is installed on the pipe. It will protect the passage from dust and dirt entering it.
How to properly ventilate the garage - a summary of information
Summing up the intermediate result, you can determine the main tasks that need to be completed before you make a hood in the garage - this is the creation of a project, the acquisition of the necessary materials and the insulation of walls and ceilings. No special knowledge or skills are required for this. The main thing is to approach this work not only deliberately, but also creatively. If we talk about the scheme drawn up before you make ventilation in the garage with your own hands, then the simplicity of the device of the air exchange system itself will depend on how detailed it is. But most of the time, you don't even need it. If we take garages without basements as an example, ventilation in them will be so simple that a separate project will not even be required. The main thing here is the concept of the laws of physics and creativity.
Nice to look at this garage.
Do-it-yourself ventilation device in a private house
Step #1 Calculations
To find out the power of the system, a parameter such as air exchange is calculated. It is calculated for each room separately according to the formula:
P \u003d VxK, where
V - the volume of the room (cubic meters), is calculated by multiplying the width, length and height of the room;
K - approved by SNiP 41-01-2003 norms for the minimum air exchange in the premises (cubic m / h). For residential areas - 30, separate sanitary rooms - 25, combined - 50, kitchens - 60-90.
Also, in the calculations of the ventilation system of a private house, other indicators are taken into account:
- The number of people permanently in the house. One requires 30 cubic meters. m/h of air.
- The thickness of the walls of the premises.
- Number of household and computer equipment.
- Glazing area.
- The location of the building relative to the cardinal points.
- The presence (absence) of the prevailing wind in the area.
- The presence in the building of the pool. For him, it is recommended to carry out a separate system.
Step #2 Natural Ventilation: Improving Parameters
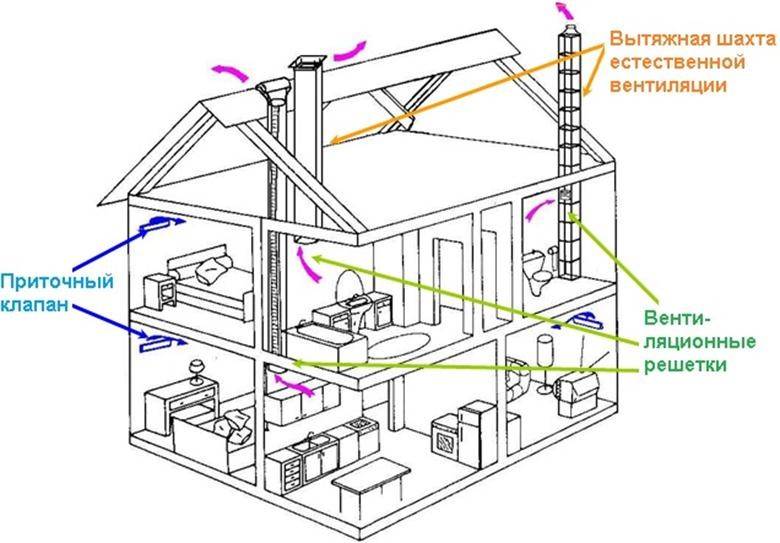
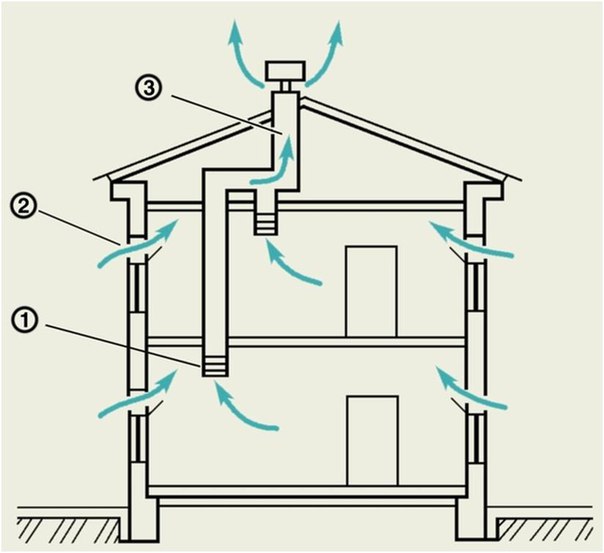
Natural ventilation in a private house does not always cope with its task of maintaining the specified temperature and humidity parameters. Then, it is desirable to “finish” the system.


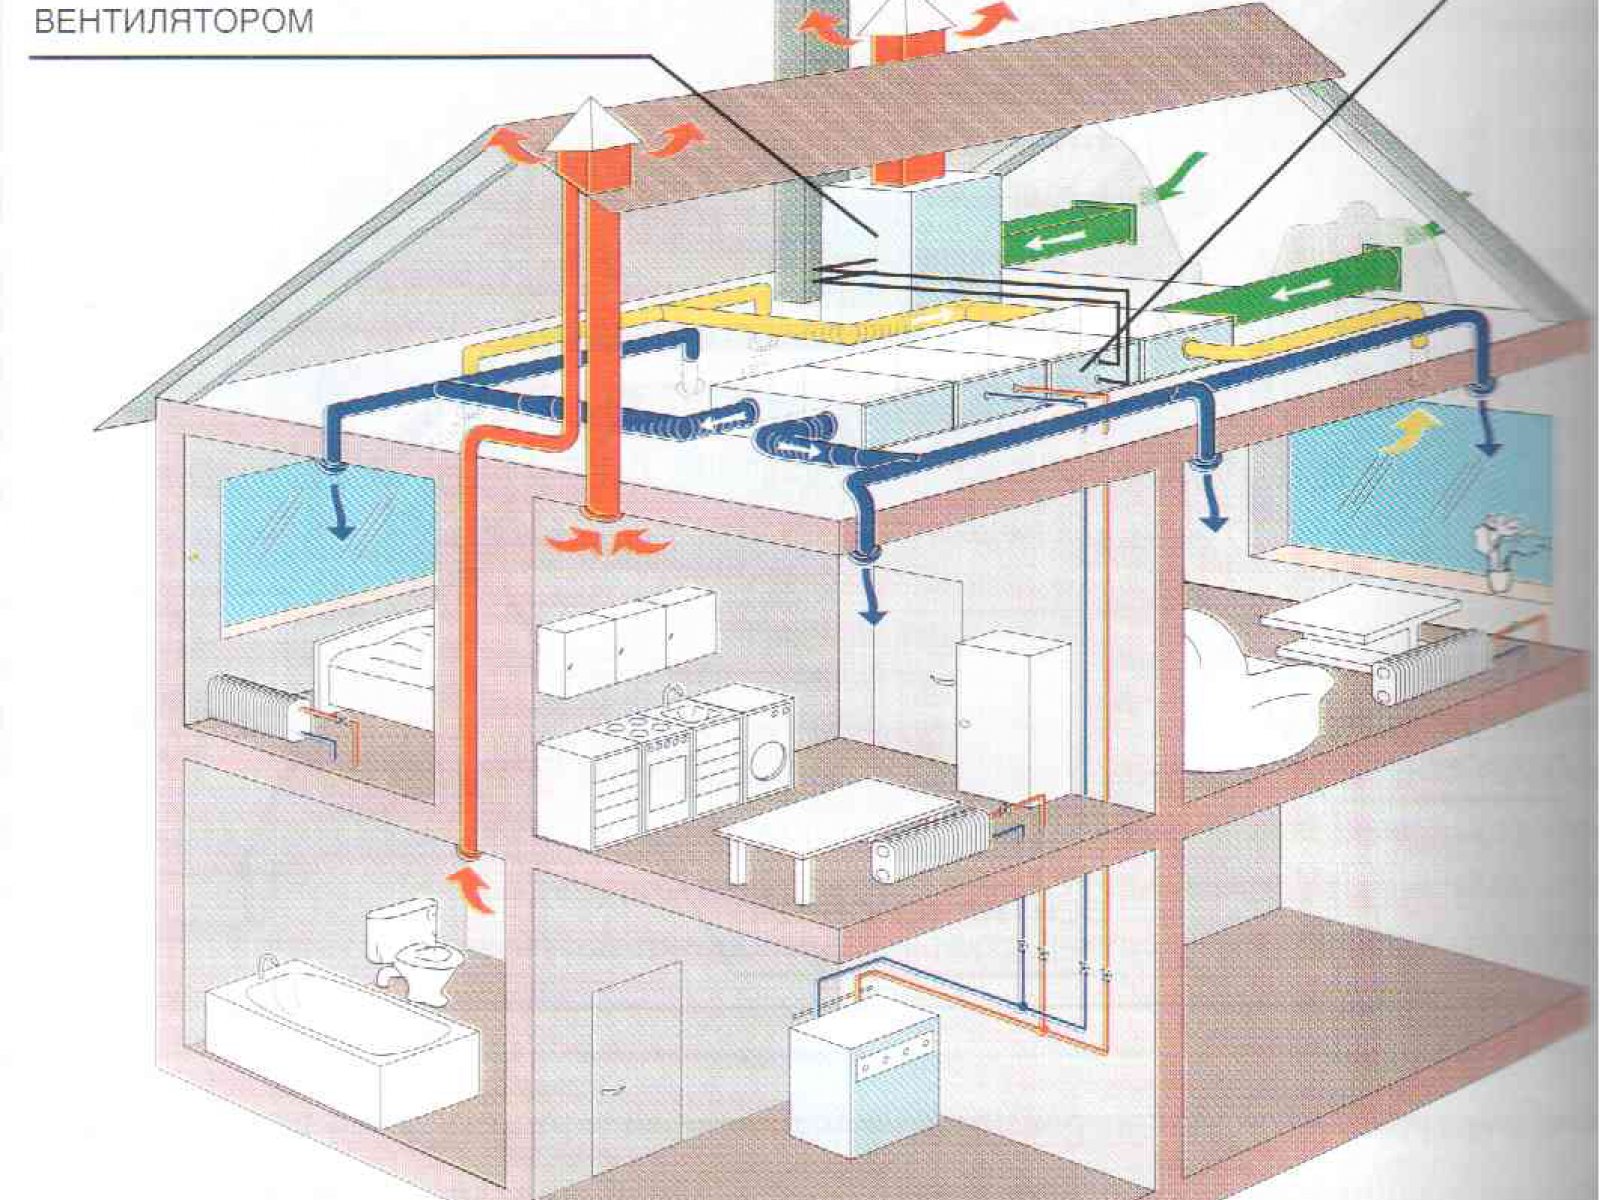
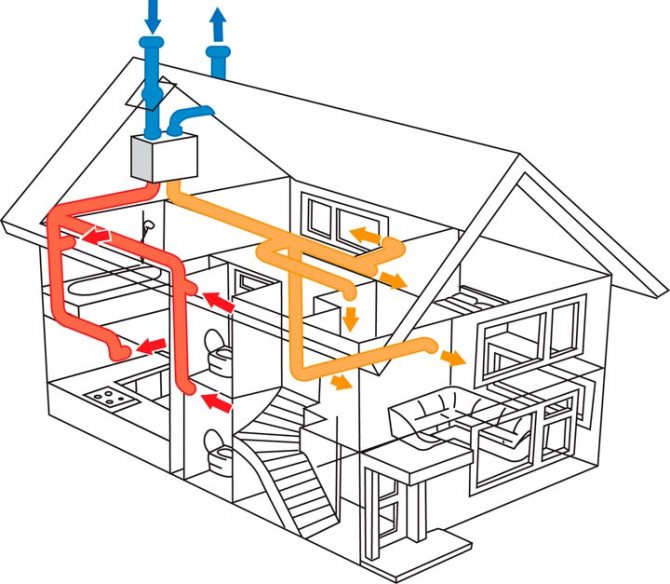
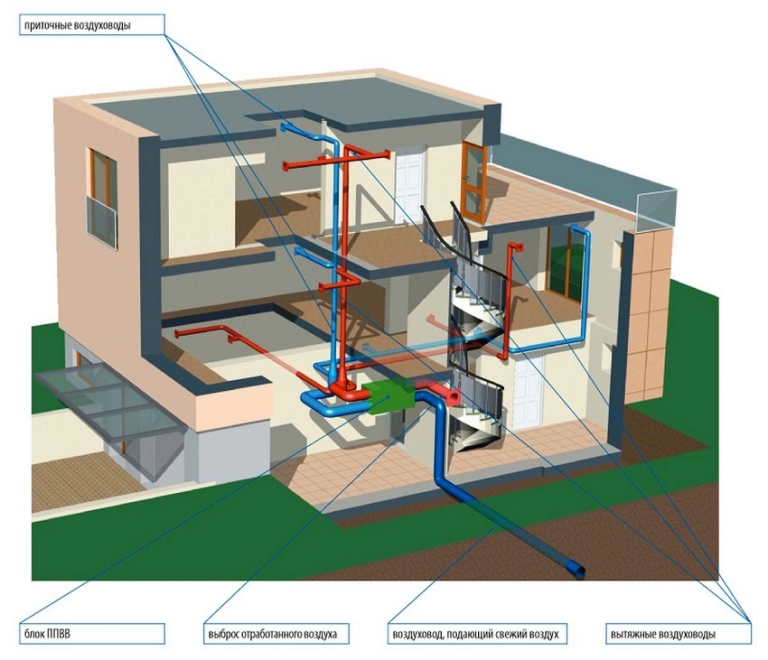
The principle of the ventilation system in a two-story private house
Window inlet valves will help with this. They will not depressurize the window, but will create an influx of fresh air. Their installation is elementary, following the instructions, even a completely ignorant person can handle it. The principle is that an elongated device (350 mm) is mounted on the upper part of the sash. From this place, a regular seal is cut off and installed from the delivery set (narrower).
A few more devices that improve air circulation. In order not to block the flow of air, ventilation grilles are installed on all interior doors. It is impossible to “block” with a window sill that is too wide the process of mixing the cold air of the window and the warm radiator.
If during the construction of the house a natural ventilation system is designed, then the following nuances should be taken into account: the house should not have rooms without windows; a guarantee of good ventilation - the windows overlook all sides of the building (deaf walls are excluded).
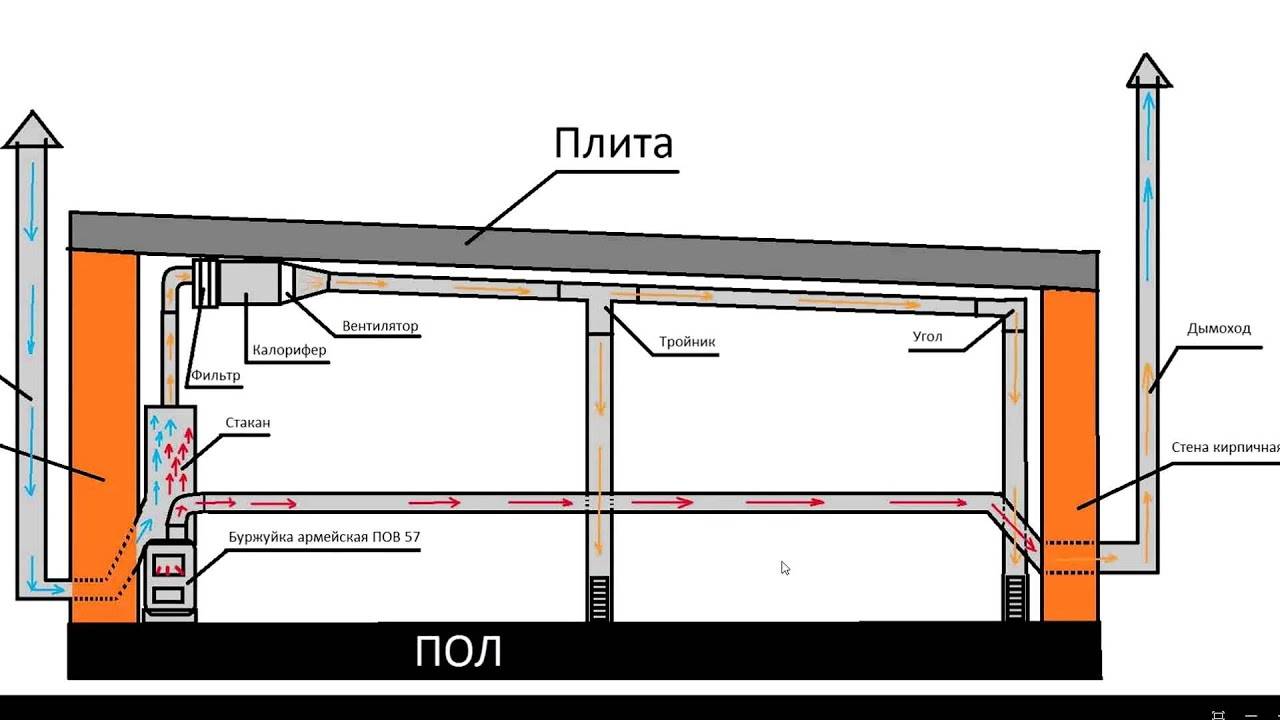
Step number 3 Supply and exhaust ventilation systems
The supply ventilation device in a private house is solved using a wall ventilator.It is a telescopic or flexible tube, on one side (outer) of which there is a decorative grill with a mosquito net (from midges and mosquitoes), on the other (inner) - a fan, a filter.
Recuperator for ventilation system
Supply ventilation in a private house, mounted in the wall in this way:
- Using the appropriate equipment, a hole of the required diameter is punched.
- A pipe with a heater is inserted into it.
- The device itself is mounted on the adhesive solution, consisting of a fan, a filter, some models are equipped with an ionizer.
- Connection to the electrical network.
- From the side of the street, a decorative cover is installed that protects against rain and snow from getting inside, from the inside - a decorative grille.
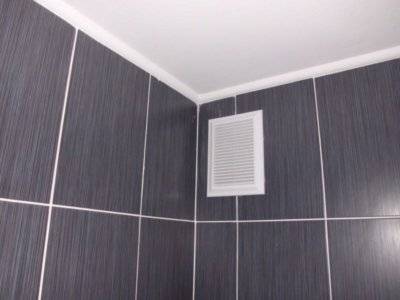
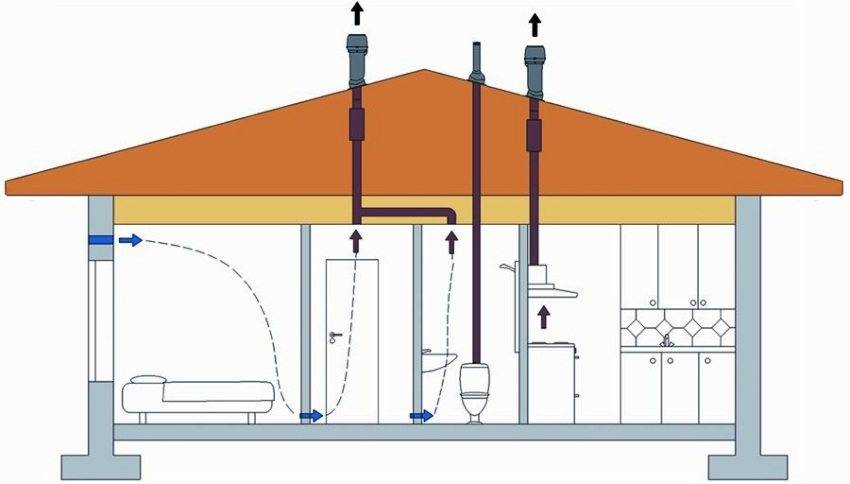
The exhaust ventilation scheme in a private house, with a good natural inflow, may consist of fans mounted in the sanitary rooms, in the kitchen. The wall exhaust fan in the kitchen is installed similarly to the supply fan. In the sanitary room, either axial or channel is mounted in the ventilation duct.
The hood in the kitchen above the stove will also be an additional exhaust duct. If the exhaust ventilation works more intensively than the supply, then the house will suffocate.
Step number 4 Do-it-yourself ventilation in a private house scheme
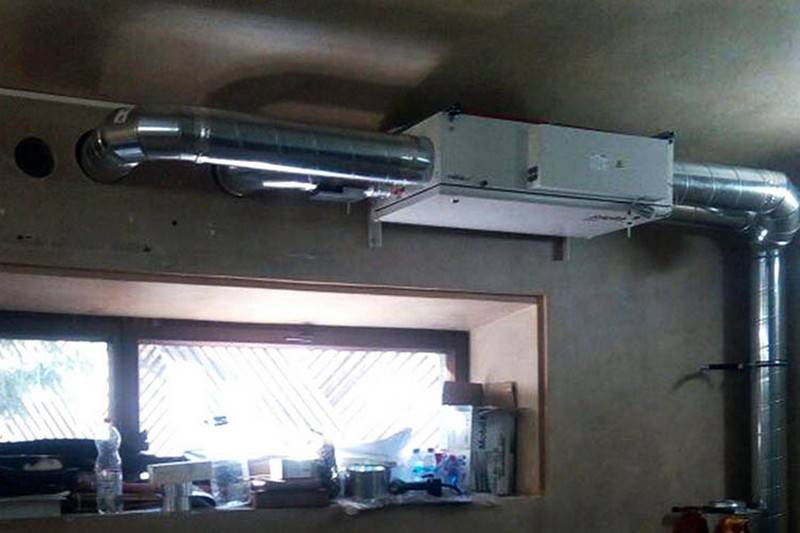
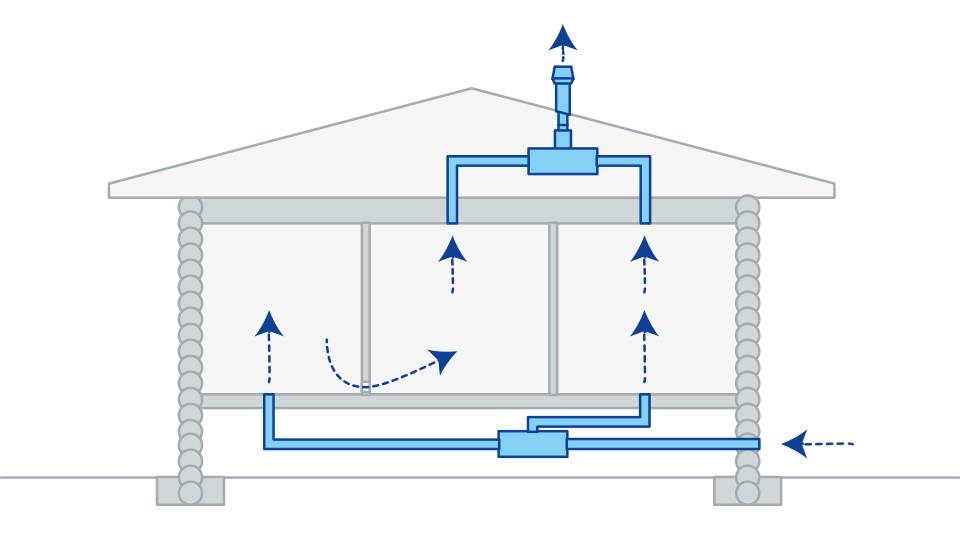
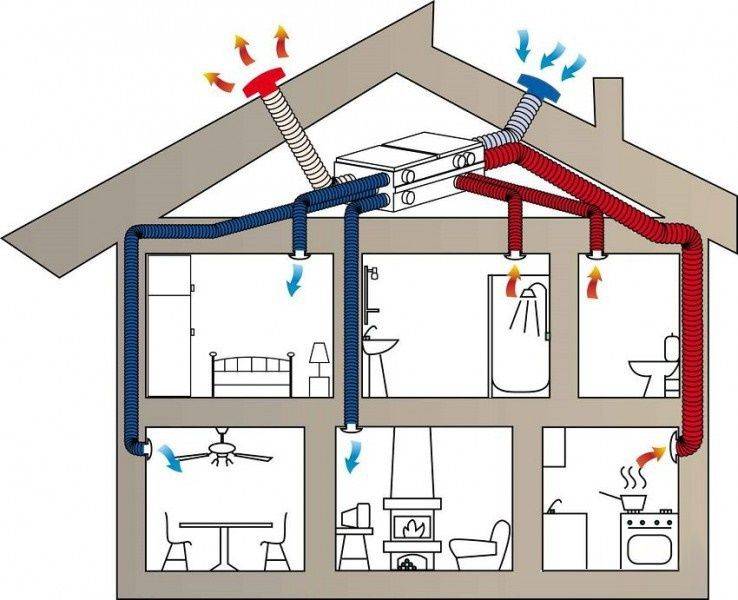
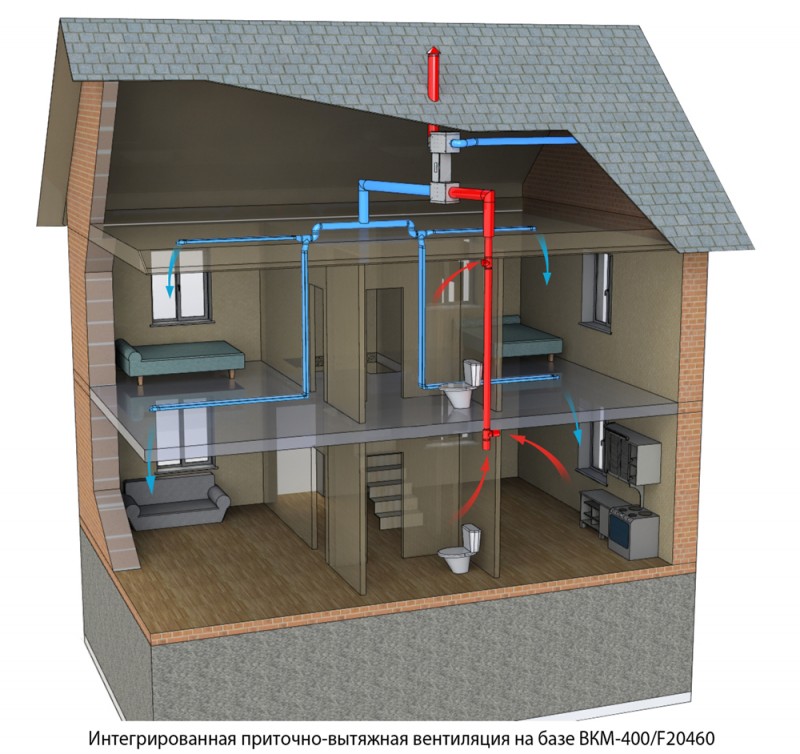
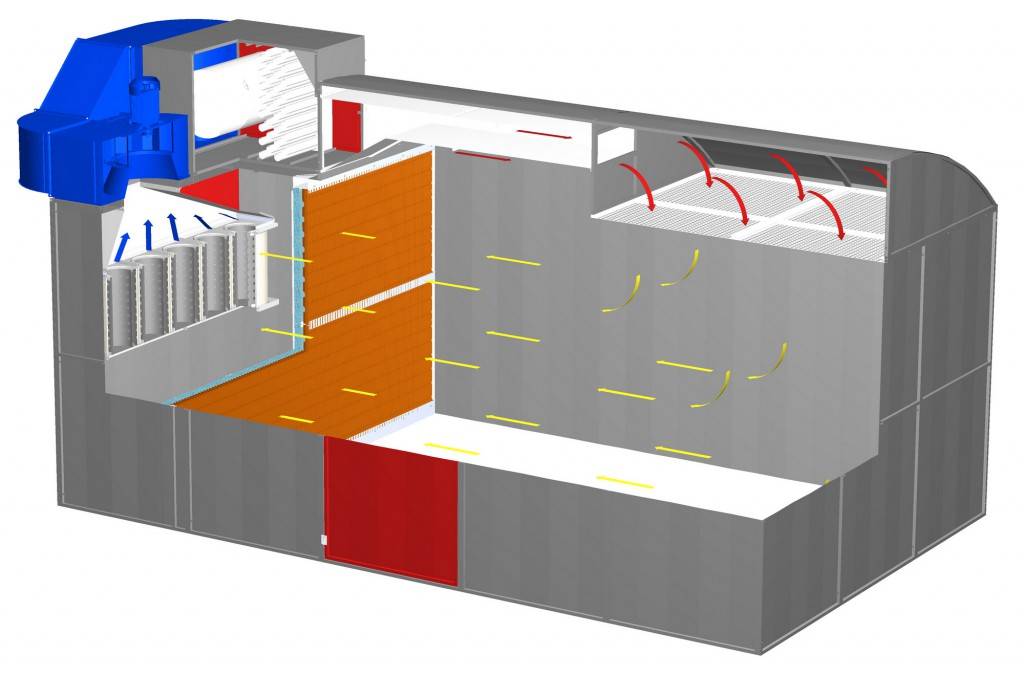
The most optimal ventilation option for a private house is supply and exhaust with mechanical stimulation. Two types of its designs are used: type-setting and monoblock.
Energy saving ventilation duct
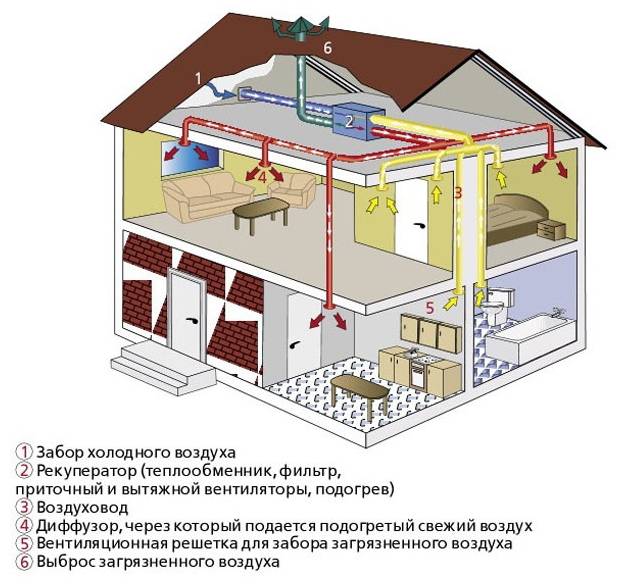
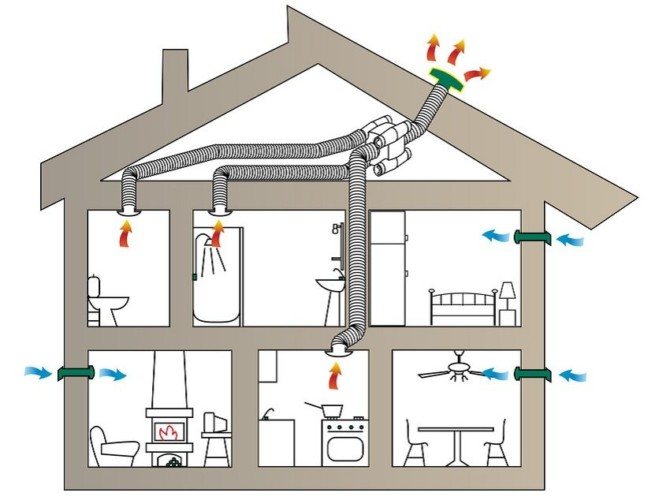
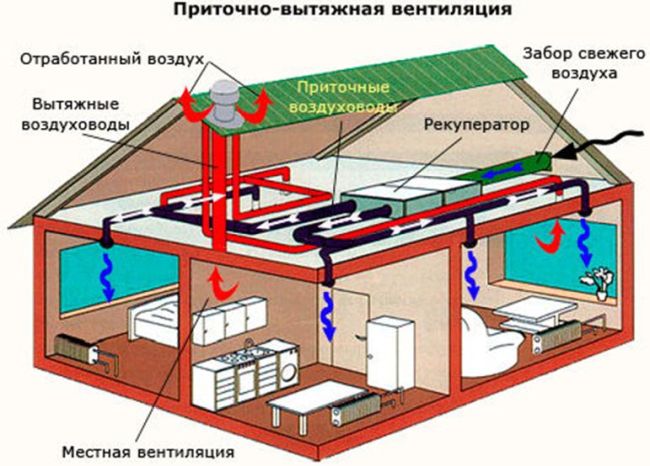
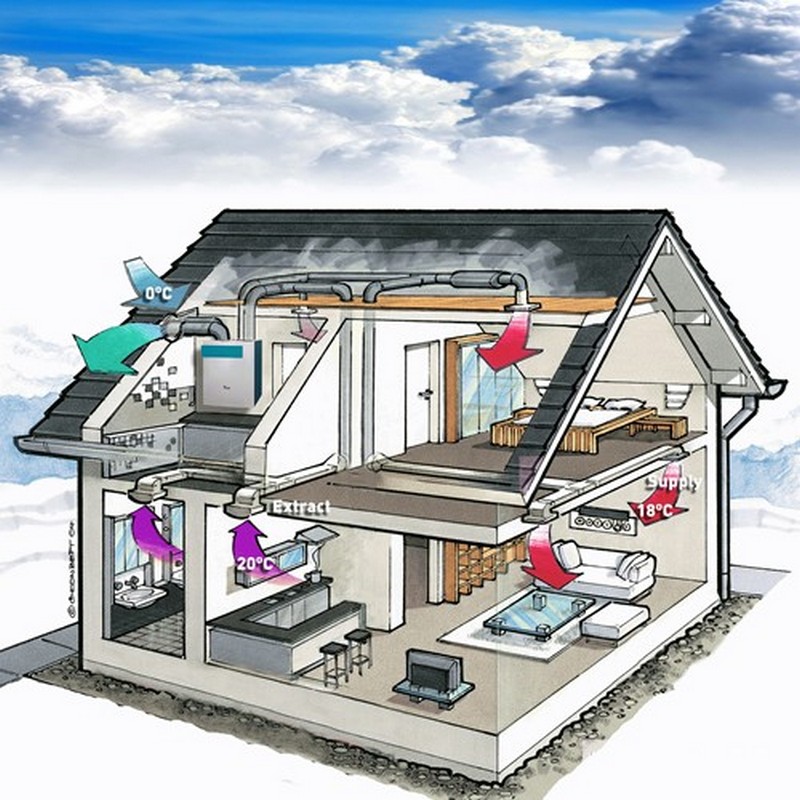
The ventilation scheme in a private house of a monoblock system looks something like this:
- air from the street, through the supply air duct, enters the heat exchanger;
- it is cleared of harmful impurities of the atmosphere;
- heated to the required temperature;
- further, through the air duct, it enters all the premises of the house;
- exhaust air through the exhaust pipeline enters the heat exchanger;
- gives off its heat to the incoming cold air;
- from the heat exchanger, through the exhaust pipe - to the atmosphere.
About forced exhaust
Putting a fan on the exhaust pipe of general ventilation is pointless for three reasons:
- effective air intake and exhaust is carried out only when the unit is turned on;
- in the absence of the owner, the impeller of the switched off fan covers at least 50% of the ventilation duct cross section, the removal of moisture in a natural way slows down greatly;
- electricity is consumed.
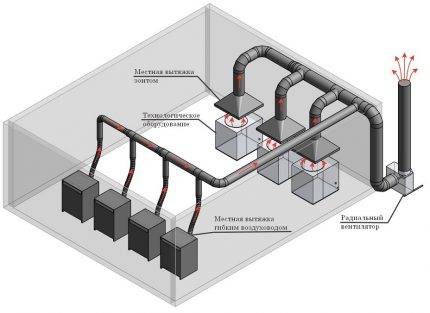
If you converted a garage into a workshop, there is a reason to make a local exhaust device, consisting of a suction hood, a duct fan and an air duct with a check valve. The cap is made from improvised materials (thin sheet metal 0.3-0.5 mm), the air channel is made from sewer pipes Ø110 mm.
The petal damper and the duct-type fan are selected according to the inner diameter of the ventilation duct - 10 cm. We will give a number of installation tips:
- The umbrella is placed over a source of air pollution (usually a workbench). The dimensions of the cap are 20 cm larger than the maximum dimensions of the source, the opening angle is not more than 60°.
- Try to hang the umbrella at a minimum distance from harmful emissions, taking into account the convenience of performing work.
- Mark the shortest route for the air duct from the workbench to the outer wall of the building.
- Insert the valve and fan inside the sockets, after wrapping it with sealing material (foam rubber is a suitable option). Drill a hole in the wall of the ventilation duct and insert the power cable through it.
- The check valve is placed at the outlet of the channel, the fan - within the room. Outside, protect the air duct with a grid with a mesh in order to block the way for birds and rodents.
Installing a duct supercharger inside a plastic pipe d110 mm
Do not forget about the need for inflow - after turning on the fan, we completely open the grate for incoming air. Otherwise, a running unit will simply overturn the draft in the nearest exhaust duct.


With a small mass of the umbrella, the last section of the duct can be turned, which allows you to quickly move the hood to the next table. See the implementation of the method in the next video:
Requirements for ventilation in the apartment
Scheme of supply and exhaust ventilation in the apartment
In accordance with the current sanitary standards, such ventilation is considered sufficient, in which the exhaust air in each room is completely replaced with fresh air at least twice an hour.
Initially, ventilation was supplied to each apartment from a common ventilation duct. However, in some situations, the power of such a system is not enough to provide the required level of air exchange.
To check the efficiency of the ventilation system, it is not at all necessary to call specialists. You can use elementary tricks and draw conclusions about the quality of air exchange yourself.
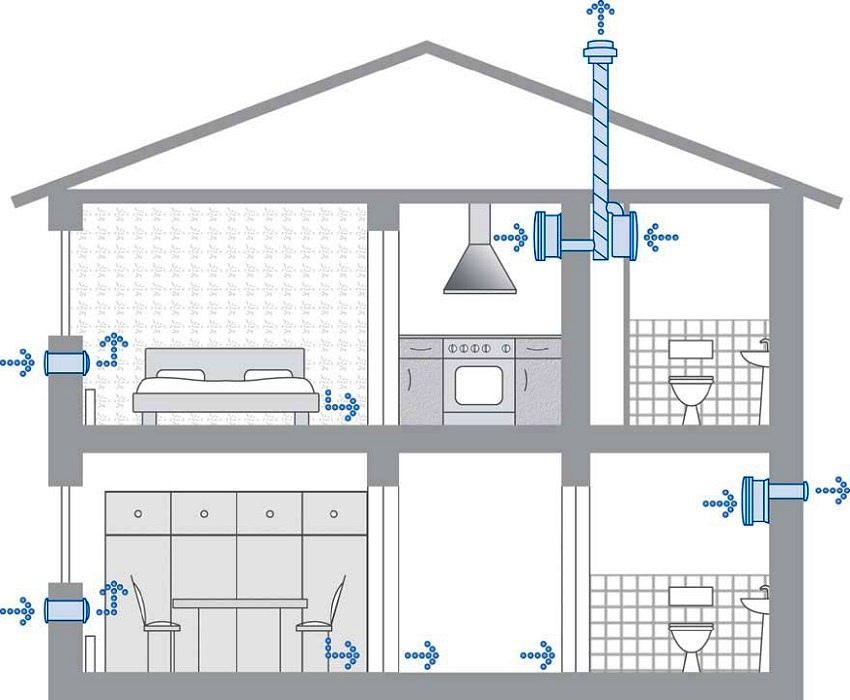
Typical apartment ventilation scheme
Scheme
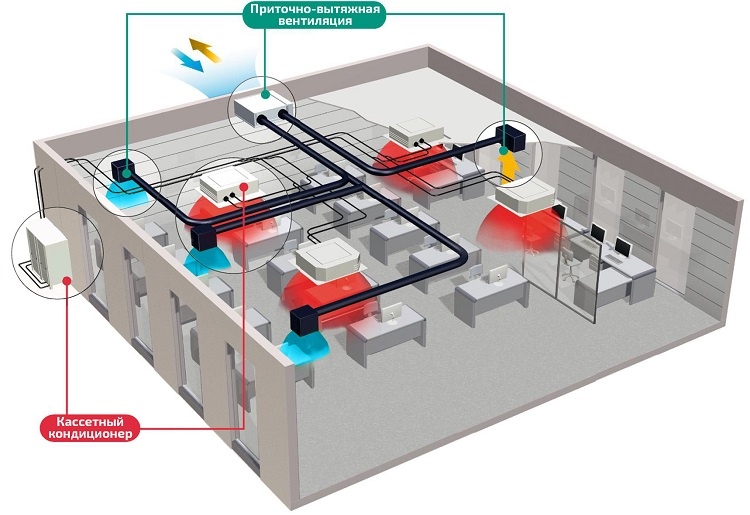
To create comfortable conditions in the house, a forced ventilation scheme is selected, which can be of several types:
- Supply with cooling function, which is mounted complete with air conditioning. Cons - high price, the need for constant service.
- Forced with air heating, provides for the presence of a heat exchanger (find out how to make ventilation heating here).
- Combined, combining both ventilation schemes. Easy to install, low maintenance.
- A recirculation system is a design, the installation of which requires knowledge and complex devices that mix outgoing exhaust air flows with the outdoor atmosphere and return them to the house.
Supply ventilation with cooling function:
Forced ventilation with air heating:
Combined ventilation:
Air recirculation system:
Advice
Please note that a massive installation for general ventilation of the house should be located away from living rooms, because the device will create noise even with insulation.
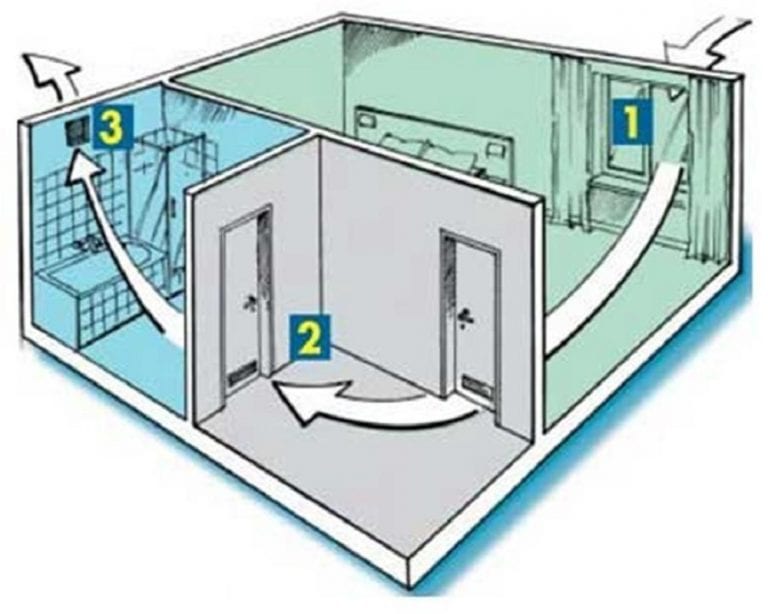
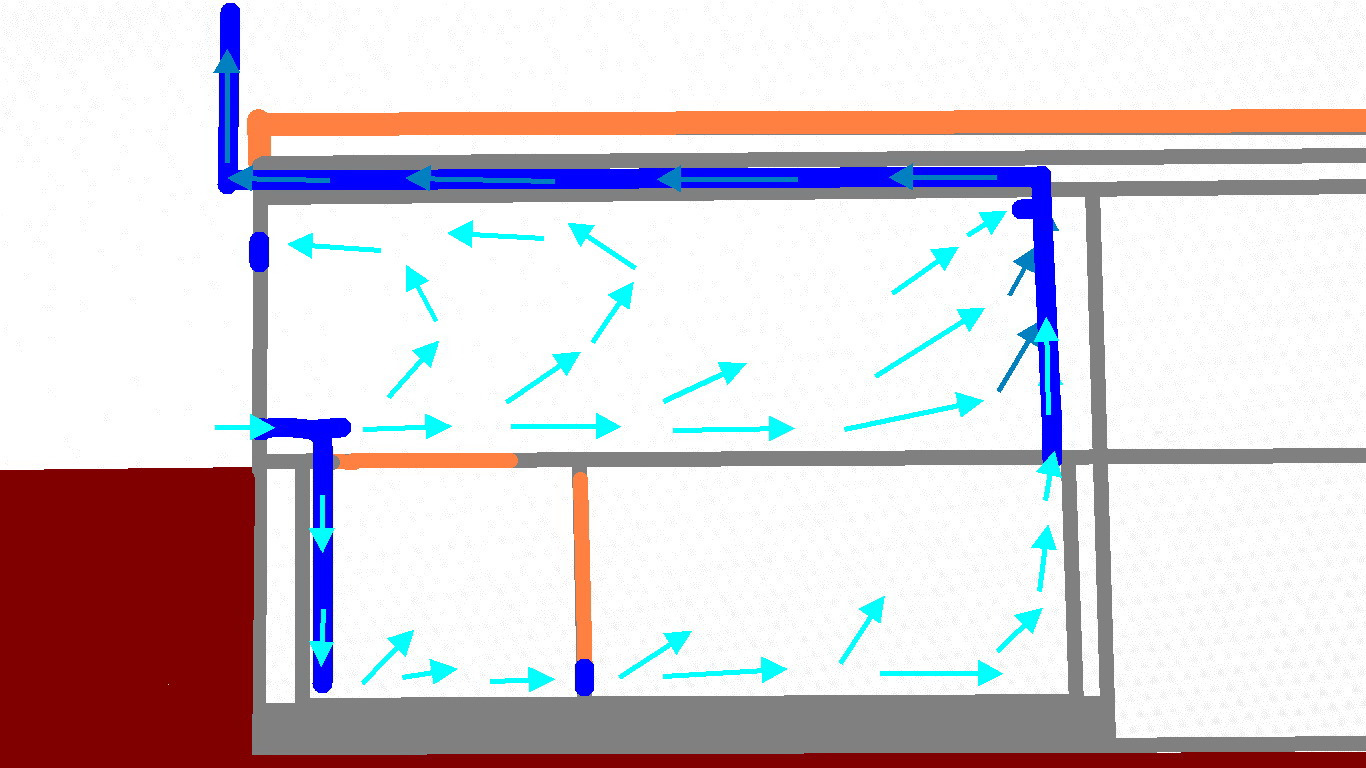
When choosing a ventilation scheme, the basic rule must be observed - air flows must circulate from living rooms (bedroom, living room) to non-residential ones (bathroom, kitchen). It is not worth saving on the quality of construction, because well-installed ventilation helps prevent the appearance of fungus and bacteria in the room, prevents the accumulation of dust, provides a good microclimate in the house, preserving the health of its owners.


Pre-launch tests
After assembling the entire ventilation complex, connecting all the elements, check its performance.
Pre-start tests at maximum power are required to ensure the following:
- all systems work correctly;
- design performance achieved;
- air exchange is carried out according to planned design norms, that is, the conditions for air distribution in individual rooms are met;
- smoke removal is effective;
- no vibration;
- fastening to the wall and ceiling did not reveal any flaws;
- electrical circuits do not spark, do not heat up, do not close.
- The heating elements change the temperature evenly.
In accordance with the rules of SNiP, test run and adjustment of equipment are carried out to confirm the design performance of the system. Typically, pre-start tests of the ventilation system are carried out before its industrial operation. Sometimes such launches are carried out after the completion of the installation work of individual blocks or cycles. The results of intermediate checks must be recorded in the acts, which, upon completion, will be included in the package of documents for the ventilation system.

Before the trial run, the technicians should check the technical documentation to ensure that the following criteria are met:
- the equipment actually installed coincides with the one declared in the project;
- installation work was carried out in accordance with technical specifications and standards;
- the degree of readiness of the installations corresponds to the operating instructions from the manufacturer;
- all deviations from the project are documented in the author's supervision book or by another act, agreed and meet the requirements of SNiP;
- all identified defects were eliminated by the time of launch, as evidenced by the attached acceptance certificates.
If the pre-launch tests revealed a discrepancy between the actual data and the design data, then after the reasons are found, the devices must be adjusted.Elimination is carried out by a contractor who installs ventilation.
The following inconsistencies are allowed.
- Deviation by 10%, both in plus and minus, indicators of the volume of air that passes through the head general exchange sections of the ventilation unit.
- The deviation of the volume of air flow passing through the distributing or receiving units, in the range from -20% to +20%.
- Deviation of air volume indicators ±10% entering special purpose buildings. These include medical institutions, in particular, operating rooms, museums, control rooms and other premises that require precise air conditions.
In the next video you will find the installation of ventilation in the kitchen.
Ventilation in living quarters
Now let's talk about properly organized ventilation in residential premises, that is, in those where people will spend all their time in the country. This is a living room, bedroom, nursery and other rooms, depending on the plan of the cottage. In these rooms, the supply of fresh air is incredibly important in order not to spoil health and maintain normal living conditions.
The ventilation system should be thought out at the construction stage of the cottage. In particular, it is necessary to leave a gap of a couple of centimeters under each door to ensure draft. In winter, fresh air is needed most of all in the room, since it will not work to ventilate the cottage with the help of windows. The best way to ensure the necessary conditions is supply and exhaust ventilation in the country in winter.
Air supply is provided by supply valves, or professionally, air infiltration valves. It is necessary to select valves suitable for temperature endurance.For living rooms, a hidden ventilation system is best suited, which is not visible to people, it can be hidden in the ceiling or in the walls.
Extractor hood, it is better to do in the workroom, bath, toilet, kitchen, etc. But most importantly, organize the extraction of air so that unpleasant odors from the kitchen or toilet do not get into the living quarters. The duct ventilation pipe, which can be installed in the attic so that it is invisible, does an excellent job. Most importantly, provide pipes and fans with sufficient insulation so that they survive the winter frosts and do not form condensation.
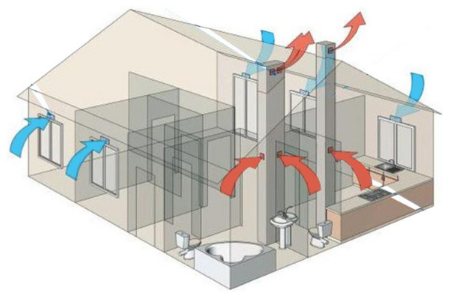
Device nuances
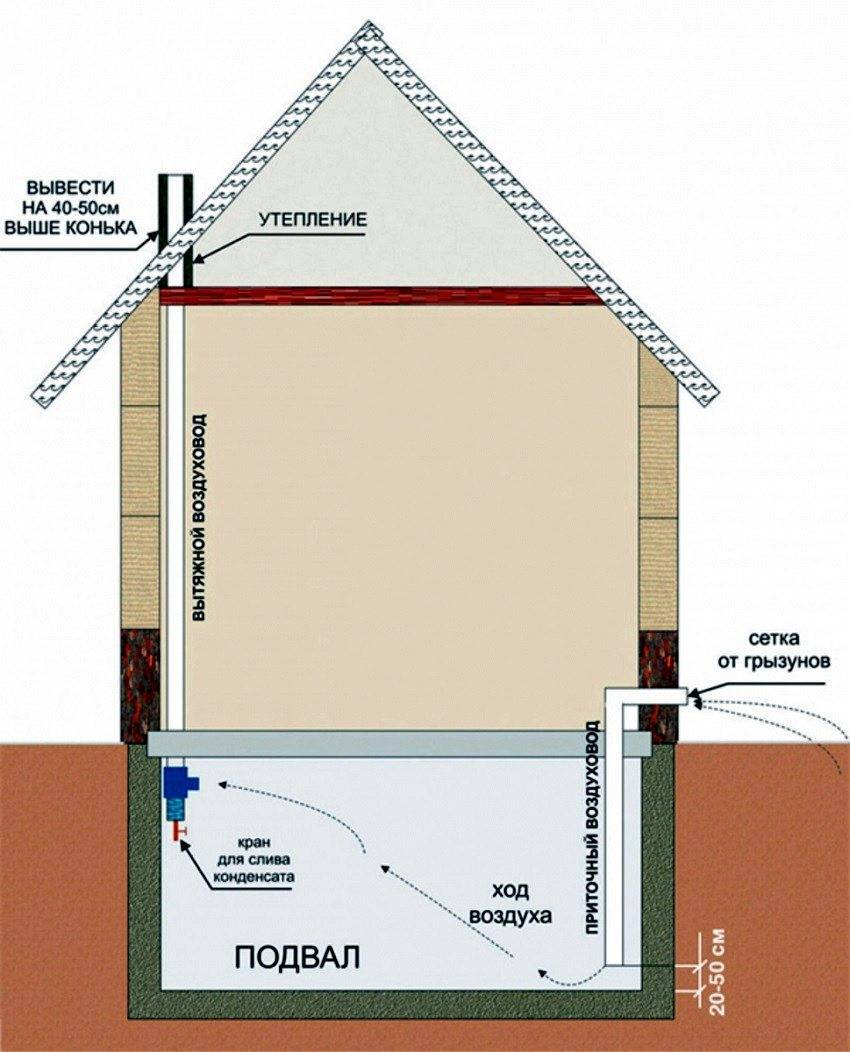
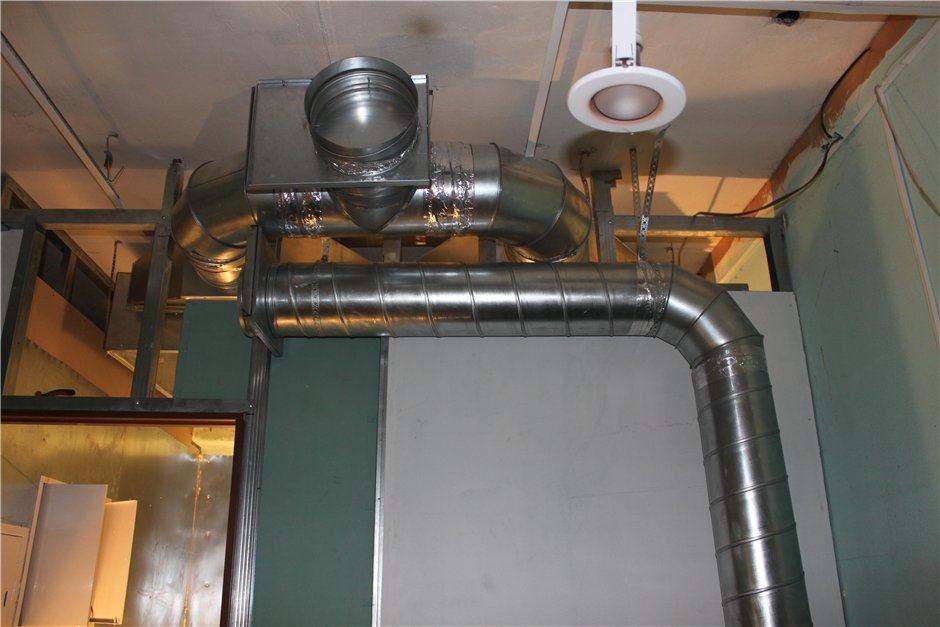
Any ventilation involves the inflow and outflow of air, its movement and exchange inside the room. The outlet of the exhaust air from the premises is organized by installing special openings in the roof or walls with access to the street. By their nature, they should be done during the construction of the building before the fine finishing of the walls. The air duct box is usually rigid, transitions between elements and turns are often made in the form of a corrugated aluminum pipe. The entire structure is hidden under the final finishing of the house, leaving only holes covered with protective bars. In production, the ventilation complex is left open in case of unforeseen breakdowns or maintenance of individual elements.
The hood in the apartment of a multi-storey building is usually already done, if necessary, adjustments can be made in the form of additional fans in the bathroom or in the kitchen. As for the exhaust ventilation in a private house or at work, then you have to act from scratch, which involves the installation of air ducts and the removal of the hood through the roof.In this case, you will need to insulate the part of the duct that will pass through rooms where there is no heating. This will prevent the formation of condensate, respectively, will protect the pipes from dampness.
If it is planned to make a ventilation outlet on the roof, then it is necessary to provide for its thermal and hydroprotection, as well as the installation of a deflector, which will increase traction and serve as protection from precipitation.
The importance of preliminary calculations
Shower ventilation is required if it is installed in a concrete building or in a wooden house. It prevents the negative impact of high humidity on the integrity of sanitary equipment and building materials.


It is necessary to follow the norms of SNiP, which will serve the safe operation of the room in the future. Before you equip the room with ventilation with your own hands, you must have a drawing of the shower cabin, as well as the locker rooms available in the room.
Removing excess moisture helps to increase the life of all metal plumbing fixtures and some building materials. For normal health of a person, humidity should not exceed 65%. If this indicator is overestimated, staying in a shower cabin can adversely affect the health of its visitor.
In the norms of SNiP, the concept of "air exchange rate" is introduced. It is the ratio of the volume of air entering or leaving the room to the volume of the room itself. The minimum indicator according to SNiP is 50 m3 / hour. For public showers - 75 m3 / hour.
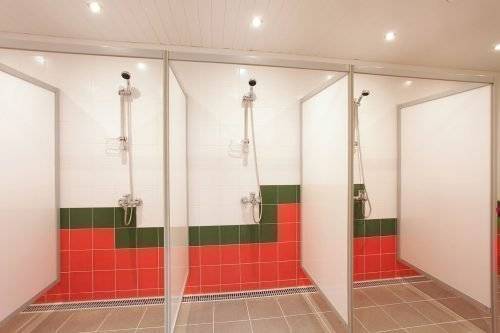
The minimum indicator of "air exchange rate" according to SNiP in a public shower room is 75 m3 / h
Conclusion
So, we looked at how to properly ventilate the garage.Each of the presented options has its pros and cons. The choice in the direction of one of them should be done based on the budget. The best option in terms of price-quality ratio is a combined scheme.
As it became known from this article, do-it-yourself ventilation in the garage is a must for every car owner, and besides, it’s not difficult at all. Do not forget that thanks to her, the “iron horse” will last longer, and there will also be less health hazard for the owner of the garage when visiting this room.


