Peculiarities
Ventilation in the bath can be done in various ways.
Depends on her presence:
- distribution of heat flows inside;
- comfort and safety of washable;
- period of operation of the building.
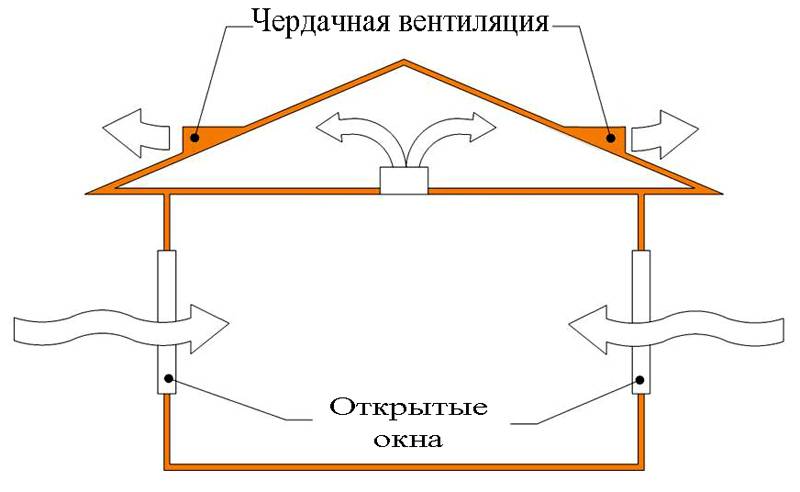
Water and steam are continuously concentrated there, the tree actively absorbs them. Even if you dry the building periodically, without establishing a constant movement of air, the effect will not be strong enough. In order to avoid dampness, it is required to create a pair of ventilation windows - one serves to bring in clean air from the outside, and the other helps to exit the heated one, which has absorbed a lot of water. Choosing the location of the openings, they change areas that are especially intensively ventilated. The use of a pair of outlets in the steam room and dressing room sometimes improves the orientation of the air flow in the required direction.
Of course, the size of each window and the ability to adjust the clearance are of great importance.They put valves that open fully or partially. The calculation of the volume of ventilation openings is repelled, first of all, from the area of \u200b\u200bthe bath rooms. If you make them too large, mold will never appear on the floor and in the sink, but the steam room will heat up for a very long time, and an unusually large amount of fuel or electrical energy will be consumed. Too narrow windows will not allow the air inside to cool or become dry.
All deviations from normal parameters are categorically unacceptable, which make it possible to exclude the occurrence of powerful temperature changes - this not only creates discomfort, but can also provoke health problems. It is impossible to completely eliminate the difference in the temperature of the flows; it is only necessary to limit their magnitude. Normal ventilation systems are formed during the construction of the bath, while making channels and preparing openings. Windows are mounted only after the decorative cladding of the building has been completed. Therefore, you will have to enter information about the arrangement of ventilation ducts into the bath project.
In most cases, the ventilation openings are made strictly the same. The outlet can be made larger than the inlet, but according to safety rules, it cannot be smaller than the first. For the same reasons, sometimes they resort to paired exit windows. As control elements, it is worth using not doors, but valves, when closing which it is impossible to preserve the gaps. When the steam room is heated for the first time, the shutters are closed 100% until the air reaches the desired temperature.
The use of elements with controlled position is also useful because the amount of air flow must be adjusted according to the season.When there are negative temperatures outside, even a very small trickle of air brings a lot of cold. Therefore, you should not open the ventilation windows completely. The cross sections of such windows should average 24 square meters. cm per 1 cu. m of internal volume. But these are only preliminary figures, and if in doubt about the result obtained, it is worth contacting qualified heat engineers for calculations.
It is categorically impossible to place ventilation windows at the same height or even directly opposite each other, since this will not allow all the air in the bath to be warmed up sufficiently. In addition, such a design will not allow the air masses to be evenly mixed, which means that it will be necessary to thoroughly calculate the accuracy of the location of the ventilation elements. Exhaust windows are recommended to be placed just below the ceiling, because the air immediately rushes up after heating.
Natural ventilation of a wooden house
 This variety is the most preferred, since it is characterized by the lowest cost, and operating costs are generally zero.
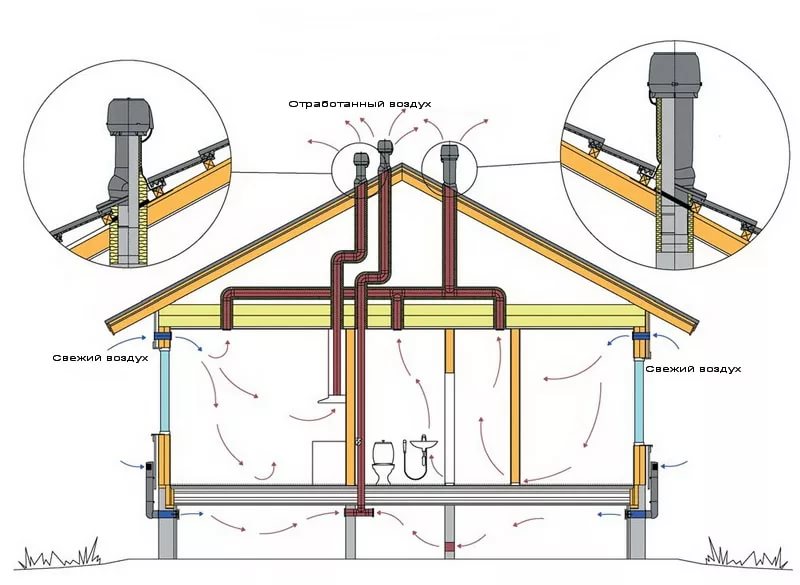
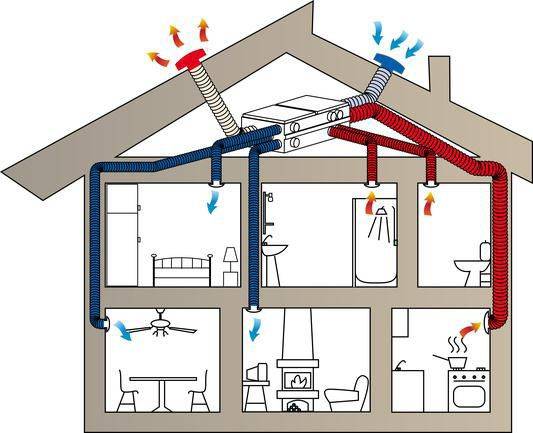
Ventilation is arranged in such a way that the air moves in the direction from the living rooms to the kitchen and bathroom and from here is removed to the outside.
For this purpose, vertical exhaust ducts are installed in the kitchen, bathroom and toilet, the inlets of which are located under the ceiling. It is here that, as a result of convection, warm air saturated with carbon dioxide, water vapor and odors rushes.
In living rooms, supply valves should be installed, the role of which in former times was played by gaps in the windows. They are of two types:
- Window.They are mounted in a metal-plastic window, and to install some models in the window, you only need to cut out a section of the seal.
- Wall. Installed in a hole made in the outer wall. Installation of a wall valve is laborious, but it can be installed directly above the battery (the incoming air will immediately be heated) and equipped with a filter.
In order for the ventilation system to supply exactly as much fresh air as necessary, thus saving heat, install supply valves with automatic regulation. The angle of rotation of the damper in such devices is set by a hygrostat, which analyzes the level of relative humidity in the room. During the absence of residents, the system will completely close the valves so that the heat does not evaporate for nothing.


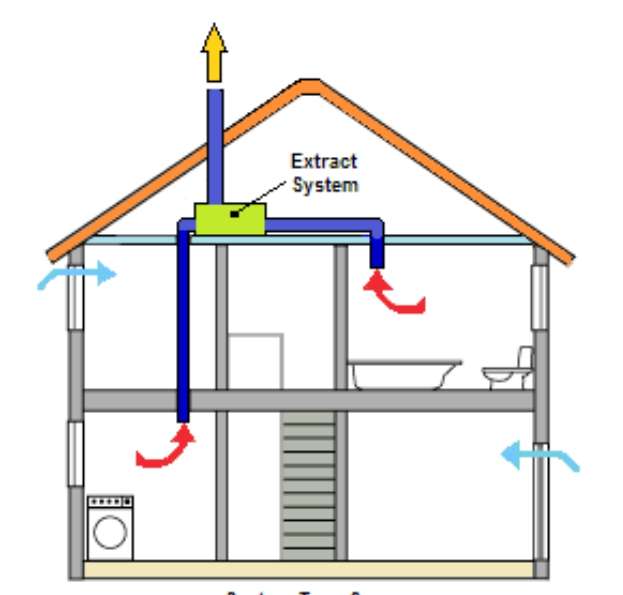
Do not forget to provide ventilation and the basement. The supply channel is placed in it in such a way that the outlet is in a corner about 10 cm above the floor. The hood is placed in the opposite corner so that the inlet is under the ceiling. Placing the supply and exhaust in opposite corners will eliminate the appearance of "dead", that is, unventilated areas.
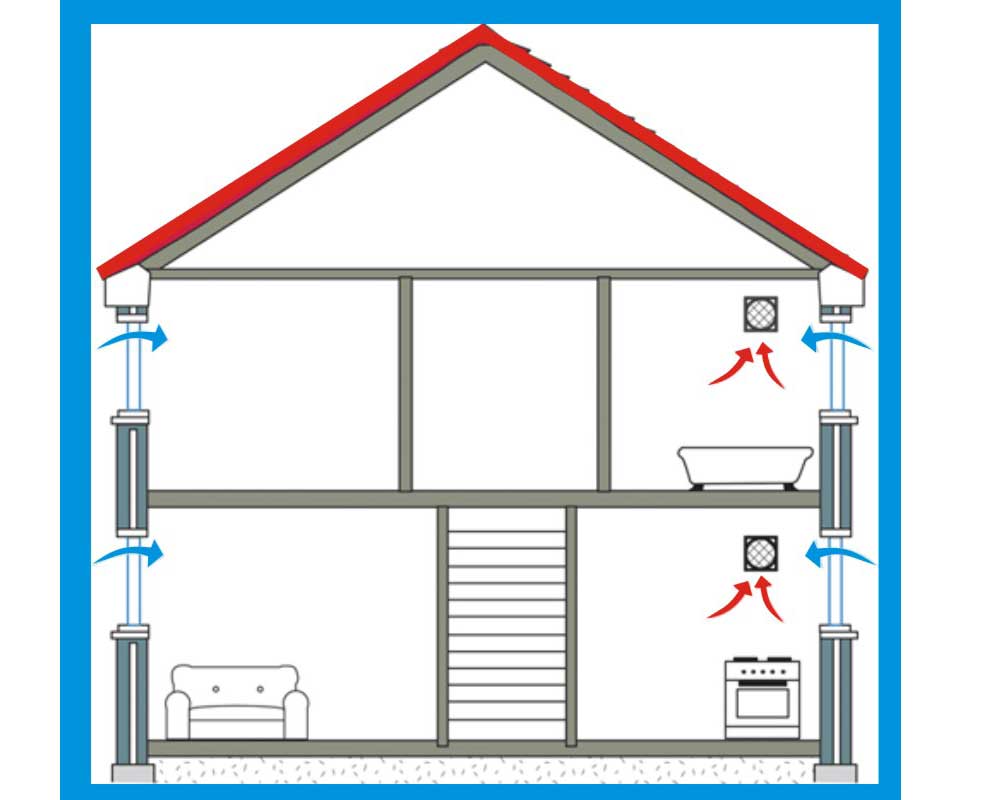
An example of natural ventilation at home
Interior doors should not tightly block the opening, otherwise the ventilation system will not work. You should either leave a gap 15–20 cm wide under them, or install doors with special ventilation holes (closed with a decorative mesh).
In a house without a basement, in the upper part of the foundation below the floor, holes closed with a fine mesh are arranged - air ducts that provide ventilation of the underground space.
Natural draft in the exhaust duct will be sufficient if the following conditions are met:
- the inner surface of the channel should be as smooth as possible;
- outdoor areas should be insulated so that the air passing through them cools more slowly;
The channel must be vertical throughout, and it must be brought out to the highest possible height.
Features of installation of natural ventilation
Installation of ventilation in a private house has its own characteristics. In part, they depend on the location of supply windows, ventilation ducts and hoods. It is not necessary to install ventilation elements in each room.
The correct location of one pair of devices for the whole house can provide effective ventilation. Therefore it follows:
- Start installing ventilation in a log house from its foundation. Windows are installed on each of its walls, which ventilate the basement, relieving it of dampness.
- Provide air supply with a ventilation duct, removed from the base. Its street part should be located on the north side of the building (the air there is fresher and cooler).
- Correctly position the exhaust windows. Extraction of air masses is carried out by ventilation ducts led to the ceiling of each room. All of them are displayed on the roof of the building: the higher the pipe, the better the draft.
Be sure to take into account the factors that affect the strength of natural air exchange. In addition to the height of the exhaust pipe, which rises above the roof, it is influenced by weather conditions, the configuration of the air channels (their size and the presence of turns). The design features of the building are important - partitions, doors, etc.
In order for ventilation by natural air currents to be carried out throughout the house, you should take care of a sufficient number of slots and “windows”. Air penetrates from one room to another under the action of traction, if there is a gap of 2–3 cm between the door leaf and the floor. Another option is to make a through hole in the door and decorate it with a decorative grille.
The space under the roof also needs to be ventilated. A log house, regardless of the type of roof, is an airtight structure, and the air condenses in it under the influence of natural factors, which leads to violations of the integrity of the structure.
Lack of ventilation system can lead to roof leakage. That is why the attic must also be equipped with ventilation.
Types of ventilation systems
How air will be exchanged in a wooden house should be taken care of before construction begins. There are several types of ventilation, each of which has its own arrangement features:

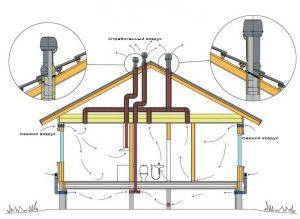
- Natural ventilation in a wooden house implies the possibility of free penetration of air flows through the cracks in the window and door blocks. In order for the outflow of air to occur no less efficiently, its paths should be determined. For this purpose, air ducts are mounted, which are displayed on the roof. Given that today the level of building materials and technologies has increased significantly, the natural penetration of air into the room is sometimes problematic.
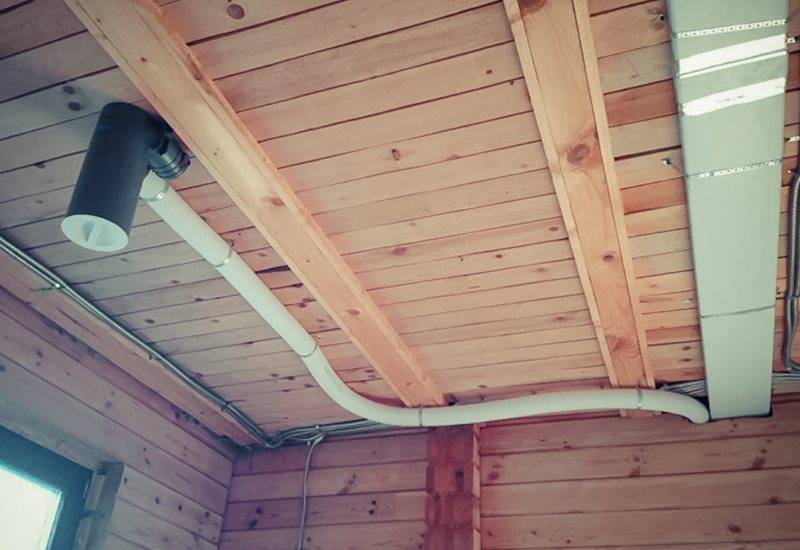
In addition, it is necessary to create unhindered conditions for movement airflow throughout the house. To perform this function, there is a gap between the floor and the door; you can also drill holes in the lower part of the door leaf, which, if desired, are decorated with a grill. Exhaust ventilation in a wooden house is provided by an air duct going to the roof. The greater its length, the stronger the thrust. The same can be said about the cross section of the ventilation ducts: the larger its area, the higher the efficiency of the outflow of exhaust air from the room.
Ventilation in a wooden house forced type. It also has its advantages and disadvantages. Among the advantages, high performance can be distinguished, but there are also tangible disadvantages: the high cost of its arrangement, the increased noise level. However, both of these problems are solvable. More expensive equipment can be replaced with simplified air intake and exhaust valves. And soundproofing materials will help reduce the noise effect.
Ventilation in a timber house is also possible of a mixed type. At the same time, air access to the rooms is provided in a natural way, and at the outlet of the ventilation system there is a device that causes a powerful outflow of air. In this case, it is possible to regulate the process of air outflow by means of a fan, the power of which is selected based on the parameters of the room.
Ventilated floor device
An important component of the organization of air exchange in a log house is the ventilation of the floor, foundation and lower crowns of the log house. The system will dry the lumber of the base of the house, which means it will protect the entire building from rotting and fungus
All structures of a wooden house must be regularly dried with air currents.
special attention should be paid to the foundation: foundation, ceiling, floor system.Basic principles and rules for base ventilation:
Basic principles and rules for base ventilation:
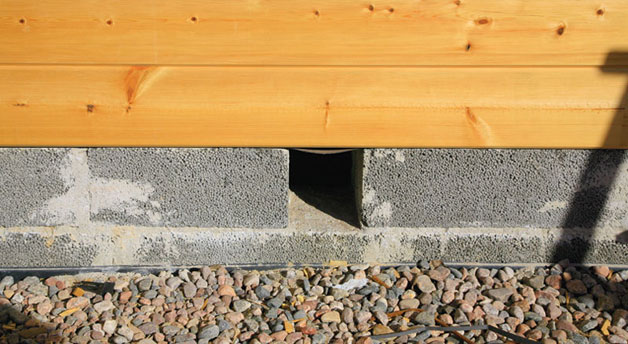
- The device of holes-air (diameter - 10 cm) from the windy and opposite side of the base of the log house. The distance from the ground to the center of these holes should be at least 33 cm.
- Construction of the floor according to a floating scheme with gaps around the perimeter of the premises. The gaps are loosely covered with a plinth, so that the air entering the vents can freely exit.
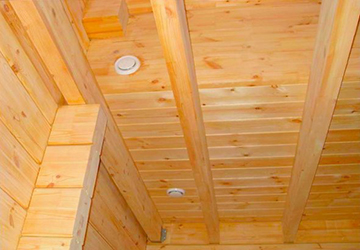
- Formation of ventilation holes in the floor structure that communicate with the underground. They are closed with bars, they are arranged if not natural floorboards were used as a floor covering, but linoleum, carpet, laminate and similar material that does not allow air to pass through.
In the frosty period, the vents selected in the basement or foundation are closed with dampers, which significantly reduce air exchange, and in the summer they put grates on them.
The distance between the products themselves is about 2 meters if the house is located in a lowland. If the log house is high, then this distance should be increased, since the strength of the wind increases, and hence the intensity of the blow.


The ventilation system of a low-rise building must necessarily provide ventilation of the underground and basements in a natural or artificial way.
Particular attention should be paid to the air exchange system of attics and attic rooms, on which the condition and durability of the roof largely depend. Attic and attic ventilation will increase the total amount of airflow to 500th of the total area of the entire house
To organize natural air exchange in the attic or attic, gable ventilation and dormer windows are arranged. The type of ventilation structure is selected based on the shape of the roof. It is clear that in pitched versions it is easier to arrange an opening in the pediment, hip and hipped ones are equipped with dormer windows.
To divert the exhaust air mass, ventilation shafts will be required. They are most often planned in the center of the building, closer to the ridge. In the summer, ventilation shafts can be equipped with fans, so the operation of the entire system on hot windless days will be ensured.
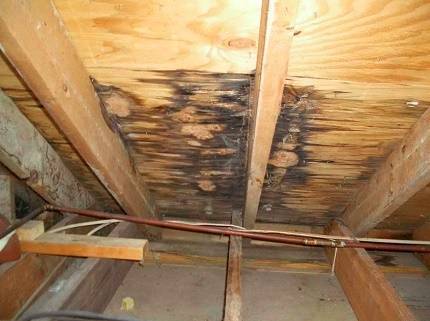
If the air exchange within both the cold attic and the equipped attic space is insufficient, the mold fungus settles and multiplies at an amazing rate.
Roof ventilation requires careful attention to the following nuances:
- Between the insulating layers, insulation and roofing, it is necessary to leave gaps of 3-5 cm.
- The specified distance is provided by the device of the crate and the counter-crate.
- Thermal insulation from the inside must be protected by a layer of vapor barrier.
- The insulation layer in the roofing pie from the outside must be protected by waterproofing, separated from the roofing by a ventilation gap.
Compliance with established norms and rules is necessary for the development of a competent ventilation project in a private house. Knowledge of building codes and pre-prepared drawings will help to do without designers, and at the same time achieve the goal - to keep the wooden house in a habitable condition.
Why Choose Natural Air Exchange
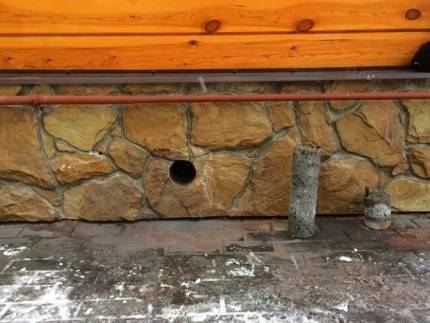
 Vents in the basement - an element of natural ventilation
Natural ventilation in a wooden house is carried out in the form of vertical air channels. They must be of the same section and with a minimum roughness of the inner side of the walls. This will greatly increase traction. Mounted in the kitchen, toilet, bathroom. Inlets are arranged in rooms with access to the wall, and then brought out under the roof. The higher the hood is located under the roof, the better the movement of air flows. If you plan to install a similar duct in the cellar, basement, then one channel is not enough. Several are required.
Roof ventilation in the form of an aerator prevents the formation and settling of condensate on crossbars, rafters, columns, and thermal insulation of the house. This is a passage through the roof, made to insert a device with a diameter of 100 mm into it. The aerator is fixed with self-tapping screws along the edges of the "skirt". If the ventilation passage to the roof is illiterate, troubles may arise in the form of:
- Corrosion damage to metal parts of the structure.
- Destruction of wooden elements by fungus and mold.
- Deterioration of the characteristics of the thermal insulation material, etc.
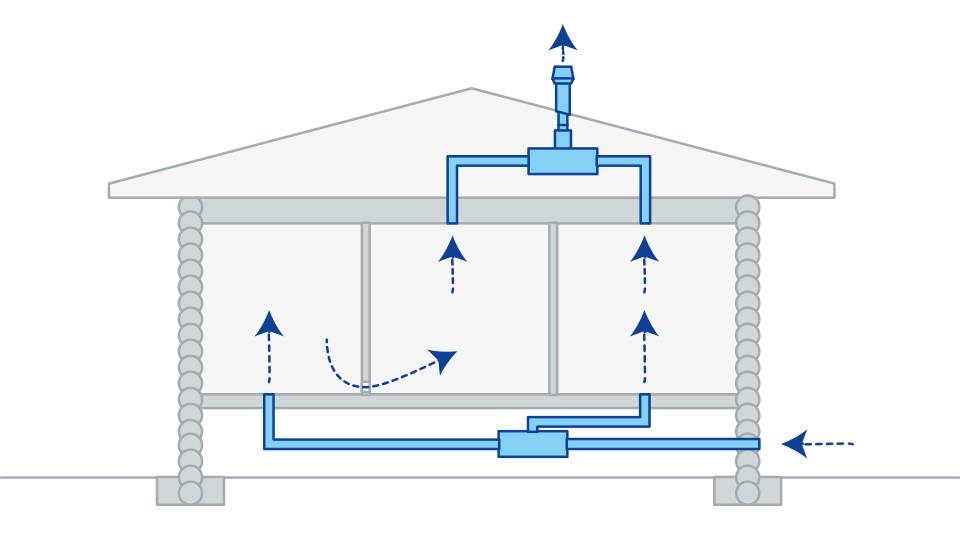
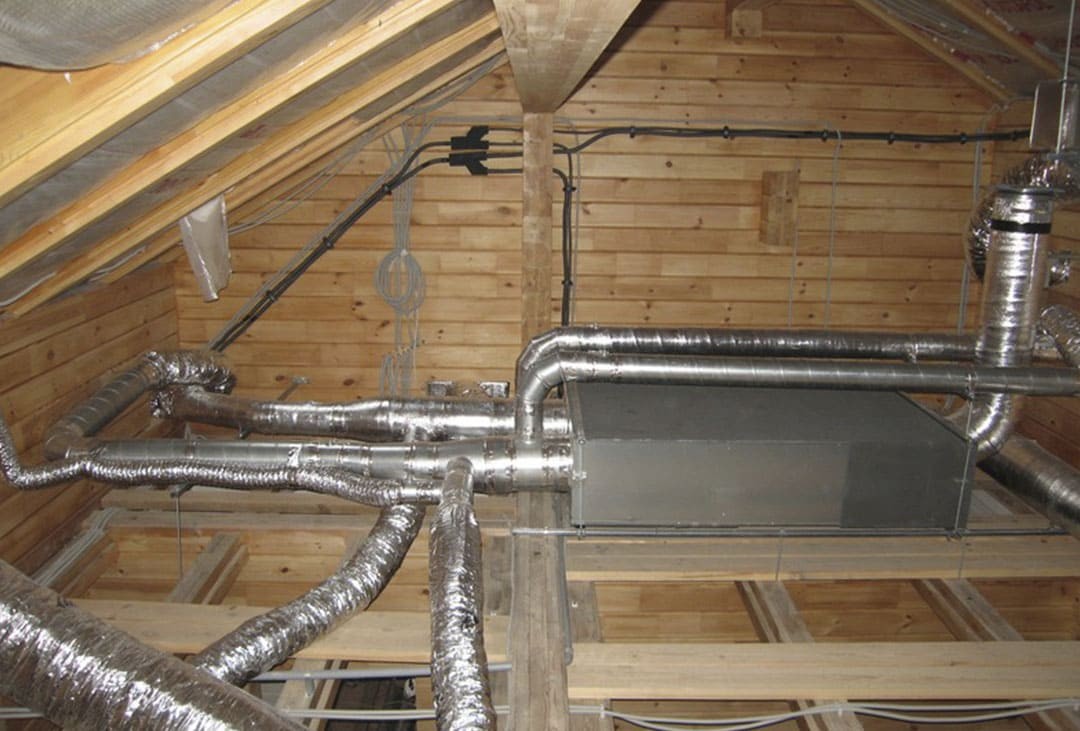
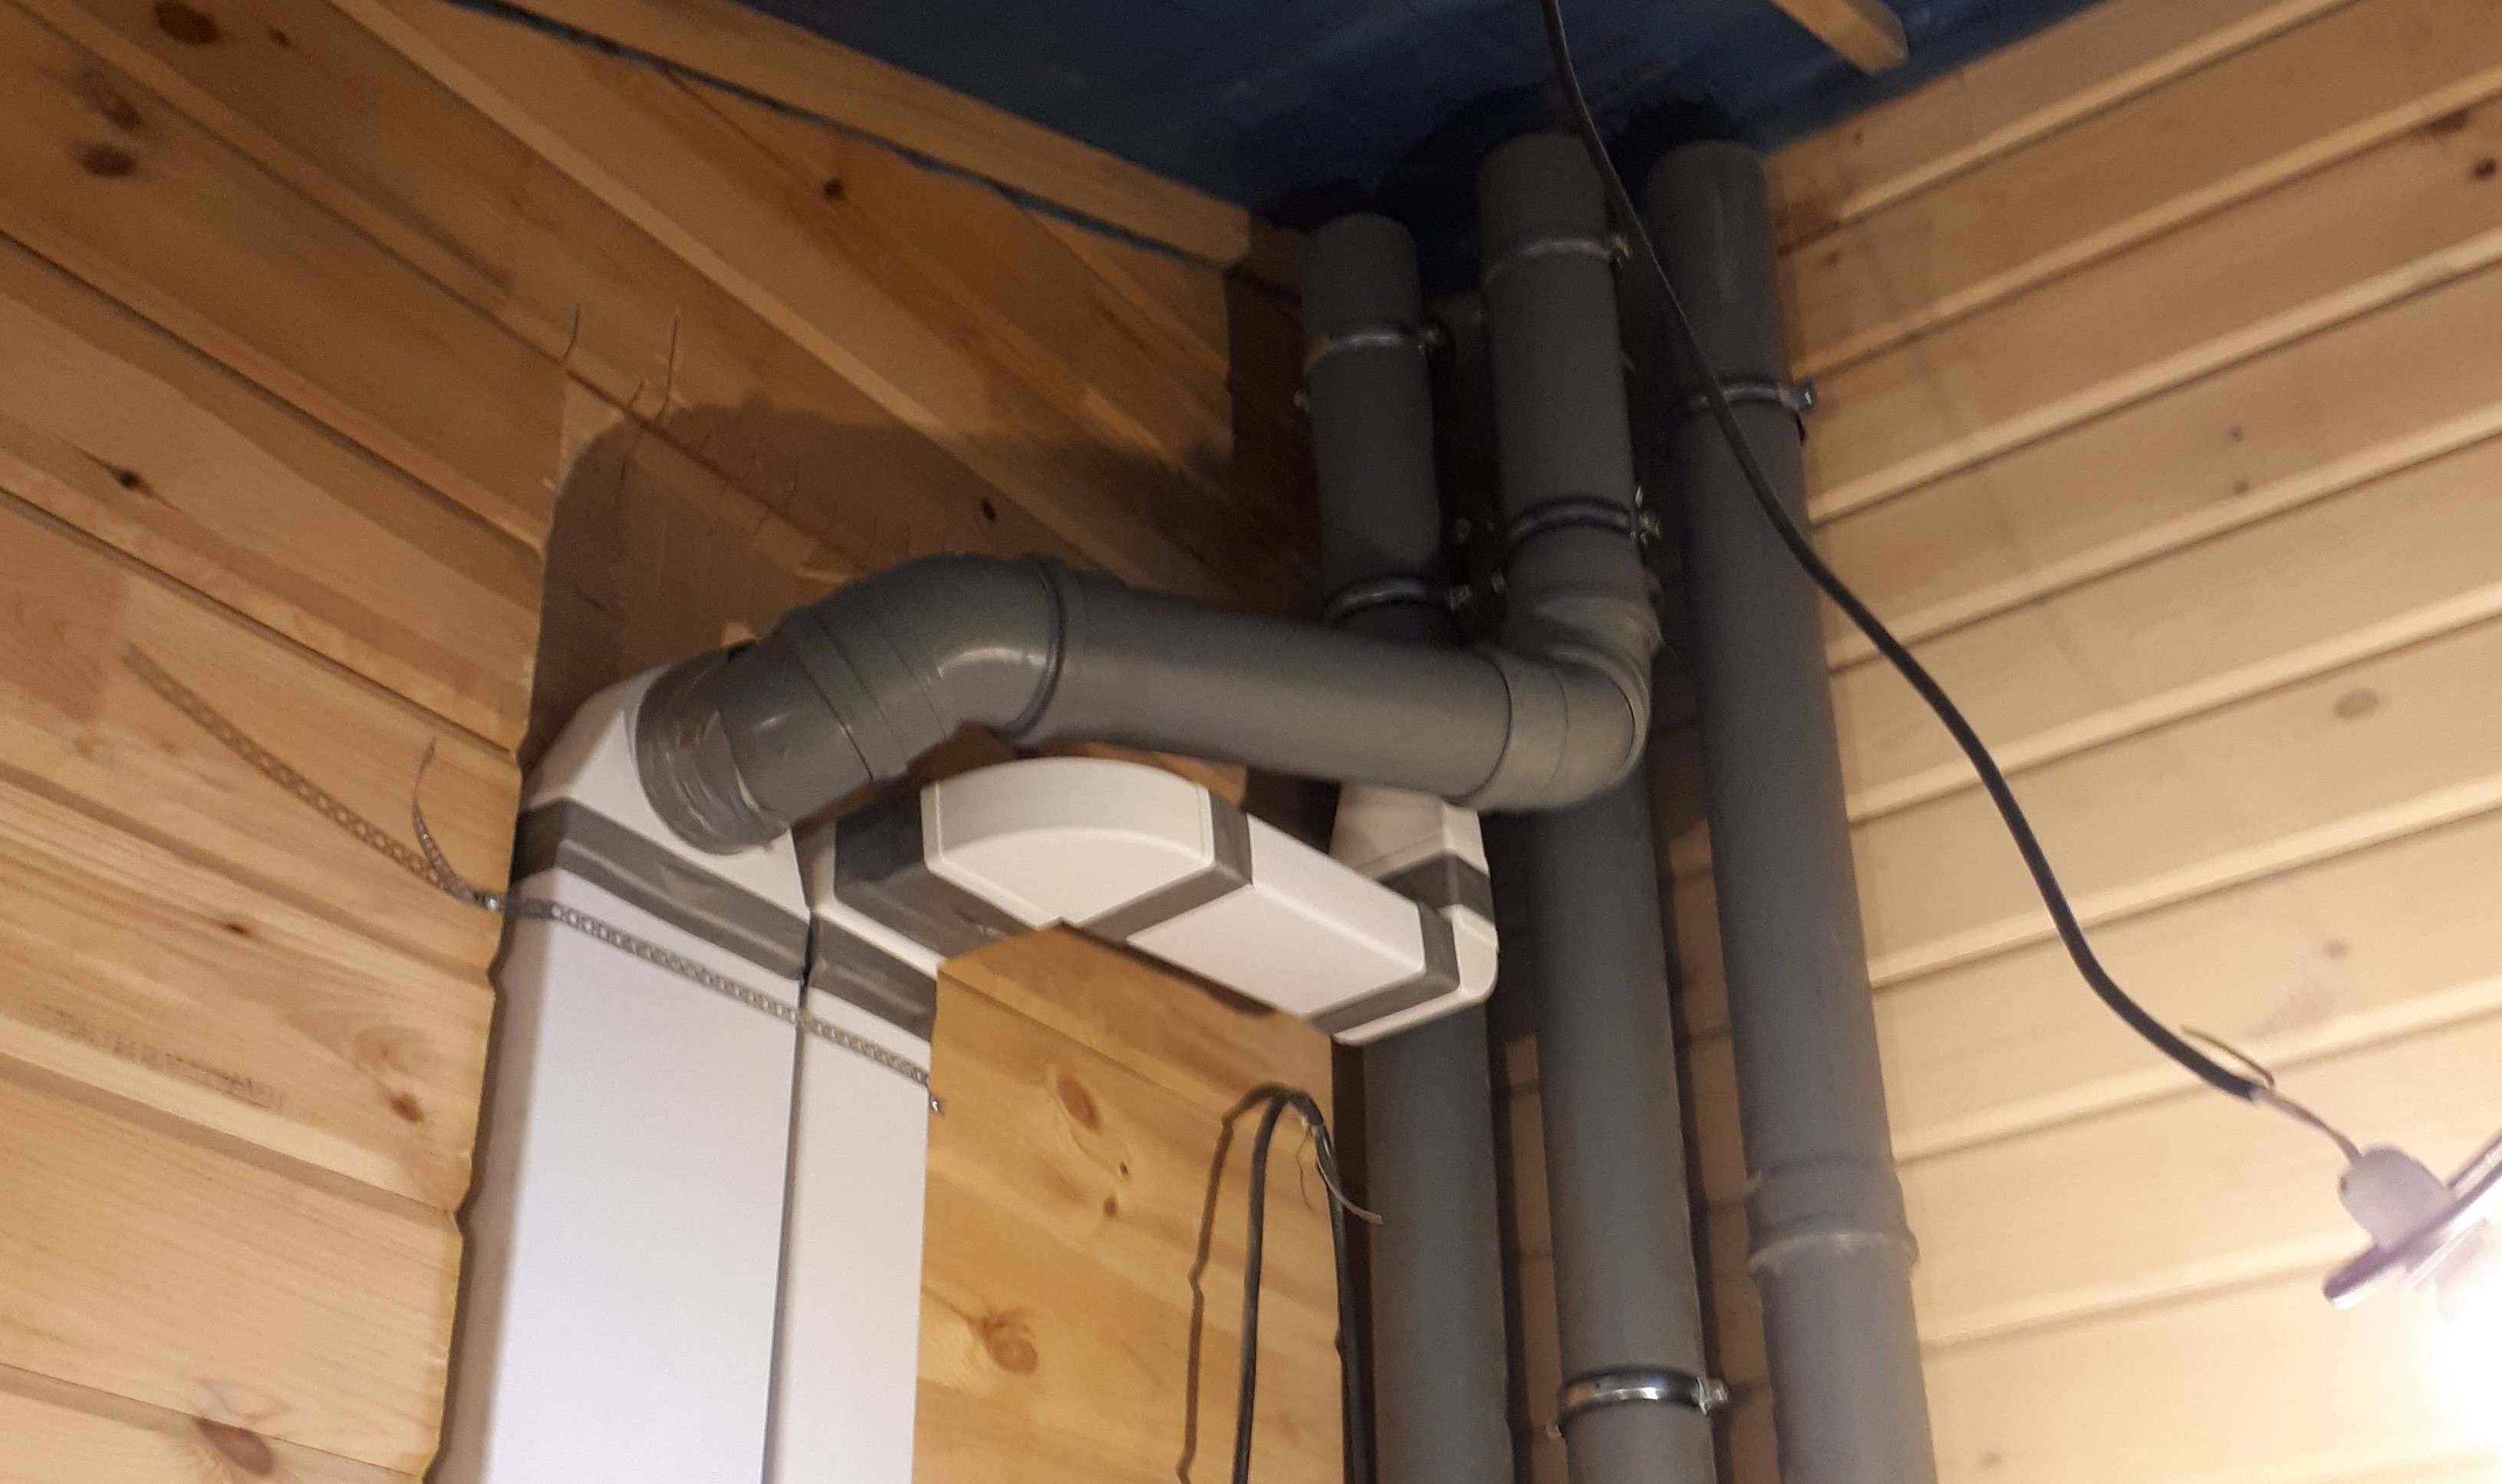
Forced (supply and exhaust) type of ventilation in a wooden house does not depend on weather conditions. Moreover, the devices included in the system can additionally heat or cool the air injected from the street before it enters the house. The ventilation unit is working. Two sleeves of an air duct are brought to it. The flows circulate in the deflector. Once in the air intake, they spread throughout the room. One of the disadvantages is the participation of a person who controls the parameters and adjusts the air supply.
When choosing a ventilation system for a wooden house, you need to understand the principle of its operation, as well as evaluate the possibilities of installing it yourself.
Bath ventilation device
Components in the bath are selected depending on the type of ventilation:
Window.
This is an important element in the bath, not only because of the lighting, but also because after the procedures you can ventilate the steam room with high quality.
But it is important to install it correctly so that there is no depressurization. Otherwise, warm air will not linger for a long time and you will have to raise the temperature more often.
Masters advise installing two windows: one above the shelves (if during the procedure there is too much heat and someone feels bad, then it can be opened to cool the room) and under the shelves (the beds dry out so quickly). The second window should be small and opaque.


It is also important to remember that for safety reasons, windows should open inward. Do not install plastic windows in the steam room, as they can begin to release toxic substances
Only wood can be used.
A well-chosen window will complement the interior of the bath well.
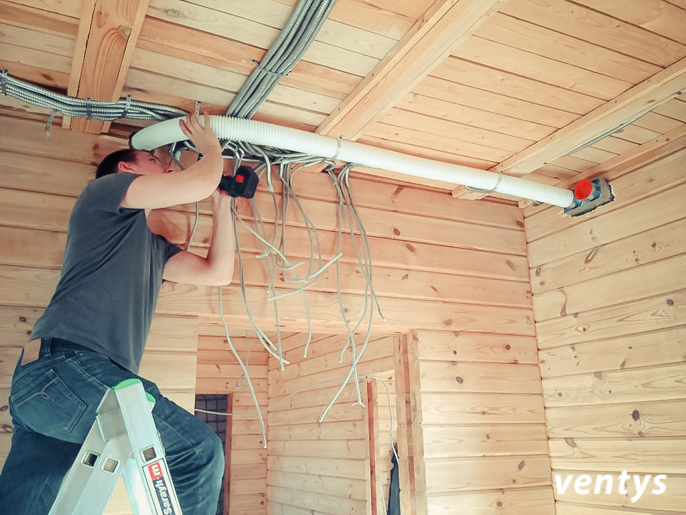
Fan.
To install ventilation, you need to purchase several components: a grill, a valve, a valve, a box, a mosquito net, a thermometer and the fan itself. It is advisable to take the grate from wood, and the mesh from metal.
Thus, they will not let insects or rodents into the room. Corrugated or galvanized pipe can be used as an air duct. Do not use plastic, as it is not suitable for use at high temperatures.
Steam room fan
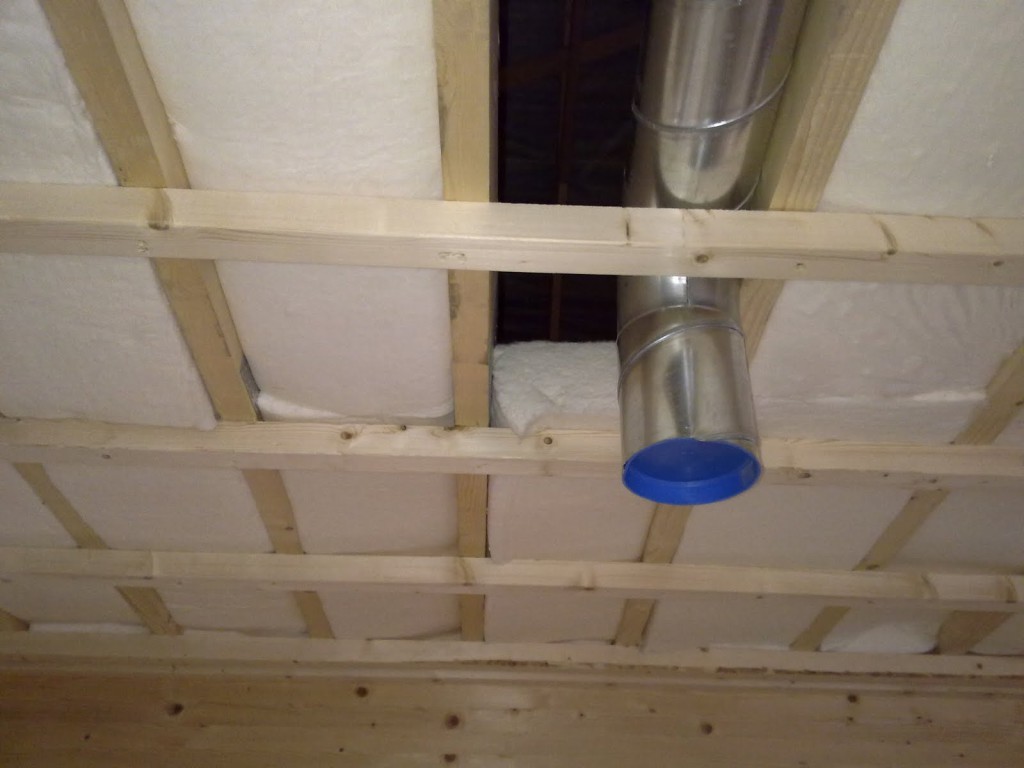
Bath vent valve.
It must be installed in the supply and exhaust duct.Dimensions and shape are selected depending on the interior. There are two types of valves: forced ventilation and infiltration. Both work on the same principle and differ little in appearance. They are easy to install by shortening them to the thickness of the wall in the steam room. On the outside there are blinds that will not let rain or snow into the ventilation.
On the inside there is a cap and a membrane for better sound insulation and heat retention. There is also a mosquito net inside.
The valve is installed in a load-bearing wall and it is important to ensure that it does not lead to an outdoor toilet or garbage cans. Otherwise, all this smell will be indoors.
The valve must be installed in a load-bearing wall
Vents and air in the bath.
Vents are installed at a distance of 2m. There are three types of vents: round, square and rectangular and are located on the roof.
Hood.
If the bath is located along with the house, then the hood is installed so that the air goes in the opposite direction from the dwelling. The hood cannot be installed under the ceiling, as in this case there will be a large draft.
The hood should not be directed towards the house.
In order for the steam room to function properly, it is necessary to install all the components. If there is at least something, then there is a high probability of a fire or that someone in the process will become unwell
It is also important to remember that materials must be selected in accordance with safety regulations.
Windows in the bath must be installed so that they open inward
Natural ventilation of a wooden house
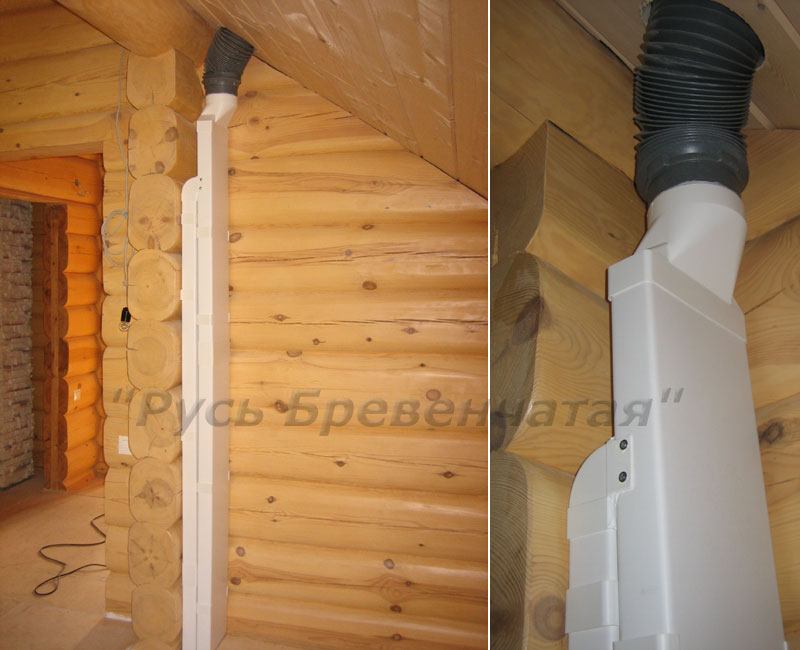
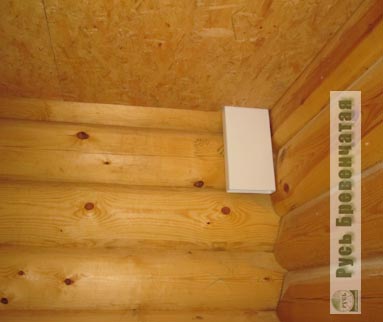
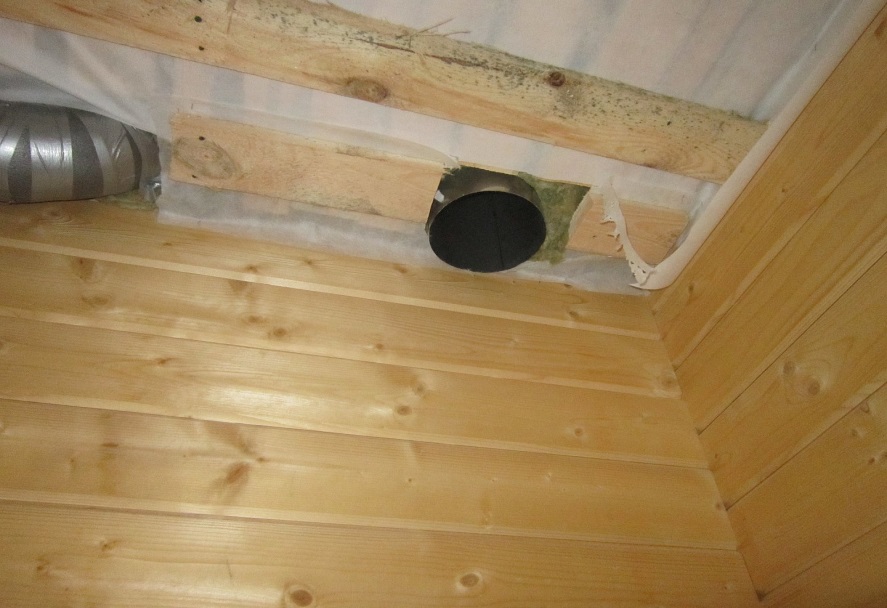
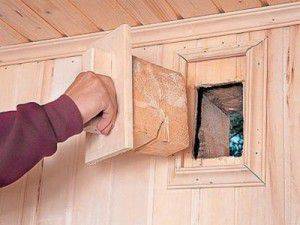 The plug of the ventilation duct in a wooden house
The natural ventilation system in a wooden house is attractive for its comparative cheapness, as well as the simplicity of the device. The movement of air is carried out due to the desire of a warm air mass to rise upward along vertical channels specially constructed for this purpose. Therefore, for you, natural ventilation in a wooden house with your own hands may be the most simple to do, and at the same time quite effective.
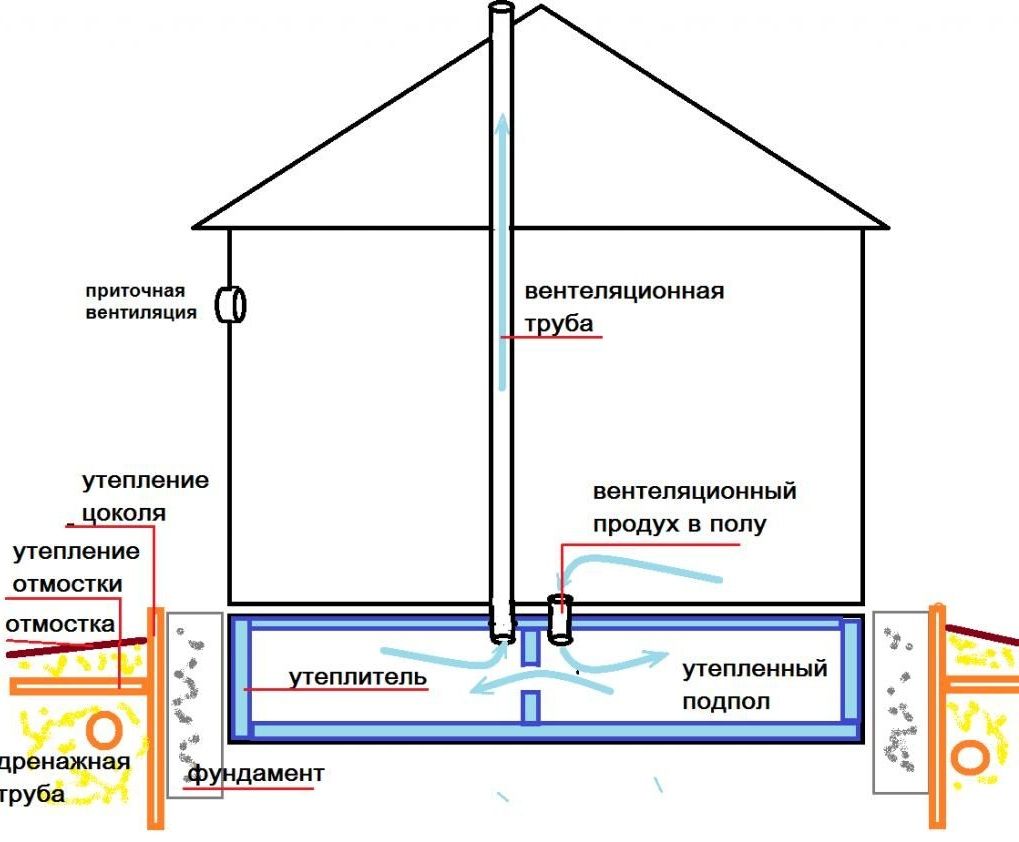


To arrange ventilation in a wooden house, start from the basement, since it is here that air from the outside should first of all penetrate. Under normal conditions, the ventilation of the foundation of a wooden house occurs through the so-called air vents. These small vents must be placed under each wall of the house during construction.
Air supply through the supply channel must be organized at the level of the basement. It is best on the north side of the house, where the air is coolest, and this is useful for increasing traction. It is not necessary to equip each home with a separate supply channel. It will be enough to leave gaps of one and a half to two centimeters under all the internal doors, and through them fresh air will begin to spread everywhere. The exhaust air will be naturally forced out through the exhaust ducts, the entrances to which must be arranged under the ceiling of each room and covered with decorative grilles. The output of each of the ventilation ducts must be raised as high as possible above the roof level.
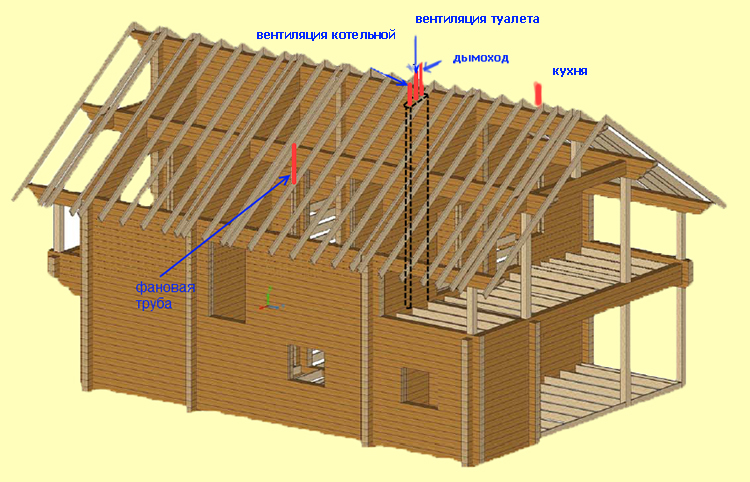
When you arrange natural ventilation in a wooden house with your own hands, make separate ventilation ducts for each type of room. That is, one channel for exhaust from the kitchen, another for the bathroom, the third for the bedroom, etc.Of course, it is tempting to make one single pass through the roof instead of four. It will seem to you that this will save money and effort when installing ventilation in a wooden house, but it is unlikely to be useful. After all, with a strong wind in the exhaust duct, a reverse draft can occur, and then, for example, smells from the sewer will begin to penetrate into the rooms.
In addition to atmospheric phenomena, other factors also influence the traction force in the ventilation duct:
- ventilation pipe height;
- the size of the inner opening of the channel;
- number and configuration of turns,
- the presence of thermal insulation of the hood.
Consider these points when you install ventilation in a wooden house.
In addition, in summer there is a minimum temperature difference at the lower and upper points of the ventilation duct, so there is almost no draft. Under these conditions, it will be necessary to arrange ventilation through open windows more often.
In a small wooden house it is not necessary to build ventilation shafts from brick. This work is time-consuming, and in addition, dust will accumulate on the rough surface of the channel. When deciding how best to ventilate your wooden house, opt for smoother metal or plastic duct blocks.
When you make a ventilation device in a wooden house with your own hands, do not forget that the space under the roof also needs air circulation. If the uppermost room is built as a residential attic, it is necessary to equip it with the same ventilation as in other rooms. And if the attic is non-residential, then its ventilation should be carried out through special equipped holes in the roof.
Ventilation of a bathroom in a modern wooden house
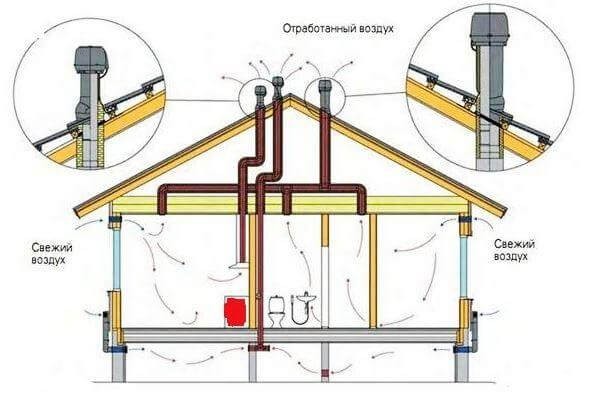
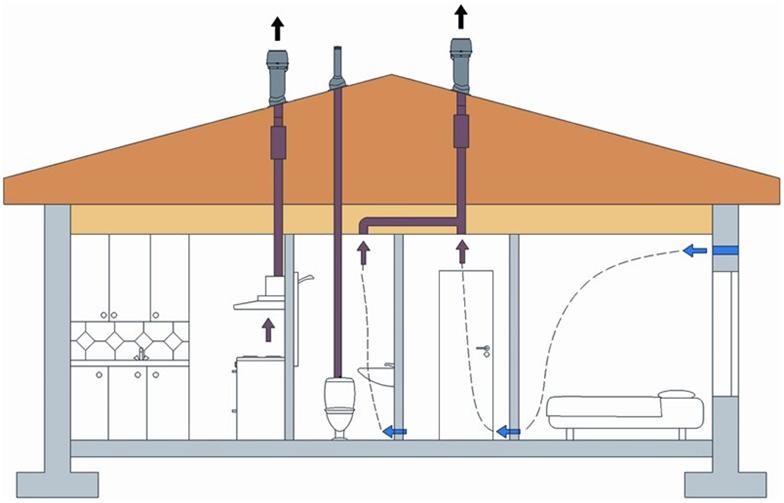
 The scheme of air movement in the house
In ancient times, there was no such thing as ventilation of latrines, but in log houses the Russian stove served as a means of natural air purification. The stagnant air, along with the smells of the garbage pail, was drawn into the stove blew and carried out through the chimney.
Current building technologies deprive the walls of a wooden frame house of the ability to "breathe". And hermetic double-glazed windows even more so turn the dwelling into a kind of space station. To ventilate rooms, you can install windows with ventilation holes, but this method is not suitable for effective ventilation of a bathroom in a private house.
To be sure to get rid of stale air, you will have to make artificial ventilation in do-it-yourself bathroom. Its essence is that the exhaust fan is built into the system, and it greatly enhances air exchange. The best option is to install a central fan in the attic. Additionally, you can equip the system with air condition sensors to optimize the fan operation.
When developing a project for a ventilation system, it is necessary to solve the issue of combining air ducts. For example, ventilation of bathrooms in public buildings should be carried out only by an independent system, and it is forbidden to combine it with a common one according to the norms of SNiP ventilation of bathrooms.
But in private homes, such a precaution is unnecessary. It is enough to install a non-return valve on the ventilation duct, and the path to the living quarters will be cut off for smells from the toilet
A good example of a combination of air ducts can serve as a bathroom, equipped as a backlash closet.


