- Step by step installation guide
- Ventilation calculation
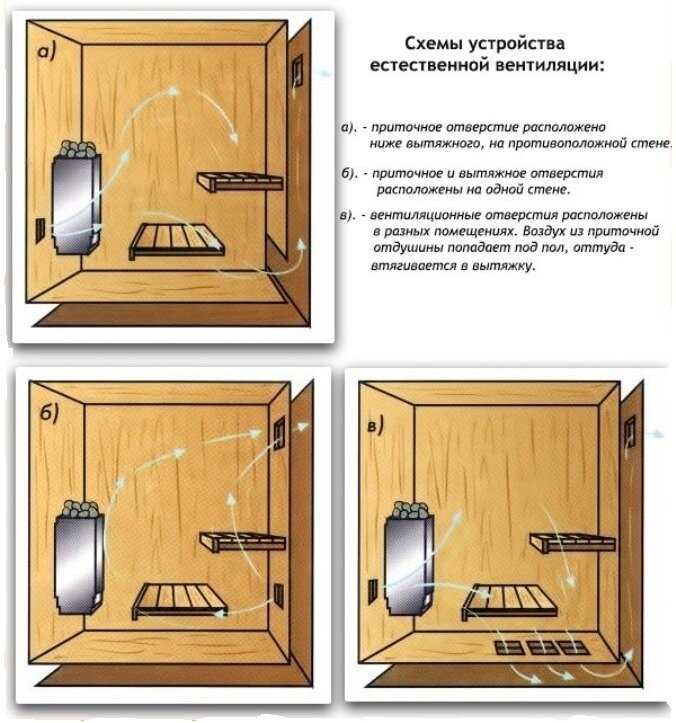
- Natural ventilation in the steam room
- Features of the functioning of natural ventilation
- Instructions on how to build ventilation in a Russian bath?
- General rules for planning bath ventilation
- Hood in the bath: depending on which bath
- Extractor in the sauna
- In a log cabin
- In a foam block bath
- The main ways to organize the ventilation system in the bath
- Method No1
- Method No2
- Method No3
- Method No4
- Method No5
- Video - Features of arranging ventilation in the bath
- Supply and exhaust ventilation in the sauna - arrangement scheme
- Combined ventilation system
Step by step installation guide
The classic workflow is:
- In the walls of the bath, two holes are made with transverse dimensions of 100-200 mm. It is advisable to form the ducts even at the construction stage, so that later you do not have to carve them into the finished walls. One hole is made behind the stove (or next to it), at a distance of 20 cm from the floor. The other is on the opposite wall, diagonally, at a distance of 20 cm from the ceiling.
- Boxes are installed in the holes. They can be bought ready-made - made of metal or plastic. In chopped baths, it is better to use wooden boxes knocked together from boards.
- A ventilation grill is placed on the inlet, and a valve on the exhaust.If one of the holes goes outside, an insect net is installed on the outside of the box.
But this order of work is not the only correct one - it all depends on what kind of structure you have and what duct scheme you have chosen.
Ventilation calculation
We take into account that when using an electric heater, the ventilation openings are selected smaller, but for a sauna with wood or gas heating, they should be selected 10–15% larger than the calculated one.
Based on the specified document on air exchange, we will calculate the conditional (!) Bath. With main supply and exhaust air ducts.
Table 1
| Name | Length Width Height | Volume, m3 | Air exchange, multiplicity | Air exchange, m3/hour | Note | ||
| tributary | Hood | tributary, Group 3 x group 4 | Hood, gr.3 x gr.5 | ||||
| 1 | 2 | 3 | 4 | 5 | 6 | 7 | 8 |
| dressing room | 2 x 3 x 2.4 | 14,4 | 3 | 43,2 | Add an inflow in the amount of 158 - 43 = 115 m3 | ||
| Washing, shower | 2 x 2.5 x 2.4 | 12,0 | Not less than 50 m3/hour | 50 | |||
| bathroom | 2 x 1.2 x 2.4 | 5,8 | Not less than 50 m3/hour | 50 | |||
| steam room | 2.3 x 2.3 x 2.2 | 11,6 | 5 | 58 | |||
| Total | 43,8 | Σp = 43 | Σv = 158 |
The speed of air flows is also normalized in the above recommendations. For natural ventilation of all rooms, this is at least 1 m / s, for a steam room - 2 m / s. With mechanical (forced) - no more than 5 m / s.
In table 2 we find the required diameter for a round duct, in table 3 - square or rectangular. In the column with the required speed, we are looking for the closest value to the air exchange obtained by us (158 m3 / h). For 5 m/s it is 125 mm. For a steam room (58 m3/hour) at a speed of 2m/s - 125 mm.
table 2
Table 3
Similarly, we find the required values for non-circular ducts.
In the bath with the indicated rooms, the inflow comes from the dressing room and exits in the bathroom.These rooms and the soap room are equipped with forced ventilation. Ventilation in the bath in the steam room is provided by air supply from the dressing room or (if possible) from the street.
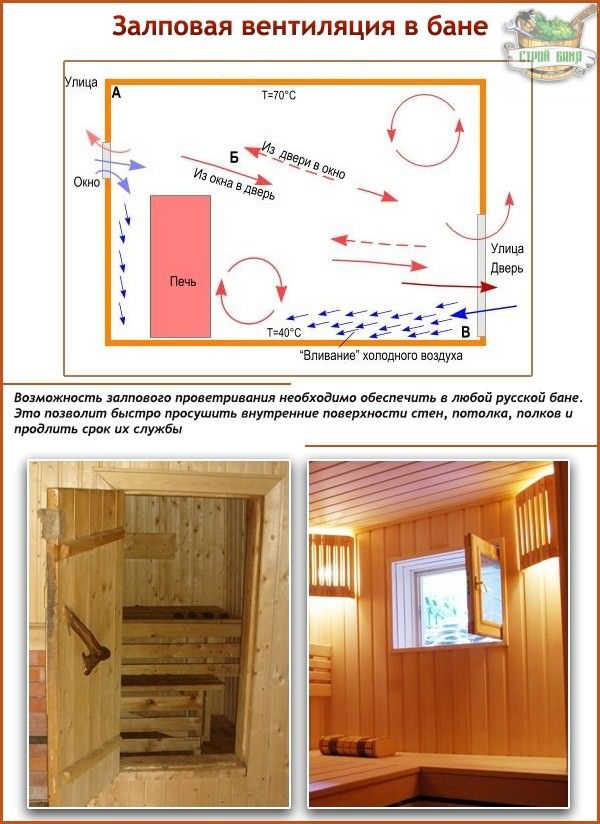
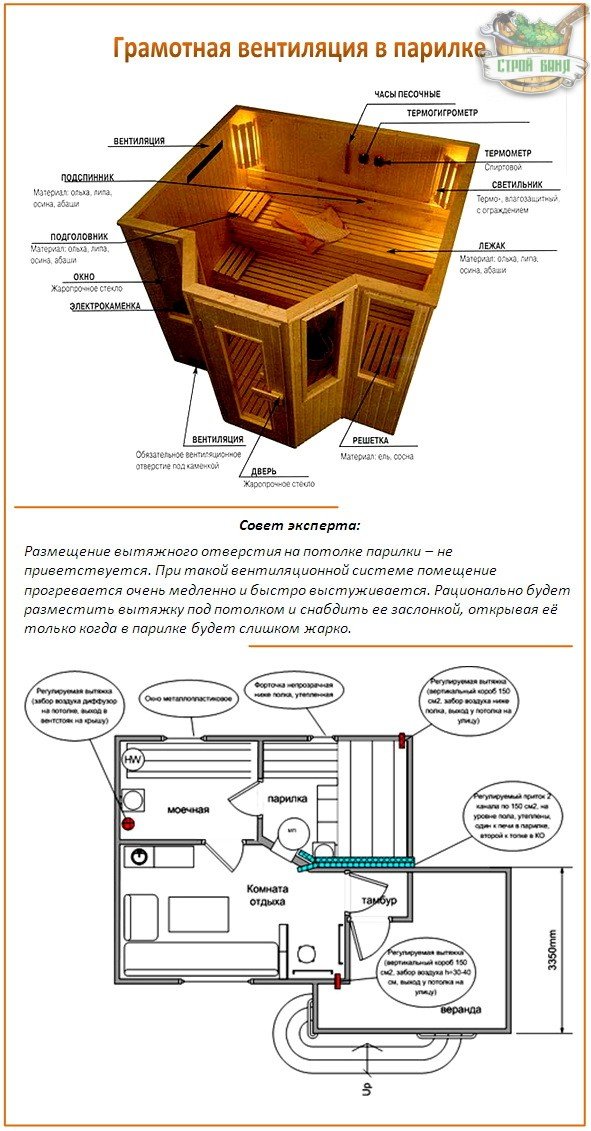
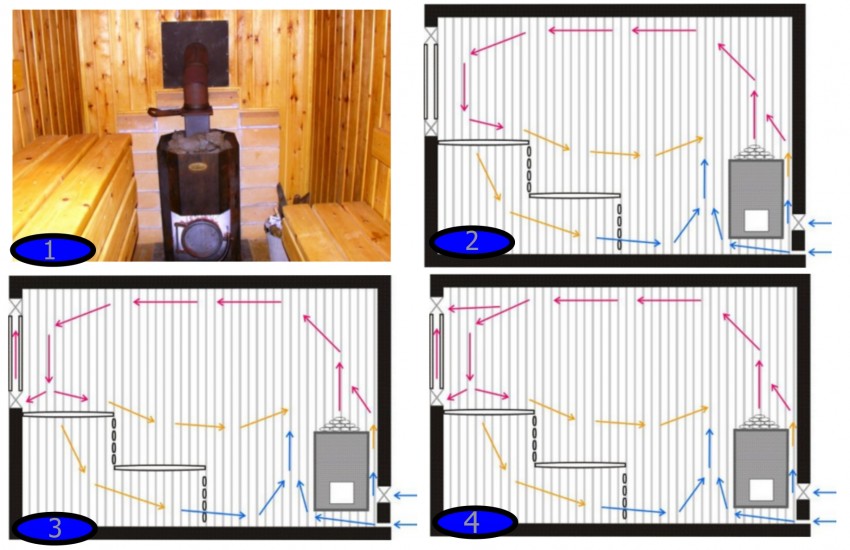
Natural ventilation in the steam room
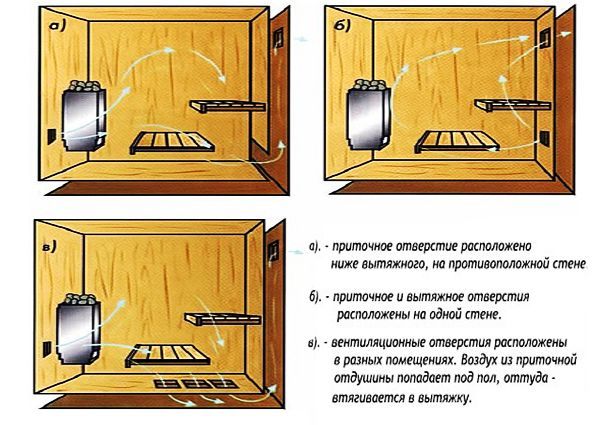
This type of ventilation is the most popular, as it is suitable for most rooms, it is safe, efficient and the device will be inexpensive. It is necessary to carefully select the places in the room for the veterinary ducts - the area of \u200b\u200bthe sauna, the height of the ceilings, the location of the stove and, of course, the materials from which the building is made are taken into account.
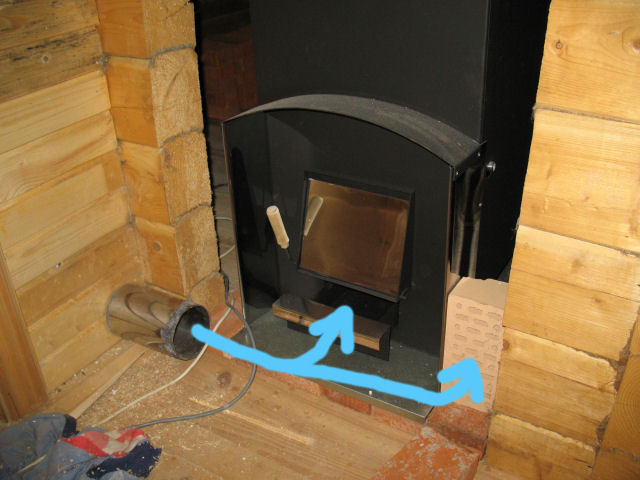 Properly placed ventilation duct
Approximate hole sizes 320-410 sq. see, but experts advise making them better more than less. If the process of air circulation in the room is too fast and the temperature in the bath quickly decreases, the outlets must be covered with special dampers - rotary valves, ventilation and adjustable grilles. From the point of view of the aesthetic appearance of the sauna, it is better to use decorative dampers.


Features of the functioning of natural ventilation
The ventilation of any living space must be organized correctly, and with regard to the bath, this is even more important. This room is characterized by high humidity and sudden changes in temperature. If the air exchange is not balanced, then a bath built from natural wood will need serious repairs in a couple of years.
In addition, without ventilation in the steam room there will be an extremely unpleasant and even health-threatening microclimate: heavy air, mold, unpleasant odors, etc. Natural ventilation is considered optimal for a Russian bath, the organization of which does not require large expenditures or complex building skills.
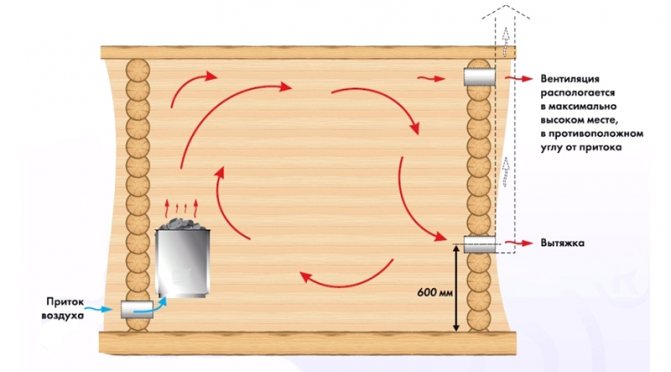
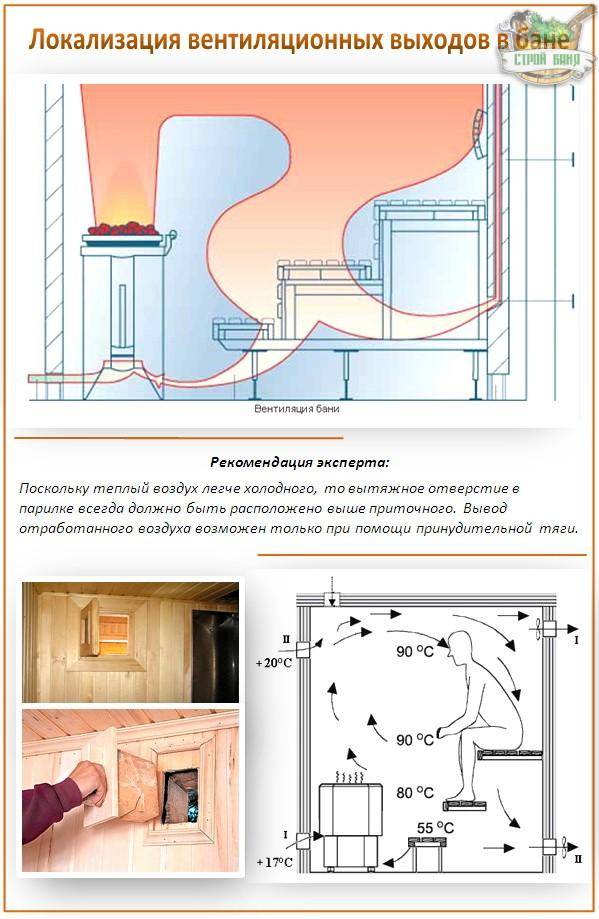
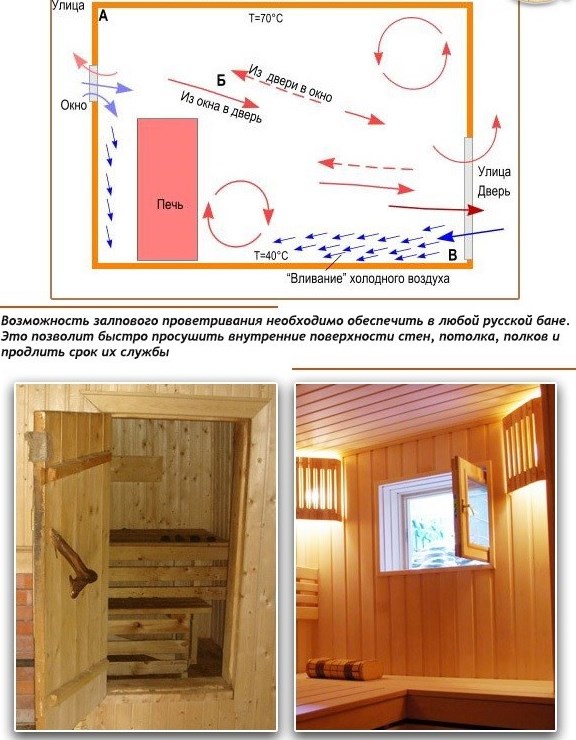
As you know, warm air flows usually rise up, and cold air tends to move down. This physical principle is the basis of natural ventilation.
Cold air enters through the holes located at the bottom, heats up, rises and is removed through the openings at the top.
 For the proper functioning of natural ventilation in the bath, it is necessary to place the inlet at the bottom, near the stove, and put the hood on the opposite wall under the ceiling
For this ventilation scheme in the steam room to work, a difference in air temperature between indoors and outdoors is necessary. Conventional naturally ventilated living quarters can be problematic during the summer, as both indoors and outdoors are equally hot.
But in the bath, due to the specifics of this structure, it is not difficult to provide such a difference, since the air during the bath procedures is constantly warming up.
If ventilation is thought out even at the construction stage, then special supply openings will be provided in the lower part of the bath, and exhaust openings on the opposite side at the top.
But a special hole in the wall is not the only option for ventilating the bath. For example, in chopped baths, fresh air can be supplied through the crowns of the walls or simply through the door, which is left ajar for the time of ventilation.
 With natural ventilation, cold air entering the steam room heats up and rises, and then leaves through the exhaust outlet under the ceiling
Air vents, special vents and even a chimney of a heating stove are suitable for the role of an exhaust hood.If ventilation is carried out through special openings, they must be properly designed. To begin with, from the outside, all such objects should be closed with a protective grille.
And still, shutters or other regulators will not interfere, which will allow you to adjust the speed of the air flow or completely block the vent. The vents in the steam room are sometimes closed so that the room warms up faster. But then you need to open them to restore air exchange.
 It is not always possible to install supply and exhaust ventilation on opposite walls, but even in this case, you can achieve the desired effect.
Instructions on how to build ventilation in a Russian bath?
During the construction of the bath, it must be remembered that one of the main conditions is the arrangement of a high-quality and efficient air exchange system. The lack of ventilation leads to the appearance of dampness on the floor and walls in the room, the shelves will be covered with fungi and mold, which is very dangerous for health, and the wood will simply begin to rot.
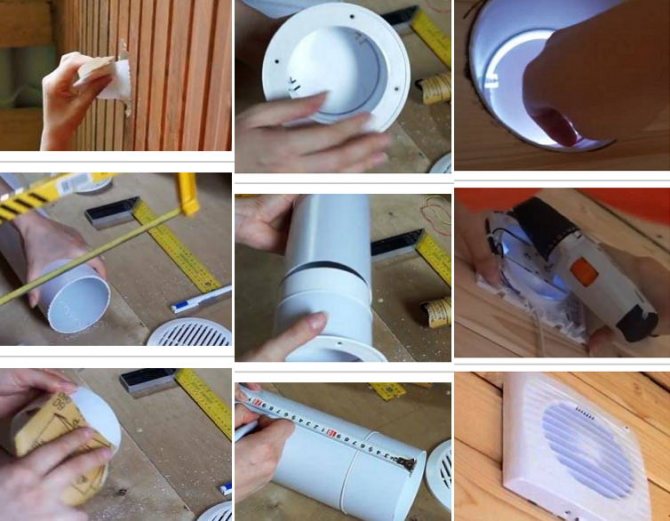
Do-it-yourself ventilation in the bath, a step-by-step guide to self-arrangement:
- To the place where the ventilation passage will be located, attach a pipe to the wall, and then circle it with a pencil or marker.
- In the resulting circle, drill at least two holes, the diameter of which will be greater than the width of the jigsaw file.
- Using a jigsaw, we cut out the casing, making a hole for the ventilation pipe.
- The wooden part of the sheathing must be removed. Using a mounting knife, we remove part of the heat and vapor barrier. Then carefully remove the heater.
- Using a long drill, we make through holes in order not to miss the opening on the outside of the wall.
- Focusing on the holes made with the help of a pipe, in the same way, we mark the cutout for the ventilation duct.
- We make a hole for the valve and pipe on the outside of the wall.
- We remove excess insulation and vapor barrier.
- For the valve, cut off a piece of pipe. The edges of the pipes are recommended to be sanded.
- We put on the ventilation valve on the adapter, and then insert it into the pipe.
- We measure the thickness of the wall and, using a hacksaw for metal, cut off the required piece of pipe.
- We insert a piece of pipe with a valve into the formed channel.
- On the inside of the wall, a fan is mounted into the pipe, which is fixed with self-tapping screws.
- The decorative lattice with a grid is put on.
- After the fan is installed, it is necessary to fix the wire on the wall so that it does not interfere or dangle.
- We fix the valve from the outside.
- Upon completion of the work, a decorative grill with a mosquito net is put on the valve and the installation can be considered completed.
It is quite simple to mount good ventilation in the bath on your own, especially since there are quite a lot of a wide variety of options. Regardless of which ventilation system is chosen - forced or natural, high-quality air exchange will make it possible to increase the life of the bath, as well as make it more comfortable to stay in it.
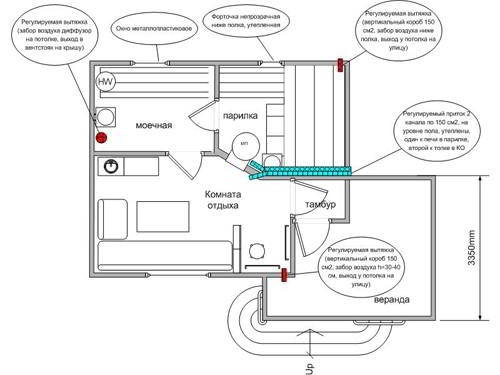
General rules for planning bath ventilation
The ventilation system in the bath itself has two main tasks: to deliver fresh air during the procedures and to ensure fast and high-quality drying of the bath rooms after them. And both options should be thought out and implemented.


And here is what ventilation should not do:
- Violate the temperature regime of the bath with an influx of fresh air.
- It is wrong to stratify temperature flows - i.e. it can be cool only near the floor, but not on the shelf where a steamed person sits.
- To remove the wrong air from the steam room - not exhausted, in which there is the most carbon dioxide.
Also, the lack of fresh air will invariably lead to the appearance of an unpleasant smell in the bath - and it is difficult to get rid of it. Yes, the air filled with mold and fungus spores is not the most healing for a resting person.
In total, ventilation in the bath is provided by the following types:
- Natural, when the entire flow of air occurs due to the pressure difference between the street and the room.
- Mechanical - when both the temperature and the air supply are monitored by devices.
- Combined, when pressure is artificially created using a fan.
And in the bath itself, not only inflow is needed, but also outflow - and this is already done with the help of a box, which is always located diagonally from the supply channel.
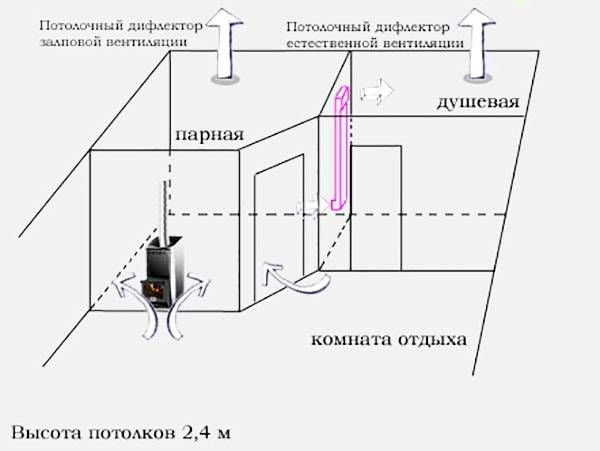
Ventilation is vital not only in a stuffy steam room - but also in the shower room, in the locker room and even in the rest room. Just initially you need to decide which of its types is suitable for a particular bath.
The floors in the bath should also be ventilated - because they are constantly in contact with water, which can lead to their destruction. If this is not done, they will have to be changed at least once every 5 years.
Therefore, in order to extend their service life, it is important to do the following:
Initially, even during the laying of the foundation, it is necessary to ensure the ventilation of the floors - to make small vents on opposite sides of the basement.
It is necessary to leave two more ventilation holes near the opposite walls of the steam room - for fresh air
And so that a rodent does not accidentally enter the bath, these windows are usually closed with bars.
During the installation of the furnace, it is important to make sure that the level of the finished floor is slightly higher than the blower - then it will work as a hood.
Boards should be laid so that there are gaps between them from 0.5 to 1 cm.
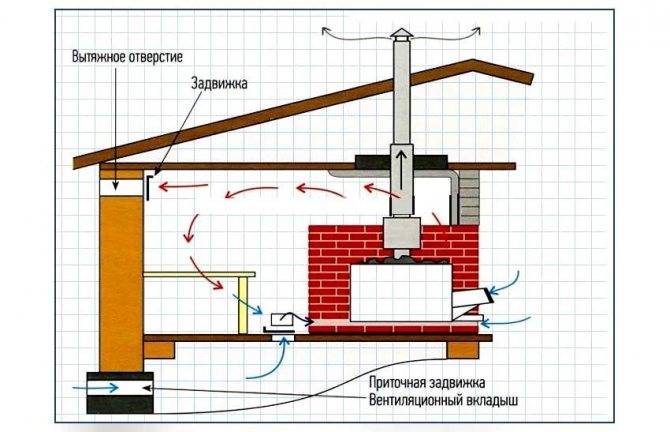
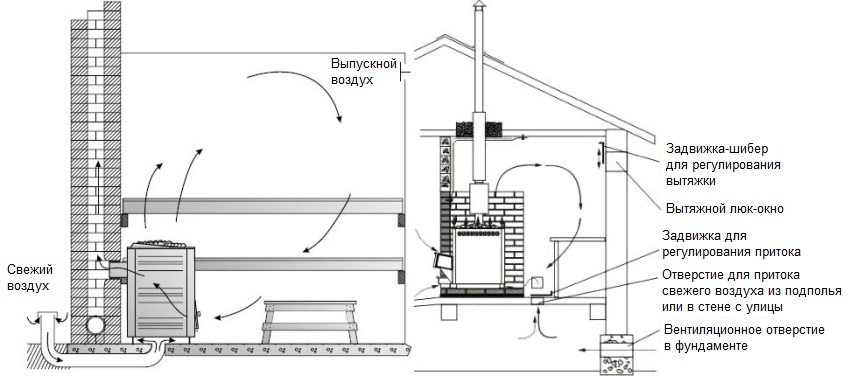
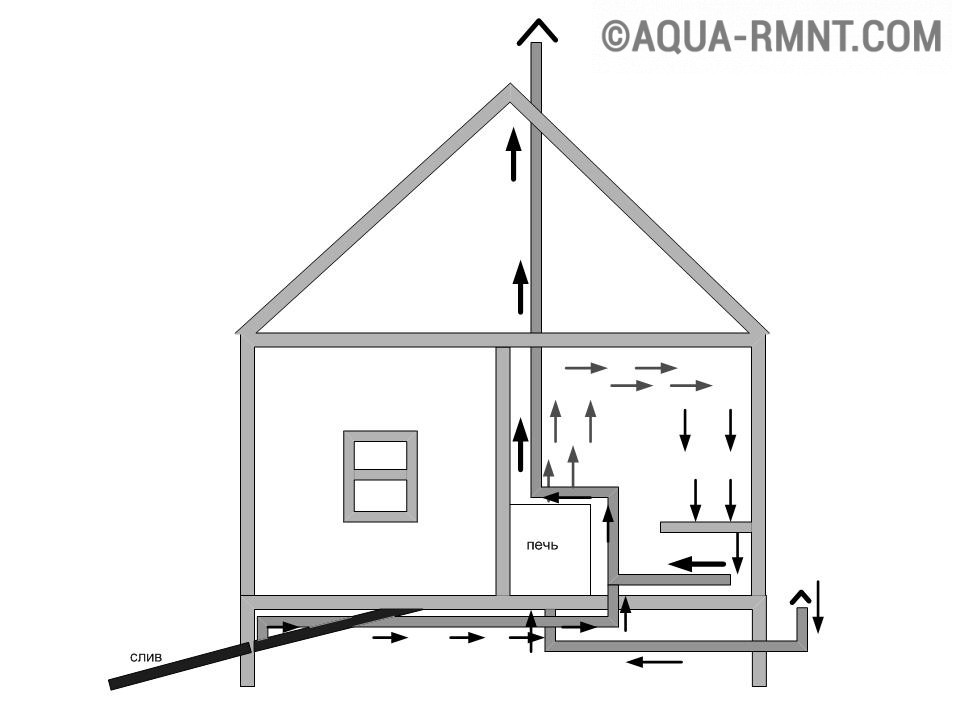
Upon completion of the bath procedures, the floors must be dried well - every time .. You can also make ventilation “according to Bast” in the bathhouse: organize an influx of fresh air under the stove, and exhaust from the ceiling directly opposite the door in the corner. For this, a special exhaust box is used - it can be made from a board and sheathed inside with foil
For this, a special exhaust box is used - it can be made from a board and sheathed inside with foil
You can also make ventilation “according to Bast” in the bathhouse: arrange an influx of fresh air under the stove, and exhaust from the ceiling directly opposite the door in the corner. For this, a special exhaust box is used - it can be made from a board and sheathed inside with foil
Hood in the bath: depending on which bath
Baths are built from a variety of materials, each of which has its own specifics. This also affects the ventilation systems, which have their own characteristics in each case. We will talk about their differences in terms of organization below.
Extractor in the sauna
A sauna or a Finnish bath differs from a Russian one in a small amount of steam (it is practically a dry bath) and a high temperature (which can reach up to 130 degrees!).During your stay in the sauna, there is a clear rule regarding ventilation: the air must be changed at least 6-8 times per hour. And this requires good controllability of air flows, replacing exhaust air with fresh air less than every 10 minutes.


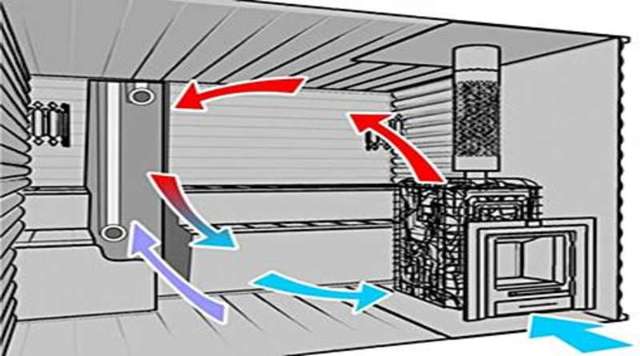


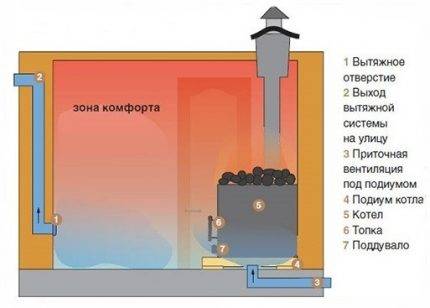
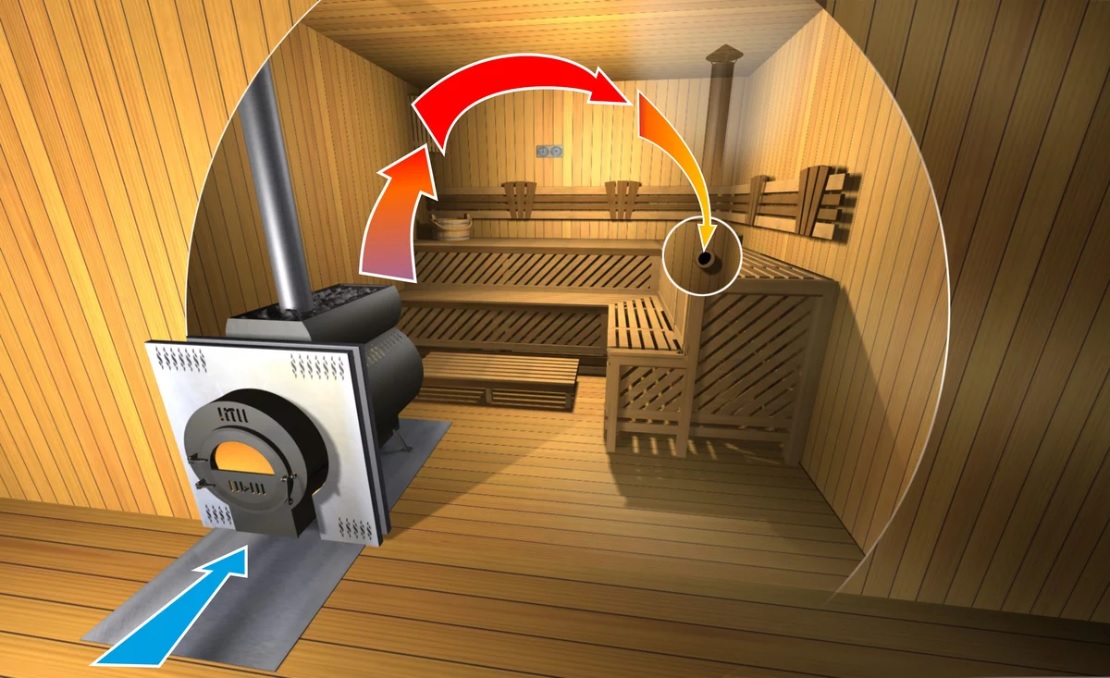
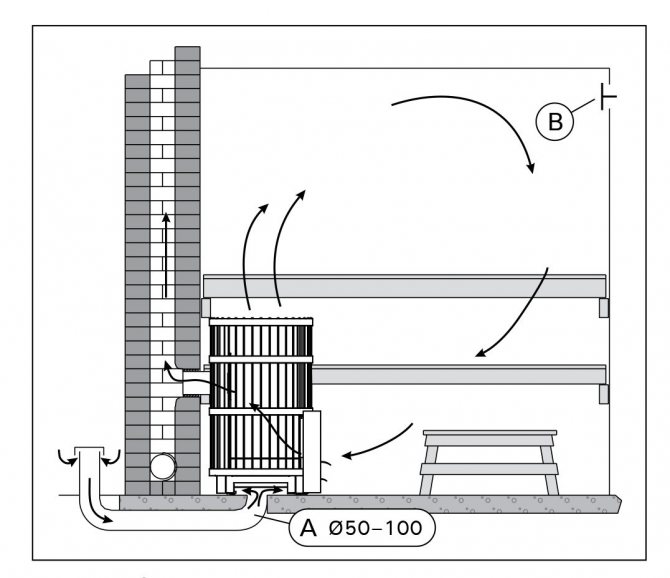
The ideal option for a sauna, as already mentioned in another article, would be bastu ventilation (convection type). Let us briefly repeat that it operates on the principle of an “inverted glass”:
- a ventilation duct, standing diagonally from the stove, takes in near-floor air;
- brings it out through the roof (wall);
- below, next to the stove, there is an inlet through which fresh air enters;
- the oven heats the oxygenated air, it rises and is distributed throughout the sauna.
The regulation of flows is carried out using dampers that regulate the openness of the box and the inlet. An important point in this case is the constant operation of the furnace, because it is it that performs the function of a “pump”.
And even if the hood in the sauna is done according to a different scheme, the task will remain the same:
- controlled frequent air exchange;
- good heating of the incoming fresh air;
- inadmissibility of fast air currents (more than 0.3 m / s), i.e. drafts.
In a log cabin
The log house was invented long before the laws of physics on which natural ventilation is based took shape. Nevertheless, the builders of log baths actively used these laws so that the owners of the bath would not suffocate in the process of soaring, and the bath would stand for decades due to it.(Of course, an exhaust hood in a log cabin bath will not save it from a fire, but it may well from rot.) In the log house, air flow was provided by the lower rims, which were deliberately laid freely, that is, they had slots through which fresh air was “stretched” . In addition, the door to the steam room below did not fit snugly against the floor.
Depending on how exactly the log house was heated - “in black” or “in white” - it also depended on where the exhaust air went.
- In a heated "black" bathhouse, the stove does not work during the soaring process, so an open window or door was used for outflow.
- In the melted "white" bath, the outflow was carried out through the chimney. The oven was working.
In principle, nothing prevents organizing the ventilation of the log house in the traditional way today. But it is necessary to decide quickly, even at the construction stage. Because a more modern solution should already be included in the project. Alternatively, you can punch holes (supply and exhaust) directly to the street and provide them with plugs or dampers. One is next to the stove blower, the second is above the top shelf on the adjacent or opposite side. Or make two exhaust holes - one above, the other below the top shelf. Another option is to make blinds at the bottom of the steam room door, and an exhaust hole under the ceiling of the shower room.
IMPORTANT! If there is no desire to make an exit to the street, you can lay air ducts, but then you will have to install a forced ventilation system instead of a natural one.
In a foam block bath
A foam block bath is no exception to the rule that you need to think about ventilation when designing a bath. It's easier than hitting ready-made walls.In order to provide a bath of cellular concrete with sufficient air circulation, which will save the structure from excess moisture, it is necessary to lay pipe trimmings at the time of pouring the foundation formwork, which will then become air ducts.
For a bath that is not in a lowland and is not surrounded on all sides by buildings, two air vents are enough on opposite sides, otherwise they are made 4. Do not forget about the ventilation gaps between the walls and the insulation.
The roof must also be ventilated, receiving inflow from the roof overhangs and giving air through the raised ridge. In the premises, supply and exhaust openings are made according to one of the standard schemes.
In case of insufficient natural ventilation, it is recommended to install fans on the hood from the foam block bath.
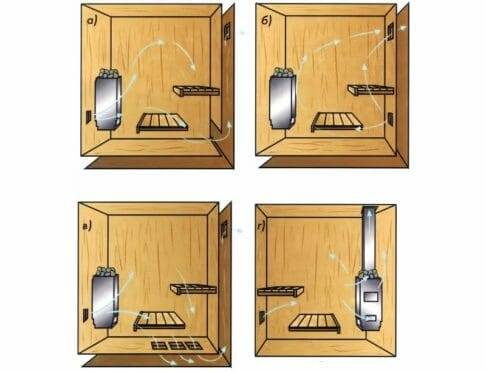
The main ways to organize the ventilation system in the bath
There are several such methods. We recommend that you familiarize yourself with each of them and choose the one that is most suitable for you.


Method No1
In this method, it is necessary to equip an inlet through which clean air will be supplied.
It is important that this hole is located 50 centimeters from the floor surface and always behind the stove. As for the exhaust opening, it should be equipped on the opposite wall approximately 20-30 centimeters from the floor, and a fan must be installed here. But the main thing here is not to overdo it.
Try not to deviate much from our recommended height, because the numbers above are optimal. Also remember to cover each hole with a ventilation grill.
But the main thing here is not to overdo it.Try not to deviate much from our recommended height, because the numbers above are optimal. Also remember to cover each hole with a ventilation grill.
Method No2
It is characterized by the fact that both holes must be located on the same wall. We are talking about the wall that is parallel to the heater. Equip the supply vent at a height of 30 centimeters from the floor surface, and the hood at the same distance, but already from the ceiling. Install a fan on the second hole, do not forget to close all open channels with ventilation grilles.
Method No3
In this case, the air inlet should be located already behind the stove, approximately 20 centimeters from the floor. If we talk about the hood, then it should be at a similar height, but already on the opposite wall. A fan is still installed on the hood. Do not forget to close all open channels with the help of all the same gratings.
Method No4
Ideal for rooms where the floorboards were laid with small gaps needed to remove moisture. The supply opening in this case should be located behind the heater about 30 centimeters from the floor. But the hood is not required here at all - the exhaust oxygen will be removed through the very slots in the floor (a common ventilation pipe will be used).
Method No5
An excellent option for those baths where the oven functions constantly. The exhaust opening should be located opposite the heater, traditionally 30 centimeters from the floor surface. The stove will act as a hood.
As for the vents themselves, it is quite possible to cope with their arrangement on their own. For brick walls, use a perforator, and for wooden walls, use any other suitable device (say, a drill). We advise you to install plastic pipes in the holes made, and also remember about special gratings for protection.
Video - Features of arranging ventilation in the bath
Now it only remains to get acquainted with the ventilation of other rooms (not only steam rooms). First, let's take a look at some introductory moments.


Supply and exhaust ventilation in the sauna - arrangement scheme
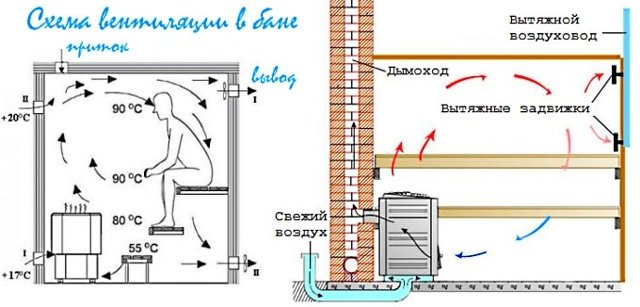
To begin with, consider the classics - natural supply and exhaust ventilation. The hood law of this type is the correct location of the inlet and outlet openings. The correct one is when the inlet is located near the stove or under it (if we are talking about the electric version), while the outlet is located on the opposite side. Also, cold fresh air will enter the steam room through a specially left 5-7 cm gap under the door.
For proper air circulation, one exhaust opening will not be enough. On the opposite side of the inflow, the first hood is located at a height of about a meter, the second is under the ceiling. Both openings must be connected by an exhaust duct, which leads either to the main ventilation system or to the chimney
If the air duct goes separately, then you need to remember that the higher the pipe rises above the roof level, the more thrust will be in the system - it is important not to overdo it!
So that you can regulate the intensity of air exchange, it is imperative to install shutters on the air outlets.How does such a system work? Let's imagine a standard steam room with a stove-heater at the far wall and a door at the near one. As expected, a gap was left under the door, and the hoods are located on opposite walls: near the stove and at the door.
Before heating the steam room, it must be properly ventilated so that there is fresh air in the room. The doors and outlets are then closed, leaving only the inlet valve open. The steam room will heat up quickly enough, since the hot air will soon have nowhere to go, which means that there will be no air discharge in the inlet.
When the sauna has warmed up, we still leave the upper channel closed, while opening the lower channel a little - thanks to this, air circulation in the steam room will begin, while the upper layers of the warmest air will not leave the room. Cold air will again begin to enter through the supply channel, but due to the proximity of the heater to the resting people, it will get already warmed up, gradually rising up and replacing the stagnant air.
Thanks to this air exchange, the room will have fresh and warm air. Vacationers may not even notice such a change, enjoying the process. Such a system provides economical handling of already heated air, which means you will save on coolant consumption. In addition, problems with mold and fungus will not affect you - thanks to such circulation, all elements will dry properly.
Combined ventilation system
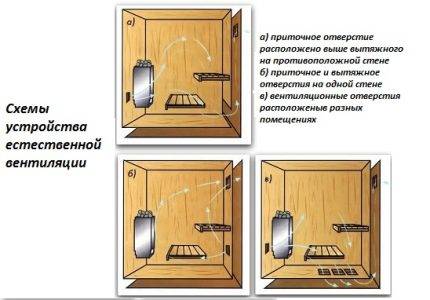
If the steam room has a special structure, then it is not always possible to equip a natural air exchange system or mechanical ventilation in such a room.For example, if the sauna has three adjacent walls with other rooms, then the inlet and outlet outlets can only be placed on one side.
In such a situation, it is necessary to follow the rules for the proper placement of veterinary ducts: the supply should be placed at a level of 25-30 cm from the floor, and the outlet should be 20-30 cm from the ceiling. Cold air masses, when they enter the steam room, pass through the stove, heat up and rise up. Such circulation will always provide fresh and heated air in the sauna. But this method has a drawback - sometimes the air exchange process can be too intense, and it can only be controlled with the help of special dampers on the outlets.
There is another option for combined ventilation - when the supply channel is located not below, but above the heater. If you install the outlet a little higher on the wall opposite, you get a fairly effective ventilation system in the steam room. But often such circulation is not enough for large rooms, so experts recommend installing a fan in the outlet duct. With its help, the air masses will be better driven through the sauna.


