- The purpose of the pit in the garage
- Garage ventilation schemes
- Installation of ventilation of the inspection pit
- Do-it-yourself ventilation of the garage, vegetable and inspection pits: diagram, photo
- What state standards and norms for inspection pits exist?
- How to do it yourself: step by step instructions
- with a pit
- Equipment and materials
- Combined and forced ventilation
- Nuances of ventilation of the inspection hole
- Ventilation of the inspection pit and basement: general information
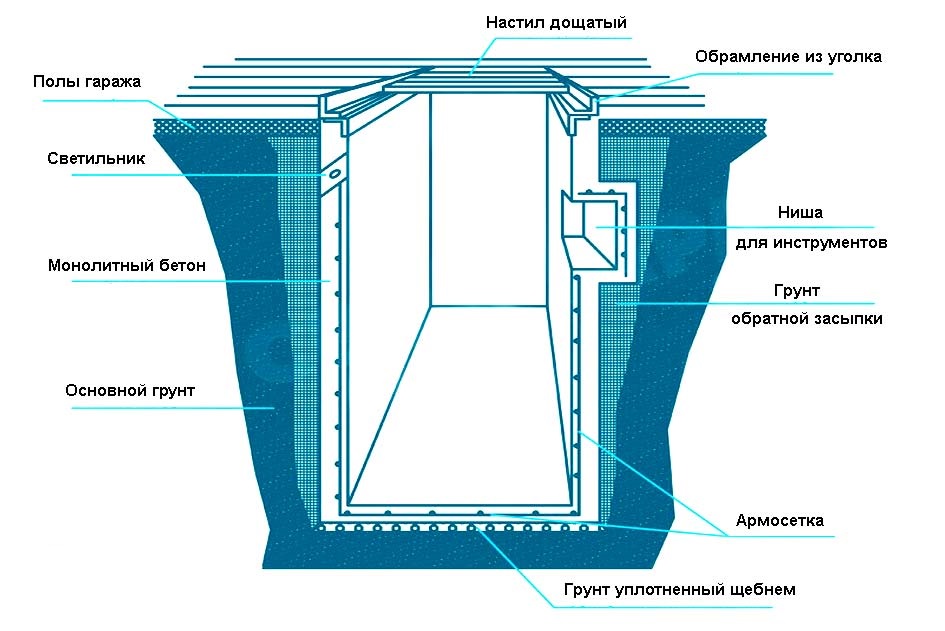
- Inspection pit equipment
- How to make effective natural ventilation
- Rational ventilation: making a choice
- What do you need to know about ventilation?
- Why do you need a hood in the cellar of the garage
- How to make ventilation in the garage with your own hands
- natural system
- Mechanical hood
- Conclusions and useful video on the topic
The purpose of the pit in the garage
The garage building of an average city dweller is often equipped with a so-called vegetable pit. Its main and only purpose is to store the seasonal harvest of vegetables, canned and other food products. The cellar inside is equipped with racks, shelves, boxes for convenient storage of harvested vegetables.
Inside the cellar, it is necessary to maintain a certain temperature, humidity indicator, which should not go beyond the norm.This will negatively affect the shelf life of vegetables: with an excess of moisture, they will rot ahead of time, with a strong cold influx, they will dry out.
Ventilation allows the vegetable pit to perform its main function - storing vegetables from autumn to spring.
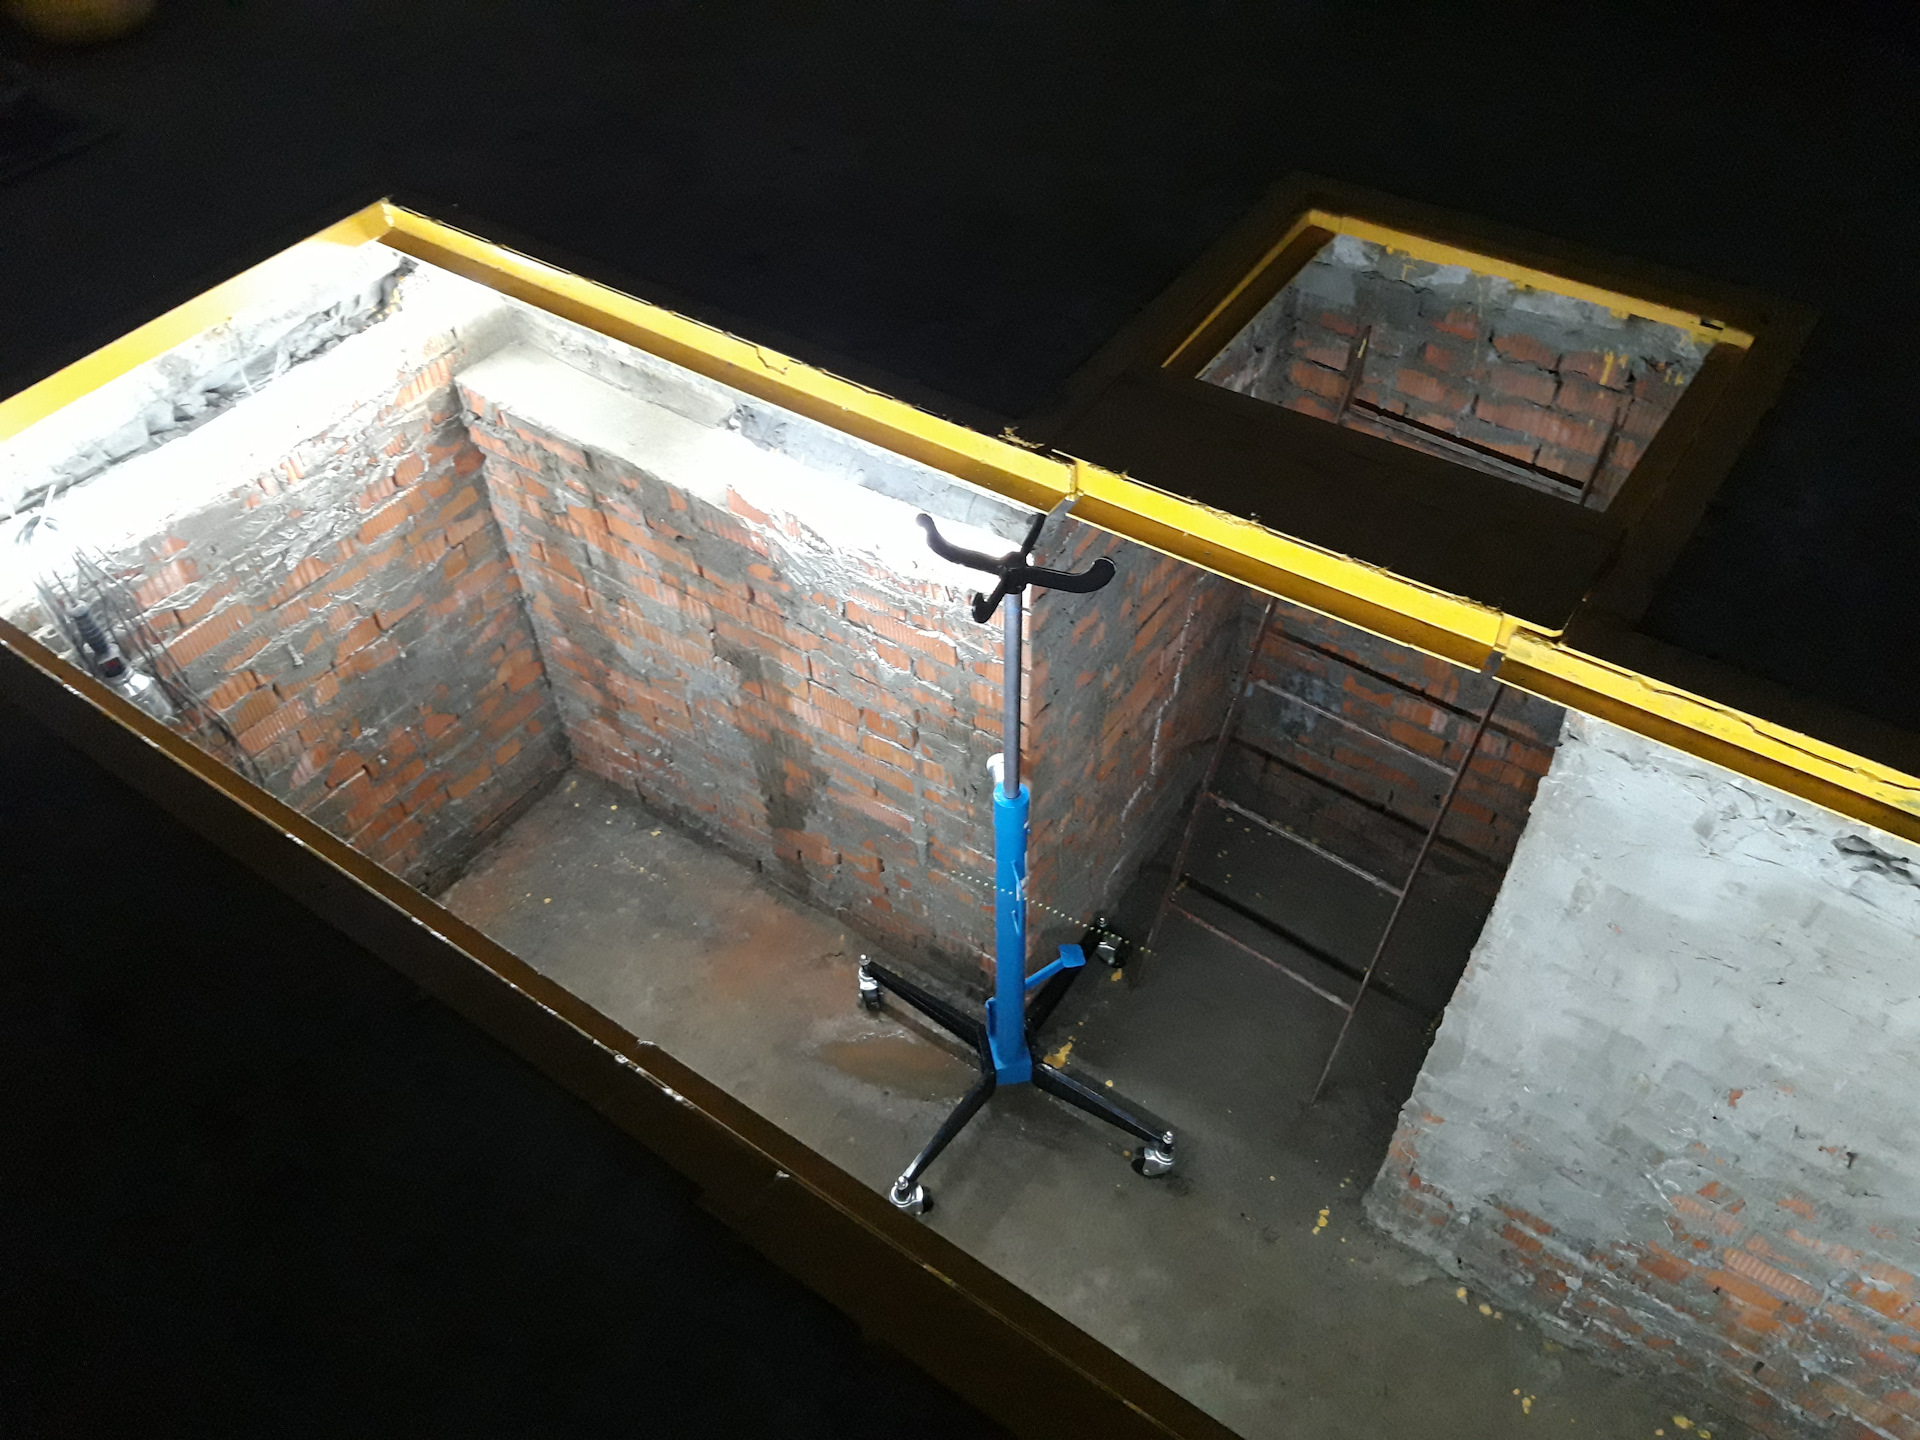
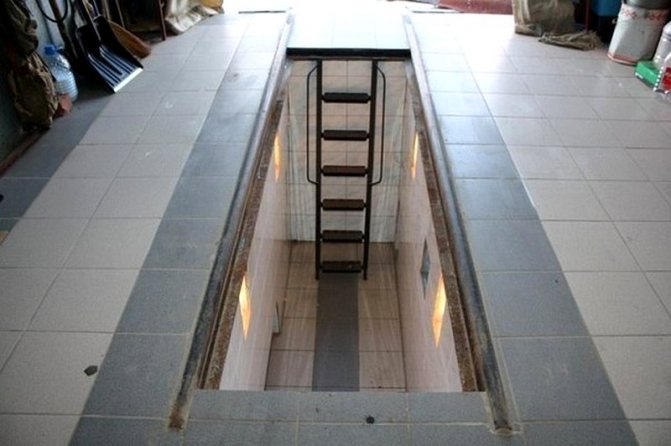
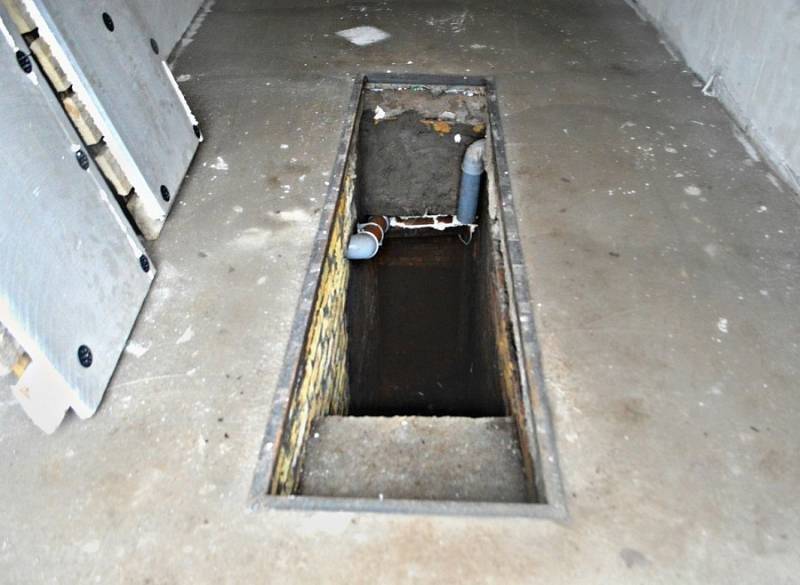
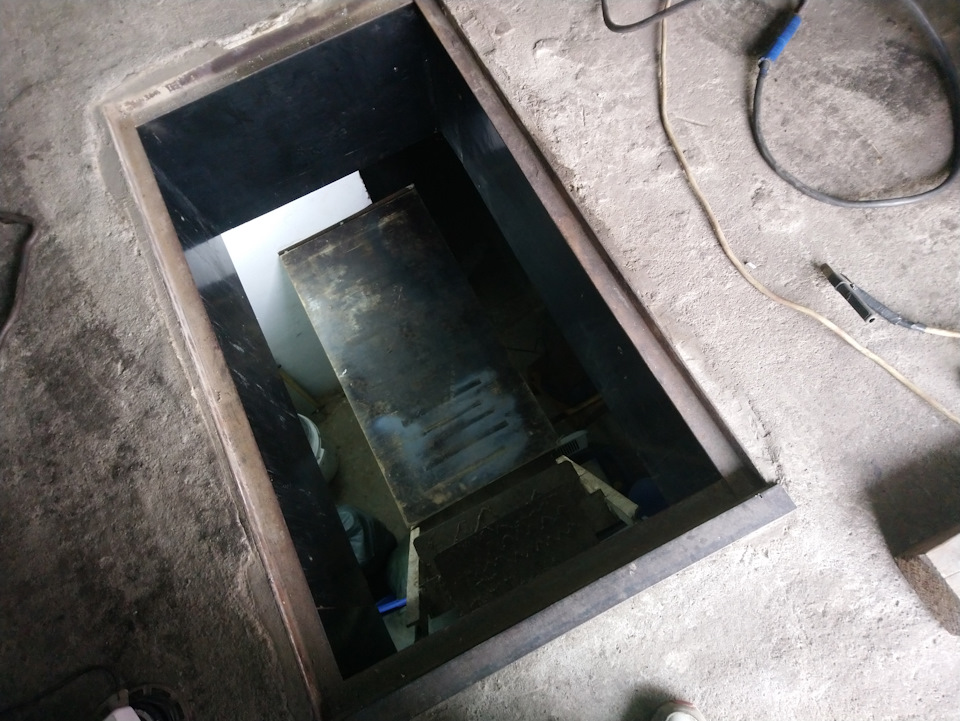
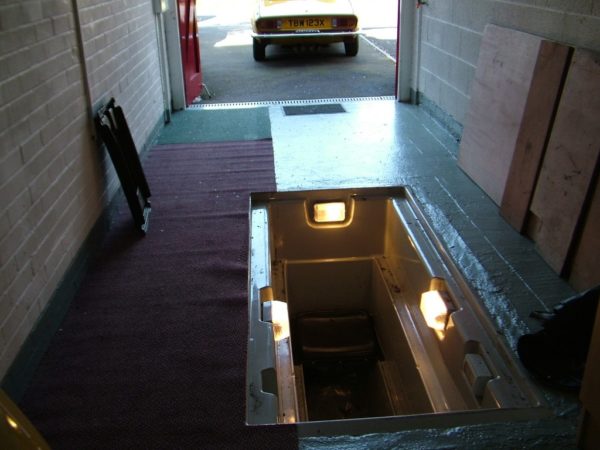
In addition, a viewing hole is often located under the garage. It is intended for repair, technical work, which must be carried out directly under the machine.
Despite its small size, the viewing compartment also needs constant ventilation and drying, because moisture from the car can often get inside, condensation can accumulate. Over time, this will lead to the destruction of the walls of the pit, it will become unusable.
The ventilation systems of the garage building, vegetable and inspection pits can be both autonomous and interact to a certain extent.
Garage ventilation schemes
People who plan to install ventilation in garages for storing cars or trucks should familiarize themselves with the basic ventilation schemes. There are three main schemes that are used most often. These include:
- Natural. It is considered the most common scheme used by most motorists. With natural ventilation, you do not have to spend money on the purchase of mechanical fans. It is enough to make holes in the room for the inflow and outflow of air masses. However, before creating such holes, you will have to determine the best place for their location.
- Forced. It is recommended to use it if the garage has a special basement. Forced ventilation is considered more efficient, as the air circulates with the help of additional fans.The air entering the system is sufficient to provide ventilation in the garage and cellar. The only drawback of such a scheme is the considerable financial costs for the acquisition of the necessary technical equipment.
- Mixed. Suitable for car garage without additional cellar. With a mixed scheme, air enters the room in a natural way, and is removed outside by an exhaust system.
Installation of ventilation of the inspection pit
Before the beginning arrangement of the air exchange system preparations are being made:
- development of a project and scheme with accurate marking, dimensional characteristics;
- calculation of the amount of necessary materials, purchase of items in the right quantity;
- preparation of tools and premises for work (exemption from foreign objects of the working space).
Materials necessary for arranging the ventilation structure of the "in-depth" garage rooms:
- Plastic pipes with a diameter of 50 to 160 mm. The length is determined based on the height of the room and the distance to the exit point outside.
- Fittings - couplings, contours, squares, plug.
- Fastening materials (clamps, self-tapping screws, dowel-nails, etc.).
- Lattice.
- Deflector.
- Plugs or other devices for shutting off pipes.
The sequence of actions when installing ventilation in a pit or basement:
In the floor, walls and ceiling (depending on the planned places on the diagram), places are marked where holes need to be made. Using a perforator, holes are made at these points.
It is important to carefully calculate the dimensions so that the holes allow pipes of the selected diameter to be pulled through them. At the same time, the holes should not be too large, because
to.this will make their subsequent accurate sealing difficult and increase the consumption of materials.
The pipes of the supply and exhaust lines are successively laid with their fastening with the help of fixing materials. Here it is important to observe the dimensional parameters of the location of the pipes, which will allow you to create the desired traction.
After laying the pipes, additional elements (grilles, deflectors) are mounted.
System performance is checked.
Joints between pipes and walls (ceiling, floor) are sealed. If necessary, open sections of pipes are insulated.
A fan is a device that can break down or turn off in the absence of electricity. In the off state, a limited amount of air can pass through it.
In this case, you will need to use natural income. In this regard, it is necessary to lay two ventilation lines in parallel or provide for the possibility of air passage at the installation site of the fan (the hole is made of a larger diameter or branched using fittings). This problem is not critical, since the fan can be simply dismantled.
Do-it-yourself ventilation of the garage, vegetable and inspection pits: diagram, photo
When building a private house, you must immediately worry about installing garage ventilation, viewing and vegetable pits. Yes, and having a regular garage for a car, make sure that the ventilation in the room exists.
A common garage and pit scheme
Ventilation in the garage should be mandatory, so you protect your car from condensation and corrosion. Even if the garage is not heated, you should worry about installing ventilation. Usually do-it-yourself garage ventilation is not difficult, since it is quite simple to make it.Most often, car owners choose natural ventilation, which depends on the temperature difference; such ventilation of the garage is easy to do with your own hands.

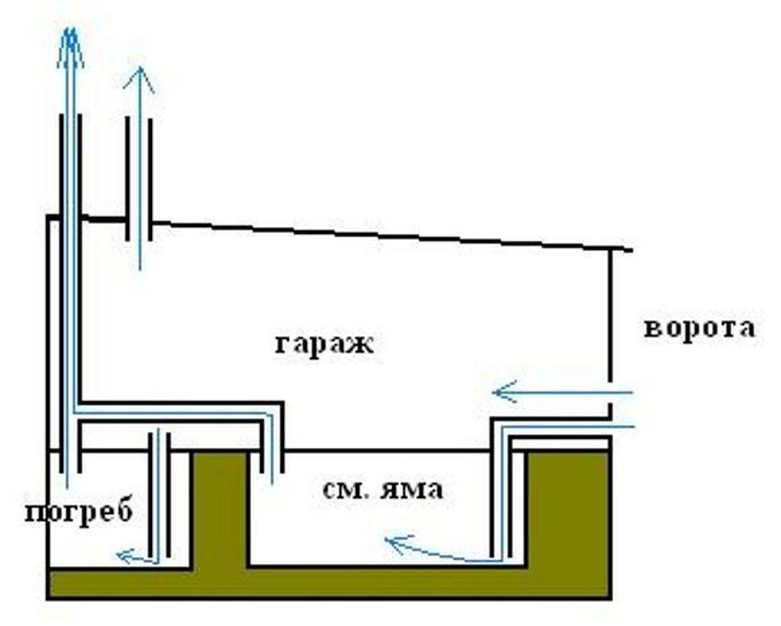


Anyone who does everything for the first time, and has never encountered such a design, can see a photo of the ventilation in the garage. There are also other methods, such as combined and mechanical.
The combined system combines natural air exchange and a fan (this can be seen in the photo of ventilation in the garage), and a mechanical one or two-channel system with special inflow and outflow settings.
The garage ventilation scheme is shown on the site, so you can easily understand how everything works. Such a garage ventilation scheme very clearly shows how air exchange occurs.
What state standards and norms for inspection pits exist?
Regulatory documents regarding the equipment of the inspection pit relate exclusively to enterprises involved in the inspection of automotive equipment. They assume that this structure is part of the technical base, therefore it is subject to appropriate registration, in full compliance with the existing GOSTs.
There are only a few such documents. In regulations, to a greater extent, they affect the rules regarding lighting and ventilation schemes, safety, rather than dimensions. If the structure is not equipped for the purpose of conducting commercial activities, compliance with the requirements of these documents is not required. Otherwise, it is necessary to study the relevant regulatory framework.
The absence of the need to register a garage with a viewing hole does not mean that it can be built in any order.There are certain standards on which the safety and ease of operation of the structure depends. An important factor is the decision of the question as to which cars are supposed to be serviced - cars and / or trucks. This determines the dimensions of the future design.
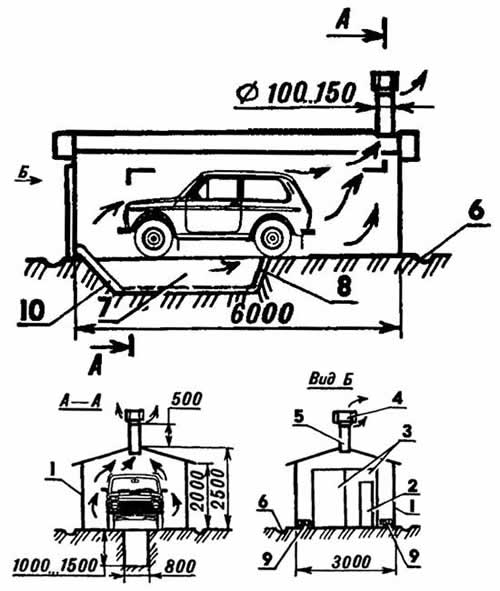
How to do it yourself: step by step instructions
with a pit
Garages are often equipped with inspection pits. Consider how to make ventilation in the garage, taking into account this feature. There are several ways to build ventilation in a garage with a pit:
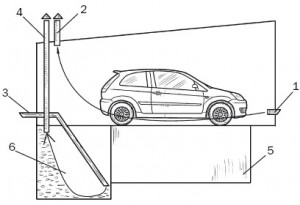
- Air is delivered to the room by drawing two boards from the floor. The outflow occurs due to the lack of one board. The pit should be located strictly longitudinally and inside the garage. One edge is placed near the supply inlets to the boxes, and the other - near the exhaust duct. Open deck boards allow fresh air to partially enter the pit. The opposite edge serves as an outlet for accumulated moisture.
-
The inflow will be provided by the installation of an air outlet pipe. With its help, the incoming air is taken under ventilation. The air duct of the adjacent dump serves as an exhaust hood. The supply channel should be located at the edge of the inspection hole.
Openings in the garage allow incoming fresh air to pass through the pipe in parts. Further, the remaining air is in the pit. Since it is located next to the cellar and is in contact with the air duct, the flow is easy to follow after entering the pit hood to the outside.
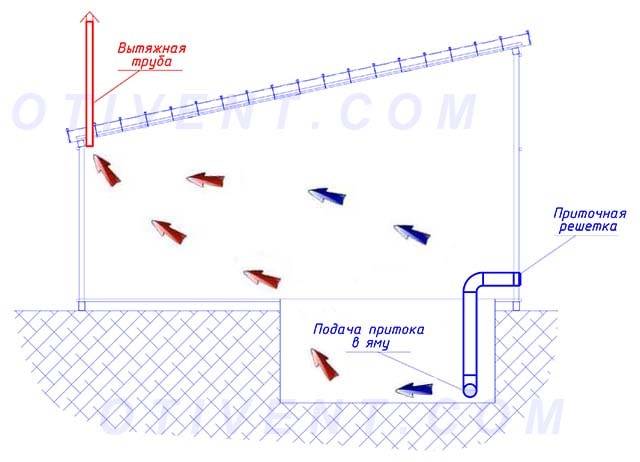
- The supply pipe has a fan. The pull-out opening is mounted by the mechanism forcibly with the help of fasteners. Space ventilation works automatically.
here
Advice
With this method, fresh air is injected through the duct, driven through the pit, and drawn out by the fan through the second ventilation duct. It can be installed independently or combined with the basement.
Equipment and materials
The puncher must be powerful, otherwise it will not be possible to make a recess in the wall or it will be uneven. It is advisable to have an angle grinder and heat-insulating material on hand.
Fans are selected depending on the type of construction:
- Exhaust duct devices. Available, easy to use. Built-in regulators allow you to change the intensity and speed of the flow of air masses. The optimal diameter is about 160 mm. To save money, it is easier to purchase 120 mm.
- Centrifugal. Difficult to install, but ideal for the hood. It is better to use them in garage boxes in which they work with chemicals, coatings.
- Vortex. Suitable for areas where welding work is regularly carried out.
If the garage is intended only for storing the vehicle and does not involve the performance of work in it, then you can choose the most practical and running option - an exhaust duct fan. This is the cheapest design, and the operation is less complicated.
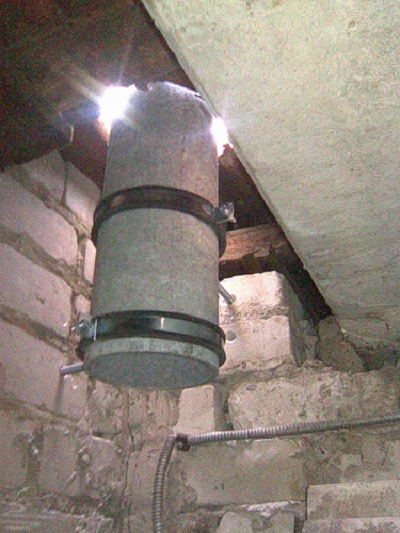
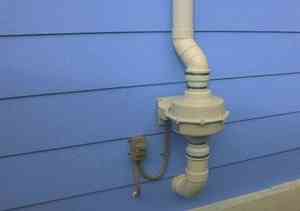
For the construction of air ducts, it is better to use asbestos or galvanized pipes. A through pipe can be mounted through a through method, when the ventilation pipe is carried through the garage floor and taken out through the roof, and wall-mounted, when an exhaust pipe is embedded in the cellar wall and taken out of the building.
Air renewal in a natural way is just achieved by installing a through pipe. There is a temperature difference inside the garage and outside.If the draft needs to be increased, then a deflector is installed on the pipe. It will protect the passage from dust and dirt entering it.
Combined and forced ventilation
As noted above, the natural ventilation of the garage is effective only under certain external conditions, i.e. with a sufficient difference in air temperature inside and outside. The use of forced ventilation means eliminates this type of problem.
Scheme of combined garage ventilation using an exhaust fan. Such a system is not too demanding on the location of the hood
Efficient removal of air in the garage is more than relevant, since the level of pollution here is much higher than in residential areas. Therefore, garage owners prefer the exhaust version of combined ventilation. Implementing this type of project is not that difficult.
To do this, you need to purchase an exhaust fan and install it at the inlet to the pipe. If such a pipe is not available, it must be installed. This is done in much the same way as when installing natural ventilation. The calculations, materials and tools will need the same, the calculations are carried out in a similar way, but there are several differences.


The exhaust fan is an easy-to-install and operate device that should be connected to the power supply. With the help of an automatic timer, you can improve the quality of ventilation
With combined ventilation, it is not necessary to install the hood strictly diagonally from the inlet, although this position is desirable. You can choose another place, both for the supply and exhaust openings. But the first must still be placed at the bottom, and the second at the top.
Another important point is the presence of furniture and other items in the path of air currents. This is a common mistake in ventilation design. The fewer such obstacles, the better the air exchange will be. An exhaust fan should be installed in the top pipe.
This can be a channel model that is installed inside the pipe, or an overhead version, such devices are mounted directly on the wall. After that, the fan should be connected to the power supply.
To improve the functioning of such an extract, it is possible to equip the fan with additional automatic control modules. For example, a timer that will turn the device on and off at a certain time.
This will slightly reduce energy costs, as well as ensure ventilation of the garage even in the absence of its owner. If the garage already has natural ventilation, but it does not work efficiently enough, the best solution would be to install an exhaust fan in an already finished channel.
If natural ventilation is good enough in winter, the fan can only be used in summer.
Forced ventilation involves the installation of both supply and exhaust fans in the appropriate openings. In ordinary garages, such systems are usually not used, since the task is solved using simpler options: a natural or combined system.
It makes sense to do forced ventilation in the garage only in cases where you simply cannot do without it. For example, for a garage located underground, forced ventilation is the only option.It happens that it is planned to carry out paintwork or other work in the garage, in which good air exchange is of particular importance. This is where forced ventilation comes in handy.
Those who wish to equip the garage with an effective exhaust system required to remove toxic substances generated during welding and painting work, it will be useful to familiarize yourself with the following photo selection. It represents the process of building a hood with a movable sleeve from a corrugated pipe:
Nuances of ventilation of the inspection hole
To ensure comfortable working conditions, the inspection pit can be equipped with high-quality lighting, various shelves for storing equipment, and, of course, ventilation. Briefly find out how it all should look like.
If there is already an exhaust hood in the room, then you can simply stretch the corresponding pipes into the inspection hole. As for the diameter of the air ducts, in this case it can be about 10 centimeters. The air supply pipe should end almost at the very bottom of the pit, fix the second one on the opposite side, stepping back from the top edge also by 10 centimeters.
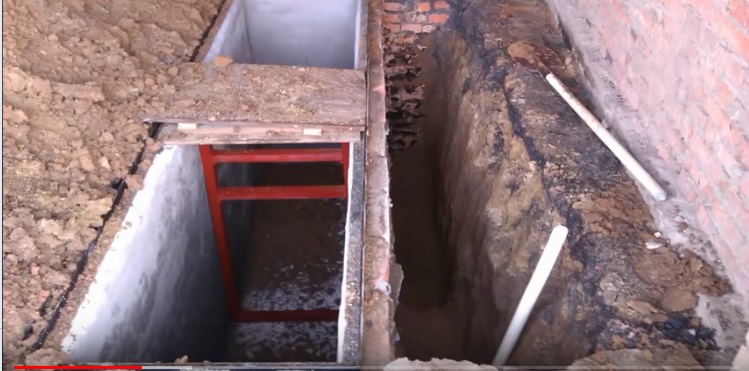
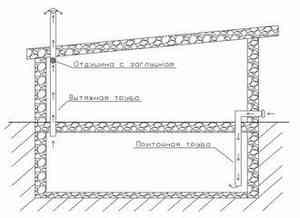
Ventilation of the inspection pit and basement: general information
To create an effective ventilation system not only for the above-ground premises, but also for an inspection pit with a basement, you will need to use a more complex system. Two principles can be applied here:
- installation of ventilation for the inspection pit and basement, which will be part of the air exchange system of the entire building;
- for premises recessed into the ground, a separate system will be installed that is not associated with general ventilation (it is more efficient).
What happens if you do not equip the ventilation system in the "low" sections of the garage building:
- Corrosion of the bottom of the car due to the accumulation of moisture in the inspection hole and the resulting condensate.
- Spoilage of food and other items.
- The formation of fungus and mold.
- Acceleration of wear of structural elements of the building.
- Accumulation of toxic gases in the inspection hole.
The tasks that the ventilation of the inspection pit in the garage solves:
- Ensuring fresh air supply.
- Temperature control.
- Removing excess moisture, preventing the formation of condensate, mold.
- Removal of fuel vapors, exhaust gases.
Factors that are taken into account when planning and calculating ventilation:
- dimensional characteristics of the building and premises (area, height);
- the purpose of the premises is car parking, repair work, storage of food, equipment;
- temporal characteristics - the planned frequency of being in the garage of the vehicle, people, the complexity and frequency of repair work.
air flow in the garage
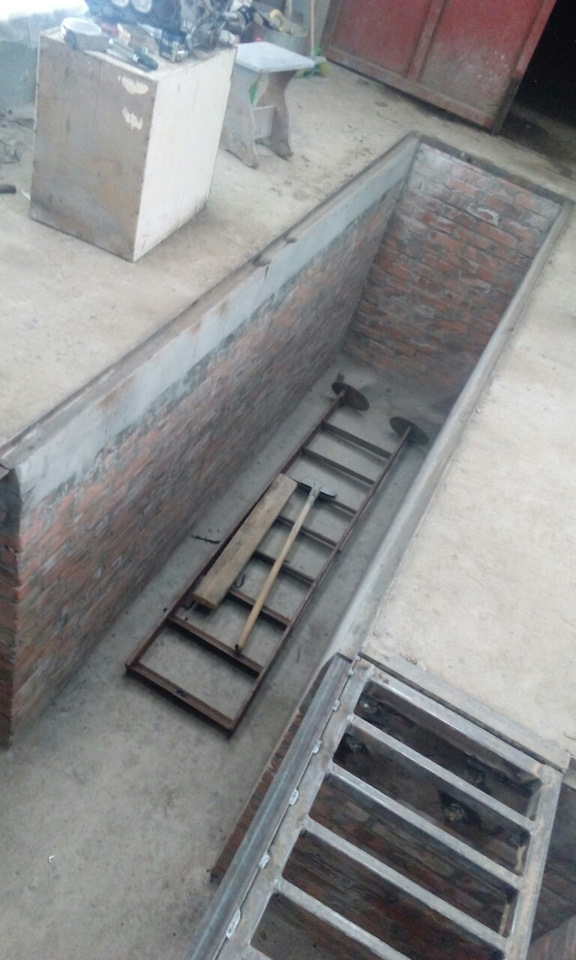
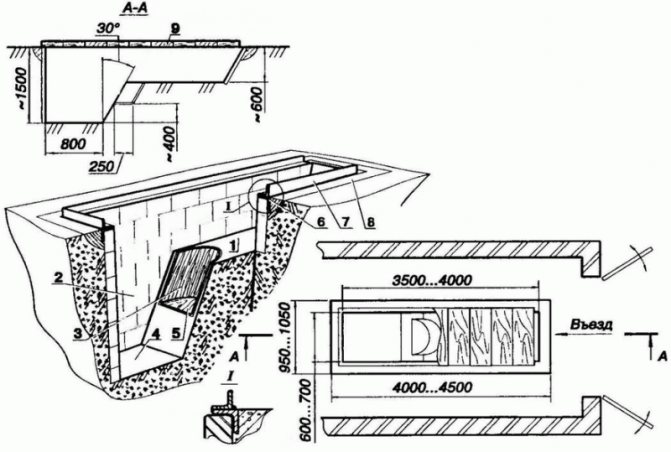
Inspection pit equipment
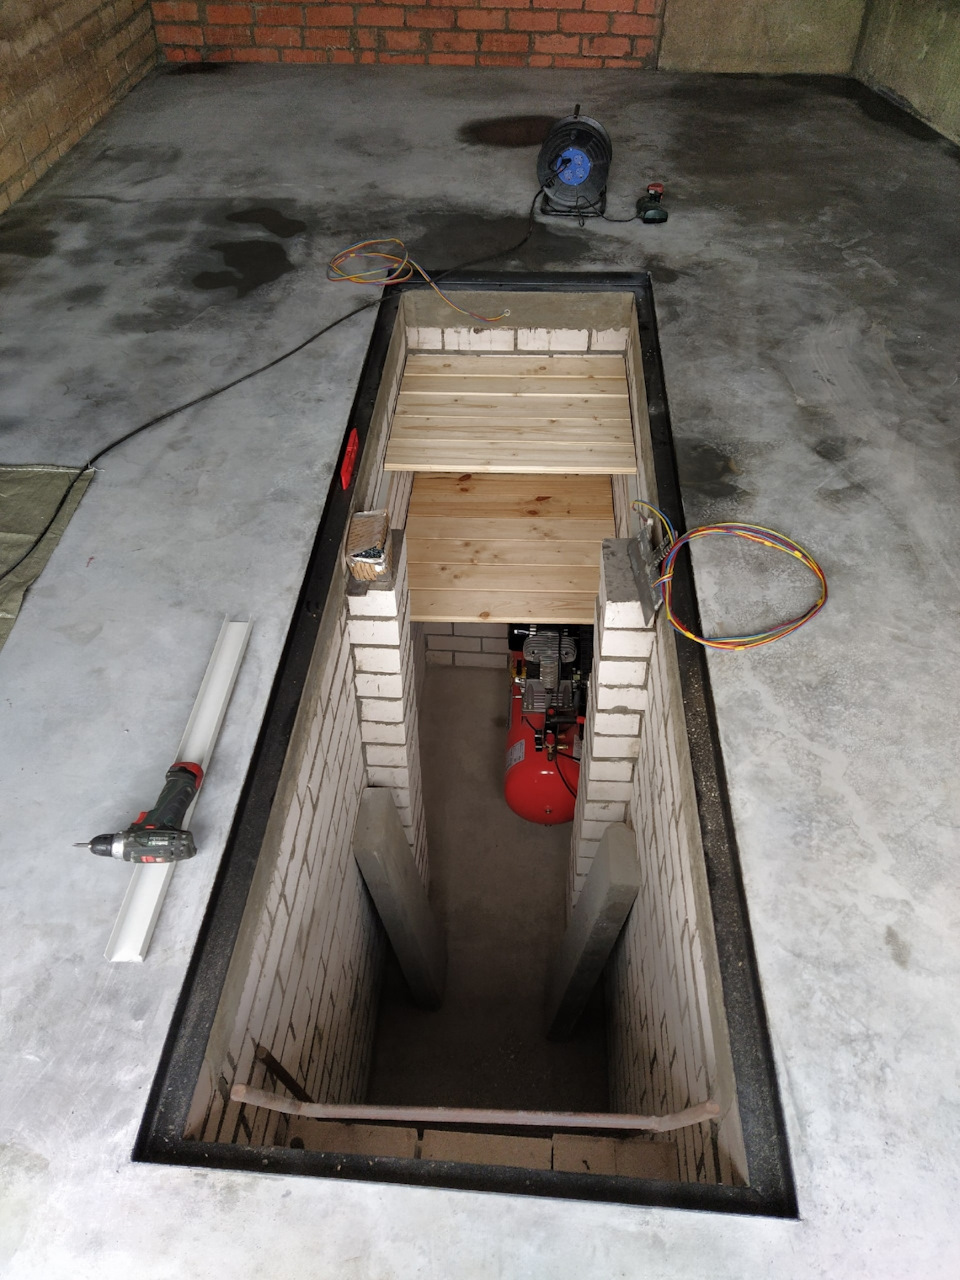
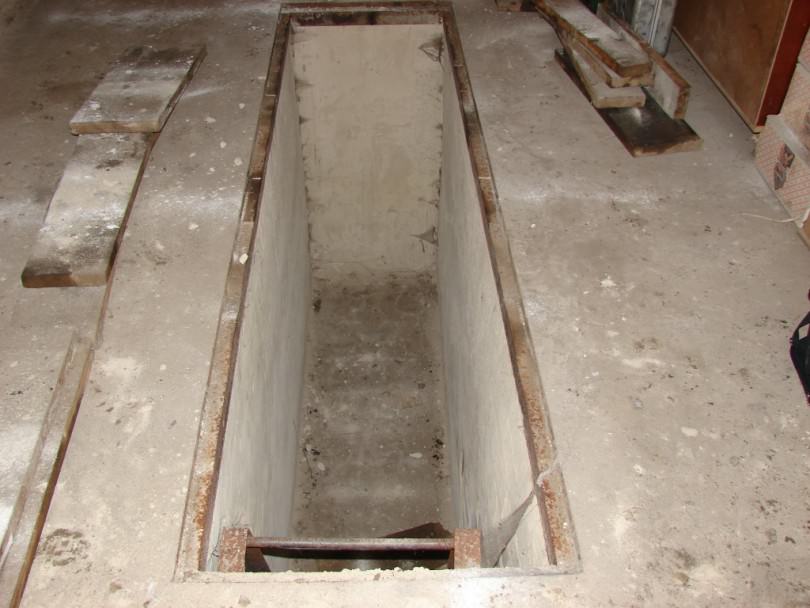
Inspection pit equipment for vehicle maintenance must be provided with several mandatory devices and systems. The required equipment must include:
- Wheel chippers;
- Staircase with handrails;
- Lighting system with mains supply of 12 or 36 volts;
- Socket for connecting a portable lamp on an extension cord with lamps of 12 or 36 volts;
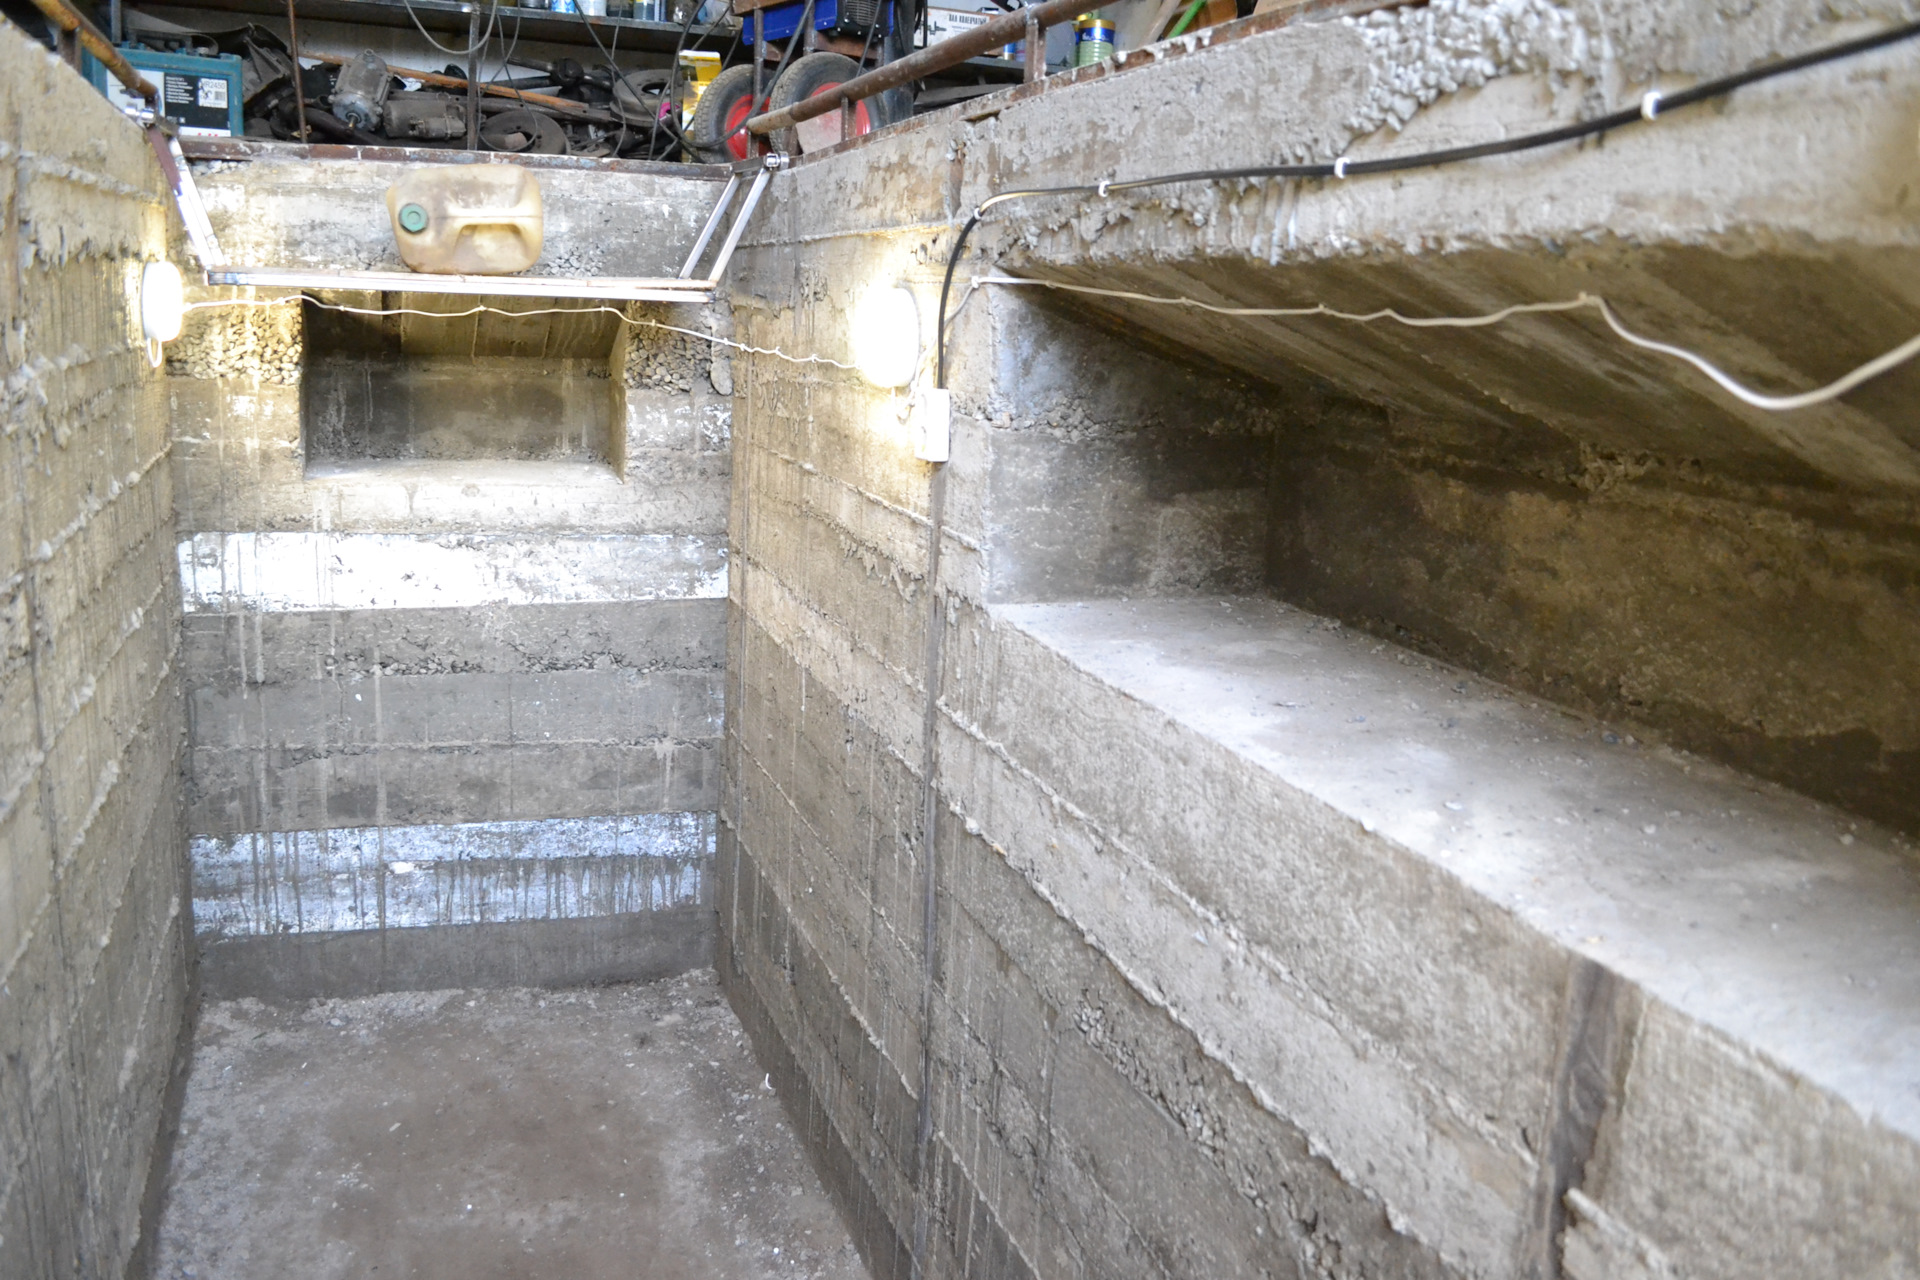
- Niche for tools;
- The edge of the inspection pit, designed to install and secure ladders;
- Platform to the bottom of the viewing hole.
To install the lighting system, moisture-proof lamps with reliable shades made of durable safety glass are usually chosen. For this, modern facade spotlights and LED lamps are best suited. The installation of such lamps is usually carried out tightly, into the wall, so that the lamps do not interfere with work. Another option for installing fixtures is to install them directly into the floor near the edge of the inspection pit between the fender and the edge of the pit. For this method of installation, waterproof vandal-proof lamps are used, which are installed directly into the surface of the roadway or sidewalk to illuminate the facades of buildings.


The wheel bumper is constructed in order to prevent the wheels of the car from driving into the pit. For this, a pipe with a diameter of 100 is usually used. mm or channel is the same width. At the beginning of the pit, near the entrance to the garage, it is necessary to make a bend to adjust the direction of movement of the wheels, and at the end of the pit, be sure to make a wide bump stop in order to limit the movement of the car outside the pit.
Tip: in order to get used to the dimensions of the pit and not go further than necessary, you can place visible landmarks on the walls of the garage, for example, vertical lines that are easy to navigate or, in the place where the car should stop on a thread, tie a tennis ball at the level of the car hood to upon arrival, it was possible to stop when the ball touched the hood.
Car maintenance work often requires changing working tools, which are not very convenient to place under the bottom of the car, and therefore you have to go down into the pit and rise to the surface several times, which is not very convenient without a ladder with handrails. Usually for garages with a small amount of boxing, a ladder is installed near the gate so that there is a flat front and a platform for working with a tool near the engine. A stationary type staircase with handrails and steps with wooden lining is equipped exactly near the gate. But in order to work more comfortably, in addition to a stationary ladder, a portable ladder is welded from a square pipe or pipe with a diameter of 25 mm, with which it is easy to climb around the hood of a car.
Inspection of a car often requires that the lighting fall from the side where it is convenient for detailed inspection, which is why to work under the bottom of the car in the tool niche it is necessary to place a socket for connecting a flashlight powered by 12 or 36 volts. The DC voltage of 12 or 36 volts is not dangerous for humans, and therefore it is this voltage rating that is recommended to be used to power the lighting in the viewing hole.
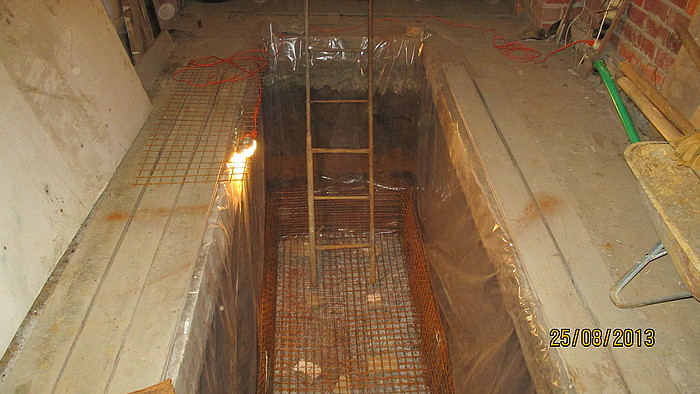
A toolbox is usually provided during the construction of the walls of the pit, in the case of masonry, this may be a small niche for installing a jack, wheel stops, or other tool normally used to work under the machine. For a pit, the walls of which are made by the method of concrete pouring, it is recommended to use a metal box as a finished niche, pre-installed in place before pouring concrete.
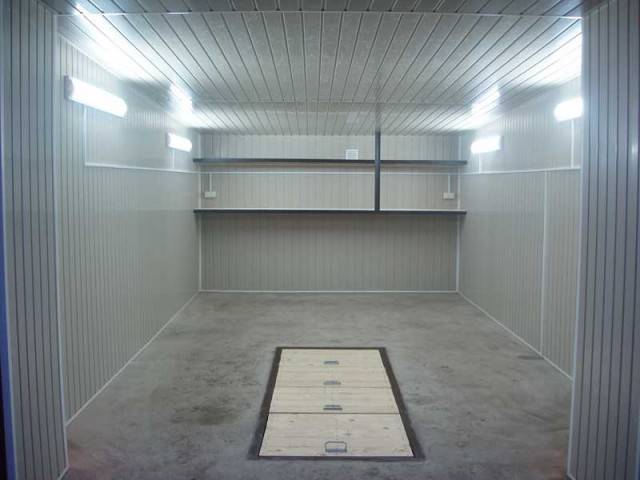
Usually, the inspection pit is covered most of the time with wooden shields, which not only makes parking the car in the garage safe, but also prevents the penetration of excess moisture into the garage. Such shields fit into the guides from the metal corner, fixed along the edges of the pit. For shields, high-quality oak boards 50 mm thick, knocked into shields 1 meter long, are usually used. But the stops are welded from a corner of 50 * 50 mm in the form of a frame and are installed on the upper part of the fill so that the inner edge of the corner is flush with the walls of the pit.
Such a support for shields can also be used to place a movable trolley on bearings, on which you can place both tools and use it as a stand. for waste oil container while changing the engine oil.
And of course, a platform of 2 * 2 cm rails 1 meter long for installation on the bottom of the pit, such a structure makes it possible to move around safely without fear of falling on spilled oil.
How to make effective natural ventilation
In order for the natural air exchange system to meet the minimum sanitary requirements for the garage room, the following points must be taken into account when planning and arranging it:
- The inlet openings should be located at the lowest possible distance from the surface of the earth, they try to place the cut of the exhaust pipe at the maximum height. In this case, there can be several supplies, and there is only one exhaust pipe for the garage, for the basement it is necessary to install its own separate exhaust pipe;
- To reduce the number of stagnant zones and ensure maximum flow around vehicles stored in the garage, ventilation windows should be made at the maximum horizontal distance from the exhaust pipe.
- To ensure ventilation of a room with an area of 15 m2 with a normal air exchange rate of 4-5 times per hour, a 100 mm exhaust pipe is required. With an increase in the area of \u200b\u200bthe garage, with each additional square meter, the diameter of the pipe increases by 10 mm.
Advice! Thus, for the natural ventilation of a standard garage of 24 m2, a pipe of almost 200 mm is theoretically required. In practice, such exhaust channels are not used; instead of one thick pipe, two "hundreds" are installed.
In addition, the above calculation was carried out for a standard ventilation pipe cut height of 3000 mm above the ground. One garage ventilation pipe, raised to a height of 5 m, will show a performance of 40% more than the total throughput of two pipes with an installation height of 3 m.
An increase in the diameter of the exhaust channel from the calculated value does not always lead to an increase in thrust. Reducing the diameter makes natural ventilation work more stable, but reduces performance. The optimal value of natural ventilation performance can be obtained based on the above calculations. In this case, the dimensions of the supply windows must correspond to the diameter of the hood.
Rational ventilation: making a choice
Modern design of the garage - the ventilation duct with a fan is protected by a grill
Even at the stage of drafting a future home for wheeled vehicles, you need to choose the type of air exchange: natural, mechanical or mixed (combined). Taken into account:
- number of floors (levels) in the garage;
- number of cars;
- the presence of a viewing hole;
- geometric dimensions of the room;
- duct length;
- garage area;
- type of building material;
- number of utility rooms, etc.
Depending on the choice, a diagram is drawn up with the application of dimensions, all the functional elements of the ventilation system. If natural air exchange (aeration) is used as an economical option, then mechanical ventilation is considered optimal for organizing microclimate parameters in warm garages. It refers to capital systems. Requires significant material and physical costs. Works with the release of harmful substances into the air of the working area (painting, grinding, etc.) must be carried out only with forced exchange of air moving at a speed of at least 2.5 m/s. Such traffic intensity will not allow hazards to accumulate inside the garage.
What do you need to know about ventilation?
Anyone who has at least once encountered the problem of indoor air exchange knows that there are natural, forced and combined ventilation systems. With the first option, everything is simple: it is based on the difference in air temperature inside and outside.


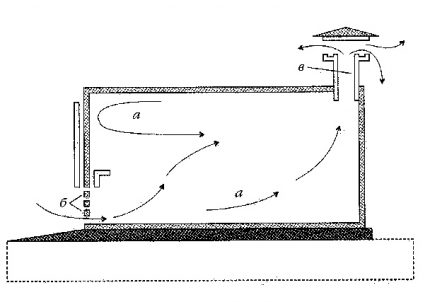
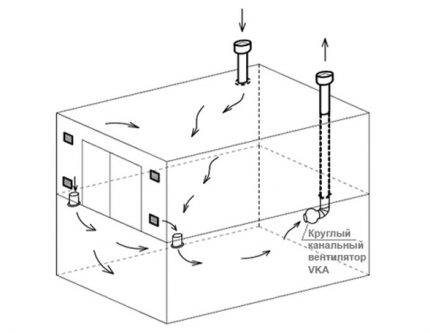
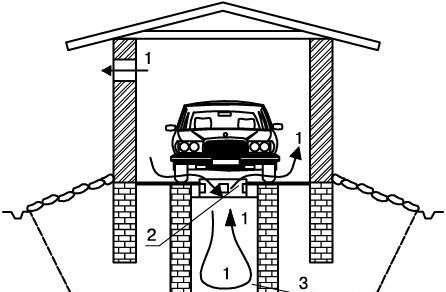
Organization of ventilation of a garage without a viewing hole: the arrows “a” indicate the direction of air flow, the letter “b” indicates the location of the supply air vents, “c” - the ventilation duct
As you know, warm air rises and cold air sinks. The idea is that cool air masses enter the room from the street, rise up and naturally leave through the exhaust opening.At the same time, they must be replaced by new currents of fresh air that enters from outside.
In the garage, such ventilation is easy to organize. To do this, it is necessary to provide sufficiently wide openings for the inflow and exhaust of air, but the temperature difference between inside and outside the room will also be of great importance.
There are no problems with this condition in winter, but in summer, when the heat is almost the same everywhere, the efficiency of natural ventilation is sharply reduced.
To ensure the supply of fresh air to the garage, instead of a hole in the wall, you can put special supply grilles on the gate
An alternative option in such a situation is forced ventilation, i.e. using additional funds. Special fans are installed in the supply and exhaust openings, which, depending on the purpose, blow air into the room or remove it.
But installing two devices at the same time for one small garage is not always reasonable and justified from an economic point of view. It is more profitable to use a combined ventilation system, which requires only one device.
For example, a supply fan is installed, it pumps fresh air, and the exhaust air masses are forced out through the exhaust opening.
In garages, an exhaust system is considered more acceptable. A fan is installed that effectively removes air saturated with harmful vapors and excess moisture. Fresh air masses will enter the room naturally through the supply part of the system.
Why do you need a hood in the cellar of the garage
Many car owners equip small cellars under their garages where they store canned food and other food supplies. If the basement is not properly constructed, the shelf life of supplies is drastically reduced.
High-quality ventilation will protect the room under the garage from a number of negative factors:
- With insufficient air exchange, condensation appears in the pit and humidity increases. This leads to spoilage of products, the appearance of mold and fungus on the walls, and stale air.
- In winter, the temperature in the underground cellar is much higher than in the garage. In the absence of ventilation, the air rises and takes out the moisture accumulated in the vegetable pit. This leads to corrosion on the car body and metal objects in the room.
- In the absence of ventilation in the basement, stored supplies become toxic. This is affected by the operation of the car engine and toxic fumes from chemical fluids in the garage. To minimize exposure to toxic compounds, the ventilation system must be able to remove air from the pit and allow it to enter. This is solved by installing supply and exhaust ventilation.
A competent exhaust system will avoid the consequences of adverse factors. Thanks to the supply pipe, fresh air will freely flow to the stored food stocks. Excess moisture, toxic and poisonous substances will come out through the exhaust pipe.
This is interesting: Living room with stairs and a fireplace (video)
How to make ventilation in the garage with your own hands
The complexity of the processes carried out will depend on what type of ventilation scheme was chosen, plus for which garage it is organized. For example, ventilation in a metal garage will be very different in complexity from a brick building built right next to the main house. Because the last building is, in fact, a solid room that requires the same approach to the organization of ventilation.
Therefore, we will consider in more detail how to make ventilation in the garage, depending on its design features.
natural system
It is just used most often in metal structures. If we are talking about how to properly make a ventilation system in a garage with your own hands, then you need to understand the principles by which it should work effectively.
First of all, this concerns the correct movement of the air flow so that it captures space as much as possible. Therefore, a competent organization is based on two basic principles.
-
-
-
- The movement of air from the bottom up, for which holes are made in the form of a lattice in one of the walls near the floor. And in the ceiling through the hole made, a pipe is removed.
- The movement from the floor to the ceiling should occur diagonally in the room. Thus, the entire volume of air inside is captured.
-
-
The easiest way to organize the natural ventilation of a garage without a basement is a grate in the back wall and a pipe at the entrance, or a pipe at the back wall, and the grate is organized in the garage door. Of course, leaks in the gates and doors can become a supply area. But the exhaust pipe will have to be installed necessarily.And if we are talking about a metal garage, then a hole is made in its roof, a steel pipe is installed, which is welded to the metal ceiling.
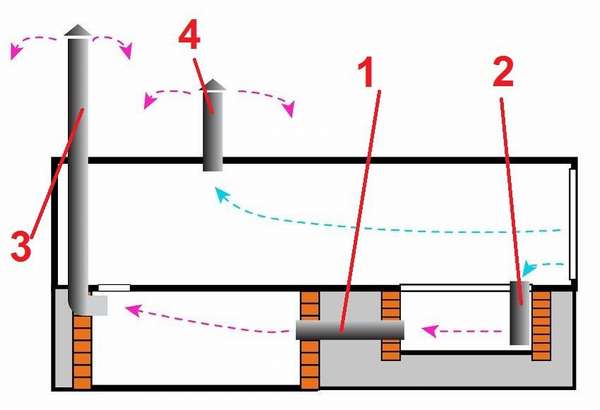
It is more difficult with a garage that has a basement as a storage place. To do this, you will have to make or two hoods: one for the basement, the other for the garage space itself, or one common, which will pass from the basement through the floor and roof. In this case, a short section will have to be connected to the riser, through which air will be exhausted from the room. Don't forget to organize a supply area. This is still the same pipe that from the street through one of the walls enters the basement from its ceiling.
As for the garage, as a capital structure, here natural ventilation must first of all be calculated. The calculation is quite simple - the floor area is multiplied by 0.2%. And the result is the area of outlets in the natural ventilation system. For example, if the area of the garage is 50 m², then the area of all ventilation risers on the hood should be: 50x0.002 = 0.1 m². This is a square-section riser with sides 10x10 cm.
But there is one important requirement, which is determined by sanitary standards. If the area exceeds 50 m², then natural exhaust cannot be used in it.
For this, a mechanical removal of exhaust air masses must be installed.
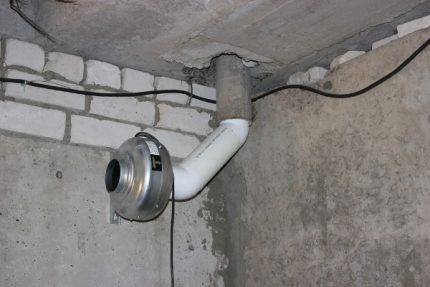
Mechanical hood
It is necessary to approach the construction of forced ventilation in the garage with your own hands, as well as the natural one, from the position of an accurate calculation. The main thing is to choose the right fan for performance. According to the standards in the garage, the air exchange rate varies between 20-30 m³ / h.Accordingly, the fan must be selected for this performance. It can be installed on the exhaust or in the supply area.


Today, manufacturers of fans for forced systems offer several varieties of their products. But most often in garages they use wall models. These are structures consisting of an electric motor with an impeller on the shaft, which itself is fixed on the device case, closed on one side by a grate.
There are four mounting holes on the case through which the fan is mounted to the walls or ceiling. Some modern models have a receiver function, this is when the motor shaft can turn both clockwise and counterclockwise. Such devices are more convenient because they can be installed both inside the garage and outside. The main thing is to correctly turn on the fan in the right direction.
Today, more and more manufacturers of ventilation systems offer ready-made kits, which include air ducts and a closed-type fan. That is, it is a plastic or metal sealed case, inside of which a fan is installed. The housing has branch pipes on both sides, with the help of which the device is installed in the air duct scheme. At the same time, the fan can be installed both in the supply area and in the exhaust area. The main thing is to orient it in the direction of the air flow.
Conclusions and useful video on the topic
An effective natural ventilation system in a real garage with a basement:
How to insulate the exhaust pipe above the garage to stop the accumulation of condensate and freezing:
Mechanical supply and exhaust systems are used in heated garage rooms.For unheated autoboxes, a natural ventilation complex is better suited. Underground garages may only be ventilated by means of mechanical ventilation by connecting carbon monoxide controllers.
Looking for a way to improve air circulation in your garage? Or do you have experience with mechanical ventilation systems? Leave, please, to the article and ask questions. The contact block is located below.


