- Projects
- How to make ventilation in the cellar
- We do the ventilation of the cellar in the garage with our own hands
- Purpose of ventilation
- Useful tips and tricks
- How to do it yourself: step by step instructions
- with a pit
- Equipment and materials
- How to build?
- Preparation for construction
- Purchase of necessary materials
- Installing a combined circuit
- Ventilation in the garage - if suddenly it does not become ...
- How to make natural ventilation with your own hands
- The choice of ventilation scheme and calculation
- Tools and materials
- Installation and ventilation check
- Implementation
- natural ventilation
- Forced ventilation
- Development of a project with the optimal depth of the cellar in the garage
- Advantages of ventilation
- Conclusions and useful video on the topic
Projects
There are several options for equipping the basement in the garage. If we talk about the depth of the bookmark, the cellar can be semi-buried (depth - up to 1.5 meters) or buried (up to 3 meters). The latter option is different in that the indicators of humidity and temperature in it are always at the same level, regardless of the time of year. Due to this quality, conservation can be stored indoors without fear.
The device of semi-buried cellars is considered a necessary measure.As a rule, this option is resorted to if the soil does not make it possible to create a deeper recess or groundwater is located too close at a high freezing point without the possibility of high-quality waterproofing. In practice, sometimes there are ground variations of cellars, but such a structure cannot be created in a garage.
Buried cellars under the garage will be reliable if the fundamental part is located higher than 70 cm from any water source. In this case, you can even create a cellar that will be larger than the area of \u200b\u200bthe garage. Experts advise to develop a project in advance, to make all the calculations.
How to make ventilation in the cellar
In order to correctly make the hood in the cellar with your own hands, it is recommended to use clear drawings and diagrams, this will help prevent the formation of condensate and save the crop from damage. Thanks to a chic assortment of building materials, it is possible to make the ventilation of the cellar in the garage with your own hands.
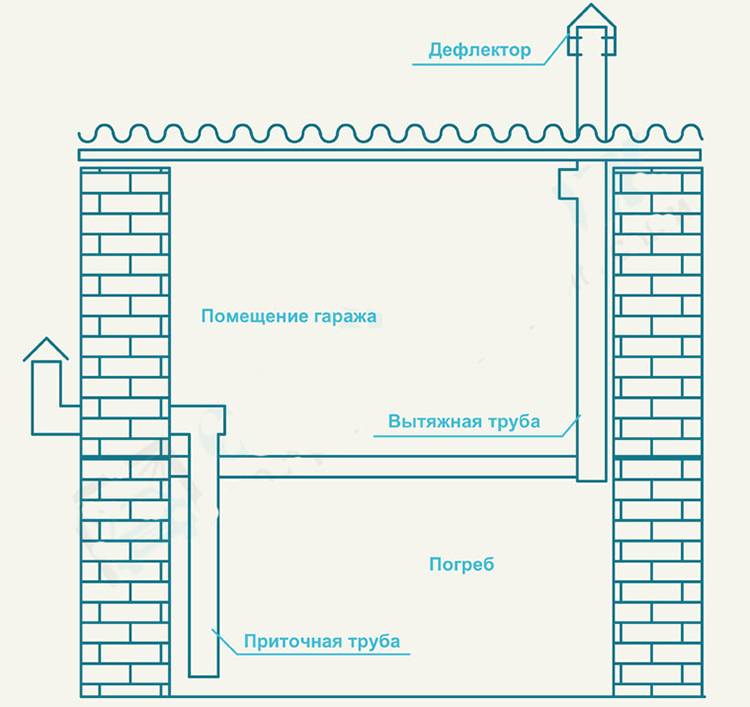
When there is a cellar under the garage, but there is no ventilation in it, various poisons and toxins released by the car will adversely affect the products. Flow-exhaust ventilation will help to solve this problem. This type of air exchange is possible even naturally or due to fans. As for the top of the pipe, it is displayed above the garage.
An accurate, correct exhaust scheme will help fix the problem in the shortest possible time. If you install a supply pipe, it is possible for the purified air to pass into the basement. The role of a pipe with an exhaust function in a garage with a cellar is the elimination of excessive moisture and toxic substances.The optimal output is a successful combination of exhaust and supply systems, which can be done in two ways:
- Natural air exchange. This option is the most popular and common, you will need to install two pipes - supply and exhaust. The device functions perfectly, because the temperature indicator in the basement and outside is significantly different. The main disadvantage is that the hood does not function during the warm period. As for winter, it will have to be warmed up additionally.
- Forced ventilation in the cellar. The proposed system is the best option of all existing ones. Thanks to this ventilation, it is possible to achieve an optimal microclimate, which is similar to the outdoor one. It helps to ensure ideal air exchange, as various units and fans are involved.
Read more: How to properly organize the ventilation system in the basement of a private house.
The arrangement of forced ventilation is carried out using electric fans that are added to the system. Making such a system with your own hands is very simple. The main advantage is the stabilization of temperature and humidity levels, despite the weather and season.
The scheme of the proposed device almost does not differ from natural ventilation. The algorithm of actions is simple: fastening pipes, installing a fan in an exhaust pipe. Instead of a fan, you can use a rotary diffuser-weather vane, it is installed on the top of the supply pipe, it functions from the wind. A deflector will help ensure good ventilation, which improves air exchange and rarefies the air.
There is another method - installing a heating bulb in the chimney that will warm the air.
The best and most advanced option is mechanized forced ventilation using a special monoblock. It installs the software that controls the modular system. The main problem and disadvantage is the high cost.
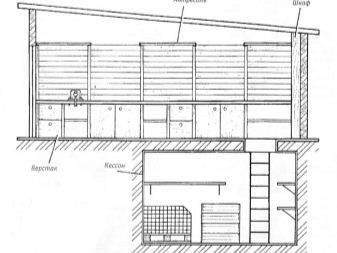
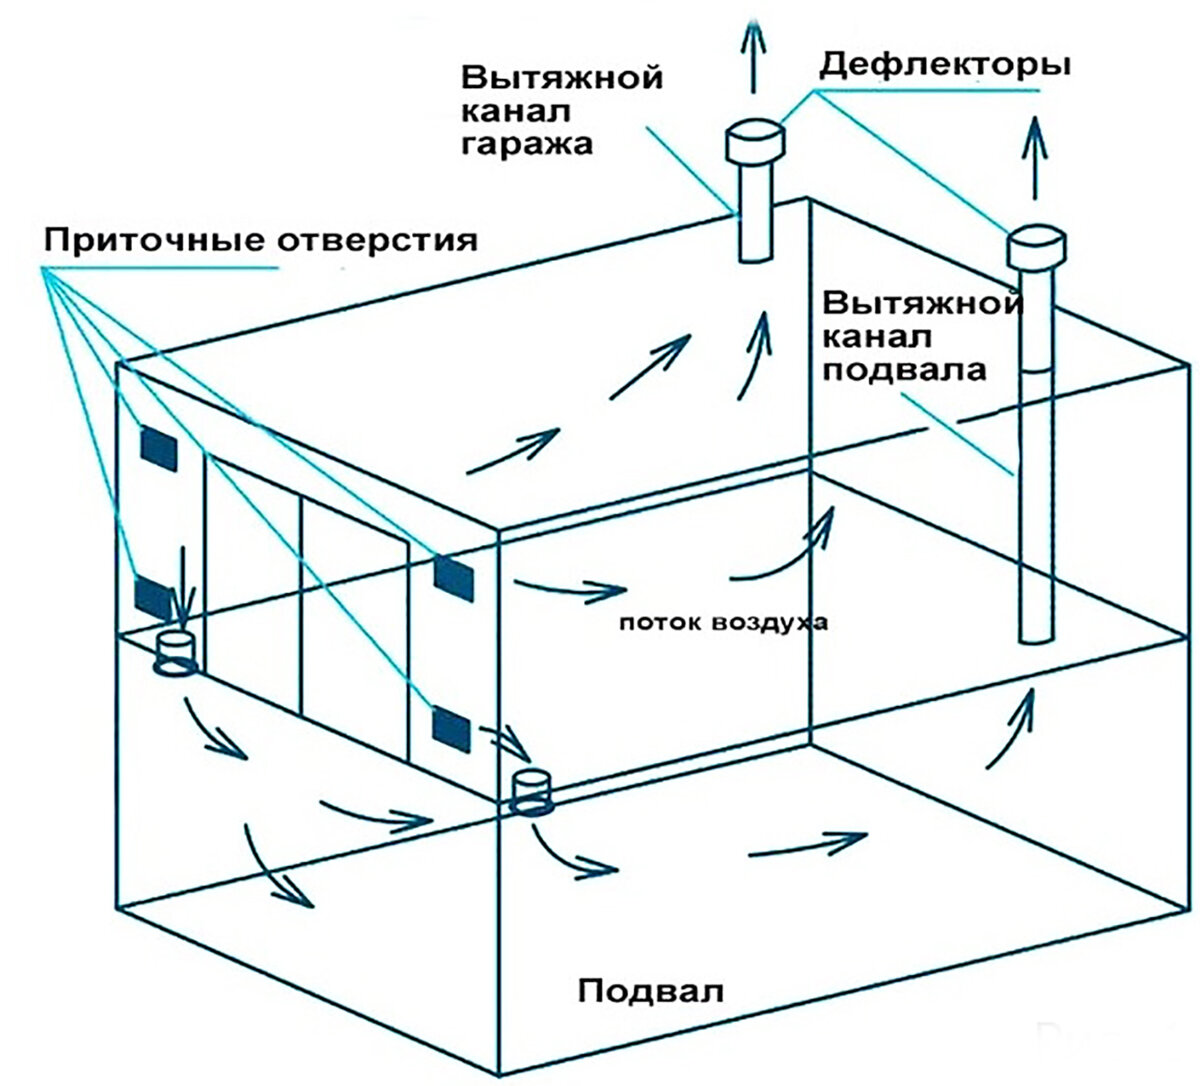
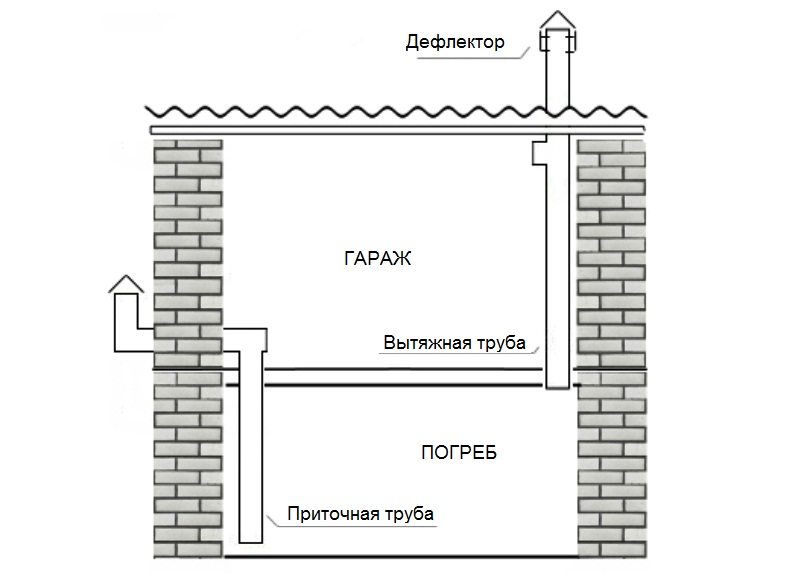
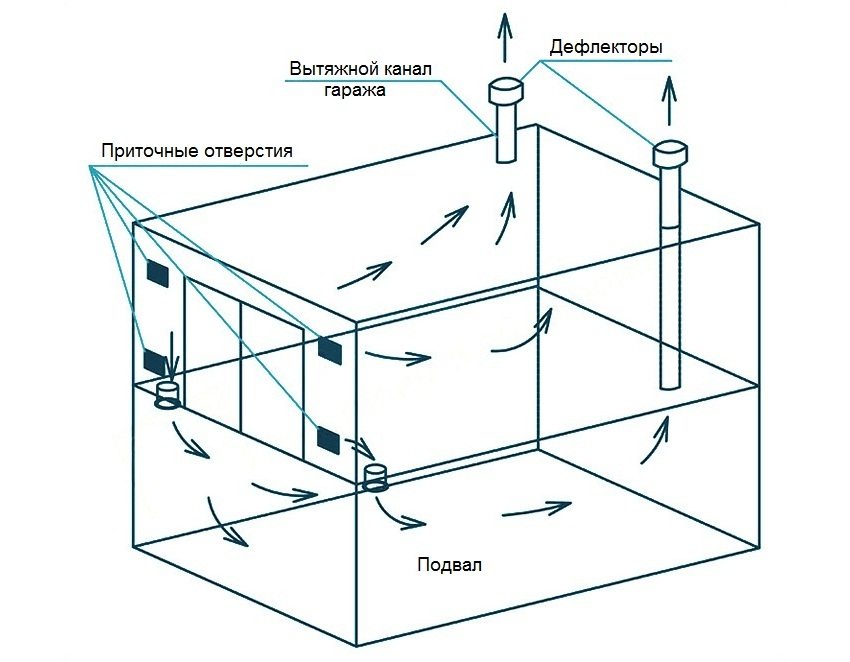
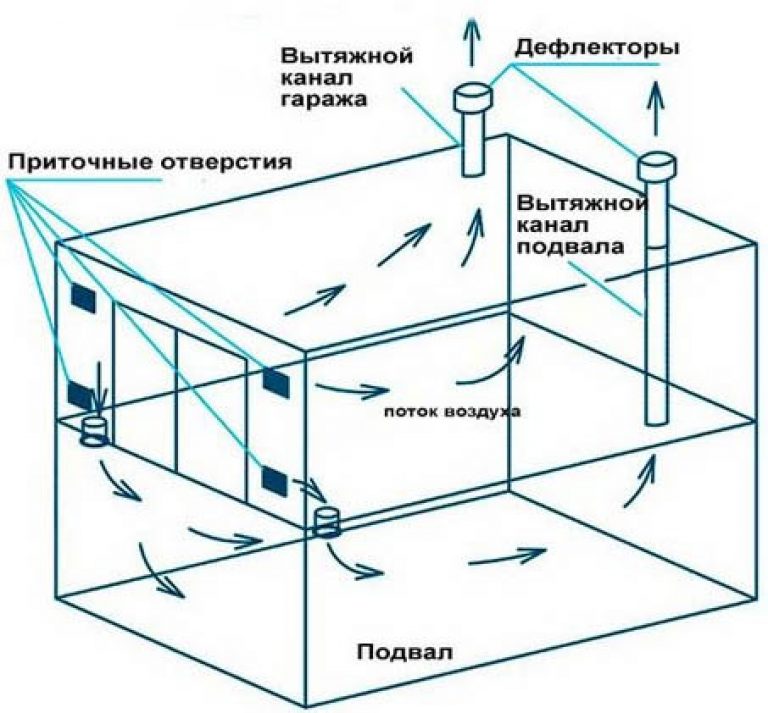
The scheme of proper ventilation of the cellar in the garage
To effectively use the cellar of the garage, it is important to ensure proper, full ventilation. To create natural ventilation, you can independently mount the system using plastic sewer pipes
In the process of work, it is worth observing some rules and tips:
- the ventilation scheme must contain a limited number of bends, pipe turns;
- it is necessary to insulate the exhaust pipe, otherwise condensation will appear;
- cover the entrance to the pipe with a cap to prevent precipitation;
- the entire length of the pipe must have the same diameter.
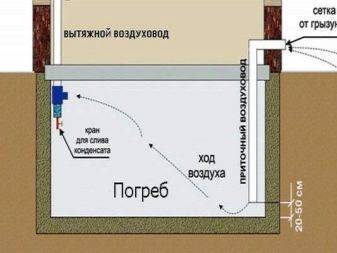
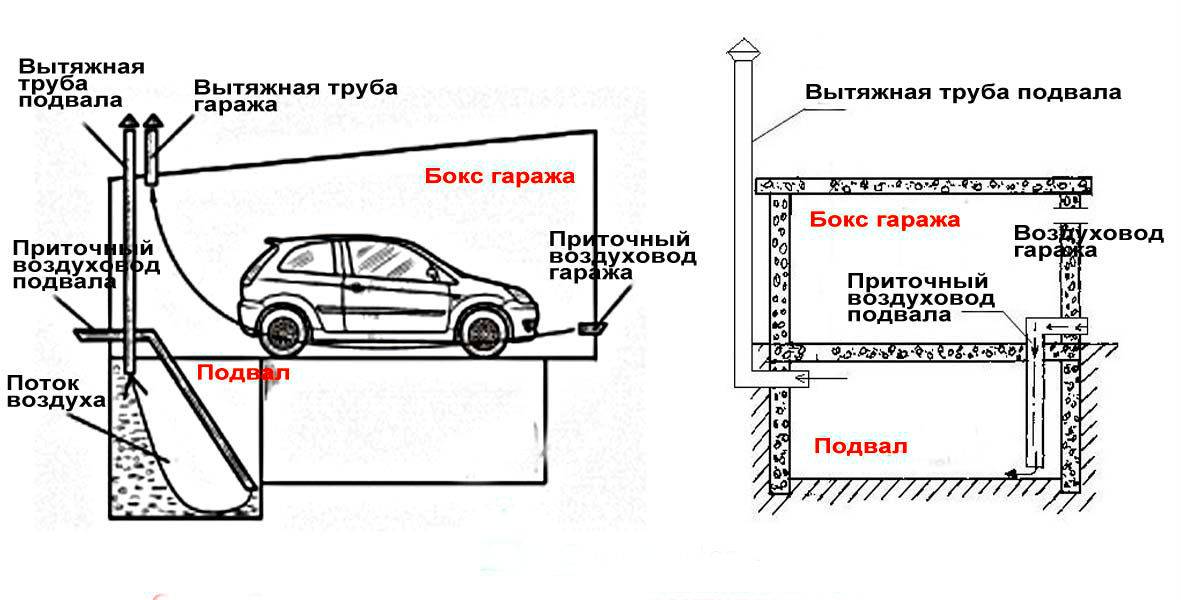
To equip natural ventilation, you should calculate the area of \u200b\u200ball openings. The beginning of the supply pipe is 50 cm above the basement floor, it is taken out. As for the exhaust, it is fixed under the ceiling, pulled over the roof of the garage
It is important that the pipes are in opposite corners of the room
Having completed all the calculations, having determined the diameter section, it is necessary to determine the material of the pipes for the ventilation system. It is customary to use two main types, namely asbestos cement and low pressure polyethylene. Pipes made of asbestos cement are similar in structure to slate, which is why they are called slate pipes. Such raw materials are considered durable, strong and reliable.


Polyethylene pipes are not inferior in strength at all, but they have a much easier installation method, you do not have to use the services of professionals.The main condition is that they need to be soldered.
We do the ventilation of the cellar in the garage with our own hands
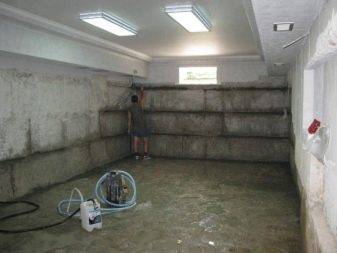
The desire of the owners of individual garages to equip the cellar is quite natural and justified, because. it is possible at minimal cost to obtain a sufficiently capacious storage for vegetables and canned foods. However, errors in the design and construction of a garage with a cellar can lead to very sad consequences: the stored products will be hopelessly damaged, and most importantly, the car will be seriously damaged due to high humidity.
Therefore, when arranging the cellar, almost the closest attention should be paid to the effectiveness of the ventilation system for it.
Purpose of ventilation
The main condition required when using the cellar is the installation of an effective ventilation system, which creates a favorable atmosphere for the long-term preservation of vegetables. So:
- If the room is poorly ventilated, the air inside the cellar becomes damp and musty, which can lead to increased rotting of vegetables.
- Excessive ventilation leads to drafts, as a result of which root crops can dry out. To avoid such phenomena, it is necessary to create an optimal regime of temperature, humidity, and proper air exchange.
Useful tips and tricks
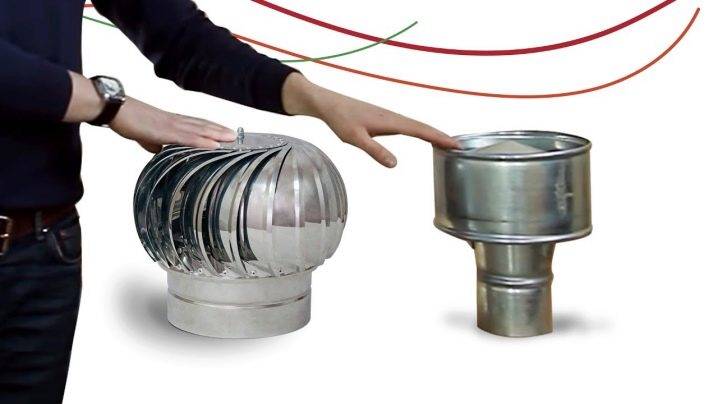
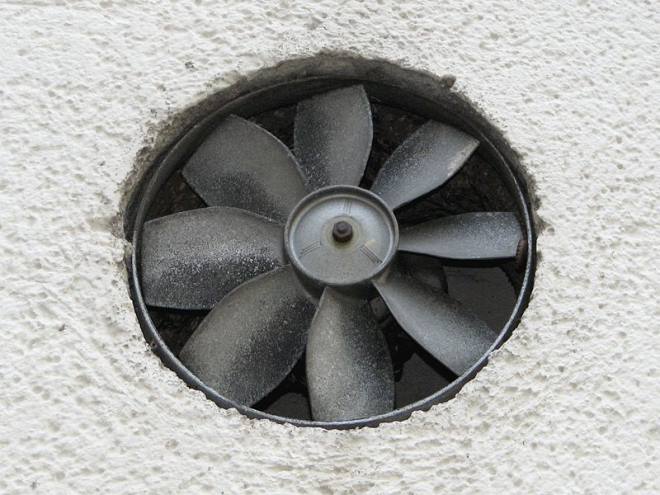
The deflector is a device that is installed above the exhaust duct and is used to increase the flow rate in it due to the so-called Bernoulli effect, which increases the efficiency of the ventilation system. According to the principle of operation, the deflector can be stationary (fixed) or rotating (rotary).
A turbo deflector is an improved and much more efficient version of a conventional deflector, in other words, it is one of the names of a rotary turbine. In fact, this is an ordinary impeller mounted on the upper section of the exhaust duct.
It helps to remove exhaust air from the garage box in a natural way.
The turbo deflector operates using only the laws of physics, without the use of mechanical devices, electricity or fuel costs. As already noted, the humidity in the garage plays an important role, and its elimination is the most important task of the ventilation system. The turbo deflector is an original, cheap and very effective part of the exhaust duct, which helps to establish the correct and efficient air exchange in the garage box.
The principle of operation of the turbo deflector is that passively using the movement of air masses, it creates an area of low pressure, facilitating air flow and increasing draft in the duct. It operates regardless of the wind, its strength and direction.
The ability of its impeller to rotate in the same direction eliminates tipping of the thrust and increases the efficiency of air exchange in the hood.
It can be noted that this is also an additional protection against the ingress of precipitation, foreign objects into the duct.
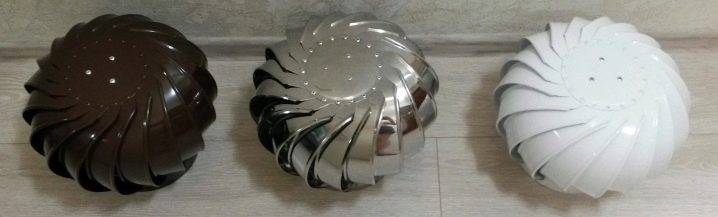
The shape of the impeller and the body of the product varies in accordance with the aesthetic wishes of the owner. Its service life with proper maintenance is more than 10 years.
Of course, in addition to the advantages, the turbo deflector is not without certain disadvantages:
- The higher price of the device, which depends on the material from which it is made.
- In the absence of air flow in the duct during the winter season, the blades may stop and become covered with frost and ice.
- The maintenance rules for the turbo deflector are simple and elementary. It does not require frequent maintenance.
The worst thing that can happen to him is the cessation of movement of the impeller blades due to lack of air flow or skew and jamming of the bearings.
Let's sum up some results.
- Installation of a ventilation system in a garage of any type is necessary. It allows you to save and extend the life of the car, reduces the impact of harmful fumes of fuel, oils, chemicals in an enclosed space on human health.
- You need to choose one of the different types of ventilation - natural, forced / mechanical, combined, depending on the purpose of using the garage.
- Insulation of the floor will help to avoid condensation on the walls and ceiling of the garage, made of metal. It is first covered with roofing felt, then a concrete screed follows and linoleum is covered on top.
On the intricacies of the ventilation device in the garage, see the following video.
How to do it yourself: step by step instructions
with a pit
Garages are often equipped with inspection pits. Consider how to make ventilation in the garage, taking into account this feature. There are several ways to build ventilation in a garage with a pit:

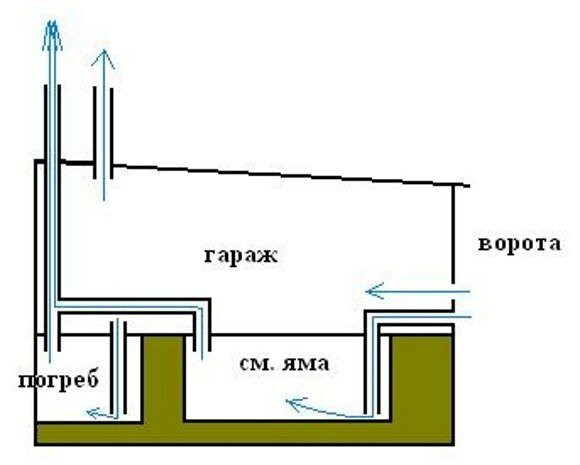


- Air is delivered to the room by drawing two boards from the floor. The outflow occurs due to the lack of one board. The pit should be located strictly longitudinally and inside the garage. One edge is placed near the supply inlets to the boxes, and the other - near the exhaust duct. Open deck boards allow fresh air to partially enter the pit. The opposite edge serves as an outlet for accumulated moisture.
-
The inflow will be provided by the installation of an air outlet pipe. With its help, the incoming air is taken under ventilation. The air duct of the adjacent dump serves as an exhaust hood. The supply channel should be located at the edge of the inspection hole.
Openings in the garage allow incoming fresh air to pass through the pipe in parts. Further, the remaining air is in the pit. Since it is located next to the cellar and is in contact with the air duct, the flow is easy to follow after entering the pit hood to the outside.
- The supply pipe has a fan. The pull-out opening is mounted by the mechanism forcibly with the help of fasteners. Space ventilation works automatically.
here
Advice
With this method, fresh air is injected through the duct, driven through the pit, and drawn out by the fan through the second ventilation duct. It can be installed independently or combined with the basement.
Equipment and materials
The puncher must be powerful, otherwise it will not be possible to make a recess in the wall or it will be uneven. It is advisable to have an angle grinder and heat-insulating material on hand.
Fans are selected depending on the type of construction:
- Exhaust duct devices. Available, easy to use. Built-in regulators allow you to change the intensity and speed of the flow of air masses. The optimal diameter is about 160 mm. To save money, it is easier to purchase 120 mm.
- Centrifugal. Difficult to install, but ideal for the hood. It is better to use them in garage boxes in which they work with chemicals, coatings.
- Vortex. Suitable for areas where welding work is regularly carried out.
If the garage is intended only for storing the vehicle and does not involve the performance of work in it, then you can choose the most practical and running option - an exhaust duct fan. This is the cheapest design, and the operation is less complicated.
For the construction of air ducts, it is better to use asbestos or galvanized pipes. A through pipe can be mounted through a through method, when the ventilation pipe is carried through the garage floor and taken out through the roof, and wall-mounted, when an exhaust pipe is embedded in the cellar wall and taken out of the building.
Air renewal in a natural way is just achieved by installing a through pipe. There is a temperature difference inside the garage and outside. If the draft needs to be increased, then a deflector is installed on the pipe. It will protect the passage from dust and dirt entering it.
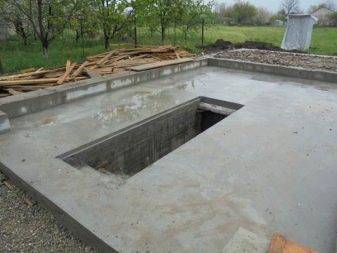
How to build?
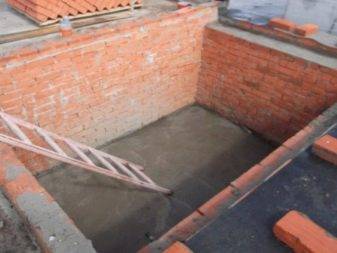
The construction of the basement in the garage consists of several stages. Each step is an important event, without which a high-quality construction of a structure is impossible. To build a basement with your own hands, you should study the sequence of actions and follow the work guide step by step.
Preparation for construction
For the construction of a recessed cellar, a capital garage will be required. To realize your idea, you need to make preliminary preparation. It consists of several stages:
- Before construction work, you need to make sure that there is a technical possibility for equipping the basement. There are a large number of communication lines in the soil of large cities, so making a hole of the required depth is quite difficult.To reduce cash investments and determine the possibility of carrying out work, you can seek help from a specialist or use the project documentation that was used to create the garage.
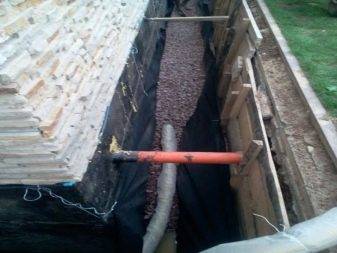
- The foundation must be protected from groundwater. This step should be provided for even at the stage of building a garage using a drainage system. If this issue has not been resolved in advance, a thorough waterproofing of the basement will be required.
Purchase of necessary materials
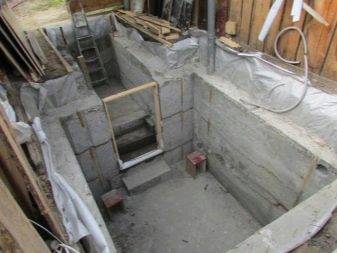
For the construction of the basement will also require special tools and materials. For the construction of walls, you can use concrete slabs, cinder blocks, bricks or natural stones.
Concrete slabs are only suitable for building a garage from scratch. The arrangement of the cellar is carried out before the construction of walls and ceilings. You will also need the help of a professional installation team, which, using a lifting mechanism, will be able to install the plate.

To pour the base, you will need ready-made M-100 concrete or a do-it-yourself solution. The solution is created from gravel, crushed stone, sand and cement M-400. The resulting solution is suitable for preparatory work before screeding and wall finishing during plastering.
To create the formwork, you will need an edged board. The required amount will depend on the dimensions of the basement. Roofing material is used as waterproofing.
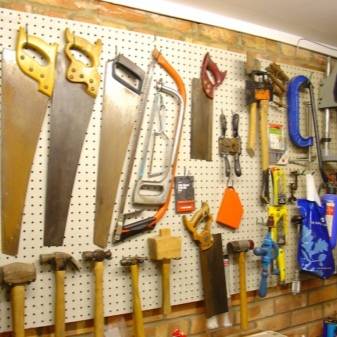
When building a cellar with your own hands, you do not need professional equipment. For this, a traditional list of tools that every home craftsman has at hand is suitable.
To work, you will need the following items:
- jackhammer;
- scrap;
- sledgehammers;
- spatula with a trowel;
- hacksaws;
- electric drills;
- screwdriver;
- pliers;
- construction shovel.

Installing a combined circuit
Such a scheme practically does not differ from the previous one. In the same way, a hole will be made on one side of the garage at a height of ten centimeters from the floor. The only difference is that there is no need to make an exhaust hole in the opposite wall. Installing a fan allows you to do it anywhere.


Thus, the combined air exchange method is more suitable, as it will work efficiently at any time of the year.
As for fans, many of them have minimal power consumption, so when buying, you should choose one that will make the least amount of noise.
Ventilation in the garage - if suddenly it does not become ...
Extractors and ventilation for automotive premises are not a luxury or an option, but a recognized necessity. Without ventilation, using a garage is fraught with a lot of unpleasant surprises:
Ventilation in the garage is not only for the ease of breathing of the car owner and his guests. Much more important is the fact that ventilated air reduces dampness in the room. The car often has splashes of mud and raindrops, and sometimes snowdrifts. Thawed in a warm garage, they become a breeding ground for the development of corrosion;
In a garage without ventilation, the car rusts much faster. It is impossible to treat all critical components and parts with anti-corrosion compounds; no do-it-yourself drainage will protect against moisture in the air.Water vapor penetrates everywhere - as a result, major bodywork worth tens of thousands of rubles will be needed in a year or two, even for a new car;
Damp air contributes to the destruction of the supporting structures of the garage and the corrosion of most metal objects.
If we periodically inspect the car ourselves and entrust the prevention to the masters, then garage racks and expensive spare parts are deprived of such attention. It is in proverbs that water wears away a stone - in modern reality, metal often turns out to be in place of a stone;
Ventilated air rids our lungs of gasoline fumes, toxic exhaust fumes and other chemicals of little use.
Your own health is immeasurably more expensive than a well-designed and well-installed garage ventilation system.
In addition, leaks in water heating systems are also fraught with the development of mold and fungi.
The technical condition of pressure pipes in automotive premises must be monitored with special attention.
Photo of ventilation in the garage,
In the photo - do-it-yourself ventilation in the garage,
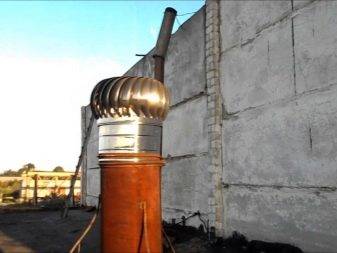
Photo of the ventilation pipe on the roof of the garage,
In the photo - homemade ventilation for the garage,
Photo of a hood for a garage,
How to make natural ventilation with your own hands
Consider how to make ventilation in the garage without the help of professionals. Before starting work, the building must be insulated to prevent condensation from accumulating inside the garage.
Networking rules:
- The air inlet is located at least 10 cm from the floor surface. To prevent debris from getting into it, the pipe is closed with a mesh.
- To protect against snow, make the outlet pipe of the inlet at a height of 30 cm relative to the ground.
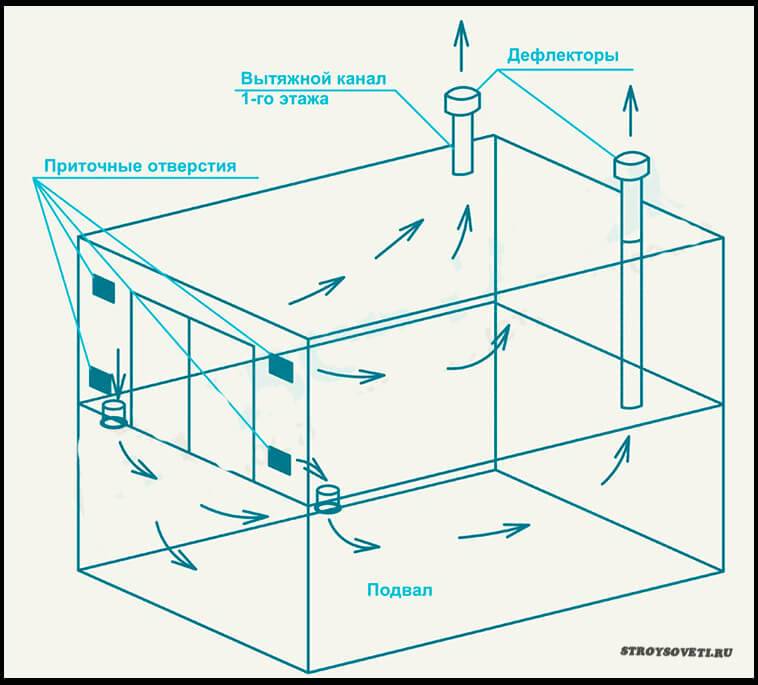
- The hood is located in the upper part of the building opposite the inlet. It is better to space the dots diagonally and as far apart as possible. The hood should be placed at a distance of 10 cm from the roof. Output at least 50 cm above the roof horizon. To protect against precipitation, put on a fungus at the output end.
- It is permissible to organize the inflow with gratings embedded in the walls of the garage, gates. Efficient air exchange is maintained provided that the size of the gratings is 3 times larger than the cross section of the exhaust pipe.
The choice of ventilation scheme and calculation
Do-it-yourself ventilation scheme in the garage is selected for each individual room.
Terms:
- ease of implementation;
- availability of repairs;
- maximum air exchange;
- reduced heat loss;
- possibility of network reorganization.
The last item is required, since in the summer the owner may need to install a fan. In winter, most often it is necessary to block the intensive access of cold air.
The calculation of the diameter of the ventilation ducts is carried out in two ways:
- According to the formula, 15 mm of the pipe section is taken per 1 m2 of area. It turns out that for an area of 10 m2, a pipe with a diameter of 150 mm is chosen.
- According to the formula: the sum of the cross section of the holes \u003d 0.3% of the area of \u200b\u200bthe garage. This calculation is performed for a single-channel mechanical network.
Natural ventilation in the garage does not require special calculations, it is important to follow the rules:
- position the inlet on the windward side;
- equip the outlet of the inflow at a distance of 10 cm from the floor or 30 cm from the ground;
- protect the pipe from above with a grate;
- the hood is located diagonally as far as possible from the inlet;
- arrangement of the exhaust pipe not lower than 10 cm from the ceiling;
- outlet of the duct pipe at a distance of 50 cm above the roof horizon;
- protect the air duct with fungus and mesh.
Tools and materials
Structurally, the network consists of a number of elements that the master will need:
- inflow pipe with a diameter of up to 250 mm;
- exhaust pipe with a diameter of up to 250 mm;
- container for collecting condensate;
- nets and gratings for branch pipes;
- thermal insulation material;
- sealant;
- perforator;
- add-on elements.
Pipes are selected according to the material depending on the purpose of the room. In household standard garages, PVC products with reinforcement are used. They have low linear expansion and are stronger than products without reinforcement. For buildings with elevated temperatures, it is more practical to take steel pipes, but only with galvanized or stainless steel. It is expensive, but the pipes will last longer than without a protective coating.


Installation and ventilation check
Installation of ventilation in the garage begins with the preparation of tools and cutting pipes. For cutting, a hacksaw for metal or plastic is useful.
How to equip the ventilation in the garage with your own hands in stages:
- Determine the areas for placement of exhaust and inflow pipelines. Drill holes.
- Fix the exhaust duct. Place the lower end 1.5 m from the floor - it all depends on the height of the basement. The outer part of the pipeline is brought out 0.5-1.5 m above the roof point.
- Install exhaust pipe. You can do this through the garage floor and roof. Let's go through the wall. In this case, the ventilation device in the garage cellar is as follows - the lower part of the outlet pipeline is located horizontally. It goes through the side wall outside the building, rises next to the wall of the garage.
- Install the air duct.Here the lower part is inserted into a viewing hole or cellar. It is necessary to start so that the end is located in the opposite direction from the hood. The pipe is fixed at a distance of 0.5 m from the floor. Bring the other end outside the garage wall, placing it 30 cm from the ground level.
Now all the holes are closed with nets, the upper end on the roof is supplemented with a fungus. To collect condensate, a container is placed under the outlet pipe.
Any smoky device, for example, tow, will help to check the draft. Bring smoke to the exhaust pipe, track how the medium is drawn out through the pipeline. As a rule, there are no problems with the exhaust, and the supply is organized automatically after the removal of the spent medium. The supply air duct is checked with a burning candle - bring the flame to the outlet pipe, it should deviate towards the incoming stream.
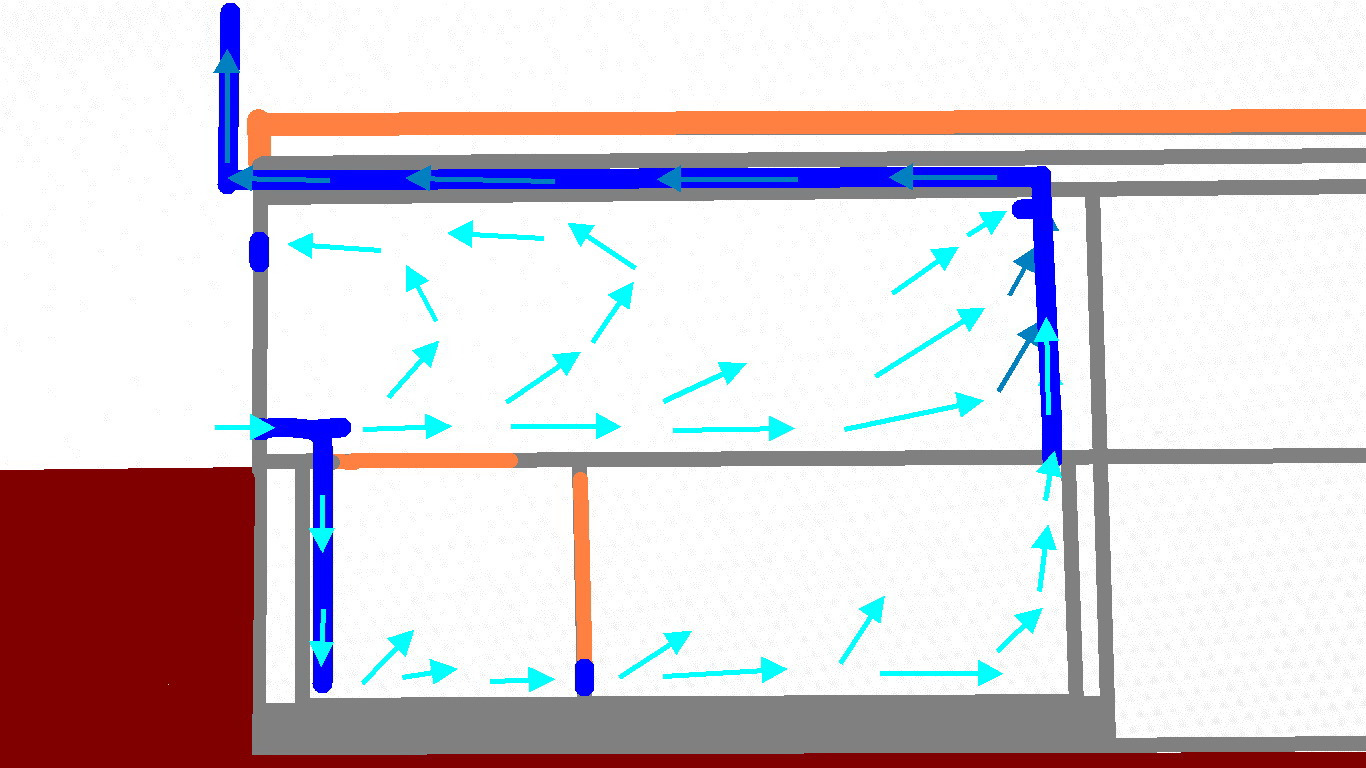
Implementation
natural ventilation
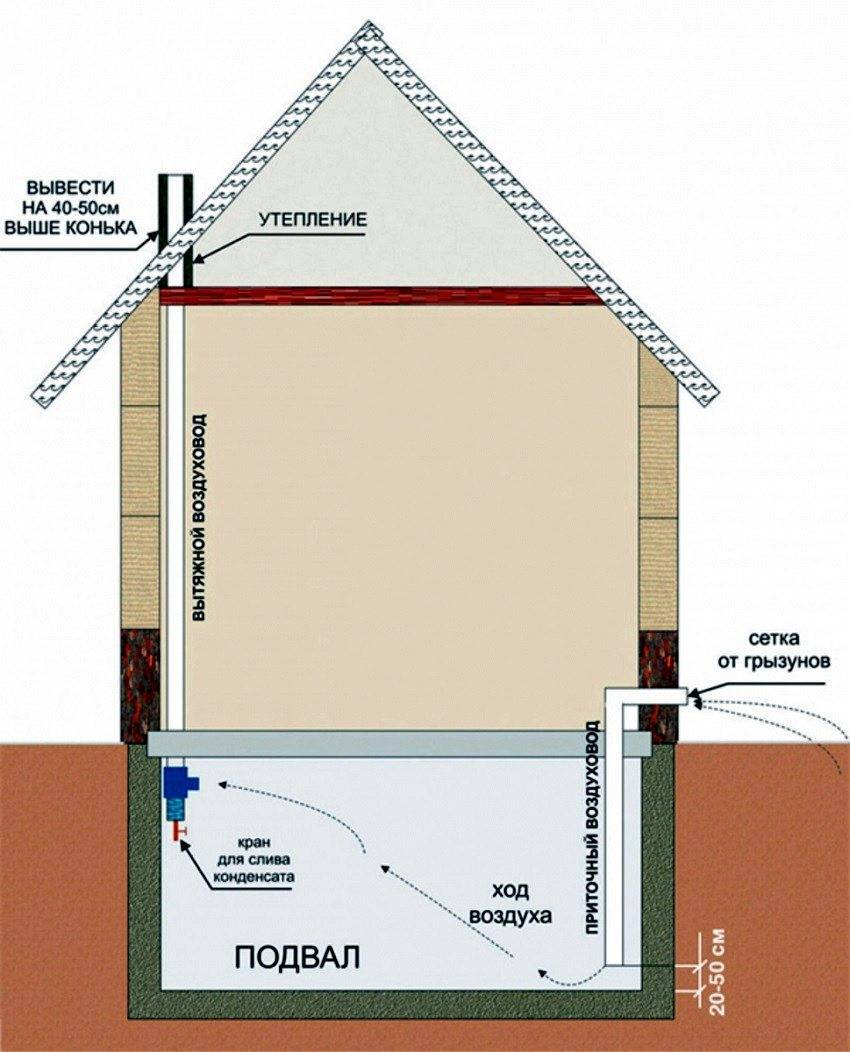
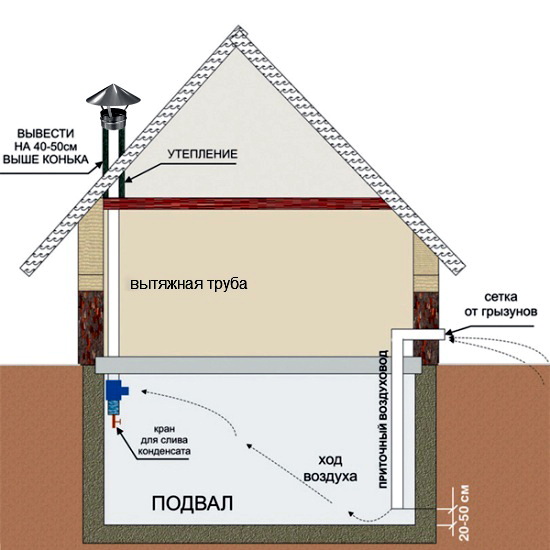
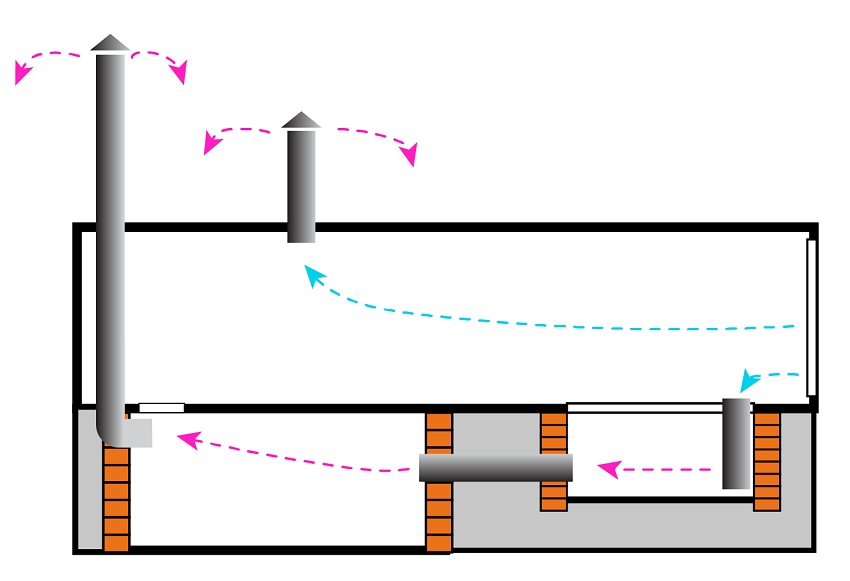
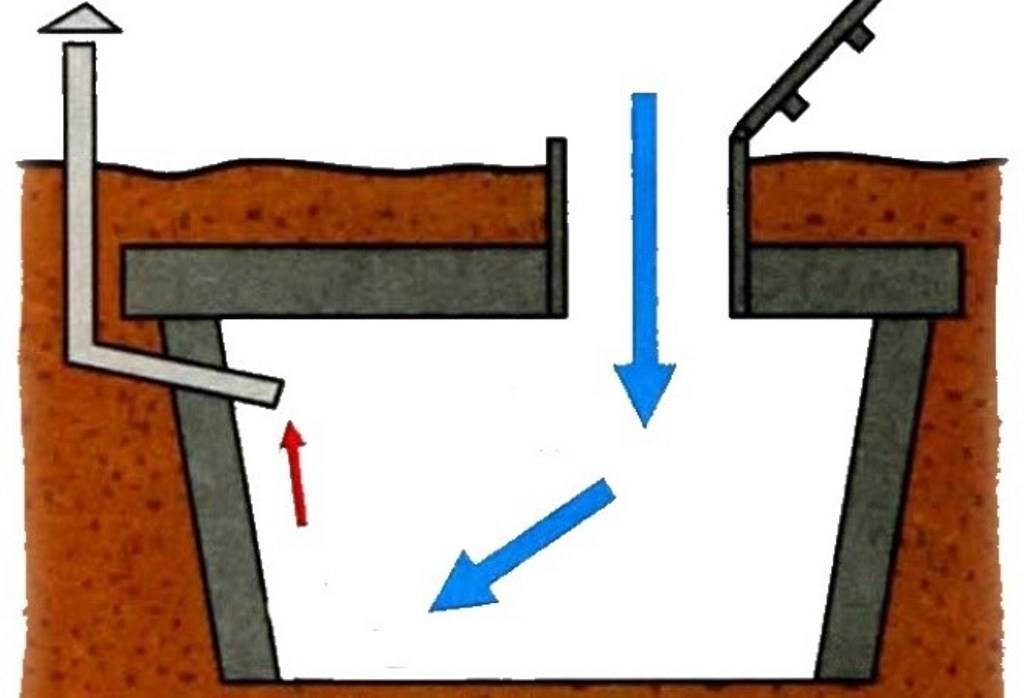
What does the correct implementation of the ventilation system look like in the cellar, over which any room is built (garage, cellar or residential building)?
Not only the exhaust is organized, but also the influx of fresh air. It is possible to implement such a scheme not only with two, but also with one pipe. It is divided in half by a longitudinal partition; in one half of the pipe, the air intake is made higher than in the other.
The supply and exhaust pipe is divided by a longitudinal partition.
Tin, steel or plastic pipes can act as ventilation ducts.
The cheapest set of materials looks like this:
- Two three-meter PVC sewer pipes.The diameter depends on the volume of the cellar: if a 50-mm ventilation duct is enough for 8-10 cubic meters, then with a cubic capacity of 50-70 m3, a 150-mm one will be required.
- Two deflectors (they can be found on sale under the name “sewer umbrella”).
- Optional - clamps for fixing pipes at the required level.
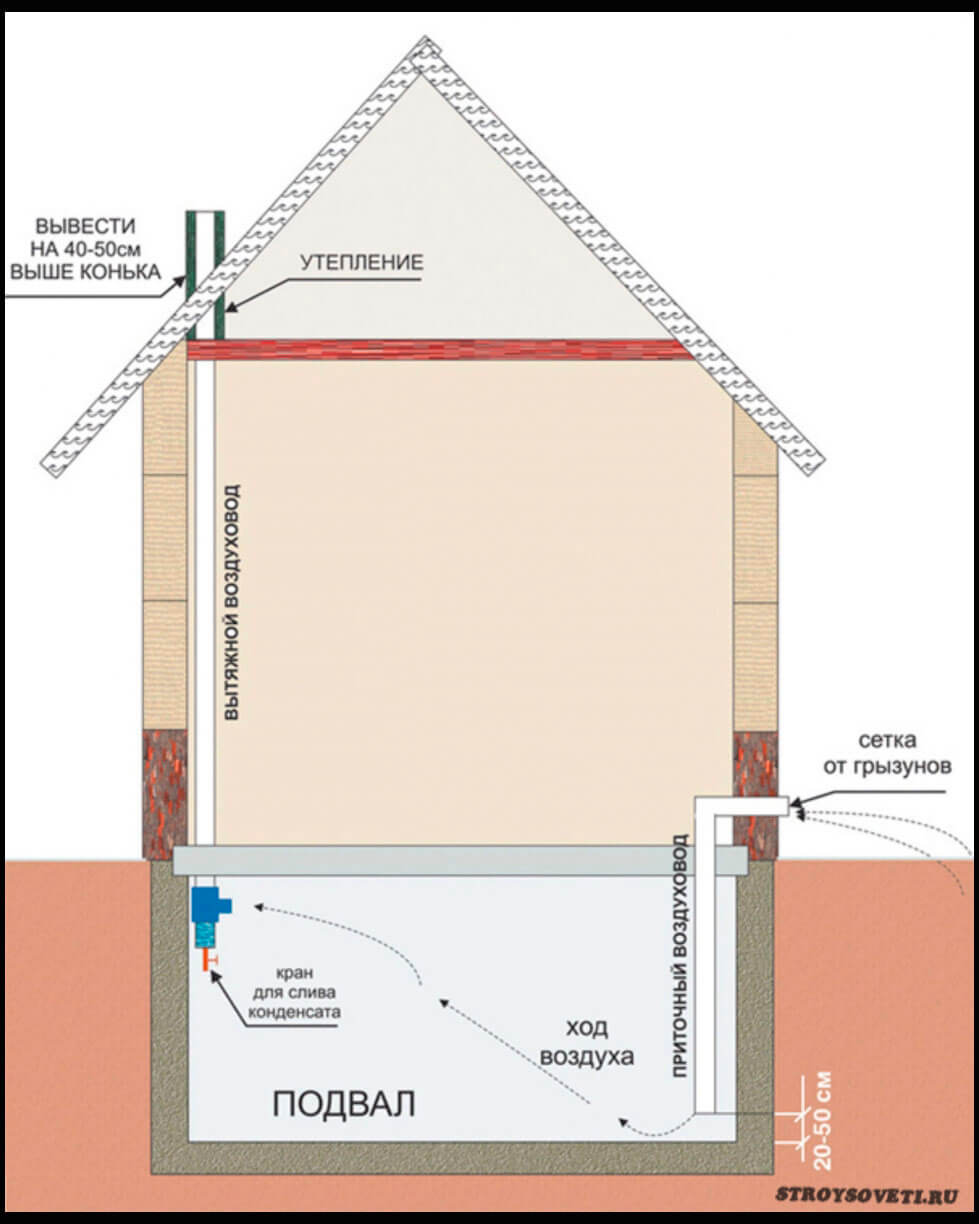
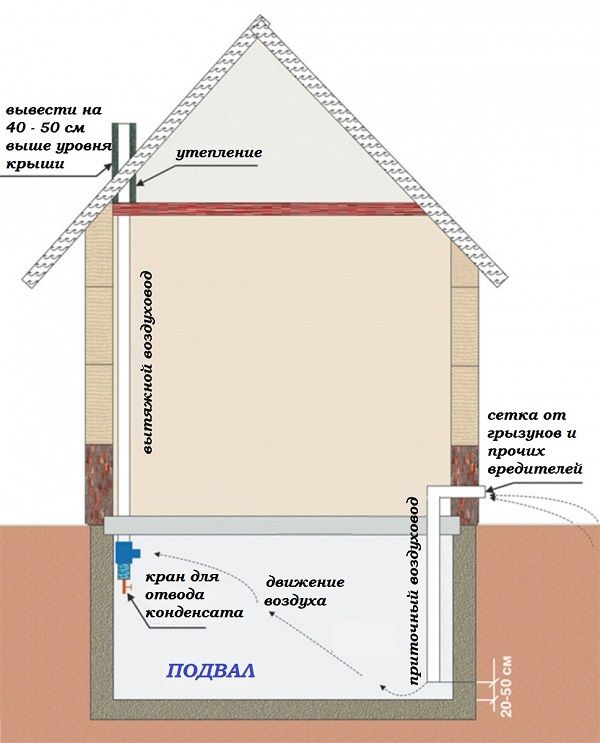
Ventilation ducts are mounted at different levels: the upper one is right under the ceiling, the lower one is at a distance of 20-50 centimeters from the floor. It is due to this difference that in the cold season there is a constant air exchange between the cellar and the street: warmer air is gradually replaced by colder air.
The hood device in the cellar may have a number of additional features.
A tee with a condensate drain valve is often installed on the exhaust pipe. In the cold season, moisture will settle on the cooled walls.
- Pipes are equipped with ventilation grilles. Better - not plastic, but metal. They will interfere with the visits of rodents.
- The exhaust pipe is brought out above the roof of the cellar, garage or other room above the cellar. The deflector on it not only protects against rain or snow getting into the pipe; it also increases traction in windy weather. It is clear that this mechanism will work only if the ventilation duct is not blocked by anything.
Scheme of natural ventilation.
Forced ventilation
It is required when:
- It is necessary to quickly dry the room before the next storage season.
- The performance of the existing natural ventilation system in the basement is not enough, and increasing the diameter of the ventilation ducts or installing additional ventilation pipes is undesirable for some reason.
- The cellar is used in summer.In the summer heat, ventilation is less efficient, especially in calm weather: the temperature difference between the cellar and the street is much less than in winter.
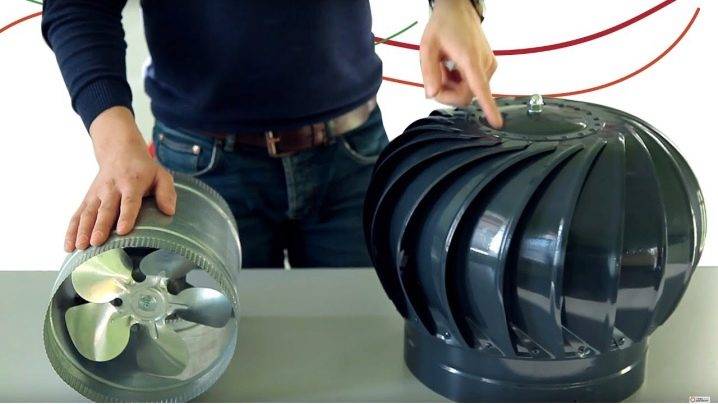
The simplest do-it-yourself cellar hood is installed within 5 minutes. It is a fan for the ventilation duct and a fitting - a sewer corner of the appropriate diameter. The corner is needed only so that the fan is mounted in a vertical position: it is less likely that vibration will sooner or later force it to leave its standard location.
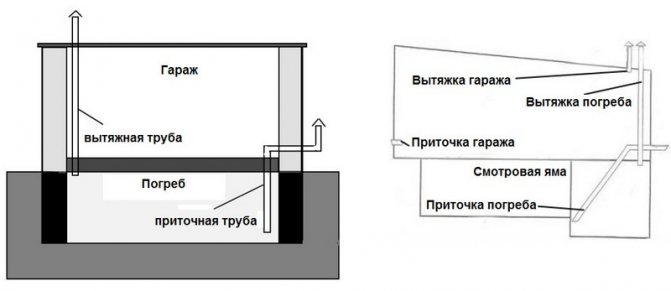
Scheme of ventilation of the garage with a cellar.
How to fix the fan in the pipe? The easiest way is to pre-apply silicone sealant to it. It will make the mount sufficiently reliable, at the same time ensuring its tightness.
Exhaust fan with dimmer.
The simple solution, however, has one catch. In the cellar, the use of high-voltage wiring is undesirable: dampness can make electric shock quite real. Can a cellar hood be installed in garage or cellar above him?
Of course. The so-called duct fan, which is installed inside the pipe or opens it, will come to the rescue.
However, here we are waiting for one problem: as a rule, such fans have a diameter of 100 or 150 millimeters and do not want to fit tightly into the sewer pipe.
The domestic duct fan is made to fit ventilation pipes, not sewer pipes.
- We open the ventilation duct. If it is already mounted - just cut out a section of the pipe.
- We install a sewer coupling on the lower end of the pipe.
- We insert the duct fan into the compensating pipe; we bring the cord out through a hole drilled in its wall.On the inner walls of the compensator, before narrowing it, it does not hurt to first apply a little sealant: it will prevent the fan from driving part of the air in a circle.
- Pull the compensator onto the top tube until it stops.
- We insert a pipe cut exactly to its size with a socket into the remaining gap and upset it into the coupling. (See also the article Waterproofing Basement Walls: Features.)
- We upset the compensator in the socket. After connecting the power, the hood in the garage from the cellar is ready for use.
In the photo - a compensating pipe. Its inappropriate use completely solves our problem.


Development of a project with the optimal depth of the cellar in the garage
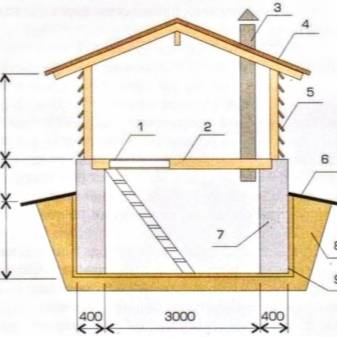
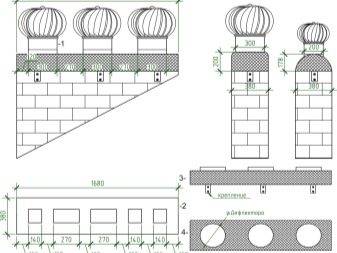
Before starting construction work, design documentation should be prepared. When working out a detailed drawing, you should make sure that there are no communications in the place where construction is planned. Considering that most often the cellars in the garage are located at a depth of 2.5–3.5 m, the pipes will be higher.
When calculating the dimensions of the pit, the following should be taken into account:
- the depth by 30 - 40 cm should be greater than the selected basement depth. The size depends on the thickness of the arranged sand substrate and the poured screed;
- the width and length will be at least 35 cm larger than the similar dimensions of the underground structure to form walls of sufficient thickness.
The dimensions of the buried cellar are developed taking into account the growth of an adult
Advantages of ventilation
Properly organized ventilation system of the cellar and observation compartment entails positive consequences:
- the temperature background is normalized.For vegetable storage, this means long-term preservation of food, constant air exchange while maintaining the necessary temperature indicators, which does not fall below zero even in severe frosts;
- the amount of moisture in the air is normal. This is reflected in all sections of the garage, as well as in the quality of the maintenance of the car. When interacting with moisture, the metal surfaces of the garage, tools, car body corrode, become unusable. In addition, vegetables disappear long before spring, the design of the inspection pit is gradually destroyed;
- dry air prevents the appearance of mold, fungus, which are dangerous not only for vegetable crops, but even for concrete, brick building elements, inspection compartment;
- toxic fumes of technical fluids, paints and varnishes, liquid fuels, machine oils, etc. due to the well-established air exchange, they do not accumulate inside the room, do not get inside the cellar, inspection hole. After all, reaching a certain concentration, they can harm human health, are highly flammable.
Conclusions and useful video on the topic
Cellar ventilation options:
The use of deflectors to strengthen the hood in the basement and cellar of the garage:
Homemade deflector tests:
In conclusion, it is worth noting that the efforts and costs aimed at arranging ventilation in the basement of the garage will more than pay off in the future with the safety of products. Armed with the information and tools provided, the entire installation can be done by hand.
Are you just going to install ventilation in the cellar of the garage or improve the existing one and you still have questions that we have not considered in this article? Ask them to our experts and other site visitors - the contact form is located below.


