- Implementation
- natural ventilation
- Forced ventilation
- How to make natural ventilation in a private house on your own
- Scheme
- in the hole
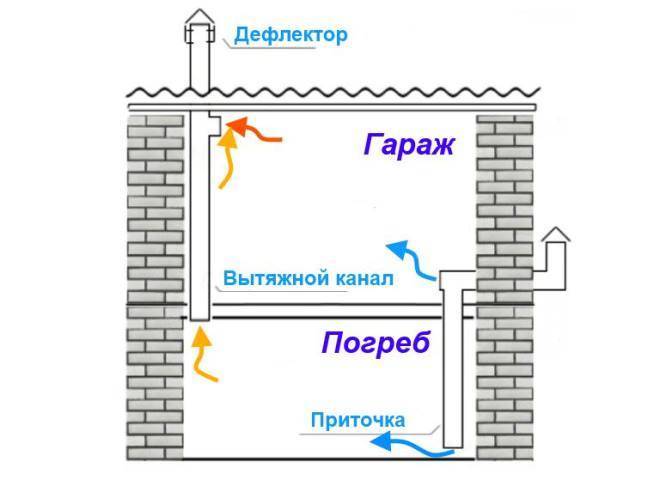
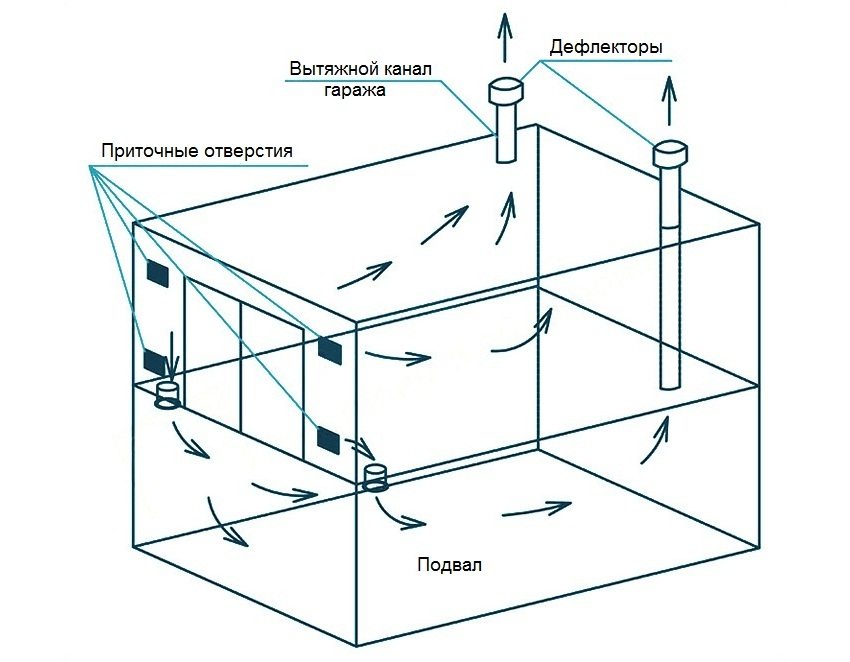
- In the garage
- In the pit of the garage
- In a private house
- How to properly ventilate the cellar - Materials and tools for installing ventilation
- Cellar ventilation tool
- Selection of air exchange pipes
- Installation instructions for ventilation from plastic (sewer socket) pipes
- Deflector for ventilation in the cellar: how to make a device with your own hands
- Making a deflector with your own hands
- Scheme
- How else can you reduce the humidity in the cellar
- Ventilation in living quarters
- Do-it-yourself ventilation: an action plan
- Preparatory work
- Parameter calculations and detailing
- Installation and setup
- Classification and types of ventilation systems
Implementation
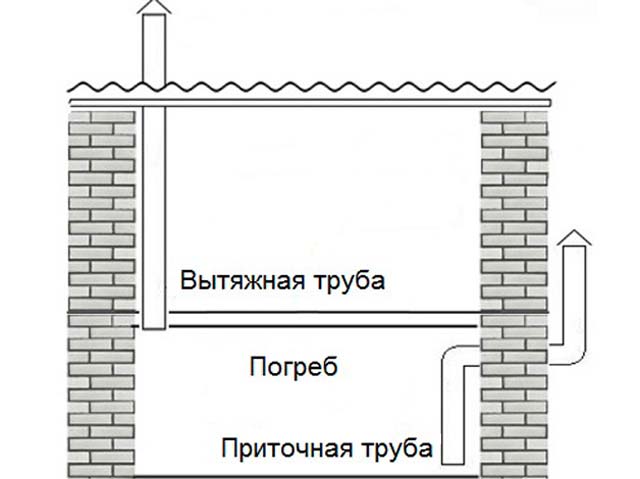
natural ventilation
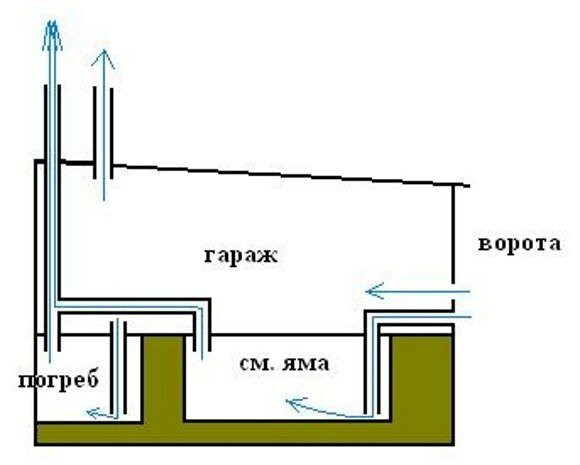
What does the correct implementation of the ventilation system look like in the cellar, over which any room is built (garage, cellar or residential building)?
Not only the exhaust is organized, but also the influx of fresh air. It is possible to implement such a scheme not only with two, but also with one pipe. It is divided in half by a longitudinal partition; in one half of the pipe, the air intake is made higher than in the other.
Supply and exhaust pipe divided by a longitudinal partition.
Tin, steel or plastic pipes can act as ventilation ducts.
The cheapest set of materials looks like this:
- Two three-meter PVC sewer pipes. The diameter depends on the volume of the cellar: if a 50-mm ventilation duct is enough for 8-10 cubic meters, then with a cubic capacity of 50-70 m3, a 150-mm one will be required.
- Two deflectors (they can be found on sale under the name “sewer umbrella”).
- Optional - clamps for fixing pipes at the required level.
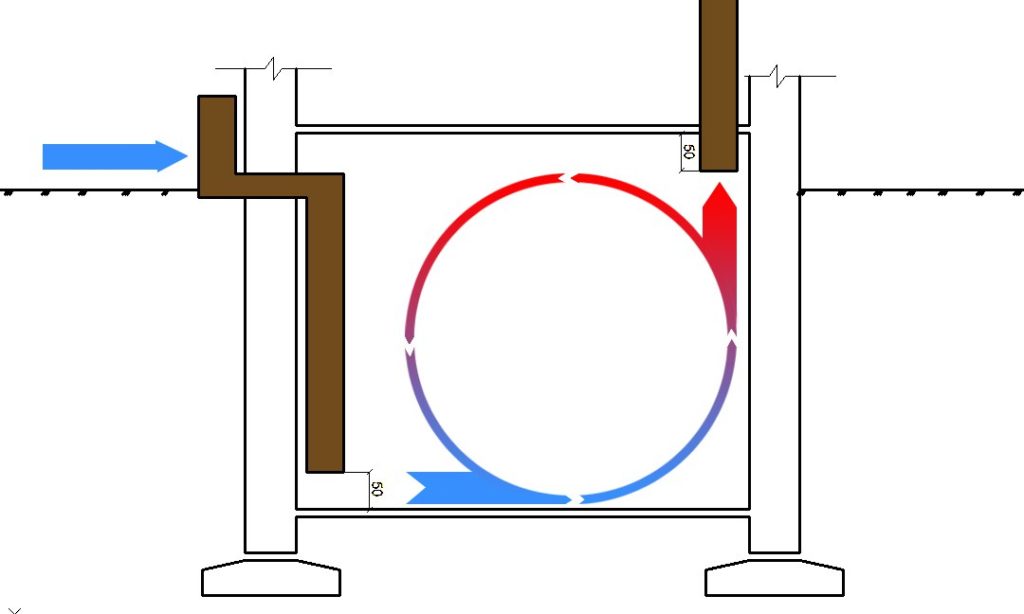
Ventilation ducts are mounted at different levels: the upper one is right under the ceiling, the lower one is at a distance of 20-50 centimeters from the floor. It is due to this difference that in the cold season there is a constant air exchange between the cellar and the street: warmer air is gradually replaced by colder air.
The hood device in the cellar may have a number of additional features.
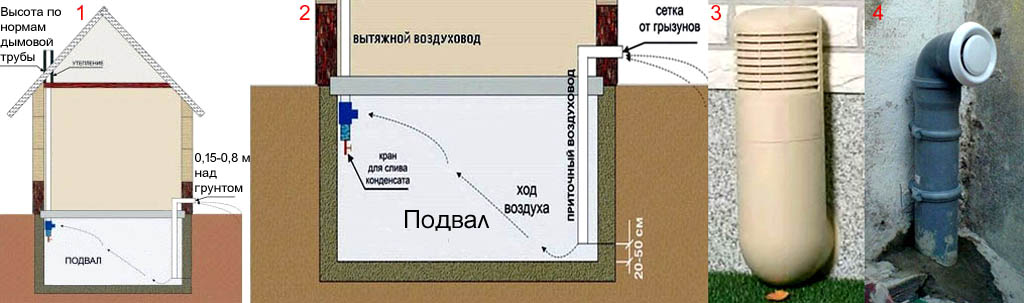
A tee with a condensate drain valve is often installed on the exhaust pipe. In the cold season, moisture will settle on the cooled walls.
- Pipes are equipped with ventilation grilles. Better - not plastic, but metal. They will interfere with the visits of rodents.
- The exhaust pipe is brought out above the roof of the cellar, garage or other room above the cellar. The deflector on it not only protects against rain or snow getting into the pipe; it also increases traction in windy weather. It is clear that this mechanism will work only if the ventilation duct is not blocked by anything.
Scheme of natural ventilation.
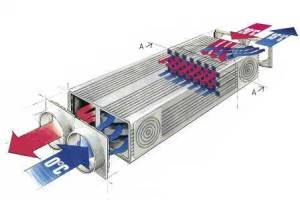
Forced ventilation
It is required when:
- It is necessary to quickly dry the room before the next storage season.
- The performance of the existing natural ventilation system in the basement is not enough, and increasing the diameter of the ventilation ducts or installing additional ventilation pipes is undesirable for some reason.
- The cellar is used in summer. In the summer heat, ventilation is less efficient, especially in calm weather: the temperature difference between the cellar and the street is much less than in winter.
The simplest do-it-yourself cellar hood is installed within 5 minutes. It is a fan for the ventilation duct and a fitting - a sewer corner of the appropriate diameter. The corner is needed only so that the fan is mounted in a vertical position: it is less likely that vibration will sooner or later force it to leave its standard location.
Scheme garage ventilation with cellar.
How to fix the fan in the pipe? The easiest way is to pre-apply silicone sealant to it. It will make the mount sufficiently reliable, at the same time ensuring its tightness.
Exhaust fan with dimmer.
The simple solution, however, has one catch. In the cellar, the use of high-voltage wiring is undesirable: dampness can make electric shock quite real. Can a cellar hood be installed in a garage or cellar above it?
Of course. The so-called duct fan, which is installed inside the pipe or opens it, will come to the rescue.
However, here we are waiting for one problem: as a rule, such fans have a diameter of 100 or 150 millimeters and do not want to fit tightly into the sewer pipe.
The domestic duct fan is made to fit ventilation pipes, not sewer pipes.
- We open the ventilation duct.If it is already mounted - just cut out a section of the pipe.
- We install a sewer coupling on the lower end of the pipe.
- We insert the duct fan into the compensating pipe; we bring the cord out through a hole drilled in its wall. On the inner walls of the compensator, before narrowing it, it does not hurt to first apply a little sealant: it will prevent the fan from driving part of the air in a circle.
- Pull the compensator onto the top tube until it stops.
- We insert a pipe cut exactly to its size with a socket into the remaining gap and upset it into the coupling. (See also the article Waterproofing Basement Walls: Features.)
- We upset the compensator in the socket. After connecting the power, the hood in the garage from the cellar is ready for use.
In the photo - a compensating pipe. Its inappropriate use completely solves our problem.
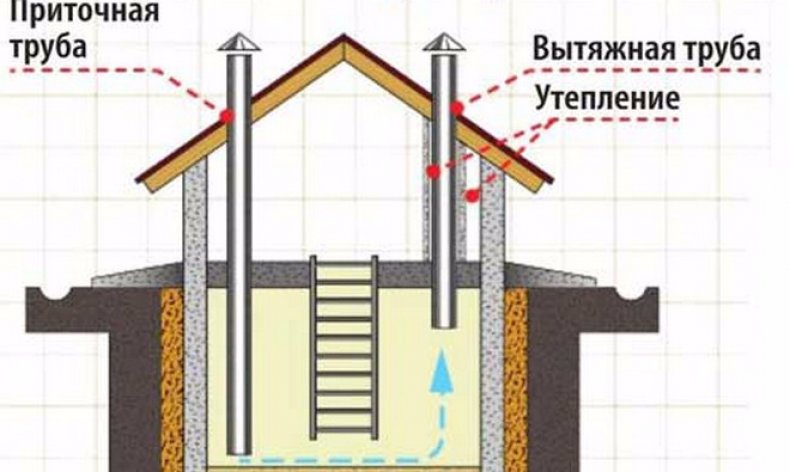
How to make natural ventilation in a private house on your own
In order to equip the house with natural ventilation, first of all, two basic conditions must be met:
- really clean air outside;
- suitable material from which the house was built.
If everything is more or less clear with the first requirement, then the second paragraph may raise a question. What exactly is considered a suitable material? Natural ventilation can be arranged in houses that were built of wood, brick, adobe, gas block or foam block, cinder block, expanded clay block.
Before proceeding with the purchase of pipes for ventilation in a private house, as well as directly with the installation of the system, it is necessary to make a drawing that will indicate how and from where the air will flow and then be removed. This will be the ventilation scheme in a private house.It is quite possible to draw up a scheme on your own, but it will be much more reliable to entrust this matter to professionals. After all, even one mistake at the planning stage can lead to a malfunction of the entire system.


Useful advice! Do all types ventilation in a private house made of plastic pipes
Therefore, it is important not to forget the importance of correct calculations, according to which you will make purchases. Otherwise, there is a risk of extra costs or, conversely, a shortage of materials.
The main rule that you must remember if you still undertake to make a scheme natural ventilation in a private house - the room where the air is most polluted should be at the end of the ventilation chain. That is why, in a private house, bathroom ventilation, as a rule, closes the system. Although at your discretion, the kitchen may also be the last.
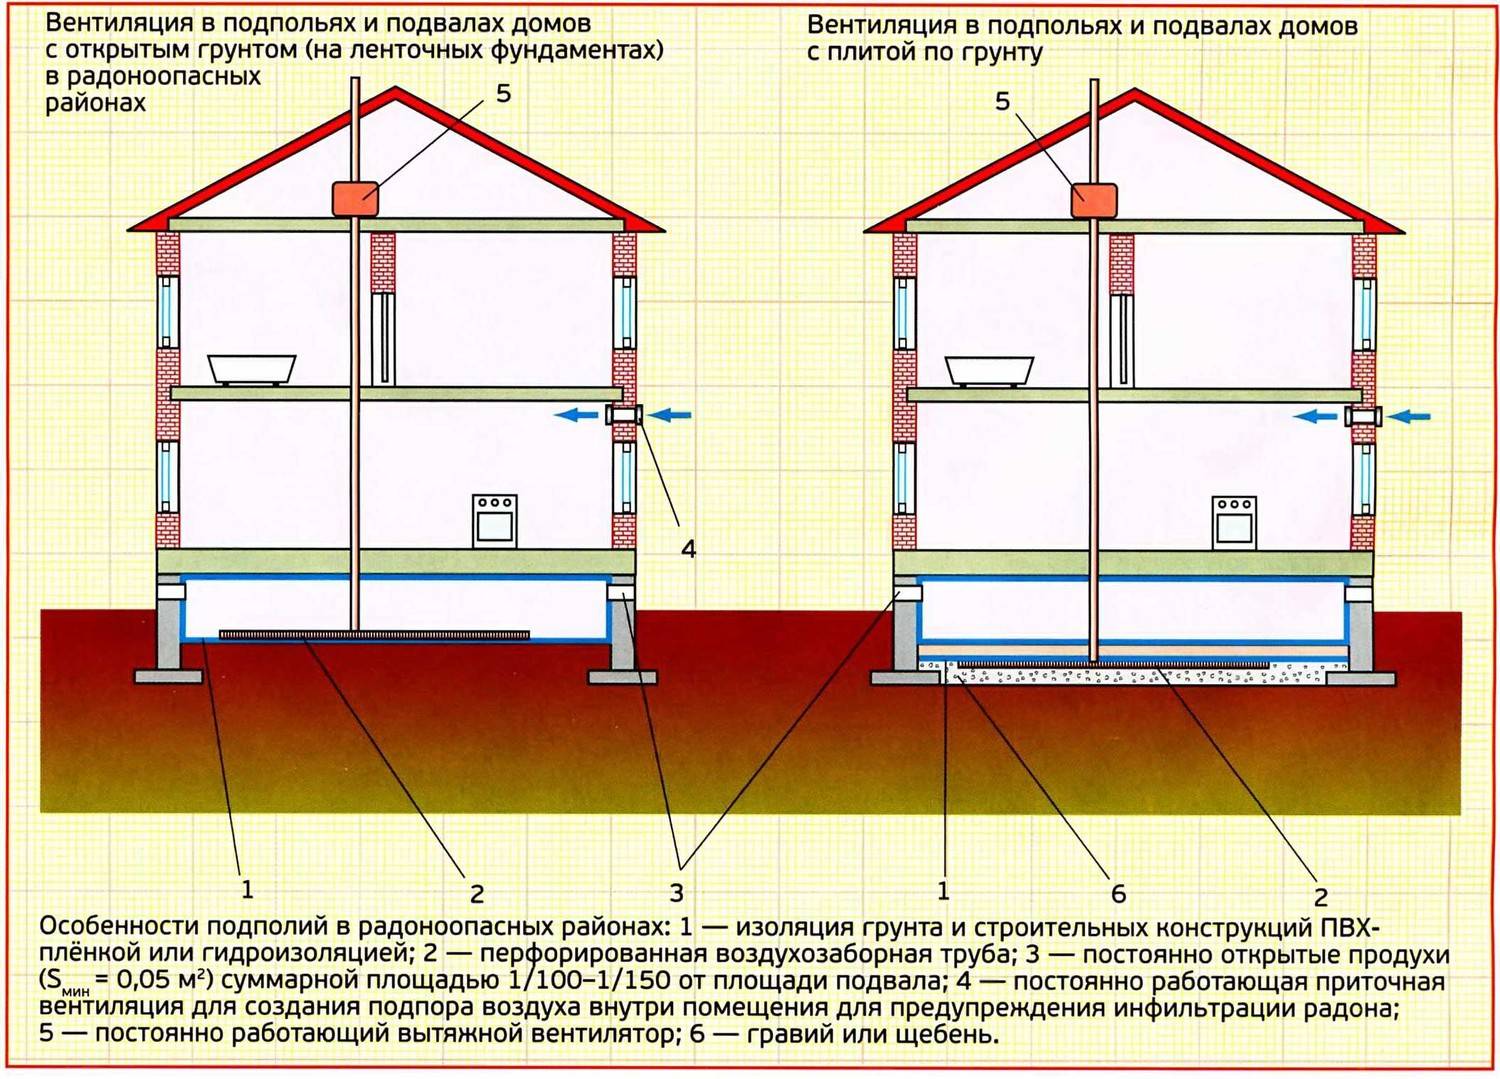
Note! If there is a basement in a private house, the ventilation of this room should be removed separately, or, in extreme cases, close the circuit. Do not allow air from the basement to enter the living rooms

Valves in window frames or walls are used as sources of fresh air. The hole, which will serve to remove the exhaust air, is displayed on the roof
It is important not to forget to calculate what section of the pipe is needed. If we are talking about designing a natural ventilation system, then here vertical channels will be used as the basis
In order to accurately calculate everything, it is necessary to take into account such an indicator as the frequency of air exchange.Simply put, this is how many times in one hour the system is able to completely update the air in the room. To do this, you only need to know the volume of each room and use a special formula.
Scheme
There are three schemes for arranging basement ventilation:
- standard system with one pipe for air extraction;
- installation of two pipes - for removal and intake of air;
- forced aeration.
Choose one of the schemes depending on the type of basement, its location.
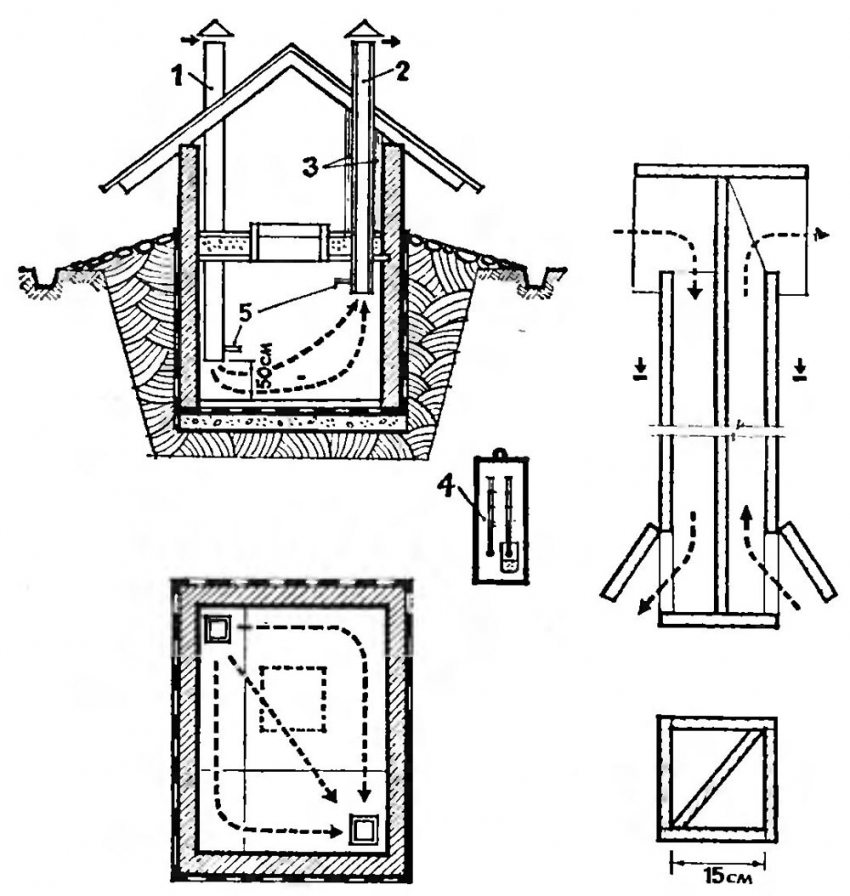
in the hole
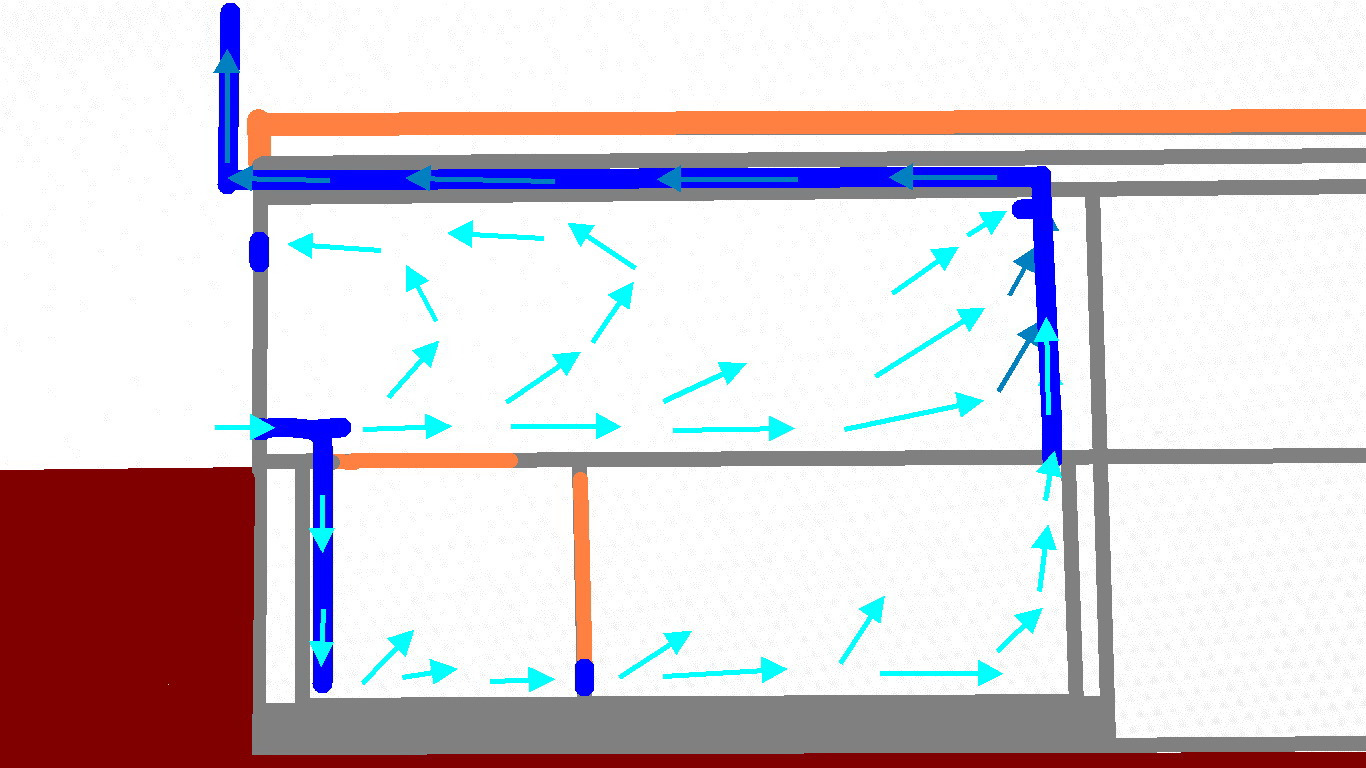
For small cellars with a separate exit to the surface, ventilation is made from a single pipe, which allows you to arrange circulation as needed. The air temperature in the cellar is always positive, even in winter.
Warmer layers rise up, go outside through the exhaust pipe. In their place come cold air masses that enter through the supply valves in the door or hatch, and then, according to the laws of physics, fall down to the floor. As it warms up, the air warms up again, rushes up, and the cycle repeats.
For a basement with an area of \u200b\u200bno more than 10 square meters. m take a pipe at least 16 cm in diameter, make it two-channel.
Advice
For efficient air circulation, the ventilation duct is installed on the opposite wall from the entrance, and the air environment in the basement is completely renewed.
In the garage
The garage needs ventilation just like any other room. Properly organized aeration removes harmful exhaust gases, toxic fumes from the room, prevents the formation of condensate on the walls and in the inspection pit. The car is dried in a timely manner, metal surfaces are protected from rust.
Methods for arranging ventilation in a garage room:
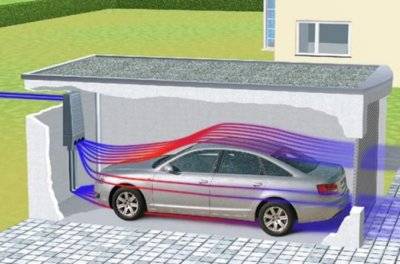
- Natural ventilation.A perforator cuts holes in the wall: one for fresh air at a distance of 10-15 cm from the floor. The other is for exhaust air 10 cm from the ceiling on the opposite side. Starts at least half a meter behind the roof.
An asbestos or plastic pipe is inserted into the openings, the cracks are sealed with cement mortar. Outside, the openings of the pipes are covered with gratings to protect against rodents and debris.
-
- Forced ventilation. They act according to the principle of natural, but with the installation of fans in the openings. Such a system is more efficient, but more expensive. For underground garages, the only way is possible.
- Combined method, when forced ventilation is combined with natural ventilation. Air is supplied by a supply pipe, and the exhaust is carried out by a fan.

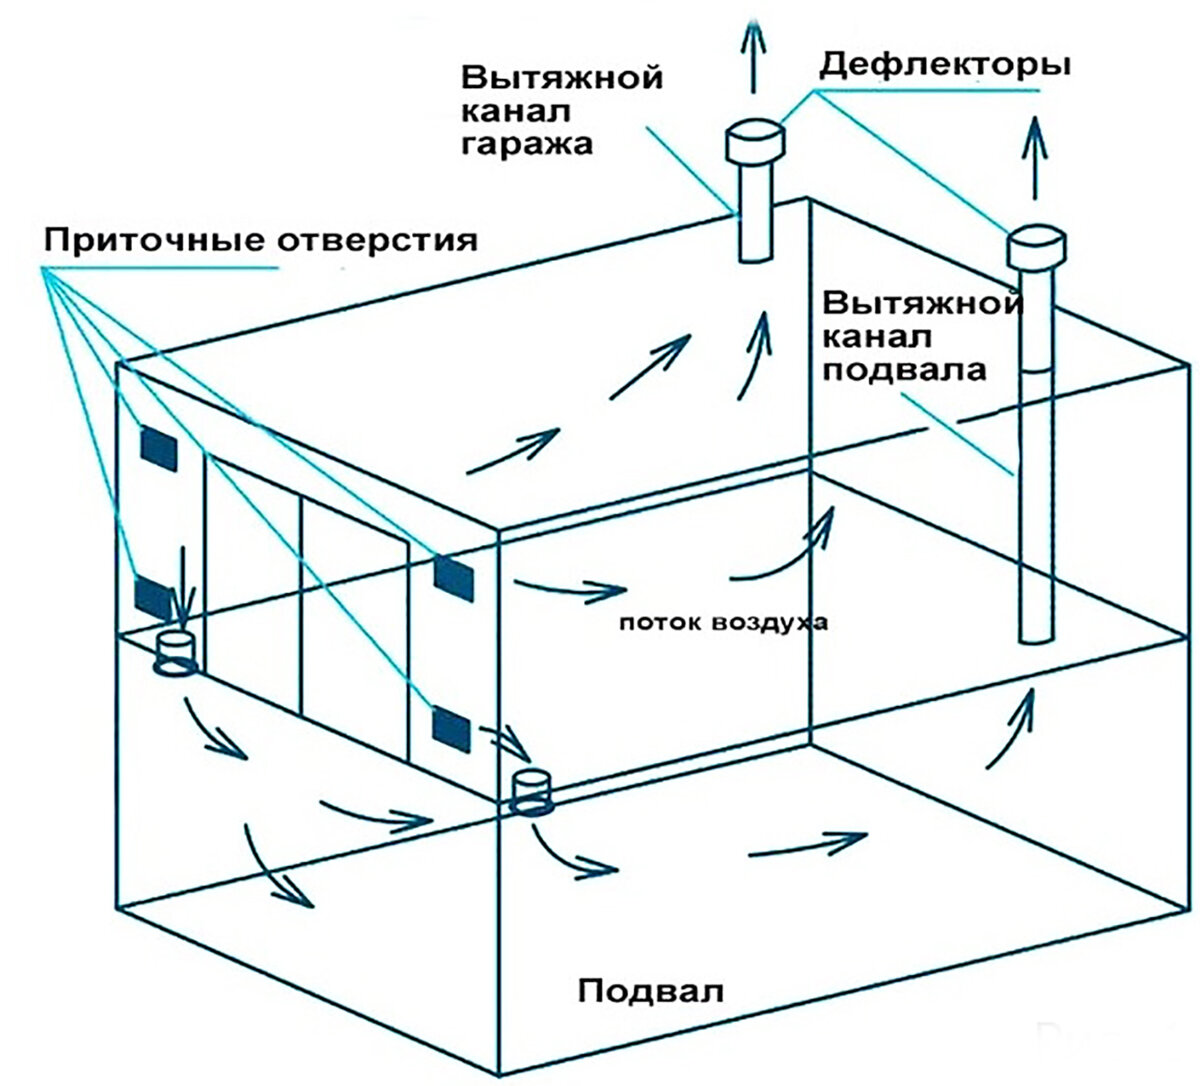
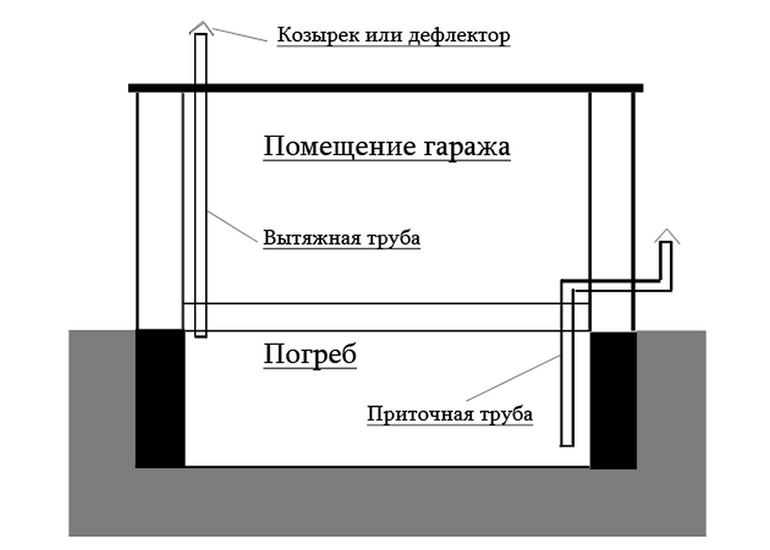


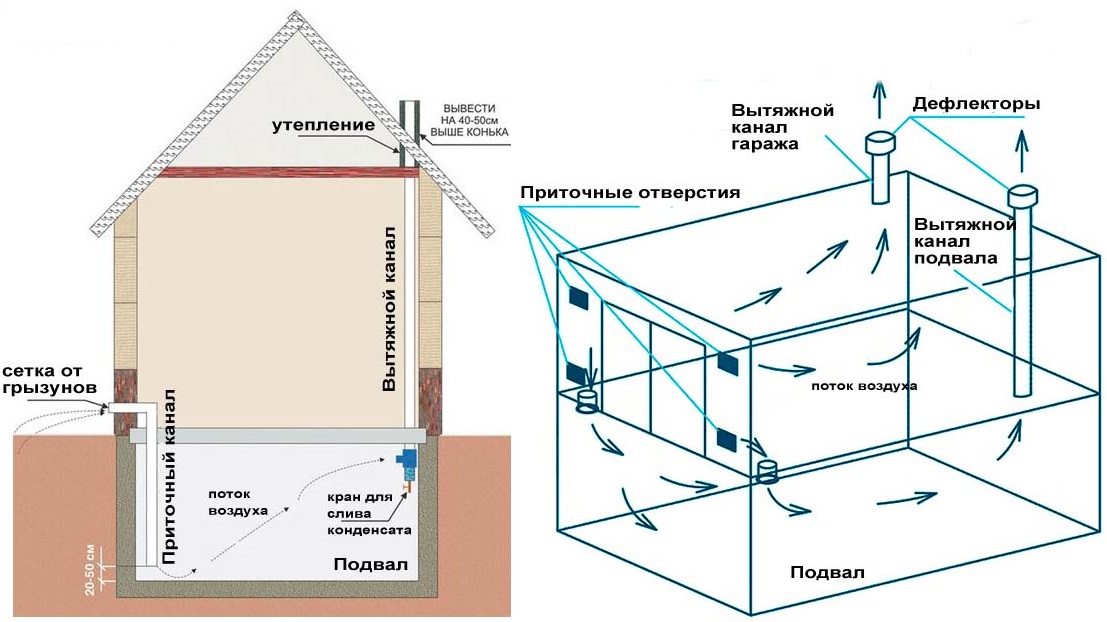
In the pit of the garage
Ventilation in the garage basement provides a continuous supply of fresh air, removes unpleasant odors, moisture and fumes, prevents condensation, which prevents damage to equipment.
Air exchange is provided by natural and forced type of ventilation. Both methods have their advantages and disadvantages:
- The first is easy to install, does not require large expenses, but is not effective enough if the room is too large.
- The second is more reliable, but requires the purchase of a fan.
Rules for arranging natural ventilation:
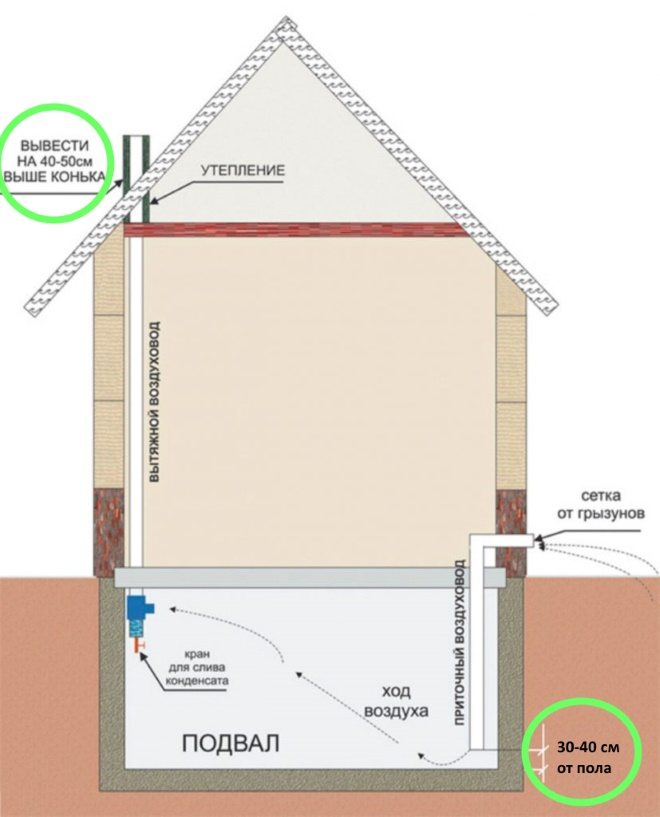
- Pipes are carried out in opposite corners. The exhaust pipe is led out through the floor and roof of the garage or along any wall with a length of at least 3 meters. At the same time, the edge of the pipe is a meter above the level of the garage, supplemented with a deflector to improve traction.
- The edge of the inlet pipe is placed 35–55 cm above the level of the basement floor and at a distance of at least 2 meters from the floor to the ceiling.
We offer you to watch a video about the ventilation system in the garage pit:
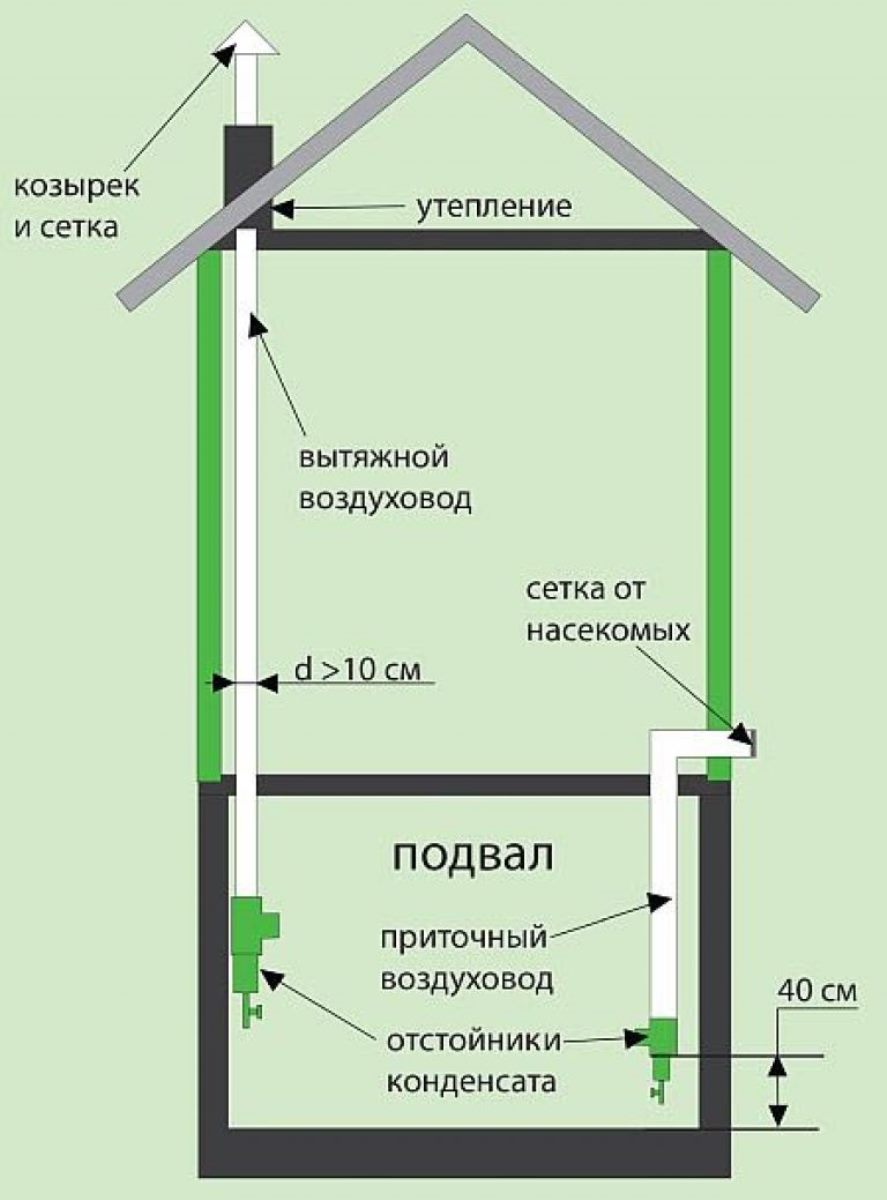
In a private house
Equipping the ventilation of the basement located in the house, take into account the area of \u200b\u200bthe room. For a small space with a separate exit to the street, it is enough to install natural ventilation with one pipe.
If there is no separate entrance in the cellar, air exchange is provided by two pipes in opposite corners. They are output in the following ways:
- The exhaust shaft is carried out from the outside of the building, the length is 2 m from the intake opening. The edge of the supply pipe is placed at the level of the plinth.
- If other buildings interfere with the outlet, the duct is laid through the roof, while the edge of the hood is above the ridge.
How to properly ventilate the cellar - Materials and tools for installing ventilation
From the general description of ventilation systems given above, it can be understood that in order to arrange effective ventilation in the cellar, you will need:
- Steel, plastic or asbestos-cement pipes of the estimated diameter and length;
- round bends in the presence of turns along the exhaust or inflow line;
- protective visors or deflectors to protect the heads;
- axial fan with design capacity with a working width of the blades corresponding to the diameter of the pipe;
- louver type air distribution grilles.
Cellar ventilation tool
A set of accessories for the ventilation device in the cellar is selected depending on the type of pipes chosen. For plastics, it will be minimal, consisting of a measuring tape, a pencil, cutting tool, screwdriver and hammer.
Steel pipes additionally require welding, which in this case it is fashionable to replace with clamp clamp connections, but this will cost more.
Selection of air exchange pipes
Based on this, we can conclude that the most inexpensive and easiest option is to use plastic sewer pipes with a diameter 110, 150 or 200 mm. Rolled steel will cost much more, and the use of welding will complicate installation.
Industrial release asbestos cement pipes are now phased out- for the environmental hazard of the material. Therefore, even if you manage to find inexpensive stock balances, there may be problems with the presence of couplings. As a result, the system will not be airtight and will become accessible to moisture penetration.
Installation instructions for ventilation from plastic (sewer socket) pipes
Plastic ventilation pipes are best placed inside the walls enclosing the cellar. Laying in the ground, outside the building structures, is possible, but in case of swelling, movement and simple subsidence of the soil, it can lead to a violation of the integrity of the system. Therefore, ventilation work should be carried out during the construction of load-bearing walls, the basement.

An example of the location of the vents
supply pipe
Ventilation scheme
Location of ventilation pipes inside the cellar is allowed if the system is mounted in an already built structure. In this case, holes are punched in the ceiling, pipes are installed, and all the cracks are sealed with cement mortar with bituminous mastic. In order to do the installation yourself:
- Calculate the required diameter of the air ducts;
- draw a diagram of the location of the laying points and determine the places of possible turns, with bends of 15, 30, 45 or 90 °;
- based on the diagram, complete each line with materials, while keeping in mind that the length of plastic pipes can be 0.5, 1, 2, 4 or 6 m;
- assemble the pipeline throughout, using a special lubricant and a grinder with a metal cutting disc to facilitate the work;
- place taps at line turns;
- lower the assembled air duct into the prepared channel, connecting it with installed outlets;
- fasten louvre grilles on the wall at the holes;
- install visors or deflectors on the heads.
Mounting the fan in a stationary position is not performed, since it will interfere with the free circulation of air. As an option, rotary hinges are fixed on its body, on which it is put into working position, and when not needed, it is set aside. Another method involves mounting studs on which the fan is fixed if necessary.

Hole
Installing guides
Fixing the pipe
Hole patching
Deflector for ventilation in the cellar: how to make a device with your own hands
The principle of operation of the deflector is that air flows, cutting through the diffuser, create increased draft in the ventilation pipe, due to which air is circulated. The use of deflectors allows you to save on electricity, as well as increase the efficiency of the forced ventilation system. In addition, such a construction can be successfully used in a natural-type system.
There are several types of deflectors.Consider the most popular of them.
ASTATO is a deflector that can be powered by an electric motor or wind. The design of the device implies the presence of a special sensor that automatically turns off mechanical traction when there is sufficient wind strength. This version of the device is advantageous to use in cases where the wind force is not always enough to ensure normal air circulation. The electric motor in such models is quite economical, so you don’t have to worry about energy overruns.
Weather vane deflector - rotates solely due to the force of the wind, it is good that it can adapt to any direction of air flow. The disadvantages include the fact that the bearings included in the design need regular lubrication and periodic replacement. In addition, if you use such a deflector in the cellar ventilation scheme, then please note that at low temperatures its mechanism may freeze.

Weather vane deflector
The static deflector is a relatively new model, which is characterized by the presence of an ejector fan. At a relatively high cost, it has such advantages as a reduced noise level during operation, high efficiency, and moisture removal from the system.


Rotary turbine - installs in an area with a stable strong wind, so this design is not very popular.
In addition, there are spherical and H-shaped deflectors, Grigorovich deflectors and other options. The choice of model depends on the characteristics of the ventilation system and the area in which the basement is located.

Rotary vents
Making a deflector with your own hands
This device is most often made of galvanized or stainless steel sheets, as well as plastic. Plastic models are cheaper than their steel counterparts and look more attractive, but lack durability. In addition, plastic deflectors are very sensitive to high temperatures, so you should not install them if the ventilation system combines the functions of a chimney.
Before proceeding directly to the manufacture of the deflector, it is necessary to calculate its parameters. The height of the deflector is calculated by the formula: H = 1.7xD, where D is the diameter of the ventilation pipe. The width of the dome is equal to the diameter times 1.8, and the width of the diffuser is the diameter times 1.3.
Do-it-yourself drawings of a ventilation deflector are made on cardboard or thick paper, after which metal or plastic parts are cut out from them. To work, you will need the following tools and materials:
- paper or cardboard for drawings;
- scissors for metal for cutting parts;
- sheet of metal or plastic;
- marker or construction pencil;
- drill with drills of various diameters.

Sketch of the deflector: d - pipe diameter; d1 = d*1.26; d2 = d*1.7; h = d; h1 = d*0.7; h2 = d*0.25; D = d*2; H = d*1.2
It is also recommended to use personal protective equipment during work, that is, special glasses and gloves. The manufacture of the deflector is carried out in the following order:
- The contours of the product are transferred from the drawing to the sheet of metal. This includes hood, outer cylinder, strut and diffuser reamers.
- With the help of scissors for metal, these parts are cut out.
- The parts are connected to each other using a rivet gun.
- The finished deflector is installed on the pipe head and secured with clamps.
When installing ventilation in the cellar, the installation of the deflector is a very crucial moment. It is best to install the device with two people, since work is usually carried out at height. First, the lower cylinder of the structure is fixed at the outlet of the ventilation pipe. This is done using clamps or special bolts with dowels. After that, a diffuser is attached to the cylinder, on top of which a protective cap is installed. It is recommended to additionally treat the joints of parts with bolts with a special anti-corrosion compound.
On the hood diagram in the cellar, the deflector occupies a very important place, so special attention must be paid to its assembly and installation

Designs of various deflectors for ventilation pipes
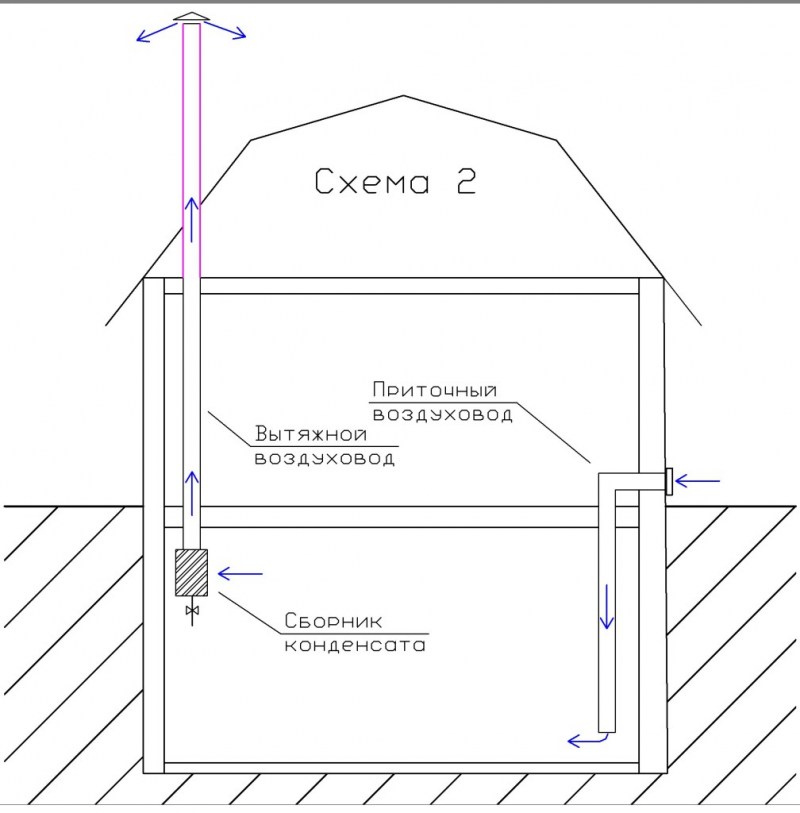
Scheme
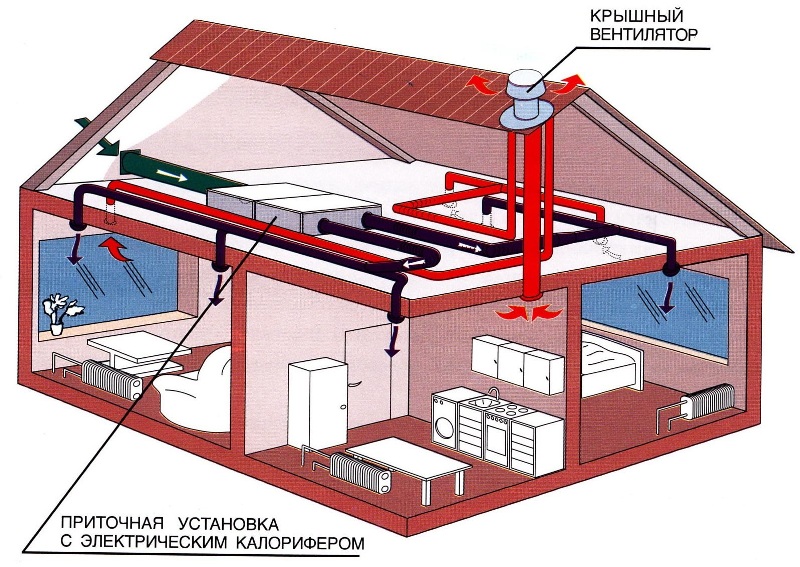
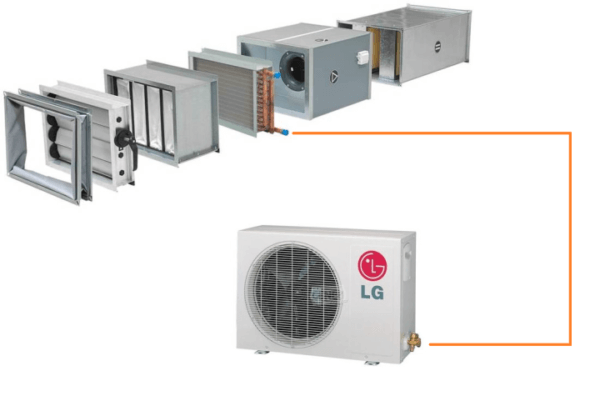
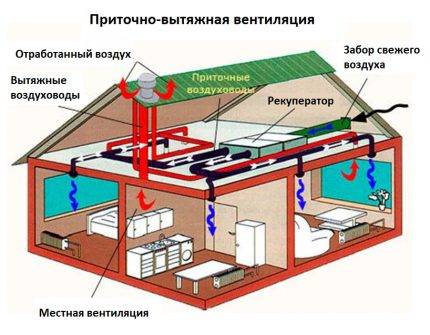
To create comfortable conditions in the house, a forced ventilation scheme is selected, which can be of several types:
- Supply with cooling function, which is mounted complete with air conditioning. Cons - high price, the need for constant service.
- Forced with air heating, provides for the presence of a heat exchanger (find out how to make ventilation heating here).
- Combined, combining both ventilation schemes. Easy to install, low maintenance.
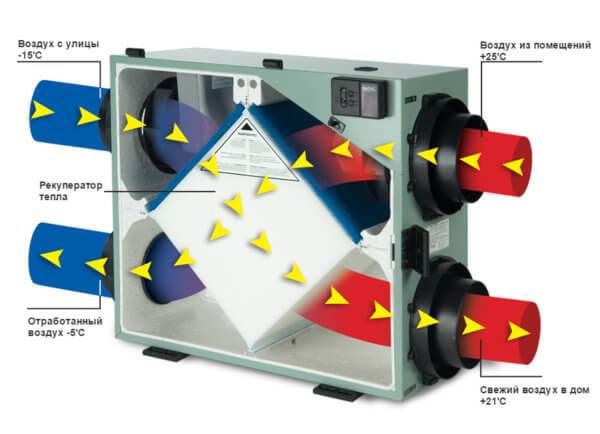
- A recirculation system is a design, the installation of which requires knowledge and complex devices that mix outgoing exhaust air flows with the outdoor atmosphere and return them to the house.
Supply ventilation with cooling function:
Forced ventilation with air heating:
Combined ventilation:
Air recirculation system:
Advice
Please note that a massive installation for general ventilation of the house should be located away from living rooms, because the device will create noise even with insulation.
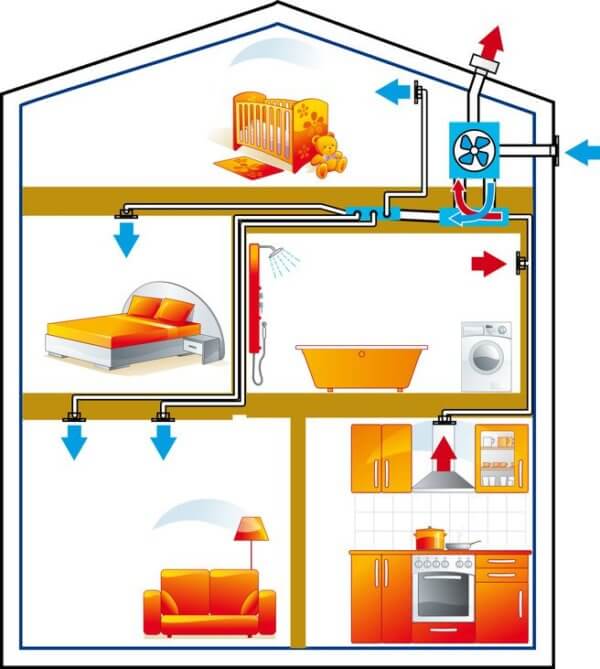
When choosing a ventilation scheme, the basic rule must be observed - air flows must circulate from living rooms (bedroom, living room) to non-residential ones (bathroom, kitchen). It is not worth saving on the quality of construction, because well-installed ventilation helps prevent the appearance of fungus and bacteria in the room, prevents the accumulation of dust, provides a good microclimate in the house, preserving the health of its owners.


How else can you reduce the humidity in the cellar
Even very high-quality ventilation will not cope with the task if the basement room is not sufficiently prepared for storing supplies. To prevent the ingress of moisture from the outside, waterproofing is carried out. Various waterproof materials can be used:
- roll;
- coating;
- bentonite clay;
- waterproofing membranes.
They are mounted outside the cellar during the construction phase. If these works have not been done, you can impregnate the walls from the inside with penetrating agents or apply a layer of liquid glass.
Along with waterproofing, reliable thermal insulation helps protect the room from excessive moisture. It prevents condensation in the structures and thereby reduces the flow of moisture into the air of the cellar.
In addition to building techniques, regular basement drying in combination with disinfection fights moisture and mold well. They are best done in the summer, when the weather is dry and warm outside, and the stocks for the winter are almost all used up.
Ventilation in living quarters
Now let's talk about properly organized ventilation in residential premises, that is, in those where people will spend all their time in the country. This is a living room, bedroom, nursery and other rooms, depending on the plan of the cottage. In these rooms, the supply of fresh air is incredibly important in order not to spoil health and maintain normal living conditions.
The ventilation system should be thought out at the construction stage of the cottage. In particular, it is necessary to leave a gap of a couple of centimeters under each door to ensure draft. In winter, fresh air is needed most of all in the room, since it will not work to ventilate the cottage with the help of windows. The best way to ensure the necessary conditions is supply and exhaust ventilation in the country in winter.
Air supply is provided by supply valves, or professionally, air infiltration valves. It is necessary to select valves suitable for temperature endurance. For living rooms, a hidden ventilation system is best suited, which is not visible to people, it can be hidden in the ceiling or in the walls.
Extractor hood, it is better to do in the workroom, bath, toilet, kitchen, etc. But most importantly, organize the extraction of air so that unpleasant odors from the kitchen or toilet do not get into the living quarters. The duct ventilation pipe, which can be installed in the attic so that it is invisible, does an excellent job. Most importantly, provide pipes and fans with sufficient insulation so that they survive the winter frosts and do not form condensation.
Do-it-yourself ventilation: an action plan
To independently design a ventilation system, you will have to perform a number of actions. It's easier if the sequence is known.
Preparatory work
The collection of information and elementary calculations - this is where the independent creation of a ventilation project begins.
-
Calculate the frequency of exchange in the entire house / apartment. It depends on the volume of the premises (you need to calculate the cubic capacity of each room), their purpose, the number of residents. According to sanitary standards in residential premises, the air must be changed once per hour, in technical premises (kitchen / bathroom / toilet) - at least three times per hour. The norms for boiler rooms are their own and must be taken into account (depending on the type of heating). Adding all the numbers, we get the required performance of the system, according to which the cross section of the exhaust duct is calculated, the performance of the ventilation equipment is selected.
- Draw a diagram of the movement of air currents. At the same time, you immediately have to estimate the position of the supply and retraction channels.
- Draw a duct diagram. So far without dimensions and details, just following the rules and trying to fit the system without complicating the design too much. Everything is complicated here, since you can hide the air ducts only behind a suspended or stretch ceiling. Otherwise, they will be open.
Preliminary data is ready. Think about where and what devices should be located for some more time.
Parameter calculations and detailing
When all the questions on the scheme are resolved, it has taken its final form, we proceed to the detailing. First, there are also calculations, then you have to look for the components of the system, decide which company to use the equipment and reduce the budget.
- Calculate the cross-section of air ducts based on the exchange rate, the volume of the room and the speed of “silent” air movement. Otherwise it will be impossible to live.
- Enter the dimensions on the diagram (you can redraw).
-
Carry out detailing. That is, make a list of the necessary elements of the systems, indicating the type and section.
- Calculate the resistance of each section of the system, select fans (according to the operating point in the characteristic, taking into account the obtained system resistance). Take into account the noise level from the fan operation, take measures to reduce it (choose a low-noise model).
- Calculate the cost of system components. Try to combine "cash" with desires. Here you have to change the components several times, moving from what you want to what is real.
- We draw a final project with full details. We must also remember about the nodes of the passage of ventilation ducts through the walls / ceiling / roof, consumables and insulation materials, ventilation grilles and diffusers, fasteners and all other “little things” that result in a decent amount.
Installation and setup
"It remains" to find, buy, mount. Little has been written, but it will take a lot of effort, time, and nerves to implement this item. Only after that can we say that do-it-yourself ventilation is completely ready.
But that's not all. Do-it-yourself ventilation must be started and adjusted. This is also not the easiest process - to achieve consistent operation of the system as a whole. Then, during operation, reconfiguration has to be done often. With a change of season, a change in the number of residents, a change in weather conditions. In general, adjusting the ventilation system is another responsibility of the home owner.
Such openings on the facade leave supply valves / recuperators
By the way, we advise you to think. Do-it-yourself ventilation (meaning installation) will cost less, but it requires more knowledge and time. Knowledge can be gleaned, and if there is a shortage of time, you will have to look for and hire performers, then accept their work.
Classification and types of ventilation systems
The creation of ventilation in the cottage is due to the fact that it must be continuous air mass exchange. Old, used air with a large amount of carbon dioxide must be removed from the premises, replacing the constantly oxygenated air with fresh air from the street.
If you stop this air exchange, then the microclimate inside will quickly become far from favorable for human health.
 According to the norms for living rooms, the optimal atmosphere is a temperature in the region of 20–25 degrees and a relative humidity of 30–60%, depending on the season and the readings on the thermometer outside the window
In order to maintain the air exchange parameters established by GOSTs, the ventilation system in the house, made by oneself or with the involvement of third-party installers, must continuously change the air in the premises.
For example, for living rooms in a cottage, the air exchange rate per hour is set to "1". That is, in an hour, the entire volume of air must be completely replaced in them.


The purpose of ventilation is to combat the following factors:
- excess heat;
- constantly appearing dust;
- excessive air humidity;
- harmful gases and vapours.
Every person in the house exhales carbon dioxide around the clock. Also in the residential building there are fireplaces, gas and electric stoves, numerous household appliances, that is, there are a lot of sources of heat, moisture, dust and gases in the cottage.And all this must be removed from the premises so that the microclimate in them is suitable for living.
According to the method of moving air, ventilation systems are:
- With natural traction.
- With a mechanical drive.
The first option involves the movement of air masses due to the existence of a pressure difference outside and inside the ventilated building. At the same time, it can be organized - using adjustable valves, and unorganized - exclusively through windows, doors and vents in the foundation.
In the second case, the air is forced to move through the premises and ventilation ducts using mechanical devices. This option is volatile, but more efficient.
 The main disadvantage of a mechanical ventilation system is its dependence on the power supply. Without power from the mains, the fans will stop spinning, and the air exchange efficiency will immediately drop sharply
By appointment ventilation systems are divided into:
- supply;
- exhaust;
- combined.


